

Page 1

009-1689-02
INA-LC100
User Guide
Page 2

Contents
Introduction 3
System Setup 4
Mounting 4
Connectivity 4
Remote Control 5
Registration 6
Basic Navigation 9
Using the remote and keyboard 9
Using the on screen keyboard 9
Using a mouse and keyboard 9
Document Viewer 10
Supported document types 10
Open document les 11
Document Viewer tools 12
Annotate the le 13
Annotation tools 15
Save the le 17
Share the le 17
Create a new folder 19
Delete les and folders 20
Cast (Wireless display) 21
LightCast 21
AirPlay 22
Miracast 23
Whiteboard 24
Navigation 24
Create a drawing object 24
Add text 25
Whiteboard tools 25
Save the whiteboard canvas 28
Save the whiteboard canvas to a USB thumb drive 29
Share the le 30
Open a new whiteboard canvas 30
Open a whiteboard le 30
Open a whiteboard le from a USB thumb drive 30
Browser 31
Navigation controls 31
Tools submenu 32
Page 3

Save the le 34
Share the le 35
Settings 36
Network Settings 36
Device 37
System and Security 38
Accounts 39
Browser Preferences 40
Troubleshooting 41
Declaration of Conformity 43
Limited Warranty 44
Specications 47
Appendix 48
Access Point Setup 48
Port Requirements for AirPlay, Miracast, and LightCast Sender App 49
Page 4

Page 3INA-LC100 User Guide
Introduction
LightCast is an easy to use set of applications designed to maximize the connectivity and interactivity
of your InFocus display.
Available features
Document reader
• Documents (doc, docx, ppt, pptx, pdf, txt, xls, xlsx)
• Pictures (bmp, jpg, jpeg, png)
• Videos (avi, v, mkv, mov, mpg, mp4, ts, wmv, 3gp)
Wireless display (AirPlay, LightCast, Miracast)
Whiteboard
Internet browser
Network control (if display is equipped with a wired network connector)
USB-A connectors which can be used for:
• USB storage device (such as a thumb drive, camera, or external hard drive)
• Touch device (such as a touchpad)
• Wireless USB keyboard/mouse
Current limit on both connectors is 1A.
Accessories
• International power cord with country-specic adapters
• Remote control (no batteries are included)
• HDMI cable
• Velcro strips (3)
• User manual
Page 5
Page 4
System Setup
Mounting
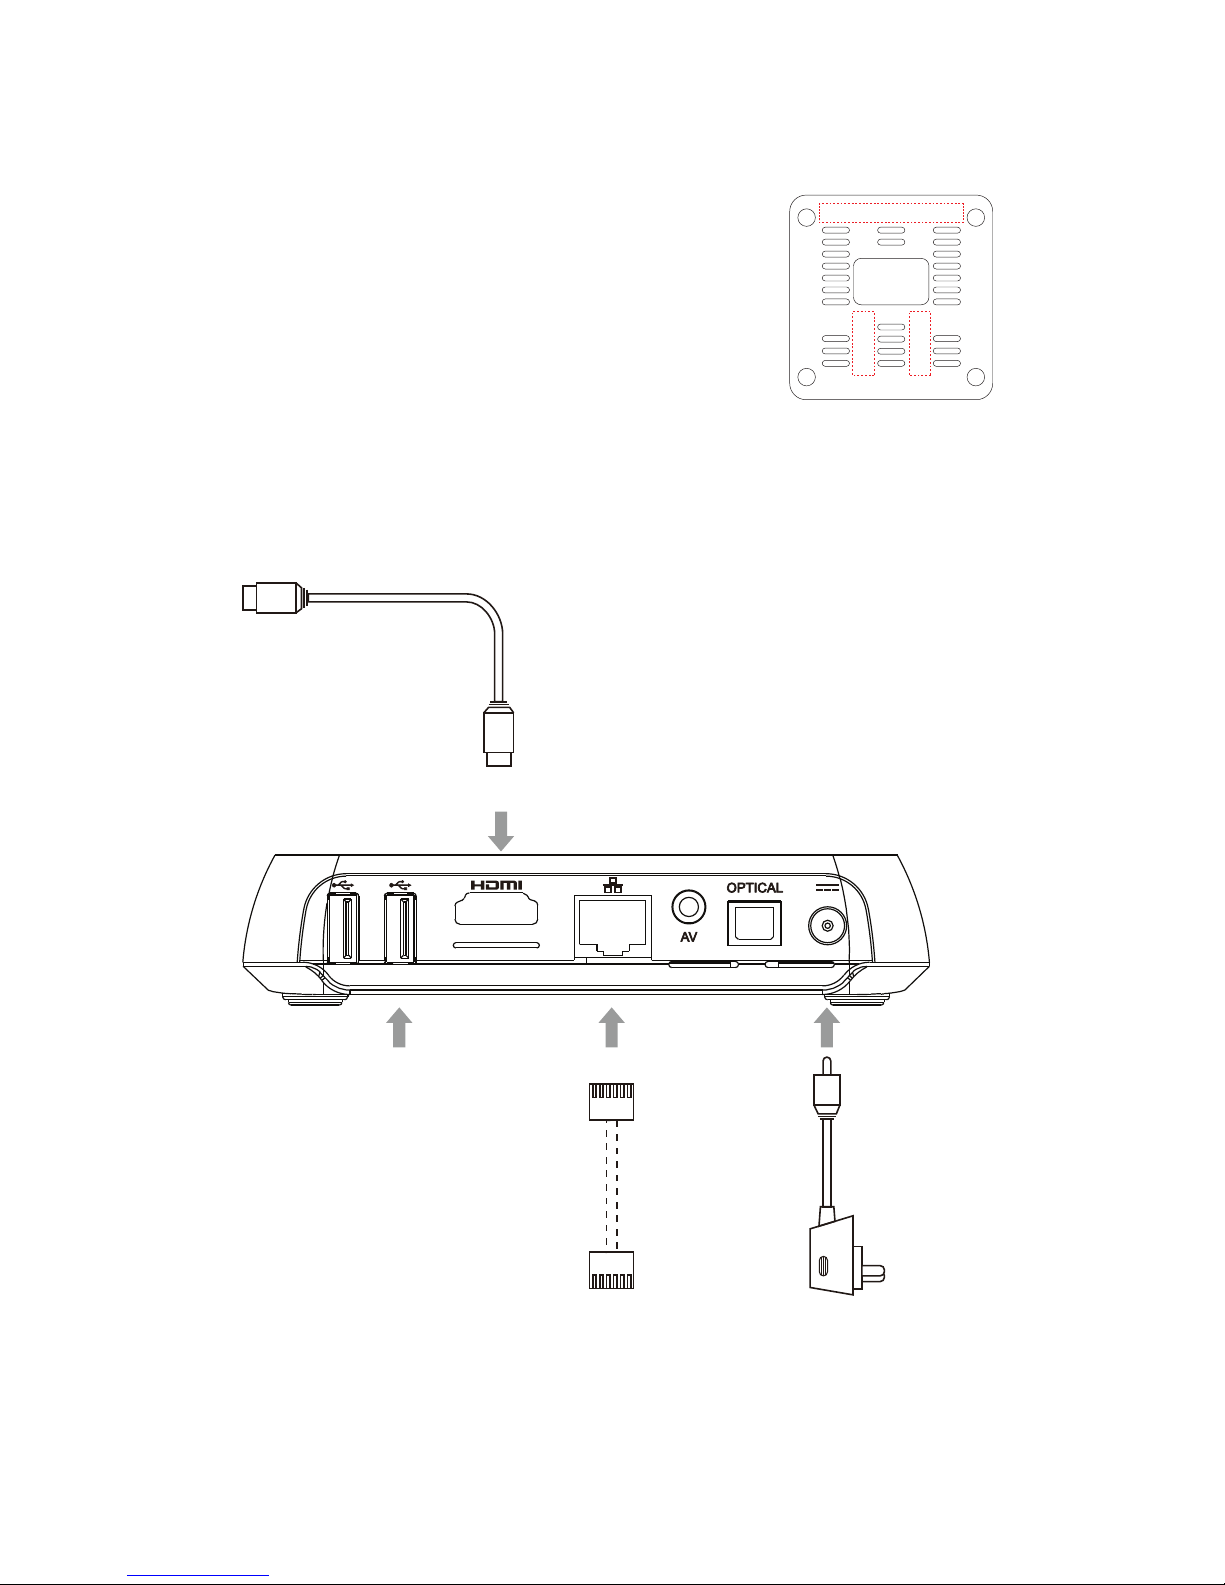
If desired, the InFocus hub can be mounted to the back of the
display. To do so, attach the velcro strips onto back of hub per the
illustration. Then attach it to the back of display being careful
not to block display vents.
Note: When mounted to the back of the display, we recommend
using the display to control the InFocus hub instead of the remote.
Connectivity
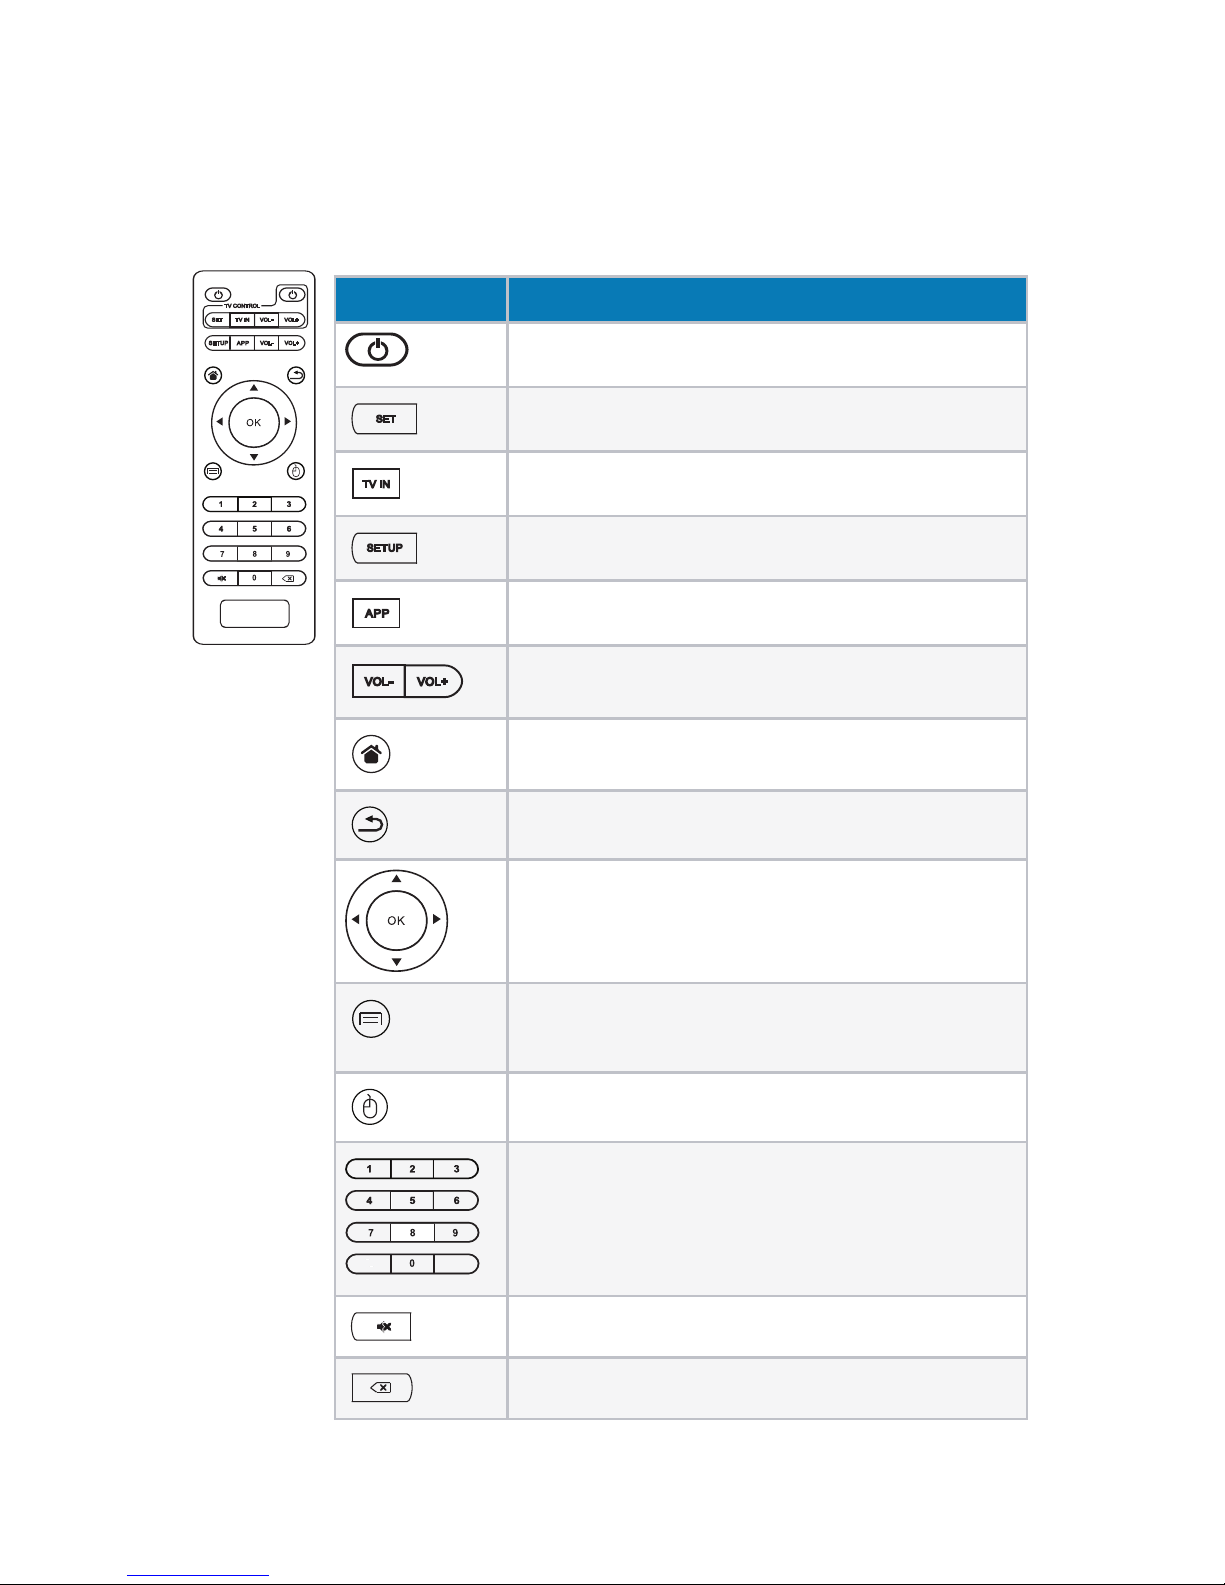
1) Connect the LightCast hub to the desired devices per below. Note: To use all the LightCast features, you must connect a mouse and keyboard to the LightCast hub, or connect the LightCast
hub to an InFocus touch display.
2) Turn on the InFocus hub when the indicator light is blue. The main menu appears in about 30
seconds.
Optional:
Connect USB cable
to InFocus touch
display
Router
Power adapter
Ethernet cable
Connect to InFocus touch display
HDMI cable
Page 6
Page 5INA-LC100 User Guide
Remote Control
Use the remote to control the LightCast hub. Note: To use all the LightCast features, you must connect a mouse and keyboard to the LightCast hub, or connect the LightCast hub to an InFocus touch
display.
SETUP
APP
Remote key Description
Power: Click to turn on/o.
SET: Not functional on this model.
TV IN: Not functional on this model.
SET UP
SETUP: Click to access the
Settings options.
APP
APP: Not functional on this model.
VOL: Click to decrease/increase the volume.
Home: Click to get back the main menu.
Return: Click to return back to previous menu.
Navigation: Click to navigate
left/right/up/down, and click OK to conrm your selection.
Menu: Click to choose function menu of corresponding application in video, music, photo and website.
Mouse: Click to use the navigation button as a mouse.
Number: Click to select a number.
Mute: Click to turn down the volume.
Backspace: Click to backspace the input.
Page 7

Page 6
Registration
1) Turn on the LightCast hub.
2) Press the Source button on the remote or keypboard.
3) Navigate to LightCast.
4) Press the Enter/Select button on the remote or keyboard. The LightCast registration welcome
page displays.
5) Click the arrow.
Page 8
Page 7INA-LC100 User Guide
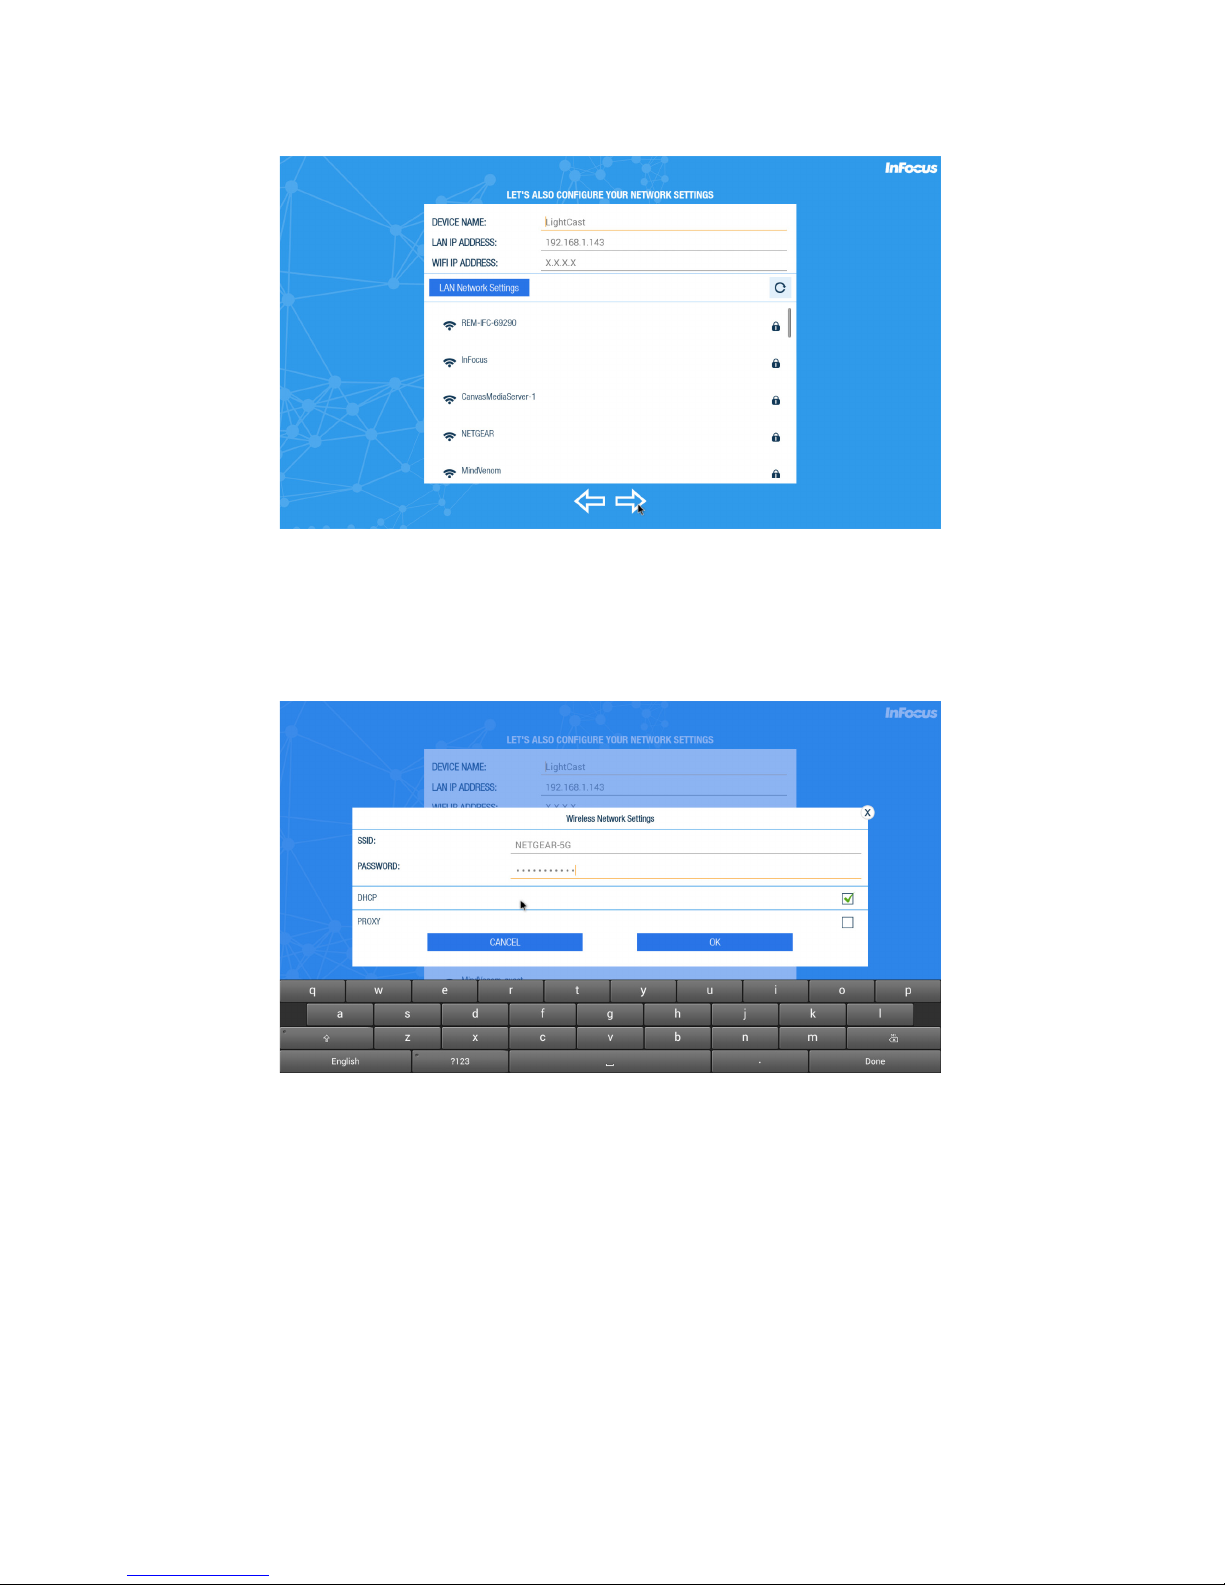
6) Enter the information for registration using either a wireless keyboard/mouse (not included) or
the on screen keyboard and remote. Click the right facing arrow.
7) Use a keyboard/mouse or on screen keyboard and remote to rename the device. This is useful to
dierentiate between dierent displays that have LightCast enabled.
8) If equipped, the Wired LAN IP address is displayed.
9) After the local SSIDs are displayed, log onto a wireless network:
10) Highlight an SSID.
11) Press Select/Enter.
12) If the SSID is encrypted, enter the password.
Page 9

Page 8
13) The word “Connected” displays below the SSID when the connection is made. A green checkmark displays next to saved SSIDs.
14) If a software update is available, an update window displays. Click Update and follow the
prompts to complete the update process.
15) When registration is complete, the LightCast home page displays.
Page 10

Page 9INA-LC100 User Guide
Basic Navigation
Using the remote and keyboard
1) Use the arrow keys to highlight items in LightCast.
2) Press the Select button on the remote or the Enter button on the display to select the highlighted item.
3) Press the Esc button on the remote to back out of the currently running item.
4) Press the Auto Image button on the remote or Auto button on the display to return to the
LightCast home screen.
Using the on screen keyboard
1) In the desired eld, highlight and click Select using the keyboard or remote.
2) The on screen keyboard is displayed.
3) Use the arrow keys to highlight characters.
4) Click Select when the correct character is highlighted.
5) After each eld is completed, highlight and click Done to go to the next eld.
Using a mouse and keyboard
1) Plug a mouse and keyboard into an available USB-A connectors on the display.
2) Use the mouse and keyboard as you normally would.
Page 11

Page 10
Document Viewer
The Document Viewer allows you to display images, les, and videos from your display's internal
memory or from a USB thumb drive.
Supported document types
Supported File Types File Extensions
Images .jpg, .jpeg, .bmp, .png
PowerPoint .ppt, .pptx
Excel .xls, .xlsx
Word .doc, .docx
Adobe PDF .pdf
Video les .avi, .v, .mkv, .mov, .mpg, .mp4, .ts, .wmv, .3gp
Other les .txt
To access the Document Viewer follow the instructions below:
1) Turn on the display.
2) Press the Source button on the remote or keyboard.
3) Navigate to LightCast.
4) Press the Enter/Select button on the remote or keyboard. The LightCast home page displays.
5) Navigate to Documents.
Page 12

Page 11INA-LC100 User Guide
6) Press the Enter/Select button on the remote or keyboard. The Document Viewer displays.
Open document les
1) Navigate to the desired le and either click the le with an attached mouse, or press the Select/Enter button on the remote or keyboard. Note: Files can be opened from the local folder
or a USB thumb drive.
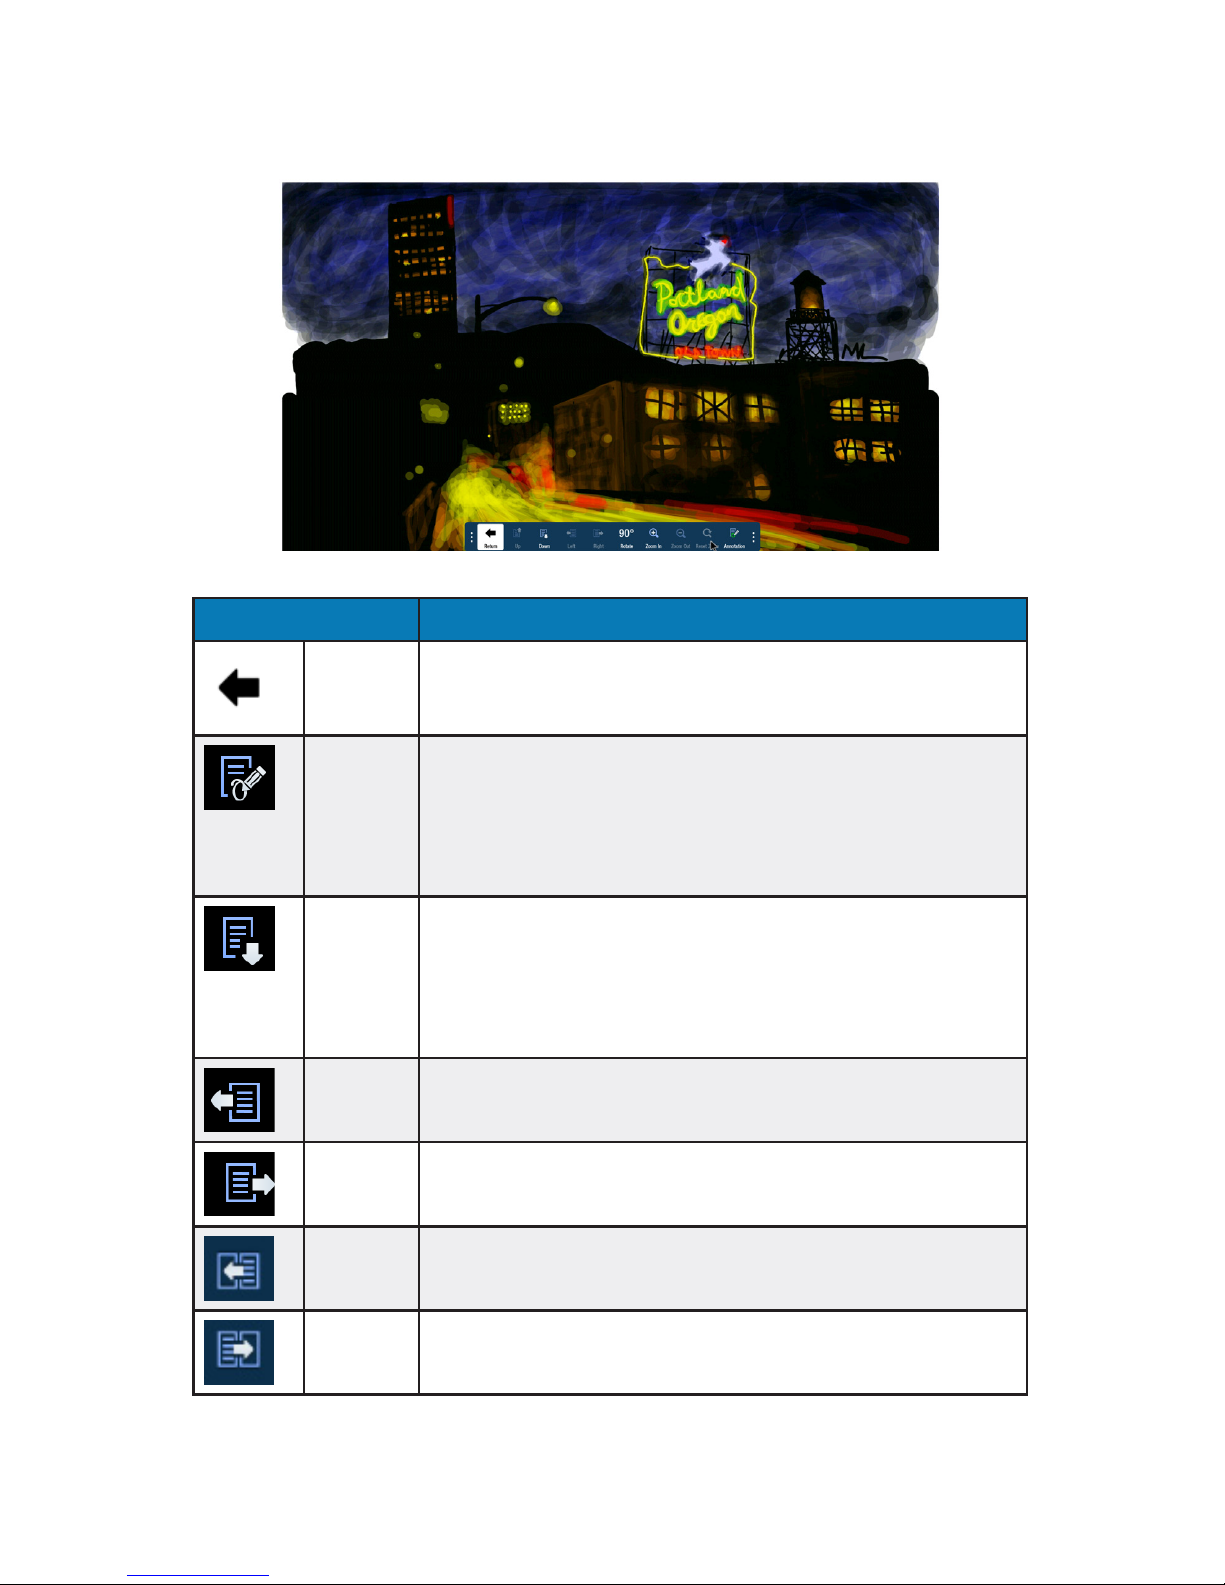
2) Use the menu options to navigate through the le. Note: File-level tools vary depending on the
le type.
3) To move the tool bar position, use a mouse to click the vertical dots and drag the tool bar to
one of four positions. Or use the remote or keyboard to highlight the vertical dots and press the
Select/Enter button. Then use the up or down arrow buttons to move the tool bar and press
the Select/Enter button when done.
4) When nished with the document le, click the Return button to return to the document
folder.
5) To return to the LightCast home page, click the Home button.
Page 13
Page 12
Document Viewer tools
Note: Document tools vary based on le type.
Button Description
Return Exits the document view and returns to the folder view.
Up When displaying an Excel, Word, or PDF document, selecting up scans
up the open document. When displaying a PowerPoint document,
selecting up goes to the previous slide in the slideshow.When an image
is shown in full screen, selecting Up displays the previous image in the
same folder. When the document is zoomed in, selecting Up scans up
the open document.
Down When displaying an Excel, Word, or PDF document, selecting down
scans down the open document. When displaying a PowerPoint document, selecting down goes to the next slide in the slideshow. When an
image is shown in full screen, selecting Down displays the next image
in the same folder. When the document is zoomed in, selecting Down
scans down the open document.
Left When the document is zoomed in, selecting Left scans the open docu-
ment to the left.
Right When the document is zoomed in, selecting Right scans the open docu-
ment to the right.
Previous For Excel documents only: Selects the previous tab in the le.
Next For Excel documents only: Selects the next tab in the le.
Page 14

Page 13INA-LC100 User Guide
Rotate Rotates the document ninety degrees clockwise
Zoom In Magnies the document view
Zoom Out Reduces the document view
Reset
Zoom
Returns the document back to its original document width
Annotation When selected, allows the user to annotate the document. See "An-
notate the le" on page <OV> for more information. Note: Annotation
is only available when a mouse (or touch device) is connected to one of
the USB-A connectors.
Video
menu
For video les only: Click to open the video controls.
Return For video les only: Click to close the video le and return to the folder
view.
Play For video les only: Click to play the video le.
Pause For video les only: Click to pause the video le.
Annotate the le
Document les can be annotated and saved us using the Annotation submenu.
Note: You must attach a mouse (or touch device) to use the annotation feature. If a mouse (or touch
device) is not detected, a warning displays.
Create a drawing
1) Open a le from the document viewer.
2) Click Annotation.
3) Click Tools and select a drawing tool.
4) Click Color Wheel to adjust the color, size, and opacity of the selected drawing tool.
5) Draw on the page using the mouse (or touch device).
6) Use Eraser, Select, Undo, Re-do, and Clear to modify the drawing. See "" on page 14 for
more information.
Page 15

Page 14
Add text
Note: Text boxes overlay the open document and do not aect the text within the displayed docu-
ment.
1) Open a le from the document viewer.
2) Click Annotation.
3) Click Tools.
4) Click Text.
5) Click the screen where you want the text box to be. A text box opens.
6) Adjust the font family, size, color, and text attributes, as desired.
7) Using either a keyboard or the on-screen keyboard, type your text.
8) Click OK when nished.
Page 16
Page 15INA-LC100 User Guide
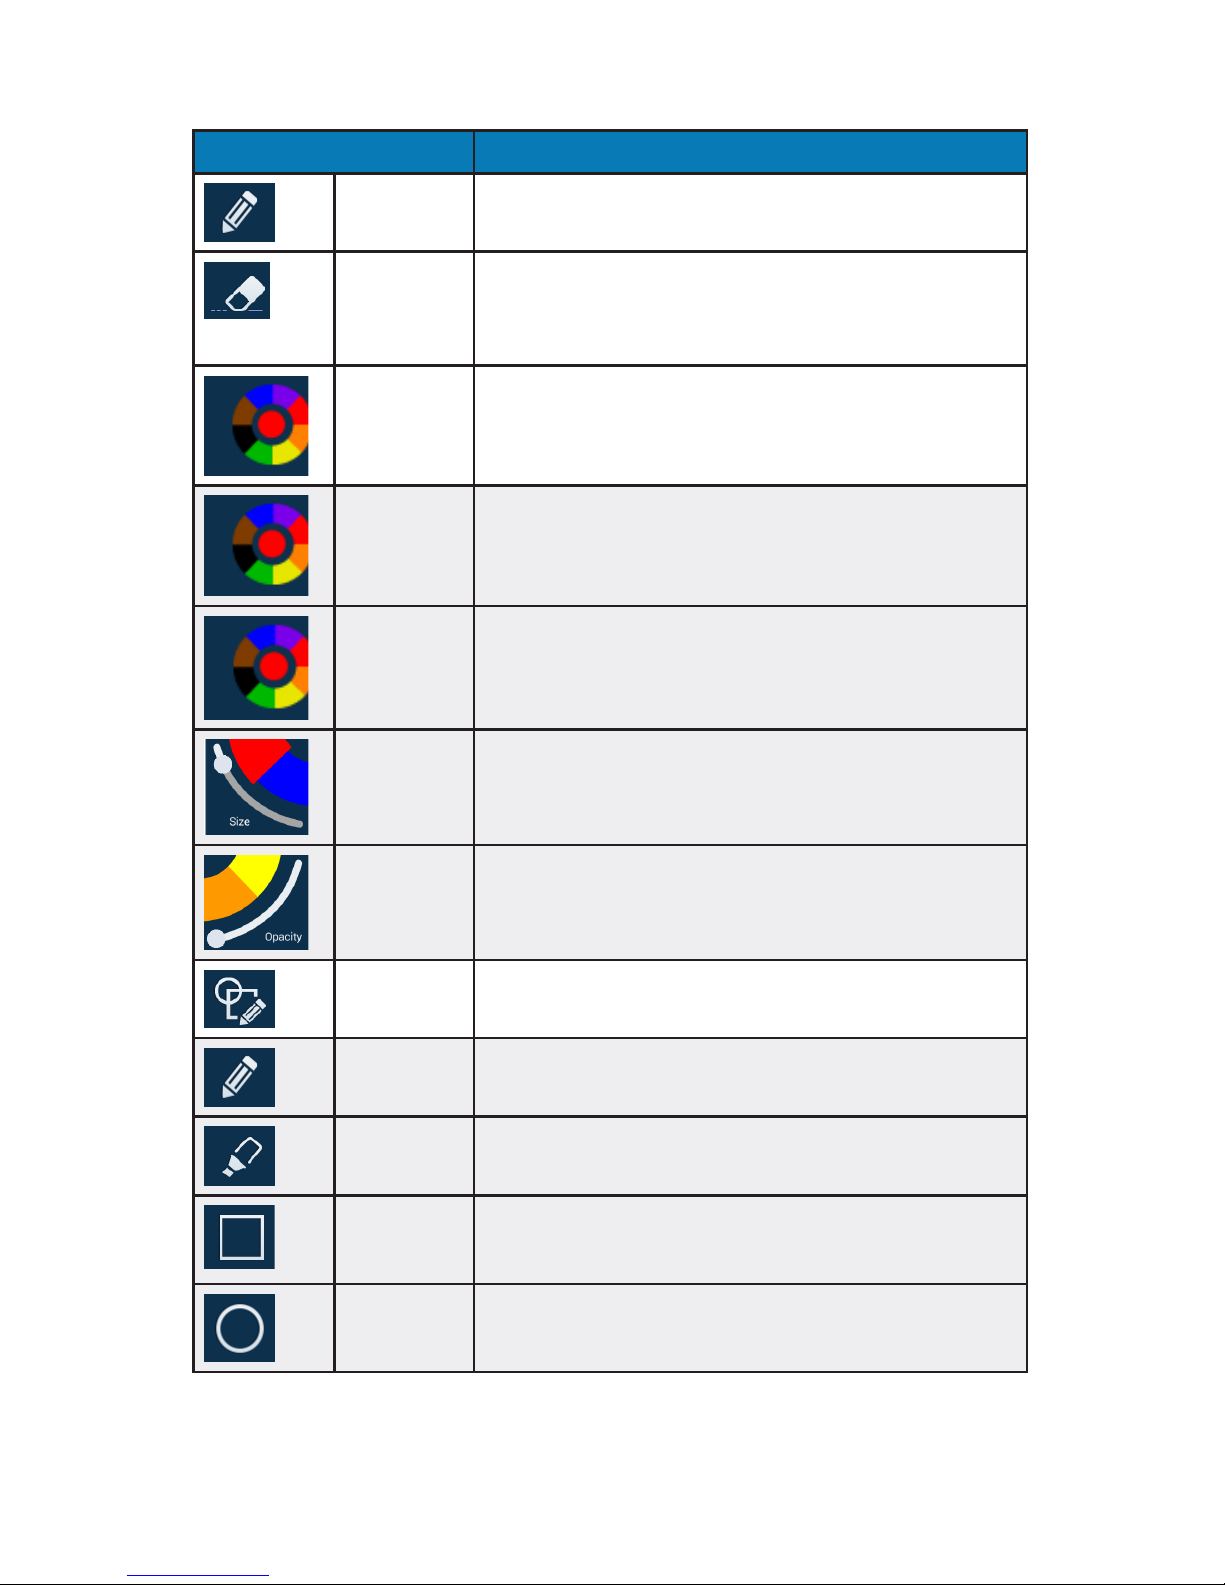
Annotation tools
Button Description
Current tool Click to use the current tool.
Eraser Click Eraser, and then click and drag across the drawing object
to erase the portion you touched. Only drawing objects are
aected.
Color Wheel
submenu
Click to access the color submenu.
Color wheel Click to choose a color using a color ramp. The current selected
color displays in the middle of the color wheel.
Segmented
color wheel
Click to choose a color from the segmented color wheel. The current selected color displays in the middle of the color wheel.
Size Click and drag the thumbnail button along the slider path to
adjust the size of the pen/line width.
Opacity Click and drag the thumbnail button along the slider path to
adjust the size of the highlighter/shape opacity.
Tools submenu
Click to select an annotation tool. Note: Each object has its own
color, pen width, and pen transparency setting.
Pen Click to use a pen. Note: Opacity control is not available for the
pen object.
Highlighter Click to use a highlighter.
Rectangle Click to draw a rectangle.
Circle Click to draw a circle.
Page 17
Page 16
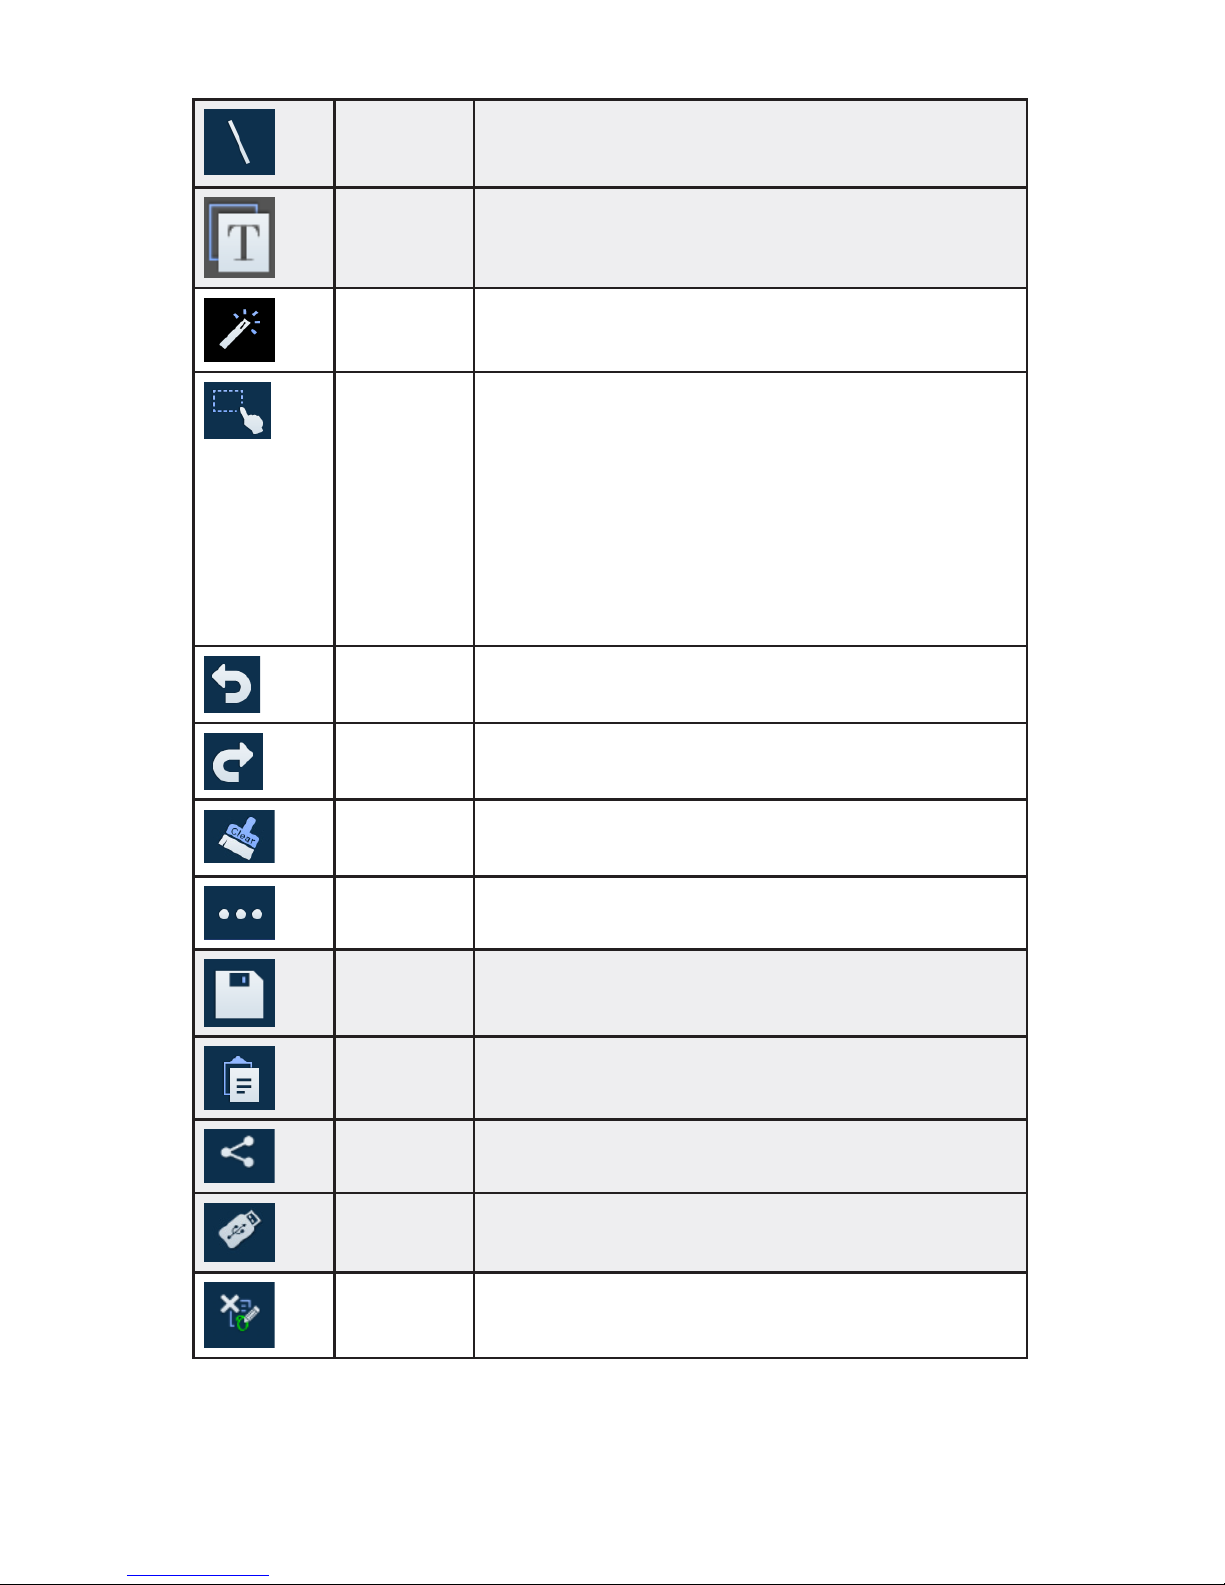
Line Click to draw a line.
Text Click to add a text box. Adjust the font size, color, and type at-
tributes as desired. Type your text and click OK.
Laser Click to highlight something temporarily. The mark disappears
when a new mark is made. Laser marks cannot be saved.
Select Click Select. Click and drag the selection box around the draw-
ing objects which you want to move, cut, copy, paste, or delete.
Once selected:
• Click and drag to move the selection.
• Click Copy to copy the selection, and then click Paste to
create a duplicate object set.
• Click Delete to delete the selection.
Undo Click to delete the last annotation.
Redo Click to display the last deleted annotation.
Clear Click to delete all annotations from the le.
More submenu
Click to access additional menu features.
Save Click to save the le as a JPG image or PDF le.
Paste Click to paste the clipboard onto the image.
Share Only available when the display is connected to a network. Click
to send the annotated image as a JPG image by email.
USB Click to save the annotated picture to a USB device as a JPG
image or PDF le.
Exit Click to exit the annotation submenu.
Page 18
Page 17INA-LC100 User Guide
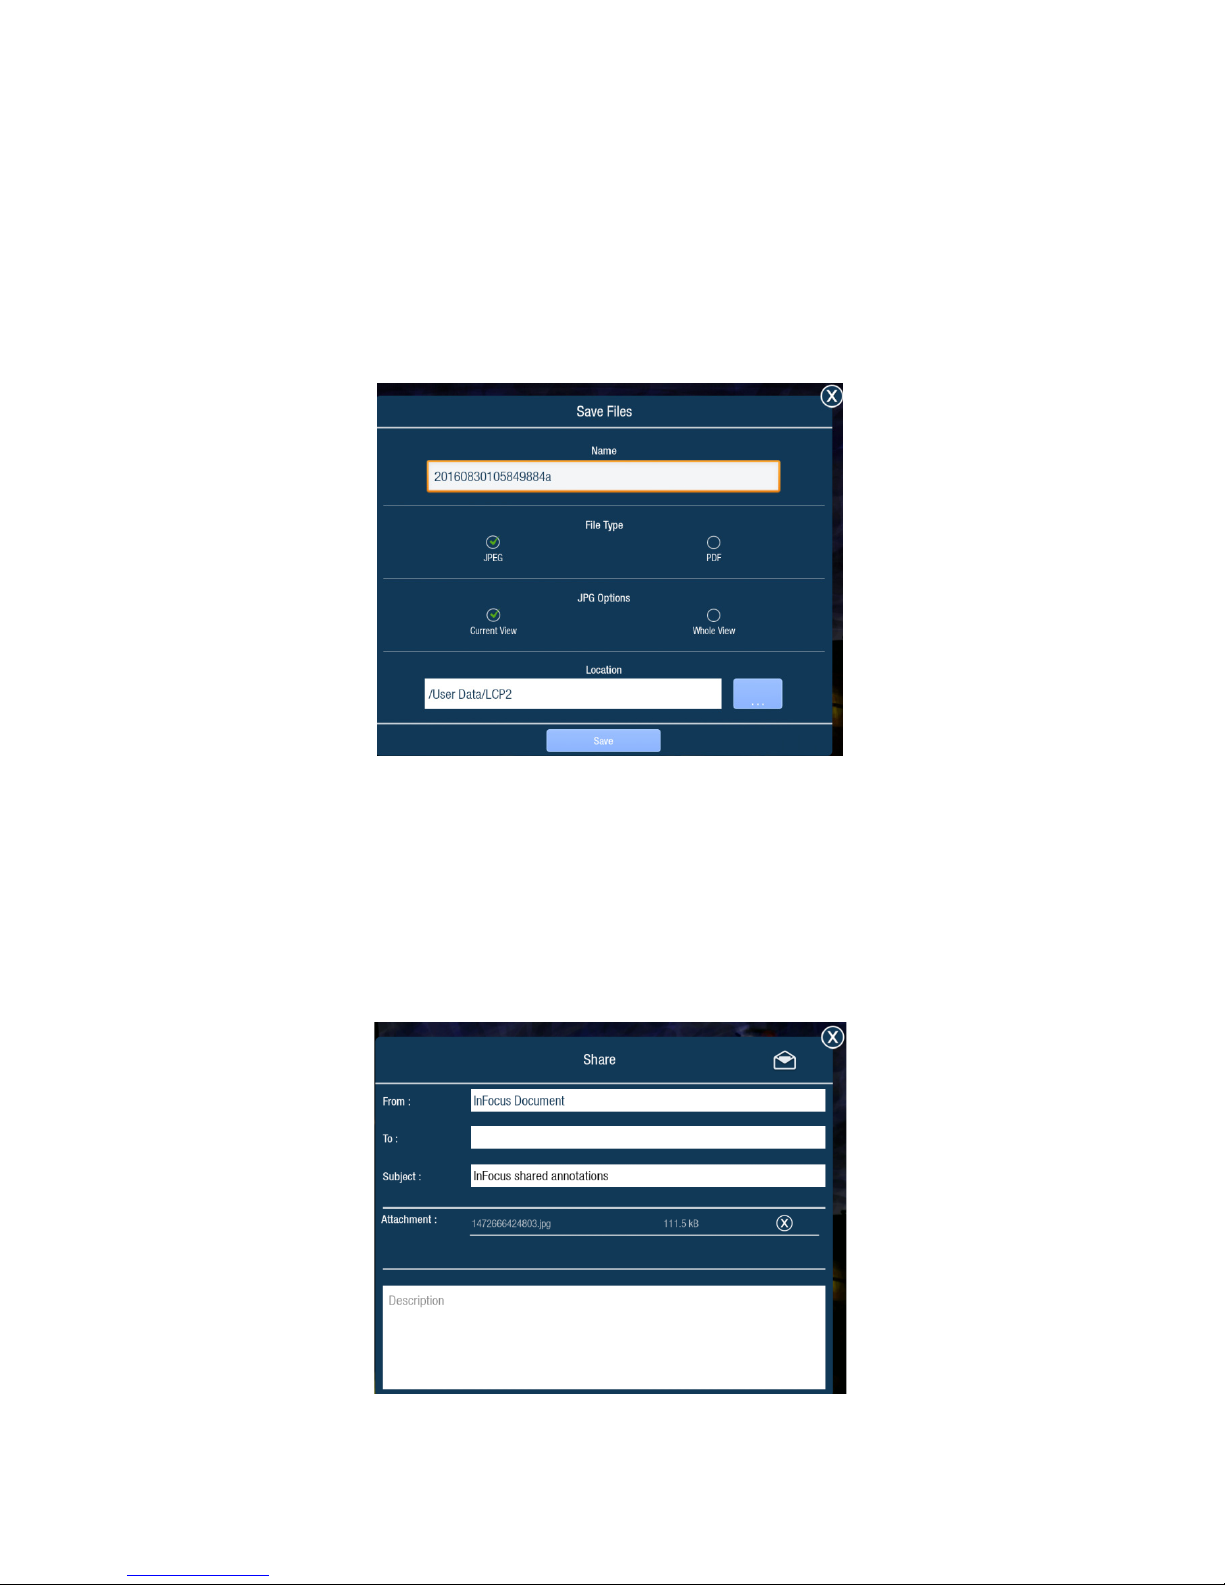
Save the le
1) From the annotation submenu, click More.
2) Click Save.
3) Type the le name in the Name eld.
4) Select the desired File Type ( JPG or PDF).
5) Select Current View to save the displayed page or Whole View to save the entire le.
6) Browse to the Location you would like to save the le to or accept the default location.
7) Click Save.
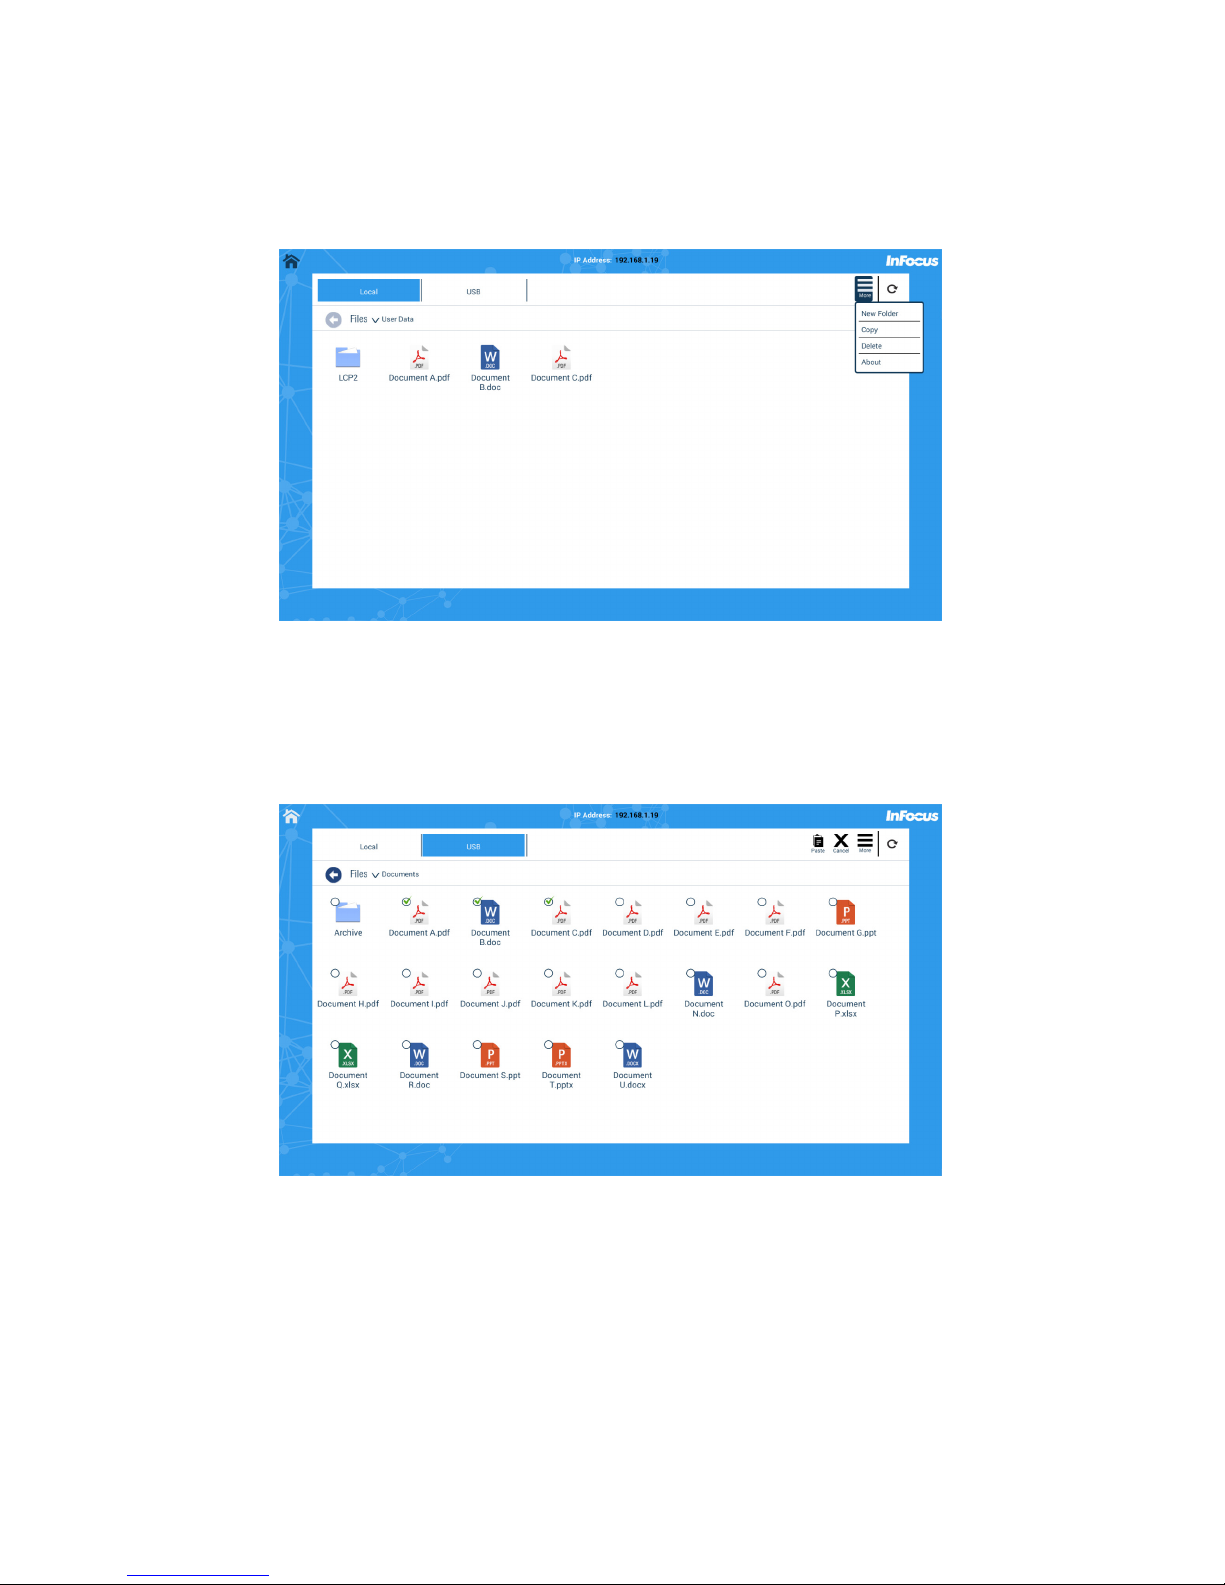
Share the le
1) From the annotation submenu, click More.
2) Click Share.
3) Type the recipient email address in the To: eld.
4) Type information about the le in the Description eld, if desired.
5) Click Send (envelope icon).
Page 19
Page 18
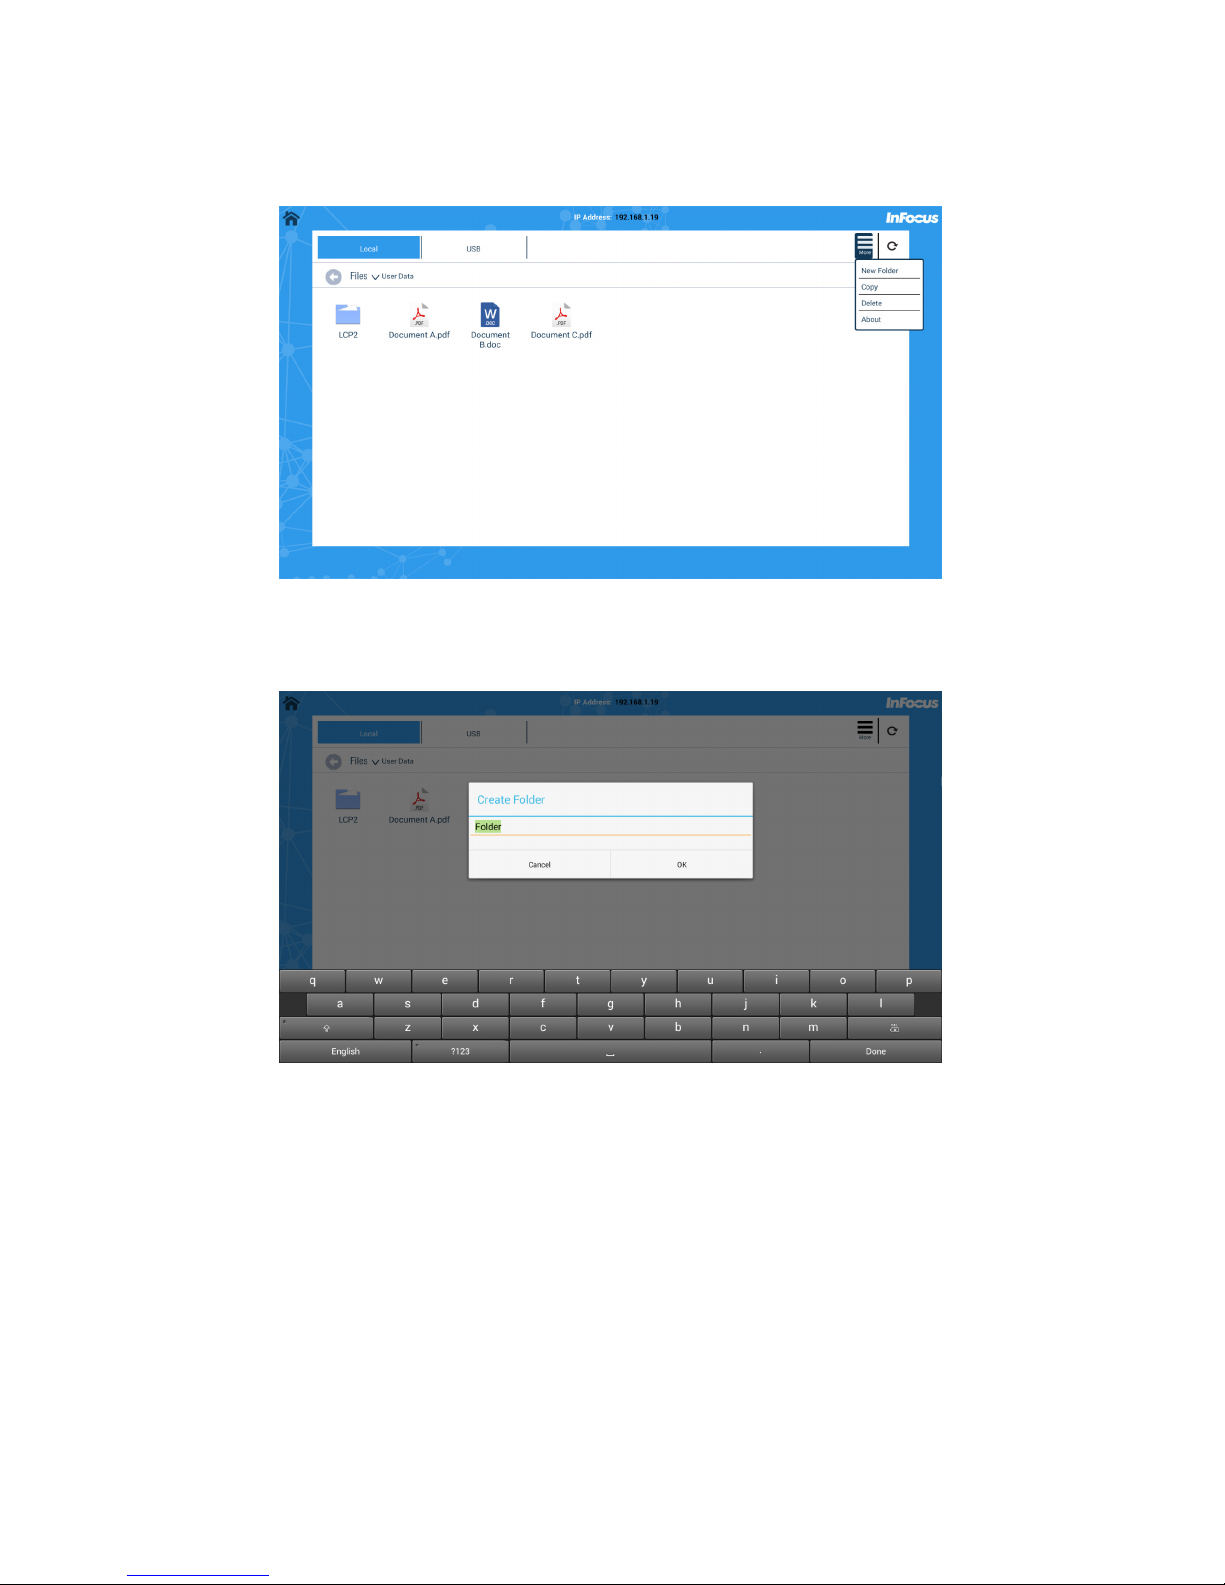
Copy a le or folder
1) Navigate to the desired le or folder location.
2) Navigate to More.
3) Click Select/Enter on the remote or keyboard.
4) Navigate to Copy.
5) Click Select/Enter on the remote or keyboard.
6) Navigate to the desired le or folder.
7) Click Select/Enter on the remote or keyboard. A green checkmark displays.
8) Repeat until all desired les or folders are selected.
9) Navigate to the location where you would like to paste the copied les.
10) Navigate to Paste.
11) Click Select/Enter on the remote or keyboard.
12) Click Done.
Page 20
Page 19INA-LC100 User Guide
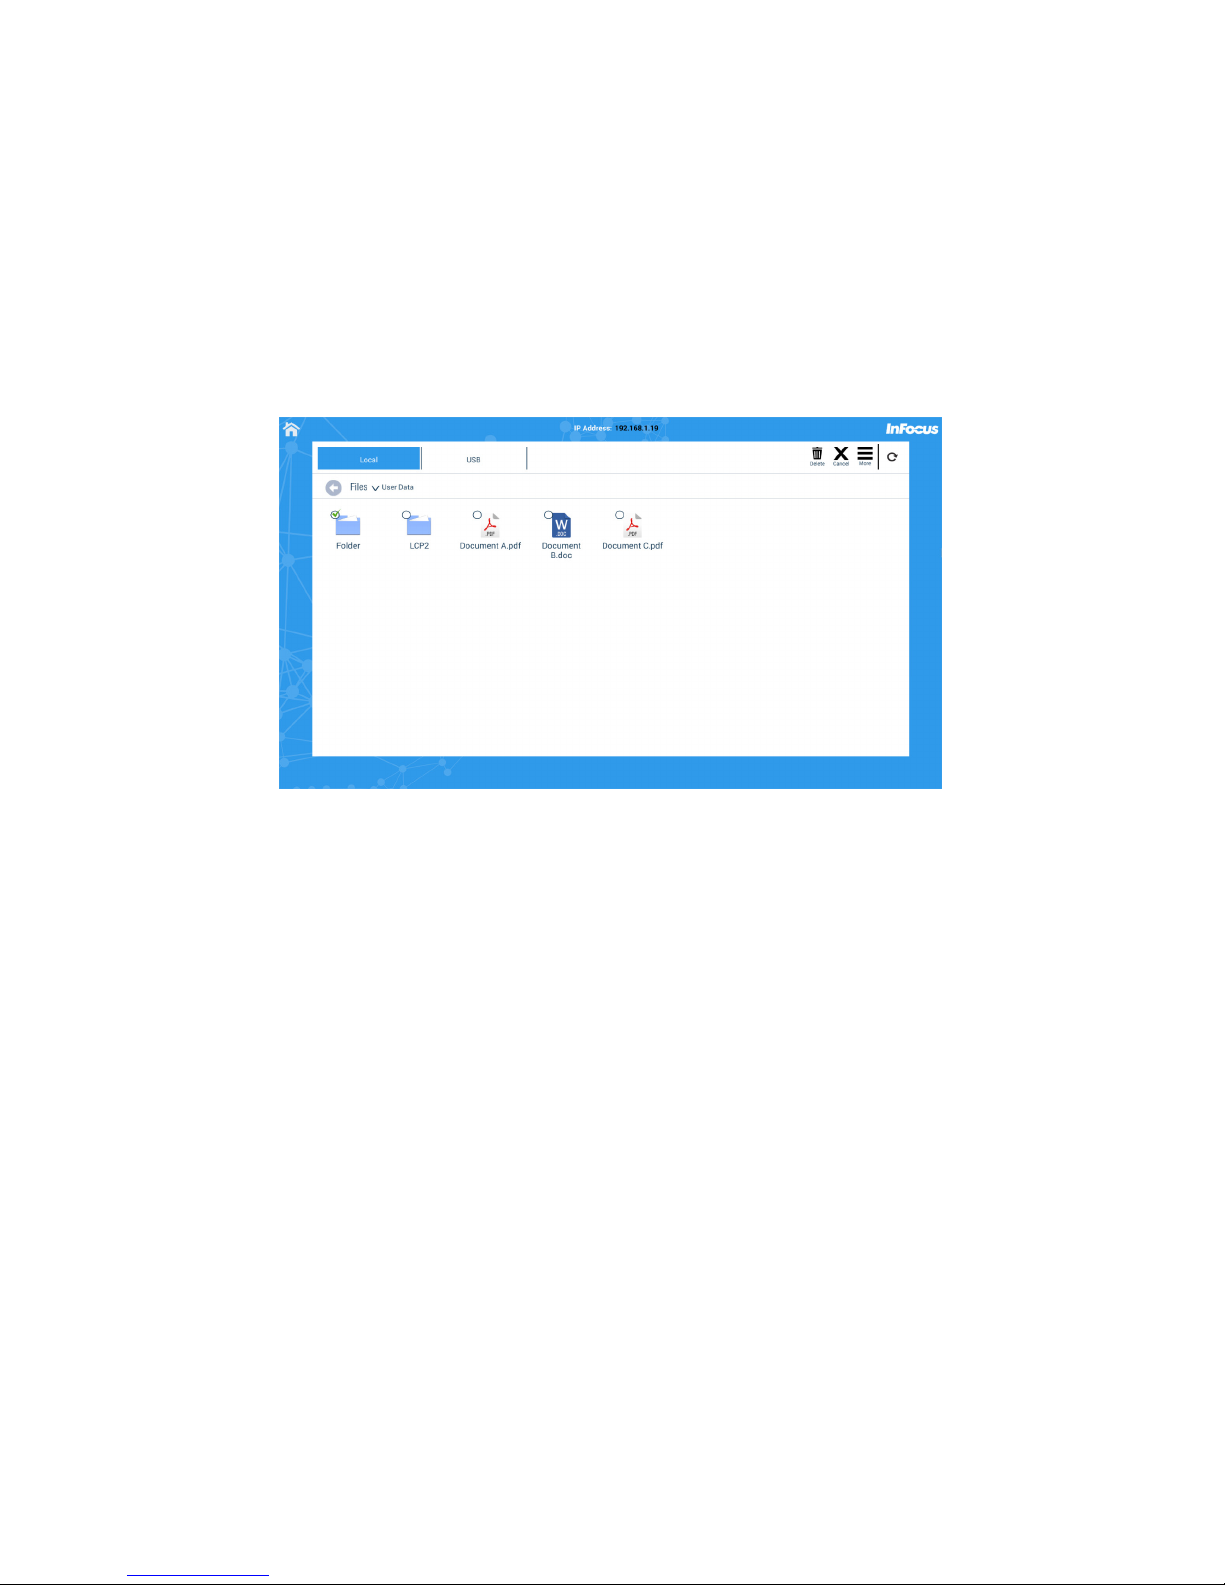
Create a new folder
1) Browse to the desired folder location.
2) Navigate to More.
3) Click Select/Enter on the remote or keyboard.
4) Click New Folder.
5) Using an attached keyboard or the virtual keyboard, enter the desired folder name. Note: If
using the virtual keyboard, use the arrows and Select/Enter button on the remote or keypad to
select the letters. Select Done when the folder name is complete.
6) Click OK.
Page 21
Page 20
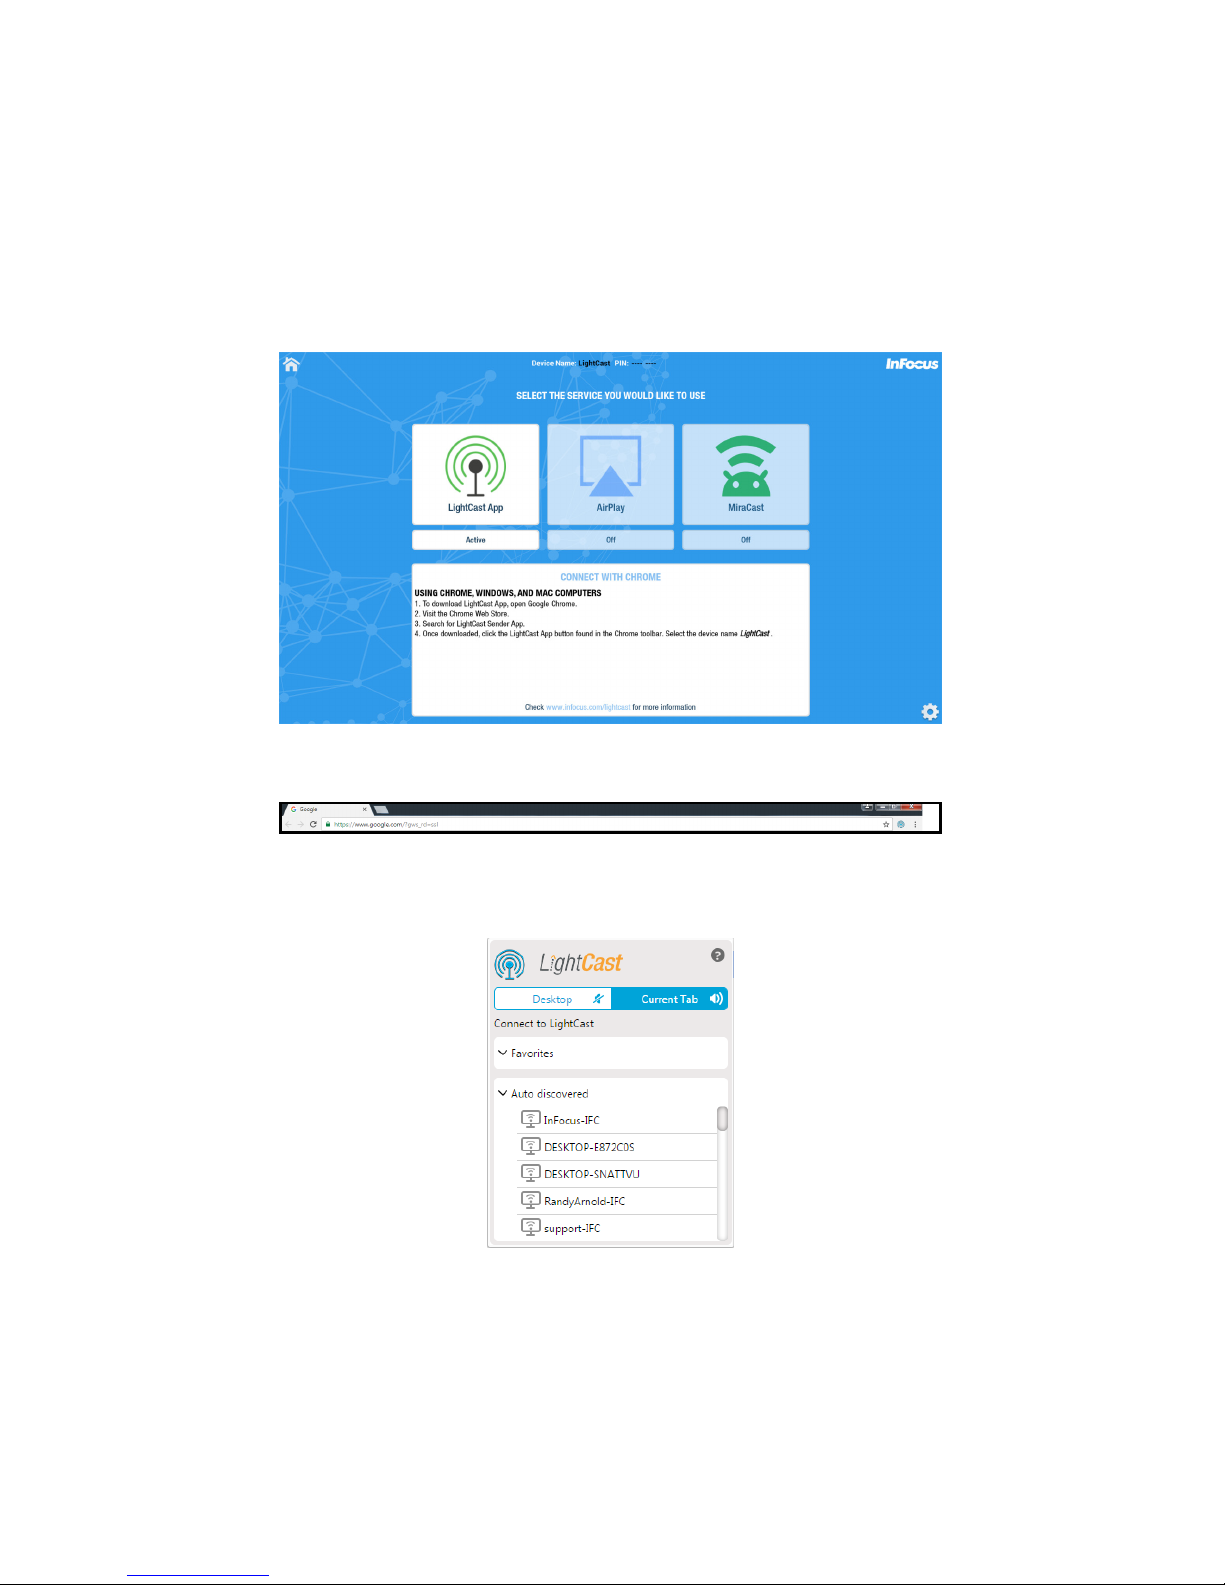
Delete les and folders
1) Navigate to the desired le or folder location.
2) Navigate to More.
3) Click Select/Enter on the remote or keyboard.
4) Navigate to Delete.
5) Click Select/Enter on the remote or keyboard.
6) Navigate to the desired le or folder.
7) Click Select/Enter on the remote or keyboard. A green checkmark displays.
8) Repeat until all desired les or folders are selected.
9) Navigate to the Delete icon.
10) Click Select/Enter on the remote or keyboard.
11) Click Done.
Page 22
Page 21INA-LC100 User Guide
Cast (Wireless display)
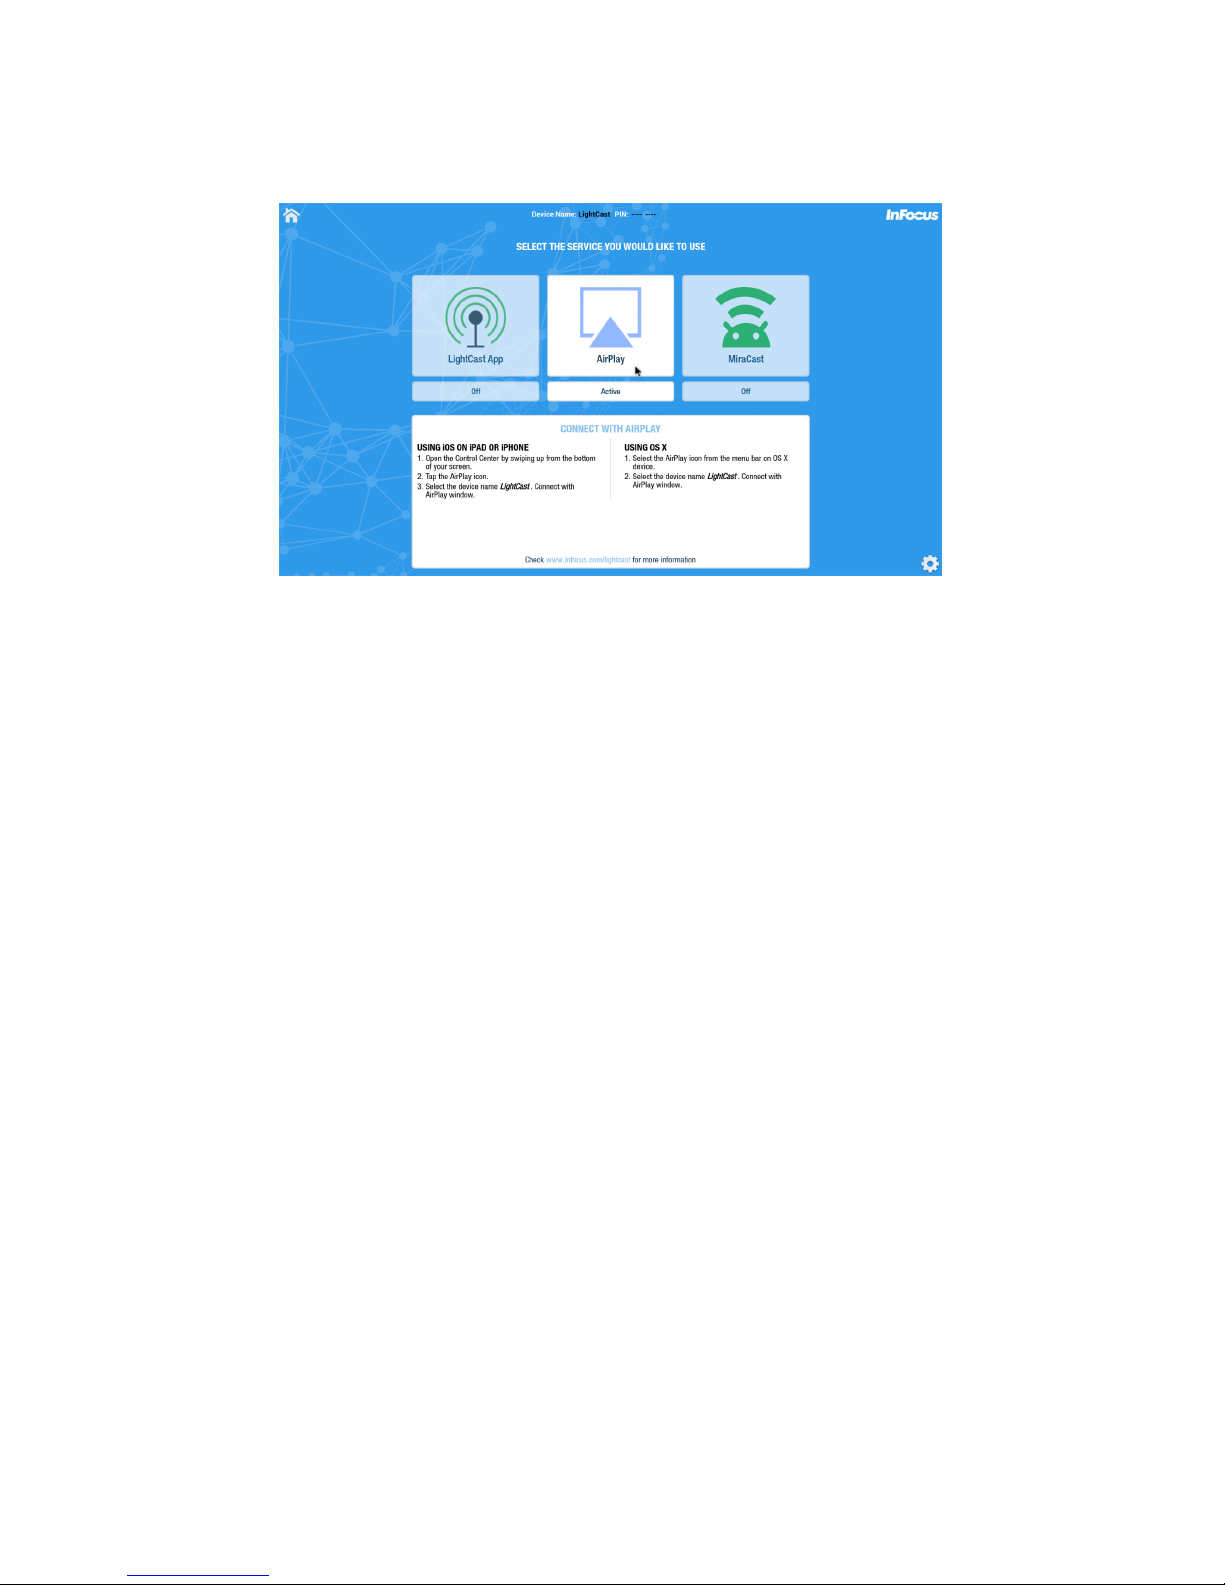
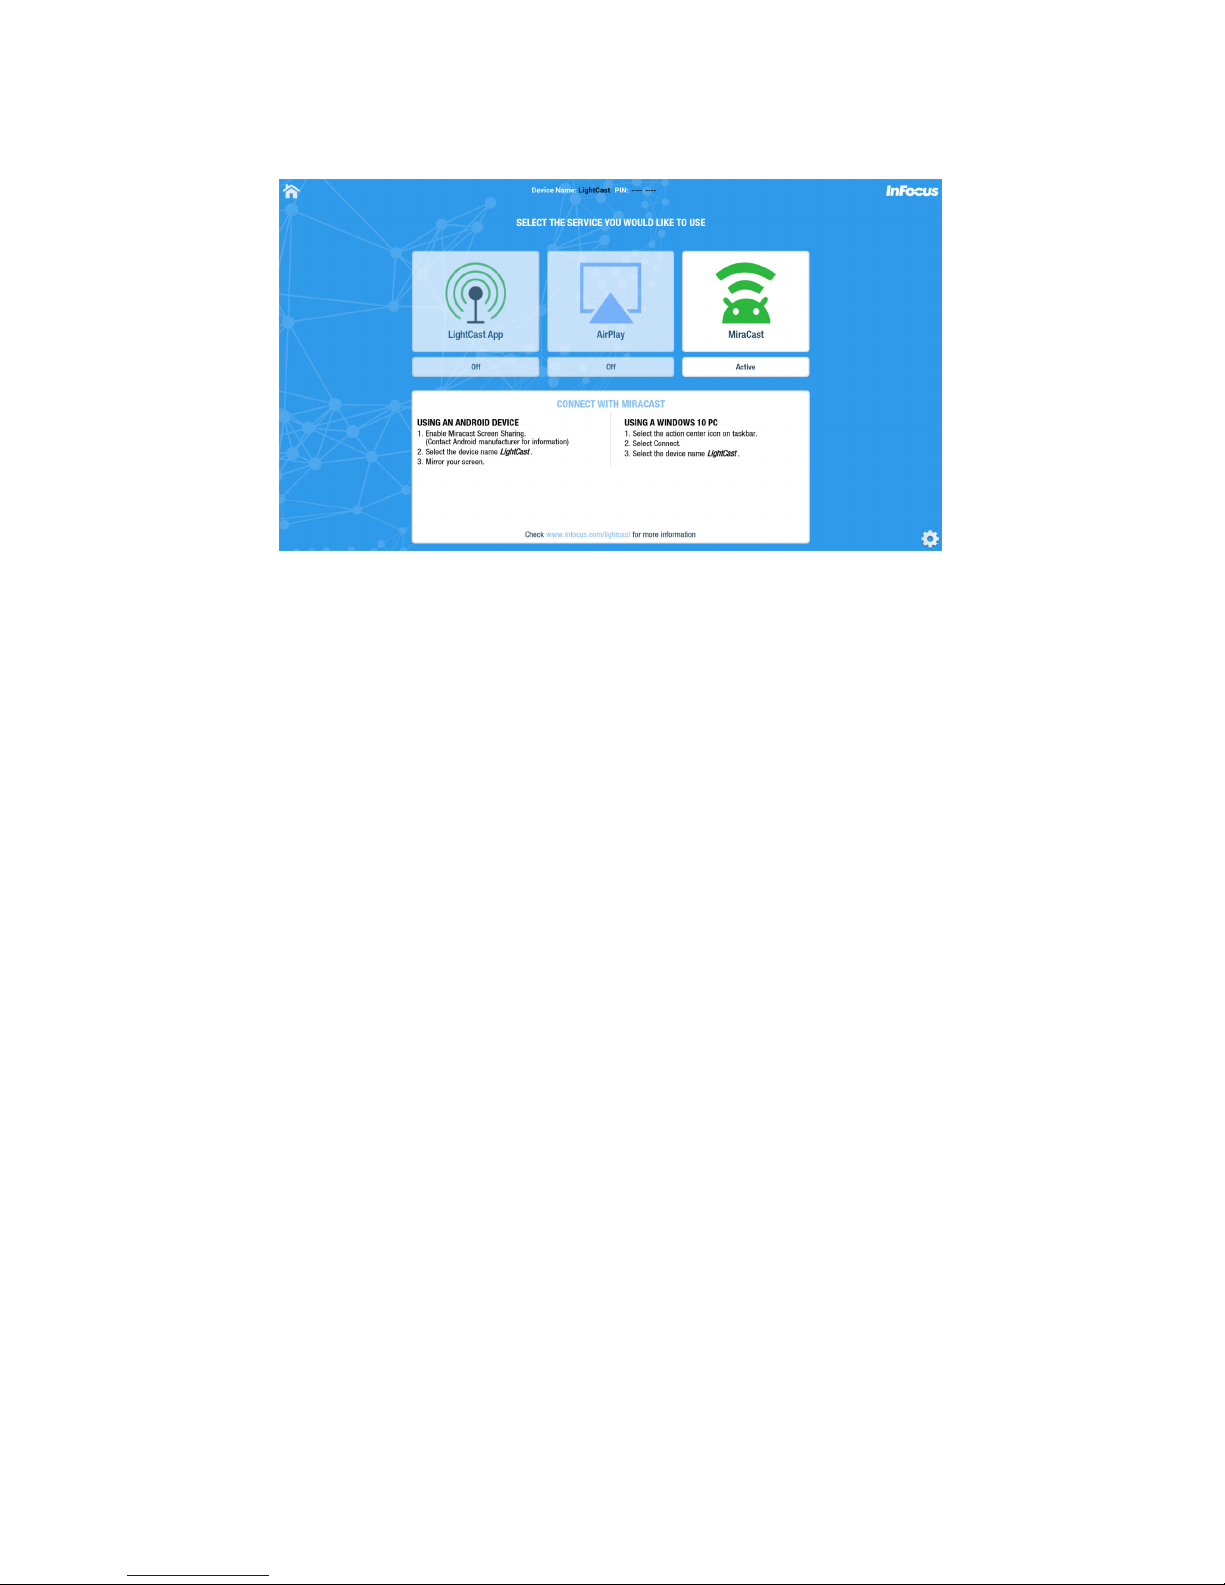
From the LightCast home page, select Cast. From the Cast screen, select which service to use. To
protect the display, you can enable an eight digit PIN. See "Network Settings" on page 36 for more
information.
LightCast
To send video and audio wirelessly using the Chrome browser on Windows, Chrome OS, and OS X
computers, download and install the LightCast Sender application from the Chrome web store.
1) With Chrome open, click the LightCast icon in the toolbar.
2) Select the Current Tab with the audio in order to pass audio to the projection device. Otherwise
no audio will pass through. Select the display from the list.
Page 23
Page 22
AirPlay
Display using an iPhone, iPad, iPod Touch, or stream audio and video from a Macintosh computer.
Your device and LightCast must be connected to the same wireless network.
To display from a Mac computer
1) Click the AirPlay icon in the menu bar, then choose the name of the LightCast device under
"Connect To AirPlay Display." The icon turns blue when your Mac is using an AirPlay display.
2) From the same AirPlay menu, choose either Extended Desktop or one of the mirroring options under "Use AirPlay Display To."
To display from an iOS device
1) Swipe up from the bottom of your screen to open Control Center.
2) Click AirPlay.
3) Click the name of the device you want to stream content to. You'll see (TV) or (speaker) next to
each device, so you know what type of content you can stream.
Compatibility
• iPhone 4 or later. iPhone 4s or later for AirPlay Mirroring.
• iPad, iPad mini. iPad 2 or later for AirPlay Mirroring.
• iPod touch (4th generation) or later. iPod touch (5th generation) or later for AirPlay Mirroring.
For mirroring your display or extending your desktop, any of the following Mac computers with OS X
Mountain Lion v10.8 or later:
• iMac (Mid 2011 or later)
• Mac mini (Mid 2011 or later)
• MacBook (Early 2015 or later)
• MacBook Air (Mid 2011 or later)
• MacBook Pro (Early 2011 or later)
• Mac Pro (Late 2013 or later)
Page 24
Page 23INA-LC100 User Guide
Miracast
Your device and LightCast should be connected to the same wireless network for best performance.
Using an Android tablet or phone
1) Launch the Miracast application (See device instructions).
2) Select the LightCast device.
Using a Windows 8.1 or 10 PC
1) Open the Charms menu on the right side of the desktop.
2) Select Devices.
3) Select Project.
4) Select Add a Wireless Device.
5) Select the LightCast device.
Page 25
Page 24
Whiteboard
Use the whiteboard feature to brainstorm ideas, create graphs and workows, or whatever you
desire. The blank slate lets you collaborate, share, and save your ideas.
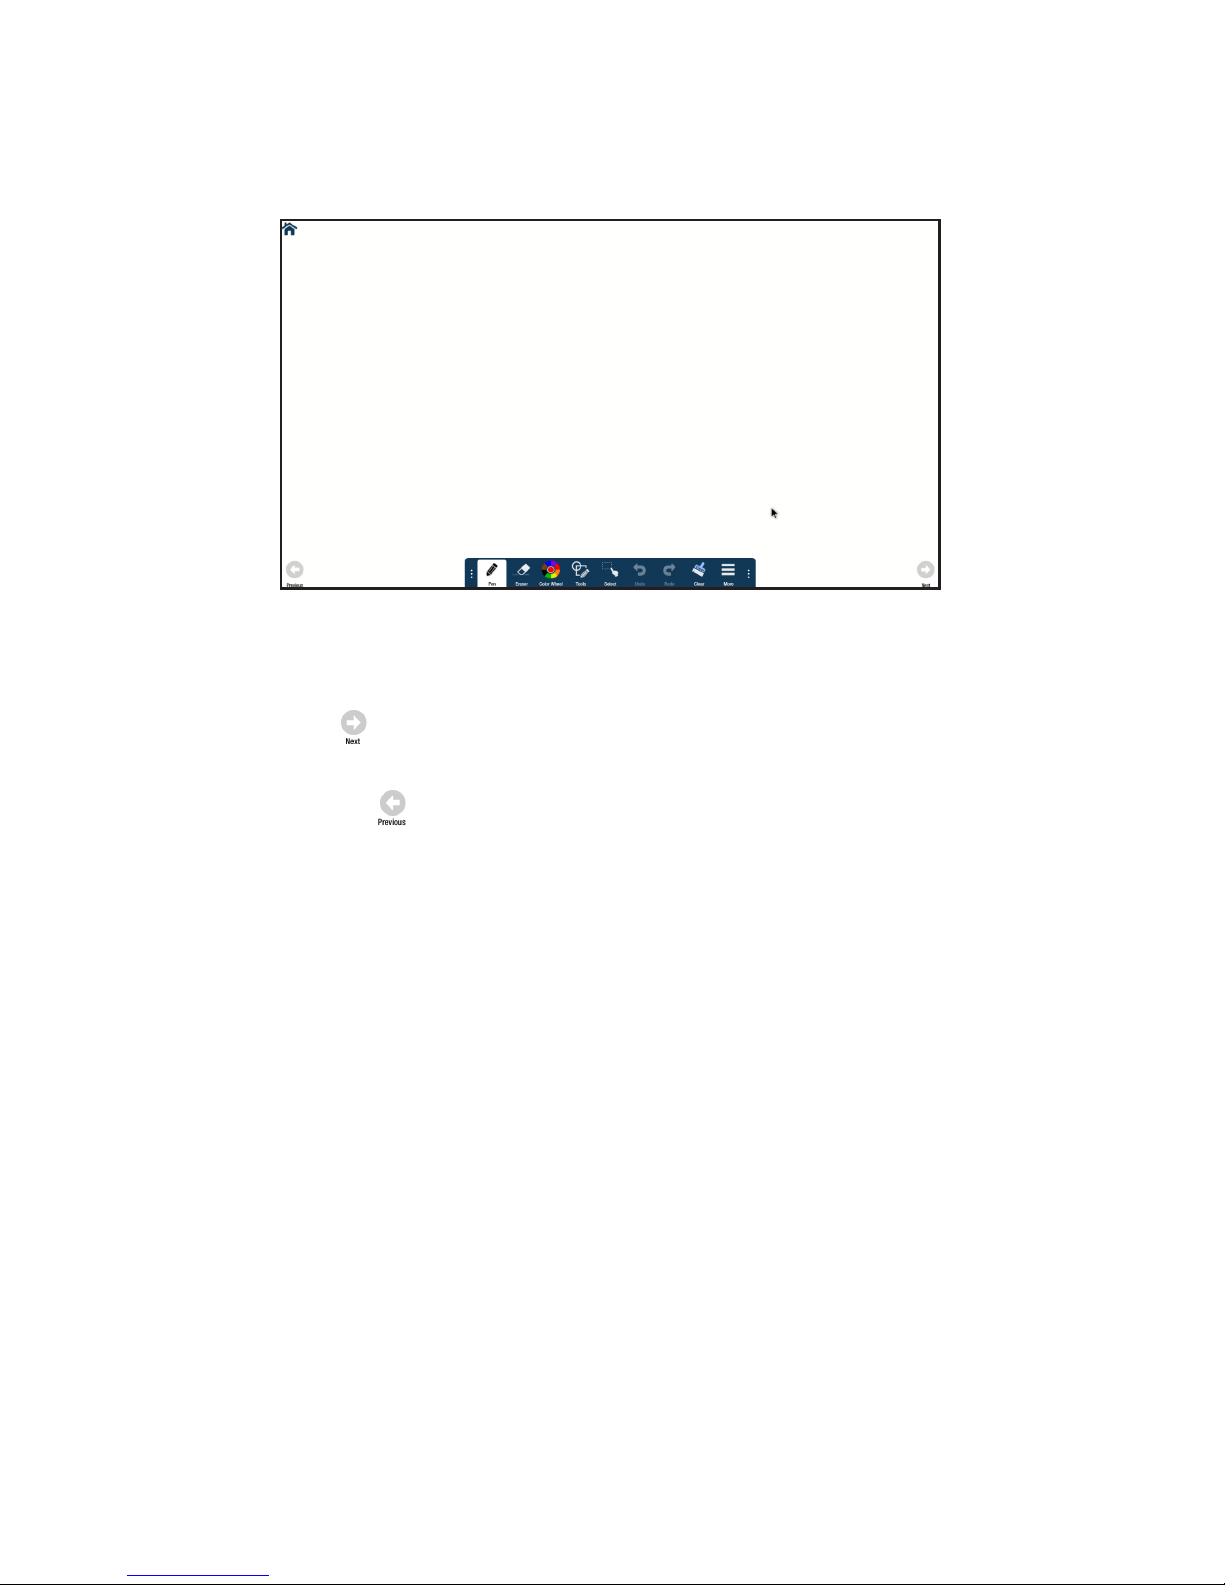
Navigation
1) From the LightCast home page, select Whiteboard.
2) Click Next to add or go to the next page. Note: The whiteboard feature supports up to 3
pages total.
3) Click Previous to add or go to the previous page. Note: The whiteboard feature supports
up to 3 pages total.
4) To return to the LightCast home page, click the Home button.
Create a drawing object
1) Click Tools and select a drawing tool.
2) Click Color Wheel to adjust the color, size, and opacity of the selected drawing tool.
3) Draw on the whiteboard canvas with the mouse (or touch device).
4) Use Eraser, Select, Undo, Re-do, and Clear to modify the drawing. See "Whiteboard tools"
on page 25 for more information.
Page 26
Page 25INA-LC100 User Guide
Add text
NOTE: Text boxes overlay the open document and do not aect the text within the displayed docu-
ment.
1) Click Tools.
2) Click Text.
3) Click the screen where you want the text box to be. A text box opens.
4) Adjust the font family, size, color, and text attributes, as desired.
5) Using either a keyboard or the on-screen keyboard, type your text.
6) Click OK when nished.
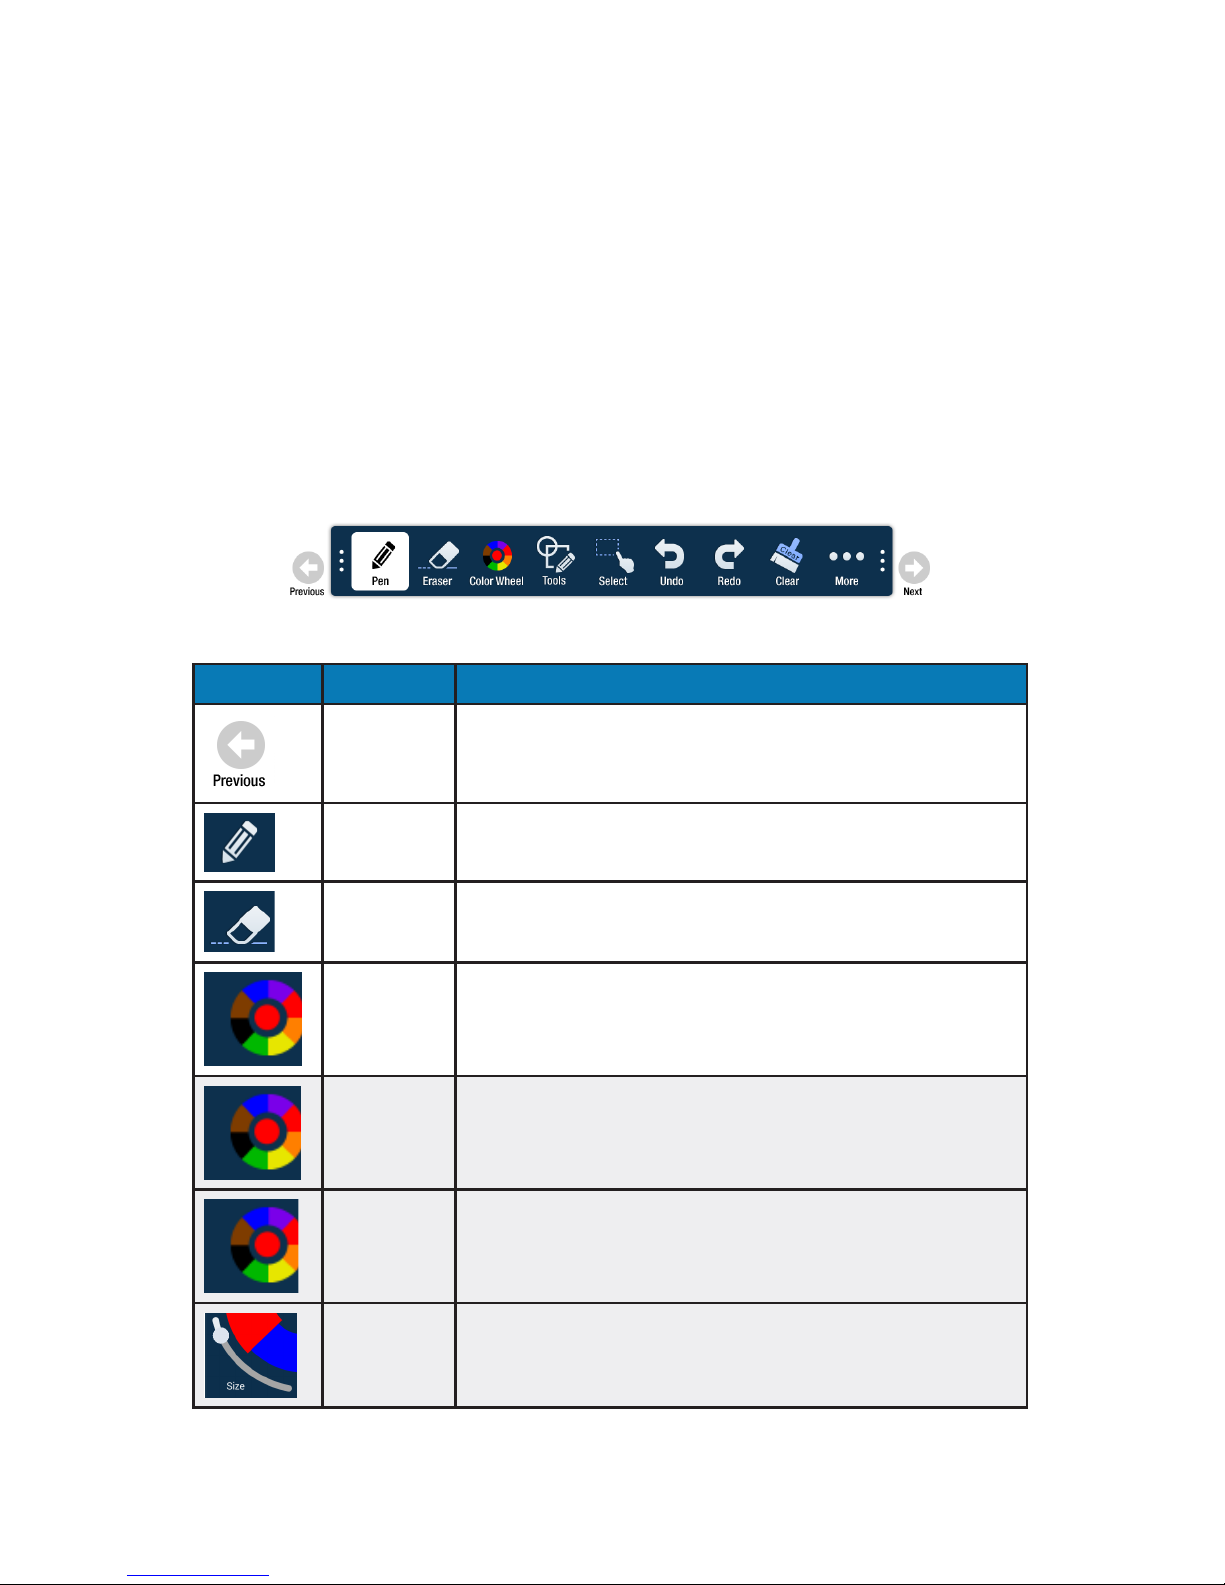
Whiteboard tools
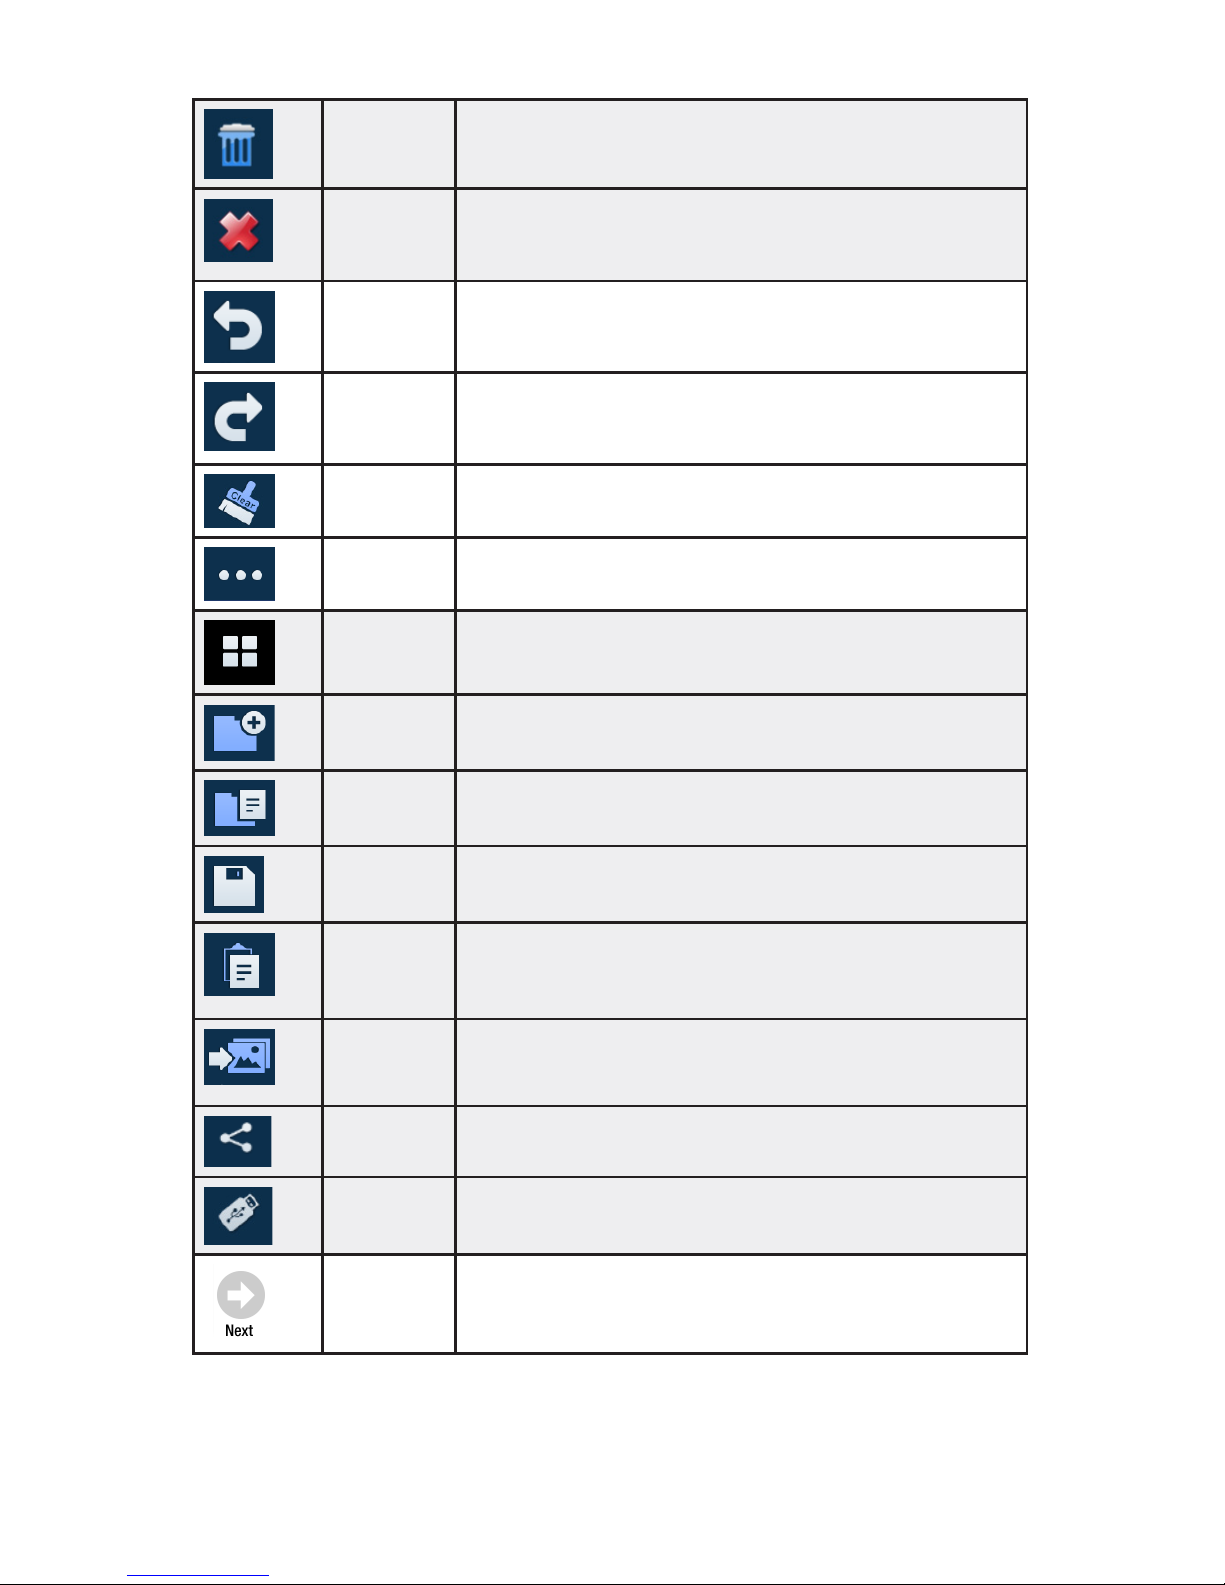
Icon Tool Name Description
Previous Click to go to the previous page.
Current tool Click to use the current tool.
Eraser Click Eraser, and then click and drag across the drawing object to
erase the portion you touched.
Color Wheel
submenu
Click to access the color submenu.
Color wheel Click to choose a color using a color ramp. The current selected
color displays in the middle of the color wheel.
Segmented
color wheel
Click to choose a color from the segmented color wheel. The current selected color displays in the middle of the color wheel.
Size Click and drag the thumbnail button along the slider path to adjust
the size of the pen/line width.
Page 27
Page 26
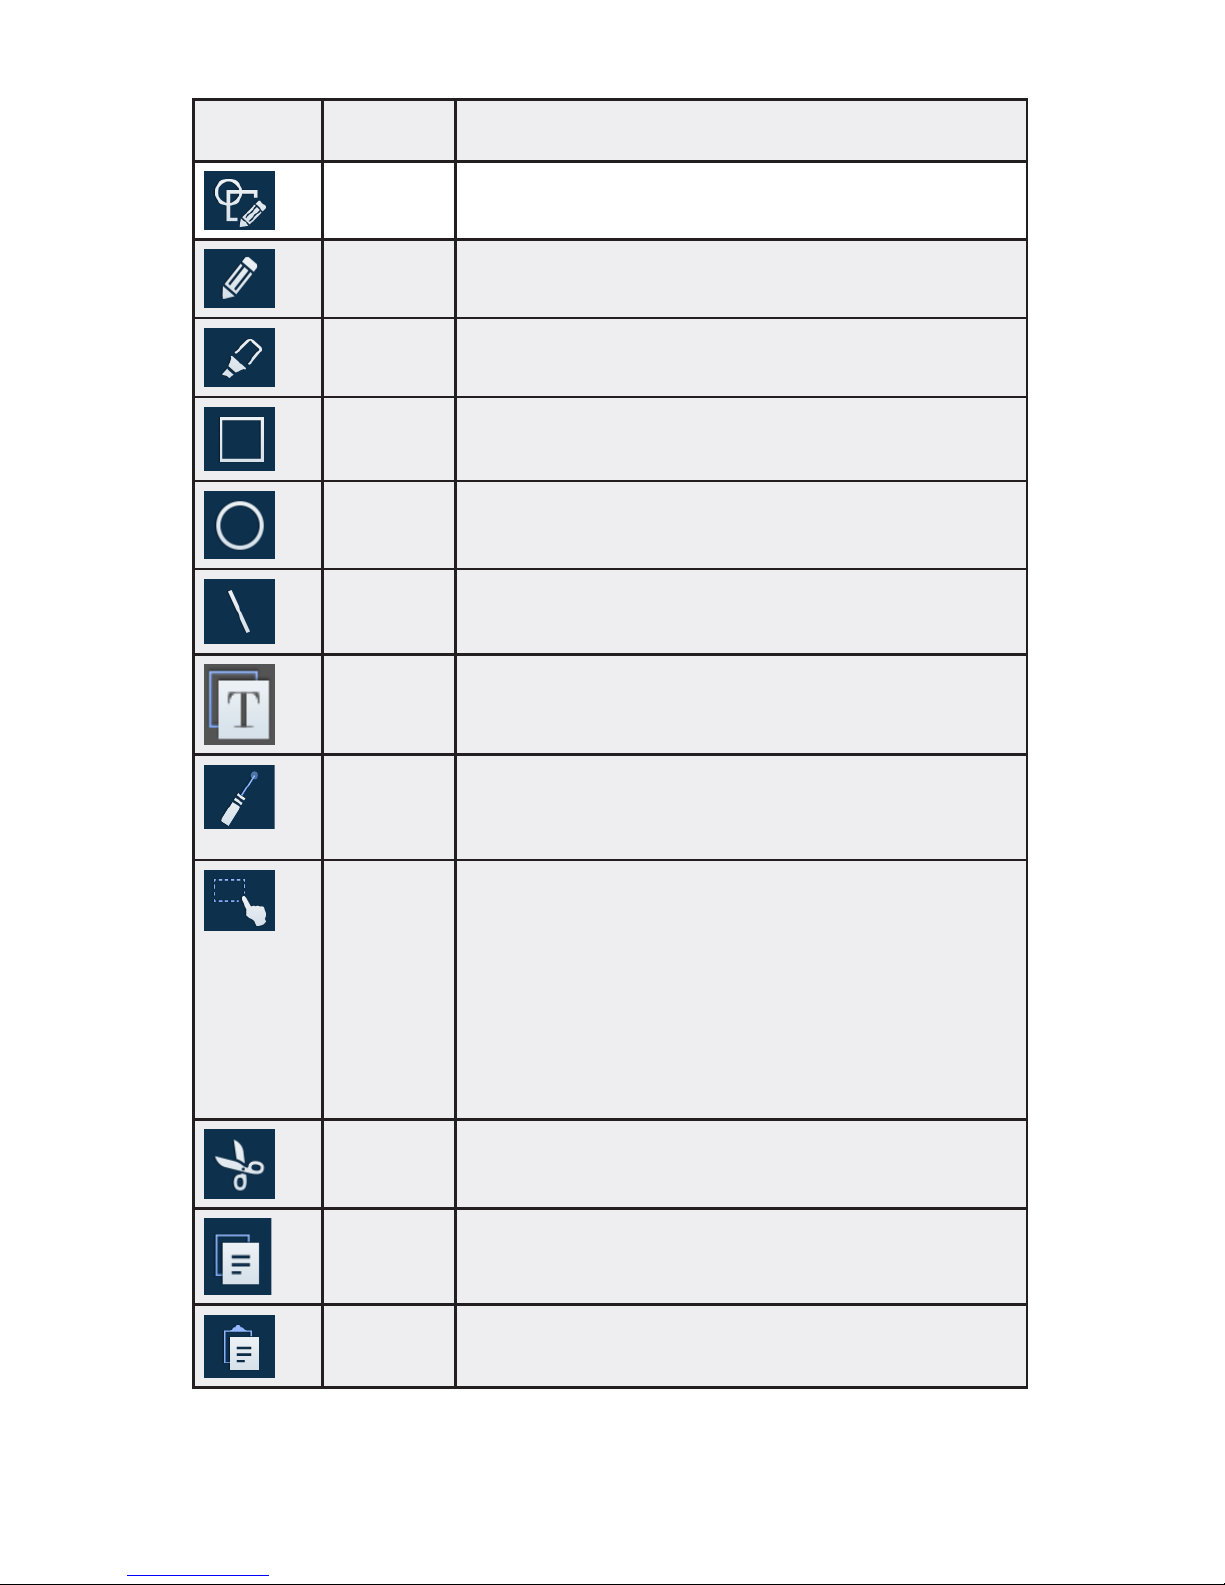
Opacity Click and drag the thumbnail button along the slider path to adjust
the size of the highlighter/shape opacity.
Tools submenu
Click to select a drawing object. Note: Each object has its own
color, pen width, and pen transparency setting.
Pen Click to use a pen. Note: Opacity control is not available for the
pen object.
Highlighter Click to use a highlighter.
Rectangle Click to draw a rectangle.
Circle Click to draw a circle.
Line Click to draw a line.
Text Click to add a text box. Adjust the placement, font size, color, and
type attributes as desired. Type your text and click OK.
Laser Click to highlight something temporarily. The red laser mark disap-
pears when a new mark is made. Laser marks cannot be saved.
Select Click Select. Click and drag the selection box around the drawing
objects which you want to move, cut, copy, paste, or delete.
Once selected:
• Click and drag to move the selection.
• Click Copy to copy the selection, and then click Paste to
create a duplicate object set.
• Click Delete to delete the selection.
Cut Click to cut the selected object(s).
Copy Click to copy the selected object(s).
Paste Click to paste the last copied or cut object(s) onto the whiteboard
canvas.
Page 28
Page 27INA-LC100 User Guide
Delete Click to delete the selected object(s).
Cancel Click to remove the selection box.
Undo Click to reverse the last executed command.
Redo Click to reverse the last Undo command.
Clear Click to clear the drawing objects from the whiteboard canvas.
More submenu
Click to access additional menu features.
Canvas Click to view thumbnails of all the edited pages. Click a thumbnail
to navigate to that page.
New Click to open a new whiteboard canvas.
Open Click to open a saved le.
Save Click to save the annotated pages as a DigiEasel whiteboard le
(.mwbx), JPG image, or PDF le.
Paste Click to paste the last copied or cut object(s) on the whiteboard
canvas.
Import Click to import an image onto the whiteboard canvas. To remove
an imported image, click the red X in the top right-hand corner of
the image.
Share Only available when the display is connected to a network. Click to
send the annotated image as a JPG image by email.
USB Click to save or open les from an external USB thumb drive.
Next Click to go to the next page.
Page 29
Page 28
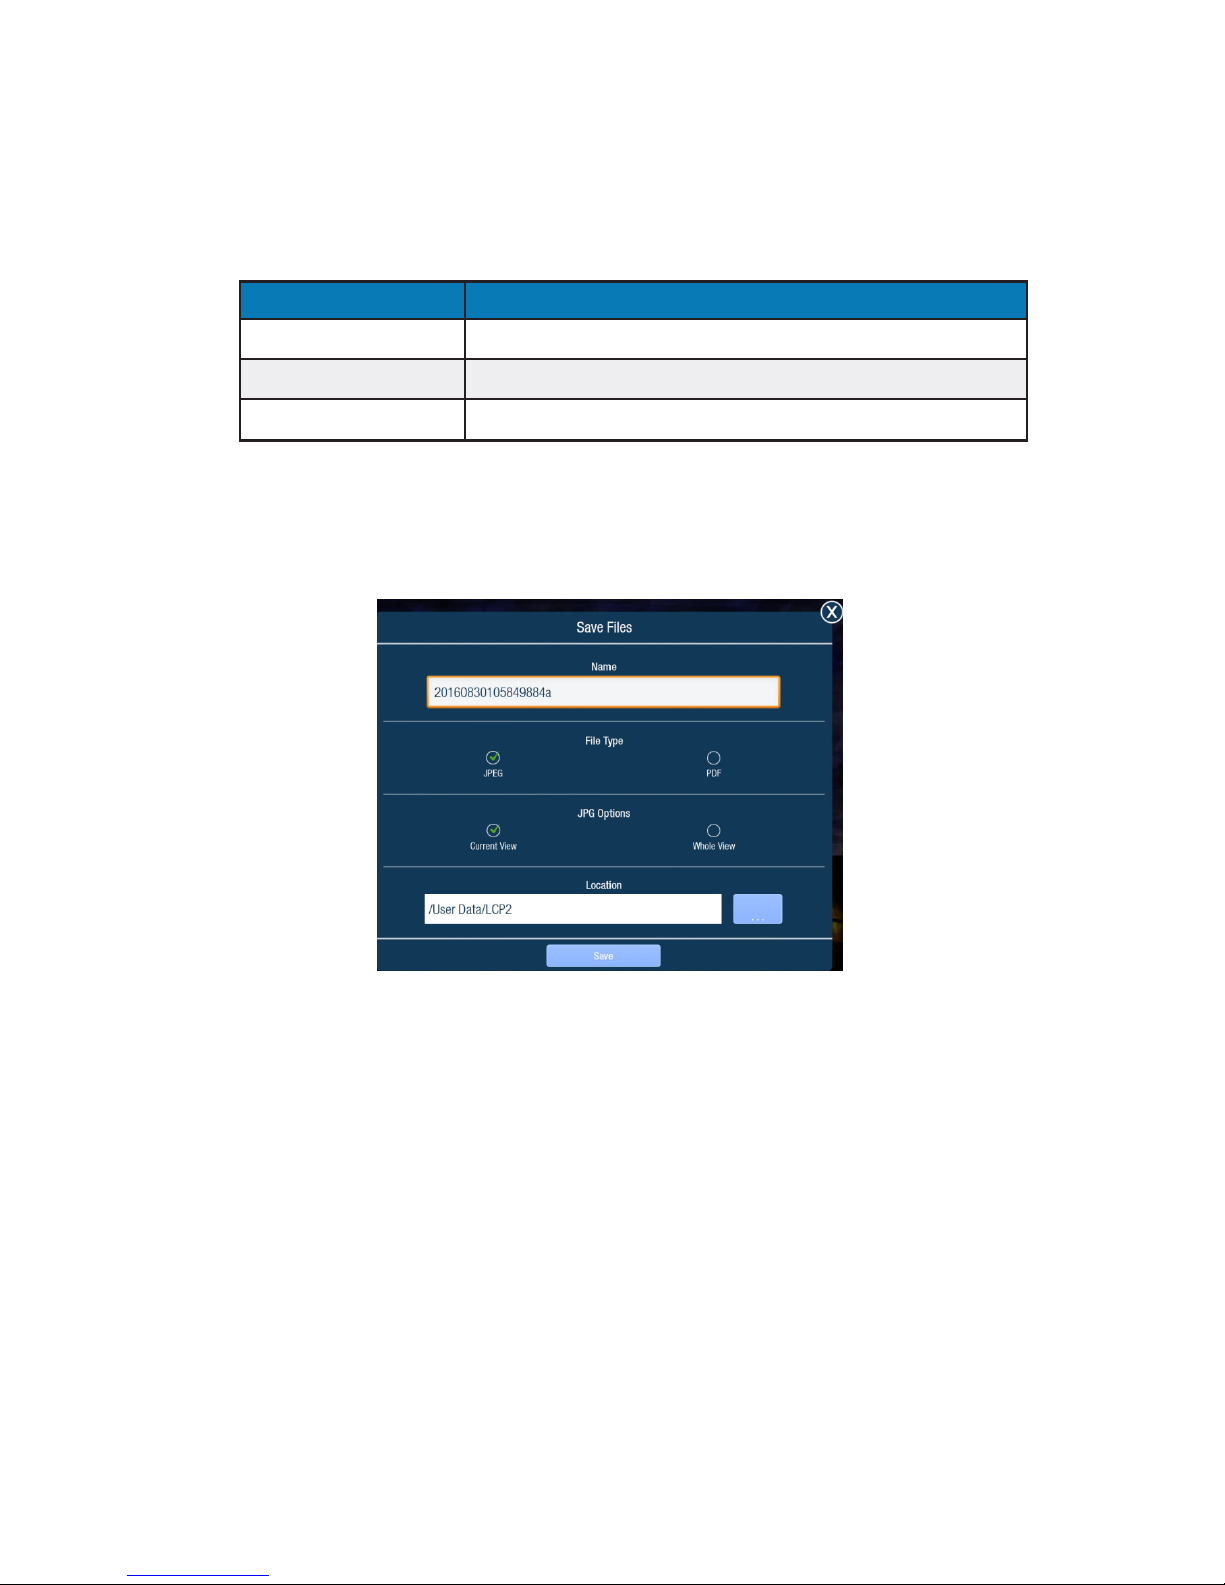
Save the whiteboard canvas
1) Click More.
2) Click Save.
3) Type a le name in the Name text box.
4) Select the le type:
File Type Option Choose this le type if you want to...
DigiEasel Saves the whiteboard le (.mwbx) for future editing.
JPG Creates an image le.
PDF Creates a printable document for others to view.
5) For JPG and PDF le types, click Current view to save the visible portion of the canvas or
click Whole view to save the entire canvas. Note: Whole view creates multiple pages and
requires extra time to complete.
6) Browse to the desired le location or accept the default location.
7) Click Save.
Page 30
Page 29INA-LC100 User Guide
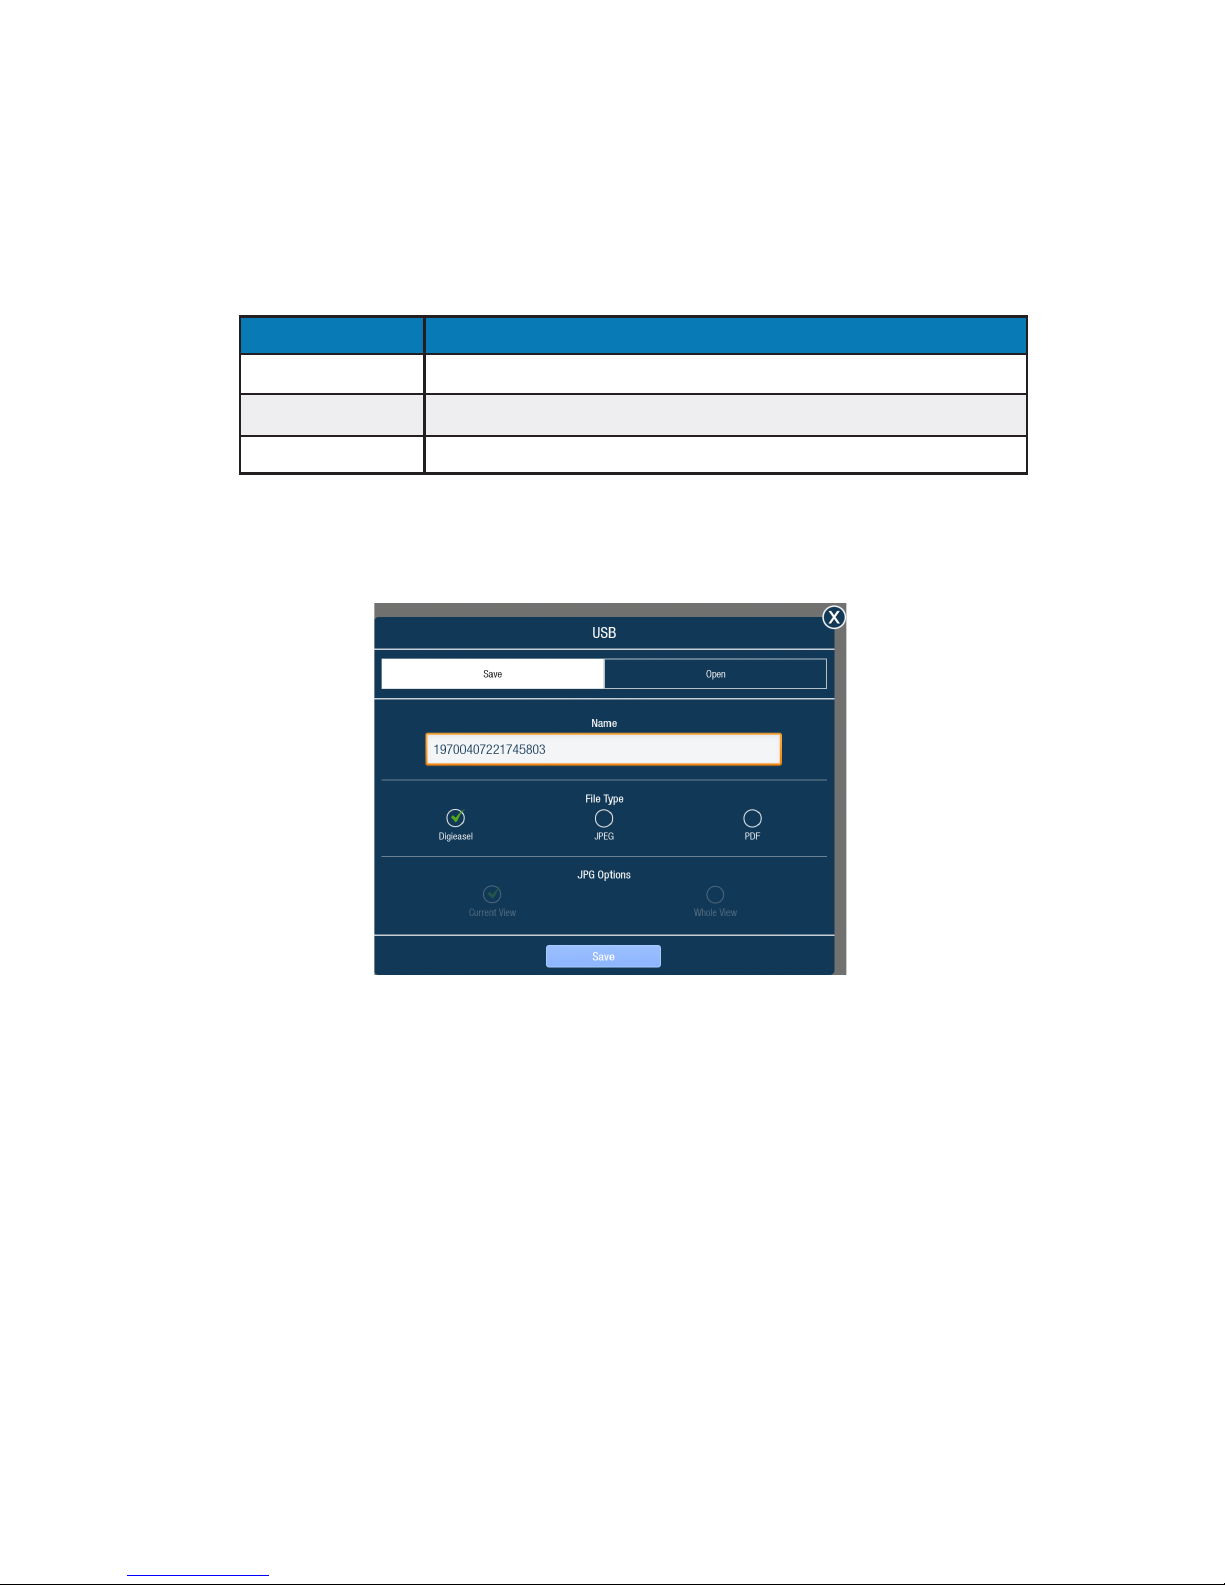
Save the whiteboard canvas to a USB thumb drive
1) Click More.
2) Click USB.
3) Click Save, if not already highlighted.
4) Type a le name in the Name text box.
5) Select the le type:
File Type Option Choose this le type if you want to...
DigiEasel Saves the whiteboard le (.mwbx) for future editing.
JPG Creates an image le.
PDF Creates a printable document for others to view.
6) For JPG and PDF le types, click Current view to save the visible portion of the canvas or
click Whole view to save the entire canvas. Note: Whole view creates multiple pages and
requires extra time to complete.
7) Click Save.
Page 31
Page 30
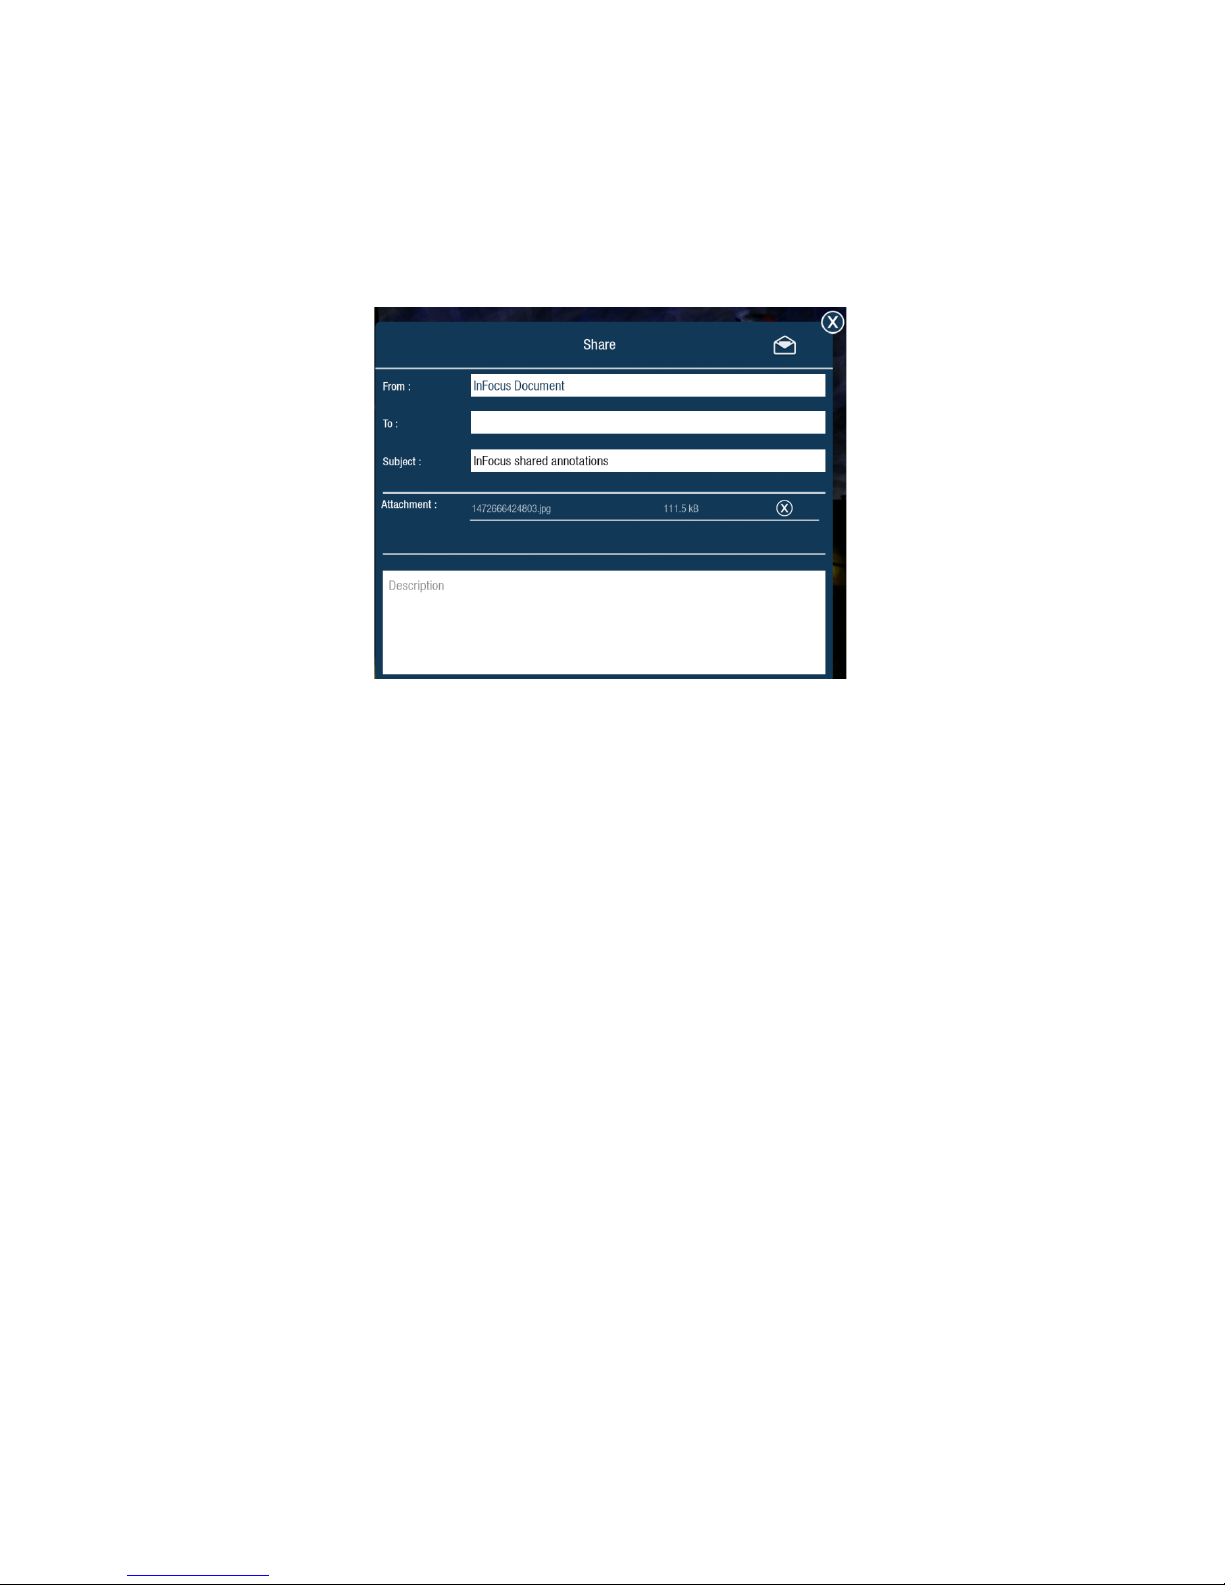
Share the le
1) Click More.
2) Click Share.
3) Type the recipient email address in the To: eld.
4) Type information about the le in the Description eld, if desired.
5) Click Send (envelope icon).
Open a new whiteboard canvas
1) Click More.
2) Click New.
3) Select Save to save the existing canvas or Don't save to delete the existing canvas and open a
new one. Cancel returns the user to the current canvas.
Open a whiteboard le
1) Click More.
2) Click Open.
3) If the whiteboard canvas contains objects, you are prompted to save the existing canvas. Select
Save to save the existing canvas or select Don't save to delete the existing canvas and open a
new one. (Cancel returns the user to the current canvas.)
4) By default, the Open Files window displays whiteboard les saved internally on the display.
To open a saved le from a USB thumb drive, click the USB icon at the top of the Open Files
window, and navigate to the desired USB thumb drive.
5) Browse to the desired folder and click the whiteboard le you wish to open.
Open a whiteboard le from a USB thumb drive
1) Click More.
2) Click USB.
3) Click Open.
4) Browse to the desired folder and click the whiteboard le you wish to open.
Page 32
Page 31INA-LC100 User Guide
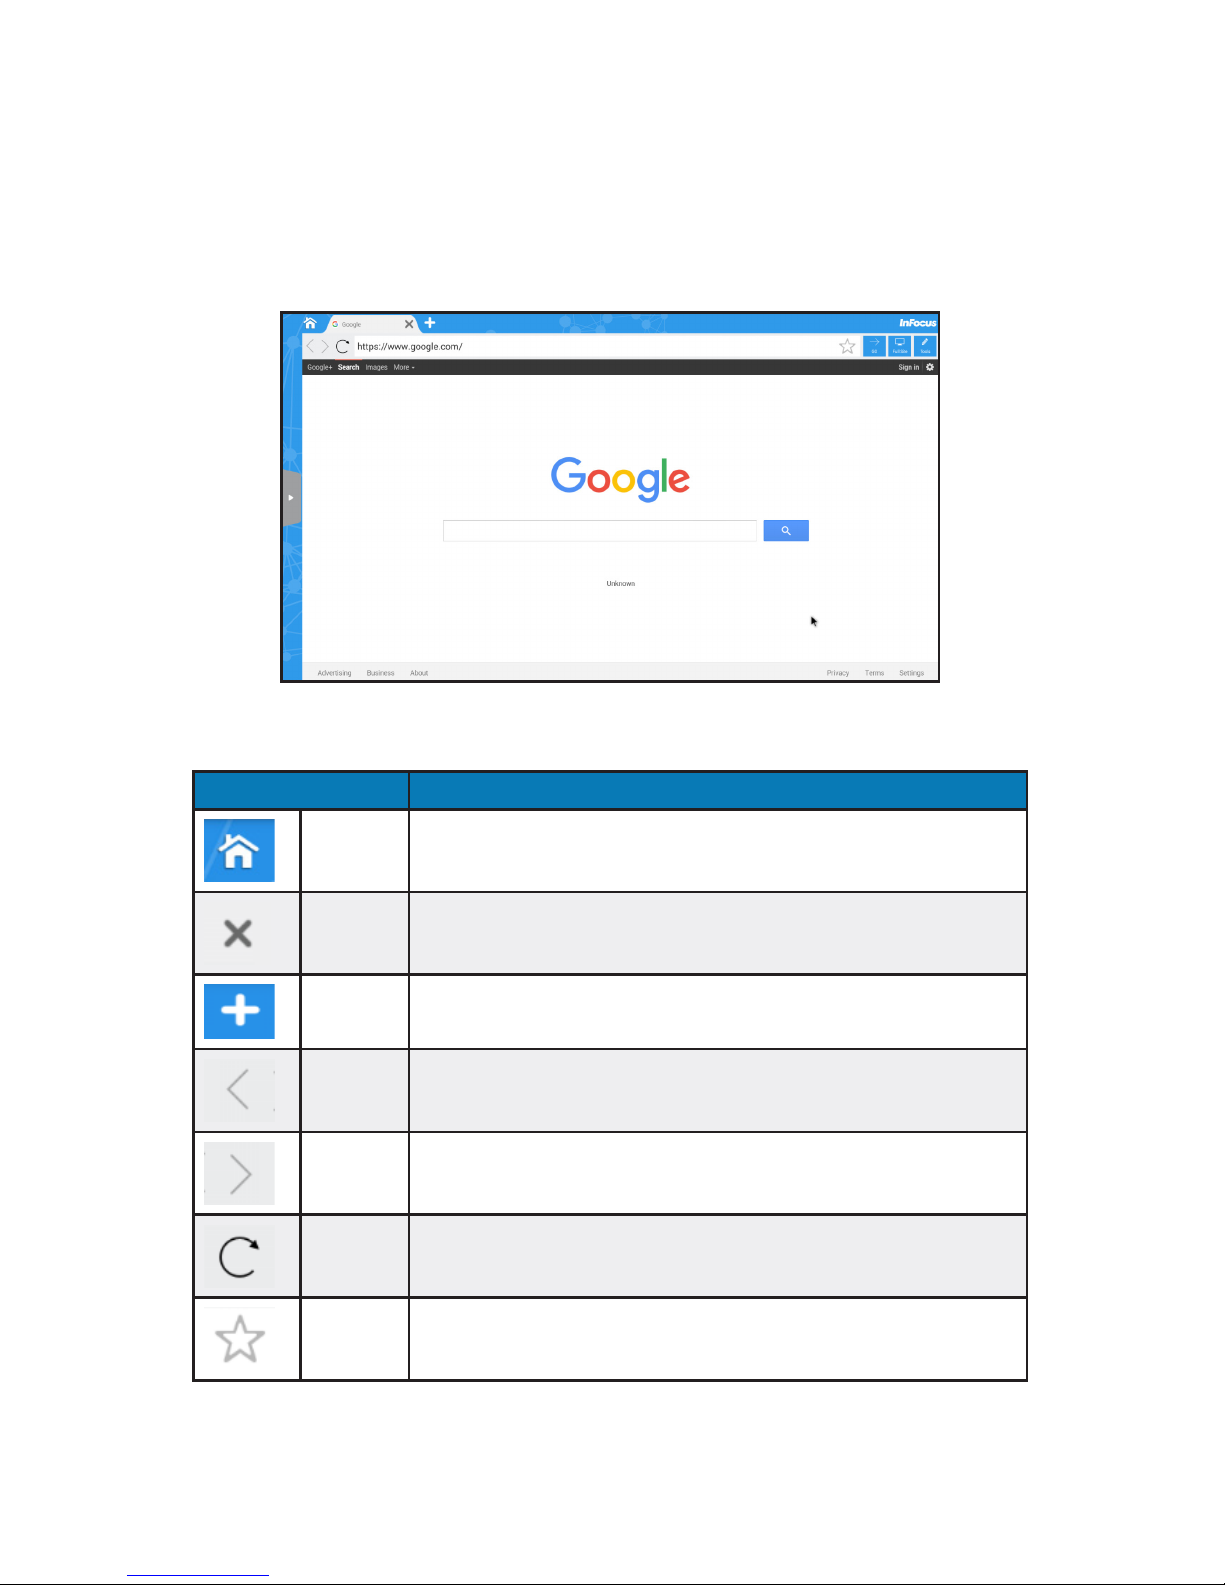
Browser
Use the Browser to access the internet, save links to favorite web pages, and annotate images of web
pages.
1) From the LightCast home page, select Browser.
2) To return to the LightCast home page, click the Home button.
Navigation controls
Button Description
Home Click to return to the LightCast home page.
Close Click to close the current browser tab.
Add Click to open another browser tab.
Back Click to return to the previous web page.
Forward Click to go to the next web page.
Refresh Click to refresh the browser window.
Favorite Click to add the current URL to your Favorites list.
Page 33
Page 32
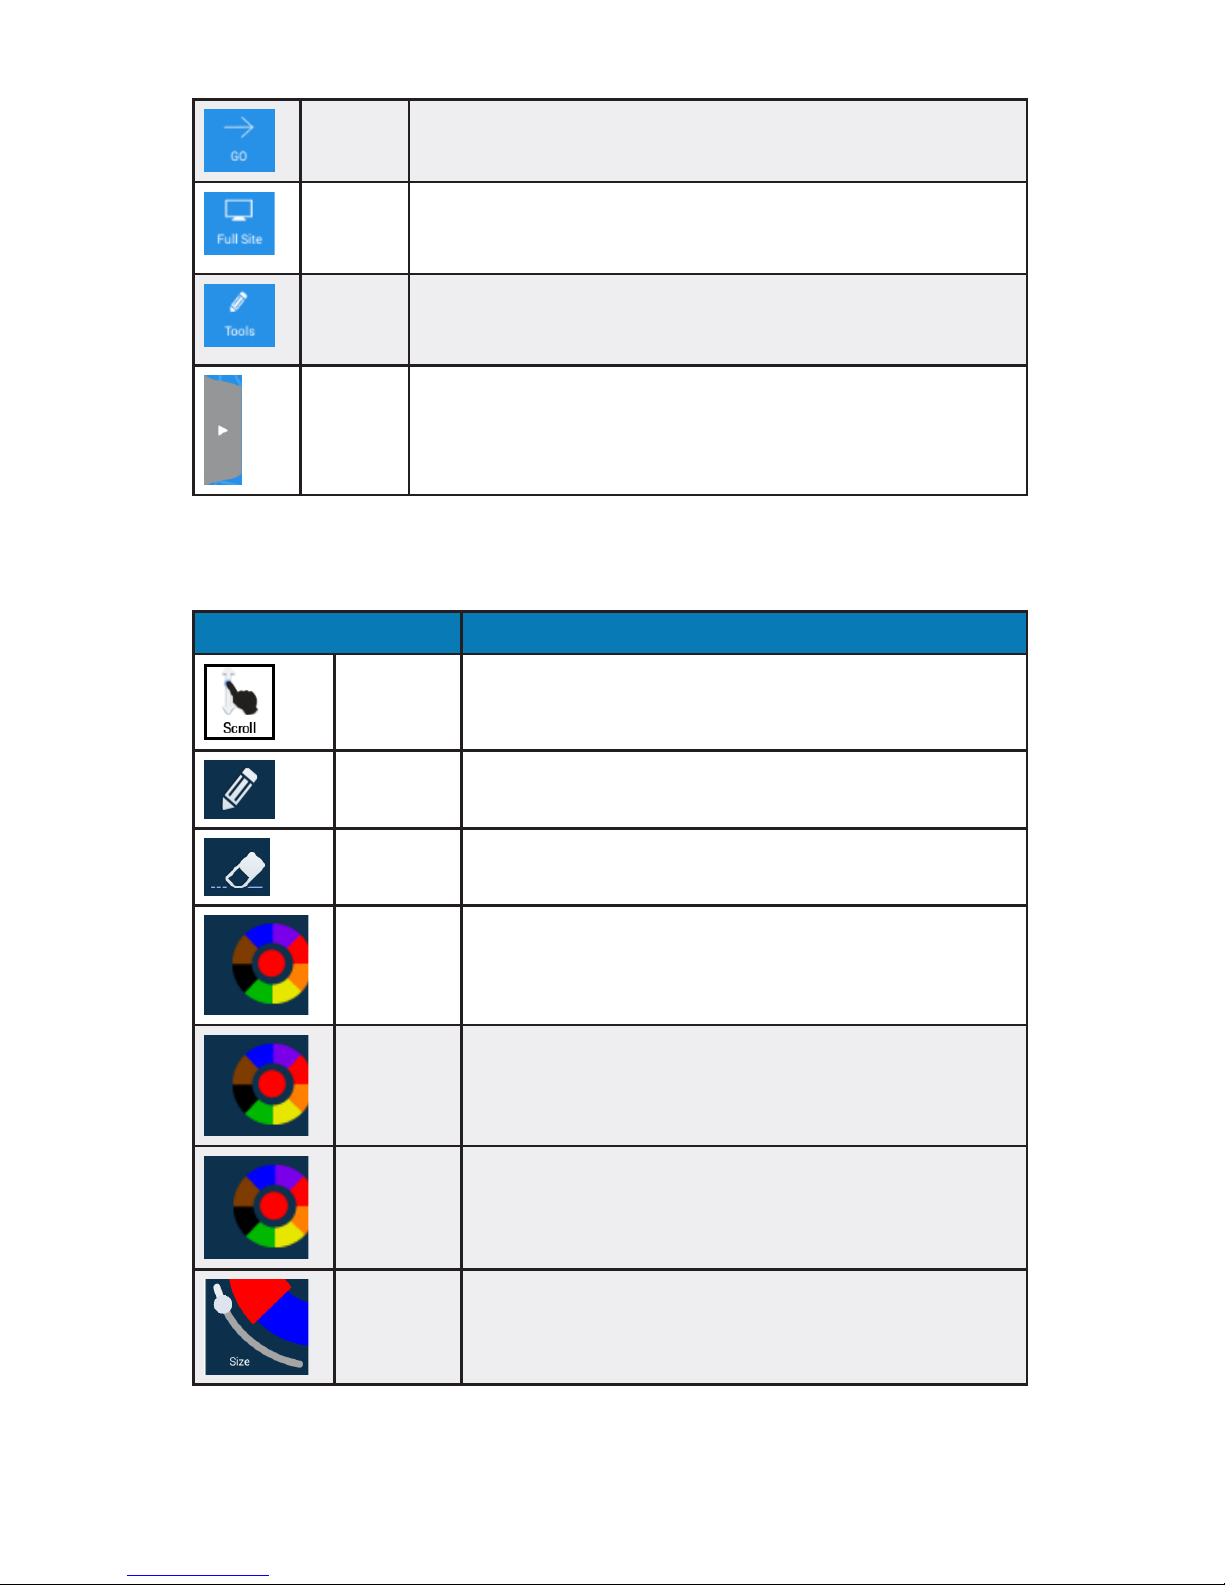
Go Click to go to the URL address listed in the browser address bar.
Full Site/
Touch Site
Select Full Site to go to a non-touch site. Select Touch Site to return.
Tools/
Exit Tools
Select Tools to annotate and save an image of the browser site (see the
Tools submenu section below). Select Exit Tools to exit out of annotation mode.
Favorites
bar
Click to expand or minimize the Favorites bar.
Tools submenu
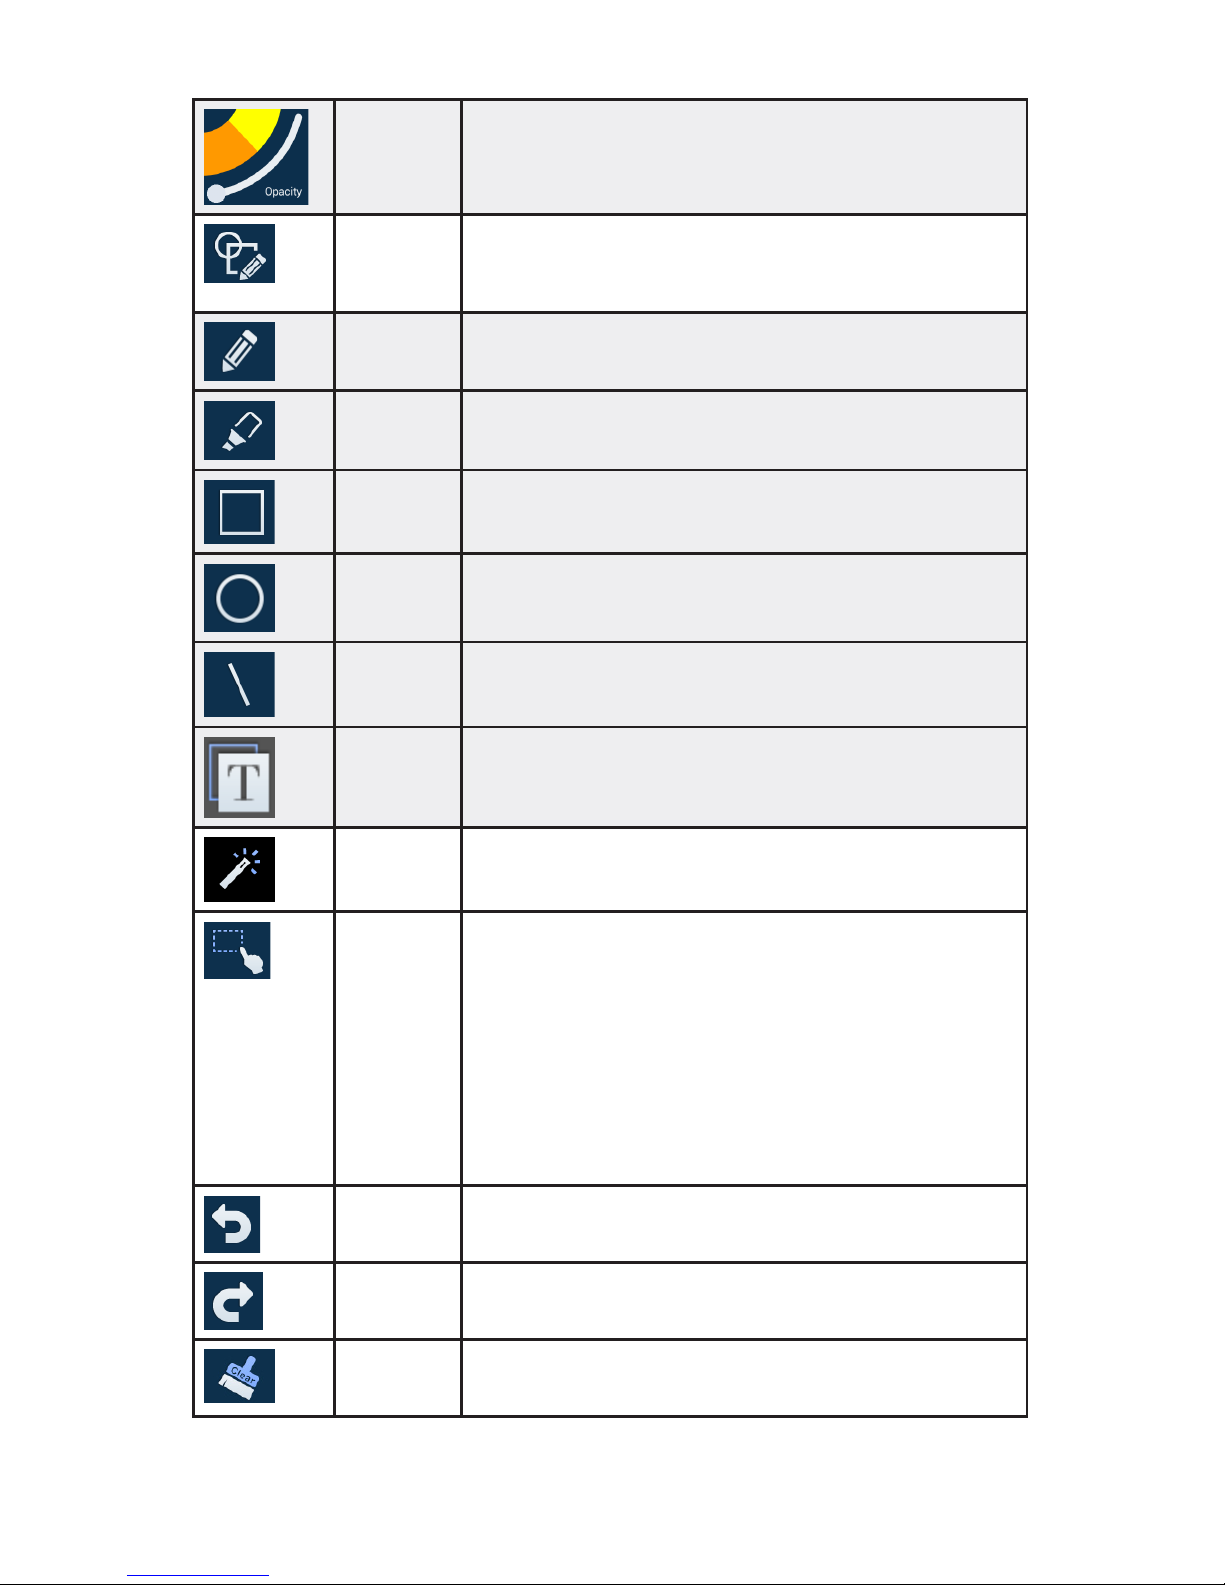
Use the Tools submenu to annotate the browser image.
Button Description
Scroll Click to scroll up or down the web page.
Current tool Click to use the current tool.
Eraser Click Eraser, and then click and drag across the drawing object
to erase the portion you touched. The picture is not aected.
Color Wheel
submenu
Click to access the color submenu.
Color wheel Click to choose a color using a color ramp. The current selected
color displays in the middle of the color wheel.
Segmented
color wheel
Click to choose a color from the segmented color wheel. The current selected color displays in the middle of the color wheel.
Size Click and drag the thumbnail button along the slider path to
adjust the size of the pen/line width.
Page 34
Page 33INA-LC100 User Guide
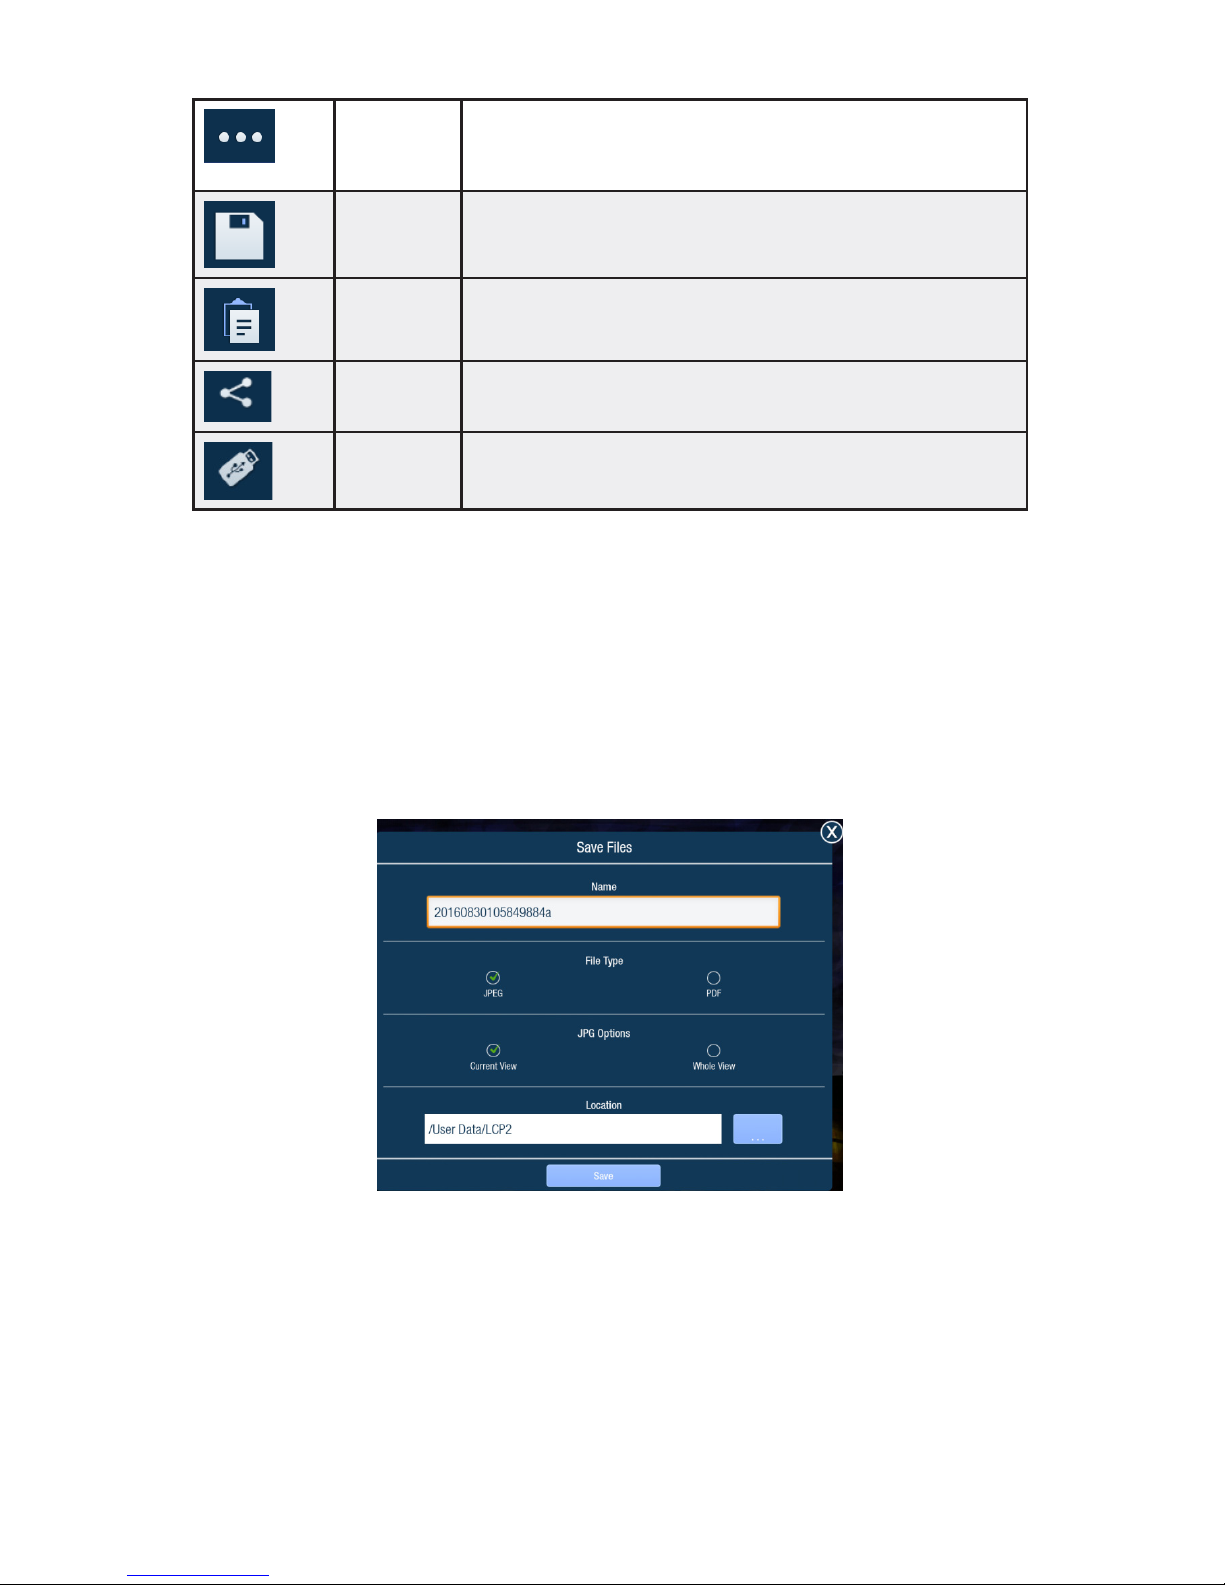
Opacity Click and drag the thumbnail button along the slider path to
adjust the size of the highlighter/shape opacity.
Tools submenu
Click to select an annotation tool. Note: Each object has its own
color, pen width, and pen transparency setting.
Pen Click to use a pen. Note: Opacity control is not available for the
pen object.
Highlighter Click to use a highlighter.
Rectangle Click to draw a rectangle.
Circle Click to draw a circle.
Line Click to draw a line.
Text Click to add a text box. Adjust the placement, font size, color, and
type attributes as desired. Type your text and click OK.
Laser Click to highlight something temporarily. The mark disappears
when a new mark is made. Laser marks cannot be saved.
Select Click Select. Click and drag the selection box around the drawing
objects which you want to move, cut, copy, paste, or delete.
Once selected:
• Click and drag to move the selection.
• Click Copy to copy the selection, and then click Paste to
create a duplicate object set.
• Click Delete to delete the selection.
Undo Deletes the last annotation.
Redo Displays the last deleted annotation.
Clear Deletes all annotations from the le.
Page 35
Page 34
More submenu
Accesses additional menu features.
Save Saves the le as a JPG image or PDF le.
Paste Pastes the clipboard onto the image.
Share Only available when the display is connected to a network. Sends
the annotated image as a JPG image by email.
USB Saves the annotated picture to a USB device as a JPG image or
PDF le.
Save the le
1) From the Tools submenu, click More.
2) Click Save.
3) Type the le name in the Name eld.
4) Select the desired File Type ( JPG or PDF).
5) Select Current View to save the displayed page or Whole View to save the entire le.
6) Browse to the Location you would like to save the le to or accept the default location.
7) Click Save.
Page 36
Page 35INA-LC100 User Guide
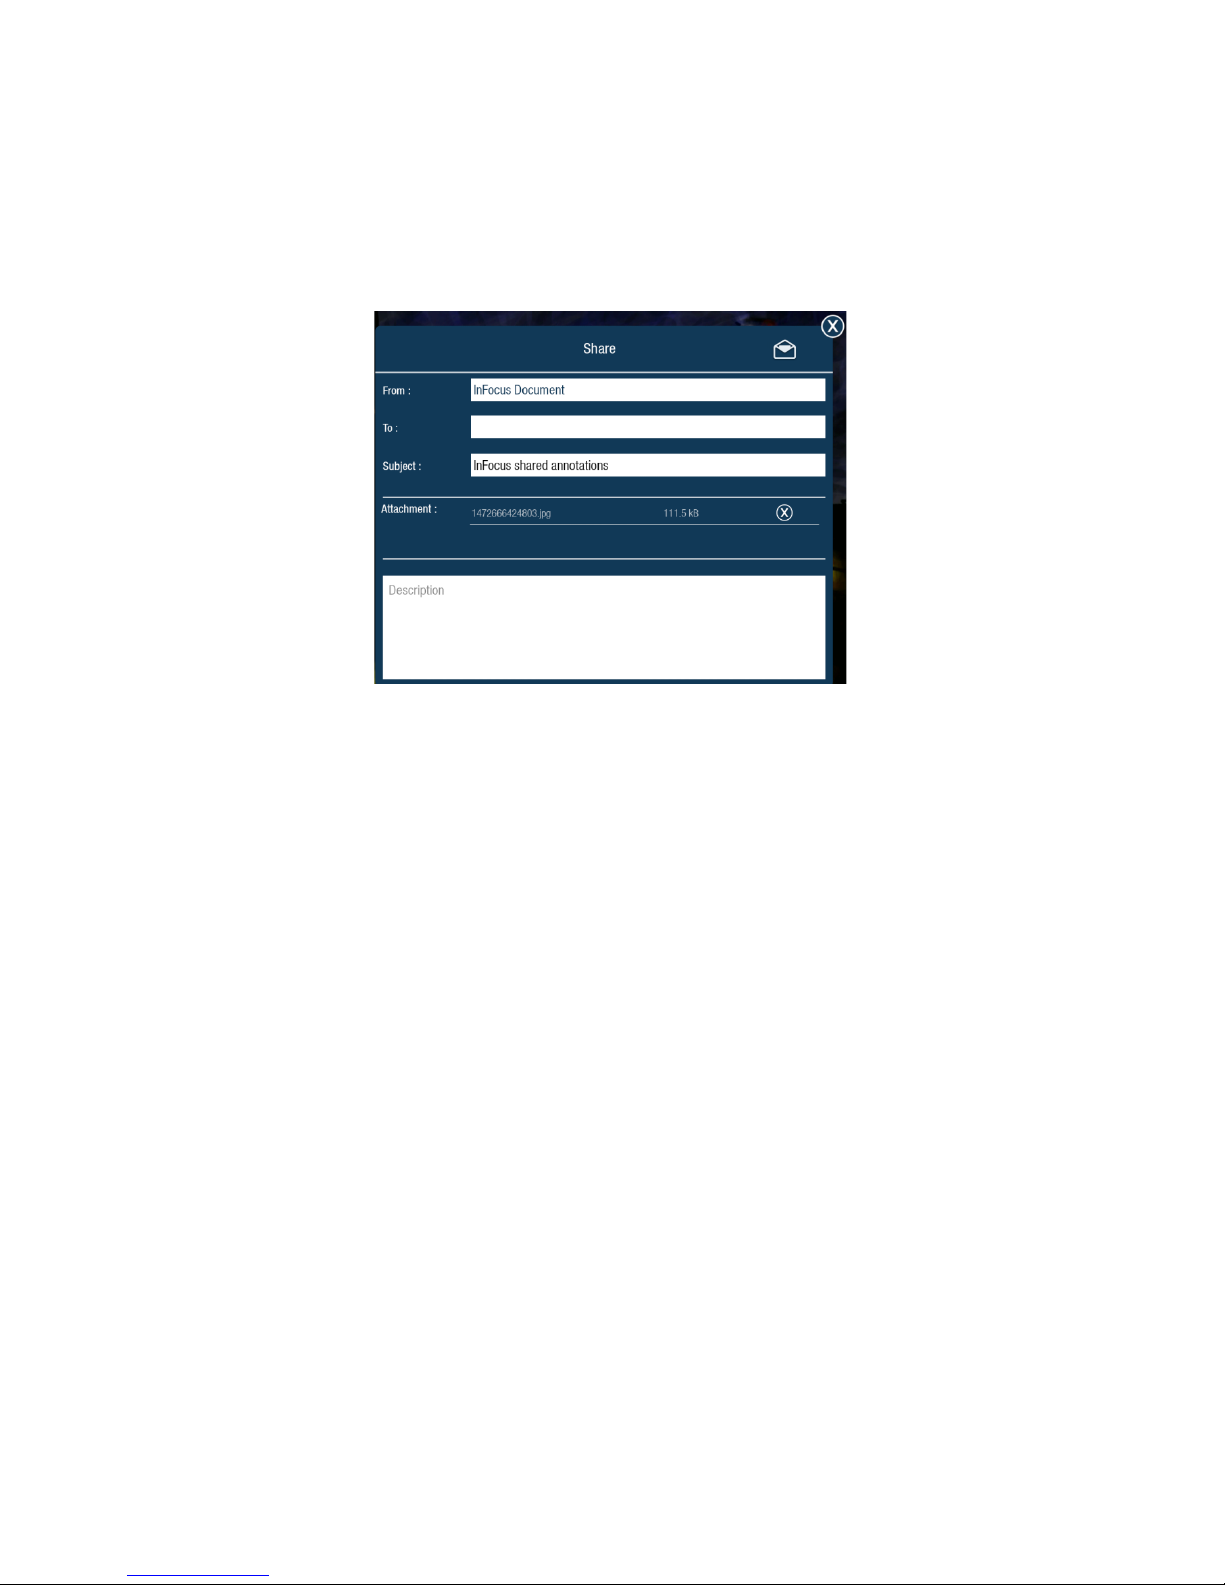
Share the le
1) From the Tools submenu, click More.
2) Click Share.
3) Type the recipient email address in the To: eld.
4) Type information about the le in the Description eld, if desired.
5) Click Send (envelope icon).
Page 37
Page 36
Settings
To access setting options, click the Settings gear icon in the lower right corner of the LightCast
home page.
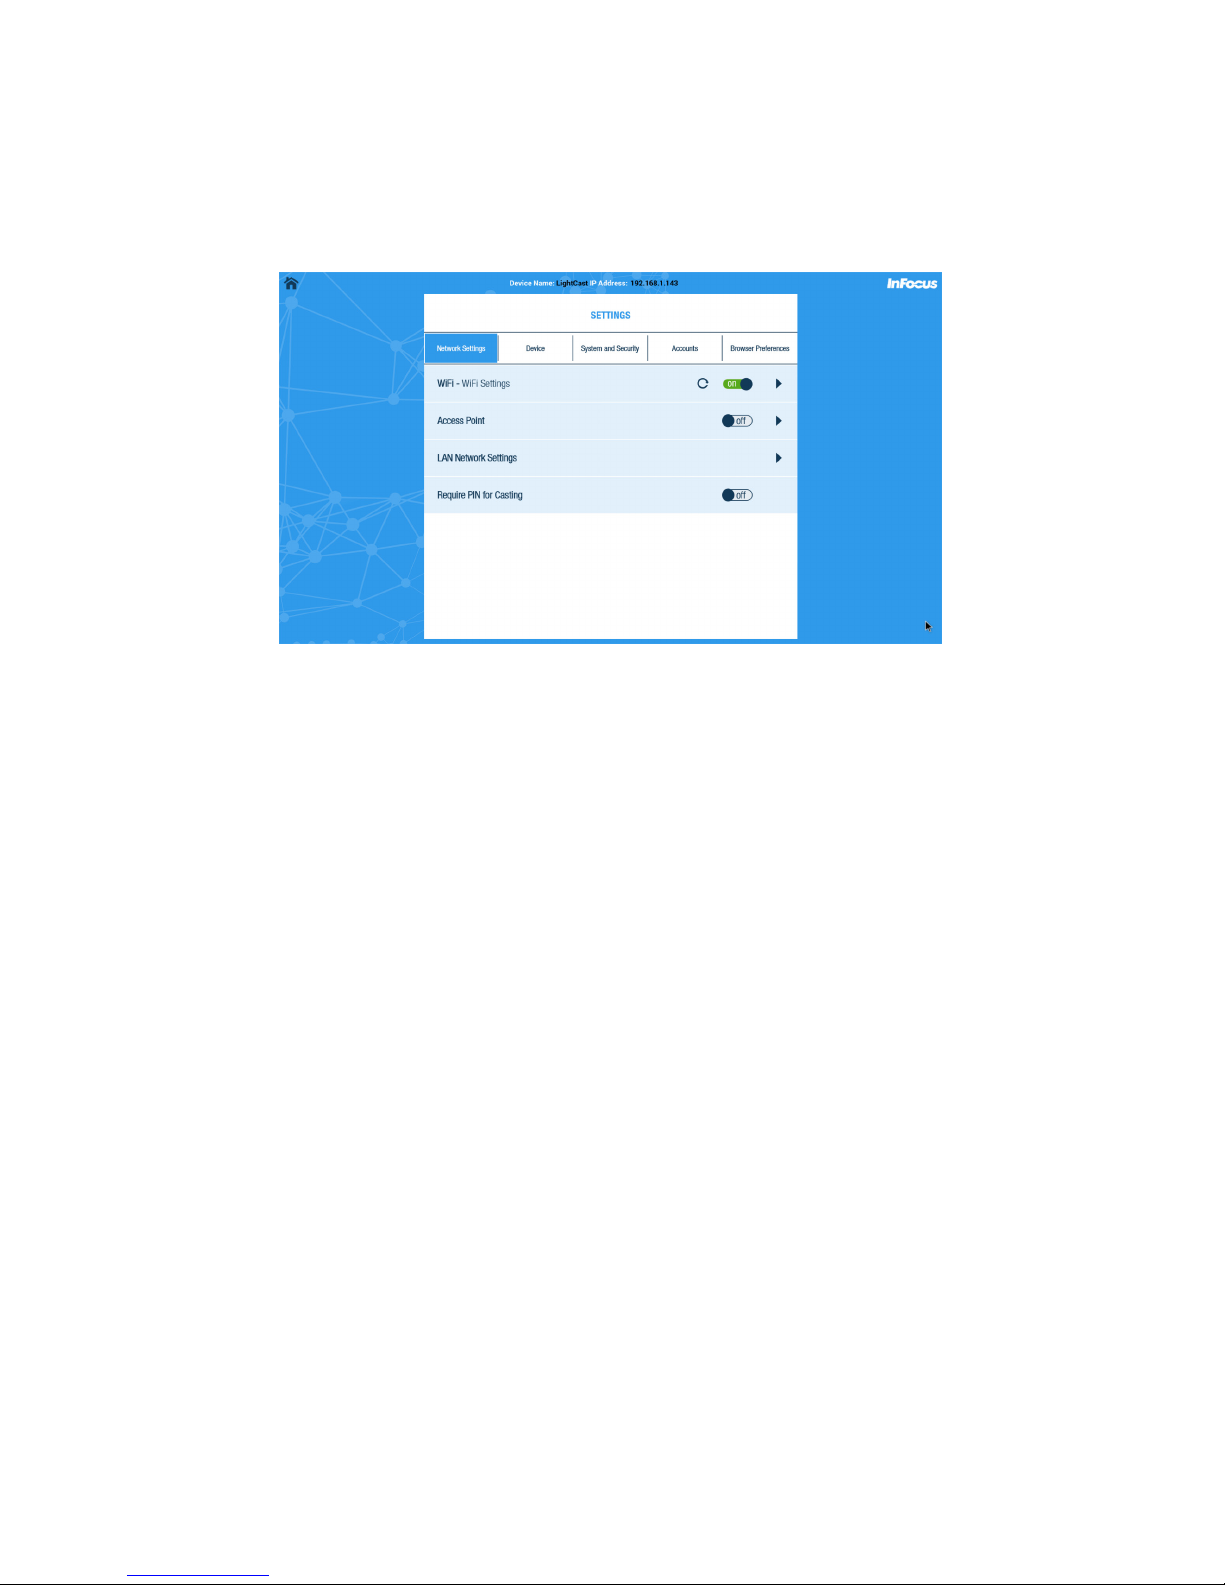
Network Settings
WiFi - WiFi Settings allows you to turn WiFi on and o, and to select and connect to visible
SSIDs.
Access Point allows you to congure the display as a WiFi access point. The internet connection
is passed down from the wired connection. This is also useful for casting video using LightCast or
AirPlay when another network is not available. (See "Access Point Setup" on page 48 for additional
information.)
LAN Network Settings allows you to set up a wired network connection between the display (if
this feature is available) and the wired network. The wired network connection can be congured as
xed or non-xed IP or go through a proxy.
Require PIN for Casting allows you to enable or disable a security PIN for casting onto the
display. When enabled, the user must enter a random eight digit PIN to connect. The PIN displays in
the top center of the screen.
Page 38
Page 37INA-LC100 User Guide
Device
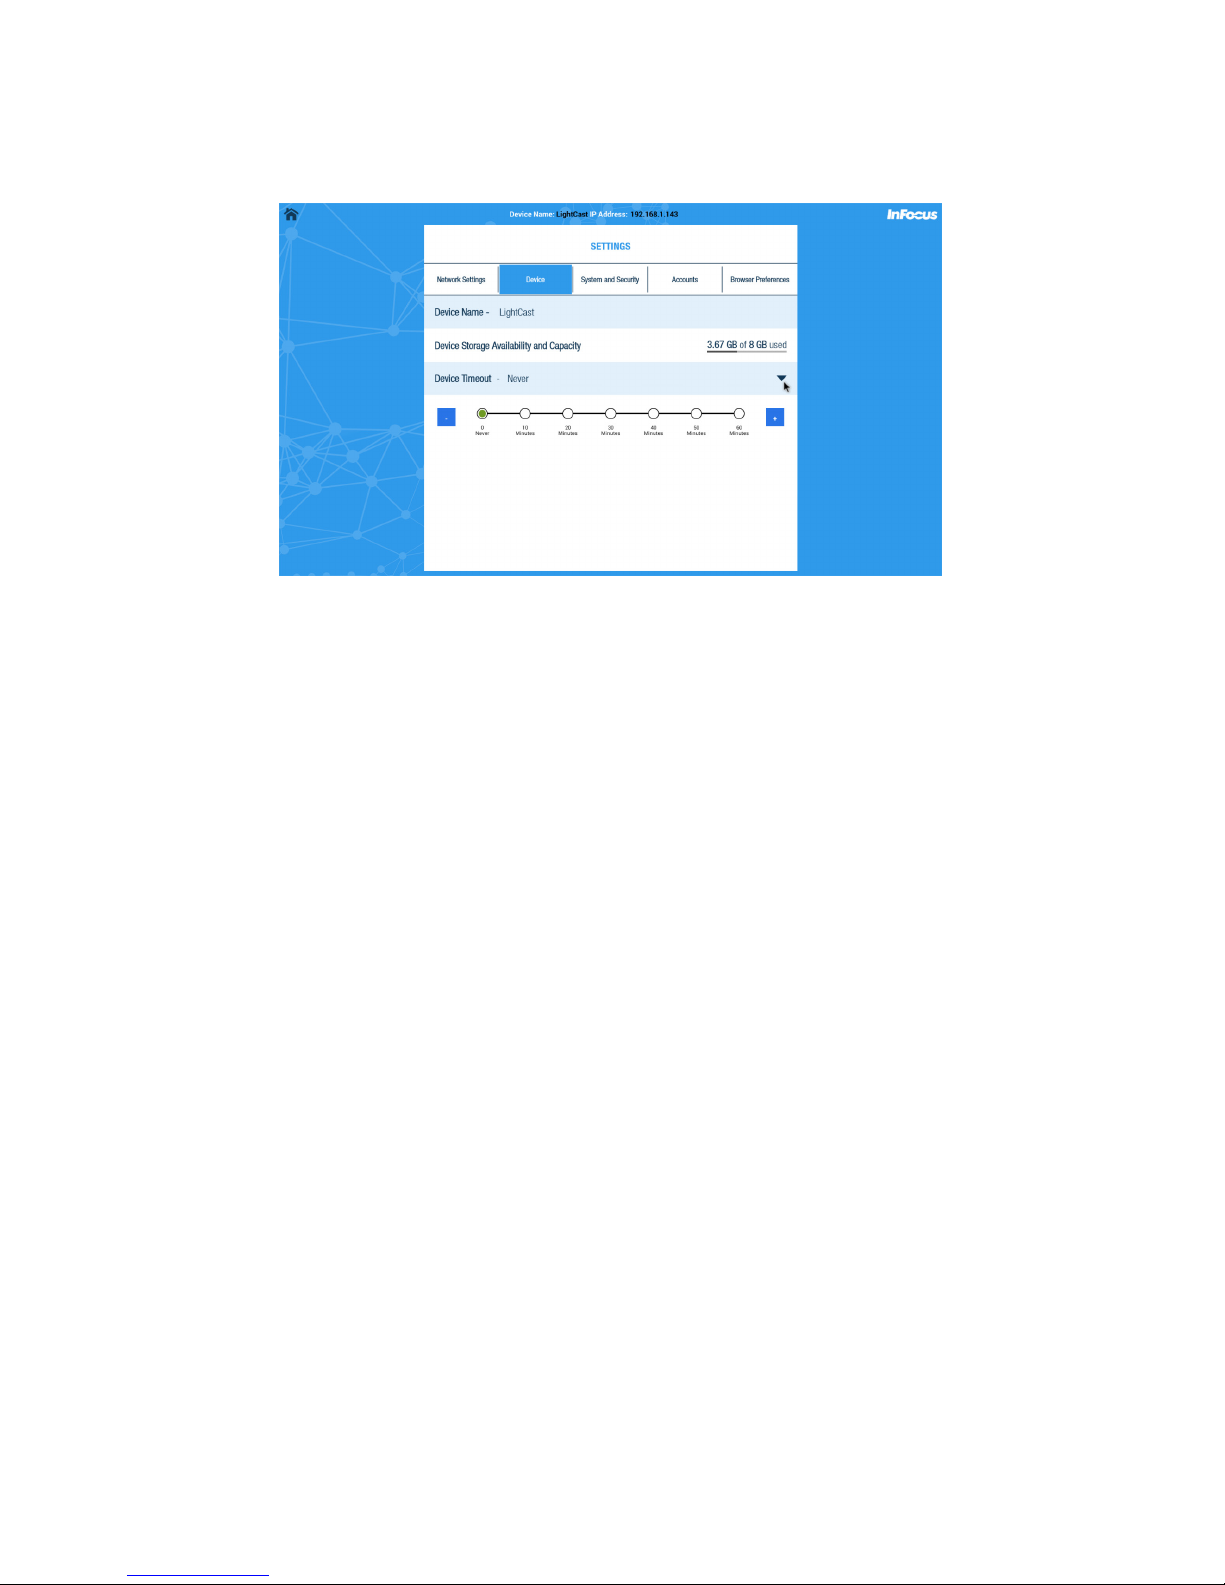
Use this submenu to dene the display name, determine how much local storage on the display is
available, and when the display should go to sleep.
Device Name displays the current device name. Click the name to edit it. This helps dierentiate
between dierent displays that have LightCast enabled.
Device Storage Availability and Capacity displays the current ash memory usage.
Device Timeout puts the LightCast display to sleep but does not shut o the display immediately.
If no other video sources are active or if Auto Source is disabled, the display shuts o based on the
Sleep Timer setting in the display menu (20 minutes by default).
Page 39
Page 38
System and Security
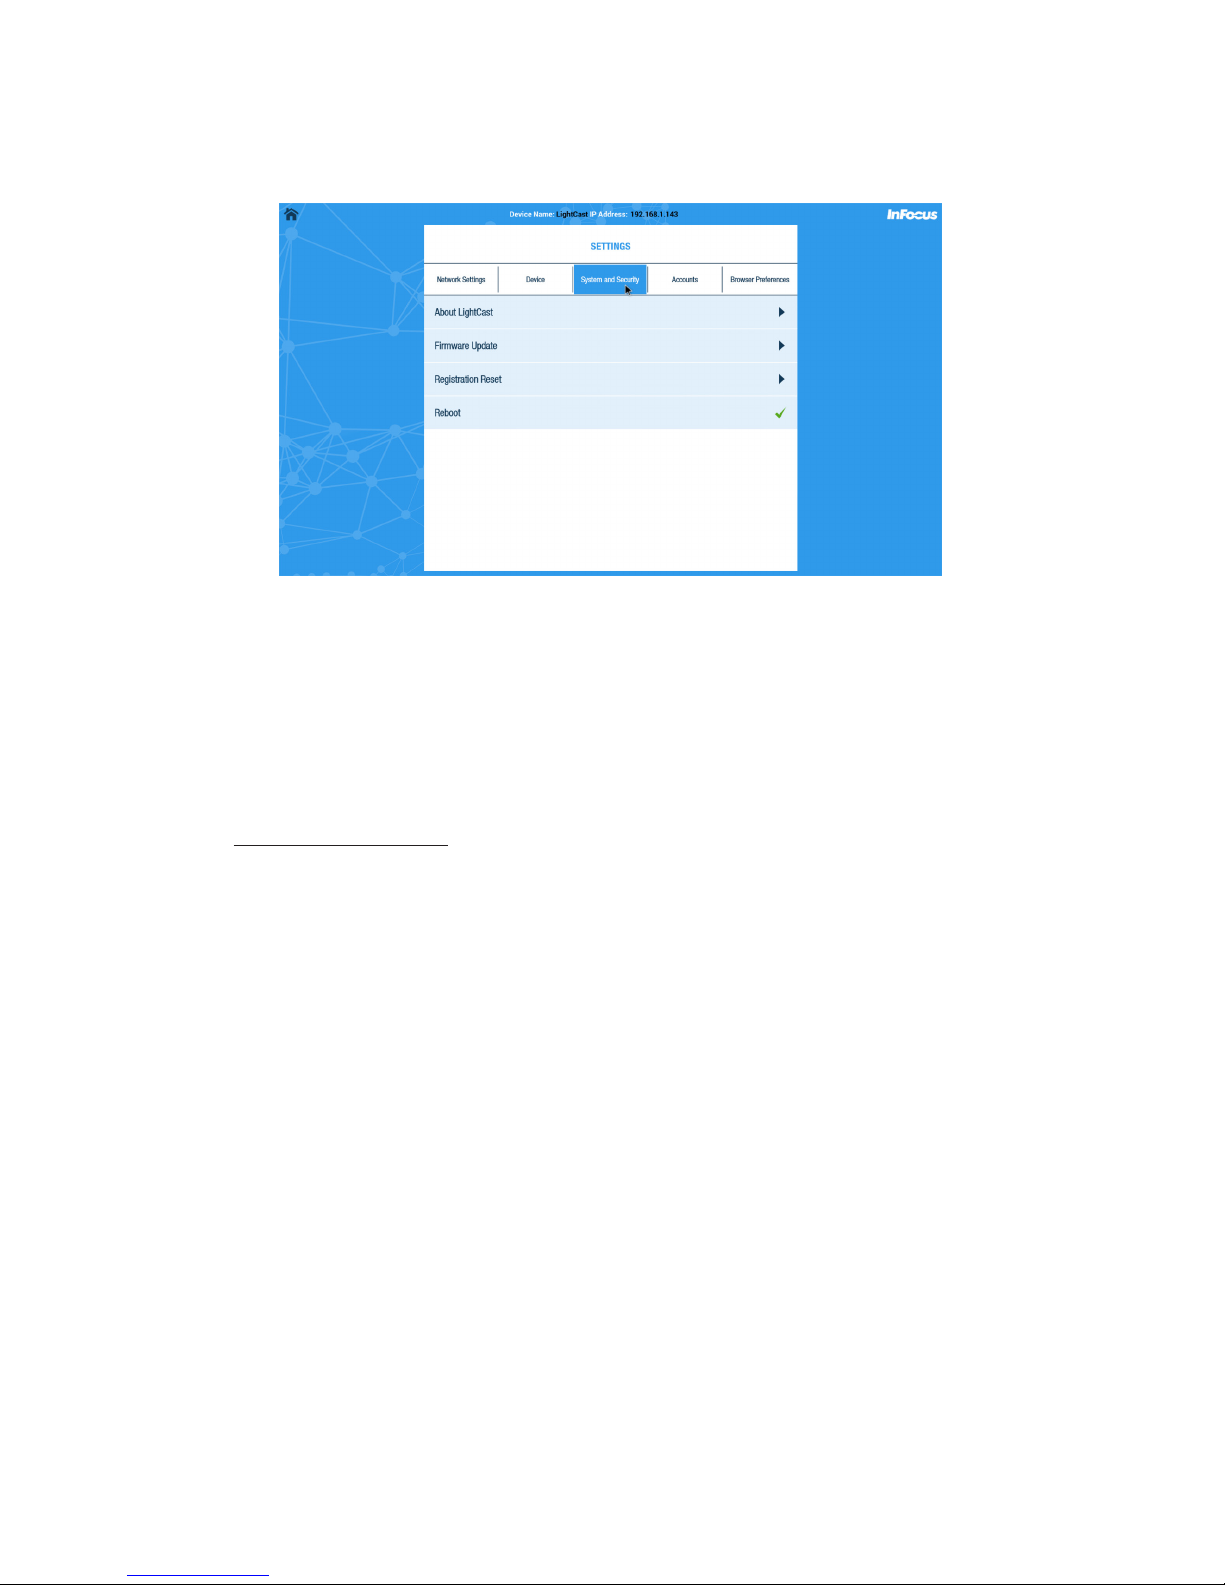
Use this submenu to review LightCast information, update the LightCast rmware, reset registration,
and reboot the rmware.
About LightCast displays the LightCast revision, display serial number and the MAC addresses for
WiFi and LAN (if present on the display).
Firmware Update allows you to dene the update method:
• Online Update searches for a newer version of LightCast rmware on the internet automati-
cally. This requires a valid internet connection. Follow the prompts to complete the update.
• SD Card/USB Update allows you to update the LightCast rmware from a USB storage
device. Visit
www.infocus.com/support to download the latest version of LightCast rmware. Select the correct .zip le from the list to continue.
• Factory reset completely erases all personal data in memory, including registration informa-
tion, and return all settings to default.
Registration Reset erases the registration information but not personal data in memory.
Reboot restarts LightCast while the display continues to run. LightCast displays when the reboot is
complete.
Page 40

Page 39INA-LC100 User Guide
Accounts
Use this submenu to dene the registered email address.
Email settings displays the email address initially dened during the registration process. To
change the address associated with this device, click the current email address and enter the new
email address.
Page 41
Page 40
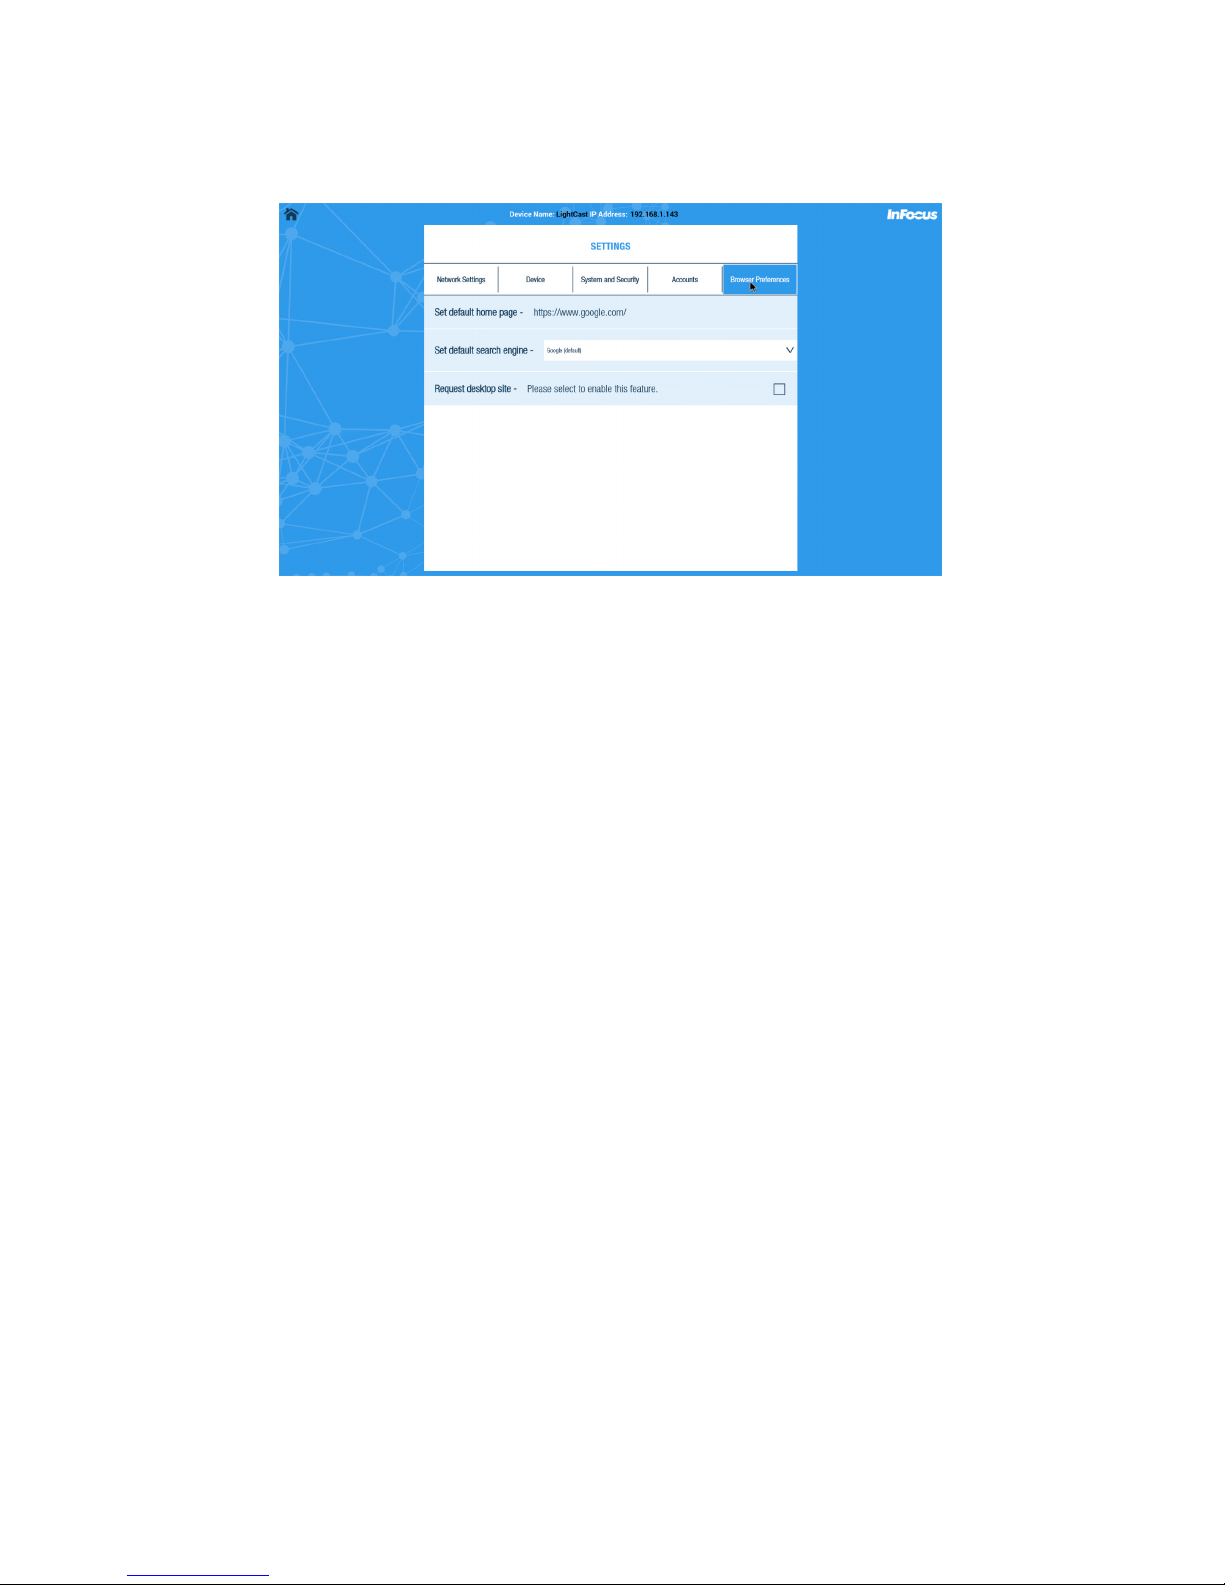
Browser Preferences
Use this submenu to dene the browser default home page, default search engine, and the request
desktop site.
Set default home page allows you to dene the home page that displays when the browser is
opened. Click the existing home page to change the address.
Set default search engine allows you to dene the default search engine when the browser is
opened. Click the down arrow to choose from the options.
Request desktop site allows you to change the web page type from a Touch Site (default) to a Full
Site (non-touch page). Enabling the feature displays the page as a Full Site.
Page 42

Page 41INA-LC100 User Guide
Troubleshooting
Under no circumstances should you try to repair the InFocus hub by yourself, as this will invalidate
the warranty. Do not open the InFocus hub as there is a risk of electrical shock. If a fault occurs, rst
check with points listed below before taking the InFocus hub for repair. If you are unable to remedy
a problem by following these hints, consult your dealer for help or contact InFocus Support at www.
infocus.com/support.
Problem Solution
No power • Check if the power adapter is properly connected to a power outlet
and to the InFocus hub.
• Click the power button on the remote control to turn power on.
No image • Reconnect the HDMI cable or AV cable.
• Verify that the InFocus touch display is turned on.
No sound or distorted
sound
• Adjust the volume.
• Verify that the HDMI cable or audio cable is properly connected to
the InFocus hub and to the InFocus touch display.
• Verify that the speakers are connected correctly.
No audio or digital
output
• Check the digital connections.
• Verify that your amplier is set correctly.
No sound during movie
playback
• Adjust the volume.
• The audio codec many not be supprted by the InFocus hub. Change
the audio codec.
The box does not
respond to the remote
control
• Aim the remote control directly at the sensor on the front of the
InFocus hub.
• Reduce the distance to the InFocus hub.
• Replace the batteries in the remote control.
Player does not
respond to some operating commands during
playback
• Operations may not be permitted. Refer to the user manual.
• The system may have halted. Re-insert the power adapter to
restart.
The contents of the
USB ash drive cannot
be read
• Turn o the InFocus hub. Wait 30 seconds, and then turn the
InFocus hub back on.
• The USB ash drive format may not be
compatible with the InFocus hub.
Slow operation of the
USB ash drive
• Reduce the le size or resolution of the images on the USB ash
drive.
The InFocus touch
display screen is blank
and the InFocus hub
LED is blinking.
• Turn o the InFocus hub. Wait 30 seconds, and then turn the
InFocus hub back on.
• Verify that the HDMI cable or audio cable is properly connected to
the InFocus hub and to the InFocus touch display.
• Change the resolution output of the InFocus hub to 720p.
Page 43

Page 42
For additional support, please contact:
InFocus Corporation
Technical Support
6am-5pm PST
877-388-8385
www.infocus.com/support
Page 44

Page 43INA-LC100 User Guide
Declaration of Conformity
FCC Warning
This equipment has been tested and found to comply with the limits for a Class A digital device, pursuant to part 15 of the FCC Rules. These limits are designed to provide reasonable protection against
harmful interference when the equipment is operated in a commercial environment. This equipment
generates, uses and can radiate radio frequency energy and, if not installed and used in accordance
with the instruction manual, may cause harmful interference to radio communications.
Operation of the equipment in a residential area is likely to cause harmful interference in which case
the user will be required to correct the interference at his own expense. Changes or modications not
expressly approved by InFocus Corporation may void authority to operate the equipment.
This device complies with part 15 of the FCC Rules. Operation is subject to the following two conditions: (1) This device may not cause harmful interference and (2) this device must accept any interference received, including interference that may cause undesired operation.
The manufacturer is not responsible for any radio or TV interference caused by unauthorized
modications to this equipment. Such modications could void the user’s authority to operate the
equipment.
ICC
CAN ICES-3 (A)/NMB-3(A). This device complies with Industry Canada licence-exempt RSS standard(s).
Operation is subject to the following two conditions: (1) this device may not cause interference, and
(2) this device must accept any interference, including interference that may cause undesired operation of the device.
Le présent appareil est conforme aux CNR d'Industrie Canada applicables aux appareils radio exempts
de licence. L'exploitation est autorisée aux deux conditions suivantes : (1) l'appareil ne doit pas
produire de brouillage, et (2) l'utilisateur de l'appareil doit accepter tout brouillage radioélectrique
subi, même si le brouillage est susceptible d'en compromettre le fonctionnement.
EU/EEC
Warning: This is a class A product. In a domestic environment this product may cause radio interference in which case the user may be required to take adequate measures. Warnung: Dieses ist eine
Einrichtung der Klasse A. Diese Einrichtung kann im Wohnbereich Funk-Störungen verursachen; in
diesem Fall kann vom Betreiber verlangt werden, angemessene Maßnahmen zu ergreifen und dafür
aufzukommen.
This product operates at fundamental frequencies of 2.4 and 5 GHz. Each frequency outputs a maximum of 100 mW of power. Dieses Produkt arbeitet mit Basis Frequenzen von 2.4 und 5GHz. Jeder
dieser Frequenzbereiche sendet mit einer maximal Leistung von 100 mW.
Trademarks
HDMI logo and “High Denition Multimedia Interface” are registered trademarks of HDMI Licensing
LLC. InFocus, In Focus, INFOCUS (stylized), MondoCenter, Mondopad, BigTouch, and JTouch are either
registered trademarks or trademarks of InFocus Corporation in the United States and other countries.
All other trademarks are the property of their respective owners. Any other trademarks, service
marks, personal names or product names are assumed to be the property of their respective owners
and are used only for reference. There is no implied sponsorship, aliation, certication, approval or
endorsement if we use one of these terms.
Page 45

Page 44
Limited Warranty
InFocus Limited Warranty For InFocus Branded Hardware Products Only
LIMITED WARRANTY. InFocus’s warranty obligations for the hardware products are limited to the terms set forth herein. InFocus
warrants the InFocus-branded hardware products against defects in materials and workmanship under normal use for a period outlined
in the Limited Warranty Periods section below from the date of retail purchase by the original end-user purchaser (“Warranty Period”).
The Warranty Period starts on the date of purchase. Your dated sales or delivery receipt, showing the date of purchase of the product,
is your proof of the purchase date. You may be required to provide proof of purchase and proof that the product was purchased new as
a condition of receiving warranty service. If a hardware defect arises and a valid claim is received within the Warranty Period, at its option and to the extent permitted by law, InFocus will either (1) repair the hardware defect at no charge, using new parts or refurbished
parts that are equivalent to new in performance and reliability, (2) exchange the product with a product that is new or refurbished
that is equivalent to new in performance and reliability and is at least functionally equivalent to the original product, or (3) refund
the purchase price of the product. InFocus may request that you replace defective parts with customer-installable new or refurbished
parts that InFocus provides in fulllment of its warranty obligation (“Customer Self Repair”). A replacement product or part, including a
Customer Self Repair part that has been installed in accordance with instructions provided by InFocus, assumes the remaining warranty
of the original product or ninety (90) days from the date of replacement or repair, whichever provides longer coverage. When a product
or part is exchanged, any replacement item becomes your property and the replaced item becomes InFocus’s property. Parts provided
by InFocus in fulllment of its warranty obligation must be used in products for which warranty service is claimed. When a refund is
given, the product for which the refund is provided must be returned to InFocus and becomes InFocus’s property. This is your exclusive
remedy for defective products.
Limited Warranty Periods vary depending on your product model and the country of purchase. To review the warranty period associated with your product model, please refer to the product specications information on www.infocus.com. By inputting your product
model in the Quick Search box on the website, you will nd warranty terms in the Specications matrix.
EXCLUSIONS AND LIMITATIONS. This Limited Warranty applies only to the hardware products manufactured by or for InFocus,
and sold by InFocus, its worldwide subsidiaries, authorized resellers or country distributors, that can be identied by the “InFocus”
trademark, trade name, or logo axed to it, and to required rmware. The Limited Warranty does not apply to any non-InFocus
hardware products or peripherals external to the InFocus-branded hardware products (including but not limited to external storage
subsystems, displays, printers, speakers or other peripherals), or to any software applications or programs, even if packaged or sold
with the InFocus hardware. Manufacturers, suppliers, or publishers of products, software or peripherals, other than InFocus, may provide their own warranties to the end user purchaser, but InFocus, in so far as permitted by law, provides their products “AS IS” without
the InFocus Limited Warranty. Software distributed by InFocus with or without the InFocus brand name (including, but not limited to
system software) is not covered under this Limited Warranty. Refer to the licensing agreement accompanying the software for details
of your rights with respect to its use.
InFocus does not warrant that the operation of the products will be uninterrupted or error-free. InFocus is not responsible for damage
arising from failure to follow instructions relating to the products’ use.
INFOCUS IS NOT RESPONSIBLE FOR DAMAGE TO OR LOSS OF ANY PROGRAMS, DATA, OR REMOVABLE STORAGE MEDIA. INFOCUS
IS NOT RESPONSIBLE FOR THE RESTORATION OR REINSTALLATION OF ANY PROGRAMS OR DATA OTHER THAN SOFTWARE
INSTALLED BY INFOCUS WHEN THE PRODUCT IS MANUFACTURED.
To enable InFocus to provide the best possible support and service during the Limited Warranty Period, you will be required to:
• Maintain a proper and adequate environment, and use the InFocus hardware products in accordance with the instructions
furnished.
• Verify congurations, load most recent rmware, install software patches, run InFocus diagnostics and utilities, and implement
temporary procedures or workarounds provided by InFocus while InFocus works on permanent solutions.
• Allow InFocus to keep resident on your systems or sites certain system and network diagnosis and maintenance tools to facilitate the performance of warranty support (collectively referred to as “Proprietary Service Tools”); Proprietary Service Tools are
and remain the sole and exclusive property of InFocus.
Additional Limitations:
• Products external to the system processor (CPU) box, such as external storage subsystems, printers and other peripherals, are
covered by the applicable warranty for those products or options.
• An eective repair does not necessarily require the replacement of a defective part. For example, cleaning the heads of a oppy
drive or updating revision levels of ROM BIOS on a PCA board are activities that in many instances deliver an eective repair.
• BIOS/Firmware upgrades are not covered under the Limited Warranty. Firmware that is an integral part of the option hardware
board is not automatically upgraded when new versions of rmware are released.
• It is the responsibility of the customer to ensure that their software is compatible with the latest BIOS/rmware revision.
This Limited Warranty does not apply: (a) to consumable or expendable parts, such as batteries, or protective coatings designed to
diminish over time unless failure has occurred due to a defect in materials or workmanship; (b) to cartons, carrying cases, shipping
cases, external cabinets, accessories used in connection with the product; (c) to cosmetic damage, including but not limited to scratches,
dents, and broken plastic on ports; (d) to damage caused by use with non-InFocus products; (e) to damage caused by accident, abuse,
misuse, improper ventilation, smoke exposure, contamination, improper or inadequate maintenance, cleaning or calibration, liquid
contact, unusual physical or electrical stress and/or power surges, virus infection, re, earthquake, disaster, lightning or other external
causes; (f) to damage caused by operating the product outside the permitted or intended uses or usage parameters described by
Page 46

Page 45INA-LC100 User Guide
InFocus (including burned monitor screens and incorrect input voltage); (g) to damage caused by service (including upgrades and
expansions) performed by anyone other than a representative of InFocus or an InFocus Authorized Service Provider (“ASP”) or your own
installation of customer-installable parts as instructed by InFocus; (h) to a product or part that has been modied to alter functionality
or capability without the written permission of InFocus (including use of an unauthorized mount); (i) to defects caused by normal wear
and tear or otherwise due to the normal aging of the product; (j) to failure to follow maintenance procedures as outlined in the product
user documentation including where a schedule is specied for regular cleaning of certain parts (based on usage and environment); (k)
to loss or damage in transit; or (l) if the product is not used under normal operating conditions which are dened as use not in excess
of 16 hours continuously per day with a minimum 8 hour period of continuous rest in the powered o state; or (m) if any InFocus serial
number has been removed or defaced. In addition, LCD burn-in as a result of excessive display of static images on the product is not
covered under the terms of this Limited Warranty.
Important: Do not open the hardware products unless otherwise directed by InFocus for the purposes of a Customer Self Repair (CSR).
Opening the hardware products may cause damage that is not covered by this Limited Warranty. Only InFocus or an ASP should
perform service on the hardware products.
TO THE EXTENT PERMITTED BY LAW, THIS WARRANTY AND THE REMEDIES SET FORTH ABOVE ARE EXCLUSIVE AND IN LIEU
OF ALL OTHER WARRANTIES, REMEDIES AND CONDITIONS, WHETHER ORAL, WRITTEN, STATUTORY, EXPRESS OR IMPLIED. AS
PERMITTED BY APPLICABLE LAW, INFOCUS SPECIFICALLY DISCLAIMS ANY AND ALL STATUTORY OR IMPLIED WARRANTIES, INCLUDING, WITHOUT LIMITATION, WARRANTIES OF MERCHANTABILITY AND FITNESS FOR A PARTICULAR PURPOSE AND WARRANTIES AGAINST HIDDEN OR LATENT DEFECTS. IF INFOCUS CANNOT LAWFULLY DISCLAIM STATUTORY OR IMPLIED WARRANTIES
THEN TO THE EXTENT PERMITTED BY LAW, ALL SUCH WARRANTIES SHALL BE LIMITED IN DURATION TO THE DURATION OF THE
EXPRESS WARRANTY AND TO THE REPAIR OR REPLACEMENT SERVICE AS DETERMINED BY INFOCUS IN ITS SOLE DISCRETION. No
InFocus reseller, agent, or employee is authorized to make any modication, extension, or addition to this warranty. If any term is held
to be illegal or unenforceable, the legality or enforceability of the remaining terms shall not be aected or impaired.
EXCEPT AS PROVIDED IN THIS WARRANTY AND TO THE MAXIMUM EXTENT PERMITTED BY LAW, INFOCUS IS NOT RESPONSIBLE
FOR DIRECT, SPECIAL, INCIDENTAL OR CONSEQUENTIAL DAMAGES RESULTING FROM ANY BREACH OF WARRANTY OR CONDITION,
OR UNDER ANY OTHER LEGAL THEORY, INCLUDING BUT NOT LIMITED TO LOSS OF USE; LOSS OF REVENUE; LOSS OF ACTUAL OR
ANTICIPATED PROFITS (INCLUDING LOSS OF PROFITS ON CONTRACTS); LOSS OF THE USE OF MONEY; LOSS OF ANTICIPATED SAVINGS; LOSS OF BUSINESS; LOSS OF OPPORTUNITY; LOSS OF GOODWILL; LOSS OF REPUTATION; LOSS OF, DAMAGE TO, COMPROMISE
OR CORRUPTION OF DATA; OR ANY INDIRECT OR CONSEQUENTIAL LOSS OR DAMAGE HOWSOEVER CAUSED INCLUDING THE
REPLACEMENT OF EQUIPMENT AND PROPERTY, ANY COSTS OF RECOVERING, PROGRAMMING OR REPRODUCING ANY PROGRAM
OR DATA STORED IN OR USED WITH THE INFOCUS PRODUCT AND ANY FAILURE TO MAINTAIN THE CONFIDENTIALITY OF DATA
STORED ON THE PRODUCT. THE FOREGOING LIMITATION SHALL NOT APPLY TO DEATH OR PERSONAL INJURY CLAIMS, OR ANY
STATUTORY LIABILITY FOR INTENTIONAL AND GROSS NEGLIGENT ACTS AND/OR OMISSIONS. INFOCUS DISCLAIMS ANY REPRESENTATION THAT IT WILL BE ABLE TO REPAIR ANY PRODUCT UNDER THIS WARRANTY OR MAKE A PRODUCT EXCHANGE WITHOUT
RISK TO OR LOSS OF PROGRAMS OR DATA.
Limitation on Bringing Action: No action, regardless of form, arising out of the agreement to purchase the Product may be brought by
purchaser more than one year after the cause of action has accrued. Governing Law: Any action, regardless of form, arising out of the
agreement to purchase the Product is governed by the laws of the State of Oregon, U.S.A. Mandatory Arbitration – Any action, regardless of form, arising out of the agreement to purchase the Product is subject to mandatory arbitration.
ADDITIONAL RIGHTS. FOR CUSTOMERS, WHO ARE COVERED BY CONSUMER PROTECTION LAWS OR REGULATIONS IN THEIR
COUNTRY OF PURCHASE OR, IF DIFFERENT, THEIR COUNTRY OF RESIDENCE, THE BENEFITS CONFERRED BY THIS WARRANTY
ARE IN ADDITION TO ALL RIGHTS AND REMEDIES PROVIDED BY SUCH CONSUMER PROTECTION LAWS AND REGULATIONS. THIS
WARRANTY DOES NOT EXCLUDE, LIMIT OR SUSPEND ANY RIGHTS OF CONSUMERS ARISING OUT OF NONCONFORMITY WITH A
SALES CONTRACT. SOME COUNTRIES, STATES AND PROVINCES DO NOT ALLOW THE EXCLUSION OR LIMITATION OF INCIDENTAL OR
CONSEQUENTIAL DAMAGES OR ALLOW LIMITATIONS ON HOW LONG AN IMPLIED WARRANTY OR CONDITION MAY LAST, SO THE
LIMITATIONS OR EXCLUSIONS DESCRIBED BELOW MAY NOT APPLY TO YOU. THIS WARRANTY GIVES YOU SPECIFIC LEGAL RIGHTS,
AND YOU MAY ALSO HAVE OTHER RIGHTS THAT VARY BY COUNTRY, STATE OR PROVINCE. INFOCUS, THE WARRANTOR UNDER
THIS LIMITED WARRANTY, IS IDENTIFIED AT THE END OF THIS DOCUMENT.
EXTENDED WARRANTIES. InFocus extended product warranties are available for an additional charge. For further information on
InFocus extended product warranties, please contact InFocus or your product reseller.
OBTAINING WARRANTY SERVICE. Please access and review the online help resources located at www.infocus.com/support
before seeking warranty service. If the product is still not functioning properly after making use of these resources, please contact
InFocus Technical Support or, if applicable, an ASP using the information provided below. When contacting InFocus via telephone,
other charges may apply depending on your location. When calling, InFocus Technical Support or an ASP will help determine whether
your product requires service and, if it does, will inform you how InFocus will provide it. You must assist in diagnosing issues with
your product and follow InFocus’s warranty processes. InFocus may restrict service to the country where InFocus or its Authorized
Distributors originally sold the hardware product. InFocus will provide warranty service either (i) at an ASP location, where service is
performed at the location, or the ASP may send the product to an InFocus repair service location for service, (ii) by sending you prepaid
way bills (and if you no longer have the original packaging, InFocus may send you packaging material at your cost) to enable you to
ship the product to an InFocus repair service location, or (iii) by sending you customer-installable new or refurbished replacement parts
to enable you to conduct Customer Self Repair, or (iv) by exchanging the product for a new or refurbished replacement.
Customer Self Repair
InFocus products are designed with many Customer Self Repair (CSR) parts to minimize repair time and allow for greater exibility in
performing defective parts replacement. If during the diagnosis period, InFocus identies that the repair can be accomplished by the
use of a CSR part, InFocus will ship that part directly to you for replacement. There are two categories of CSR parts:
Page 47

Page 46
• Parts for which customer self repair is mandatory. If you request InFocus to replace these parts, you will be charged for the
travel and labor costs of this service.
• Parts for which customer self repair is optional. These parts are also designed for customer self repair. If, however, you require
that InFocus replace them for you, this may be done at no additional charge under the type of warranty service designated for
your product.
Based on availability and where geography permits, InFocus will attempt to ship CSR parts out the next business day. Customer receipt
will vary based upon the actual part, customer location and shipping method. Next Day service may be oered at an additional charge
where geography permits. If assistance is required, you can call the InFocus Technical Support Center and a technician will help you
over the phone. InFocus species in the materials shipped with a replacement CSR part whether a defective part must be returned to
InFocus. In cases where it is required to return the defective part to InFocus, you must ship the defective part back to InFocus within
a dened period of time, normally ve (5) business days, and clearly display the Return Material Authorization (RMA#) on the outside
of the shipping carton or a similar package aording an equal degree of protection. The defective part must be returned with the
associated documentation in the provided shipping material. Failure to return the defective part may result in InFocus charging you for
the replacement. With a Customer Self Repair, InFocus will pay all shipping and part return costs and determine the courier/carrier to
be used.
Upon receipt of the replacement product or part, the original product or part becomes the property of InFocus and you agree to follow instructions, including arranging the return of original product or part to InFocus in a timely manner. When providing a product
exchange or Customer Self Repair (CSR) part requiring the return of the original product or part, InFocus may require a credit card
authorization as security for the retail price of the replacement product or part and applicable shipping costs. When returning product
to InFocus, a Return Material Authorization Number (RMA #) is required and must be clearly displayed on the outside of the shipping
carton or a similar package aording an equal degree of protection. Service options, parts availability and response times may vary
according to the country in which service is requested. Service options are subject to change at any time. You may be responsible for
shipping and handling charges if the product cannot be serviced in the country in which service is requested. If you seek service in a
country that is not the country of original purchase, you will comply with all applicable import and export laws and regulations and be
responsible for all custom duties, V.A.T. and other associated taxes and charges. Where international service is available, InFocus may
repair or exchange defective products and parts with comparable products and parts that comply with local standards. In accordance
with applicable law, InFocus may require that you furnish proof of purchase details and/or comply with registration requirements before
receiving warranty service. Resources with more details on this and other matters on obtaining warranty service are described below.
PRIVACY. InFocus will maintain and use customer information in accordance with the InFocus Privacy Policy available at www.
Infocus.com/privacy and InFocus’s applicable legal obligations.
BACKUP. If your product is capable of storing software programs, data and other information, you should protect its contents against
possible operational failures. Before you deliver your product for warranty service it is your responsibility to keep a separate backup
copy of the contents, remove all personal information and data that you want to protect and disable any security passwords. THE
CONTENTS OF YOUR PRODUCT WILL BE DELETED AND THE STORAGE MEDIA REFORMATTED IN THE COURSE OF WARRANTY
SERVICE. Your product or a replacement product will be returned to you as your product was congured when originally purchased,
subject to applicable updates. InFocus may install system software updates as part of warranty service that will prevent the hardware
from reverting to an earlier version of the system software. Third party applications installed on the hardware may not be compatible or
work with the hardware as a result of the system software update. You will be responsible for reinstalling all other software programs,
data and passwords. Recovery and reinstallation of software programs and user data are not covered under this Limited Warranty.
RESOURCES. Support and service information including Authorized Distributor and Authorized Service Provider locations is available
at: www.infocus.com/support.
InFocus Corporation, 13190 SW 68th Parkway, Suite 200, Portland, OR 97223-8368 USA
© 2016 InFocus Corp. All rights reserved. InFocus and the InFocus logo are trademarks of InFocus Corp., registered in the U.S. and
other countries.
Page 48

Page 47INA-LC100 User Guide
Specications
Chipset Quad core Cortex A9R4 2GHz
GPU Octo-Core Mali-450
Memory 2GB-DDR3, 8GB-Flash
Inputs SD/SDHC/MMC card slot, USB-A (2), RJ45
Outputs HDMI 1.4 out, 3.5mm A/V out
Dimensions (W x L x D) 5.06" x 5.06" x 1.18" / 128.5mm x 128.5mm x 30mm
Weight .56 lbs / 256g
Electrical range for video 1.0V +/-0.1V
Electrical range for audio 2.0V +/-0.2V
Power Supply 5V DC; 2A
Temperature and humidity limitations Operation: 0-40° C; 20-80%.
Storage: -20-50° C; 10-90%.
This specication may be modied without notice.
Page 49
Page 48
Appendix
Access Point Setup
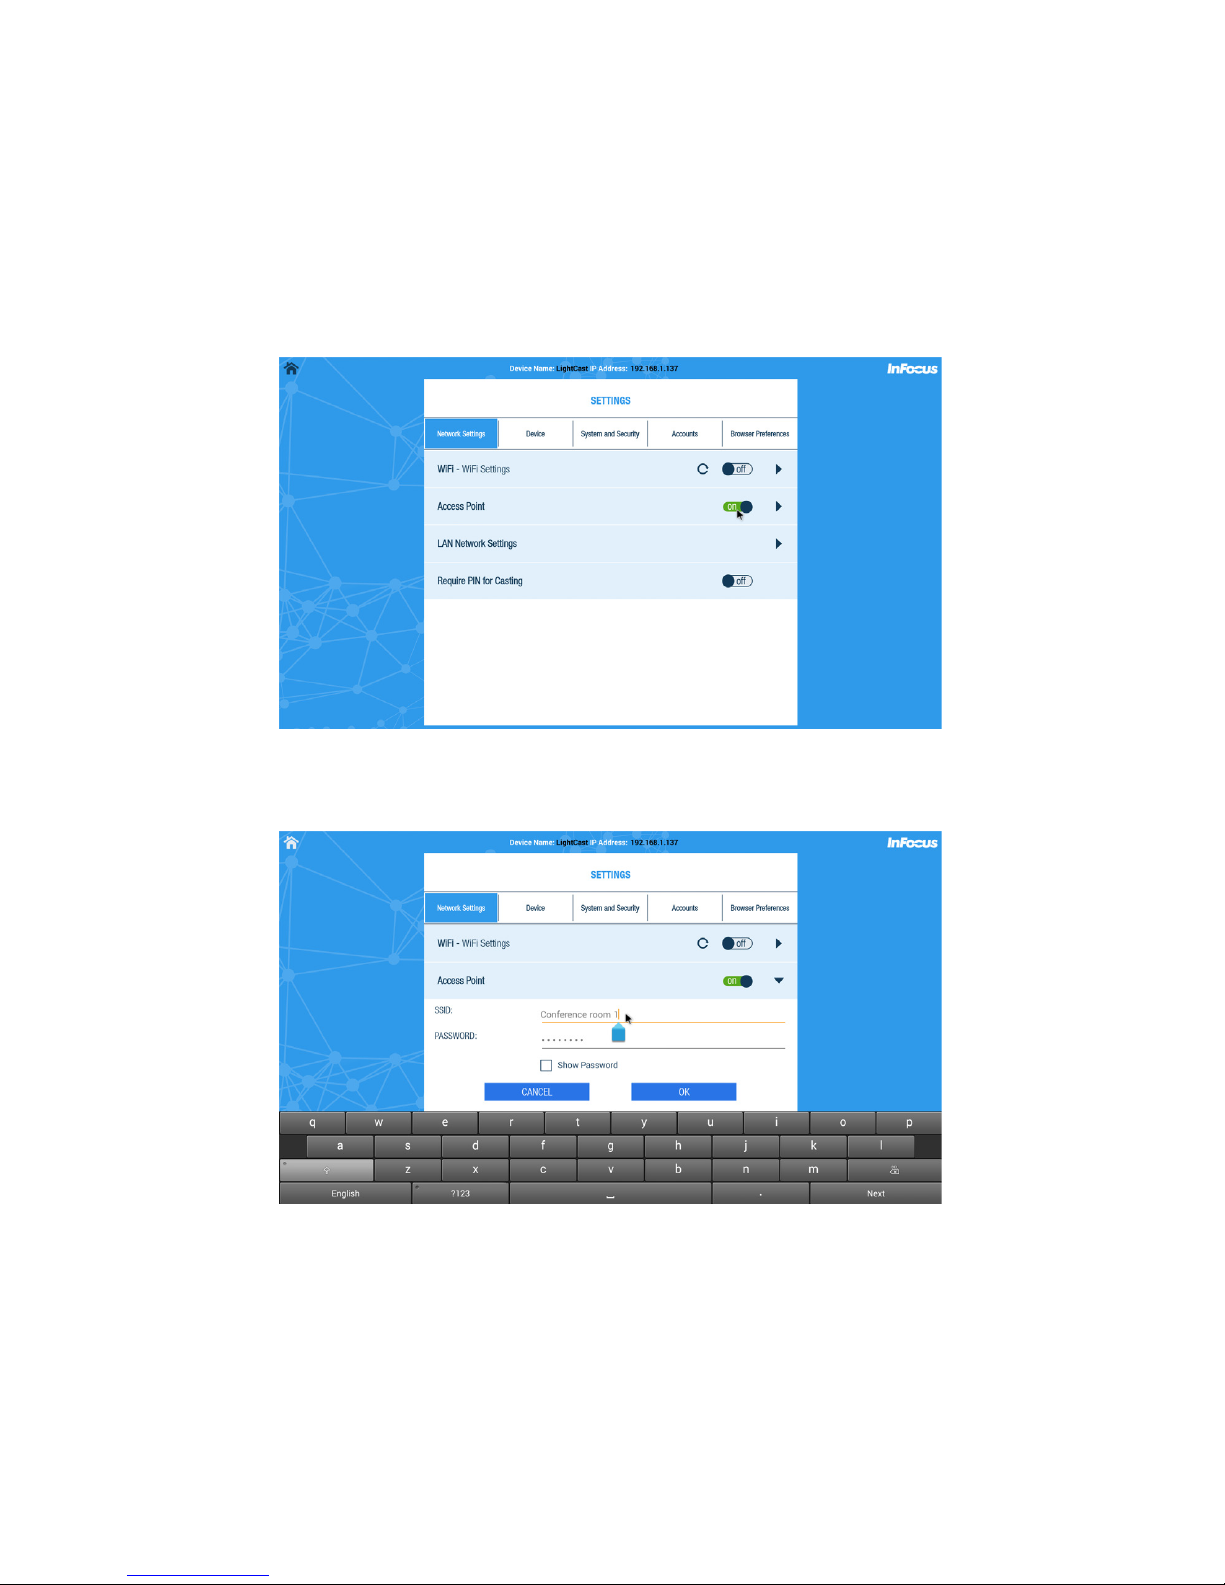
1) From the home page, click the Settings icon.
2) Navigate to the Network Settings tab.
3) Click the Access Point On/O button, so that On is selected. This disconnects the current
WiFi connection.
4) Click the right arrow to open the Access Point submenu.
5) By default, the SSID is LightCastAP. If other LightCast equipment is being used nearby, change
the SSID to a unique name using a mouse and keyboard, or the remote and on screen keyboard.
6) Enter a password (min. 8 characters) and click OK.
Page 50

Page 49INA-LC100 User Guide
Port Requirements for AirPlay, Miracast, and LightCast Sender App
AirPlay
Port Number Type Protocol RFC Used by
80 TCP HTTP 2616 AirPlay
443 TCP HTTPS AirPlay
554 UDP/TCP RTSP 2326 AirPlay
3689 TCP DAAP iTunes Music Sharing/AirPlay
5297 TCP Bonjour
5289 UDP/TCP Bonjour
5353 UDP MDNS Bonjour/AirPlay
49159 UDP MDNS (Windows) Bonjour/AirPlay
49163 UDP MDNS (Windows) Bonjour/AirPlay
Miracast
Miracast uses the network dierently than AirPlay and the LightCast Sender App. Miracast connects
directly using WiFi protocol between your sending device and the LightCast (receiving) device. Your
sending device (PC or mobile device) must be Miracast compatible in order for communication to
occur. No router or internet connection is needed.
LightCast Sender App
The three server addresses listed below must be entered into the rewall allowing them through on
UDP port 443 outbound. UDP ports 5000-65534 are required for internal network communication
only and should not be opened outside of the rewall, or blocked internally.
Application Port
M360.api.splashtop.com 443
Turn.relay.splashtop.com 443
Wbs.relay.splashtop.com 443
 Loading...