

Page 1
IN32 IN34 IN36
User's Guide
Page 2
Please read the safety instructions booklet before setting up
the projector.
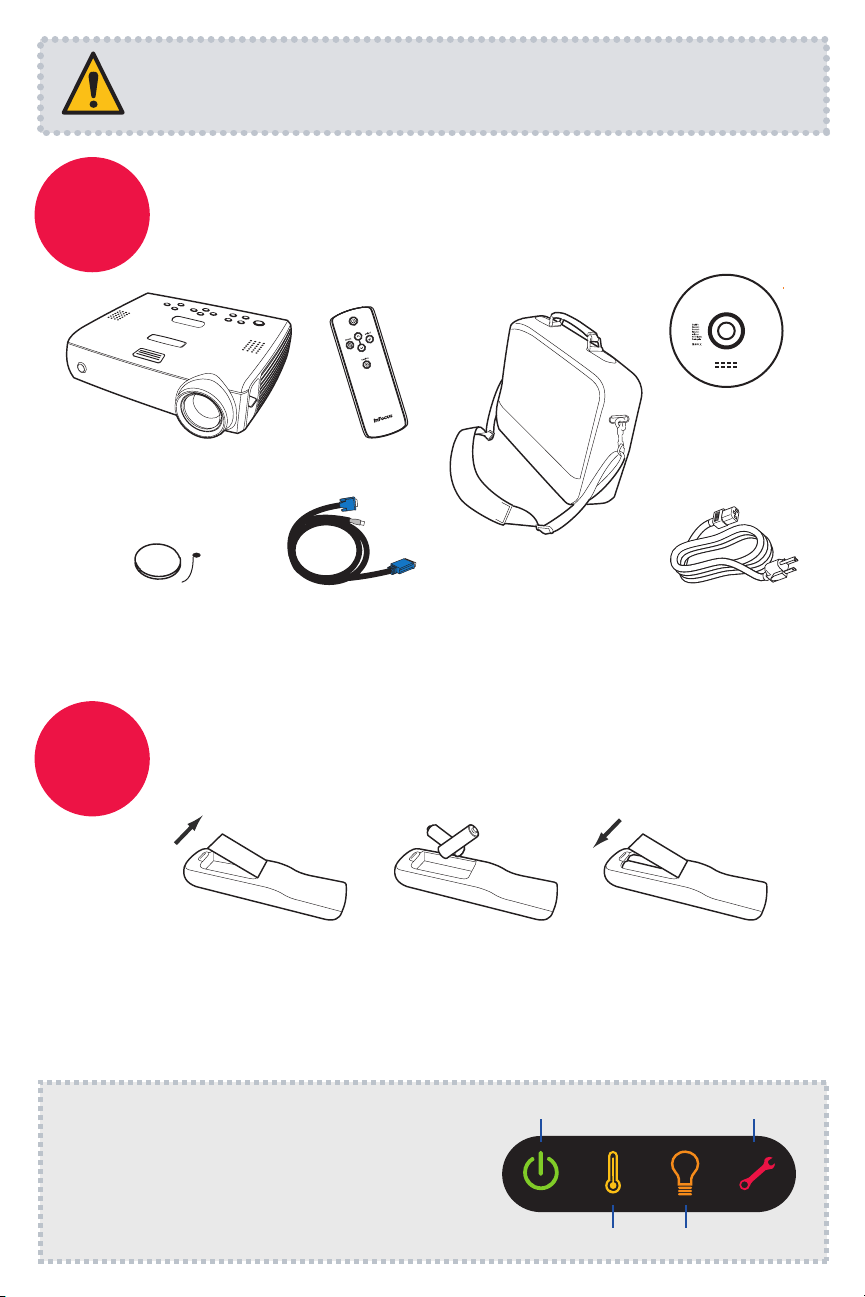
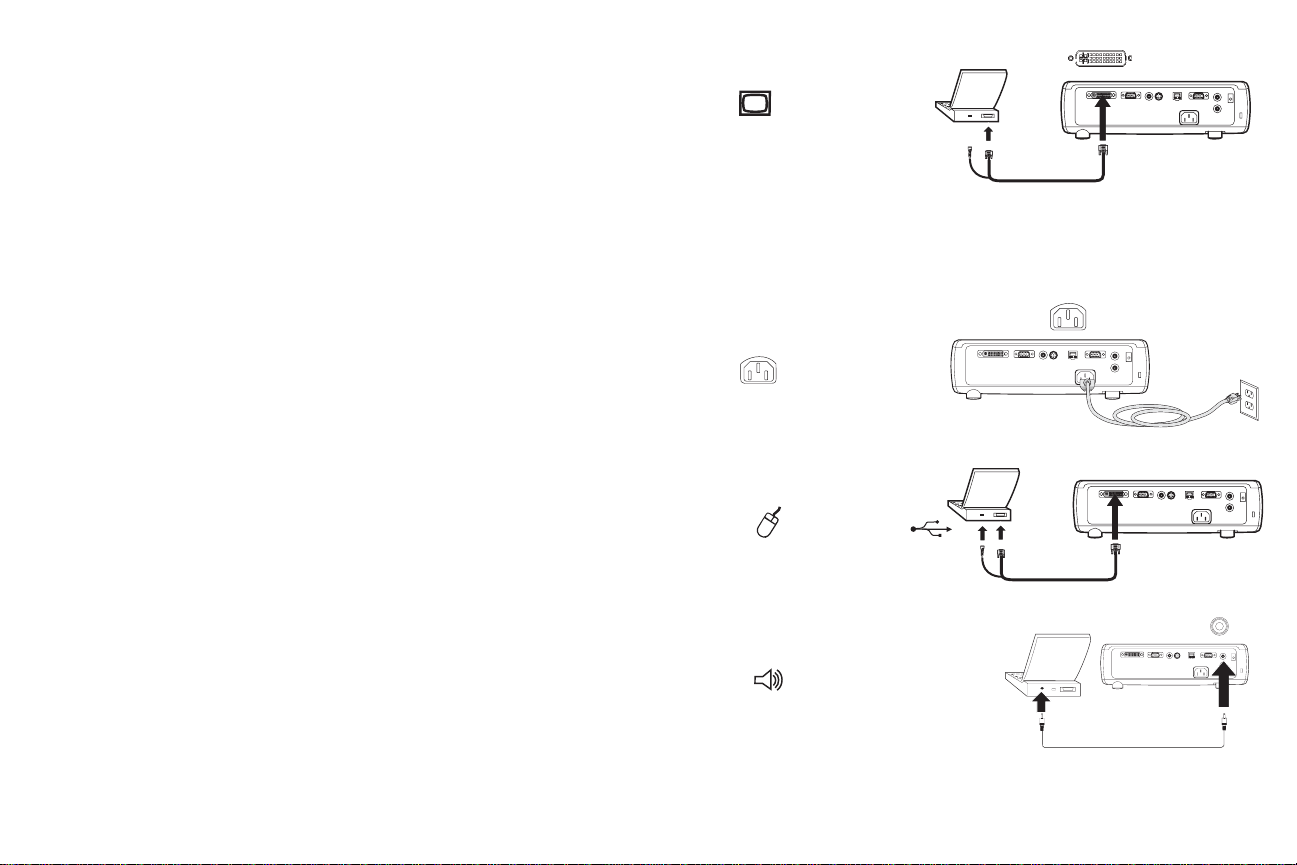
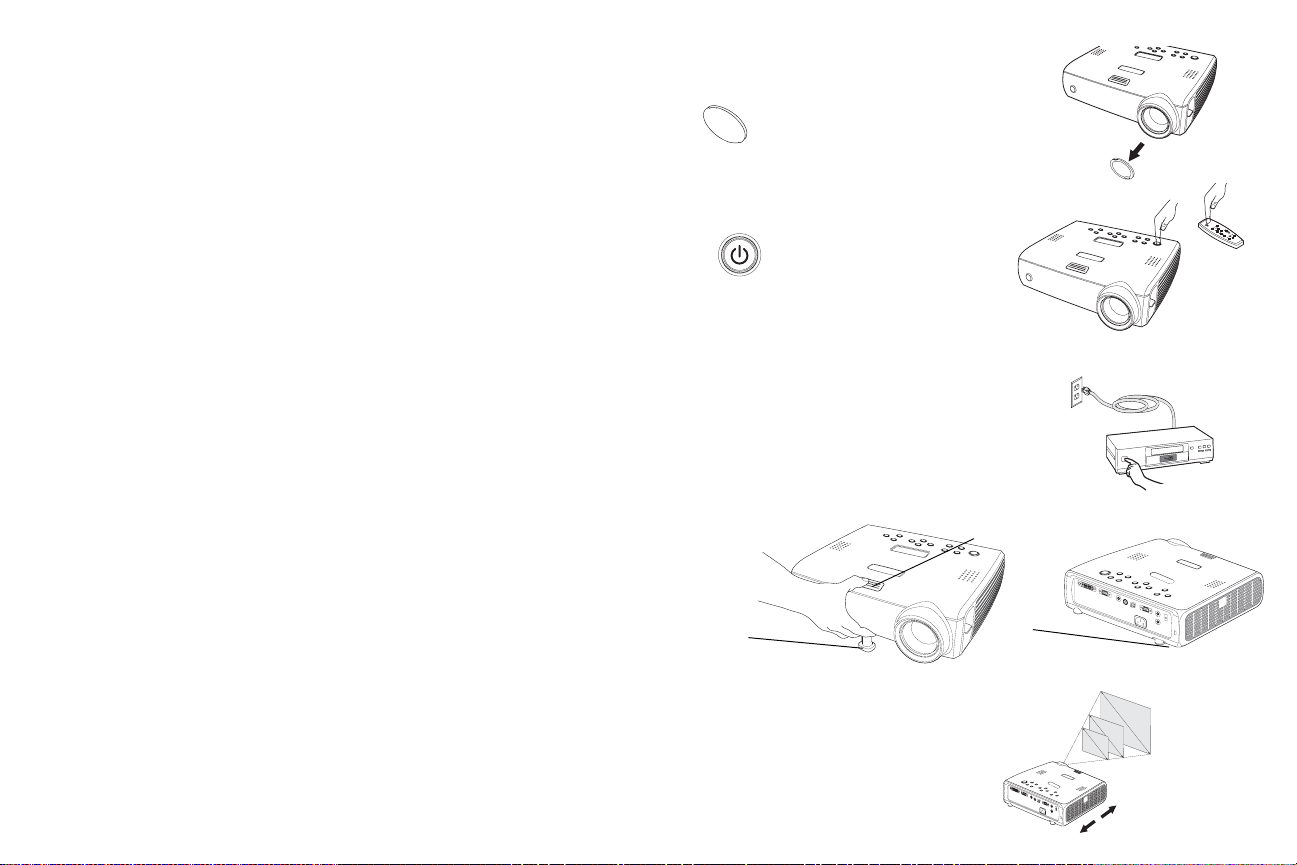
Unpack the box
1
Projector
Lens Cap
and Tether
2
Here's what's included:
Registration / Reference guide / Online resources
Register to activate your warranty to ensure eligibilty
for service and support, and get special offers and
notifications about free product updates.
Reference
guide
languages:
Svenska
CD-ROM
Product Registration
Remote
and Reference Guide
Carry Case
Computer Cable
Power Cable
Save the box and packing materials.
Put batteries in the remote
The remote uses 2 AA batteries.
Inscription / Guide de
référence / Ressources en ligne
Activez votre garantie pour avoir
droit aux réparations et à
l’assistance et obtenir les
notifications d’offres spéciales et
les avis sur les mises à niveau
gratuites des produits.
Registro / Manual de referencia
/ Recursos en línea
Active la garantía para asegurarse
los beneficios del servicio y soporte
técnico. Reciba ofertas especiales
y notificaciones sobre las
actualizaciones gratuitas de
nuestros productos.
Registrierung /Referenzanleitung
/ Online-Ressourcen
Aktivieren Sie Ihre Garantie,
sodass Sie für Service und
Unterstützung berechtigt
sind. Sie erhalten
Sonderangebote und
Benachrichtigungen
über kostenlose
Aktualisierungen.
2 31
+
+
-
Please dispose of batteries in an environmentally proper manner.
Buy a Full-Featured Remote and Other Custom Accessories
www.infocus.com/store
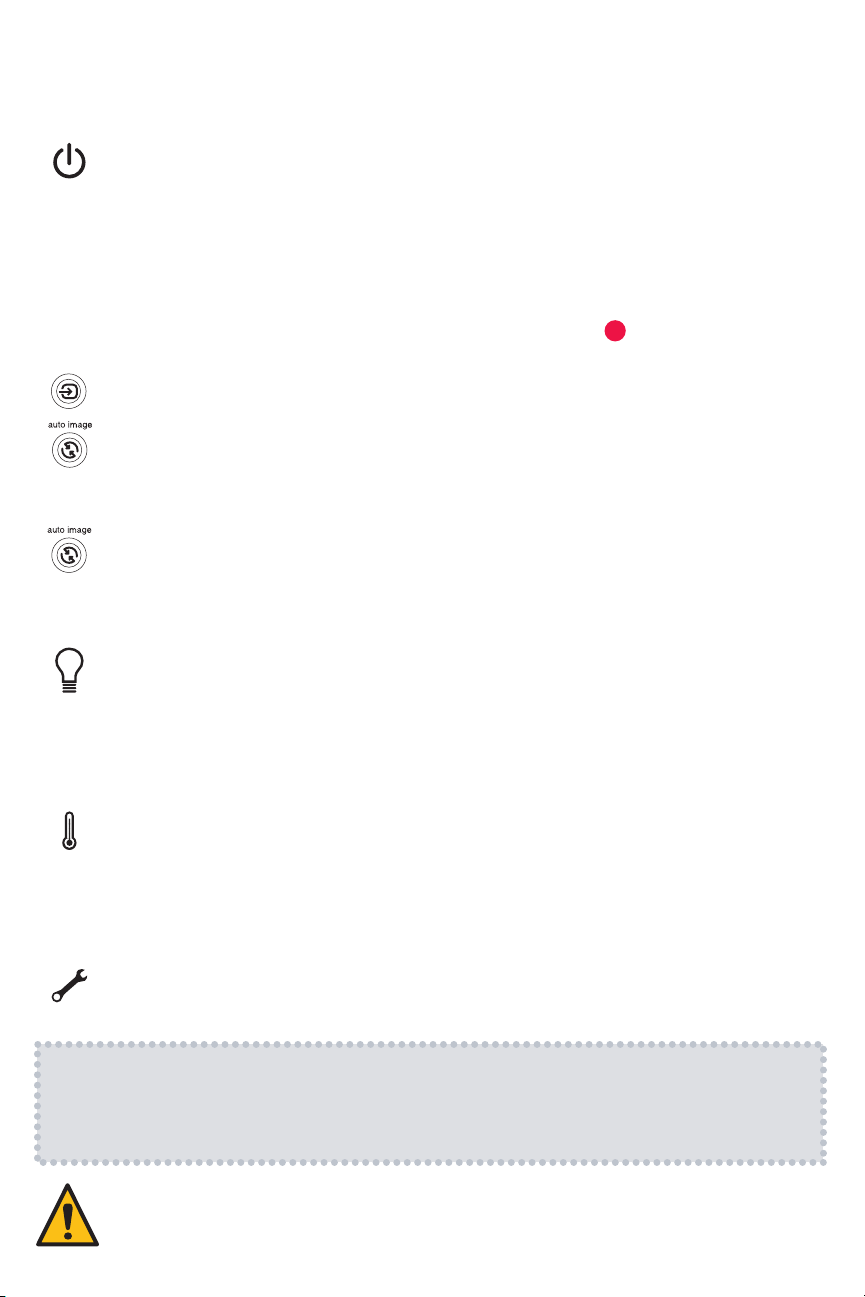
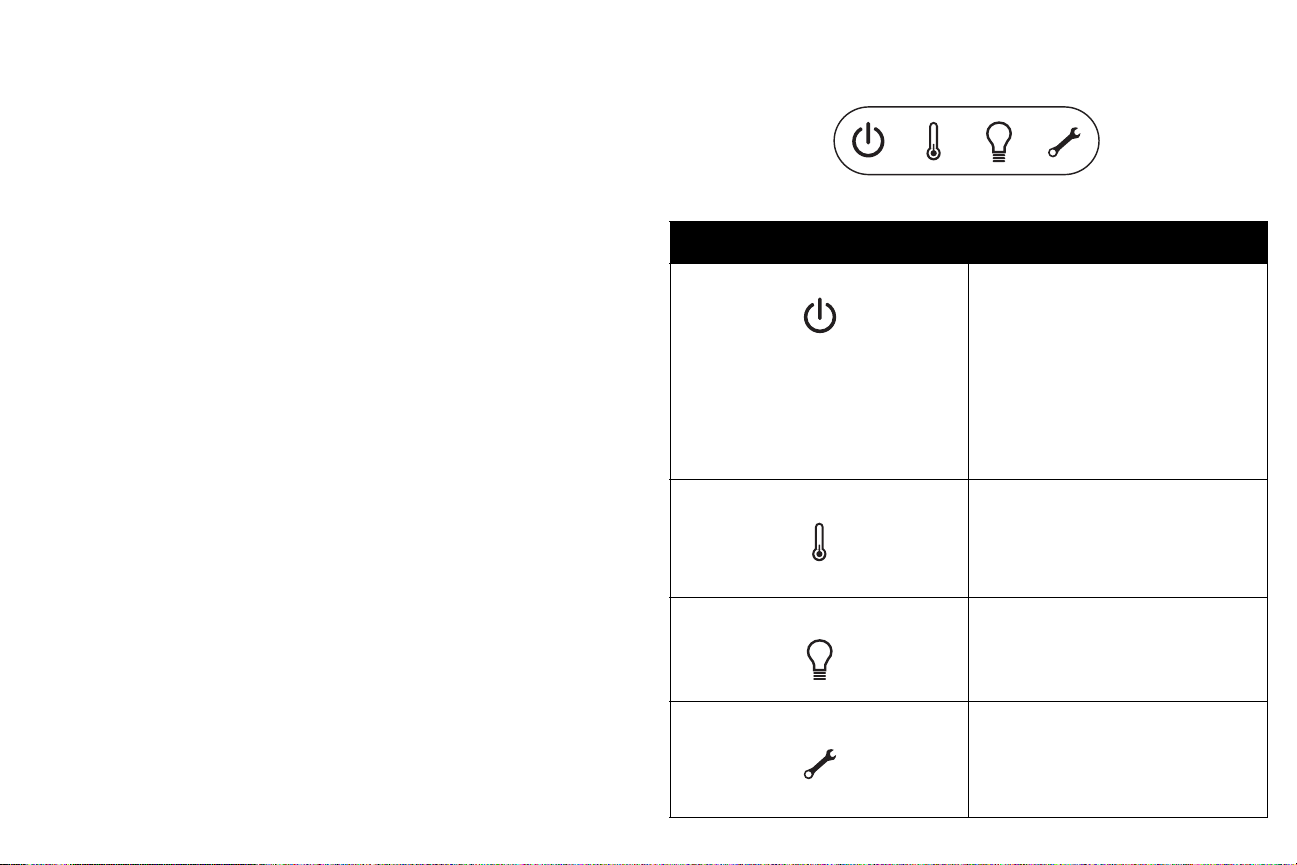
Status Indicator Panel
The top of your projector includes a
convenient indicator panel with symbols that
light up to show important status.
For details, see Troubleshooting.
Power/Standby
High Temperature Replace Lamp
Service Required
Page 3

3
Connect source
Color-coded connections make it easy.
You can connect more than one source if needed.
Connect to: Computer
Computer Cable (included)
Computer
Got an Apple computer?
You may need an adapter. For more
information, see How-To Guides at
www.infocus.com/support/howto
USB is optional
USB connection only needed for:
Presentation control using
projector remote
Upgrading projector firmware
OR
Connect to: DVD or VCR* (using optional cables)
Connect video using either an S-Video or a Composite Video cable
1
www.infocus.com/store part no. SP-SVIDEO-10M or SP-CPSTVID-5M
Connect audio using a Mini-Plug to RCA Audio Y-Cable
2
Available from A/V dealer or retailer
Composite Video Cable
Video Cable
S-
Mini-Plug Audio Y-Cable
OR
Good
Better
L R
Audio Out
DVD or VCR
*Also for game console or cable box.
RCA Audio Cable
Want better sound?
Connect the source's audio output to a
receiver/amplifier or home theater
system with separate speakers.
L R
Home Theater or Receiver
Audio In
L R
Audio Out
DVD or VCR
OR
Connect to: Other kinds of sources
How-To Guides are available at www.infocus.com/support/howto
Video Out
To Projector
or
Video Out
Page 4
4
5-10 sec.
Turn on projector and source
1 Connect the power cord to the projector
and to an electrical outlet
The power light on the projector will light amber.
2 Turn on the projector
Press power (on the projector or remote).
The power light will start blinking green.
3 Wait for the lamp to warm up
After a few seconds, the power light will stop blinking and turn
After a few seconds, the power light will stop blinking and turn
green. It can take a minute for the lamp to reach full brightness.
green. It can take a minute for the lamp to reach full brightness.
Warning: Do not look directly into the lens
when the projector is turned on.
source
4 Turn on computer or other source
You may need to press a specific key combination to activate
your laptop's external video port. On most laptops, hold down
the FN key while pressing a key labeled CRT/LCD, LCD/VGA,
a monitor icon , or similar. Key combos for popular models:
Apple F7
Dell Fn+F8
Fujitsu Fn+F10
Complete laptop activation chart at www.infocus.com/support
Important: If there is still no video, restart your
computer (first make sure it's connected to the
i
i
projector and the projector is turned on).
Gateway Fn+F3 or Fn+F4
HP/Compaq Fn+F4 or Fn+F6
Sony Fn+F7
IBM ThinkPad Fn+F7
Toshiba Fn+F5
5 Change source if needed
If needed, press source (on the projector or remote) to view the
source. You may have to press it more than once.
Page 5
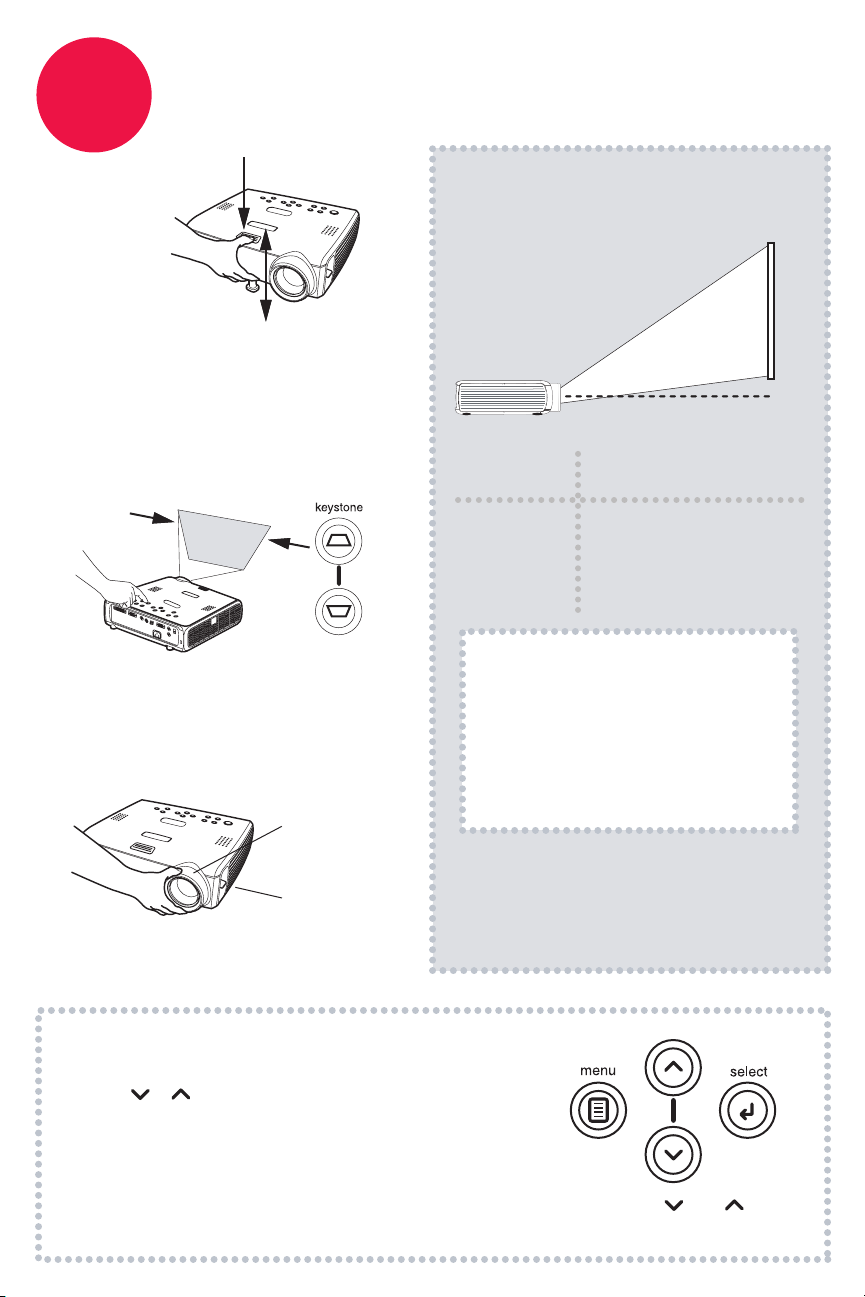
5
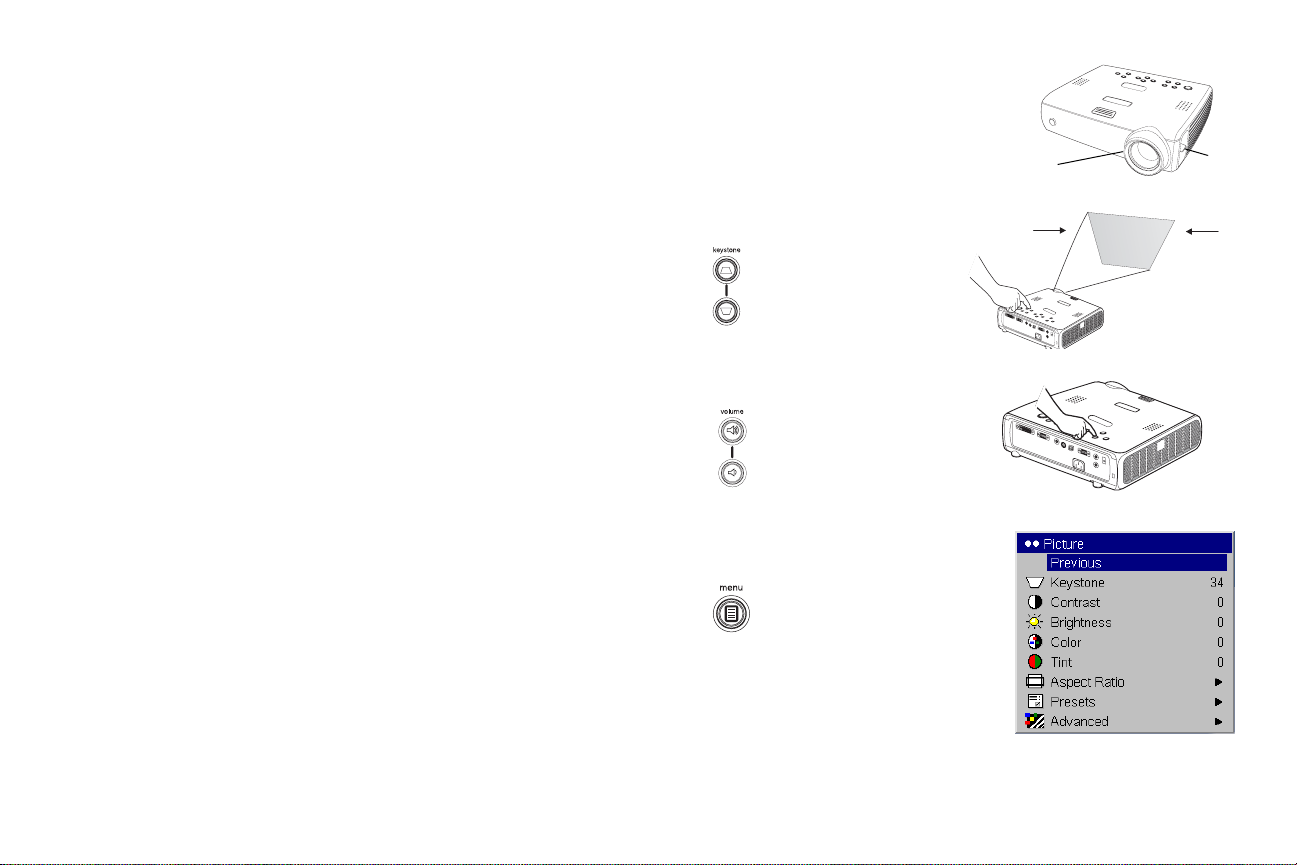
Adjust the picture
1 Height
1
1 Hold down the release button on
top of the projector.
2 Lift the front of the projector to
the desired height.
3 Release the button.
2 Keystone
Press the keystone buttons to
make the picture square.
3 Zoom and focus
2
Focus
Projector Location
As distance increases, the
image gets larger and
moves upwards.
Lens center line
Diagonal
Screen Size
60" / 1.5m
80" / 2m
92" / 2.3m
150" / 3.8m
Interactive Screen Size and
Distance Calculator
www.infocus.com/calculator
Buy a Screen and Other Custom
www.infocus.com/store
Distance to Screen
Minimum Maximum
7'4" / 2.2m
9'9" / 3m
11'3" / 3.4m
18'4" / 5.6m
Accessories
9'1" / 2.8m
12'1" / 3.7m
13'11" / 4.2m
22'8" / 6.9m
Ceiling mount?
Zoom
Adjust zoom first, then focus the
center of the image.
Using the menus
1 Press menu to show menus
2 Press or to choose items (or adjust setting)
3 Press select to confirm menu choice
4 Press menu to hide menus
Controlling your presentations
Connect the computer cable (including USB) to your computer, then use and to
move through your presentation slides.
To flip the image, enable Ceiling in the
System menu (press menu, then select
Settings > System > Ceiling).
Page 6

6
Turn off the projector
Press the power button twice
The first press shows a confirmation message; the second
press confirms that you want to power off.
The power light on the projector will blink while the fan cools
the lamp. If you need to unplug the projector, wait until the
fan stops and the power light stops blinking and stays on.
Note: While the power light is blinking, button presses on the
projector and remote are ignored.
7
Register your product
Activate your warranty to ensure eligibility for
service and support. Get special offers and
notifications about free product updates.
1 Write down your projector's serial number
It's printed on the label on the back of the projector. You'll need it to register (and if
you ever need to contact support).
Serial number:
2 Go to www.infocus.com/register
8
Read the Reference Guide
Insert the CD-ROM, or go to www.infocus.com/support
The Reference Guide is on the CD-ROM in multiple languages. It covers advanced setup and
operation, including lamp replacement instructions. The Reference Guide is also available at
www.infocus.com/support
Page 7
Troubleshooting
If there is no picture or the picture is blank
If the power light is off, make sure the power cord is connected and plugged
into a live electrical outlet. If the power light is amber and not blinking, press
the power button.
Check video source and cables. Make sure the video source (computer, DVD
player, VCR, etc.) is turned on and cables are securely connected between the
source and the projector.
Make sure your computer's video port is enabled. Press the key combination
that activates your laptop's external video port (see step ). If there is still no
source
Press the Source button. You may need to press it several times to view the
Press the Auto Image button.
image, restart your laptop.
correct source.
If "Signal out of range" is shown, or the picture looks bad
Press the Auto Image button. If that doesn't help (and the source is a computer),
reduce your computer's display resolution or vertical refresh rate.
If the replace lamp light is on
Turn the projector off and wait at least one minute, then turn it on again. If the
replace lamp light turns on again, the lamp needs to be replaced. For lamp
replacement instructions, see the Reference Guide, which is on the included
CD-ROM or can be downloaded at
www.infocus.com/support
4
If the high temperature light is on
Turn the projector off and remove anything that may be blocking the air vents
on its side. Leave the projector off for at least one minute to let it cool before
turning it on again. Important: Continuous operation at high temperature may
reduce the lifetime of the lamp and/or projector.
If the service required light is on
Turn the projector off and wait at least one minute, then turn it on again. If the
service required light turns on again, the projector needs to be serviced. See
below for service contact information.
More troubleshooting options are in the Reference Guide
The Reference Guide is on the included CD-ROM,
or download it at www.infocus.com/support
Warning: In the unlikely event of a lamp rupture, particles may be ejected from the projector.
Keep out of the area under and around the projector when it is turned on. See the safety
instructions booklet for more details.
Page 8

Questions? We’re here to help!
Visit us at:
www.infocus.com/support
We’re here to support you with your new purchase. We can help you with…
• Determining screen sizes
• Documentation in other languages
• Connecting your sources (TV, DVD, Cable/Satellite, Game, etc.)
• Selecting optional accessories
• Product warranty protection plans
USA, Canada, Latin America
Customer Support Telephone
+1 (503) 685-8888
TOLL FREE: 800-799-9911
Mon-Fri, 7 am - 5 pm Pacific
techsupport@infocus.com
Asia Pacific
Customer Support Telephone
Singapore: +65 63539449
China: 800.828.2268
Australia: 1300-725-295
Australia Direct Sales: 1800-885-841
Europe, Middle East, Africa
Customer Support Telephone
+31 (0)36 539 2820
Mon-Fri, 08:30 - 18:00 CET
emea.support@infocus.com
Mon-Fri, 9 am - 5 pm SGT
asia-support@infocus.com
Warning: Hg - Lamp contains mercury. Manage in accordance with local disposal laws.
See www.lamprecycle.org
Declaration of Conformity
Manufacturer: InFocus Corporation, 27500 SW Parkway Ave. Wilsonville, Oregon 97070-8238 USA
European Office: Louis Armstrongweg 110, 1311 RL Almere, The Netherlands
We declare under our sole responsibility that this projector conforms to the following directives and norms: EMC Directive 89/336/EEC,
Amended by 93/68/EEC, EMC: EN 55022, EN 55024, EN 61000-3-2, EN 61000-3-3, Low Voltage Directive 73/23/EEC, Amended by
93/68/EEC, Safety: IEC 60950-1:1st Edition
Trademarks
Apple, Macintosh, and PowerBook are trademarks or registered trademarks of Apple Computer, Inc. IBM is a trademark or registered
trademark of International Business Machines, Inc. Microsoft, PowerPoint, and Windows are trademarks or registered trademarks of
Microsoft Corporation. Adobe and Acrobat are trademarks or registered trademarks of Adobe Systems Incorporated. InFocus, In Focus,
and INFOCUS (stylized), LP, LiteShow, ScreenPlay, LitePort, ASK and Proxima are either registered trademarks or trademarks of InFocus
Corporation in the United States and other countries.
FCC Warning
This equipment has been tested and found to comply with the limits for a Class A digital device, pursuant to part 15 of the FCC Rules.
These limits are designed to provide reasonable protection against harmful interference when the equipment is operated in a
commercial environment. This equipment generates, uses, and can radiate radio frequency energy and, if not installed and used in
accordance with the instruction manual, may cause harmful interference to radio communications. Operation of this equipment in a
residential area is likely to cause harmful interference in which case the user will be required to correct the interference at his own
expense. Changes or modifications to this equipment that are not expressly approved by InFocus Corp. may void the user’s authority to
operate the equipment.
EN 55022 Warning
This is a Class A product. In a domestic environment it may cause radio interference, in which case the user may be required to take
adequate measures. The typical use is in a conference room, meeting room or auditorium.
Canada
This Class A digital apparatus complies with Canadian ICES-003.
Cet appareil numérique de la classe A est conforme à la norme NMB-003 du Canada.
Agency Approvals Product Models: W320, W340, W360
UL, CUL, NOM, IRAM, GOST, C-tick
Other specific Country Approvals may apply. Please see product certification label.
InFocus reserves the right to alter product offerings and specifications at any time without notice.
Page 9

IN32 IN34 IN36
Reference Guide
Page 10

Declaration of Conformity
Manufacturer: InFocus Corporation, 27500 SW Parkway Avenue, Wilsonville,
Oregon 97070 USA
European Office: Louis Armstrongweg 110, 1311 RL Almere, The Netherlands
We declare under our sole responsibility that this projector conforms to the following
directives and norms:
EMC Directive 89/336/EEC, Amended by 93/68/EEC
EMC: EN 55022
EN 55024
EN 61000-3-2
EN 61000-3-3
Low Voltage Directive 73/23/EEC, Amended by 93/68/EEC
Safety: IEC 60950-1: 1st Edition
May, 2004
Trademarks
Microsoft, PowerPoint, Word, Excel and Windows are trademarks or registered trademarks of Microsoft Corporation. Adobe and Acrobat are trademarks or registered
trademarks of Adobe Systems Incorporated. Digital Light Processing is a trademark
or registered trademark of Texas Instruments. InFocus, In Focus, and INFOCUS (styl
ized) are either registered trademarks or trademarks of InFocus Corporation in the
United States and other countries.
FCC Warning
This equipment has been tested and found to comply with the limits for a Class A
digital device, pursuant to part 15 of the FCC Rules. These limits are designed to pro
vide reasonable protection against harmful interference when the equipment is operated in a commercial environment. This equipment generates, uses, and can radiate
radio frequency energy and, if not installed and used in accordance with the instruc
tion manual, may cause harmful interference to radio communications. Operation of
this equipment in a residential area is likely to cause harmful interference in which
case the user will be required to correct the interference at his own expense. Changes
or modifications not expressly approved by InFocus Corporation may void authority
to operate the equipment.
Canada
This Class A digital apparatus complies with Canadian ICES-003.
Cet appareil numérique de la classe A est conforme à la norme NMB-003 du Canada.
Agency Approvals
UL, CUL, TUV
Other specific Country Approvals may apply, please see product certification label.
This user’s guide applies to models IN32, C175, W320, IN34, C185, W340, IN36, C310,
and W360.
InFocus reserves the right to alter product offerings and specifications at any time.
-
-
-
EN 55022 Warning
This is a Class A product. In a domestic environment it may cause radio interference,
in which case the user may be required to take adequate measures. The typical use is
in a conference room, meeting room or auditorium.
1
Page 11
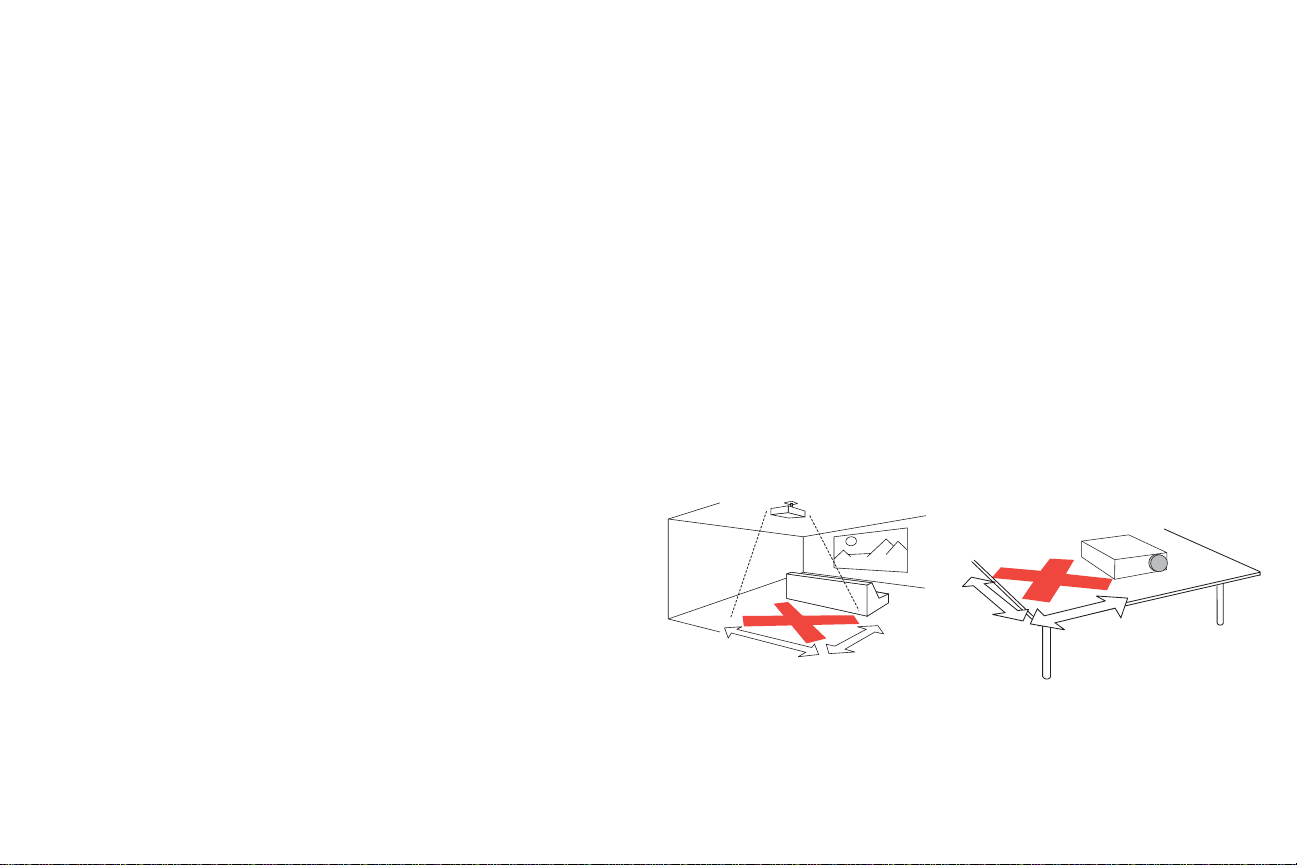
Table of Contents
2’ / 0.6 m
3’ / 1 m
Introduction 3
Connecting a computer 5
Required computer connections 5
Displaying a computer image 7
Adjusting the image 8
Connecting a video device 9
Displaying a video image 10
Shutting down the projector 12
Troubleshooting your setup 12
Using the keypad buttons 20
Using the remote control 21
Using the audio 22
Optimizing computer images 23
Presentation features 23
Optimizing video images 23
Customizing the projector 23
Using the menus 24
Picture menu 25
Settings menu 28
Maintenance 32
Cleaning the lens 32
Using the security lock 32
Replacing the projection lamp 33
Cleaning the lamp filter screens 35
Appendix 36
Projected image size 36
Important Operating Considerations for Safety
• Place the projector in a horizontal position no greater than 15 degrees
off axis.
• Locate the projector in a well-ventilated area without any obstructions
to intake or exhaust vents. Do not place the projector on a tablecloth or
other soft covering that may block the vents.
• Locate the projector at least 4' (1.2 m) away from any heating or cooling
vents.
• Use only InFocus-approved ceiling mounts.
• Use only the power cord provided. A surge-protected power strip is
recommended.
• Refer to this guide for proper startup and shutdown procedures.
• Warning : Hg – Lamp contains mercury. Manage in accordance with
local disposal laws. See www.lamprecycle.org.
• In the unlikely event of a lamp rupture, particles may exit through the
projector side vents. When the projector is turned on, keep people,
food, and drinks out of the "keep out" area under and around the pro
jector, as indicated by the "X" areas below.
8
’
/2.4m
’
5
/1.5m
Follow these instructions to help ensure image quality and lamp life over
the life of the projector. Failure to follow these instructions may affect the
warranty. For complete details of the warranty, see the Warranty booklet.
-
2
Page 12
Introduction
Your new digital projector provides computer and video inputs and has
XGA 1024x768 resolution. The projector is easy to connect, easy to use, and
easy to maintain.
Product specifications
To read the latest specifications on your multimedia projector, be sure to
visit our website at www.infocus.com, as specifications are subject to
change.
Accessories
The standard accessories that came with your projector are listed in the
included user’s guide. Optional accessories can be found on our website at
www.infocus.com or at your retailer or dealer.
Online Registration
Register your projector on our website at www.infocus.com/register to acti-
vate your warranty and receive product updates, announcements, and registration incentives.
Projector components and features
remote
control
receiver (IR)
elevator foot release
focus
status indicators
keypad
speaker
zoom
IR receiver
connectors
leveling
foot
IR receiver
heat vent
3
Page 13
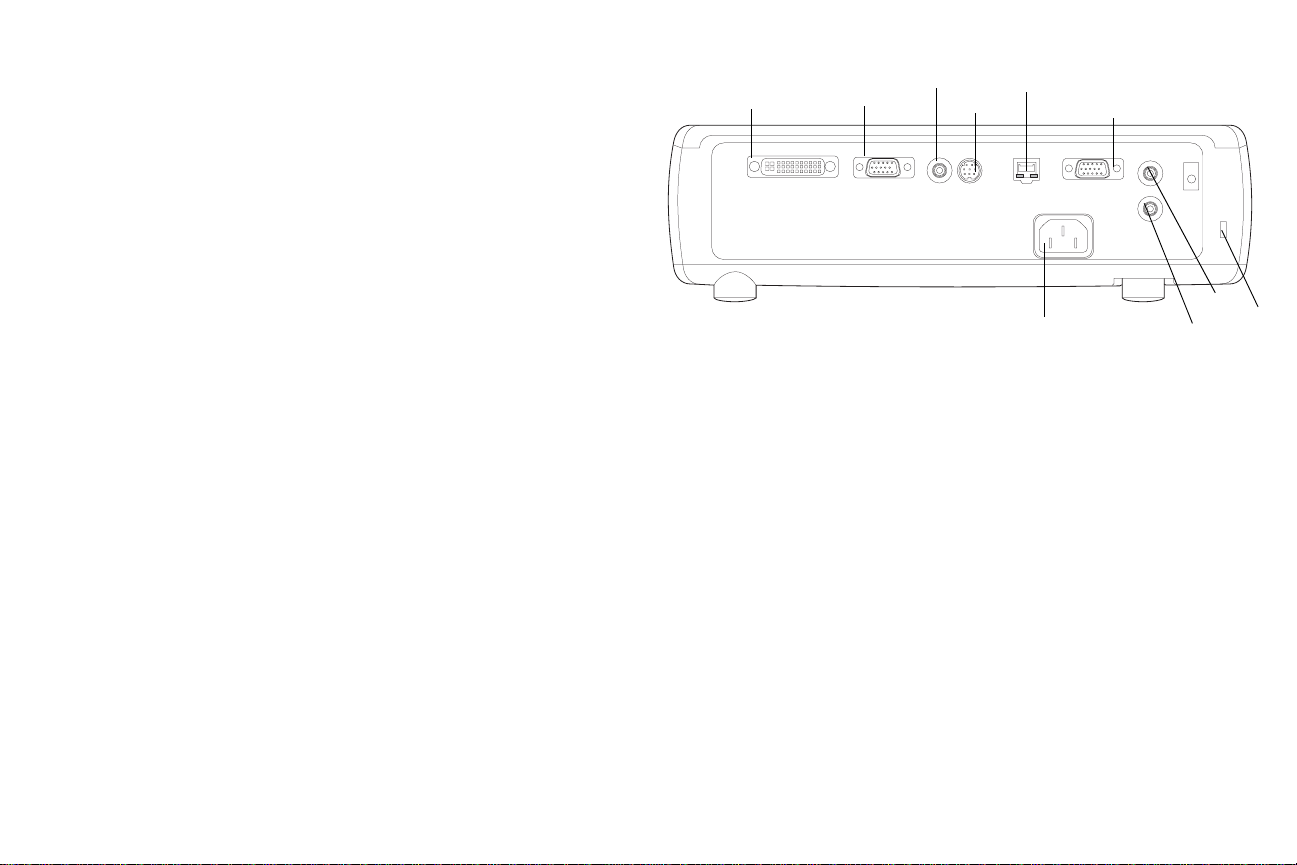
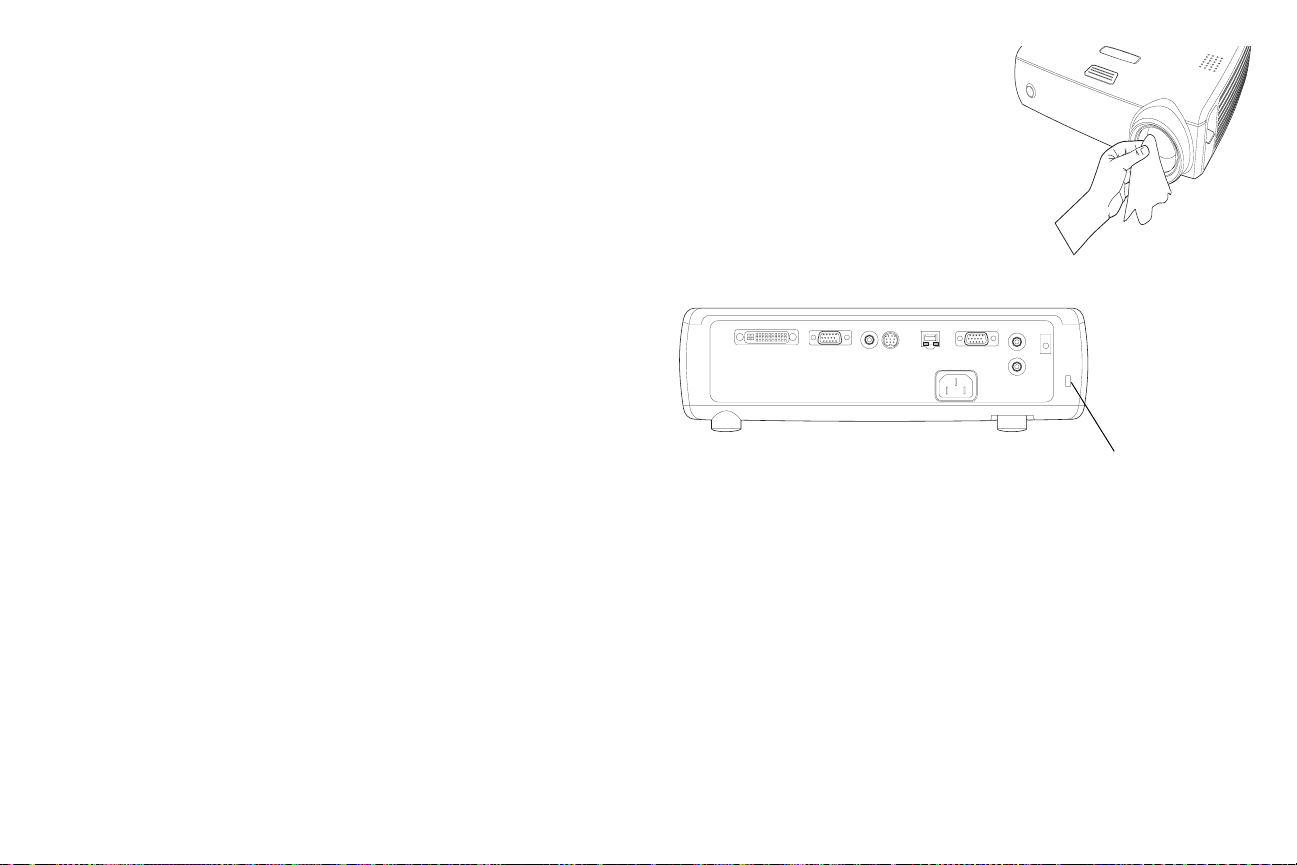
Connector Panel
The projector provides computer and video connectors:
• one M1-D/A (HD, DVI, and computer)
• one VESA (HD, HD component, and computer)
• one VESA (monitor out)
• one S-video
• one composite RCA video
• one audio in/one audio out
It also has an RJ-45 connector for serial control. The Command Line Interface (CLI) specifications and commands are on our website.
Connector panel
M1-D/A
computer
VESA in
composite
video
RJ-45 serial control
s-video
power
connector
monitor out
audio in
external
speaker
(audio out)
lock
4
Page 14
Connecting a computer
Required computer connections
Connect the black end of the computer cable to the Computer 1 connector
on the projector. Connect the blue end to the video port on your computer. If
you are using a desktop computer, you first need to disconnect the monitor
cable from the computer’s video port.
Some Macintosh® computers do not have a standard VESA-out video port.
If the supplied computer cable will not connect to your computer, purchase
the appropriate adapter from your Apple® reseller.
Connect the black power cable to the connector on the back of the projector
and to your electrical outlet.
The Power light on the Status Indicator Panel (page 12) turns amber.
NOTE: Always use the power cable that shipped with the projector.
connect computer cable
connect power cable
Optional computer connections
To advance slides in a PowerPoint™ presentation using the up and down
arrow buttons on the remote, plug the USB connector on the computer cable
into the USB mouse connector on your computer.
To have sound with your presentation, connect an audio cable (sold separately) to your computer and to the Audio In connector on the projector.
connect computer cable
connect audio cable
5
Page 15
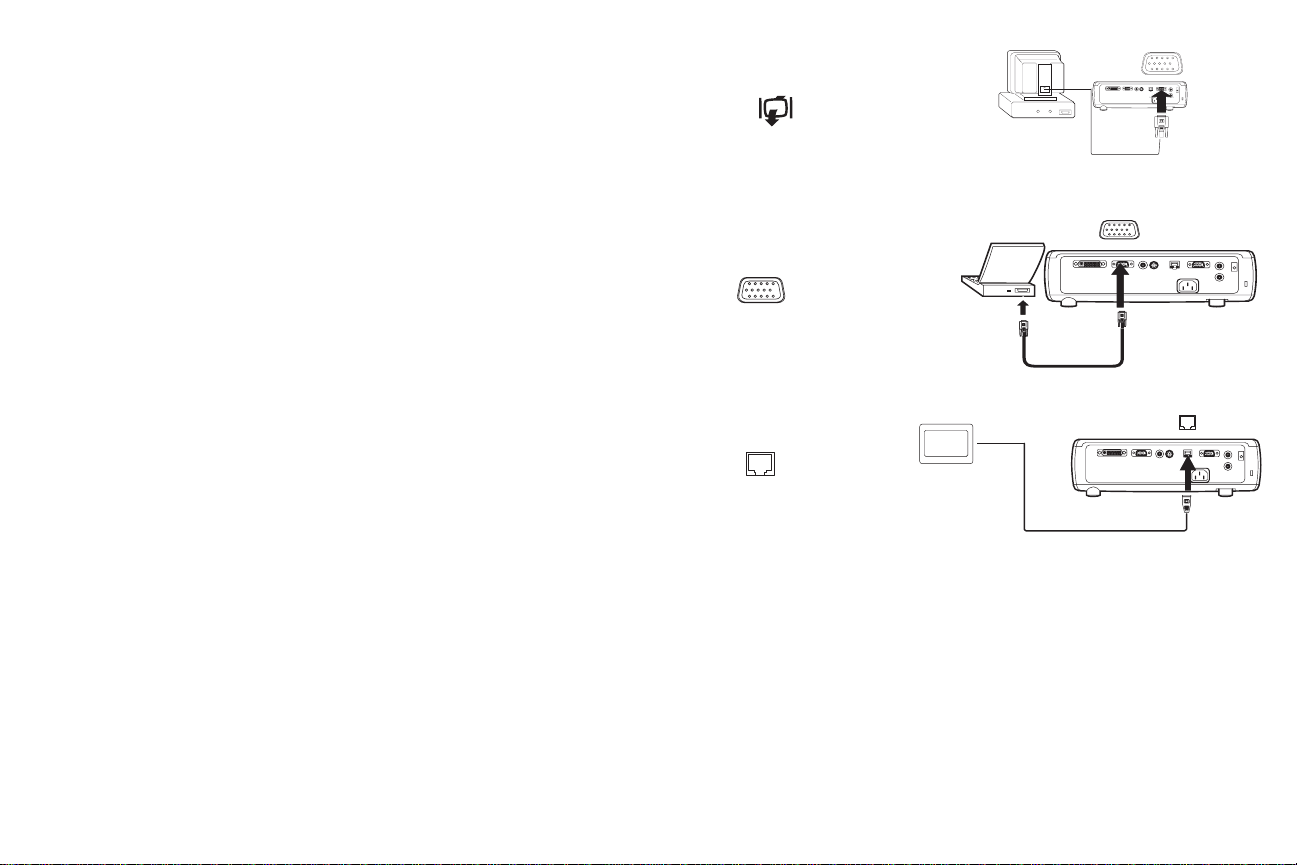
If you are using a desktop computer and want to see the image on your
computer screen as well as on the projection screen, plug the monitor cable
to the Monitor Out connector on the projector.
connect monitor cable
If you prefer connecting your projector to your computer with an optional
VESA cable, connect one end of the cable to the VESA port on your com
puter, and connect the other end of the cable to the blue Computer 2 connector on the projector.
You can control the projector from an LCD control panel or computer by
connecting an RS-232 cable to the projector’s Serial Control connector. Spe
cific RS-232 commands can be found in the Service and Support section of
our website.
connect VESA cable
connect RS-232 cable
-
6
Page 16
Displaying a computer image
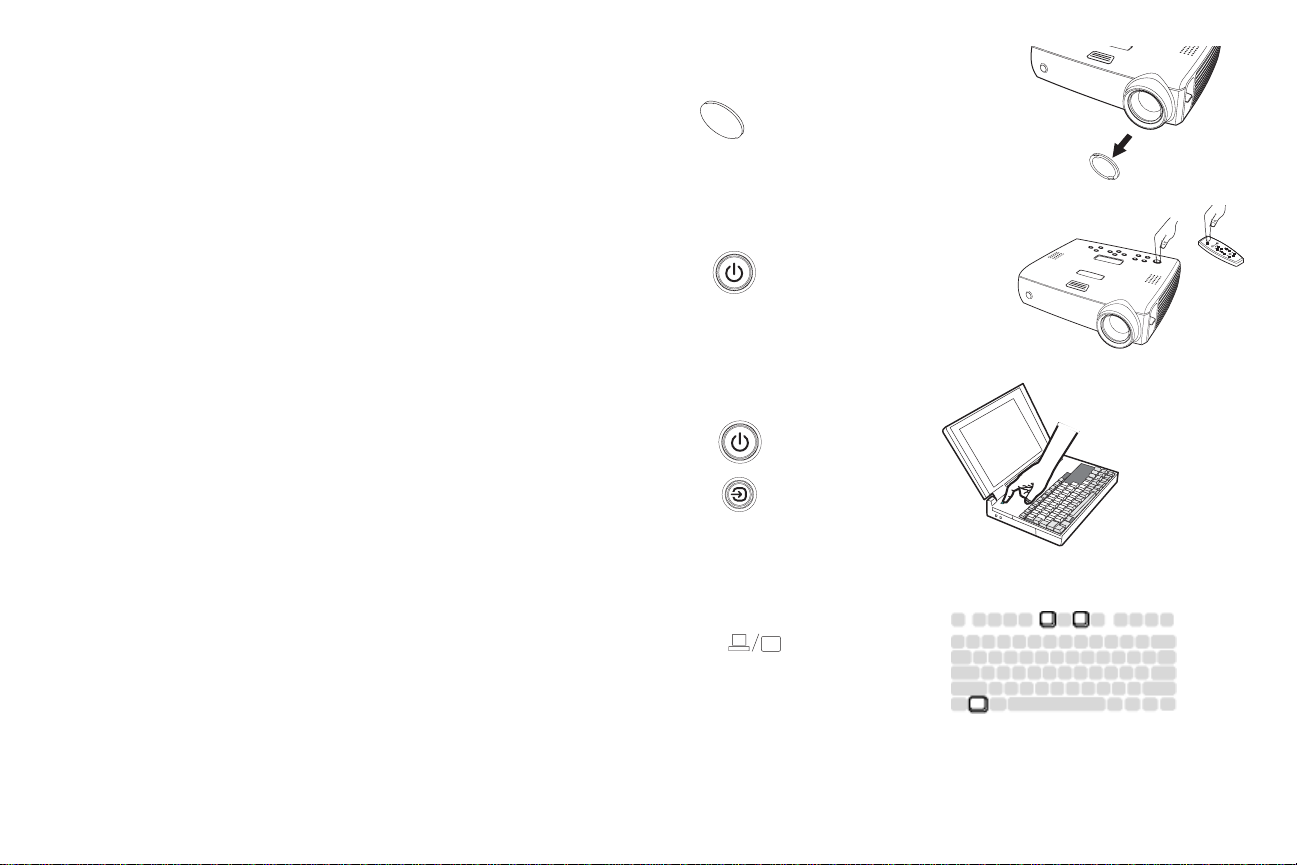
Remove the lens cap.
remove lens cap
Press the Power button on the top of the projector or the remote.
The Power light on the Status Indicator Panel (page 12) blinks green and the
fans start to run. When the lamp comes on, the start up screen displays and
the Power light is steady green. It can take a minute for the image to achieve
full brightness.
? No startup screen? Get help on page 13.
Turn on your computer.
The computer’s image should appear on the projection screen. If it doesn’t,
press the Source button on the projector’s keypad.
Make sure your laptop’s external video port is active.
Many laptops do not automatically turn on their external video port when a
projector is connected. Usually a key combination like FN + F8 or CRT/LCD
key turns the external display on and off. Locate a function key labeled
CRT/LCD or a function key with a monitor symbol. Press FN and the
labeled function key simultaneously. Refer to your laptop’s documenta
tion to learn your laptop’s key combination.
? No computer image? Try p ressi n g the Auto Image
button on the keypad. Get help on page 13.
-
press Power button
turn on computer
activate laptop’s external port
7
Page 17
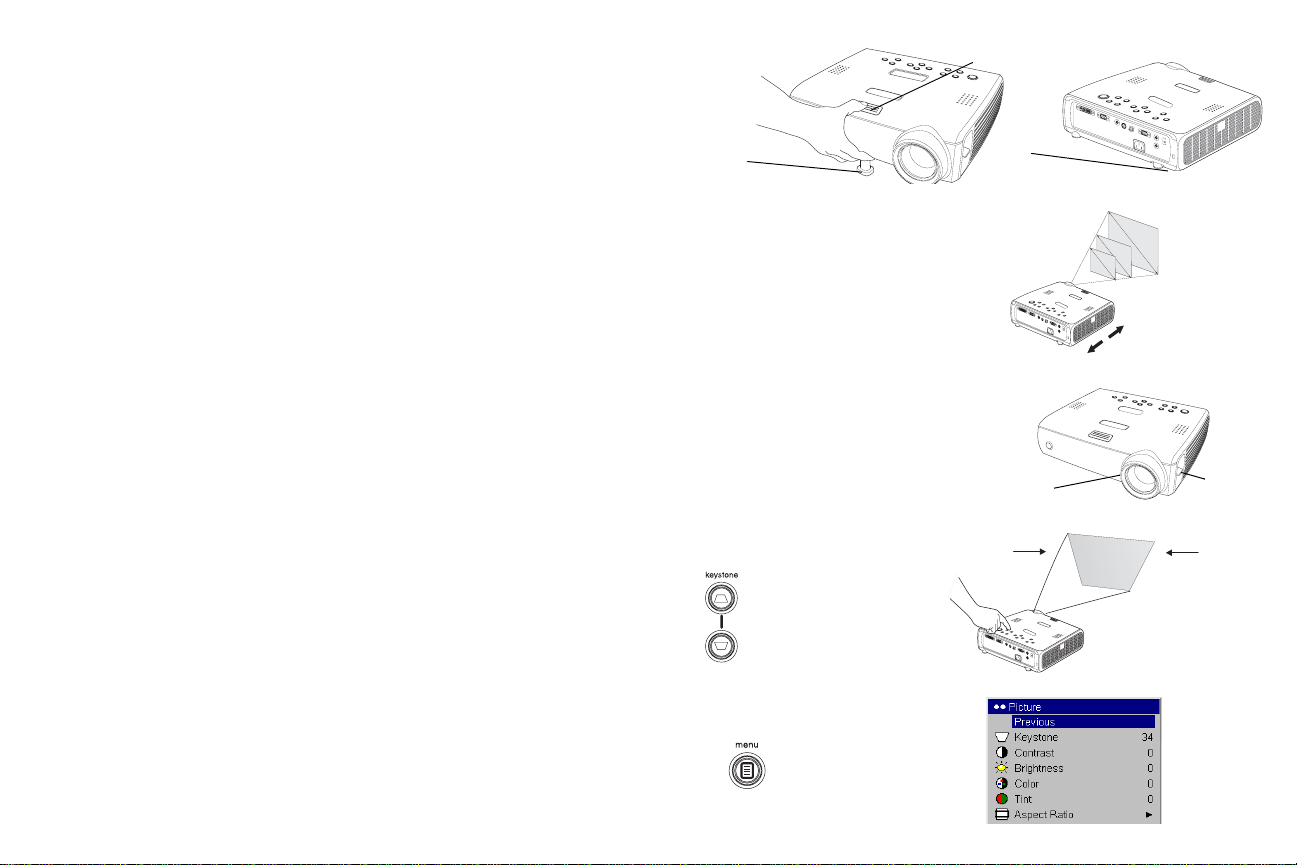
Adjusting the image
l
Adjust the height of the projector, if necessary, by pressing the release button to extend the elevator foot.
Rotate the leveling foot (located at the bottom back right corner), if necessary.
Position the projector the desired distance from the screen, so that the lens is
perpendicular to the screen.
See page 36 for a table listing screen sizes and distances.
Adjust the zoom or focus rings by rotating them until the desired image size
and focus are produced.
If the image is not square, adjust the vertical digital keystone by using the
buttons on the keypad. Press the upper Keysto ne button to reduce the
upper part of the image, and press the lower Keysto ne button to reduce the
lower part.
You can also adjust the keystone via the menus. See page 25.
adjust height
elevator
foot
adjust distance
adjust zoom and focus
adjust keystone
ease button
re
rotate
leveling
foot
focus
zoom
Adjust the Contrast or Brightness in the Picture menu.
See page 24 for help with the menus.
adjust Contrast or Brightness
8
Page 18

Connecting a video device
No video or audio cables are included with your projector.
If the video device uses a round, four-prong S-video connector, plug an
S-video cable into that connector on the video device and into the Video 2
connector on the projector. If the device uses a composite video connector,
plug a composite video cable into that connector on the video device and
into the Video 1 connector on the projector.
For audio, plug a mini-plug audio Y-cable into the Audio in connector on
the projector and into the video device’s left and right audio out connectors.
connect S-video and audio cables
connect video and audio cables
Connect the black power cable to the connector on the back of the projector
and to your electrical outlet.
NOTE: Always use the power cable that shipped with the projector.
To connect a progressive scan EDTV or HD source, use the Component to
M1 adapter (sold separately).
connect power cable
9
Page 19
Displaying a video image
Remove the lens cap.
remove lens cap
Press the Power button on the top of the projector or the remote.
The Power light on the Status Indicator Panel (page 12) blinks green and the
fans start to run. When the lamp comes on, the start up screen displays and
the Power light is steady green. It can take a minute for the image to achieve
full brightness.
.
? No startup screen? Get help on page 12.
Plug in and turn on the video device.
The video device’s image should appear on the projection screen. If it
doesn’t, press the Source button on the keypad.
Adjust the height of the projector by pressing the release button to extend
the elevator foot. Rotate the leveling foot, if necessary.
Position the projector the desired distance from the screen, so that the lens is
perpendicular to the screen. See page 36 for a table listing screen sizes and
distances to the screen.
press Power button
turn on video device
adjust height
elevator
foot
adjust distance
release button
rotate
leveling
foot
10
Page 20
Adjust the zoom or focus rings by rotating them until the desired image size
and focus are produced.
adjust zoom and focus
If the image is not square, adjust the vertical keystone using the buttons on
the keypad.
Press the upper Keysto ne button to reduce the upper part of the image, and
press the lower Keysto ne button to reduce the lower part.
You can also adjust the keystone via the menus. See page 25.
Adjust the volume on the keypad.
Adjust the Contrast, Brightness, Color, or Tint in the Picture menu.
See page 24 for help with the menus.
focus
zoom
adjust keystone
adjust volume
adjust Picture menu
11
Page 21
Shutting down the projector
The projector automatically blanks the screen after no active source is
detected for 30 minutes. This blank screen helps preserve the life of the projector. The image returns when an active source is detected or a remote or
keypad button is pressed.
Screen Save
You can make the blank screen appear after five minutes by turning on
Screen Save in the Settings>System menu. See page 29. There are six time
options for the Screen Save feature. They range from five minutes to 30 minutes with five minute intervals.
Power Save
The projector also has a Power Save feature that automatically turns the
lamp off after no signal is detected for 20 minutes. After 10 additional min
utes with no signal, the projector powers down. If an active signal is
received before the projector powers down, the image is displayed. You
must press the Power button to display an image after 30 minutes have
passed. When Power Save is enabled, Screen Save is disabled. See
page 29.
Turning off the projector
To turn off the projector, press the Powe r button and verify that you want to
turn the projector off by pressing the Power button again within 3 seconds.
You can cancel the shutdown by not pressing the Power button a second
time. The lamp turns off and the LED blinks amber for 1 minute while the
fans continue to run to cool the lamp. When the lamp has cooled, the LED
lights amber and the fans stop. Unplug the power cable to completely
power off the projector.
Troubleshooting your setup
If your image appears correctly on the screen, skip to the next section
(
page 21). If it does not, troubleshoot the setup.
The Status Indicator Panel on top of the projector indicates the state of the
projector and can help you troubleshoot.
.
Table 1: Status indicator light behavior and meaning
Status Indicator Panel Symbols Meaning
Power, solid amber
-
Power, blinking green
Power, solid green
Power, blinking amber
Thermometer The projector is too hot. Make sure the
Lamp Turn off the projector and wait one
Wrench/Service Turn off the projector and wait one
The projector is plugged in.
The power button has been pressed and
the software is initializing.
The projector is on and initialized.
The power button has been pressed twice
to turn the projector off and the fans are
running to cool the projector.
vents aren’t blocked (see
off the projector and wait one minute,
then turn the projector on again. Contact
Technical Support if the problem persists
minute, then turn the projector on again.
If the lamp light turns on again, replace the
lamp and reset the lamp timer.
minute, then turn the projector on again.
If the service lamp turns on again, service
is required. Visit www.infocus.com/service
to contact Service.
page 19). Turn
.
12
Page 22
Source Troubleshooting
Problem Solution Result
No startup screen
Only startup screen appears
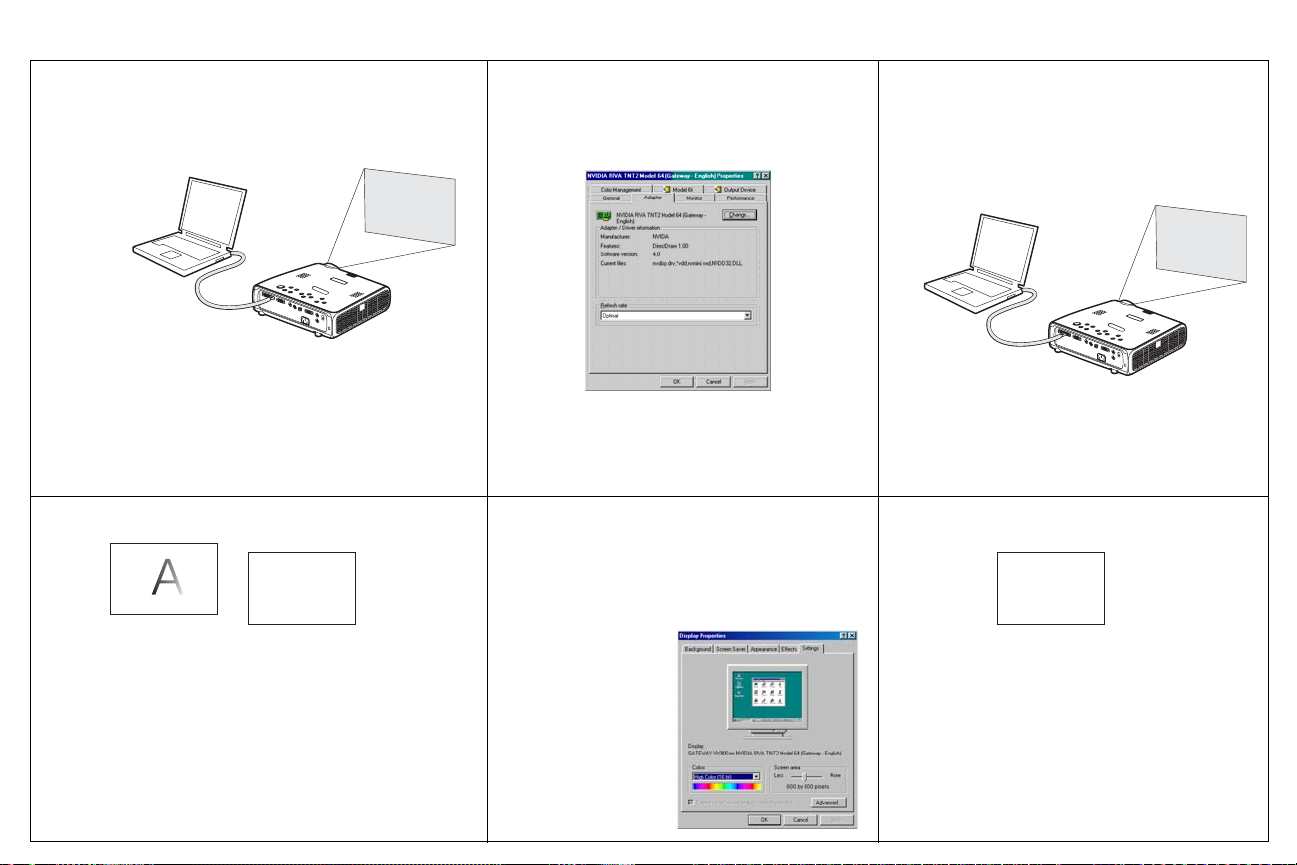
A
Plug power cable in, press Power button.
Remove lens cap.
Press the Source button
Activate laptop’s external port
or restart
laptop
Correct image
Computer image projected
A
A
13
Page 23
No computer image, just the words “Signal out of
range”
Adjust computer refresh rate in Control
Panel>Display>Settings>Advanced>
Adapter (location varies by operating
system)
Computer image projected
A
For PC: Image fuzzy or cropped
A
A
Signal out of
range
You may also need to set a different
resolution on your computer, as shown
in the following problem, “Image fuzzy
or cropped”
Set your computer’s display resolution to
the native resolution of the projector
(Start>Settings>Control
Panel>Display>Settings tab, select
1024x768)
For a laptop,
disable laptop
monitor
or turn-on dualdisplay mode
A
Image clear and not cropped
A
A
14
Page 24
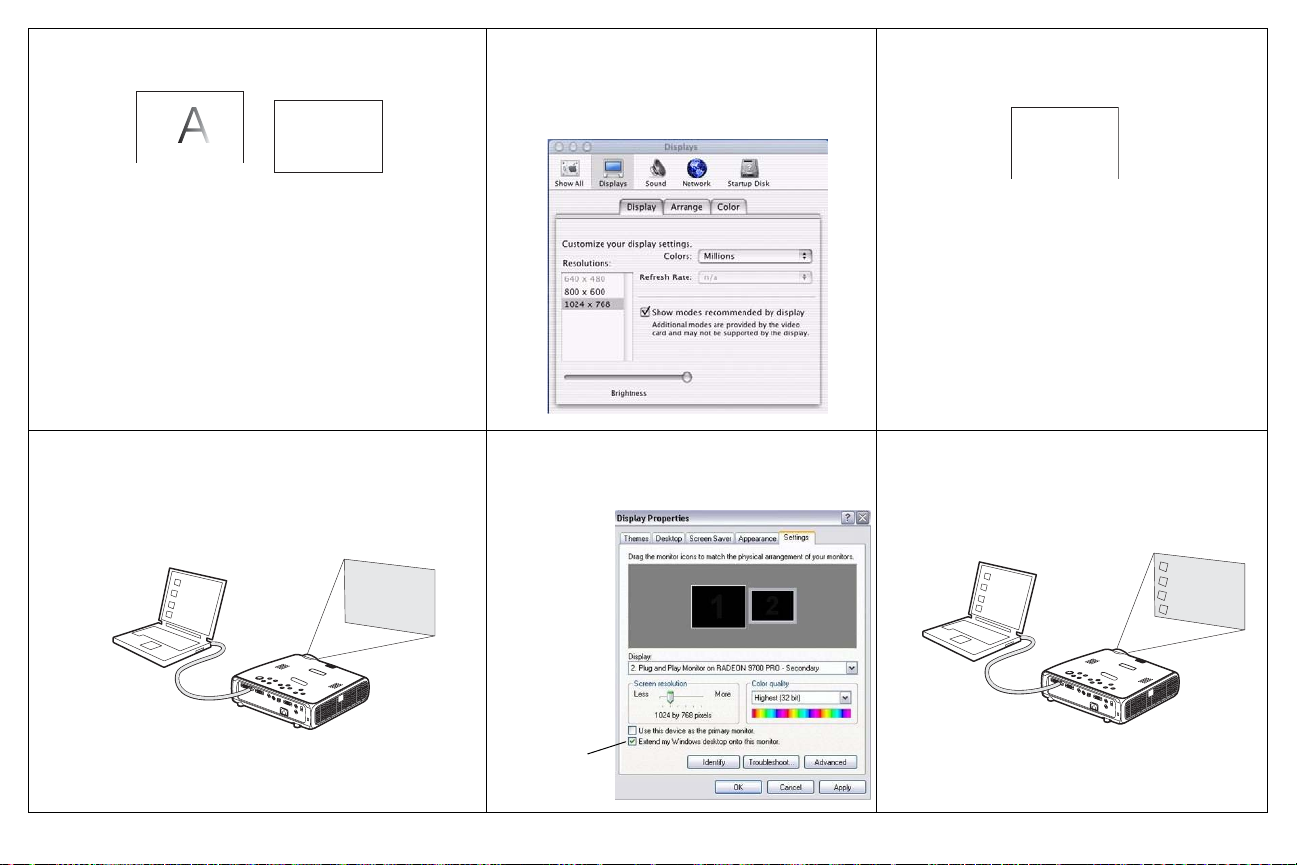
For Macintosh: Image fuzzy or cropped
A
A
Set your computer’s display resolution to
the native resolution of the projector
(Apple menu>System
Preferences>Displays, choose 1024x768)
Image clear and not cropped
A
Only my laptop’s background appears, not the
Desktop icons
A
A
Disable “Extend my Windows Desktop” in
Control Panel>Display>Settings>Display 2
(location varies by operating system)
Uncheck this
option, then
click Apply
15
Background and Desktop projected
A
A
Page 25
The video embedded in my PowerPoint
presentation does not play on the screen
Turn off the internal LCD display on your
laptop
Embedded video plays correctly
A
B
Projector troubleshooting
Problem Solution Result
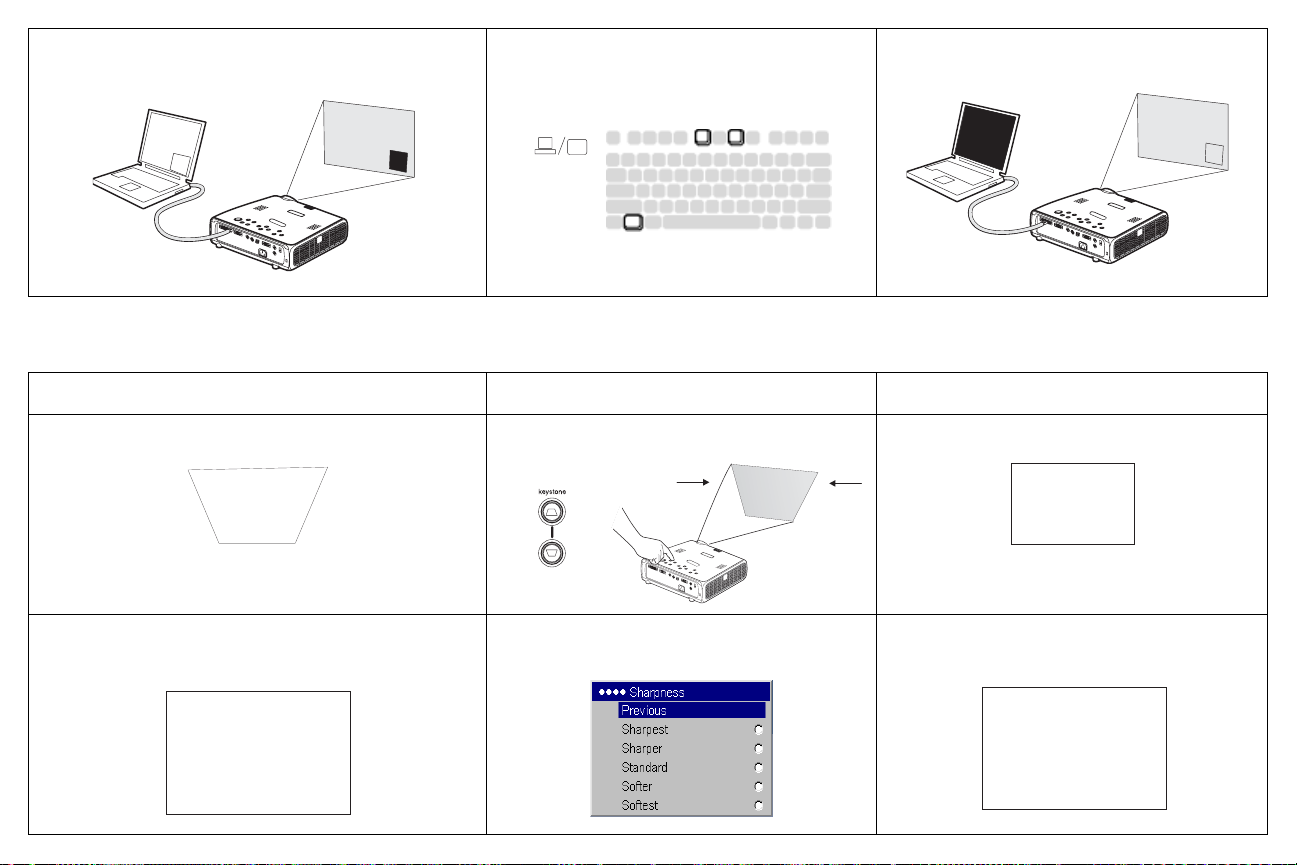
Image not square Adjust keystone on keypad or Picture menu
Image not sharp
A
Adjust the focus lens or Sharpness in the
Picture>Advanced menu
Square image
Correct image
A
B
ABAB
AB
16
Page 26

Image does not fit 16:9 screen
Change aspect ratio to 16:9 in
Picture>Aspect ratio menu
Correct image
Image upside down
A
Image reversed left to right
A
B
Turn off Ceiling in Settings>System menu
Turn off Rear in Settings>System menu
17
Correct image
AB
Correct image
AB
Page 27

Projected colors don’t match source
Adjust color, tint, color temperature,
brightness, contrast in the menus
Correct image
COLOR
Image not centered on screen
Move projector, adjust zoom, adjust height
zoom
Adjust horizontal or vertical position in
Picture>Advanced menu
COLOR
Correct image
18
Page 28

Lamp won’t turn on, Temperature light is on
Temperature light
“Change lamp” message appears at startup, lamp
won’t turn on, Lamp light is turned on
Lamp light
Make sure vents aren’t blocked; allow
projector to cool for one minute
Lamp must be replaced (page 33)
Unplug projector; wait one minute; plug in
projector and turn it on: lamp lights
Lamp turns on
Still having problems?
If you need assistance, visit the Service and Support section of our website
or call us.
This product is backed by a limited warranty. An extended warranty plan
may be purchased from your dealer. When sending the projector in for
repair, we recommend shipping the unit in its original packing material, or
having a professional packaging company pack the unit. Please insure your
shipment for its full value.
19
Page 29

Using the keypad buttons
Most buttons are described in detail in other sections, but here is an overview of their functions:
power–turns the projector on (page 7) and off (page 12).
menu–opens the on-screen menus (page 24).
select–confirms choices made in the menus (page 24).
up/down arrows–navigates to and adjusts settings in the menus (page 24).
auto image–resets the projector to the source.
presets–cycles through the available preset settings (page 26).
keystone–vertical keystone adjusts the squareness of the image (page 8).
You can also adjust the keystone via the menus. See page 25.
volume–adjusts sound (page 22).
source–changes the active source.
menu navigation buttons
20
Page 30

Using the remote control
The remote uses two (2) provided AA batteries. They are easily installed by
sliding the cover off the remote’s back, aligning the + and - ends of the batteries, sliding them into place, and then replacing the cover.
Caution: When replacing the batteries, be aware that using batteries other
than the type provided with the projector may risk severe damage to the
remote. When disposing of the batteries, be sure to do so in an environmen
tally proper manner.
To operate, point the remote at the front of the projector (not at the computer). The range of optimum operation is about 15 feet (4.5m).
Press the remote’s Powe r button to turn the projector on and off (see
page 12 for shutdown info).
Press the remote’s Menu button to open the projector’s menu system. Use
the arrow buttons to navigate, and the Select button to select features and
adjust values in the menus. See page 24 for more info on the menus.
The remote also has a Source button to switch between sources.
If you connect the USB portion of the M1-DA computer cable (page 5) you
can use the up and down arrow navigation buttons to advance slides in a
PowerPoint presentation.
Troubleshooting the remote
• Make sure the batteries are installed in the proper orientation and are
not dead.
• Make sure you’re pointing the remote at the projector or the screen, not
the computer, and are within the remote range of 15 feet (4.5m). For
best results, point the remote at the projector.
navigation
buttons
-
21
Page 31

Using the audio
To play sound from the projector, connect your source to the Audio In connector on the projector.
To adjust the volume, use the buttons on the keypad.
To adjust the balance or turn off the projector’s chime, use the Audio menu
(see page 28).
Troubleshooting audio
If there is no sound, check the following:
• Make sure the audio cable is connected.
• Make sure mute isn’t active.
• Make sure the volume is turned up enough. Press the Volu me button
on the keypad.
• Adjust the audio source.
• If playing a video, make sure the playback has not been paused.
Connecting external speakers
The projector can be attached to external speakers that have their own
power source by plugging a speaker cable into the projector’s Audio Out
connector.
connect audio cable
adjust volume
external speakers
22
speaker
cable
Page 32

Optimizing computer images
After your computer is connected properly and the computer’s image is on
the screen, you can optimize the image using the onscreen menus. For general information on using the menus, see page 24.
• Adjust the Keystone, Contrast, or Brightness in the Picture menu.
• Change the Aspect Ratio. See page 25 for details.
• Adjust the Color Space, Temperature or Control in the Advanced
menu.
• Adjust the Phase, Tracking, or Horizontal or Vertical position in the
Advanced menu.
• Once you have optimized the image for a particular source, you can
save the settings using Presets. This allows you to quickly recall these
settings later. See page 26.
Presentation features
Several features are provided to make giving presentations easier. The following is an overview, details are found in the menu section on page 24.
• The Custom key, available on several optional remotes only, allows you
to assign various features to the button. See
• The Startup Logo menu option lets you change the default startup
screen to a black, white, or blue screen. See page 29.
• Two menu options, Power Save and Screen Save, are provided to auto-
matically shut down the projector after several minutes of inactivity or
display a blank screen. This helps preserve lamp life. See page 29.
page 30 for details.
• Adjust the Keystone, Contrast, Brightness, Color, or Tint in the Picture
menu. See page 25.
• Change the Aspect ratio. Aspect ratio is the ratio of the image width to
image height. TV screens are usually 1.33:1, also known as 4:3. HDTV
and most DVDs are 1.78:1, or 16:9. Choose the option that best fits your
input source. See
• Select a Sharpness, Color Temperature, or Video Standard setting. See
page 27.
• Adjust the Color Control or White Peaking settings. See page 27.
page 25.
Customizing the projector
You can customize the projector for your specific setup and needs. See
page 28 to page 32 for details on these features.
• For rear projection, turn Rear mode on in the Settings>System menu.
• For ceiling mounted projection, turn Ceiling mode on in the Set-
tings>System menu.
• Specify which source the projector checks first for active video during
power-up.
• Specify the function of the Custom Key on the optional remote.
• Turn the projector’s display messages on and off.
• Turn on power saving features.
• Specify blank screen colors and startup logos.
• Specify the menu language.
• Control your projector using RS-232 commands. See page 6.
Optimizing video images
After the video device is connected properly and the image is on the screen,
you can optimize the image using the onscreen menus. For general information on using the menus, see page 24.
23
Page 33
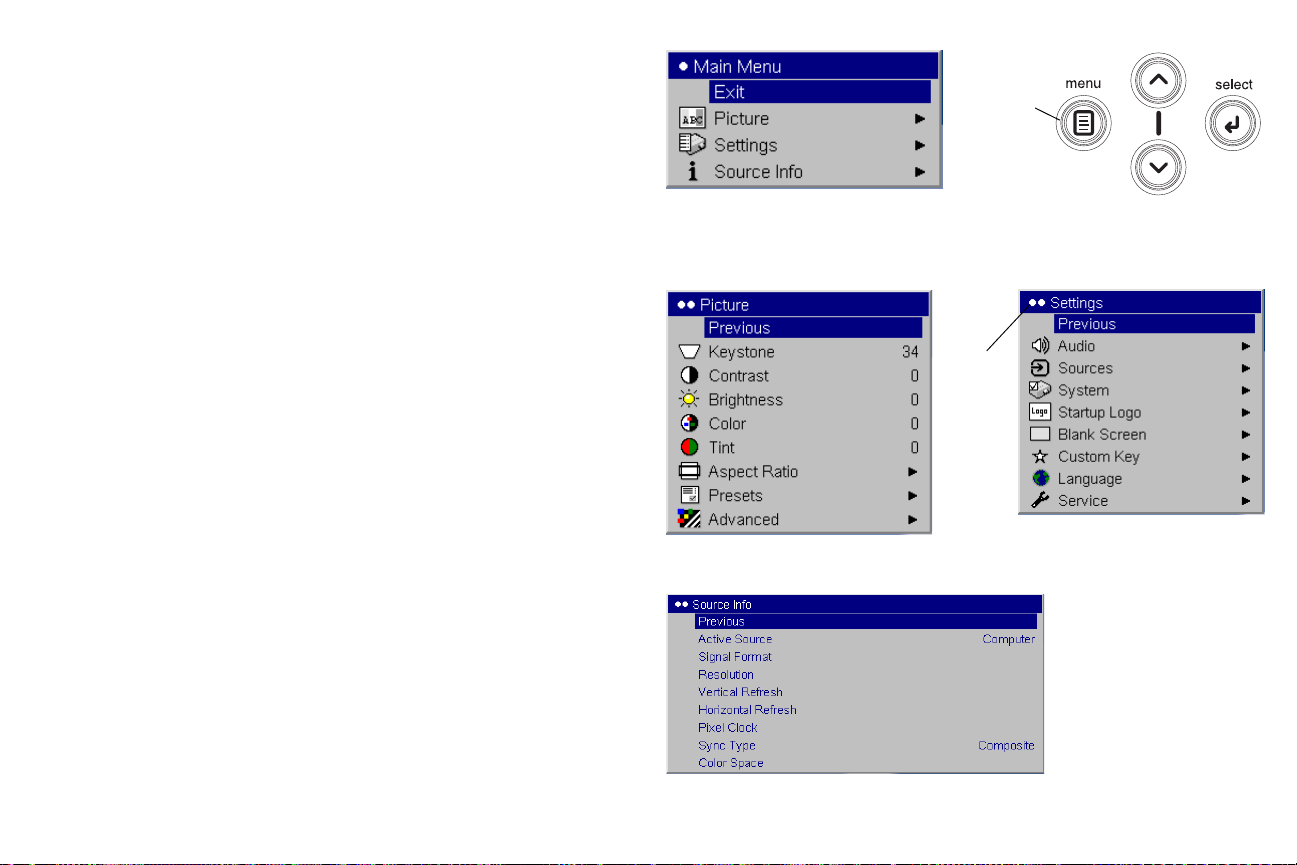
Using the menus
To open the menus, press the Menu button on the keypad or remote. (The
menus automatically close after 60 seconds if no buttons are pressed.) The
Main menu appears. Use the arrow buttons to move up and down to highlight the desired submenu, then press the Select button.
To change a menu setting, highlight it, press Select, then use the up and
down arrow buttons to adjust the value, select an option using radio buttons, or turn the feature on or off using check boxes. Press Select to confirm
your changes. Use the arrows to navigate to another setting. When your
adjustments are complete, navigate to Exit, then press Select to go to the
previous menu; press the Menu button at any time to close the menus.
Dots appear before the menu name. The number of dots indicate the menu’s
level, ranging from one (the Main menu) to four (the most nested menus).
The menus are grouped by usage:
• The Picture menu provides image adjustments.
• The Settings menu provides set-up type adjustments that are not
changed often.
• The Source Info menu provides a read-only display of information
about the projector and source.
Certain menu items may be grayed out until a particular source is connected. For example, Sharpness is only available for video sources and will
be hidden when a computer source is active. Other menu items may be
grayed out when they are not available. For example, Brightness is grayed
out until an image is active.
Main menu
Picture
menu
Menu
button
Keypad navigation
buttons
Dots
Settings
menu
24
Source Info menu
Page 34
Picture menu
To adjust the following six settings, highlight the setting, press Select, use
the up and down arrows to adjust the values, then press select to confirm
the changes.
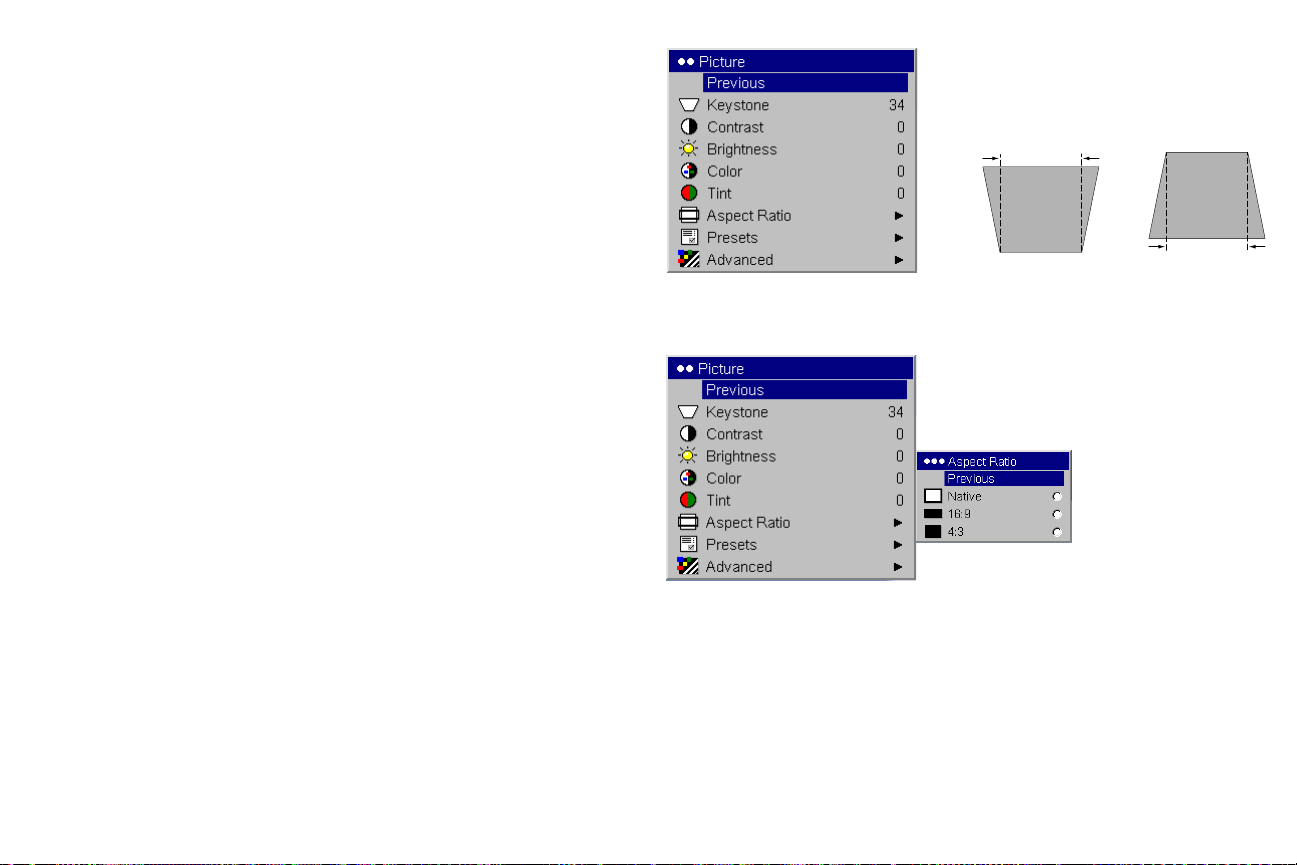
Key stone : adjusts the image vertically and makes a squarer image. You can
also adjust keystone from the keypad.
Contrast: controls the degree of difference between the lightest and darkest
parts of the picture and changes the amount of black and white in the
image.
Brightness: changes the intensity of the image.
Color: (video and component sources only) adjusts a video image from
black and white to fully saturated color.
Tint: (NTSC video sources only) adjusts the red-green color balance in the
image.
increasing keystone
decreasing keystone
Aspect Ratio: Aspect ratio is the ratio of the image width to image height.
TV screens are usually 1.33:1, also known as 4:3. HDTV and most DVDs are
1.78:1, or 16:9. The default is 4:3, which displays the input resized up or
down to fill the display area.
The aspect ratio selection is saved for each source.
Aspect Ratio
25
Page 35
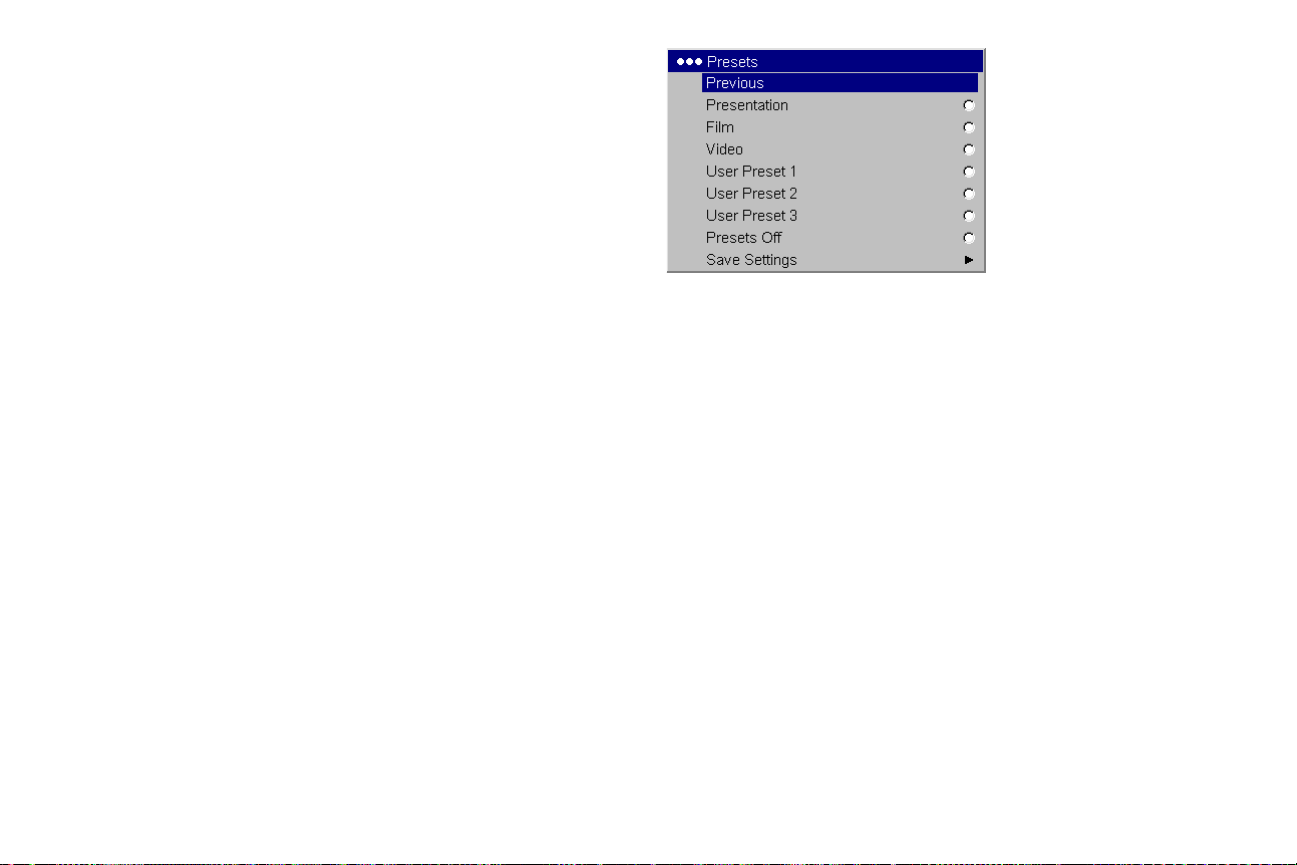
Presets: Presets are provided that optimize the projector for displaying
computer presentations, film images, and video images. Film input is material originally captured on a film camera, like a movie; video input is material originally captured on a video camera, like a TV show or sporting event.
There are also user-definable presets. To set a preset for the current source,
adjust the image, select Save Settings in the Presets menu, then select Save
User 1 (or 2 or 3). You can recall these settings in the future by selecting the
User 1 preset.
If you make any adjusts the image, Presets Off will automatically be
selected in the Preset menu to indicate changes have been made.
To restore the factory default settings, choose Factory Reset in the Set-
tings>Service menu.
Presets
26
Page 36
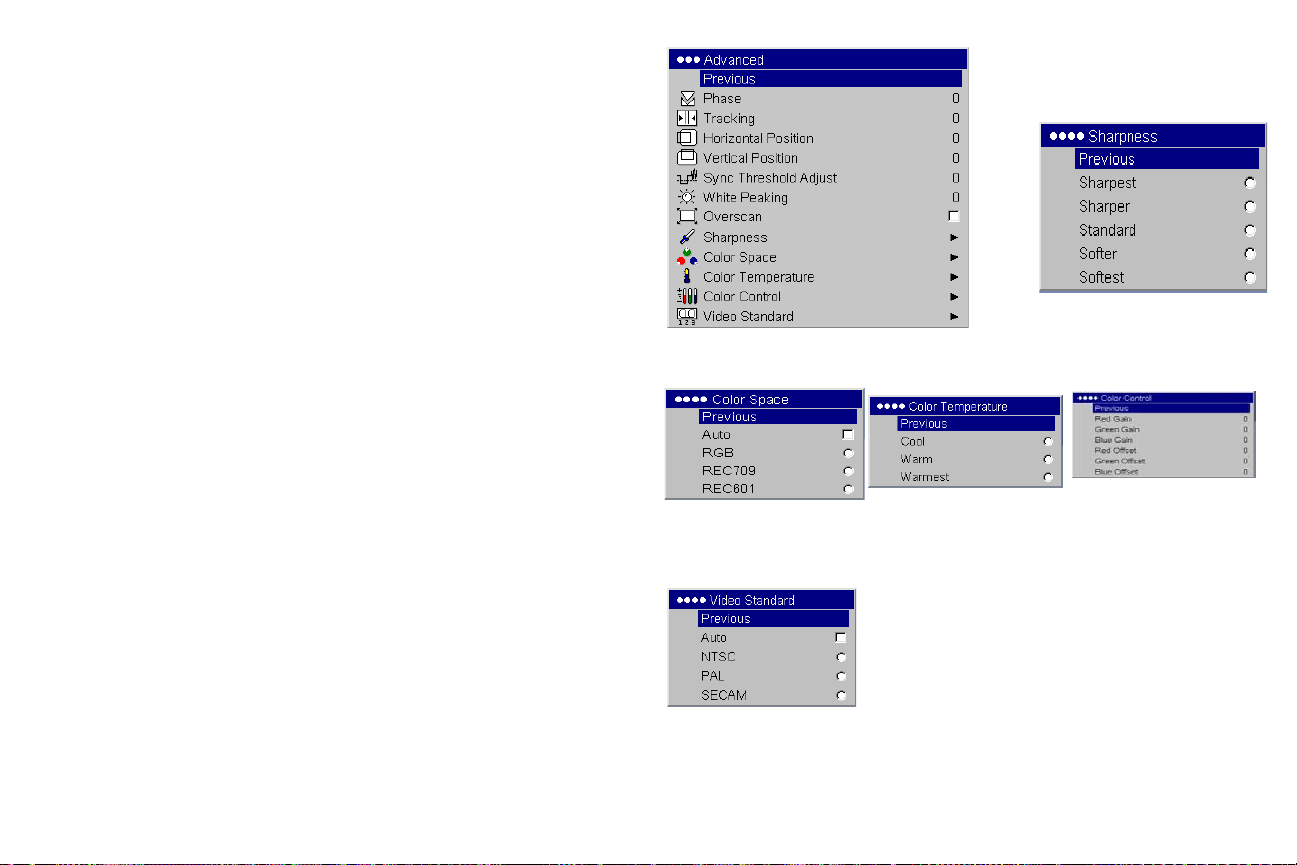
Advanced settings
The following 4 options are for computer and component sources only.
Phase: adjusts the horizontal phase of a computer source.
Tr a ck i n g : adjusts the vertical scan of a computer source.
Horizontal/Vertical Position: adjusts the position of a computer source.
Sync Threshold Adjust: (enhanced and high definition sources only) If a
hardware device, such as a DVD player, is not syncing properly with the
projector, select this option to help it sync.
White Peaking: (video sources only) adjusts the white level processed in
the image. It increases the brightness of whites that are near 100%.
Overscan: (video sources only) removes noise around the video image.
Sharpness: (video sources only) changes the clarity of the edges of a video
image. Select a sharpness setting.
Color Space: This option applies to computer sources. It allows you to
select a color space that has been specifically tuned for the video input.
When Auto is selected, the projector automatically determines the standard.
To choose a different setting, turn off Auto, then choose RGB for computer
sources, choose either REC709 or REC601 for component sources.
Color Temperature: changes the intensity of the colors. Select a listed
value.
Color Control: allows you to individually modify each color. Highlight the
color, press Select, then use the arrows to adjust the value.
Color Space
Advanced
Color Temperature
Sharpness
Color Control
Video Standard: (video sources only) When it is set to Auto, the projector
attempts to pick the video standard automatically based on the input signal
it receives. (The video standard options may vary depending on your region
of the world.) If the projector is unable to detect the correct standard, the
colors may not look right or the image may appear “torn.” If this happens,
manually select a video standard by selecting NTSC, PAL, or SECAM from
the Video Standard menu.
Video Standard
27
Page 37
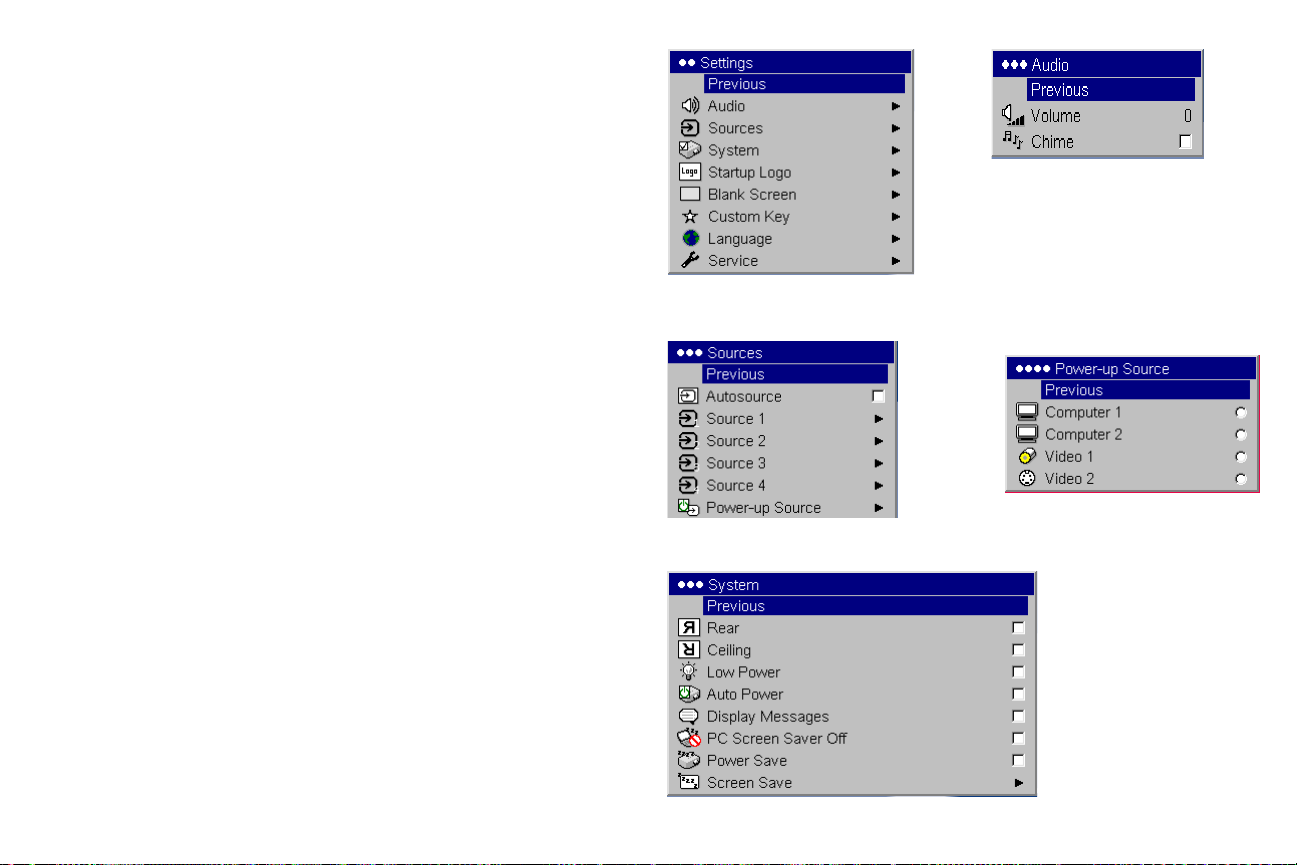
Settings menu
Audio: allows adjustments to the volume and balance, and turns the projec-
tor’s startup Chime on and off.
Sources: allows you to assign a particular input to a specific source key
when using an optional remote. Also allows selection of a default Power-up
Source and enables or disables Autosource.
Sources>Power-up Source: this determines which source the projector
checks first for active video during power-up.
Sources>Autosource: When Autosource is not checked, the projector
defaults to the source selected in Power-up Source. If no source is found, a
blank screen displays. When Autosource is checked, Power-up Source
determines which source the projector defaults to at startup. If no signal is
present, the projector checks the sources in order until a source is found or
until power down.
System>Rear: reverses the image so you can project from behind a translucent screen.
Ceiling: turns the image upside down for ceiling-mounted projection.
Auto Power: When Auto Power is checked, the projector automatically
goes into the startup state after the projector is powered on. This allows con
trol of ceiling mounted projectors with a wall power switch.
Low Power: Turn this on to lower the light output of the lamp. This also
lowers the fan speed, making the projector quieter.
Display Messages: displays status messages (such as “Searching” or
“Mute”) in the lower-left corner of the screen.
Audio
Settings
Sources
-
Power-up
Source
28
System
Page 38
PC Screen Saver Off: prevents your computer from going into Screen Save
mode. This feature is only available if the USB portion of the computer cable
is connected to your computer (
page 5).
Power Save: automatically turns the lamp off after no signals are detected
for 20 minutes. After 10 additional minutes with no signal, the projector
powers down. If an active signal is received before the projector powers
down, the image will be displayed.
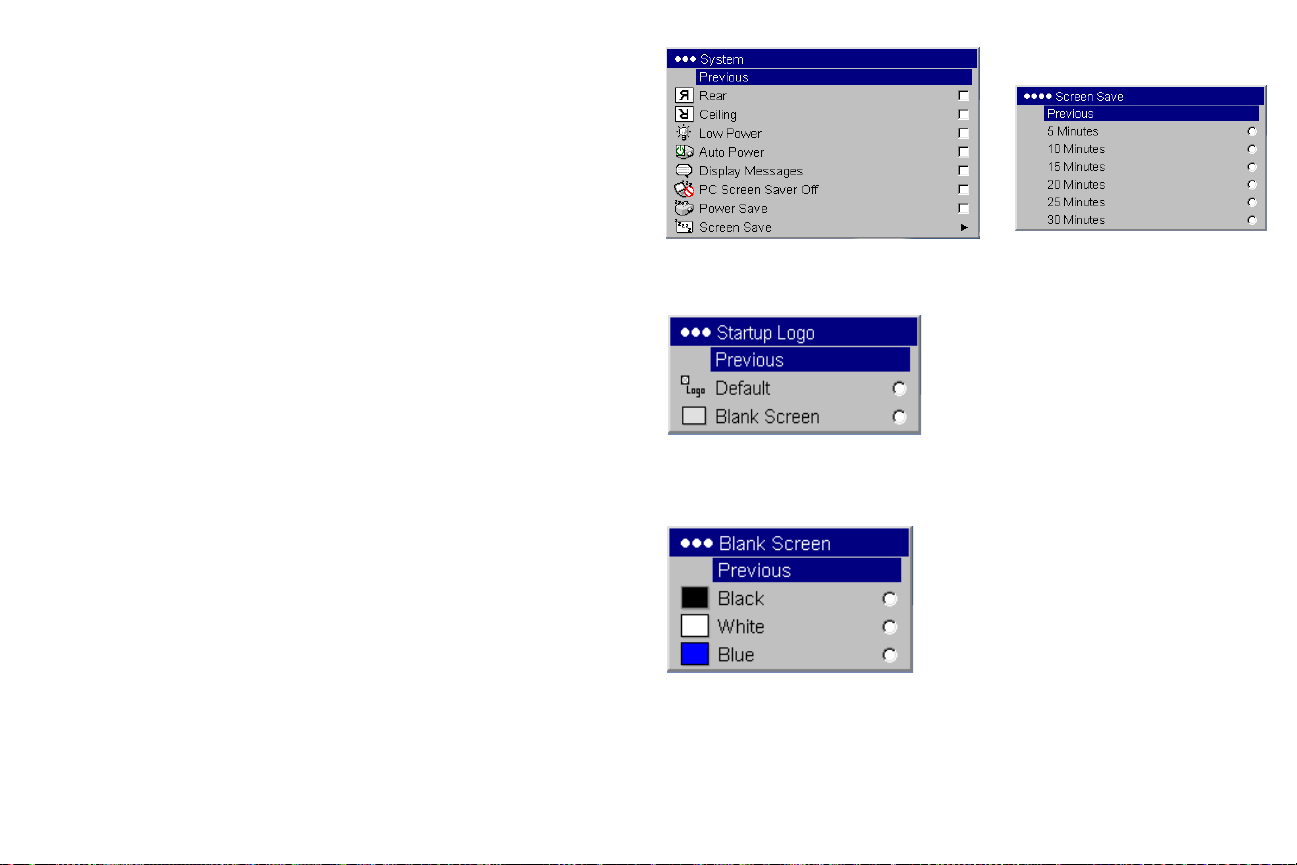
Screen Save: automatically blanks the screen with a black color after no signals are detected for a preset number of minutes. The image returns when
an active source is detected or a remote or keypad button is pressed. Screen
Save is disabled when Power Save is enabled.
System
Screen Save
Startup Logo: allows you to display a blank Black, White, or Blue screen
instead of the default screen at startup and when no source is detected.
Blank Screen: determines what color is displayed when no source is
detected3.
Startup Logo
Blank Screen
29
Page 39
Custom Key (for use with optional remote only): allows you to assign a dif-
ferent function to the Custom button on the remote to quickly and easily
use the effect. Only one effect can be enabled at a time. Highlight an effect
and press Select to choose a different one. The default effect is About.
• Blank: displays an empty screen.
• Mute: turns off all sound.
• Aspect Ratio: toggles among 4:3, 16:9, and Native (see page 25).
• Source: cycles through available sources.
• Auto Image: resets the projector to the source (page 20).
• Freeze: pauses the projected image.
• Source Info: the default effect. It opens a window with projector and
source information.
• Service Info: opens a window with projector and source information.
Language: allows you to select a language for the onscreen display of
menus and messages.
Service: to use these features, highlight them and press Select.
Factory Reset: restores all settings (except Lamp Hours) to their default
after displaying a confirmation dialog box.
Reset Lamp Hours: resets the lamp hours counter in the Service Info menu
to zero. Do this only after changing the lamp. It displays a confirmation dialog box.
PIN: see the next section.
Test Pattern: allows you to display certain patterns to adjust the image.
This feature only works with an optional remote. To display test patterns,
click the Test Pattern check box, exit the menus, then press the Blank button
on the remote. To select the patterns, use the up/down arrows on the
remote or keypad. To exit the test patterns, press the Blank button again.
Service Info: provides information about the projector and lamp.
Service Code: only used by authorized service personnel.
Custom Key
Language
Service menu
appears only when PIN is disabled
appears only when PIN is enabled
30
Page 40

PIN feature
The PIN (personal identification number) feature allows you to password
protect your projector. Once you enable the PIN feature, you must enter the
PIN before you can project an image.
To use this feature, you must register your projector at www.infocus.com/
register and follow the instructions there to get a default PIN. The PIN consists of a sequence of 5 navigation button presses. The navigation buttons
are menu, select, up arrow and down arrow. Once you have this PIN, select
Enable PIN in the Service menu. The Enter PIN dialog box appears.
Use the navigation buttons on the remote or keypad to enter the correct button press sequence. After pressing the first button, a dot appears in the current PIN slot and the highlighted cursor moves to the right one slot. When
all 5 numbers are entered correctly, press the Select button on the remote or
keypad to select OK. If the message “Incorrect PIN” appears, verify the code
and re-enter it. If you mis-enter a number, you must enter 5 numbers and
press the Select button in order to access the “Incorrect PIN” message and
re-enter the code.
To enter the PIN at projector startup:
Power up the projector. The “Enter PIN” dialog box appears after the startup screen. Enter the PIN. Use the navigation buttons on the remote or keypad to enter the correct button press sequence. See the description above for
instructions. If you lose or forget your PIN, go to www.infocus.com/pin.
To c h a n g e t h e PI N :
Select “Change PIN” in the Service menu. Enter the existing PIN. Enter the
new PIN. You can navigate between OK and Cancel by pressing the up and
down buttons on the keypad. Select OK or Cancel by pressing the Select
button. Verify the new PIN.
To reset the PIN back to the default:
Power up the projector. After the “Enter PIN” dialog box appears, press and
hold the Select button down for 10 seconds. Enter the default PIN to use
the projector. If you lose or forget your default PIN, go to
www.infocus.com/pin.
31
Page 41
Maintenance
Cleaning the lens
1 Apply a non-abrasive camera lens cleaner to a soft, dry cloth.
Avoid using an excessive amount of cleaner, and don’t apply the
cleaner directly to the lens. Abrasive cleaners, solvents or other harsh
chemicals might scratch the lens.
2 Lightly wipe the cleaning cloth over the lens in a circular motion. If you
don’t intend to use the projector immediately, replace the lens cap.
Using the security lock
The projector has a security lock for use with a cable lock system. Refer to
the information that came with the lock for instructions on how to use it.
clean the lens
with a soft dry cloth
and non-abrasive
cleaner
security lock
32
Page 42

Replacing the projection lamp
The lamp hour timer in the Service Info menu counts the number of hours
the lamp has been in use. Twenty hours before the specified end of the
lamp’s life, the message “Replace lamp” briefly appears on the screen at
each startup. When the expected lamp life has been reached, the Lamp indi
cator icon lights red (page 12).
Service Info menu
-
NOTE: You can order new lamp housings from www.infocus.com (in select
areas), your retailer or your dealer. Use only a replacement lamp with the
same type and rating as the original lamp.
1 Turn off the projector and unplug the power cable.
2 Wait 60 minutes to allow the projector to cool thoroughly.
3 Turn the projector upside down and remove the lamp door by placing a
flat-blade screwdriver into the space between the lamp door and the
projector and gently prying the door off.
4 Loosen the captive screw on the lamp module.
WARNINGS:
• To avoid burns, allow the projector to cool for at least 60 minutes before
you replace the lamp.
• Unplug the power cord before replacing the lamp.
• Do not drop the lamp module. The glass may shatter and cause injury.
• Do not touch the glass lamp screen. Fingerprints can obscure projection
sharpness.
turn off and unplug
the projector
wait 60 minutes
pry the lamp door off
loosen the screw on lamp module
33
Page 43

• Be extremely careful when removing the lamp housing. In the unlikely
event that the lamp ruptures, small glass fragments may be generated.
The lamp module is designed to contain most of these fragments, but
use caution when removing it. Before replacing a ruptured lamp, clean
the lamp compartment and dispose of cleaning materials. Wash hands
after lamp replacement.
Hg – Lamp contains mercury. Manage in accordance with local disposal laws. See www.lamprecycle.org.
5 Detach the lamp connector from the projector by gently pulling the con-
nector until it is disconnected from the projector.
6 Carefully remove the lamp module by grasping and lifting the metal
bail wire. Dispose of the lamp in an environmentally proper manner.
disconnect lamp connector
7 Install the new lamp module, making sure that it is properly seated. Be
careful not to touch the interior components of the projector.
8 Snap the bail wire back into its flat position against the lamp module.
9 Re-attach the lamp connector to the projector. Make sure the connector is
fully inserted.
10 Tighten the screw on the lamp module.
11 Replace the lamp door.
12 Plug in the power cable then press the Powe r button to turn the projec-
tor back on, then reset the lamp hour timer.
Resetting the lamp timer
To reset the lamp timer, navigate to the Settings>Service menu and select
Reset Lamp Hours.
remove module using bail wire
reset lamp time in Service menu
34
Page 44

Cleaning the lamp filter screens
In dirty or dusty environments, the dust filter screens on the lamp module
and lamp door and in the lamp compartment
high temperatures inside the lamp module. These high temperatures can
impact lamp performance and operating life. Routine maintenance to
remove dust and dirt from the screens lowers the lamp operating temperature and prolongs lamp life. To maximize lamp life you will need to clean
the screens every 250 hours. Lamp screen maintenance may need to occur
more often than 250 hours depending on your installation/use environ
ment.
1 Wait 60 minutes to allow the projector to cool thoroughly. Remove the
lamp module. Refer to
page 33 for instructions.
2 Examine the dust filter screens on each side of the lamp module. If nec-
essary, use compressed or canned air to clean the screens. Then use a
cotton swab dipped in isopropyl alcohol to lightly wipe each screen.
After you've wiped each screen, blow away any remaining contami
nants.
3 Before you replace the lamp, repeat the cleaning process on the screen in
the lamp compartment in the projector.
4 Examine the dust filter screen on the lamp door. If necessary, use com-
pressed or canned air to clean the screen.
5 Replace the lamp module and lamp door.
can become clogged, causing
-
-
screen
screen
screen
35
screen
Page 45

Appendix
Projected image size
Ta b l e 2 :
Image sizes
Distance
to screen
(feet/m)
5/1.5 2.75/0.83 3.4/1.02 2.2/0.66 2.73/0.82
10/3 5.5/1.65 6.8/2.04 4.41/1.32 5.46/1.64
15/4.6 8.25/2.53 10.2/3.13 6.61/2.03 8.2/2.51
20/6.1 11/3.36 13.6/4.15 8.81/2.69 10.93/3.33
30/9.1 16.5/5.01 20.4/6.19 13.22/4.01 16.39/4.97
32.8/10 18.0/5.5 22.3/6.8 14.45/4.41 17.92/5.46
NOTE: Visit our website for an interactive image size calculator.
Minimum
Diagonal
(feet/m)
Maximum
Diagonal
(feet/m)
Minimum
Horizontal
(feet/m)
Maximum
Horizontal
(feet/m)
36
Page 46

INDEX
A
Advanced setting 27
Aspect Ratio 25, 30
audio 22
Audio In connector 5, 9
audio volume 11
audio, troubleshooting 22
Auto Power 28
Autosource 28
B
Blank screen 29
Brightness 8
C
Ceiling 28
cleaning the lamp filter screens 35
cleaning the lens 32
Color 11, 25
Color Control 27
Color Space 27
Color Temperature 27
colors are incorrect 18
computer connections
optional 5
required 5
computer image
optimize 23
troubleshooting 13
connecting
computer 5
external speakers 22
video device 9
connector panel 4
contacting InFocus 19
Contrast 8, 11, 25
Custom key 23
D
Display Messages 28
displaying
computer image 7
video image 10
E
elevator foot 8
F
Factory Reset 30
focus 8, 11
fuzzy image 14
I
image
display computer 7
display video 10
image does not fit screen 17
image not centered 18
image not sharp 16
image not square 16
image reversed 17
image size matrix 36
image upside down 17
K
keypad buttons 20
keystone 8, 25
L
lamp, cleaning filter screens 35
lamp replacement 33
Lamp Reset 30
lamp screens, cleaning 35
lamp won’t turn on 19
Language 30
laptop
connecting 5
external video port 7
lens, cleaning 32
leveling foot 8
37
Page 47

lock, security 32
Low Power 28
M
Macintosh troubleshooting 15
Main menu 24
menu system 24
Monitor connector 6
N
no computer image 14
no startup screen 13
O
only startup screen appears 13
onscreen menus 24
Overscan 27
P
password-protecting the projector 31
PC Screen Saver 29
personal identification number 31
Picture menu 25
PIN 31
Position 27
power cable 5, 9
Power Save 12, 29
Power-up Source 28
presentation features 23
projected image sizes 36
projector
adjusting the height 8, 10
connector panel 4
customizing 23
password-protecting 31
PIN 31
positioning 8
registering 3
safety considerations 2
shutdown 12
troubleshooting problems 12
R
Rear 28
remote control 21
replacing the lamp 33
Reset 30
resetting the lamp timer 34
resolution 3
RS-232 4, 6
S
Screen Save 12, 29
screens, cleaning 35
security lock 32
serial connection 6
Service 30
Settings menu 28
Sharpness 27
shutting down the projector 12
Source troubleshooting 13
Sources 28
speakers, connecting 22
Startup Logo 29
Sync Threshold Adjust 27
T
Tint 11, 25
Tracking 27
Troubleshooting 12, 13
Turning off the projector 12
U
using the keypad buttons 20
V
VESA connector 6
video connections 9
video images, optimizing 23
Video Standard 27
W
White Peaking 27
Z zoom 8, 11
38
 Loading...