

Page 1
in100
Page 2

Declaration of Conformity
Manufacturer: InFocus Corporation, 13190 SW 68th Parkway, Suite 200, Portland, Oregon
97223-8368 USA
We declare under our sole responsibility that this projector conforms to the following
directives and norms:
ErP Directive 2009/125/EC
EMC Directive 2004/108/EC
EMC: EN 55022, EN 55024, EN 61000-3-2, EN 61000-3-3
Low Voltage Directive 2006/95/EC
Safety: IEC 60950-1: 2005;EN 60950-1:2006 +A11:2009
Trademarks
Apple, Macintosh, and PowerBook are trademarks or registered trademarks of Apple
Computer, Inc. IBM is a trademark or registered trademark of International Business
Machines, Inc. Microsoft, PowerPoint, and Windows are trademarks or registered
trademarks of Microsoft Corporation. Adobe and Acrobat are trademarks or registered
trademarks of Adobe Systems Incorporated. DLP®, DLP Link and the DLP logo are
registered trademarks of Texas Instruments and BrilliantColor™ is a trademark of Texas
Instruments. InFocus, In Focus, and INFOCUS (stylized) are either registered trademarks or
trademarks of InFocus Corporation in the United States and other countries.
NOTE: This product is covered electrical and electronic equipment under
the European Union's Waste from Electrical and Electronic Equipment
("WEEE") Directive (2002/96/EC). The WEEE Directive requires that covered
equipment be collected and managed separately from typical household waste
in all EU member states. Please follow the guidance of your local
environmental authority or ask the shop where you purchased the product
for collection or recycling options.
FCC Warning
This device complies with part 15 of the FCC Rules. Operation is subject to the following
two conditions: (1) This device may not cause harmful interference, and (2) this device must
accept any interference received, including interference that may cause undesired operation.
Note: This equipment has been tested and found to comply with the limits for a Class B
digital device, pursuant to part 15 of the FCC Rules. These limits are designed to provide
reasonable protection against harmful interference in a residential installation. This
equipment generates, uses and can radiate radio frequency energy and, if not installed and
used in accordance with the instructions, may cause harmful interference to radio
communications. However, there is no guarantee that interference will not occur in a
particular installation. If this equipment does cause harmful interference to radio or television
reception, which can be determined by turning the equipment off and on, the user is
encouraged to try to correct the interference by one or more of the following measures:
--Reorient or relocate the receiving antenna.
--Increase the separation between the equipment and receiver.
--Connect the equipment into an outlet on a circuit different from that to which the receiver
is connected.
--Consult the dealer or an experienced radio/TV technician for help.
Changes or modifications not expressly approved by InFocus Corporation may void authority
to operate the equipment.
Canada
This Class B digital apparatus complies with Canadian ICES-003. Cet appareil numérique de la
classe B est conforme à la norme NMB-003 du Canada.
Agency Approvals
cULus
Other specific Country Approvals may apply. Please see product certification label.
This document applies to regulatory model IN122ST/IN124ST/IN126ST.
Input ratings: 100-240Vac, 3.2A, 50-60Hz
InFocus reserves the right to alter product offerings and specifications at any time without
notice.
1
Page 3

Table of Contents
Positioning the projector 6
Connecting a computer source 7
VGA connection 7
HDMI connection 7
Connecting power 7
Optional computer connections 7
Displaying an image 8
Adjusting the image 9
Connecting a video device 10
Video device connections 10
Composite video connection 10
VGA connection 10
Component video connection 10
S-video connection 10
Shutting down the projector 11
Troubleshooting your setup 11
Using the remote control 19
Using the audio 20
Using the keypad buttons 21
Optimizing computer images 22
Presentation features 22
Optimizing video images 23
Customizing the projector 23
Using the menus 24
Basic Menu 25
Advanced Menu 26
Maintenance 30
Cleaning the lens 30
Using the security lock 30
Replacing the projection lamp 31
2
Page 4
Important Operating Considerations for Safety
• Refer to this guide for proper startup and shutdown procedures.
• Follow all warnings and cautions in this manual and on the projector.
• Place the projector in a horizontal position no greater than 15 degrees off
axis.
• Locate the projector at least 4' (1.2m) away from any heating or cooling vents.
• Do not block ventilation openings. Locate the projector in a well-ventilated
area without obstructions to intake or exhaust vents. Do not place the
projector on a tablecloth or other soft covering that may block the vents.
• Do not place the projector in direct sunlight, humid, greasy or dusty places or
in places where the projector may come into contact with smoke or steam.
• Do not touch or block the projector lens with any objects as this can damage
the projector lens. Scratches, gouges and other lens damage are not covered
by the product warranty.
• Do not look directly into the lens while the projector is being used.
• Do not drop the projector.
• Do not spill liquid on the projector. Spilled liquid may damage the projector.
• Use the power cord provided. Connect the power cord to a receptacle with a
protective safety (earth) ground terminal. A surge-protected power strip is
recommended.
• Do not overload wall outlets.
• When disconnecting the power cord, hold the plug, not the cord.
• Wash hands after handling the cables supplied with this product.
• The projector remote control uses batteries. Make sure the batteries’ polarity
(+/-) is aligned correctly. Dispose of used batteries in accordance with local
disposal laws.
• Use an InFocus approved ceiling mount kit for proper fitting, ventilation and
installation. The warranty does not cover any damage caused by use of nonapproved ceiling mount kits or by installing in an improper location.
• When the projector is ceiling mounted, wear protective eyewear to prevent
eye injury before opening lamp door.
• Refer all service to qualified service personnel. Servicing your own projector
can be dangerous to you and will void the warranty.
• Only use replacement parts specified by InFocus. Unauthorized substitutions
may result in fire, electrical shock, or injury, and may void the warranty
• Only genuine InFocus lamps are tested for use in this projector. Use of non
InFocus lamps may cause electrical shock and fire, and may void the projector
warranty.
• Hg – Lamp contains mercury. Manage in accordance with local
disposal laws. See www.lamprecycle.org.
• The projector uses a high-pressure mercury glass lamp. The lamp may fail
prematurely, or it may rupture with a popping sound if jolted, scratched, or
handled while hot. The risk of lamp failure or rupture also increases as the
lamp age increases; please replace the lamp when you see the “Replace Lamp”
message.
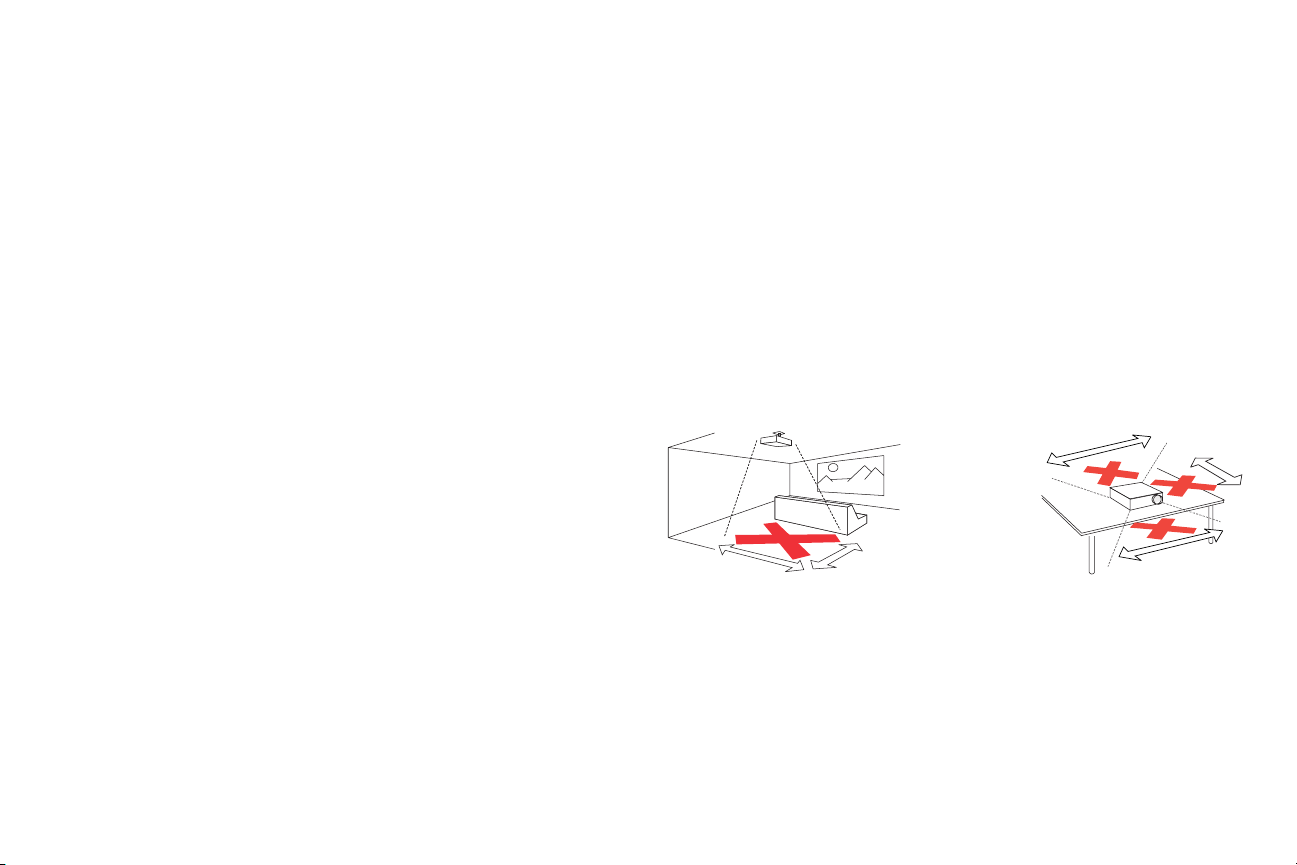
• In the unlikely event of a lamp rupture, particles may exit through the
projector vents. Keep people, food, and drinks out of the "keep out" area
under and around the projector, as indicated by the "X" areas below.
3’ / 1 m
8
’
/2.4m
’
5
/1.5m
• Follow these instructions to help ensure image quality and lamp life over the
life of the projector. Failure to follow these instructions may affect the
warranty. For complete details of the warranty, see the Warranty/Safety
booklet.
3’ / 1 m
2’ / 0.6 m
3
Page 5
Introduction
Your new digital projector is simple to connect, easy to use, and straightforward to maintain.
It is a versatile projector that is flexible enough for business presentations and home video
viewing too. IN122ST has native SVGA 800 x 600 resolution, IN124ST has native XGA 1024
x 768 resolution, and IN126ST has native WXGA 1280 x 800 resolution. It is compatible
with a wide variety of computers and video devices.
Product specifications
To read the latest specifications on your multimedia projector, be sure to visit our website at
www.infocus.com, as specifications are subject to change.
Accessories
The standard accessories that came with your projector are listed in the included Quick Start
documentation. Optional accessories can be found on our website at
support or at your retailer or dealer.
Online registration
Register your projector on our website at www.infocus.com/register to activate your
warranty and receive product updates, announcements, and registration incentives.
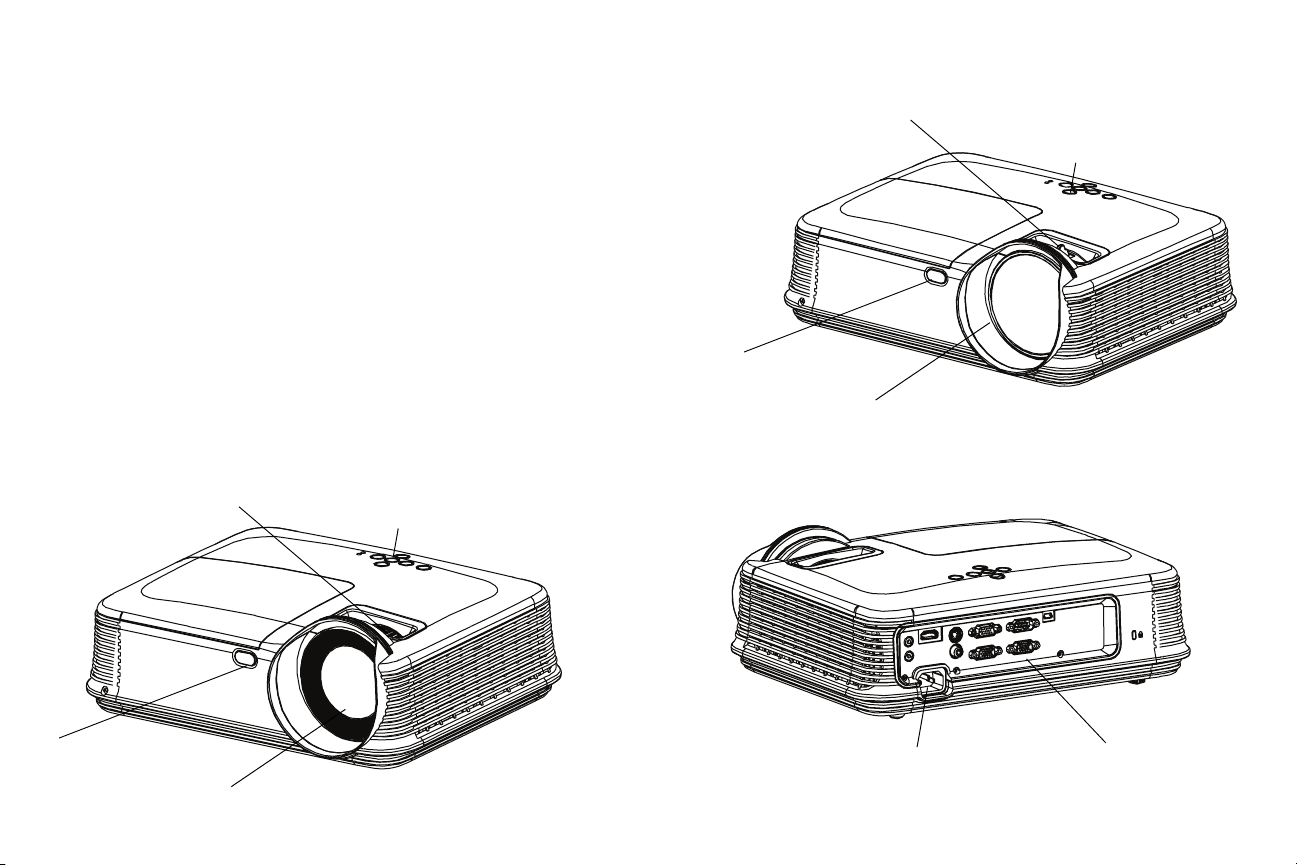
focus
keypad
www.infocus.com/
remote control
receiver (IR)
lens
focus
keypad
IN126ST
remote control
receiver (IR)
lens
IN122ST/IN124ST
power cord
connector
connector
panel
4
Page 6
Connector panel
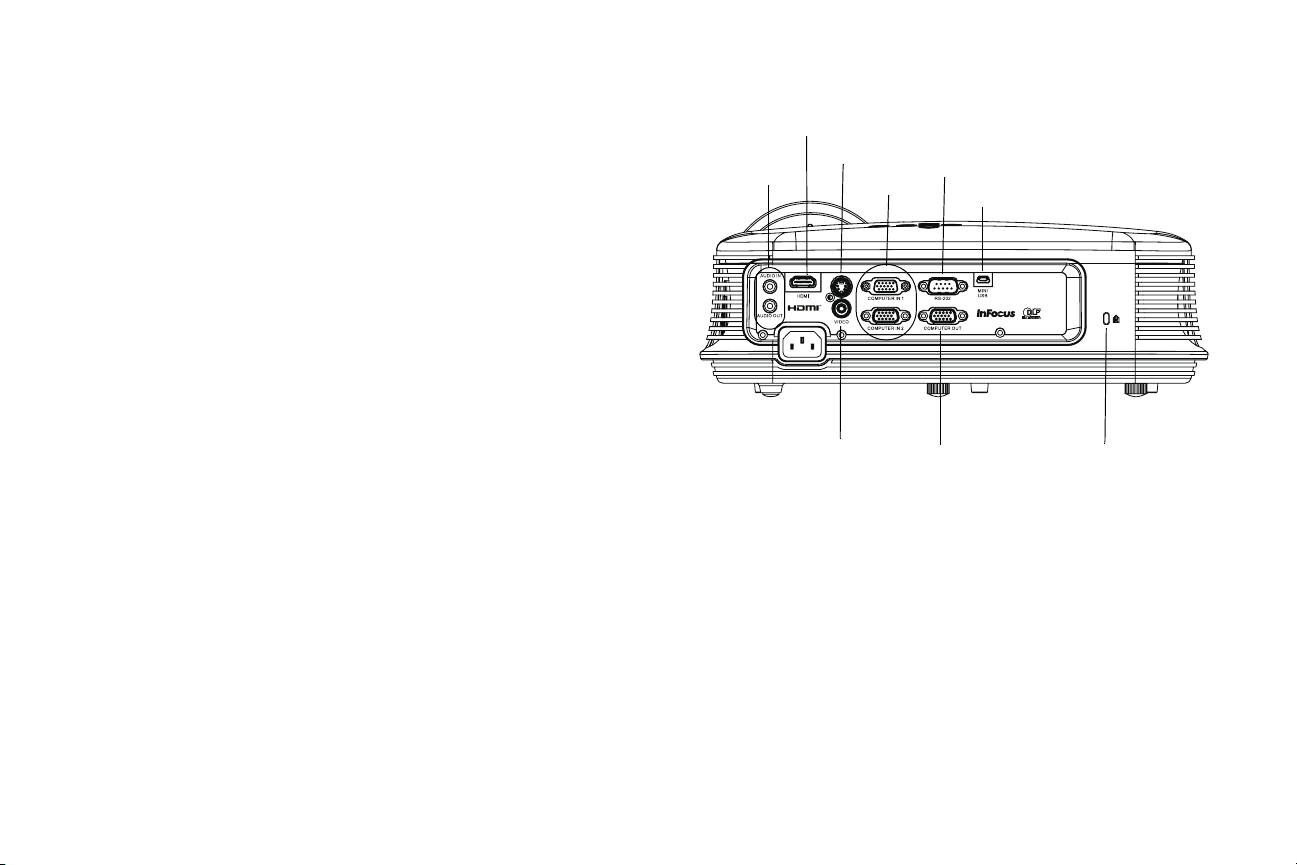
The projector provides both computer and video connection options, including:
• VGA computer
• Composite video
•HDMI
•S-video
• USB mini B connector for firmware upgrades and presentation slide control.
• Monitor out, for VGA pass through to an external monitor.
• Audio input for video and computer.
• Audio output to external speakers.
• RS232 serial control. Command control codes are on our support website at
www.infocus.com/support.
audio in/out
HDMI
S-video
computer
RS232
USB mini B
composite
video
monitor
out
security lock
5
Page 7
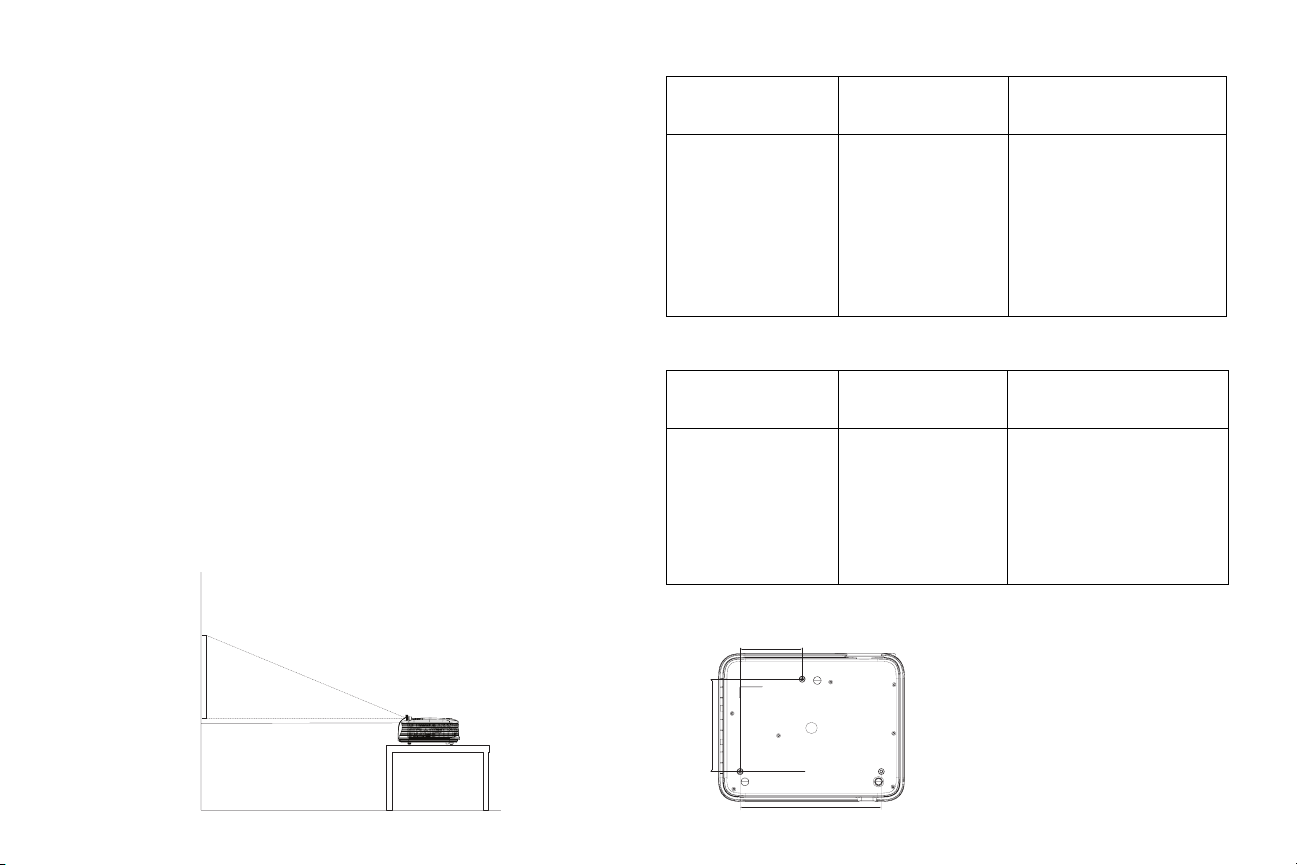
Positioning the projector
To determine where to position the projector, consider the size and shape of your
screen, the location of your power outlets, and the distance between the projector
and the rest of your equipment. Here are some general guidelines:
• Position the projector on a flat surface at a right angle to the screen. IN122ST
and IN124ST must be at least 24” (0.6m) from the projection screen, and
IN126ST must be at least 32” (0.8m) from the projection screen.
• If you are installing the projector on the ceiling, we strongly recommend using
InFocus approved ceiling mounts for proper fitting, ventilation and installation.
Refer to the installation guide that comes with the InFocus Ceiling Mount Kit
(p/n PRJ-MNT-UNIV) for more information. The warranty does not cover any
damage caused by use of non-approved ceiling mount kits or by installing in an
improper location. To turn the image upside down, see “Ceiling mount” on
page 27. We recommend using an InFocus authorized ceiling mount.
• Position the projector the desired distance from the screen. The distance
from the lens of the projector to the screen and the video format determine
the size of the projected image.
• The image offset for IN122ST/IN124ST is 110% +/-3%. This means that if you
have an image 60 inches (1.52 meters) tall from a table-mounted projector,
the bottom of the image will be 6 inches (15.2 cm) above the centerline of the
lens. The image offset for IN126ST is 113% +/-3%. This means that if you
have an image 60 inches (1.52 meters) tall from a table-mounted projector,
the bottom of the image will be 7.8 inches (19.8 cm) above the centerline of
the lens.
60" image
(height)
Projection angle
Table 1: IN122ST (SVGA)/IN124ST (XGA) Screen size
Image Size (inches/m)
Image Width
(inches/m)
Projection distance
50”/1.3m 40”/1.0m 24”/0.6m
65”/1.6m 52”/1.3m 31”/0.8m
81”/2.1m 65”/1.6m 39”/1.0m
100”/2.5m 80”/2.0m 48”/1.23m
120”/3.0m 96”/2.4m 58”/1.48m
150”/3.8m 120”/3.0m 73”/1.85m
200”/5.1m 160”/4.1m 97”/2.47m
Table 2: IN126ST (WXGA) Screen size
Image Size (inches/m)
Image Width
(inches/m)
Projection distance
79”/2.0m 67”/1.7m 32”/0.8m
101”/2.6m 86”/2.2m 39”/1.0m
125”/3.1m 106”/2.6m 48”/1.23m
150”/3.8m 128”/3.2m 58”/1.48m
187”/4.8m 159”/4.0m 73”/1.85m
250”/6.4m 212”/5.4m 97”/2.47m
109
(inches/m)
(inches/m)
bottom of image 6"
above center of
lens
lens center
162
Ceiling mount screws:
M4x8 (Max. L= 8mm)
Unit: mm
248
6
Page 8
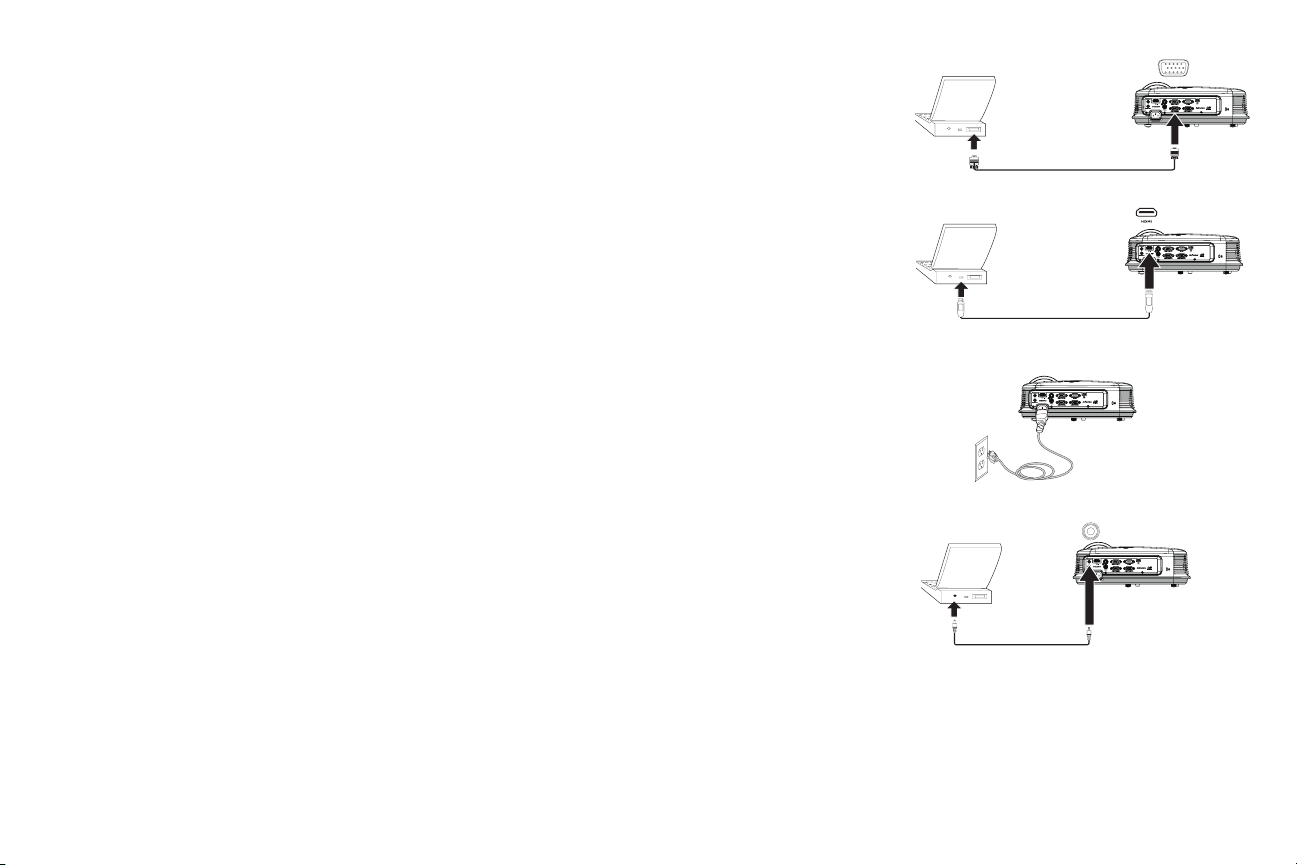
Connecting a computer source
VGA connection
Connect one end of the provided computer cable to the Computer in 1/Computer
in 2 connector on the projector and the other to the VGA connector on your computer. If
you are using a desktop computer, you will need to disconnect the monitor cable from the
computer’s video port first.
HDMI connection
HDMI is a standard, uncompressed, all-digital audio/video interface. HDMI provides an
interface between sources, such as set-top boxes, DVD players, and receivers and your
projector. Plug an HDMI cable into the video-out connector on the video device and into the
HDMI connector on the projector.
Connecting power
Connect the black power cord to the Power connector on the rear of the projector and to
your electrical outlet. If the Power Saving Mode feature is off, the Power LED on the Status
Indicator Panel (
is steady blue. By default, this feature is off. You can change the setting, see page 28. NOTE:
Always use the power cord that shipped with the projector.
page 11) blinks blue. If the Power Saving Mode feature is on, the Power LED
Optional computer connections
To get sound from the projector, connect an audio cable (optional cable, not included) to
your computer and to the
adapter.
If you are using a desktop computer and want to see the image on your computer screen as
well as on the projection screen, connect to the desktop’s computer cable to Computer 1
and the desktop’s monitor cable to the Computer out connector on the projector.
Audio in connector on the projector. You may also need an
connect VGA cable
connect HDMI
connect power
connect audio cable
7
Page 9
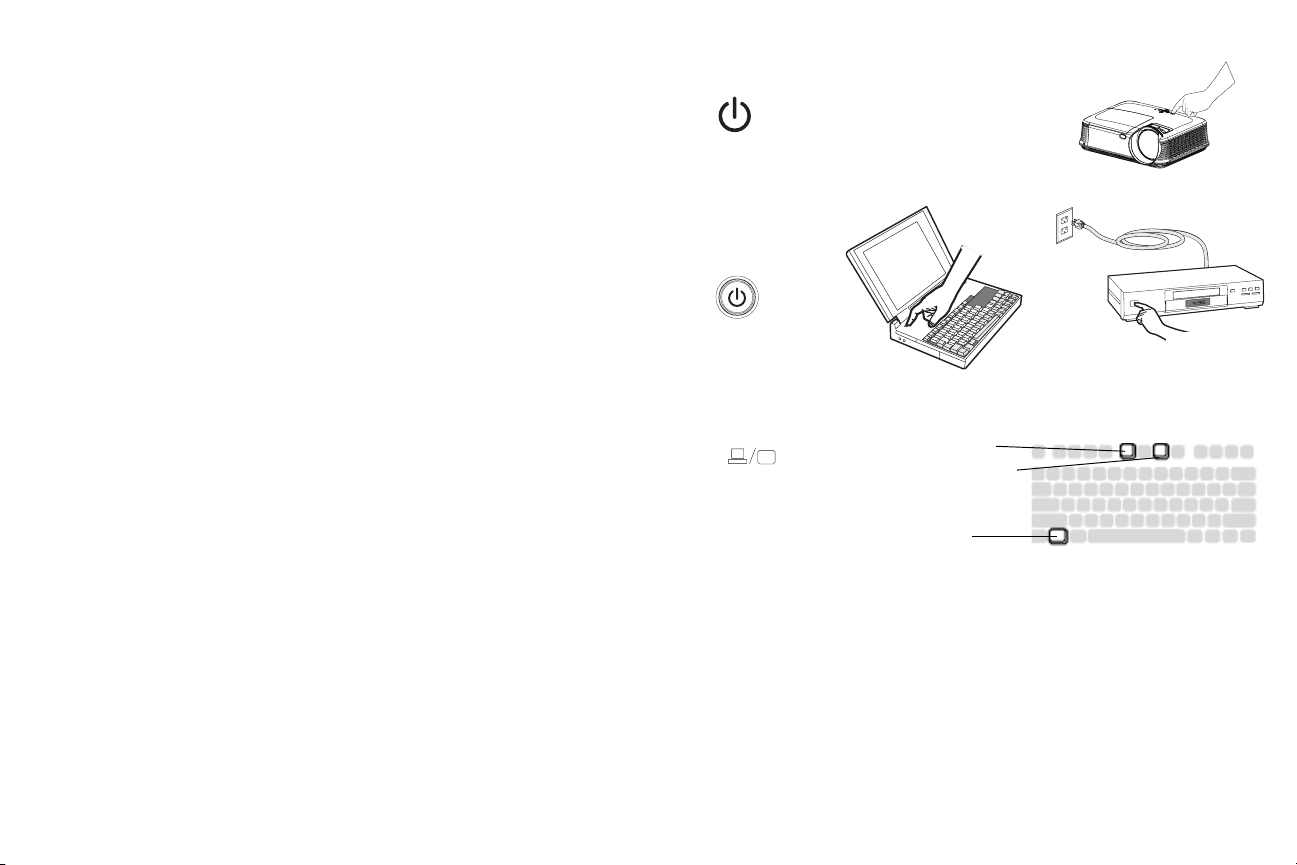
Displaying an image
Press the Power button.
The Power LED lights blue, and the fans start to run. When the lamp comes on, the start up
screen displays. It can take up to a minute for the image to achieve full brightness. Note:
When the feature, AC Power On, is enabled, the projector automatically turns on when
power is connected. This allows control of ceiling mounted projectors with a wall power
switch.
press Power button
No start up screen? Get help on page 12.
Turn on your computer or video device.
The image should appear on the projection screen. If it doesn’t, press the Source button on
the projector’s keypad or remote.
If you are using a VGA cable to connect your computer to the projector:
If using a laptop, make sure its external video port is active.
Many laptops do not automatically turn on their external video port when a projector is
connected. Usually a key combination like FN + F8 or CRT/LCD key turns the external
display on and off. Locate a function key labeled CRT/LCD or a function key with a monitor
symbol. Press FN and the labeled function key simultaneously.
Refer to your laptop's documentation for more information about your
laptop's key combination.
No laptop image? Try pressing the Auto Image button on the remote.
Get help on page 12.
turn on computer or
video device
activate laptop’s external port
monitor key or
LCD/CRT key
FN key
8
Page 10
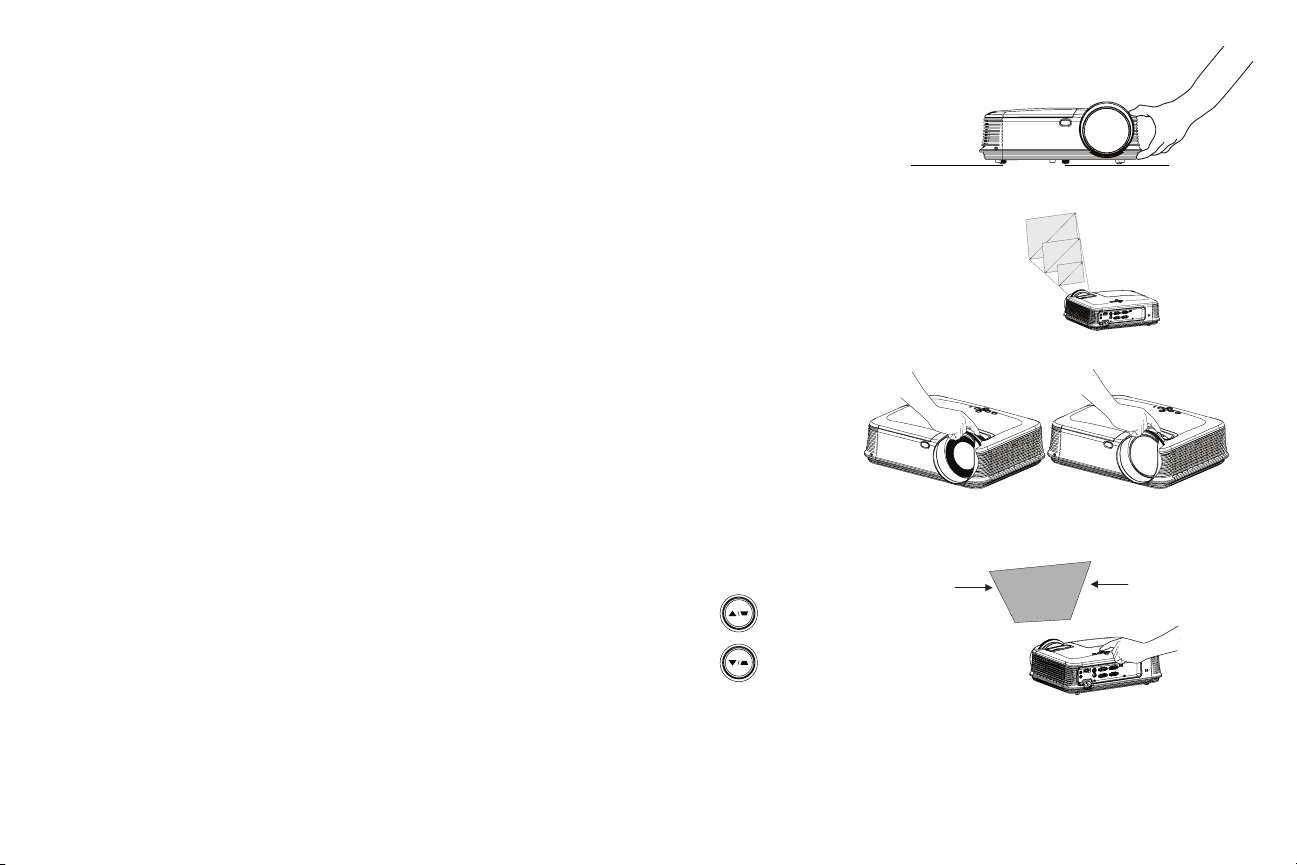
Adjusting the image
If necessary, adjust the height of the projector by rotating the elevator foot to extend the
foot.
If necessary, rotate the leveling foot located at the rear of the projector.
Avoid placing your hands near the hot exhaust vent at the front of the projector.
adjust height
leveling foot
elevator foot
Position the projector the desired distance from the screen at a 90 degree angle to the
screen.
See page 6 for a table listing screen sizes and distances.
Adjust the focus.
If the image is not square, first make sure that the projector is perpendicular to the screen. If
the image is larger or smaller on the top or bottom edge of the screen, press the top
Keystone button to reduce the upper part of the image, and press the bottom Keys tone
button to reduce the lower part.
If the left or right side of the screen is larger or smaller the other, you can turn the projector
to the left or to the right a few degrees to square the image.
Adjust the Contrast or Brightness in the Basic Menu. See page 25 for help with these menu
adjustments.
adjust distance
adjust focus
adjust keystone
IN122ST/IN124ST
IN126ST
9
Page 11

Connecting a video device
You can connect video devices such as VCRs, DVD players, camcorders, digital cameras,
video game consoles, HDTV receivers, and TV tuners to the projector. You can connect the
audio directly to the projector to get sound from the built-in speaker, or you can bypass the
projector’s audio system and connect the audio directly from your source to a stereo or
home theater system.
You can connect the projector to most video devices that can output video. You cannot
directly connect the coaxial cable that enters your house from a cable or satellite company,
the signal must pass through a tuner first. Examples of tuners are digital cable boxes, VCRs,
digital video recorders, and satellite TV boxes. Basically, any device that can change channels
is considered a tuner.
Before connecting your projector, you should decide which aspect ratio you want to use. The
projector’s Aspect Ratio setting is accessed through the Resize button on the remote or
through the projector’s Basic Menu. See page 25 for more information.
Video device connections
No video cables are provided with the projector. You can order cables from InFocus or
provide your own.
HDMI connection
HDMI is a standard, uncompressed, all-digital audio/video interface. HDMI provides an
interface between sources, such as set-top boxes, DVD players, and receivers and your
projector. Plug an HDMI cable into the video-out connector on the video device and into the
HDMI connector on the projector.
Composite video connection
Plug the composite video cable’s yellow connector into the video-out connector on the video
device. Plug the other yellow connector into the yellow
Video connector on the projector.
Component video connection
If your HD video device has component connectors, an optional Component to VGA
adapter can be used. Plug the component cable into the video device. Plug the other end of
the component cable into the adapter and plug the adapter into the
Computer connector.
S-video connection
Plug the S-video cable’s connector into the video-out connector on the video device. Plug the
other connector into the S-
Video connector on the projector.
Audio
For audio, connect a 3.5mm stereo cable to the Audio In connector on the projector and to
your source. If your source uses RCA audio connectors, a Y-cable or adapter may be used.
(Note: A separate audio connection is not required for HDMI source inputs.)
VGA connection
If your video device has a 15-pin VGA output, plug one end of the included computer cable
into the VGA connector on your video source. This connector may be labeled “To Monitor”
on the video source. Plug the computer cable into either the Computer In 1 or
Computer In 2 connector on the projector.
10
Page 12
Shutting down the projector
Auto Off Time
The projector also has an Auto Off Time feature that automatically turns the projector off
after no active sources are detected and no user interaction with the projector is performed
for 30 minutes. By default, this feature is off. You can change the length of time, see page 29.
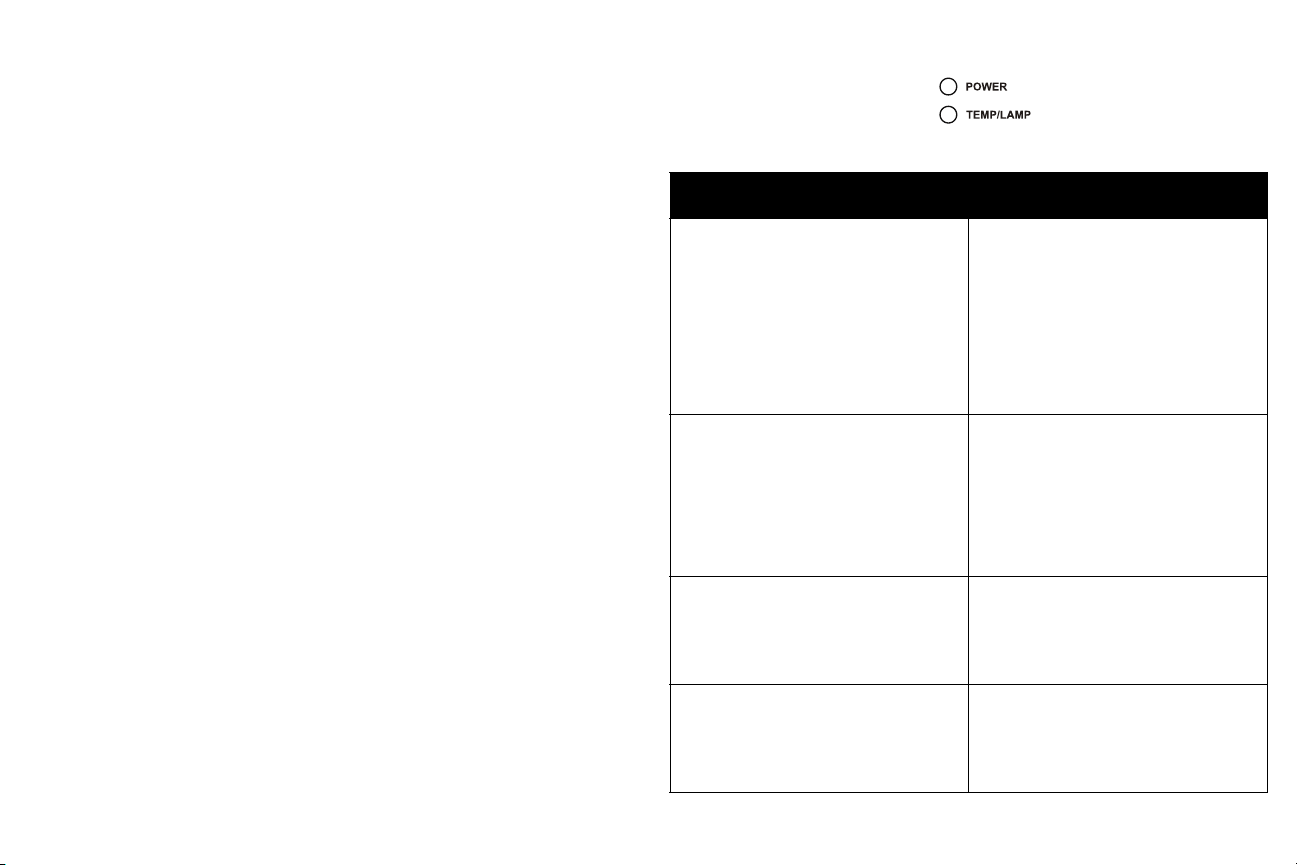
The Status Indicator Panel on top of the projector indicates the state of the projector and
can help you troubleshoot.
Table 3: Status indicator light behavior and meaning
Turning off the projector
To turn the projector off, press the Power button on the remote or keypad. If the Instant
Power On feature is enabled and it has been less than 1 minute since the projector was
powered down, you can turn the projector back on immediately. If this feature is disabled,
you must wait for the projector lamp to completely cool before restarting the projector. The
lamp turns off and the Power LED blinks blue for 1 minute while the fans continue to run to
cool the lamp. If the Power Saving Mode feature is on and when the lamp has cooled, the LED
lights blue and the fans stop. If the Power Saving Mode feature is off and when the lamp has
cooled, the LED blinks blue and the fans stop. Unplug the power cable to completely power
off the projector.
Troubleshooting your setup
If your image appears correctly on the screen, skip to the next section. If it does not,
troubleshoot the setup.
Status Indicator Light Meaning
POWER: Solid blue
POWER: Blinking blue
POWER: Blinking blue
TEMP/LAMP: Blinking pink
POWER: Solid blue
TEMP/LAMP: Blinking pink
POWER: Solid blue
TEMP/LAMP: Blinking red
POWER: Solid blue
TEMP/LAMP: Blinking blue
1. If the Power Saving Mode feature is on,
the projector is plugged in.
2. The projector is on and initialized.
3. The projector is in normal operation.
1. If the Power Saving Mode is off, the
projector is plugged in.
2. The projector is powering down and
the fans are cooling the projector.
The projector fan(s) are not operating
correctly and the projector has been shut
down.
The lamp failed to ignite.
Contact Technical Support if the problem
persists. Visit www.infocus.com/support
to contact service.
The lamp has reached its end of life and
must be replaced. The lamp will continue
to operate until it fails.
Contact Technical Support. Repair may be
needed.
1. The projector is overheating and the
lamp will be shut off. The fans will
continue to run.
2. The projector will not turn back on
until the cooling process is complete.
11
Page 13
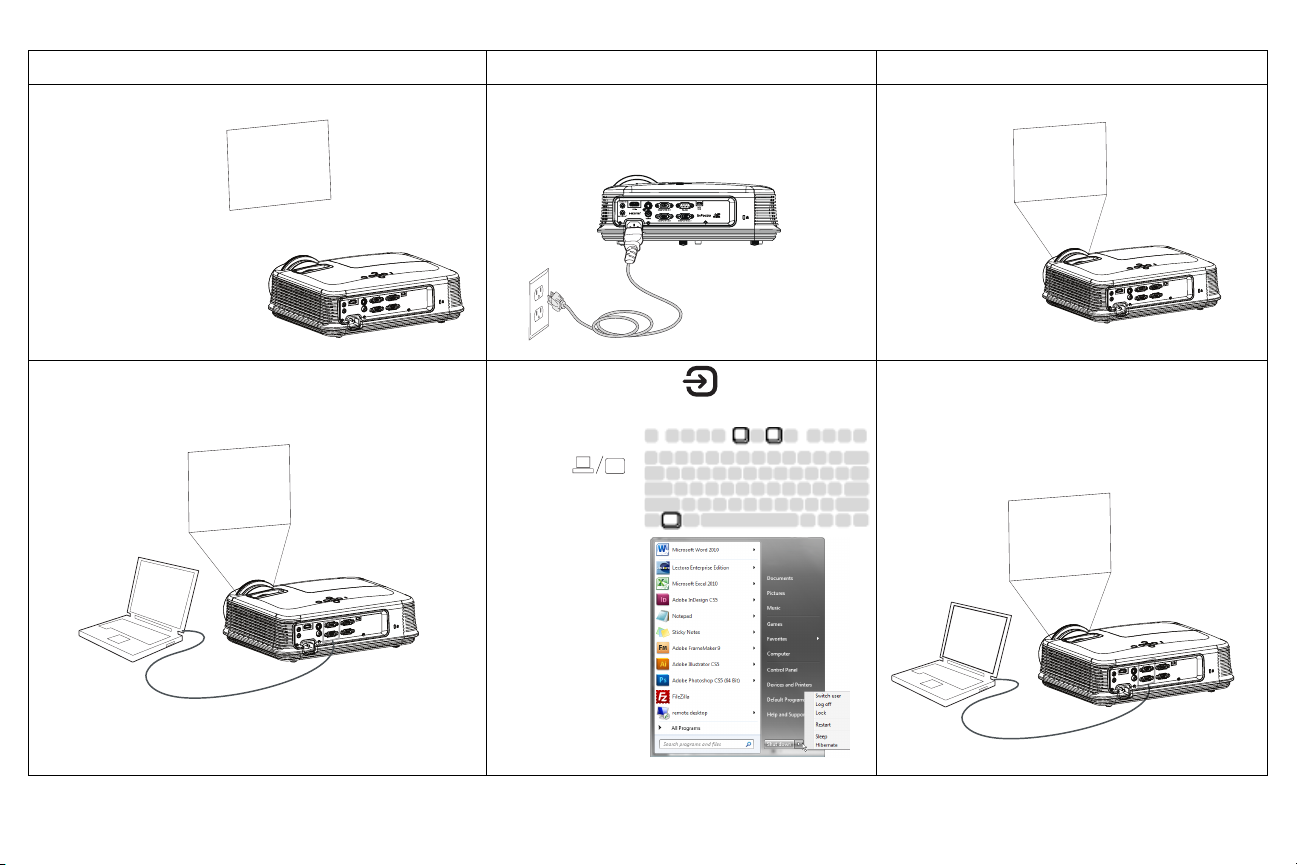
Problem Solution Result
Startup
Screen
A
A
No start up screen
Plug power cord into the projector
press power button
Correct image
Only start up screen appears
Startup
Screen
A
Press the Source button
activate laptop’s external port
Restart laptop
12
Computer image projected
Page 14
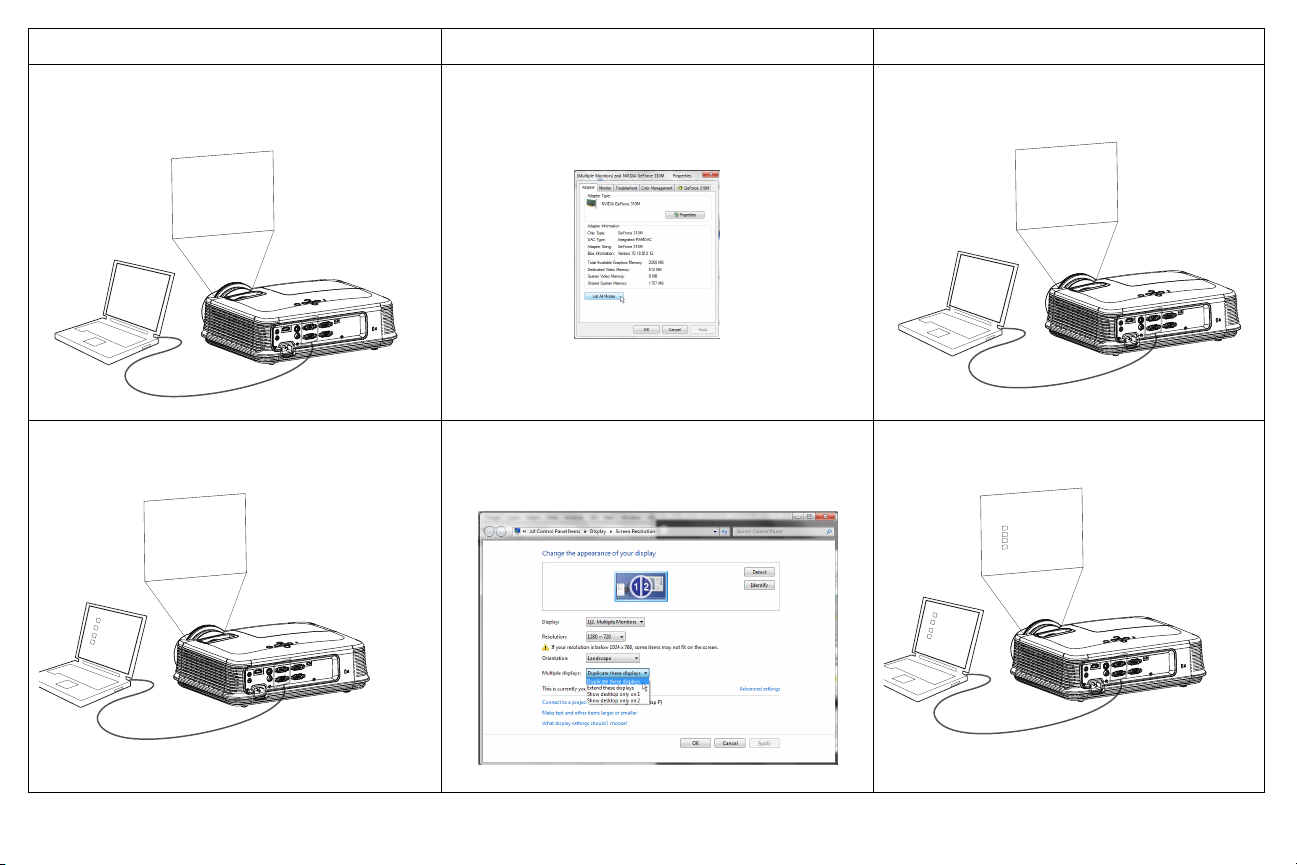
Problem Solution Result
A
A
A
A
No computer image, just the words “Signal out of
range”
Signal out of
the range
A
Only my laptop’s background appears, not the
Desktop icons
A
A
Press the Auto Image button on remote
Adjust computer refresh rate (Windows 7: Control
Panel > Display > Screen Resolution > Advanced
Settings > Adapter tab). Varies per operating system.
You may also need to set a different resolution on your
computer, as shown in the following problem, “image
fuzzy or cropped”
Change the Multiple Display setting to "Duplicate these
displays" (Windows 7: Control Panel > Display > Screen
Resolution). Varies per operating system.
Computer image projected
Background and Desktop projected
13
Page 15
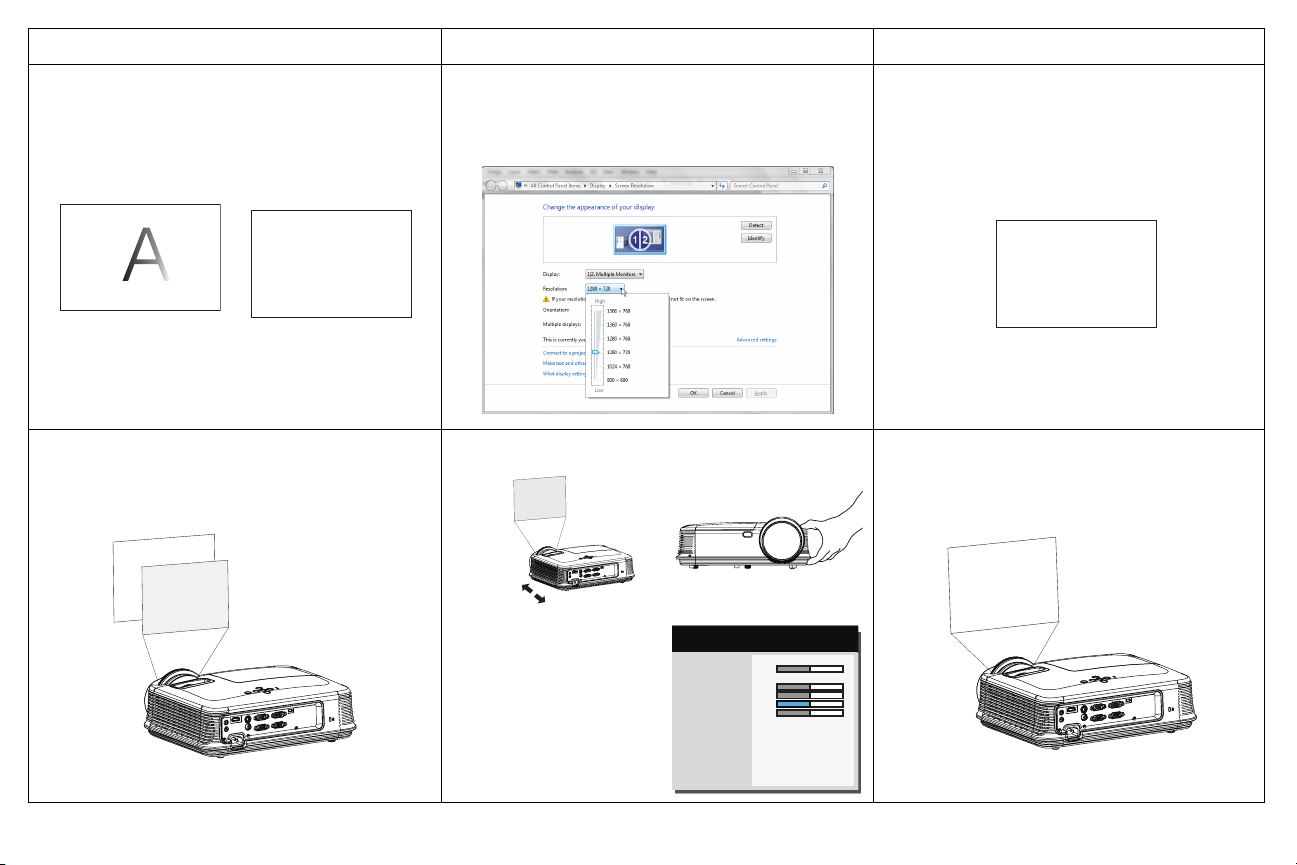
Problem Solution Result
Image fuzzy or cropped
A
Image not centered on screen
A
Change the computer's "Resolution" setting to match
the projector's resolution (Windows 7: Control Panel >
Display > Screen Resolution). Varies per operating
system.
Move projector, adjust height
MDL: IN122ST
FW: 1.28
Adjust horizontal or
vertical position in
Advanced Menu >
Image > PC menu
( PC )
Force Wide
Phase
Prevent PC Screen Saver
Sync Threshold
Tracking
Horz Position
Vert Position
Previous
Off
50
Off
50
50
50
50
Image clear and not cropped
A
Correct image
14
Page 16
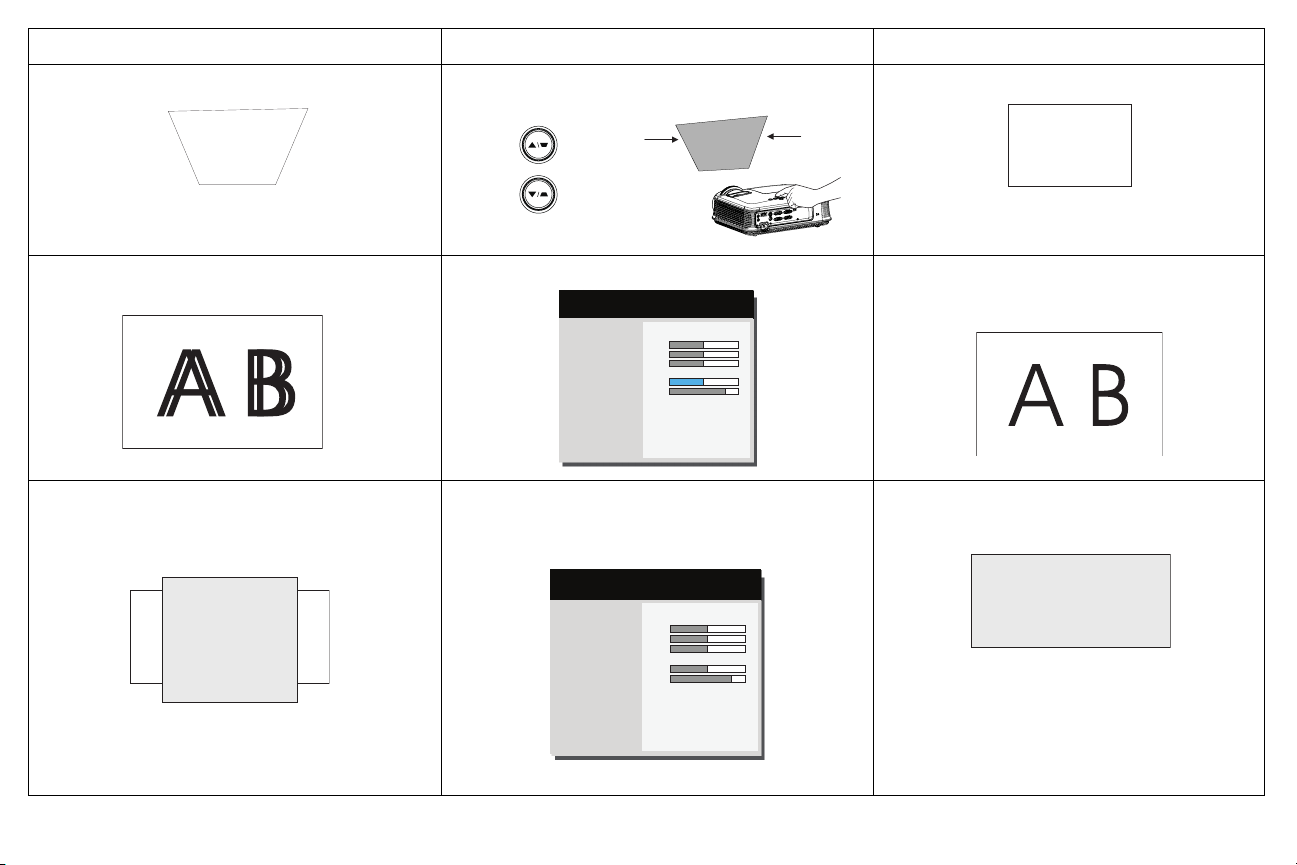
Problem Solution Result
Image not square Adjust Keystone on keypad
Image not sharp
Image does not fit 4:3 or 16:9 screen
Adjust Sharpness in the Basic Menu
( Basic Menu )
Aspect Ratio
Auto Image
Brightness
Contrast
Keystone
Presets
Sharpness
Volume
Ceiling Mount
Advanced Menu
Change aspect ratio to 4:3 or 16:9 in Basic Menu >
Aspect Ratio menu
( Basic Menu )
Aspect Ratio
Auto Image
Brightness
Contrast
Keystone
Presets
Sharpness
Volume
Ceiling Mount
Advanced Menu
Auto
Execute
50
50
0
Presentation
16
16
Off
◄ Auto ►
Execute
50
50
0
Presentation
16
16
Off
MDL: IN122ST
FW: 1.28
MDL: IN122ST
Square image
Correct image
Correct image
FW: 1.28
15
Page 17
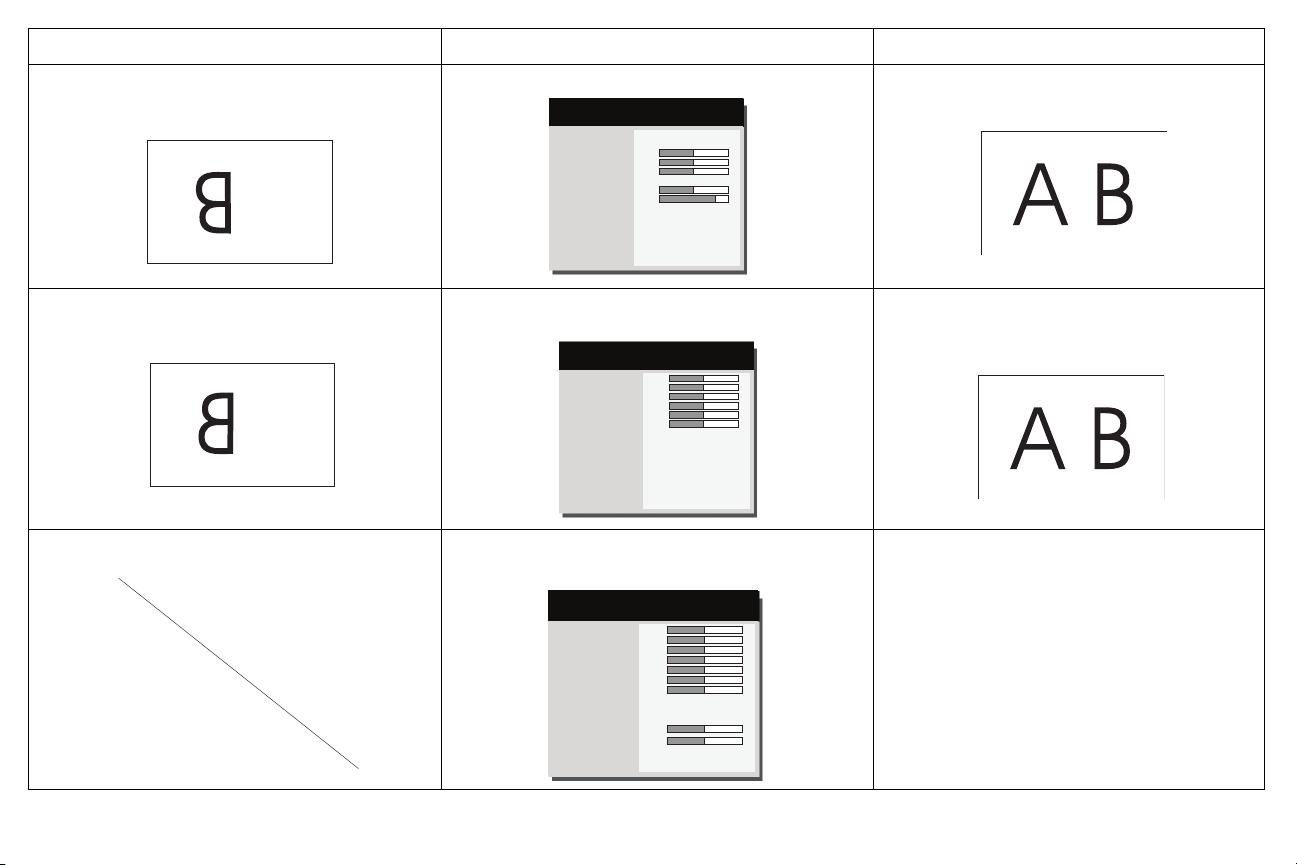
Problem Solution Result
Image upside down
A
Image reversed left to right
A
Projected colors don’t match source
COLOR
Turn off Ceiling Mount in Basic menu
( Basic Menu )
Aspect Ratio
Auto Image
Brightness
Contrast
Keystone
Presets
Sharpness
Volume
Ceiling Mount
Advanced Menu
Auto
Execute
50
50
0
Presentation
16
16
◄ Off ►
MDL: IN122ST
FW: 1.28
Turn off Rear Project in Advanced Menu > Setup >
Image Setup menu
( Image Setup )
Digital Zoom
Horz Shift
Vert Shift
Magnify Level
Horz Shift
Vert Shift
Rear Project
Ceiling Mount
Previous
50
50
50
50
50
50
◄ Off ►
Off
MDL: IN122ST
FW: 1.28
Adjust the items in the Advanced Menu > Image > Color
menu
( Color )
Color
Red Gain
Green Gain
Blue Gain
Red Offset
Green Offset
Blue Offset
Color Space
Color Temp
Gamma
Tint
White Intensity
Previous
50
50
50
50
50
50
50
Auto
Warm
Bright
50
50
MDL: IN122ST
FW: 1.28
Correct image
Correct image
Correct image
COLOR
16
Page 18
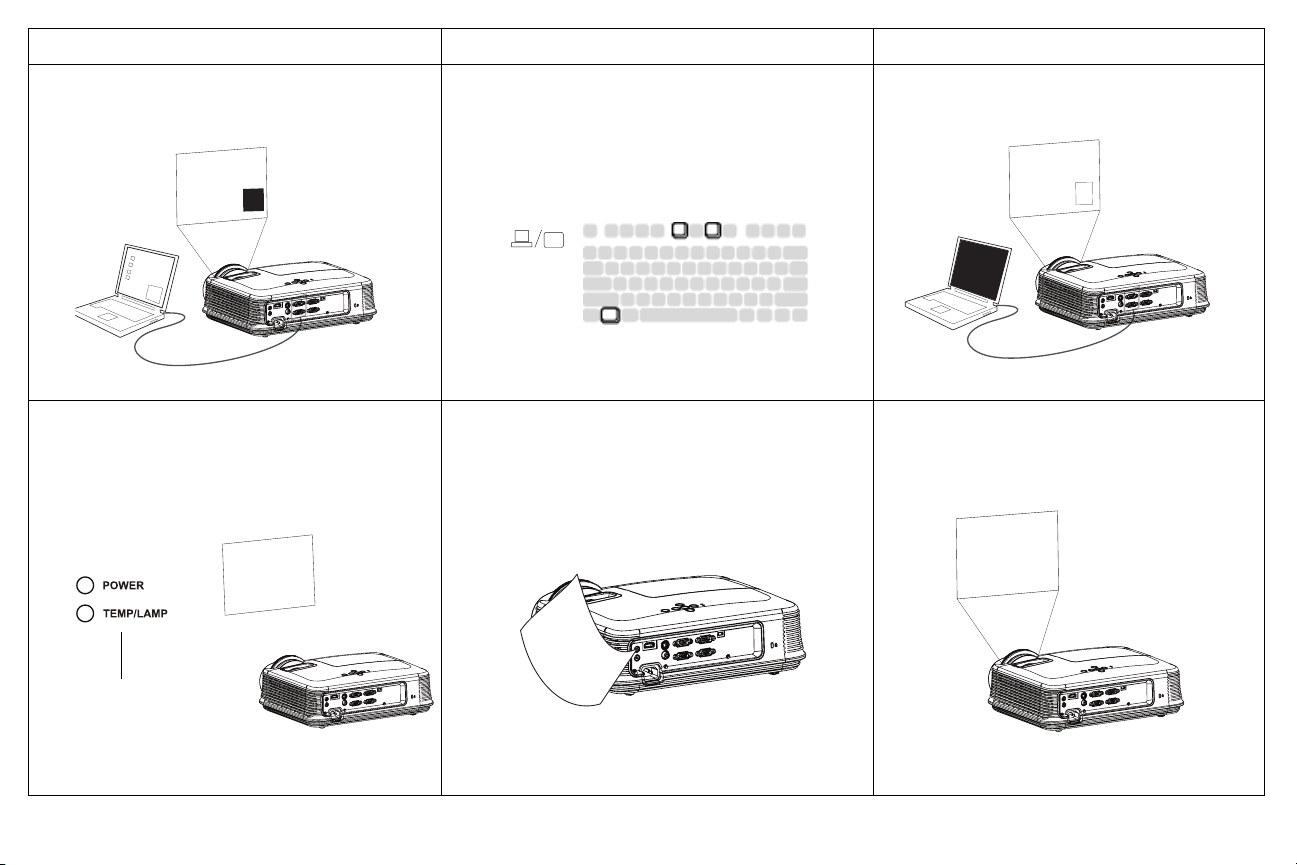
A
B
Startup
Screen
Problem Solution Result
The video embedded in my PowerPoint presentation
does not play on the screen
A
B
A
B
Lamp won’t turn on, the projector is overheating
Overheating
indicator
Turn off the internal LCD display on your laptop
Make sure vents aren’t blocked, turn off the projector
and allow it to cool for one minute
Embedded video plays correctly
Lamp turns on
17
Page 19
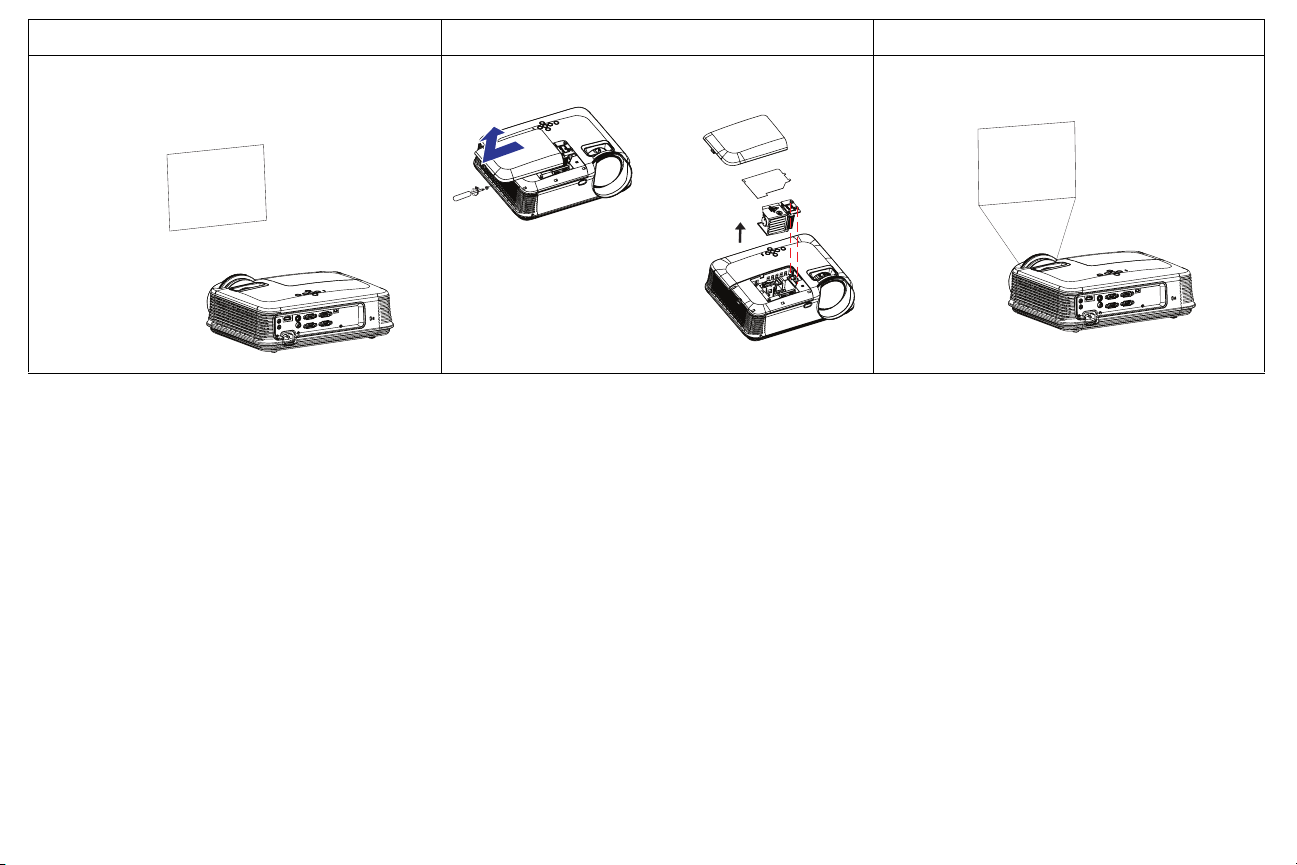
Startup
Screen
Problem Solution Result
“Replace lamp” message appears at startup, lamp
Lamp must be replaced (see page 31)
won’t turn on
lamp door
Still need assistance?
If you need assistance, visit our website at www.infocus.com/support or call us. See
the Warranty/Safety booklet for support contact information.
This product is backed by a limited warranty. An extended warranty plan may be purchased
from your dealer. When sending the projector in for repair, we recommend shipping the unit
in its original packing material, or having a professional packaging company pack the unit.
Please insure your shipment for its full value.
Lamp turns on
replace lamp
18
Page 20
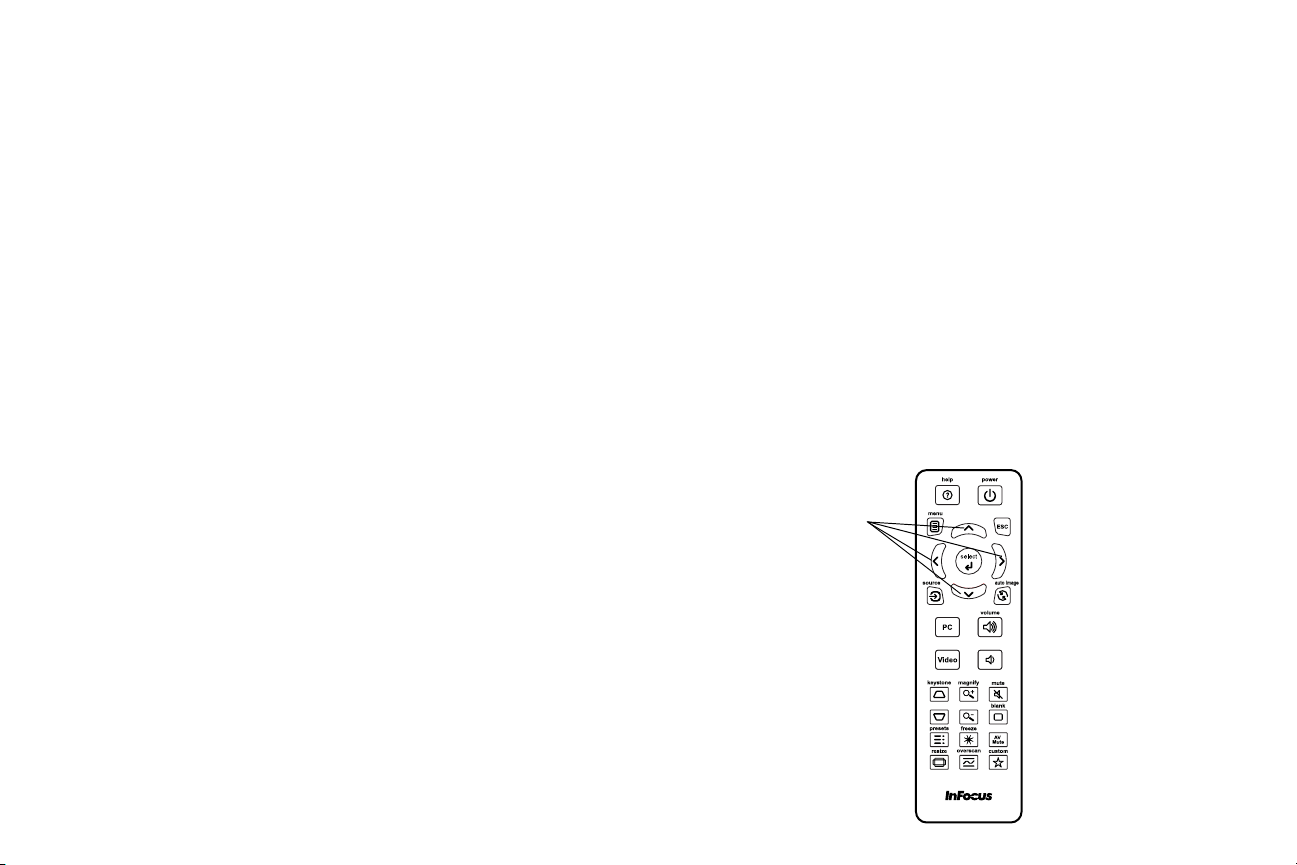
Using the remote control
The remote uses two (2) AAA batteries (not provided). They are easily installed by
removing the cover from the remote’s back, aligning the + and - ends of the
batteries, sliding them into place, and then replacing the cover.
Caution:
• When replacing the remote batteries, be aware that using batteries other
than AAA batteries may risk severe damage to the remote. When disposing
of the batteries, be sure to do so in an enviromentally proper manner.
• If the remote control gets wet, wipe it dry immediately.
• Avoid excessive heat and humidity.
• Ensure the batteries' polarity (+/-) is aligned correctly.
• Do not mix new and old batteries together, or mix different types of batteries
together.
• Replace the batteries as soon as they run out.
• Remove batteries from the remote control when storing or not in use for a
prolonged period.
To operate, point the remote at the front of the projector (not at the computer).
The range of optimum operation is about 15 feet (4.5m).
Press the remote’s Powe r button to turn the projector on and off (see page 11 for
shutdown info).
Press the remote’s Menu button to open the projector’s menu system. Use the
arrow buttons to navigate, and the Select button to select features and adjust
values in the menus. See page 24 for more info on the menus.
The remote also has:
• Vo lu me buttons adjust the sound.
• Custom button that can be assigned to a special function, like Blank Screen
or Freeze (see
• Source button brings up a menu of all possible sources allowing the user to
switch the active source.
• Blank button to blank the screen.
• Presets button to select stored settings (see page 25).
• Mute button to silence the audio.
page 27).
• Auto Image button to resynch the projector to the source.
• Resize button to switch among aspect ratios (see page 25).
• Help button to get help with connecting sources and improving the picture.
•ESC button to go back to previous OSD menu.
• PC button to cycle through the Computer sources.
• Video button to cycle through Composite/S-Video/HDMI input sources.
• Keystone buttons adjust the squareness of the image
• Magnify buttons magnify and reduce the projected picture size.
• Freeze button to pause the projected image.
• Overscan button remove noise around the video image.
• AV Mute button blanks the projected image and mutes audio.
Troubleshooting the remote
• Make sure the batteries are installed in the proper orientation and are not
dead.
• Make sure you’re pointing the remote at the projector or the screen, not the
computer, and are within the remote range of 15 feet (4.5m). For best results,
point the remote at the projector.
navigation
buttons
19
Page 21
Using the audio
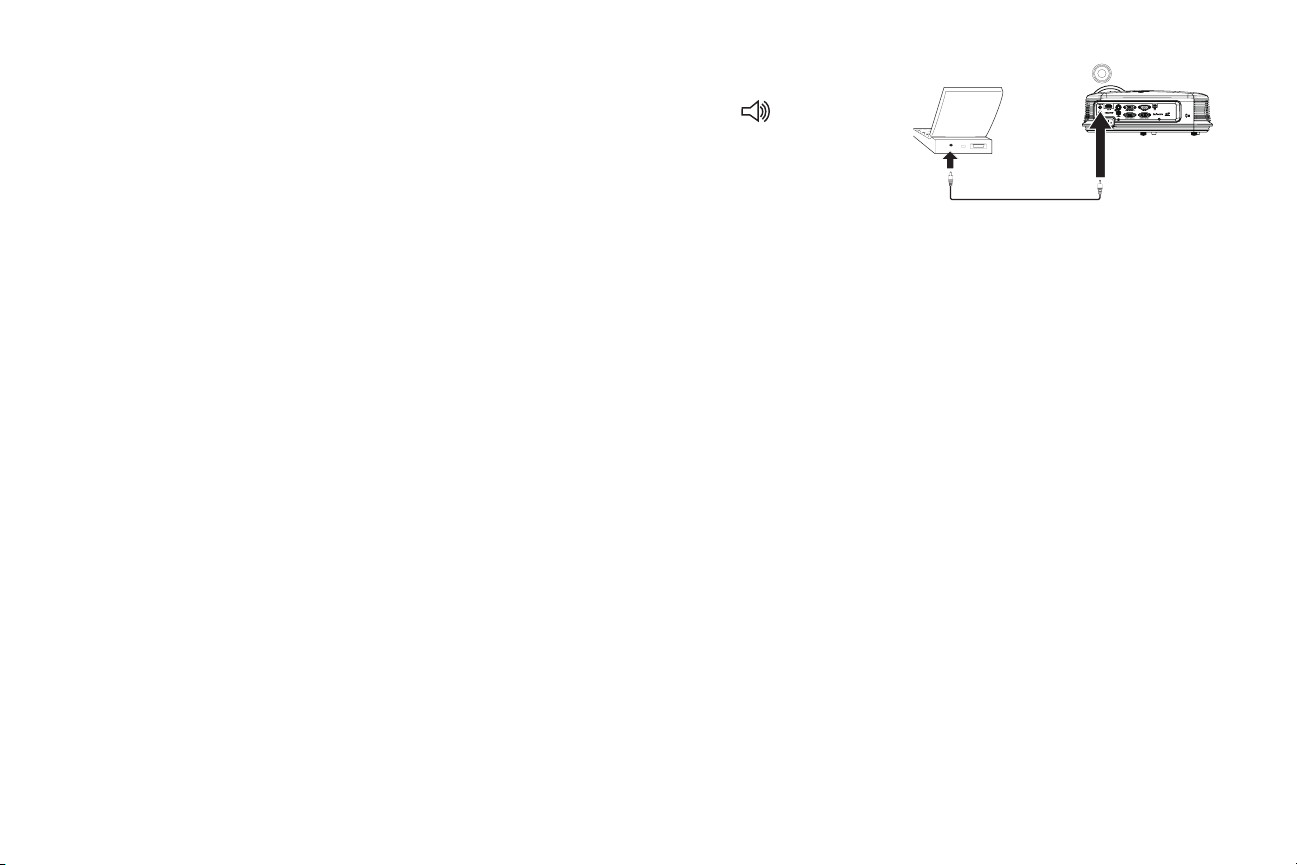
Using the projector’s speaker
Connect the audio source to the Audio In connectors to hear audio through the
projector speaker.
Amplified speakers may also be connected to the projector using the Audio Out
connector.
To adjust the volume, press the Vol um e buttons on the remote.
Troubleshooting Audio
If you aren’t hearing the audio, check the following:
• Make sure the audio cable is connected to the Audio In connector on the
projector, and that the other end of the cable is connected to an Audio Out
connector on the source (not a “line-in” or “microphone” connector).
• Make sure the volume is turned up enough. Press the Vol um e button on the
remote.
• Make sure the correct source is active.
• Adjust the audio source.
• If playing a video, make sure the playback has not been paused.
connect audio cable
20
Page 22
Using the keypad buttons
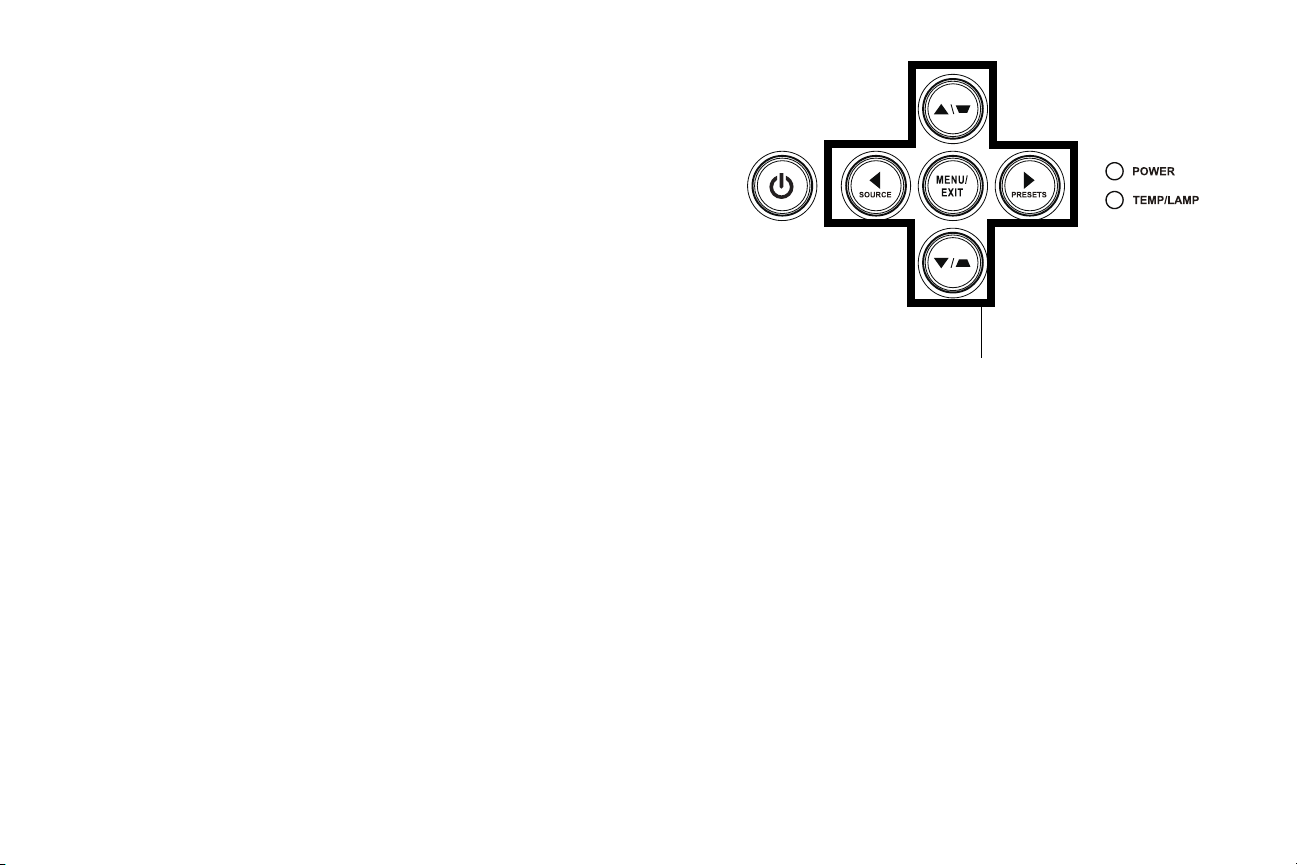
Most buttons are described in detail in other sections, but here is an overview of
their functions:
Power–turns the projector on and off (page 8).
Right arrow/Presets - When the menu is displayed, the right arrow button navi-
gates through the menu. When the menu is not displayed, this button cycles
through available preset options.
Up arrow/Keystone - When the menu is displayed, the up arrow button navi-
gates through the menu. When the menu is not displayed, this button adjusts the
squareness of the image (page 9).
Down arrow/Keystone - When the menu is displayed, the down arrow button
navigates through the menu. When the menu is not displayed, this button adjusts
the squareness of the image (
Left arrow/Source - When the menu is displayed, the left arrow button navigates
through the menu. When the menu is not displayed, this button brings up a source
menu, allowing the user to change the active source (
page 9).
page 8).
menu navigation
buttons
21
Page 23

Optimizing computer images
Presentation features
After the projector is running and the image is on the screen, you can optimize the
image using the onscreen menus. For general information on using the menus, see
page 24.
• Select default image settings using a preset appropriate to your environment.
• Adjust the Keystone, Contrast, or Brightness (page 25).
• Change the Aspect Ratio. Choose the option that best fits your input source
(
page 25).
• Adjust the Color Temperature (page 26).
• Adjust the Phase, Tracking, or Horizontal or Vertical position (page 26).
• Once you have optimized the image for a particular source, you can save the
settings using Presets. This allows you to quickly recall these settings later
(page 25).
Several features are provided to make giving presentations easier. Here is an
overview, details are found in the menu section.
• The Custom key allows you to assign various features to the button. The
default effect is Source Info, which displays information about the projector
and current source. See
• The Search Screen option lets you change the appearance of the blank screen
and start up screen (
• Auto Off Time is provided to automatically shut down the projector after
several minutes. This helps preserve lamp life (
page 27 for details.
page 28).
page 28).
22
Page 24

Optimizing video images
Customizing the projector
After your video device is connected properly and the image is on the screen, you
can optimize the image using the onscreen menus. For general information on
using the menus, see page 24.
• Adjust the Keystone, Contrast, Brightness, Color, or Tint (page 25).
• Change the Aspect Ratio. Choose the option that best fits your input source
page 25).
(
• Select a Sharpness setting (page 25).
• Adjust the Color Temperature. Select a listed warmth value (page 26).
• Turn on Overscan to remove noise on the edges of the image (page 27).
You can customize the projector for your specific setup and needs. See page 27 for
details on these features.
• For rear projection, turn Rear Project on in the Advanced Menu > Setup >
Image Setup menu.
• For ceiling mounted projection, turn Ceiling Mount on in the Basic menu.
• Specify which source the projector checks first for active video during powerup.
• Specify the function of the Custom key on the remote.
• Turn the projector’s display messages on and off.
• Turn on power saving features.
• Specify appearance of blank screen and startup screen.
• Specify the language viewed on the menus.
• Save settings for the active source as a preset.
23
Page 25
Using the menus
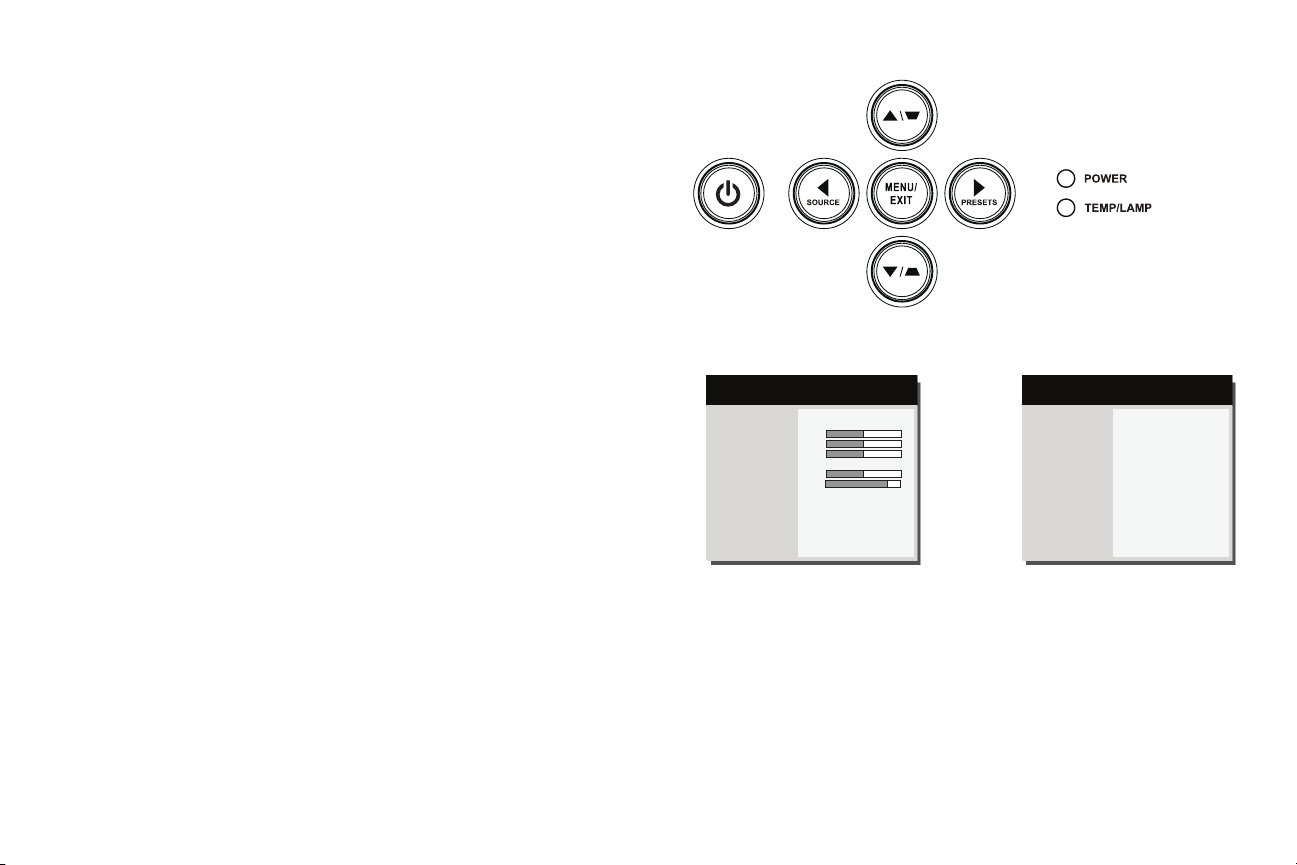
1 To open the menus, press the Menu button on the keypad or remote. (The
menus automatically close after 60 seconds if no buttons are pressed.) Use the
arrow buttons to move up and down to review the menu options.
2 To enter a submenu, highlight the desired submenu and press > on the keypad
or remote.
3 To adjust a menu setting, highlight the desired menu option and press < or > to
scroll through the available adjustments.
4 Press the Menu button to exit the menu system.
The menus are grouped by usage:
• The Basic Menu provides common adjustments.
• The Advanced Menu provides more complex adjustments.
( Basic Menu )
Aspect Ratio
Auto Image
Brightness
Contrast
Keystone
Presets
Sharpness
Volume
Ceiling Mount
Advanced Menu
Basic Menu
Auto
Execute
50
50
0
Presentation
16
16
Off
MDL: IN122ST
FW: 1.28
keypad navigation
buttons
( Advanced Menu )
Image
Setup
Status/Service
Basic Menu
3D Control...
Color...
PC...
Video...
Advanced Menu
MDL: IN122ST
FW: 1.28
24
Page 26
Basic Menu
To adjust the following settings, highlight the setting, use the right and left arrows
to adjust the values.
Aspect Ratio: Aspect ratio is the ratio of the image width to image height. TV
screens are usually 4:3. HDTV and most DVDs are 16:9.
Select Auto to have the projector choose the ratio. Choose Native to see the
unmodified input with no resizing by the projector. Select 16:9 to watch enhanced
widescreen DVDs.
Auto Image: resets the projector to the source.
Brightness: changes the intensity of the image.
Contrast: controls the degree of difference between the lightest and darkest
parts of the picture and changes the amount of black and white in the image.
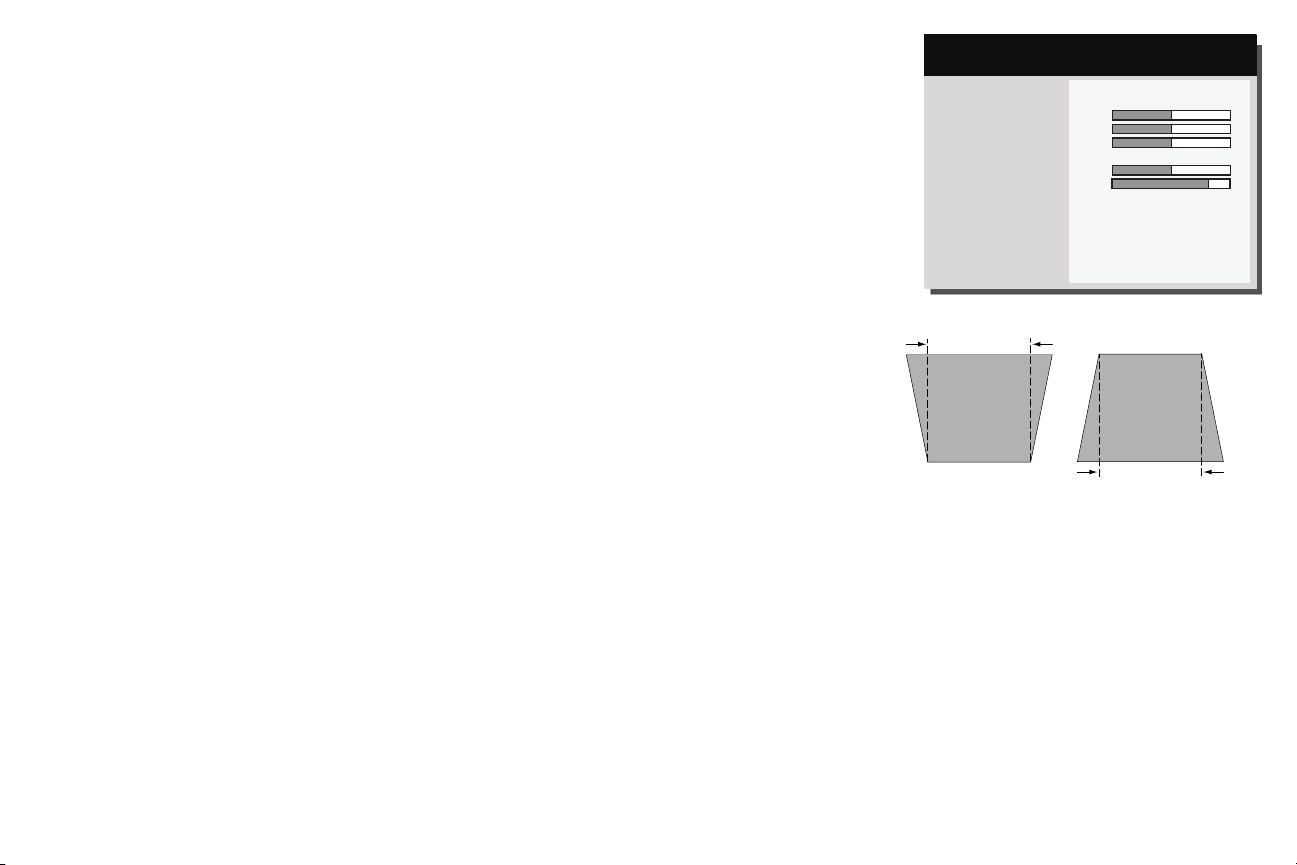
Keystone : adjusts the image vertically and makes a squarer image. You can also
adjust keystone from the keypad.
Presets: Presets are provided that optimize the projector for displaying computer
presentations and video images under certain conditions. Note: Users can save
their settings as a User Preset.
Sharpness: Changes the clarity of the edges of a video image. Select a sharpness
setting.
Vo lu me : increases or decreases the audio volume.
Ceiling Mount: turns the image upside down for ceiling-mounted projection.
Basic Menu
(
Basic Menu
Aspect Ratio
Auto Image
Brightness
Contrast
Keystone
Presets
Sharpness
Volume
Ceiling Mount
Advanced Menu
)
Auto
Execute
50
50
0
Presentation
16
16
Off
MDL: IN122ST
increasing keystone decreasing keystone
FW: 1.28
25
Page 27

Advanced Menu
Advanced Menu
(
Advanced Menu
Image
Setup
Status/Service
Basic Menu
)
3D Control...
Color...
PC...
Video...
Image:
3D Control:
3D Control: allows you to enjoy 3D (stereoscopic) content. Your projector
supports two synchronization modes (External Sync and DLP Link™) for controlling LCD shutter glasses. In addition to the projector, you will need a pair
of 3D shutter glasses, 3D content, and 3D compatible source (and emitter).
Ensure the glasses you choose are consistent with the synchronization mode
you will be using.
3D Sync Invert: (Only applies when 3D control is set to DLP Link™.) If the
image appears to flutter, look odd or if the image depth looks off or you experience eye strain, turn this feature on to see if the image improves.
Color...
Color: adjusts a video image from black and white to fully saturated color.
The color setting applies to video sources only.
Red/Green/Blue Gain: adjusts the gain of the red, green or blue channel of
the image.
Red/Green/Blue Offset: adjusts the offset of the red, green or blue channel
of the image.
MDL: IN122ST
FW: 1.28
Color Space: applies to computer and component video sources. It allows
you to select a color space that has been specifically tuned for the input signal.
When Auto is selected, the projector automatically determines the standard.
To choose a different setting, turn off Auto, then choose RGB for computer
sources or choose either REC709 or REC601 for component video sources.
Color Temperature: changes the intensity of the colors. Select a listed relative warmth value.
Gamma: select the appropriate gamma from among Video, Film, Bright, and
CRT.
Tint: adjusts the red-green color balance in the image of NTSC video images.
The tint setting applies to NTSC video sources only.
White Intensity: increases the brightness of whites that are near 100%.
PC:
Force Wide: when this is off, the analog locking algorithms choose the stan-
dard mode resolution (4:3) as the preferred default resolution. When this is
on, the analog locking algorithms choose wide mode resolution (16:10) as the
preferred default resolution.
Phase: adjusts the horizontal phase of a computer source.
Prevent PC Screen Saver: prevents your computer from going into Screen
Save mode. The projector must be connected to the PC via a USB cable for
this feature to work.
Sync Threshold: (progressive signals only) If a hardware device, such as a
DVD player, is not syncing properly with the projector, select this option to
help it to sync when connected to the projector.
Tr a ck i ng : adjusts the vertical scan of a computer source.
Horizontal/Vertical Position: adjusts the position of a computer source.
Video:
Detect Film: determines whether the original source of the input video was
film (progressive) or video (interlaced).
26
Page 28

Overscan: removes noise around the video image.
Set Black Level: analyzes the current input image and calculates an offset
value which is then added to the analog to digital converter black level value.
This ensures optimum black level for each analog source.
Setup:
Audio Setup
Internal Speaker: turns the internal speaker on or off.
Closed Captioning
Closed Captions: controls closed captioning. If the source is NTSC and
contains captions on the selected channel, then the projector will display
caption text overlaid on the image. When Closed Captions is off and volume
is muted, closed captioning will appear. Options are: Off, CC1 and CC2.
Image Setup
Digital Zoom: reduces the size of projector’s display area. If the display area
has been resized by this setting, it can be moved by changing the Horz Shift
and Ver t S h if t settings.
Magnify Level: magnifies the image. If the image has been magnified by this
setting, it can be moved by changing the Horz Shift and Ver t Shi f t settings.
Rear Project: reverses the image so you can project from behind a translucent screen.
Ceiling Mount: turns the image upside down for ceiling-mounted projection.
•
Mute: turns off all sound.
Source: brings up a menu of available sources.
•
Auto Image: resets the projector to the source.
•
Freeze Screen: pauses the projected image.
•
Source Info: the default action. Shows the Source Info menu.
•
Projector Info: shows the Projector Info menu.
•
Overscan: removes noise around the image.
•
• AV M u t e : enables or disables AV M u t e functio n .
• Closed Captions: enables or disables Closed Captions.
Keypad : enables or locks the projector keypad.
Keypad/Remote
Blank Key: select what to display when the blank key on the remote is
pressed: a solid color screen (blue, black or white), or the factory logo
screen.
Custom Key: allows you to assign a different function to the Custom button,
allowing you to quickly and easily use the effect. Highlight an effect and press ^
or v on the keypad or Select on remote to choose a different one.
• Blank Screen: displays an empty screen.
27
Page 29

Lamp
Programmed Dimming: When enabled, Programmed Dimming enhances
contrast ratios in dark scenes and disables Lamp Low Power. Programmed
Dimming will impact lamp life and system noise performance. Programmed
Dimming works in conjunction with the lamp. If Lamp Low Power is enabled,
Programmed Dimming is unavailable.
Lamp Low Power: toggles between on and off. Turn it on to lower the light
output of the lamp. This also lowers the fan speed, making the projector quieter.
OSD Setup
Language: allows you to select a language for the onscreen display.
Menu Position: allows you to change the position of the On Screen Display
items.
Menu Transparency: allows you to change how much of the projected
image behind the menu you can see. As the value increases, more of the
image behind the menu is visible.
Show Messages: displays status messages (such as “Searching”) in the lowerleft corner of the screen.
PIN Settings
PIN Protect: The PIN (personal identification number) feature allows you to
password protect your projector. Once you enable the PIN feature, you must
enter the PIN before you can project an image. Use the Left/Right/Up/
Down arrows buttons on the remote or keypad to set a 4-button press
sequence. If you enter an incorrect PIN 3 times in succession, the projector
will automatically shut down. If you lose or forget your custom PIN, contact
InFocus Technical Support.
To enter the PIN at projector startup:
Power up the projector. The “Enter PIN” dialog box displays after the startup
screen. Enter the PIN. Use the Left/Right/Up/Down arrows buttons on the
remote or keypad to enter the correct 4-button press sequence. See the
description above for instructions.
To c h a n g e t h e P I N:
Select “Change PIN...” in the Advanced Menu > Setup > PIN settings menu.
Enter the existing PIN. Enter the new PIN.
Power
Power Saving Mode: When the Power Saving Mode is On and the projec-
tor is in standby (powered off but connected to AC power), the monitor out
function will not work.
AC Power On: When this feature is enabled, the projector automatically
turns on when power is connected. This allows control of ceiling mounted
projectors with a wall power switch.
Instant Power On: When this feature is enabled and it has been less than 1
minute since the projector was powered down, you can turn the projector
back on immediately. When this feature is disabled, you will need to wait for
the projector lamp to completely cool before restarting the projector.
Source
Auto Source: When this feature is On, the projector automatically finds the
active source, checking the selected Power-up Source first. When this feature
is Off, the projector defaults to the source selected in Power-up Source. To
display another source, you must manually select one by pressing the Source
button on the remote or keypad and selecting one from the displayed Source
menu.
Power-up Source: determines which source the projector checks first for
active video during power-up.
Search Screen: allows you to display a blank screen instead of the default
screen at startup, and when no source is detected.
28
Page 30

Timer
Auto Off Time: automatically turns the projector off after no signals are
detected for a preset number of minutes. If an active signal is received before
the projector powers down, the image will be displayed.
High Altitude Setting
High Altitude Setting: We recommend you turn on the High Altitude
Mode when your environment is between 5000' (1500m) and 10,000'
(3000m) above sea level.
Status/Service:
Source Info: a read-only display of current source settings.
Projector Info: a read-only display of current projector settings.
Reset Lamp Hours...: resets the lamp hours used counter in the Projector
Info menu to zero. Do this only after changing the lamp.
Factory Reset...: restores all settings to their factory default settings.
Service Code...: only used by authorized service personnel.
29
Page 31
Maintenance
Cleaning the lens
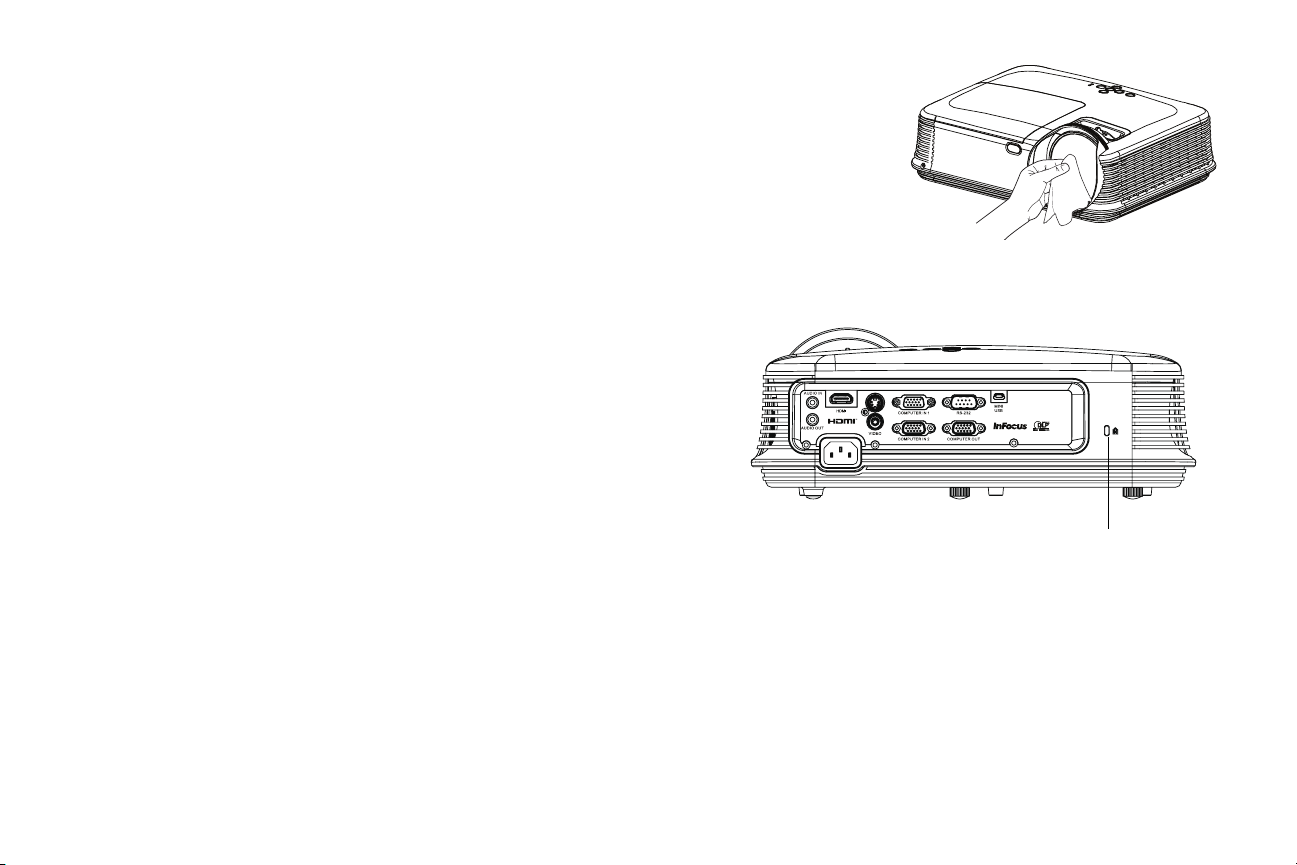
1 Apply a non-abrasive camera lens cleaner to a soft, dry cloth.
• Projector must be off and the lens must be at room temperature.
• Avoid using an excessive amount of cleaner, and don’t apply the cleaner
directly to the lens. Abrasive cleaners, solvents or other harsh chemicals
might scratch the lens.
2 Lightly wipe the cleaning cloth over the lens in a circular motion.
WAR NINGS:
• Turn the projector off and unplug power cord before cleaning any part of
the projector.
• Do not touch or block the projector lens with any objects as this can
damage the projector lens. Scratches, gouges and other lens damage are not
covered by the product warranty.
• Do not open any cover on the projector, except the lamp cover.
• Do not attempt to service this product yourself as opening and removing
covers may expose you to dangerous voltage and other hazards. Refer all
servicing to qualified service personnel.
Using the security lock
The projector has a security lock for use with a Cable Lock System. Refer to the
information that came with the lock for instructions on how to use it.
security
lock
30
Page 32

Replacing the projection lamp
The Lamp Hours timer in the Projector Info menu counts the number of hours the
lamp has been in use. Twenty hours before the lamp life expires, the message
“Replace lamp” displays on the screen at startup.
• NOTE: Be sure to use the InFocus lamp module designed for this projector.
You can order new lamps from www.infocus.com (in select areas), your
retailer or your dealer. Only genuine InFocus lamps are tested for use
in this projector. Use of non InFocus lamps may cause electrical shock and
fire, and may void the projector warranty. InFocus is not liable for the
performance, safety or certification of any other lamps.
WARNINGS:
• The projector uses a high-pressure mercury glass lamp. The lamp may fail
prematurely, or it may rupture with a popping sound if jolted, scratched, or
handled while hot. The risk of lamp failure or rupture also increases as the
lamp age increases; please replace the lamp when you see the “Replace Lamp”
message.
• To avoid burns, allow the projector to cool for at least 60 minutes before you
replace the lamp.
• Do not touch or block the projector lens with any objects as this can damage
the projector lens. Scratches, gouges and other lens damage are not covered
by the product warranty.
• Unplug the power cord before replacing the lamp.
• Do not drop the lamp module. The glass may shatter and cause injury.
• Do not touch the glass surface of the lamp module. Fingerprints can obscure
projection sharpness and may cause the glass to shatter.
• Be extremely careful when removing the lamp housing. In the unlikely event
that the lamp ruptures, small glass fragments may be generated. The lamp
module is designed to contain most of these fragments, but use caution when
removing it.
• Before replacing a ruptured lamp, clean the lamp compartment and dispose of
cleaning materials. Wash hands after lamp replacement.
• When replacing the lamp while the projector is ceiling-mounted, wear
protective eyewear to prevent eye injury.
Hg – Lamp contains mercury. Manage in accordance with local disposal
laws. See www.lamprecycle.org.
31
Page 33
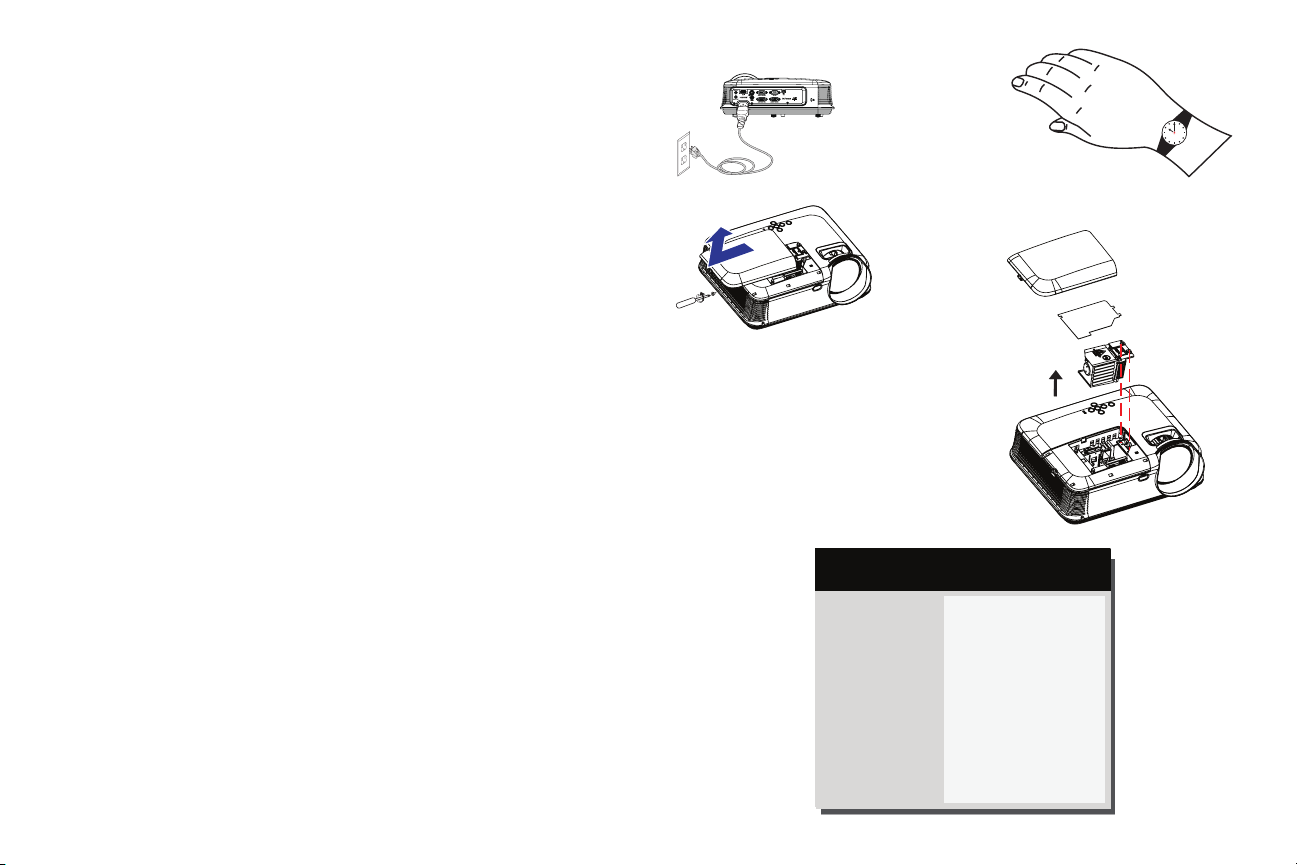
1 Turn off the projector and unplug the power cord.
2 Wait 60 minutes to allow the projector to cool thoroughly.
3 Remove the lamp door, located on top of the projector, by removing the screw
on the side of the lamp door, sliding the door to the left, and lifting the lamp
door off.
4 Loosen the captive screws that attach the lamp housing to the projector.
NOTE: If the projector is installed on a ceiling mount, be careful not to drop
the lamp module once the captive screws are loosened.
5 Carefully lift the lamp straight up, off of the alignment pins; being careful not to
pinch the lamp connector. Dispose of the lamp in an environmentally proper
manner.
6 Install the new lamp module, aligning the pins properly. Be careful not to pinch
the lamp connector.
7 Tighten the screws. (NOTE: If the pins have not been aligned properly, the
screws will not tighten securely.)
8 Replace the lamp door by (a) aligning the hinges, (b) putting the lamp door
down and (c) locking it back into place.
loosen screw
turn off and unplug
projector
wait 60 minutes
9 Replace the lamp door screw and tighten securely.
10 Plug in the power cord and press the Power button to turn the projector back
on.
11 To reset the lamp hour timer, navigate to the Advanced Menu > Status/
Service menu and select Reset Lamp Hours....
32
( Advanced Menu )
Image
Setup
Status/Service
Basic Menu
Source Info...
Projector Info...
Reset Lamp Hours...
Factory Reset...
Service Code...
MDL: IN122ST
FW: 1.28
Page 34

INDEX
Numerics
3D Sync Invert 26
A
AC Power On 28
Aspect Ratio 25
Audio In Computer connector 7
Auto Image 25
Auto Off Time 29
Auto Source 28
AV Mute 27
B
Blank Key 27
Blank Screen 27
Brightness 25
C
Cable box 10
Ceiling Mount 27
Closed Captions 27
Color Space 26
Computer In connector 7
Connecting
Video device 10
Contacting InFocus 18
Contrast 25
Customer service contact information 18
D
Detect Film 26
Digital Zoom 27
F
Factory Reset 29
Focus 9
Force wide 26
Freeze Screen 27
G
Gamma 26
H
HDTV 25
High Altitude Setting 29
Horizontal Position 26
Horz Shift 27
I
Instant Power On 28
Internal Speaker 27
K
Keypad 27
Keypad buttons 21
Keystone 25
L
Lamp Low Power 28
M
Magnify Level 27
Menu Transparency 28
menu usage 24
Mute 27
O
Overscan 27
P
Phase 26
PIN Protect 28
Power connector 7
Power cord 7
Power Saving Mode 28
Prevent PC Screen Saver 26
Programmed Dimming 28
Projector
Connecting video devices 10
Keypad buttons 21
Menus 24
Positioning 6
33
Page 35

Positioning 6
Setting up 6
Troubleshooting problems 11
Projector Info 27, 29
R
Rear Project 27
Red/Green/Blue Gain 26
Red/Green/Blue Offset 26
remote control 19
Resetting the projector 29
S
Screen Aspect 10
Search Screen 28
Service 29
Set Black Level... 27
Sharpness 25
Show Messages 28
Source 27
Source Info 27, 29
Sync Threshold 26
T
Tint 26
Tracking 26
Troubleshooting 11
TV tuner 10
U
USB 5
V
Vert Shift 27
Vertical Position 26
Volume 25
Volume button 20
W
Warranty 18
34
 Loading...