

Page 1
LiteBoard™ Wand
The LiteBoard™ Wand works like a wireless mouse - but one that works in
midair, not on your desktop. Just hold the wand in your hand, and point it at the
projected image to point, click and drag. The wand works with all your software,
just like a regular mouse.
Remote menu.
7 Turn on the wand by pressing its tip - the wand's blue status light will start to
blink.
8 Point the wand at the screen to point, click, and drag - just like a normal
mouse.
Charging the Wand’s Battery
When the wand’s red battery light starts to blink, its internal battery is low.
To charge the battery, open the flap at the side of the wand to expose the wand’s
USB connector. Then connect a USB cable between the wand and a computer
(make sure the computer is powered on). The battery light will stay on while the
battery is charging, then it will turn off when the battery is fully charged.
When charging is finished, disconnect the USB cable.
NOTE: The charging time will take approximately 3 hours and will allow more
than 25 hours of wand use. Do not use the wand while the wand’s battery is
charging.
Caution: The lithium battery is only rechargeable, and is not user serviceable or
user replaceable.
Caution: Always use the included USB cable and your computer to charge the
wand.
How to Use the Wand
1 The projector needs to be powered on and connected to your computer.
2 Connect the projector and your computer with a USB cable.
3 Connect the projector and your computer with a VGA cable.
4 Make sure the wand's battery is charged or charging.
5 Turn on the projector and make sure it's displaying the computer's screen -
set the source to Computer 1 or Computer 2 (press the source button on the
projector or its remote if needed - you may need to press it several times).
NOTE: When you’re done, set the wand aside and make sure it isn’t pointing at
the screen; it will turn itself off automatically after 1 minute.
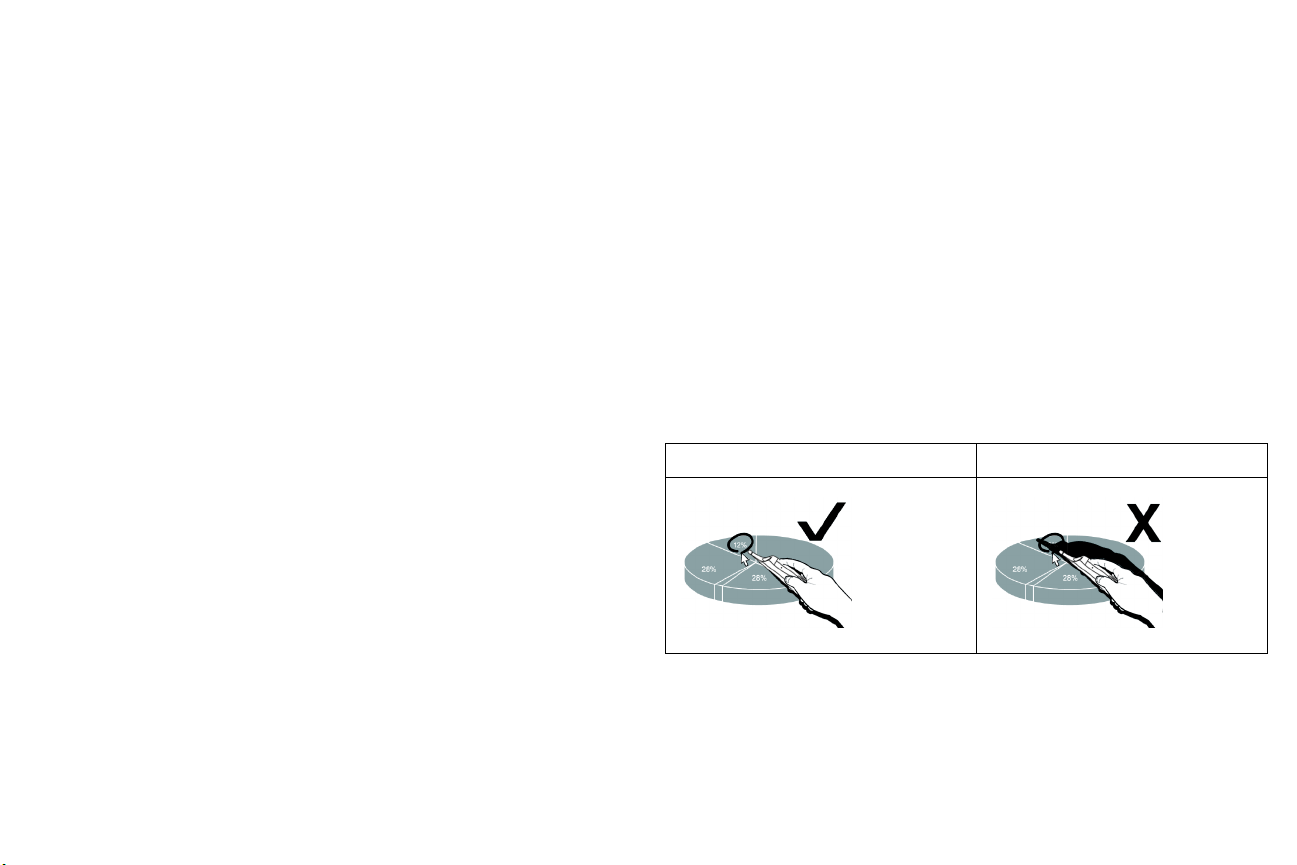
Wand Position and Avoiding Shadows
Your Location Distance from the Screen
You can use the LiteBoard™ Wand right up against the screen, or around the
room. You might find that your pointing accuracy will improve if you get closer to
the screen. Also, avoid standing too far off from either side of the screen.
Avoid Shadows!
The wand won't work if its sensor is in a shadow or if it is pointing at a shadow:
Correct (no shadow) Incorrect (shadow)
6 Enable the LiteBoard™ Wand in the Advanced Menu > Setup > Keypad/
1
Page 2

How to Hold the Wand
You can hold the wand the way you would hold a normal pencil or pen, or you can
hold it like a remote control - use in whichever position is most comfortable.
NOTE: If the wand is up close to the screen, you can press its tip against the
projection surface to click and drag. Not recommended for use with fabric
screens.
Using More than One Wand
The projector can work with two wands at the same time.
1 Enter the Keypad/Remote menu under Advanced Menu> Setup > Keypad/
Remote menu.
2 Scroll to the LiteBoard™ Wand function.
3 Select the desired setting:
None = No Liteboard Wand (Default)
Single = Use 1 Liteboard Wand
Dual = Use 2 Liteboard Wands
When you want to switch to a different wand:
1 Point the current wand away from the projected image for at least 3 seconds.
2 Press the tip on the new wand to turn it on, and then start using the new
wand.
( Keypad/Remote )
Blank Key
Custom Key
Keypad
LiteBoard™ Wand
Previous
Factory Logo
Source Info
Enable
◄ None ►
MDL: IN3924
FW: 1.02
NOTE: You can access the LiteBoard™ Wand menu from the projector's Setup >
Keypad/Remote menu. Three options are available: None, Single Pen and Dual
Pens.
2
Page 3
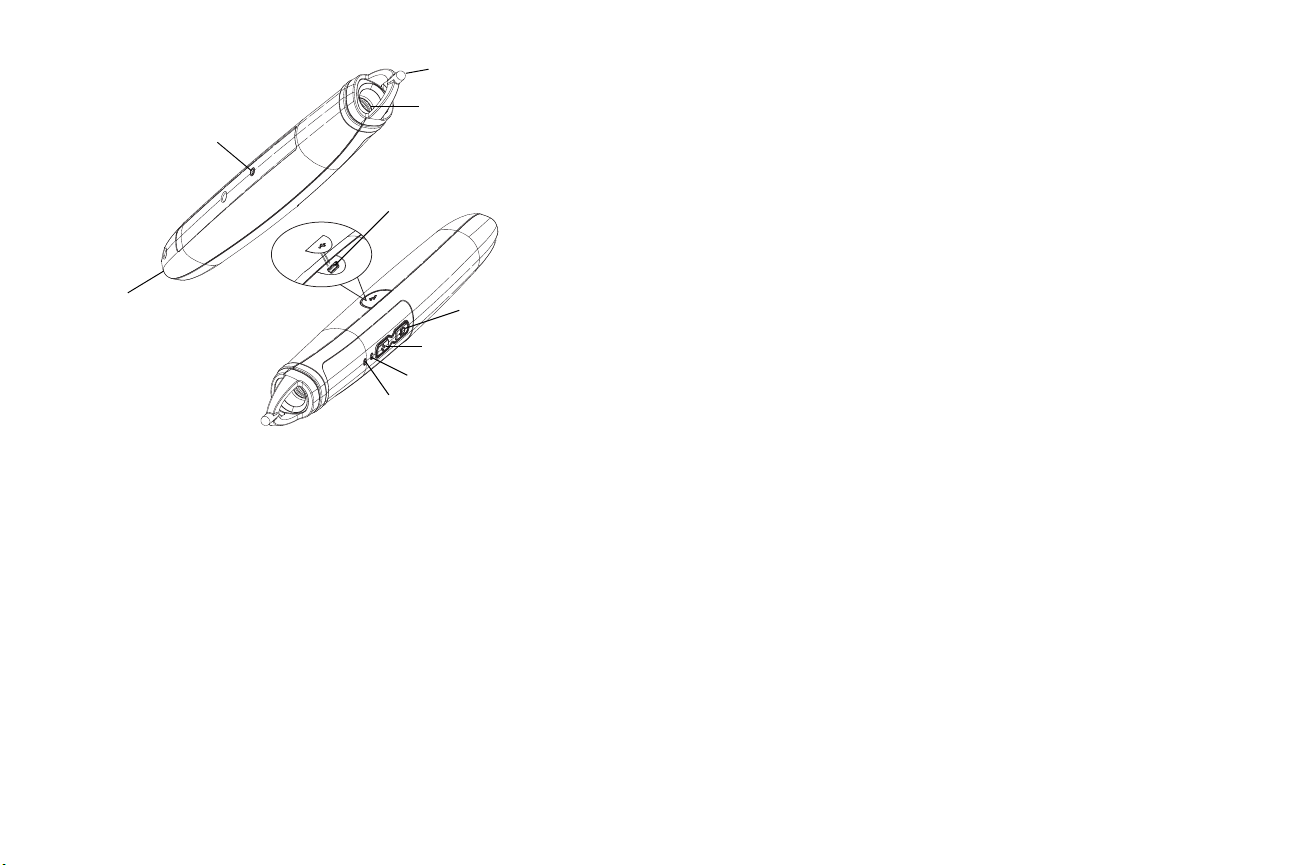
Wand Features
Reset button
Tip
Sensor
USB connector
USB Connector
The wand's USB connector is behind a flap on the side of the wand. The USB
connector is only used for charging the wand's battery.
Sensor
The wand's optical sensor opening is located above the wand's tip. Don't block the
sensor, and make sure it always has a clear view of the screen.
NOTE: The sensor won't work if you point it at a shadow or away from the
screen.
Wrist strap holder
Battery light
Left mouse button
Right mouse button
Link light
Buttons and Wand Tip
The wand's two top buttons are equivalent to the left and right buttons on a
mouse. The wand's tip is equivalent to the power button. Reset button is to
restore the wand to the factory default.
Battery Light
The red battery light shows the status of the wand's built-in battery (see below for
battery information). The battery light will turn on while the wand is charging, and
it will blink if the battery is low.
Link Light
The blue link light shows the status of the wand's wireless connection to the
projector. The link light will blink frequently when the wand is attempting to link
to the projector; then it will light steady after the wand has linked to the projector.
NOTE: The link light will stay off when the wand is off.
3
Page 4

Lithium Battery Information
Federal Communication Commission Interference Statement
This equipment has been tested and found to comply with the limits for a Class B
digital device, pursuant to Part 15 of the FCC Rules. These limits are designed to
provide reasonable protection against harmful interference in a residential installation.
This equipment generates, uses and can radiate radio frequency energy and, if not
installed and used in accordance with the instructions, may cause harmful interference
to radio communications. However, there is no guarantee that interference will not
occur in a particular installation. If this equipment does cause harmful interference to
radio or television reception, which can be determined by turning the equipment off and
on, the user is encouraged to try to correct the interference by one of the following
measures:
- Reorient or relocate the receiving antenna.
- Increase the separation between the equipment and receiver.
- Connect the equipment into an outlet on a circuit different from that to which the
receiver is connected.
- Consult the dealer or an experienced radio/TV technician for help.
FCC Caution: Any changes or modifications not expressly approved by the party
responsible for compliance could void the user's authority to operate this equipment.
This device complies with Part 15 of the FCC Rules. Operation is subject to the
following two conditions: (1) This device may not cause harmful interference, and (2)
this device must accept any interference received, including interference that may
cause undesired operation.
IC Statement
This device complies with RSS-210 of the Industry Canada Rules.
Operation is subject to the following two conditions:
1) this device may not cause interference and
2) this device must accept any interference, including interference that may cause
undesired operation of the device.
Ce dispositif est conforme à la norme CNR-210 d'Industrie Canada applicable aux
appareils radio exempts de licence. Son fonctionnement est sujet aux deux conditions
suivantes:
(1) le dispositif ne doit pas produire de brouillage préjudiciable, et
(2) ce dispositif doit accepter tout brouillage reçu, y compris un brouillage susceptible
de provoquer un fonctionnement indésirable.
Rating: 3.7V/800mAh
Caution: Lithium battery is only rechargeable, and not user replaceable. Not user
serviceable.
Troubleshooting LiteBoard™
For the most up-to-date information, visit our support site at www.infocus.com/
support
• If the wand doesn't work at all, or it works intermittently, try one of these
solutions:
- If the wand's battery light is blinking or lit, then the wand's battery is fully
discharged; connect the wand to your computer.
- Make sure the wand is not pointing at a shadow and make sure its tip is not
in a shadow.
- If the room is brightly lit, reduce the room illumination.
- If you're trying to use the computer's mouse at the same time as the wand,
point the wand away from the screen while using the mouse
• If accurate clicking is difficult, hold the wand steadier when clicking.
• If the mouse pointer is in the wrong place on the screen, or the mouse
pointer's movement is restricted to only part of the screen, make sure your
projector is displaying the computer's screen and not some other source
(such as DVD, VCR, etc.). To change the source, press the SOURCE button
on the projector or remote control.
4
 Loading...