

Page 1
InFocus Projector Setup Guide for an HDTV receiver
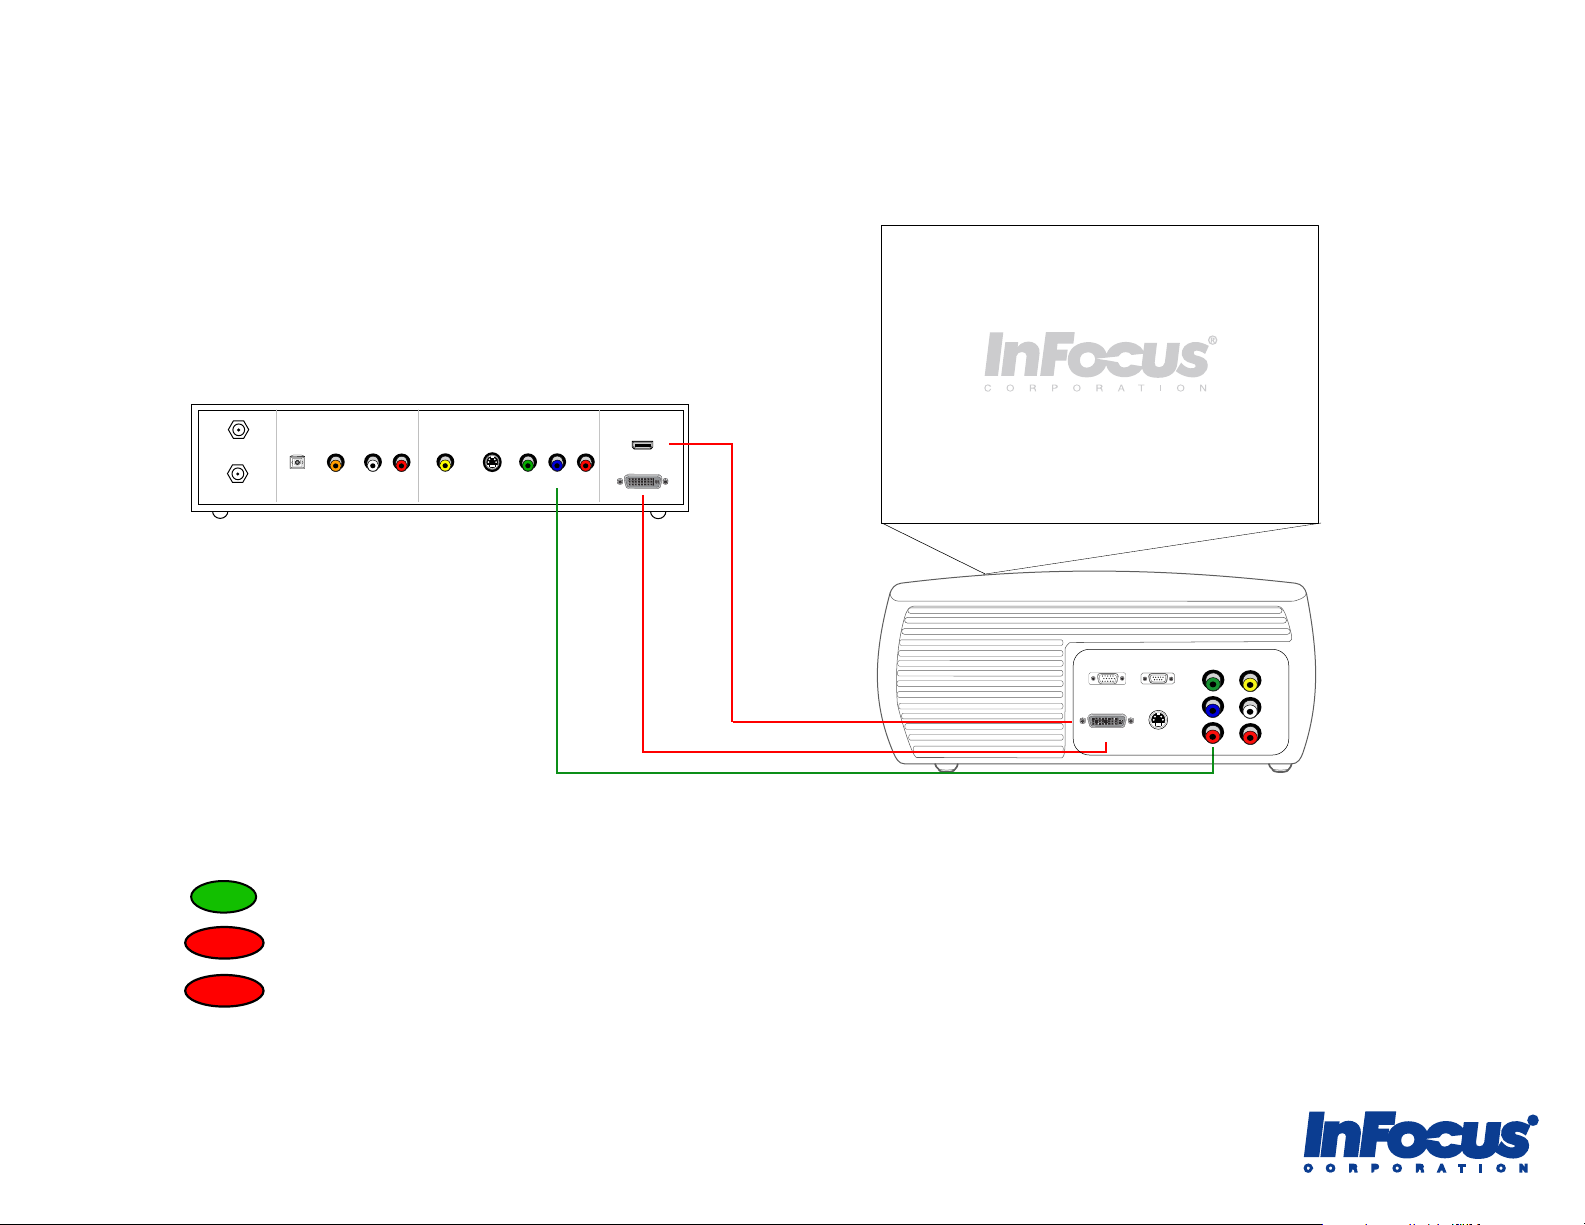
How to connect an HDTV receiver to an InFocus projector
Cable In
To TV/VCR
Audio Out
Surround Sound
Digital
Digital
Optical
Coax
Stereo
L
Analog Video Out
Composite
R
S-video
Component
Y Pb/Cb Pr/Cr
Digital Video Out
HDMI
DVI
Table of Contents
- For the quickest setup using a component video cable, see pages 2-3.
Best
Premium
- If you have a DVI port on your HDTV receiver and a M1 port on your projector, see page 4.
Premium
- If you have a HDMI port on your HDTV receiver and a M1 port on your projector, see page 5.
VGA
M1-DA
RS-232
S-video
Component
Y
Pb
Pr
Composite
L
R
For more information and troubleshooting...
Read the tips, common issues and frequently asked questions on pages 6-8.
Page 2
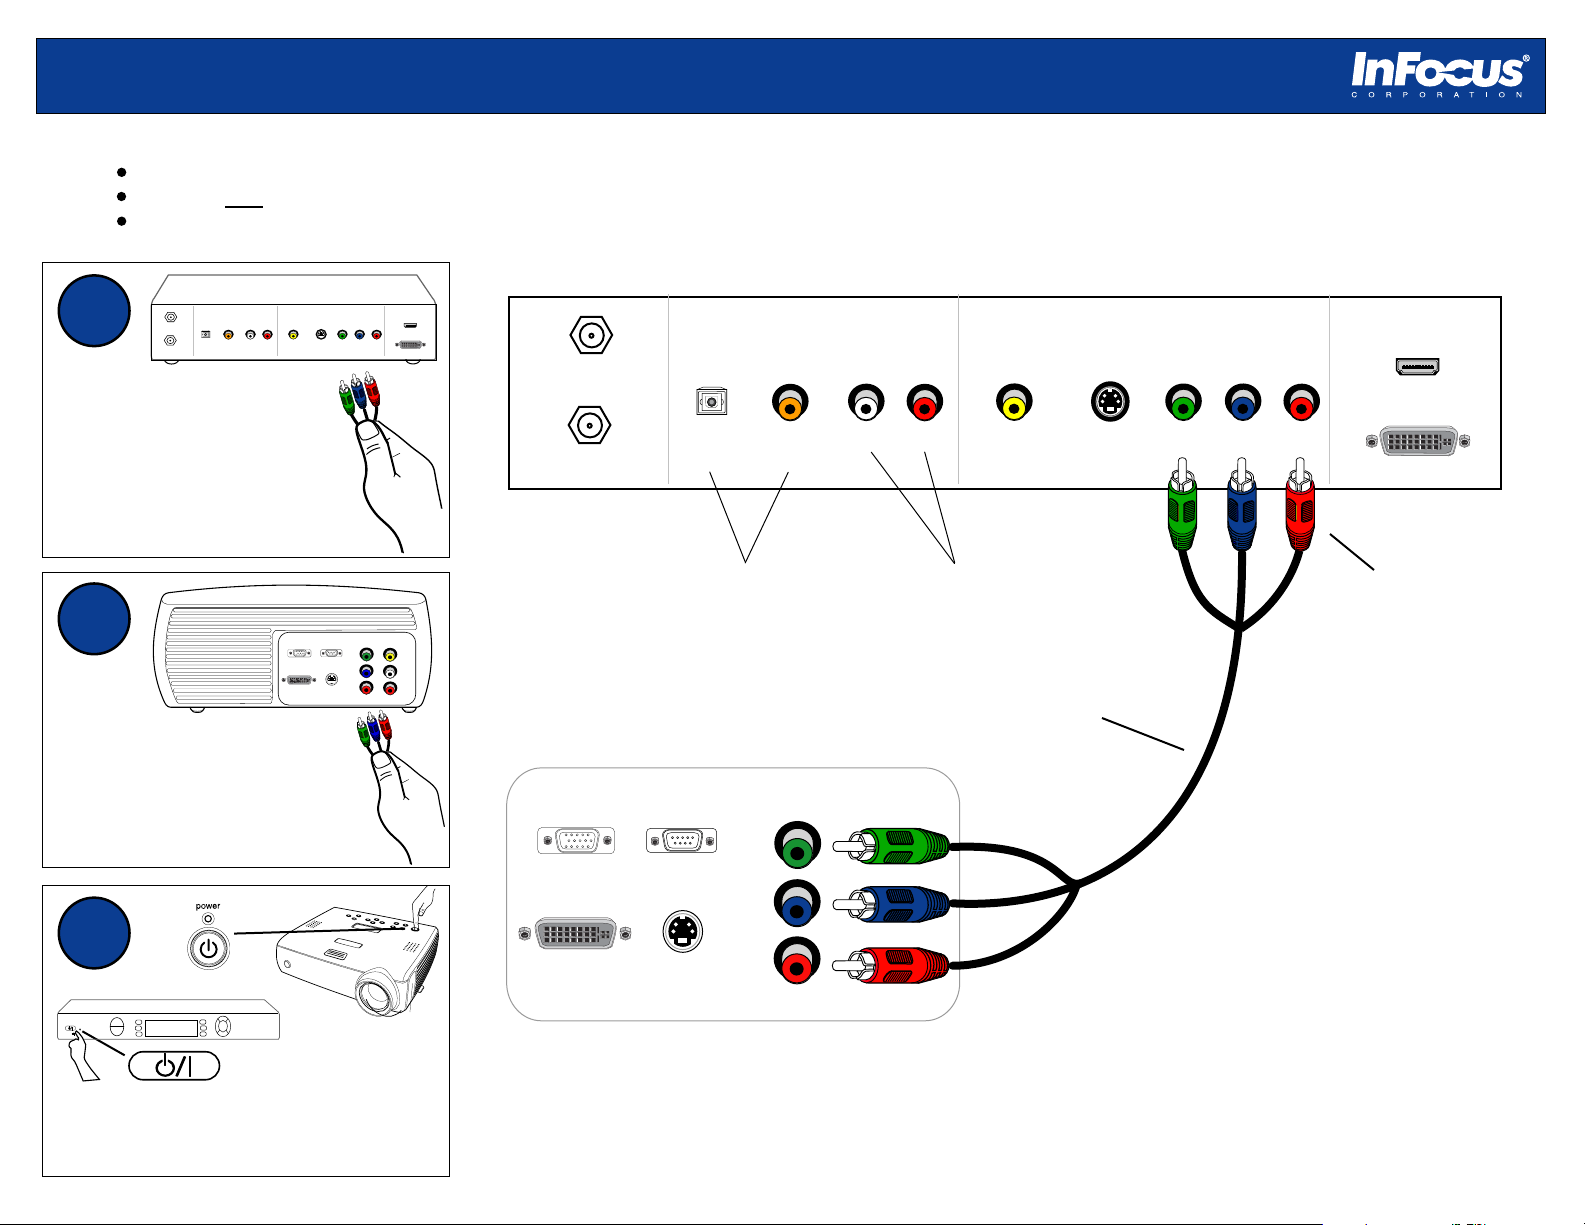
Connect an HDTV receiver to a component-ready projector using a component video cable
STANDBY
Setup Requirements
HDTV receiver with component video-out ports
Projector with component video-in ports
Component video cable (red, green, blue male RCA)
1
Cable In
To TV/VCR
Audio Out
Surround Sound
Digital
Optical
Analog Video Out
Composite
Stereo
Digital
L
R
Coax
Plug the component video
cable into the component
ports on the HDTV receiver.
2
M1-DA
Connect the other end of the
cable to the component video
ports on the projector.
3
Cable In
Audio Out
Surround Sound
Stereo
Analog Video Out
Composite
S-video
connector panel may vary from actual product
Digital Video Out
Component
HDMI
S-video
Component
Y Pb/Cb Pr/Cr
Digital Video Out
HDMI
DVI
HDTV Receiver Connector Panel
DVI
To TV/VCR
Digital
Optical
Digital
Coax
L
R
Y Pb/Cb Pr/Cr
Connect to surround
sound receiver to
receive surround sound
Composite
Component
Y
VGA
RS-232
Pb
L
Pr
S-video
R
Projector Connector Panel
Connect to external audio
receiver, speakers or
projector (if supported).*
component video cable
(optional accessory)
component video
connectors
VGA
Component
Y
RS-232
Composite
Pb
L
M1-DA
connector panel may vary from actual product
S-video
Pr
R
Power on the projector, then power on
the HDTV receiver. You are ready to
watch high definition television!
* We recommend connecting the HDTV receiver to an external
sound system to provide the best audio experience.
2
Page 3
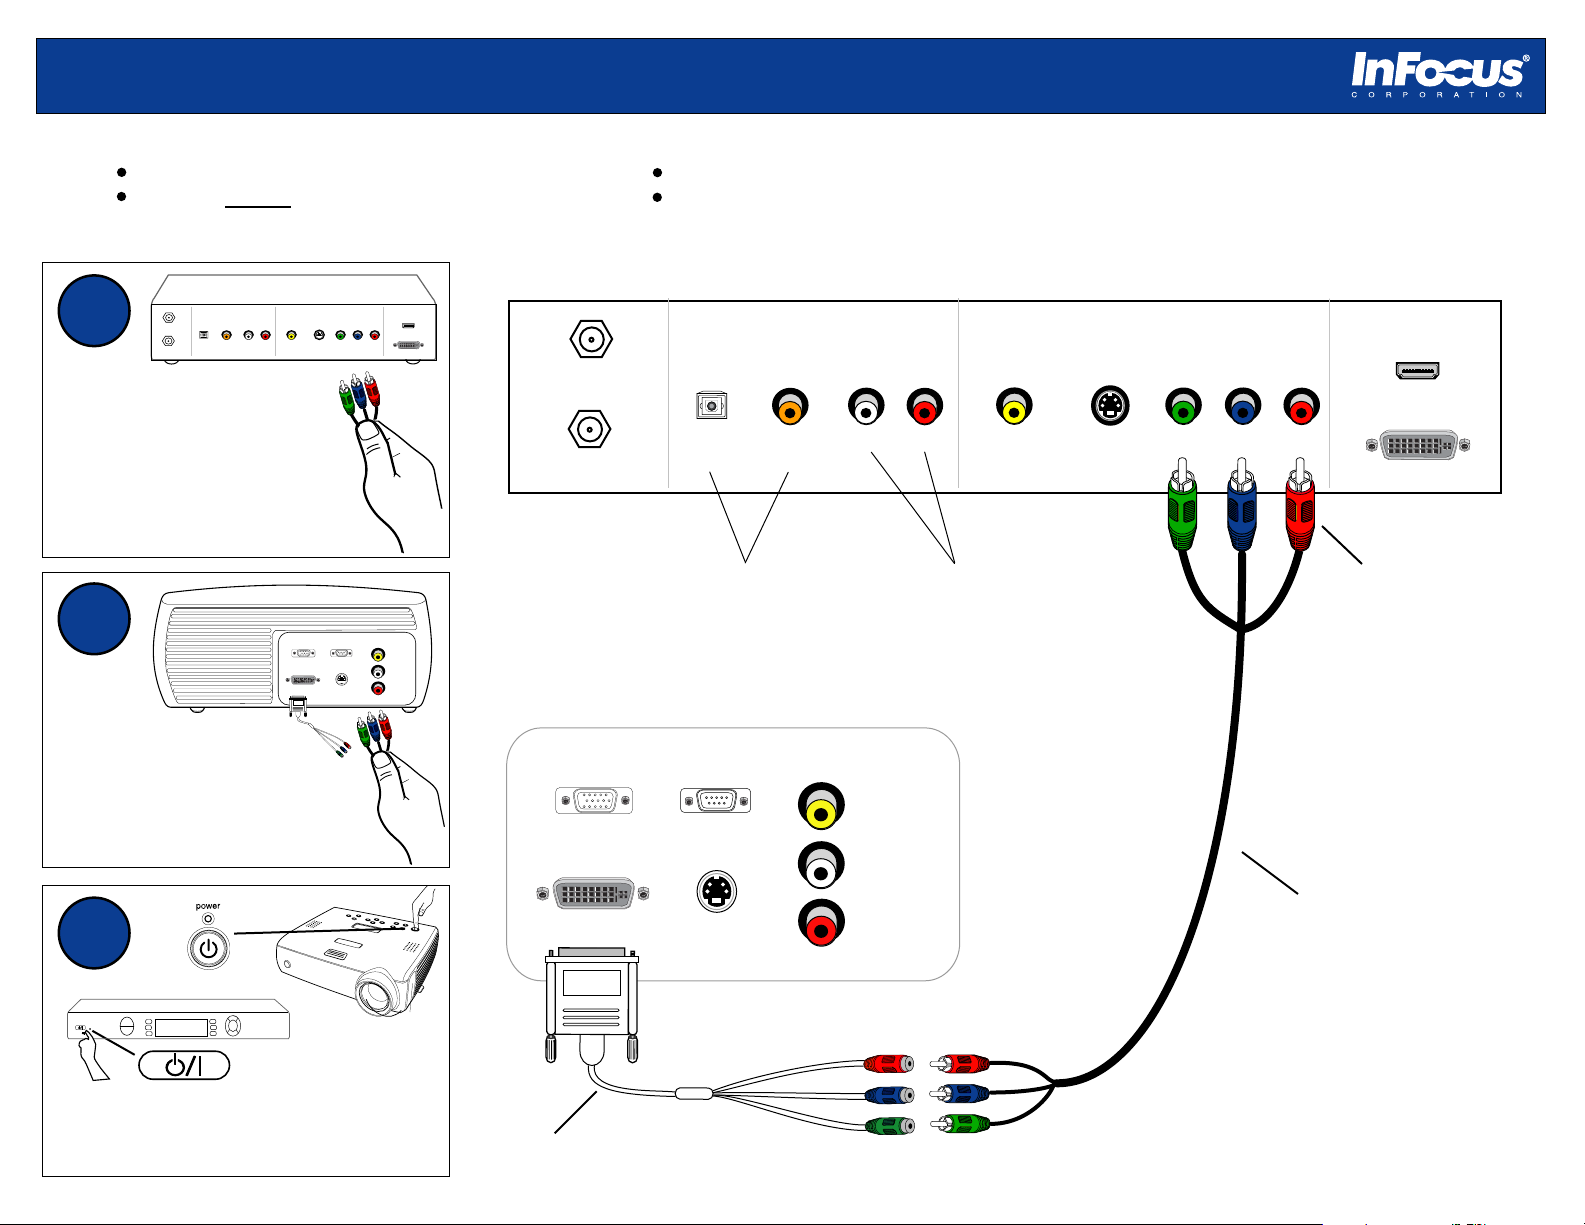
Connect an HDTV receiver to a projector (w/o component) using a component video cable
STANDBY
Setup Requirements
HDTV receiver with component video-out ports
Projector without component video-in ports
1
Audio Out
Surround Sound
Cable In
Digital
Optical
To TV/VCR
Analog Video Out
Composite
Stereo
Digital
L
Coax
S-video
R
Plug the component video
cable into the component
ports on the HDTV receiver.
2
VGA
M1-DA
Connect the other end of the
cable to the M1 to component
adapter. Connect M1 adapter
to the M1-A port on the projector.
3
Component
Y Pb/Cb Pr/Cr
RS-232
S-video
Composite
Digital Video Out
HDMI
DVI
Video
L
R
M1 to component adapter (InFocus part #SP-M1-ADPT)
Component video cable (red, green, blue male RCA)
HDTV Receiver Connector Panel
Audio Out
Surround Sound
Cable In
To TV/VCR
Digital
Optical
Digital
Coax
Connect to surround
sound receiver to
receive surround sound
Projector Connector Panel
Composite
VGA
RS-232
M1-DA
S-video
connector panel may vary from actual product
Analog Video Out
Stereo
L
Connect to external audio
receiver, speakers or
projector (if supported).
Composite
R
Video
L
R
*
S-video
connector panel may vary from actual product
Digital Video Out
Component
HDMI
DVI
Y Pb/Cb Pr/Cr
component video connectors
component video cable
(3rd party optional accessory)
Power on the projector, then the
HDTV receiver. You are ready to
watch high definition television!
M1 to component adapter
(optional accessory)
We recommend connecting the HDTV receiver to an external
*
sound system to provide the best audio experience.
3
Page 4

Connect an HDTV receiver to a projector using a DVI (digital video interface) cable
STANDBY
Setup Requirements
HDTV receiver with DVI-out port
Projector with M1-D port and HDCP support
M1 to DVI cable (6 ft, InFocus part #SP-DVI-D or 33 ft, InFocus part #SP-M1-10M)
Cable In
VGA
M1-DA
D
Audio Out
Surround Sound
Digital
Optical
Digital
Coax
L
Connect to surround
sound receiver to
receive surround sound
Connect to external audio
Composite
RS-232
Video
L
S-video
connector panel may vary from actual product
R
Analog Video Out
Stereo
receiver, speakers or
projector (if supported).
Composite
R
M1 to DVI-D cable (6 ft)
(optional accessory)
S-video
*
USB connector
1
Audio Out
Surround Sound
Cable In
Digital
Optical
To TV/VCR
Analog Video Out
Composite
Stereo
Digital
L
R
Coax
Plug the DVI connector into
the DVI-out port on the
DVD player.
2
VGA
M1-DA
Connect the M1-D connector
to the M1 port on the projector.
3
S-video
RS-232
S-video
Component
Y Pb/Cb Pr/Cr
Component
Y
Pb
Pr
D
Digital Video Out
Composite
L
R
HDTV Receiver Connector Panel
HDMI
DVI
To TV/VCR
Projector Connector Panel
connector panel may vary from actual product
Digital Video Out
Component
HDMI
DVI
Y Pb/Cb Pr/Cr
Do not connect
DVI-D
connector
Power on the projector, then the
HDTV receiver. You are ready to
watch high definition television!
M!-D
connector
We recommend connecting the HDTV receiver to an external
*
sound system to provide the best audio experience.
4
Page 5

Connect an HDTV receiver to a projector using an HDMI (high definition multimedia interface) cable
STANDBY
Setup Requirements
HDTV receiver with HDMI-out port
Projector with M1 port and HDCP support
1
Audio Out
Surround Sound
Cable In
Digital
Optical
To TV/VCR
Analog Video Out
Composite
Stereo
Digital
L
R
Coax
Plug the HDMI connector
into the HDMI port on the
HDTV receiver.
2
M1-DA
Connect the HDMI connector
to the M1 to HDMI adapter
on the projector.
3
M1 to HDMI adapter (2 in, InFocus part #SP-HDMI-ADPT)
HDMI cable (3rd party)
Cable In
Audio Out
Surround Sound
Stereo
Analog Video Out
Composite
S-video
connector panel may vary from actual product
Digital Video Out
Component
HDMI
S-video
Component
Y Pb/Cb Pr/Cr
Digital Video Out
HDMI
DVI
HDTV Receiver Connector Panel
DVI
Digital
To TV/VCR
Optical
receive surround sound
Composite
Component
Y
VGA
RS-232
Pb
S-video
L
Pr
R
Projector Connector Panel
Connect coax cable to
Cable In on HDTV receiver.
Digital
Coax
Connect to surround
sound receiver to
L
R
Connect to external audio
receiver, speakers or
projector (if supported).
*
Y Pb/Cb Pr/Cr
HDMI
connector
Composite
Video
L
HDMI cable
(optional accessory)
VGA
RS-232
M1-DA
S-video
connector panel may vary from actual product
R
Power on the projector, then the
HDTV receiver. You are ready to
watch high definition television!
M1 to HDMI adapter
(optional accessory)
5
We recommend connecting the HDTV receiver to an external
*
sound system to provide the best audio experience.
Page 6

Tips
• For the best sound, we recommend connecting the HDTV receiver to an audio receiver or a surround sound system. Only optical and coaxial audio
cables support 5.1 surround sound. With red and white RCA audio cables, you only receive 2.1 stereo sound.
• If you are connecting your HDTV receiver to the M1 port, you need a special adapter. Refer to the Service and Support web site or the InFocus
user guide to reference the video connectivity charts.
• DVI will provide the best signal. Current HDTV receivers have DVI and component connectors. Older HDTV receive rs may only have component
video. Composite and S-video cables cannot transmit a high definition signal.
• Check your HDTV receiver’s aspect ratio, output type and 4:3 override settings in the menu.
o Aspect ratio will control how the HDTV receiver will display the signal. Make sure the aspect ratio of the HDTV receiver matches the
standard aspect ratio of your projector. This will maintain the proportion of your video image.
o Output type is the preferred video format for high definition television stations. There are two choices: 720p or 1080i.
720p is recommended for the best video quality.
o 4:3 override is the video format for standard programming. There are two choices: 480i or 480p.
480p is recommended for the best video quality.
• When sending video through DVI, ensure that your projector is HDCP compatible. All InFocus ScreenPlay models with M1 ports are HDCP
compatible. Most business projectors are not compatible. Consult the Service and Support web site or user guide.
• We recommend DVI cables to not exceed 33 feet. When purchasing third party cables, always look at their rating. Cables may have ratings of a
shorter distance based on the signal format that you are using. Higher resolution formats will have shorter distance ratings. (i.e. a cable may be
rated for 33 feet for 720p, but may be rated only 15 feet for 1080p signal.)
• All TV stations are not broadcast in high definition (720p or 1080i). Commercials and some channels will be displayed in 480i or 480p. Check with
your cable provider to verify which channels are displayed in high definition.
• Visit the Service and Support web site at http://www.infocus.com/service for further proje ctor support, including FAQs, firmware, user guides and
connectivity information.
6
Page 7

Common Issues
SYMPTOMS: Light bar rolling from bottom to top
Solution: This is probably a ground loop issue. Ground loop effects
are caused by a differential in the power between the source and
projector. The solution is to ground the source and projector. Use a
ground loop isolator and/or plug both the source and projector to the
same power outlet.
A rolling bar can also be caused by poorly shielded cabling. Make sure
you use quality cables
SYMPTOMS: Static, noise, or video artifacts in video image
Solution: Usually you can eliminate a lot of video defects by using
high quality cable in as short a length as possible. For the best results,
we recommend using DVI or component cables with the projector.
Composite and S-video cables do not support high definition and
produce lower quality video. Try to keep cable length to less than 10
feet. If the setup requires a longer cable, make sure to use the thicker,
well-shielded cables.
SYMPTOMS: No video image from the projector
Solution:
• Check the coaxial cable connection to the HDTV box.
Typically, there are two coax connections on an HDTV
receiver: To TV and Cable In. Make sure the cable is securely
connected to the Cable In port.
• Make sure the projector is searching the correct input (see the
projector user’s guide). If Auto Source is turned off, you need
to manually change the source that the projector is searching.
Press the Auto Source or Video button the projector keypad or
remote.
• Try a different video cable. The cable may be defective.
• Some video ports do not accept progressive signals. Refer to
connectivity chart on the Service and Support web site.
SYMPTOMS: Image is not perfectly rectangular (keystoning)
Solution: When a projected image is wider at the top or the bottom
(horizontal keystoning), or taller on the right or left side (vertical
keystoning), the projector is not perpendicular to the screen, either in
the vertical plane or the horizontal plane.
If the sides are angled, then you need to raise or lower the front of the
projector. Also, most projectors have digital vertical keystone
correction that you can adjust in the projector menu. If the top and
bottom of the image are angled, then you need to rotate the projector
left or right until the image is rectangular. Most projectors do not have
digital horizontal keystone correction.
SYMPTOMS: Image proportion is incorrect
Solution: The aspect ratio is set incorrectly on the projector and/or the
HDTV receiver. Make sure the projector and HDTV receiver aspect
ratio are the same. In the projector menu, you can adjust the aspect
ratio. In the HDTV receiver menu, you can adjust the aspect ratio.
SYMPTOMS: Sound is too soft from projector speakers
Solution: We recommend connecting the HDTV receiver to a home
theater audio receiver or amplifier to receive a more robust and quality
audio experience. The speakers on the projector are meant for very
small spaces.
(i.e. people appear too tall or too short)
7
Page 8

Frequently Asked Questions
Which one is better: 480i (480 lines interlaced) or
480p (480 lines progressive)?
Most people cannot tell the difference between 480i and 480p.It
depends on whether the projector or the source has the better
deinterlacer chip. When you send 480i to the projector, the projector’s
deinterlacer converts the signal to a progressive signal. When you
send 480p, the video source’s deinterlacer converts the signal. We
recommend sending 480i to the projector.
Which cable provides me with the best video quality?
Connector Type Quality Signal Type
Composite Good
S-video Better
Component Best
DVI
(digital video interface)
HDMI
(high definition multimedia
interface)
Premium
Premium
Analog, standard
definition
Analog, standard
definition
Analog, 480i, 480p,
720p, 1080i
Digital, 480p, 720p,
1080i, 1080p
Digital, 480p, 720p,
1080i, 1080p, up to 8
channel audio
What does Overscan do?
Some video devices cause noise around the edges of an image.
Overscan crops approximately 3% of the image to hide this video
noise. The disadvantage of this feature is that you lose part of the
image. Most InFocus projectors include this option in the menu when a
standard definition or interlaced signal is projected. You can turn
Overscan off through the projector menu or, with some projectors, with
the remote control.
Where is the luma detail, chroma detail, CCS and noise reduction
settings in the advanced menu? My advanced menu is not
matching what I see in the user guide.
These range of advanced options varies, depending on which video
source is active. The ones listed above are available only when
composite, s-video or 480i component signals are projected. If you are
sending digital, 480p, 720p or 1080i signals, these options are not
available.
At what cable length do I lose video quality?
The answer depends on the quality of cabling you use. Some cables
begin to lose noticeable quality beyond 10 feet. Higher quality cables
can maintain a clean signal beyond 25 feet. To guarantee the best
video quality, we recommend using heavy duty shielded cabling (for
example Monster Cable or Belkin). Use as short a cable as your setup
allows.
When is the projector’s deinterlacer used?
The projector’s deinterlacer is used when you send an interlaced signal
to the projector. If you send composite, S-video or 480i component
video to the projector, the deinterlacer is used. If you send progressive,
the source device’s deinterlacer would be used.
8
 Loading...