

Page 1
Impact Drill
Taladro de percusión
日立牌手提震動電鑽
FDV 16VB2
Handling instructions
Instrucciones de manejo
使用說明書
Read through carefully and understand these instructions before use.
Leer cuidadosamente y comprender estas instrucciones antes del uso.
使用前務請詳加閱讀。
Page 2
1
12
3
4
2
2
1
4
5
3
5
6
34
A
0
4
L
9
8
7
R
6
E
B
D
C
1
Page 3

Engilsh Español 中國語
1
Ring Anillo 套環
2
Sleeve Manguito 套管
3
Tighten Apretar 擰緊
4
Loosen Aflojar 擰鬆
5
Side handle Asa lateral 邊柄
6
Chuck wrench Llave 卡盤扳手
7
Push button Botón pulsador 按鈕
8
9
0
A
B
C
D
E
mark Marca
R
mark Marca
L
Impact Impacto 衝擊
Rotation Rotación 旋鑽
Speed control dial Dial de control de velocidad 速度控制撥盤
High speed Alta velocidad 高轉速
Low speed Baja velocidad 低轉速
Stopper Tope 擋塊
R
L
標記
R
標記
L
2
Page 4

English
GENERAL OPERATIONAL PRECAUTIONS
WARNING! When using electric tools, basic safety
precautions should always be followed to reduce the
risk of fire, electric shock and personal injury, including
the following.
Read all these instructions before operating this product
and save these instructions.
For safe operations:
1. Keep work area clean. Cluttered areas and benches
invite injuries.
2. Consider work area environment. Do not expose
power tools to rain. Do not use power tools in
damp or wet locations. Keep work area well lit.
Do not use power tools where there is risk to
cause fire or explosion.
3. Guard against electric shock. Avoid body contact
with earthed or grounded surfaces. (e.g. pipes,
radiators, ranges, refrigerators).
4. Keep children and infirm persons away. Do not
let visitors touch the tool or extension cord. All
visitors should be kept away from work area.
5. Store idle tools. When not in use, tools should
be stored in a dry, high or locked up place, out
of reach of children and infirm persons.
6. Do not force the tool. It will do the job better and
safer at the rate for which it was intended.
7. Use the right tool. Do not force small tools or
attachments to do the job of a heavy duty tool.
Do not use tools for purposes not intended; for
example, do not use circular saw to cut tree limbs
or logs.
8. Dress properly. Do not wear loose clothing or
jewelry, they can be caught in moving parts.
Rubber gloves and non-skid footwear are
recommended when working outdoors. Wear
protecting hair covering to contain long hair.
9. Use eye protection. Also use face or dust mask
if the cutting operation is dusty.
10. Connect dust extraction equipment.
If devices are provided for the connection of dust
extraction and collection facilities ensure these are
connected and properly used.
11. Do not abuse the cord. Never carry the tool by
the cord or yank it to disconnect it from the
receptacle. Keep the cord away from heat, oil and
sharp edges.
12. Secure work. Use clamps or a vise to hold the
work. It is safer than using your hand and it frees
both hands to operate tool.
13. Do not overreach. Keep proper footing and balance
at all times.
14. Maintain tools with care. Keep cutting tools sharp
and clean for better and safer performance. Follow
instructions for lubrication and changing
accessories. Inspect tool cords periodically and if
damaged, have it repaired by authorized service
center. Inspect extension cords periodically and
replace, if damaged. Keep handles dry, clean, and
free from oil and grease.
15. Disconnect tools. When not in use, before servicing,
and when changing accessories such as blades,
bits and cutters.
16. Remove adjusting keys and wrenches. Form the
habit of checking to see that keys and adjusting
wrenches are removed from the tool before turning
it on.
17. Avoid unintentional starting. Do not carry a
plugged-in tool with a finger on the switch. Ensure
switch is off when plugging in.
18. Use outdoor extension leads. When tool is used
outdoors, use only extension cords intended for
outdoor use.
19. Stay alert. Watch what you are doing. Use common
sense. Do not operate tool when you are tired.
20. Check damaged parts. Before further use of the
tool, a guard or other part that is damaged should
be carefully checked to determine that it will
operate properly and perform its intended function.
Check for alignment of moving parts, free running
of moving parts, breakage of parts, mounting and
any other conditions that may affect its operation.
A guard or other part that is damaged should be
properly repaired or replaced by an authorized
service center unless otherwise indicated in this
handling instructions. Have defective switches
replaced by an authorized service center. Do not
use the tool if the switch does not turn it on and
off.
21. Warning
The use of any accessory or attachment, other
than those recommended in this handling
instructions, may present a risk of personal injury.
22. Have your tool repaired by a qualified person.
This electric tool is in accordance with the relevant
safety requirements. Repairs should only be carried
out by qualified persons using original spare parts.
Otherwise this may result in considerable danger
to the user.
3
Page 5

English
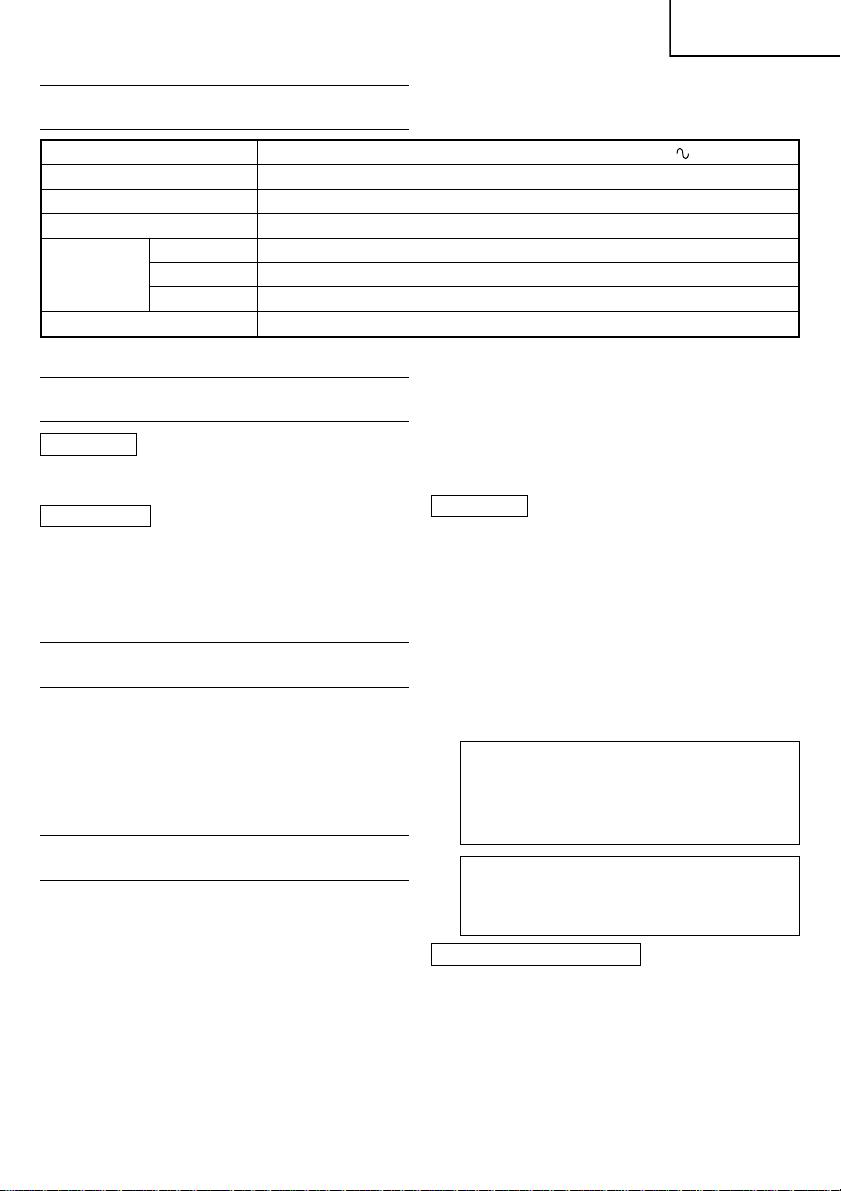
SPECIFICATIONS
Voltage (by areas)* (110V, 115V, 120V, 127V, 220V, 230V, 240V)
Power input 550W*
No load speed 0–2900/min
Steel 13 mm
Capacity Concrete 16 mm
Wood 25 mm
Weight (without cord) 1.6 kg
*Be sure to check the nameplate on product as it is subject to change by areas.
STANDARD ACCESSORIES
For entire area
(1) Side handle ............................................................... 1
(2) Depth stopper ........................................................... 1
For partial areas
(1) Chuck wrench ............................................................ 1
(For drill chuck with chuck wrench)
(2) Plastic case ................................................................ 1
Standard accessories are subject to change without
notice.
APPLICATIONS
䡬 By combined actions of ROTATION and IMPACT:
Boring holes in concrete, marble, granite, tile, and
similar materials.
䡬 By ROTATIONAL action:
Boring holes in metal, wood and plastic.
Tightening wood screws.
PRIOR TO OPERATION
1. Power source
Ensure that the power source to be utilized conforms
to the power requirements specified on the product
nameplate.
2. Power switch
Ensure that the power switch is in the OFF position.
If the plug is connected to a receptacle while the
power switch is in the ON position, the power tool
will start operating immediately, inviting serious
accident.
3. Extension cord
When the work area is removed from the power
source. Use an extension cord of sufficient thickness
and rated capacity. The extension cord should be
kept as short as practicable.
4. Fixing the side handle
Attach the side handle to the mounting part.
Rotate the side handle grip in a clockwise direction
to secure it.
Set the side handle to a position that is suited to
the operation and then securely tighten the side
handle grip.
5. Mounting and dismounting of the bit.
For keyless chuck
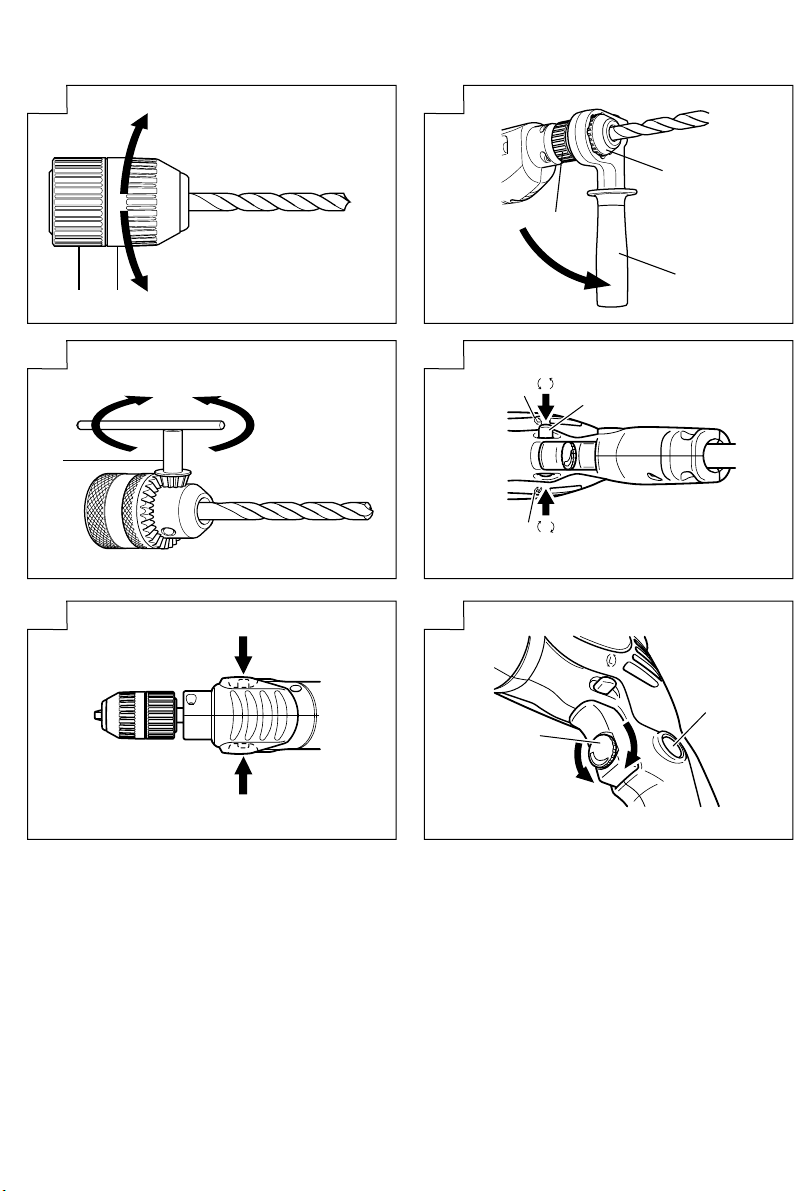
(1) Mounting the bit
After inserting a driver bit, etc. into the keyless drill
4
chuck, firmly grasp the ring and tighten the sleeve
by turning it toward the right (in the clockwise
direction as viewed from the front). (See Fig. 1)
䡬 If the sleeve becomes loose during operation, tighten
it further. The tightening force becomes stronger
when the sleeve is tightened.
(2) Dismounting the bit
Firmly grasp the ring and loosen the sleeve by
turning it toward the left (in the counterclockwise
direction as viewed from the front). (See Fig. 1)
NOTE
When the sleeve does not become loose any further,
fix the side handle to the sleeve. Then, strike the
grip of the side handle to the left in order to loosen
the sleeve,while holding the ring by hand. (Fig. 2)
CAUTION
Do not fix the side handle to the ring of the keyless
chuck because of a risk that doing so may damage
the ring.
For Drill chuck with chuck wrench
Fit the drill bit into the chuck and use the chuck
wrench to secure it, tightening the chuck by each
of the three holes in turn. (Fig. 3)
6. Selecting the appropriate drill bit
䡬 When boring concrete or stone
Use the drill bits for concrete.
䡬 When boring metal or plastic
Use an ordinary metalworking drill bit.
䡬 When boring wood
Use an ordinary woodworking drill bit.
However, when drilling 6.5 mm or smaller holes,
use a metalworking drill bit.
7. Selecting the driver bit
Screw heads or bits will be damaged unless a bit
appropriate for the screw diameter is employed to
drive in the screws.
8. Check the rotational direction (Fig. 4)
The bit rotates clockwise (viewed from the rear
side) by pushing the R-side of the push button.
The L-side of the push button is pushed to turn
the bit counterclockwise.
and R marks are provided on the body.)
(The
L
CAUTION
䡬 Never change the direction of bit rotation during
operation.
Turn the power switch OFF before changing the
direction of bit rotation; otherwise, the motor
will burn.
䡬 Always use with clockwise rotation, when using
it as an impact drill.
Page 6

English
9. IMPACT to ROTATION changeover (Fig. 5)
The impact drill can be switched from IMPACT
(impact plus rotation) to ROTATION (rotation only)
by simply sliding the change lever. When boring
concrete, stone, tile or similar board materials, slide
the change lever right. The drill head impacts against
the material while continuing to rotate.
When boring metal, wood or plastic, slide the change
lever fully to the left. The drill simply rotates as
an ordinary electric drill.
CAUTION
Do not use the impact drill in the IMPACT mode
if the material can be bored by rotation only. Such
action will not only reduce drill efficiency, but may
also damage the drill tip.
When changing over, ensure the change lever is
slid as far as it will go.
HOW TO USE
1. Pressure
Drilling will NOT be accelerated by placing heavy
pressure on the drill. Such action will only result
in a damaged drill bit, decreased drilling efficiency
and/or shortened service life of the drill.
2. Using a large diameter drill bit
The larger the drill bit diameter, the larger the
reactive force on your arm. Be careful not to lose
control of the drill because of this reactive force.
To maintain firm control, establish a good foothold,
hold the drill tightly with both hands, and ensure
that the drill is vertical to the material being drilled.
3. When drilling completely through the material
When the drill bit bores completely through the
material, careless handling often results in a broken,
drill bit or damage to the drill body itself due to
the sudden movement of the drill. Always be alert
and ready to release pushing force when drilling
through the material.
4. Switch operation
䡬 When the trigger is depressed, the tool rotates.
When the trigger is released, the tool stops.
䡬 The rotational speed of the drill can be controlled
by varying the amount that the trigger switch is
pulled. Speed is low when the trigger switch is
pulled slightly and increases as the trigger switch
is pulled more.
䡬 The desired rotation speed can be pre-selected with
the speed control dial.
Turn the speed control dial clockwise for higher speed
and counterclockwise for lower speed. (Fig. 6)
䡬 Pulling the trigger and pushing the stopper, it keeps
the switched-on condition which is convenient for
continuous running. When switching off, the stopper
can be disconnected by pulling the trigger again.
CAUTION
Drill at a maximum rotation speed when drilling
wooden materials.
5. When driving wood screws
(1) Selecting a suitable driver bit
Employ plus-head screws, if possible, since the
driver bit easily slips off the heads of minus-head
screws.
(2) Driving in wood screws
䡬 Prior to driving in wood screws, make holes suitable
for them on the wooden board. Apply the bit to
the screw head grooves and gently drive the screws
into the holes.
䡬 After rotating the screwdriver at low speed for a
while until a wood screw is partly driven into the
wood, squeeze the trigger more strongly to obtain
optimum driving force.
CAUTION
䡬 Exercise care in preparing a hole suitable for the
wood screws taking the hardness of the wood into
consideration.
Should the hole be excessively small or shallow,
requiring much power to drive the screw into it,
the thread of the wood screw may sometimes be
damaged.
䡬 Do not drive machine screws.
MAINTENANCE AND INSPECTION
1. Inspection the drill bit
Continued use of a worn and/or damaged drill bit
will result in reduced drilling efficiency and may
seriously overload the drill motor. Inspect the drill
bit often and replace it with a new bit as necessary.
2. Inspecting the mounting screws
Regularly inspect all mounting screws and ensure
that they are properly tightened. Should any of the
screws be loose, retighten them immediately. Failure
to do so could result in serious hazard.
3. Maintenance of the motor
The motor unit winding is the very “heart” of the
power tool. Exercise due care to ensure the winding
does not become damaged and/or wet with oil or
water.
4. Servicing
Consult an authorized Service Center in the event
of power tool failure.
5. Service parts list
CAUTION:
Repair, modification and inspection of Hitachi Power
Tools must be carried out by an Hitachi Authorized
Service Center.
This Parts List will be helpful if presented with the
tool to the Hitachi authorized Service Center when
requesting repair or other maintenance.
In the operation and maintenance of power tools,
the safety regulations and standards prescribed in
each country must be observed.
MODIFICATION:
Hitachi Power Tools are constantly being improved
and modified to incorporate the latest technological
advancements.
Accordingly, some parts may be changed without
prior notice.
NOTE
Due to HITACHI’s continuing program of research and
development, the specifications herein are subject to
change without prior notice.
5
Page 7

Español
PRECAUCIONES GENERALES PARA
OPERACIÓN
¡ADVERTENCIA! Cuando utilice herramientas eléctricas,
tome las medidas de seguridad básicas para reducir el
riesgo de incendios, descargas eléctricas, y lesiones,
incluyendo lo siguiente.
Lea todas todas estas instrucciones antes de utilizar este
producto y guárdelas.
Para realiza roperaciones seguras:
1. Mantener el área de trabajo limpia, áreas y bancos
de trabajo desordenados son causa de daños
personales.
2. Considerar el medio ambiente del área de trabajo.
No exponer las herramientas eléctricas a la lluvia.
No usar herramientas eléctricas en lugares mojados
o húmedos. Mantener el área de trabajo bien
iluminada.
No utilice herramientas eléctricas cuando exista el
riesgo de incendios o de explosión.
3. Protegerse contra descargas eléctricas. Evitar el
contacto del cuerpo con las superficies puestas a
tierra (p. ej., tubos, radiadores, hornos de
microondas, o refrigeradores).
4. Mantener a los niños y a las personas débiles
alejados. No dejar que los visitantes toquen las
herramientas ni los cables de extensión. Todos los
visitantes deberán mantenerse alejados del área de
trabajo.
5. Guardar las herramientas que no se usen y ponerlos
en lugares secos, altos o cerrados, fuera del alcance
de los niños y a las personas débiles.
6. No forzar las herramientas, éstas trabajarán más y
con mayor seguridad cuando cumplan con las
especificaciones para las cuales fueron diseñadas.
7. Usar las herramientas apropiadas. No forzar
pequeñas herramientas o accesorios a realizar el
trabajo de herramientas de mayor potencia. No
utilizar herramientas para otros propósitos para los
cuales no fueron diseñadas, por ejemplo, no utilizar
sierras circulares para cortar ramas de árboles o
troncos.
8. Vestir apropiadamente. No ponerse ropas que
queden flojas ni tampoco joyas. Estas podrian
quedar atrapadas en las partes móviles de las
herramientas. Cuando se trabaje en exteriores, se
recomienda el uso de guantes de goma y calzado
que no resbale. Utilice elementos de protección
para sujetar el cabello largo.
9. Usar gafas de protección. Usar también mascarillas
contra el polvo si las condiciones de corte fuesen
polvorientas.
10. Conecte un equipo colector de polvo.
Si existen dispositivos para la conexión de equipos
de extracción y recolección de polvo, cerciórese de
queéstos estén conectados adecuadamente, y de
utilizarlos en la forma correcta.
11. Cuidar del cable. Nunca lleve las herramientas
colgando del cable, tampoco tire del cable para
efectuar la desconexión de las herramientas.
Mantener el cable alejado del calor, aceite y bordes
agudos.
12. Asegurar la pieza de trabajo usando para ello
abrazaderas o un tornillo. Esto es más seguro que
usar las manos, ademas, ambas manos quedan
libres para operar la herramienta.
6
13. No extenderse excesivamente para efectuar un
trabajo. Mantener en todo momento un buen
balance y base de apoyo.
14. Mantener cuidadosamente las herramientas.Tener
las siempre limpias y afiladas para obtener un mejor
rendimiento y un funcionamiento más seguro.
Seguir siempre las instrucciones para la lubricación
y el cambio de accesorios. Inspeccionar
periódicamente los cables de las herramientas y si
estuviesen danãdos, hacer que los reparen técnicos
ó expertos. Inspeccionar periodicamente los cables
de extensión y cambiarlos si estuviesen dañados.
Mantener los mangos secos, limpios, y libres de
aceite y grasa.
15. Desconectar las herramientas cuando no se usen,
antes de repararlas, y cuando se cambien accesorios
como por ejemplo, cuchillas, brocas, cortadores, etc.
16. Quitar las cuñas y las llaves de tuercas.
Acostumbrarse a comprobar si se han quitado las
cuñas y las llaves de tuercas antes de poner las
harramientas en funcionamiento.
17. Evitar puestas en funcionamiento sin fin alguno.
No llevar las herramientas con los dedos en los
inerruptores mientras que éstas cestán conectadas.
Cuando se conecten las herramientas, cerciorarse
de que los interruptores esten en la posición de
desconectados.
18. Para usos en exteriores usar cables de extensión.
Cuando las herramientas vayan a ser usadas en
exteriores, usar solamente cables de extensión
diseñados para tal propósito.
19. Estar siempre alerta y poner atención a lo que se
está haciendo, usar el sentido común y no operar
con la herramienta cuando se esté cansado.
20. Comprobar las piezas dañadas. Antes de seguir
con el funcionamiento de las herramientas, las
piezas que estén dañadas deberán comprobarse
cuidadosamente para determinar si pueden
funcionar apropiadamente y cumplir con la función
para las que fueron diseñadas. Comprobar el
alineamiento y agarrotamiento de piezas móviles,
rotura de piezas, montura, y cualiquier otra anomalia
que pudiese afectar al rendimiento de la
herramienta. Cualquier pieza que estuviese dañada
deberá repararse apropiadamente o cambiarse en
un centro de reparaciones autorizado, al menos
que se indique, lo contrario en este manual de
instrucciones. Procurar que los interruptores
defectuosos los cambie un centro de reparaciones
autorizado. No usar las herramientas si sus
interruptores no funcionasen apropiadamente.
21. Advertencia
La utilización de cualquier accesorio o aditivo no
recomendado en este manual de instrucciones
puede conducir al riesgo de lesiones.
22. En caso de avería, haga que su herramienta sea
reparada por un técnico cualificado.
Esta herramienta eléctrica está de acuerfdo con los
requisitos de seguridad pertinentes. Las
reparaciones solamente deberán realizarlas técnicos
cualificadosutilizando piezas de repuesto originales.
De lo contrario, el usuario podría lesionarse.
Page 8

Español
ESPECIFICACIONES
Voltaje (por áreas)* (110V, 115V, 120V, 127V, 220V, 230V, 240V)
Acometida 550 W*
Velocidad de marcha en vacío 0–2900 / min
Acero 13 mm
Capacidad Hormigón 16 mm
Madera 25 mm
Peso (sin cable) 1,6 kg
*Verificar indefectiblemente los datos de la placa de características de la máquina, pues varían de acuerdo al país de
destino.
ACCESORIOS ESTANDAR
Para todas las áreas
(1) Asidero lateral ............................................................ 1
(2) Dispositivo de ajuste de profundidad.......................1
Para áreas parciales
(1) Volvedor de mandril .................................................. 1
(Para portabrocas con llave para el mismo)
(2) Caja de plástico .......................................................... 1
Accesorios estándar están sujetos a cambio sin previo
aviso.
APLICACIONES
䡬 Acciones combinadas de ROTACION e IMPACTO:
Perforar orificios en hormigón, mármol, granito,
baldosa y materiales similares.
䡬 Acción de ROTACION:
Por acción de orificios en metal, madera y plástico.
Y apretar tornillos para metal y madera.
ANTES DE LA PUESTA EN MARCHA
1. Alimentación
Asegurarse de que la acometida de red que ha de ser
utilizada es conforme a las exigencias de corriente
espacificadas en la placa de características del
producto.
2. Conmutador de alimentación
Asegurarse de que el conmutador de acometida está
en posición OFF (desconectado). Si el enchufe está
conectado a la caja del enchufe mientras el
conmutador de acometida está en posición ON
(conectado) la herramienta eléctrica empezará a
tradajar inmediatamente, provocando un serio
accidente.
3. Cable de prolongación
Cuando está alejada el área de trabajo de la red de
acometida, usar un cable de prolongación de un
grosor suficiente y potencia nominal. El cable de
prolongación debe ser mantenido o más corto posible.
4. Montar el asidero lateral
Instale el asidero lateral en la parte de montaje.
Gire la empuñadura del asidero lateral hacia la
derecha para asegurarla.
Coloque el asidero lateral en la posición adecuada
para la operación, y después apriete firmemente la
empuñandura del mismo.
5. Montaje y desmontaje de las brocas
Para portabrocas sin llave
(1) Montaje de la broca
Después de insertar una broca de destornillador, etc.,
en el portabrocas automático, sujete firmemente el
anillo y apriete el manguito girándolo hacia la derecha
(visto desde el frente) (Consulte la Fig. 1).
䡬 Si el manguito se afloja durante la operación,
apriételo. La fuerza de apriete será más intensa
cuando el manguito esté bien apretado.
(2) Desmontaje de la broca
Sujete firmemente el anillo y afloje el manguito
girándolo hacia la izquierda (visto desde el frente)
(Consulte la Fig. 1).
NOTA
Cuando el manguito no se afloje más, fíjele el asa.
Después, golpee la empuñadura del asa hacia la
izquierda a fin de aflojar el manguito mientras sujete
el anillo con la mano (Fig. 2).
PRECAUCIÓN
No fije el asa lateral al anillo del portabrocas sin llave
porque podría dañar el anillo.
Para portabrocas con llave para el mismo
Montar la broca de taladro dentro del mandril y usar
la llave de mandril para asegurarla, apretando el
mandril en cada uno de sus orificios alternamente
(Fig. 3).
6. Seleccionar la broca de taladro apropiada
䡬 Caso de perforar hormigón o piedra:
Usar las brocas de taladro para hormigón.
䡬 Perforando metal o plástico:
Usar una broca de taladro ordinaria para trabajos en
metal.
䡬 Perfornado madera:
Usar una broca de taladro ordinaria para trabajos en
madera.
En cualquier caso, perforando orificios de 6,5 mm, o
menos, usar una broca de taladro para trabajos en
metal.
7. Seleccione la broca para destornillar
Tanto los tornillos como las brocas se rompen, si no
se emplea la broca para el diámentro correcto del
tornillo.
7
Page 9

Español
8. Verifique la dirección de rotación (Fig. 4)
La broca gira en el sentido de las agujas del reloj
(visto desde el lado trasero) empujando el lado R del botón.
Si empuja el lado L del botón, la broca girará en
sentido contrario a las agujas del reloj.
(Las marcas
PRECAUCION
䡬 Nunca hay que cambiar la dirección de broca
cuando está funcionando.
Desconecte la unidad (en “OFF”) antes de cambiar
la dirección de rotación, de lo contrario, puede
quemarse el motor.
䡬 Siempre hay que usar la rotación a la derecha
cuando se usa la herramienta como taladro de
impacto.
9. Alteración de IMPACTO a ROTACION (Fig. 5)
El taladro de impacto puede commutarse de IMPACTO
(rotación e impacto) a ROTACION (sólo rotación)
simplemente con correr la palaquita de cambio.
Cuando se taladren materiales duros por ejemplo:
hormigón, piedras, baldosas o similars, deslizar la
palanquita de cambio hacia la derecha. La cabeza de
la broca entra en contacto con el material mientras
que continúa girando.
Cuando se perfora metal, madera o plástico, o se
aprietan tornillos, hay que correr la palanquita de
cambio completamente a la izquierda. Con lo cual el
taladro simplemente rota como taladro eléctrico
comùn.
PRECAUCION
No usar el taladro de impacto en el modo IMPACTO
si el material puede perforarse con rotación
solamente. Tal acción no sólo reduce la eficiencia de
perforación, sino que puede dañar la punta del
taladro.
Al hacer el cambio, hay que asegurarse que la
palanquita de cambio corra lo máximo possible.
y R están provistas en el cuerpo).
L
COMO SE USA
1. Presión
Para taladrar NO se acelera aplicando una presión
pesada en el taladrador. Una tal acción tendría como
resultado daño a la broca y disminuiría la eficiencia
de taladro y/o acortaría la vida del servicio del
taladrador.
2. Uso de un diámetro grande de la broca de taladro
Cuanto más grande sea el diámetro de la broca de
taladro, y tanto más grande sea la fuerza reactiva en
subrazo, tener cuidado de no perder el control sobre
el taladrador, a causa de ésta fuerza reactiva. Para
mantener un firme control, establecer una buena
posisión de los pies, y sujetar el taladrador firmemente
con ambas manos y asegurarse de que el taladrador
esté en forma vertical, con respecto al material que
se vaya a taladrar.
3. Perforando completamente a través de material
Si la broca de taladro perfora completamente a través
del material, un manejo sin cuidado, ocasionaría a
menudo daños al taladro a causa del movimiento
repentino, siempre estar atento y preparado para
relajar la fuerza de apretar al taladrar a través del
material.
4. Operación del interruptor
䡬 La herramienta gira al presionar el interruptor de
gatillo. Al soltar el gatillo, la herramienta se detiene.
䡬 La velocidad de rotación del taladro puede controlarse
variando la fuerza de apriete del interruptor de gatillo.
Apretando ligeramente el interruptor de gatillo la
velocidad es lenta, pero aumenta mientras más se lo
aprieta.
䡬 Es posible seleccionar previamente la velocidad de
rotación deseada con el dial de control de velocidad.
Gire el dial de control de velocidad en el sentido a las
agujas del reloj para aumentar la velocidad, y en
sentido contrario para disminuirla (Fig. 6).
䡬 Tire del gatillo y empuje el tope para mantener
activada la alimentación, lo cual es conveniente para
un funcionamiento continuo. Cuando se lo
desconecta, el tope puede quitarse tirando del gatillo
otra vez.
PRECAUCION
Para taladrar madera, emplee la velocidad máxima.
5. Atornillando los tornillos, para madera
(1) Seleccionar la broca destornillador apropiada
Emplear tornillos cabeza (+), de ser posible, debido a
que la broca destornillador puede zafarse fácilmente
de los tornillos con cabeza (-).
(2) Atornillar tornillos de madera
䡬 Antes de atornillar los tornillos de madera, hay que
hacer los orificios apropiados, para ellos antes de
perforar la madera. Aplicar la broca a la ranura de la
cabeza del tornillo para poner éstos en sus orificios.
䡬 Luego de rotar el destornillador a baja velocidad por
un rato, hasta que el tornillo para madera está
parcialmente metido, apretar el gatillo con más fuerza
para obtener una fuerza eficáz.
PRECAUCION
䡬 Tener cuidado al preparar el orificio apropiado para
el tornillo de madera, teniendo en cuenta la dureza
de la madera.
Si el orificio es muy pequeño o estrecho, se requiere
mucha fuerza para atornillar y ésto puede ocasionar
deterioros a la rosca.
䡬 No introducir tornillos de máquinas.
MANTENIMIENTO E INSPECCION
1. Inspeccionar la broca de taladro
El uso contínuo de una broca de taladro desgastada
y/o dañada podria ocasionar una reducida eficiencia
de taladro y también pordría sobrecalentar seriamente
el motor de taladro. Inspeccionar a menudo la broca
de taladro y reemplazarla por una nueva broca,
cuando sea necesario.
2. Inspeccionar la broca de taladro y el macho de roscar
Como el uso continuado de una broca o macho de
roscar desgastados disminuye la eficiencia operativa
y causa un posible recalentamiento del motor,
reemplazar o afilar la broca o el macho sin demora si
se nota un excesivo desgaste.
3. Mantenimiento d motor
La unidad de devanado del motor es el verdadero
“corazón” del herramientas eléctricas. Prestar el
mayor cuidado a asegurarse de que el devando no se
dañe y/o se humedezca con aceite o agua.
8
Page 10

4. Servicio
Consultar a un representante de servicio autorizado
en caso de fallo de las harramientas eléctrica.
5. Lista de repuestos
PRECAUCIÓN
La reparación, modificación e inspección de las
herramientas eléctricas Hitachi deben ser realizadas
por un Centro de Servicio Autorizado de Hitachi.
Esta lista de repuestos será de utilidad si es presentada
junto con la herramienta al Centro de Servicio
Autorizado de Hitachi, para solicitar la reparación o
cualquier otro tipo de mantenimiento.
En el manejo y el mantenimiento de las herramientas
eléctricas, se deberán observar las normas y
reglamentos vigentes en cada país.
MODIFICACIONES
Hitachi Power Tools introduce constantemente
mejoras y modificaciones para incorporar los últimos
avances tecnológicos.
Por consiguiente, algunas partes pueden ser
modificadas sin previo aviso.
OBSERVACION
Debido al programa continuo de investigación y desarollo
de HITACHI estas especificaciones están sujetas a cambio
sin preaviso.
Español
9
Page 11

中國語
作業上的一般注意事項
警告﹗當使用電動工具時,為了減少造成火災、電擊
和人身傷害,必須時刻遵守基本注意事項,以及下述
操作注意事項。
在操作本機之前,請通讀本說明書,並予以妥善保
管。
安全操作注意事項︰
1. 工作場所應打掃乾淨,清理妥當,雜亂無章將導
致事故。
2. 確保妥適的作業環境。電動工具不可任其風吹雨
打。不得在潮濕的地方作業。工作場所需保持充
分的亮度。請勿在有可能造成火災或爆炸的地方
使用電動工具。
3. 謹防觸電事故。應避免身體同大地或接地表面接
觸(例如︰管道、散熱器、爐灶、冰箱等)。
4. 不可讓孩童和体弱人士靠近工作場所。請勿讓訪
客觸摸電動工具或延伸線纜。所有訪客必須與工
作區保持安全距離。
5. 妥善存放不使用的工具。應將不使用的電動工具
存放到乾燥及孩童和体弱人士伸手不及的高處,
並加鎖保管。
6. 不得使勁用力推壓。電動工具需按設計條件才能
有效而安全地工作,絕不可勉強。
7. 妥選使用工具。不可用小型工具或附件去幹重
活。不可用於規定外的作業。舉例說,用圓鋸進
行伐木打枝或原木鋸切作業。
8. 工作時衣服穿戴要合適。不要讓鬆散的衣角和寶
石類捲入轉動部份。屋外作業時,最好手戴橡膠
手套,腳穿防滑膠鞋。同時要戴上能夠罩籠長髮
的工作帽。
9. 絕大多數的電動工具作業時,均需戴安全眼鏡。
進行粉塵飛揚的切削作業時,需戴防塵面罩。
10. 連接除塵設備。
如果提供連接除塵和集塵的設備,請確認是否已
經連接好並且使用正常。
11. 不要拿電線提起電動工具,也不得拉扯電線從電
源插座拆除插頭。電線需從熱源和油液隔開,並
避免與銳利的邊緣接觸。
12. 作業以安全第一為原則。工件要用夾具或台鉗卡
緊。這樣做,比用手按壓更為可靠,也能夠讓雙
手專心操作。
13. 作業時腳步要站穩,身體姿勢要保持平衡。
14. 工具應維護妥善,經常保持鋒利、清潔才能充分
發揮性能,落實作業安全的要求。應按規定加注
潤滑脂、更換附件。線纜應定期檢查,如發現損
傷應即委託專業性的服務單位加以修復。延伸電
纜如有損傷應予更換。手柄要保持乾燥,並防止
沾附油脂類。
15. 不使用時,維修前以及更換附件(如:刀具、鑽
頭、鋸具等)之前,都必須拆卸電源插頭才行。
16. 開動前務必把調整用鍵和扳手類拆除下來。這一
點與安全有關。應養成習慣,嚴格遵守。
17. 謹防誤開動。插頭一插上電源插座,指頭就不可
隨便接觸電源開關。插接電源之前,應先確認開
關是否切斷。
18. 屋外延伸線纜的使用。屋外作業時,必須使用專
用的延伸線纜。
19. 保持高度警覺,充分掌握情況,以正常的判斷力
從事作業。疲憊時切不可開動電動工具。
20. 檢查損壞部件。在繼續使用電動工具之前,應詳
細檢查各部零件以及防護裝置有無損壞,以便決
定能否正常工作,能否發揮正常效能。檢查轉動
部份的對準、空轉、各零件有無異常,安裝是否
妥善以及其它足以給工作帶來不良影響的情況。
如防護以及其它零件損傷了。除非本說明書中已
有記載否則應即委託服務中心進行修理或更換。
開關一發現缺陷,應即委託服務中心加以更換。
如開關不能正常地接通或切斷,絕不可使用該電
動工具。
21. 警告
為了防止人身傷害,不得使用電動工具去進行規
定外的作業。並祇能使用本說明書目錄中所指定
的附件。
22. 本工具必須委託有資格的維修人員進行維修。
本電動工具滿足相關的安全要求。維修必須由專
業人員使用純正配件來進行。否則有可能會給用
戶造成人身損害。
10
Page 12
規格
電壓(按地區)* (110V, 115V, 120V, 127V, 220V, 230V, 240V)
輸入功率 550W*(台灣 500W)
額定輸出功率 270W
無負荷速度 0∼2900 轉分
金 屬 13 mm
能力 混凝土 16 mm
木 材 25 mm
重量(不含線纜) 1.6 kg
* 當須改變地區時應檢查產品上的銘牌。
標 準 附 件
用於全地區
(1) 側柄 ................................... 1
(2) 停止器 ................................. 1
用於部分地區
(1) 夾持器扳手 ............................. 1
(用於帶夾持器扳手的鑽頭夾持器)
(2) 塑料套 ................................. 1
標準附件可能不預先通告而更改。
用 途
䡬 旋鑽加衝擊:混凝土、大理石、花崗岩、瓷鑽以
及其它類似材料的鑽孔。
䡬 專用旋轉方法的用途:
金屬、木材和塑料的鑽孔。
木螺絲的擰緊。
4. 側柄的安裝
把側柄安裝到底座部。
將側柄夾順時針方向固定起來。同時配合工作時
的位置、把它裝好之後,充分地把側柄夾擰緊。
5. 安裝和拆卸鑽頭
無鍵夾持器
(1) 安裝鑽頭
將螺絲刀頭等插入無鍵鑽頭夾持器後,抓緊環並
將其向右側(從前面看是朝順時針方向)旋轉以
擰緊套管。(圖 1)
䡬 如套管在作業中鬆弛,請將其進一步擰緊。套筒
被擰緊時,其擰緊力變得更強。
(2) 拆卸鑽頭
抓緊環並將其向左側(從前面看是朝逆時針方
向)旋轉以擰鬆套管。(圖 1)
註
當無法擰鬆套管時,請將側柄裝在套筒上,然
後用手抓住環,將側柄的把手撞擊至左側以便
擰鬆套筒。(圖 2)
中國語
作 業 之 前
1. 電源
確認所使用的電源與工具銘牌上標示的規格是否
相符。
2. 電源開關
確認電源開關是否切斷。若電源開關接通,則插
頭插入電源插座時電動工具將出其不意地立刻轉
動,從而招致嚴重事故。
3. 延伸線纜
若作業場所移到離開電源的地點,應使用容量足
夠、鎧裝合適的延伸線纜,並且要盡可能地短
些。
注意
請勿將側柄裝在無鍵夾持器的環上,因為這樣
可能會損傷環。
帶夾持器扳手的鑽頭夾持器
將鑽頭套入夾持器,用夾持器扳手加以固定。具
體上可將夾持器扳手插入夾持器上三個孔口,逐
一緊固。(圖 3)
6. 選擇合適的鑽頭
䡬 混凝土或石材:使用混凝土用鑽頭。
䡬 金屬或塑料:使用通常的金屬用鑽頭。
11
Page 13

中國語
䡬 木材的鑽孔:使用通常的木工用鑽頭。
但鑽開 6.5mm 或更小的孔口時,宜使用金屬用鑽
頭。
7. 螺絲刀頭的選擇
除非使用適合於螺絲直徑的鑽頭來旋入螺絲,否
則會損壞螺絲刀頭或鑽頭。
8. 確認鑽頭旋轉方向(圖 4)
按下按鍵的 R(右)側可使鑽頭沿順時針方向(前
視)旋轉。按下按鍵的 L(左)側可使鑽頭沿逆時
針方向旋轉。
(機身上有 L 和 R 標記。)
注意
䡬 操作中請勿改變鑽頭旋轉方向。
改變鑽頭旋轉方向之前,應先關掉開關,
否則馬達會燒壞。
䡬 作為震動電鑽使用時,一定要使用順時針
方向。
9. 衝擊與旋轉的切換(圖 5)
只要滑動切換手柄,震動電鑽即可從衝擊(衝擊
加上旋轉)切換到旋轉(只旋轉)。對混凝土、
石頭、瓷磚或類似板材進行鑽孔時,請將切換手
柄往右推動。在繼續旋轉時,鑽頭會給材料以衝
擊。
對金屬、木材或塑膠進行鑽孔時,將切換手柄往
左推到盡頭。震動電鑽就像普通電鑽一樣只旋轉
而無衝擊力。
注意
如果材料只能用旋轉方法鑽孔時,請勿在衝擊
模態下使用震動電鑽。這種動作不僅會降低鑽
孔效率,而且也會損壞鑽尖。
切換時,一定要把切換手柄移到底。
使 用 方 法
3. 進行穿孔作業時
穿孔作業時,常因操作不慎,使電鑽突然移動而
損壞鑽頭或電鑽主體。因此,必需提高警覺,準
備隨時放鬆推力。
4. 開關操作
䡬 按下起動器時,電鑽旋轉;鬆開起動器時,電鑽
停止。
䡬 改變拉起動器開關的程度可以控制電鑽的轉速。
輕拉起動器開關轉速較慢,進一步拉起動器開關
則轉速變快。
䡬 可以用速度控制撥盤預選所需的旋轉速度。
順時針轉動速度控制撥盤提高速度,逆時針轉動
降低速度。(圖 6)
䡬 拉起動器並推制動器,保持開關合上狀態,便於
連續運轉。當開關斷開時,再次拉起動器便可釋
放制動器。
注意
在木材上開孔時,請用全速度開孔。
5. 旋入木螺絲時
(1) 選擇適當的螺絲刀頭
如果可能的話,要使用十字槽頭螺絲,因為螺絲
刀頭容易從一字槽頭螺絲滑脫。
(2) 旋入木螺絲
䡬 旋入木螺絲之前,先在木板上打出適合的孔,把
鑽頭放在螺絲頭槽裡,將螺絲輕輕旋入孔內。
䡬 使螺絲刀以低速旋轉一會兒,直到木螺絲有一部
份旋入木材裡,然後再多用點力扳緊扳機,以達
到最佳的驅動力。
注意
䡬 考慮到木材的硬度,小心備製適合於木螺絲的
孔。如果備製的孔太小或太淺,要多用點力把
螺絲旋入,但要注意,木螺絲的螺紋有時會損
壞。
䡬 請勿用於旋入機器螺絲。
1. 壓力
鑽孔作業時,絕不可使勁推壓鑽頭,以加快作業
速度。這樣做,只會使鑽頭受損,降低效率,從
而縮短鑽頭的使用壽命。
2. 使用大口徑鑽頭
鑽頭的口徑越大,手上受到的反力也越大,因而
必須注意會因反力過大而失去對鑽頭的控制。為
了得到良好的控制,腳步要站穩,並用雙手牢靠
地握住電鑽。同時,鑽頭與鑽面要保持垂直。
12
維 護 和 檢 查
1. 檢查鑽頭
繼續使用磨損或受傷的鑽頭,不僅使工作效率大
為降低,同時還會導致電動機過載。因此,鑽頭
必需時常檢查,並根據情況需要加以更換。
Page 14

2. 檢查安裝螺釘
要經常檢查安裝螺釘是否緊固妥善。若發現螺釘鬆
了,應立即重新扭緊,否則會導致嚴重的事故。
3. 電動機的維護
電動機繞線是電動工具的心臟部。應仔細檢查有
無損傷,是否被油液或水沾濕。
4. 維修
電動工具起故障時,請洽經授權的維修代理店。
5. 維修部件目錄
注意:
日立電動工具的修理、維護和檢查必須由日立所
認可的維修中心進行。
當尋求修理或其他維護時,將本部件目錄與工具
一起提交給日立所認可的維修中心會對您有所幫
助。
在操作和維護電動工具中,必須遵守各國的安全
規則和標准規定。
改進:
日立電動工具隨時都在進行改進以適應最新的技
術進步。
因此,有些部件可能未預先通知而進行改進。
中國語
註:
為求改進,本手冊所載規格可能不預先通告而徑予
更改。
13
Page 15

503
502
501
1
2
3
3
4
5
6
7
8
9
11
10
10
12
13
14
15
16
17
18
21
22
23
24
25
27
26
28
19
20
37
36
35
34
31
30
32
33
29
Part Name
1 Flat Hd. Screw (A) (Left Hand) M6 × 25
2 Chuck Wrench For 13VLB-D, 13VLR-D
3 Drill Chuck 13VLRB-D
3 Drill Chuck 13VLRC-N (W/O Chuck Wrench)
4 Spindle
5 Spring
6 Ball Bearing (6201VVCMPS2S)
7 Retaining Ring For D12 Shaft
Item
No.
8 Gear
9 Steel Ball D4.76
10 Change Knob
11 Change Plate
12 Spring (A)
13 Holder
14 Ball Bearing (608VVMC2EPS2L)
15 Armature
16 Stator
17 Ball Bearing (326VVMC2ERPS2S)
18 Housing (A), (B) Set
19 Nameplate
20 Tapping Screw (W/Flange) D4 × 20
21 Carbon Brush
22 Brush Holder
23 Choke Coil
24 Internal Wire (D)
25 Switch
26 Push Button
27 Internal Wire (C)
28 Choke Coil
29 HITACHI Label
30 Cord Armor
31 Cord Clip
32 Tapping Screw (W/Flange) D4 × 16
33 Cord
34 Internal Wire (B)
35 Internal Wire (A)
36 Noise Suppressor
37 Earth Terminal
501 Side Handle
502 Depth Gauge
503 Case
14
Page 16

15
Page 17

Hitachi Koki Co., Ltd.
602
Code No. C99126433
Printed in China
 Loading...