

Page 1
日立牌充电式往复锯
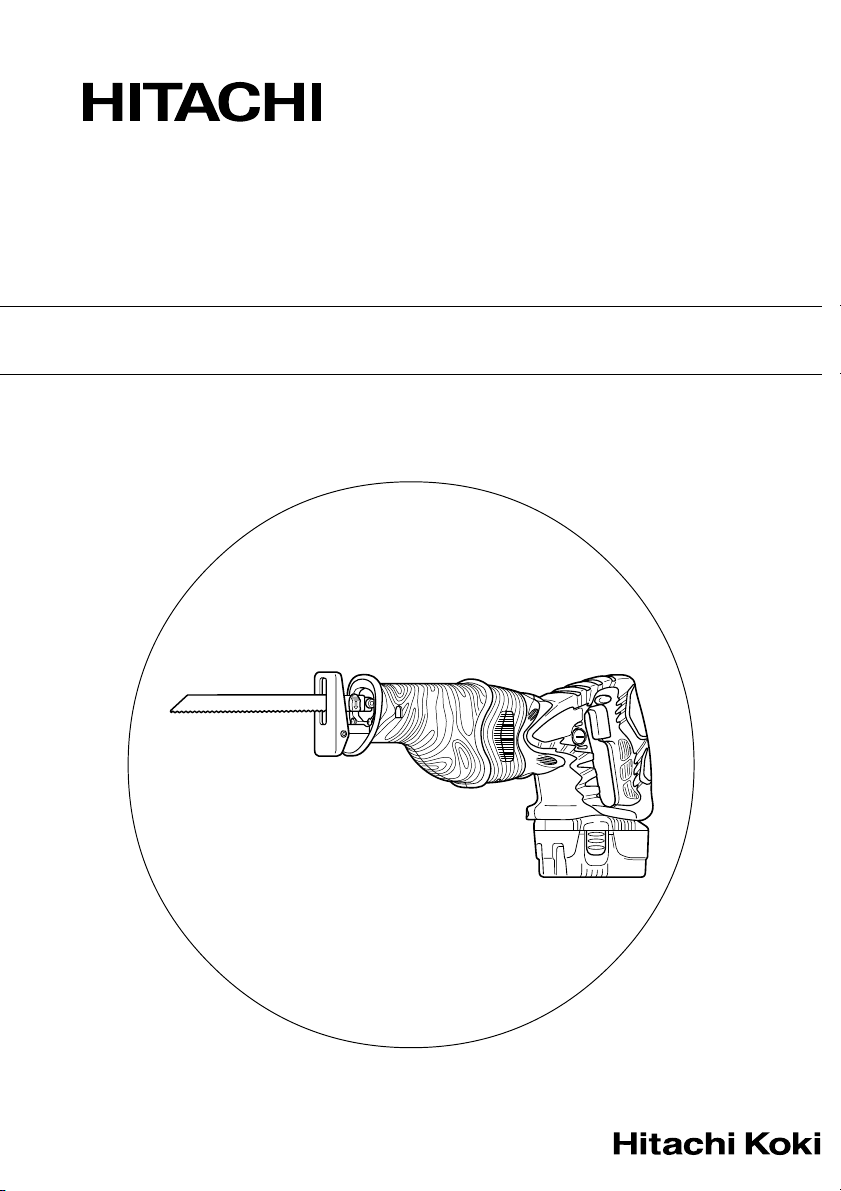
Cordless Reciprocating Saw
CR 18DMR
使用说明书
HANDLING INSTRUCTIONS
使用前务请详加阅读
Read through carefully and understand these instructions before use.
Page 2
12
5
2
4
3
2
34
8
1
1
1
7
1
6
7
9
9
56
0
A
78
0
B
8
B
C
910
0
B
1
C
0
Page 3
11 12
0
D
C
0
E
F
13 14
0
G
15 16
I
K
J
J
17 18
L L
N M
H
B
J
O
19 20
2
O
Page 4
21 22
23 24
25 26
27 28
29 30
3
P
3 mm
11.5 mm
Page 5
31 32
Q
R
33
S
1
充电式电池
插销
2
拉出
3
插入
4
把手
5
按
6
插入
7
指示灯
8
充电式电池连接孔
9
手柄
0
前罩
A
刀刃
B
柱塞缝
C
其他刀刃
D
刀刃座
E
机油
F
橡皮盖
G
刀刃孔
H
六角杆扳手
I
底座
J
12mm 固定螺丝
K
锁定解除按钮
L
游离
M
锁住
N
行程
O
磨耗极限
P
碳刷钉
Q
碳刷突起
R
碳刷管外侧连接部分
S
Rechargeable battery
Latch
Pull out
Insert
Handle
Push
Insert
Pilot lamp
Hole for connecting the rechargeable battery
Lever
Front cover
Blade
Plunger slit
Another blade
Blade holder
Machine oil
Rubber Cap
Blade hole
Hexagonal bar wrench
Base
Set screw 12 mm
Lock-off button
Free
Lock
Stroke
Wear limit
Nail of carbon brush
Protrusion of carbon brush
Contact portion outside brush tube
4
Page 6

作业上的一般注意事项
1. 工作场所应打扫干净,清理妥当。杂乱无章将导
致事故。
2. 避免危险的环境,请勿让电动工具与充电器淋到
雨,不可在潮湿地方使用电动工具和充电器,工
作地点要保持明亮。请勿在易燃或爆炸性物质附
近使用电动工具和充电器。不可在存放易燃液体
或气体的地方使用电动工具和充电器。
3. 在无监督的情况下小孩或体弱者不适宜使用此电
动工具。应监督小孩不要让其玩耍电动工具。所
有访客均须保持安全距离。
4. 保存现未使用的工具和充电器。未使用电动工具
和充电器时,须将它们存放在干燥处、高处或能
上锁处,以防止小孩和体弱者取到。请将电动工
具和充电器存放在温度低于 40℃ 地方。
5. 不得使劲用力推压。电动工具需按设计条件才能
有效而安全地工作。绝不可勉强。
6. 妥选使用工具。不可用小型工具或附件去干重
活。
7. 服装要穿戴齐整。衣服或服饰不可松驰,以免卷
入活动部件内。在室外工作时,最好戴橡胶手
套,穿上鞋袜。
8. 使用电动工具时,大部分需要戴安全眼镜。如果
作业中灰尘多,还要戴上面具或防尘口罩。
9. 塞绳不可滥用。充电器切勿拿著塞绳搬动或从插
座中拔出。不可让塞绳受热、沾油或碰到锐利的
棱角。
10. 作业以安全第一为原则。工件要用夹具或台钳卡
紧。这样做,比用手按压更为可靠,也能够让双
手专心操作。
11. 作业时脚步要站稳,身体姿势要保持平衡。
12. 电动工具要小心保养。刀具要经常保持锋利、清
洁,以确保性能与安全。请按照润滑剂和所变更
的附件说明进行。
13. 充电器不用时或维修检查时,务请将充电器的插
头从插座中拔出。
14. 拆下卡盘扳手和扳手。打开开关之前,总要先检
查扳手是否从工具上卸下。
15. 谨防不慎打开开关。搬运钻机时,请勿将手指搁
在开关上。
16. 请勿使用未经指定的充电器以免发生危险。
17. 只能使用日立指定的更换零件。
18. 不得使用电动工具去进行规定以外的其它作业。
19. 为了防止人体受伤,只能使用本说明书或日立牌
产品目录中所指定的附件。
20. 如果电源线破损,必须将充电器送回日立授权的
服务中心来更换电源线。只能请授权的服务店来
维修本工具。对于因非授权者的修理或因错误使
用了本工具而造成的工具损坏或人体伤害,本制
造公司概不负责。
21. 为了保证设计的完整性,电动工具和充电器的盖
罩和螺钉类不可随便拆除。
22. 务请在铭牌上规定的电压下使用充电器。
23. 除非电池已经拆下,否则绝不可接触转动部分或
附件。
24. 使用前务请充电。
25. 请勿使用未经指定的电池。请勿将未经指定的普
通干电池、充电式电池或汽车蓄电池连接于电动
工具上。
26. 请勿使用含有升压器的变压器。
27. 请勿用引擎发电机或直流电源装置对电池进行充
电。
28. 务请在室内进行充电。充电时,充电器和电池会
稍微变热,因此,不要在直射阳光处充电,而应
在湿度低、通风好的阴凉处进行充电。
29. 在高处作业时,要注意下面的动静。作业前,应
先确认下面无人。
30. 进行授权服务时,请使用本说明书中的组装分解
图。
31. 如果电源线破损,必须由厂家或其维修代理店或
具有同等资格的技术人员更换,以避免发生危
险。
充电式往复锯使用上的注意事
项
1. 务请在 10~40°C 的温度下进行充电。温度低于
0°C 将会导致充电过度,极其危险。电池不能在
高于 10°C 的温度下充电。最适合于充电的温度
是 20~25°C。
2. 不要连续使用充电器。
一次充电完毕后,在 15 分钟内不要再次使用该充
电器对电池充电。
3. 勿让杂质进入充电式电池连结口内。
4. 切勿拆卸充电式电池与充电器。
5
Page 7
5. 切勿使充电式电池短路。
使电池短路将会造成很大的电流和过热,从而烧
坏电池。
6. 请勿将电池丢入火中。
电池受热将会爆炸。
7. 持续使用本机,可能造成过热,从而导致马达和
开关损坏。请停止使用本机 15 分钟左右。
8. 充电后电池寿命太短不够使用时,请尽快将电池
送往经销店。请勿将用过的电池乱丢。
9. 使用一个电力耗尽的电池将会损坏加载装置。
10. 在锯进墙壁、天花板或地板之前,请确认内部是
否有电线或管道之类的东西。
11. 请勿将异物插入充电器的通风口。
若将金属异物或易燃物插入通风口的话,将会引
起触电事故或使充电器受损。
12. 为保护您的听力请在工作时带上耳塞。
13. 切勿在工作中或刚刚结束工作时触摸锯条,因为
在工作中锯条会变得很热,触摸其将会造成严重
的烫伤。
14. 始终持牢把手和电动工具的前盖,否则反作用力
可能会造成操作误差或人身伤害。
15. 在进行调整、更换附件或存放工具之前请取出电
池或将开关置于锁定或关闭位置。
规 格
电动工具
型式 CR18DMR
无负荷速度 0-2100/分
行程 28 mm
能力 软钢管∶ 外径 90 mm
聚氯乙烯管∶ 外径 90 mm
木材∶ 厚度 90 mm
软钢板∶ 厚度 10 mm
EB1820L 镍镉电池,18 V (2.0 Ah 15 电池)
充电式电池 EB1826HL Ni-MH电池,18 V (2.6Ah 15 电池)
EB1830HL 氢化镍金属电池,18 V (3.0 Ah 15 电池)
重量 3.8 kg
充电器
型式 UC24YFA UC18YG
充电电压 7.2-24 V 7.2-18 V
重量 0.6 kg 0.3 kg
标 准 附 件
12 3
CR18DMR
1 刀刃 (No. 103) ...................................................................................................... 1
2 六角杆扳手 ............................................................................................................ 1
3 充电器 (UC24YFA) ............................................................................................. 1
4 塑料箱 ................................................................................................................... 1
标准附件可能不预先通告而径予更改。
4
6
Page 8
选购附件(分开销售)
电池的拆卸/安装法
1. 电池 (EB1820L, EB1826HL, EB1830HL)
2. 刀刃
(1) 1 号刀刃 (10) 101号刀刃
(2) 2 号刀刃 (11) 102 号刀刃
(3) 3 号刀刃 (12) 103 号刀刃
(4) 4 号刀刃 (13) 104 号刀刃
(5) 5 号刀刃 (14) 105 号刀刃
(6) 8 号刀刃 (15) 106 号刀刃
(7) 9 号刀刃 (16) 107 号刀刃
(8) 95 号刀刃 (17) 108 号刀刃
(9) 96 号刀刃 (18) 121 号刀刃
(19) 131 号刀刃
(20) 132 号刀刃
䡬 (1)-(9)∶HCS 刀刃(HCS∶高速碳钢)
䡬 (10)-(20)∶Bl-METAL 刀刃
使用刀刃时,请参照表 6,表 7 和表 8。
选购附件可能不预先通告而径予更改。
用 途
䡬 管子和角钢的切锯。
䡬 各种木材的切锯。
䡬 软钢板、铝板及铜板的切锯。
䡬 苯酚树脂、聚氯乙烯等合成树脂的切锯。
详细内容,请参照“刀刃的选择”一节的内容。
注意
务必保持开关关闭或将锁定解除按钮移至右侧(锁
定位置)。(参照图 17)
1. 电池的拆卸法
请先紧抓住把手,然后再推压电池插销以拆下电
池(参照图 1 和 2)。
注意
切勿使电池短路。
2. 电池的安装法
插入电池时请注意极性。(参照图 2)
充 电
〈UC24YFA〉
在使用充电式电动工具之前,请先按以下方法给电池
充电。
1. 将充电器的电源线连接至电源插座
连接电源线时,充电器的指示灯将闪烁呈红色
(以 1 秒的间隔)。
2. 将电池装入充电器
如图 3 所示,将电池稳稳地插入充电器直至其接
触到充电器的底部,并确认电池的极性方向正确
无误。
3. 充电
将电池插入充电器后,充电开始,并且,充电器
上的指示灯将持续点亮呈红色。
电池完全充电后,指示灯将闪烁呈红色(以 1 秒
的间隔)(参照表 1)。
(1) 指示灯显示
根据充电器或充电式电池的情况,指示灯的显示
如表 1 所示。
7
Page 9

表 1
充电前
闪烁
(红色)
指示灯的显示
点亮 0.5 秒钟,不点亮 0.5 秒钟
(熄灭 0.5 秒钟)
充电时
充电完成
无法充电
无法充电
点亮
(红色)
闪烁
(红色)
闪动
(红色)
点亮
(绿色)
连续点亮
点亮 0.5 秒钟,不点亮 0.5 秒钟
(熄灭 0.5 秒钟)
点亮 0.1 秒钟,不点亮 0.1 秒钟
(熄灭 0.1 秒钟)
连续点亮
(2) 关于充电式电池的温度
充电式电池的温度如表 2 所示,在充电前应使已
发热的电池冷却片刻。
表 2
电池类型 电池可充电的温度
EB1820L -5°C-60°C
EB1826HL, EB1830HL 0°C-45°C
(3) 关于充电时间
根据充电器和电池的组合,充电时间如表 3 所
示。
表 3 充电时间(于 20°C)
电池类型 充电时间
EB1820L 约 50 分钟
EB1826HL 约 60 分钟
EB1830HL 约 70 分钟
注
充电时间可能根据温度和电压而有变化。
4. 从电源插座拔下充电器的电源线
5. 握紧充电器并取出电池
注
充电完成后,请先从充电器内取出电池,然后加以
妥善保存。
电池或充电器有问题
电池温度太高,以致无
法充电。
关于新电池等的放电。
因新的和长期未使用的充电式电池内部的化学物
质无活性,故第一次和第二次使用时其放电能力
可能较低。这是暂时现象,这种电池充电 2-3 次
后即可恢复其充电所需的正常时间。
较长时间保持电池性能的方法。
(1) 在电池电力完全耗尽之前进行充电。
感到电动工具的能力变弱时,请停止使用并给电
池充电。若您继续使用电动工具并耗尽电力,电
池可能会损坏或其使用寿命缩短。
(2) 避免在高温环境中充电。
使用后充电式电池的温度将迅速升高。若使用后
立即对这种电池进行充电,其内部化学物质会劣
化,电池使用寿命将缩短。请稍等片刻,待电池
冷却后再进行充电。
注意
䡬 若在电池因长时间存放在有直射阳光的场所或
刚使用后发热时进行充电,充电器的指示灯点
亮呈绿色。遇此情况时,请先让电池冷却后再
开始充电。
䡬 指示灯闪动呈红色时(以 0.2 秒钟的间隔),
请检查并取出充电器电池安装孔内的任何异
物。若无异物,则可能电池或充电器发生故
障。请带去经授权的维修中心检查。
䡬 因内置的微机需要约 3 秒钟才能确认正用
UC24YFA 进行充电的电池已被取出,因此请
待 3 秒钟后再重新插入电池继续充电。
8
Page 10

〈UC18YG〉
在使用电动工具之前,请先按以下方法给电池充电。
1. 将充电器的电源线连接至电源插座
连接电源线后,打开充电器电源。
2. 将电池装入充电器
按正确的方向插入电池,直至电池接触到充电器
底部(参照图 4)(充电器指示灯点亮)。
注意
如果充电器指示灯未点亮,请从插座上拔下电源
线,然后检查电池安装是否正确。
(1) 检查充电式电池的温度。充电式电池的温度如
表4所示。
表 4 电池的充电温度范围
充电式电池 电池的充电温度
EB1820L 0℃-45℃
(2) 检查充电时间
根据充电器和电池的组合,充电时间如表 5 所示。
表 5 充电时间(于20℃)
充电器 UC18YG
电池
EB1820L 约 50 分钟
充电器指示灯熄灭表示电池已完成充电。
温度过低或电源电压过低时,电池充电时间变
长。
如果充电开始 120 分钟后充电器指示灯仍未熄灭,
请停止充电,并联系日立公司授权的维修中心。
注意
若在电池因阳光直射或刚使用后发热时进行充
电,充电器指示灯可能不会点亮。遇此情况时,
请先让电池冷却后再开始充电。
3. 从电源插座拔下充电器的电源线
4. 握紧充电器并取出电池
注
充电完成后,请先从充电器内取出电池,然后加以
妥善保存。
关于新电池等的放电。
因新的和长期未使用的充电式电池内部的化学物
质无活性,故第一次和第二次使用时其放电能力
可能较低。这是暂时现象,这种电池充电 2—3 次
后即可恢复其充电所需的正常时间。
较长时间保持电池性能的方法。
(1) 在电池电力完全耗尽之前进行充电
感到电动工具的能力变弱时,请停止使用并给电
池充电。若您继续使用电动工具并耗尽电力,电
池可能会损坏或其使用寿命缩短。
(2) 避免在高温环境中充电
使用后充电式电池的温度将迅速升高。若使用后
立即对这种电池进行充电,其内部化学物质会劣
化,电池使用寿命将缩短。请稍等片刻,待电池
冷却后再进行充电。
操作前须知
1. 安装锯条
该工具采用了不使用扳钳或其他工具便可装卸锯
条的可装卸式装置。
(1) 打开、关闭开关搬钮数次以致手柄从前盖完全弹
出。然后,关闭开关并取出电池。(图 5)
注意
为杜绝意外事故的发生请务必关闭开关并取出电
池。
(2) 如图 6 所示,按手柄上标示的箭头标记的方向推
动手柄。(图 6)
(3) 推压着手柄,将刀刃完全插入柱塞端部的缝隙中。
可朝上或朝下安装此刀刃。(图 7,图 8)
(4) 松开手柄时,弹簧的弹力会使手柄自动返回正确
的位置。(图 9)
(5) 用手试着拉刀刃背两三次,以确认刀刃已安装牢
固。拉刀刃背时,若它发出喀嗒声并手柄稍位移
则说明已正确安装。(图 10)
注意
当拉动锯条时务必从后侧拉动,拉动锯条的其他部
分将造成人身伤害。
9
Page 11

2. 卸下锯条
(1) 打开、关闭开关搬钮数次以致手柄从前盖完全弹
出。然后,关闭开关并取出电池。(图 5)
注意
为杜绝意外事故的发生请务必将开关关闭并取出电
池。
(2) 按照图 6 中箭头所示的方向按下手柄后,将锯条
转至面朝下,锯条应自然落下,若未自然落下请
用手将其拔出。
注意
切勿用手触摸刚刚使用过的锯条,否则,灼热的金
属极易烫伤您的皮肤。
当锯条损坏时
即使当刀刃破损并残留在柱塞的小缝隙内时,若
按箭头标记的方向推动手柄并使刀刃朝下,它仍
会自行掉下。若未自行掉下,请按下述步骤将它
取出。
(1) 损坏的锯条的某部分粘在了插条的小插槽中,拔
出插条并将锯条拔出。
(2) 若损坏的锯条藏在小插槽内部,请用锯条的尖部
将其钩住并取出。(图 11)
电锯的维护和检查
(1) 使用后,请用气刷或刷子清除掉锯条上的灰尘、
泥土、尘沙或潮气等,以确保锯条的工作顺畅。
(2) 如图 12 所示,定期使用切锯液等在刀刃周围涂上
润滑油。
注
若在不乾净或未润滑刀刃的状态下使用工具,手柄
的功能可能因积尘和碎屑而变得重滞。在这种情况
下,按图 13 所示的箭头标记方向拉动安装在手柄
上的橡皮盖,并将其从手柄上取下。然後,使用气
刷或类似工具清洁刀刃座内部,并涂上适量的润滑
油。
朝手柄用力按压橡皮盖可将其安装上。此时请确定
刀刃座与橡皮盖之间没有缝隙,并确保所安装的刀
刃工作正常。
注意
请勿使用带有磨损刀刃孔的刀刃-否则,刀刃可能
会掉下,导致人员受伤。(图 14)
3.移动基座
按照图 15,图 16 松开固定螺丝向前移动基座,
轻轻拧紧螺丝。确保基座不向前或后活动,再紧
固螺丝。确保基座不与锯条接触。
4. 务必正确安装电池
使用方法
注意
䡬 切勿让手指按着开关搬运工具。否则因突然起
动而造成人身伤害。
䡬 在作业中请小心勿使锯屑、灰尘、水等通过柱
塞部份进入机内。若锯屑等积于柱塞部份,请
务必在使用前加以清除。(参照图 5)
䡬 请勿拆下前罩。
请务必通过前罩上部拿起机身。(参照图 5)
䡬 在使用时,在切锯作业中请将底座压在材料上
面。
若未将底座紧紧压在工件上,振动会导致刀刃
损坏。
因此,有时刀刃端会接触管内壁,导致刀刃损
坏。
䡬 请选择长度最适当的刀刃。理论上,减去行程
量后从刀刃座突出的刀刃长度应大于材料。
(参照图 18 和图 20)
若切锯超过刀刃切锯能力的大工件、大木块
等,刀刃可能会接触到管内壁和木料等,从而
发生危险。(参照图 19 和图 21)
1. 开关的操作
(1) 锁定解除按钮
本工具配有锁定解除按钮。要锁定搬钮,请将按
钮移至右侧。移至左侧时便可操作工具。(图
17)
当搬运或存放时务必锁定开关,以避免意外启
动。
(2) 搬钮开关
本工具配有控制各种速度的搬钮开关。通过按压
和松开搬钮可将工具打开或关闭,通过按压搬钮
来调整至合适的电锯的速度(从铭牌标注的最小
速度至最大速度),向下按时速度加大,松开时
速度减小。
10
Page 12

2. 切锯金属材料
注意
䡬 将底座紧紧按在工件之上。
䡬 切锯时请勿给刀刃施加异常力量。否则很容易
损坏刀刃。
䡬 根据切割物的构成或锯条的不同有时马达会锁
住。一旦马达锁住,请立即关闭开关。
(1) 在作业前牢牢固定工件。(图 22)
(2) 在切锯金属材料时,请使用适当的机油(涡轮油
等)。未使用液体机油时,请给工件涂上润滑
油。
注意
若未使用机油,刀刃的使用寿命会大幅缩短。
3. 切锯木料
切锯木料时,在开始操作前务必先牢牢固定工
件。(图 23)
注意
䡬 切锯时请勿给刀刃施加异常力量。同时,请将
底座紧紧压在木料上。
4. 切锯曲线
建议使用表 7(参照第 12 页)中的 BI-METAL
刀刃,因为这种刀刃坚韧耐用。
注意
将材料切割成小圆弧时须降低进料速度,速度过快
可能会损坏刀刃。
5. 插入切锯
使用本电动往复锯,可在木合板和薄板材料上进
行插入切锯。如图 25、图 26、和图 27 所示,
颠倒安装刀刃,可相当轻松地进行袋形切锯。请
尽量使用短而薄的刀刃。为此,建议使用第 12 页
表 7 中列出的 BI-METAL 刀刃号码 132 号。在
切锯作业中请务必小心操作并遵守以下步骤。
(1) 请将底座的下部(或上部)压在切锯材料上,使
刀刃前端脱离切锯材料并扣扳机。(图 24,图
25)
(2) 慢慢抬起把手并用刀刃一点一点地切入。(图
26,图 27)
(3) 紧紧抓住机身,直至刀刃完全切入材料。(图
28,图 29)
注意
䡬 避免对金属材料进行切锯,否则很容易损坏刀
刃。
䡬 在刀刃前端压在切锯材料上时切勿扣扳机。否
则,当刀刃接触材料时很容易被损坏。
䡬 务必紧紧抓住机身缓慢地进行切锯。在切锯作
业中若对刀刃异常用力,则很容易损坏刀刃。
注
在寒冷的条件(低于摄氏零度)下使用电池
EB1826HL 和 EB1830HL 会减弱转动扭力和减少
工作量。这只是暂时现象。在电池变热后会恢复正
常。
刀刃的选择
为了确保最大工作效率和效果,必须选择种类和厚度
最适合切锯材料的刀刃。
注
䡬 表中所示的工件尺寸,表示将底座设置于最靠
近充电式往复锯安装位置时的尺寸。须注意,
若将底座安装在远离充电式往复锯处,则工件
尺寸将变小。
1. HCS 刀刃的选择
表 6 中 HCS 刀刃的刀刃号码标示于各刀刃的安
装位置附近。请参照下面表 6 和表 8 来选择适当
的刀刃。
表 6∶HCS 刀刃
刀刃
号码 (mm)
1 号 切锯直径小于 100mm 的钢管 2.5-6
2 号 切锯直径小于 30mm 的钢管 2.5-6
3 号 切锯直径小于 30mm 的钢管 3.5 以下
4 号 切锯和磨毛木料 50-70
5 号 切锯和磨毛木料 30 以下
8 号 切锯直径小于 100mm 的聚氯 2.5-15
乙烯管
切锯和磨毛木料 100 以下
用途
厚度
11
Page 13

刀刃
号码 (mm)
9 号 在使用切锯导向器的情况下,
用于切锯直径小于 100mm 的 2.5-6
软钢管
95 号 切锯直径小于 100mm 的不 2.5 以下
锈钢管
96 号 切锯直径小于 30mm 的不 2.5 以下
锈钢管
注
1 号-96 号 HCS 刀刃为另售件。
2. BI-METAL 刀刃的选择
表 7 中的 BI-METAL 刀刃号码表示特殊套装附
件。请参照下面表 7 和表 8 选择适当的刀刃。
表 7∶BI-METAL 刀刃
刀刃
号码 (mm)
101 号 切锯外径小于 60mm 的钢管 2.5-6
和不锈钢管
102 号 切锯外径小于 100mm 的钢管 2.5-6
和不锈钢管
103 号 切锯外径小于 60mm 的钢管 2.5-6
和不锈钢管
104 号 切锯外径小于 100mm 的钢管 2.5-6
和不锈钢管
105 号 切锯外径小于 60mm 的钢管 2.5-6
和不锈钢管
106 号 切锯外径小于 100mm 的钢管 2.5-6
和不锈钢管
107 号 切锯外径小于 60mm 的钢管 3.5 以下
和不锈钢管
108 号 切锯外径小于 100mm 的钢管 3.5 以下
和不锈钢管
121 号 切锯和磨毛木料 100
131 号 切锯和磨毛木料 100
132 号 切锯和磨毛木料 100
注
101 号至 132 号 BI-METAL 刀刃为另售件。
用途
用途
厚度
厚度
3. 选择用于其他材料的刀刃
表 8
切锯
材料性质
材料 (mm)
铁板 软钢板 2.5-10 1、2、101、102、
有色 铝、铜 5-20 1、2、101、102、
金属 和黄铜 103、104、105、
合成 苯酚树脂、 10-50 1、2、4、101、
树脂 蜜胺甲醛 102、103、104、
树脂等 131、132 号
聚氯乙烯 10-60 1、2、4、101、
树脂、丙 102、103、104、
烯酸树脂等 131、132 号
厚度
3.5 以下 3、107、108 号
5 以下 3、107、108 号
5-30 3、5、8、105、
5-30 3、5、8、105、
刀刃号码
103、104、105、
106、131 号
106、131、132 号
106、107、108 号
106、107、108 号
维护和检查
注意
维护和检查前请务必关闭开关。
1. 检查刀刃
如继续使用已钝了的或已损坏了的刀刃,会降低
工作效率并可能会引起马达超负荷。因此,一旦
注意到刀刃磨损,请立即用新刀刃更换之。
2. 检查安装螺丝
定期检查所有的安装螺丝并确保它们均被正常拧
紧。若有某些螺丝松弛,请立即将其拧紧。否
则,会导致发生重大危险。
3. 马达的保养
马达装置线圈是电动工具的“心脏”。
须特别注意,确保线圈不受损和(或)被油或水
浸湿。
12
Page 14

4. 检查炭刷(图 30)
马达使用炭刷这种消耗品。因过度磨损的炭刷会
导致马达发生故障,因此,当炭刷磨损或接近
“磨损极限”时,请换上新的炭刷。此外,请始
终保持炭刷的清洁,并确保它能在炭刷盒里自由
滑动。
注
换上新的炭刷时,请一定使用日立牌炭刷(代码
号:999058)。
5. 更换炭刷
如图 32 所示,先取下刷帽,然后用平头螺丝刀等
钩住炭刷的突起部分,取出炭刷。
安装炭刷时,选择方向,使炭刷钉对准炭刷管外
面的连接部分。如图 33 所示,用手指将其推入。
最后安装刷帽。
注意
务请将炭刷钉插入炭刷管外面的连接部分。(可插
入附带的两个炭刷钉中的任何一个)。
须特别注意,因为操作的任何差错均会导致炭刷钉
变形,并且可能在很早的阶段就导致马达发生故
障。
6. 清洁外部
往复锯沾污时,用软布或沾肥皂水的布擦拭。不
要使用氯溶液、汽油或稀释剂。
7. 存放
请存放在温度低于 40°C 并远离小孩的场所。
8. 维修零部件一览表
A∶项目号
B∶代码号
C∶使用数
D∶备注
注意
日立牌电动工具的维修、改造和检查须由经日立公
司授权的维修中心进行。
当要求维修或其他保养服务时,若将此零部件一览
表与电动工具一起呈交给经日立公司授权的维修中
心,将有助于维修或保养工作。
在操作和维修电动工具时,必须遵守贵国制定的安
全的有关规则和标准。
改造
日立牌电动工具经常加以改善和改造以采用最新的先
进技术。
因此,某些零部件〔例如代码号和(或)设计〕可能
变更,恕不另行通知。
注
为求改进,本手册所载规格可能不预先通告而径予
更改。
13
Page 15

GENERAL OPERATIONAL PRECAUTIONS
1. Keep work area clean. Cluttered areas and benches
invite accidents.
2. Avoid dangerous environment. Don’t expose power
tools and charger to rain. Don’t use power tools
and charger in damp or wet locations. And keep
work area well lit. Never use power tools and
charger near flammable or explosive materials.
Do not use tool and charger in presence of
flammable liquids or gases.
3. The appliance is not intended for use by young
children or infirm persons without supervision.
Young children should be supervised to ensure
that they do not play with the appliance. All visitors
should be kept safe distance from work area.
4. Store idle tools and charger. When not in use,
tools and charger should be stored in dry, high
or locked-up place – out of reach of the children
and infirm persons. Store tools and charger in a
place where the temperature is less than 40°C.
5. Don’t force tool. It will do the job better and safer
at the rate for which it was designed.
6. Use right tool. Don’t force small tool or attachment
to do the job of a heavy duty tool.
7. Wear proper apparel. Do not wear loose clothing
or jewelry. They can be caught in moving parts.
Rubber gloves and non-skid footwears are
recommended when working outdoor.
8. Use eye protection with most tools. Also use face
or dust mask if cutting operation is dusty.
9. Don’t abuse cord. Never carry charger by cord or
yank it to disconnect from receptacle. Keep cord
from heat, oil and sharp edges.
10. Secure work. Use clamps or a vise to hold work.
It’s safer than using your hand and it frees both
hands to operate tool.
11. Don’t overreach. Keep proper footing and balance
at all times.
12. Maintain tools with care. Keep tools sharp at all
times, and clean for best and safest performance.
Follow instructions for lubricating and changing
accessories.
13. When the charger is not in use, or when being
maintained and inspected, disconnect its power
cord from the receptacle.
14. Remove chuck wrenches and wrenches. Form habit
of checking to see that wrenches are removed
from tool before turning it on.
15. Avoid accidental starting. Don’t carry tool with
finger on switch.
16. To avoid danger, always use only the specified charger.
17. Use only genuine HITACHI replacement parts.
18. Do not use power tools for applications other than
those specified in the Handling Instructions.
19. To avoid personal injury, use only the accessories
or attachment recommended in these handling
instructions or in the HITACHI catalog.
20. If the supply cord of this charger is damaged, the
charger must be returned to the HITACHI
authorized service center for the cord to be
replaced. Let only the authorized service center
do the repairing. The Manufacturer will not be
responsible for any damages or injuries caused
by repair by the unauthorized persons or by
mishandling of the tool.
21. To ensure the designed operational integrity of
power tools and charger, do not remove installed
covers or screws.
22. Always use the charger at the voltage specified
on the nameplate.
23. Do not touch movable parts or accessories unless
the battery has been removed.
24. Always charge the battery before use.
25. Never use a battery other than that specified. Do not
connect a usual dry cell, a rechargeable battery other
than that specified or a car battery to the power tool.
26. Do not use any transformer that has a booster.
27. Do not charge the battery from an engine electric
generator or DC power supply.
28. Always charge indoors. Because the charger and
battery heat slightly during charging, charge the
battery in a place not exposed to direct sunlight;
where the humidity is low and the ventilation is good.
29. When working in a high place, pay attention to
the activities below to make sure there are no
people below.
30. Use the exploded assembly drawing on this
handling instructions only for authorized servicing.
31. If the supply cord is damaged, it must be replaced
by the manufacture or its service agent or a similarly
qualified person in order to avoid a hazard.
PRECAUTIONS ON USING CORDLESS
RECIPROCATING SAW
1. Always charge the battery at a temperature of 10 –
40°C. A temperature of less than 10°C will result in
over charging which is dangerous. The battery cannot
be charged at a temperature higher than 10°C.
The most suitable temperature for charging is that
of 20 – 25°C.
2. Do not use the charger continuously.
When one charging is completed, leave the charger for
about 15 minutes before the next charging of battery.
3. Do not allow foreign matter to enter the hole for
connecting the rechargeable battery.
4. Never disassemble the rechargeable battery and
charger.
5. Never short-circuit the rechargeable battery. Shortcircuiting the battery will cause a great electric
current and overheat. It results in burn or damage
to the battery.
6. Do not dispose of the battery in fire.
If the battery is burnt, it may explode.
7. When using this unit continuously, the unit may
overheat, leading to damage in the motor and
switch. Please leave it without using it for
approximately 15 minutes.
8. Do not insert object into the air ventilation slots
of the charger.
Inserting metal objects or inflammables into the
charger air ventilation slots will result in electrical
shock hazard or damaged charger.
9. Using an exhausted battery will damage the charger.
10. Prior to cutting into walls, ceillings or floors, ensure
there are no electric cables or conduits inside.
11. Bring the battery to the shop from which it was
purchased as soon as the post-charging battery
life becomes too short for practical use. Do not
dispose of the exhausted battery.
12. Wear earplugs to protect your ears during operation.
13. Do not touch the blade during or immediately
after operation. The blade becomes very hot during
operation and could cause serious burns.
14. Always hold the body handle and front cover of
the power tool firmly. Otherwise the counterforce
produced may result in inaccurate and even
dangerous operation.
15. Remove the battery from tool or place the switch in
the locked or off position before making any
adjustments, changing accessories, or storing the tools.
14
Page 16

SPECIFICATIONS
POWER TOOL
Model CR18DMR
No-Load Speed 0 – 2100 min
Stroke 28 mm
Capacity Mild Steel Pipe: O.D. 90 mm
EB1820L Ni-Cd battery, 18 V (2.0 Ah 15 cells)
Rechargeable battery
Weight 3.8 kg
CHARGER
Model UC24YFA UC18YG
Charging voltage 7.2 – 24 V 7.2 – 18 V
Weight 0.6 kg 0.3 kg
EB1826HL Ni-MH battery, 18 V (2.6 Ah 15 cells)
EB1830HL Ni-MH battery, 18 V (3.0 Ah 15 cells)
Vinyl Chloride Pipe: O.D. 90 mm
Wood: Depth 90 mm
Mild Steel Plate: Thickness 10 mm
1
-
STANDARD ACCESSORIES
12
CR18DMR
1 Blade (No. 103) ............................................................................................................... 1
2 Hexagonal bar wrench ................................................................................................... 1
3 Charger (UC24YFA) .........................................................................................................1
4 Plastic case ....................................................................................................................... 1
Standard accessories are subject to change without notice.
OPTIONAL ACCESSORIES (sold separately)
1. Battery (EB1820L, EB1826HL, EB1830HL)
2. Blades
(1) No. 1 Blade (10) No. 101 Blade
(2) No. 2 Blade (11) No. 102 Blade
(3) No. 3 Blade (12) No. 103 Blade
(4) No. 4 Blade (13) No. 104 Blade
(5) No. 5 Blade (14) No. 105 Blade
(6) No. 8 Blade (15) No. 106 Blade
(7) No. 9 Blade (16) No. 107 Blade
15
(8) No. 95 Blade (17) No. 108 Blade
(9) No. 96 Blade (18) No. 121 Blade
䡬 (1) – (9) : HCS Blades (HCS : Highspeed Carbon
䡬 (10) – (20) : Bl-METAL Blades
Refer to Table 6, 7 and 8 for use of the blades.
Optional accessories are subject to change without
notice.
APPLICATIONS
䡬 Cutting pipe and angle steel.
䡬 Cutting various lumbers.
䡬 Cutting mild steel plates, aluminum plates, and
䡬 Cutting synthetic resins, such as phenol resin and
For details refer to the section entitled “SELECTION OF
BLADES”.
Steel)
copper plates.
vinyl chloride.
3
(19) No. 131 Blade
(20) No. 132 Blade
4
Page 17

BATTERY REMOVAL/INSTALLATION
CAUTION
Be sure to keep the switch turned off and the lockoff button moved to right position (lock position)
(See Fig. 17).
1. Battery removal
Hold the housing tightly and push the battery latches
to remove the battery (see Figs. 1 and 2).
CAUTION
Never short-circuit the battery.
2. Battery installation
Insert the battery while observing its polarities (see
Fig. 2).
CHARGING
〈UC24YFA〉
Before using the Cordless Reciprocating Saw, charge
the battery as follows.
Table 1
Indications of the pilot lamp
Before
charging
Blinks
(RED)
Lights for 0.5 seconds. Does not light for 0.5
seconds. (off for 0.5 seconds)
1. Connect the charger’s power cord to a receptacle
When the power cord is connected, the charger’s
pilot lamp will blink in red (At 1-second intervals).
2. Insert the battery into the charger
Firmly insert the battery into the charger till it
contacts the bottom of the charger and checking
the polarities as shown in Fig. 3.
3. Charging
When inserting a battery in the charger, charging
will commence and the pilot lamp will light up
continuously in red.
When the battery becomes fully recharged, the pilot
lamp will blink in red (At 1-second intervals) (See
Table 1).
(1) Pilot lamp indication
The indications of the pilot lamp are shown in
Table 1, according to the condition of the charger
or the rechargeable battery.
While
charging
Charging
complete
Charging
impossible
Charging
impossible
(2) Regarding the temperatures of the rechargeable
battery.
The temperatures for rechargeable batteries are as
shown in the table 2, and batteries that have become
hot should be cooled for a while before being recharged.
Table 2
Battery type which the battery
EB1820L –5°C – 60°C
EB1826HL, EB1830HL 0°C – 45°C
Lights
(RED)
Blinks
(RED)
Flickers
(RED)
Lights
(GREEN)
Lights continuously
Lights for 0.5 seconds. Does not light for 0.5
seconds. (off for 0.5 seconds)
Lights for 0.1 seconds. Does not light for 0.1
seconds. (off for 0.1 seconds)
Lights continuously
Temperatures at
can be recharged
Malfunction in the battery
or the charger.
The battery temperature
is high, making recharging impossible.
(3) Regarding recharging time
Depending on the type of battery, the recharging
time will become as shown in Table 3.
Table 3 Recharging time (At 20°C)
Battery type Recharging time
EB1820L Approx. 50 min.
EB1826HL Approx. 60 min.
EB1830HL Approx. 70 min.
NOTE
The recharging time may vary according to
temperature and power source voltage.
4. Disconnect the charger’s power cord from the
receptacle
5. Hold the charger firmly and pull out the battery
NOTE
After operation, pull out batteries from the charger
first, and then keep the batteries properly.
16
Page 18

Regarding electric discharge in case of new batteries,
etc.
As the internal chemical substance of new batteries
and batteries that have not been used for an
extended period is not activated, the electric
discharge might be short when using them the first
and second time. This is a temporary phenomenon,
and normal time required for recharging will be
restored by recharging the batteries 2 – 3 times.
How to make the batteries perform longer.
(1) Recharge the batteries before they become
completely exhausted.
When you feel that the power of the tool becomes
weaker, stop using the tool and recharge its battery.
If you continue to use the tool and exhaust the
electric current, the battery may be damaged and
its life will become shorter.
(2) Avoid recharging at high temperatures.
A rechargeable battery will be hot immediately after
use. If such a battery is recharged immediately after
use, its internal chemical substance will deteriorate,
and the battery life will be shortened. Leave the battery
and recharge it after it has been cooled for a while.
CAUTION
䡬 If the battery is charged while it is heated because
it has been left for a long time in a location subject
to direct sunlight or because the battery has just
been used, the pilot lamp of the charger lights up
green. In such a case, first let the battery cool, then
start charging.
䡬 When the pilot lamp flickers in red quickly (at 0.2-
second intervals), check for and take out any foreign
objects in the charger’s battery installation hole. If
there are no foreign objects, it is probable that the
battery or charger is malfunctioning. Take it to your
authorized Service Center.
䡬 Since the built-in micro computer takes about 3
seconds to confirm that the battery being charged
with UC24YFA is taken out, wait for a minimum of
3 seconds before reinserting it to continue charging.
If the battery is reinserted within 3 seconds, the
battery may not be properly charged.
〈
Before using the power tool, charge the battery as follows.
1. Connect the charger power cord to the receptacle
2. Insert the battery into the charger
(1) Regarding the temperatures of the rechargeable battery
Table 4 Recharging ranges of batteries
17
〉
UC18YG
Connecting the power cord will turn on the charger.
Insert the battery firmly while observing its direction,
until it contacts the bottom of the charger (See
Fig. 4) (the pilot lamp lights up).
CAUTION
If the pilot lamp does not light up, pull out the
power cord from the receptacle and check the
battery mounting condition.
The temperatures for rechargeable batteries are as
shown in Table 4.
Rechargeable batteries which the battery
EB1820L 0°C – 45°C
Temperatures at
can be recharged
(2) Regarding recharging time
Depending on the combination of the charger and
batteries, the charging time will become as shown
in Table 5.
Table 5 Charging time (At 20°C)
Battery
EB1820L Approx. 50 min.
The pilot lamp goes off to indicate that the battery
is fully charged.
The battery charging time becomes longer when a
temperature is low or the voltage of the power
source is too low.
When the pilot lamp does not go off even if more
than 120 minutes have elapsed after starting of the
charging, stop the charging and contact your
HITACHI AUTHORIZED SERVICE CENTER.
CAUTION
If the battery is heated due to direct sunlight,
etc., just after operation, the charger pilot lamp
may not light up. At that time, cool the battery
first, then start charging.
3. Disconnect the charger’s power cord from the
receptacle
4. Hold the charger firmly and pull out the battery
NOTE
After charging, pull out batteries from the charger
first, and then keep the batteries properly.
Regarding electric discharge in case of new batteries,
etc.
As the internal chemical substance of new batteries
and batteries that have not been used for an
extended period is not activated, the electric
discharge might be low when using them the first
and second time. This is a temporary phenomenon,
and normal time required for recharging will be
restored by recharging the batteries 2 – 3 times.
How to make the batteries perform longer.
(1) Recharge the batteries before they become
completely exhausted.
When you feel that the power of the tool becomes
weaker, stop using the tool and recharge its battery.
If you continue to use the tool and exhaust the
electric current, the battery may be damaged and
its life will become shorter.
(2) Avoid recharging at high temperatures.
A rechargeable battery will be hot immediately after
use. If such a battery is recharged immediately after
use, its internal chemical substance will deteriorate,
and the battery life will be shortened. Leave the
battery and recharge it after it has cooled for a while.
Charger
UC18YG
PRIOR TO OPERATION
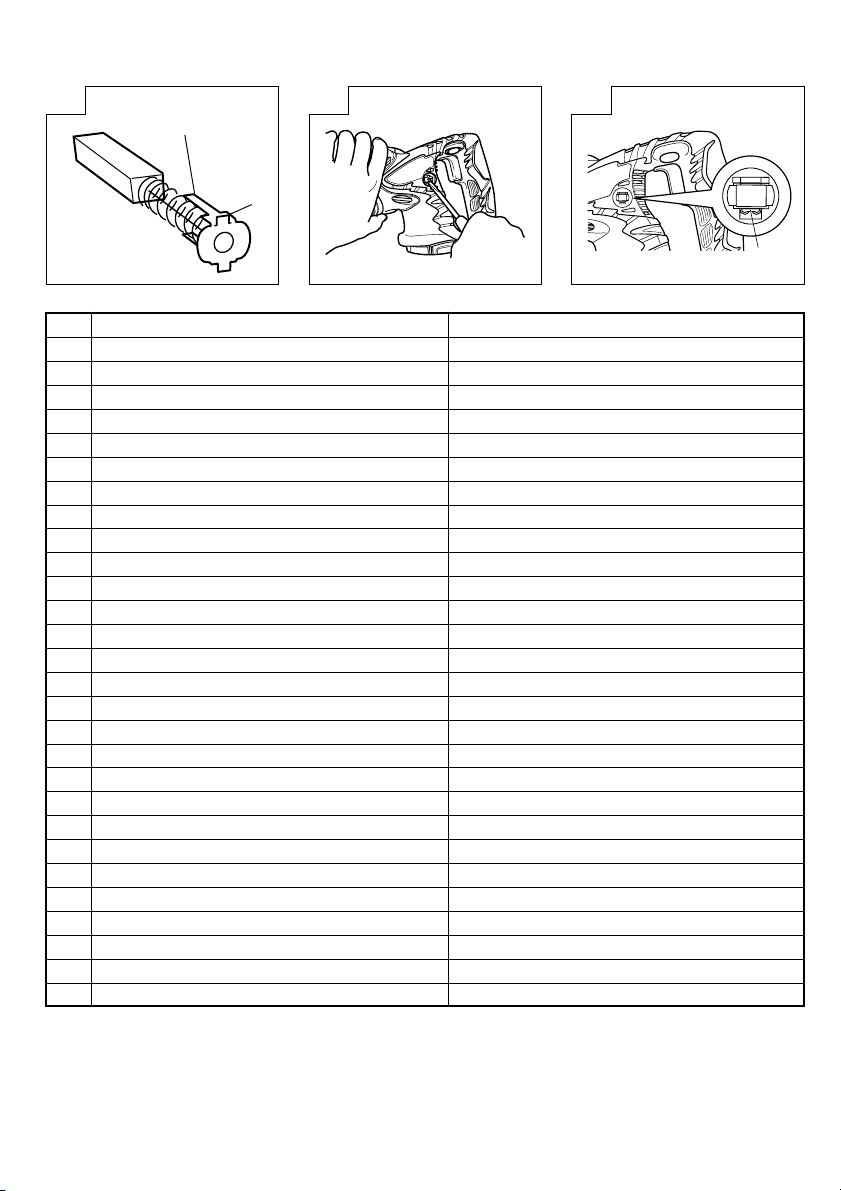
1. Mounting the blade
This unit employs a detachable mechanism that
enables mounting and removal of saw blades
without the use of a wrench or other tools.
Page 19

(1) Turn on and off the switching trigger several times
so that the lever can jump out of the front cover
completely. Thereafter, turn off the switch and
remove the battery (Fig. 5).
CAUTION
Be absolutely sure to keep the switch turned off
and the battery removed to prevent any accident.
(2) Push the lever in the direction of the arrow mark
shown in Fig. 6 marked on the lever (Fig. 6).
(3) Insert the saw blade all the way into the small slit
of the plunger tip with the lever pushing. You can
mount this blade either in the upward or downward
direction (Fig. 7, Fig. 8).
(4) When you release the lever, the spring force will
return the lever to the correct position automatically
(Fig. 9).
(5) Pull the back of the saw blade two or three times
by hand and check that the blade is securely
mounted. When pulling the blade, you will know
it is properly mounted if it clicks and the lever
moves slightly (Fig. 10).
CAUTION
When pulling the saw blade, be absolutely sure to
pull it from the back. Pulling other parts of the blade
will result in an injury.
2. Dismounting the blade
(1) Turn on and off the switching trigger several times
so that the lever can jump out of the front cover
completely. Thereafter, turn off the switch and
remove the battery (Fig. 5).
CAUTION
Be absolutely sure to keep the switch turned off
and the battery removed to prevent any accident.
(2) After you have pushed the lever in the direction
of the arrow mark shown in Fig. 6 and secured it,
turn the blade so it faces downward. The blade
should fall out by itself. If the blade doesn’t fall out,
pull it out by hand.
CAUTION
Never touch the saw blade immediately after use.
The metal is hot and can easily burn your skin.
WHEN THE BLADE IS BROKEN
Even when the saw blade is broken and remains
inside the small slit of the plunger, it should fall
out if you push the lever in the direction of the
arrow mark, and face the blade downward. If it
doesn’t fall out itself, take it out using the procedures
explained below.
(1) If a part of the broken saw blade is sticking out
of the small slit of the plunger, pull out the protruding
part and take the blade out.
(2) If the broken saw blade is hidden inside the small
slit, hook the broken blade using a tip of another
saw blade and take it out (Fig. 11).
MAINTENANCE AND INSPECTION OF SAW BLADE
MOUNT
(1) After use, blow away sawdust, earth, sand, moisture,
etc., with air or brush them away with a brush, etc.,
to ensure that the blade mount can function
smoothly.
(2) As shown in Fig. 12, carry out lubrication around
the blade holder on a periodic basis by use of
cutting fluid, etc.
NOTE
Continued use of the tool without cleaning and
lubricating the area where the saw blade is installed
can result in some slack movement of the lever due
to accumulated sawdust and chips. Under the
circumstances, pull a rubber cap provided on the
lever in the direction of an arrow mark as shown
in Fig. 13 and remove the rubber cap from the lever.
Then, clean up the inside of the blade holder with
air and the like and carry out sufficient lubrication.
The rubber cap can be fitted on if it is pressed firmly
onto the lever. At this time, make certain that there
exists no clearance between the blade holder and
the rubber cap, and furthermore ensure that the
saw-blade-installed area can function smoothly.
CAUTION
Do not use any saw blade with a worn-out blade
hole. Otherwise, the saw blade can come off,
resulting in personal injury (Fig. 14).
3. Moving the base
Loosen the set screw and move the base forward,
as shown in Fig. 15, Fig. 16. Tighten the set screw
slightly, ensure the base does not move back and
forth, and firmly tighten the set screw. Ensure that
the base does not contact the blade.
4. Confirm that the battery is mounted correctly
HOW TO USE
CAUTION
䡬 Do not carry tools with your finger on the switch.
A sudden startup can result in an unexpected injury.
䡬 Be careful not to let sawdust, earth, moisture, etc.,
enter the inside of the machine through the plunger
section during operation. If sawdust and the like
accumulate in the plunger section, always clean it
before use (refer to Fig. 5).
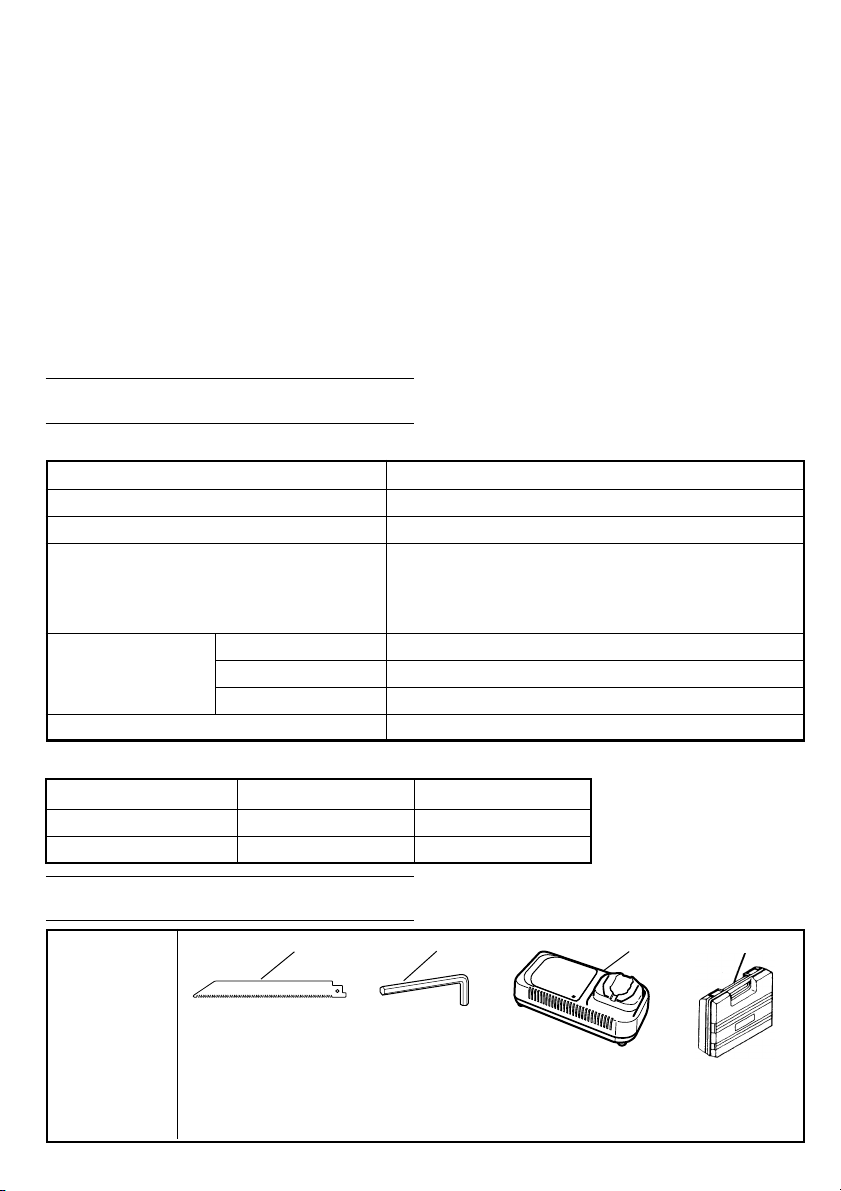
䡬 Do not remove the front cover.
Be sure to hold the body from the top of the front
cover (refer to Fig. 5).
䡬 During use, press the base against the material
while cutting.
Vibration can damage the saw blade if the base is
not pressed firmly against the workpiece.
Furthermore, a tip of the saw blade can sometimes
contact the inner wall of the pipe, damaging the
saw blade.
䡬 Select a saw blade of the most appropriate length.
Ideally, the length protruding from the base of the
saw blade after subtracting the stroke quantity should
be larger than the material (see Fig. 18 and
Fig. 20).
If you cut a large pipe, large block of wood, etc.,
that exceeds the cutting capacity of a blade; there
is a risk that the blade may contact with the inner
wall of the pipe, wood, etc., resulting in damage
(Fig. 19, Fig. 21).
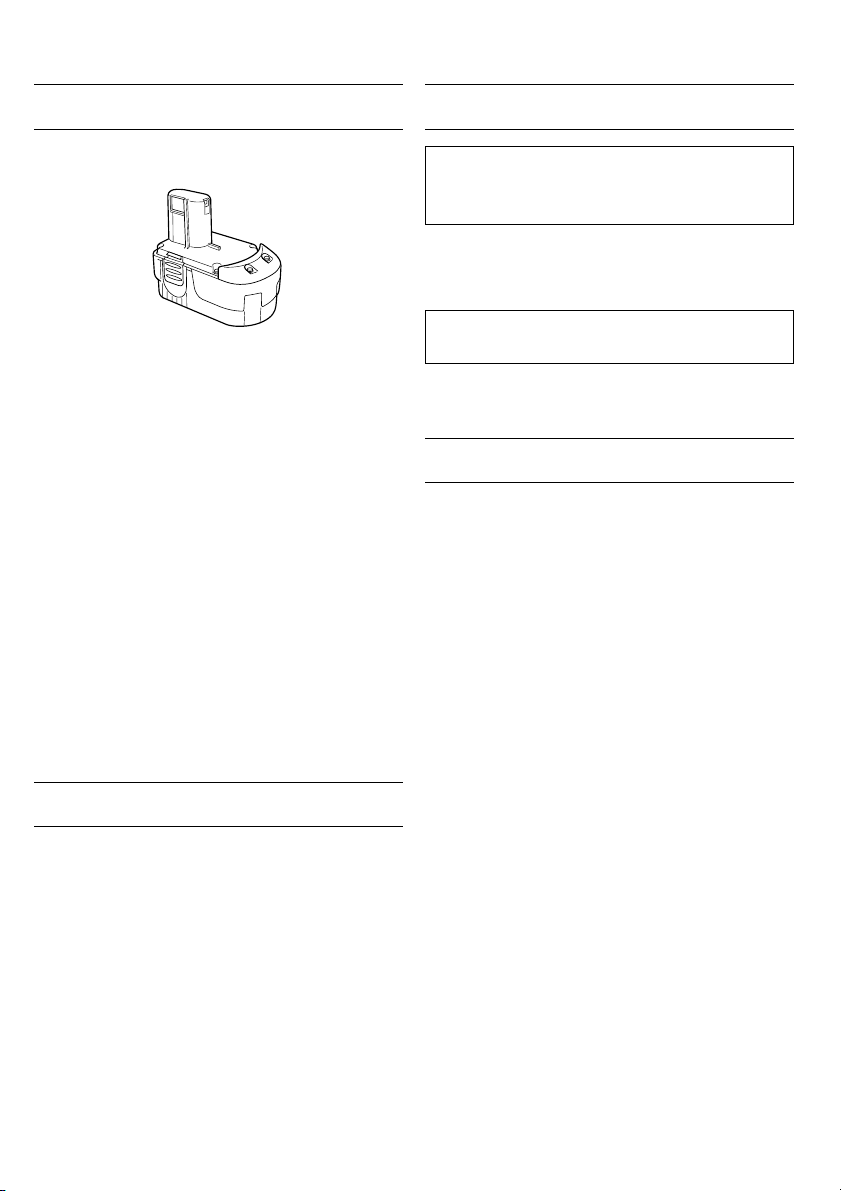
1. Switch operation
(1) Lock-off button
The tool is equipped with a lock-off button. To
activate the trigger lock, move the button to the
right position. Move the button to the left to operate
the tool (Fig. 17).
Always lock the switch when carrying or storing the
tool eliminate unintentional starting.
18
Page 20

(2) Trigger switch
This tool is equipped with a variable speed controlled
trigger switch. The tool can be turned "ON" or "OFF"
by squeezing or releasing the trigger. The blade
plunger stroke rate can be adjusted from the
minimum to maximum nameplate stroke rate by
the pressure you apply to the trigger. Apply more
pressure to increase the speed and release pressure
to decrease speed.
2. Cutting metallic materials
CAUTION
䡬 Press the base firmly against the workpiece.
䡬 Never apply any unreasonable force to the saw
blade when cutting. Doing so can easily break the
blade.
䡬 The motor can be locked sometimes, depending on
the combination of the material to be cut and the
blade. Whenever the motor gets locked, switch it
off immediately.
(1) Fasten a workpiece firmly before operation (Fig. 22).
(2) When cutting metallic materials, use proper machine
oil (turbine oil, etc.). When not using liquid machine
oil, apply grease over the workpiece.
CAUTION
The service life of the saw blade will be drastically
shortened if you don’t use machine oil.
3. Cutting lumber
When cutting lumber, make sure that the workpiece
is fastened firmly before beginning (Fig. 23).
CAUTION
䡬 Never apply any unreasonable force to the saw
blade when cutting. Also remember to press the
base against the lumber firmly.
4. Sawing curved lines
We recommend that you use the BI-METAL blade
mentioned in Table 7 (Page 20) for the saw blade
since it is tough and hardly breaks.
CAUTION
Delay the feed speed when cutting the material into
small circular arcs. An unreasonably fast feed may
break the blade.
5. Plunge cutting
With this tool, you can perform plunge cutting on
plywood panels and thin board materials. You can
carry out pocket cutting quite easily with the saw
blade installed in reverse as illustrated in Fig. 25,
Fig. 26, and Fig. 27. Use the saw blade that is as
short and thick as possible. We recommend for this
purpose that you use BI-METAL Blade No. 132
mentioned in Page 20, Table 7. Be sure to use
caution during the cutting operation and observe
the following procedures.
(1) Press the lower part (or the upper part) of the base
against the material. Pull the switch trigger while
keeping the tip of the saw blade apart from the
material (Fig. 24, Fig. 25).
(2) Raise the handle slowly and cut in with the saw
blade little by little (Fig. 26, Fig. 27).
(3) Hold the body firmly until the saw blade completely
cuts into the material (Fig. 28, Fig. 29).
CAUTION
䡬 Avoid plunge cutting for metallic materials. This can
easily damage the blade.
䡬 Never pull the switch trigger while the tip of the
saw blade is pressed against the material. If you
do so, the blade can easily be damaged when it
collides with the material.
䡬 Make absolutely sure that you cut slowly while
holding the body firmly. If you apply any
unreasonable force to the saw blade during the
cutting operation, the blade can easily be damaged.
NOTE
The use of the battery EB1826HL and EB1830HL in
a cold condition (below 0 degree Centigrade) can
sometimes result in the weakened cutting torque
and reduced amount of work. This, however, is a
temporary phenomenon, and returns to normal when
the battery warms up.
SELECTION OF BLADES
To ensure maximum operating efficiency and results,
it is very important to select the appropriate blade best
suited to the type and thickness of the material to be
cut.
NOTE
䡬 Dimensions of the workpiece mentioned in the table
represent the dimensions when the mounting
position of the base is set nearest to the body of
the Cordless Reciprocating Saw. Caution must be
exercised since dimensions of the workpiece will
become smaller if the base is mounted far away
from the body of the Cordless Reciprocating Saw.
1. Selection of HCS blades
The blade number of HCS blades in Table 6 is
engraved in the vicinity of the mounting position
of each blade. Select appropriate blades by referring
to Tables 6 and 8 below.
Table 6: HCS blades
Blade Thickness
No.
No. 1 For cutting steel pipe less than
100 mm in diameter
No. 2 For cutting steel pipe less than
30 mm in diameter
No. 3 For cutting steel pipe less than
30 mm in diameter
No. 4 For cutting and roughing lumber 50 – 70
No. 5 For cutting and roughing lumber Below 30
No. 8 For cutting vinyl chloride pipe less
than 100 mm in diameter
For cutting and roughing lumber Below 100
No. 9 For cutting mild steel pipe less
than 100 mm in diameter when 2.5 – 6
used with cut off guide
No. 95 For cutting stainless steel pipe
less than 100 mm in diameter
No. 96 For cutting stainless steel pipe
less than 30 mm in diameter
NOTE
No. 1 – No. 96 HCS blades are sold separately as
optional accessories.
Uses
(mm)
2.5 – 6
2.5 – 6
Below 3.5
2.5 – 15
Below 2.5
Below 2.5
19
Page 21

2. Selection of BI-METAL blades
The BI-METAL blade numbers in Table 7 are
described on the packages of special accessories.
Select appropriate blades by referring to Table 7
and 8 below.
Table 7: Bl-METAL blades
Blade Thickness
No.
No. 101
For cutting steel and stainless pipes
less than 60 mm in outer diameter
No. 102
For cutting steel and stainless pipes
less than 100 mm in outer diameter
No. 103
For cutting steel and stainless pipes
less than 60 mm in outer diameter
No. 104
For cutting steel and stainless pipes
less than 100 mm in outer diameter
No. 105
For cutting steel and stainless pipes
less than 60 mm in outer diameter
No. 106
For cutting steel and stainless pipes
less than 100 mm in outer diameter
No. 107
For cutting steel and stainless pipes
less than 60 mm in outer diameter
No. 108
For cutting steel and stainless pipes
less than 100 mm in outer diameter
No. 121
For cutting and roughing lumber 100
No. 131
For cutting and roughing lumber 100
No. 132
For cutting and roughing lumber 100
NOTE
Nos. 101 – No. 132 Bl-METAL blades are sold
separately as optional accessories.
3. Selection of blades for other materials
Table 8
Material Material Thickness
to be cut quality (mm)
Iron plate Mild steel 2.5 – 10 No. 1, 2, 101,
Nonferrous Aluminium, 5 – 20 No. 1, 2, 101,
metal Copper and 102, 103, 104,
Systhetic Phenol resin, 10 – 50 No. 1, 2, 4,
resin Melamine 101, 102, 103,
plate 102, 103, 104,
Brass 105, 106, 131,
resin, etc. 104, 131, 132
Vinyl chloride,
Acrylic resin, 101, 102, 103,
etc. 104, 131, 132
Uses
Below 3.5 No. 3, 107,
Below 5 No. 3, 107,
5 – 30 No. 3, 5, 8,
10 – 60 No. 1, 2, 4,
5 – 30 No. 3, 5, 8,
(mm)
2.5 – 6
2.5 – 6
2.5 – 6
2.5 – 6
2.5 – 6
2.5 – 6
Below 3.5
Below 3.5
Blade No.
105, 106, 131
108
132
108
105, 106, 107,
108
105, 106, 107,
108
MAINTENANCE AND INSPECTION
CAUTION
Be sure to turned off the switch and remove the
battery before maintenance and inspection.
1. Inspecting the blade
Continued use of a dull or damaged blade will
result in reduced cutting efficiency and may cause
overloading of the motor. Replace the blade with
a new one as soon as excessive abrasion is noted.
2. Inspecting the mounting screws
Regularly inspect all mounting screws and ensure
that they are properly tightened. Should any of the
screws be loose, retighten them immediately. Failure
to do so could result in serious hazard.
3. Maintenance of the motor
The motor unit winding is the very “heart” of the
power tool. Exercise due care to ensure the winding
does not become damaged and/or wet with oil or
water.
4. Inspecting the carbon brushes (Fig. 30)
The motor employs carbon brushes which are
consumable parts. Since and excessively worn
carbon brush can result in motor trouble, replace
the carbon brush with new ones when it becomes
worn to or near the "wear limit". In addition, always
keep carbon brushes clean and ensure that they
slide freely within the brush holders.
NOTE
When replacing the carbon brush with a new one,
be sure to use the Hitachi Carbon Brush Code No.
999058.
5. Replacing carbon brushes
Take out the carbon brush by first removing the
brush cap and then hooking the protrusion of the
carbon brush with a flat head screw driver, etc., as
shown in Fig. 32.
When installing the carbon brush, choose the
direction so that the nail of the carbon brush agrees
with the contact portion outside the brush tube.
Then push it in with a finger as illustrated in
Fig. 33. Lastly, install the brush cap.
CAUTION
Be absolutely sure to insert the nail of the carbon
brush into the contact portion outside the brush
tube (You can insert whichever one of the two nails
provided).
Caution must be exercised since any error in this
operation can result in the deformed nail of the carbon
brush and may cause motor trouble at an early stage.
6. Cleaning of the outside
When the Cordless Reciprocating Saw is stained,
wipe with a soft dry cloth or a cloth moistened with
soapy water. Do not use chloric solvents, gasoline
or paint thinner, as they melt plastics.
7. Storage
Store the Cordless Reciprocating Saw in a place in
which the temperature is less than 40°C, and out
of reach of children.
8. Service parts list
A: Item No.
B: Code No.
C: No. Used
D: Remarks
20
Page 22

CAUTION
Repair, modification and inspection of Hitachi Power
Tools must be carried out by an Hitachi Authorized
Service Center.
This Parts List will be helpful if presented with the
tool to the Hitachi Authorized Service Center when
requesting repair or other maintenance.
In the operation and maintenance of power tools,
the safety regulations and standards prescribed in
each country must be observed.
MODIFICATIONS
Hitachi Power Tools are constantly being improved
and modified to incorporate the latest technological
advancements.
Accordingly, some parts (i.e. code numbers and/or
design) may be changed without prior notice.
NOTE
Due to HITACHI’s continuing program of research and
development, the specifications herein are subject to
change without prior notice.
21
Page 23

22
Page 24

ABC D
1 321-132 1
2 322-709 1
3 324-472 1
4 996-401 1
5 996-400 1
6 996-407 1 1AP-12
7 956-589 2
8 324-471 1
9 305-574 4 M5×16
10 322-134 1 M4
11 321-130 1
12 321-131 1
13 321-135 1
14 321-134 1
15 318-483 1
16 319-866 1
17 951-039 5 M4×12
18 324-474 1
19 324-473 1
20 993-244 3 M4×12
21 319-849 1
22 690-1ZZ 1 6901ZZCMPS2L
23 319-848 1
24 954-789 1
25 996-399 1 M5×12
26 986-011 4 D5×30
27 319-844 1 “24”
28 319-875 2 M5×12
29 319-851 1 M6×16
30 319-856 1
31 319-874 1
32 983-567 1
33 996-405 1
34 983-541 1
35 324-470 1
36 319-852 1
37 324-469 1
38 670-514 1
39 600-1VV 1 6001VVCMPS2L
40 319-843 1
41 360-703 1 DC18V “38-40, 42”
42 608-VVM 1 608VVC2PS2L
43 324-468 1
44 324-478 1
45 318-247 1
46 324-475 1
47 319-847 2
48 999-058 2
—————
49
—————
50
51 324-517 1
52 319-760 1
53 319-861 1
54
—————
55 302-086 8 D4×20
56 319-812 1
57 993-963 1 M3×12
58-1 322-880 1 EB1820L
58-2 322-878 1 EB1826HL
501 318-613 1 No.103, 150L
503 944-458 1 4MM
504 324-313 1
—————
505
1
1
1
1 UC24YFA
23
Page 25

24
Page 26

Hitachi Koki Co., Ltd.
505
Code No. C99140121
Printed in China
 Loading...