

Page 1

USER GUIDE
LITESHOW4
009-1527-00
Page 2

Declaration of Conformity
Manufacturer: InFocus Corporation, 13190 SW 68th Parkway, Suite 200, Tigard, OR 97223-8368
We declare under our sole responsibility that the LiteShow wireless adapter conforms to the following
directives and norms:
European Union: CE Standard
EN 300 328/EN 62311/EN 55022 CLASS B/EN 55024/EN 301 489-17/EN 301 489-1/EN
61000-3-2/EN 61000-3-3 /EN 61000-4-2/EN 61000-4-3/EN 61000-4-4/EN 61000-4-5/EN
61000-4-6/EN 61000-4-8/EN 61000-4-11/EN 60950-1/ICE 60950-1
U.S.A : FCC Standard
FCC 47 CFR Pact 15 Subpart C/ANSI C63.4-2003/FCC 47 CFR Part 15 Subpart B Class B/ANSI
C63.4-2003/ICES-003
Canada : IC Standard
IC RSS-210/ICES-003 Issue 4
Australia : C-Tick Standard
AS/NZS 4268/CISPR 22 Class B/IEC 60950-1
Mexico : NOM & COFETEL Standard
NOM-001-SCFI-1993/NOM-121-SCT1-2008
The Agency/Regulatory Approval for the computer’s wireless adapter is solely the responsibility of the
adapter manufacturer - not InFocus Corporation.
2
Page 3

Trademarks
FCC Warning
CAUTION:
FCC CAUTION
InFocus, In Focus, INFOCUS (stylized), LiteShow and associated INFOCUS logos and designs, are either
trademarks or registered trademarks of InFocus Corporation in the United States and other countries.
Apple and Macintosh are trademarks or registered trademarks of Apple Computer, Inc. Microsoft and
Windows are trademarks or registered trademarks of Microsoft Corporation. Other trademarks
mentioned herein are the property of their respective owners and are referenced for information only. Any
reference does not imply affiliation, recommendation or endorsement by or between the respective
trademark owners and InFocus Corporation.
NOTE: This product is covered electrical and electronic equipment under the European
Union’s Waste from Electrical and Electronic Equipment (“WEEE”) Directive (2002/96/EC). The
WEEE Directive requires that covered equipment be collected and managed separately from
typical household waste in all EU member states. Please follow the guidance of your local
environmental authority or ask the shop where you purchased the product for collection or
recycling options.
Note: This equipment has been tested and found to comply with the limits for a Class B digital device,
pursuant to part 15 of the FCC Rules. These limits are designed to provide reasonable protection against
harmful interference in a residential installation. This equipment generates, uses and can radiate radio
frequency energy and, if not installed and used in accordance with the instructions, may cause harmful
interference to radio communications. However, there is no guarantee that interference will not occur in a
particular installation. If this equipment does cause harmful interference to radio or television reception,
which can be determined by turning the equipment off and on, the user is encouraged to try to correct
the interference by one or more of the following measures:
--Reorient or relocate the receiving antenna.
--Increase the separation between the equipment and receiver.
--Connect the equipment into an outlet on a circuit different from that to which the receiver is connected.
--Consult the dealer or an experienced radio/TV technician for help.
The Part 15 radio device operates on a non-interference basis with other devices operating
at its frequency. Any changes or modification to said product not expressly approved could void the
user's authority to operate this device.
: Any changes or modifications not expressly approved by the party responsible for
compliance could void the user's authority to operate this equipment. This device complies with Part 15
of the FCC Rules. Operation is subject to the following two conditions: (1) This device may not cause
harmful interference, and (2) this device must accept any interference received, including interference
that may cause undesired operation. The antenna(s) used for this transmitter must not be co-located or
3
Page 4

operating in conjunction with any other antenna or transmitter.
IMPORTANT NOTE:
Canada
Agency Approvals
FCC Radiation Exposure Statement:
This equipment complies with FCC radiation exposure limits set forth for an uncontrolled environment.
This equipment should be installed and operated with a minimum distance of 2.5cm between the
equipment and your body. Proper operation of this radio according to the instructions found in this user's
guide will result in user exposure that is substantially below the FCC recommended limits.
• Do not touch or move antenna while the unit is transmitting or receiving.
• Do not hold any component containing the radio such that the antenna is very close or touching
any exposed parts of the body, especially the face or eyes, while transmitting.
• Do not operate a portable transmitter near unshielded blasting caps or in an explosive
environment unless it is a type especially qualified for such use.
• Do not operate the radio or attempt to transmit data unless the antenna is connected: if not, the
radio may be damaged.
This Class B digital apparatus complies with Canadian ICES-003.
Cet appareil numérique de la classe B est conforme à la norme NMB-003 du Canada.
This device complies with Class B Limits of Industry Canada. Operation is subject to the following
conditions:
1) This device may not cause harmful interference, and 2) This device must accept any interference
received, including interference that may cause undesired operation. The device is certified to the
requirements of RSS-139-1 and RSS-210 for 2.4-GHz spread spectrum devices. The use of this
device in a system operating either partially or completely outdoors may require the user to obtain
a license for the system according to the Canadian regulations. For further information, contact
your local Industry Canada office.
FCC, CE, IC, C-Tick, NOM, COFETEL
Other specific Country Approvals may apply, see please product certification label.
InFocus reserves the right to alter product offerings and specifications at any time without notice.
4
Page 5

Table of Contents
OVERVIEW ............................................................................................................................................................... 8
INITIAL SETUP .......................................................................................................................................................... 9
WINDOWS CLIENT UTILITY .....................................................................................................................................11
MAC CLIENT UTILITY ..............................................................................................................................................24
Features ........................................................................................................................................................................ 8
What’s in the Box .......................................................................................................................................................... 8
Launch Application ...................................................................................................................................................... 11
Application Control Panel ............................................................................................................................................ 12
Projection Mode Tab .............................................................................................................................................................. 12
Video Mode Tab ..................................................................................................................................................................... 13
Menu Functions .......................................................................................................................................................... 14
Show Receiver Information ..................................................................................................................................................... 14
Web Admin… ........................................................................................................................................................................ 14
Search Receiver Device .......................................................................................................................................................... 14
Launch SidePad .................................................................................................................................................................... 15
Launch WebSlides ................................................................................................................................................................. 16
Select Projection Desktop ...................................................................................................................................................... 18
Projection Quality ................................................................................................................................................................... 19
Projection Mode .................................................................................................................................................................... 19
Resolution Setting .................................................................................................................................................................. 19
Projection Aspect Ratio .......................................................................................................................................................... 20
Enable IWB USB Bridge ......................................................................................................................................................... 20
Advanced Screen Capture...................................................................................................................................................... 20
Send Audio to Display ............................................................................................................................................................ 21
Auto Power Management ....................................................................................................................................................... 21
Auto WiFi Connect ................................................................................................................................................................. 21
Make USB PnS token ............................................................................................................................................................ 22
Copy Application to Desktop .................................................................................................................................................. 22
Hot Key ................................................................................................................................................................................. 22
About .................................................................................................................................................................................... 23
Exit ....................................................................................................................................................................................... 23
Launch Application ...................................................................................................................................................... 24
Application Control Panel ............................................................................................................................................ 25
5
Page 6

Projection Mode Tab .............................................................................................................................................................. 25
WEB MANAGEMENT ...............................................................................................................................................33
Video Mode Tab ..................................................................................................................................................................... 26
Menu Functions .......................................................................................................................................................... 27
Show Receiver Information ..................................................................................................................................................... 27
Web Admin… ........................................................................................................................................................................ 27
Search Receiver Device .......................................................................................................................................................... 27
Launch SidePad .................................................................................................................................................................... 27
Enable WebSlides .................................................................................................................................................................. 29
Select Projection Desktop ...................................................................................................................................................... 30
Projection Quality ................................................................................................................................................................... 30
Projection Mode .................................................................................................................................................................... 30
Resolution Setting .................................................................................................................................................................. 31
Projection Aspect Ratio .......................................................................................................................................................... 31
Auto WiFi Connect ................................................................................................................................................................. 31
Send Audio to Display ............................................................................................................................................................ 32
Hot Key ................................................................................................................................................................................. 32
About .................................................................................................................................................................................... 32
Exit ....................................................................................................................................................................................... 32
Home Page ................................................................................................................................................................. 33
Download ................................................................................................................................................................... 34
System Status ............................................................................................................................................................. 35
Conference Control ..................................................................................................................................................... 36
Admin ......................................................................................................................................................................... 37
Device Setup............................................................................................................................................................... 37
Network Setup ............................................................................................................................................................ 38
IP Setup ................................................................................................................................................................................ 39
DHCP Server Setup ............................................................................................................................................................... 39
Wireless Setup ....................................................................................................................................................................... 39
AP Setup ............................................................................................................................................................................... 40
Gatekeeper ........................................................................................................................................................................... 40
SNMP ................................................................................................................................................................................... 40
OSD Setup.................................................................................................................................................................. 41
Change Passwords ..................................................................................................................................................... 42
Reset to Default .......................................................................................................................................................... 43
Firmware Upgrade....................................................................................................................................................... 44
WebSlides Setup ......................................................................................................................................................... 45
Reboot ........................................................................................................................................................................ 46
Logout ........................................................................................................................................................................ 46
6
Page 7

Start WebSlides .......................................................................................................................................................... 47
APPENDIX A: USING PTG CONVERTER ...................................................................................................................48
APPENDIX B: LITESHOW PORT MAP.......................................................................................................................49
APPENDIX C: CONFIGURING LITESHOW FOR SPECIFIC ENVIRONMENTS ..............................................................50
7
Page 8

Overview
Features
What’s in the Box
With the revolutionary Plug-and-Show wireless projection, QuadView, and wireless projection via PDA,
LiteShow makes all of your presentations and meetings more efficient and successful.
• Compatible with Windows 8, Windows 7, Vista, XP, and Macintosh (Mac) version 10.5 and above
• Plug and Show! Just link your computer to LiteShow (through WLAN or Ethernet); plug the token
into a USB port, and in seconds, your screen will be projected wirelessly to your projector!
• QuadView allows up to four computer or PDA screens to be projected on one projector at the
same time.
• Web-based conference control
• Session security login, wireless WEP/WPA key and gatekeeper functions protect presentation
contents and maintain office network security.
• Media playback feature supports music and video streaming. LiteShow can even handle high-
definition video.
• LiteShow 4 module
• LiteShow USB token
• Power Adapter (DC +5V, 2.5A)
• Antenna (2)
• Mounting Hardware
• Quick Installation Guide with Warranty Card
• Quick Installation Guide for mobile applications
8
Page 9
Initial Setup
Basic User
basic
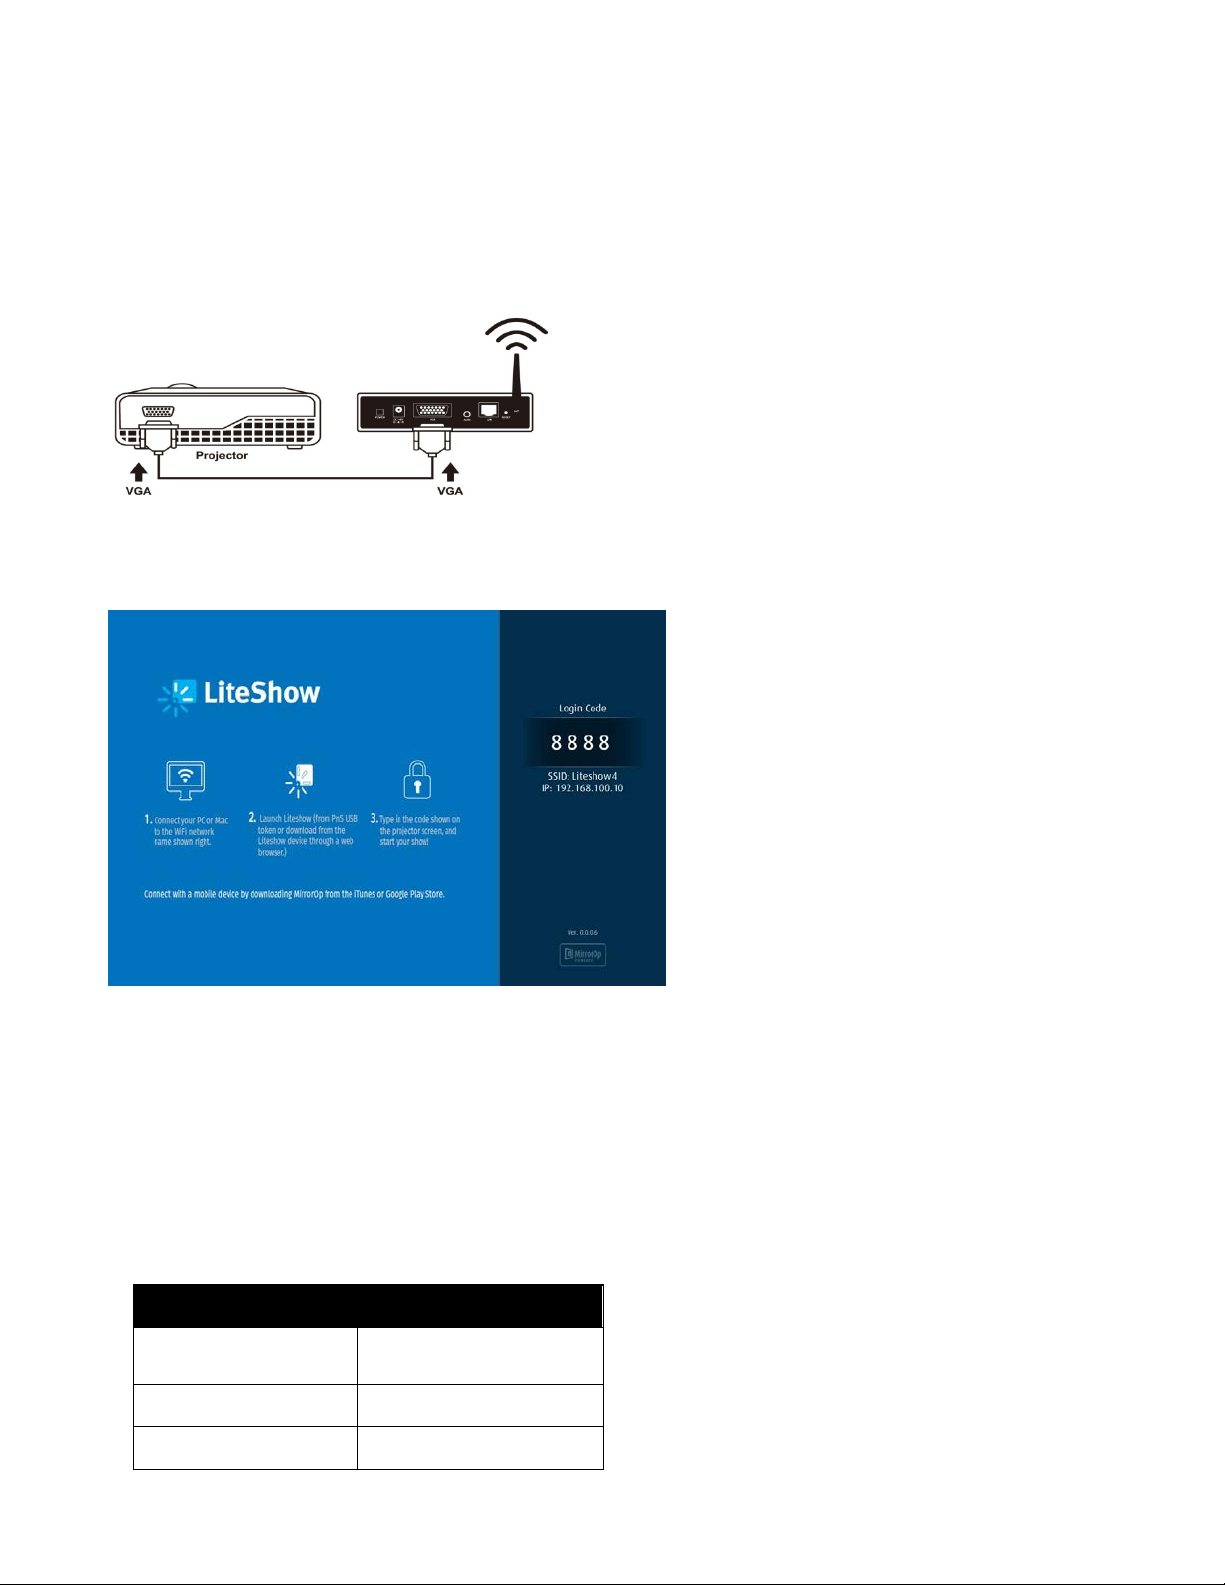
1) Connect power to LiteShow module, and connect a VGA cable from the projector to the LiteShow
VGA connector. If desired, audio can also be connected to the LiteShow Audio connector.
2) Turn on the projector and LiteShow module. Note:
LiteShow is ready for use.
3) Verify that your computer’s wireless connection is enabled and connect to the LiteShow wireless
network.
4) Open your browser. Although the LiteShow page should display automatically, you can bring up the
When the projector shows the instructions below,
LiteShow page by entering the IP address displayed on the projector into your web browser.
Note: The default IP address of LiteShow is 192.168.100.10.
5) At the LiteShow login screen, enter one of the following combinations to access the downloadable
client software:
9
Login Default Password
None
Admin User admin
Not applicable – No
password required
Page 10
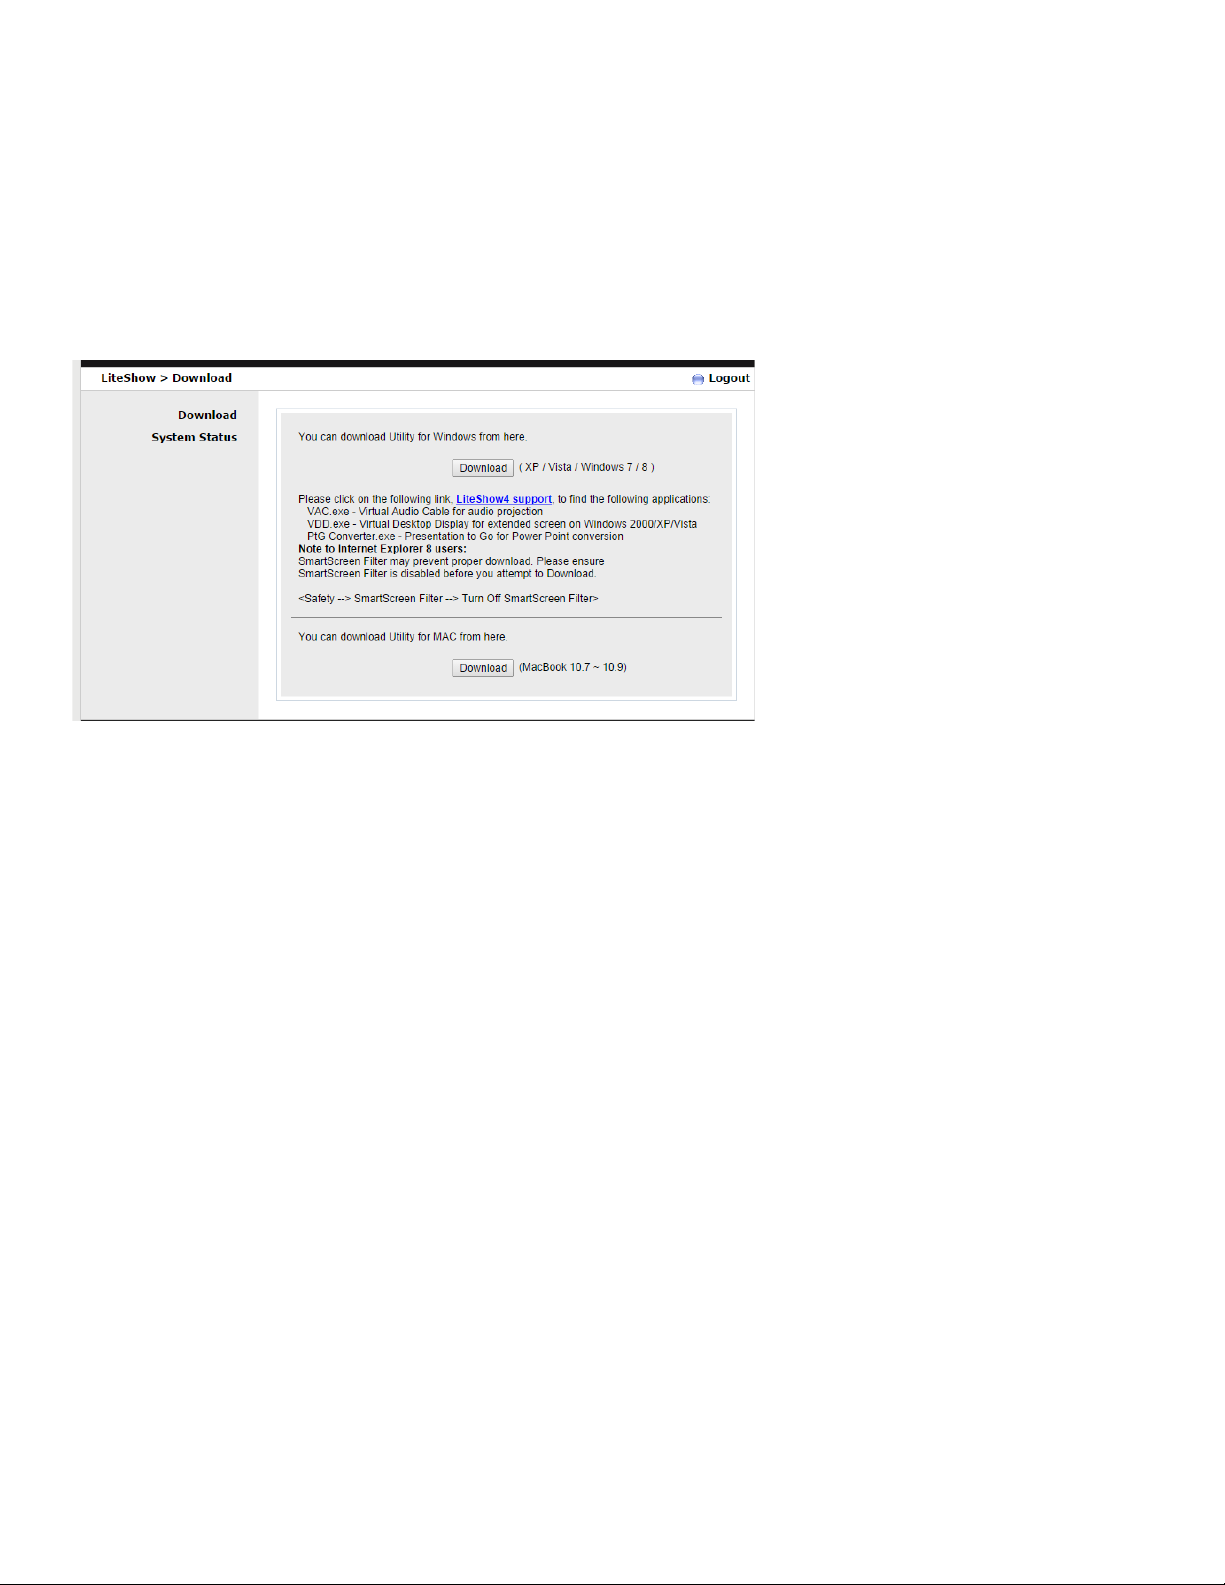
Download
Windows Security Alert
Unblock
Note: If the default password listed above does not work, contact your IT administrator.
6) Select the client software that corresponds to your operating system and click
installation program.
7) Follow the Installation Wizard instructions.
Note: If a
window displays, click
to continue installation.
8) Once installation is complete, a LiteShow shortcut will appear on your Desktop.
to start the
10
Page 11
Windows Client Utility
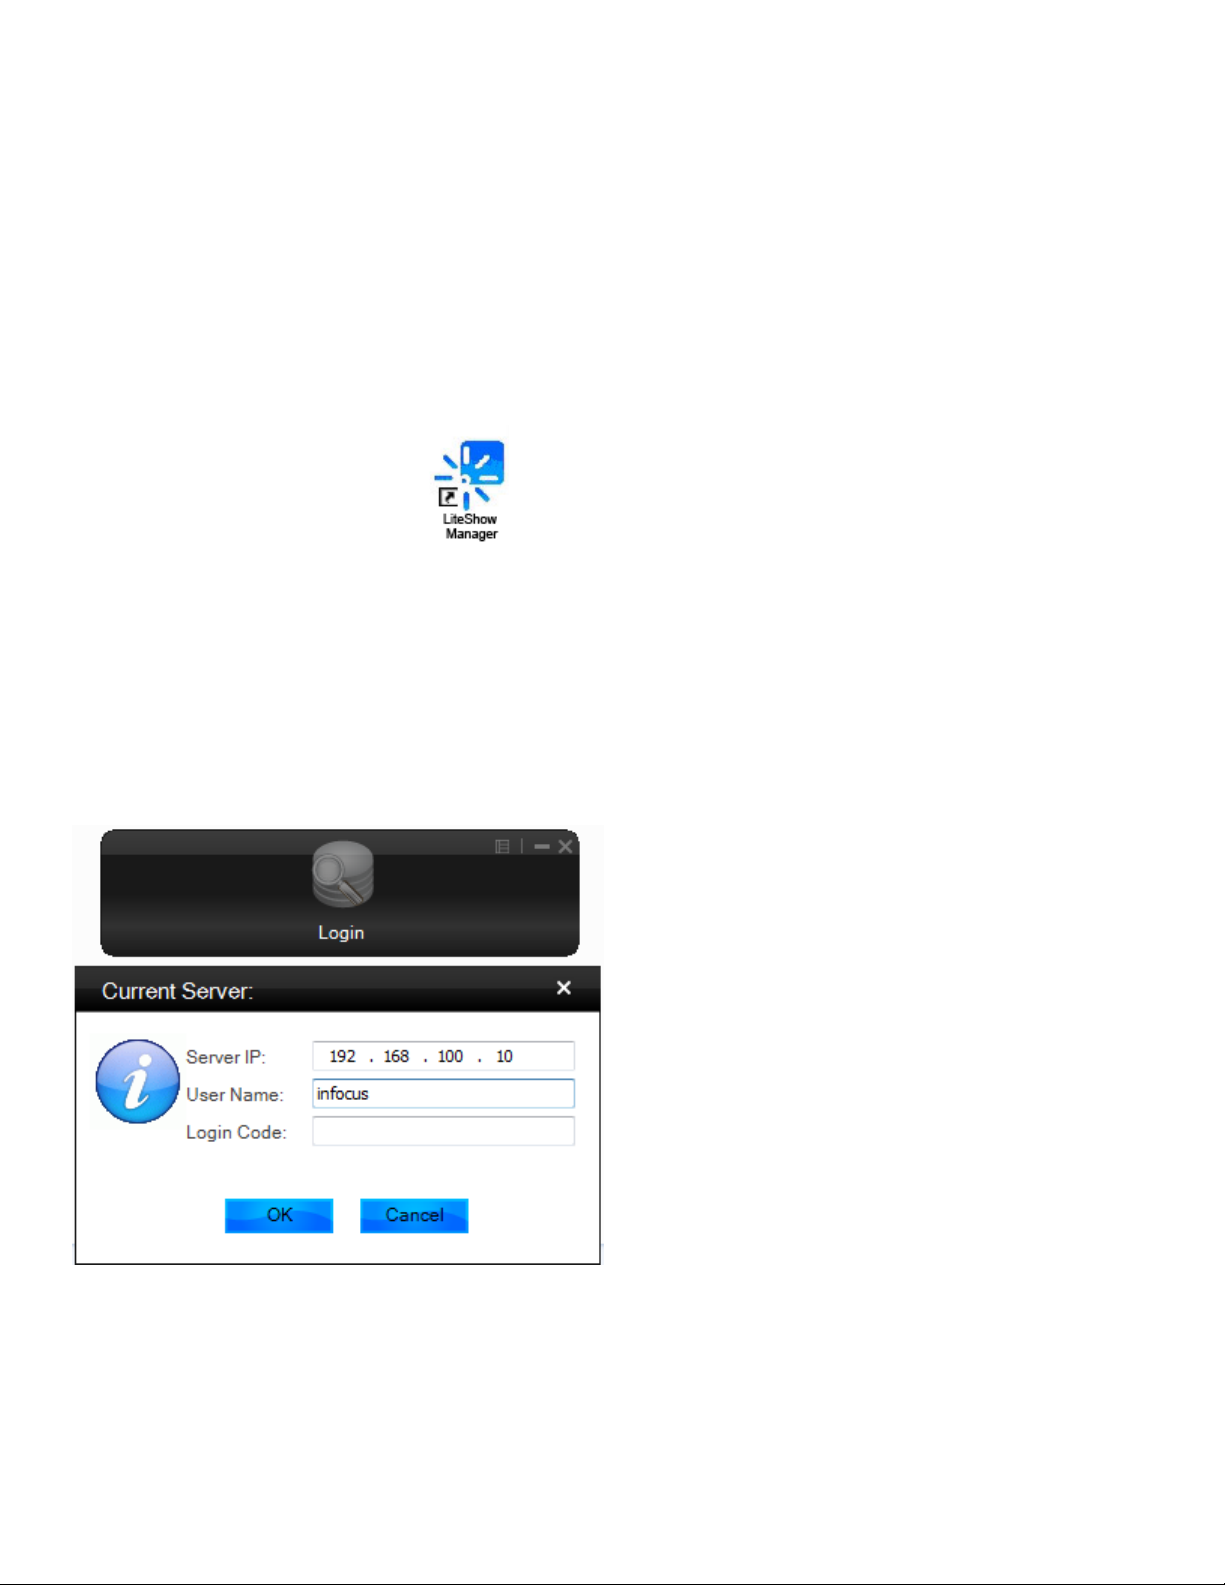
Launch Application
LiteShow
Login Code
Login Code
After you successfully download the LiteShow Windows client, follow the steps below to start the
program.
1) Click the
2) Select the network you want to project over, and then the LiteShow module you wish to use.
3) If the LiteShow module is found, a Login Code dialog box displays on your projector.
4) Enter the
displaying automatically.
5) If the
administrator. Click OK to proceed.
shortcut.
visible on the projector and click OK. Your computer screen should begin
is not visible on the projector, the Login Code has been disabled by your
11
Page 12
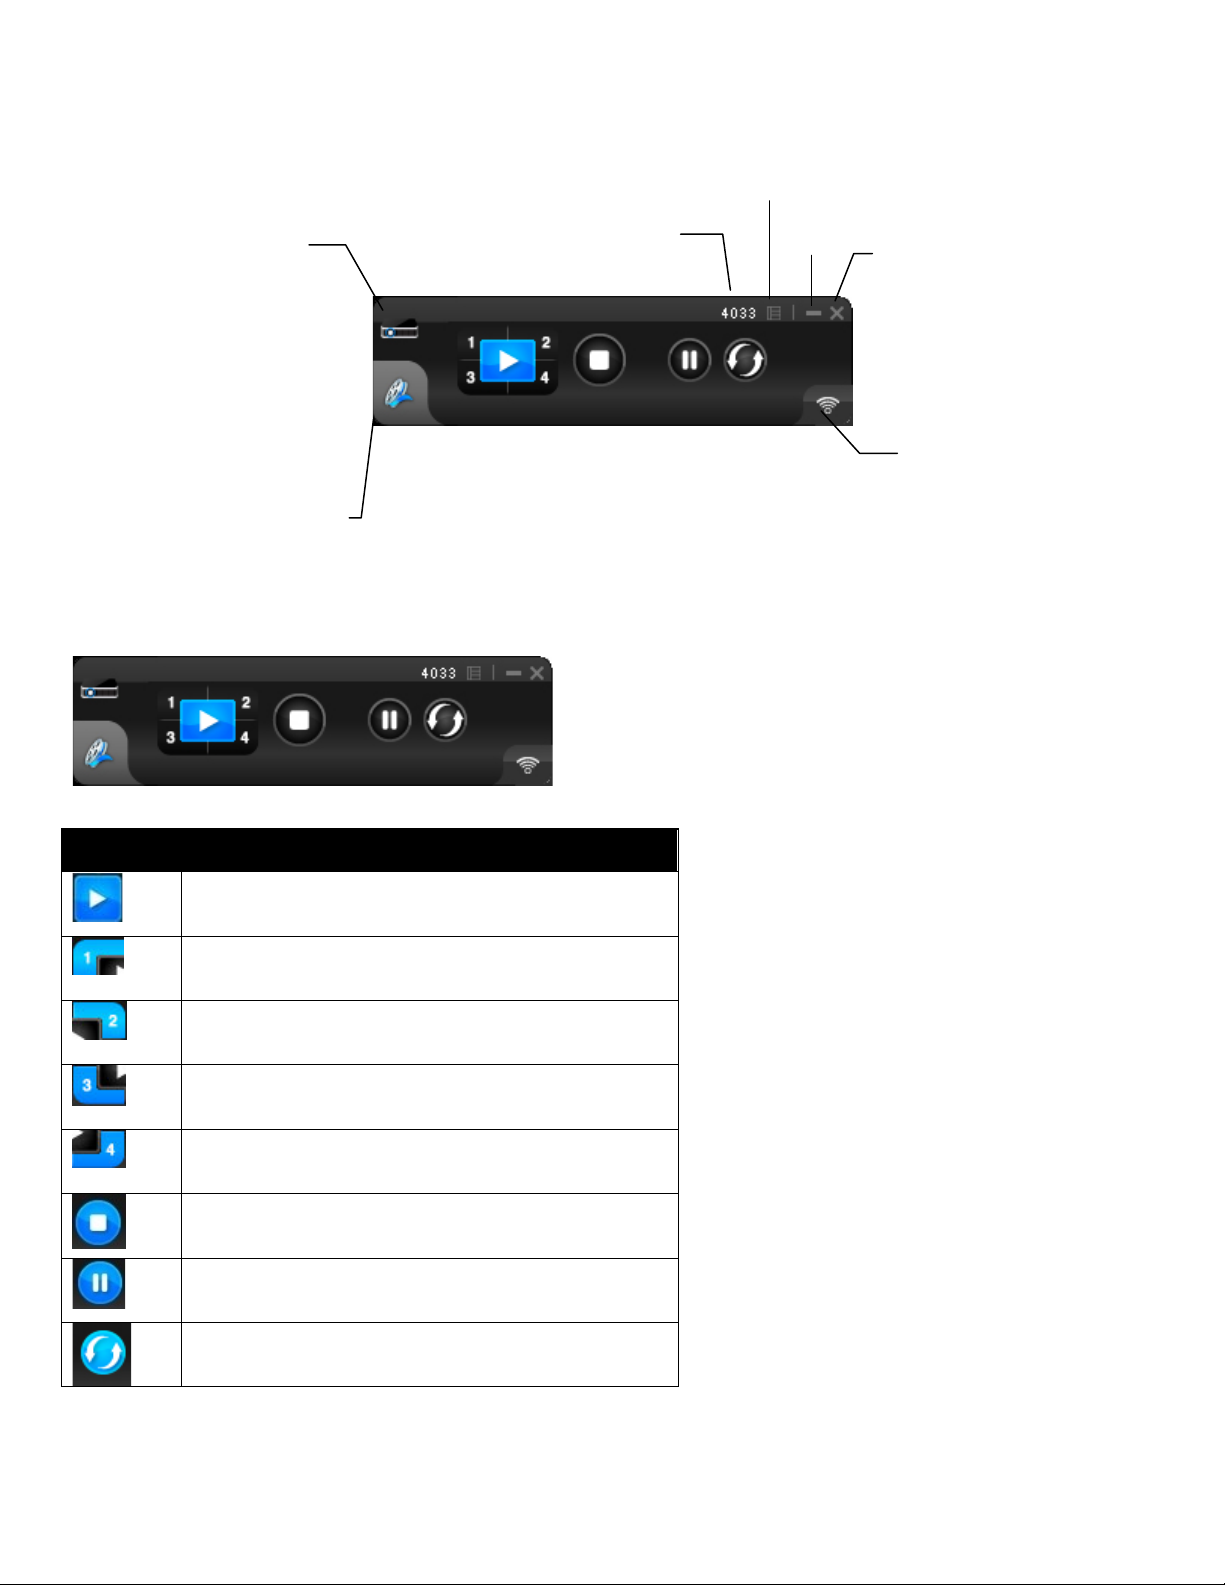
Application Control Panel
Projection Mode Ta b
Full Screen projection
Pause projecting
Clos
Projection
Mode Tab
Menu
Min/Max
Login Code
Projection Mode Controls
Video Mode
Tab
Project to Quadrant #1
Project to Quadrant #2
Status Indicator
12
Project to Quadrant #3
Project to Quadrant #4
Stop projecting
Refresh projection
Page 13

Projection Audio Notes:
Send Audio to Display
Yes
Video Mode Ta b
Video Mode Notes:
Video Mode
LiteShow can redirect your computer’s audio to the projector using an optional VAC driver. To enable
audio projection, you must first install the VAC Setup application (located on the USB token). Once VAC
is installed, open the LiteShow application menu, select
LiteShow.
Video Mode Controls
Start playing video/music
Stop playing video/music
Open video/music file
, select
, and restart
Mute
Supported formats include: MPEG1/2, DivX(3.4.5), XviD(MPEG4), H.264, WMV9, MP3, WMA.
For higher quality video or music playback, stream the files from your computer to the LiteShow module.
Decompression, buffering, and video processing all take place in the LiteShow module reducing the load
on your computer and network. Click the
video/audio file to begin playback on the screen.
Volume level
Progress bar
tab to switch to video mode. Choose a
13
Page 14
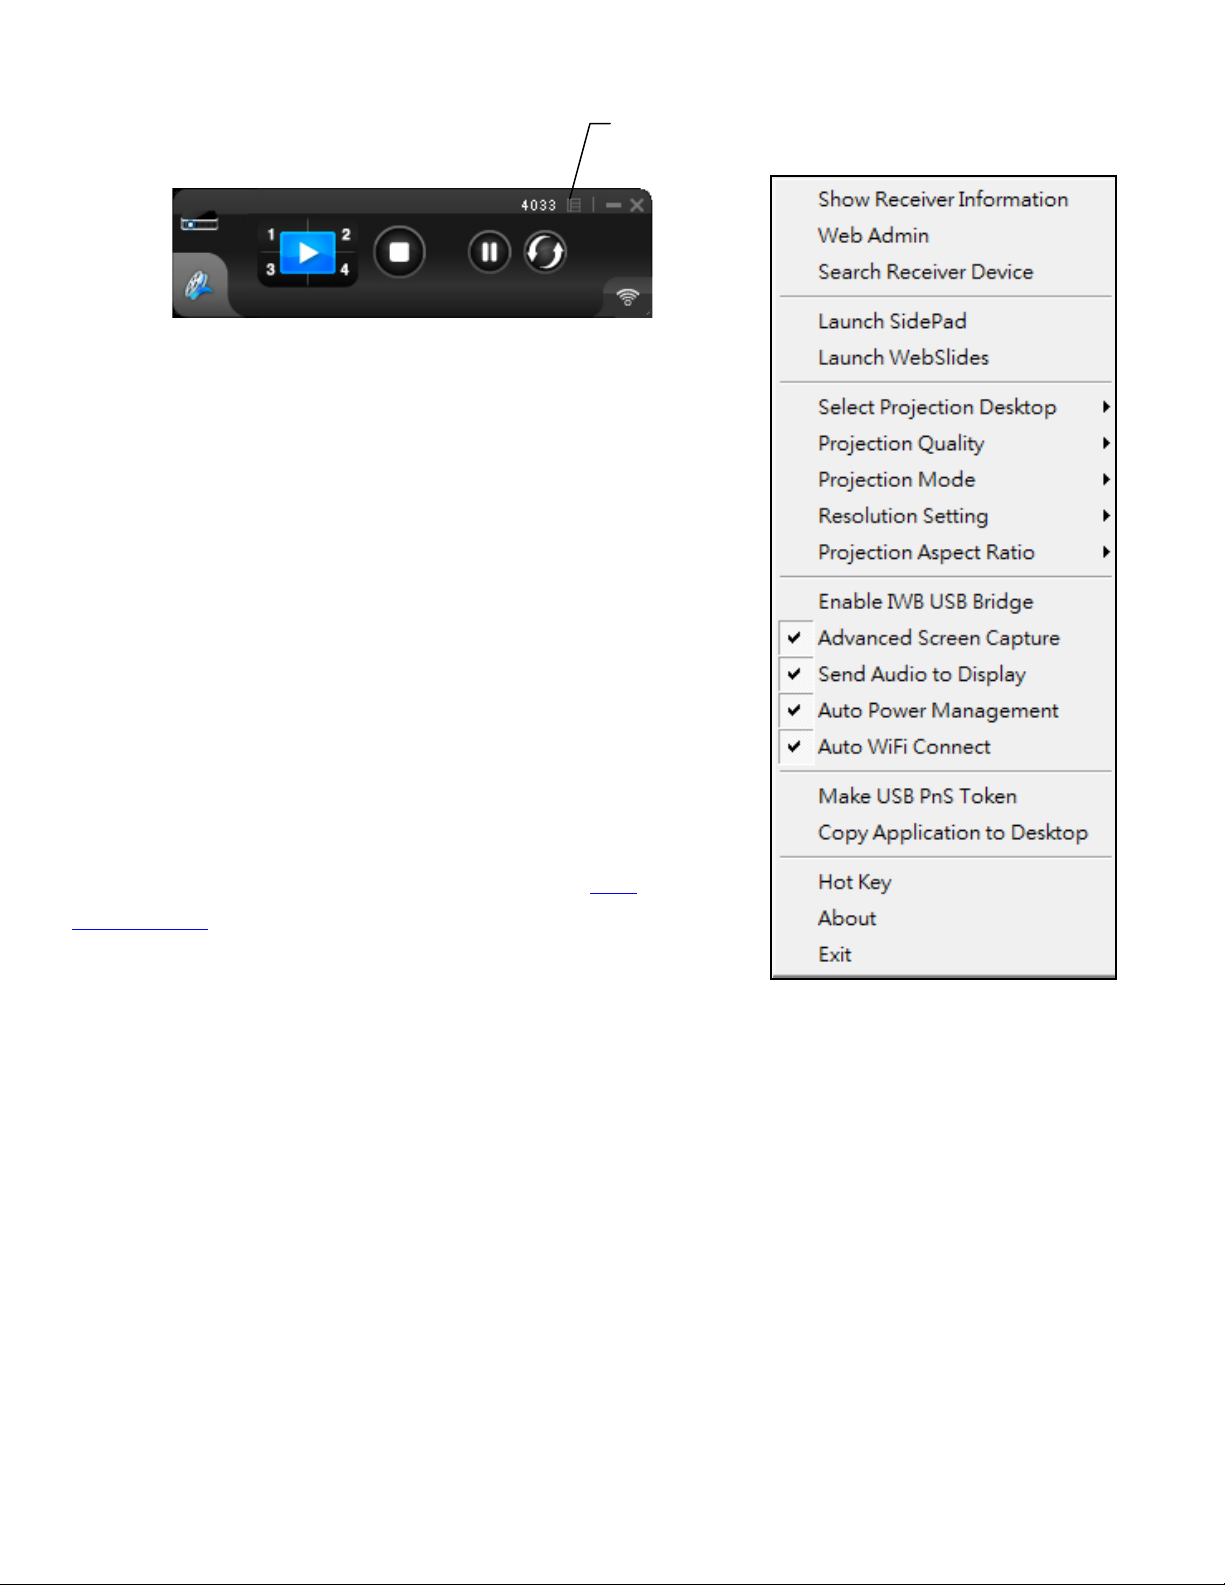
Menu Functions
Menu
Show Receiver Information
Web Admin…
Search Receiver Device
Menu
When you click the
displayed on the right appears. Click an option to enable/disable
a feature or open another submenu.
Displays the receiver information, such as the WiFi name, IP
address, and code, in the upper-left corner of the desktop for ten
seconds.
Opens the Web Management login page. See the Web
Management section for more information.
Disconnects the current receiver and searches for the receiver again.
button shown above, the menu window
14
Page 15
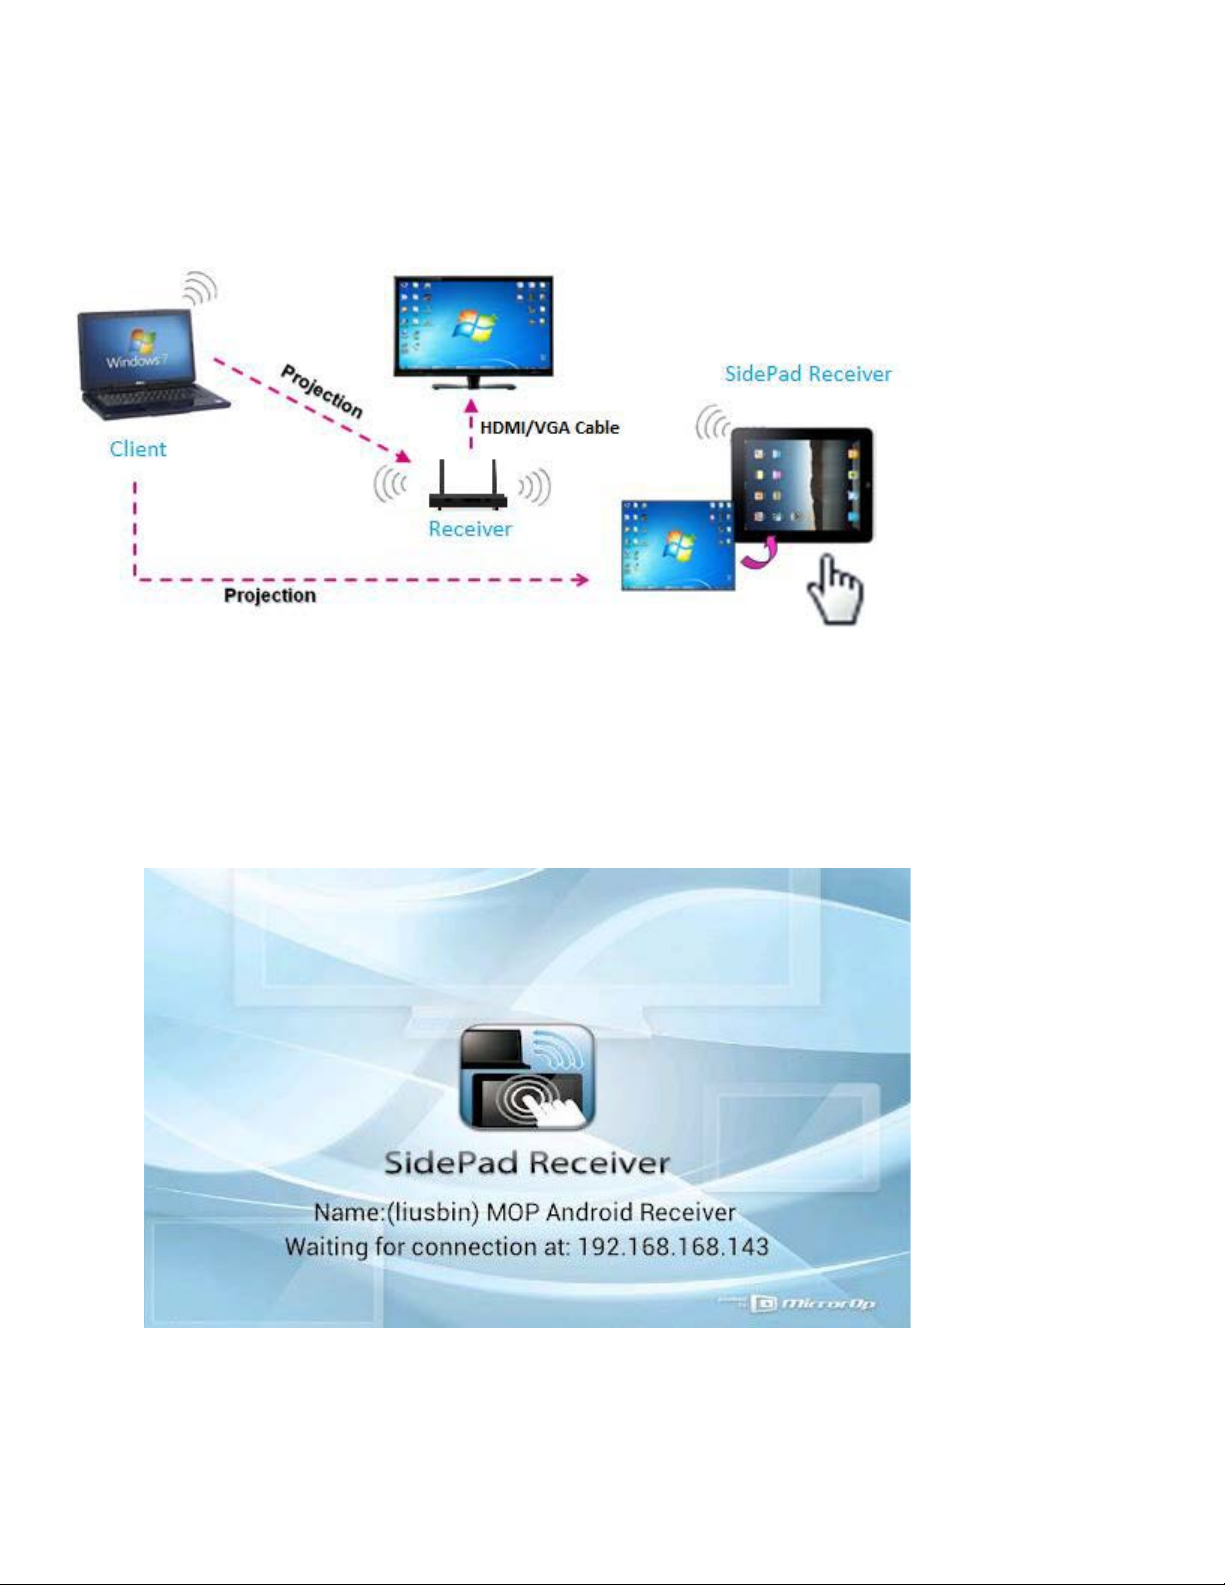
Launch SidePad
SidePad Receiver
SidePad Receiver
SidePad
Receiver
Launch SidePad
SidePad is an application that allows users to connect iPads/Smartphones (Android and iOS), PCs, and
displays/projectors via the LiteShow 4 device. The user can then control the projecting PC via the
iPad/Smartphone. See the illustration below.
1) Download the software application:
For iOS: Download
For Android: Download
from the Apple Store.
from the Google Play Store.
2) Connect your iOS/Android device to the LiteShow 4 device through WiFi and launch
.
3) Click
15
from the menu. In a few seconds, the PC desktop will display on the
iOS/Android device. You can now control the PC from your iOS/Android device.
Page 16

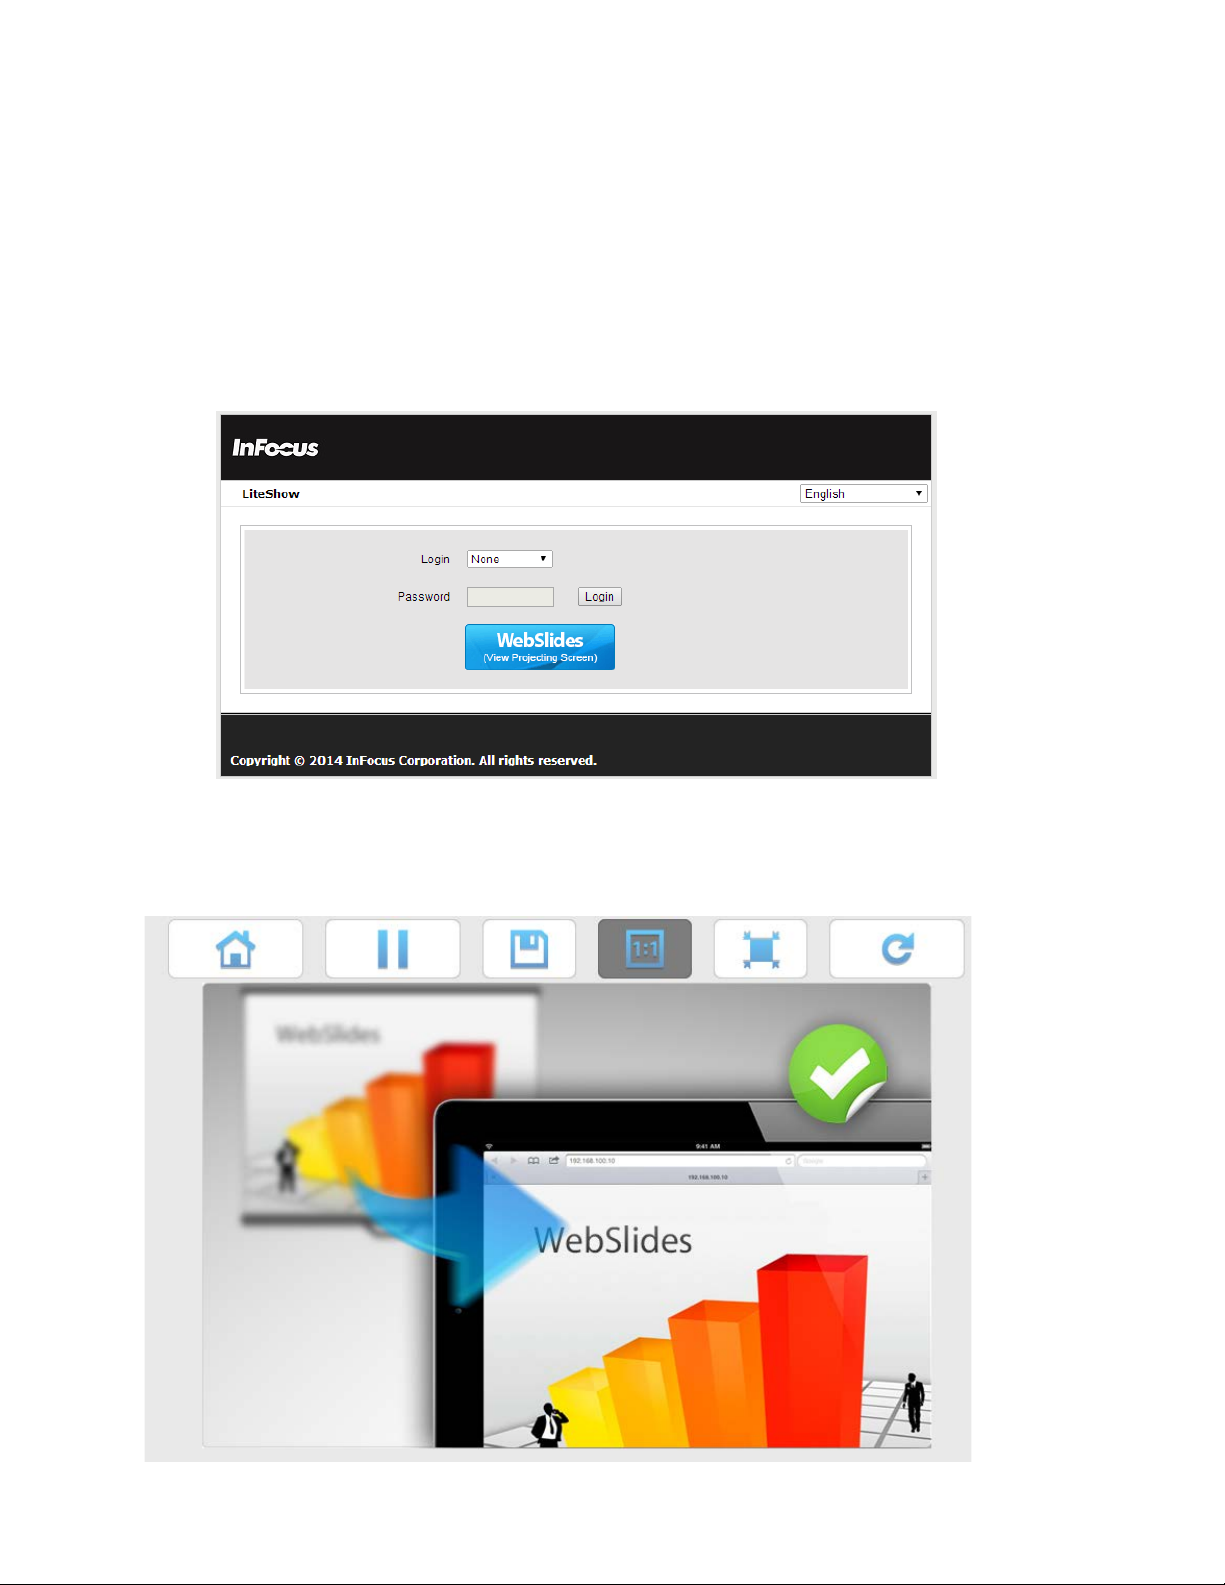
Launch WebSlides
Presenter:
Launch WebSlides.
Audience:
WebSlides
4) If no iPad/Smartphone is detected, the SidePad login screen displays.
WebSlides allows users to broadcast their presentation to up to 64 users simultaneously.
Note: WebSlides is not available when QuadView is in use.
1)
Make sure your PC/Mac is connected to LiteShow4 and click
16
2)
a. Connect to the LiteShow4 WiFi Network shown on the projector.
b. Launch your web browser and enter the LiteShow4 IP address.
c. Click the
button.
Page 17

Notes:
3) The presenter’s slides display.
4) Use the toolbar to pause, save, change the aspect ratio, expand, and refresh the presentation
window.
• WebSlides users and users logged into LiteShow4 both consume wireless bandwidth. If more
thatn 10 users are logged into LiteShow4, we recommend connecting LiteShow4 to the company
network using Ethernet or a router to ensure best performance.
• We also recommend that Webslides users do not exceed the recommended number specified on
the Web Management page.
• Wireless Projection function and Conference Control function can support up to 64 users.
17
Page 18

Select Projection Desktop
Notes:
Allows you to project the main screen or the extended screen.
• The VDD application (found on the USB token) must be installed on Windows XP computers
before the Projection Desktop feature is used.
• Extended display is not supported on computers with Windows 7 and Vista Starter operating
systems. In addition, extended display is not supported by all Windows 8 computers, however if
the computer can extend its display to an external monitor/device, then it should work with
LiteShow4.
18
Page 19

Projection Quality
Normal
Best
Projection Mode
Presentation
Video
Resolution Setting
Never Change
Always Change
Always ask
me
Allows you to toggle between
(faster performance and lower image quality) and
image quality and slower performance).
Allows you to toggle between
performance).
mode (shortest latency) and
(better
mode (better video
Allows you to toggle between
(keeps the original desktop resolution),
(automatically changes the resolution to match the application’s recommended settings), or
(prompts the user to change).
19
Page 20

Projection Aspect Ratio
Keep aspect ratio
Fit full screen
Enable IWB USB Bridge
Enable USB IWB Bridge
Notes:
Advanced Screen Capture
Allows you toggle between
different than the LiteShow4 resolution), and
(keep the original aspect ratio if the desktop resolution is
(adjusts the image to project full screen).
This feature enables touch functionaly between your LiteShow device and your touch computer/ display.
1) Plug in a USB cable from the back port to your touch computer/display.
2) Click
.
3) When the full screen projection is displayed, it will bridge the IWB device to your PC wirelessly.
• The UoIP driver (found on the USB token) must be installed first before using this feature.
• The UoIP driver supports standard Win7/8 compatible HID touch devices.
• The front two USB ports do not support UoIP feature.
Allows the user to see the layered windows on the connected display. Note: The mouse cursor may blink
from time to time when the PC screen is displayed in this mode.
Advanced Screen Capture disabled:
20
Page 21

Advanced Screen Capture enabled:
Send Audio to Display
Note:
Auto Power Management
High performance
Auto WiFi Connect
Skip
Bridges the audio to your display device, and mutes the local speaker. Audio is restored when the
application closes.
For Windows XP only: If you cannot hear the audio, the VAC Setup application (located on the
USB token) must be installed on your computer.
To optimize projection performance, the LiteShow application will
automatically turn the computer’s Windows power management settings to
when the LiteShow Application is enabled.
Note: When the LiteShow application is disabled, the computer’s power
management settings are unchanged.
When Auto WiFi Connect is enabled, the LiteShow application will search out and list all available
wireless networks and automatically switch to the selected network before searching for available
LiteShow modules. (Selecting
when Auto WiFi is selected, will not modify the computer’s existing
network connection.)
When Auto WiFi Connect is disabled, the LiteShow application will only search the computer’s existing
network connection for LiteShow modules.
21
Page 22

Make USB PnS token
Copy Application to Desktop
Hot Key
Creates a duplicate USB LiteShow token. You can insert a USB thumb drive and follow the Setup Wizard
to make the token. Users can execute the LiteShow application directly from the token, avoiding the
need for guests to install the application.
Copies the LiteShow application to your desktop. Administrator rights on your computer are not required.
Displays a list of available Hot Keys.
22
Page 23

About
Exit
Displays system information, including the client version, IP
address and login code.
Closes and exits the LiteShow application. Projection stops immediately.
23
Page 24

Mac Client Utility
Launch Application
LiteShow
Login Code
Connect.
1) Click the
2) Select the network you want to project over, and then the LiteShow module you wish to use.
3) If the LiteShow module is found, a Login Code dialog box is displayed on your projector.
4) Enter the
displaying your computer screen to the connected projector.
shortcut.
visible on the projector and click
LiteShow automatically begins
24
Page 25

Application Control Panel
Projection Mode Tab
Full Screen projection
Pause projecting
Clos
Projection
Mode Tab
Menu
Min/Max
Login Code
Video Mode
Tab
Projection Mode Controls
Project to Quadrant #1
Project to Quadrant #2
Status Indicator
25
Project to Quadrant #3
Project to Quadrant #4
Stop projecting
Refresh projection
Page 26

Video Mode Tab
Video Mode Notes:
Video Mode
Video Mode Controls
Start playing video/music
Stop playing video/music
Open video/music file
Mute
Supported formats include: MPEG1/2, DivX(3.4.5), XviD(MPEG4), H.264, WMV9, MP3, WMA.
For higher quality video or music playback, stream the files from your computer to the LiteShow module.
Decompression, buffering, and video processing all take place in the LiteShow module reducing the load
on your computer and network. Click the
video/audio file to begin playback.
Volume level
Progress bar
tab to switch to video mode. Choose a
26
Page 27

Menu Functions
Show Receiver Information
Web Admin…
Search Receiver Device
Launch SidePad
When you click the Menu button shown above, this additional menu
window will appear:
Displays the receiver information, such as the WiFi name, IP address,
and code in the upper-left corner of the desktop for 30 seconds.
Menu
Opens the Web Management login page. See the Web Management
section for more information.
Disconnects the current receiver and searches for the receiver again.
SidePad is an application that allows users to connect iPads/Smartphones (Android and iOS), PCs, and
displays/projectors via the LiteShow 4 device. The user can then control the projecting PC via the
iPad/Smartphone. See the illustration below.
27
Page 28

SidePad Receiver
SidePad Receiver
SidePad
Receiver
Launch SidePad
SidePad Login
1) Download the software application:
For iOS: Download
For Android: Download
from the Apple Store.
from the Google Play Store.
2) Connect your iOS/Android device to the LiteShow 4 device through WiFi and launch
.
3) Click
from the menu. In a few seconds, the PC desktop will display on the
iOS/Android device. You can now control the PC from your iOS/Android device.
4) If your device is not detected, the
window displays:
28
Page 29
Enable WebSlides
Presenter:
Launch WebSlides.
Audience:
WebSlides
WebSlides allows users to broadcast their presentation to up to 64 users simultaneously. Note:
WebSlides is not available when QuadView is in use.
1)
2)
Make sure your PC/Mac is connected to LiteShow4 and click
a. Connect to the LiteShow4 WiFi Network shown on the projector.
b. Launch your web browser and enter the LiteShow4 IP address.
c. Click the
button.
3) Start to receive the presenter’s slides. The below image can be seen on the audience’s browser.
29
Page 30

4) Use the toolbar to pause, save, change the aspect ratio, expand, and refresh the presentation
Notes:
Select Projection Desktop
Notes:
Projection Quality
Normal
Best
Projection Mode
Presentation
Video
window.
• WebSlides users and users logged into LiteShow4 both consume wireless bandwidth. If more
thatn 10 users are logged into LiteShow4, we recommend connecting LiteShow4 to the company
network using Ethernet or a router to ensure best performance.
• We also recommend that Webslides users do not exceed the recommended number specified on
the Web Management page.
• Wireless Projection function and Conference Control function can support up to 64 users.
Allows you to project the main screen or the extended screen.
• Only Mac 10.7 and above are supported.
• To use the extended screen, install the SVS extended screen driver from the USB token.
Allows you to toggle between
(faster performance and lower image quality) and
image quality and slower performance).
Allows you to toggle between
mode (shortest latency) and
mode (better video
performance).
(better
30
Page 31

Resolution Setting
Never Change
Always Change
Always ask
me
Projection Aspect Ratio
Keep aspect ratio
Fit full screen
Auto WiFi Connect
Skip
Allows you to toggle between
(keeps the original desktop resolution),
automatically changes the resolution to match the application’s recommended settings), or
(prompts the user to change).
Allows you toggle between
different than the LiteShow4 resolution), and
(keep the original aspect ratio if the desktop resolution is
(adjusts the image to project full screen).
(
When Auto WiFi Connect is enabled, the LiteShow application will search out and list all available
wireless networks and automatically switch to the selected network before searching for available
LiteShow modules. (Selecting
when Auto WiFi is selected, will not modify the computer’s existing
network connection.)
When Auto WiFi Connect is disabled, the LiteShow application will only search the computer’s existing
network connection for LiteShow modules.
31
Page 32

Send Audio to Display
Hot Key
About
Exit
Bridges the audio to your display device, and mutes the local speaker. Audio is restored when the
application closes.
Displays a list of available Hot Keys.
Displays system information, including the client version, IP address and login code.
Closes and exits the LiteShow application. Projection stops immediately.
32
Page 33

Web Management
Home Page
None
Not applicable – No
Download
Note:
1) Ensure your computer has successfully connected to LiteShow.
2) Open your web b ro ws er. It should automatically open to the LiteShow home page. If not, enter the
IP address shown on the projector screen in your browser window. The default IP is
“192.168.100.10.”
3) At the LiteShow login screen, choose your desired language from the drop-down, and enter one of
the following combinations to access associated LiteShow menus:
Login Default Password Menu Options
password required
Basic User basic Download
Admin User admin Download
If the default password listed above does not work, contact your IT administrator.
System Status
System Status
Conference Control
System Status
Conference Control
Admin Menu
33
Page 34
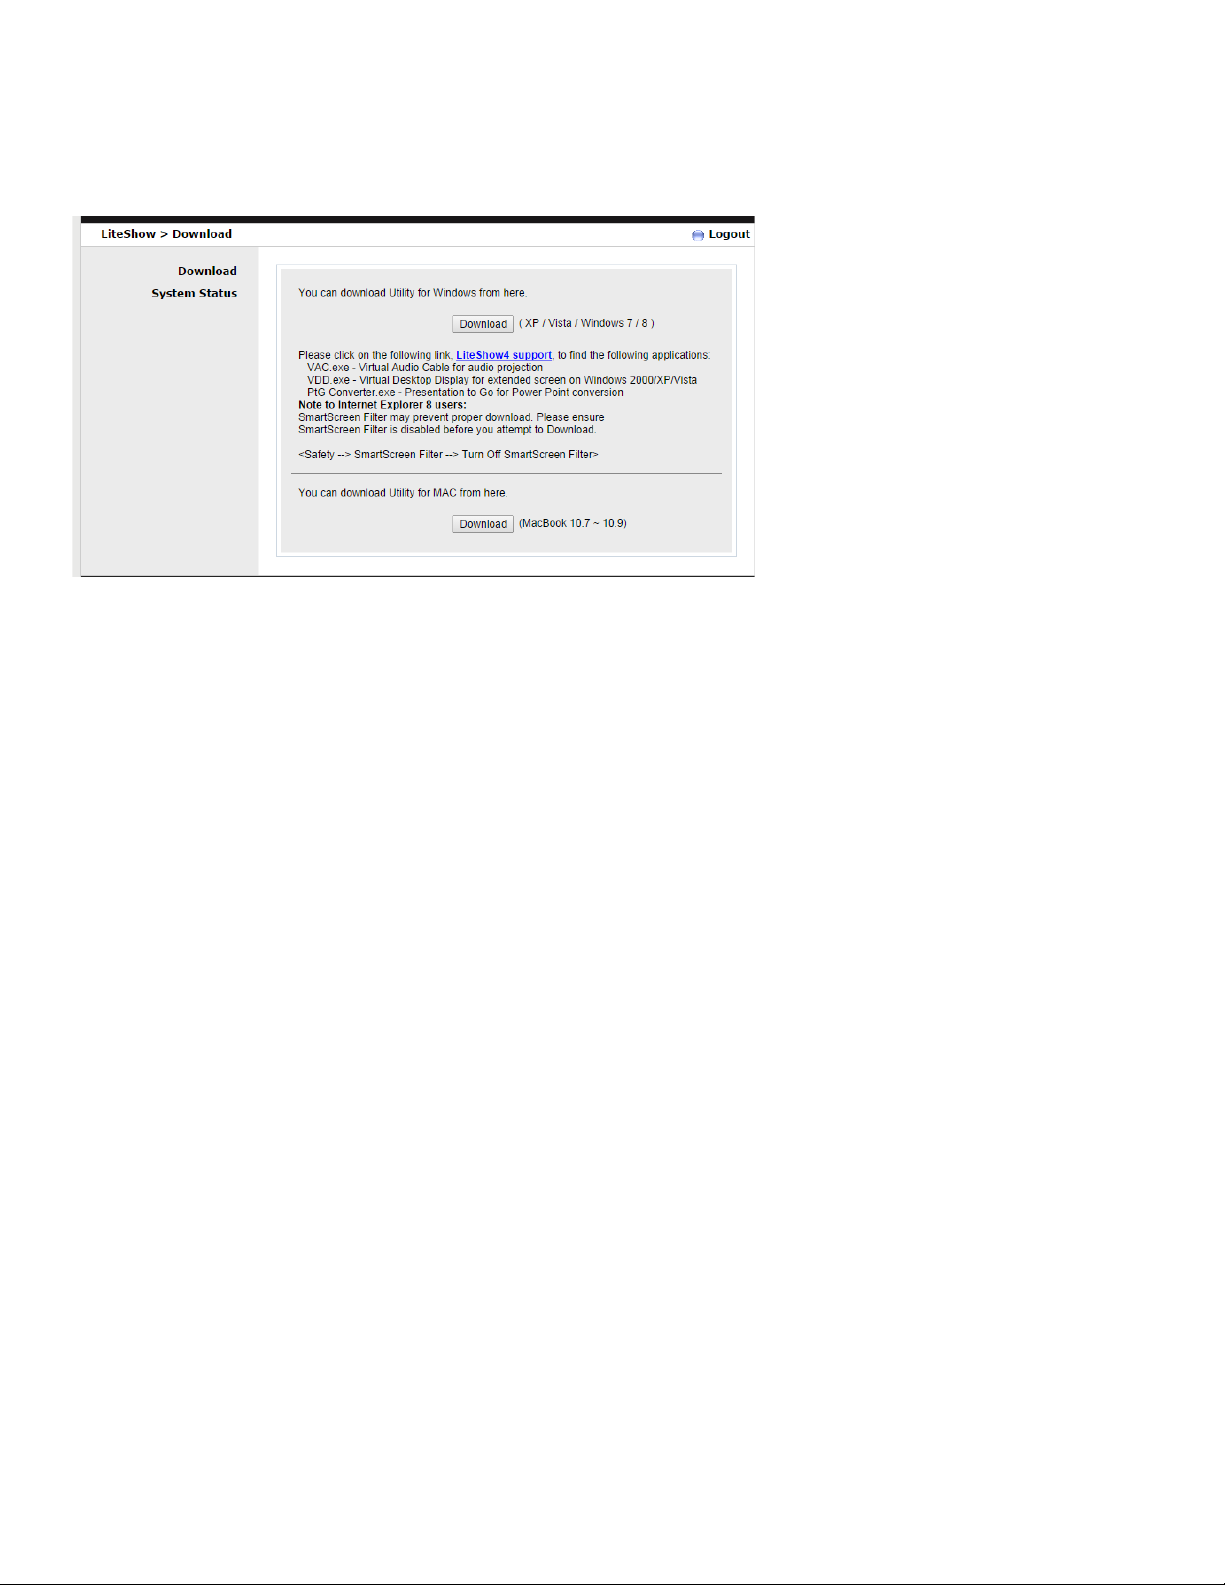
Download
Download
Download
Windows Security Alert
Unblock
Note to System Administrators
Available to all users, regardless of which login is used.
1) From the
operating system, and click
window, select the appropriate client software that corresponds to your
to start the installation program.
2) Follow the Installation Wizard instructions.
Note: If a
window displays, click
to continue installation.
3) Once installation is complete, a LiteShow shortcut will appear on your desktop.
: If you save the “LiteShow4.exe” installation file to an accessible folder,
you can invoke it in a script as “LiteShow4.exe /VERYSILENT.” This causes LiteShow to install without
prompts and silently terminate without launching LiteShow at the end of the installation process.
34
Page 35

System Status
Available to all users, regardless of which login is used. This page displays a variety of network-related
information, including the IP address of LiteShow, whether it is currently projecting, and how many users
are currently connected to the device.
35
Page 36

Conference Control
To a l low users to project freely:
Allow control from this page only
To change presenters:
To enable QuadView:
Displays presentation in Quadrant #1
Displays presentation in Quadrant #2
Stops presentation
Available only to users logged in as either Basic or Admin Users. Conference Control allows you to easily
change presenters and to display up to four presentations at one time.
options associated with the desired presenter.
Play Control options list.
Play Control Options
Full-screen presentation
Displays presentation in Quadrant #3
Displays presentation in Quadrant #4
Review the available presenters listed under Name and click the Play Control
Review the available presenters listed under Name and click 1, 2, 3 or 4 in the
Uncheck the
box.
36
Page 37

Admin
Device Setup
Available only to users logged in as Admin Users. Clicking on Admin provides additional administrative
options.
Allows you to select the input type, the projector’s resolution, and IWB USB port, and disable, randomize
or apply a static Login Code.
37
Page 38

Network Setup
By default, the LiteShow device is a DHCP client. When the LiteShow module is connected to a LAN
that already has a DHCP server present, the LiteShow module takes an IP address assigned to it by the
server. When the LiteShow module is connected to a LAN that does not have a DHCP server, the
LiteShow module becomes the DHCP server in the network.
38
Page 39

IP Setup
Obtain IP address automatically
Use the following IP address
IP Address:
Subnet Mask:
Default Gateway:
DNS Server:
DHCP Server Setup
Start IP:
End IP:
Subnet Mask:
Default Gateway:
DNS Server:
Wireless Setup
Wireless LAN:
Embedded AP SSID/Name:
SSID Broadcast:
Channel:
Encryption:
Key:
You can select
or
The default value is 192.168.100.10.
The default value is 255.255.255.0
The default value is 192.168.100.10
Enter the values for your network
Enable or disable the DHCP server automatically, or disable it altogether.
The start IP address of DHCP Server.
The end IP address of DHCP Server.
Enter the values for your network
Enter the values for your network
Enter the values for your network
.
“Enable” or “Disable” the Wireless LAN.
Type the device name.
SSID string, maximum length is 32 bytes. (No spaces)
You can set fixed channel or choose Auto. After powering on the LiteShow, choosing
“Auto” will scan all wireless channels and select one clear channel automatically.
Disable or select a wireless encryption preference (WEP/WPA/WPA2 64-bit or 128-
bit in ASCII or HEX string).
If Encryption is enabled, a key value must be set based on the selected encryption mode.
39
Page 40

AP Setup
Connect to Existing AP:
Existing AP SSID:
Encryption:
Key:
Gatekeeper
All Pass:
All Block:
Internet Only:
SNMP
The AP Setup feature allows LiteShow to connect to the corporate network as a wireless client rather
than through the RJ45 wired connection.
To setup LiteShow as a wireless client, choose “Enable.” Note: Enabling
the Wireless Client will disable both the wired RJ45 connection and Gatekeeper (Gatekeeper will
be set to “All Pass”). Disabling the Wireless Client will restore the RJ45 wired connection.
the SSID string of the corporate wireless LAN (maximum length 32 bytes; no
spaces).
the encryption method required to access the corporate wireless LAN
(WEP/WPA/WPA2 64-bit or 128-bit in ASCII or HEX string).
the value required to access the corporate wireless LAN. Used only when Encryption is
enabled.
Designed to ensure enterprise network security.
allows Guest Users connected through a wireless connection to access the office
network (LAN).
prevents Guest Users connected through a wireless connection from accessing the
office network (LAN).
prevents Guest Users from accessing the office network (LAN), but still allows
internet traffic (browser packets i.e. port 80, 443) to pass through.
Allows you to enable or disable SNMP services.
40
Page 41

OSD Setup
Allows you to customize the LiteShow standby image with a personal image and/or restore the original
standby image. In addition, you can control how the device information and screen saver is displayed.
41
Page 42

Change Passwords
Allows you to reset the passwords for Basic User and/or Admin User.
42
Page 43

Reset to Default
Reset
Reset
Restores LiteShow to factory default settings.
Alternatively, factory default settings can also be restored as follows:
1) Turn off the LiteShow module.
2) Press and hold the
3) Turn on the LiteShow module.
4) Wait for at least 10 seconds and release the
5) Factory default settings should be restored.
button on the bottom of the LiteShow module.
button.
43
Page 44
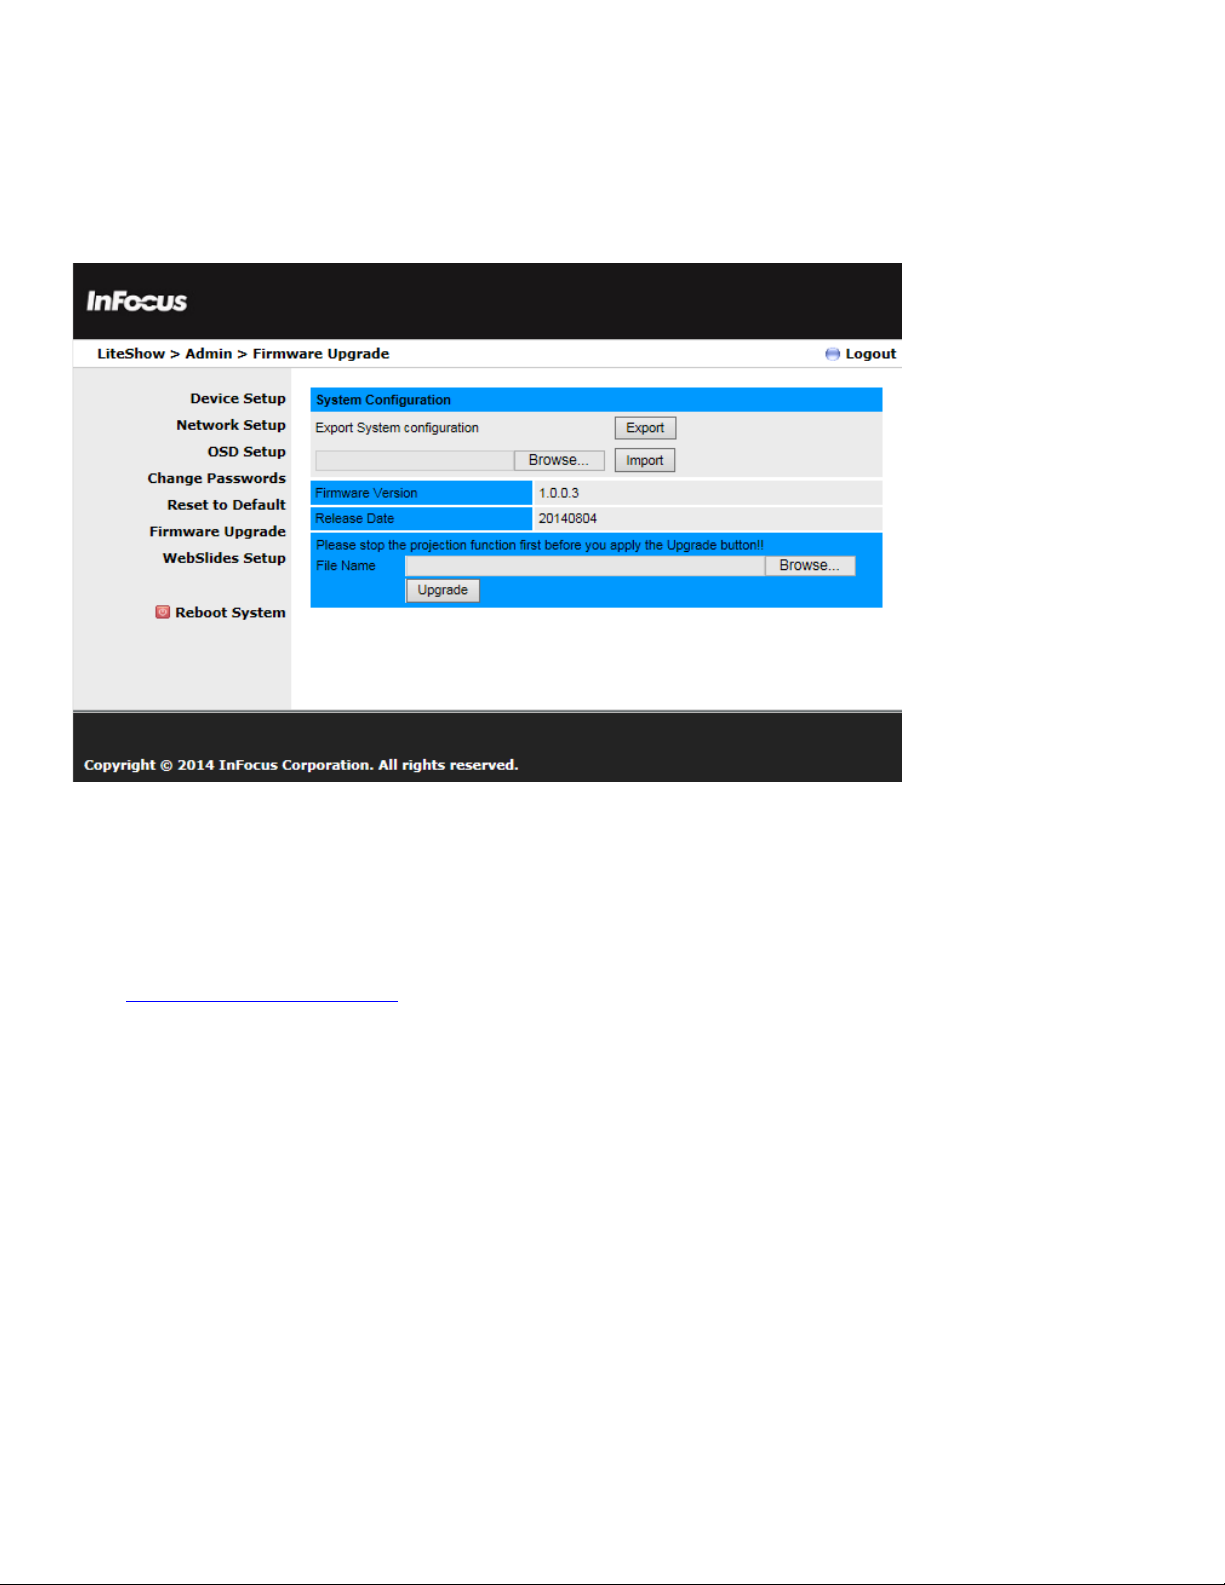
Firmware Upgrade
Firmware Upgrade
Browse
Upgrade. Note:
OK
Used for upgrading the LiteShow firmware, and for importing and exporting configuration settings
(this is helpful when multiple LiteShow devices are being configured).
To u p d a t e your LiteShow firmware:
1) Connect the LiteShow device to your network RJ45 connector before updating. (Do not update
wirelessly.)
2) Download the latest firmware image file (*.awd) from the InFocus support site
(www.infocus.com/support
3) Choose
4) Click
5) Click
6) After a message appears stating the update has been successful, click
LiteShow.
and open the firmware image file you previously downloaded to your computer.
) to your computer.
from the left-hand menu.
This process will take several minutes.
and begin using
44
Page 45

WebSlides Setup
Allows you to adjust the Auto Refresh Interval and Access Password Control.
45
Page 46

Reboot
Logout
Restarts the LiteShow system.
Exits the LiteShow web page.
46
Page 47

Start WebSlides
WebSlides
Click the
information.
button to start the WebSlides feature. See the Launch WebSlides section for more
47
Page 48

Appendix A: Using PtG Converter
Convert
Note:
Convert
Preview
Play
Open
1) Download the PtG Converter application from the LiteShow USB token or from the InFocus
website at: www.infocus.com/support.
2) Once installed, the converter will reside in the MobiShow\MobiShow PtG Converter folder within
Programs.
3) Launch the PtG Converter and the following control panel will display:
4)
5) Click
6) After successfully converting the file, you can use any of the following controls:
PtG Converter will convert the PowerPoint file to a PtG format.
turn off all extended monitors. Only the primary monitor should be active to ensure proper PtG
conversion.
a.
b.
c.
to select and start conversion of the desired PowerPoint presentation.
expands and collapses the preview pane.
plays the selected PtG file.
allows another PtG file to be opened.
Convert
Play
Open Preview
Before clicking
,
48
Page 49

Appendix B: LiteShow Port Map
443
Device -> Client
Video
1041
LiteShow uses the following ports for network traffic. It may be necessary for the network administrator
to configure the network to pass broadcast packets on ports 1047, 1048, and 1049 to enable the
LiteShow application to correctly discover LiteShow modules on a complex network.
Socket Direction Usage Port#
TCP
Command
Client -> Device
Data
3268
389
8080
21
515
UDP
Bi-directional
Broadcast
Device
Discovery
1047
1048
1049
49
Page 50

Appendix C: Configuring LiteShow for Specific
Environments
PC always connects to the same display
PC connect to a limited number of displays
Running LiteShow on a PC where System Folders are locked down by IT
Locking a USB token to a specific Display
Rolling out Custom Configurations to Large Installs
Profiles and Menu Options allow the user/administrator to customize LiteShow startup behavior for
particular situations. Here are some examples:
Create and save a profile for the display. Turn on Auto Profile Connect. Turn off Auto WiFi Connect, if you
will access the display over your normal network connection. Use Auto Change PC Resolution to set a
default action and avoid repetitive startup prompts.
Create and save a profile for each display – use a descriptive name for each profile. Turn off Auto WiFi
Connect, if you will access the display over your normal network connection. Use Auto Change PC
Resolution to set a default action and avoid repetitive startup prompts.
Run LiteShow from the USB token. From the LiteShow menu, select Copy Application to Desktop. Place
the resulting LiteShow4 folder anywhere in your Documents folder structure and put a link to the
LiteShow4.exe program somewhere easy to find. Then run LiteShow from that folder and configure it
normally – LiteShow will store and use configuration information in the startup folder when it is not
installed in the System Program Files structure.
When you run LiteShow from a USB token, it will store and use configuration information in the startup
folder on the USB token. To create a token locked to a specific display, run LiteShow from the token and
follow the same steps as above for “PC always connects to the same display.” Network connect
configuration will be stored on the token and applied at startup. Separate tokens can be configured for
employees and guests to reflect appropriate connection strategies as defined by the administrator.
Rollout using a script which invokes “LiteShow4.exe /VERYSILENT” to cause LiteShow to install without
prompts and exit after install is complete. Use the same script to distribute custom wps.ini (configuration)
and profile.ini (saved profiles) into the <User>\Appdata\LiteShow4 folder. Both .ini files are simple text
files. Username in profile.ini, for example, can be customized by the rollout script.
50
 Loading...