

Page 1
Effective from December 1 2012
This product is serviced exclusively by Prospec Electronics Inc. and must be returned to
Prospec for in and out of warranty repairs. It can not be serviced under warranty by other
Infinity service centers.
For service contact us : 3325 South Morgans Point Road Mt Pleasant SC 29466
Tel 843-849-9037 Fax 843-849-9054
Or visit: prospecelectronics.com
Operation Manual
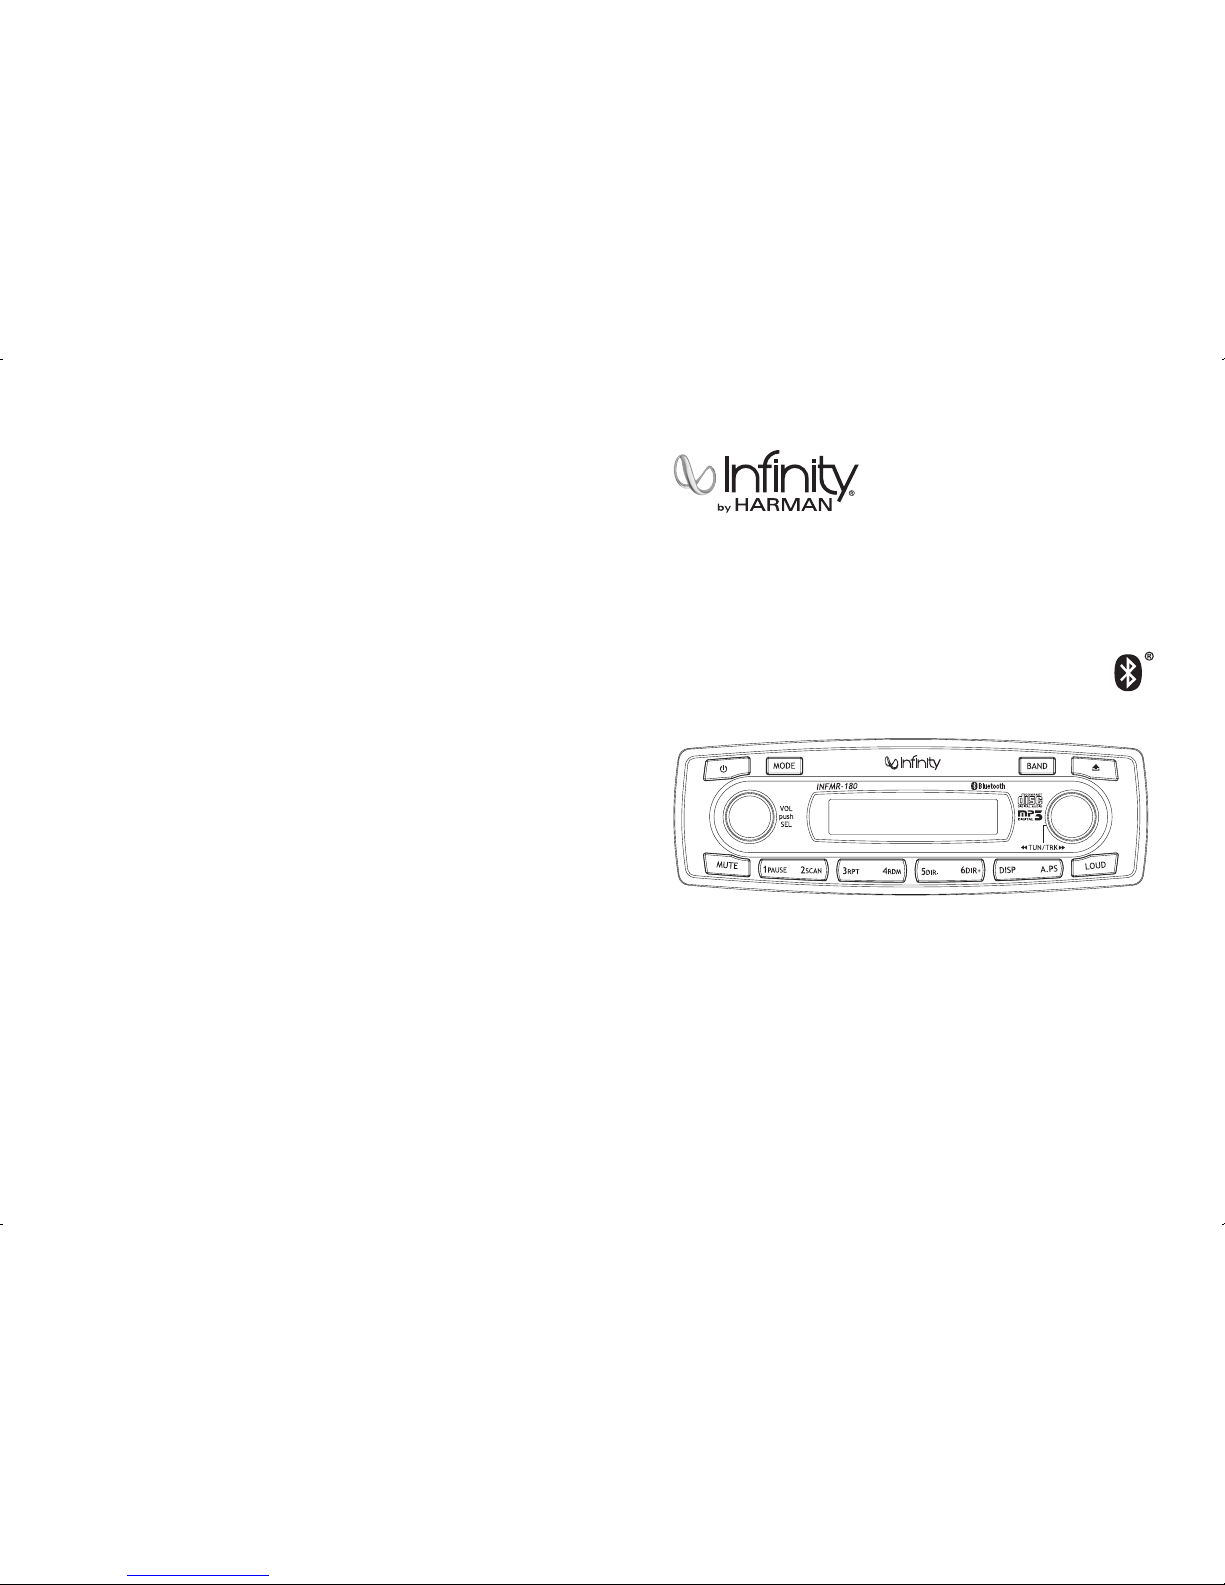
Model No.: INFMR-180
This product is designed and manufactured by Prospec Electronics. Please
contact us for any additional questions.
The Bluetooth logo is owned by the Bluetooth SIG and licensed to Prospec.
Page 2

1
Table of Contents
Table of Contents --------------------------------------------------------------- 1
Product Description ------------------------------------------------------------- 2
Installation ----------------------------------------------------------- 3
Wiring Identification ------------------------------------------------------------ 4
Important Notes ------------------------------------------------------------------ 5
Identification of Controls and Functions ------------------------------------- 6
General Controls ( In Detail ) ------------------------------------------------ 7-9
Radio Operation ----------------------------------------------------------------- 10
Disc Operation -------------------------------------------------------------- 11-12
Bluetooth Operation ----------------------------------------------------------- 13
USB Operation ----------------------------------------------------------------- 13
AUX, RCA, Remote Description -------------------------------------------- 14
Trouble Shooting Guide ------------------------------------------------------- 15
Specifications ------------------------------------------------------------------- 16
16
Specifications
Operation Voltage ------------------------------12 volts DC, Negative Ground
Output Power ----------------------------------- 200 watts maximum
(50wattsx4channels)
Output Impedance ------------------------------ compatible with 4 ~8 ohm speakers
Tuning Range
USAAREA ----------------------------------- FM: 87.5 ~ 107.9MHz. (200KHz step)
AM: 530 ~1710 KHz. (10KHz step)
Sensitivity ---------------------------------------AM: 35 dBu
FM: 10 dBu
FM Stereo Separation -------------------------- 30 dB
CD/USB Frequency Response ----------------- 20 ~20,000 Hz
CD/USB S/N Ratio ----------------------------- 63 dB
CD/USB Channel Separation ------------------ 50 dB
AUX Input Sensitivity ------------------------- 2V (VOLUME STEP 20)
400 and 800mV@10K ohm
Bluetooth --------------------------------------- Version 2.0
Profile ----------------------------------------Advanced Audio Distribution Profile
Audio/Video Remote Control Profile
EUR AREA ----------------------------------- FM: 87.5 ~ 108MHz. (50KHz step)
AM: 522 ~1620 KHz. (9KHz step)
Page 3
2
Product Description
This radiofeatures state ofthe art Bluetoothtechnology allowing musicto wirelessly
stream froman audio sourceto the receiveryou just purchased.Why Bluetooth?
From apractical standpoint, Bluetoothenables your musicdevice (if applicable)to
be placedin a glovebox, your overheadconsole, or evenyour pocket-places thatare
dry-without havingto install aseparate docking station.In addition, Bluetoothaudio
streaming willwork with anyBluetooth enabled device,not just onebrand of media.
Once connected,you can useyour receiver tocontrol your mediadevice and vice
versa! Bluetoothhas a rangeof approximately 30’,depending upon conditions,so
once yourboat is parked,feel free tocontrol the stereothrough your media device!
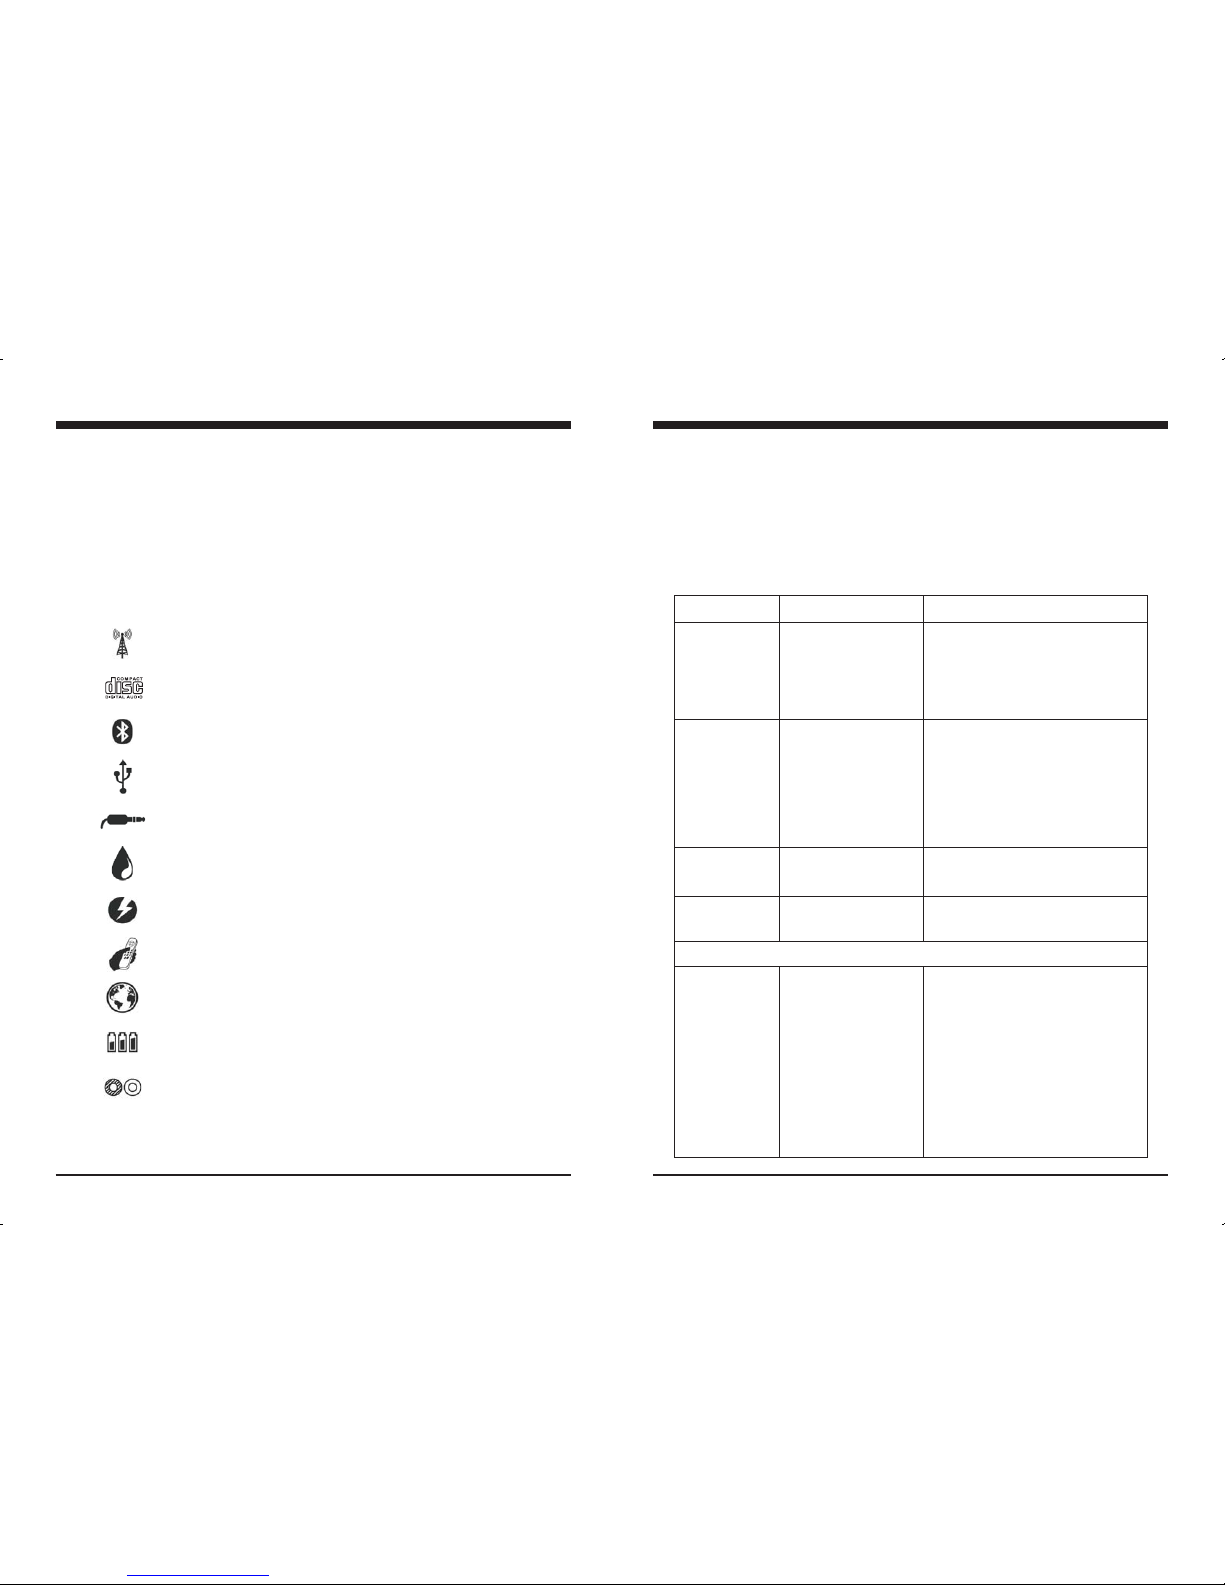
AM/FM
Compact Disc (MP3, WMA)
Bluetooth Audio Streaming
USB input (rear input)
Auxiliary input (rear input)
Waterproof Faceplate
50Wattsx4amplifier
RF remote/wired remote option
U.S. and European tuning
Charging through USB
2 pair of RCA output
15
Trouble shooting Guide
Caution
1. CONNECTOR PINS: Always keep connector pins clean.
If the PIN connector looks dirty, use cotton tips to clean it, so as to avoid any unexpected
malfunction caused by dirt.
2. In many respects, a stereo acts much like a computer and occasionally requires a reboot.
In the unlikely event of product malfunction, a reset can usually fix the issue.
A reset is accomplished by holding the BAND and Preset 1 button simultaneously
until the unit turns off.
Issue
No power
No Sound
No Reception
USB sticknot
reading
Cause
1. Incorrectwiring
2. Fuseis blown
3. Lowbattery voltage
1. Speakerconnection
came loose
2. Badspeaker
3. Outputblown
4. Volume too low on
media device
1. Antenna not firmly
seated insocket
1. Filemust be amp3
or wmafile
Solution
1. Doublecheck wiring
2. Replacefuse
3. Checkvoltage of vehiclebattery
with multimeter. Voltage must
be atleast 11V.
1. Doublecheck connections.
2. Replacebad speaker withknown
good speakerand connect.
3. Sendunit in forrepair.
4. Increasevolume of mediadevice
1. Insertfirmly
1. Convertformat to mp3or wma.
While inBluetooth mode:
No Connection
1. You are not
connected tothe
“Infinity-BT”
address onyour
portable media
device.
2. Outof range
3. The connection is
already inuse.
1. Choose“Infinity-BT”
2. Bringportable media devicecloser
to thereceiver. Device needs to be
within 30’.
3. Ask the person who first pairedto
drop out.
Page 4
3
14
Installation
1. Precautions
2. Mounting angle adjustment
3. Supporting the unit
Choose the mounting location carefully so that the unit will not interfere with the normal
driving functions of the boat.
Avoid installing the unit where it would be subject to high temperature (such as from direct
sunlight or hot air) or where it would be subject to dust, dirt or excessive vibration. Use only
the supplied mounting hardware for a safe and secure installation.
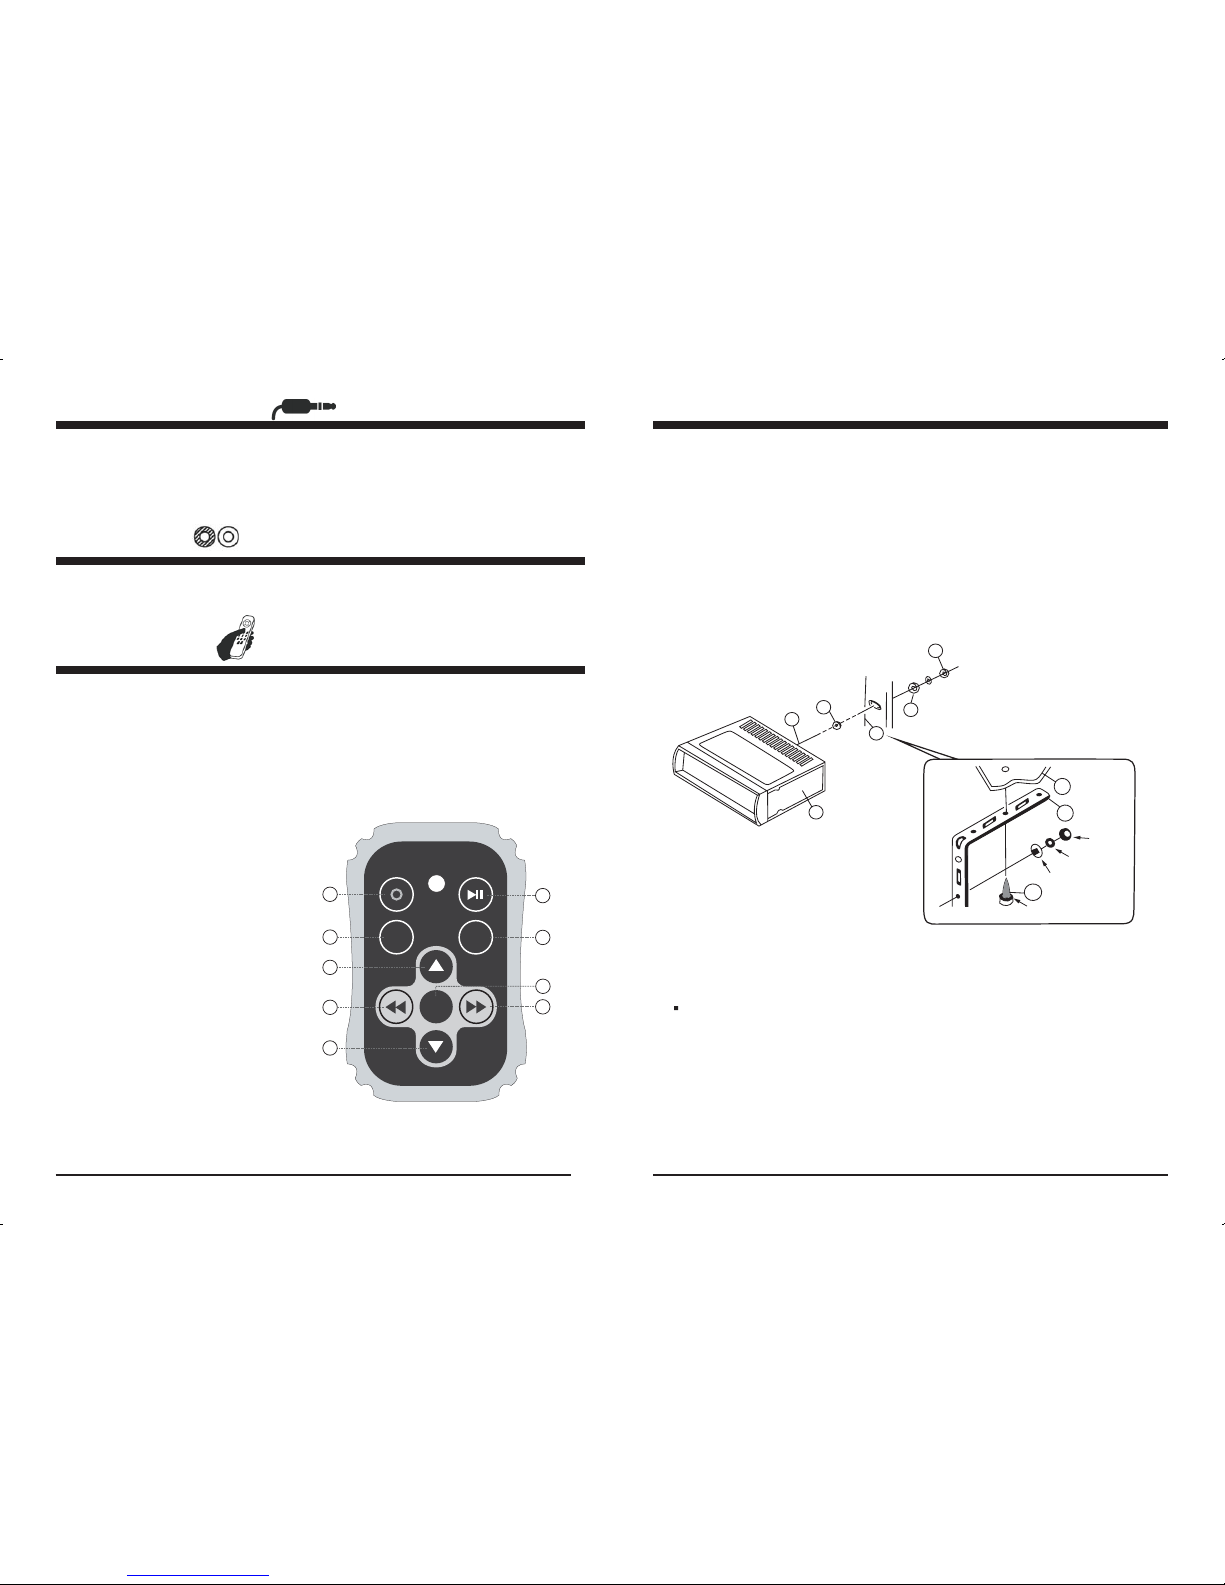
Adjust the mounting angle to less than 20 degrees from the horizontal position. Otherwise,
the unit will skip beyond its intended level.
Failure to support the unit with the back bracket will reduce the life of the unit due to
possible CD mechanism imbalance.
1. UNIT
2. HEX NUT
3. SPRING WASHER
4. PLAIN WASHER
5. BODY
6. REAR SUPPORT STRAP
7. TAPPING SCREW
8. M5 X 20 HEX BOLT
4
1
3
Accessories subject to change without notice.
If the fuse blows, check the power connection and replace the fuse. If the fuse blows
again after the replacement, there may be an internal malfunction. In this case, consult
your nearest dealer.
Use the specified amperage fuse for each lead.
Use of a higher amperage fuse may cause serious damage.
1. Fuse replacement
2. Warning
2
9
6
Spring Washer
5
7
HEX
Spring Washer
Plain Washer
6
A. RFremote option.
This stereowas built withan internal RFreceiver. Simply purchase the associated
transmitter (Prospecpart, MILRF9) tocomplete the option.The RF remote will allow
wireless remoteoperability up to30 feet away.
B. Wired remote.
Proprietary wiredremotes may alsobe used withthis stereo receiver. The two wired
remote optionsare the following:JBLMC20 and MILREM50.
Auxiliary Input Mode
A. Pressthe Mode buttonuntil “AUX” appearson the LCDscreen.
B. The use of auxiliary mode allows you to play theportable musicdevice through
the headphonejack. An auxiliary adaptor will need to bepurchased separately
(Prospec offers part, SEAMINI2).
RCA output
Description: The use of RCAoutputs allow anamplifier or subwooferto be connected.
Remote Option
MILRF9 Function and Name
1. POWER ON/OFF button
2. MODE button
(Radio --> CD --> AUX-IN)
3. CD Play/Pause, Radio BAND button
4. MUTE button
5. VOLUME UP button
6. VOLUME DOWN button
7. TUNE / TRACK DOWN button
8. TUNE / TRACK UP button
9. SEL (select) button
Short push: VOL --> BAS --> TRE -->
BAL --> FAD.
Press and hold: BEEP 2ND --> I-VOL
--> AREA --> DSP.
Open the cover of the back of remote marked Battery.
Place battery as indicated on the back of the remote noting polarity.
* Replacement Battery : Cr2025
How to exchange the battery
MODE
MUTE
TUNE TRACK
VOL
POWER
BAND/PAUSE
SEL
1
2
3
4
5
6
7
8
9
Page 5
(AUTOANT)
( BACK-UP B+ )
( GROUND)
FUSE
( IGNITION B+ )
BLUE
YELLOW
BLACK
RED
GRAY
GRAY/BLACK
VIOLET
VIOLET/BLACK
(FRONT RIGHT)
( REARRIGHT )
GREEN
GREEN/BLACK
WHITE
WHITE/BLACK
( FRONT LEFT)
( REARLEFT )
10A
(USB)
(ANT JACK)
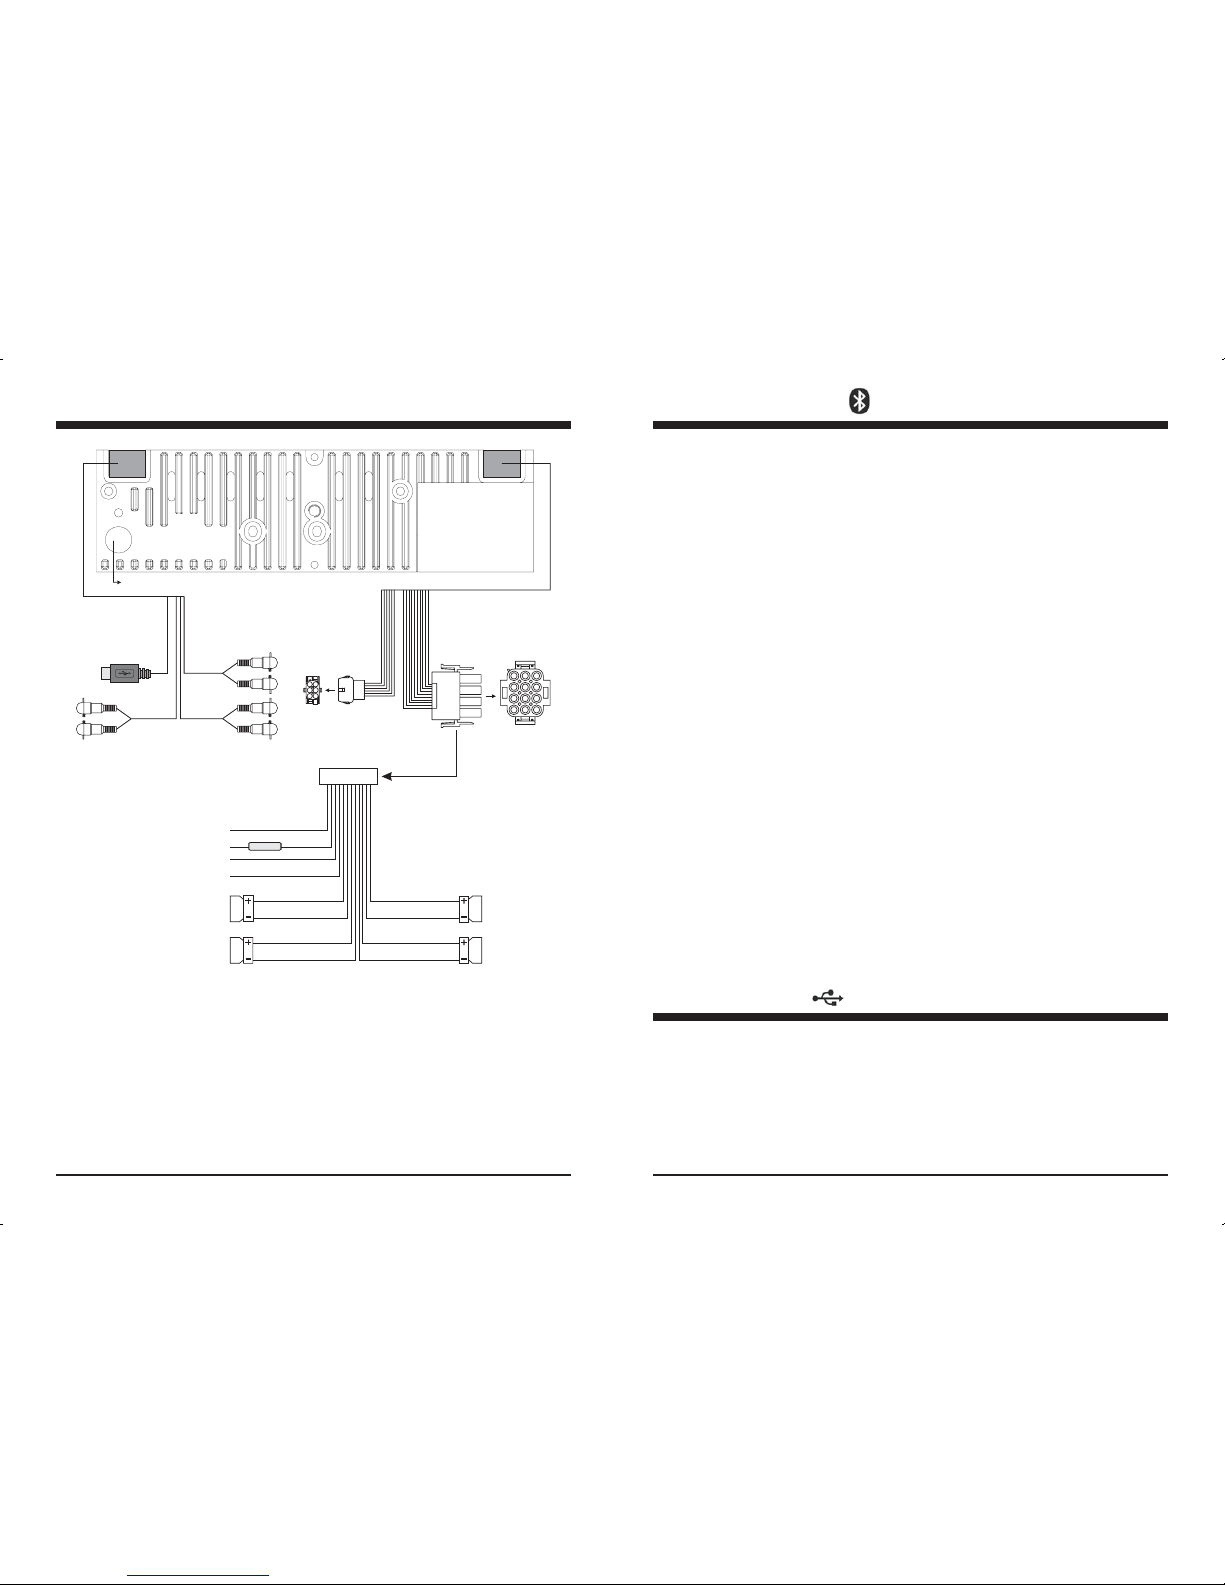
Wiring Identification
12P CONNECTOR
6P REMOTE
CONTROL
13
4
NOTE: When wiring, both the yellow and red lead must be hooked up. The yellow lead
goes to the battery while the preferred method for the red wire is ACC/ignition
power lead.
BLACK
(AUX)
GRAY
(REAR
LINE OUT)
BLACK
(FRONT
LINE OUT)
Bluetooth Operation
Yourmedia device mustincorporate the Bluetoothoption in orderto stream music.
1) Pressand hold MODEbutton for 2seconds on thestereo until Pairingappears
and theBluetooth icon beginsto blink.
2) Next,go to settingson the Bluetoothdevice and turnthe Bluetooth option to “on”.
3) Pickthe “Infinity” optionon your Bluetoothenabled device (pleasenote that
if youare prompted fora password, thecode entered willbe “1234”.
4) Confirmand establish theconnection on yourBluetooth Device. Oncefinished,
it woulddisplay Bluetooth Iconand PAIROK on the display.
5) Ifyou want toexit pairing mode,press MODE buttonbriefly, then it will show
PAIRCLR on the display.
6) Ifthe pairing failed,it would displayPAIR FAIL on the display for3 seconds.
- EachBluetooth Device hasa distinct menuso you mayneed to refer to your
manufacture’s instruction for the correct procedure onhow to connect a new
Bluetooth device.
- Pleaseretry pairing instructionsif Infinity doesnot appear onyour Bluetooth
Device.
1) When pairing between the stereo and bluetooth device occurs, the Bluetooth
icon willstay constant.
2) To disconnectBluetooth Link
While inBT MUSIC mode, press and hold MODE button for 2 seconds to
disconnect theBluetooth Link.
3) To connectthe Bluetooth Link
Press Preset4 button tore-connect the lastpaired Bluetooth Deviceautomatically.
1) Oncesuccessful connection occurs,in most cases,the music willplay
automatically. In rare cases, youmay have to activate the play function on the
media devicefirst.
2) DuringBT Music playing, you could select the previous or next track byturning
TRK knob(5) on theStereo or operatevia your BluetoothDevice.
1. Pairingyour Stereo and Bluetooth Device (must be in Bluetooth mode)
NOTE:
2. Bluetooth.Connect/Disconnect.
3. Listeningto Bluetooth Music
USB Operation
1. USB Playback
2. USB Function
AlloftheUSBfileplaybackfunctionissameasMP3Discfunction.
Please refer to page 11~12 on how to use possible function for USB file playback.
With a USB stick connected, press MODE button (3) to select USB mode.
Note: The music in the USB stick must be of mp3 or wma format.
The USB drive is for USB drives only. Do not attempt to hook up any other
portable media forms as they will notbe recognized.
Page 6
5
Important notes
Connecting the Speakers and Power Cables
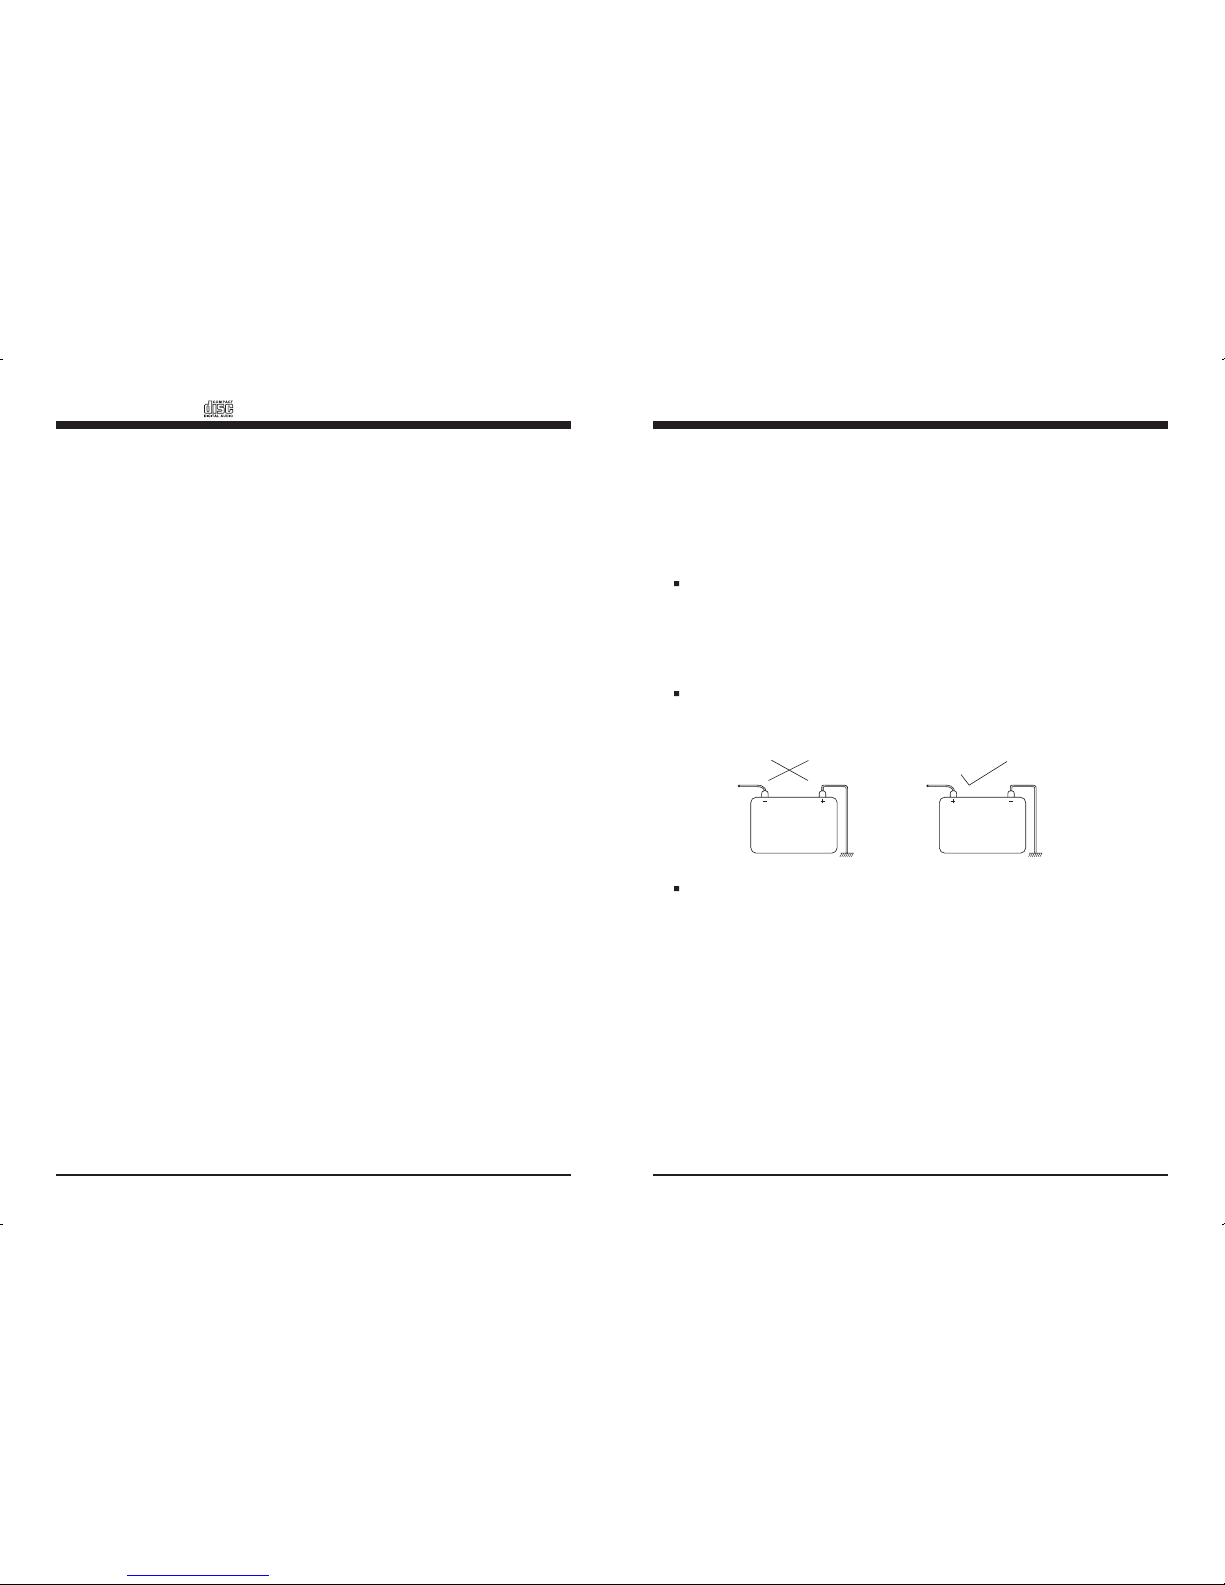
Before you wire your system, disconnect your boat battery's positive (+) cable.
This helps prevent damage in case of a short. When you complete the wiring,
reconnect the battery cable and test your marine stereo. When connecting your
marine stereo's black ground wire, be sure to connect the wire to a metal part of
your boat or preferably to the negative (-) terminal of the boat battery.
POSITIVE
CHASSIS
NEGATIVE
CHASSIS
Prior to the final installation, perform a sound check. If high distortion or intermittent
sound is experienced, it is possible that the wiring from the receiver to the boat's electrical
system is poor or that the battery needs recharging.
If the battery and its charging circuit are OK, then rewire the yellow fused wire of the
player directly to the positive terminal (+) of the boat battery.
Marine accessory shops stock the connector blocks and the 10 Amp cable that may
be necessary for extending the fuse wire connection.
Make sure that the black wire on the wiring harness is connected to a good ground
point on the boat. If the chassis of the boat is used as a grounding point, make sure
that the surface is scraped clean of paint before attaching the wire to it.
It is preferable to connect the black ground wire directly to negative terminal (-) of
the boat battery.
This model is only suitable for use in boats which have a Negative ground system,
e. g. : the negative terminal of the boat battery is connected to the chassis.
Grounding
Warning: polarity...
12
Disc Operation
4. Repeat play button (10)
Note:
5. Random play button (11)
Note:
6. Directory UP or Down button (12, 13)
Short push RPT button to play the current track repeatedly. Press and hold RPT for 2
seconds to play all the tracks in current directory repeatedly. Simply push RPT button
again to return to normal play mode.
The press and hold function is only available for MP3/WMA playing mode.
Short push RDM button to play all the tracks in the disc in a random sequence. Press
and hold RDM for 2 seconds to play all the tracks in current directory randomly. Simply
push RDM button again to return to normal play mode.
The press and hold function is only available for MP3/WMA playing mode.
Simply push the Directory UP or Down button to select the next or previous directory.
If it does not contain directories, it would play the track at 10- file when you push DIRbutton (12), and play the track at 10+ file when you push DIR+ button (13).
7. ID3 Display button (14)
8. Track Up or Down button (5)
9. Directory Search button (15)
While a MP3 or WMA track is playing, pushing DISP button (14) repeatedly to display
the ID3 information in a sequence of:
TITLE --> FILE --> ARTIST --> ALBUM --> CLOCK --> ELAPSE TIME.
Turn TRK knob (5) clockwise or counter-clockwise to select the next or previous track.
Push TRK knob (5), it would display SEARCH ON, then turn TRK knob (5) clockwise
to go fast forward and turn TRK knob (5) counter-clockwise to rewind the track. At the
desired location, push TRK knob (5) once again, it would display SEARCH OFF and
begin to play the track.
Press A.PS button (15) to enter Directory search mode, then turn TRK knob (5) to search
the directory upward or downward in one directory step. At your desired directory, press
A.PS button (15) to confirm your selection. Then search sub-directory and track by turning
TRK knob (5) and confirm by pushing A.PS button (15) until you select the track you
desired, push A.PS button (15) to play the track.
Page 7
6
Identification of controls and functions
11
13
3
5
2
4
1
7
6
15
16
8
9
10
11
12
14
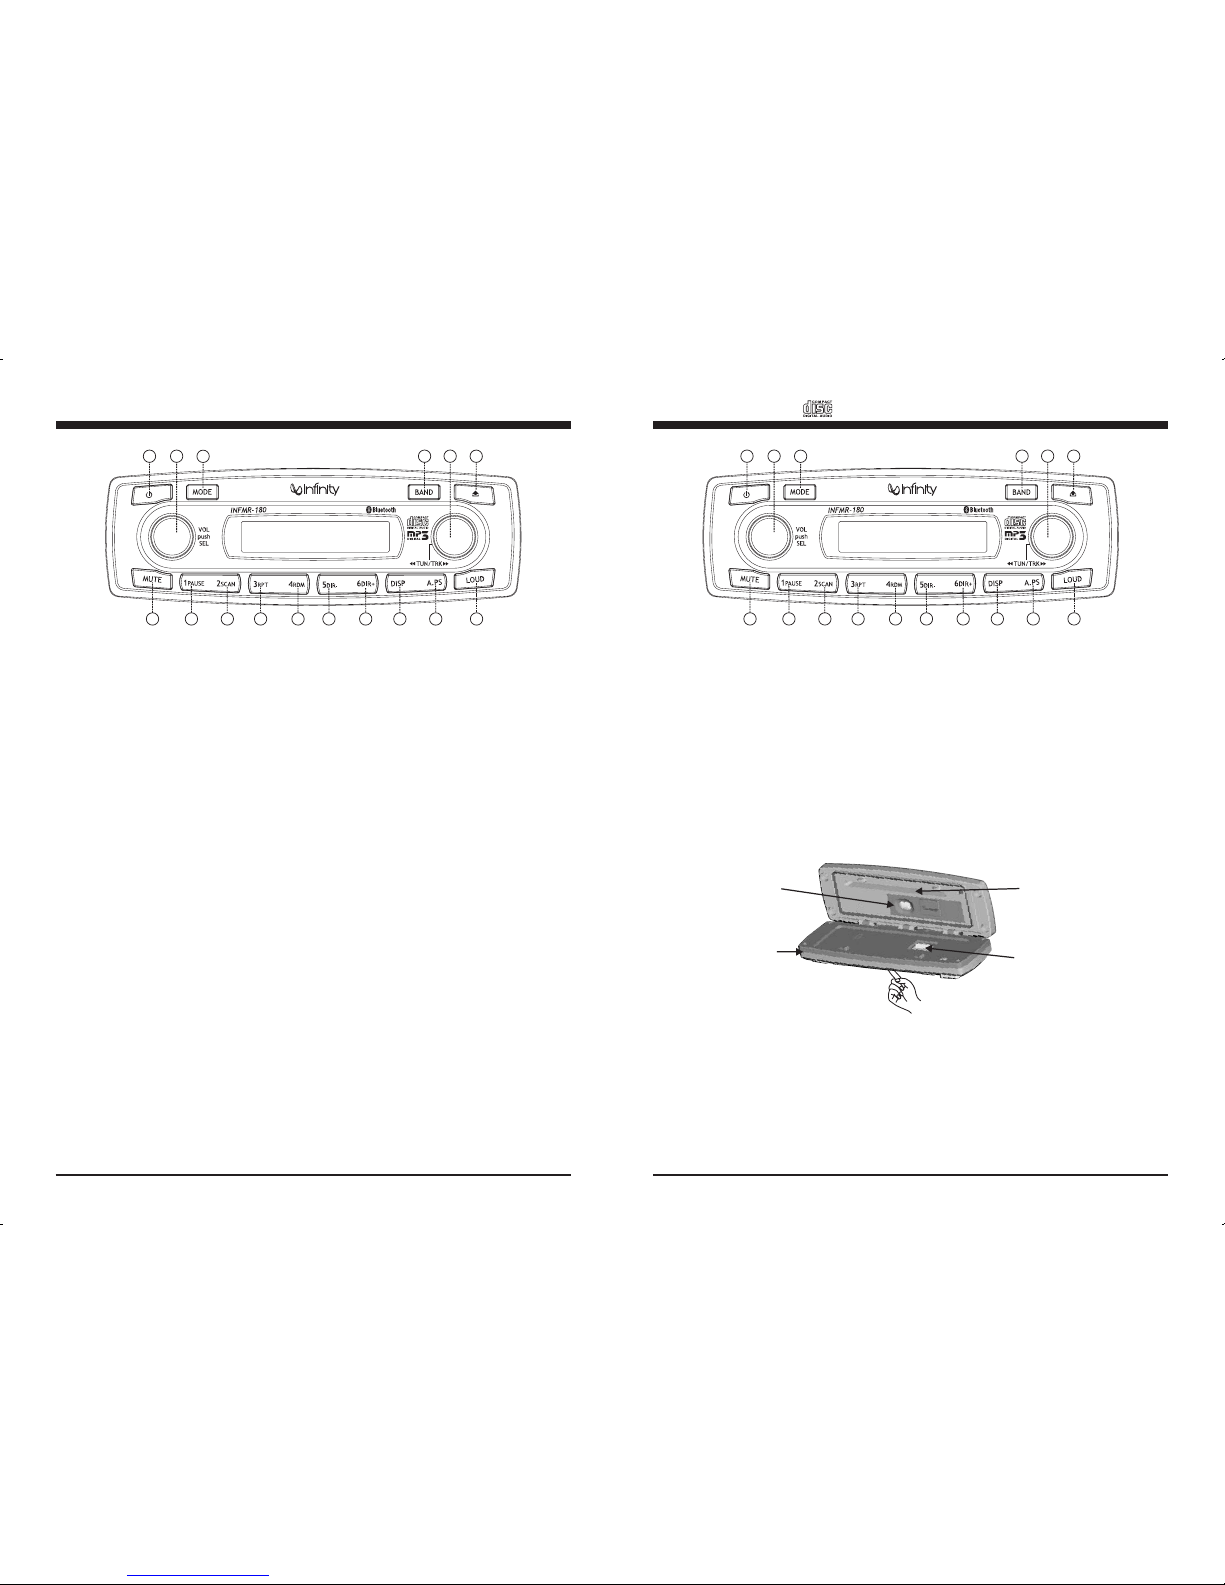
1. POWER ON / OFF button
2. Turn VOL knob, Push SEL button
3. MODE button (RADIO --> CD --> USB --> AUX --> BT MUSIC)
4. BAND button (FM1 --> FM2 --> FM3 --> AM1 --> AM2)
5. Turn TUNE UP/DOWN, TRACK UP/DOWN button
6. Faceplate Release button
7. Audio MUTE button
8. Radio Preset 1 button, Track play / pause button
9. Radio Preset 2 button, Track Intro Scan button
10. Radio Preset 3 button, Track Repeat Play button
11. Radio Preset 4 button, Track Random Play button
12. Radio Preset 5 button, Directory Down button
13. Radio Preset 6 button, Directory Up button
14. DISP (display) button
15. A/PS - FM/AM Auto Preset Scan button
16. LOUD (loudness) button
Disc Operation
1. Loading a CD
2.
3. Play / Pause (8)
3. Intro Scan button (9)
Note:
Open the door by pushing the Faceplate Release button (6).
Insert a CD label side up into the slot opening, push the front panel backward to the
front plate. A noticeable "click" sound will be heard, resulting in a properly closed unit.
The CD will begin playing automatically after it is loaded.
or the
transit screws have not yet been removed.
If the unit has become extremely hot we strongly recommend that you allow it to
cool down before using.
Take care of your CDs to preserve the quality of the recording. Do not allow them
to be exposed to direct sunlight. Store them in a place protected from dirt and dust
and avoid handling them with oily, greasy or wet hands.
With a disc inside, simply select the by pressing the in sequence.
Push this button to Pause playback. Push it again to resume playback.
Short push SCAN to hear the first 10 seconds of each track in the disc. Press and hold
SCAN for 2 seconds to hear the first 10 seconds of each track in current directory. Simply
push SCAN again to return to normal play mode.
The press and hold function is only available for MP3/WMA playing mode.
CD button (3)MODE
Notes:
- NEVER insert foreign objects into the CD slot opening.
- If a CD is difficult to insert, there may already be a CD loaded in the unit
-
-
CD slot
Connector pin
Front panel
CD eject button
13
3
5
2
4
1
7
6
15
16
8
9
10
11
12
14
Page 8
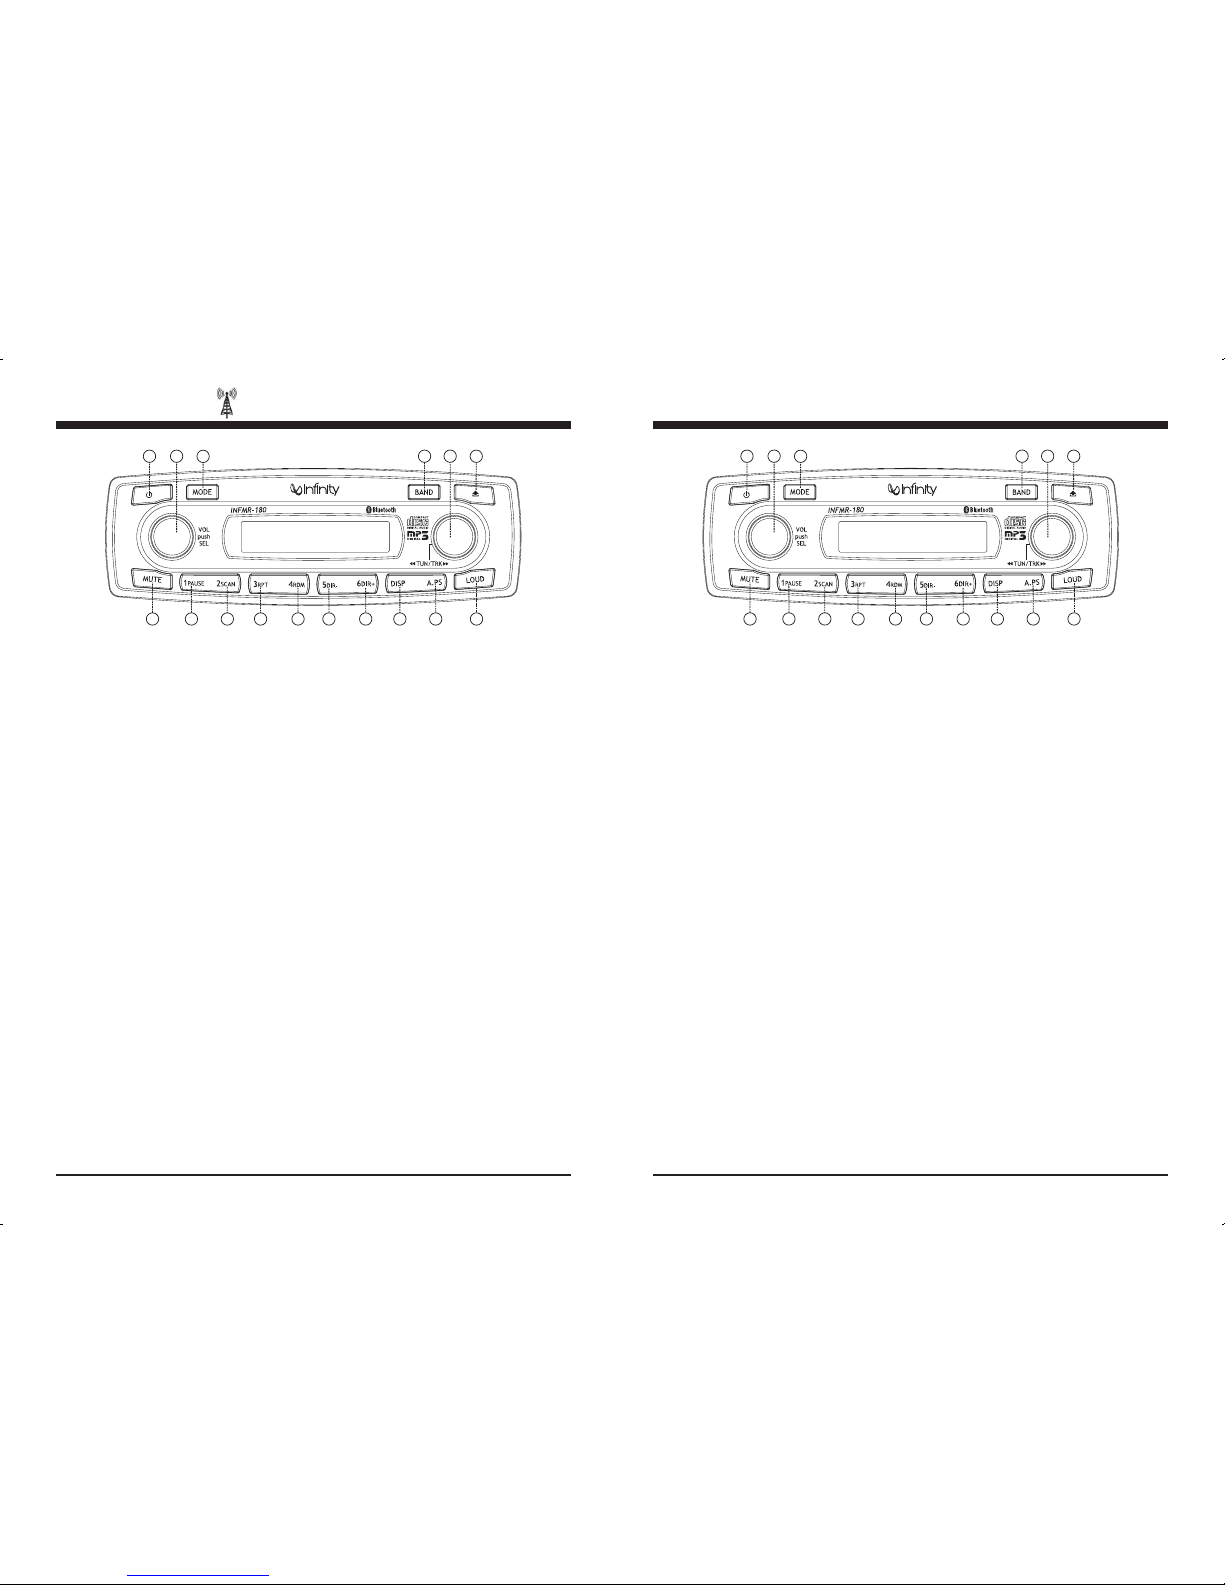
1. POWER ON/OFF button (1)
2. SELECT button (2)
2-1 Audio control ( VOLUME / BASS / TREBLE / BALANCE / FADER )
a. BASS Control
b. TREBLE Control
c. BALANCE Control
Simply press the Power button (1) to turn the unit on and off.
If the key or one of the
keys is not pressed within 5 seconds, the radio automatically switches into volume
control mode.
To adjust the bass tone level, first select the bass mode by pressing button (2) until BASS
appears on the display panel. Turn VOL knob (2) within 5 seconds to adjust the bass level
as desired. The bass level will be shown on the display panel from a minimum of BASS -7
to a maximum of BASS +7
To adjust the treble tone level, first select the treble mode by pressing button (2) until
TREBLE appears on the display panel. Turn VOL knob (2) within 5 seconds to adjust
the treble level as desired. The treble level will be shown on the display panel from a
minimum of TREBLE -7 to a maximum of TREBLE +7
To adjust the left-right speaker balance, first select the balance mode by pressing button
(2) until BALANCE appears on the display panel. Turn VOL knob (2) within 5 seconds
to adjust the left-rear speaker level as desired. The balance position will be shown by the
bars on the display panel from BALANCE L10 (full left) to BALANCE R10 (full right).
Press SEL button (2) repeatedly to select the desired mode in the following order:
At each feature, turn VOL knob (2) to adjust to the desired level.
Please note that if an EQ setting is chosen, then you will not be able to access BASS and
TREBLE functions. This is because the stereo has pre-chosen those levels for you. You
may adjust BASS and TREBLE if EQ is in the OFF position.
.
.
BASS --> TREBLE --> BALANCE --> FADER--> EQ
General Controls (In Detail)
7
13
3
5
2
4
1
7
6
15
16
8
9
10
11
12
14
10
Radio Operation
1. Radio Operation
2. To Select Band
3. Auto / Manual tuning button (5)
4. Manual Station store
5. A.PS - Auto Store function (15)
Press MODE button (3) to select Radio mode. Station frequency is indicated on display.
Press BAND button (4) to toggle through radio modes as follows:
FM1 --> FM2 --> FM3 --> AM1 --> AM2 --> FM1.
Simply turn TUNE knob (5) to activate the Auto Tune mode. It will automatically tune
up or down the wave band and stop at the next station of sufficient signal strength.
Press TUNE button (5) to enter manual tuning mode. It would display MANUAL on the
LCD, then turn TUNE knob (5) to tune a station by step. The unit will revert back to
Auto Tune mode after 5 seconds without use.
Select the desired band and tune to a radio station to be memorized. Choose the preset
button memory location span 1-6 into which the station is to be stored and press and
hold that preset button for 2 seconds.
The station will now be entered into the preset memory. 6 stations can be memorized
on each of the FM1, FM2, FM3, AM1, AM2 bands.
In Radio mode, press A.PS button (15) to scan the preset stations in each band. It would
play each preset station for about 5 seconds. At the desired station press A.PS button
again to stop scanning.
Press and hold A.PS button (15) for approximately 2 seconds until you hear a beep which
confirms the memory function is engaged. The unit will SEARCH for six strong stations
and automatically store them on buttons1-6.(FM/AM only)
You can override the preset station on any button by manually setting a new frequency.
13
3
5
2
4
1
7
6
15
16
8
9
10
11
12
14
Page 9

General Controls (In Detail) Continued
To adjust the front-rear speaker balance, first select the fader mode by pressing button (2)
until FADER appears on the display panel. Turn VOL knob (2) within 5 seconds to adjust
the front-rear speaker level as desired. The fader position will be shown by the bars on the
display panel from FADER F10 (full front) to FADER R10 (full rear).
To adjust the EQ selection, first select the EQ mode by pressing button (2) until EQ
appears on the display panel. Turn VOL knob (2) within 5 seconds to select an equalizer
curve from 4 music types (FLAT, CLASSIC, POP, ROCK).
EQ OFF : Cancel the sound feature.
FLAT : Normal operation mode.
CLASSIC : For the dramatic depth of classical music in an auditorium.
POP : For the electric excitement of stadium pop.
ROCK : For the subtle extension of the music.
When the SEL button (2) is held over 2 seconds, the unit will
I-VOL is the volume level the unit will play To adjust
the I-VOL level, first select the I-VOL mode by pressing button (2) until I-VOL appears
on the display panel. Turn VOL knob (2) within 5 seconds to adjust the I-VOL level
from a minimum of I-VOL 00 to a maximum of I-VOL 45. This feature controls the max
volume level desired when powering the unit on.
To adjust the area selection, first select the area mode by pressing button (2) until AREA
appears on the display panel. Turn VOL knob (2) within 5 seconds to select between EUR
and USA.
To adjust the beep mode, first select the beep mode by pressing button (2) until BEEP
appears on the display panel. Turn VOL knob (2) within 5 seconds to select between
BEEP 2ND, BEEP ON, and BEEP OFF. Select BEEP 2ND when you wish to hear BEEP
sound whenever any button is pressed for more than 2 seconds. Select BEEP ON when
you wish to hear BEEP sound whenever any button is pressed. Select BEEP OFF then
no beep sound would be heard.
d. FADER Control
e. EQ Control
a. I-VOL Control
b. AREA Control
c. BEEP Control
enter into a submenu.
Once entered, a single press of the SEL button will result in the following functions:
when the unit is first turned on.
This unit also incorporates memory
retention. For example, if you power the boat off at volume 45 and your initial volume
setting was at 30, the unit will turn back on at 30. If however, you power the boat off at
volume 15 and your initial volume setting was at 30, the unit will turn on at 15. The unit
will always remember the lowest volume as a way of protecting your hearing.
2-2. I-VOL, AREA, BEEP 2ND Selection
I-VOL --> AREA --> BEEP 2ND
8
9
Simply turn the spindle knob (2) to increase or decrease volume. Current volume setting
is briefly indicated on the display panel from 00 to 45.
Press MODE button (3) to cycle through available program sources as follows:
RADIO --> CD --> USB --> AUX --> BT MUSIC.
In Radio mode, press DIS button (14) once to display the time.
A. Press and hold the DIS (14) button until time flashes on the display.
B. Turn VOL knob (2) clockwise to set hour.
C. Turn VOL knob (2) counter-clockwise to set minute.
D. Press the DIS (14) button again quickly to accept the adjusted time.
If no button is pressed within 5 seconds, then the unit would automatically accept
the adjusted time without further intervention from the user.
When listening to music at low volume levels, this feature will boost the bass and treble
response. This action will compensate for the reduction in bass and treble performance
experienced at low volume. Press the LOUD button (16) once to turn LOUD ON, LOUD
icon would appear on the display panel. Press the LOUD button (16) once again to turn
LOUD OFF, and LOUD icon would disappear from display panel.
3. VOLUME Control (2)
4. MODE Selection (3)
6. CLOCK/TIME Adjustment
7. LOUD Control
Note:
5. MUTE button (7)
A valid USB drive must be inserted into the USB port in order for that mode to appear.
Simply press MUTE button (7) to mute sound output. Press it again to resume sound output.
Controls (In Detail) Continued
 Loading...