

Page 1

2015 Infiniti QX70
Quick Reference Guide
Page 2
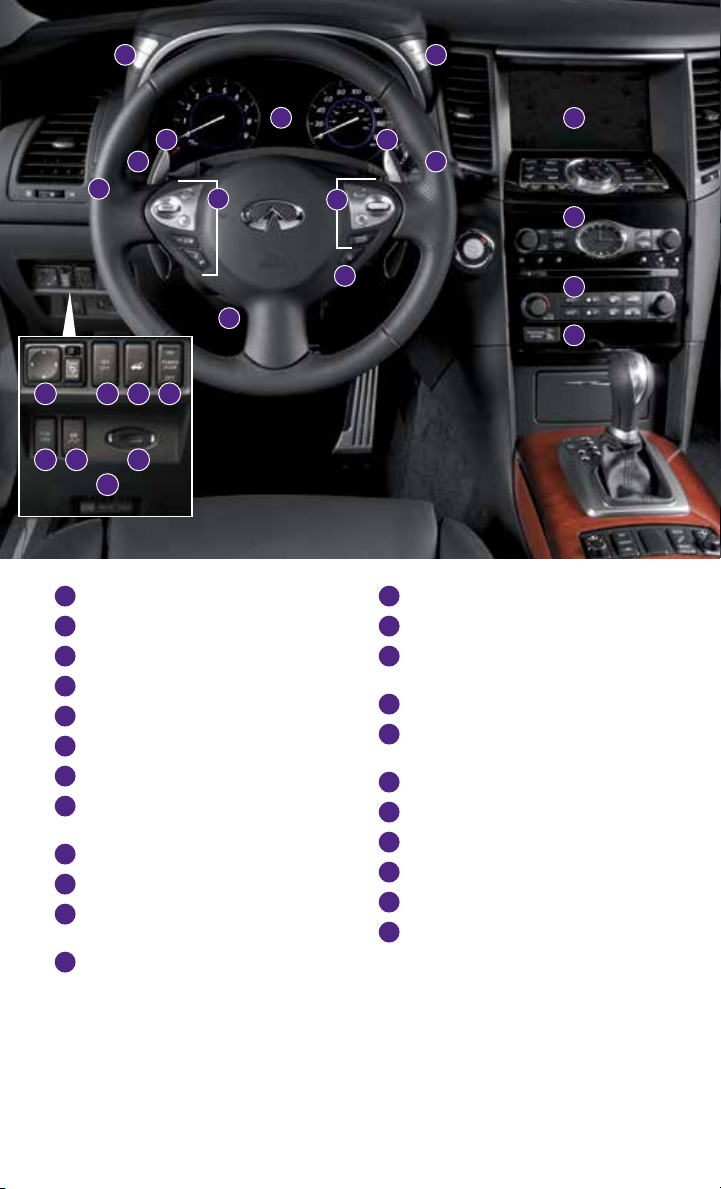
1
2
4
7
Behind
steering
wheel
Behind
steering
wheel
8
15
On steering
column
10
16 17
11 12 13
18
19
INSTRUMENT BRIGHTNESS CONTROL*
1
TRIP COMPUTER SWITCHES
2
LOW TIRE PRESSURE WARNING LIGHT
3
PADDLE SHIFTERS*
4
HEADLIGHT AND TURN SIGNAL CONTROL
5
WINDSHIELD WIPER AND WASHER SWITCH
6
TRIP A/B RESET SWITCH*
7
STEERING WHEEL SWITCHES FOR
8
AUDIO* / BLUETOOTH
INTELLIGENT CRUISE CONTROL
9
OUTSIDE MIRROR CONTROL SWITCH
10
INTELLIGENT BRAKE ASSIST (IBA)
11
®
/ NAVIGATION
OFF SWITCH*
POWER LIFTGATE SWITCH
12
3
20
4
65
Behind
steering
9
wheel
21
14
22
23
POWER LIFTGATE MAIN SWITCH
13
DYNAMIC DRIVER ASSISTANCE SWITCH*
14
TILT / TELESCOPIC STEERING
15
WHEEL SWITCH*
WARNING SYSTEMS SWITCH*
16
VEHICLE DYNAMIC CONTROL (VDC)
17
OFF SWITCH*
INTELLIGENT KEY PORT*
18
HOOD RELEASE*
19
CONTROL PANEL DISPLAY SCREEN*
20
AUDIO SYSTEM
21
AUTOMATIC CLIMATE CONTROLS
22
FRONT PASSENGER AIR BAG
23
STATUS LIGHT*
*See your Owner’s Manual for information.
Page 3
new system features
Around View® Monitor (AVM) with Moving Object Detection (MOD)
(if so equipped) ................................................2
Lane Departure Prevention (LDP) System (if so equipped) ..............3
Garage Mode System............................................3
essential information
Tire Pressure Monitoring System (TPMS) ............................4
Loose Fuel Cap .................................................4
Fuel-filler Door .................................................5
Front Armrest/Center Console Storage Box ..........................5
Clock Set/Adjustment (Type A) ....................................5
first drive features
INFINITI Intelligent Key System ...................................6
Power Liftgate..................................................7
Power Seat Adjustments .........................................7
table of contents
Automatic Drive Positioner (if so equipped) .........................8
Outside Mirror Control Switch.....................................8
Starting/Stopping the Engine .....................................9
Headlight Control Switch.........................................9
Windshield Wiper and Washer Switch .............................10
Automatic Climate Controls......................................11
FM/AM/SiriusXM® Satellite Radio with CD/DVD Player
(with Navigation System – if so equipped) .........................13
USB/iPod® Interface ...........................................14
Conventional (Fixed Speed) Cruise Control .........................14
Intelligent Cruise Control (ICC) System (if so equipped) ..............15
Power Outlets.................................................16
system guide
Trip Computer ................................................17
Bluetooth® Hands-free Phone System .............................18
System Operating Tips .......................................18
Bluetooth® System with Navigation (if so equipped) .................18
Bluetooth® System without Navigation (if so equipped) ..............20
Navigation System (if so equipped) ...............................22
DVD Player (if so equipped)......................................23
HomeLink® Universal Transceiver.................................24
Please see your Owner’s Manual for important safety information
and system operation limitations.
• A cellular telephone should not be used for any purpose while
driving so full attention may be given to vehicle operation.
• Always wear your seat belt.
• Supplemental air bags do not replace proper seat belt usage.
• Children 12 and under should always ride in the rear seat properly
secured in child restraints or seat belts according to their age
and weight.
• Do not drink and drive.
For more information, refer to the “Safety –– Seats, seat belts and
supplemental restraint system (section 1)”, “Monitor, climate,
audio, phone and voice recognition systems (section 4)” and the
“Starting and driving (section 5)” of your Owner’s Manual.
Additional information about your vehicle is also available in your Owner’s
Manual, Navigation System Owner’s Manual and at www.InfinitiUSA.com.
To view detailed
instructional videos, go to
www.infinitiownersinfo.mobi/2015/qx70
or snap this barcode with an
appropriate barcode reader.
Page 4
new system features
Around View® Monitor (AVM) with Moving Object Detection (MOD)
(if so equipped)
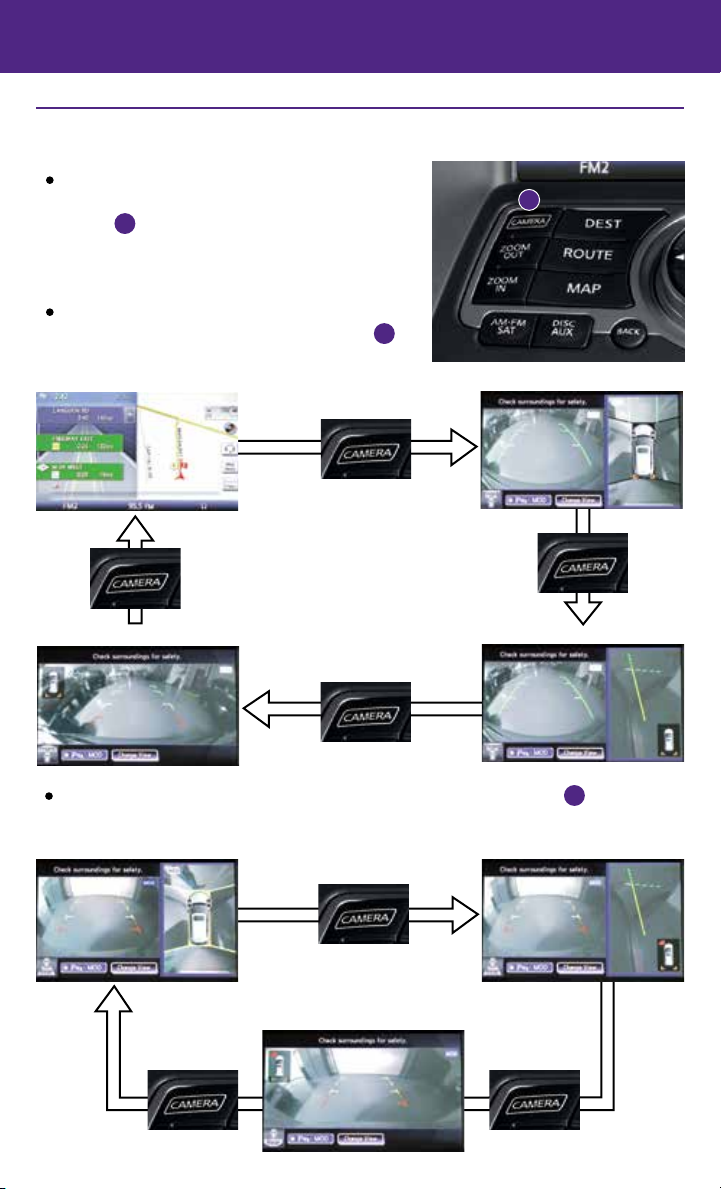
With the ignition switch in the ON position, the Around
View® Monitor is activated by pressing the CAMERA
1
button
, located on the control panel, or by moving
the shift lever to the R (REVERSE) position. The control
panel displays various views of the position of
the vehicle.
When the shift lever is in the P (PARK), N (NEUTRAL)
or D (DRIVE) position and the CAMERA button
pressed, the following views will display in order:
Start from any Control Panel screen
Press
1
is
1
Front view & bird’s-eye view
Press
Front wide view
Press
When the shift lever is in the R (REVERSE) position and the CAMERA button
the following views will display in order:
Rear view & bird’s-eye view
Press
Rear wide view
Press
Front view & front-side view
is pressed,
1
Rear view & front-side view
PressPress
2
Page 5
For information regarding how to access additional viewing cycles, please see your
Owner’s Manual.
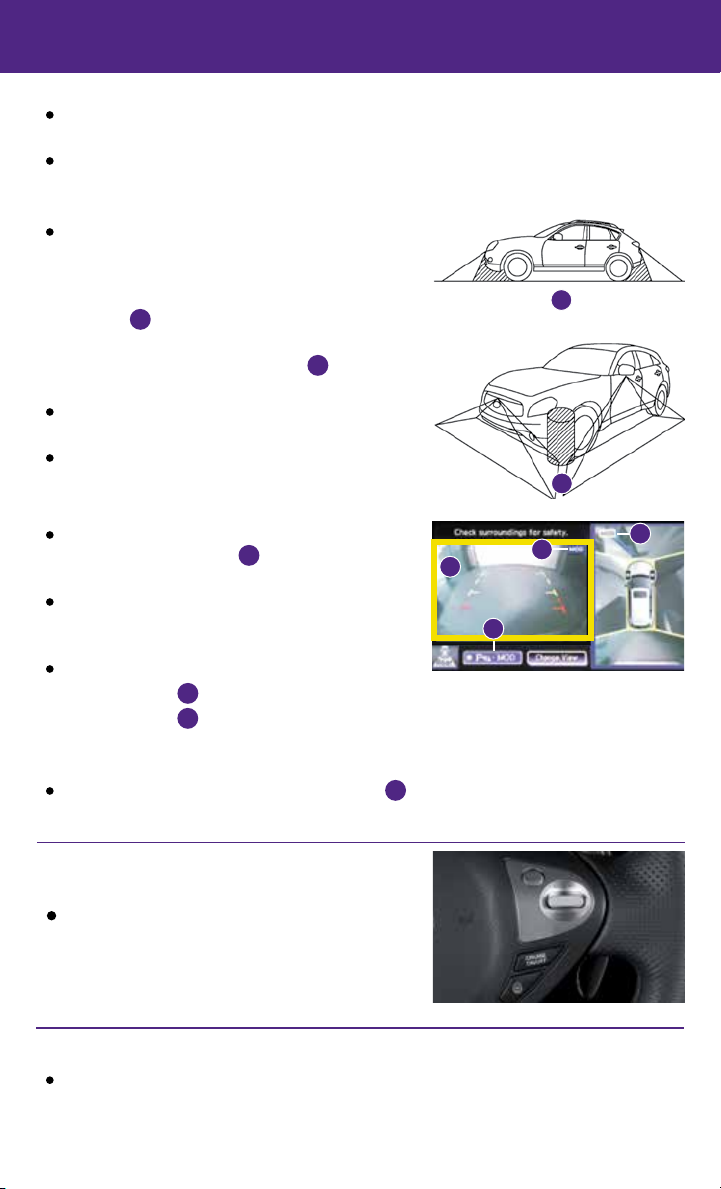
The colored guide lines on the display screen indicate vehicle width and approximate distances
to objects with reference to the vehicle body line.
• Red 1.5 ft (0.5 m); Yellow 3 ft (1 m); Green 7 ft (2 m) and 10 ft (3 m).
There are some areas where the system will not
show objects.
• When in the front or the rear view display, an object
below the bumper or on the ground may not be
2
viewed
.
2
• When in the bird’s-eye view, a tall object near the
seam of the camera viewing areas
3
will not
appear in the monitor.
The distance between objects viewed on the AVM
differs from the actual distance.
Objects in the bird’s-eye view will appear further than
the actual distance.
3
MOVING OBJECT DETECTION (MOD)
If the MOD system detects moving objects surrounding
the vehicle, a yellow frame
1
will be displayed on the
camera image and a chime will sound.
In the bird’s-eye view, a yellow frame is displayed on
those camera images (front, rear, right, left) where
moving objects are detected.
When the following are displayed:
• Blue MOD icon
• Gray MOD icon
2
: the system is operative in this view.
3
: the system is not operative in this view.
1
2
4
04
3
• No MOD icon: the system is off. The indicator will also be off if all of the warning systems are
deactivated using the camera settings menu.
To temporarily turn the system on or off, touch the
For more information, refer to the “Monitor, climate, audio, phone and voice recognition systems (section 4)” of your Owner’s Manual.
4
key.
Lane Departure Prevention (LDP) System
(if so equipped)
This system will help you return the vehicle to the center
of the traveling lane by applying brake control to the left
or right wheels individually (for a short period of time).
For more information, refer to the “Starting and driving (section 5)” of your
Owner’s Manual.
Garage Mode System
Your vehicle’s power liftgate operation can be set to stop opening at a user-selected position
in order to help avoid damaging the liftgate or overhead objects.
For more information, refer to the “Pre-driving checks and adjustments (section 3)” of your Owner’s Manual.
3
Page 6
essential information
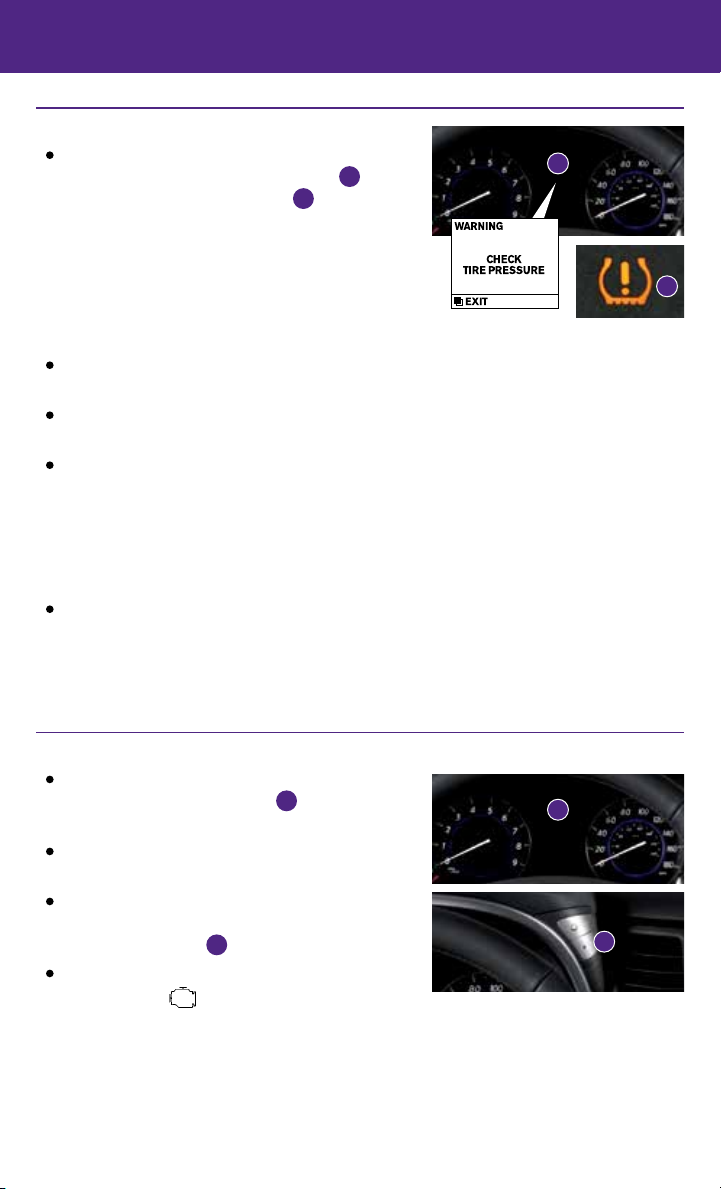
Tire Pressure Monitoring System (TPMS)
A CHECK TIRE PRESSURE warning message will
appear in the vehicle information display
the low tire pressure warning light
when one or more tires are low in pressure and air
is needed.
• The tire pressures should be checked when the tires
are cold. The tires are considered cold after the
vehicle has been parked for 3 hours or more or
driven less than 1 mi (1.6 km) at moderate speeds.
After tire pressures are adjusted, drive the vehicle at speeds above 16 MPH (25 km/h). The
CHECK TIRE PRESSURE warning message and low tire pressure warning light will extinguish.
When the low tire pressure warning light flashes for 1 minute and then remains on, the TPMS
is not functioning properly. Have the system checked by an INFINITI retailer.
Tire pressure rises and falls depending on the heat caused by the vehicle’s operation and the
outside temperature. Low outside temperature can lower the temperature of the air inside
the tire, which can cause a lower tire inflation pressure. This may cause the low tire pressure
warning light to illuminate. If the warning light illuminates, check the tire pressure in your tires.
• Check the tire pressure (including the spare tire) often and always prior to long
distance trips.
The Tire and Loading Information label contains valuable information. Please refer to
“Technical and consumer information (section 9)”, in your Owner’s Manual for the location of
the Tire and Loading Information label.
For more information, refer to the “Instruments and controls (section 2)”, the “Starting and driving (section 5)” and the
“Maintenance and do-it-yourself (section 8)” of your Owner’s Manual.
2
and
1
will illuminate
1
2
Loose Fuel Cap
A LOOSE FUEL CAP warning message will appear in
the vehicle information display
filler cap is not tightened correctly.
To tighten, turn the cap clockwise until a single click
is heard.
The warning message will extinguish when the
vehicle detects the fuel-filler cap is properly tightened
and the reset button
If the cap is not properly tightened, the Malfunction
Indicator Light may illuminate.
For more information, refer to the “Instruments and controls (section 2)” and the “Pre-driving checks and adjustments (section 3)”
of your Owner’s Manual.
4
2
is pressed.
when the fuel-
1
1
2
Page 7
Fuel-filler Door
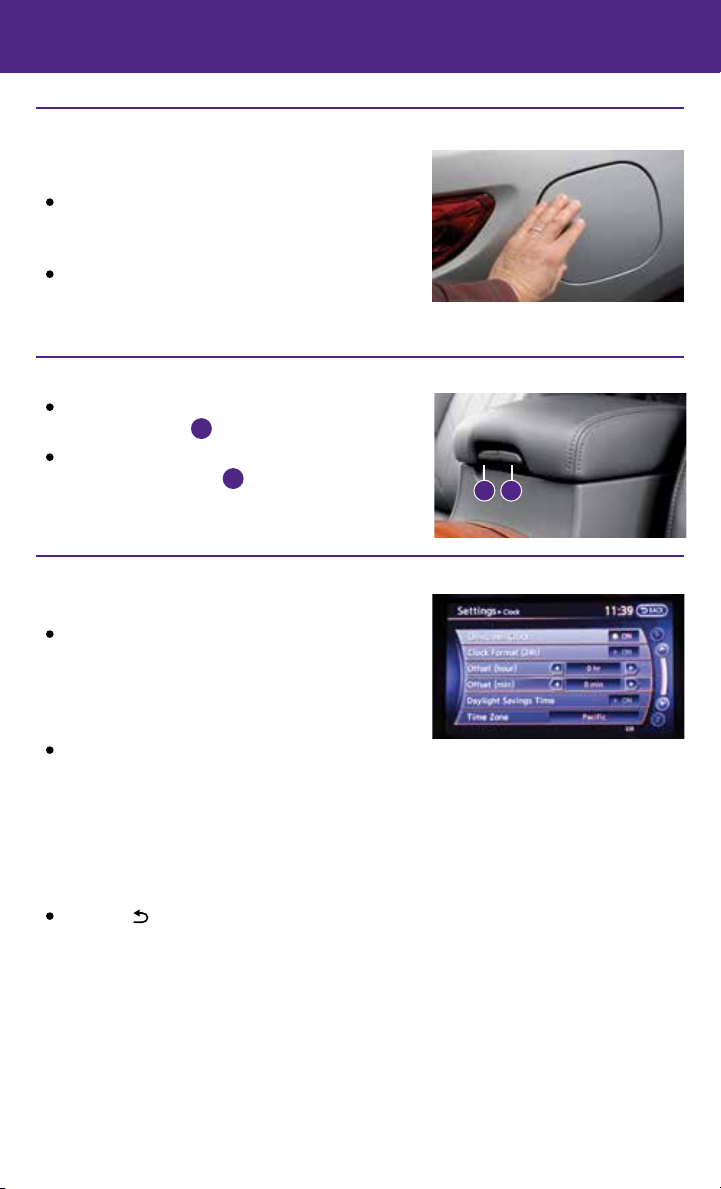
The fuel-filler door is located on the passenger’s side of
the vehicle.
When the doors of the vehicle are locked or unlocked,
the fuel-filler door is automatically locked or unlocked
at the same time.
To open the fuel-filler door, once unlocked, push the
left side of the door and release.
For more information, refer to the “Pre-driving checks and adjustments (section 3)” of your Owner’s Manual.
Front Armrest/Center Console Storage Box
To access the bottom storage bin, pull up on the
driver’s side lever
To access the top storage bin, pull up on the
passenger’s side lever
For more information, refer to the “Instruments and controls (section 2)” of your
Owner’s Manual.
1
.
2
.
2 1
Clock Set/Adjustment (Type A)
DIGITAL CLOCK ADJUSTMENT
To adjust the time and the appearance of the clock
on the display:
1. Press the SETTING button on the control panel.
2. Touch the “Others” key.
3. Touch the “Clock” key.
The following settings can be adjusted:
• On-screen Clock: The clock in the upper right corner of the display can be turned ON or OFF.
• Clock Format (24h): The clock can be set to 12 hours or 24 hours.
• Offset (hour): The time can be adjusted by increasing or decreasing per hour.
• Offset (min): The time can be adjusted by increasing or decreasing per minute.
• Daylight Savings Time: The application of daylight savings time can be turned ON or OFF.
• Time Zone: Adjust the time zone. Choose a time zone from the available list.
Press the BACK button to return to the previous screen.
For more information, refer to the “Monitor, climate, audio, phone and voice recognition systems (section 4)” of your
Owner’s Manual.
5
Page 8
first drive features
INFINITI Intelligent Key System
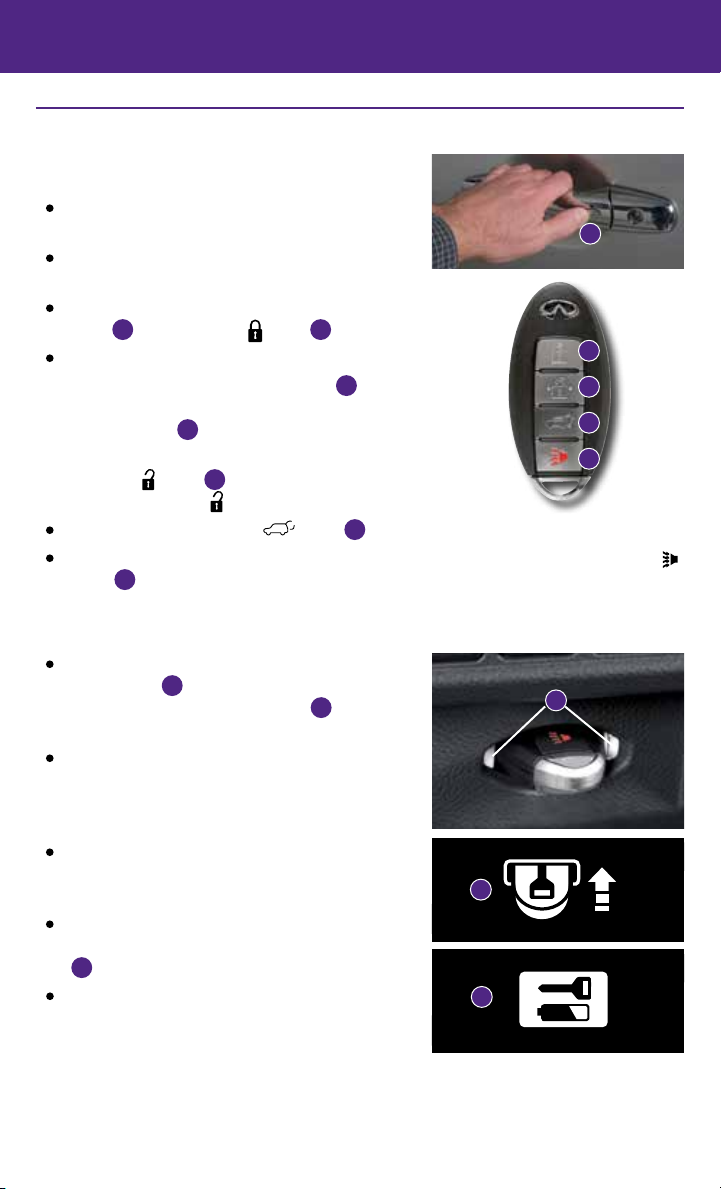
The INFINITI Intelligent Key system allows you to lock or
unlock your vehicle, open your liftgate and start the engine.
It is important to make sure the Intelligent Key is
with you (that is, in your pocket or purse).
The operating range of the Intelligent Key is within
31.5 in (80 cm) from each request switch.
To lock the vehicle, push either door handle request
switch
To unlock the vehicle, perform one of the following procedures:
• Push either door handle request switch
• Press the
To open the liftgate, press the button
The Intelligent Key can also be used to activate the panic alarm by pressing and holding the
button
for a period of time.
once or press the
1
button
on the key fob.
2
1
once; the
corresponding door will unlock. Push the door handle
request switch
again within 1 minute; all other
1
doors will unlock, or
button
side door. Press the
for more than 1 second. Once activated, the panic alarm and headlights will stay on
5
on the key fob to unlock the driver’s
3
button again; all other doors will unlock.
for more than 1 second.
4
1
2
3
4
5
INFINITI INTELLIGENT KEY BATTERY DISCHARGE
If the battery in the Intelligent Key is almost discharged,
the guide light
the Intelligent Key insertion indicator
of the Intelligent Key port blinks and
6
is displayed
7
in the vehicle information display.
To start the engine under these circumstances, insert
the Intelligent Key into the key port with the keyring
side facing backward until it latches into place. Then
push the ignition switch to start the engine.
To remove the Intelligent Key from the port, push the
ignition switch to turn the engine off and then pull the
Intelligent Key out of the port.
The Intelligent Key port does not charge the Intelligent
Key battery. If you see the Intelligent Key warning light
8
, replace the battery in the Intelligent Key.
Do not insert the mechanical key or other objects into
the key port because it will damage the key port.
For more information, refer to the “Pre-driving checks and adjustments
(section 3)”, “Starting and driving (section 5)” and the “Maintenance and
do-it-yourself (section 8)” of your Owner’s Manual.
6
7
8
6
F E
Page 9
Power Liftgate
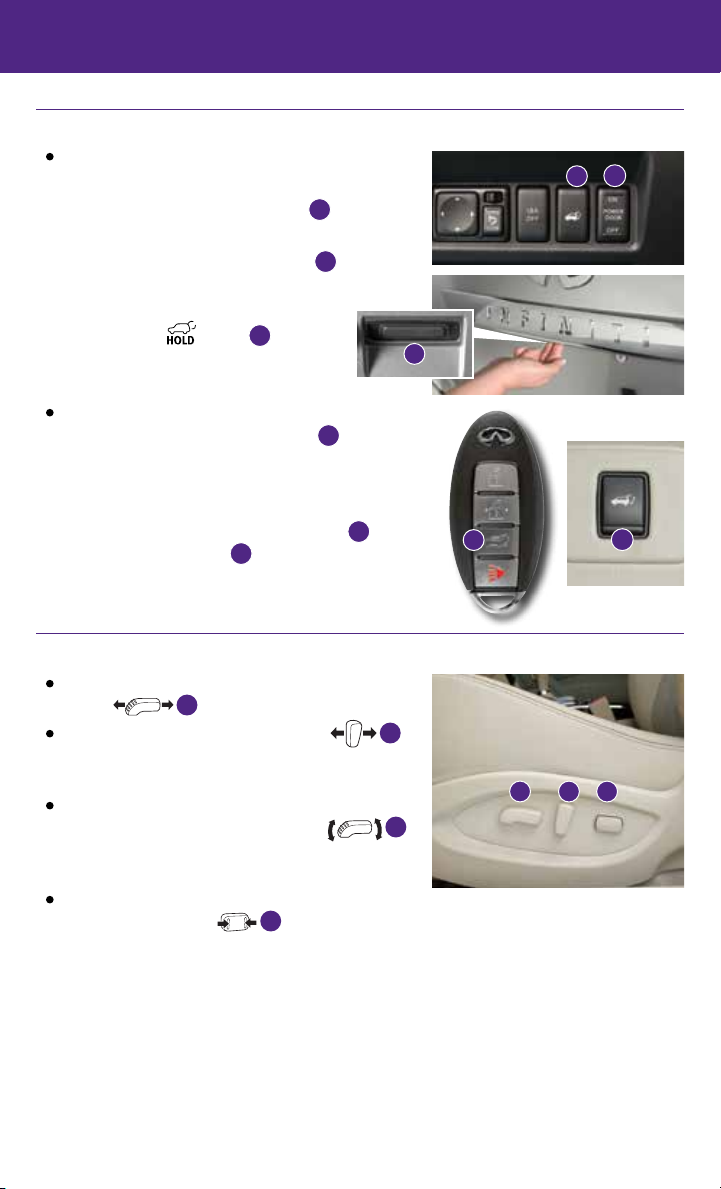
When the liftgate is closed and locked, the liftgate
will open automatically by:
• Pushing the power liftgate switch
1
instrument panel.
• Pushing the liftgate opener switch
2
on the
; the liftgate
4
1
must be unlocked or you must have the Intelligent
Key with you (in your pocket or purse).
• Pressing the
INFINITI Intelligent Key for a period
button
3
on the
2
of time.
The power liftgate operation can be turned on or
off by the power liftgate main switch
instrument panel.
4
on the
• When the power liftgate main switch is pushed to the
OFF position, power operation is not available using
the power liftgate switch on the liftgate
liftgate opener switch
For more information, refer to the “Pre-driving checks and adjustments (section
3)” of your Owner’s Manual.
.
2
or the
5
3
5
Power Seat Adjustments
To slide the seat forward or backward, push the control
switch
1
To recline the seatback, push the switch
forward or backward.
SEAT LIFTER
To raise or lower the front portion or height of the seat,
push the front or back end of the switch
up or down.
POWER LUMBAR SUPPORT
To adjust the seat lumbar support, push the front or
back end of the switch
For more information, refer to the “Safety —— Seats, seat belts and supplemental restraint system (section 1)” of your
Owner’s Manual.
forward or backward.
3
.
2
1
2 3
1
7
Page 10
first drive features
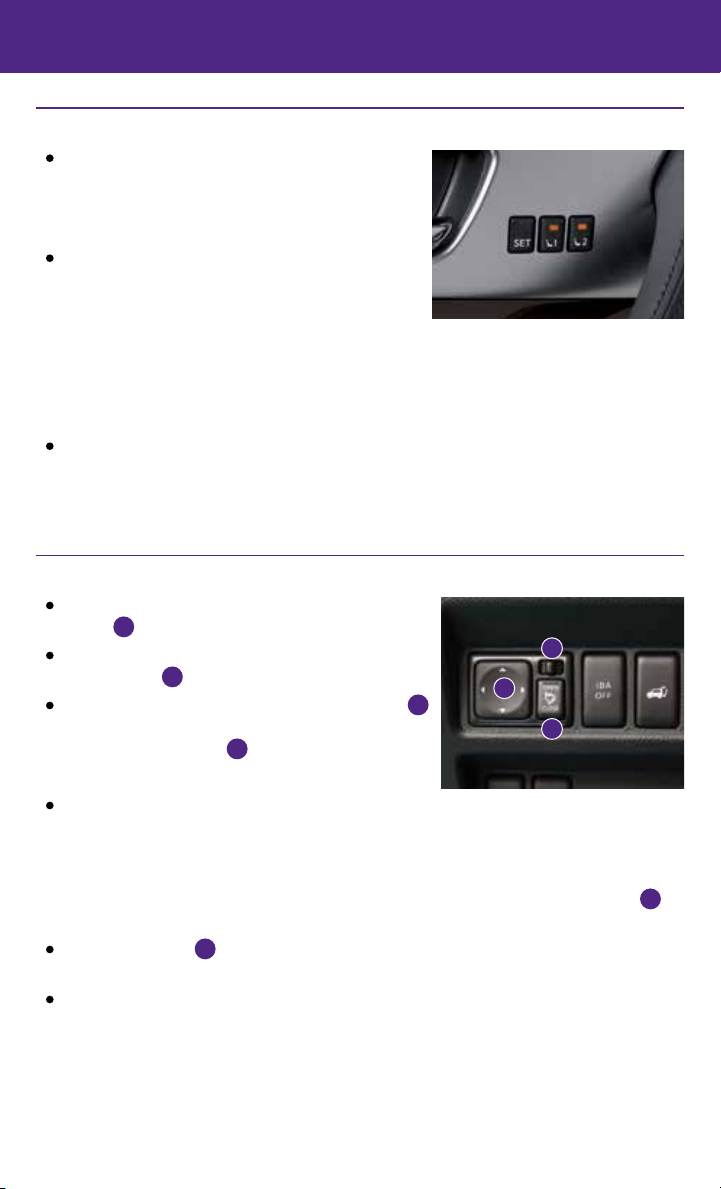
Automatic Drive Positioner (if so equipped)
Two positions for the driver’s seat, steering column
and outside mirrors can be stored in the automatic
drive positioner memory.
SEAT MEMORY CONTROLS (if so equipped)
Follow this procedure to set the memory positions:
• Confirm the shift lever is in the P (PARK) position.
• Push the ignition switch to the ON position.
• Adjust the driver’s seat, steering column and outside mirrors to the desired positions using the adjusting switches for each feature.
• Push the SET switch and within 5 seconds push the memory switch (1 or 2) for at least 1 second.
• The indicator light on the memory switch you select will illuminate for approximately 5 seconds.
• The driver’s seat, steering column and outside mirror positions are now set to your preferences.
These memorized positions can also be linked to your INFINITI Intelligent Key. To link a
memorized position to your INFINITI Intelligent Key, press the unlock button on the key fob
after completing the previous step.
For more information, refer to the “Pre-driving checks and adjustments (section 3)” of your Owner’s Manual.
Outside Mirror Control Switch
To select the right or left side mirror, move the control
switch
To adjust each mirror to the desired position, use the
control switch
To fold the outside rearview mirrors, push the switch
to the CLOSE position, and to unfold the outside rearview
mirrors, push the switch
REVERSE TILT-DOWN FEATURE (if so equipped)
When backing up the vehicle, the right or left outside
mirror can be selected to turn downward to provide better rear visibility.
1. Push the ignition switch to the ON position.
2. Move the shift lever to the R (REVERSE) position.
3. Choose the right or left outside mirror by operating the outside mirror control switch
4. The selected outside mirror surface moves downward.
The control switch
to function.
When one of the following conditions has occurred, the outside mirror surface will return to
its original position:
• The shift lever is moved to any position other than R (REVERSE).
• The outside mirror control switch is set to the center (neutral) position.
• The ignition switch is pushed to the OFF position.
For more information, refer to the “Pre-driving checks and adjustments (section 3)” of your Owner’s Manual.
8
right or left.
1
1
2
.
3
to the OPEN position.
3
must be in the right or left position for the reverse tilt-down feature
1
2
3
1
.
Page 11
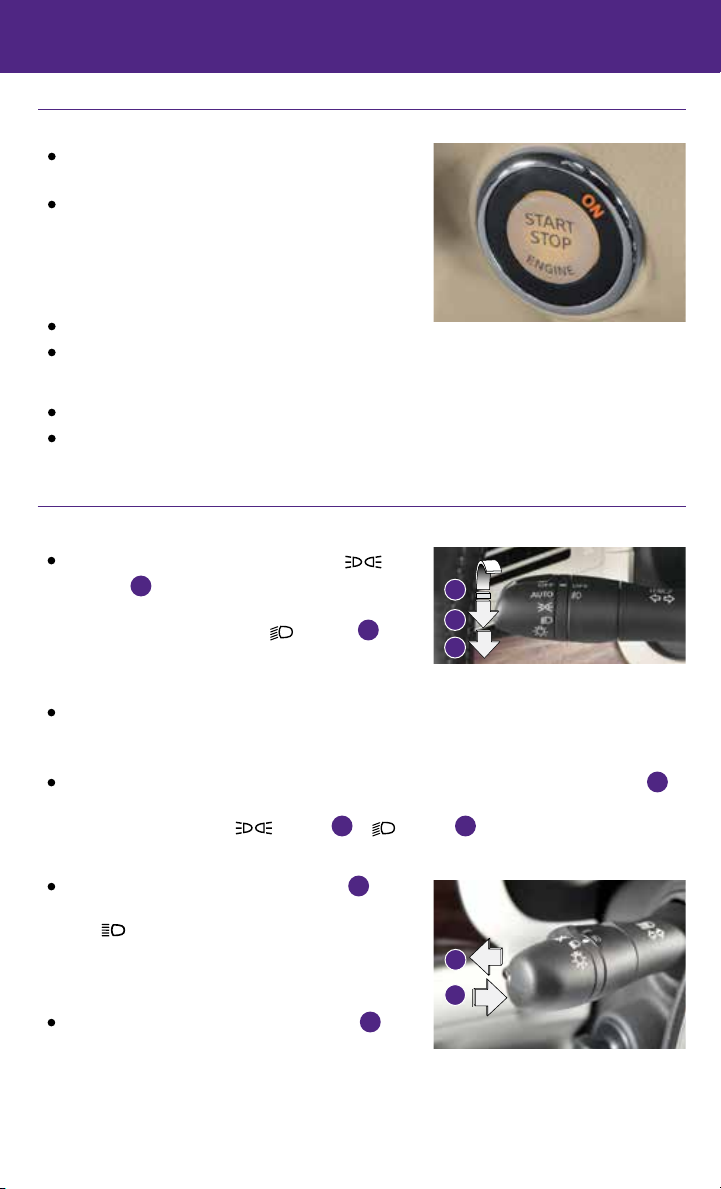
Starting/Stopping the Engine
It is important to make sure the INFINITI Intelligent
Key is with you (that is, in your pocket or purse).
Depress the brake pedal.
• If the brake pedal is not depressed, pushing the
ignition switch once enters the ACC mode.
• If the ignition switch is pushed a second time, the
vehicle will enter the ON mode.
Move the shift lever to the P (PARK) position.
Push the ignition switch to start the engine.
TURNING THE ENGINE OFF
Move the shift lever to the P (PARK) position and apply the parking brake.
Press the ignition switch START/STOP button to turn the engine off.
For more information, refer to the “Starting and driving (section 5)” of your Owner’s Manual.
Headlight Control Switch
Turn the headlight control switch to the
position
to turn on the front parking, side
1
marker, tail, license plate and instrument panel
lights. Turn the switch to the
turn on the headlights.
AUTOLIGHT SYSTEM
The autolight system will automatically turn the headlights on when it is dark and off when it is
light. The system will keep the headlights on for a period of time after you turn the ignition off
and all the doors are closed.
To activate the autolight system, turn the headlight control switch to the AUTO position
then push the ignition switch to ON. To deactivate the autolight system, turn the headlight
control switch to the OFF, position
HIGH BEAM SELECT
Push the headlight control switch forward
select the high beam function. The blue indicator
light illuminates in the instrument panel. Pull
the headlight switch back to the original position to
select the low beam. The blue indicator light
will extinguish.
Pull and release the headlight control switch
flash the headlight high beams on and off.
position
1
2
or
4
5
to
to
to
position
3
1
2
2
.
4
5
3
9
Page 12
first drive features
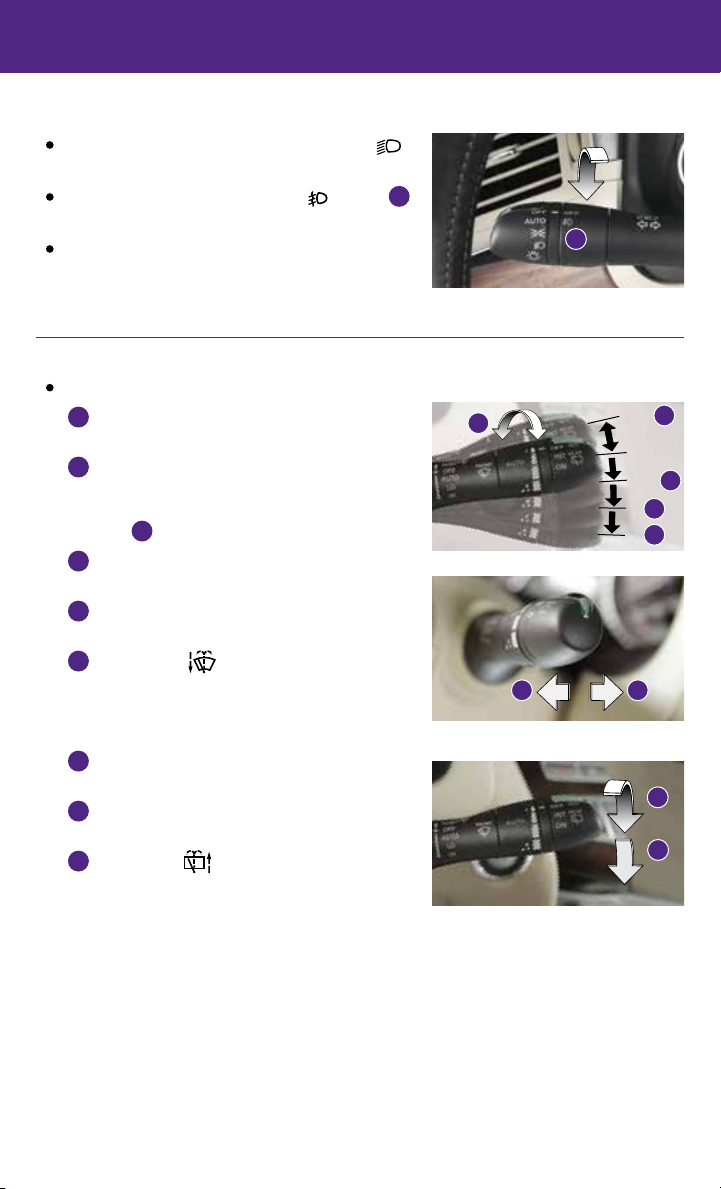
FOG LIGHT SWITCH
The headlights must be on and the low beams
selected for the fog lights to operate.
Turn the switch (inside collar) to the position
to turn the fog lights on.
Turn the switch (inside collar) to the OFF position to
turn the fog lights off.
For more information, refer to the “Instruments and controls (section 2)” of your Owner’s Manual.
Windshield Wiper and Washer Switch
Move the lever to one of the following positions to operate the windshield wipers:
Mist (MIST) - One sweep operation of the
1
front wipers.
Auto (AUTO) (if so equipped) - Operates the
2
rain-sensing wipers intermittently. To increase or
decrease wiper sensitivity twist the control
ring 3 .
Low (LO) - Front wipers operate at a continuous
4
low-speed.
High (HI) - Front wipers operate at a continuous
5
high-speed.
Front washer - Pull the lever toward you to
6
activate the front washer. The front wipers will
operate several times.
REAR WINDSHIELD WIPER AND WASHER
Intermittent (INT) - Rear wiper operates
7
intermittently.
Low (ON) - Rear wiper operates at a continuous
8
low-speed.
Rear washer - Push the lever forward to
9
activate the rear washer. The rear wiper will
operate several times.
For more information, refer to the “Instruments and controls (section 2)” of your Owner’s Manual.
6
3
6 9
6
MIST
1
OFF
AUTO
2
LO
4
5
HI
7
INT
8
ON
2
10
Page 13
8
4
5
1
3
9
6
7
Automatic Climate Controls
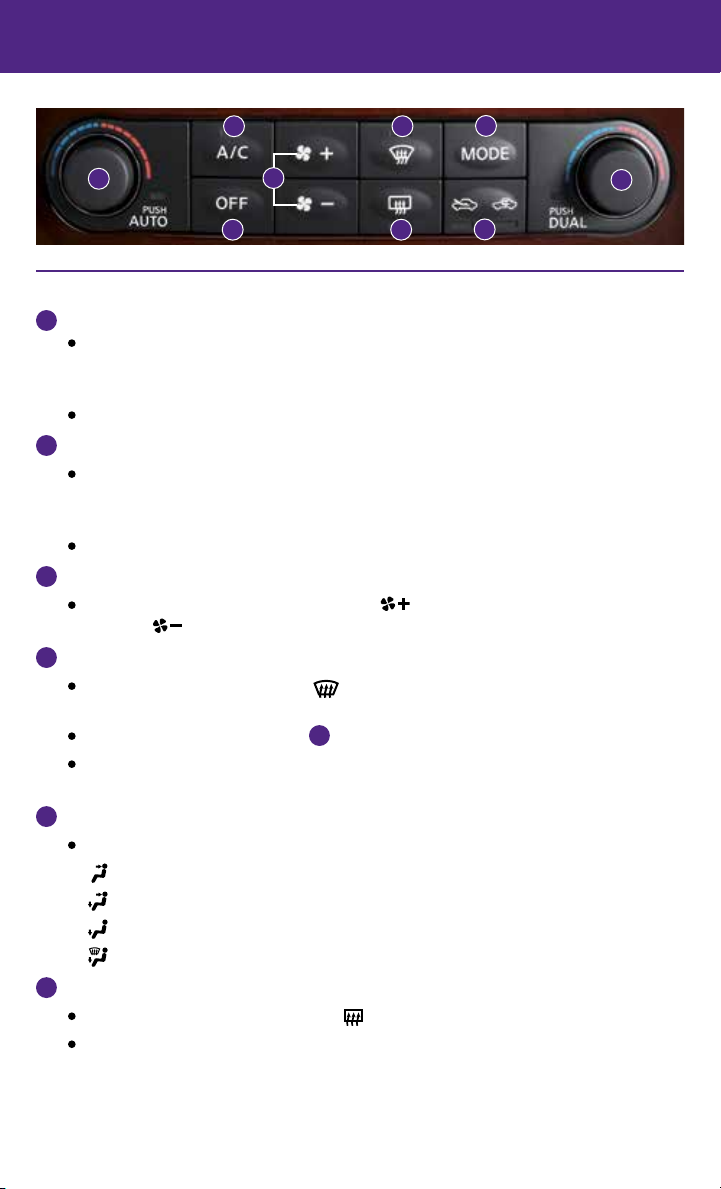
1
AUTO BUTTON/DRIVER’S SIDE TEMPERATURE CONTROL DIAL
The auto mode may be used year-round. Press the AUTO button to turn the system on,
and the system will automatically control the inside temperature (automatic cooling and/
or dehumidified heating), air flow distribution and fan speed.
Turn the driver’s side temperature control dial to the left for cooler air or right for warmer air.
2
DUAL BUTTON/PASSENGER’S SIDE TEMPERATURE CONTROL DIAL
Press the DUAL button to turn the passenger’s side temperature controls on or off. This
will allow the passenger’s side temperature to be adjusted independently from the
driver’s side by turning the passenger’s side temperature control dial.
Turn the passenger’s side temperature control dial left for cooler air or right for warmer air.
3
FAN SPEED CONTROL BUTTONS
To manually adjust the fan speed, press the button to increase the fan speed or
press the button to decrease the fan speed.
4
DEFROSTING/DEFOGGING FRONT AND SIDE WINDOWS
Press the defroster control button
on when the defroster mode is selected. This feature removes humidity from the air.
Turn the temperature control dial
To defrost the front and side windows quickly, set the temperature controls and fan speed
controls to their maximum settings.
5
MODE BUTTON
Press the MODE button to cycle through the following air flow outlets:
6
Air flows from the center and side vents.
Air flows from the center, side and foot vents.
Air flows mainly from the foot vents.
Air flows from the defroster and foot vents.
REAR WINDOW AND OUTSIDE MIRRORS DEFROSTER SWITCH
Push the rear window defroster switch to turn the system on or off.
This function automatically turns off after approximately 15 minutes.
to turn the system on. The A/C automatically turns
to set the desired temperature.
1
2
11
Page 14

first drive features
7
INTAKE AIR CONTROL BUTTON
AIR RECIRCULATION
Press the intake air control button to recirculate interior air inside the vehicle. The indicator
light on the side will illuminate. This system is used to avoid outside odors and to help
adjust the inside vehicle temperature more effectively.
The air recirculation mode cannot be activated when the climate control system is in the
front defroster mode
OUTSIDE AIR CIRCULATION
Press the intake air control button again to draw outside air into the passenger
compartment. The indicator light on the
AUTOMATIC INTAKE AIR CONTROL
In the auto mode, the intake air will be controlled automatically. To manually control the
intake air, press the intake air control button. To return to the automatic control mode,
press the intake air control button for about 2 seconds.
8
A/C BUTTON
Press the A/C button to turn the air conditioner system on or off. This system helps cool
and dehumidify the air inside the cabin and defog the windows.
9
OFF BUTTON
Press the OFF button to turn the climate control system off.
For more information, refer to the “Instruments and controls (section 2)” and the “Monitor, climate, audio, phone and voice
recognition systems (section 4)” of your Owner’s Manual.
or front defroster and foot vent mode .
side will illuminate.
12
Page 15
5
1 3
4
2
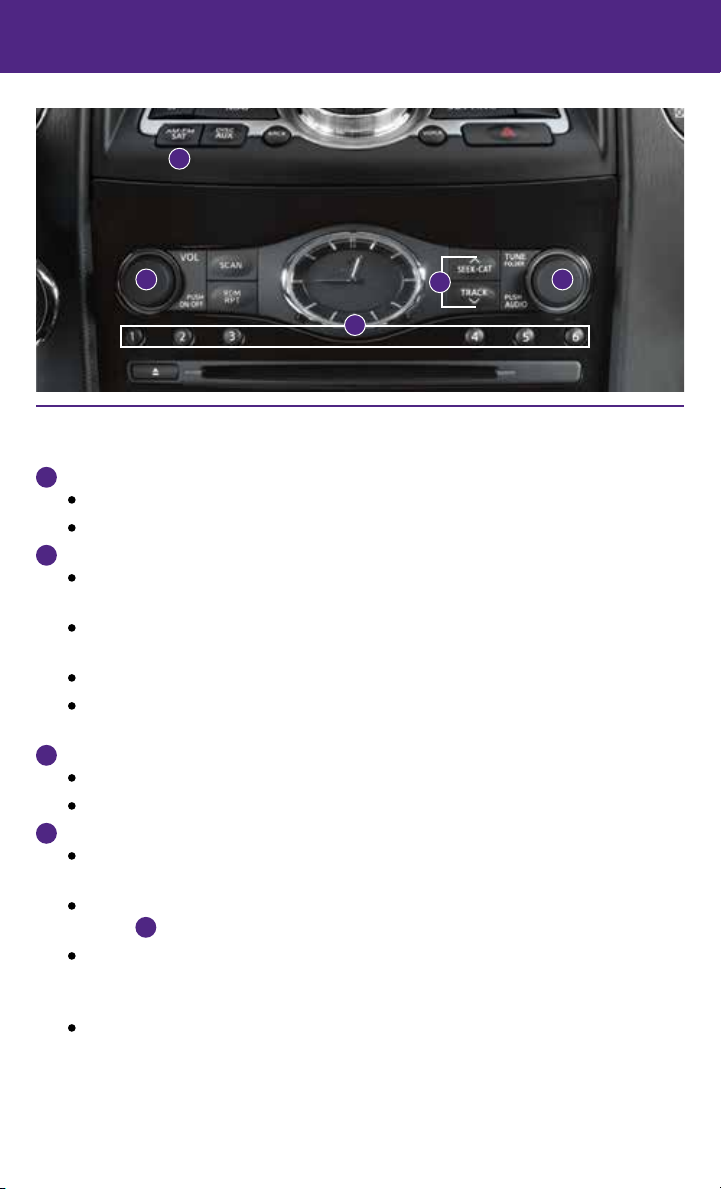
FM/AM/SiriusXM®* Satellite Radio with CD/DVD Player
(with Navigation System – if so equipped)
1
ON•OFF BUTTON/VOL (volume) CONTROL KNOB
Press the VOL/ON•OFF control knob to turn the system on or off.
Turn the knob right or left to increase or decrease the volume.
2
SEEK•CAT AND TRACK BUTTONS
To scan quickly through each broadcasting station, press the SEEK•CAT button or the TRACK
button to stop at the next or previous broadcast station.
For satellite radio, press the SEEK•CAT button or the TRACK button to switch to the first
channel of the next or previous category.
Press the SEEK•CAT button or the TRACK button to change tracks on a CD.
Press and hold the SEEK•CAT button or the TRACK button to fast forward or rewind a track
on a CD.
3
TUNE/FOLDER/AUDIO CONTROL KNOB
To manually tune the radio, turn the TUNE/FOLDER/AUDIO knob left or right.
To access the audio settings screen press the AUDIO button.
4
STATION PRESET BUTTONS
Twelve stations can be set for the FM band, six for the AM band and eighteen for
satellite radio.
To store a station in a preset, you must first select a radio band by pressing the FM•AM/SAT
5
button
Then press and hold the desired station preset button (1-6) until the sound is briefly
muted. The channel indicator will then display and the sound will resume. Programing is
now complete.
To retrieve a previously set station, select the radio band where the preset was stored
then press the corresponding station select button (1-6).
*SiriusXM® Satellite Radio is only available on vehicles equipped with an optional satellite radio subscription service.
For more information, refer to the “Monitor, climate, audio, phone and voice recognition systems (section 4)” of your Owner’s Manual.
then tune to the desired FM, AM or XM satellite radio station.
13
Page 16
first drive features
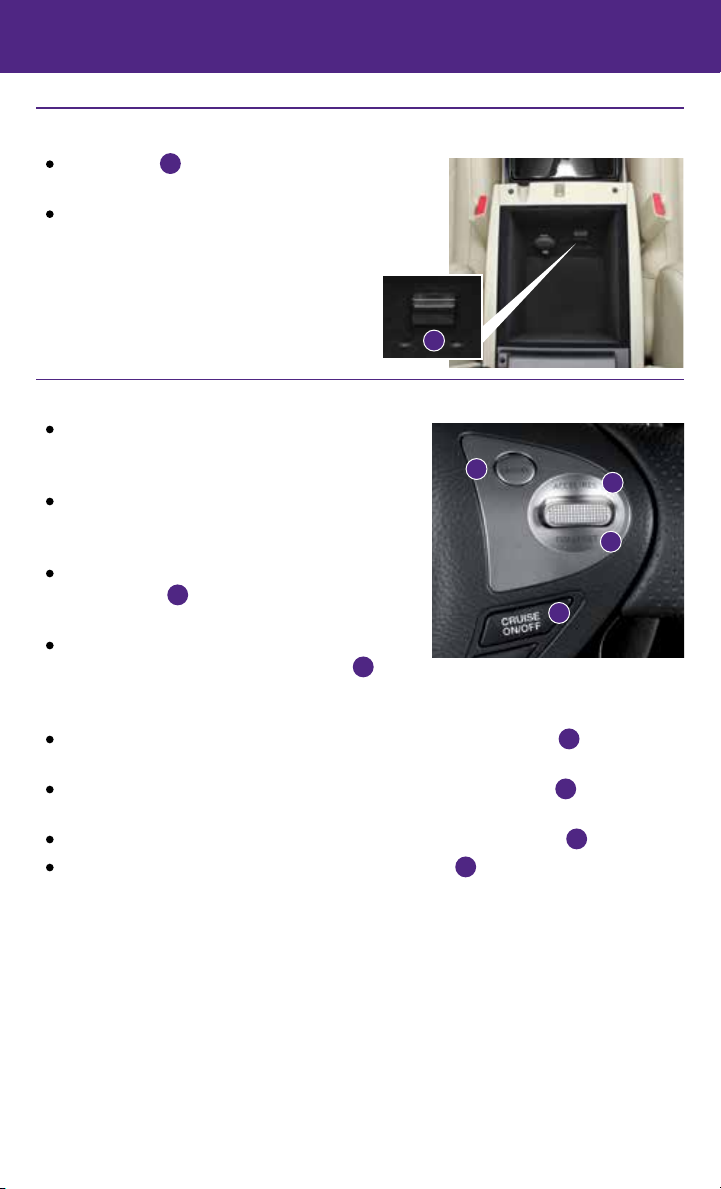
USB/iPod® Interface
The USB jack
under the arm rest.
When a compatible USB memory device or iPod®
is plugged into the USB jack, compatible audio and
video files stored on the device can be played
through the vehicle’s audio system and
front display.
For more information, refer to the “Monitor, climate, audio, phone
and voice recognition systems (section 4)” of your Owner’s Manual.
Conventional (Fixed Speed) Cruise Control
The cruise control system enables you to set a
constant cruising speed once the vehicle has
reached 25 MPH (40 km/h).
The system will automatically maintain the set speed
until you tap the brake pedal, accelerate, cancel or
turn the system off.
To activate the cruise control, push the CRUISE
ON/OFF switch
the instrument panel will illuminate.
To set a cruising speed, accelerate the vehicle to the
desired speed, push the COAST/SET switch
release. The SET indicator light in the instrument panel will illuminate. Take your foot off the
accelerator pedal. Your vehicle will maintain the set speed.
To reset at a faster cruising speed, push and hold the ACCEL/RES switch
vehicle attains the desired speed, release the switch.
To reset at a slower cruising speed, push and hold the COAST/SET switch
switch when the vehicle slows to the desired speed.
To cancel the preset speed, tap the brake pedal or push the CANCEL switch
To turn off cruise control, push the CRUISE ON/OFF switch
light and the SET indicator light in the instrument panel will extinguish.
For more information, refer to the “Starting and driving (section 5)” of your Owner’s Manual.
is located in the center console
1
1
. The CRUISE indicator light in
2
and
1
4
1
1
. Both the CRUISE indicator
3
. When the
2
. Release the
4
3
2
.
14
Page 17
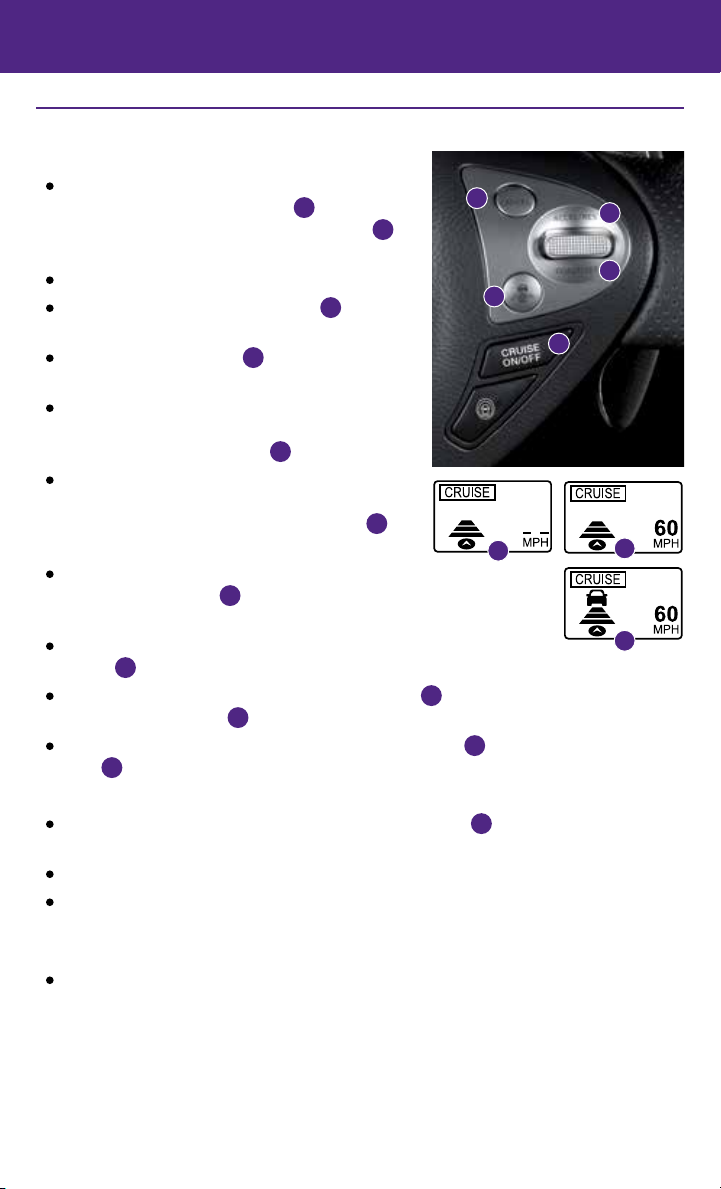
Intelligent Cruise Control (ICC) System (if so equipped)
VEHICLE-TO-VEHICLE DISTANCE CONTROL MODE
To set Vehicle-To-Vehicle Distance Control mode,
press the CRUISE ON/OFF button
than 1.5 seconds. The CRUISE indicator light
1
for less
2
will illuminate.
Accelerate to the desired speed.
Push down on the COAST/SET switch
and release
3
it. Cruise control will be set to the desired speed.
Press the distance button
repeatedly to change
4
the set distance between long, middle and short.
When a vehicle is not detected ahead of you in
the lane, the set distance and set vehicle speed
indicator lights will illuminate
When a vehicle is detected ahead of you in the lane,
in set mode.
5
the vehicle ahead detection, set distance and set
vehicle speed indicator lights will illuminate
6
in
set mode.
To reset at a faster cruising speed, push and hold
the ACCEL/RES switch
7
. When the vehicle attains the desired
speed, release the switch.
To reset at a slower cruising speed, push and hold the COAST/SET
3
switch
To cancel the preset speed, push the CANCEL switch
vehicle speed indicator
To turn off cruise control, press the CRUISE ON/OFF button
. Release the switch when the vehicle slows to the desired speed.
will extinguish.
5
light 2 in the instrument panel will extinguish.
To set the conventional (fixed speed) cruise control mode:
While cruise control is off, press the CRUISE ON/OFF button
than 1.5 seconds. The CRUISE indicator light will illuminate.
Accelerate to the desired speed.
Push down on the COAST/SET switch and release it. The SET indicator light will illuminate.
Cruise control should be set to the desired speed.
To switch between the two cruise control modes:
When one of the two cruise modes is in use, you must turn the system off and then turn it
on again to select the other cruise control mode.
For more information, refer to the “Starting and driving (section 5)” of your Owner’s Manual.
8
4
1
2
or tap the brake pedal. The set
8
1
. The CRUISE indicator
and hold it down for more
1
7
3
5
6
15
Page 18
first drive features
Power Outlets
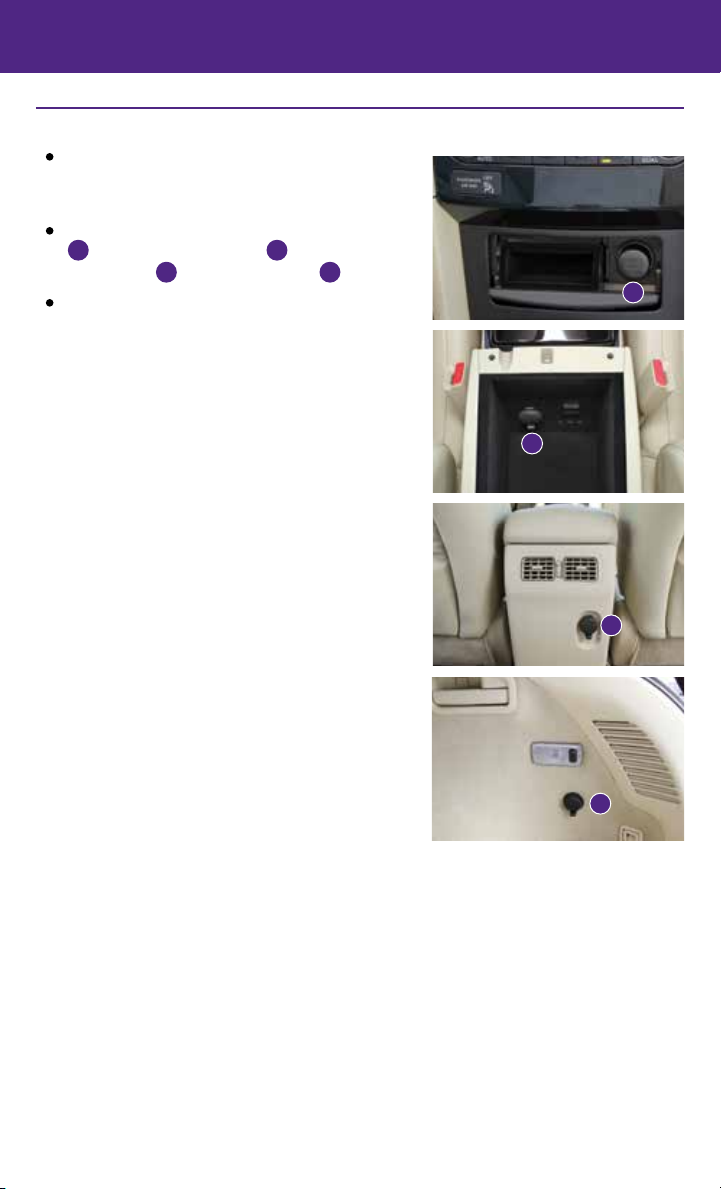
The power outlets are used for powering electrical
accessories such as cellular phones. They are
rated at 12V, 120W (10A) maximum.
Power outlets are located on the instrument panel
1
, inside the center console
front console
To use a power outlet, open the cap.
For more information, refer to the “Starting and driving (section 5)” of your
Owner’s Manual.
and in the cargo area
3
2
, on the rear of the
4
.
1
2
3
16
4
Page 19
system guide
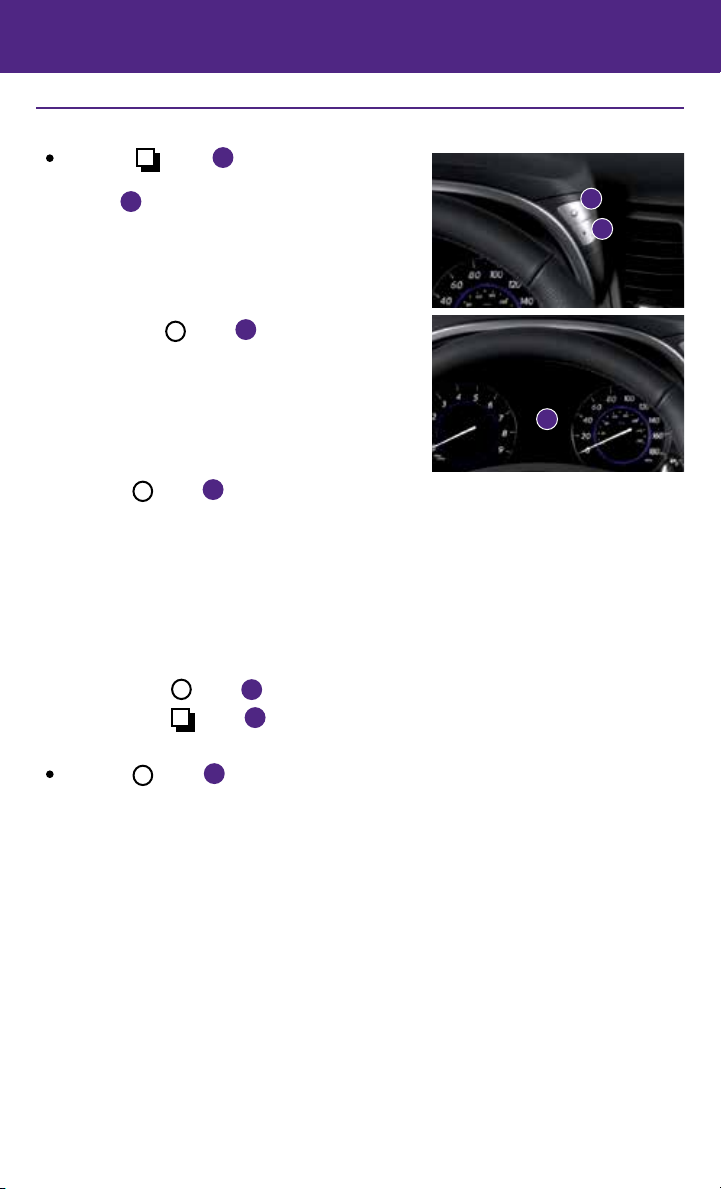
Trip Computer
When the
modes will appear on the vehicle information
display
• MPG – Displays the current fuel consumption.
• MPG/MPH – Displays the average fuel
consumption and speed since the last reset.
— To reset the displayed MPG/MPH, press and
• TIME/MILES – Displays the elapsed time and
total distance the vehicle has been driven since
the last reset.
— To reset the elapsed time/miles, press and hold
• RANGE – Displays the estimated distance to empty (dte) the vehicle can be driven
before refueling.
• OUTSIDE TEMP – Displays the exterior air temperature including a low temperature
warning feature.
• SETTING – Allows you to set reminders for alerts and maintenance intervals or change the
language and units used in the system.
— Press the
— Press the
• WARNING – Displays when a warning is present.
Press the
odometer to zero.
For more information, refer to the “Instruments and controls (section 2)” of your Owner’s Manual.
button
2
:
hold the
second. Both elapsed MPG/MPH will reset at the
same time.
the
button 3 for more than one second.
Both elapsed time/miles will reset at the same time.
button
is pressed, the following
1
button 3 for more than one
button
button
to cycle through the various setting modes.
3
to choose the selected menu.
1
for approximately 1 second to reset the currently displayed trip
3
1
3
2
17
Page 20
system guide
Bluetooth® Hands-free Phone System
A cellular telephone should not be used while driving
so full attention may be given to vehicle operation.*
SYSTEM OPERATING TIPS
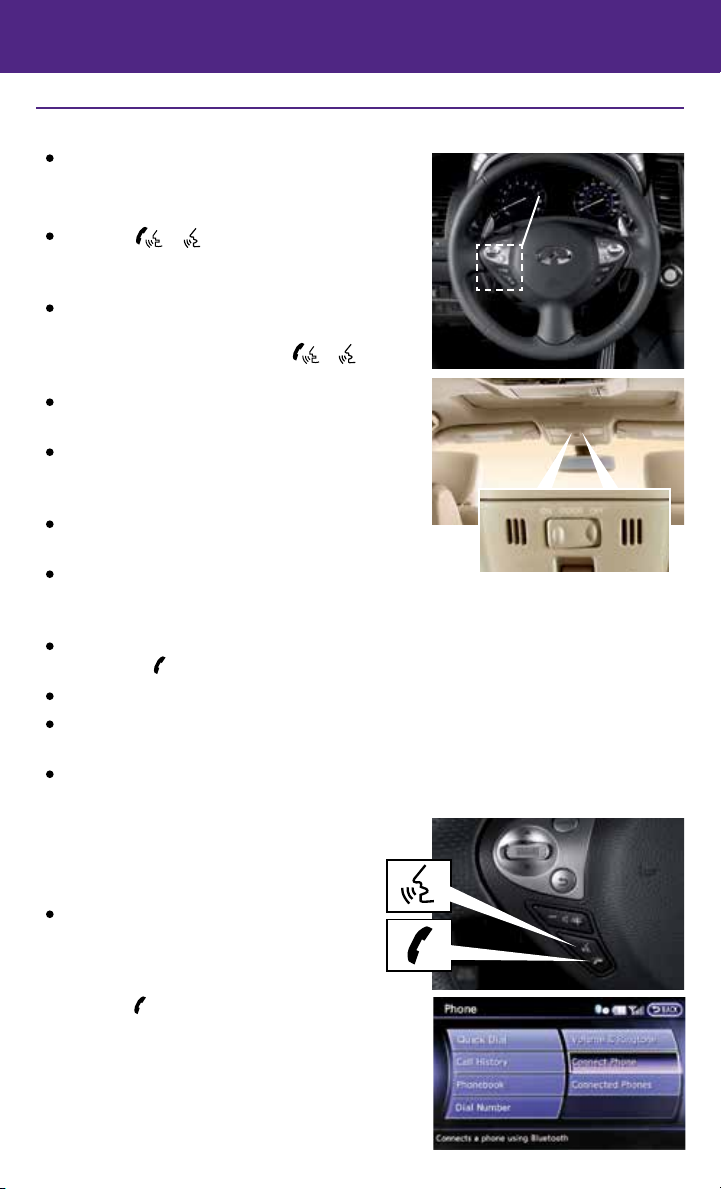
Press the or button to interrupt the voice
prompts at any time and speak a command after
the tone.
To use the system faster, you may speak the second
level commands with the main menu command on the
main menu. For example, press the or button
and after the tone say “Call Redial”.
The “Help” command can be used to hear a list of
available commands at any time.
Reduce background noise as much as possible by
closing windows and pointing HVAC vents away from
the ceiling.
Speak naturally without long pauses and without
raising your voice.
When speaking phonebook names, please be
aware some phones require the last name to be spoken before the first name.
For example, “Michael Smith” may be spoken as “Smith Michael”.
To cancel a Voice Recognition session, simply wait 5 seconds, say “Cancel” or “Quit”, or press
and hold the button for 5 seconds.
To go back to the previous command, say “Go back” or “Correction”.
If the Voice Recognition system does not recognize your voice commands, train the system
using the Voice Adaptation Mode. See your Owner’s Manual for detailed information.
For more detailed information and instructions, refer to your cellular phone’s Owner’s Manual
and visit www.InfinitiUSA.com/Bluetooth.
Bluetooth® Controls
Microphone
Bluetooth® System with Navigation*
(if so equipped)
CONNECTING PROCEDURE
The vehicle must be stationary when
connecting the phone.
1. Press the
“Connect Phone” key.
*Some jurisdictions prohibit the use of cellular telephones while driving.
18
button and select the
Page 21
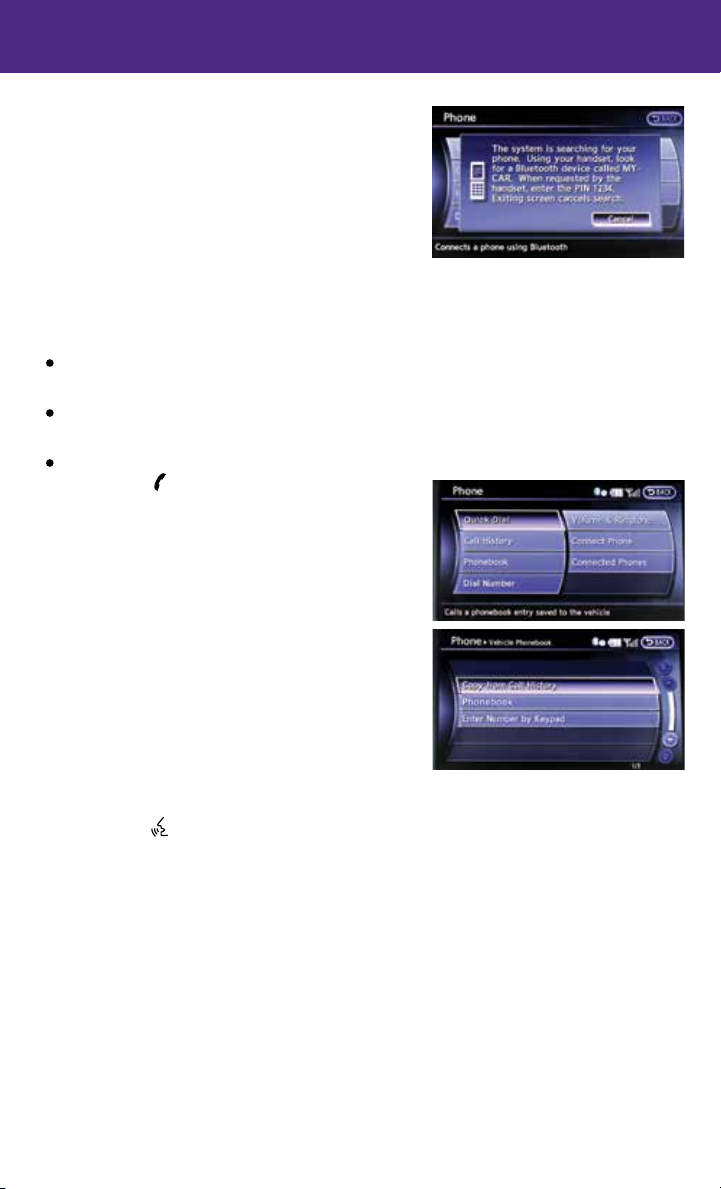
2. Initiate connecting from the phone.
•
The connecting procedure varies according to
each cellular phone model. For detailed connecting
instructions and a list of compatible phones,
please visit www.InfinitiUSA.com/bluetooth.
• When prompted for a PIN code, enter “1234”
from the handset. (The PIN code is assigned by
INFINITI and cannot be changed.)
3. When the connecting is complete, the screen will return to the Phone menu display.
PHONEBOOK SETUP
Depending on your cellular phone, the system may automatically download your cellular
phone’s entire phonebook to the vehicle’s Bluetooth® system.
If the phonebook does not download automatically, the vehicle phonebook may be set for
up to 40 entries.
To manually download entries:
1. Press the button and select the
“Quick Dial” key.
2. Select the “Add New” key at the top of the
display. There are different methods to input a
phone number. Select one of the
following options:
• “Copy from Call History”- to save a number from
the Outgoing, Incoming or Missed Calls lists.
• “Copy from the Phonebook”- to save a number
that has been downloaded from your handset
to the vehicle.
• “Enter Number by Keypad”- to input the number
and name manually.
MAKING A CALL
1. Press the
2. After waiting for the tone, say “Phone”.
3. After the next tone, say “Dial Number”.
4. After the next tone, say “123-456-7890”. You may also say the digits in groups of
3, 3 and 4, respectively. To use this group dialing method, say only the first 3 digits of
the phone number instead of all 10 digits. After the system recognizes the number, it
will request the next 3 digits and finally the last 4 digits.
5. After the system speaks the correct number and sounds the tone, say “Dial.”
button.
19
Page 22
system guide
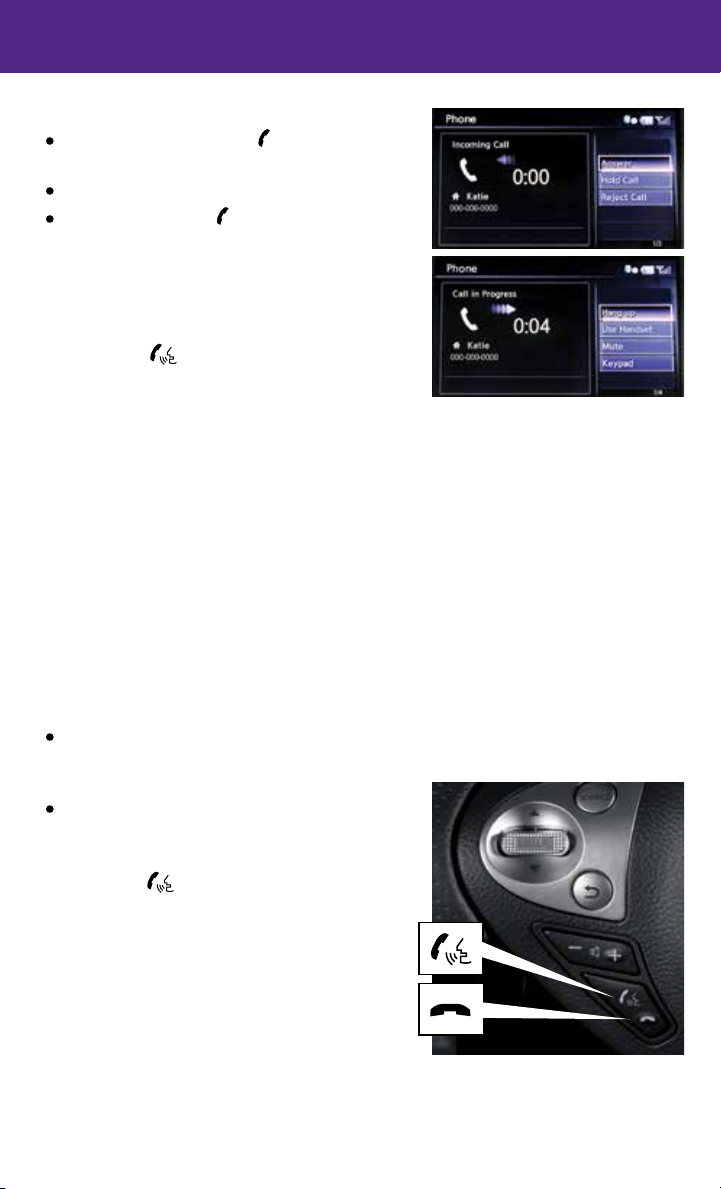
RECEIVING/ENDING A CALL
To accept the call, press the button on the steering
wheel or touch the “Answer” key.
To reject the call, touch the “Reject Call” key.
To hang-up, press the button or touch the “Hang
Up” key.
Bluetooth® System without Navigation*
(if so equipped)
PAIRING PROCEDURE
1. Press the
system announces the available commands.
2. Say: “Connect Phone”. The system acknowledges
the command and announces the next set of available commands.
3. Say: “Add Phone”. The system acknowledges the command and asks you to initiate
connecting from the phone handset.
4. Initiate pairing from the phone.
• The connecting procedure varies according to each cellular phone model.
For detailed connecting instructions and a list of compatible phones, please visit
www.InfinitiUSA.com/bluetooth.
• When prompted for a PIN code, enter “1234” from the handset. (The PIN code is
assigned by INFINITI and cannot be changed.)
5. Say a name for the phone when the system asks you to provide one. You can give the
phone a name of your choice.
button on the steering wheel. The
PHONEBOOK
Depending on the cellular phone, the system may automatically download the entire
phonebook. For more information, please visit www.InfinitiUSA.com/bluetooth or refer to
the cellular phone’s Owner’s Manual.
If the phonebook does not download automatically,
40 entries can be individually downloaded. To
manually download entries:
1. Push the
2. After the tone, say “Phonebook”.
3. After the next tone, say “Transfer Entry”.
4. Using the cellular phone, select an entry to send
to the vehicle. Please consult the website above
or your cellular phone’s Owner’s Manual for
specific steps of your cellular phone.
5. Say a name for the cellular phone when the
system asks you to provide one. You can give the phone a name of your choice.
*Some jurisdictions prohibit the use of cellular telephones while driving.
20
button on the steering wheel.
Page 23

CALLING A PHONEBOOK ENTRY
In some cases, names stored using all UPPERCASE letters may not be recognized by the Voice
Recognition system.
1. Press the button.
2. After waiting for the tone, say “Call”.
3. After the next tone, speak a name of a phonebook entry. For example, “Michael Smith”.
4. Confirm the correct name is recognized by saying “Dial” after the tone.
MAKING A CALL
1. Press the button.
2. After waiting for the tone, say “Call”.
3. After the next tone, say “Phone Number”.
4. After the next tone, say “123- 456- 7890”. You may also say the digits in groups of 3, 3
and 4, respectively. To use this group dialing method, say only the first 3 digits of the phone
number instead of all 10 digits. After the system recognizes the digits, it will request the next
3 digits and finally the last 4 digits.
5. After the system speaks the correct number and sounds the tone, say “Dial”.
RECEIVING/ENDING A CALL
To accept the call, press the button on the steering wheel.
To reject the call, press the button.
To hang-up, press the button.
For more information, refer to the “Monitor, climate, audio, phone and voice recognition systems (section 4)” of your Owner’s Manual
or please visit www.InfinitiUSA.com/bluetooth.
21
Page 24
system guide
1
2
4
9
5
10
12
6
13
3
7
8
11
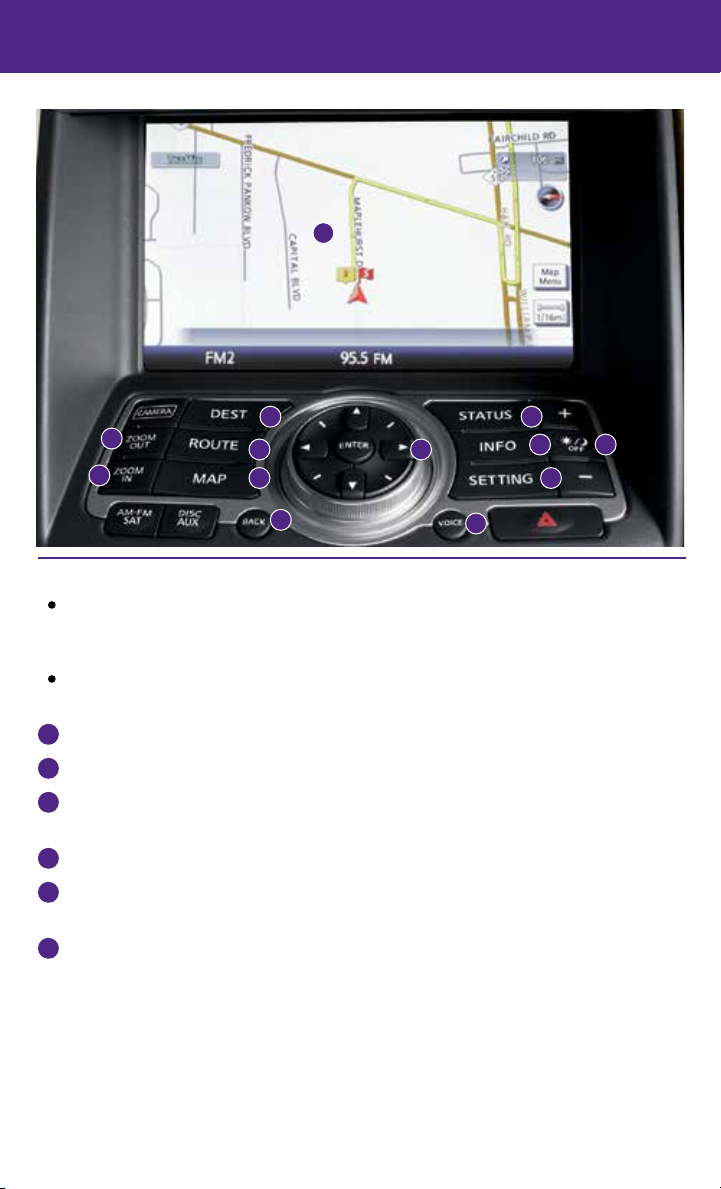
Navigation System (if so equipped)
Your Navigation System can calculate a route from your current location to a preferred
destination. The real-time map display and turn-by-turn voice guidance will lead you along
the route.
The Navigation System will continually update your vehicle’s position. If you have deviated
from the original route, it will recalculate the route from your current location.
1
Touch-screen display
2
DEST button – Press to enter a destination.
3
STATUS button – Press multiple times to display audio information with either the air
conditioner status, fuel economy or navigation directions.
4
ZOOM OUT button – Press to zoom the map out.
5
ROUTE button – Press to access the guidance control functions (guidance cancellation, route
priority, waypoint setting on the route, etc.).
6
INFINITI Controller
• ENTER button – Press to select the highlighted item on the screen. If this button is pressed
while a map is displayed, the map menu screen is displayed.
• Main directional buttons – Use to move across the map, highlight an item on the screen or
adjust a setting (volume, brightness, etc.).
• Additional directional buttons – Use to move across the map or highlight an item on the
character input screen.
• Center dial – Use to highlight an item on the screen or adjust a setting. The center dial can
also be used to adjust the map scale.
22
Page 25
7
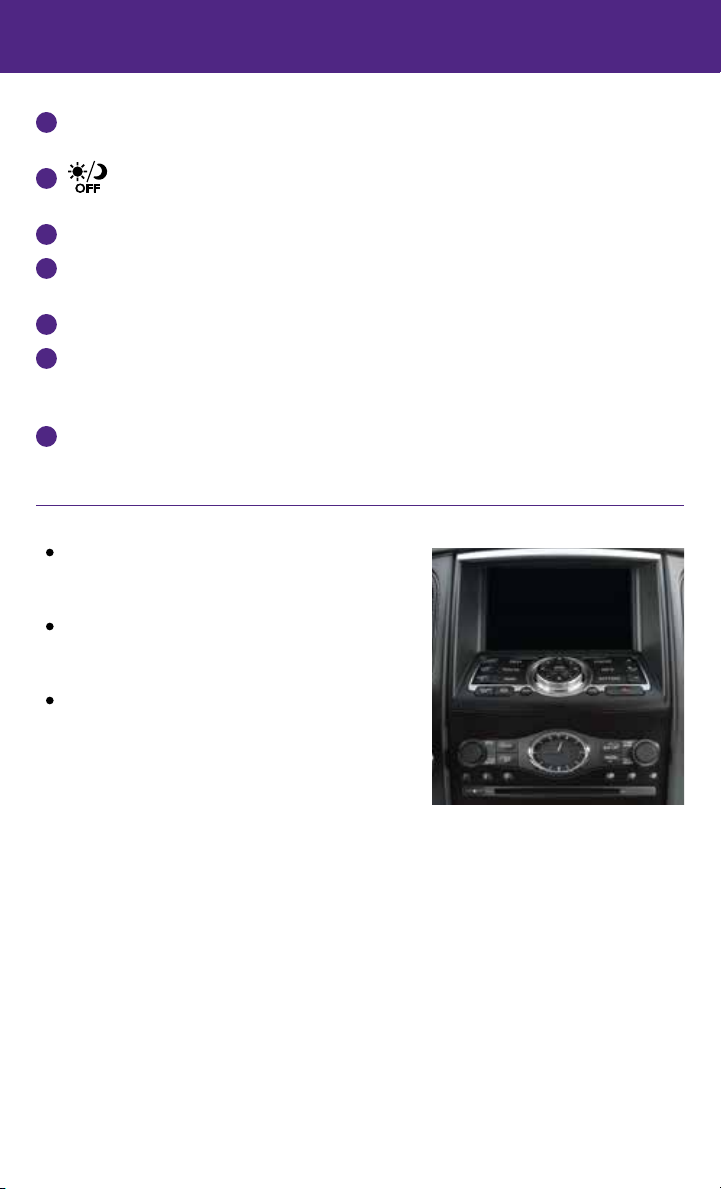
INFO button – Press to display the fuel economy, tire pressure, maintenance, location, traffic
information (if so equipped) and weather information (if so equipped).
8
9
10
button – Press to switch between the day screen (bright) and the night screen (dark).
Press and hold to turn off the display. Press again to turn on the display.
ZOOM IN button – Press to zoom the map in.
MAP button – Press to display the map. While following a programed route, press multiple
times to change the type of route information displayed.
11
SETTING button – Press to access the system settings.
12
BACK button – Press to return to the previous screen. In a settings screen, this button is also
used to apply the setting. In a character input screen, this button is also used to delete the
characters that have been entered.
13
VOICE button – Press to hear the current guidance for a programed route.
For more information, please refer to your Navigation System Owner’s Manual.
DVD Player (if so equipped)
This system allows you to play video files via a DVD
or USB storage device, containing supported file
formats, from the front display.
To view movies on the front display, stop the vehicle in
a safe location, move the shift lever to the P (PARK)
position and apply the parking brake.
To reduce driver distraction, movies will not be shown
on the front display while the vehicle is in any
drive position.
For more information, refer to the “Monitor, climate, audio, phone and voice
recognition systems (section 4)” of your Owner’s Manual.
23
Page 26
system guide
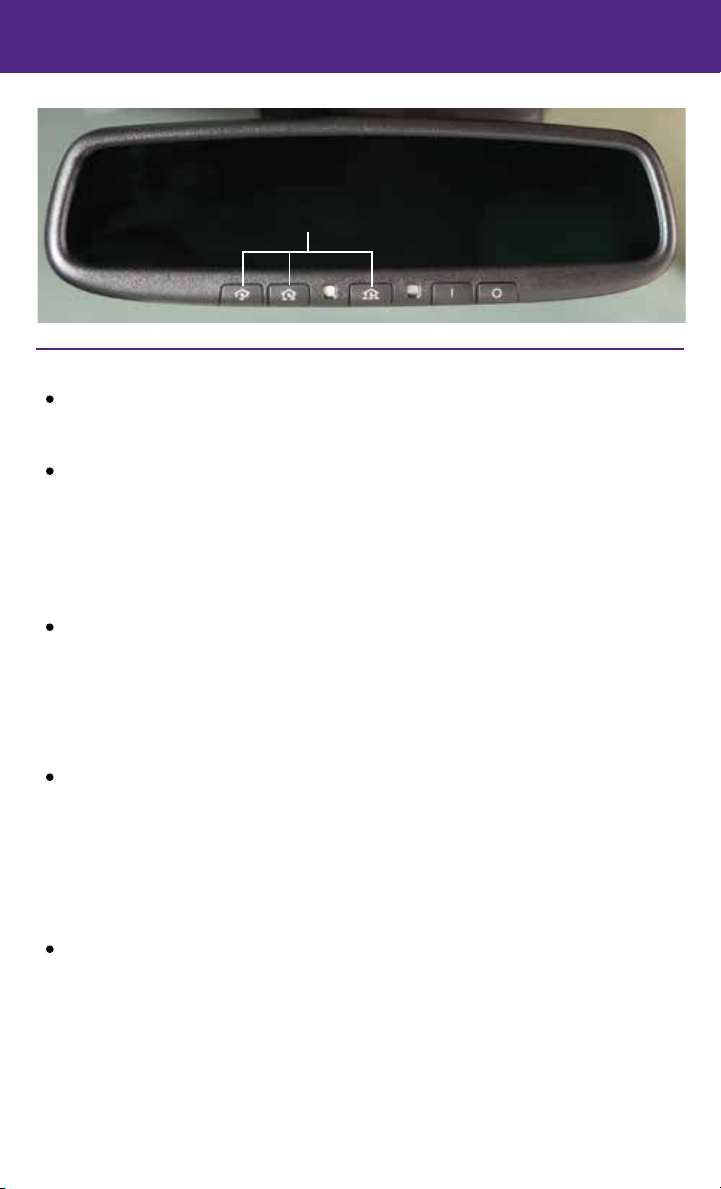
HOMELINK
HomeLink® Universal Transceiver
The HomeLink® Universal Transceiver can learn and consolidate the functions of up to
three different hand-held transmitters, operating items such as garage doors, property
gates, outdoor and indoor lights or alarm systems.
To program the HomeLink® Universal Transceiver:
• Position the handheld transceiver 1-3 in (26-76 mm) away from the HomeLink surface,
keeping the HomeLink indicator light in view.
• Press and hold the desired HomeLink button and the handheld transmitter button
simultaneously until the HomeLink indicator light flashes slowly and then rapidly.
• Both buttons may be released when the indicator light flashes rapidly.
To verify the programing is complete, press and hold the HomeLink button and observe
the indicator light:
• A solid, continuous light indicates the programing is complete and the HomeLink
button will activate your device.
• A blinking light that turns to a solid, continuous light after 2 seconds indicates
additional steps are required to complete the programing.
An additional person may make the remaining steps easier. To complete the
programing process:
• At the receiver of the device that you are programing to the HomeLink button, press
and release the learn or smart button (the name may vary by manufacturer but it is
usually located near where the hanging antenna wire is attached to the unit). You have
approximately 30 seconds to initiate the following step.
• Press and hold the programed HomeLink button for 2 seconds and release.
You may have to repeat the previous 2 steps up to 3 times to complete the programing
process. HomeLink should now activate your device.
For more information, refer to the “Instruments and controls (section 2)” of your Owner’s Manual, the HomeLink website at
www.homelink.com or call 1-800-355-3515.
24
Page 27

memo
Page 28
Printing: April 2014 (11) / QR15EA 0S51U0 / Printed in USA
This Quick Reference Guide is intended to provide an overview of some of the unique features of
your new vehicle. Please see your Owner’s Manual for important safety information and system
operation limitations. Features and equipment in your vehicle may vary depending on model,
trim level, options selected, order, date of production, region or availability. Therefore, you may
find information about features or equipment that are not included or installed on your vehicle.
All information, specifications and illustrations in this Quick Reference Guide are those in effect
at the time of printing. NISSAN reserves the right to change specifications, performance, design
or component suppliers without notice and without obligation. From time to time, NISSAN
may update or revise this Quick Reference Guide to provide owners with the most accurate
information currently available. Please carefully read and retain, with this Quick Reference Guide,
all revision updates sent to you by NISSAN to ensure you have access to accurate and up-to-date
information regarding your vehicle. Current versions of vehicle Quick Reference Guide, Owner’s
Manuals and any updates can also be found in the Owner section of the INFINITI website at
https://owners.infinitiusa.com/iowners/navigation/manualsAndGuides. If you have questions
concerning any information in your Owner’s Manual, contact INFINITI Consumer Affairs. See
the INFINITI CUSTOMER CARE PROGRAM page in the Owner’s Manual for contact information.
To view detailed instructional videos, go to
www.infinitiownersinfo.mobi/2015/qx70
or snap this barcode with an appropriate
barcode reader.
 Loading...