

Infiniti QX60 Hybrid, QX60, QX30 Owner's Manual

For your safety, read carefully and keep in this vehicle.
2017 Infiniti
Infiniti InTouch Owner’s Manual

(4,1)
INFINITI CONSUMER AFFAIRS DEPARTMENT
For assistance or inquiries about the
INFINITI warranty, service or general questions, contact the INFINITI Consumer Affairs
Department at:
For U.S. customers
1-800-662-6200
For Canadian customers
1-800-361-4792
INFINITI INTOUCHTMSYSTEM HELPDESK CONTACT INFORMATION
For assistance or inquiries about the
Infiniti InTouch
TM
system, or to order
updated map data, contact the INFINITI
NAVIGATION SYSTEM HELPDESK at:
. ADDRESS: P.O. Box 1588 Orem, UT
84059-992
. E-MAIL: infiniti-navi-info@here.com
. WEB SITE: www.InfinitiNavigation.com
or www.infiniti.ca.
. PHONES: 1-888-362-8837
. HOURS: Monday – Friday: 8:00 AM -
8:00 PM (Eastern Time) and Saturday:
10:00am - 6:00 PM (Eastern Time)
FOREWORD
Thank you for purchasing an INFINITI
vehicle.
This user’s manual is for the navigation
system only. This manual contains operating instructions for the Infiniti InTouch
TM
offered in your INFINITI vehicle.
Please read this manual carefully to ensure
safe operation of Infiniti InTouch
TM
.
. Because of possible specification
changes and optional equipment, some
sections of this manual may not apply
to your vehicle.
. All information, specifications and il-
lustrations in this manual are those in
effect at the time of printing. INFINITI
reserves the right to change specifications or design at any time without
notice.
. Do not remove this manual from the
vehicle when selling this vehicle. The
next user of this Infiniti InTouch
TM
may
need the manual.

(1,1)
Table of Contents
1 Introduction
How to use this manual ..................... 1-2
Safety information ............................. 1-3
Laser product .................................... 1-4
Customer assistance .......................... 1-5
2 Getting Started
Control buttons and functions ........... 2-2
Displaying operation screen .............. 2-7
Starting system ................................. 2-8
Touch panel operation ....................... 2-8
Navigation system status screen ...... 2-10
Shortcut menu ................................. 2-11
Map menu ....................................... 2-11
Display View Bar ............................. 2-12
How to input letters
and numbers ................................... 2-14
Functions disabled while driving ...... 2-15
Additional system information ......... 2-16
3 Map operation
Map types .......................................... 3-2
Displaying current
vehicle location .................................. 3-5
Moving map ....................................... 3-6
Changing scale of map ....................... 3-7
Changing map orientation .................. 3-8
Setting split screen ............................ 3-9
Map view settings ............................ 3-10
Setting information on map ..............3-13
Traffic information on map ................ 3-14
4 Setting destination
Changing region ................................ 4-2
Destination screen ............................. 4-3
Finding address ................................. 4-7
Finding points of interest ................... 4-8
Setting home as destination ............ 4-10
Finding nearby place ....................... 4-10
Searching from stored locations ...... 4-11
Searching from history .................... 4-12
Using Journey Planner ..................... 4-12
Setting intersection ......................... 4-13
Setting freeway entrance/exit .......... 4-14
Setting city center ........................... 4-15
Setting by phone number ................ 4-15
Setting from stored routes ............... 4-16
Searching by connecting
Data Center ..................................... 4-16
Setting by Infiniti
InTouch
Setting point on map ....................... 4-18
Procedures after setting route ......... 4-19
TM
Services .......................... 4-17
5 Route guidance
About route guidance ......................... 5-2
Guidance screen settings .................... 5-7
Canceling route .................................. 5-7
Route menu screen ............................. 5-8
Editing route ....................................... 5-9
Recalculating route ........................... 5-11
Searching for detour route using
traffic information ............................. 5-12

(2,1)
Displaying turn list ........................... 5-13
Route guidance settings ................... 5-14
Settings screen ................................ 8-23
Navigation settings .......................... 8-29
6 SiriusXM Traffic information
Viewing traffic information ................. 6-2
Viewing available
traffic information .............................. 6-3
7 Storing a location/route
Storing location .................................. 7-2
Storing route ...................................... 7-3
Storing avoid area .............................. 7-4
Editing stored information .................. 7-5
Deleting stored item ........................... 7-8
Transferring information to/from
address book ................................... 7-10
8 Information and settings
Information screen ............................. 8-2
SiriusXM Travel Link
Infiniti InTouch
®
TM
........................ 8-4
Services ............... 8-10
9 Voice Recognition for navigation system
INFINITI Voice Recognition ................... 9-2
10 General information
Current vehicle location ................... 10-2
Route calculation ............................. 10-6
Route guidance ................................ 10-8
Map data ....................................... 10-10
How to handle the SD card ............ 10-16
11 Troubleshooting guide
System unit ..................................... 11-2
Navigation ....................................... 11-4
Voice Recognition .......................... 11-12

(5,1)
1 Introduction
How to use this manual .......................................... 1-2
For safe operation .............................................. 1-2
Reference symbols ............................................. 1-2
Screen illustrations ............................................ 1-2
Safety information ................................................. 1-3
Laser product ........................................................ 1-4
Trademarks ...................................................... 1-4
Customer assistance .............................................. 1-5
(6,1)
1. Introduction
HOW TO USE THIS MANUAL
This manual uses special words, symbols,
icons and illustrations organized by function.
Please refer to the following items and
familiarize yourself with them.
FOR SAFE OPERATION
SG5TJN2-F375076F-362A-4309-A800-D1D6C6376A66
This is used to indicate the presence of a
hazard that could cause death or serious
personal injury. To avoid or reduce the risk,
the procedures must be followed precisely.
SG5TJN2-FFAF409C-10E2-45AA-BD7F-A8B0005F7083
This is used to indicate the presence of a
hazard that could cause minor or moderate
personal injury or damage to your vehicle. To
avoid or reduce the risk, the procedures must
be followed carefully.
SG5TJN2-D8FFB8FA-A072-42AA-8D6D-9FEA0AD9B6F9
SG5TJN2-AF356C63-BA5E-4B54-878D-6D8BA7D7E683
WARNING
CAUTION
NOTE:
Indicates items that help you understand and
maximize the performance of your vehicle. If
ignored, they may lead to a malfunction or poor
performance.
REFERENCE SYMBOLS
SG5TJN2-A9CE57CF-4F6A-454A-9EF8-91C4E396725F
INFO:
This indicates information that is necessary for
efficient use of your vehicle or accessories.
Reference page:
This indicates the title and page that you
should refer to.
[ ]:
This indicates a key/item displayed on the
screen.
Voice Command:
This indicates an operation by voice
command.
SCREEN ILLUSTRATIONS
SG5TJN2-5F699818-FF71-447B-881E-832E1898366B
Icons and menu items displayed on the
screen may be abbreviated or omitted from
the screen illustrations when appropriate.
The omitted icons and menu items are
described as dotted lines as illustrated.
5GB0034X
5GF0016X
1-2
(7,1)
1. Introduction
SAFETY INFORMATION
The navigation system is primarily designed to help you support your pleasant
driving as outlined in this manual. However, you, the driver, must use the system
safely and properly. Information and the
availability of services may not always be
up to date. The system is not a substitute
for safe, proper and legal driving.
Before using the system, please read the
following safety information. Always use
the system as outlined in this manual.
SG5TJN2-43837604-6D3B-4A88-95CC-9A1143515BA5
. To operate Infiniti InTouchTMor to use the
INFINITI controller or the control panel,
first park the vehicle in a safe location
and set the parking brake. Operating the
system while driving can distract the
driver and may result in a serious
accident.
. Exercise extreme caution at all times so
full attention may be given to vehicle
operation. If the system doesn’t respond
immediately, please be patient and keep
your eyes on the road. Inattentive driving
may lead to a crash resulting in serious
SG5TJN2-E215E2CD-5877-46AC-B4EF-5D0B6683FCA9
WARNING
injuries or death.
. Do not disassemble or modify this
system. If you do, it may result in
accidents, fire or electrical shock.
. If you notice any foreign objects in the
system hardware, spill liquid on the
system or notice smoke or a smell
coming from it, stop using the system
immediately. It is recommended you visit
an INFINITI retailer for servicing. Ignoring
such conditions may lead to accidents,
fire or electrical shock.
. Do not rely on route guidance alone.
Always be sure that all driving maneuvers are legal and safe in order to avoid
accidents.
SG5TJN2-CABB1B9E-B526-42ED-BC3A-AF6F2878701B
CAUTION
. Some jurisdictions may have laws limit-
ing the use of video screens while
driving. Use this system only where it is
legal to do so.
. Extreme temperature conditions [below
−48F (−208C) and above 1588F (708C)]
could affect the performance of the
system.
. The display screen may break if it is hit
with a hard or sharp object. If the display
screen breaks, do not touch it. Doing so
could result in an injury.
NOTE:
Do not keep the system running with the engine
or the hybrid system stopped. Doing so may
discharge the vehicle battery (12V battery).
When you use the system, always keep the
engine or the hybrid system running.
1-3

(8,1)
1. Introduction
LASER PRODUCT
This Infiniti InTouchTMis certified as a Class
1 laser product.
Infiniti InTouch
Rules 21 CFR Chapter 1, Subchapter J.
. Do not disassemble or modify this
system. There are no user serviceable
parts in Infiniti InTouch
. If maintenance, adjustments and opera-
tions other than those specified in this
manual are attempted, injury due to laser
radiation and exposure could occur.
TRADEMARKS
Required SiriusXM Satellite Radio and
SiriusXM Traffic monthly subscriptions are
sold separately. SiriusXM Traffic are only
available in select markets. For more
information,
see www.siriusxm.com/siriusxmtraffic
SG5TJN2-415B0FE3-387A-46ED-8CD5-D088A6D68506
TM
complies with DHHS
SG5TJN2-A0667E60-909D-4DC4-8EE9-D1197E1F8DB1
WARNING
TM
.
SG5TJN2-9FC03AD0-EBF8-481D-A9E5-F229D1F2B583
5GH0156X
5GH0157X
Required SiriusXM Satellite Radio and
SiriusXM Travel Link monthly subscriptions
are sold separately. SiriusXM Travel Link is
only available in select markets. For more
information,
see www.siriusxm.com/travellink
Google
C
*
2012 Google Inc. All rights reserved.
Google Calendar
TM
calendaring application
is a trademark of Google Inc.
1-4

(9,1)
1. Introduction
CUSTOMER ASSISTANCE
For assistance or inquiries about the
INFINITI Navigation System, or to order
updated map data, contact the INFINITI
NAVIGATION SYSTEM HELPDESK. See the
contact information on the inside front
cover of this manual.
SG5TJN2-EA84A59D-8111-427E-AF1B-134B59A3E4B8
1-5

(10,1)
1. Introduction
MEMO
1-6

(13,1)
2 Getting Started
Control buttons and functions ................................ 2-2
How to handle display ........................................ 2-2
INFINITI controller (if so equipped) ..................... 2-2
Control panel (if so equipped) ............................ 2-4
Steering wheel switches (Type A)
(if so equipped) ................................................. 2-5
Steering wheel switches (Type B)
(if so equipped) ................................................. 2-5
Map data card slot ............................................. 2-6
Displaying operation screen ................................... 2-7
MENU button operation (models with
INFINITI controller) .............................................. 2-7
Control panel operation (models with
control panel) ..................................................... 2-7
Starting system ...................................................... 2-8
Start-up screen .................................................. 2-8
Touch panel operation ............................................ 2-8
Operating menu screen ...................................... 2-9
Scrolling message or list .................................... 2-9
Selecting item .................................................. 2-9
Adjusting volume and settings .......................... 2-9
Navigation system status screen .......................... 2-10
Shortcut menu ..................................................... 2-11
Displaying shortcut menu screen .................... 2-11
Available items ............................................... 2-11
Edit shortcut menu ......................................... 2-11
Map menu ........................................................... 2-11
Displaying map menu ..................................... 2-11
Available items ............................................... 2-11
Display View Bar .................................................. 2-12
Customizing the Display View Bar ................... 2-14
How to input letters and numbers ........................ 2-14
Character (letters and numbers)
input screen ................................................... 2-14
Functions disabled while driving .......................... 2-15
Additional system information ............................. 2-16
Additional help ............................................... 2-17
(14,1)
2. Getting Started
CONTROL BUTTONS AND FUNCTIONS
Designs and button layout may vary
depending on the specifications and the
model.
HOW TO HANDLE DISPLAY
The display is a liquid crystal display and
should be handled with care.
Never disassemble the display. Some parts
utilize extremely high voltage. Touching
them may result in serious personal injury.
SG5TJN2-1D7E0D66-C372-4533-A154-A968B3FBAE87
SG5TJN2-372A4E1B-44A4-402D-B2E2-BBC1C2EE95EA
SG5TJN2-BF8A0598-D125-4FF1-B357-47FEEE82AED5
WARNING
Characteristics of liquid crystal
display
. If the temperature inside the vehicle is
especially low, the display will stay
relatively dim or the movement of the
images may be slow. These conditions
are normal. The display will function
normally when the interior of the
vehicle has warmed up.
. Some pixels in the display are darker or
brighter than others. This condition is
an inherent characteristic of liquid
GUID-9624F4FA-2727-48AA-9C0C-94B91701C52A
crystal display, and it is not a malfunction.
. A remnant of the previous display
image may remain on the screen. This
screen burn is inherent in display, and
it is not a malfunction.
The screen may become distorted by
strong magnetic fields.
Maintenance of display
GUID-1EA78076-C6DA-4A0D-8A85-030163FB1242
GUID-BBE1BEF8-DE9F-453F-9C9C-F24F74BE0D12
CAUTION
. To clean the display, stop the vehicle in a
safe location.
. Clean the display with the ignition switch
in the OFF position. If the display is
cleaned while the ignition switch is in the
ON position, unintentional operation may
occur.
. To clean the display, never use a rough
cloth, alcohol, benzine, thinner and any
kind of solvent or paper towel with a
chemical cleaning agent. They will
scratch or deteriorate the panel.
. Do not splash any liquid such as water or
car fragrance on the display. Contact with
liquid will cause the system to malfunc-
tion.
To clean the display screen, use a dry, soft
cloth. If additional cleaning is necessary,
use a small amount of neutral detergent
with a soft cloth. Never spray the screen
with water or detergent. Dampen the cloth
first, then wipe the screen.
INFINITI CONTROLLER (if so
equipped)
SG5TJN2-5071B81F-C81D-4CCA-B63C-026790F3C19F
JNB0437X
2-2
(15,1)
2. Getting Started
1
<MAP/VOICE>
*
Push to display the vehicle’s current
location on the map.
Push again to display the Display View
Bar.
“Display View Bar” (page 2-12)
Push and hold to hear the current
guidance for a programmed route.
2
<MENU>
*
Push to display the Menu screen.
Destination setting, route selection,
phone connection, activation and
download of applications, information
screen display or other settings can be
accessed from this screen.
“MENU button operation (models
with INFINITI controller)”
(page 2-7)
3
< /OK>/Center dial/Slide switch
*
Slide or turn to select an item, scroll to
the next/previous page or to adjust a
setting (volume, brightness, etc.).
When the map is displayed on the
screen, turn the center dial to adjust
the map scale.
The map can be scrolled in eight
directions by sliding this switch.
Push the switch to enter the selected
item.
If this switch is pushed while a map is
displayed, the shortcut menu or map
menu is shown on the display.
“Shortcut menu” (page 2-11)
“Map menu” (page 2-11)
4
< >
*
Push to go back to the previous screen.
5
<CAMERA > (models with Around
*
®
View
Monitor system)
Push to view the Around View
tor screen.
Push and hold to switch the display to
the daytime mode or the nighttime
mode, and to adjust the display brightness.
For details of the Around View
Monitor, refer to the vehicle Owner’s
Manual.
<
> (models without Around View
Monitor system)
Push to switch the display to the
daytime mode or the nighttime mode,
and to adjust the display brightness.
Push and hold to turn the display on/
off.
®
Moni-
®
®
2-3
(16,1)
2. Getting Started
CONTROL PANEL (if so equipped)
1
<CAMERA >
*
Push to operate the Around View
Monitor system. Refer to the vehicle
Owner’s Manual.
Push and hold <CAMERA
the display brightness to the daytime
mode or the nighttime mode, and to
adjust the display brightness level
using the center dial while the indicator is displayed at the center of the
screen.
GUID-AFB91C4D-C7F9-4E51-8F6D-05A9BE39791B
> to switch
tioner, audio and navigation route
information.
5
<AUDIO>
*
Push to operate the audio system.
Refer to the vehicle Owner’s Manual.
6
<MAP>
*
Push to display the vehicle’s current
location on the map. Push again to
display the Display View Bar.
“Display View Bar” (page 2-12)
7
< >
*
Push to return to the previous screen.
In a settings screen, this button is also
used to apply the setting.
Push to display the current location
2
<NAVI>
*
®
Push to display the navigation menu.
“Destination screen” (page 4-3),
“Route menu screen” (page 5-8)
3
<APPS>
*
Push to display the available Apps.
Refer to the vehicle Owner’s Manual.
4
<STATUS>
*
Push to display the current setting of
the vehicle information, air condi-
5GH0704X
map screen.
8
<ENTER>/Center dial/Slide switch
*
Push <ENTER> to enter the selected
item.
Push or turn to select an item, scroll to
the next/previous page or to adjust a
setting (volume, brightness, etc.).
When the map is displayed on the
screen, turn the center dial to adjust
the map scale.
The map can be scrolled in eight
2-4
(17,1)
directions by sliding this switch.
If the buttons are pushed while a map
is displayed, the shortcut menu or map
menu is shown on the display.
“Shortcut menu” (page 2-11)
“Map menu” (page 2-11)
9
<VOICE>
*
Push to repeat the voice guidance.
10
<INFO>
*
Push to display the Information menu
screen.
“Information screen” (page 8-2)
11
<SETTING>
*
Push to display the Settings menu
screen.
“Settings screen” (page 8-23)
STEERING WHEEL SWITCHES (Type
A) (if so equipped)
1
< > (TALK):
*
Push to enter the Voice Recognition
mode.
2
< > (Phone End):
*
End an active call and reject an
incoming call. Refer to the vehicle
Owner’s Manual for details.
3
< > (System on/off):
*
Push to turn on/off the audio system.
Refer to the vehicle Owner’s Manual
for details.
SG5TJN2-1B7CD1C1-5D48-4964-8816-2649513B59D0
“Giving voice commands”
(page 9-2)
2. Getting Started
4
<->/<+> (Volume control):
*
Push to adjust the volume.
5
< > (Phone Send):
*
Make a call and accept an incoming
call. Refer to the vehicle Owner’s
Manual for details.
STEERING WHEEL SWITCHES (Type
B) (if so equipped)
JNB0472X
1
<ENTER>
*
Tilt to highlight an item on the screen
or adjust a setting. Push to select the
highlighted item.
If this button is pushed while a map is
displayed, the shortcut menu or map
menu is displayed.
GUID-F72821E4-BFCD-414F-A3DA-54581C073BA4
“Shortcut menu” (page 2-11)
JNB0475X
2-5

(18,1)
2. Getting Started
“Map menu” (page 2-11)
2
< >
*
Push to return to the previous screen.
3
<+>/<−> (Volume control)
*
Push to adjust the volume.
4
< > (TALK)
*
Push to enter the Voice Recognition
mode.
“Giving voice commands”
(page 9-2)
MAP DATA CARD SLOT
An SD card containing map data is provided with the vehicle.
Type A (if so equipped):
To eject the SD card, open the console box
lid and the inside cover to expose the map
2-6
GUID-4A821D2A-F94E-49A8-B41B-601808917A61
5GH0590X
data SD card slot. Push the SD card in to
release the card from the slot and then pull
the card from the slot.
“Map data” (page 10-10)
Type B (if so equipped):
5GH0705X
To eject the SD card, open the console box
to expose the map data SD card slot. Push
the SD card in to release the card from the
slot and then pull the card from the slot.
“Map data” (page 10-10)
NOTE:
Never insert foreign objects such as coins
.
into the SD card slot. Doing so may result in
a malfunction of the device.
.
Do not apply overload to the SD card when
inserting it to the slot. Doing so may result
in a malfunction of the device.
.
The SD card may be hot when it is removed
from the device. This does not indicate a
malfunction.
INFO:
Do not remove the SD card containing map data.
If the SD card containing map data is accidentally removed, re-insert the SD card containing
map data into the slot and place the ignition
switch in the “OFF” position.

(19,1)
2. Getting Started
DISPLAYING OPERATION SCREEN
GUID-F076F218-3FE5-422C-BDB6-50A008A41CFD
MENU BUTTON OPERATION (models
with INFINITI controller)
Push <MENU> to display the Menu screen.
Touch the icon on the Menu screen to
display various operation screens.
. Navigation
Touch to display the Navigation menu
screen. The available functions will vary
based on the current navigation settings.
“Destination screen” (page 4-3)
“Route menu screen” (page 5-8)
. Phone
Touch to display the Phone screen.
Refer to the vehicle Owner’s Manual.
. Apps
Touch to display the Apps screen.
GUID-8370ABA5-E083-4429-B4E6-E95C9A30BFDB
JNB0445X
Refer to the vehicle Owner’s Manual.
. Information
Touch to display the Information menu
screen.
“Information screen” (page 8-2)
. Settings
Touch to display the Settings menu
screen.
“Settings screen” (page 8-23)
CONTROL PANEL OPERATION (models with control panel)
Push the button on the control panel to
display each operation screen.
. <NAVI>
Push to display the Navigation menu
screen. The available functions will vary
GUID-F037887C-B555-45AD-B126-627EF016F901
JNB0474X
based on the current navigation settings.
“Destination screen” (page 4-3)
“Route menu screen” (page 5-8)
. <APPS>
Push to display the Apps screen.
Refer to the vehicle Owner’s Manual
. <INFO>
Push to display the Information menu
screen.
“Information screen” (page 8-2)
. <SETTING>
Push to display the Settings menu
screen.
“Settings screen” (page 8-23)
2-7

(20,1)
2. Getting Started
STARTING SYSTEM
The system starts when the ignition switch
is pushed to the “ACC” or “ON” position.
START-UP SCREEN
For this system, when the ignition switch is
pushed to the “ACC” or “ON” position, the
start-up screen is displayed.
Touch [OK] after reading and agreeing to
the message. If you do not agree to the
message, some of Infiniti InTouch
tions will be disabled.
NOTE:
Do not keep the navigation system on with the
engine or the hybrid system stopped. Doing so
may discharge the vehicle battery (12V battery). When you use the navigation system,
always keep the engine or the hybrid system
running.
INFO:
Once you select [Decline] on the start-up screen,
the [OK]/[Decline] screen will not be displayed
for 30 days.
SG5TJN2-F7A7E93C-1CA4-4F06-A2C8-03063B07BE78
SG5TJN2-1CCFB241-BAB4-4C9C-8412-EF467F738826
TM
func-
TOUCH PANEL OPERATION
SG5TJN2-A1BF9C2C-4643-4997-9E6E-93C94C9905EC
Basic touch panel operation methods are
explained here.
. Touch
JNB0463X
Select and execute the selected key on
the screen.
. Swipe
5GH0583X
Menu screen pages will skip to the next
page.
. Drag
5GH0584X
Drag up or down to scroll. You can scroll
up and down a list screen.
Various further operations are possible for
a map screen. For detailed operations of
the map screen, refer to the map operation
section.
2-8

(21,1)
2. Getting Started
“Operating with touch panel operation” (page 3-5)
OPERATING MENU SCREEN
1
Touch [<] to scroll to the previous page.
*
2
Touch a preferred icon to execute a
*
SG5TJN2-B2704A91-F2DB-44B4-827A-4CF2E650F379
function and display the next screen.
3
Indicates the position of the currently
*
displayed page out of the total number
of available pages.
4
Touch [>] to scroll to the next page.
*
SCROLLING MESSAGE OR LIST
1
Drag the scroll bar up or down to scroll
*
SG5TJN2-61F59C45-775A-499D-8F59-D484F7E6F12A
the message or list up or down.
JNB0439X
2
Touch a preferred item.
*
3
If a listed item name is not completely
*
displayed (due to length), touch [>] to
display the hidden part of the name.
4
Touch [ ] or [ ] to scroll the
*
message or list one item at a time.
Touch [
] or [ ] to skip to the next
or previous page.
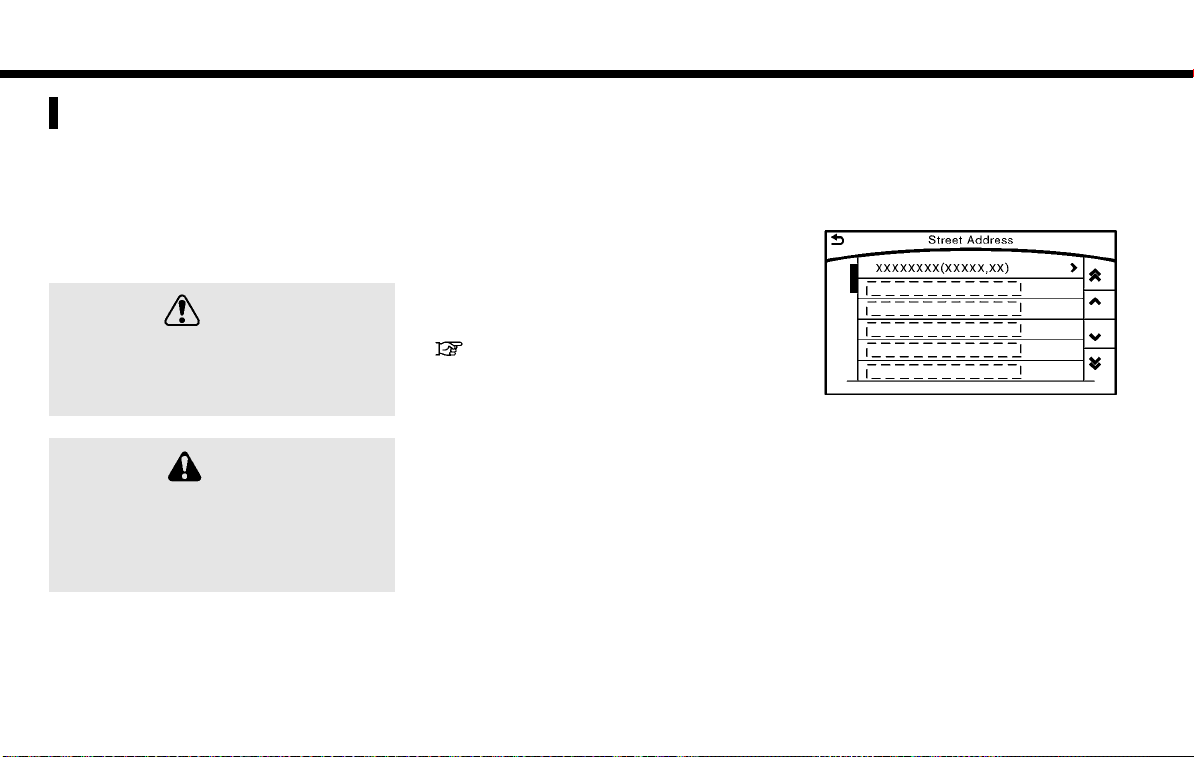
SELECTING ITEM
5GH0591X
SG5TJN2-95BA168E-58CE-49B9-BD55-B4571D8D40DB
When the item is touched, it is executed
and the next screen is displayed.
Touch [
] to return to the previous
screen.
ADJUSTING VOLUME AND SETTINGS
SG5TJN2-7511E082-9116-41D3-90B0-85329BDCEE4D
Set the volume and brightness.
Touch adjustment keys, such as [+]/[-], [L]/
[R], etc., to adjust each item. Each time a
key is touched, the indicator moves along
5GH0274X
5GH0592X
2-9

(22,1)
2. Getting Started
the bar.
NAVIGATION SYSTEM STATUS SCREEN
GUID-8CF1ED9E-8EB1-457B-917E-9DE16BB2F7CE
Models with INFINITI controller
By pushing <STATUS> on the audio system,
the current status of the system can be
displayed.
Models with control panel
By pushing <STATUS> on the control panel,
the current status of the system can be
displayed.
INFO:
There are different status screens displayed
depending on various factors, such as the
currently active mode, whether a destination
has been set or not, etc.
5GH0597X
When a route to the destination is set and
the audio system is on, a screen similar to
the one above appears.
Touching [<] /[>] can switch air conditioner
status screen and navigation route information screen.
When no route is set, a compass and the
direction of travel are displayed instead of
the route information.
2-10

(23,1)
2. Getting Started
SHORTCUT MENU
SG5TJN2-9C164757-2396-4631-B69B-CF8A10AF4BEE
DISPLAYING SHORTCUT MENU
SCREEN
Models with INFINITI controller
Push <
current location map screen is displayed to
display the shortcut menu screen.
Models with control panel
Push <ENTER> or touch [
current location map screen is displayed to
display the shortcut menu screen.
AVAILABLE ITEMS
The items on the shortcut menu can be
customized to your preference.
. Audio Source
. Audio List
GUID-DA408FA4-219C-4F75-9299-32CB129E6AA2
/OK> or touch [ ] while the
] while the
GUID-86486C82-3D40-4E49-9903-32CA449D6F6B
5GH0585X
. Call History
. Phonebook
. Cancel Route
. Nearby Places
. Store Location
. View Settings
. Select Add/Edit
. (Blank)
EDIT SHORTCUT MENU
GUID-52442C85-73B3-49EB-89CB-D088F16361E6
The following procedure can edit or sort the
shortcut menu.
1. Select [Select Add/Edit] to register a
new item to the menu, or to change an
existing menu item.
2. Select a preferred setting.
.
[Change Order]
Change the order in which shortcut
menu items are shown. Touch and
hold the [
] displayed next to the
item you wish to relocate. Drag the
icon to the position in the list where
you wish to insert the item.
.
[Edit Shortcut Items]
Select items to be displayed in the
shortcut menu.
MAP MENU
GUID-057D7EDA-4772-4FA5-8F66-56187640F354
DISPLAYING MAP MENU
Models with INFINITI controller
While scrolling the map screen, push <
/OK> or touch [ ] to display the map
menu.
Models with control panel
While scrolling the map screen, push
<ENTER> or touch [
menu.
AVAILABLE ITEMS
. New Destination
. Show Current Location
. Store Location
. Nearby Places
GUID-D232317D-C4A9-47A7-9C73-601FB4C4F00A
] to display the map
GUID-E952305E-EBC4-4C92-836A-3BCBA21A1944
5GH0615X
2-11

(24,1)
2. Getting Started
. Delete Stored Location
INFO:
[Delete Stored Location] is available only when
aligned the cross pointer over the stored
location.
DISPLAY VIEW BAR
SG5TJN2-3E1BEB07-8329-4B01-86E9-3CBE9325EDE7
Various map information screens can be
shown by selecting from the Display View
Bar.
5GH0276X
. Models with INFINITI controller
When the screen displays the map,
push <MAP/VOICE> to show the Display
View Bar.
. Models with control panel
When the screen displays the map,
push <MAP> to show the Display View
Bar.
Viewing Split Map:
5GH0058X
The map can be displayed on a split
screen. Each screen can be adjusted
independently.
Viewing Intersection:
5GH0689X
The next intersection is always displayed.
INFO:
When no route is set, the intersection screen is
not displayed and the map is displayed on the
full screen.
2-12

(25,1)
2. Getting Started
Viewing Turn List:
5GH0690X
This displays the turn list on the left
screen. When approaching a guide point,
the left screen automatically switches to an
enlarged view of the intersection.
INFO:
When no route is set, the turn list screen is not
displayed and the map is displayed in the full
screen.
Viewing Where am I ?:
5GH0691X
This displays the information about the
current vehicle location.
Viewing Turn by Turn:
5GH0692X
This displays a turn point when driving
according to route guidance.
INFO:
When no route is set, the turn by turn screen is
not displayed and the map is displayed in the
full screen.
Viewing Fuel Economy (if so equipped):
5GH0277X
Fuel economy information can be checked
while driving.
Viewing Eco Drive Report:
5GH0693X
Your driving score will be displayed in real
time, with 100 points designated as the
score for ideal eco-driving.
For improving your score:
. When starting off, depress the accel-
erator gently.
. When cruising, accelerate and decele-
rate as little as possible.
. When decelerating, releasing the accel-
erator early.
2-13

(26,1)
2. Getting Started
CUSTOMIZING THE DISPLAY VIEW
BAR
The menu icons on the Display View Bar
can be customized to your preference.
1. Display the Settings menu screen.
2. Touch [Navigation] to display the navigation setting screen.
3. Touch [Map & Display View] and touch
[Change Order].
4. Change the order of the icons to be
displayed on the Display View Bar.
Touch and hold the [
to the item you wish to relocate. Drag
the icon to the position in the list where
you wish to insert the item.
SG5TJN2-6EE6497B-04EC-44CB-BBFD-25DE617960BF
“Displaying operation screen”
(page 2-7)
] displayed next
HOW TO INPUT LETTERS AND NUMBERS
SG5TJN2-95CCE032-178B-4697-8BFB-8BB9856AFD9C
CHARACTER (letters and numbers)
INPUT SCREEN
Alphanumeric characters are entered using
the keyboard screen.
1
Touch a character on the displayed
*
keyboard. The selected character is
entered.
2
Entered characters are displayed here.
*
3
Touch [Delete] to delete the last
*
character entered.
Touch and hold [Delete] to delete all
the characters entered.
SG5TJN2-9244CA6E-8CE8-4E92-9F93-3F3D3E32096E
5GH0587X
4
The symbol keys are displayed by
*
touching [Symbols]. Touch [A-Z] to
return to the alphabet keys.
5
Touch [Space] to enter a space.
*
6
Touch [OK] or [List] to finalize your
*
input.
INFO:
Touch [CAPS] to toggle uppercase and low-
.
ercase characters on the keyboard screen.
.
Touch [ ] or [ ] to move the character
input position.
2-14

(27,1)
2. Getting Started
FUNCTIONS DISABLED WHILE DRIVING
SG5TJN2-96075C82-A5BC-42F2-A4C5-DF0BB2863C3F
Example
5GH0593X
To help ensure safe driving, some functions cannot be operated or have limited
operation while the vehicle driving speed
is above 5 MPH (8 km/h).
The on-screen text and keys for these
restricted functions will be “grayed-out”
or muted and cannot be selected while
driving. In some cases, a screen message
will appear indicating a restricted function.
Restricted functions while driving include:
. Character (letter and number) input
screen.
. Scrolling and viewing of certain list
screens
. Displaying detail information and
touching item on the information
screen
. Adding/editing home location, address
book entries and current route
. Making a call by dial number and
handset phonebook
. Setting phone, Infiniti InTouch
vices and Bluetooth
®
functions
TM
Ser-
These functions will become available
again when the vehicle speed is reduced
to 5 MPH (8 km/h) or less.
2-15

(28,1)
2. Getting Started
Destination functions available while driving include:
. Home
. Nearby Places
. Stored Locations
. Previous Destinations
. Journey Planner
. Stored Routes
. Map input
ADDITIONAL SYSTEM INFORMATION
Infiniti InTouchTMuses an operating system
like those found on many computers,
tablets and cell phones. Like these devices, processing speed may vary, and
system response delays or resets may
occur intermittently. This does not indicate
a malfunction, and further information on
system operation can be found below.
System Start-Up
Due to the large number of features and
capabilities that the Infiniti InTouch
system needs to load on start-up, it may
take up to a minute for all functions (such
as Apps) to be available. The system will
display “Now Loading All Apps...” during
this time.
System Response Delay
Infiniti InTouch
like those found on many computers,
tablets and cell phones. Like these devices, sometimes programs do not respond
immediately and this may temporarily
delay system use.
In most situations, simply waiting a few
moments longer should be sufficient for
the pending operations to complete.
SG5TJN2-93B76E8C-BA3A-4164-9CB4-4EBBD272A364
TM
TM
uses an operating system
If the system temporarily does not respond
to commands, the system can be easily
reset. Simply push down the Audio Power
knob for at least 5 seconds. The system will
turn off and restart.
After restart, all functions should be
available.
If a navigation route was set, the route
should resume automatically.
System Reset
As noted above, intermittent system resets
may occur during normal operation. You
may also wish to reset the system if you
find that a particular feature is not loading
or responding. Often, a quick system reset
will resolve any issue you may be experiencing. After restart, all functions will be
available as described above.
System Updates
The Infiniti InTouch
TM
system is designed
to allow software updates for additional
enhancements and new features. If you
have questions about system performance,
contact your retailer to ensure that your
vehicle has had the latest available software installed.
2-16

(29,1)
2. Getting Started
Operating Tips
Infiniti InTouch
TM
provides several methods of operation to suit your preferences.
The following are suggested operating tips.
. Operating the INFINITI controller, con-
trol panel, Steering Wheel Controls, or
other controls too quickly can cause a
lag between the control and the display. Operate the controls carefully and
allow the system to respond to your
request.
. INFINITI recommends using Voice Re-
cognition whenever possible to select
options while driving. Some touch
screen functionality is intentionally
unavailable during driving. Please view
the available voice commands by pushing the <
> (TALK) switch and then
selecting a category on the display.
. When looking for a street address or
Points of Interest (POI), remember that
you can use Connected Search and
Destination Assistance features within
Infiniti InTouch
TM
Services to expand
your search methods and results. The
Voice Recognition system recognizes a
defined set of commands. These commands can be viewed in the display by
pushing the <
> (TALK) switch and
then selecting a category from the
displayed list. The commands can also
be found in the Voice Recognition
section under
“Command list” (page 9-7).
. In some situations, the system may not
be able to recognize your command
even if you say the exact command.
This can be due to noise conditions or
an accent.
. In some unique cases, the system may
expect a word to be spoken as it is
spelled as opposed to the way it is
normally pronounced.
ADDITIONAL HELP
SG5TJN2-98BE3DDA-648D-476F-97C1-096A46CBBB31
For additional technical information, visit
the following websites or contact the
support line.
Websites:
www.infinitiusa.com (for U.S.)
www.infiniti.ca (for Canada)
Support line:
1-855-444-7244
2-17

(30,1)
2. Getting Started
MEMO
2-18

(31,1)
3 Map operation
Map types .............................................................. 3-2
2D map .............................................................. 3-2
Birdview
Building graphics ............................................... 3-4
Displaying current vehicle location ......................... 3-5
Operating with touch panel operation ................ 3-5
Operating with INFINITI controller (if
so equipped) ...................................................... 3-5
Operating with control panel (if so equipped) ...... 3-5
Moving map ........................................................... 3-6
2D map .............................................................. 3-6
Birdview
TM
(3D) map .......................................... 3-4
TM
(3D) map .......................................... 3-6
Changing scale of map .......................................... 3-7
Touch panel operation ...................................... 3-7
Center dial operation ........................................ 3-7
Map scale ......................................................... 3-7
Changing map orientation ...................................... 3-8
Setting split screen ................................................ 3-9
Map view settings ................................................ 3-10
Setting information on map ................................. 3-13
Displaying facility icons .................................. 3-13
Displaying map scrolling information .............. 3-13
Road color ...................................................... 3-13
Traffic information on map ................................... 3-14

(32,1)
3. Map operation
MAP TYPES
Two types of map views are available: 2D
map and Birdview
2D MAP
The 2D map displays the map in a twodimensional environment similar to a road
map.
SG5TJN2-8F144229-3732-40A7-B87E-81F06E4649A2
TM
(3D) map.
SG5TJN2-EE372FB2-4CFF-45FF-B632-64E8205D13D0
Screen information:
1
*
2
*
Arrow:
Indicates the turning direction of the
next guide point. Distance to the guide
point is also indicated above the
arrow.
Traffic indicator:
Displays the reception condition of
traffic information transmitted from
the traffic information provider.
When the reception condition of traffic
information transmitted from the pro-
vider is not detected, the traffic indicator will be “grayed-out”.
3
Waypoint:
*
Displays the set locations between the
starting point and the destination. A
maximum of five waypoints can be set.
4
Guide point:
*
Indicates a guide point on the route.
5
Vehicle icon:
*
Indicates the current vehicle location
and the direction of travel.
5GB0630X
3-2
 Loading...