

Page 1

2017
INFINITI QX50
QUICK REFERENCE GUIDE
Page 2

To view detailed instructional videos, go to
www.infinitiownersinfo.mobi/2017/qx50
or snap this barcode with an
appropriate barcode reader.
Helpful Resources
BELOW IS A LIST OF HELPFUL RESOURCES THAT CAN BE USED TO LEARN MORE ABOUT THE VEHICLE’S SYSTEMS AND FEATURE OPERATIONS.
• VEHICLE OWNER’S MANUAL
• INFINITI CLIENT SUPPORT
Support is always available if your Infiniti retailer cannot assist you or you would
like to provide INFINITI directly with comments or questions.
• INFINITI ROADSIDE ASSISTANCE 1-800-662-6200 (option 1)
As part of the Infiniti Total Ownership Experience®, Roadside Assistance
is available to you, 24 hours a day 365 days a year, for emergency
roadside assistance.
• INFINITI ELITE® EXTENDED PROTECTION PROGRAM 1-800-662-6200
Infiniti Elite® Assurance Products provide you with quality long-term protection
and enhanced peace of mind.
• INFINITI FINANCIAL SERVICES CLIENT SUPPORT 1-800-627-4437
For client support with your Infiniti Financial Services loan or lease.
• INFINITI FINANCIAL SERVICES www.infinitifinance.com
Use the IFS Online Account Manager to check your account status, schedule
recurring payments and access important forms.
1-800-662-6200
• OWNER PORTAL 1-855-444-7244 www.owners.InfinitiUSA.com/iowners
Your Infiniti Owner Portal account contains your personal preferences, vehicle
information and links to key vehicle features and services.
• INFINITI INTOUCH
The suite of services that is your direct link to personal security, convenience
and confidence.
• SiriusXM RADIO 1-877-447-0011
For support with your SiriusXM subscription.
• INFINITI USA.COM w ww.InfinitiUSA.com/bluetooth
Reference this site for a list of compatible cellular phones and instructions on
how to pair your cellular phone to your vehicle.
• INFINITI ELECTRONIC QUICK REFERENCE GUIDE
(use the Quick Response (QR) code or URL on this page or on the back cover)
™
1-855-444-7244 usa.infinitiintouch.com
Page 3
Table of Contents
Cockpit Overview ............................................................................. 1
Instrument Panel ............................................................................. 3
Meters and Gauges .......................................................................... 5
Connecting your Cellular Phone or Device via Bluetooth
®
Bluetooth
Intelligent Cruse Control (ICC) (if so equipped) ................................ 8
Navigation System (if so equipped) ................................................. 9
Infiniti Intelligent Key System ........................................................ 10
Seat Adjustments ..........................................................................10
Additional information about your vehicle is also available in your Owner’s Manual, Navigation System Owner’s Manual and at www.InfinitiUSA.com.
Streaming Audio (if so equipped) ................................... 7
®
................. 7
Opening the Liftgate ......................................................................11
Sun Visors .....................................................................................11
USB Connection Port...................................................................... 11
Exterior Light Operation .................................................................12
Windows ....................................................................................... 12
Clock Set/Adjustment .................................................................... 13
Trip Computer ................................................................................ 13
Wiper and Washer Switch ..............................................................14
Brightness Control Switches ..........................................................14
PLEASE SEE YOUR OWNER’S MANUAL FOR IMPORTANT SAFETY INFORMATION AND SYSTEM OPERATION LIMITATIONS.
• A cellular telephone should not
be used for any purpose while
driving so full attention may be
given to vehicle operation.
• Always wear your seat belt.
• Supplemental air bags do not
replace proper seat belt usage.
• Children 12 and under
should always ride in the
rear seat properly secured
in child restraints or seat
belts according to their age
and weight.
• Do not drink and drive.
For more information, refer to the “Safety — Seats, seat
belts and supplemental restraint system (section 1)”,
the “Display screen, heater and air conditioner, and
audio system (section 4)” and the “Starting and driving
(section 5)” of your Owner’s Manual.
Page 4

Cockpit Overview
5
6
7
4
3
2
1
1
For more information, refer to your Owner’s Manuals.
Page 5

Cockpit Overview
Intelligent Cruise Control (ICC) switches (if so equipped)
1
Cruise control switches
2
Wiper and washer switch
3
Vehicle information display
4
Combined turn signal/Headlight control switch
5
Vehicle information display and audio control switches
6
Bluetooth® control switches
7
For more information, refer to your Owner’s Manuals.
2
Page 6

Instrument Panel
9
8
1
2
3
7
4
5
6
3
For more information, refer to your Owner’s Manuals.
Page 7

Instrument Panel
Multi-function control touch-screen/ RearView Monitor display/
1
Around View® Monitor (AVM) display (if so equipped)
Navigation control panel
2
Push-button engine start
3
Audio control panel
4
Climate control panel
5
• Heater and air conditioning (automatic)
• Front/Rear window defroster
Shift lever
6
Parking brake
7
Hood latch release
8
Lower switch bank
9
• Vehicle Dynamic Control (VDC) OFF switch
• IBA OFF switch
• Safety Shield OFF switch
• Intelligent Key port
For more information, refer to your Owner’s Manuals.
4
Page 8

Meters and Gauges
6
5
5
4
3
For more information, refer to your Owner’s Manuals.
2
1
Page 9

Meters and Gauges
Fuel gauge
1
Speedometer
2
Vehicle information display
3
Shift lever indicator
4
Tachometer
5
Engine coolant temperature gauge
6
For more information, refer to your Owner’s Manuals.
6
Page 10

Connecting your Cellular Phone
or Device via Bluetooth
®, 1, 2
Bluetooth® Streaming Audio
(if so equipped)
The vehicle must be stationary when
connecting the cellular phone.
1. Press the SETTING button on
the control panel and touch the
“Bluetooth” key on the display.
2. Touch the “Connect
Bluetooth” key.
3. A pop-up box will appear on the
screen, prompting you to confirm
that the connection is for the
hands-free phone system. Touch
the “Yes” key.
4. Initiate connecting from the
cellular phone.
For any Bluetooth
or device.
1
Availability of specific features is dependent upon the phone’s Bluetooth® support. Please refer to
your phone owner’s manual for details. Bluetooth
SIG, Inc.
2
Some jurisdictions prohibit the use of cellular telephones while driving. Compatible smartphone
required. Text rates and/or data usage may apply
®
connectivity issues, reboot your cellular phone
®
word mark and logos are owned by Bluetooth
7
1. Press the SETTING button
on the control panel and
touch the “Bluetooth”
key on the display.
2. Select “Connected
Devices”.
3. Select “Audio Player”.
4. Select the name of the
device that you are
attempting to connect as
an audio player.
5. Select “Select”.
6. Verify that the system confirms that the device has been selected as an
audio player.
For any Bluetooth® connectivity issues, reboot your cellular phone or device.
For more information, refer to your Owner’s Manuals.
Page 11
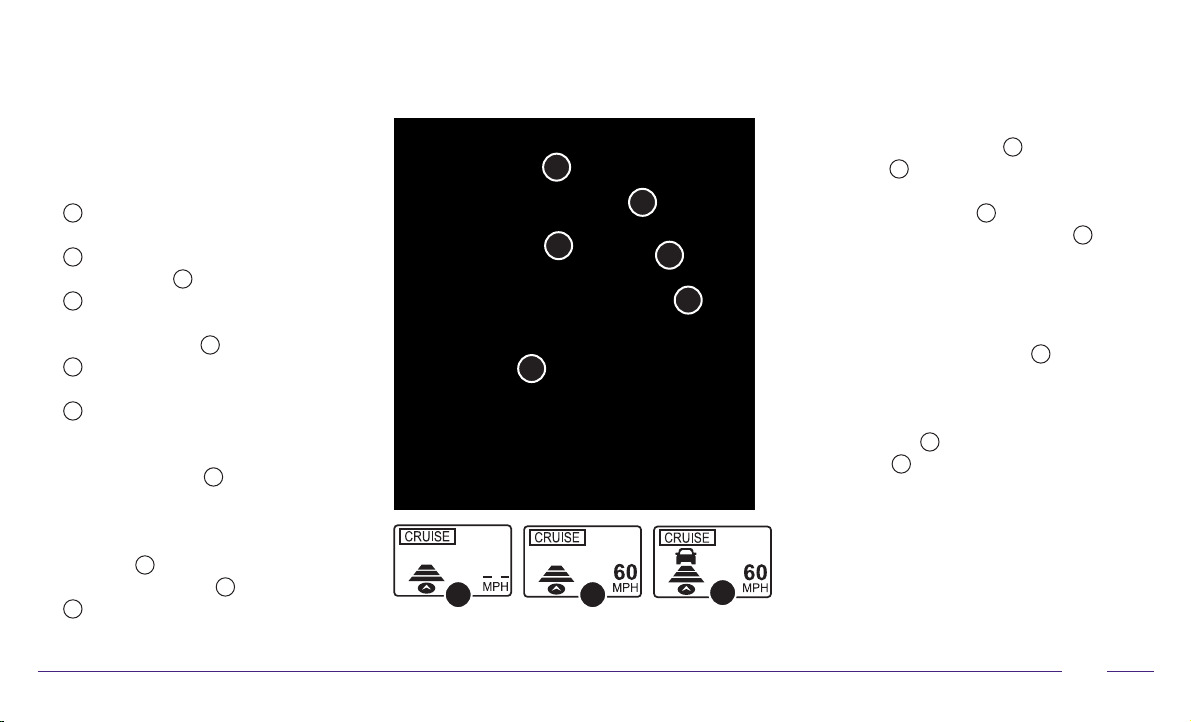
Intelligent Cruise Control (ICC) (if so equipped)
The vehicle’s cruise control maintains a constant
set speed for you. The system is operational
only at speeds above 20 mph (32 km/h).
• Press the CRUISE ON/OFF button
1
to turn the system on and off.
The indicator lights will illuminate
2
in set mode and extinguish.
• Push the switch 3 down toward COAST/SET
4
and release it to set the desired speed.
• To set at a slower cruising speed, push down
and hold the switch
4
until the desired speed is reached.
• Press the vehicle-to-vehicle distance button
5
repeatedly to change the set distance.
• When a vehicle is not detected ahead, the
set distance and set vehicle speed indicator
lights will illuminate 6 in set mode.
• When a vehicle is detected ahead, the
vehicle ahead detection, set distance
and set vehicle speed indicator lights will
illuminate 7 in set mode.
• Push up on the switch 3 toward ACCEL/RES
8
and release it to resume the set speed.
For more information, refer to your Owner’s Manuals.
3
toward COAST/SET
• To set a higher cruising speed, push up
and hold the CANCEL switch
9
8
3
4
1
5
2
6
7
ACCEL/RES
is reached.
• Push the CANCEL switch
speed. The set vehicle speed indicator 6
will change to gray.
TO SET CONVENTIONAL (FIXED SPEED)
CRUISE CONTROL MODE:
• While cruise control is off, press and
hold the CRUISE ON/OFF button
more than 1.5 seconds. The CRUISE
indicator light will illuminate.
• Accelerate to the desired speed.
• Push the switch 3 down toward
COAST/SET 4 and release it. The SET
indicator light will illuminate.
8
until the desired speed
3
toward
9
to cancel the set
1
for
8
Page 12
Navigation System (if so equipped)
• Your Navigation System can calculate
a route from your current location to a
preferred destination. The real-time map
display and turn-by-turn voice guidance will
lead you along the route.
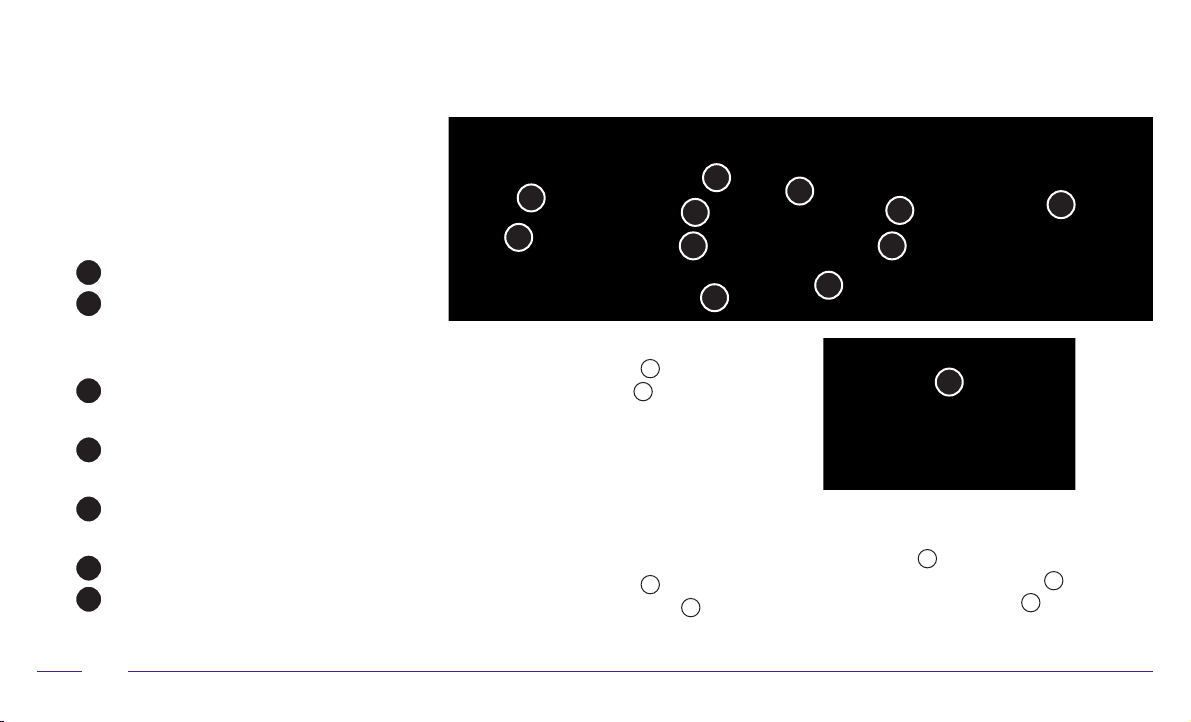
SYSTEM OPERATION
Rotate to highlight an item on the screen.
1
Press the ENTER button to select the
2
highlighted item, or touch the desired key
on the touch-screen display.
Press the BACK button to return to the
3
previous screen.
Press the MAP button to display the map on
4
the display.
Push and hold to switch between the day
5
screen (bright) and the night screen (dark).
Press the INFO button to display map info.
6
Press the SETTING button to access the
7
navigation settings.
SETTING A ROUTE
1. Press the ROUTE button
2. Touch the DEST button
3. Enter the House Number and touch the
4. Enter the Street Name and touch the
5. Select the preferred Street/City combination.
6. Touch the “Start” key.
CANCELING A ROUTE
1. Press the ROUTE button
2. Select the “Cancel Route” key
11
12
“OK” key.
“List” key.
9
8
2
6
5
7 4
3
8
.
9
.
8
.
10
.
1
10
ZOOMING IN AND OUT
• On the map screen, turn the Infiniti
controller
press the ZOOM OUT button 11 to zoom out
and the ZOOM IN button
1
right or left to zoom in or out or
12
to zoom in.
9
For more information, refer to your Owner’s Manuals.
Page 13
Infiniti Intelligent Key System
Seat Adjustments
ROLL DOWN FEATURE
The windows can be opened remotely using your
Infiniti Intelligent Key.
• Press and hold the unlock button
windows and moonroof (if so equipped) remotely.
• If the unlock button 1 is released, the windows
will stop. To resume the roll down feature, press
and hold the unlock button 1 again.
For more information, refer to your Owner’s Manuals.
1
to open the
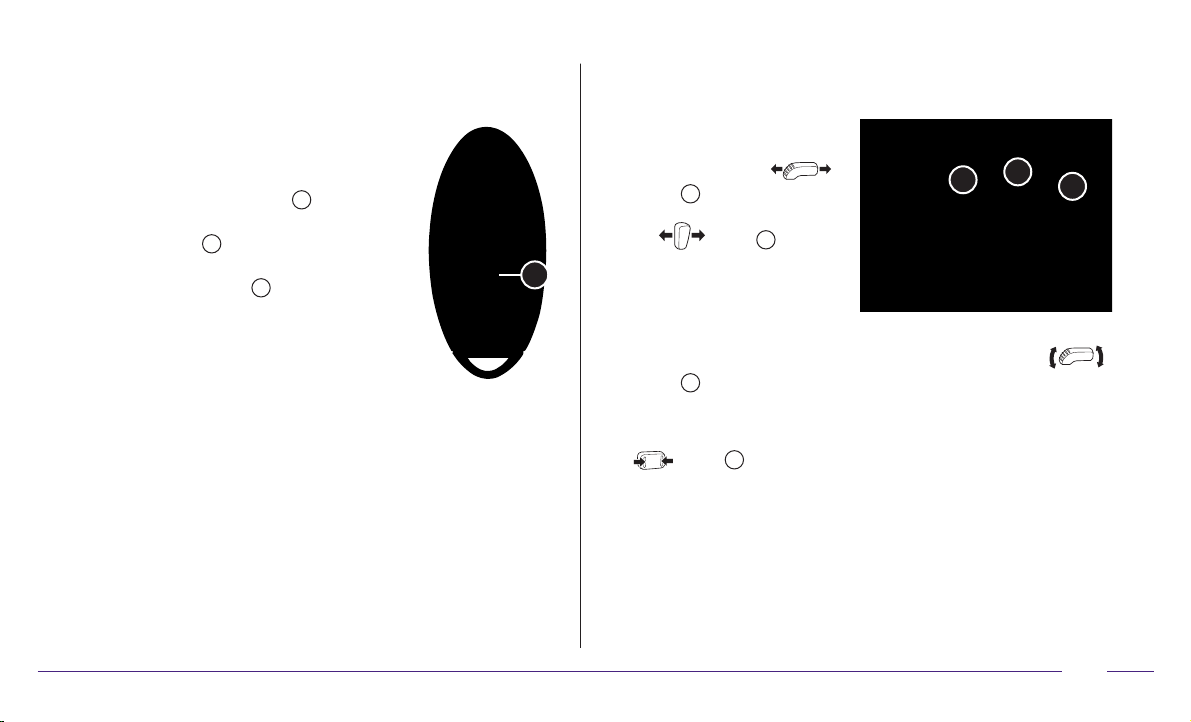
POWER SEAT ADJUSTMENTS
• To slide the seat forward or
backward, push the
switch 1 forward or backward.
• To recline the seatback, push
the
1
or backward.
SEAT LIFTER (driver’s seat and if
so equipped for passenger’s seat)
• To adjust the angle of the front
portion or height of the seat, push the front or rear end of the
1
switch
POWER LUMBAR SUPPORT (if so equipped for driver’s seat)
• To adjust the seat lumbar support, push the front or back end of the
up or down.
switch
switch
3
.
2
forward
2
1
3
10
Page 14
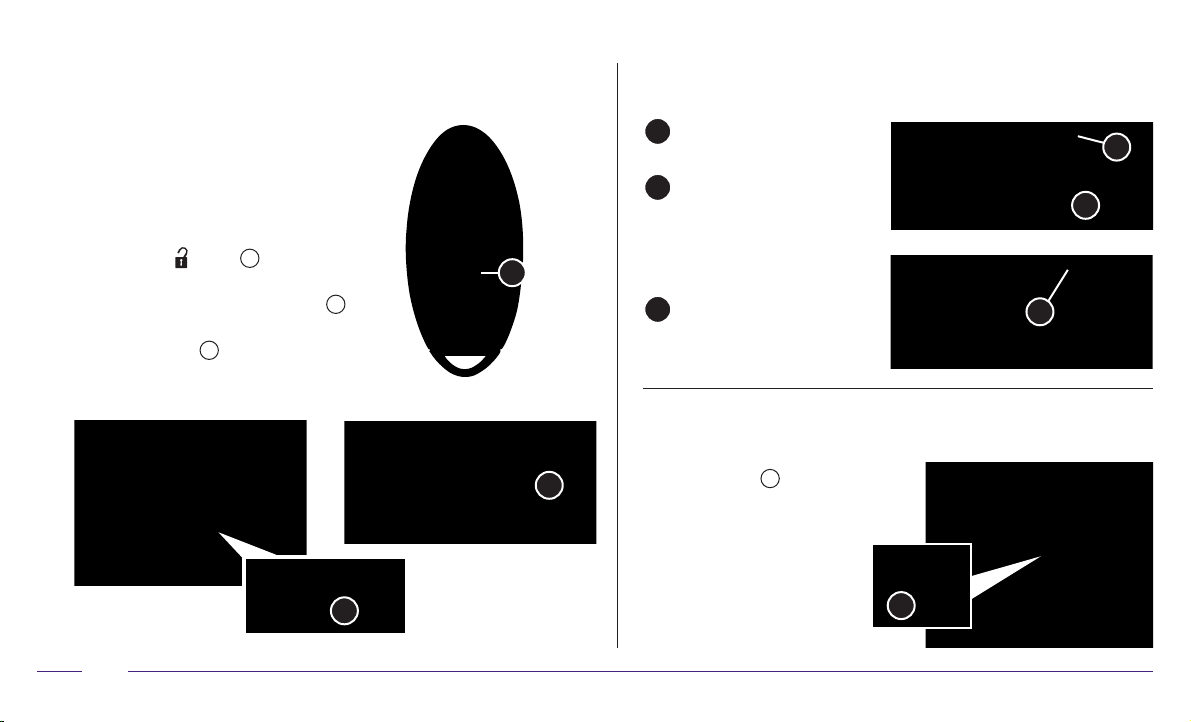
Opening the Liftgate Sun Visors
LIFTGATE RELEASE
• It is important to make sure the
Intelligent Key is with you (that is, in
your pocket or purse).
• Use one of the following methods to
unlock the liftgate:
· Press the
Intelligent Key twice.
· Push the liftgate request switch 2.
• To open the liftgate, push the liftgate
opener switch 3 located just above
the license plate and pull the liftgate
opener handle.
button 1 on the Infiniti
11
Pull down the sun visor to
1
block glare from the front.
Remove the sun visor from
2
the center mount by lifting
it slightly and swing it to the
1
side to block glare from the
side window.
Slide the sun visor out from
3
the mount to further extend
the visor location.
3
2
1
USB Connection Port
2
3
• The USB port 1 is located
in the center console under
the armrest. Compatible
audio and video files
stored on a USB device
can be played through the
vehicle’s audio system and
front display.
1
For more information, refer to your Owner’s Manuals.
Page 15
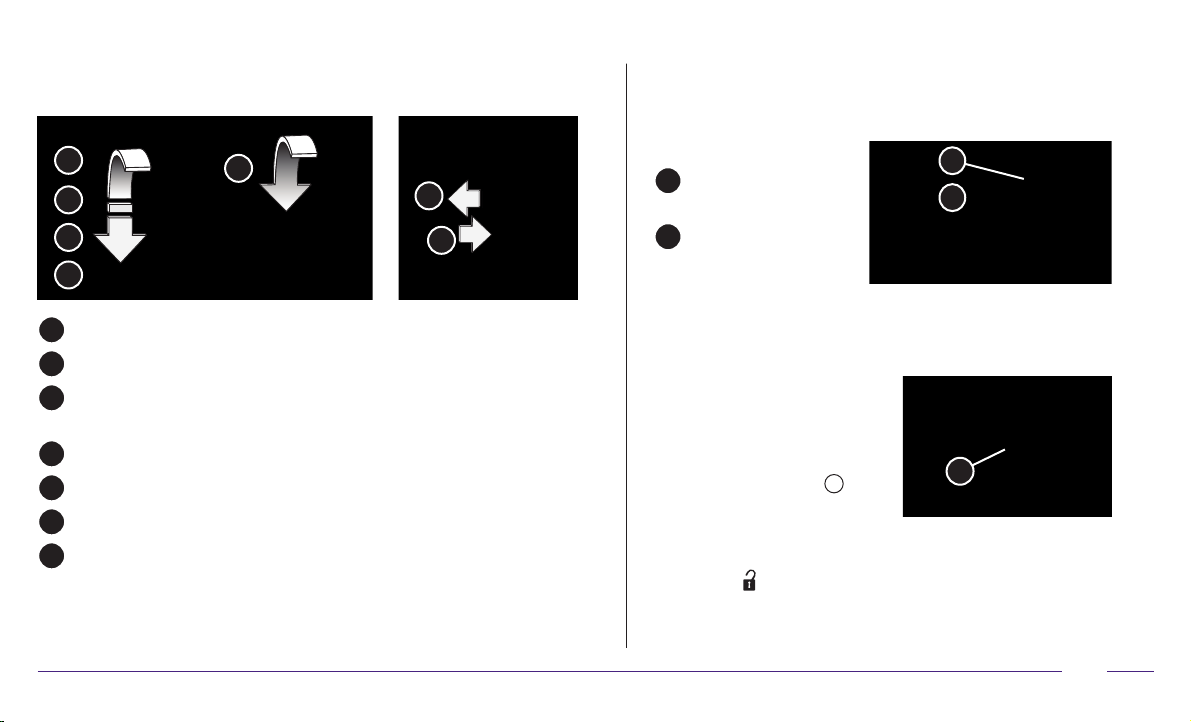
Exterior Light Operation Windows
All power windows can be operated through the main switch on the
4
3
1
2
5
6
7
driver’s door.
Power windows
1
open/close.
Disable rear passenger
2
window operation by
rear passengers.
2
1
Side lights, license plate lights and combination meter lighting ON position
1
Headlight ON position
2
Automatic AUTO headlight mode ON position (headlights switch on/off
3
automatically depending on ambient light conditions/daytime light system)
OFF position
4
Front fog light switch
5
Push the headlight switch forward for the high beams.
6
Pull the headlight switch rearward to flash the high beams.
7
For normal headlight operation, leave the exterior light switch in the AUTO position.
For more information, refer to your Owner’s Manuals.
POWER WINDOW CONVENIENCE OPENING/CLOSING FEATURE
The vehicle can be locked/unlocked and the power windows can
be closed/opened simultaneously
from outside the vehicle using
the Intelligent Key as follows:
To lock the vehicle and close the
power windows simultaneously,
touch the sensor surface
on the door handle until the
windows are fully closed.
To unlock the vehicle and open the windows simultaneously, press
and hold the
have reached the desired position.
button on the Intelligent Key until the windows
3
3
12
Page 16
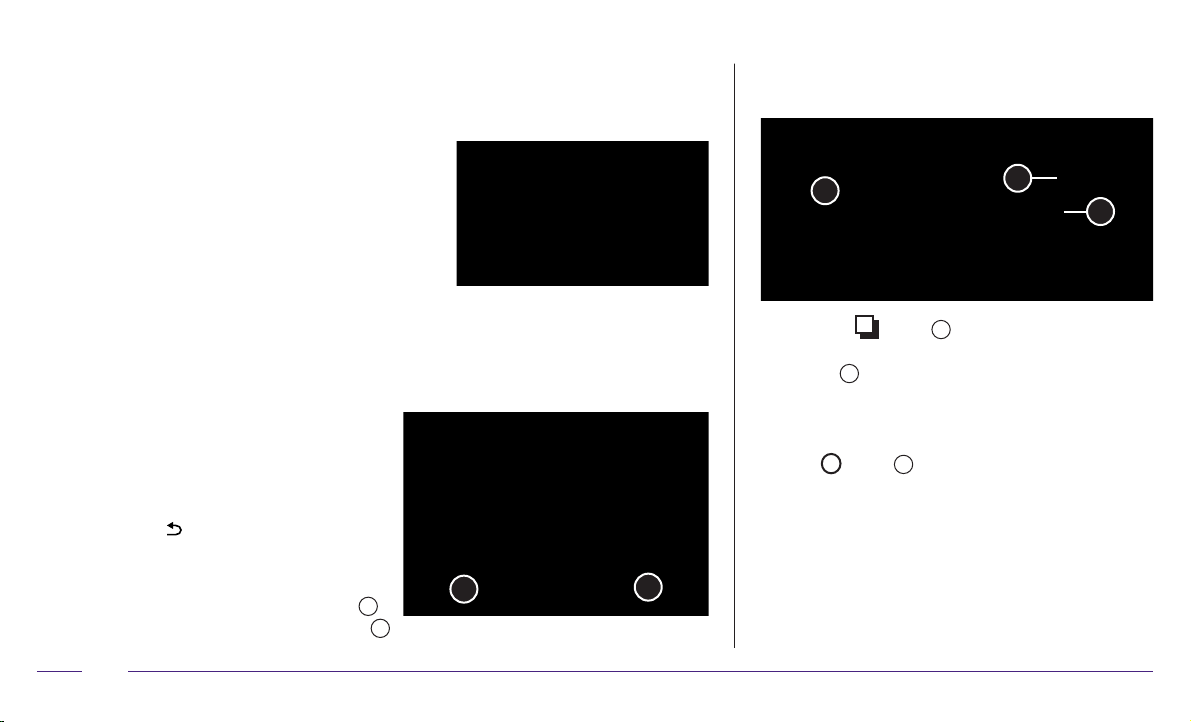
Clock Set/Adjustment
DIGITAL CLOCK WITH NAVIGATION (if so equipped)
• To adjust the time and the appearance of the clock
on the display:
1. Press the SETTING button on the control panel.
2. Select the “Others” key.
3. Select the “Clock” key.
• The following settings can be adjusted:
· On-screen Clock: The clock in the upper right
corner of the display can be turned ON or OFF.
· Clock Format (24h): The clock can be set to 12 hours or 24 hours.
· Offset (hour): The time can be adjusted by increasing or decreasing per hour.
· Offset (min): The time can be adjusted by increasing or decreasing per minute.
· Daylight Savings Time: The application
of Daylight Savings Time can be turned
ON or OFF.
· Time Zone: Adjust the time zone. Choose
a time zone from the available list.
• Press the BACK button to return to the
previous screen.
ANALOG CLOCK
1
To set the clock forward, press the button
To set the clock backward, press the button 2.
.
2
Trip Computer
2
• When the button 1 is pressed, the following
modes will appear on the vehicle information
2
display
MPG, MPG/MPH, TIME/MILES, RANGE,
OUTSIDE TEMP, SETTING, WARNING
· To reset the elapsed time/miles, press and hold
the
Both elapsed time/miles will reset at the
same time.
1
:
button 3 for more than 1 second.
1
3
13
For more information, refer to your Owner’s Manuals.
Page 17
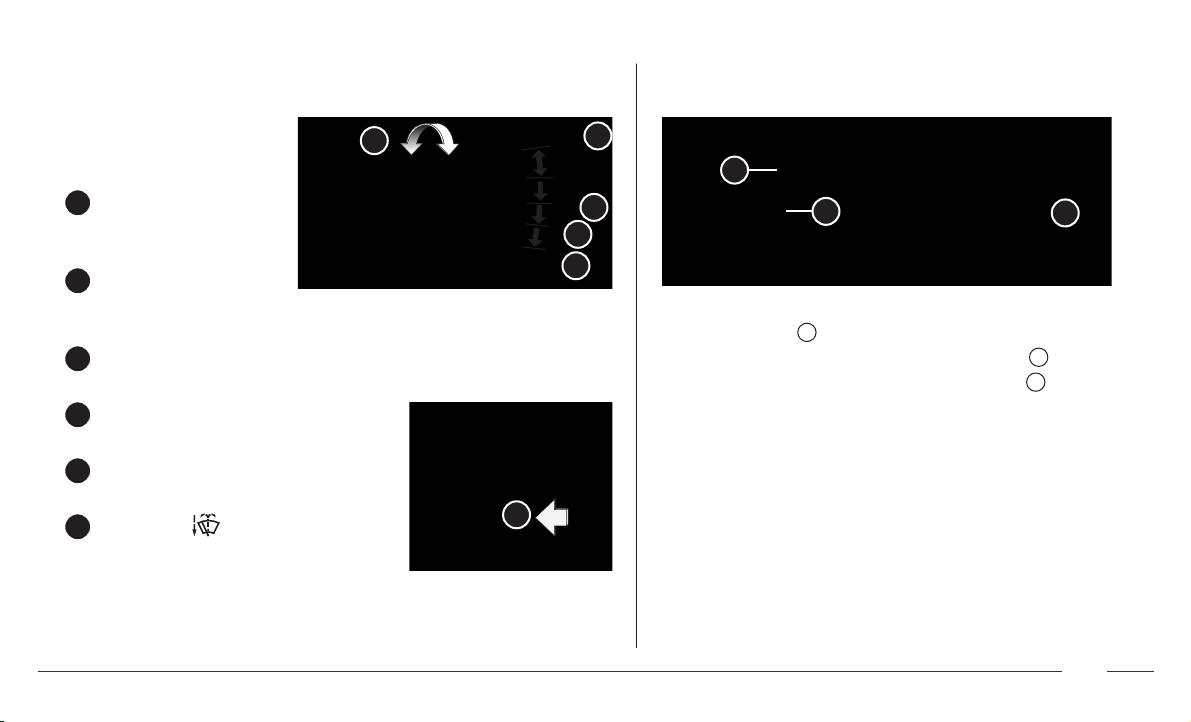
Wiper and Washer Switch Brightness Control Switches
• Move the lever to one of the
following positions to operate
the windshield wipers:
Mist (MIST) – One
1
sweep operation of
the front wipers.
Intermittent (INT) – Turns
2
on the speed-sensing front
wipers intermittently.
The control ring adjusts the operation speed of the intermittent wipes to
3
increase or decrease wiper speed.
Low (LO) – Operates at a continuous
4
low-speed.
High (HI) – Operates at a continuous
5
high-speed.
6 Front Washer – Pull the lever toward
you to activate the front washer. The front
wipers will operate several times.
For more information, refer to your Owner’s Manuals.
3
1
MIST
OFF
INT
2
LO
4
HI
5
Use these buttons to adjust the brightness of the vehicle
information display 1.
• To increase the brightness, push the upper switch 2.
• To increase the brightness, push the lower switch
6
2
3
1
2
.
14
Page 18

Memo
Page 19

Memo
Page 20

This Quick Reference Guide is intended to provide an overview of some of
the unique features of your new vehicle. Please see your Owner’s Manual for
Printing: March 2017 (14)
important safety information and system operation limitations. Features and
QR17EA 0J50U2 • Printed in USA
equipment in your vehicle may vary depending on model, trim level, options
selected, order, date of production, region or availability. Therefore, you
may find information about features or equipment that are not included or
installed on your vehicle.
All information, specifications and illustrations in this Quick Reference Guide
are those in effect at the time of printing. INFINITI reserves the right to change
specifications, performance, design or component suppliers without notice
and without obligation. From time to time, INFINITI may update or revise this
Quick Reference Guide to provide owners with the most accurate information
currently available. Please carefully read and retain, with this Quick
Reference Guide, all revision updates sent to you by INFINITI to ensure you
have access to accurate and up-to-date information regarding your vehicle.
Current versions of vehicle Quick Reference Guides, Owner’s Manuals and
any updates can also be found in the Owner section of the INFINITI website
at https://owners.infinitiusa.com/iowners/navigation/manualsAndGuides.
If you have questions concerning any information in your Owner’s Manual,
contact INFINITI Client Support (see contact information listed above).
To view detailed instructional videos, go to
www.infinitiownersinfo.mobi/2017/qx50 or snap
this barcode with an appropriate barcode reader.
I N SPIRED P ERF O R MANC E
 Loading...