

infinias S-IMS-A Intelli-M Installation And User Manual

For SKU: S-IMS-A
Essentials
ACCESS
®
PLEASE READ THIS MANUAL BEFORE USING YOUR INTELLIM ACCESS SYSTEM, and always
follow the instructions for safety and proper use. Save this manual for future reference.
IN_S-IMS-A_4.0_RM
1/2/2014
S-IMS-A Intelli-M Access Essentials V4.0
Installation and User Guide

ii
www.innias.com
Legal Notice
innias, the innias logo, and Intelli-M are trademarks of innias.
Microsoft and Windows are either registered trademarks or trademarks of Microsoft Corporation in the United
States and/or other countries.
Other trademarks and trade names may be used in this document to refer to either the entities claiming the marks
and names or their products. innias disclaims any proprietary interest in trademarks and trade names other than
its own.
innias
9340 Priority Way West Drive
Indianapolis, IN 46240
Telephone: 866.496.5783 (toll free), email: sales@innias.com, support@innias.com
No part of this document may be reproduced or distributed in any form or by any means without the express
written permission of innias. The information in this document is subject to change without notice or
obligation.
© Copyright 2014, innias. All Rights Reserved.

iii
Intelli-M Access V4.0 User Manual
TABLE OF CONTENTS
Table of Contents
SECTION 1 Introduction .......................................................................1
1.1 System requirements .................................................................1
1.1.1 Considerations ..................................................................1
1.1.2 Operating systems ...............................................................1
1.1.3 Hardware ......................................................................1
1.1.4 Software .......................................................................2
1.2 Version 4.0 license ...................................................................2
1.3 Important terms and concepts .........................................................3
SECTION 2 Installation ........................................................................6
2.1 Import data from other access control systems (optional) .................................14
2.1.1 Import to Intelli-M Access ........................................................18
SECTION 3 Congure Intelli-M Access ...........................................................22
3.1 Logging into Intelli-M Access .........................................................22
3.2 Settings page ......................................................................23
3.3 Replacement license - Intelli-M Access upgrade to V4.0 ...................................26
3.4 Activate your license .................................................................26
3.5 Create a door .......................................................................30
3.5.1 Create a door with eIDC controller .................................................30
3.5.2 Create a door with Stanley EL Series locksets ........................................33
3.6 Create a Person .....................................................................35
3.6.1 Change the Admin password .....................................................36
3.7 Create an Access Privilege ............................................................38
3.8 Additional conguration steps for your facility ...........................................39
SECTION 4 User Interface .....................................................................41
4.1 Page layout ........................................................................41
4.2 Login to Intelli-M Access .............................................................43
4.3 Events page ........................................................................44
4.4 People page ........................................................................46
4.4.1 Views and Actions ..............................................................47
4.4.2 Create Person ..................................................................47
4.4.3 Edit Person ....................................................................53
4.4.4 Delete Person ..................................................................53
4.4.5 View Person ...................................................................53

iv
www.innias.com
TABLE OF CONTENTS
4.4.6 Print Badge ...................................................................53
4.4.7 Get Events .....................................................................53
4.4.8 Create Group ...................................................................54
4.4.9 Edit Group .....................................................................55
4.4.10 Reports page ..................................................................56
4.5 Doors page - Home section ...........................................................59
4.5.1 Views .........................................................................60
4.5.2 Actions (Doors View) ............................................................60
4.5.3 Actions (Zones View) ............................................................61
4.5.4 Door Status Icons ...............................................................61
4.6 Doors page - Conguration section ....................................................63
4.6.1 Create Door ....................................................................65
4.6.2 Edit Door ......................................................................66
4.6.3 Delete Door ....................................................................67
4.6.4 Update All .....................................................................67
4.6.5 Update Modied ...............................................................67
4.6.6 Update ........................................................................67
4.6.7 Get Events .....................................................................67
4.6.8 Create Behavior ................................................................67
4.6.9 Edit Behavior ..................................................................68
4.6.10 Delete Behavior ................................................................68
4.6.11 Create Zone ...................................................................69
4.6.12 Edit Zone ......................................................................69
4.6.13 Delete Zone ....................................................................69
4.6.14 Update ........................................................................70
4.7 Schedules page .....................................................................70
4.7.1 Create Schedule ................................................................71
4.7.2 Delete Schedule ................................................................72
4.7.3 Create Holiday Set ..............................................................73
4.7.4 Edit Holiday Set ................................................................74
4.7.5 Delete Holiday Set ..............................................................74
4.8 Groups page - Conguration section ...................................................74
4.9 Rules page .........................................................................75
4.9.1 Create Rule - Access Privilege .....................................................76
4.9.2 Create Rule - Event Management .................................................77

v
Intelli-M Access V4.0 User Manual
TABLE OF CONTENTS
4.9.3 Create Rule - Hide Event .........................................................78
4.9.4 Create Rule - Alarm Management .................................................78
4.9.5 Create Rule - Credential Management .............................................79
4.9.6 Create Rule - Email Event ........................................................79
4.9.7 Create Rule - Lock Zone ..........................................................80
4.9.8 Edit rule .......................................................................81
4.9.9 Delete Rule ....................................................................81
4.10 Peripherals page ....................................................................81
4.10.1 Create Peripheral ...............................................................82
4.10.2 Edit Peripheral .................................................................85
4.10.3 Delete Peripheral ...............................................................86
4.10.4 Customize page ................................................................86
4.11 System Settings ....................................................................87
4.11.1 About tab .....................................................................87
4.11.2 E-mail tab .....................................................................88
4.11.3 Security tab ....................................................................89
SECTION 5 Mobile Credential ..................................................................91
5.1 Install the Mobile Credential server ....................................................91
5.2 Congure Intelli-M Access for Mobile Credentials ........................................95
5.2.1 Install a Mobile Credential license .................................................95
5.2.2 Assign Mobile Credential to a person ..............................................98
5.3 Install and congure the innias app on a mobile device ..................................99
5.4 Using the Mobile Credential .........................................................101
SECTION 6 Advanced Setup and Conguration ..................................................104
APPENDIX A Stanley QEW Gateway Setup for Intelli-M Access .......................................105
APPENDIX B Troubleshooting FAQ ..............................................................111
B.1 Installation issues ..................................................................111
B.2 Runtime troubleshooting ...........................................................113

vi
www.innias.com

1
Intelli-M Access V4.0 User Manual
SECTION 1: INTRODUCTION
SECTION 1
Introduction
Thank you for purchasing Intelli-M Access, the Simple, Scalable, and Secure access control system. Intelli-M Access is the most
functional and economical access control system available for small through enterprise scale installations. This guide the
installation, conguration and management of the Intelli-M Access V4.0 access control system.
1.1 System requirements
1.1.1 Considerations
Since Intelli-M Access is a client/server application, we recommend that it be run on a server in a secure environment. If Intelli-M
Access is installed in a virtual environment, we recommend VMWare ESXi or higher. Note that Intelli-M Access includes a Rules
engine that extends the functionality of the system; to take advantage of these features, the server must be available continuously.
1.1.2 Operating systems
Intelli-M Access runs on Microsoft Windows® operating systems. We always recommend using the most recent versions of
operating systems, and for installations of greater than 32 doors, we strongly recommend using a server class operating system.
• Microsoft Windows Vista Professional (recommended), Enterprise, Ultimate
• Microsoft® Windows® Server 2008 R2, Server 2012 R2
• Microsoft Windows 7 Professional, Enterprise, and Ultimate, Windows 8, Windows 8.1
Other versions of Microsoft Windows, including the Home version, do not include components required by Intelli-M Access.
1.1.3 Hardware
For 32 doors or less, the recommended hardware includes:
• 2GB RAM
• 2 GHz Processor
• 50GB HDD free space
• Single 100 Mb network interface
• Microsoft® Windows® Vista or newer

2
www.innias.com
SECTION 1: INTRODUCTION
For 32 to 128 doors
, the recommended hardware includes:
• 4GB RAM
• Dual core, 2 GHz Processor
• 100GB HDD free space
• Single or dual 100 Mb network interface
• Microsoft® Windows® Vista or newer
For more than 128 doors
Intelli-M Access takes advantage of multiple processors and expanded memory. For extremely large systems, the database server
and reporting services can be moved to another server to improve performance. For specic recommendations, please contact
innias.
1.1.4 Software
Intelli-M Access requires key components available with or for advanced Microsoft Windows operating systems including:
• IIS (Internet Information Server) - Microsoft web server resident in Windows. This server is used to provide Intelli-M Access
web pages to any standard browser. IIS must be activated before installing Intelli-M Access.
• Message Queueing - By using transaction server, Intelli-M Access delivers an asynchronous message queuing architecture
designed to be robust, highly scalable and resilient to spikes in demand. Like IIS, Message Queueing must be activated before
installing Intelli-M Access.
• Reporting Services - Reporting Services is installed with the SQL Server Advanced Services package provided by innias.
It provides reporting capabilities. Both reports and badges are delivered through Reporting Services. To design reports,
download and install Report Builder, a free tool from Microsoft.
• SQL Server - Intelli-M Access uses version 2008 or newer, and will automatically install the 32-bit version of SQL Server
2008 R2 with Advanced Services if a compatible version of SQL Server is not already installed. Intelli-M Access also requires
Microsoft SQL Reporting Services, a part of the SQL Server installation, to be installed.
All required software packages, including SQL Server 2008, will be automatically congured during the installation process. Refer to
the installation chapter for more information.
1.2 Version 4.0 license
The new Intelli-M Access V4.0 licensing system requires the Intelli-M Access server to be connected to the internet during the
license activation phase. If the server is not or cannot be connected to the Internet, contact innias to help you activate your system.
The new license key consists of a License Key string and a Password string – each string is 6 or 7 characters long. Keys used to
activate Intelli-M Access V3.x and earlier systems are incompatible with V4. However, as with previous versions of Intelli-M Access,
if you are installing Intelli-M Access as a new install, or as an update to an Intelli-M Access V3.x or older system, a 30-day trial key

3
Intelli-M Access V4.0 User Manual
SECTION 1: INTRODUCTION
will automatically be generated. Refer to “3.3 Replacement license - Intelli-M Access upgrade to V4.0” on page 26 for more
information.
1.3 Important terms and concepts
This subsection includes important terms and concepts used in the advanced innias access control system, which is a signicant
departure from traditional access control systems. Please become familiar with the following before conguring and using your
Intelli-M Access system.
Door vs. zone
In former access control systems, a Door was congured to grant certain access privileges to that Door. Intelli-M Access introduces
the concept of a Zone. A Zone can viewed as the physical space which the Door occupies in a facility, oor, or room. Simply put, a
Door borders two areas of a room, oor, or building. Each of the two areas is called a Zone. Therefore, when you apply privileges to a
Door Intelli-M Access, you’re granting access to the Zone that the door protects.
During installation, Intelli-M Access creates two default Zones: Inside and Outside. These zones represent the inside of your
building or oce, and the outside of your building or oce - your perimeter door or doors already border these two zones. Inside
your building, you may have interior doors that you need to secure. Each door to be secured also borders two zones: the interior
of the oor or building, and the side you wish to secure. You could re-use the Inside Zone for the unsecured side of the door, and
create a new Zone, for example IT Server Room, to serve as the name of the secured side of the door. During conguration of access
privileges, you will grant access to the IT Server Room Zone, not the Door that borders it.
You can re-use Zones in more than one way. The previous example demonstrated how you could re-use the Inside Zone because it
happened to represent the same physical space that your perimeter doors also occupied. Another way to re-use a Zone name is if
the same people will always be given identical access privileges to multiple areas. For example, if you are a hospital, and you have
3 operating rooms, and the same people always have identical access to those 3 rooms, then you can create a single Zone, such as
Operating Room, to represent the secured side of the operating rooms.
As you plan your system conguration, consider useful names for the Zones to which you will be applying access privileges. Once
you have congured your Zones, it will be much easier to maintain and re-congure access privileges to the Zones than compared to
the old mechanism of per-Door privileges.
Muster zone
A Muster Zone is a Zone that has been tagged with the In or Out Muster attribute. When you tag a Zone with the In Muster attribute,
Intelli-M Access will keep track of all users that have entered that Zone. You can also tag a Zone with the Out Muster attribute to
keep track of both sides of a Door if you wish. A special Muster View on the Events Page displays the location of all cardholders in
these Muster Zones in real-time.

4
www.innias.com
SECTION 1: INTRODUCTION
Cardholder vs. group
Traditional access control systems dene a cardholder and allow you to congure that Cardholder’s access rights within the
system. Intelli-M Access borrows from the Enterprise world, and extends the Cardholder as a member of a Group, similar to the
way Windows contains Windows account Users and Groups. All cardholders must be a member of at least one Group, and can be a
member of multiple Groups.
Access Privileges will be not be applied to a Cardholder but rather to a Group. Thus you can modify the access privileges of a large
number of Cardholders with one simple conguration change. Or you can make signicant access privilege changes to a single
Cardholder merely by adding them to or removing them from a Group.
Door types
Intelli-M Access presents the Door Type, a template that describes the input and output conguration gathered into a single entity.
Most door wiring conguration are already described with one of the built-in Door Types. If you have one or more doors with a nonstandard conguration, you can easily create your own Door Type which you can apply to your custom-congured doors.
Door Behaviors
Door Behavior declares the Door’s unlock schedule and the mode of the attached card reader(s), such as “Card Only” mode or “Card
plus PIN” mode. Intelli-M Access creates one behavior by default, the “Always Locked” Behavior. This Behavior sets the card reader
to “Card plus PIN”.
Rules and privileges
Intelli-M Access expands the aging concept of access control, with the concept of Privilege : the combination of a Group (who has
access), a Zone (where access is granted), and a Schedule (when access is granted). You can create as many Privileges as needed to
manage the conguration of access rights in your system.
Intelli-M Access extends these capabilities with the Rule. A Rule species the action taken when something happens. A Privilege
is a type of a Rule (“what to do when a card is swiped or a PIN is entered”). There are many other Rules that you can create to make
Intelli-M Access do precisely what you want when something happens. Examples include sending email, locking and unlocking any
Zone or Door, energizing or de-energizing one of the door controller outputs, etc. For more information see “SECTION 6 Advanced
Setup and Conguration” on page 104.
Schedules and holiday sets
A Schedule is a stand-alone set of time ranges that dene a 7-day week. Each day has a set of zero or more time ranges you can
dene. Schedules dene the Active Time Range. A Schedule (Active Time Range) can be applied to a Door (via the Door Behavior) as
an unlock schedule, to a Person (via the Group membership) to dene the hours they may access a Zone, or a Rule to specify when
the Rule can be active. For example, when a Schedule is applied to a Door, the Door will be unlocked during the Active Time Range,
and unlocked during the inactive time range.

5
Intelli-M Access V4.0 User Manual
SECTION 1: INTRODUCTION
A Holiday is a single day in which normal business hours are altered, such as Thanksgiving or Christmas. A Holiday Set is a grouping
of Holidays in which the altered business hours match. For example, a Holiday Set might consist of New Year’s, Thanksgiving, the
day after Thanksgiving, and Christmas Day, when the oce is closed; another Holiday Set might consist of Christmas Eve and New
Year’s Eve because the oce hours are a half day.
Once you’ve established your Holiday Set, you can assign a set of zero or more time ranges that dene that Holiday Set. You can
also apply that Holiday Set to a Schedule you’ve created. Thus, you’ll have a single Schedule that contains the normal hours of oce
operation, plus all of the days in which the oce is to be partially or completely closed. Finally, you can assign that Schedule to any
Door Behavior, Person Group, or Rule.
Events and alarms
In Intelli-M Access, you dene what is or is not an Alarm (or event) using the Rules Engine. By default, Intelli-M Access identies an
Alarm as an access control denial event.
Alarm acknowledgement
Intelli-M Access introduces the concept of Automatic Alarm Acknowledgement. Through the Rules Engine in Intelli-M Access, you
determine what events are truly important. For more information see “SECTION 6 Advanced Setup and Conguration” on page
104.
Extensibility and peripherals
Intelli-M Access introduces the concept of a Peripheral, a third-party device that can be integrated with Intelli-M Access.
A Peripheral can be any entity - a video surveillance DVR, an individual IP Camera, a hardware I/O device, or even a web service like
Google Maps. Each Peripheral is supported by a Plugin, a software module that provides a bridge between Intelli-M Access and the
device or service. You can then use the Rules Engine to control the Peripheral, telling it to “record video on camera X when a card
with invalid credentials are swiped at Door Y”, “energize output A when input B is raised”, “show live video in my browser on camera
X when even Y occurs”, etc.
During installation, Intelli-M Access provides a 32-channel Ethernet-controlled I/O device peripheral. You can create a Rule to force
the device’s output(s) to a desired state, or use the device’s inputs states to lock or unlock doors, send email, and several other
actions.
Reports
Intelli-M Access uses the Microsoft Reporting Services engine enabling you to create customized reports. Custom-printed
cardholder badges also utilize the Reporting Services engine, giving you control over the look of your badges. For additional
information about creating your own custom reports, please visit innias.com.
6
www.innias.com
SECTION 2: INSTALLATION
SECTION 2
Installation
The Intelli-M Access installation package is contained in a 1.2GB compressed, self-extracting le that can be downloaded or
available on installation media you can order from innias. The compressed le contains all of the operating system and application
prerequisites to complete the installation of Intelli-M Access V4.0.
1. Obtain the Intelli-M Access installation le.
2. Copy the installation le to the server where you want to install Intelli-M Access.
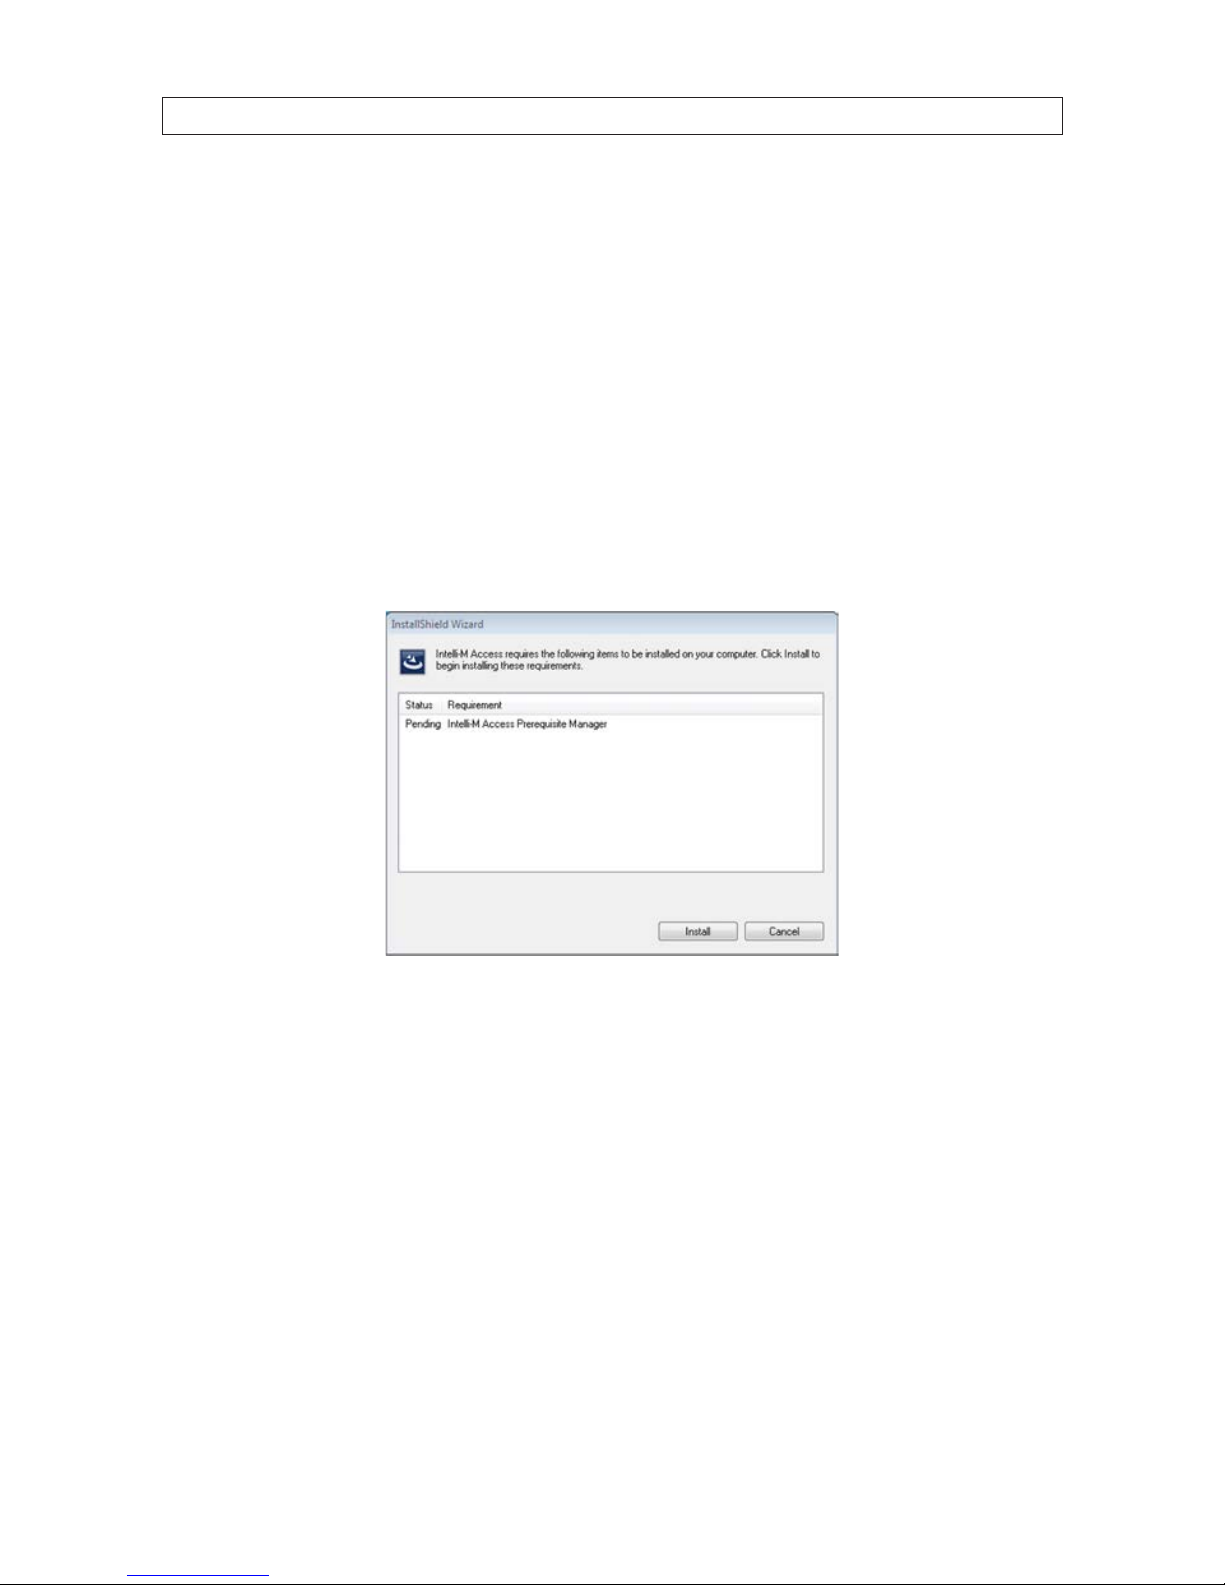
3. Double-click the le to start the installation. If your current OS conguration requires an installation of one or more prerequisite
software packages, you will be presented with a window similar to that shown below:
InstallShield Prerequisites Dialog
a. Click the Install button to install the rst prerequisite in the list. Each prerequisite will be installed in order that you
see them in the list. One or more prerequisites may require a system reboot, and may automatically do so in order to
complete the prerequisite installation. If a reboot is required, the installation will continue immediately after logging back
into the system following the reboot. Repeat this step until all prerequisites are installed.
Intelli-M Access Prerequisite Manager
A special prerequisite, the Intelli-M Access Prerequisite Manager, is the last prerequisite to be installed. This prerequisite will
automatically install the required Internet Information Services (IIS) and Microsoft Message Queuing (MSMQ), packages that are
both required by Intelli-M Access. Once this prerequisite is complete, the actual product installation will begin.
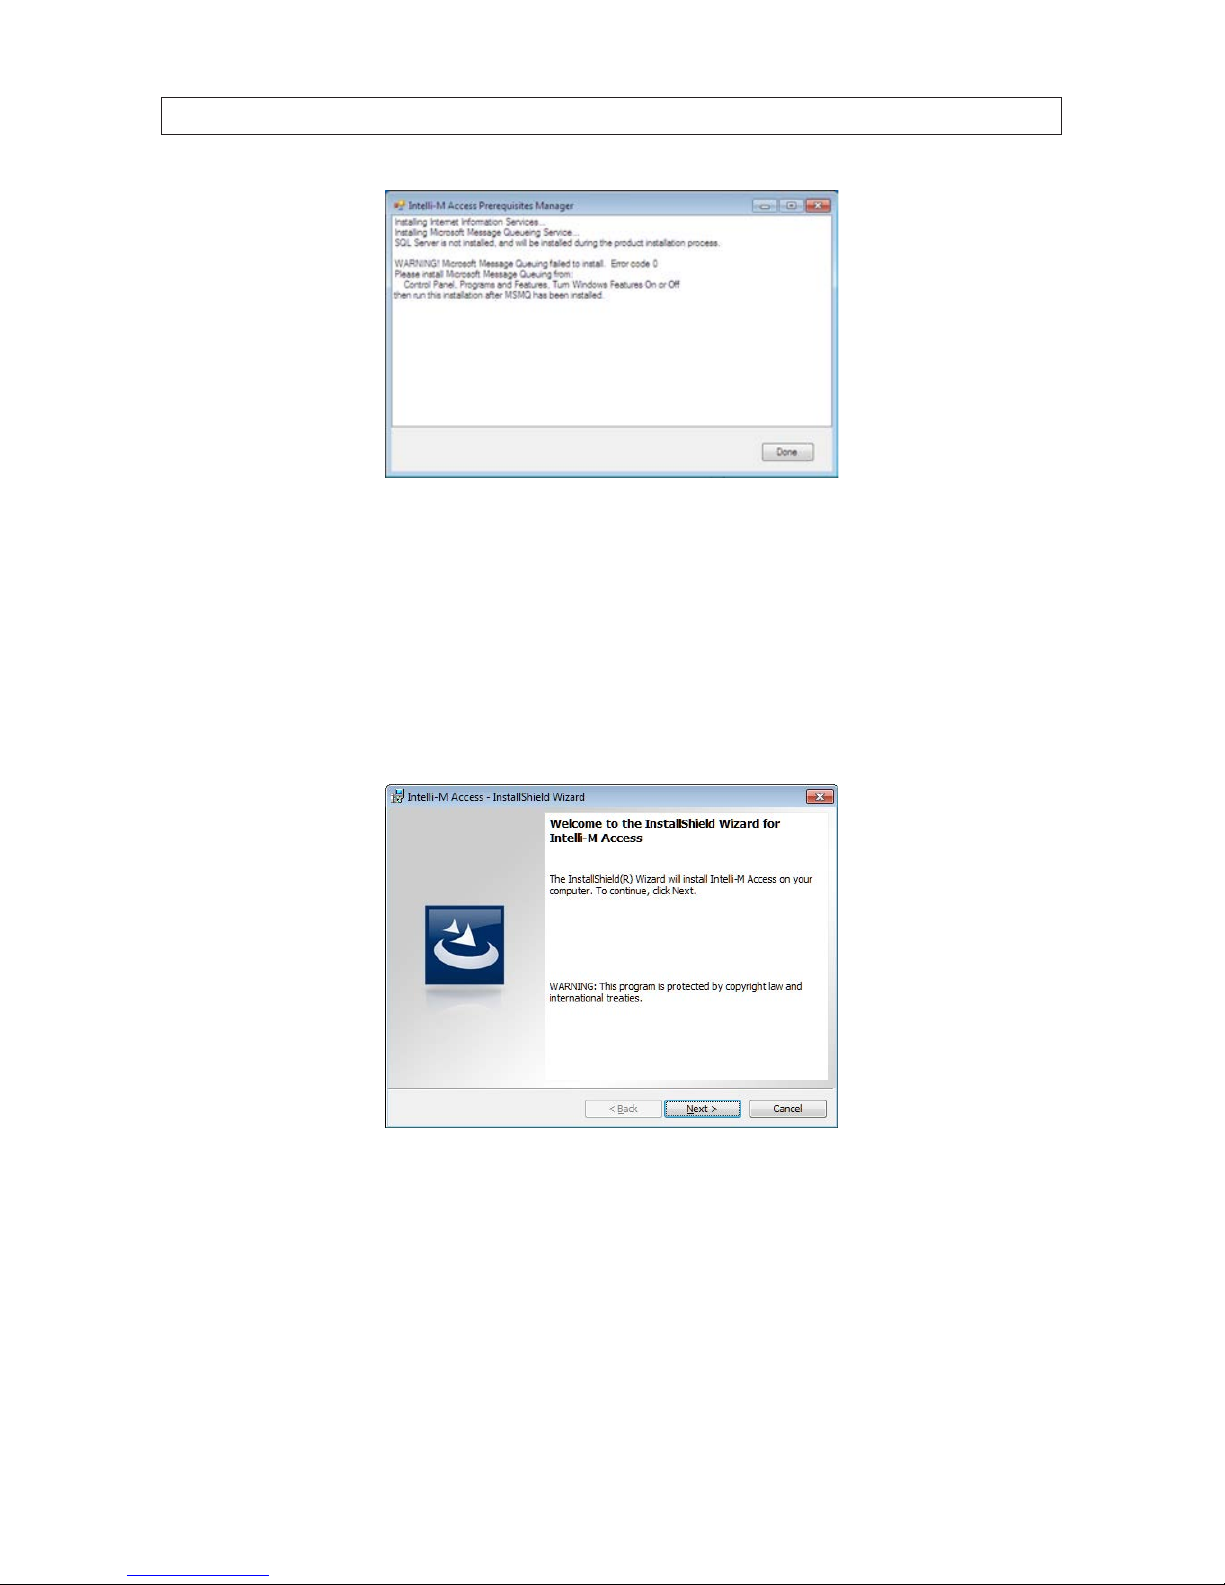
4. If there are any errors in installing any of the prerequisites, especially IIS or MSMQ, a prerequisite window will appear and will
describe the error, similar to that shown below.
7
Intelli-M Access V4.0 User Manual
SECTION 2: INSTALLATION
Intelli-M Access Prerequisite Manager Error Window
a. If an error window appears during installation of a prerequisite, follow the instructions provided in the window before
continuing the installation. If necessary, contact innias Technical Support for further assistance.
Begin installation
5. After all prerequisites are installed, you will be presented with the usual opening installation window (see below). Click Next
to continue the installation.
InstallShield Welcome dialog
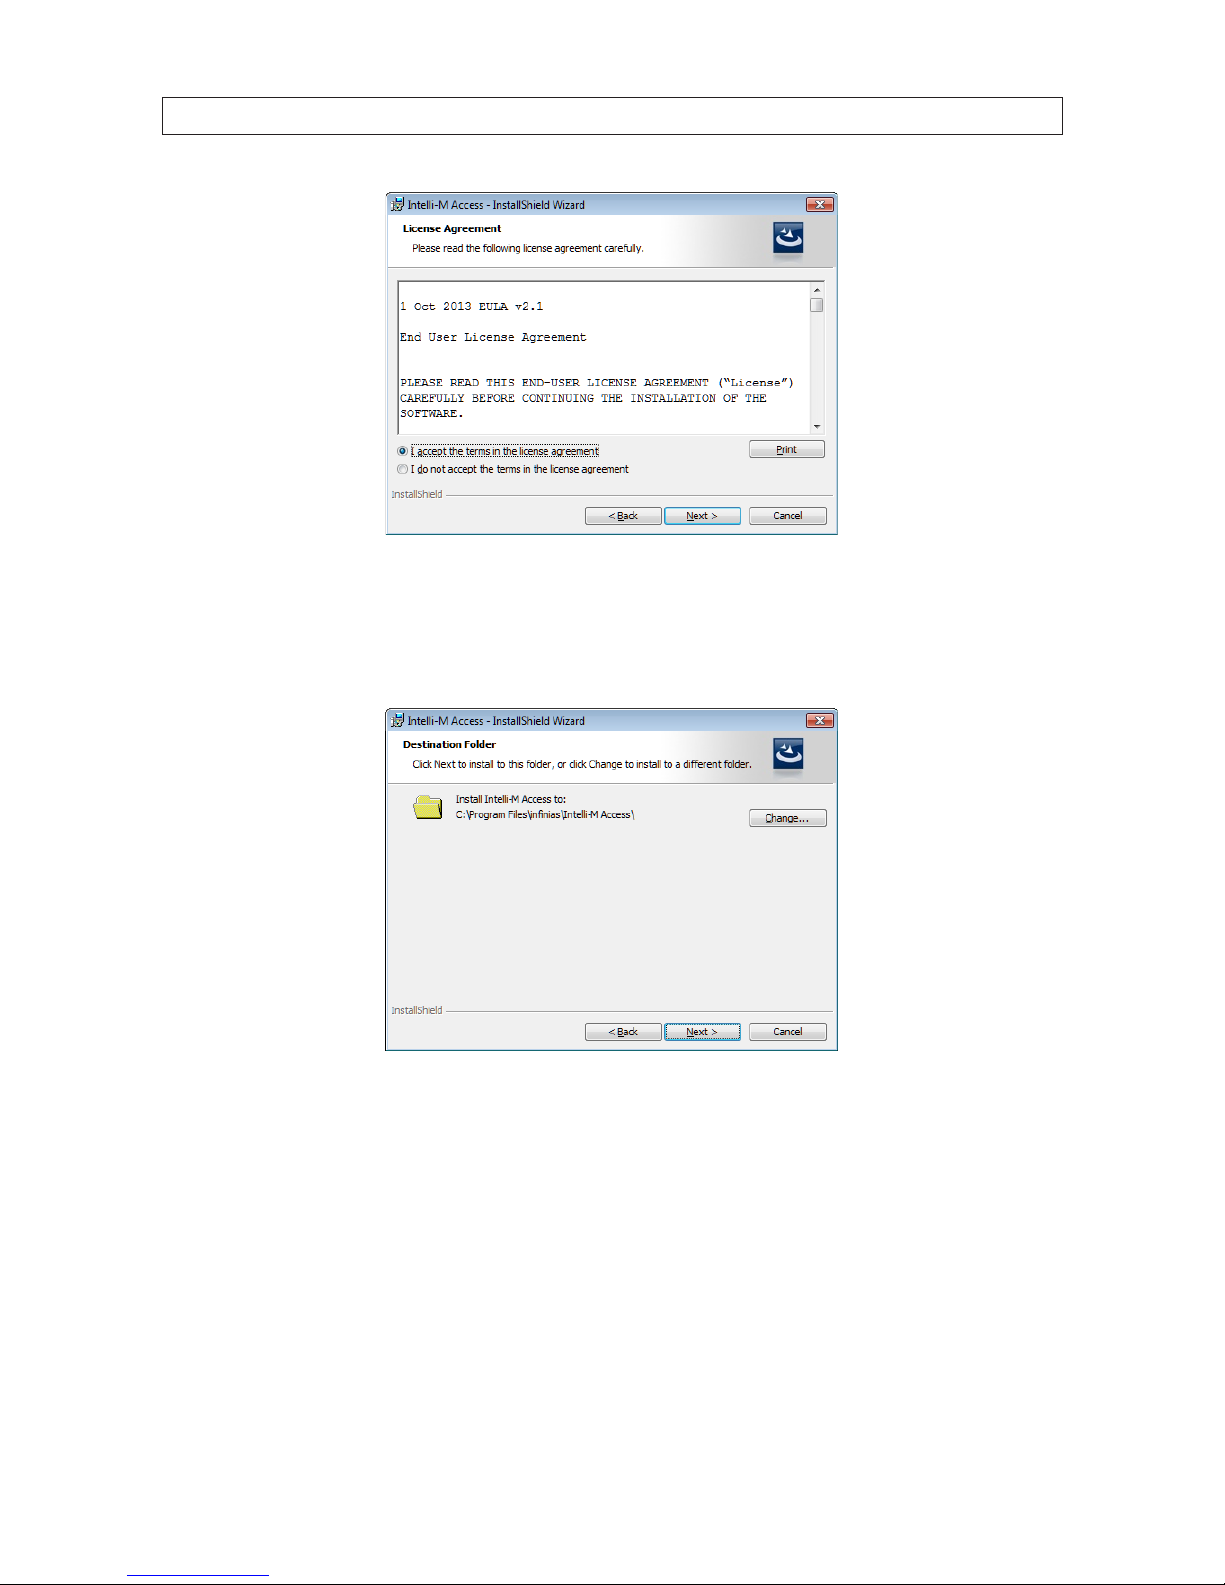
6. When the License Agreement window appears, read the contents thoroughly. If you agree to the agreement detailed in the
window, click the I accept the terms in the license agreement radio button. If you
.. do not accept the terms in the
license agreement, select that radio button. Click Next to continue.
8
www.innias.com
SECTION 2: INSTALLATION
License Agreement dialog
7. If you agreed to the terms of the license agreement shown in the window above, the Destination Folder option will appear.
Click Change, then browse to a dierent location for the installation, if necessary. Click Next to continue.
Destination Folder dialog
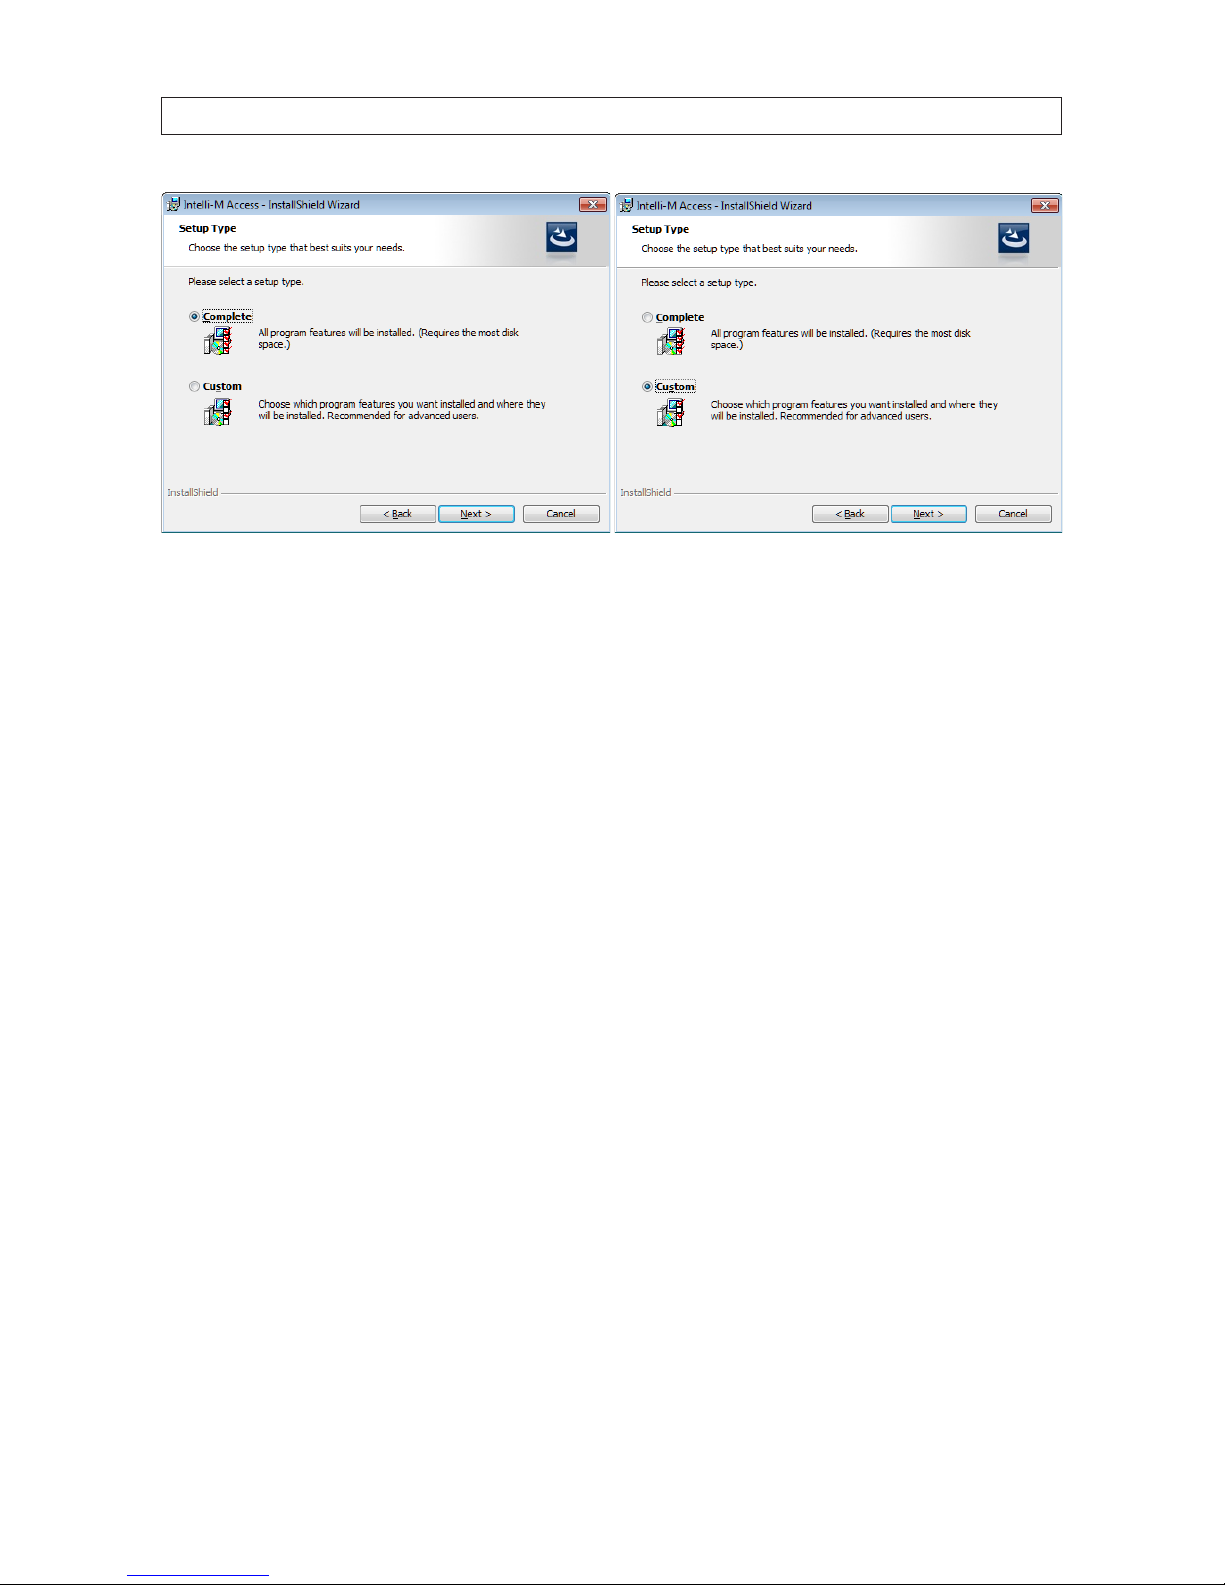
8. The Setup Type window lets you choose which features of Intelli-M Access you need to install.
9
Intelli-M Access V4.0 User Manual
SECTION 2: INSTALLATION
Setup Type dialog
a. Do either of the following:
* If a Custom installation is not necessary (see next bullet), choose Complete, then click Next and continue the
installation at Step 9.
* Select Custom then click Next and continue with the following sub steps if any of the following scenarios applies to
your system:
You already have a pre-existing instance of SQL Server 2008 R2 installed, either on the local computer or on a
remote computer. See the important notes below regarding pre-existing SQL Server instances.
You are installing Intelli-M Access onto a computer that already has a web-based application installed and is
already listening on port 80. See the important note below regarding changing the name and location of the
website.

10
www.innias.com
SECTION 2: INSTALLATION
NOTE
Many application installations aect the existing IIS conguration. Some applications change the name of the default IIS
website from “Default Web Site” to another name. Some might delete the default website altogether. In either case, the
application probably uses port 80 (and possibly port 443), preventing Intelli-M Access from using port 80. Other applications
disable IIS because they use a third-party web server like Apache. In all of these cases, you can still install Intelli-M Access on
this computer.
• If “Default Web Site” has been changed or removed, you can either provide the new name to the Intelli-M Access
installer, or you can choose your own name and provide an unused port number (e.g. 8000 or 8080).
• If IIS has been disabled, it was disabled so the third party web server could use port 80. In that case, change the port
number in the “Internet Services Information (IIS) Manager” utility to an unused port number (e.g. 8000 or 8080),
re-enable “Default Web Site”, and provide the new port number to the Intelli-M Access installation.
Intelli-M Access requires SQL Server Standard/Enterprise 2008 R2 or SQL Server Express 2008 R2 with Advanced Services.
Regardless of which Edition you have installed, you must congure SQL Server to allow Mixed Mode Authentication that is, SQL Server must allow both SQL Authentication and Windows Authentication. You can modify this conguration
property using SQL Management Studio.
You must have SQL Reporting Services installed. If you do not, the installation will succeed but the ‘Reports’ page will show
an error.
• If you do not need the reports feature in Intelli-M Access, then you do not need to install the Reporting Services option in
SQL Server.
• If you will be using the reports feature of Intelli-M Access, run your SQL Server installation again and add Reporting
Services to the installation. After that is complete, run the Intelli-M Access installation. If you have already installed
Intelli-M Access, simply run the Intelli-M Access installation again and choose the ‘Repair’ option.
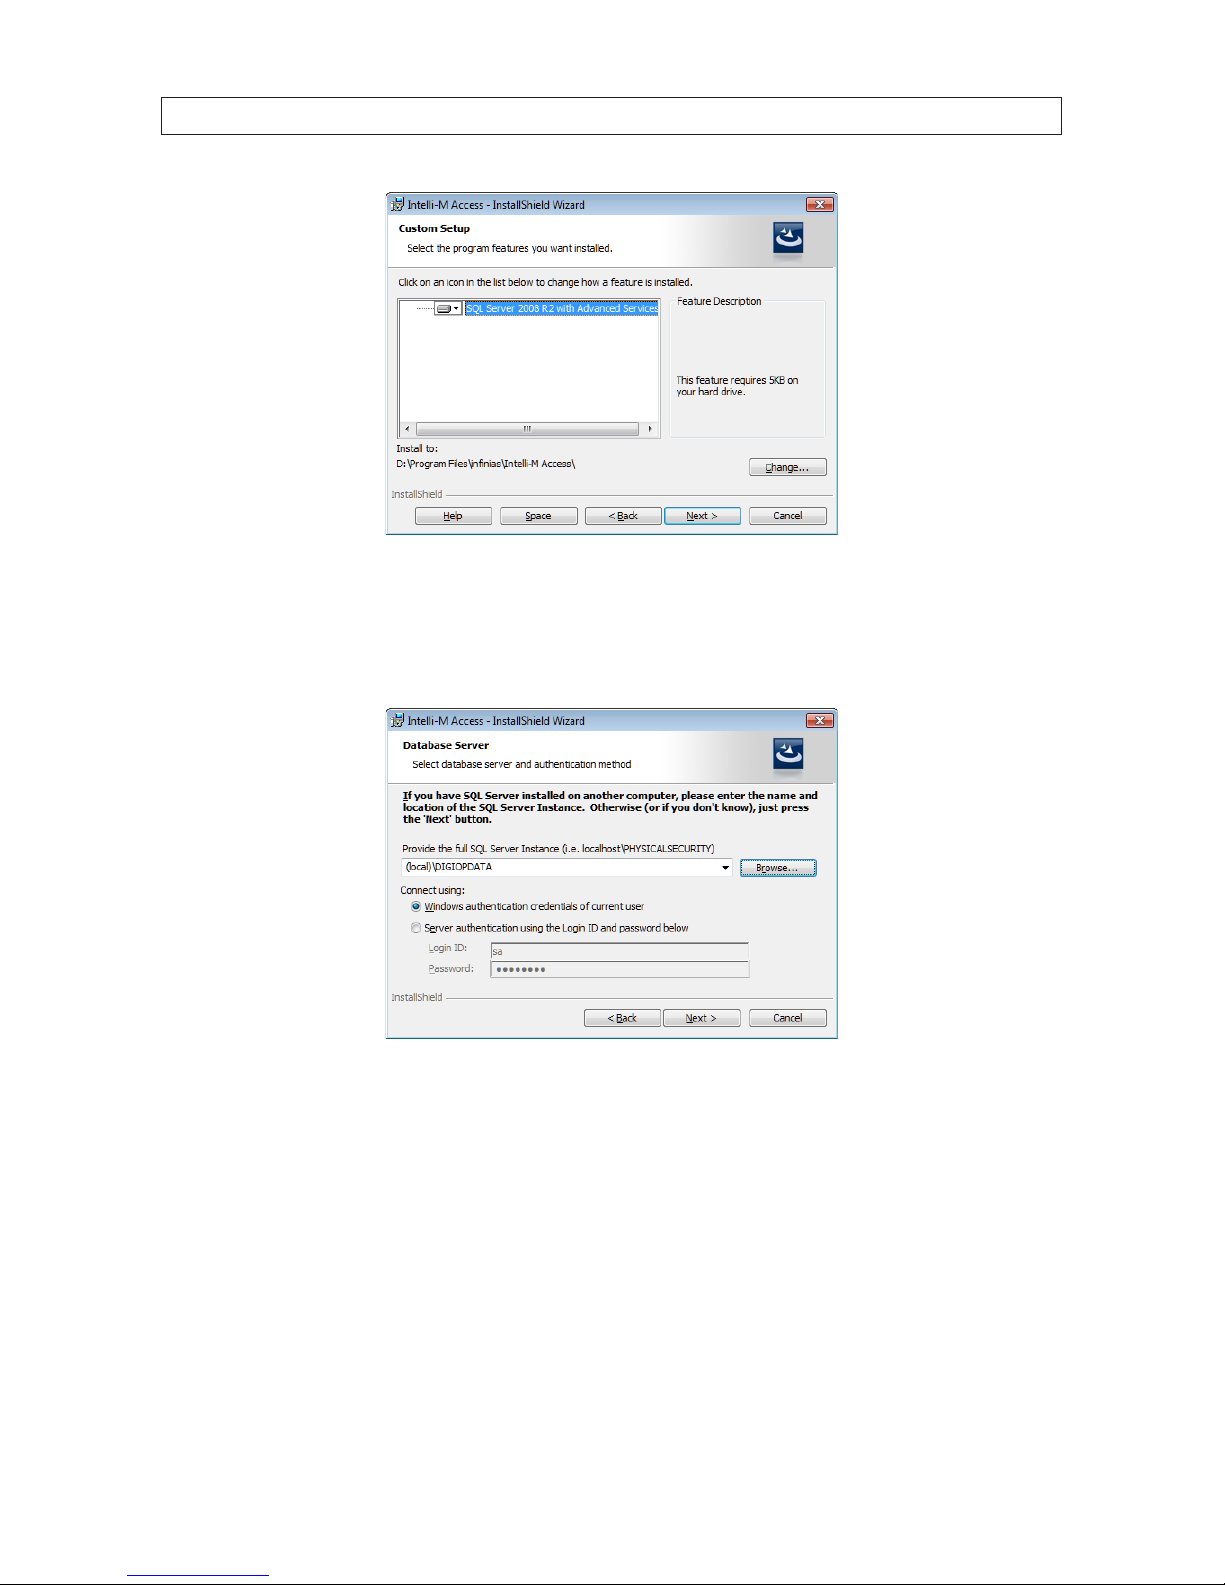
b. A Custom Setup window will open showing the installation components whose installation options you can modify.
Click on each icon in the list to change how the feature is installed, then click Next.
For example, If you already have SQL Server 2008 R2 installed, then click the icon to the left of the SQL Server entry, and
choose Will not be installed, and click Next.
If you do not have SQL Server installed, and chose Custom to modify the Intelli-M Access website name, than make no
changes and simply click Next to continue.
11
Intelli-M Access V4.0 User Manual
SECTION 2: INSTALLATION
Custom Setup dialog
c. In the Database Server dialog, click Browse locate the full path to the SQL Server instance in the top edit box, if
necessary. The full path includes the hostname or IP address of the computer on which SQL Server is installed.
Database Server dialog
If SQL is installed on the local computer, you may use “.”, “127.0.0.1”, or “localhost” to represent the computer name.
Follow the hostname with the backslash character (‘\’) and then the SQL instance name, such as MSSQLSERVER or
SQLEXPRESS. The installer attempts to discover and authenticate to any locally-installed SQL Server, so the correct
information may already be displayed. If you do not know what to enter, please contact your IT representative or the
person who installed SQL Server.
d. Next, provide credentials that have access to SQL Server with Administrative control. You can use any credentials that you
know have Administrative rights to SQL Server, either a Windows or SQL user. These credentials are necessary to create
the innias database in your SQL Server instance and will not be saved anywhere.
12
www.innias.com
SECTION 2: INSTALLATION
e. Click Next to continue. The installation will then attempt to connect to SQL Server to verify your information. You will
receive an error popup window if the installation fails to connect. If that occurs, please correct the SQL Server information
and try again.
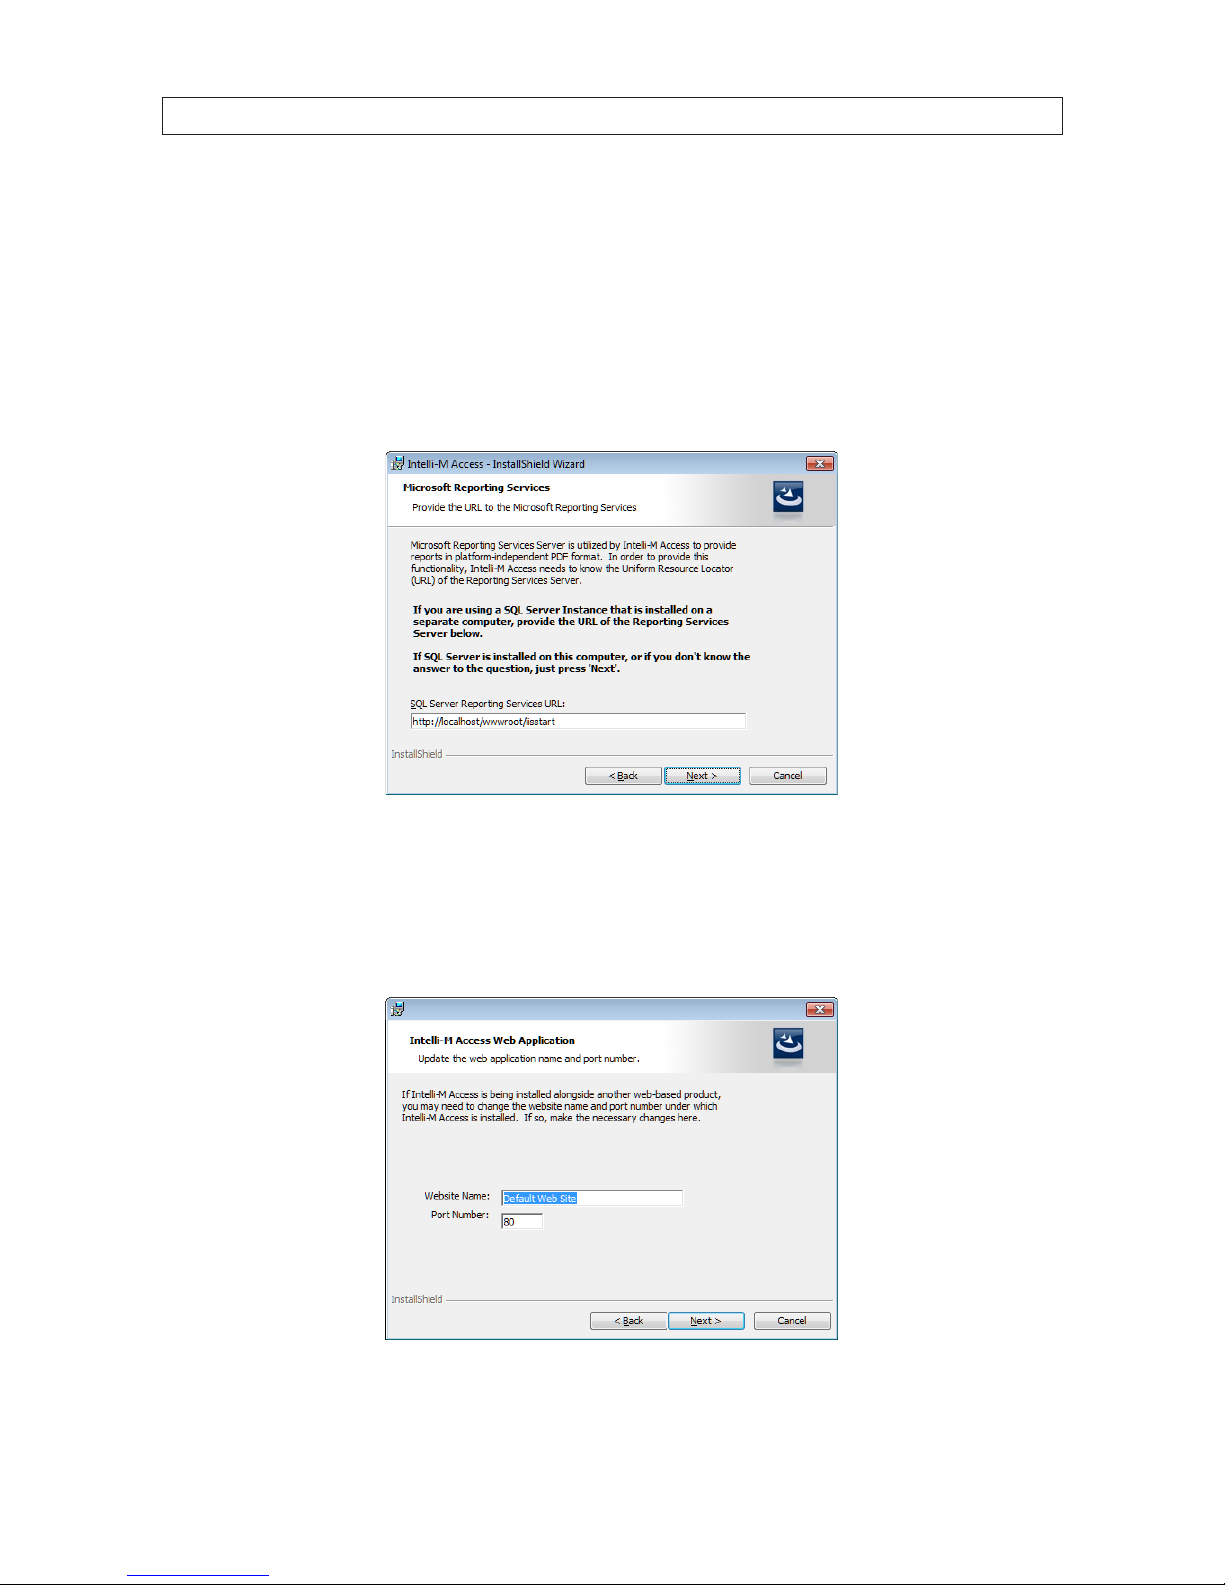
f. After the installer successfully connects to the SQL Server, it will display the Microsoft Reporting Service dialog. The
installer attempts to discover a locally-installed reporting services web server, so the correct information may already be
displayed. Ensure that the URL shown is correct, or enter the correct path in the entry eld. If you do not know what to
enter, please contact your IT representative or the person who installed SQL Server. Click Next to continue.
Microsoft Reporting Services dialog
g. In the Intelli-M Access Web Application Web Application dialog, select a website name and the port on which the
website will listen. If you are installing Intelli-M Access on a system that has an existing web-based application running,
provide a unique name for the IIS Website to be created, along with an unused port number. Click Next to continue.
Intelli-M Access Web Application Web Application dialog
13
Intelli-M Access V4.0 User Manual
SECTION 2: INSTALLATION
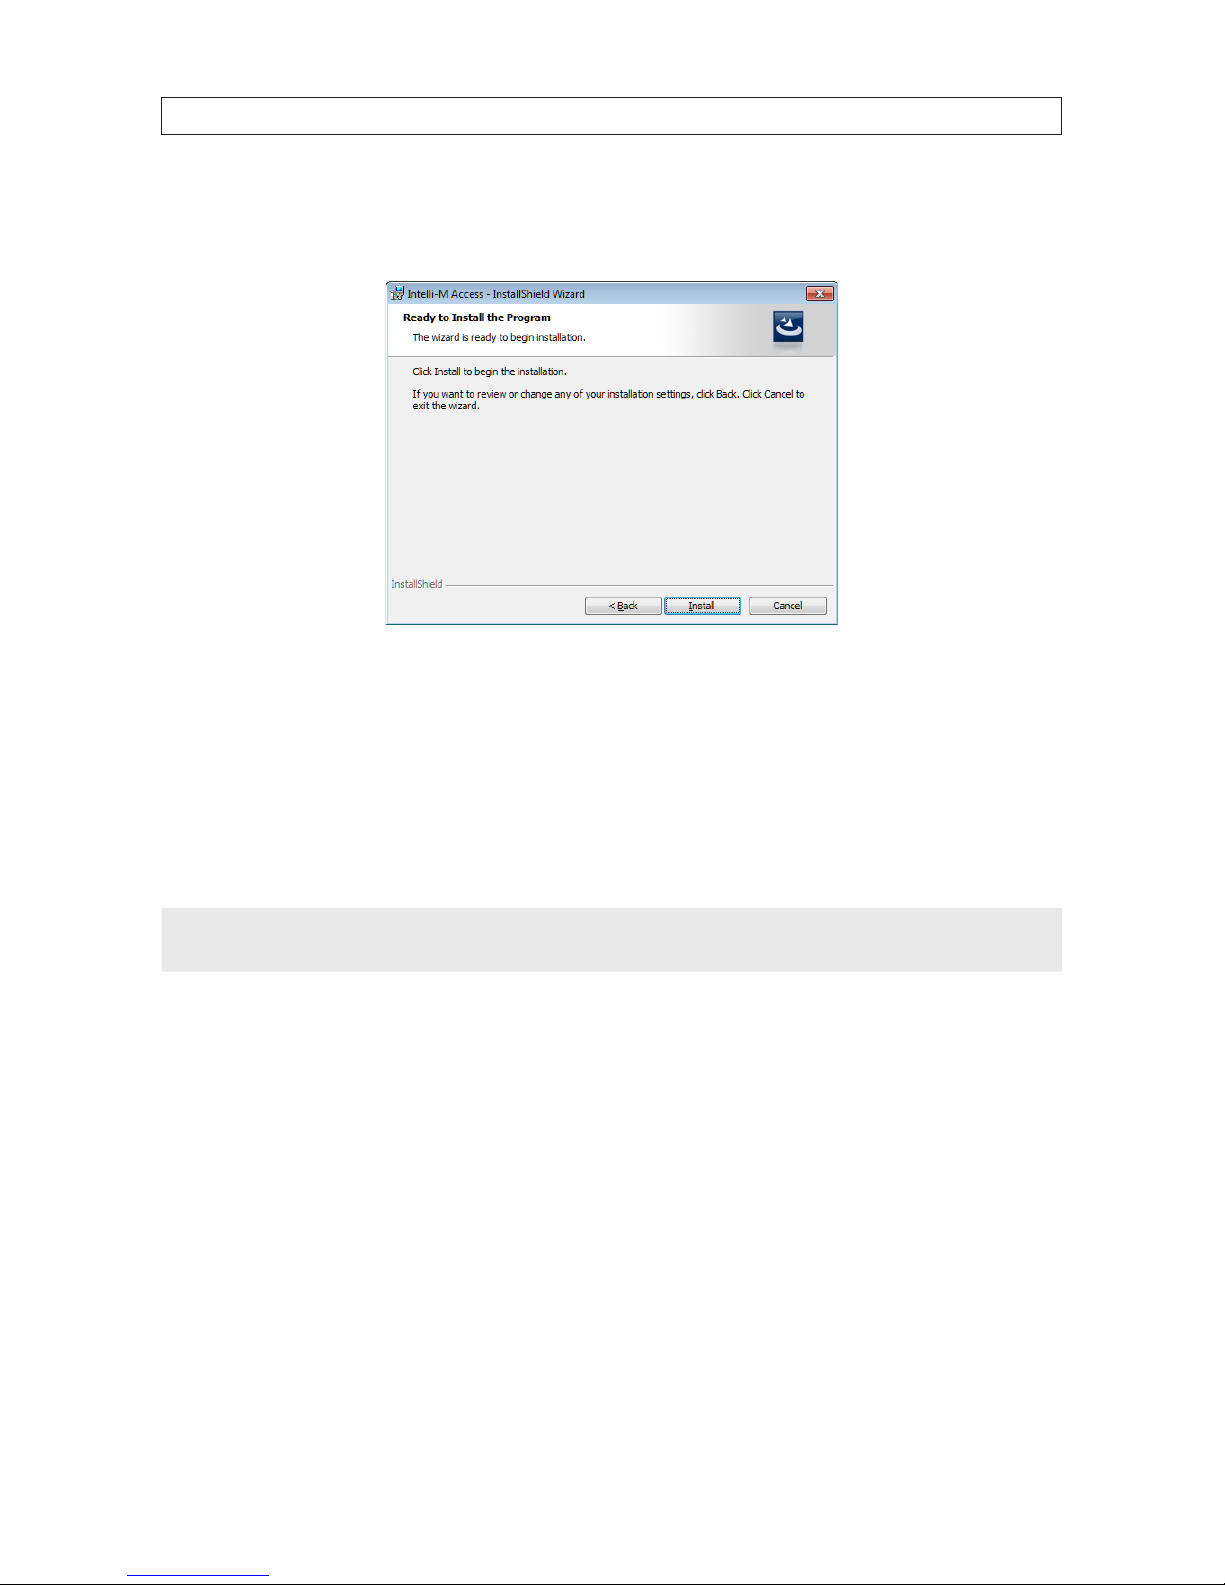
h. In the Ready to Install the Program dialog, click Back to check are modify your pre-installation settings, if necessary,
then click Install to continue with the Intelli-M Access Installation.
Ready to Install the Program dialog
Installation progress
The actual installation process of copying les and conguring your operating system may take anywhere from 5 minutes to nearly
an hour if SQL Server needs to be installed. When SQL is being installed, SQL installation process windows appear and display the
progress of the SQL Server install. If the SQL Server installation fails, the SQL install the Intelli-M Access install will abort and an
information window will appear.
NOTE
If SQL Server installation fails, refer to “B.1 Installation issues” on page 111 for suggestions on how to troubleshoot
installation failures.
Installation complete
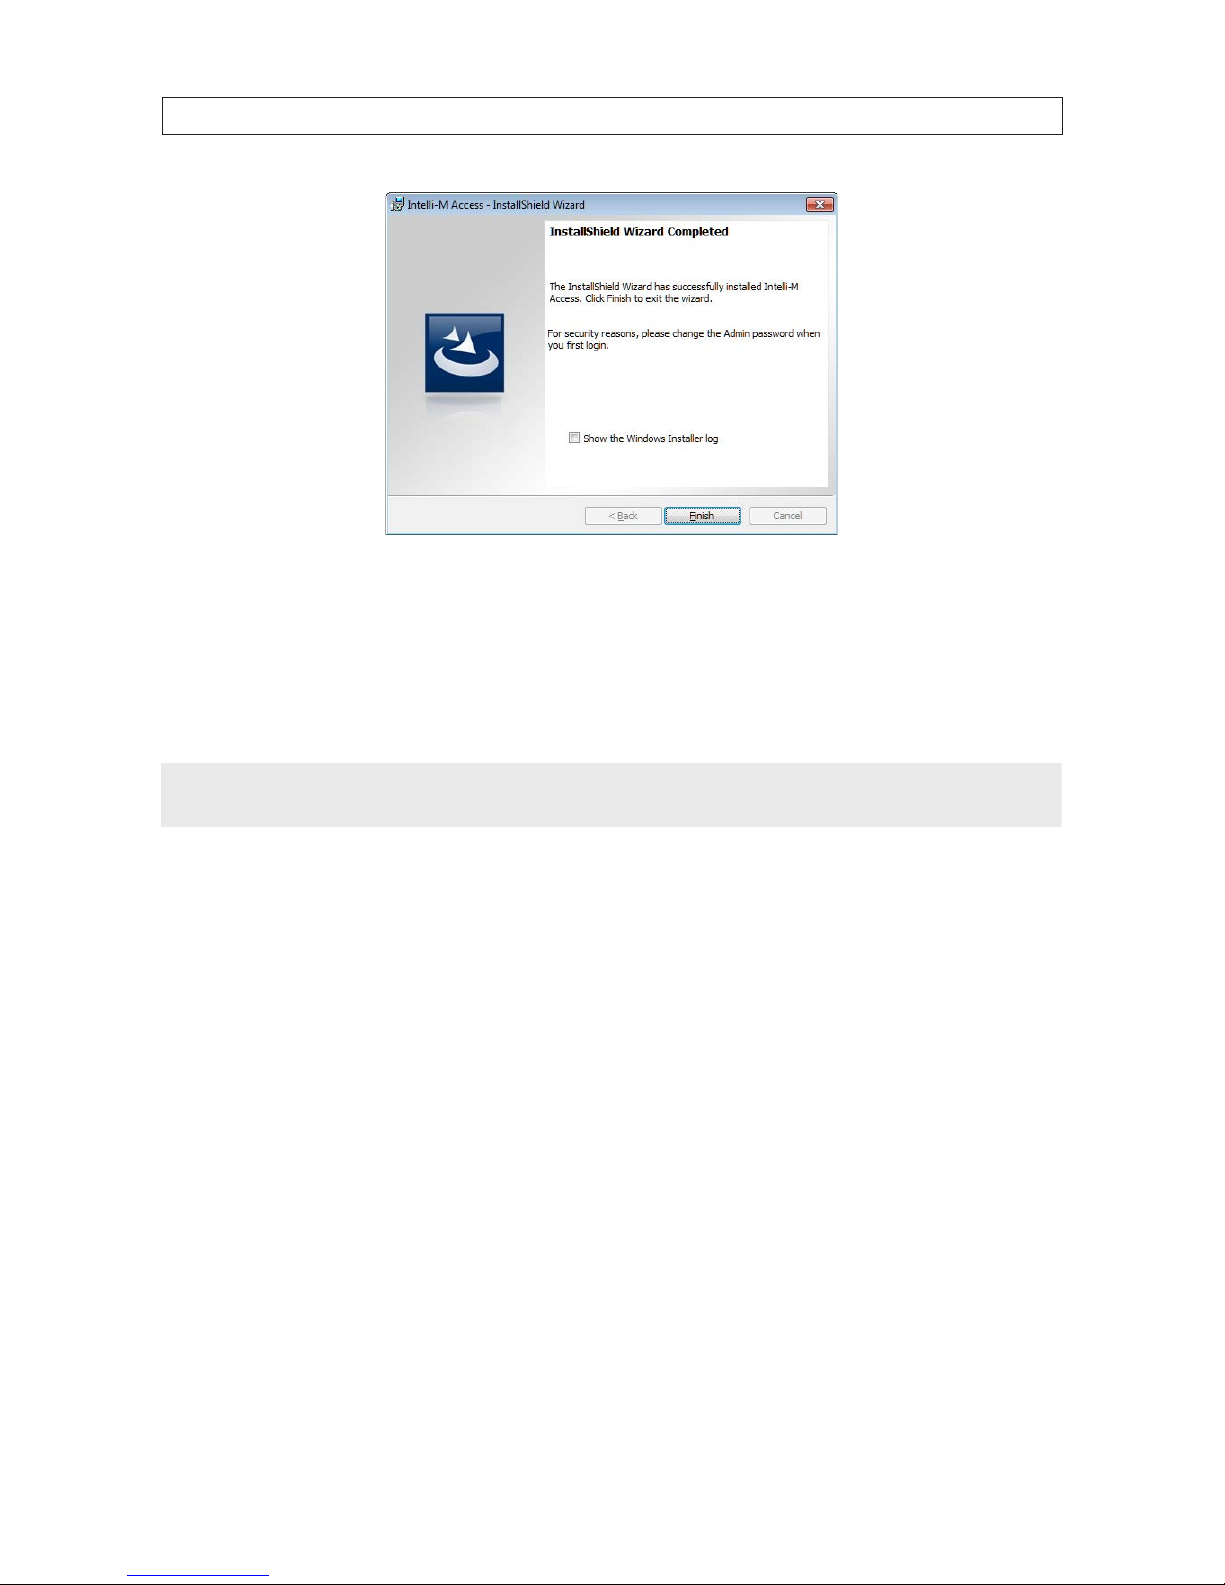
After all les have been copied and your system conguration is complete, the nal installation window will be displayed. Click
Finish to close the window. You are now ready to congure Intelli-M Access.
14
www.innias.com
SECTION 2: INSTALLATION
If you are new to the innias system, some concepts and terms used in Intelli-M Access may be unfamiliar. Review these in “1.3
Important terms and concepts” on page 3 before continuing.
2.1 Import data from other access control systems (optional)
NOTE
If your Intelli-M access control system does not replace or build upon another access control system, skip this subsection and
continue with Chapter 3.
Intelli-M Access includes an import/export utility for extracting conguration information from other access control systems
(such as Supervisor Plus) and importing that data into Intelli-M Access. For large access control networks, this can save hours of
conguration time. Because of the complexity of the Door conguration in Intelli-M Access, however, Doors are not imported; they
need to be manually created in Intelli-M Access.
This utility imports data from other systems using a comma-delimited (CSV) text le. Data in CSV format may be exporting from
a third-party access control system, and then imported directly into Intelli-M Access. A sample CSV le is available on the innias
website that describes the data format information.
To use the Import/Export Utility:
1. Click the Windows Start menu | All Programs | innias | Import Utility. The startup page will open See below.
15
Intelli-M Access V4.0 User Manual
SECTION 2: INSTALLATION
2. If you have an XML or CSV le from exported another system, skip to subsection “2.1.1 Import to Intelli-M Access” on page
18 and follow the instructions on importing data into Intelli-M Access.
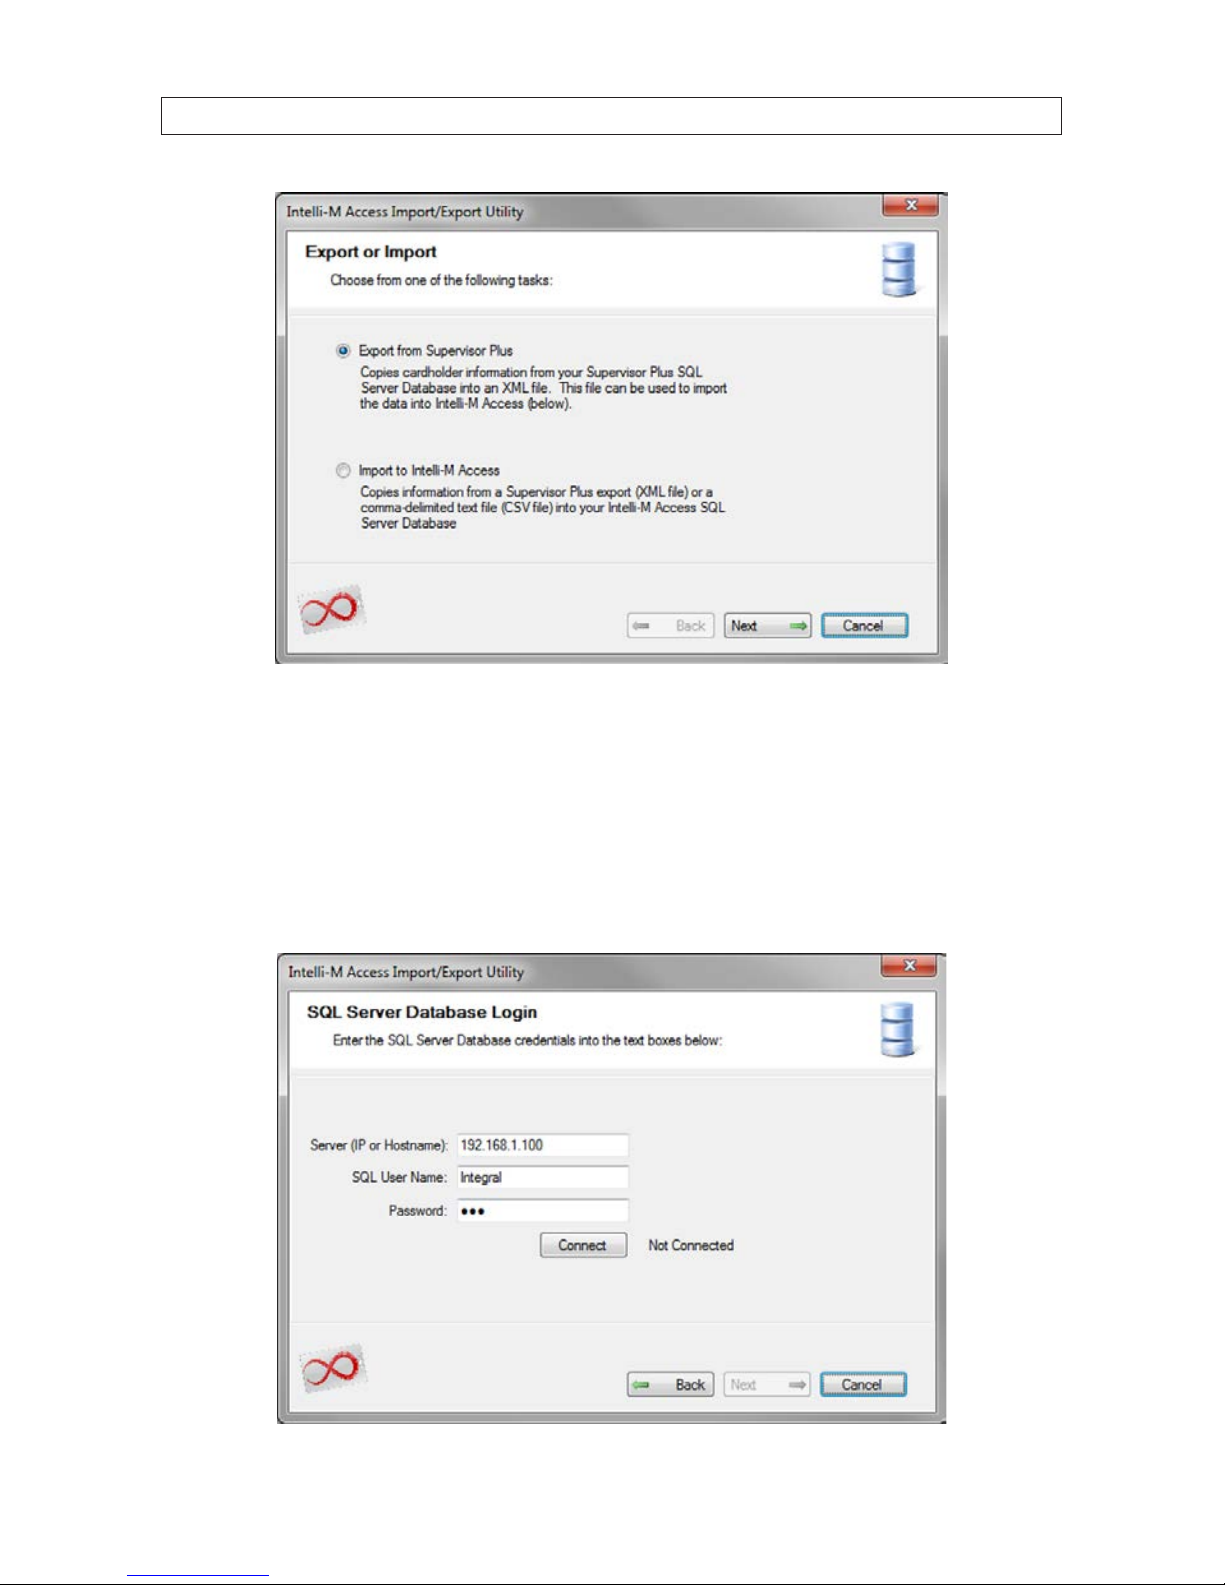
3. To export user data from Supervisor Plus, select the Export from Supervisor Plus radio button. The Export from
Supervisor Plus option causes the utility to transfer cardholder and group information into an XML le. This le will be used
later as the import le for transfer into Intelli-M Access. Click Next.
4. A Login page will open. In the Login window, enter hostname or IP address of the server where Supervisor Plus is installed.
16
www.innias.com
SECTION 2: INSTALLATION
5. Enter the user name and password for the SQL database that Supervisor Plus uses (see above). Use the default Integral name
and password if they weren’t changed.
CAUTION
If Supervisor Plus is running, exit Supervisor Plus and leave it o to avoid conicts with Intelli-M Access.
6. Click Connect to connect to the Supervisor Plus database (e.g. SQL Server). The application will connect successfully if
the proper hostname and credentials were entered. Contact innias Support if you have having trouble connecting to the
database.
7. After a connection to the database is established, click Next.
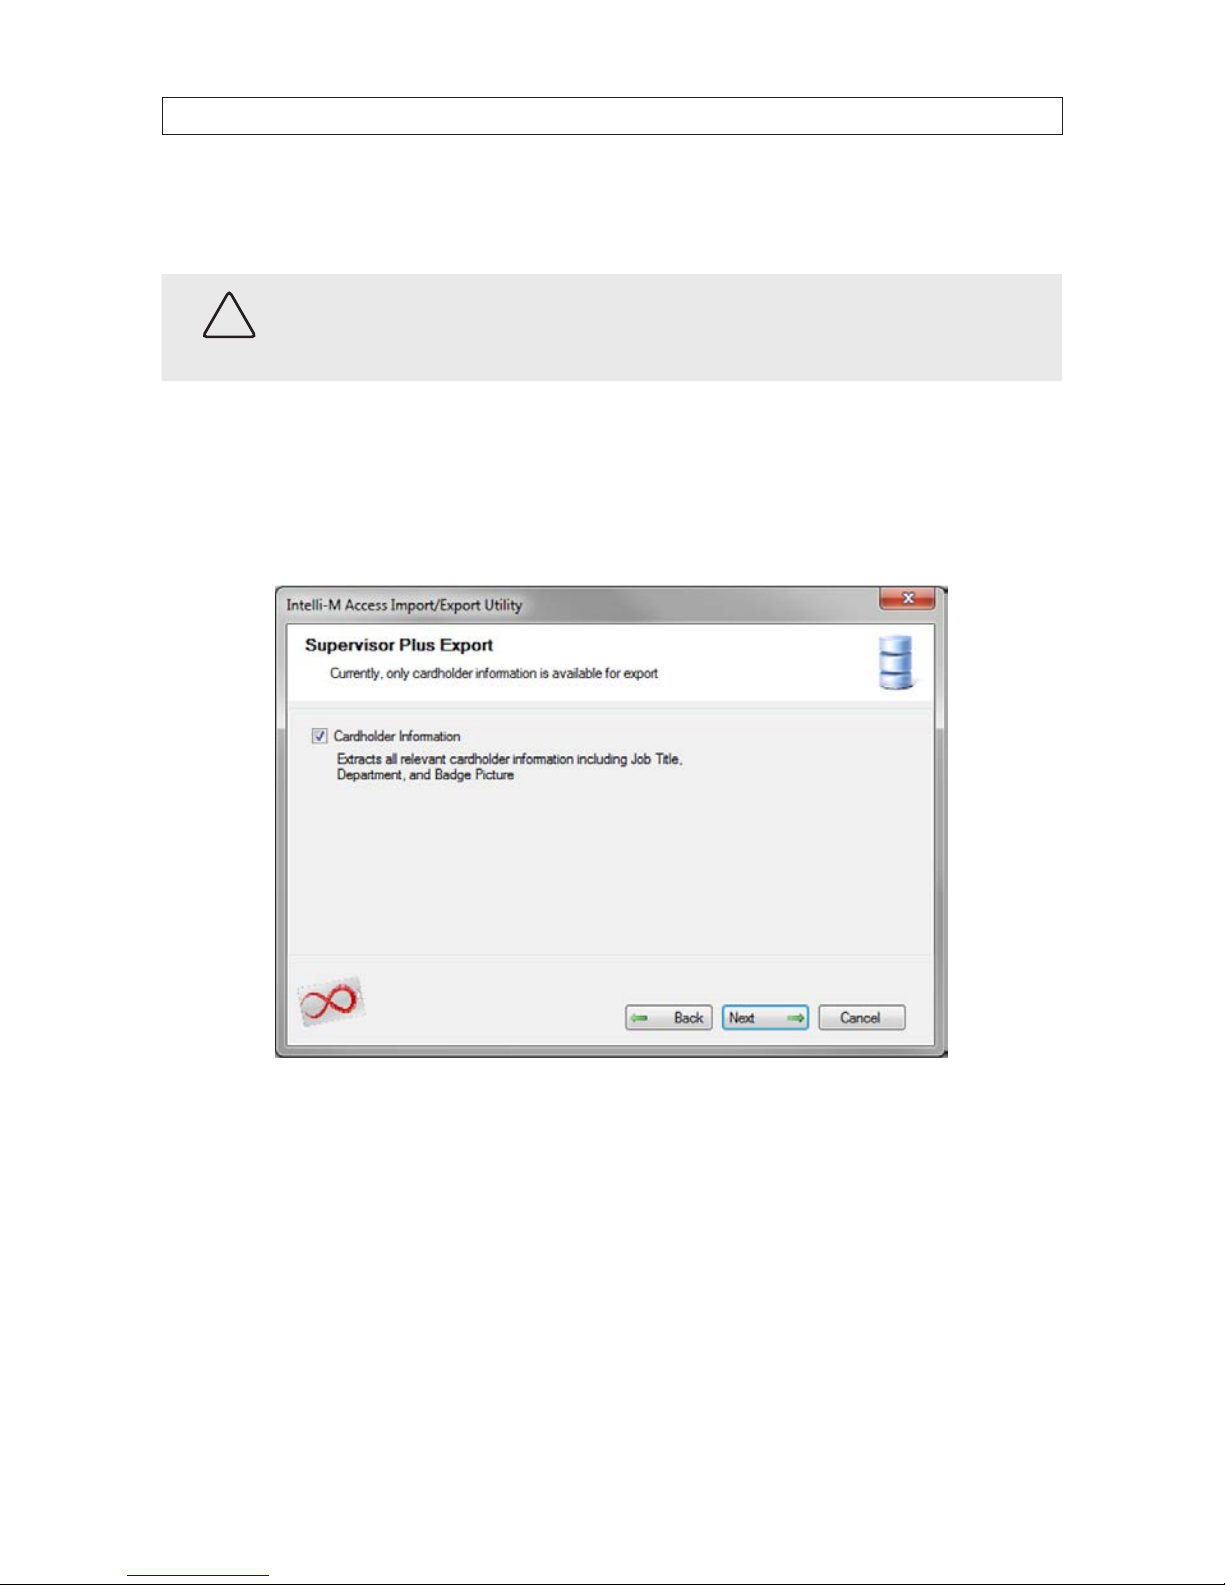
8. Check the Cardholder Information box, then click Next. The utility will export all cardholder information relevant to
Intelli-M Access.
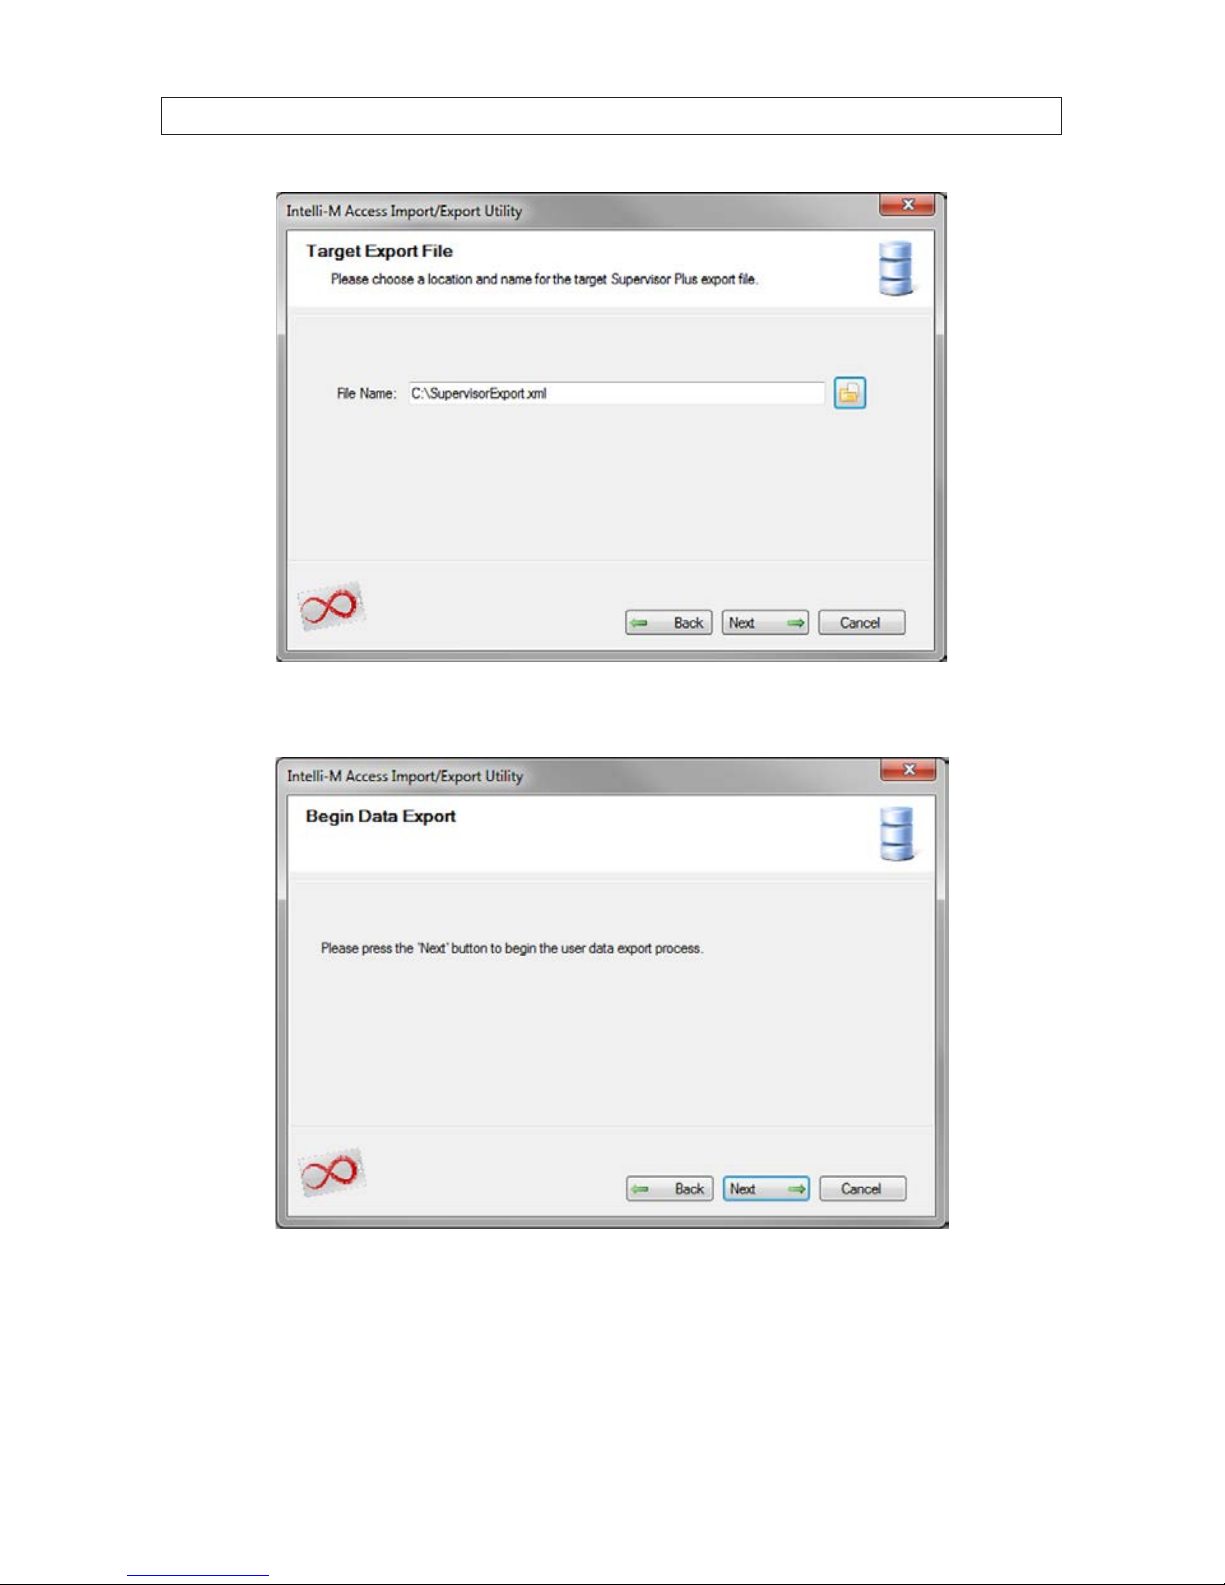
9. In the Target Export File window, click the folder icon and browse to the location where you want to save the export le.
Append a le name, then click Next.
17
Intelli-M Access V4.0 User Manual
SECTION 2: INSTALLATION
10. In the Begin File Export window, click Next to proceed. A progress dialog will appear during the export process.
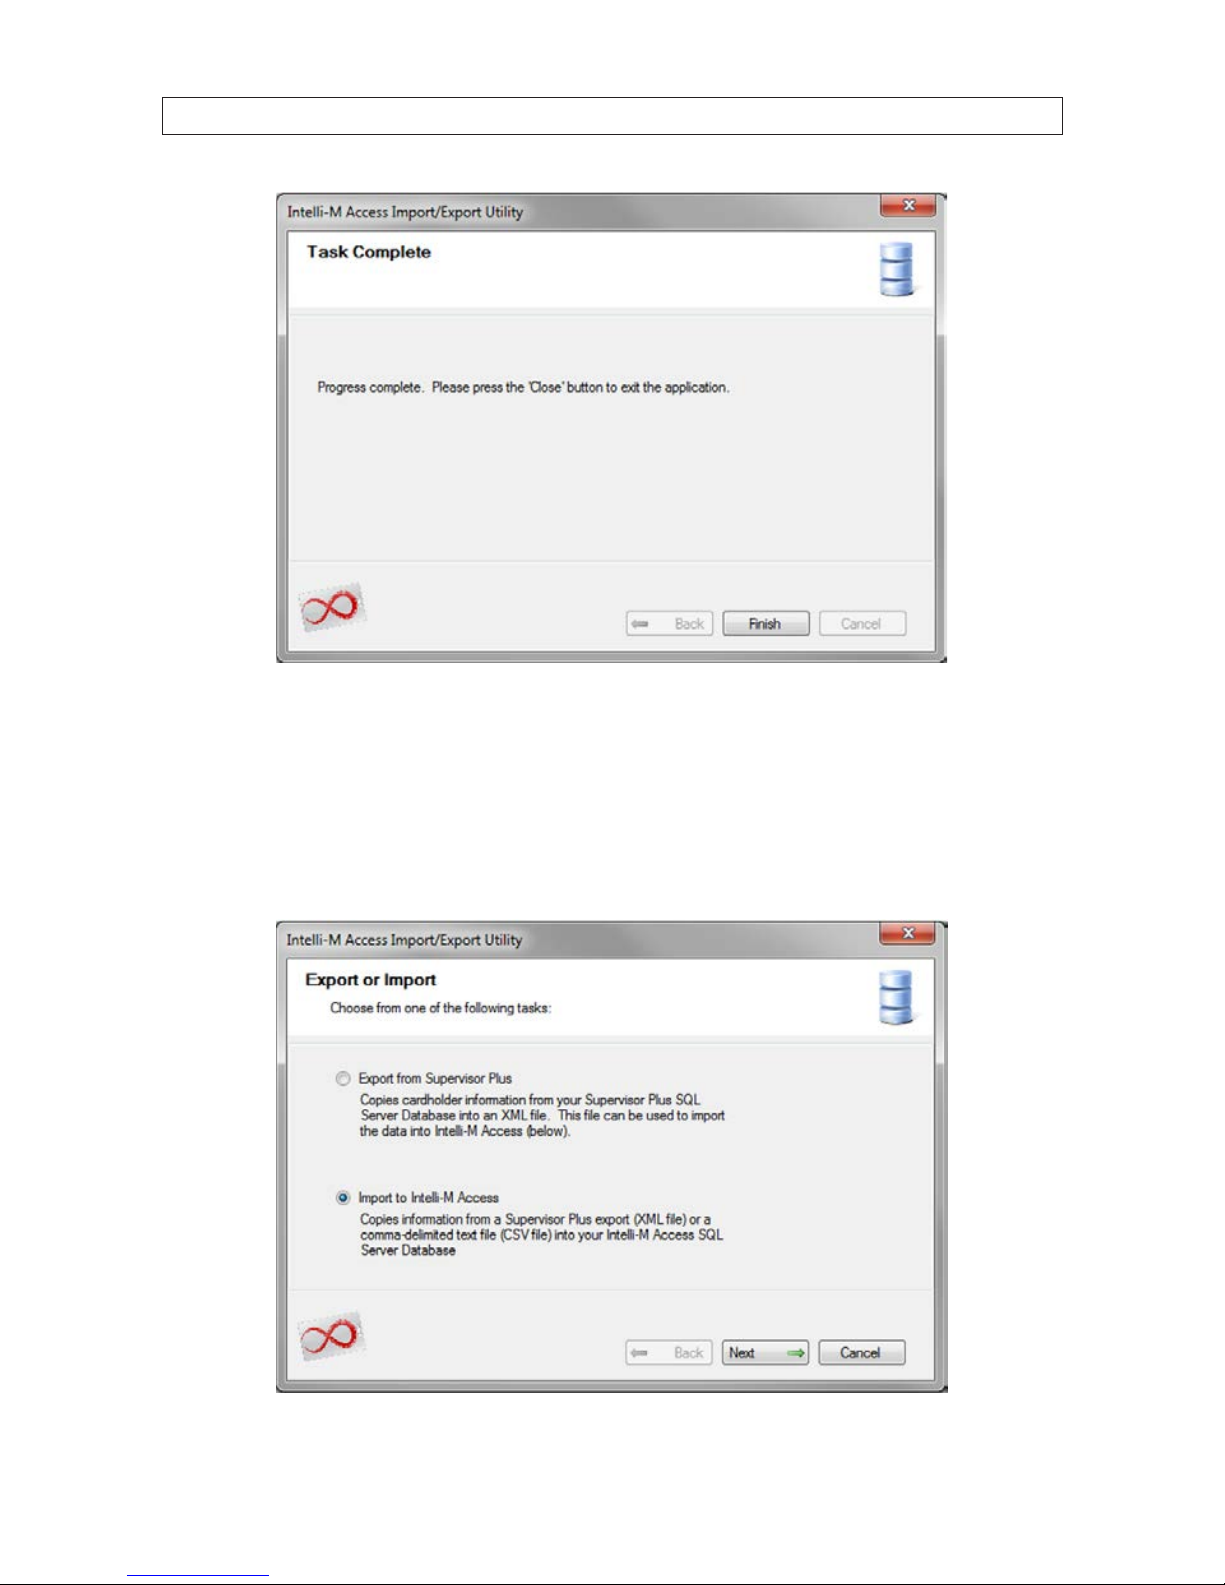
11. When the Task Complete window opens, click Finish.
18
www.innias.com
SECTION 2: INSTALLATION
2.1.1 Import to Intelli-M Access
To import data to Intelli-M Access:
1. Launch the Import utility, if not already open: Click the Windows Start menu | All Programs | innias | Export from
Supervisor Plus. The startup page will open See below.

19
Intelli-M Access V4.0 User Manual
SECTION 2: INSTALLATION
2. To import user data from another access control system (such as Supervisor Plus) to Intelli-M Access, select the Import to
Intelli-M Access radio button, then click Next.
3. In the Intelli-M Access Administrator login page, select options as follows:
a. For the hostname, enter localhost (meaning that you must be running this utility from the server onto which you
installed Intelli-M Access).
b. Enter the admin username and password (use the default values if the password was not changed) you haven’t changed
the credentials yet. Ensure that proper credentials have been entered, and click Connect to connect to Intelli-M Access. If
you have trouble connecting to the database, please contact innias Tech Support for further assistance.
c. After the test connection is successful, click Next to continue.
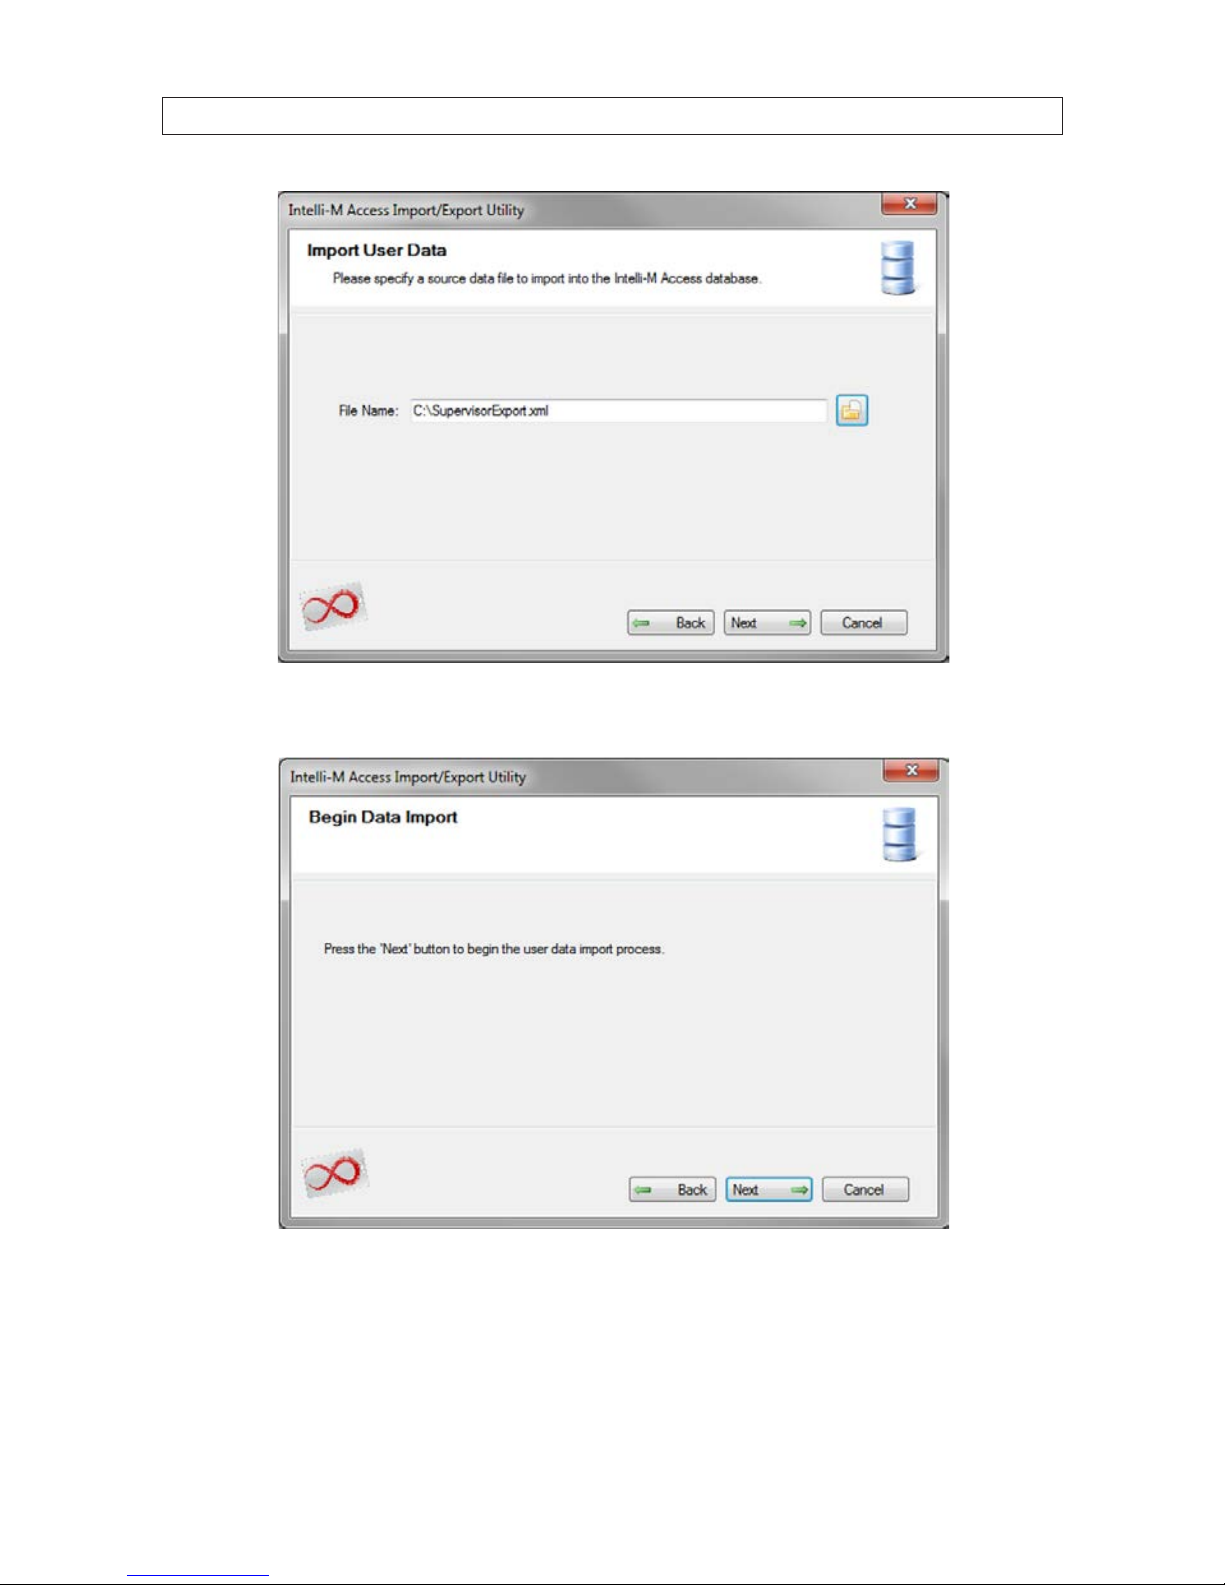
4. In the Import User Data page, click the directory icon and select the le containing the data you want to import, then click
Next to continue.
20
www.innias.com
SECTION 2: INSTALLATION
5. Click Next in the Begin Data Import page to proceed with the import. The import process may take one or two minutes.
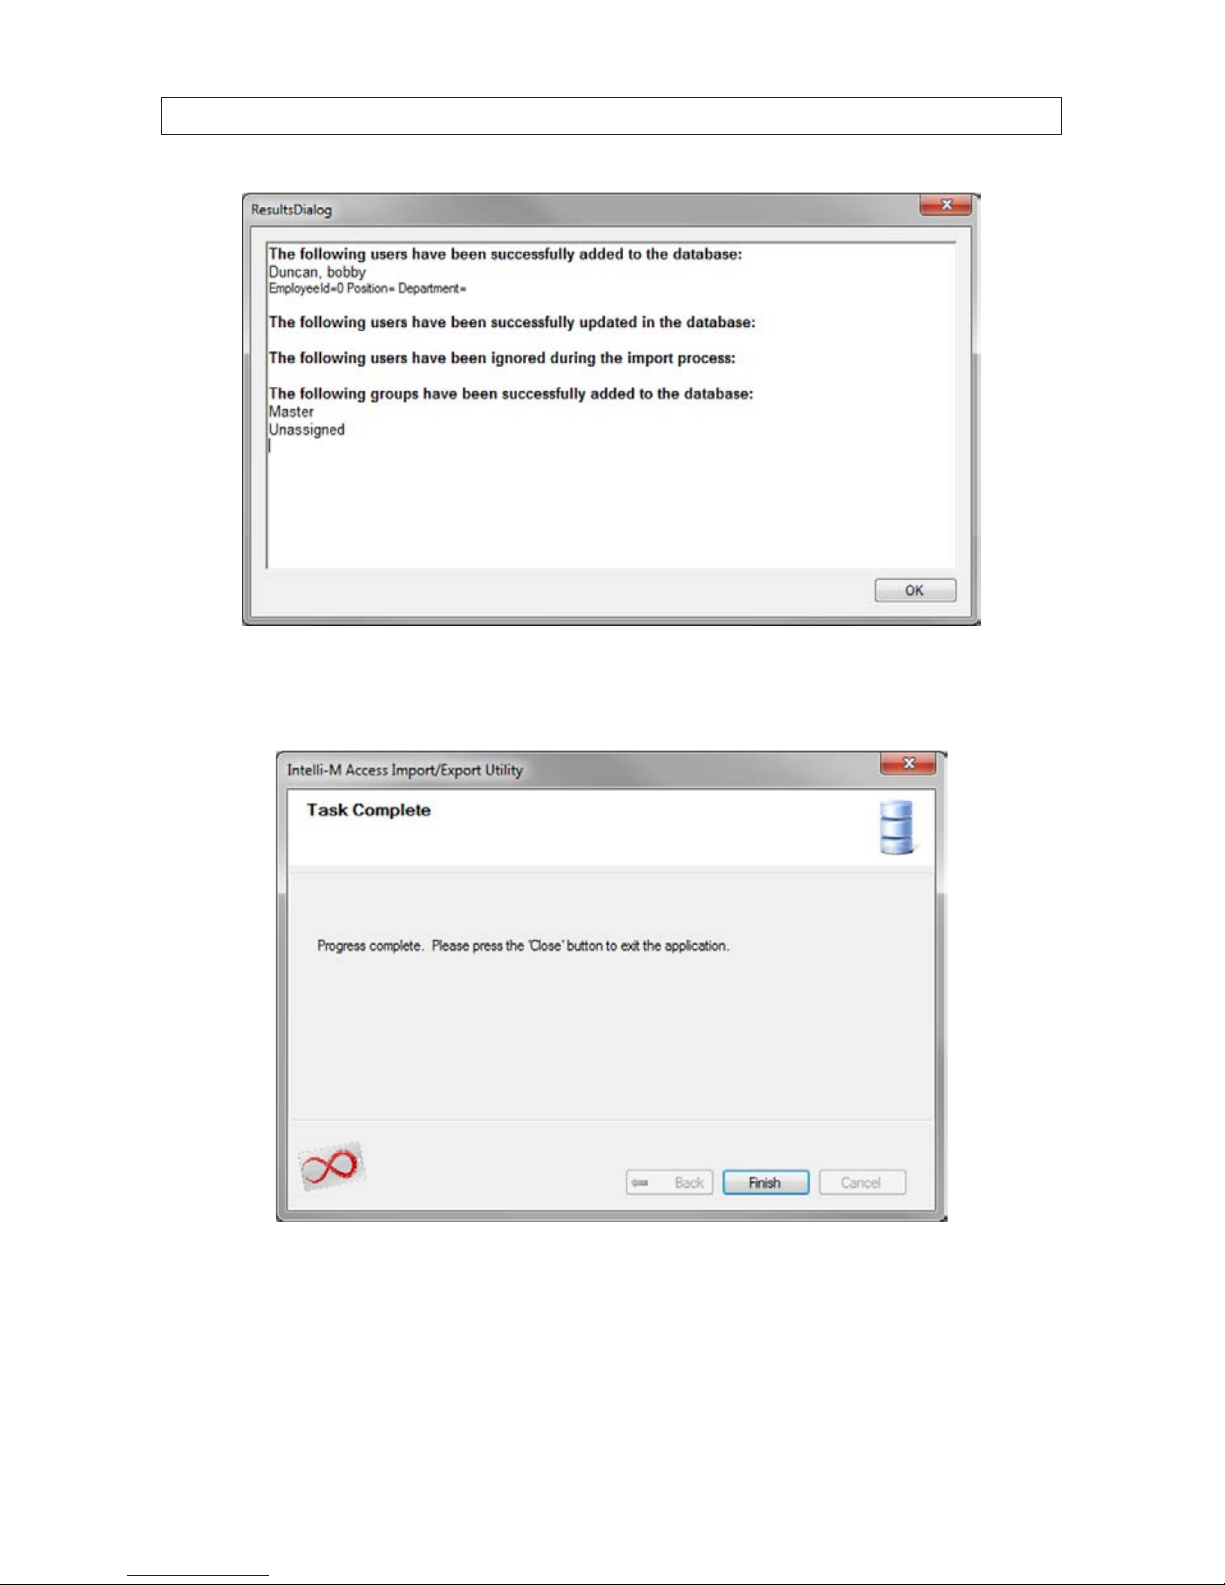
6. After the import completes, the Results Page sorts the import results into four categories:
New Users that were added to Intelli-M Access
Existing Users whose information was updated in Intelli-M Access
Users who for some reason were not added or updated
New Groups that were added to Intelli-M Access
21
Intelli-M Access V4.0 User Manual
SECTION 2: INSTALLATION
The ResultsDialog example above shows one new User and two new Groups were added. After examining, click Finish in
the Task Complete window to close the utility.
Task Complete page
Congratulations! You’ve successfully transferred the users and groups from another access control system into Intelli-M Access.
22
www.innias.com
SECTION 3: CONFIGURE INTELLIM ACCESS
SECTION 3
Congure Intelli-M Access
Follow these simple steps to get your access control up and running in minutes. This chapter will guide you through the minimal
steps required for successful conguration of your Intelli-M Access system. Before conguring your system, write down the IP
Address or Serial Number as well as the physical location of all of your door controllers. You will need this information to continue.
3.1 Logging into Intelli-M Access
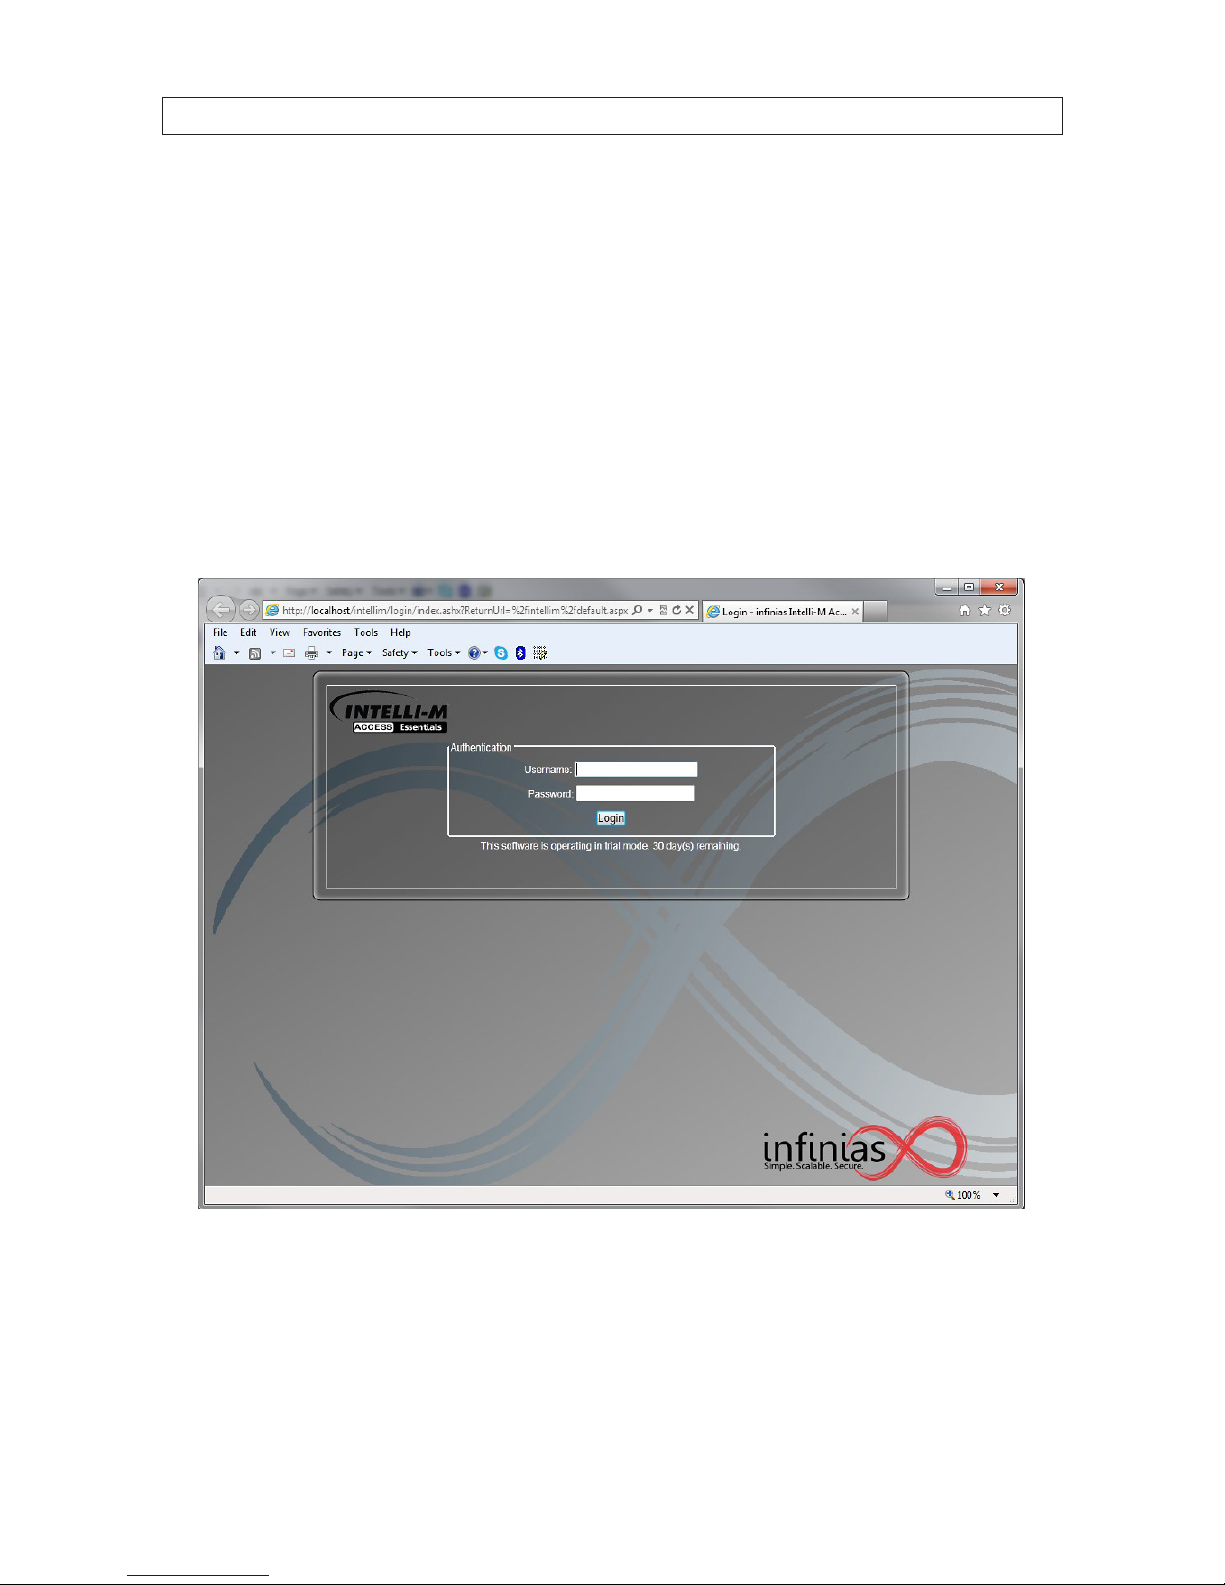
1. At the windows desktop, click Start | All Programs | innias | Intelli-M Access to open your web browser pointing at
Intelli-M Access running under IIS. An Authentication screen will appear.
Intelli-M Access Login Page
2. In the Authentication screen, enter your Intelli-M Access username (default: admin) and password (default: admin), then
click Login. Note that when Intelli-M Access is installed, the software is licensed in Trial mode for 30 days.
23
Intelli-M Access V4.0 User Manual
SECTION 3: CONFIGURE INTELLIM ACCESS
3.2 Settings page
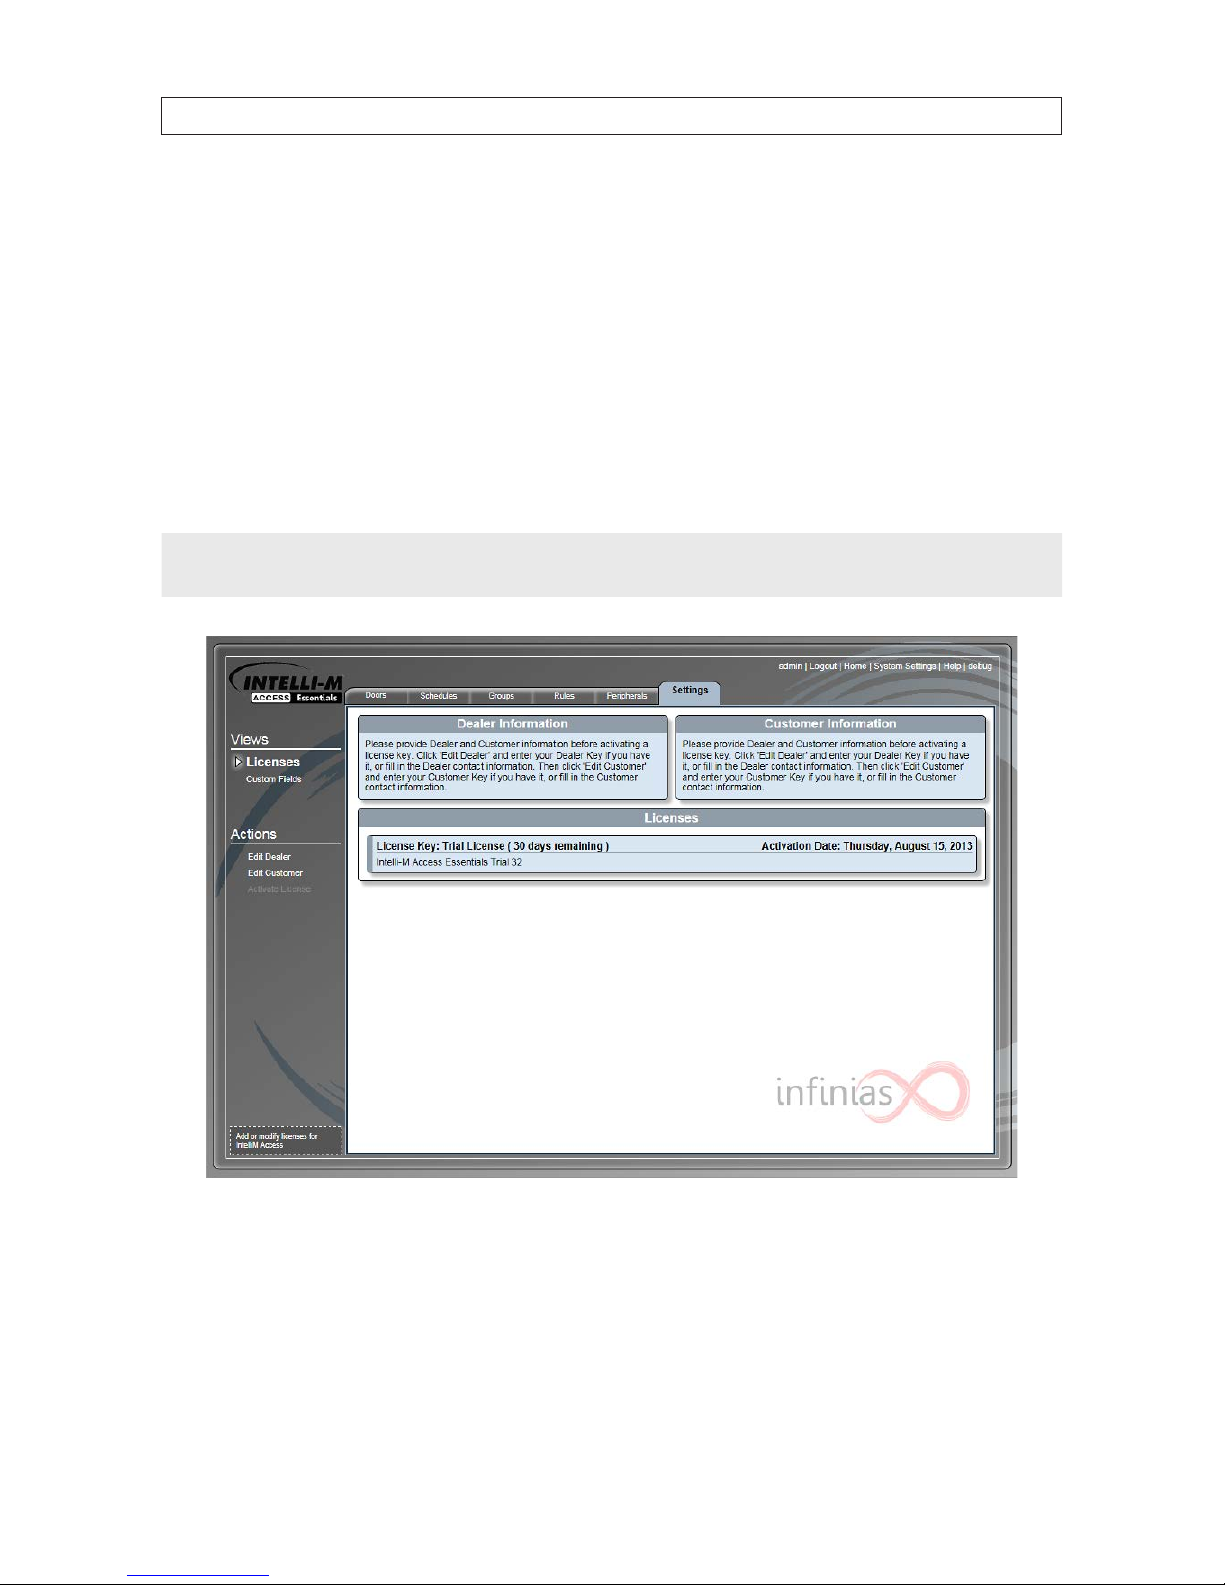
After logging into Intelli-M Access with a Trial license, the Settings tab opens. To activate your user license(s), complete the
following steps. If you do not have a valid license key and password, you can obtain one from your dealer by contacting
sales@innias.com for assistance. If your Trial license is still valid, you can skip the activation steps and continue with “3.5 Create a
door” on page 29 to congure your Intelli-M Access system.
Activate licenses
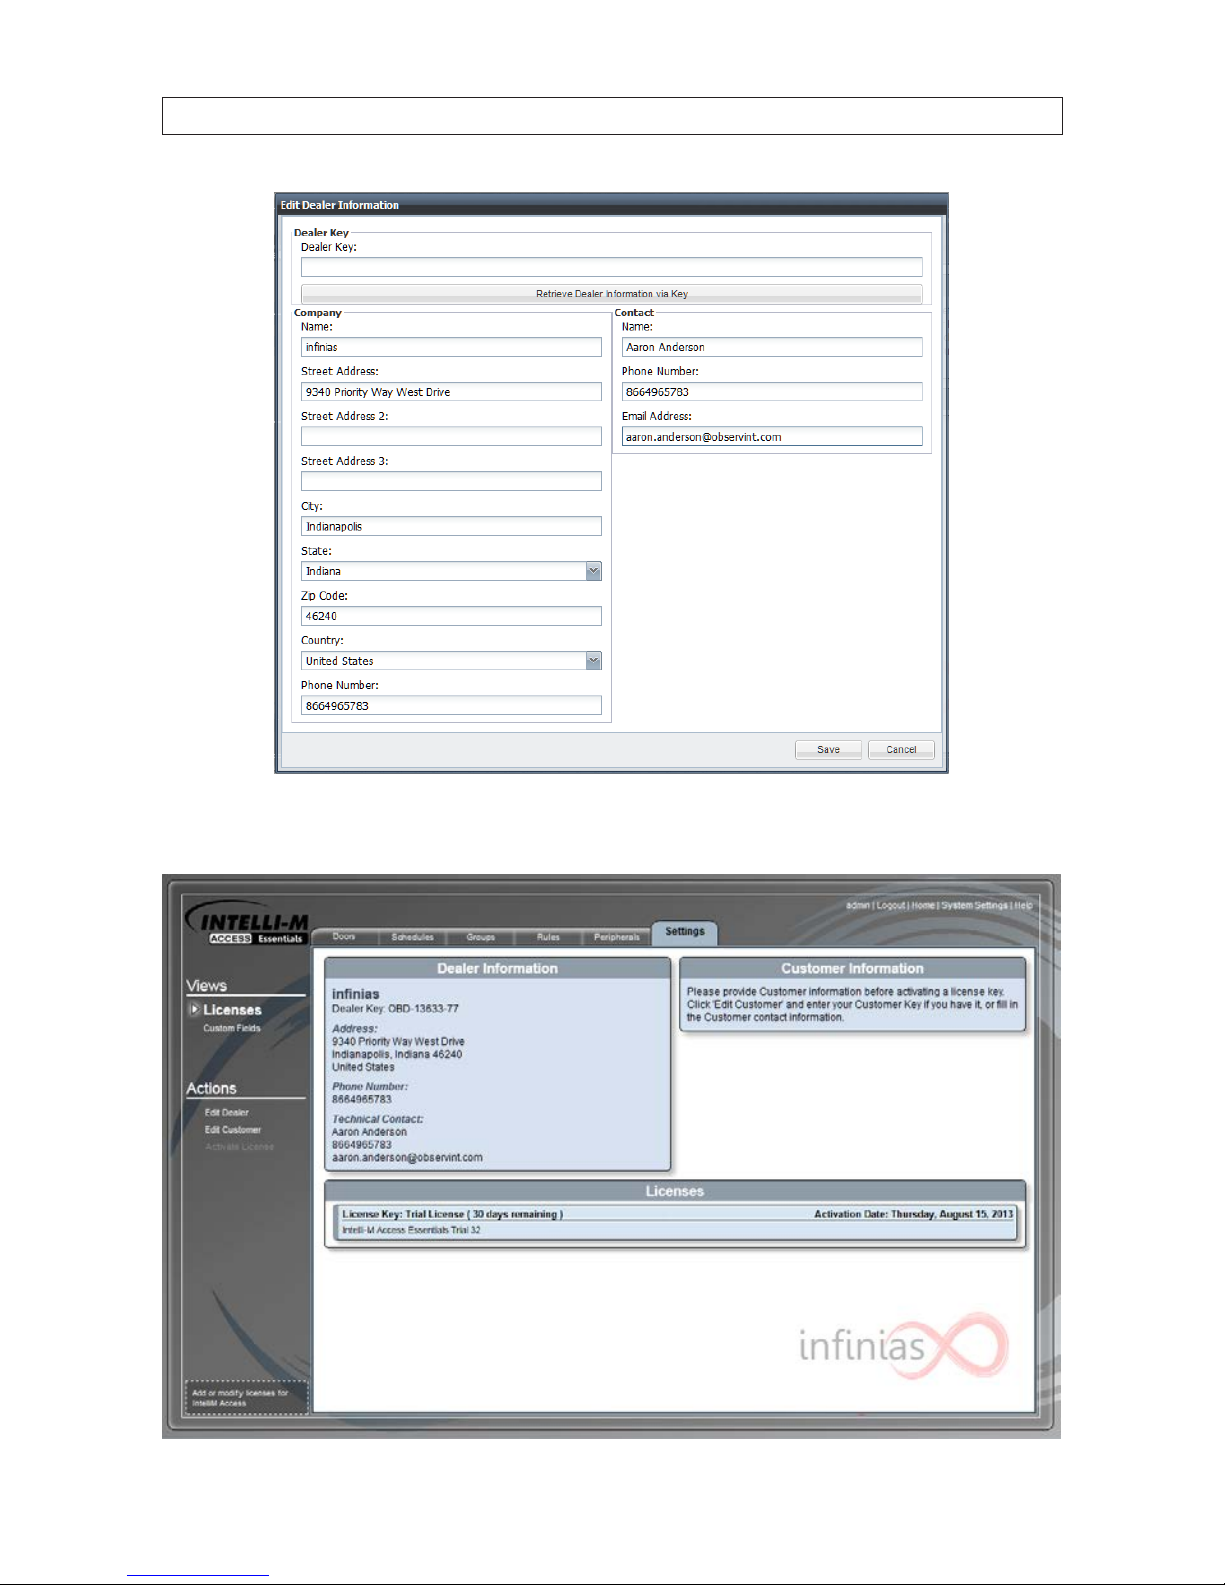
1. To begin the License activation process in the Settings tab, click the Edit Dealer link under Actions on the left side of the
window. The Edit Dealer Information window will open:
NOTE
The Custom tab in earlier version of In Intelli-M Access was renamed Settings in V4.0 to expand the functionality of this
area of the user interface. The existing features in the Custom tab accessible by clicking the Custom Fields under Views.
Settings Page
2. In the Edit Dealer Information pop-up window, you can retrieve your Dealer information from the Internet if you have your
dealer key: enter the key in the eld provided, then click Retrieve Dealer Information via Key. If you don’t have either
your dealer key or direct access to the Internet, enter the applicable information in the elds provided.
24
www.innias.com
SECTION 3: CONFIGURE INTELLIM ACCESS
3. After entering your Dealer and Contact information, click Save. Your Dealer and Contact information will be transferred to the
innias registration server and appear in the Settings page. See the example below.
 Loading...