

Page 1
TLE9869 EvalKit v1.0
User Manual v1.1
Contents
Abbreviations .......................................................................................................................................... 2
1 Concept ................................................................................................................................................ 3
2 Interconnects ........................................................................................................................................ 4
3 Test Points ............................................................................................................................................ 5
4 Jumper Settings .................................................................................................................................... 6
5 Communication Interfaces ................................................................................................................... 7
5.1 LIN (via Banana jack and uIO BSL) ................................................................................................. 7
5.2 UART (via USB)............................................................................................................................... 7
5.3 Debugging (via USB or SWD-Interface) ......................................................................................... 8
6 Technical Data ...................................................................................................................................... 8
7 Optional Additional Placements ........................................................................................................... 9
8 Schematics and Layout ....................................................................................................................... 10
Page 2

TLE9869 EvalKit v1.0 User Manual v1.1
Abbreviations
BLDC
Brushless Direct Current
BSL
Bootstrap Loader
GH1,2
Gate High side MOSFET for Phases 1, 2
GL1,2
Gate Low side MOSFET for Phases 1, 2
GPIO
General Port Input / Output
ISP
In-system Programmer
LIN
Local Interconnect Network
MON
Monitor
n.c.
not connected
n/u
not used
OP1
Negative operational Amplifier Input
OP2
Positive operational Amplifier Input
RST
Reset
SL
Source Low side MOSFET
SWD
ARM Serial Wire Debug
TMS
Test Mode Select
UART
Universal Asynchronous Receiver Transmitter
VAREF
Reference Voltage
VBAT
Battery Voltage Supply
VCOM
Virtual COM-Port
VCP
Voltage Charge Pump
VDDC
Core Supply
VDDEXT
External Voltage Supply Output
VDDP
I/O Port Supply
VDH
Voltage Drain High side MOSFET
VS
Battery Supply Input
VSD
Battery Supply Input for MOSFET Driver
Table 1: Abbreviations
Page 3
TLE9869 EvalKit v1.0 User Manual v1.1
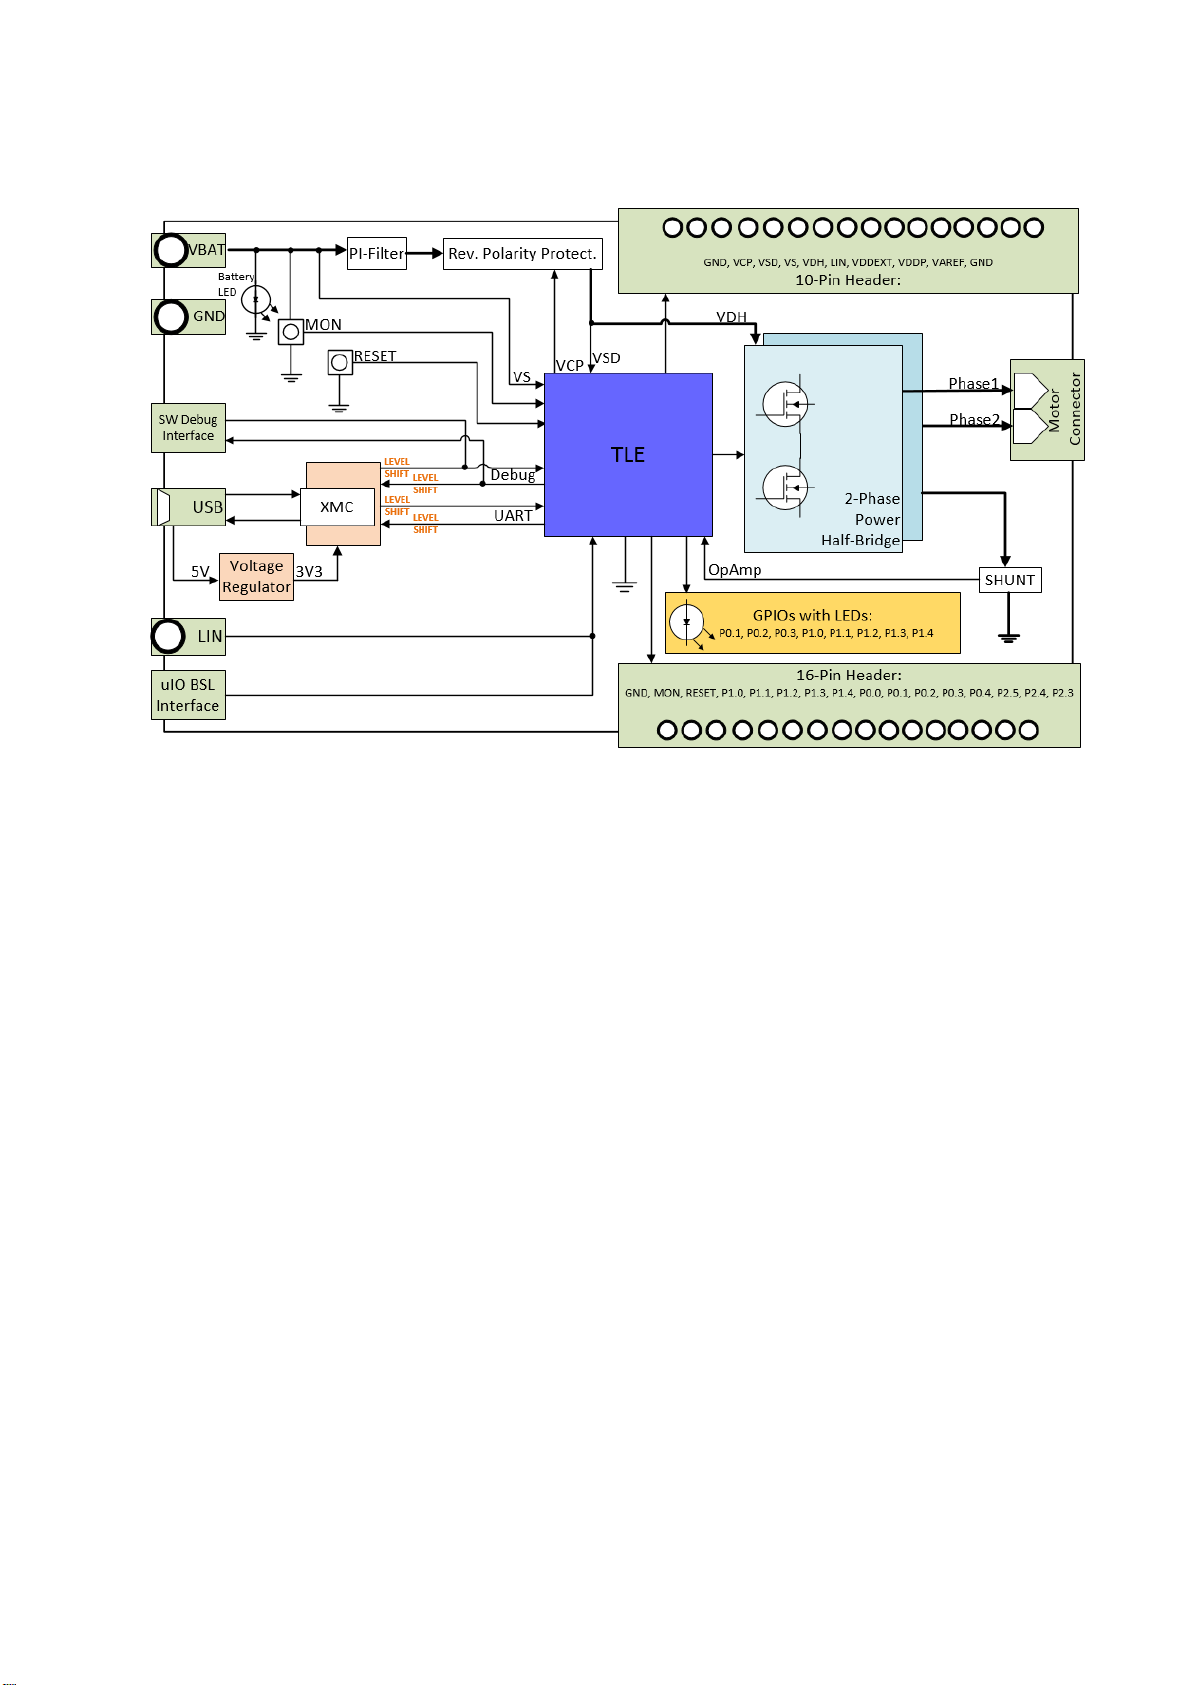
1 Concept
Figure 1: Board Concept
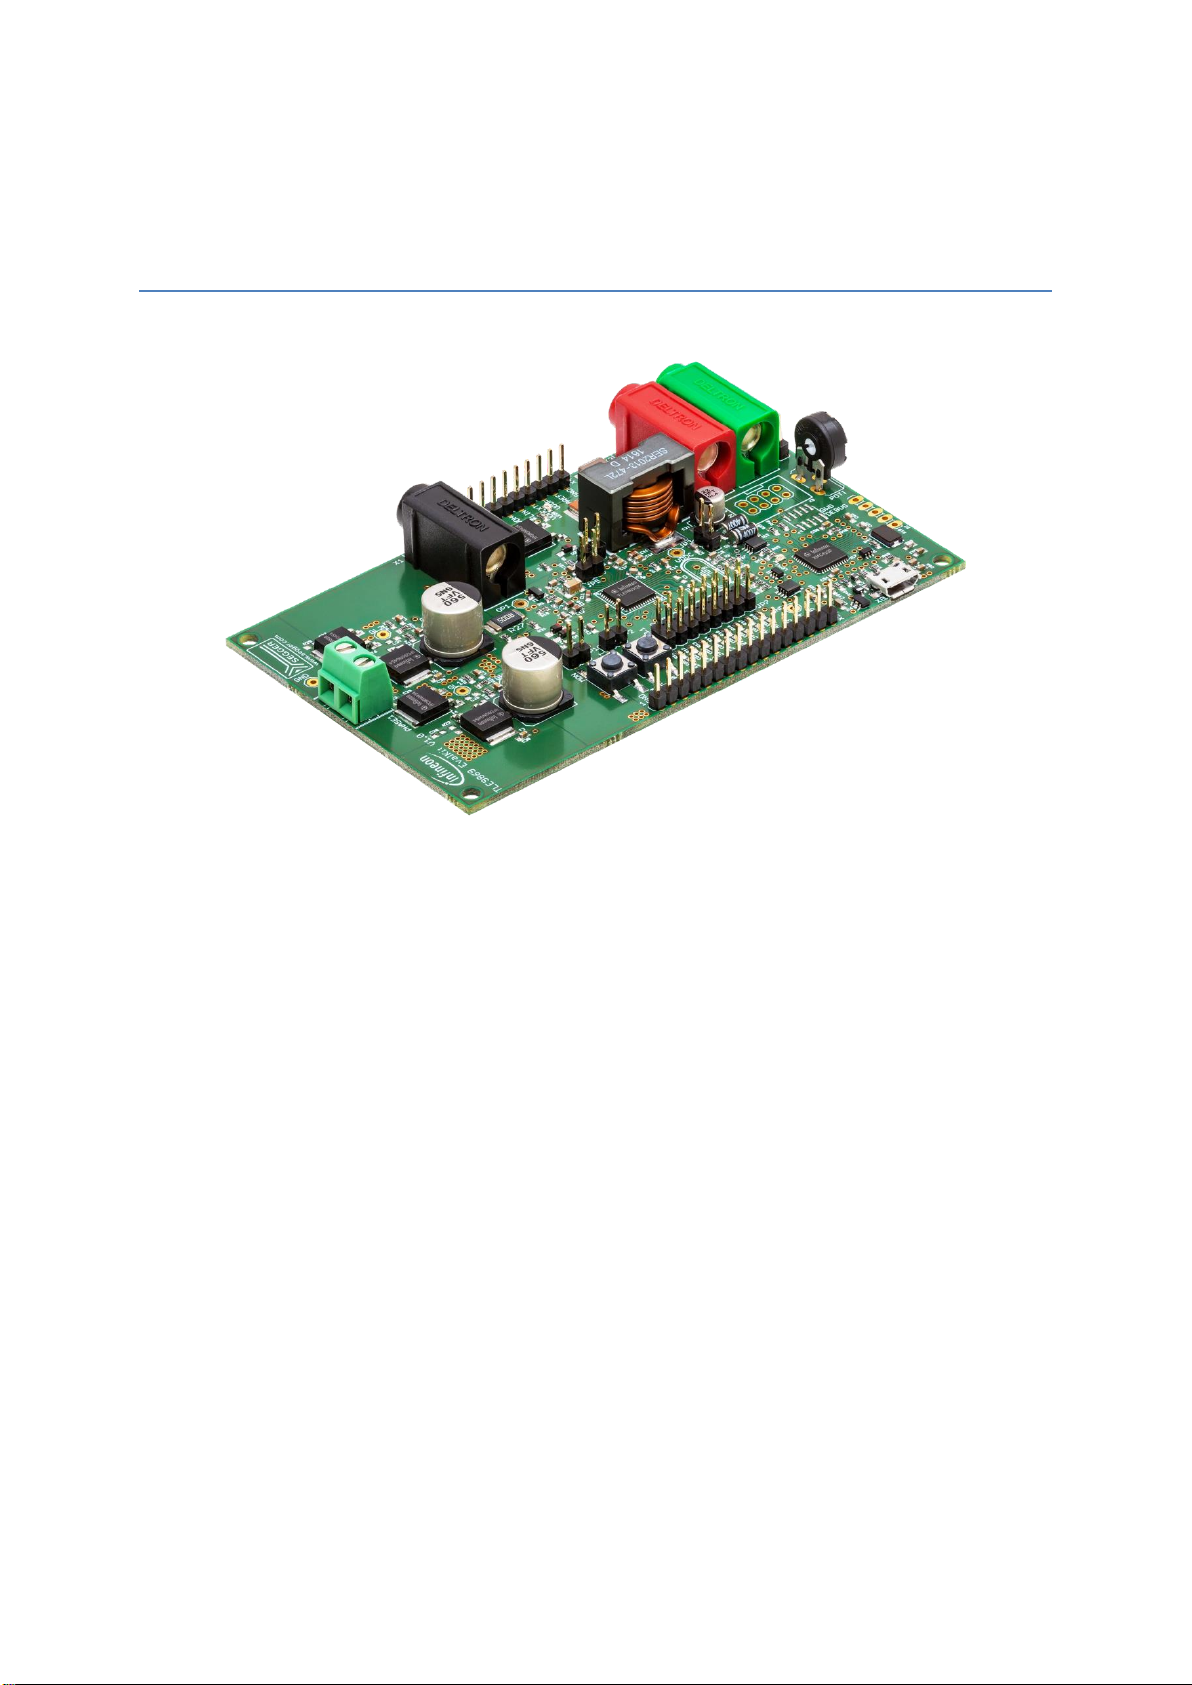
This board is intended to provide a simple, easy-to-use tool for getting familiar with Infineon’s
embedded power IC TLE9869. It contains the TLE9869 and its typical application circuit including two
MOSFET half bridges to instantly drive a DC motor. The board is ready to connect with car supply or
similar and has an implemented Segger for debugging on board.
All relevant chip pins are connected to pin headers at the edge of the board, where signals can be
probed or applied directly (see Table 2, Table 3). By different jumper settings LEDs can be put in parallel
to several ports and selected functions can be configured (see Table 6). Push button switches allow
easy hardware reset and triggering of the MON input. There are intended test points for all four gate
driver pins, for measurements at the shunt, VDDC and several ground points on the evaluation board
(see Figure 3). For testing analog signals ADC inputs can be varied by the potentiometer on board. Two
phases of motor current can be picked off at a terminal block to connect a DC motor.
The evaluation board can be operated by standard laboratory equipment as power supply and LIN
communication are working via banana jacks. Debugging and UART are provided via an USB interface
combined with onboard Segger J-Link (XMC4200). Bidirectional level shifters ensure that the respective
XMC pins are in tristate as long as UART or debugging is not used.
In case the user wants to use another ISP than the onboard Segger the SWD interface can be used. To
program the TLE9869 via LIN there is an additional uIO BSL interface (see Table 4).
There is a battery LED that indicates that the board is connected to supply the right way. Otherwise
reverse polarity protection secures the board from damage by cross connection.
Page 4

TLE9869 EvalKit v1.0 User Manual v1.1
2 Interconnects
Figure 2: Interconnects
Banana jacks (marked yellow)
There are jacks in different colors for ground, supply (max.28V) and LIN communication via banana
jack: GND (black), VBAT (red), LIN (green)
Pin Ports X4 and X5 (marked red)
Soldering pin headers with 2,54mm pitch for X4 (1x10) and X5(1x16) yields test points for the TLE9869
pins. Following signals are connected to the pins:
X4:
1 2 3 4 5 6 7 8 9
10
GND
VCP
VSD
VS
VDH
LIN
VDDEXT
VDDP
VAREF
GND
Table 2: Pin Configuration Top Line Pin Port (X4)
X5:
1 2 3 4 5 6 7 8 9
10
11
12
13
14
15
16
GND
MON
RST
P0.0
P1.1
P0.1
P0.2
P0.3
P1.2
P1.0
P1.3
P1.4
P0.4
P2.3
P2.4
P2.5
Table 3: Pin Configuration Bottom Line Pin Port (X5)
Terminal block for connecting the motor (marked blue)
The two pins of the terminal block provide access to the two half bridges and are intended to connect
a DC motor.
USB for UART and Debugging (marked green)
With this Micro USB PC and evaluation board can get connected.
Page 5
TLE9869 EvalKit v1.0 User Manual v1.1
uIO BSL for LIN (marked orange)
This uIO bootstrap loader is an 8 pin header (2x4) with 2,54mm pitch.
It is intended to connect additional hardware for bootstrap loading. For programming the TLE9869 via
LIN this uIO interface can be used (see www.infineon.com/uio).
n.c.
1 2 GND
n.c.
3 4 n.c.
LIN
5 6 VS
RESET
7 8 n.c.
Table 4: Pin Configuration uIO BSL
Pin Header for SWD (marked purple)
There is a 10 pin header (2x5) with 1,27mm pitch on the evaluation board. For debugging with another
ISP than the onboard Segger this interface can be used.
DBPRE will be implicitly connected to GND by connecting the external ISP. This keeps the XMC in reset
state to prevent interference of the SWD communication.
5V
1 2 SWDIO (TMS)
GND
3 4 SWCLK (P0.0)
GND
5 6 n.c.
n.c.
7 8 n.c.
DBPRE
9
10
RESET
Table 5: Pin Configuration SWD Interface
3 Test Points
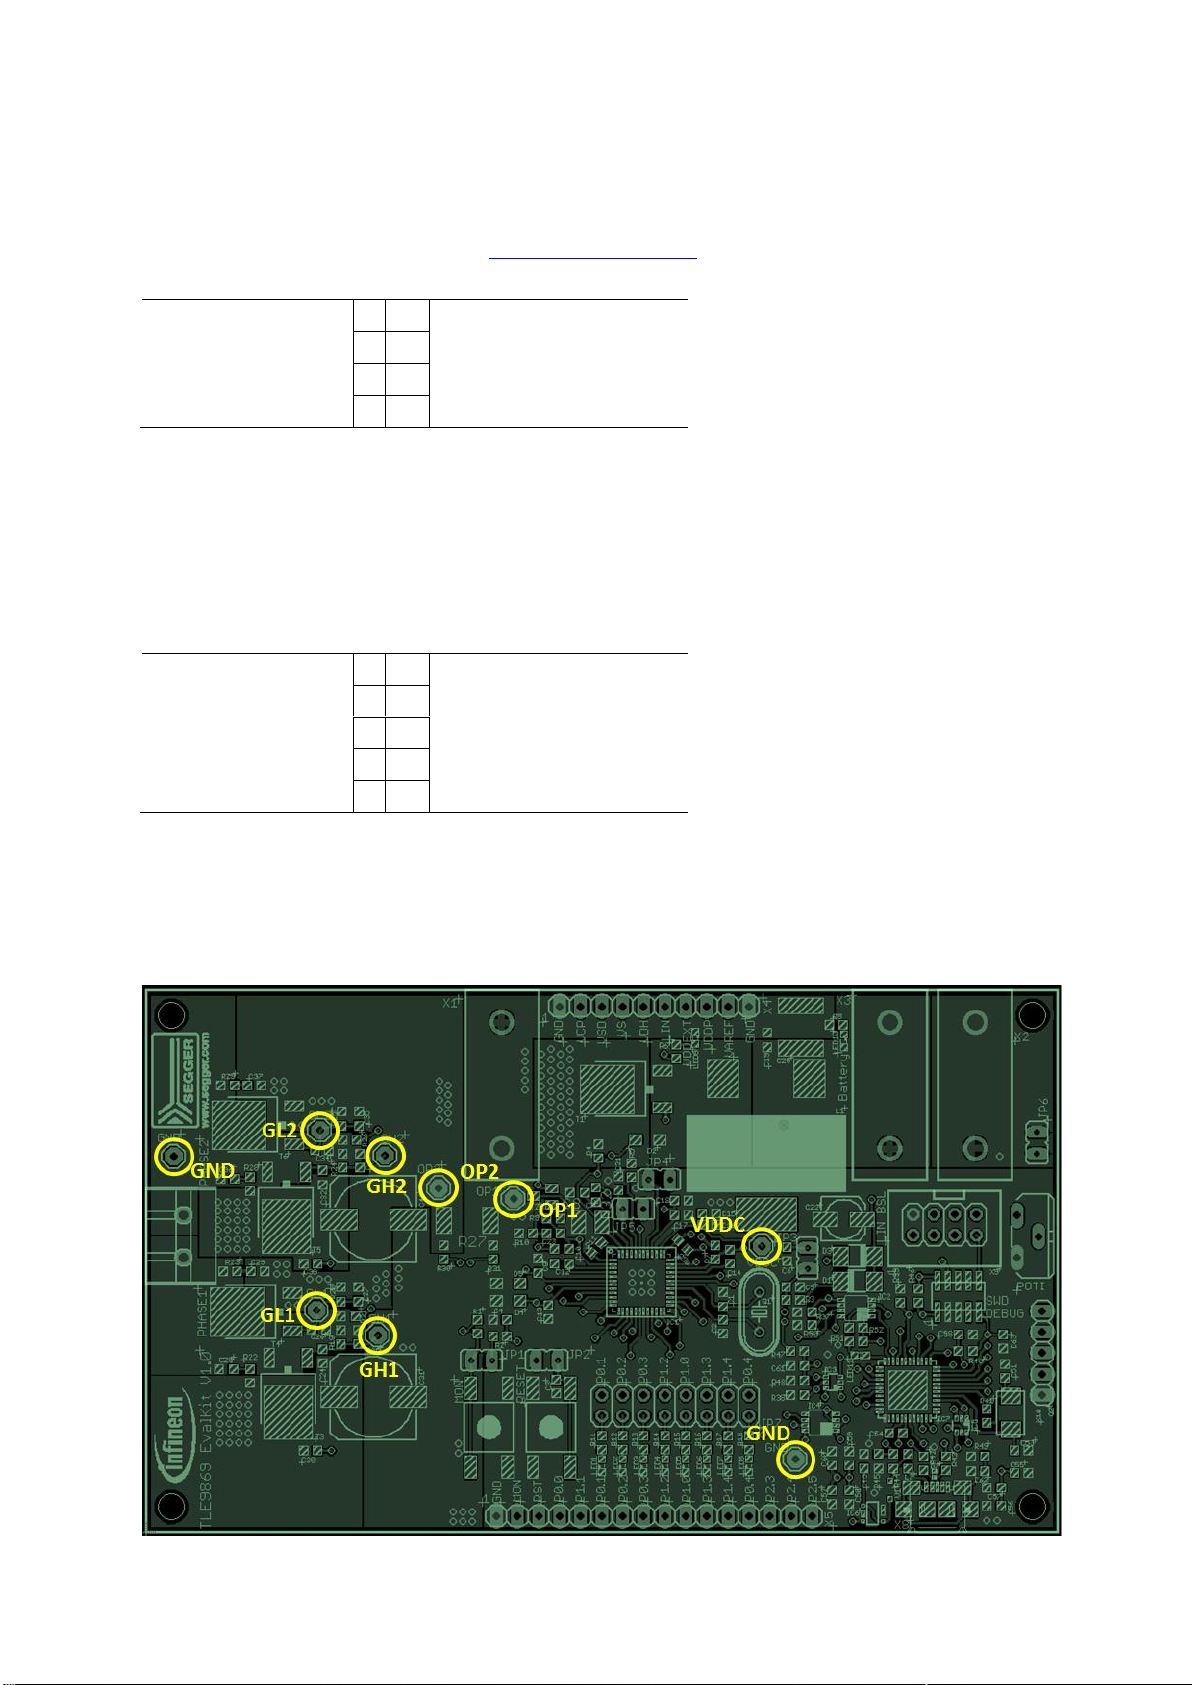
Figure 3: Test Points
Page 6

TLE9869 EvalKit v1.0 User Manual v1.1
The 2-phase power half-bridge is controlled by four gate driver pins, driving the gates of high side
MOSFET and low side MOSFET for each phase. Each gate has an intended test point to measure the
respective signals at high side gates and low side gates (GL1, GL2, GH1, GH2).
Test points OP1 and OP2 are provided at both sides of the shunt, which is 5mR.
Additionally there is an intended test point for VDDC and various ground points.
All test points marked in the shown figure are not populated. In order to use these pins they have to
be soldered in the designated solder holes.
4 Jumper Settings
The following table summarizes the jumpers’ options. More detailed information can be found in the
text below.
JP1
Enable or disable MON button
JP2
Enable or disable RESET button
JP3
Select TLE9869 as LIN Master or LIN Slave
JP4
Connect or disconnect VAREF with VDDEXT
JP5
Replace by an ampere meter to measure input current
JP6
Enable or disable POTI
JP7
Enable or disable LED for respective GPIO
Table 6: Jumpers’ functionalities
Figure 4: Jumpers
JP1: Close this jumper to connect MON button to MON input. Open it to disconnect MON button from
MON input.
JP2: Close this jumper to connect RESET button to RESET input. Open it to disconnect RESET button
from RESET input.
Page 7

TLE9869 EvalKit v1.0 User Manual v1.1
JP3: Close this jumper to connect an additional 1k pull-up resistor. This is intended for LIN master
communication. Open the jumper to use the TLE9869 as slave in a LIN network. Software for LIN low
level driver can be found at the homepage of IHR (www.ihr.de).
JP4: Close this jumper in order to supply VAREF by VDDEXT. In case VAREF is supplied externally the
user has to take care by software that the internal VAREF is disabled. Open the jumper to use the
internal VAREF which has to be enabled by software.
JP5: This jumper is closed by default. If this jumper is left open the device is not supplied. It is intended
to open the VS line in order to measure the current flowing into the TLE9869.
JP6: Close this jumper to connect the potentiometer to P2.4. Open this jumper to disconnect the
potentiometer.
JP7: Jumper 7 provides one individual jumper per LED in order to connect or disconnect the respective
LED to the pin port.
P0.1
P0.2
P0.3
P1.2
P1.0
P1.3
P1.4
P0.4
LED1
LED2
LED3
LED4
LED5
LED6
LED7
LED8
Table 7: Combinations of GPIOs and LEDs
5 Communication Interfaces
5.1 LIN (via Banana jack and uIO BSL)
The device integrated LIN transceiver is connected to a banana jack and additionally to the uIO BSL
interface. To integrate the device in a LIN network it is sufficient to use the single wire banana
interface. The BSL interface is intended to program the device via LIN. For further information about
the uIO interface see www.infineon.com/uio.
5.2 UART (via USB)
A virtual COM port provided by Segger driver enables a PC – board – communication via UART. The
UART2 module of TLE9869 uses the pins P1.1 (transmit) and P1.2 (receive). Those are connected to the
XMC4200, which emulates Rx and Tx on PC side with Segger firmware. Though they cannot be
disconnected physically, bidirectional level shifters ensure that the XMC pins are hi-Z in case the virtual
COM port is not used.
By connecting the evaluation board to the PC a virtual COM port gets emulated by the Segger driver
automatically. The port used will show up in the Microsoft® Windows® device manager.
Page 8

TLE9869 EvalKit v1.0 User Manual v1.1
Figure 5: UART and Debugging
Note: Only one of the interfaces USB or SWD can be used at one time. While using the SWD interface
the XMC is hold in reset. As long as a debugger is connected with the SWD interface it eliminates
therefore debugging or UART via USB.
5.3 Debugging (via USB or SWD-Interface)
For serial wire debug the TLE9869 uses the pins TMS (data) and P0.0 (clock). Level shifters between
XMC4200 and TLE9869 allow using P0.0, while it is not used for debugging.
The Segger J-Link module on board allows serial wire debugging via USB. Alternative debugging via
SWD interface is possible to debug with another ISP than the onboard Segger e.g. U-Link2. Therefore
the signals are routed through the 10 pin header SWD interface between the XMC4200 and the
TLE9869. The pin configuration makes sure that the XMC is hold in reset while another debugger is
physically connected as DBPRE will be implicitly connected to GND by connecting the external ISP (see
Table 5).
For more information regarding the evaluation boards and kits and the toolchain setup, see Getting
Started with TLE986x/7x Evalboards and Evalkits.
6 Technical Data
Platine Size: (110x66) mm
Voltage Supply: max. 28V
Motor Current: max. 20A
Pin Ports: 5V (GPIOs of TLE9869)
Page 9

TLE9869 EvalKit v1.0 User Manual v1.1
7 Optional Additional Placements
Figure 6: Additional Placements’ positions
Values for these optional additional placements have to be determined depending on application.
Q1
External Oscillator
C1
Oscillator Capacity 1
C2
Oscillator Capacity 2
R22
Resistance Snubber High side MOSFET Phase 1
C28
Capacity Snubber High side MOSFET Phase 1
C24
Gate Drain Capacity High side MOSFET Phase 1
R23
Resistance Snubber Low side MOSFET Phase 1
C29
Capacity Snubber Low side MOSFET Phase 1
C26
Gate Drain Capacity Low side MOSFET Phase 1
R28
Resistance Snubber High side MOSFET Phase 2
C36
Capacity Snubber High side MOSFET Phase 2
C32
Gate Drain Capacity High side MOSFET Phase 2
R29
Resistance Snubber Low side MOSFET Phase 2
C37
Capacity Snubber Low side MOSFET Phase 2
C34
Gate Drain Capacity Low side MOSFET Phase2
Table 8: Additional Placements
Page 10

TLE9869 EvalKit v1.0 User Manual v1.1
8 Schematics and Layout
Page 11

TLE9869 EvalKit v1.0 User Manual v1.1
Page 12

TLE9869 EvalKit v1.0 User Manual v1.1
Page 13

TLE9869 EvalKit v1.0 User Manual v1.1
Page 14

TLE9869 EvalKit v1.0 User Manual v1.1
Page 15

TLE9869 EvalKit v1.0 User Manual v1.1
 Loading...