

Page 1
User manual Please read the Important Notice and Warnings at the end of this document Rev.1.0
www.infineon.com page 1 of 19 2021-03-04
TLD5542-1HIPOW_EVAL board
Evaluation board manual
About this document
Scope and purpose
The scope of this user manual is to provide instructions on the use of the TLD5542-1HIPOW-EVAL evaluation
board.
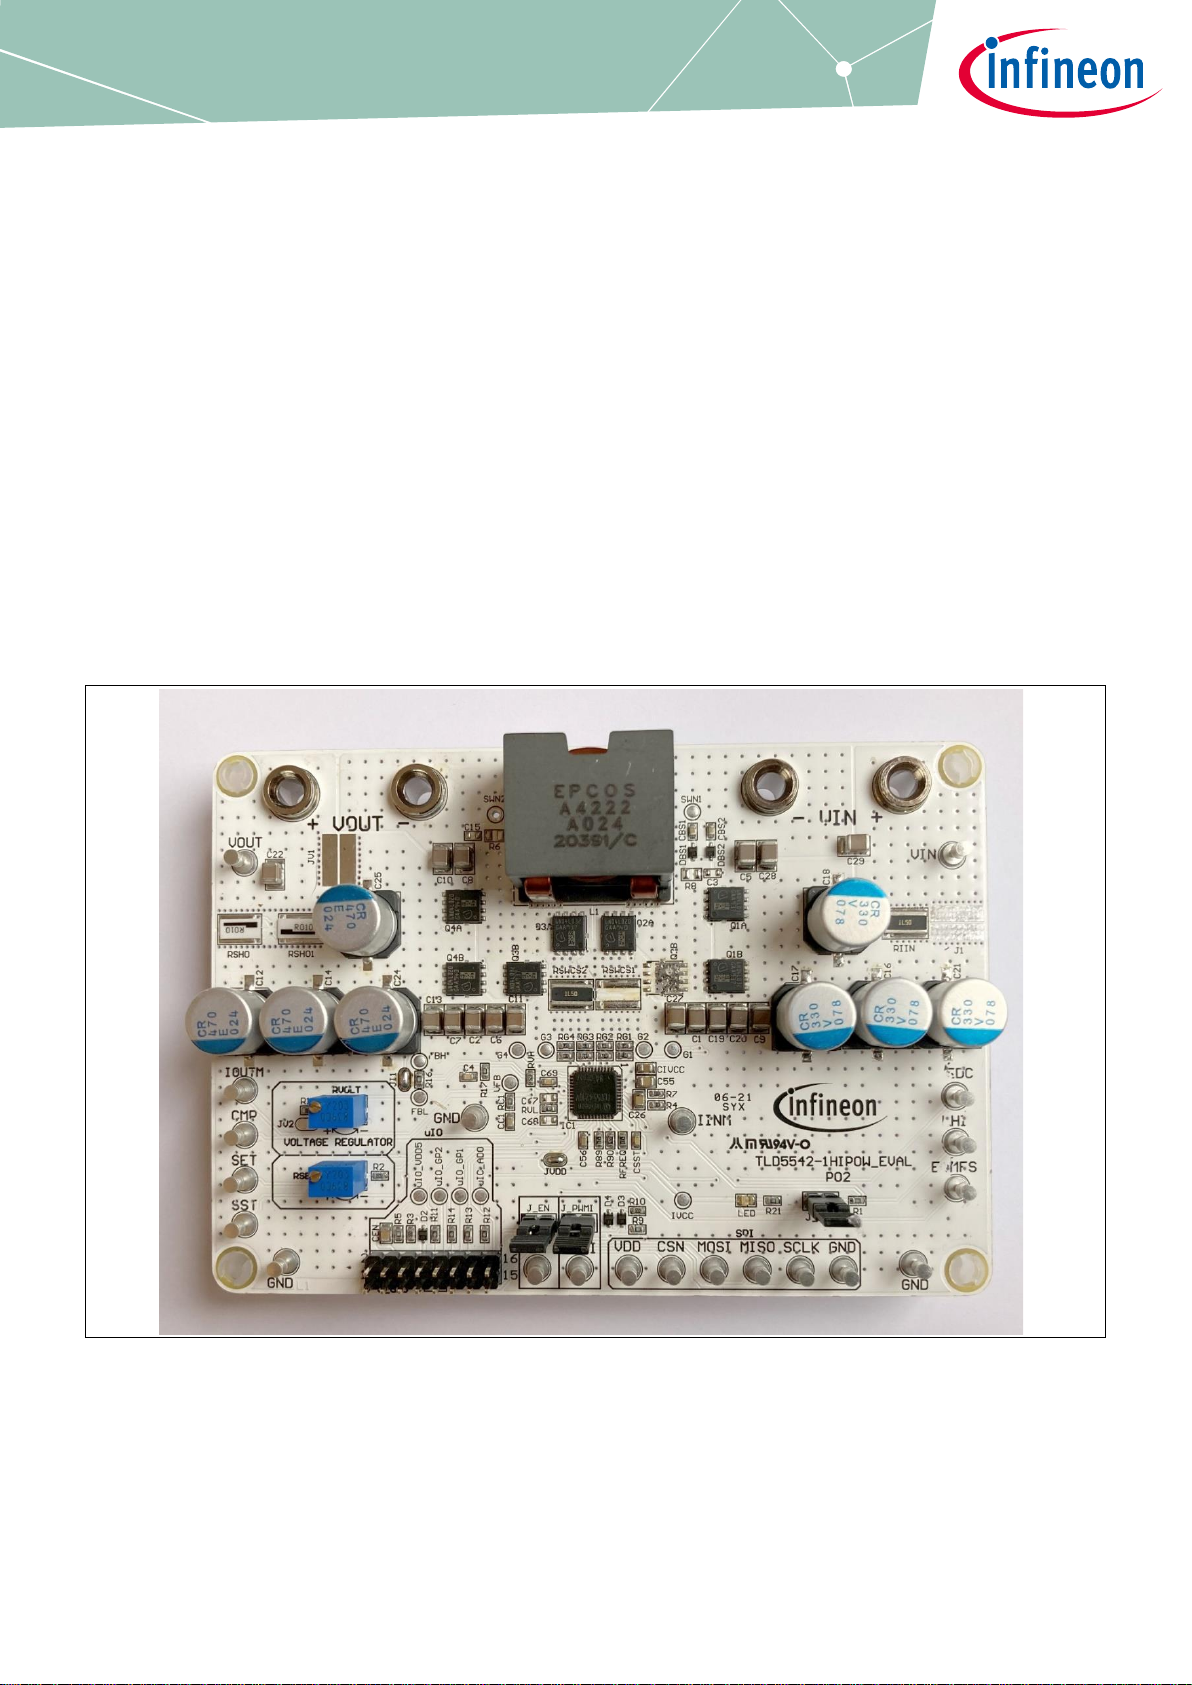
TLD5542-1HIPOW_EVAL board is a 4-switch synchronous buck-boost regulator that demonstrates the highpower capability of the TLD5542-1. The output is adjustable from 5 V to 24 V and the maximum output current is
25 A for up to 300 W power delivery without heatsink.
The switching frequency is 250 kHz and efficiency can go up to 98%.
The board can be configured as current regulator or voltage regulator.
Figure 1 TLD5542-1HI_POW_EVAL device board
Intended audience
Hardware engineers, software engineers, system architects
Page 2

User manual 2 of 19 Rev.1.0
2021-03-04
TLD5542-1HIPOW_EVAL board
Evaluation board manual
Description
Table of contents
About this document ......................................................................................................................... 1
Table of contents .............................................................................................................................. 2
1 Description .............................................................................................................................. 3
2 Quick start procedure ............................................................................................................... 4
2.1 Setup as current regulator with no microcontroller .............................................................................. 4
2.2 Board set up as voltage regulator with no microcontroller nor PC GUI ................................................ 6
2.3 Board set up as voltage/current regulator with PC GUI ......................................................................... 7
3 Infineon μIO stick and Infineon Toolbox ..................................................................................... 9
3.1 Install and launch Config Wizard .......................................................................................................... 10
4 Board control with PC GUI ........................................................................................................11
4.1 Basic user interface ............................................................................................................................... 11
4.2 Engineering user interface .................................................................................................................... 12
5 Operating range and power derating ........................................................................................14
6 Electrical characteristics ..........................................................................................................15
7 Bill of material, PCB layout and schematic .................................................................................16
8 List of references .....................................................................................................................17
Revision history ...............................................................................................................................18
Page 3
User manual 3 of 19 Rev.1.0
2021-03-04
TLD5542-1HIPOW_EVAL board
Evaluation board manual
Description
1 Description
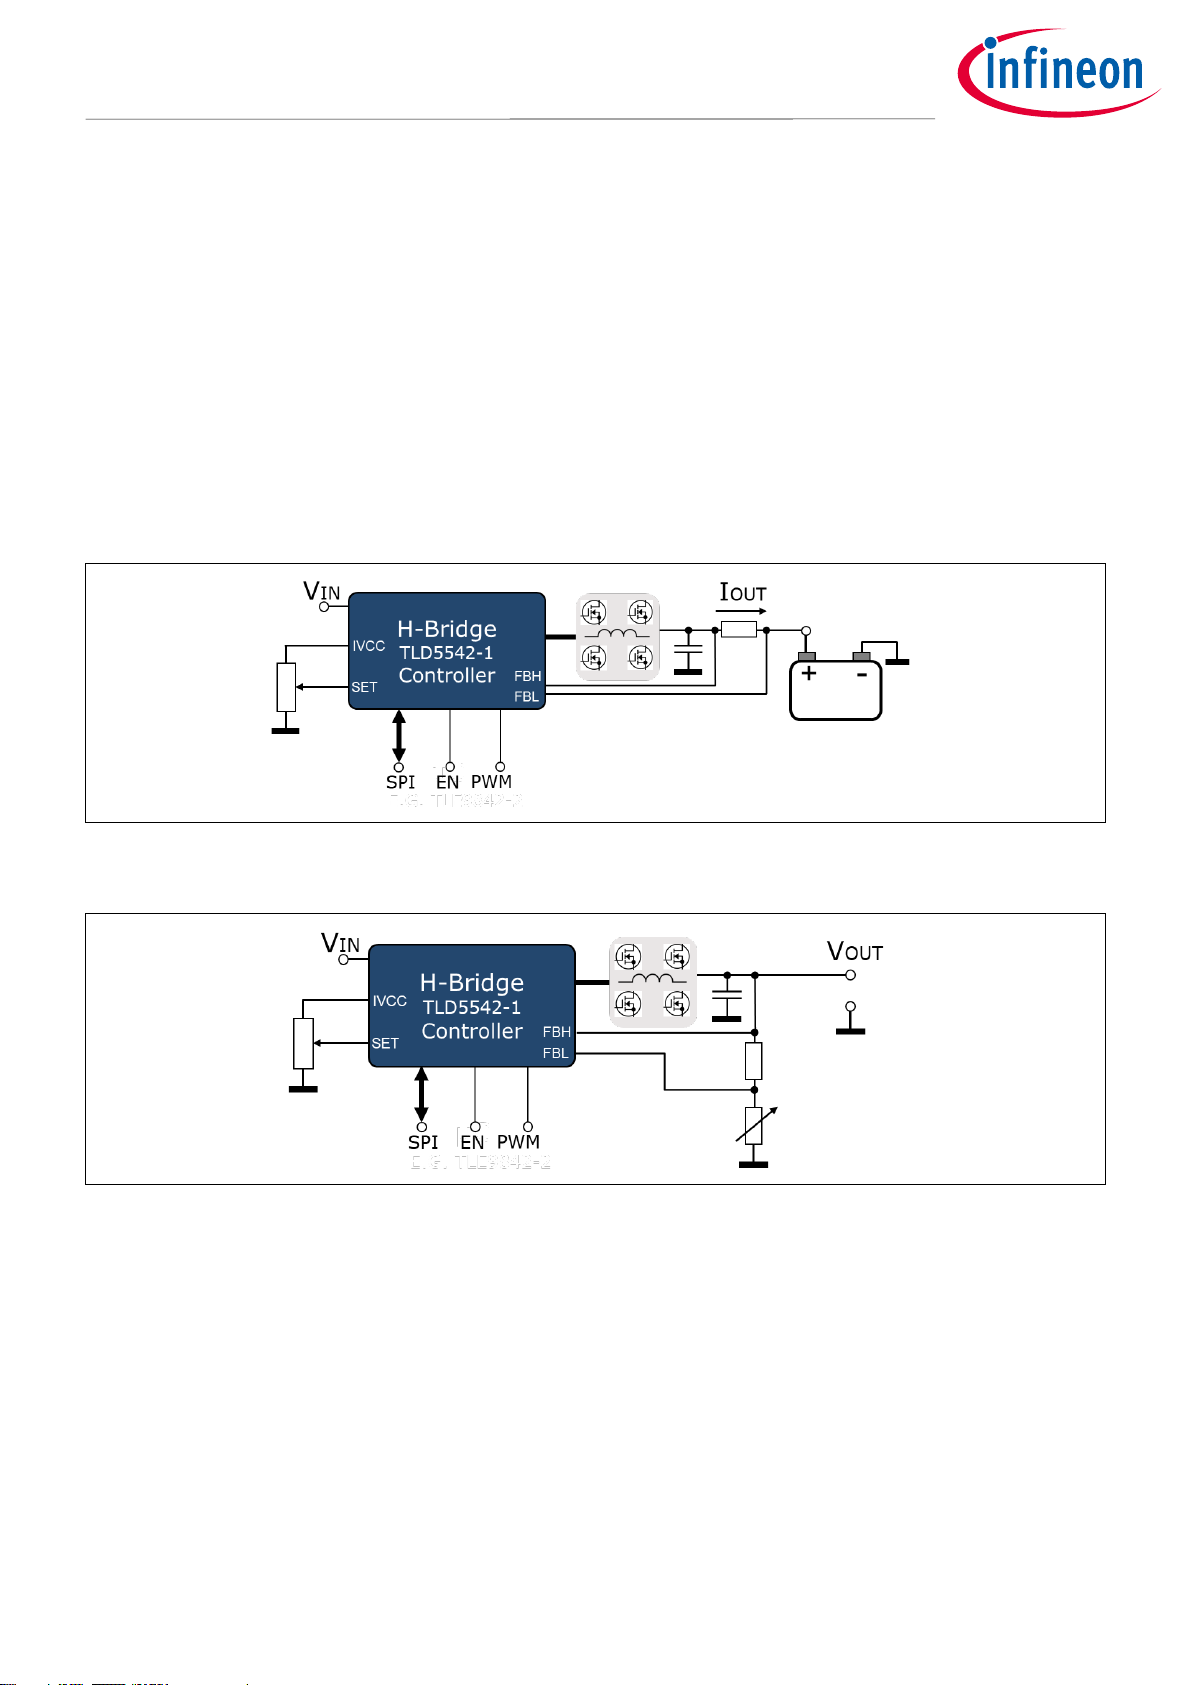
The H-bridge architecture is amongst the most efficient buck-boost topologies for high current applications. The
TLD5542-1 provides complete control and diagnostics through the SPI interface. The TLD5542-1 can also be used
in applications without microcontroller because of the limp home mode.
The TLD5542-1HIPOW_EVAL demonstrates the high-power capability of the TLD5542-1 as current or voltage
regulator.
The default configuration is adjustable voltage regulator with 25 A maximum output current. By reconfiguring
few solder jumps, the board becomes a current regulator for battery or supercapacitors charger applications.
The board can be controlled by the PC GUI via the Infineon µIO stick (see Chapter 4).
Figure 2 TLD5542-1 as battery charger
Figure 3 TLD5542-1 as voltage regulator
There are 2 trimmers, RVOLT and RSET, to easily adjust output voltage and output current in the entire range
(see table 6).
Page 4
User manual 4 of 19 Rev.1.0
2021-03-04
TLD5542-1HIPOW_EVAL board
Evaluation board manual
Quick start procedure
2 Quick start procedure
Below, step by step procedures are laid out for setup and running the TLD5542-1HIPOW_EVAL in all available
configurations.
Installation procedure for PC GUI (graphical user interface) and μIO stick interface is described in Chapter 4.
2.1 Setup as current regulator with no microcontroller
Setup of the board as simple current regulator, without a microcontroller connection and without µIO stick nor
PC GUI.
The device is configured in limp home. All the registers are set to their default value and the analog dimming is
provided by the voltage on the SET pin which is adjustable with RSET trimmer.
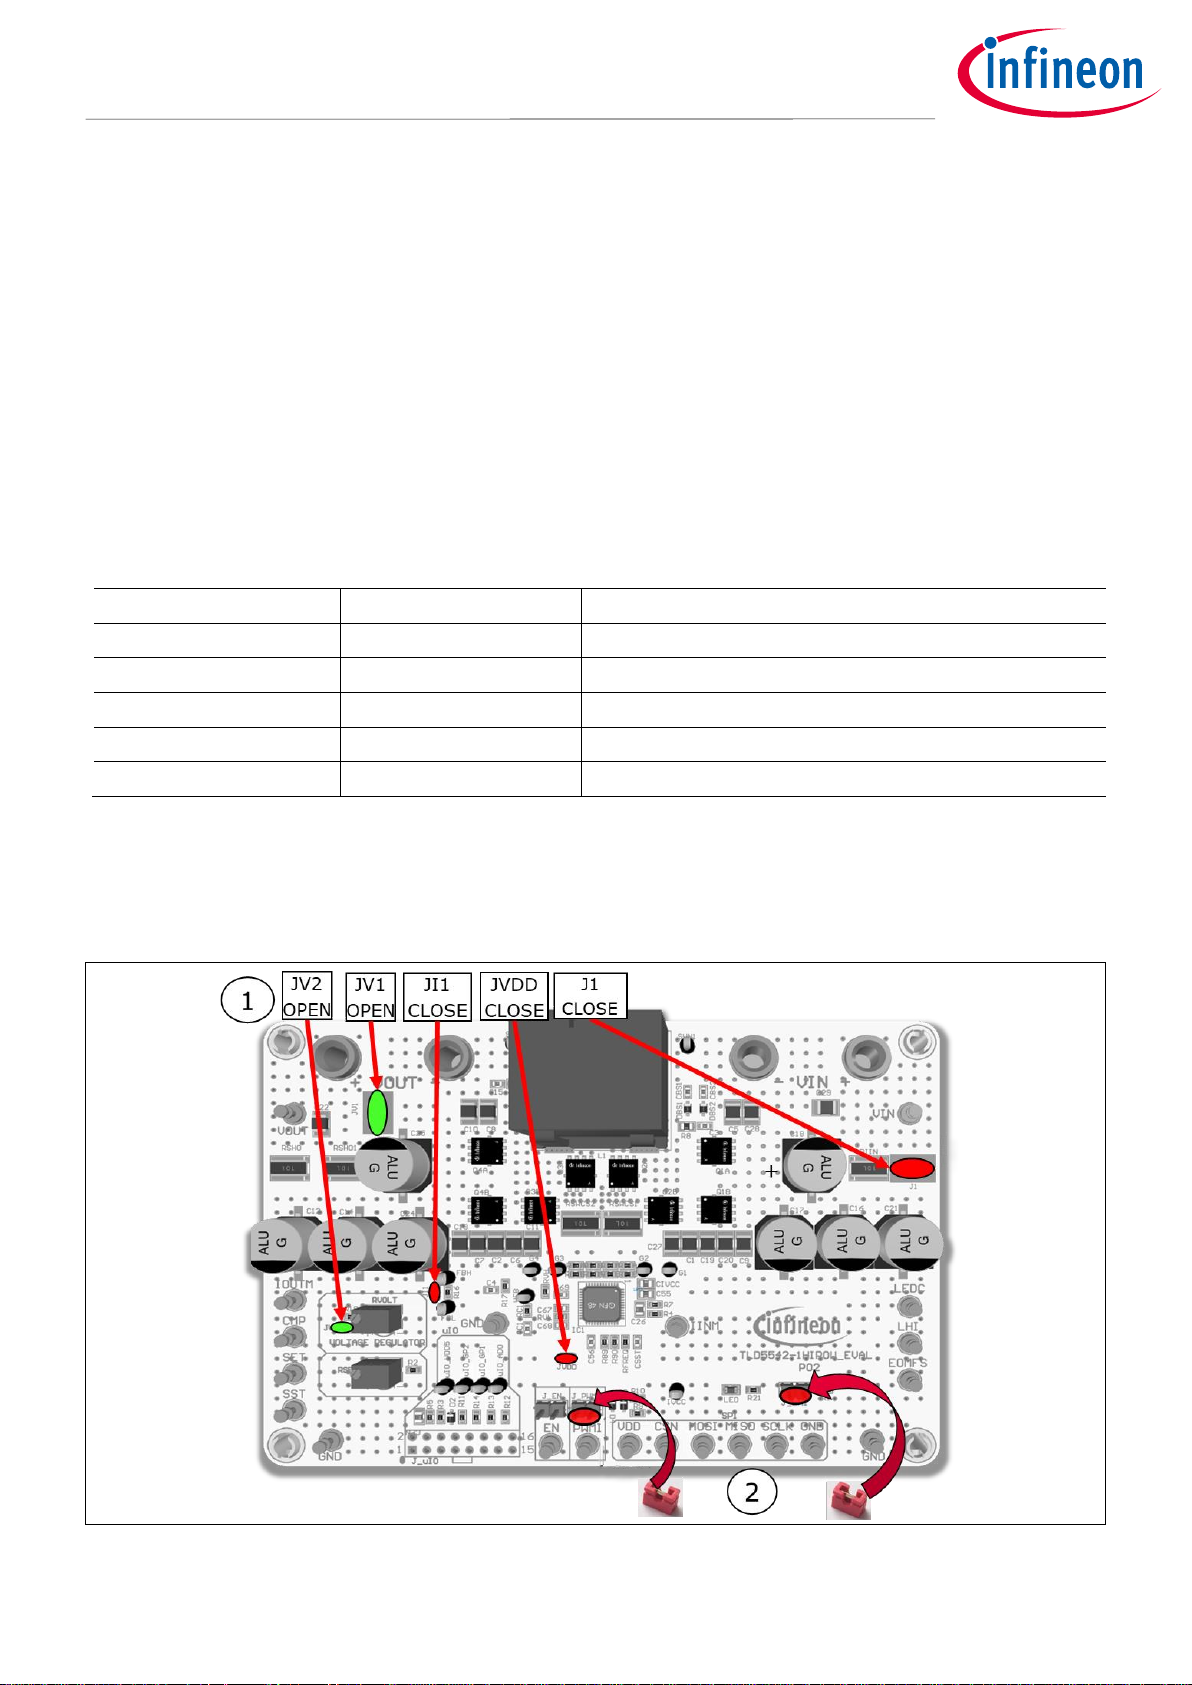
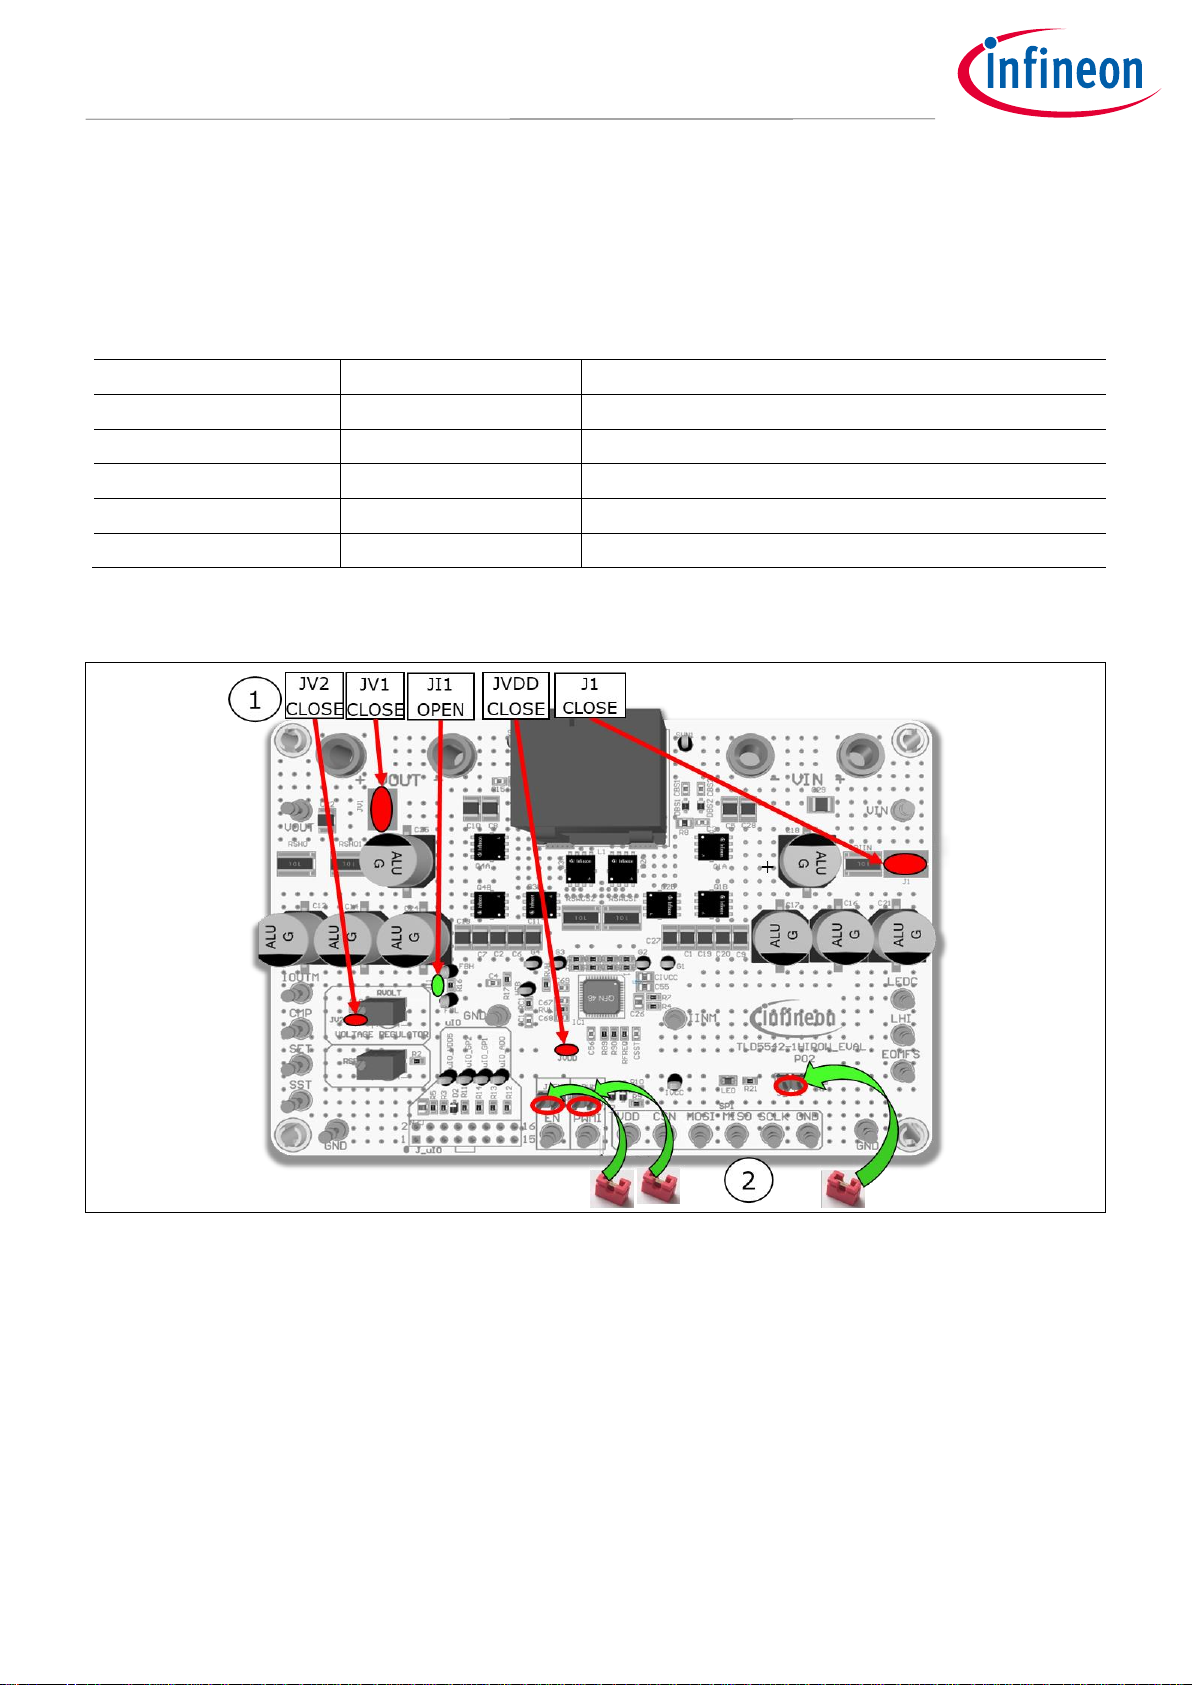
Table 1 Jumper reference and setup for current regulator
Jumper reference
Status
Description
JV1
OPEN
Bypass output current shunt resistor
JV2
OPEN
Disconnect voltage regulator feedback voltage divider
JI1
CLOSE
Connect current shunt
JVDD
CLOSE
Connect Internal 5V IVCC to VDD
J1
CLOSE
Bypass input current shunt resistor
In order to run the board in this configuration
1. Configure solder jumper for LED driver configuration as in Figure 4
2. Connect LHI (limp home) and J_PWMI jumpers
Figure 4 Jumpers to be set for current regulator mode no µC
Page 5
User manual 5 of 19 Rev.1.0
2021-03-04
TLD5542-1HIPOW_EVAL board
Evaluation board manual
Quick start procedure
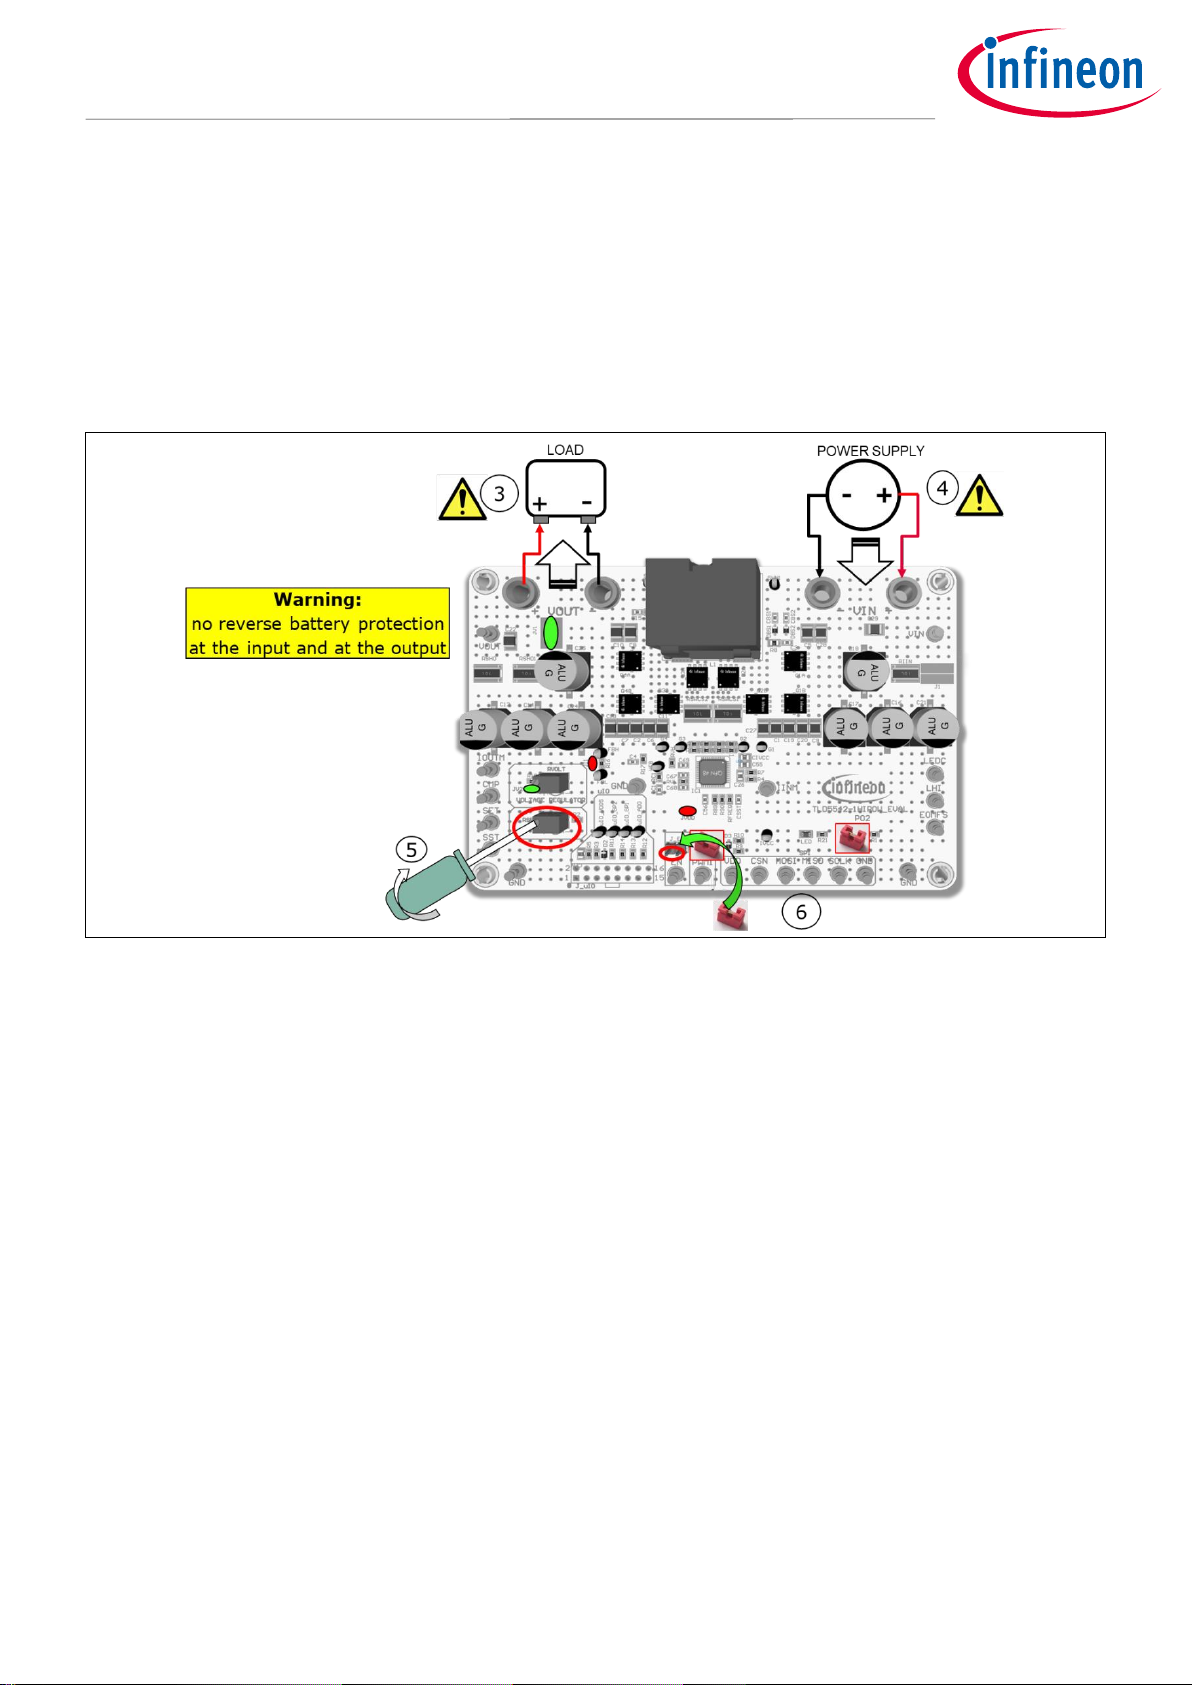
3. Connect the load (Note that the output current can be as high as 30 A if SET is adjusted to maximum)
4. Connect a 12 V power supply to the V
IN
connector
5. Rotate RSET trimmer completely anti-clockwise to lower the output current to the minimum
6. Connect the EN jumper to start providing output current to the load
7. Adjust I
OUT
with RSET (output current should be higher than 2 A for better transient response)
Figure 5 Connect power supply and load, adjust output current
Warning:
1. If the load is a battery or a supercapacitor, do not use PWMI to stop output current, use EN instead.
Otherwise, the device will affect a startup without soft-start assistance sinking high current from
the charging battery at the V
OUT
connector.
2. The board is not reverse protected at the input nor at the output, if a battery is connected with
reverse polarity the board or the battery may catch fire.
Correct start-up sequence, to provide current at the load is:
• Set EN to ON with PWMI kept to OFF (blue LED on the PCB turns ON)
• Set desired analog dimming level by using SET pin if limp home mode, otherwise operate via SPI
• Set PWMI to ON
Page 6
User manual 6 of 19 Rev.1.0
2021-03-04
TLD5542-1HIPOW_EVAL board
Evaluation board manual
Quick start procedure
2.2 Board set up as voltage regulator with no microcontroller nor PC GUI
The following describes how to setup the board as a simple voltage regulator without PC GUI. No
microcontroller connection and no µIO stick is present.
Table 2 Jumper reference and setup for voltage regulator
Jumper reference
Status
Description
JV1
CLOSE
Bypass output current shunt resistor
JV2
CLOSE
Connect voltage regulator feedback voltage divider
JI1
OPEN
Disconnect current shunt from FBL
JVDD
CLOSE
Connect Internal 5V IVCC to VDD
J1
CLOSE
Bypass input current shunt resistor
1. Configure all solder jumpers as shown in Figure 6
2. Connect J_EN, LHI and PWMI jumpers
Figure 6 Jumpers to be set for voltage regulator mode no µC
3. Connect a 12 V power supply to the V
IN
connector
4. Rotate RSET trimmer completely clockwise (100% analog dim, improves transient response and accuracy)
Page 7
User manual 7 of 19 Rev.1.0
2021-03-04
TLD5542-1HIPOW_EVAL board
Evaluation board manual
Quick start procedure
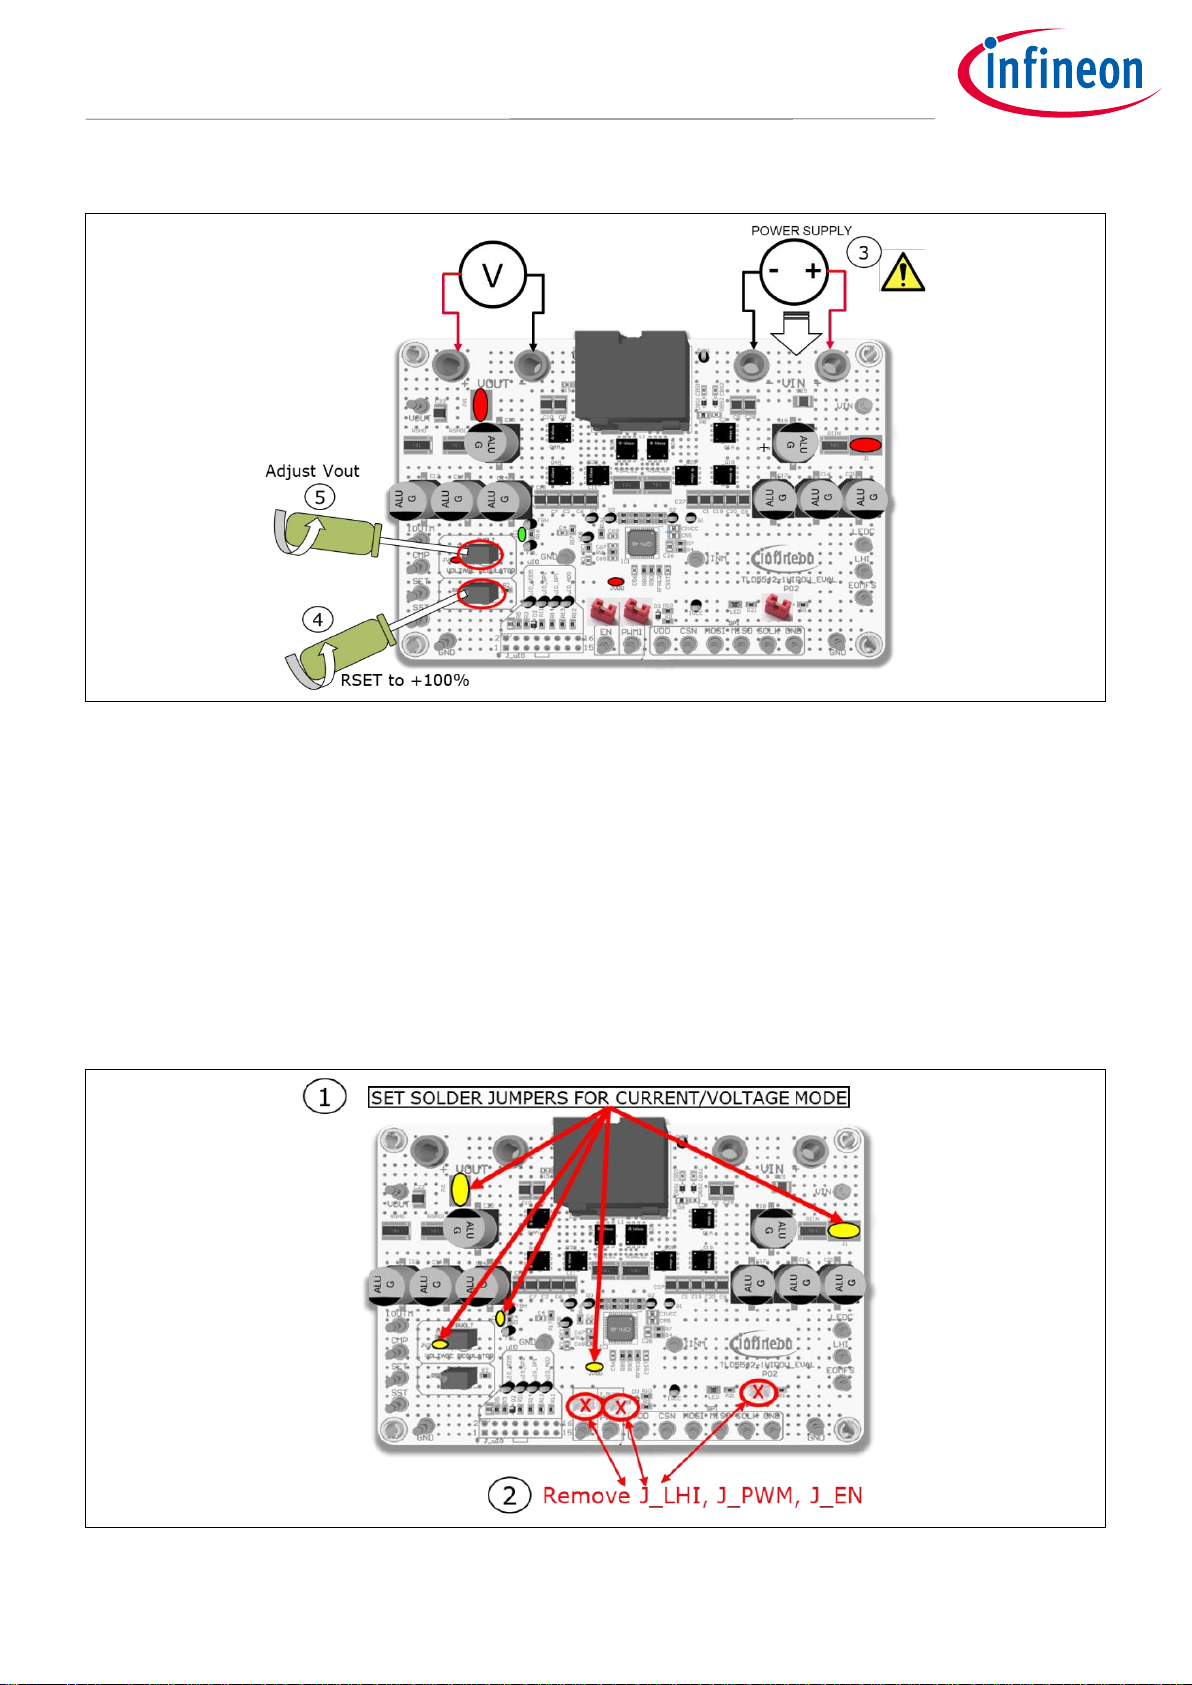
Figure 7 Connect power supply, turn RSET to maximum and adjust V
OUT
with RVOLT
5. Rotate RVOLT trimmer to obtain the desired V
OUT
6. Connect the load to V
OUT
2.3 Board set up as voltage/current regulator with PC GUI
The TLD5542-1 HIPOW_EVAL can be controlled by the PC GUI via a µIO stick. All the plug jumpers have to be
removed, or the µIO will not be able to control the TLD5542-1 properly.
1. Set solder jumpers for voltage (Chapter 2.1) or current (Chapter 2.2) regualtor
2. Remove jumper plugs J_LHI, J_PWMI, J_EN
Figure 8 Control with μIO stick board preparation
Page 8

User manual 8 of 19 Rev.1.0
2021-03-04
TLD5542-1HIPOW_EVAL board
Evaluation board manual
Quick start procedure
3. Connect the μIO to J_uIO connector (pin 1 mark on PCB on RED cable strip) and uIO stick to the PC
Figure 9 Connect μIO stick, power supply, load
4. Launch Infineon Toolbox and the Config Wizard for LED, see chapter 3.1
5. Connect power supply to the V
IN
connector
6. Adjust for the desired output current/voltage with the GUI (see Chapter 4) and connect the load
Page 9

User manual 9 of 19 Rev.1.0
2021-03-04
TLD5542-1HIPOW_EVAL board
Evaluation board manual
Infineon μIO stick and Infineon Toolbox
3 Infineon μIO stick and Infineon Toolbox
The Infineon μIO stick is an interface device for controlling Infineon boards/kits during run time
through PC.
• Enables the connection between the evaluation board and USB for SPI programming and monitoring
by using the Config Wizard software, which can be downloaded via the Infineon Toolbox [1]
• Plugs into the evaluation board via a standard 16-pin connector and allows easy interface to the
microcontroller via USB for SPI, CAN and LIN communication
Figure 10 Infineon μIO stick
The Infineon Toolbox it is a single platform interface which allows for:
• Quick installation of tools by name or QR code
• Help with documentation
• Viewing and starting installed tools from built-in launcher
• Receiving update notifications
Figure 11 Infineon Toolbox
For details about Infineon toolbox and μIO stick check the Infineon website: Infineon Toolbox.
Page 10

User manual 10 of 19 Rev.1.0
2021-03-04
TLD5542-1HIPOW_EVAL board
Evaluation board manual
Infineon μIO stick and Infineon Toolbox
3.1 Install and launch Config Wizard
1. Open the “Manage tools” tab
2. Search for “Config Wizard for LED” and click on “Install” button
Figure 12 Install Config Wizard for LED
3. Select “My Tools” tab on Infineon Toolbox
4. Press “Start” on the config wizard for LED to start
Figure 13 Start Config Wizard tool
5. Click on TLD5542-1 icon to start the LED GUI interface
Figure 14 Launch TLD5542-1 GUI
Page 11

User manual 11 of 19 Rev.1.0
2021-03-04
TLD5542-1HIPOW_EVAL board
Evaluation board manual
Board control with PC GUI
4 Board control with PC GUI
The TLD5542-1 PC GUI consists of 2 interfaces:
• Basic user interface
• Engineering user interface
The GUI works only if the TLD5542-1 evaluation board is correctly connected to the μIO stick and power supply
is applied to the VIN connector.
4.1 Basic user interface
Basic user interface allows simplified access to the main registers on TLD5542-1 (e.g. analog dimming with a
knob) and provides direct feedback on TLD5542-1 status, showing indicators for each standard diagnosis
register bit.
It is possible to provide EN signal and PWMI without the need for a function generator.
In order to turn on the device press the EN button, the “Active” indicator shall turn on.
Only once the device is on, the desired analog dimming value can be set by the ”Analog Dimming” knob on the
“Dimming” tab.
Correct startup sequence is:
• Have a power supply connected at V
IN
• Set EN to ON with PWMI kept to OFF (blue LED on the PCB turns ON)
• Set desired analog dimming level (RSET trimmer if limp home mode otherwise via GUI)
• Set PWMI to ON
Figure 15 TLD5542-1 GUI – Basic user interface
On the “Diagnosis/Monitoring” tab, (see Figure 15) the standard diagnosis register is provided, showing
information on the working status of the device.
Page 12

User manual 12 of 19 Rev.1.0
2021-03-04
TLD5542-1HIPOW_EVAL board
Evaluation board manual
Board control with PC GUI
On the “Compensation Setting” tab (see Figure 16 ), it is possible to tune the compensation transfer function in
order to have the smoothest transition from buck-boost to boost mode, which depends on the switching
frequency (385 kHz for the TLD5542-1 HIPOW _EVAL board)
Figure 16 TLD5542-1 GUI basic user interface – compensation and EMC tabs
4.2 Engineering user interface
The engineering user interface allows the user to send a sequence of SPI commands to the TLD5542-1. PWMI
and EN pin control is also possible on this interface.
The suggested sequence of operations in order to send the SPI commands is as follows:
1. Write the list of SPI commands that has to be sent
2. Turn on the device by pressing the EN button
3. Press the SEND button to send commands on the list, starting from the black row in the list Figure 17
4. Enable the switching activity by pressing PWMI button
Figure 17 TLD5542-1 GUI – Engineering user interface
Page 13

User manual 13 of 19 Rev.1.0
2021-03-04
TLD5542-1HIPOW_EVAL board
Evaluation board manual
Board control with PC GUI
It is possible to describe each command with a comment and to save the list of commands by clicking on the
“Save” button.
It is possible to set the delay applied before executing the next command in the “Delay” column, the accuracy
of the timer is approximately 10 ms.
Figure 18 TLD5542-1 GUI – writing comment - saving command list - delay between commands
Page 14

User manual 14 of 19 Rev.1.0
2021-03-04
TLD5542-1HIPOW_EVAL board
Evaluation board manual
Operating range and power derating
5 Operating range and power derating
The TLD5542-1HIPOW-EVAL has very high efficiency, so it can deliver up to 300 W at the output without a
heatsink at TA = 25°C, for VIN down to 9 V.
Figure 19 Thermal acquisition, voltage REG, V
IN
= 12 V, V
OUT
= 12 V, I
OUT
= 25 A, TA = 25°C no heatsink
Please note that the module does not implement thermal protection, so ensure proper cooling when output
power exceeds the power-derating curve. The heatsink must be positioned below the switching MOSFETs as
shown in Figure 20.
Figure 20 Optional heatsink placement
The heatsink shall be electrically insulated from the PCB, by means of a thermal pad.
Page 15

User manual 15 of 19 Rev.1.0
2021-03-04
TLD5542-1HIPOW_EVAL board
Evaluation board manual
Electrical characteristics
6 Electrical characteristics
Table 3 TLD5542-1 HIPOW -EVAL version S03 P01 – electrical characteristics
Parameter
Symbol
Value
Unit
Note/Test Condition
Min.
Typ.
Max.
Input voltage
VIN
7.5 – 35 V Power derating may occur for VIN < 9 V
Output voltage
V
OUT
2
5
–
24
24
V
Current regulator mode
Voltage regulator mode
Output current
I
OUT
0 –
25 A
Output power
P
OUT
-
300
400
– W
W
No heatsink VIN 9 V to 35 V, TA = 25°C
With heatsink VIN 9 V to 35 V, TA = 25°C
Switching
frequency
Switching
frequency
–
250 – kHz
Spread spectrum deviation is present
PWM frequency
PWM
freq
100 – 500
Hz
–
System
efficiency
η
–
97
96
–
%
Voltage mode: VIN = 12 V V
OUT
= 12 V I
OUT
= 25 A
Current mode: VIN = 12 V V
OUT
= 12 V I
OUT
= 20 A
Page 16

User manual 16 of 19 Rev.1.0
2021-03-04
TLD5542-1HIPOW_EVAL board
Evaluation board manual
Bill of material, PCB layout and schematic
7 Bill of material, PCB layout and schematic
Table 4 Bill of material
Designator
Value
Footprint
Quantity
C1, C5, C9, C19, C20, C27, C28, C29
10µF 50V X7R 1210
C1210
8
C2, C6, C7, C8, C10, C11, C13, C22
22µF 25V X7R 1210
C1210
8
C4, C69, CSST
22nF 50V
C0603
3
C12, C14, C24, C25
470µF 25V PCR1E471MCL1GS
CE D10 CASE G
4
C16, C17, C18, C21
330µF 35V PCR1V331MCL1GS
CE D10 CASE G
4
C26, C55, CEN
1µF 50V 0805
C0805
3
C56, CBS1, CBS2
100nF 50V
C0603
3
CC1
33nF 25V
C0603
1
CIVCC
10µF 6,3V 0805 X7R
C0805
1
CMP, CSN, EN, EOMFS, GND, GND3, GND4,
GND5, IINM, IOUTM, LEDC, LHI, MISO, MOSI,
PWMI, SCLK, SET, SST, VDD, VIN, VOUT
Mill-Max 2501-2-00-80-00-0007-0
–
21
D2, D3, D4, DBS1, DBS2
NXP_BAT46WJ
SOD323F
5
GND2, GND-, VIN+, VOUT+
Keystone 575-8
4 IC1
TLD5542-1QV
VQFN48 7X7 P05
1
J_EN, J_LHI, J_PWMI
TSW-102-08-G-S
CON-M-THT-TSW102-08-G-S
3
J_uIO
Header 8X2(tyco 5-146254-8)
HDR2X8
1
L1
TDK B82559A5332A024
IND SMD B82559A
1
LED
WURTH 150080BS75000
LED 0805 BLU
1
Q1A, Q1B, Q3A, Q3B
IAUC80N04S6L032
PG-TDSON-8-33
4
Q2A, Q4A, Q4B
IAUC100N04S6L020
PG-TDSON-8-33
3
R1, R9, R17, RC1, RVL, R5, R21
1.5kΩ 1%
R0603
7
RFREQ,R89, R90
47kΩ 1%
R0603
3
R3,R10,R18
4.7kΩ 1%
R0603
3
R4, R7, RG1A, RG1B, RG2A, RG2B, RG3A,
RG3B, RG4A, RG4B
1Ω
R0603
10
R11, R12, R13, R14, R16
150Ω 1%
R0603
5
R2,RVH
24kΩ 1%
R0603
2
RSET, RVOLT
Bourns 3266Y-1-203LF
–
2
RSHO1,RSHO
10mΩ FC4L64R010FER
– 2 RSWCS2,RIIN
1.5mΩ PML100HZPJV1L5
–
2
C3, C15, C67, C68, FBH, FBL, G1, G2, G3, G4,
IVCC, SWN1, SWN2, uIO_AD0, uIO_GP1,
uIO_GP2, uIO_VDD5, VFB, Q2B, R6, R8,
RSWCS1
NOT POPULATED
–
–
Spacer 12mm
Wurth 702935000
–
4
Page 17

Page 18

A
B
C
D
E
A
B
C
D
E
1 2 3 4 5 6 7 8
1 2 3 4 5 6 7 8
Capacitors are 0603 X7R 10%
Remarks: if not specified differently
connect exposed pad to GND
Place C67 and RVFBL1 close to IC
CSST 22nF 50V
RFREQ
47k 1%
RVL
1k5 1%
RG1A
1
RG2A1
RG3A 1
RG4B
1
R6
NO_POP
C15
NO_POP
R8
NO_POP
C3
NO_POP
CBS1
100nF 50V
CBS2
100nF 50V
CIVCC
10uF 6,3V 0805 X7R
VIN
44
IIN2
43
SET
22
EN/INUVLO
41
COMP
19
SOFT_START
38
IIN1
42
PWMI
24
IINMON
39
SYNC
34
IOUTMON
16
FREQ
35
VDD
31
CSN
28
SI
30
SO
27
SCLK
29
VSS26AGND
40
IVCC_EXT
47
IVCC
46
BST1
3
BST2
10
HSGD1
2
SWN1
4
LSGD1
6
SWCS
17
SGND
18
PGND1
5
SWN2
9
PGND2
8
LSGD2
7
HSGD2
11
VFB
20
FBH
13
FBL
14
DIM_HALF
36
TEST2
25
LHI
37
FILT
23
N.C.
1
N.C.
12
N.C.
15
VFB_VIN
21
EOMFS32LEDCURR33N.C.45N.C.48EP
EP
IC1
TLD5542-1QV
L1
TDK B82559A5332A024
RVH
24k 1%
C1
10uF 50V X7R 1210
DBS1
NXP_BAT46WJ
DBS2
NXP_BAT46WJ
C13
22uF 25V X7R 1210
C7
22uF 25V X7R 1210
C11 22u F 25V X7R 1210
C55
1uF 50V 0805
C5
10uF 50V X7R 1210
C56
100nF 50V
C67
NO_POP 120pF 25V
GND
GND
GND
GND
GND
GND
GND
GND GND
GND
GND
GND
GND
VIN
GND
GND
VCCINT
VCCINT
VCCINT
GND GND
GND
GND
GND
SCLK
MOSI
MISO
CSN
PWM_uIO
GND
30A@
30A@
30A@
diff.
diff.
GND
Date: 01/03/2021 Sheet: 1/1
REV:
TITLE: TLD5542-1HIPOW_EVAL
Document Number: S03
GND
C68
NO_POP 220pF 50V
BST1
BST2
GND
Place C68 close to IC
D3
NXP_BAT46WJ
D4
NXP_BAT46WJ
CSN
MOSI
MISO
SCLK
Resistors are 0603 5%
REVISION HISTORY FROM S02 to HIGH POW S03
changed Q1A to Q4B MOS
Changed R5 to 1k5
Changed Default Jumpers to VREG
R89
47k 1%
R90
47k 1%
C69
22nF 50V
GND
Vin
R4
1
GND
VCCINT
VCCINT
VHB
VDD
21
JV1
CLOSE
R17
1k5 1%
C4
22nF 50V
GND
R2
24k 1%
SET
1 2
3 4
5 6
7 8
9 10
11 12
13 14
15 16
J_uIO
Header 8X2(tyco 5-146254-8)
PWM_uIO
SCLK
CSN
MOSI
MISO
EN_uIO
VDD
VDD
30A@
R10
4k7 1%
D2
NXP_BAT46WJ
EN_uIO
R18
4k7 1%
21
JV2
CLOSE
GND
R3
4k7 1%
VHB
GND
R5
1k5 1%
COMP
VOUT
GND
GND
C24
470uF 25V PCR1E471MCL1GS
VReg->Close
Close=>Vreg
Open=>VReg
GND5
GND
Vout
CMP
EN
PWMI
SCLK
CSN
MISO
MOSI
VDD
PWMI
PWMI
CSN
MOSI
MISO
SCLK
EN_INUVLO
VDD
uIO connector
GND
GND
LEDC
EOMFS
EOMFS
LEDCURR
LEDCURR
EOMFS
SPI
IOUTMON
GND
COMP
R11 150 1%
R12 150 1%
R13 150 1%
R14 150 1%
VIN+
Keystone 575-8
GND2
Keystone 575-8
VOUT+
Keystone 575-8
GND-
Keystone 575-8
R9
1k5 1%
Q1B
IAUC80N04S6L032
Q3A
IAUC80N04S6L032
Q4A
IAUC100N04S6L020
LHI
1
2
J_LHI
TSW-102-08-G-S
LHI
EN_INUVLO
2 1
JVDD
CLOSE
13
2
RVOLT
Bourns 20k 3266Y-1-203LF
1 3
2
20K
RSET
Bourns 20k 3266Y-1-203LF
CC1
33nF 25V
RC1
1k5 1%
FB_P
FB_N
VCCINT
R1
1k5 1%
VCCINT
VCCINT
GND
VCCINT
IVCC
N.P.
1
2
J_PWMI
TSW-102-08-G-S
1
2
J_EN
TSW-102-08-G-S
uIO_AD0 N.P.
uIO_GP1 N.P.
uIO_GP2 N.P.
G1
N.P.
G2
N.P.
SWN1
SWN2
G3
N.P.
G4
N.P.
VFB
N.P.
FBL
N.P.
FBH
N.P.
IOUTM
K A
LED
WURTH 150080BS75000
SST
uIO_VDD5 N.P.
R16
150 1%
2 1
JI1
OPEN
VIN
Q2B
NO_POP
Q1A
IAUC80N04S6L032
Q2A
IAUC100N04S6L020 Q3B
IAUC80N04S6L032
Q4B
IAUC100N04S6L020
C20
10uF 50V X7R 1210
C6 22uF 25V X7R 1210
GND
C8 22uF 25V X7R 1210
C10 22uF 25V X7R 1210
GNDGND
C22
22uF 25V X7R 1210
C2 22uF 25V X7R 1210
GND GND
C12
470uF 25V PCR1E471MCL1GS
GND
C14
470uF 25V PCR1E471MCL1GS
GND
C25
470uF 25V PCR1E471MCL1GS
IINM
R7
1
C26
1uF 50V 0805
VIN
C17
330uF 35V PCR1V331MCL1GS
GND GND
C18 33 0uF 35V PCR1V331MCL1GS
C29
10uF 50V X7R 1210
GND
RIIN
1,5m PML100HZPJV1L5
12
1S
2S
RSWCS1
NO POP
1 2
1S
2S RSWCS2
1,5m PML100HZPJV1L5
RSHO1
10mOhm FC4L64R010FER
GND GND
21
J1
CLOSE
C16
330uF 35V PCR1V331MCL1GS
GND GND
C21
330uF 35V PCR1V331MCL1GS
C9
10uF 50V X7R 1210
C27
10uF 50V X7R 1210
C28
10uF 50V X7R 1210
VHB
GNDGND GND
RSHO
10mOhm FC4L64R010FER
+VOUT
GND3
GND4
R21
1k5 1%
RG2B1
RG1B
1
RG4A
1
RG3B1
CEN
1uF 50V 0805
GND
C19
10uF 50V X7R 1210
GND
VIN undervoltage set to 7,2V (7,4V Exit)
Close=>IReg
IReg->Open
Open=>IReg
COC28
PIC902
PIC1902
PIC2702
PIC1902
PIC2702
PIC1901
PIC2701
PIC1901
PIC2701
COC19
COJ0LHI
PIJ0LHI02
PIJ0LHI02
PIJ0LHI01
COJ0uIO
PIJ0uIO01
PIJ0uIO01
PIJ0uIO03
PIJ0uIO03
PIJ0uIO05
PIJ0uIO05
PIJ0uIO07
PIJ0uIO07
PIJ0uIO09
PIJ0uIO09
POCSN
POCSN
PIJ0uIO011
PIJ0uIO011
POSCLK
POSCLK
PIJ0uIO013
PIJ0uIO013
POMISO
POMISO
PIJ0uIO015
PIJ0uIO015
POMOSI
POMOSI
PIJ0uIO02
PIJ0uIO02
PIJ0uIO04
PIuIO0VDD501
PIJ0uIO04
PIuIO0VDD501
PIJ0uIO06
PIJ0uIO06
PIJ0uIO08
PIJ0uIO08
PIJ0uIO010
PIJ0uIO010
PIJ0uIO012
PIJ0uIO012
PIJ0uIO014
PIJ0uIO014
PIJ0uIO016
PIJ0uIO016
POEN0uIO
POEN0uIO
PIuIO0GP201
PIuIO0GP201
PIuIO0GP101
PIuIO0GP101
PIuIO0AD001
PIuIO0AD001
COuIO0VDD5
COuIO0GP2
COuIO0GP1
POPWM0uIO
POPWM0uIO
COuIO0AD0
COLEDC
NLLEDCURR
PILEDC01
PILEDC01
COEOMFS
NLEOMFS
PIEOMFS01
PIEOMFS01
COEN
NLEN0INUVLO
PIEN01
PIEN01
COPWMI
NLPWMI
PIPWMI01
PIPWMI01
COVDD
PIVDD01
PIVDD01
COCSN
PICSN01
COMOSI
COMISO
COSCLK
COGND
PILED0A
PILED0A
COLED
PILED0K
PILED0K
PIR2102
PIR2102
PIR2101
PIR2101
PICSN01
PIMOSI01
PIMOSI01
PIMISO01
PIMISO01
PISCLK01
PISCLK01
PIGND01
PIGND01
COR21
NLCSN
NLMOSI
NLMISO
NLSCLK
COJVDD
PIJVDD02
PIJVDD02
PIJVDD01
PIJVDD01
CORC1
COCC1
NLCOMP
PIRC102
PIRC102
PIRC101
PIRC101
PICC101
PICC101
PICC102
PICC102
PIJ0LHI01
COJ0EN
PIJ0EN01
PIJ0EN01
PIJ0EN02
PIJ0EN02
PICEN02
PICEN02
COCEN
PICEN01
PICEN01
COD2
PID20A
PID20A
COJ0PWMI
PIJ0PWMI01
PIJ0PWMI01
PIJ0PWMI02
PIJ0PWMI02
COR1
PIR101
PIR102
PIR102
PIR101
PIR302
PIR302
COR3
PIR301
PIR301
PIR502
PIR502
COR5
PIR501
PIR501
PID20K
PID20K
COD4
PID40A
PID40K
PID40K
PID40A
COD3
PID30A
PID30K
PIR901
PID30A
PID30K
PIR901
PIR1001
PIR1001
COR10
PIR1002
PIR1002
COC56
PIC5602
PIC5602
PIC5601
PIC5601
COR9
PIR902
PIR902
PIR202
PIR202
COR2
PIR201
PIR201
PIRSET03
PIRSET03
PIRSET02
PIRSET02
CORSET
PIRSET01
PIRSET01
NLLHI
COCSST
PICSST01
PICSST01
COC69
COC68
COVIN
COVIN0
PIVIN01
PIVIN01
PIVIN001
PIVIN001
COGND2
PIGND201
PIGND201
COIVCC
PIIVCC01
PIIVCC01
COGND5
PIGND501
PIGND501
PIGND301
PIGND301
COGND3
PIGND401
PIGND401
COGND4
PIJ101
PIJ101
CORIIN
PIRIIN01
PIRIIN01
PIRIIN01S
PIRIIN01S
COSET
PISET01
PISET01
PIR401
PIR401
COR4
PIR402
PIR402
PIC2601
PIC2601
COLHI
COSST
PICSST02
PICSST02
CORFREQ
PIRFREQ01
PIRFREQ02
PIRFREQ01
PIRFREQ02
NLIOUTMON
PIC6902
PIC6902
PIC6901
PIC6901
COR11
PIR1101
PIR1101
COR12
PIR1201
PIR1201
COR13
PIR1301
PIR1301
COR14
PIR1401
PIR1401
PIC6802
PIC6802
PIC6801
PIC6801
PIC2902
PIC2902
PIC2901
PIC2901
COC29
COJ1
PIJ102
PIJ102
PIRIIN02
PIRIIN02
PIRIIN02S
PIRIIN02S
PIR702
PIR702
COR7
PIIC1044
PIIC1044
COC26
PIR701
PIR701
PIC2602
PIIC1043
PIC2602
PIIC1043
PIIC1042
PIIC1042
PIIC1022
PIIC1022
PILHI01
PILHI01
PIIC1037
PIIC1037
PIIC1041
PIIC1041
PIIC1036
PIIC1036
COCMP
PICMP01
PICMP01
PIIC1019
PIIC1019
PISST01
PISST01
PIIC1038
PIIC1038
PIIC1035
PIIC1035
PIIC1024
PIIC1024
COIINM
PIIINM01
PIIINM01
PIIC1039
PIIC1039
COIOUTM
PIIOUTM01
PIIOUTM01
PIIC1016
PIIC1016
PIIC1034
PIIC1034
PIIC1031
PIIC1031
PIIC1028
PIR1102
PIIC1028
PIR1102
PIIC1030
PIR1202
PIIC1030
PIR1202
PIIC1027
PIR1302
PIIC1027
PIR1302
PIIC1029
PIR1402
PIIC1029
PIR1402
PIIC1023
PIIC1023
PIIC1025
PIIC1025
PIR8902
PIR8902
COR89
PIR8901
PIR8901
PIR9002
PIR9002
COR90
PIR9001
PIR9001
COC55
PIC5502
PIC5502
PIC5501
PIC5501
COIC1
PIIC1032
PIIC1033
PIIC1032
PIIC1033
PIIC1021
PIIC1021
PIIC1045
PIIC10EP
PIIC1045
PIIC10EP
PIIC1026
PIIC1040
PIIC1026
PIIC1040
COC27
PIC1701
PIC1701
PIC1702
PIC1702
COC17
PICIVCC01
PICIVCC01
PICIVCC02
PICIVCC02
COCIVCC
PIIC1047
PIIC1047
PIIC1046
PIIC1046
PIIC103
PIIC103
PIIC1010
PIIC1010
PIIC102
PIIC102
PIIC104
PIIC104
PIIC106
PIIC106
PIIC101
PIIC101
PIIC1012
PIIC1012
PIIC1015
PIIC1015
PIIC1017
PIIC1017
PIIC1018
PIIC1018
PIIC105
PIIC105
PIIC108
PIIC108
PIIC107
PIIC107
PIIC1011
PIIC1011
PIIC109
PIIC109
PIIC1020
PIIC1020
PIIC1013
PIIC1013
PIIC1014
PIIC1014
PIIC1048
PIIC1048
PIC6702
PIC6702
COC67
PIC6701
PIC6701
PIC1801
PIC1801
PIC1802
PIC1802
COC18
CORVL
PIC1601
PIC2802
PIC2802
COC9
PIC2801
PIC2801
CORG1A
PIRG1A01
PIRG1A01
PIRG1B01
PIRG1B01
PIRG2A01
PIRG2A01
PIRG2B01
PIRG2B01
CORG2B
PIVFB01
PIVFB01
PIRVL02
PIRVL02
PIRVL01
PIRVL01
PIC2101
PIC902
PIC1601
PIC2101
PIC901
PIC1602
PIC2102
PIC901
PIC1602
PIC2102
COC16
COC21
PIC102
PIC502
PIC2002
PIC102
PIC502
PIC2002
PIC101
PIC501
PIC2001
PIC101
PIC501
PIC2001
COC20
COC1
COC5
COG1
PIG101
PIG101
PIQ1A0D
PIQ1A0D
COQ1A
PIQ1A0G
PIRG1A02
PIQ1A0G
PIRG1A02
PIQ1B0G
PIRG1B02
PIQ1B0G
PIRG1B02
PIQ1A0S
PIQ1A0S
CORG1B
COG2
COQ2A
PIQ2A0D
PIQ2A0D
CORG2A
PIG201
PIG201
PIQ2A0G
PIRG2A02
PIQ2A0G
PIRG2A02
PIQ2B0G
PIRG2B02
PIQ2B0G
PIRG2B02
PIQ2A0S
PIQ2A0S
COVFB
CORVH
PIRVH01
PIRVH02
PIRVH02
PIRVH01
COQ1B
PIDBS10A
PIDBS10A
CODBS1
PIDBS10K
PIDBS10K
NLBST1
NLBST2
COCBS1
PICBS102
PICBS102
PIQ1B0D
PIQ1B0D
PICBS101
PICBS101
COL1
PIQ1B0S
PIQ1B0S
PIL102
PIL102
PIR802
PIR802
COR8
PISWN101
PISWN101
PIR801
PIR801
COSWN1
COC3
PIC302
PIC302
PIQ2B0D
PIQ2B0D
PIC301
PIC301
COQ2B
PIQ2B0S
PIQ2B0S
PIRSWCS101
PIRSWCS101
PIRSWCS101S
PIRSWCS101S
CORSWCS1
PIRSWCS102S
PIRSWCS102S
PIRSWCS102
PIRSWCS102
COFBH
PIFBH01
PIFBH01
COFBL
PIFBL01
PIFBL01
CODBS2
COCBS2
PIL101
PIL101
PISWN201
PISWN201
COSWN2
COC15
PIRSWCS202
PIRSWCS202
PIRSWCS202S
PIRSWCS202S
PIRSWCS201S
PIRSWCS201S
PIRSWCS201
PIRSWCS201
PIC202
PIC202
PIC201
PIC201
COC2
PIDBS20A
PIDBS20A
PIDBS20K
PIDBS20K
PIQ4B0D
PICBS202
PICBS202
PICBS201
PICBS201
COR6
PIQ4B0D
PIQ4A0D
PIQ4A0D
COQ4A
PIQ4A0G
PIQ4A0G
PIQ4B0S
PIQ4B0S
PIQ4A0S
PIQ4A0S
PIR602
PIR602
PIQ3B0D
PIQ3B0D
PIR601
PIR601
PIQ3A0D
PIQ3A0D
PIC1502
PIC1502
PIQ3A0G
PIQ3A0G
PIC1501
PIC1501
PIQ3B0S
PIQ3B0S
PIQ3A0S
PIQ3A0S
CORSWCS2
COR17
COC4
PIC602
PIC602
PIC601
PIC601
COC6
COC8
PIC702
PIC702
PIC701
PIC701
COC11
COC7
COQ4B
PIQ4B0G
PIQ4B0G
COQ3B
PIQ3B0G
PIQ3B0G
COQ3A
PIC802
PIC1002
PIC1201
PIC802
PIC1002
PIC1201
PIC801
PIC1001
PIC1202
PIC801
PIC1001
PIC1202
COC10
COC12
COC14
PIC1102
PIC1302
PIC2401
PIC1102
PIC1302
PIC2401
PIC1101
PIC1301
PIC2402
PIC1101
PIC1301
PIC2402
COC24
COC13
COG4
CORG4B
PIG401
PIG401
PIRG4B02
PIRG4B02
PIRG4A02
PIRG4A02
CORG4A
COG3
CORG3B
PIG301
PIG301
PIRG3B01
PIRG3B02
PIRG3B02
PIRG3B01
PIRG3A01
PIRG3A02
PIRG3A01
PIRG3A02
CORG3A
PIC1401
PIC1401
PIC1402
PIC1402
PIJV101
PIJV101
CORSHO
PIRSHO01S
PIRSHO01S
PIRSHO01
PIRSHO01
PIC2501
PIC2501
CORSHO1
PIRSHO102
PIRSHO102
PIC2502
PIC2502
COC25
PIRSHO102S
PIRSHO102S
PIRG4B01
PIRG4B01
PIRG4A01
PIRG4A01
COR16
PIR1601
PIR1601
COJV1
PIJV102
PIJV102
PIRSHO02S
PIRSHO02S
PIRSHO02
PIRSHO02
PIRSHO101
PIRSHO101
PIRSHO101S
PIRSHO101S
PIR1602
PIR1602
NL0VOUT
COC22
PIC2202
PIC2202
PIC2201
PIC2201
PIJI101
PIJI101
COJI1
PIJI102
PIJI102
COVOUT
PIVOUT01
PIVOUT01
NLFB0P
NLFB0N
PIR1702
PIR1702
PIR1701
PIR1701
PIC402
PIC402
PIC401
PIC401
CORVOLT
PIRVOLT01
PIRVOLT01
PIRVOLT02
PIRVOLT02
PIRVOLT03
PIRVOLT03
PIR1802
PIR1802
COR18
PIR1801
PIR1801
PIJV202
PIJV202
COJV2
PIJV201
PIJV201
COVOUT0
PIVOUT001
PIVOUT001
COGND0
PIGND001
PIGND001
Page 19

User manual 17 of 19 Rev.1.0
2021-03-04
TLD5542-1HIPOW_EVAL board
Evaluation board manual
List of references
8 List of references
[1] Infineon Toolbox and Config Wizard www.infineon.com
Page 20

User manual 18 of 19 Rev.1.0
2021-03-04
TLD5542-1HIPOW_EVAL board
Evaluation board manual
List of references
Revision history
Document
version
Date of release
Description of changes
Rev.1.0
2021-03-04
Initial User Manual
Page 21

Trademarks
All referenced product or service names and trademarks are the property of their respective owners.
Edition 2021-03-04
UM TLD5542-1HIPOW_EVAL
Published by
Infineon Technologies AG
81726 Munich, Germany
© 2021 Infineon Technologies AG.
All Rights Reserved.
Do you have a question about this
document?
Email: erratum@infineon.com
Document reference
IMPORTANT NOTICE
The information contained in this application note is
given as a hint for the implementation of the product
only and shall in no event be regarded as a
description or warranty of a certain functionality,
condition or quality of the product. Before
implementation of the product, the recipient of this
application note must verify any function and other
technical information given herein in the real
application. Infineon Technologies hereby disclaims
any and all warranties and liabilities of any kind
(including without limitation warranties of noninfringement of intellectual property rights of any
third party) with respect to any and all information
given in this application note.
The data contained in this document is exclusively
intended for technically trained staff. It is the
responsibility of customer’s technical departments
to evaluate the suitability of the product for the
intended application and the completeness of the
product information given in this document with
respect to such application.
For further information on the product, technology,
delivery terms and conditions and prices please
contact your nearest Infineon Technologies office
(www.infineon.com).
WARNINGS
Due to technical requirements products may contain
dangerous substances. For information on the types
in question please contact your nearest Infineon
Technologies office.
Except as otherwise explicitly approved by Infineon
Technologies in a written document signed by
authorized representatives of Infineon
Technologies, Infineon Technologies’ products may
not be used in any applications where a failure of the
product or any consequences of the use thereof can
reasonably be expected to result in personal injury.
 Loading...