

Infanttech ALWAYS IN VIEW 1000-GM, 1000- BP, 1000- YG, ALWAYS IN VIEW 1000-BP, ALWAYS IN VIEW 1000-YG Instruction Manual
INSTRUCTION MANUAL
AALLWWAAYYS
S
IINN VVIIEEW
W
™ BABY MONITOR FOR CARS
Thank you for purchasing Infanttech’s Always In View™ baby monitor for cars. This unique
monitor allows parents to safely operate a vehicle by reducing the need to turn around while
driving. Your Always In View™ will allow you to monitor your baby while he or she is facing
backwards in a rear passenger seat. Additionally, your Always In View™ can also be used
when your baby becomes a toddler and is facing forward in the rear passenger seat. The
parent’s unit includes a digital video monitor that easily attaches to the dashboard window of
any vehicle, with a convenient car adapter charger, and a camera installed in a cute plush
that can be secured in various locations in the backseat. Both the monitor and camera are
equipped with a rechargeable battery.
Please note, that use of the Always In View™ does not replace a driver’s need to obey
all traffic and safety laws and use reasonable safety precautions while driving to
minimize distractive driving.
CAUTION:
KEEP SMALL PARTS OUT OF CHILD’S REACH
[Model numbers 1000-GM; 1000- BP; 1000- YG]
PLEASE READ THE FOLLOWING
INSTRUCTIONS AND WARNINGS
CAREFULLY BEFORE USING YOUR
ALWAYS IN VIEW™ BABY MONITOR.
KEEP THIS INSTRUCTION MANUAL
FOR FUTURE REFERENCE.
For Technical Support call [855-422-2983]
or email us at info@infanttech.com.
For use with Children from birth to toddlers.
WARNING:
Adult installation required.

WARNING:
THIS PRODUCT CANNOT REPLACE RESPONSIBLE ADULT
SUPERVISION AND VEHICLE DRIVING.
• Test monitor before first use, periodically, and when changing location of the
units.
• Prevent distracted driving- before you are ready to start your vehicle, make
sure you have adjusted all of your vehicle’s options such as seats, mirrors,
seatbelts, the position of the camera from the Always In View™ facing your
child, etc.
• Prevent Cord entanglement- do not place any cords within arm’s reach of baby.
Never use extension cords with AC adapters. Only use the AC Adapters
provided.
• When an AC Adapter is plugged into an electrical outlet, do not touch the
exposed end.
• Do not use monitor near water.
• Keep monitor away from heat sources and make sure there is proper
ventilation.
• THIS PRODUCT IS NOT A TOY. DO NOT ALLOW CHILDREN TO PLAY WITH IT.
NOT INTENDED FOR CHILD’S PLAY.
BATTERY WARNING:
• Do not Mix old and new batteries.
• Do not mix alkaline, standard, or rechargeable batteries.
• Remove batteries and unplug the rechargeable battery pack when product is
stored for a long period of time or when batteries are exhausted.
• Dispose of exhausted batteries properly.
• Use only the original rechargeable battery pack. Warranty is void if other
batteries are used. Please contact Infantech Solutions, Inc. for a replacement
battery, contact information can be found at the end of the instruction booklet.
CAUTION:
KEEP SMALL PARTS OUT OF CHILD’S REACH
1

FCC Information
This device complies with part 15 of the FCC Rules. Operation is subject to the
following two conditions: (1) This device may not cause harmful interference, and (2)
this device must accept any interference received, including interference that may
cause undesired operation.
Industry Canada (IC) Compliance Statement
This device complies with Industry Canada licence-exempt RSS standard(s).
Operation is subject to the following two conditions: (1) this device may not cause
interference, and (2) this device must accept any interference, including interference
that may cause undesired operation of the device.
Industrie Canada (IC) Déclaration de conformité
Le présent appareil est conforme aux CNR d'Industrie Canada applicables aux
appareils radio exempts de licence. L'exploitation est autorisée aux deux conditions
suivantes : (1) l'appareil ne doit pas produire de brouillage, et (2) l'utilisateur de
l'appareil doit accepter tout brouillage radioélectrique subi, même si le brouillage est
susceptible d'en compromettre le fonctionnement.
CAUTION: Changes or modifications not expressly approved by Infantech Solutions, Inc.,
may void the users’ authority to operate this equipment.
NOTE: This equipment has been tested and found to comply with the limits for a
Class A digital device, pursuant to part 15 of the FCC Rules. These limits are
designed to provide reasonable protection against harmful interference in a
commercial environment. This equipment generates, uses, and can radiate radio
frequency energy and, if not installed and used in accordance with the instructions,
may cause harmful interference to radio communications. However, there is no
guarantee that interference will not occur in a particular installation. If this equipment
does cause harmful interference to radio reception, which can be determined by
turning the equipment on and off, the user is encouraged to correct the interference
by one or more of the following measures:
• Reorient or relocate the receiving antenna (monitor)
• Increase the separation between the equipment and the receiver
• Connect the equipment into a different circuit from that to which the receiver
is connected.
• Consult the dealer or an experienced radio/TV technician for help.
NOTE: Use only the original rechargeable battery pack or approved battery
replacement. Warranty void if other batteries are used. Please contact Infantech
Solutions, Inc. for replacement battery pack, contact information can be found on the
next page.
2

QUICK REFERENCE FOR DAILY OPERATION:
After your initial set up (see instructions below), follow these easy steps for optimal
performance of your Always in View monitor:
1. Make sure the safety buckle straps on the plush of the camera are always used and
adjusted to fit snugly on any headrest the plush is mounted on.
2. Turn on the monitor by holding the power button for 5 seconds.
3. When you place your baby/toddler in the backseat, turn on the camera in the plush
by unzipping the zipper and holding the power button until the light turns green. Zip
up the plush.
4. The monitor should display the images from the camera. Adjust the camera in the
plush for the view you like.
5. When exiting the vehicle, turn off the monitor by holding the power button for 5
seconds. When taking your baby out of the vehicle, turn off the camera in the plush.
This will ensure optimal battery life and performance.
6. Remember to charge monitor or camera as needed. If your vehicle is equipped with
cigarette lighter or power outlets, you can keep your monitor plugged in with the
included 2-port USB car adapter. The camera in the plush may be charged in the
vehicle when your child is not in the car.
7. When your monitor and camera are fully charged, enjoy a wireless unit.
3

FEATURES AND COMPONENTS
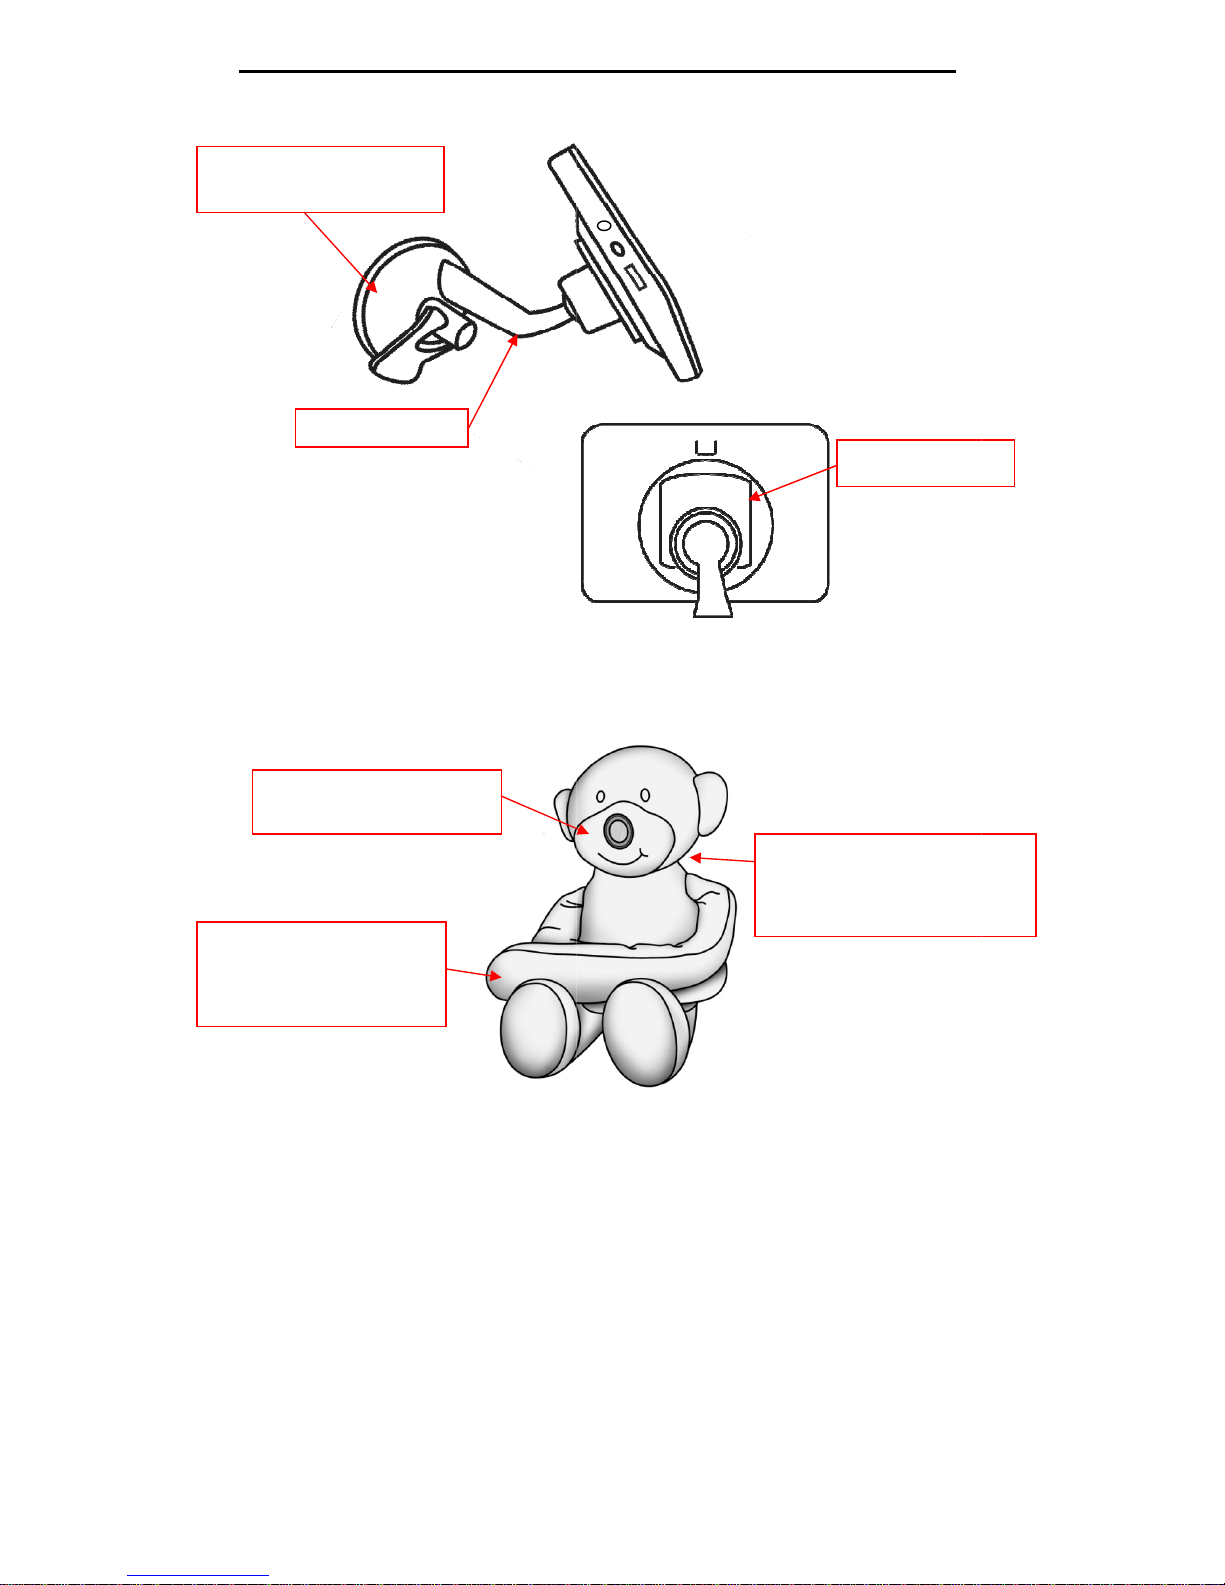
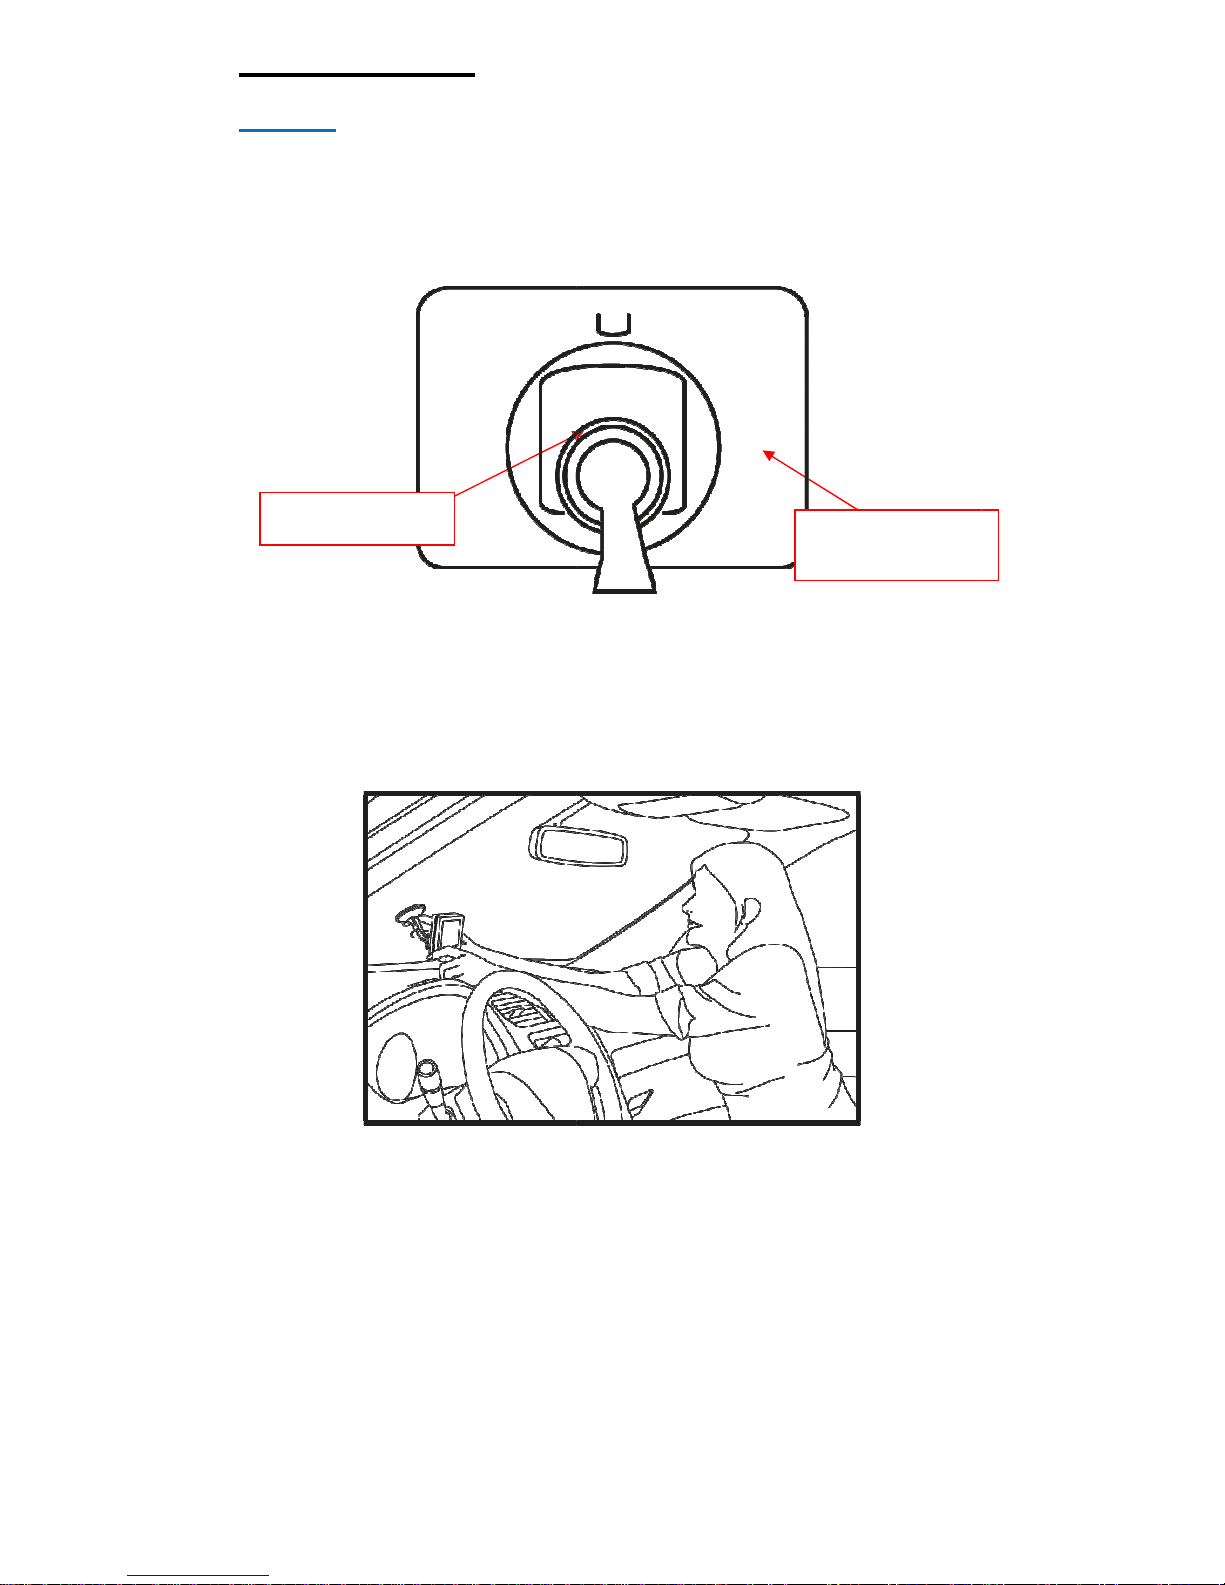
Monitor (Front View):
Always
Monitor (Side View):
Power LED
Suction Cup Mount on
Monitor Bracket
Monitor Bracket
:
In View
Anti-glare
LED Screen
Volume Control
Charging Port
Power Button
4
FEATURES AND COMPONENTS (Continued)
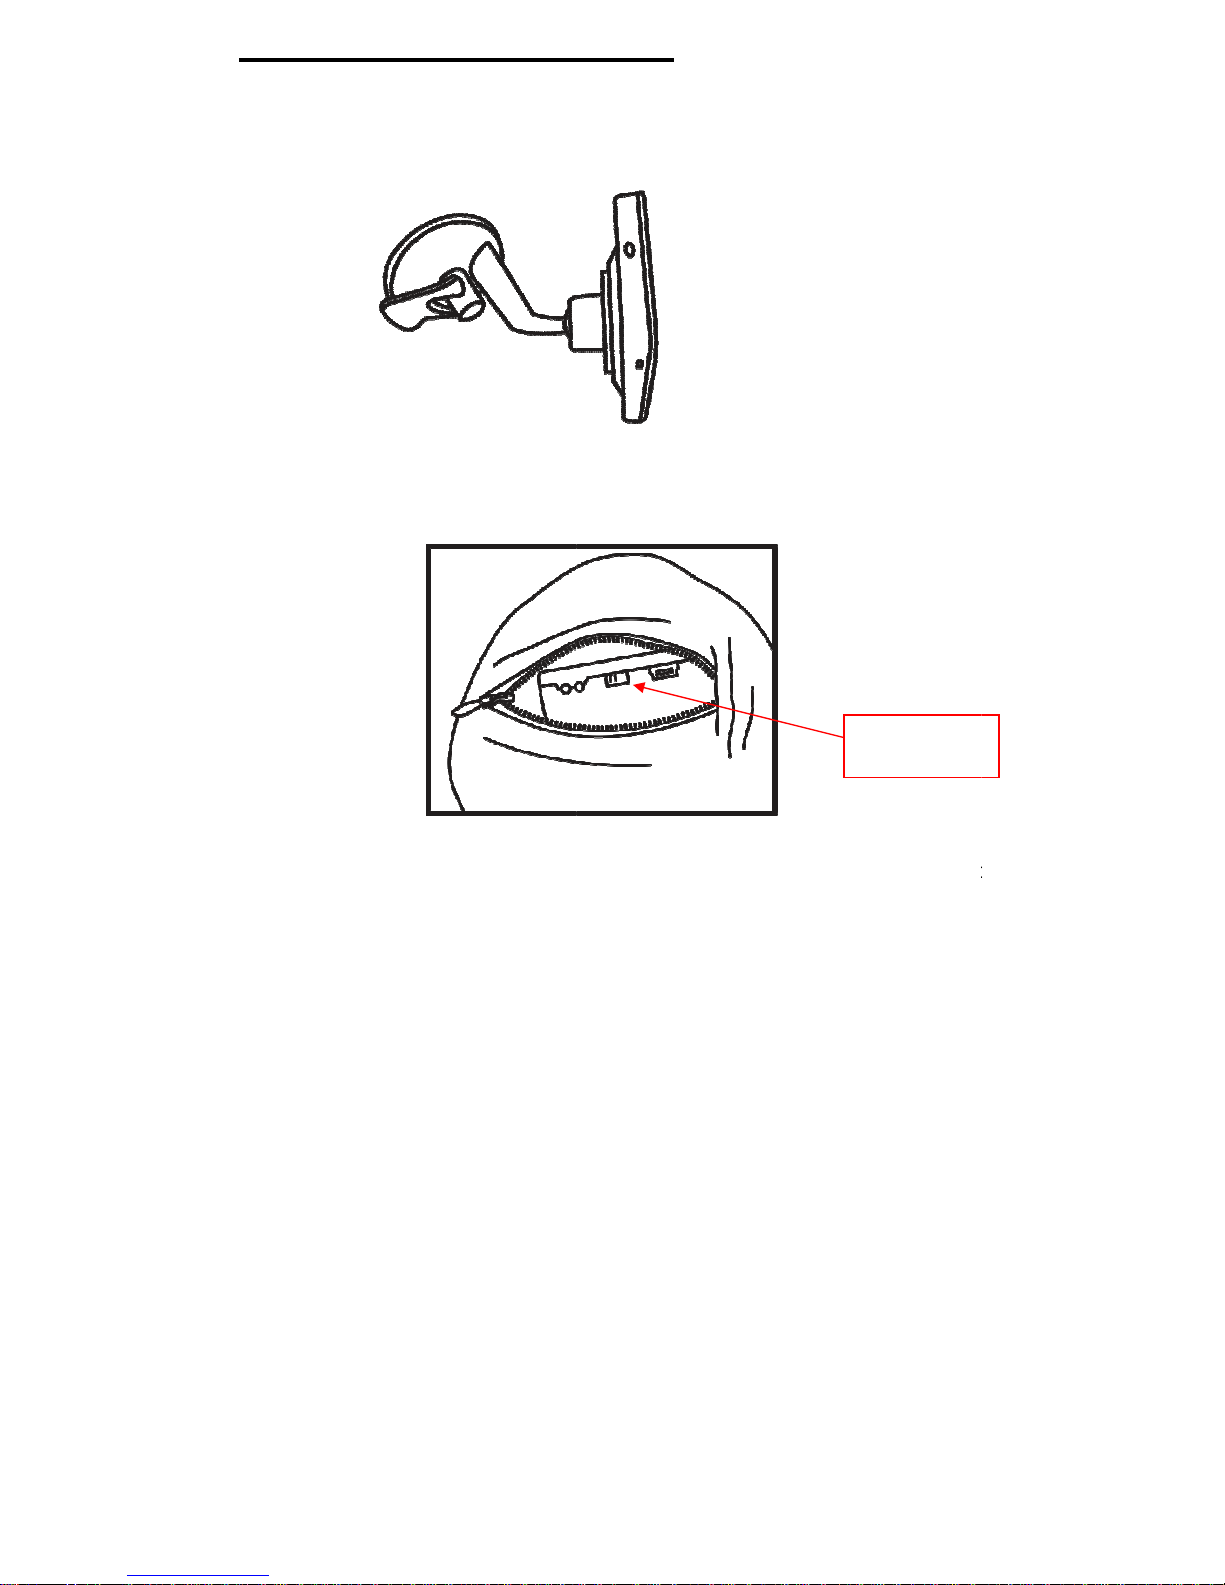
Monitor (Back View):
Camera Plush (Front View):
Camera Mounted in Nose
so you can see your child
Super Velcro
and safety
buckle straps on Paws for
ease of mounting
Suction Cup Mount on
Monitor Bracket
Monitor Bracket
:
Internal
Bendineck
technology for optimal
viewing capabilities
Bracket Slot
5
FEATURES AND COMPONENTS (Continued)
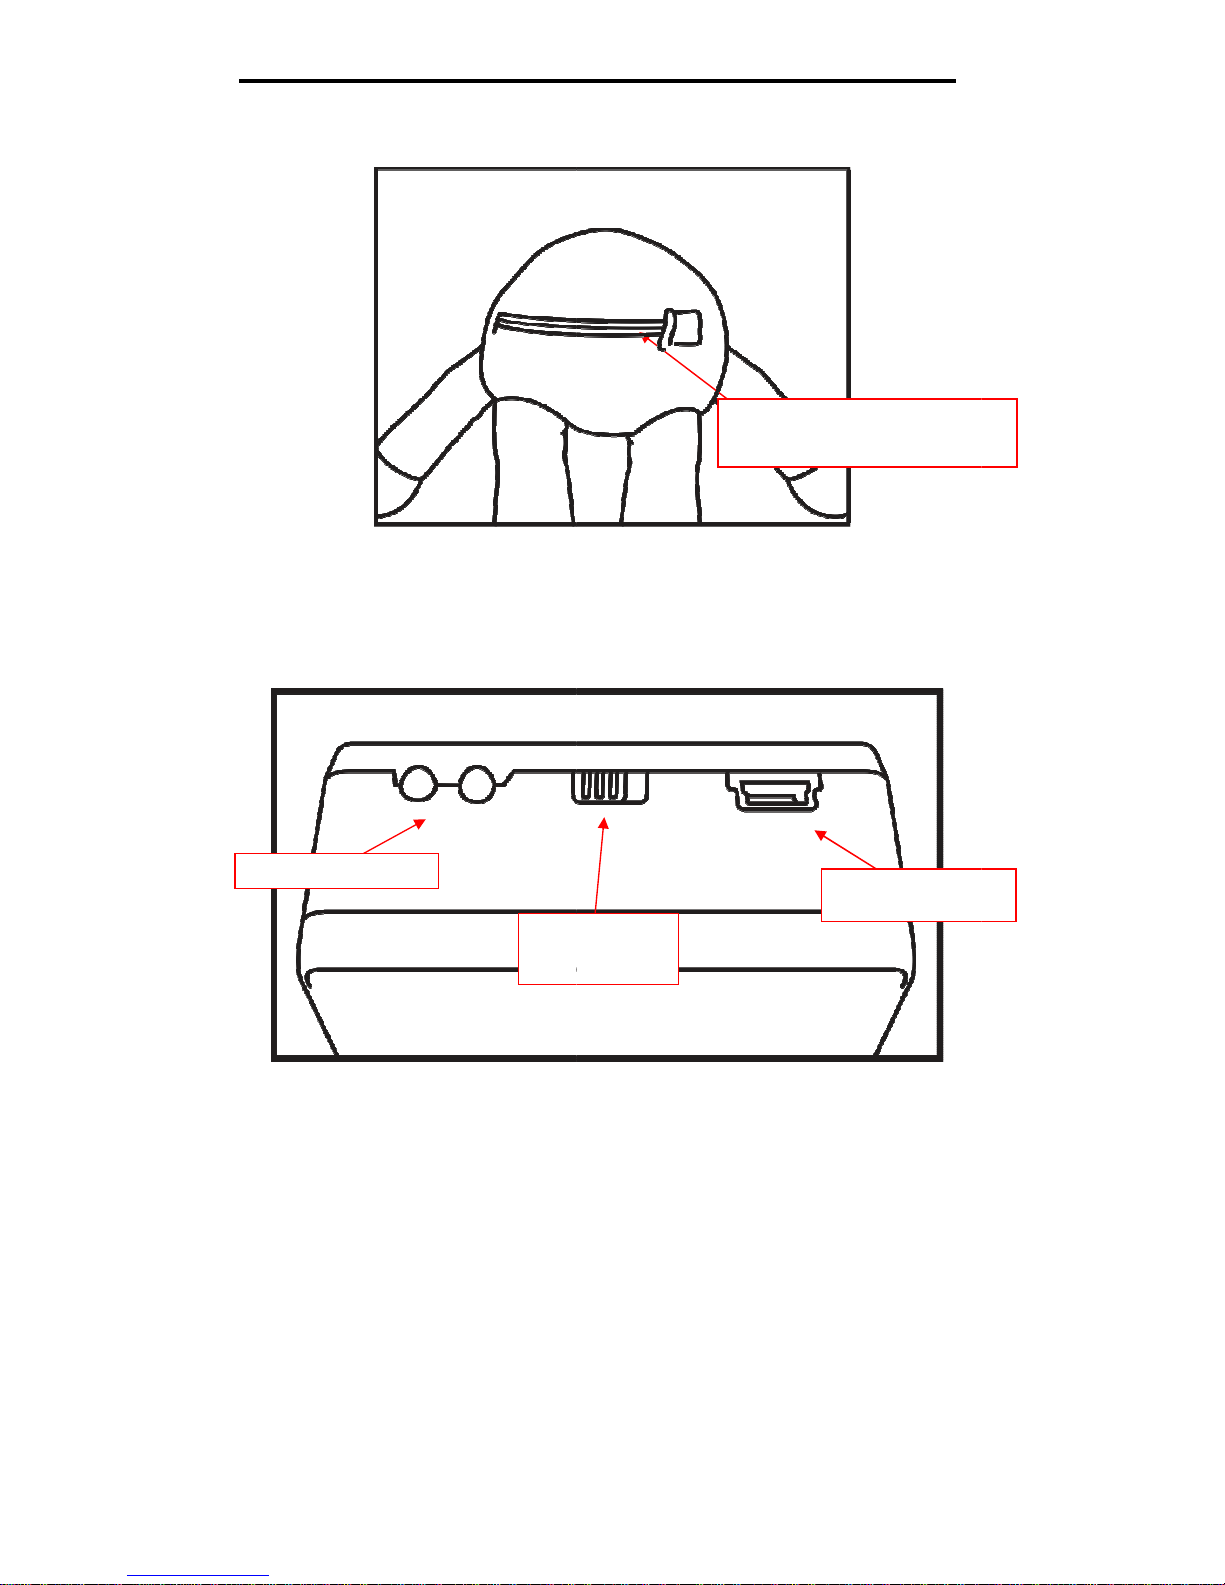
Camera Plush (bottom View):
Battery Pack
Power Indicator LED
Push ON/Off
Button
:
inside the Plush:
Hideaway Zipper to access
Charging Port and Battery Pack
USB Charging Port
6
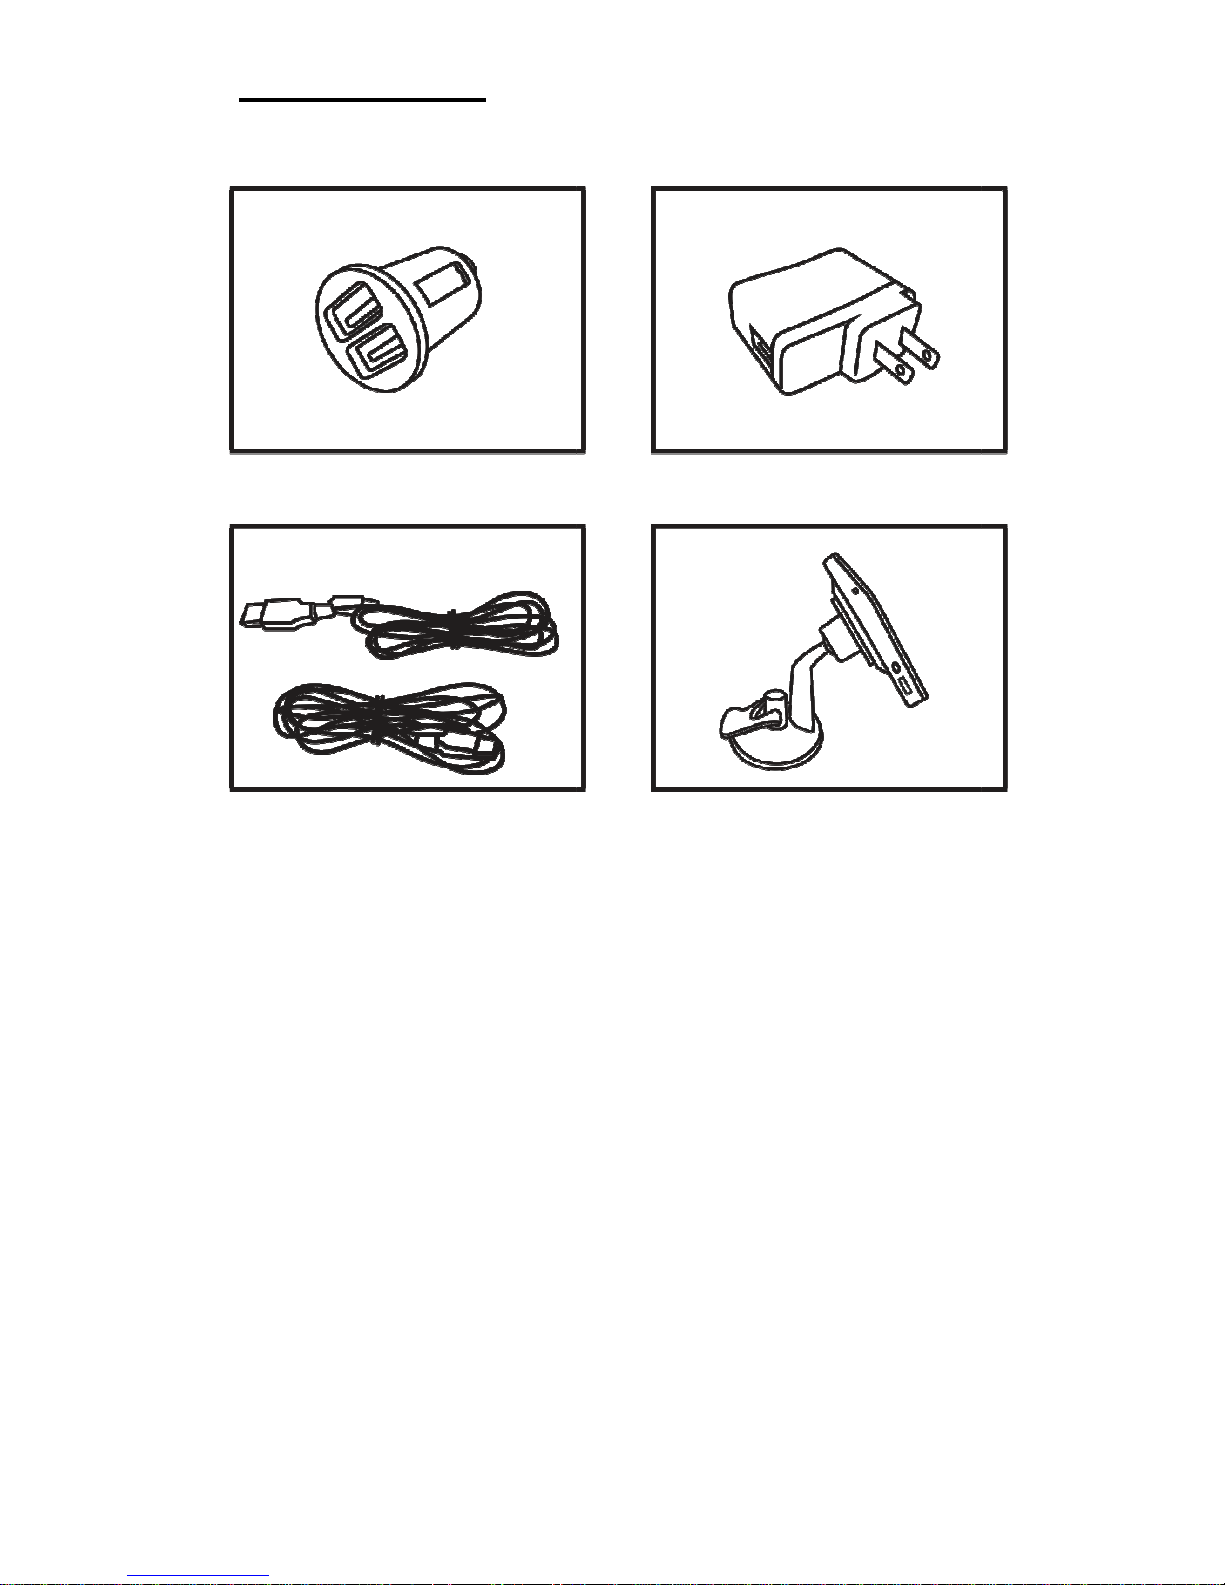
ACCESSORIES
:
2-Port USB Car Charger (1)
3Ft AND 7Ft USB Cables (1 of Each)
NOTE: Style and designs may vary from pictures
Contents:
1-Plush with Camera
1-
1000Mah Lithium ion Battery (Inside Plush)
1- 3.5” LCD Monitor
1-
Monitor bracket with suction cup mount
1- USB Charging cable for plush
1- Monitor charging cable
1- 2-Port USB car adapter
1- USB AC wall adapter
1- Instruction Manual
AC adapters (1)
Monitor mount w/ suction cup (1)
7
SET UP & USE:
Monitor
(Charge for 24 hours prior to first use):
Step 1:
Attach the mounting bracket to the back of the monitor slot.
Step 2
: Attach the monitor to the windshield of the car in a secure location that
not obstruct your view.
We recommend the left corner of the driver’s
windshield. (
only place it in a location allowed by law so that it doesn’t
interfere with vision.)
Mounting Bracket
does
Back of Monitor;
Slot for Bracket
8
SET UP & USE (Continued)
Step 3:
Press On/Off button for 5 seconds to turn monitor On.
Step 4:
Unzip bottom of plush and turn On/Off button to On position. Reclose
zipper.
Step 5:
Once the camera and monitor are on, they will pair. Signal strength / Battery
status will show on the LCD monitor. Meanwhile, the monitor can receive the video
from the camera.
:
9
Push
On/Off
SET UP & USE (Continued)
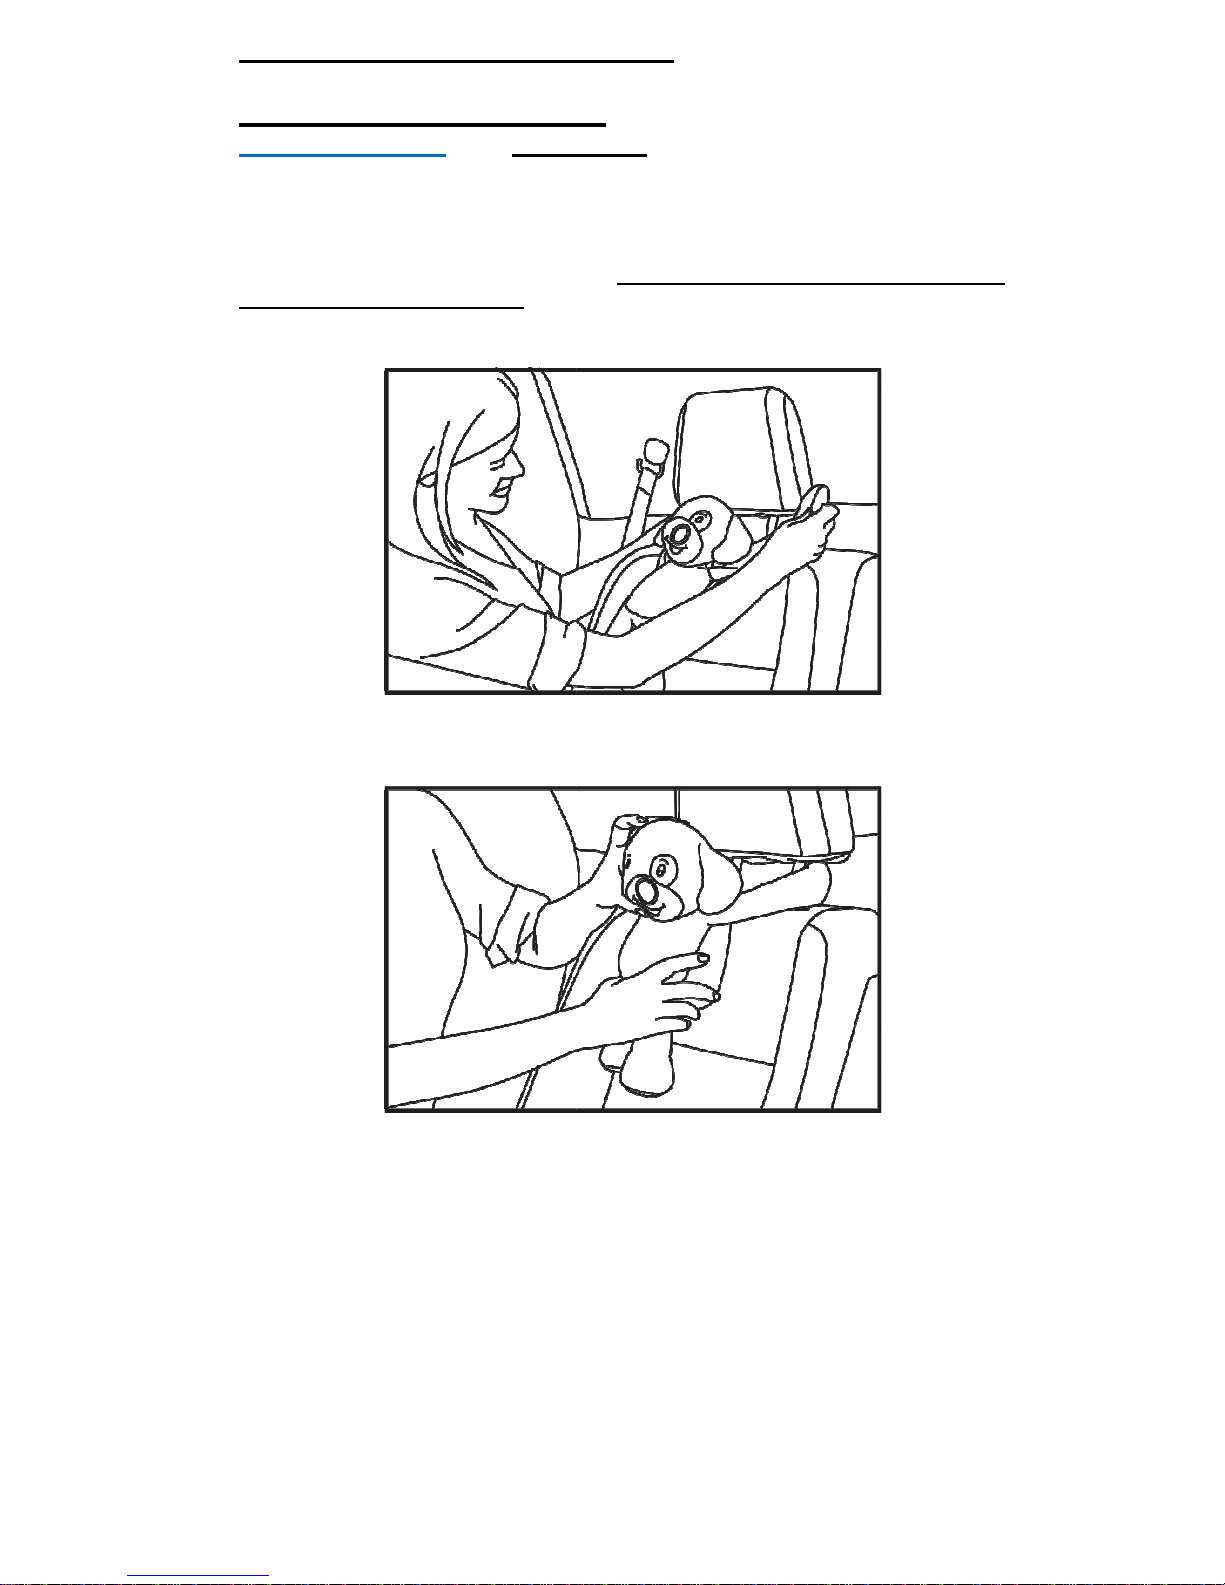
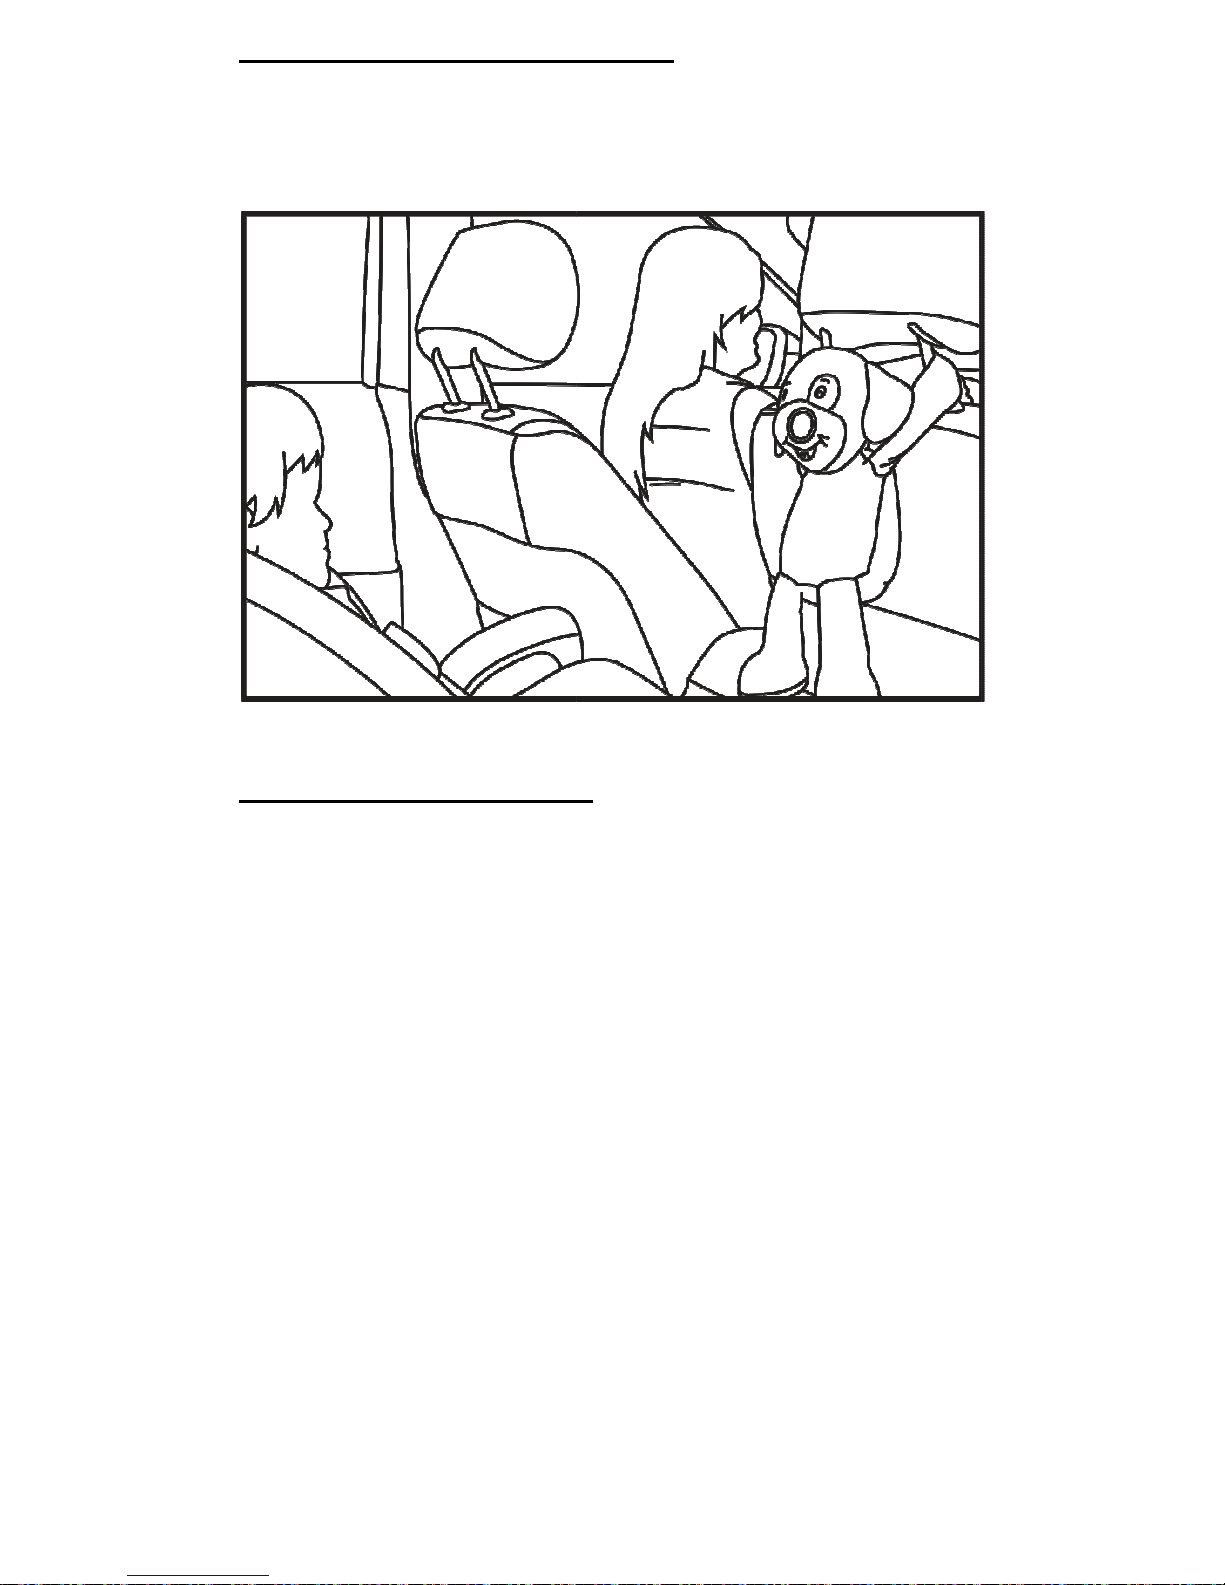
REAR FACING SET UP
Camera in Plush: For
rear facing
(Charge for 24 hours prior to first use):
Step 6:
Wrap plush’s arms around the backseat headrest in front of car seat and
attach palms together with the
Velcro. Attach the plastic safety buckle straps and pull
for a snug fit around the headrest posts.
the camera will stay in place. Note
-
Velcro use may not be possible. The b
Step 7
: Adjust plush’s head by flexing the
:
seat installation for Infants
Always use the buckle straps
to ensure
-
due to differences in headrest post width,
uckle straps should always fit.
internal
bendineck for optimal viewing.
10
SET UP & USE (Continued)
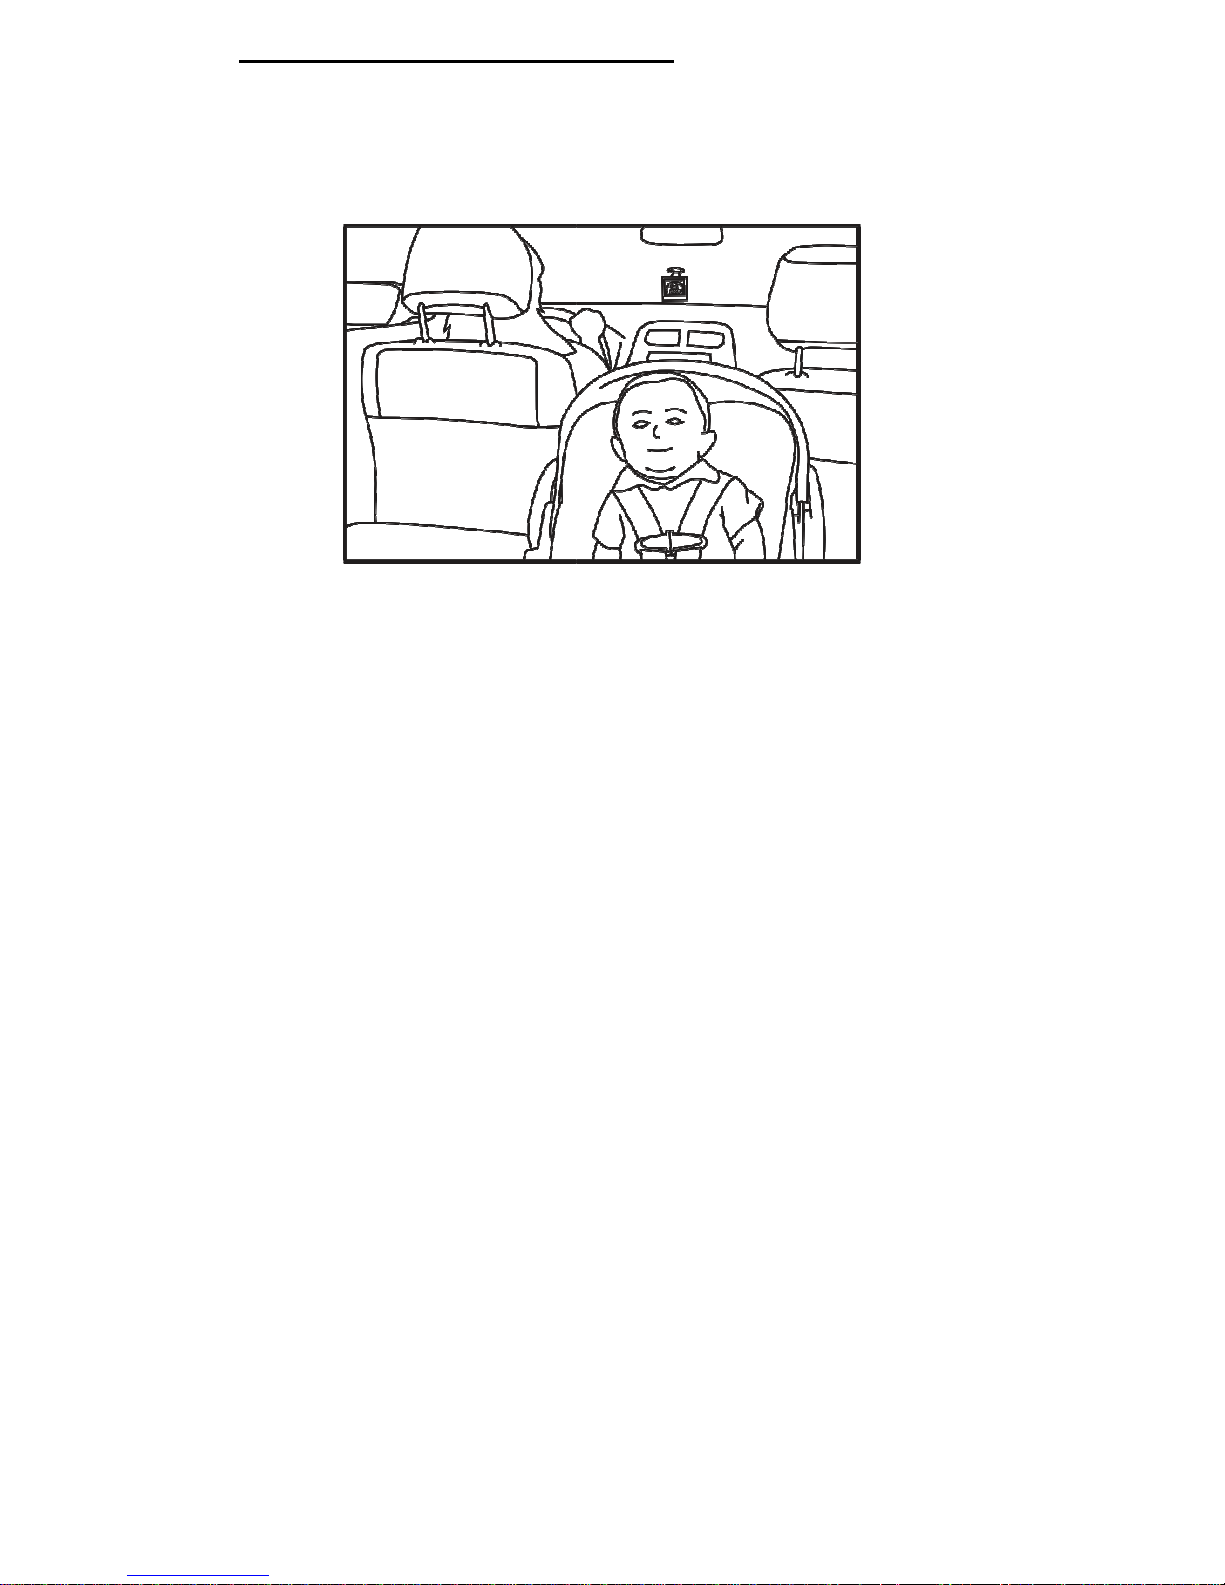
Step 8: B
efore you are ready to drive, make sure you have adjusted all of your vehicle’s
options such as seats, mirrors, seatbelts, and the position of the camera in the plush facing
your child.
Step 9:
Drive safely and with quick glances know
see something in the monitor that alerts you to attend to your child, continue to follow safe
driving practices, and cal
mly and safely pull off the road.
:
ing that your child is Always In View.
If you
1
1

SET UP & USE (Continued)
FORWARD
FACING SET UP
Camera in Plush: For
Forward facing
toddlers (Charge for 24 hours prior to use):
See steps 1-5 above.
Step 6:
Wrap plush’s arms around the front passenger’s seat headrest in front of
the toddler car seat and attach
palms together with V
buckle straps and pull for a snug fit around the headrest posts.
buckle straps
to ensure the camera will stay in place.
headrest post width, Velcro use may
always fit.
Step 7
: Adjust plush’s head by flexing the
:
Seat installation for
elcro.
. Attach the plastic safety
Always use the
Note-
due to differences in
not be possible. The buckle straps should
internal bendi-
neck for optimal viewing.
1 2
SET UP & USE (Continued)
Step 8: B
efore you are ready to drive, make sure
options such as seats, mirrors, seatbelts, and the position of the camera in th
your child.
See step 9 above
on page 11
BATTERY CHARGING
Monitor
Connect USB adapter to the monitor,
complete, the light will be green.
Monitor screen indicates battery charge.
Camera
Connect USB adapter to the camera, the light will be red. Once charging is
complete, the light will be green.
:
you have adjusted all of your vehicle’s
e plush facing
.
the light will be red. Once charging is
1
3

Signal Indicators
Signal Strength Indicators
Description
Strong Signal
Moderate Signal
Poor Signal
Note: Verify the signal strength on the LCD monitor. Please reference
the above table.
PROBLEM SOLVING:
Pair Mode
• While the monitor is off, press and hold the power button until the light
flashes. Then, while the camera is off, press and hold the power button
on the plushes battery pack for approximately 3-5 seconds. You will
see the video from the camera once the pairing is complete. The
power light will stop flashing.
No Sound coming from speaker
• Make sure both units are powered on.
• Set Volume to a higher setting.
No Video
• Check the DC power or battery on the camera.
• Make sure the camera and monitor are in effective range.
Infrared (IR) Lighting
• In the dark, the IR lights will automatically work, but IR lights do not
provide light.
14

PROBLEM SOLVING (Continued):
Static
• Monitor and plush are too close together – move farther apart.
• Turn down the volume on the monitor.
• Make sure the battery is fully charged.
Flickering monitor
• Make sure monitor and camera are moved away from other wireless
devices (i.e. Wi-Fi, Bluetooth, GPS, etc).
Weak reception or no reception
• Make sure both units are turned on.
• Move plush closer to monitor.
• Make sure batteries are charged on both plush and monitor.
Accidentally tried Pairing camera and monitor while camera is
on or camera is not charging
• Open up battery pack in plush animal.
• Remove battery.
• Get paperclip and short outer pins of battery connectors.
• Camera will shut off.
• Connect USB power cable.
• Connect power cable to house or car charger and plug into respective
outlet.
NOTE: Make sure both units are fully charged for optimal performance
If you experience a problem that is not noted in this manual, please do not return the
product to the store as once it is returned it cannot be re-sold and the materials and
energy used to make it are wasted. Our Customer Service Department may have a
simple solution to your problem. Please contact our Customer Service Department by
phone at 1-855-422-2983 between the hours of 9:00 a.m. and 4:30 p.m. (PST) or via
email 24 hours a day at info@infanttech.com.
1
5

Infanttech Solutions, Inc. warranty Policy
Infanttech Solutions, Inc will repair or replace your unit free of charge for 12 months from the
date of purchase if the unit is defective in workmanship or materials. To claim your
repair/replacement, the product must be returned to Infanttech Solutions along with a copy of
the original purchase receipt. In the absence of the purchase receipt, the warranty will be 12
months from the date of manufacture. Please visit www.infanttech.com to register your
product.
Void Warranty
:
This warranty does not apply to normal wear or damage from misuse, removal or tampering
of serial numbers, abuse, improper storage and handling, installation, accident, unauthorized
repair or alteration. If possible, Infanttech can replace or repair unit for a fee.
For most recent manual visit www.infanttech.com
Para manual mas reciente visite www.infanttech.com
Pour manuel plus tard visite www.infanttech.com
Infant
t
ech Solutions, Inc.
515 W Whittier Blvd
Montebello, CA 90640
855-422-2983
© 2013 Infanttech Solutions, Inc.
Please retain information for future
reference. Color and styles may vary.
MADE IN CHINA

MANUEL D’INSTRUCTIONS
MONITEUR DE BÉBÉ POUR VOITURE
AALLWWAAYYS
S
IINN VVIIEEW
W
MC
Merci d’avoir fait l’achat du moniteur de bébé pour voiture Always In ViewMC d’Infanttech.
Ce moniteur unique permet aux parents de conduire un véhicule en toute sécurité en
éliminant le besoin de se retourner pendant la conduite. Votre moniteur Always In ViewMC
vous permet de surveiller votre bébé pendant qu’il est assis en regardant vers l’arrière dans
le siège du passager arrière. De plus, votre moniteur Always In ViewMC peut également
être utilisé lorsque bébé grandit et devient un tout-petit et que son siège est placé sur le
siège du passager arrière de la voiture, mais tourné vers l’avant. L’unité du parent comprend
un moniteur vidéo numérique qui se fixe facilement sur le pare-brise au-dessus du tableau de
bord de tout véhicule, un adaptateur de voiture pratique et une caméra cachée dans un
toutou en peluche qui peut être installé de différentes manières sur le siège arrière. La
caméra et le moniteur sont munis d’une pile rechargeable.
Veuillez noter que malgré l’utilisation du moniteur Always In ViewMC, le conducteur
doit respecter toutes les lois en matière de sécurité et de conduite, ainsi que prendre
toutes les précautions de sécurité requises pendant la conduite pour éviter les
diMISE EN GARDE :
GARDER LES PETITES PIÈCES HORS DE LA PORTÉE DES ENFANTS
[Numéros de modèle 1000-GM; 1000-BP; 1000-YG]
VEUILLEZ LIRE LES INSTRUCTIONS SUIVANTES ET LES
AVERTISSEMENTS SOIGNEUSEMENT AVANT D’UTILISER
LE MONITEUR POUR BÉBÉ ALWAYS IN VIEWMC.
CONSERVER CE MANUEL D’INSTRUCTIONS AUX FINS
DE CONSULTATION ULTÉRIEURE.
Pour obtenir de l’assistance technique, appeler au [855 422-
2983] ou nous envoyer un courriel à l’adresse
info@infanttech.com.
Utiliser avec des bébés
jusqu’aux tout-petits.
AVERTISSEMENT :
Installation par un adulte requise.

AVERTISSEMENT :
CE PRODUIT NE REMPLACE PAS LA SUPERVISION D’UN ADULTE ET
UNE CONDUITE RESPONSABLES.
• Essayer le moniteur avant la première utilisation, régulièrement et au moment de
changer la position des unités.
• Éviter les distractions pendant la conduite : avant de démarrer le véhicule,
s’assurer que toutes les options du véhicule sont bien ajustées, comme les
sièges, les miroirs, les ceintures de sécurité, que la caméra du moniteur Always In
ViewMC est bien face à l’enfant, etc.
• Empêcher l’emmêlement des câbles : ne pas placer les cordons à portée du bébé.
Ne jamais utiliser d’extension avec les adaptateurs CA. Utiliser uniquement les
adaptateurs CA fournis.
• Lorsqu’un adaptateur CA est branché sur une prise électrique, ne pas toucher à
l’extrémité exposée.
• Ne pas utiliser le moniteur près d’une source d’eau.
• Garder le moniteur hors de portée de sources de chaleur et s’assurer qu’il est
bien aéré.
• CE PRODUIT N’EST PAS UN JOUET. NE PAS LAISSER D’ENFANT JOUER AVEC
CE PRODUIT. NE CONVIENT PAS AUX JEUX D’ENFANTS.
AVERTISSEMENT POUR
LA PILE :
• Ne pas mélanger de vieilles piles avec de nouvelles.
• Ne pas mélanger de piles alcalines, standard ou rechargeables.
• Retirer les piles et débrancher le bloc-piles rechargeable lorsque le produit est
rangé pour une longue période ou lorsque les piles sont vides.
• Disposer des piles vides convenablement.
• N’utiliser que le bloc-piles rechargeable d’origine. La garantie est annulée si
d’autres piles sont utilisées. Veuillez communiquer avec Infanttech Solutions, Inc.
pour obtenir une pile de rechange (les coordonnées se trouvent à la fin du livret
d’instructions).
MISE EN GARDE :
GARDER LES PETITES PIÈCES HORS DE LA PORTÉE DES ENFANTS
1

Renseignements relatifs à la Federal Communications Commission (FCC, É.U.)
Ce dispositif est conforme à l’article 15 du règlement de la FCC. Son utilisation est
soumise aux deux conditions suivantes : (1) ce dispositif ne peut causer
d’interférence dommageable et (2) ce dispositif doit être en mesure d’accepter
l’interférence reçue, y compris celle causée par une utilisation indésirable.
Industrie Canada (IC) Déclaration de conformité
Le présent appareil est conforme aux CNR d'Industrie Canada applicables aux
appareils radio exempts de licence. L'exploitation est autorisée aux deux conditions
suivantes : (1) l'appareil ne doit pas produire de brouillage, et (2) l'utilisateur de
l'appareil doit accepter tout brouillage radioélectrique subi, même si le brouillage est
susceptible d'en compromettre le fonctionnement.
MISE EN GARDE : Tout changement ou toute modification n’étant pas approuvé
expressément par Infanttech Solutions, Inc. peut annuler l’autorisation accordée à
l’utilisateur de faire fonctionner cet équipement.
REMARQUE : Cet équipement a subi des essais et il est conforme à la classe A
pour les dispositifs numériques, en vertu de l’article 14 du règlement de la FCC. Ces
limites sont conçues pour fournir une protection raisonnable contre une interférence
pouvant être nocive dans un environnement commercial. Cet équipement génère,
utilise et peut émettre de l’énergie de fréquence radio et, s’il n’est pas installé et
utilisé en respectant les instructions, il peut causer une interférence nocive pour les
communications radio. Toutefois, il n’y a aucune garantie qu’aucune interférence ne
sera produite dans une installation particulière. Si cet équipement cause des
interférences nocives pour la réception radio, ce qui peut être déterminé en allumant
et éteignant l’équipement, on encourage l’utilisateur à corriger l’interférence en
prenant au moins une des mesures suivantes :
• Réorienter ou repositionner l’antenne de réception (moniteur)
• Augmenter la distance séparant l’équipement et le récepteur
• Brancher l’équipement dans un circuit différent de celui sur lequel le
récepteur est branché.
• Consulter le détaillant ou un technicien radio/TV d’expérience pour obtenir de
l’aide.
REMARQUE : Utiliser le bloc-piles rechargeable fourni ou une pile de rechange
approuvée. La garantie est annulée si d’autres piles sont utilisées. Veuillez
communiquer avec Infanttech Solutions, Inc. pour obtenir une pile de rechange (les
coordonnées se trouvent sur la page suivante).
2

RÉFÉRENCE RAPIDE POUR L’USAGE QUOTIDIEN :
Une fois l’installation initiale (voir les instructions ci-dessous), suivre la marche à suivre
simple pour obtenir un rendement optimal de la part du moniteur Always in View :
8. S’assurer que les sangles avec boucle de sécurité sur la peluche de la caméra sont
toujours utilisées et ajustées pour bien se fixer sur l’appui-tête.
9. Tenir le bouton d’alimentation pendant 5 secondes pour allumer le moniteur.
10. Une fois le bébé/tout-petit installé sur le siège à l’arrière, allumer la caméra dans la
peluche en ouvrant la fermeture à glissière et en tenant le bouton d’alimentation
jusqu’à ce que la lumière verte s’allume. Refermer la fermeture à glissière de la
peluche.
11. Le moniteur doit afficher les images de la caméra. Ajuster la caméra dans la peluche
en fonction de la vue désirée.
12. À la sortie du véhicule, tenir le bouton d’alimentation pendant 5 secondes pour
éteindre le moniteur. Lorsque l’on sort bébé du véhicule, éteindre la caméra de la
peluche. Cela fera en sorte de préserver de façon optimale la durée de vie et le
rendement de la pile.
13. Ne pas oublier de charger le moniteur ou la caméra au besoin. Si le véhicule est
muni d’un allume-cigare ou de prises d’alimentation, vous pouvez garder le moniteur
du bébé branché sur l’adaptateur de voiture à 2 ports USB (fourni). La caméra dans
la peluche peut être chargée dans le véhicule lorsque l’enfant n’est pas dans le
véhicule.
14. Lorsque le moniteur et la caméra sont entièrement chargés, l’unité fonctionne sans
fil.
3

CARACTÉRISTIQUES ET COMPOSANTS
Moniteur
Always
Moniteur
Voyant
Support à ventouse sur le
moniteur Support
le moniteur Support
:
(Vue de face):
In View
(Vue latérale):
Anti
-
éblouissement
écran LED
Port de charge
Bouton
d'alimentatio
Contrôle du
4

CARACTÉRISTIQUES ET COMPOSANTS
M
oniteur
Caméra P
eluche
Caméra montée dans le
nez afin que vous puissiez
voir votre enfant
Super Velcro et la sécurité
des sangles à boucle sur
pattes pour une
facilité de montage
Support à ventouse sur le
moniteur Support
le moniteur Support
(SUITE)
(Vue arrière):
(Vue de face):
Technologie interne
Bendineck pour des capacités
de visualisation optimales
support fente
:
5

CARACTÉRISTIQUES ET COMPOSANTS
Caméra P
eluche
Batterie à l'intérieur du peluche
Indicateur
d'alimentation LED
Appuyez sur le
bouton
Marche / Arrêt
(SUITE)
(Voir en bas):
:
Zipper pour accéder à
Port de charge et batterie
Port de charge USB
:
6

ACCESSOIRES
:
Chargeur de voiture à 2
ports USB (1)
Câbles USB de 3 pi et 7 pi (1 chacun)
REMARQUE
: Le style et la conception peuvent varier des
images.
Contenu :
1 – Peluche avec caméra
1 – Pile au lithium-ion 1000
mA/h (intérieur de la peluche)
1 – Moniteur ACL 3,5 po
1 –
Équerre pour le moniteur avec support à ventouse
1 –
Câble de chargement USB pour la peluche
1 –
Câble de chargement pour le moniteur
1 – Adaptateur de voiture à 2
ports USB
1 –
Adaptateur de prise murale CA à port USB
1 – Manuel d’instructions
Adaptateurs CA (1)
Support de moniteur avec ventouse (1)
7

INSTALLATION ET UTILISATION
Moniteur
(charger pendant 24
utilisation) :
Étape 1 :
fixer l’équerre de fixation dans la fente au d
Étape 2 : fixer le moniteur au pare-
brise de la voiture dans un endroit sécuritaire
sans obstruer la vue
. Nous recommandons le coin
brise. (Le placer uniquement dans une position autorisée par la loi afin de
ne pas obstruer la vue.)
Support de montage
:
heures avant la première
os du moniteur.
gauche du pare-
L'arrièr
e du moniteur;
Emplacement pour
support
8

INSTALLATION ET UTILISATION (suite)
Étape 3 :
tenir le bouton d’alimentation pendant 5
moniteur.
Étape 4 :
défaire la fermeture à glissière de la peluche et allumer la caméra en
plaçant l’interrupteur à la position Marche. Refermer la
fermeture à glissière.
Étape 5 :
une fois la caméra et le moniteur activés, ils seront appariés. La puissance
du signal et l’état de la pile sont affichés sur le moniteur ACL. Le moniteur peut
recevoir en même temps le signal vidéo de la caméra.
:
secondes pour allumer le
9
Appuyez sur le
bouton
Marche / Arrêt

INSTALLATION ET UTILISATION
INSTALLATION SUR UN SIÈGE FAISANT FACE VERS L’ARRIÈRE
Caméra dans la peluche
: Pour un siège installé faisant
vers l’arrière
pour les bébés (charger la caméra 24
avant la première utilisation)
Étape 6 :
placer les bras de la peluc
arrière en face du siège d’auto pour bébé et
attacher les paumes à l’aide du velcro. Attacher les sangles à boucle de sécurité et
les serrer pour qu’elles soient bien fixées autour des tiges de l’appui
utiliser les sangles à boucle
pour s’assurer que la caméra demeure bien en
place. Remarque
: en raison des différentes largeurs que peuvent avoir les tiges de
l’appui-
tête, l’utilisation du velcro peut être impossible. Les sangles à boucle
devraient toujours convenir
Étape 7
: ajuster la tête de la peluche à l’aide des tiges flexibles pour un
visionnement optimal.
.
(suite) :
face
heures
:
he autour de l’appui-
tête du siège du passager
-tête.
Toujours
10

INSTALLATION ET UTILISATION (suite)
Étape 8 : a
vant de conduire, s’assurer que toutes les options du véhicule sont ajustées,
comme les sièges, les miroirs, les ceintures de sécurité et la position de la caméra dans la
peluche qui fait face à l’enfant.
Étape 9 :
Conduire prudemment et en jetant des coups d’œil rapides en sachant que
l’enfant est toujours visible
. Si quelque chose dans le moniteur indique qu’il faut s’occuper de
l’enfant, continuer à conduire en respectant les règles de sécurité et se tasser sur
l’
accotement de façon sécuritaire et calmement.
:
11

INSTALLATION ET UTILISATION (suite)
INSTALLATION SUR UN SIÈGE FAISANT FACE
VERS L’AVANT
Caméra dans la peluche
: pour un siège installé faisant
vers l’avant pour les tout-
petits (charger la caméra 24
avant la première utilisation)
Voir les étapes 1 à 5 ci-
dessus.
Étape 6 :
placer les bras de la peluche autour de l’appui
face du siège d’auto pour tout-
petit et attacher les pau
Attacher les sangles à boucle de sécurité et les serrer pour qu’elles soient bien
fixées autour des tiges de l’appui-
tête.
pour s’assurer que la caméra demeure bien en place.
différentes largeurs que peuvent avoir les tiges de l’appui
peut être impossible. Les sangles à boucle devraient toujours convenir
Étape 7
: ajuster la tête de la peluche à l’aide des tiges flexibles p
visionnement optimal.
:
face
heures
:
-
tête du siège avant en
mes à l’aide du velcro. .
Toujours utiliser les sangles à boucle
Remarque : en
raison des
-
tête, l’utilisation du velcro
our un
12

INSTALLATION ET UTILISATION (suite)
Étape 8 : a
vant de conduire, s’assurer que toutes les options du véhicule sont ajustées,
comme les sièges, les miroirs, les ceintures de sécurité et la position de la caméra dans la
peluche qui fait face à l’enfant.
Voir l’étape 9 ci-
dessus à la page
CHARGEMENT DE LA PILE
Moniteur
Brancher l’adaptateur USB sur le moniteur, le voyant sera rouge. Une fois la
charge terminée, le voyant sera vert. L’écran du moniteur indique la charge
de la pile.
Caméra
Brancher l’adaptateur USB sur la caméra, le
charge terminée, le voyant rouge s’éteint.
:
11.
voyant sera rouge. Une fois la
13

Indicateurs de signal
Indicateurs de puissance
de signal
Description
Signal fort
Signal moyen
Signal faible
Remarque : Vérifier la puissance du signal sur le moniteur ACL.
Consulter le tableau de référence ci-dessus.
RÉSOLUTION DE PROBLÈME :
Mode d’appariement
• Pendant que le moniteur est éteint, tenir le bouton d’alimentation
jusqu’à ce que le voyant clignote. Ensuite, pendant que la caméra est
éteinte, tenir le bouton d’alimentation du bloc-piles de la peluche
pendant environ 3 à 5 secondes. Une fois l’appariement réalisé, le
signal vidéo de la caméra sera affiché sur le moniteur. Le voyant
d’alimentation cessera de clignoter.
Aucun son ne sort du haut-parleur
• S’assurer que les deux unités sont allumées.
• Régler le volume à un niveau plus élevé.
Aucun signal vidéo
• Vérifier l’alimentation CC ou la pile de la caméra.
• S’assurer que la distance entre la caméra et le moniteur convient.
Éclairage infrarouge (IR)
• Dans le noir, les lumières infrarouges s’allument automatiquement,
mais elles ne servent pas d’éclairage.
14

RÉSOLUTION DE PROBLÈME (suite) :
Statique
• Le moniteur et la peluche sont trop près, les éloigner.
• Baisser le volume du moniteur.
• S’assurer que la pile est entièrement chargée.
Gigue sur le moniteur
• S’assurer que le moniteur et la caméra sont à bonne distance des
autres appareils sans fil (p. ex., Wi-Fi, Bluetooth, GPS, etc.).
Réception faible ou aucune réception
• S’assurer que les deux unités sont allumées.
• Rapprocher la peluche du moniteur.
• S’assurer que la pile du moniteur et celle de la peluche sont chargées.
Tentative d’appariement accidentelle alors que la caméra et le
moniteur sont allumés ou l'appareil photo n'est pas en charge
• Ouvrir le bloc-piles dans la peluche.
• Retirer la pile.
• Court-circuiter les broches externes des connecteurs de la pile à l’aide
d’une broche en métal.
• La caméra s’éteindra.
• Connecter un câble d’alimentation USB.
• Connecter le câble d’alimentation sur une prise de la maison ou dans
le chargeur de voiture et dans les prises respectives.
REMARQUE : S’assurer que les deux unités sont entièrement chargées
pour un rendement optimal.
Si des problèmes autres que ceux mentionnés dans le présent document surviennent,
ne pas retourner le produit au magasin, car une fois retourné, il ne peut plus être
revendu et les matériaux et l’énergie utilisés pour sa fabrication seront perdus. Notre
département de service à la clientèle peut avoir une solution simple pour le régler.
Communiquer avec le département de service à la clientèle par téléphone au
1 855 422-2983 entre 9 h et 16 h 30 (HNP) ou par courriel en tout temps à l’adresse
info@infanttech.com.
15

Politique relative à la garantie d’Infanttech Solutions, Inc.
Infanttech Solutions, Inc. s’engage à réparer ou remplacer sans frais une unité dans les
12 mois à partir de la date d’achat si l’unité est défectueuse à cause de la main-d’œuvre ou
des matériaux. Pour demander une réparation ou un remplacement, le produit doit être
retourné à Infanttech Solutions avec une copie du reçu d’achat original. En l’absence du
reçu, la garantie couvre les 12 mois à partir de la date de fabrication. Veuillez visiter le site
www.infanttech.com pour enregistrer le produit.
Annulation de la garantie
:
La présente garantie ne couvre pas l’usure normale ou les dommages causés par une
mauvaise utilisation, l’enlèvement ou la modification des numéros de série, l’abus, une
manipulation ou un rangement ne convenant pas, une mauvaise installation, un accident, une
réparation ou une modification non autorisée. Dans la mesure du possible, Infanttech peut
remplacer ou réparer l’unité moyennant certains frais.
For most recent manual visit www.infanttech.com
Para manual mas reciente visite www.infanttech.com
Pour manuel plus tard visite www.infanttech.com
Infant
t
ech Solutions, Inc.
515 W Whittier Blvd
Montebello, CA 90640
855-422-2983
© Infanttech Solutions, Inc. 2013
Veuillez conserver ces renseignements
aux fins de consultation ultérieure. La
couleur et le style peuvent varier.
FABRIQUÉ EN CHINE

MANUAL DE INSTRUCCIONES
MONITOR DE BEBÉS
AALLWWAAYYS
S
IINN VVIIEEW
W
™ PARA AUTOS
Gracias por su compra del monitor de bebés Always In View™ de Infanttech para autos.
Este monitor de características únicas permite que los padres puedan mejorar la seguridad
al conducir vehículos, dado que reduce la necesidad de voltearse para mirar hacia atrás
mientras se está al volante. Su monitor Always In View™ le permite estar atento a su bebé
mientras su bebé está sentado en una silla para bebés en el asiento trasero del vehículo,
con el bebé mirando hacia atrás. Además, su monitor Always In View™ también se puede
utilizar cuando el bebé ya empieza a caminar y se sienta mirando hacia adelante en la silla
para bebés en el asiento trasero. El monitor Always In View™ consta de una unidad de
video digital del conductor que se fija fácilmente al parabrisas de cualquier vehículo, de un
adaptador de recarga y de una cámara incorporada a un lindo peluche que se puede colocar
en diversos lugares del asiento trasero. Tanto la unidad del conductor como la cámara están
provistas de baterías recargables.
Tenga presente que el uso del monitor Always In View™ no sustituye la exigencia del
cumplimiento por parte del conductor de todas las leyes de tránsito y de las normas
de seguridad, y la aplicación de precauciones razonables de seguridad destinadas a
reducir al mnimo las distracciones al an
PRECAUCIÓN:
MANTENGA TODA PIEZA PEQUEÑA FUERA DEL ALCANCE DE LOS NIÑOS
[Modelos
1000
-
GM; 1000
- BP; 1000
- YG]
POR FAVOR, LEA CUIDADOSAMENTE LAS INSTRUCCIONES
Y ADVERTENCIAS A CONTINUACIÓN ANTES DE UTILIZAR
SU MONITOR DE BEBÉS ALWAYS IN VIEW™.
CONSERVE ESTE MANUAL DE INSTRUCCIONES PARA
CONSULTAS EN EL FUTURO.
Para recibir asistencia técnica, llame al teléfono [855-
422-2983] o escríbanos a
info@infanttech.com
.
Para usarse con bebés desde su nacimiento hasta que
empiecen a caminar.
ADVERTENCIA:
Un adulto debe instalar el monitor.
Sea cuidadoso al desempacar y ensamblar el producto.

ADVERTENCIA:
ESTE PRODUCTO NO SUSTITUYE LA SUPERVISIÓN Y LA
CONDUCCIÓN RESPONSABLES POR PARTE DE UN ADULTO
• Pruebe el monitor antes de utilizarlo por primera vez, y también
periódicamente y al cambiar de posición cualquiera de las unidades.
• Evite las distracciones al conducir. Antes de proceder a poner en marcha su
vehículo, asegúrese de haber ajustado todas las opciones de su vehículo,
como la posición de los asientos, de los espejos, el uso de los cinturones de
seguridad, la correcta posición de la cámara Always In View™ frente al bebé y
otros.
• Evite que el bebé se enrede en los cables: nunca deje cables a su alcance.
Nunca utilice cables de extensión con adaptadores de CA. Utilice
exclusivamente los adaptadores de CA suministrados.
• Cuando enchufe un adaptador de CA a un tomacorriente, nunca toque el
extremo que queda al descubierto.
• No utilice el monitor cerca del agua.
• Mantenga el monitor alejado de toda fuente de calor, y asegúrese de que
cuente con la ventilación adecuada.
• ESTE PRODUCTO NO ES UN JUGUETE. NO DEJE QUE NIÑOS JUEGUEN CON
ÉL. SU DISEÑO NO PREVÉ EL USO COMO JUGUETE.
ADVERTENCIA DE LA BATERÍA:
• Nunca mezcle baterías nuevas y viejas.
• Nunca mezcle baterías de distintos tipos (alcalinas, estándar y recargables).
• Cuando vaya a guardar el monitor durante un período prolongado de tiempo, y
también cuando las baterías estén descargadas, extraiga de las unidades las
baterías.
• Deseche las baterías adecuadamente.
• Utilice exclusivamente el paquete original de baterías recargables La garantía
quedará anulada si se utilizan otras baterías. Comuníquese con Infanttech
Solutions, Inc. cuando necesite baterías de reemplazo. La información de
contacto se puede encontrar al final del folleto de instrucciones.
PRECAUCIÓN:
MANTENGA TODA PIEZA PEQUEÑA FUERA DEL ALCANCE DE LOS NIÑOS
1

Información de la FCC estadounidense
Este dispositivo cumple con la Parte 15 de las reglas de la Comisión Federal de
Comunicaciones (FCC) estadounidense. Su operación está sujeta a las dos
condiciones indicadas a continuación: (1) Este dispositivo no debe causar
interferencias perjudiciales, y (2) este dispositivo debe aceptar toda interferencia que
reciba, incluyendo interferencias que pudieran causar su funcionamiento incorrecto.
PRECAUCIÓN: Todo cambio o modificación del equipo que no haya sido aprobado
previamente por Infanttech Solutions, Inc. podría anular la licencia que tiene el
usuario para operar este equipo.
NOTA: Este equipo fue sometido a pruebas y demostró que cumple con los límites
de los dispositivos digitales de la Clase A, establecidos en la Parte 15 de las reglas
de la FCC estadounidense. Dichos límites fueron diseñados a fin de suministrar una
protección razonable contra interferencias perjudiciales en entornos comerciales.
Este equipo genera, utiliza y puede irradiar potencia electromagnética de
frecuencias de radio, y si no se instala y utiliza en conformidad con las instrucciones
podría causar interferencias perjudiciales a las comunicaciones de radio. No
obstante, no hay ninguna garantía de que no se producirán interferencias en toda
instalación en particular. Si este equipo causa interferencias perjudiciales a la
recepción de radio (lo que se puede determinar al encender y apagar el equipo), el
usuario puede intentar corregir dichas interferencias mediante una o varias de las
siguientes medidas:
• Cambie la orientación o la posición de la antena receptora (unidad del
conductor).
• Aumente la separación entre el equipo y el receptor de radio afectado.
• Conecte el equipo a un tendido distinto al que utiliza el receptor de radio
afectado.
• Solicite asistencia al concesionario vendedor o un técnico experimentado de
radio y televisión.
NOTA: Utilice exclusivamente los paquetes originales de baterías recargables o
reemplazos aprobados. La garantía quedará anulada si se utilizan baterías distintas.
Comuníquese con Infanttech Solutions, Inc. cuando necesite baterías de reemplazo.
La información de contacto se puede encontrar en la página a continuación.
2

REFERENCIA RÁPIDA PARA LA OPERACIÓN DIARIA:
Después de la instalación original del equipo (vea las instrucciones más adelante),
siga estos sencillos pasos para obtener el desempeño óptimo de su monitor Always in View:
15. Asegúrese de que siempre se utilicen los amarres de seguridad del muñeco de
peluche, con las hebillas ajustadas de modo que el muñeco quede bien ajustado en
el apoyacabezas correspondiente.
16. Mantenga presionado durante 5 segundos el botón de encendido/apagado de la
unidad del conductor para encenderla.
17. Una vez que haya colocado al bebé en el asiento para bebés en el asiento trasero,
abra el cierre de cremallera y mantenga presionado el botón de encendido/apagado
de la cámara del peluche hasta que se encienda la luz verde. Cierre la cremallera.
18. La unidad del conductor debería mostrar ahora las imágenes de la cámara. Ajuste la
cámara del peluche para que muestre la vista deseada.
19. Al salir del vehículo, mantenga presionado durante 5 segundos el botón de
encendido/apagado de la unidad del conductor para apagarla. Al sacar del vehículo
al bebé, apague la cámara del peluche. Lo anterior asegurará una duración y un
desempeño óptimos de la carga de la batería.
20. Recuerde recargar la unidad del conductor y la cámara según sea necesario. Si su
vehículo cuenta con un encendedor de cigarrillos o con un tomacorriente, se puede
mantener la unidad del conductor permanentemente enchufada al suministro de
electricidad mediante el adaptador USB de dos puertos para autos, provisto con el
monitor. La cámara del peluche se puede recargar estando la cámara en el vehículo
cuando el bebé no se encuentre dentro del vehículo.
21. Cuando la unidad del conductor y la cámara estén totalmente cargadas, disfrute y
aproveche las ventajas del monitor Always in View.
3

CARACTERÍSTICAS, FUNCIONES Y
COMPONENTES:
Monitor (
Always
Monitor (
Indicador LED
de alimentación
soporte de monitor
Montaje de la succión de la
Copa en el soporte de monitor
vista frontal):
In View
Vista lateral):
Anti-reflejo
pantalla LED
control de volumen
Puerto de carga
Botón de encendido
4

CARACTERÍSTICAS, FUNCIONES Y
COMPONENTES (continuación):
Monitor (
Cámara Peluche (vista frontal)
Cámara montada en la nariz
para que pueda ver a su hijo
velcro y seguridad hebilla
de correas en las patas
para facilitar su montaje
Montaje de la succión de la
Copa en el soporte de monitor
soporte
para ranura
Vista posterior):
:
Tecnología Bendineck interna
para
capacidades de
visualización óptimas
soporte para
ranura
5

CARACTERÍSTICAS, FUNCIONES Y
COMPONENTES (continuación):
Cámara Peluche (Vista
Paquete de la batería dentro de la felpa
Indicador LED de
alimentación
Botón de encendido /
apagado Presione
abajo):
:
cremallera para acceder a
Puerto
de carga y paquete de batería
Puerto de carga USB
6

ACCESORIOS
:
Cargador para auto,
de 2 puertos USB (1) Adaptador de CA (1)
Cable USB de 3 pies (0,9 m) Y Base con ventosa para la
TAMBIÉN cable USB de 7 pies unidad del conductor (1)
(2,1 m) (1 de cada uno)
NOTA: El diseño de su equipo podría ser distinto del
mostrado aquí
Contenido
1- Peluche con cámara
1- Batería de iones de litio de 1000 mAh (dentro del peluche)
1- Unidad del conductor con pantalla LCD de 3.5”
1- Soporte para monitor con base de ventosa
1- Cable USB de recarga de la batería del peluche
1- Cable USB de recarga de la unidad del conductor
1- Adaptador USB de 2 puertos para auto
1- Adaptador USB de CA (para tomacorrientes)
1- Manual de instrucciones
7

CONFIGURACIÓN Y USO
Unidad del conductor
(recárguela durante 24 horas antes de
utilizarla por primera vez):
Paso 1:
Fije el soporte de montaje a la parte trasera de la unidad del conductor.
Paso 2:
Fije la unidad del conductor al parabrisas del auto en un lugar en el que
afecte la visibilidad
. Recomendamos que la fije a la esquina izquierda del
parabrisas (del lado del conductor). (Coloque la unidad sólo en lugares
permitidos por las leyes, en
los que no afecte la visibilidad).
Soporte de montaje
:
Parte posterior del monitor;
Ranura para soporte
no
8

CONFIGURACIÓN Y USO (continuación):
Paso 3:
Presione durante 5 segundos el botón de encendido/apagado de la unidad
del conductor para encenderla.
Paso 4:
Abra la cremallera del peluche y presione durante 5 segundos el botón de
encendido/apagado de la cámara para encenderla. Cierre la cremallera.
Paso 5:
La unidad del conductor y la cámara se interconectarán automáticamente
después de que ambas estén encendidas. La pantalla LCD de la unidad del
conductor mostrará la intensidad de la señal y el estado de la batería. La pantalla
también mostrará simultáneam
ente las imágenes de la cámara.
Botón de encendido
/ apagado Presione
9

CONFIGURACIÓN Y USO (continuación):
CONFIGURACIÓN CON EL BEBÉ MIRANDO
HACIA ATRÁS
Cámara en el peluche
: En el caso de configuración para
bebés en asientos
orientados hacia atrás
24 horas antes de utilizarla por primera vez):
Paso 6:
Rodee con los brazos del peluche el apoyacabezas del asiento en el que
se encuentra el asiento para bebés y una los brazos en las palmas con la tira de
Velcro. Fije los amarres p
lásticos de hebilla y jale los amarres para que el peluche
quede bien ajustado a los postes del apoyacabezas.
de hebilla a fin de asegurarse de que la cámara permanezca en su lugar.
Debido a diferencias en la separación d
podría no ser posible utilizar la tira de Velcro. Los amarres de hebilla siempre deben
poder fijarse al peluche.
Paso 7:
Flexione el cuello del peluche a fin de ajustar la posición de la cabeza y
lograr una vista óptima.
(recárguela durante
Utilice siempre los amarres
Nota
e los postes de los distintos apoyacabezas,
10
:

CONFIGURACIÓN Y USO (continuación):
Paso 8:
Antes de proceder a conducir el vehículo, asegúrese de haber ajustado
todas las opciones de su vehículo, como la posición de los asientos, espejos, los
cinturones de seguridad y la correcta posición de la cámara del peluche frente al
bebé.
Paso 9:
Conduzca con seguridad y dé miradas breves a la pantalla para tener la
confianza de que su bebé siempre estará a la vista. Si observa en el monitor algo
que usted deba atender respecto a su bebé, siga cumpliendo las prácticas de
manejo seguro y pro
ceda a salir del camino con calma y tranquilidad.
11

CONFIGURACIÓN Y USO (continuación):
CONFIGURACIÓN CON EL BEBÉ MIRANDO
HACIA ADELANTE
Cámara en el peluche
: en el caso de configuración para
bebés en asientos
orientados hacia adelante
durante 24 horas antes de utilizarla por primera vez):
Vea los pasos del 1 al 5 arriba.
Paso 6:
Rodee con los brazos del peluche el apoyacabezas del asiento del
pasajero delantero (frente al asiento del bebe), y una los brazos en las palmas con
la cinta de Velcro. . Fije los amarres plásticos de hebilla y jale los amarres para que
el peluche quede
bien ajustado a los postes del apoyacabezas.
amarres de hebilla a fin de asegurarse de que la cámara permanezca en su
lugar. Nota
: Debido a diferencias en la separación de los postes de los distintos
apoyacabezas, podría no ser posible
siempre deben poder fijarse al peluche.
(recárguela
Utilice siempre los
utilizar la tira de Velcro. Los amarres de hebilla
12

CONFIGURACIÓN Y USO (continuación):
Paso 7:
Flexione el cuello del peluche a fin de ajustar la posición de la cabeza y
lograr una vista óptima.
Paso 8:
Antes de proceder a conducir el vehículo, asegúrese de haber ajustado
todas las opciones de su vehículo, como la posición de los asi
cinturones de seguridad y la correcta posición de la cámara del peluche frente al
bebé.
Vea el paso 9 en la página 11 arriba.
entos, espejos, los
13

RECARGA DE LA BATERÍA
Unidad del conductor
Conecte el adaptador USB a la unidad del conductor; la luz se encenderá de
color rojo. Una vez finalizada la recarga, la luz se encenderá de color verde.
La pantalla de la unidad del conductor muestra el nivel de carga de la batería.
Cámara
Conecte el adaptador USB a la cámara; la luz se encenderá de color rojo.
Una vez finalizada la recarga la luz se apagará.
Indicadores
Indicadores de la potencia
de la señal
Descripción
Señal fuerte
Señal moderada
Señal débil
Nota: Determine la potencia de la señal en la pantalla LCD Utilice como
referencia la tabla anterior.
SOLUCIÓN DE PROBLEMAS:
Interconexión de las unidades
• Estando apagada la unidad del conductor, mantenga presionado el
botón de encendido/apagado hasta que destelle la luz. Después,
estando apagada la cámara, mantenga presionado el botón de
encendido/apagado del paquete de baterías del peluche durante un
lapso de 3 a 5 segundos. Una vez que las unidades se hayan
interconectado podrá ver las imágenes de la cámara en la unidad del
conductor. La luz de encendido/apagado dejará de destellar.
14

SOLUCIÓN DE PROBLEMAS (continuación):
No se escucha sonido en el altavoz
• Asegúrese de que ambas unidades estén encendidas.
• Suba el volumen.
No se ve la imagen de video en la pantalla
• Inspeccione la alimentación de electricidad de CC o de la batería a la
cámara.
• Compruebe que la cámara y el monitor estén dentro del alcance eficaz
del equipo.
Iluminación infrarroja (IR)
• En la oscuridad, las luces IR se activan automáticamente, pero estas
luces no generan una luz visible.
Estática ("ruido")
• La unidad del conductor y el peluche están demasiado cerca, aléjelos.
• Baje el volumen en la unidad del conductor.
• Compruebe que la batería esté totalmente cargada.
Parpadeo de la pantalla
• Asegúrese de que la unidad del conductor y la cámara estén alejados
de otros dispositivos inalámbricos (p.ej., Wi-Fi, Bluetooth, GPS, etc.).
Recepción débil o ausencia de recepción
• Asegúrese de que ambas unidades estén encendidas.
• Acerque el peluche a la unidad del conductor.
• Compruebe que las baterías de la unidad del conductor y del peluche
estén bien cargadas.
15

SOLUCIÓN DE PROBLEMAS (continuación):
Intento accidental de interconectar la cámara y la unidad del
conductor estando encendida la cámara o la cámara no se
carga
• Abra el paquete de baterías en el peluche.
• Retire la batería
• Con un alambre (por ejemplo, un sujetapapeles), ponga en
cortocircuito las clavijas exteriores de los conectores de la batería.
• La cámara se apagará.
• Conecte el cable USB.
• Conecte el cable de alimentación de electricidad al cargador de casa o
de auto, y conéctelo al tomacorriente o al encendedor.
NOTA: Para un óptimo desempeño, asegúrese de que ambas unidades
estén totalmente cargadas.
Si se le presenta un problema que no esté previsto en este manual, no devuelva el
producto a la tienda, dado que no se pueden revender productos que hayan sido
devueltos, y se desperdician los materiales y la energía que se utilizó en su
fabricación. Nuestro Departamento de Servicio al Cliente podría tener una solución
sencilla para el problema. Comuníquese con nuestro Departamento de Servicio al
Cliente al teléfono 1-855-422-2983 en el horario entre las 9:00 a.m. y las 4:30 p.m. (hora
de la costa este de USA), o por correo electrónico las 24 horas del día a la dirección
info@infanttech.com.
16

Política de garantía de Infanttech Solutions, Inc.
Infanttech Solutions, Inc reparará o reemplazará su equipo sin costo durante 12 meses a
partir de la fecha de compra si presenta defectos de mano de obra o materiales. Para
presentar solicitudes de reparación/reemplazo, se debe enviar de vuelta el producto a
Infanttech Solutions junto con una copia del recibo original de compra. Si no se cuenta con el
recibo de compra, la garantía será de 12 meses a partir de la fecha de fabricación. Visite
www.infanttech.com para hacer el registro de su producto.
Anulación de la garantía
:
esta garantía no será válida respecto a daños asociados al desgaste normal ni respecto a
daños por mal uso, abuso, almacenamiento y/o manipulación inadecuados, mala instalación,
reparaciones y modificaciones no autorizadas y cuando se hayan retirado o alterado los
números de serie. De ser posible, Infanttech reemplazará o reparará el equipo y cobrará un
cargo por el trabajo.
For most recent manual visit www.infanttech.com
Para manual mas reciente visite www.infanttech.com
Pour manuel plus tard visite www.infanttech.com
Infant
t
ech Solutions, Inc.
515 W Whittier Blvd
Montebello, CA 90640
855-422-2983
© 2013 Infanttech Solutions, Inc.
Conserve esta información para
consultas en el futuro. El color y el
diseño podrían variar.
HECHO EN CHINA
 Loading...