

Page 1
iNetVu® Man Pack – 80cm/100cm User Manual
The iNetVu® brand and logo are registered trademarks of C-COM Satellite Systems, Inc.
© Copyright 2017 C-COM Satellite Systems, Inc.
1-877-iNetVu6
www.c-comsat.com
Revision 3.0
November 3, 2017
Page 2

C-COM Satellite Systems Inc. Page 2 of 22
iNetVu
®
MP-80cm/100cm User Manual
This page is intentionally left blank.
Page 3
C-COM Satellite Systems Inc. Page 3 of 22
iNetVu
®
MP-80cm/100cm User Manual
Copyright © 2017. All rights reserved. C-COM Satellite Systems Inc.
This document contains information, which is protected by copyright. All rights reserved. Reproduction,
adaptation, or translation without prior written permission is prohibited, except as followed under the
copyright laws.
Both the iNetVu® and C-COM names and logos are registered trademarks of C-COM Satellite Systems Inc.
All other product names mentioned in this manual may be trademarks or registered trademarks of their
respective companies and are the sole property of their respective manufacturers.
Proprietary Notice: This document contains information that is proprietary and confidential to CCOM Satellite Systems, Inc., and is intended for internal and or C-COM Satellite Systems Inc.
authorized partners use only. No part of this document may be copied or reproduced in any way,
without prior written permission of C-COM Satellite Systems, Inc.
Page 4

C-COM Satellite Systems Inc. Page 4 of 22
iNetVu
®
MP-80cm/100cm User Manual
Table of Contents
1. Introduction .............................................................................................................................5
1.1 About This Manual ........................................................................................................................ 5
1.2 System Overview........................................................................................................................... 5
2. Clearance Requirement .........................................................................................................7
2.1 Not Available at this time .............................................................................................................. 7
3. Assembly and Disassembly ..................................................................................................8
3.1 Assembly Procedure .................................................................................................................. 8
3.2 Disassembly Procedure .......................................................................................................... 14
4. Pointing Antenna .................................................................................................................. 21
Page 5

C-COM Satellite Systems Inc. Page 5 of 22
iNetVu
®
MP-80cm/100cm User Manual
1. Introduction
1.1 About This Manual
The iNetVu® MP- 80/100 (Manpack) Manual Pointing System Installation and Operation are
described in this manual. An electronic version of this manual is included on the iNetVu® flash
drive that came with your system.
1.2 System Overview
This light weight mutli-segment carbon fiber Manpack is easy to assemble and point on satellite
within minutes. The Manpack systems are complimented by the addition of the SatAssist 1000
pointing tool. Operations with the SatAssist 1000 allows the fine tuning on Azimuth, Elevation
and Polarization axis in a fast and accurate satellite acquisition time. A magnetic compass and a
mechanical inclinometer may be used instead of the SatAssist 1000 pointing tool.
Fig. 1: iNetVu
®
Manpack Antenna
Ensure to use ballasts or anchors to weigh down the
antenna, failing to do so may result in equipment
damage.
Page 6
C-COM Satellite Systems Inc. Page 6 of 22
iNetVu
®
MP-80cm/100cm User Manual
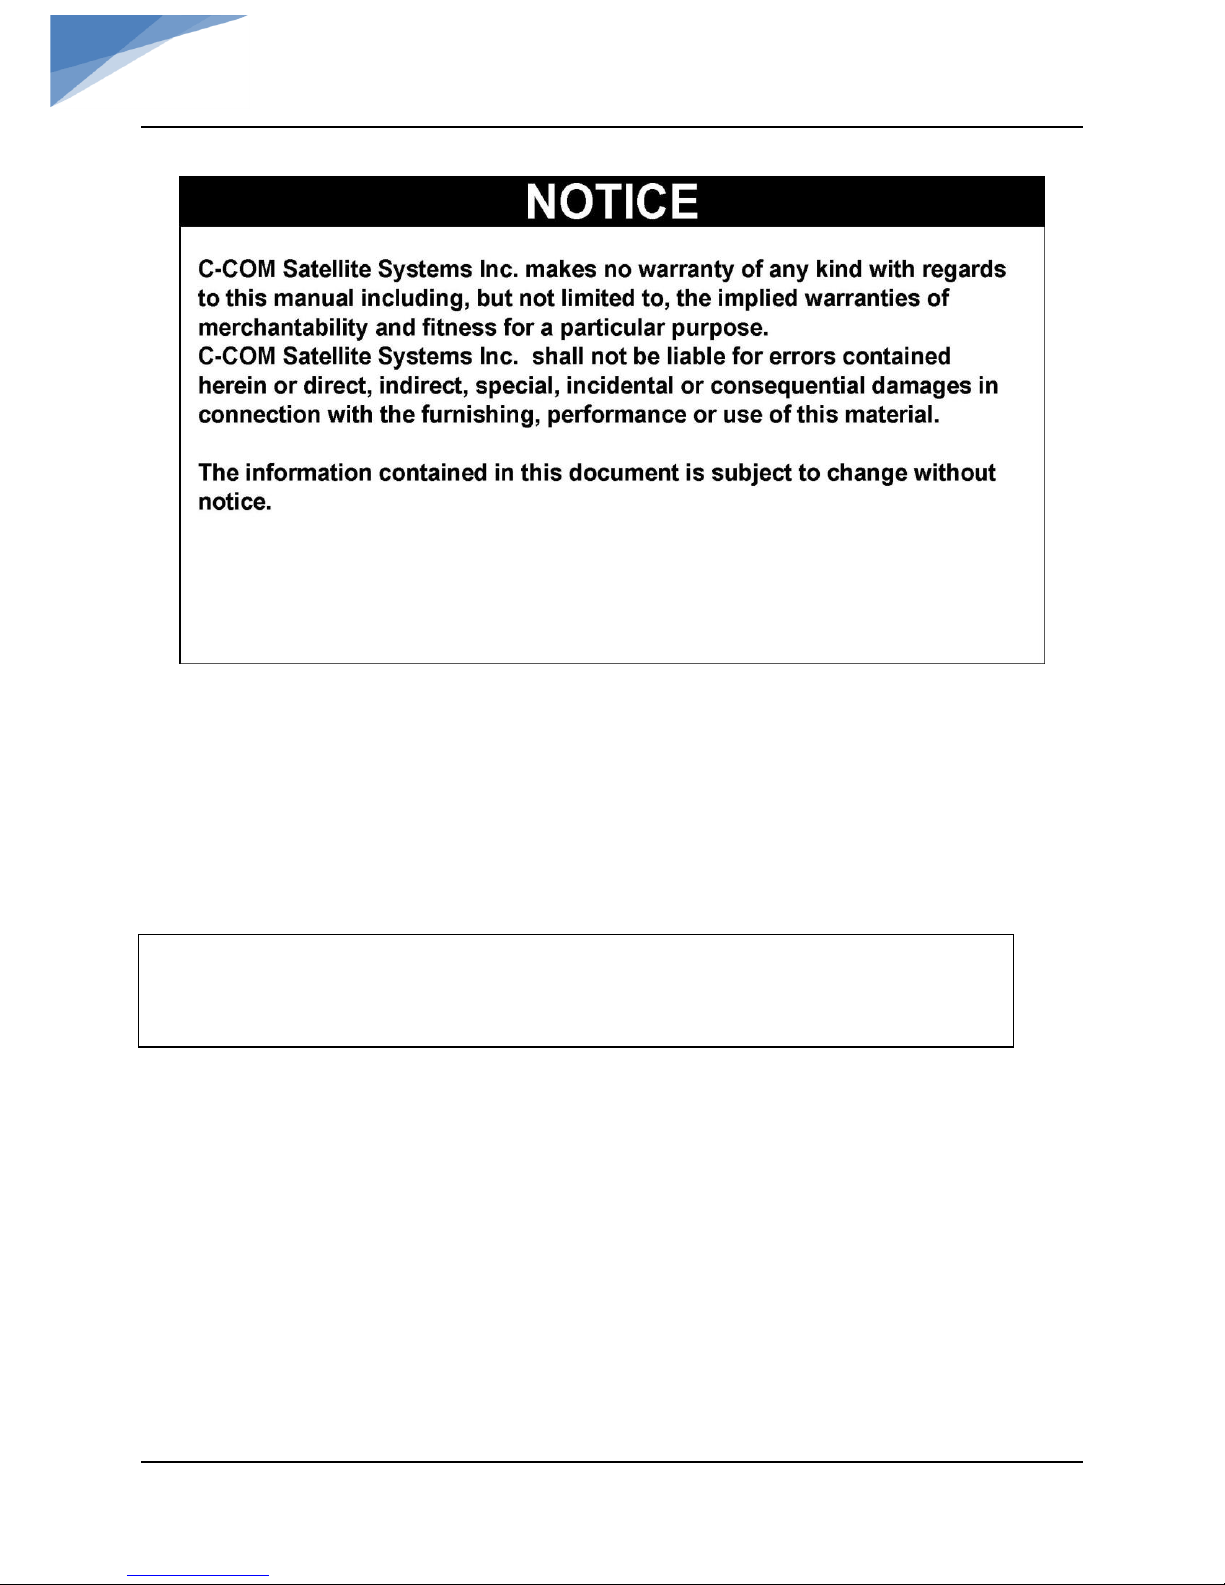
Physical Outline
Fig. 2: iNetVu
®
MP-80/100 Front View
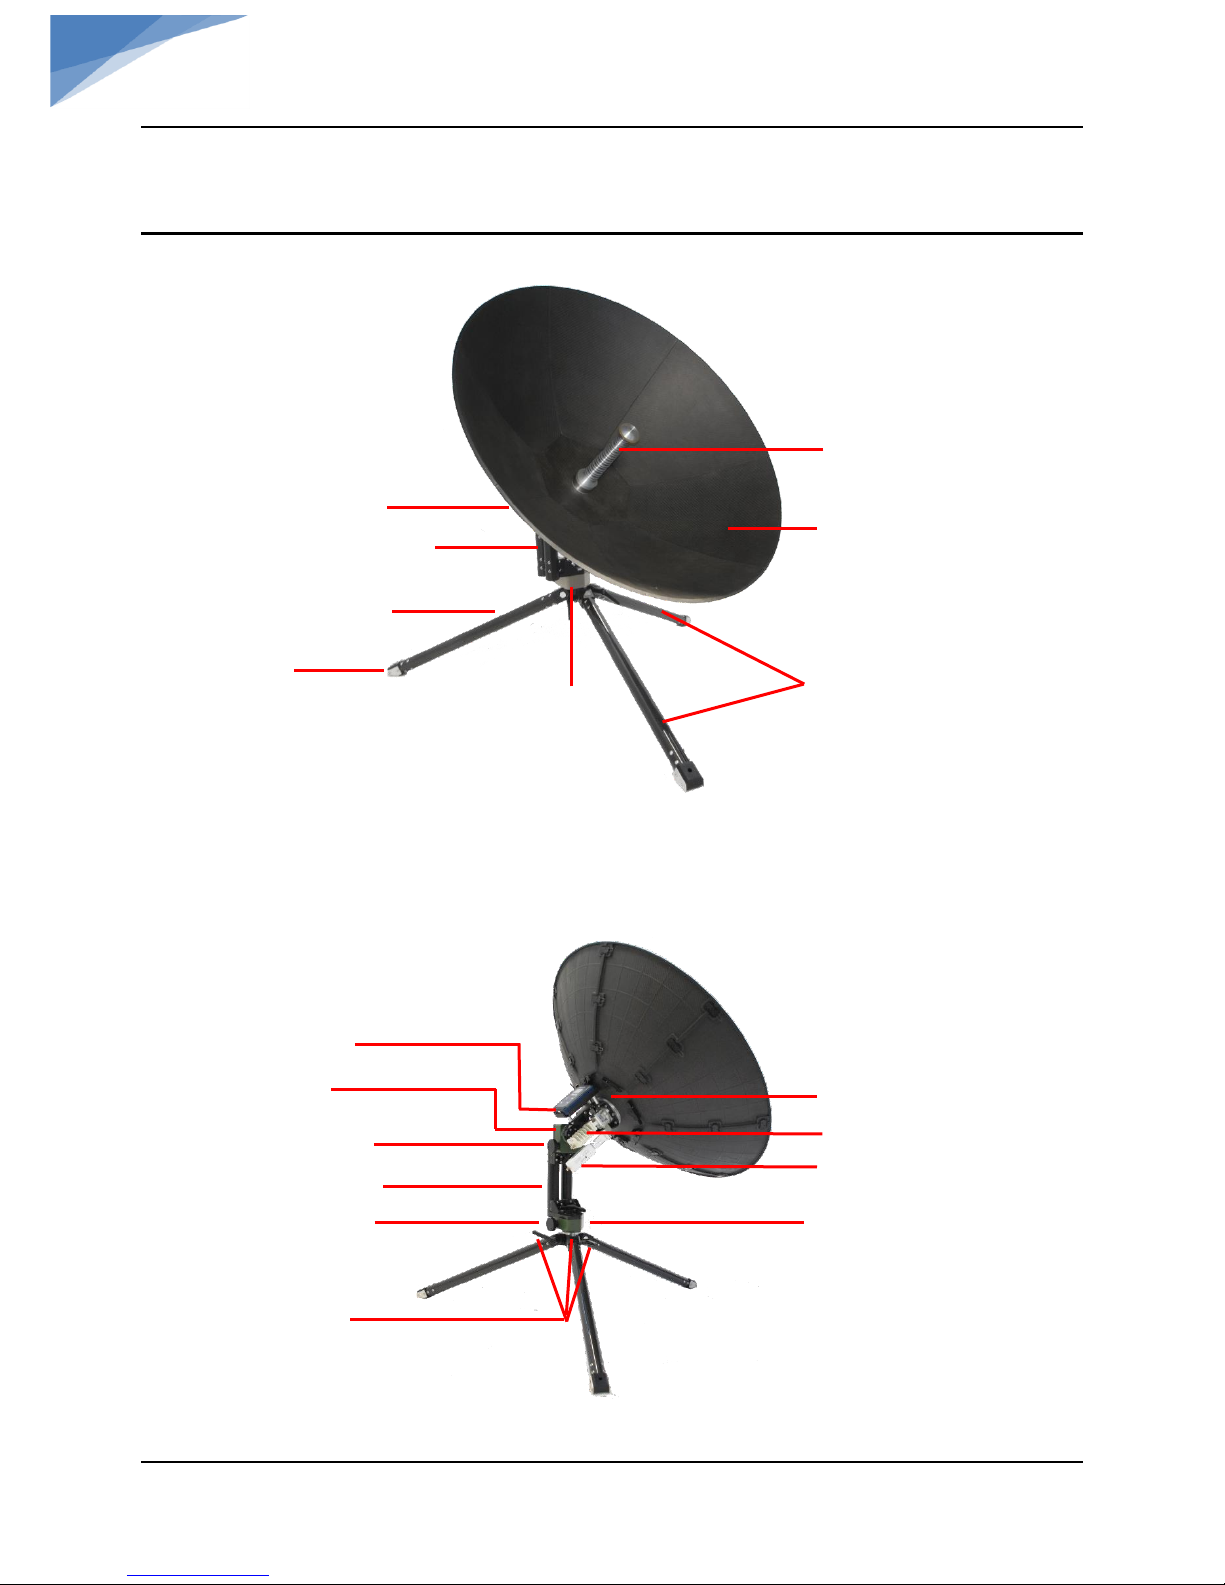
Fig. 3: iNetVu
®
MP-80/100 Back View
Center Feed
Tripod Legs
Reflector
Elevation Gearbox
Elevation Adjustment Handle
Azimuth Adjustment Handle
Tripod Leg
Azimuth Gearbox
Center Section
Center Hub
LNB
Tripod Foot
EL Center Section
AZ Gearbox
BUC
LNB
SatAssist Bracket
Tripod Locking Levers
Page 7

C-COM Satellite Systems Inc. Page 7 of 22
iNetVu
®
MP-80cm/100cm User Manual
2. Clearance Requirement
2.1 Not Available at this time
Page 8

C-COM Satellite Systems Inc. Page 8 of 22
iNetVu
®
MP-80cm/100cm User Manual
3. Assembly and Disassembly
The assembly and disassembly of the MP-80 and MP-100 are identical. The only difference is the
MP-100 reflector consists of 7 carbon Fiber sections instead of 5.
3.1 Assembly Procedure
1) Set case down flat and open.
Fig. 4: Manpack Antenna case
Page 9

C-COM Satellite Systems Inc. Page 9 of 22
iNetVu
®
MP-80cm/100cm User Manual
2) Remove tripod legs and expand out to maximum distance until they are up against the
stops, tighten the handles securing the tripod legs.
3) Remove Center Section assembly from case. Loosen 2 locking levers on the tripod base, Line
up the 2 tubes from Center Section onto the tripod and lock using the two levers.
Locking Levers
Locking Levers
Page 10

C-COM Satellite Systems Inc. Page 10 of 22
iNetVu
®
MP-80cm/100cm User Manual
4) Rotate elevation arm until the teeth are pointing up or as shown.
5) Install Center Hub and lock into place using the Lock Levers.
6) Release/open reflector levers on the Center Hub.
Page 11

C-COM Satellite Systems Inc. Page 11 of 22
iNetVu
®
MP-80cm/100cm User Manual
7) Install reflector segments. Do not latch the reflector clips until all segments have been
installed. Before installing segments, you may want to rotate the elevation arm up.
8) Some wiggling maybe required for the last reflector segment to fit in place. Lock all levers
on Center Hub.
Page 12

C-COM Satellite Systems Inc. Page 12 of 22
iNetVu
®
MP-80cm/100cm User Manual
9) Lock the clip latches, securing two segments at a time, starting from center and working
outwards. The 80cm will have 2 clips while the 100cm will have 3 clips per segment. Support
reflector segments with other hand from top center pressing down.
10) Connect Center Feed. Turn Center Feed until it drops into position, then turn CW ¼ turn
until it locks.
Page 13

C-COM Satellite Systems Inc. Page 13 of 22
iNetVu
®
MP-80cm/100cm User Manual
11) Remove SatAssist 1000 from case, power on and place in bracket. Set Satellite Longitude
you wish to lock on. Refer to SatAssist 1000 Manual for operational use.
12) Connect RX and TX cables on Antenna.
Page 14

C-COM Satellite Systems Inc. Page 14 of 22
iNetVu
®
MP-80cm/100cm User Manual
3.2 Disassembly Procedure
1) Disconnect RX and TX cables.
2) Remove SatAssist 1000 and place in case.
3) Remove Center Feed, turn Counter Clockwise ¼ turn and lift. Place in case.
4) Un-clip the reflector segments that are orientated at the top of the dish.
Page 15

C-COM Satellite Systems Inc. Page 15 of 22
iNetVu
®
MP-80cm/100cm User Manual
5) Release top lock levers on Center Hub.
6) Lightly wiggle the center segment that was un-clipped so it separates from the rest. Once
one is removed, the rest will easily come apart.
Page 16

C-COM Satellite Systems Inc. Page 16 of 22
iNetVu
®
MP-80cm/100cm User Manual
7) Place reflector segments in the case.
8) Release bottom lock levers and remove remaining reflector segments one by one. Place
segments in the case.
Page 17

C-COM Satellite Systems Inc. Page 17 of 22
iNetVu
®
MP-80cm/100cm User Manual
9) Fold levers inward on Center Hub.
10) Release 3 locking levers on Center Hub and remove in the direction of arrows. Place Center
Hub in the case.
Page 18

C-COM Satellite Systems Inc. Page 18 of 22
iNetVu
®
MP-80cm/100cm User Manual
11) Rotate Elevation Arm so it is in full stow position, Elevation Arm should point down to
tripod.
12) Release Lock Levers on Elevation Arm Center Section and remove.
Page 19

C-COM Satellite Systems Inc. Page 19 of 22
iNetVu
®
MP-80cm/100cm User Manual
13) Place Elevation Arm Center Section in the case.
14) Release Tripod Lock Levers and fold legs.
15) Place Tripod in the case.
Page 20

C-COM Satellite Systems Inc. Page 20 of 22
iNetVu
®
MP-80cm/100cm User Manual
16) Place SatAssist 1000 in the case if not already packed.
17) Close the case and fasten zipper. Man-Pack is now ready for travel.
Page 21

C-COM Satellite Systems Inc. Page 21 of 22
iNetVu
®
MP-80cm/100cm User Manual
4. Pointing Antenna
The iNetVu® SatAssist 1000 Hand-Held is shipped with the iNetVu® MP-80 or MP-100 Manpack
Antennas. Refer to SatAssit 1000 User Manual. As an alternative to the SatAssist 1000 pointing
tool, a magnetic compass and mechanical inclinometer can be used also.
1. Power up SatAssit 1000. Configure unit for the desired Satellite and place in the bracket.
Refer to SatAssit 1000 User Manual for information on how to configure and operate.
2. Wait for GPS signal to be valid before beginning the pointing operation.
Page 22

C-COM Satellite Systems Inc. Page 22 of 22
iNetVu
®
MP-80cm/100cm User Manual
3. Navigate to the Auto screen, the EL and AZ angles/distances that the unit must travel in
order to lock on satellite are displayed.
a. The AZ angle movement will be in the direction the arrow indication is on the LCD,
move until the angle reading is zero (0).
b. The EL angle movement will be in the direction the arrow indication is on the LCD,
move until the angle reading is zero (0).
4. Set/rotate the Polarization to the angle (SK) target angle as indicated on the Sat
selection screen.
5. Calibrate the compass if you are unable to lock on signal using the Auto screen.
 Loading...