

Page 1

© 2015 Inepro B.V. All rights reserved
User Manual | PosPRO
PosPRO
Product Version: 7.4
Version of this manual: 7.5.6
Page 2

Page 3

PosPRO
Thank you for choosing PosPRO as your cash register. We are convinced that you will
be satisfied with the purchase of one of the best financial-management solutions of
today.
We are more than willing to help you to reach the best results possible with your
PosPRO application en to use it safely. This manual contains the information to achieve
that goal; please read it through carefully. Because of the constant changes in our
products this manual is subject to unspecified changes.
We strongly recommend to peruse the user licence agreement so you will completely
understand what it will support and what your responsibilities are as a owner.
Your Inepro dealer is keen to keep you satisfied, answer all your questions and take
away any concerns you might have.
We wish you the very best,
Inepro BV.
The most versatile Cash register solution
Page 4

All rights reserved. No parts of this work may be reproduced in any form or by any means - graphic, electronic, or mechanical,
including photocopying, recording, taping, or information storage and retrieval systems - without the written permission of the
publisher.
Products that are referred to in this document may be either trademarks and/or registered trademarks of the respective owners. The
publisher and the author make no claim to these trademarks.
While every precaution has been taken in the preparation of this document, the publisher and the author assume no responsibility for
errors or omissions, or for damages resulting from the use of information contained in this document or from the use of programs and
source code that may accompany it. In no event shall the publisher and the author be liable for any loss of profit or any other
commercial damage caused or alleged to have been caused directly or indirectly by this document.
Version 7.5.6 created: september 2015 in Nieuw-Vennep.
Publisher
Managing Editor
Technical Editors
Cover Design
Inepro B.V.
K. de Graaf
R. Groen
K. de Graaf
Production
Inepro B.V.
Team Coordinator
R. Groen
H. Wagenaar
K. de Graaf
PosPRO
A. Polderman
Page 5

Version 7.5.6 Inepro B.V. http://www.inepro.com
Table of Content
Introduction
2
........................................................................................................................................................ 2
1
Software Requirements
........................................................................................................................................................ 4
2
Overview
Setup
6
........................................................................................................................................................ 6
1
Hardware installation
........................................................................................................................................................ 11
2
Software installation
Configuration
24
........................................................................................................................................................ 24
1
ELO Display
........................................................................................................................................................ 28
2
OPOS
........................................................................................................................................................ 31
3
Configure IBOS - CashPRO
....................................................................................................................................................................................................... 38Receipt Layout
........................................................................................................................................................ 42
4
PosPRO.ini
User Interface
50
........................................................................................................................................................ 50
1
Log In
........................................................................................................................................................ 52
2
Sales
........................................................................................................................................................ 58
3
End Of Day
........................................................................................................................................................ 59
4
PosPRO Manager
....................................................................................................................................................................................................... 60Reports
....................................................................................................................................................................................................... 67EFT Terminal
....................................................................................................................................................................................................... 68Cash Count
....................................................................................................................................................................................................... 69Configuration
....................................................................................................................................................................................................... 71Maintenance
....................................................................................................................................................................................................... 72Initial Load
........................................................................................................................................................ 72
5
Pause
........................................................................................................................................................ 73
6
Log Off
........................................................................................................................................................ 74
7
Close
Usage
76
IBOM - CashPRO
80
........................................................................................................................................................ 80
1
Start Inepro Back Office Manager
........................................................................................................................................................ 81
2
Reports
........................................................................................................................................................ 82
3
Device Log
........................................................................................................................................................ 82
4
User Log
Solving challenges
84
Notes
86
End User Licence Agreement I
Page 6

Page 7

Introduction
Part
I
Page 8

2 - PosPRO
Introduction
Introduction
We would like to express our thanks for purchasing the PosPRO till.
The first part of this manual will lead the reader through the installation and setup of our software.
After which the different modules will be introduced and all the options explained.
When making a call to our helpdesk, please have the following at hand:
· The version number of the PosPRO software
· The version of this manual
· The exact steps taken to execute the task at hand
· The messages the system might have displayed
· The log and *.ini files of the PosPRO till
Please take in account that when our support desk is contacted, the caller might be asked to;
§
Execute actions on one of the terminals
§
Provide the log files (this is the content of the PosPRO log directory, by default 'C:\Inepro\Log\')
§
Provide the *.ini files (this is the content of the PosPRO INI directory, by default 'C:\Inepro\INI\')
Software Requirements
With the installation of PosPRO a number of software components are needed. Here a list will be
found with components needed to run our PosPRO software.
Windows Installer
The Windows Installer is an engine that is used to install, remove or repair software on Windows
operating systems. Previously the name of Windows Installer was Microsoft Installer. Windows
Installer files often have the extension .msi.
Version 4.5 is needed for the installation of PosPRO.
Page 9
Version 7.5.6 - 3
Software Requirements
.NET Framework
The .NET Framework is a software component that can be added to the Microsoft Windows
operating system. It provides a great number of pre-defined code solutions for general application
demands, and manages the execution of programs that especially written for framework. The .NET
Framework is an important Microsoft component, and the intension is that most applications that
are developed for the Windows platform will use it.
Version 2.0 or higher is needed for the installation of PosPRO.
Windows PowerShell
Windows PowerShell™ is a new task-based command-line shell and scripting language designed
especially for system administration. Built on the Microsoft .NET Framework, Windows PowerShell
helps IT professionals and power users control and automate the administration of the Windows
operating system and applications that run on Windows.
Version 1.0 or higher is needed for the installation of SQL Express 2008.
SQL Server Express 2008 or higher
Microsoft SQL Server is a relational database management system, produced by Microsoft. It
supports a dialect of SQL, the most frequently used database language. It is generally used by
organisations for small to medium databases.
We supply SQL Express 2008 to enable our system to store it's information in a MS SQL database.
SQL Server Express 2008 Manager
Microsoft SQL Server Management Studio Express (SSMSE) is a free, easy to use, graphical
management tool to manage SQL Server 2008 Express Edition.
The databases can be edited and look at the table information. They can also be seen which
database instances are being used.
PosPRO
PosPRO is our digital till application itself, a software package that provides a till that seamlessly
connects with the hardware like the printer, cash drawer and line display.
Page 10
4 - PosPRO
Introduction
OPOS Drivers
The OPOS drivers are the hardware drivers that drive the printer, cash drawer and line display. A
management tool is supplied that enables the user to manage the configuration of all the connected
devices in 1 window
Overview
Page 11

Setup
Part
II
Page 12

6 - PosPRO
Setup
Setup
In this chapter an instruction on how the hard- and software should be installed can be found. Then
the software configuration of the software will be treated
Hardware installation
Introduction
Inepro uses the AerPOS model till.
The AerPOS is a beautiful POS terminal with an ultra slim display, sleek chassis and small footprint
design. The AerPOS looks elegant, yet it can endure the toughest retail and hospitality applications
with its no venting design and aluminum chassis.
Page 13
Version 7.5.6 - 7
Hardware installation
Buttons & connections
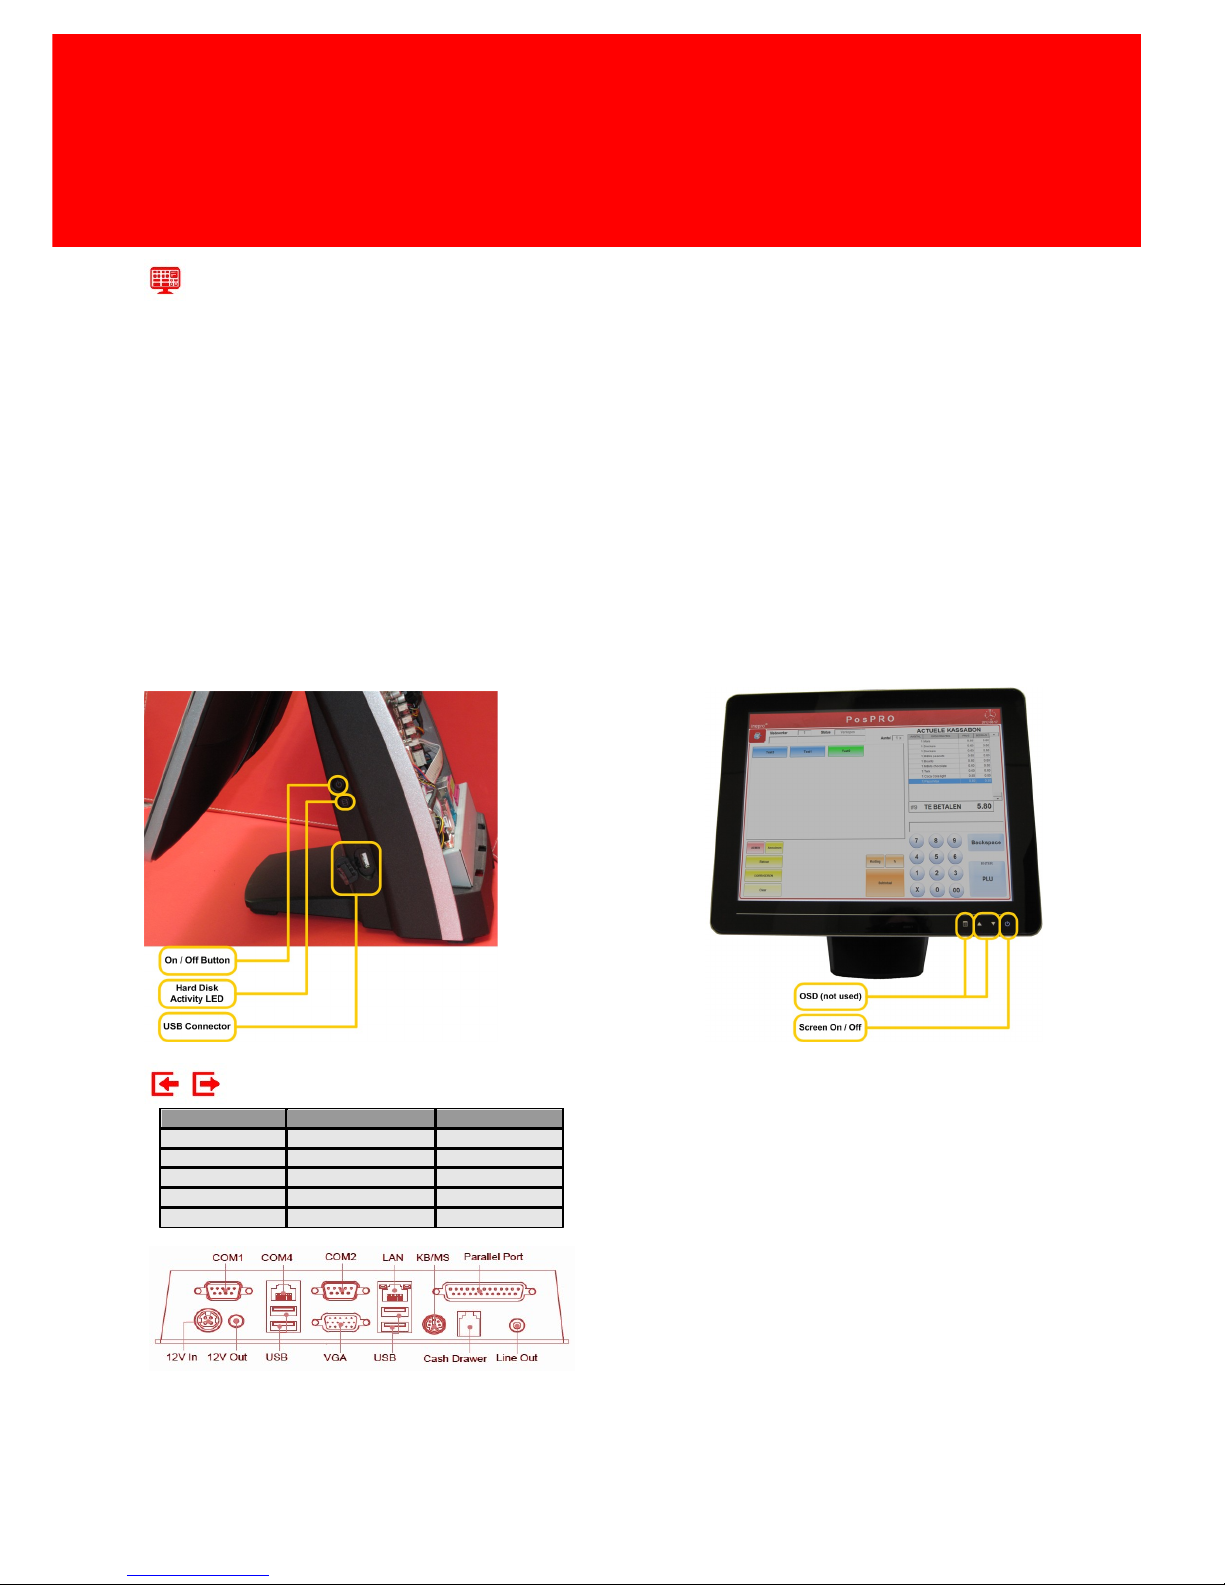
The last cash register had one on / off button used to power off (or power on) the machine. This
cash register has two on / off buttons. It also has a USB connector on the right side so the USB
extension cable is no longer needed.
Turn cash register on / off
On the right side of the cash register the on / off button, hard disk activity LED and USB connector
can be found.
Use this button to turn off the machine when asked by the Inepro support team. Normally the cash
registers will remain powered on to provide Inepro to service the machine out of operating hours.
Turn screen on / off
If the screen must be be turn off, use the on / off button on the front of the screen. This can be
used to save power and to indicate that the cash register is no longer in service at this time.
I/O Interface
Interface used
Default
Alternative
COM 1
PayCon or Xenta
Xenta
COM 2
Printer
PayCon
COM 4
<Not Used>
Printer
LAN
LAN
LAN
12V In
Power
Power
By default the cash register will have either
a PayCon or an EFT Terminal connected to
provide EFT payments, but alternatively
they can both be connected.
In that last case the PayCon will be used to
identify the customer (and optionally it's
online account), but the EFT Terminal can
still be used for EFT payments.
Page 14
8 - PosPRO
Setup
Dimensions
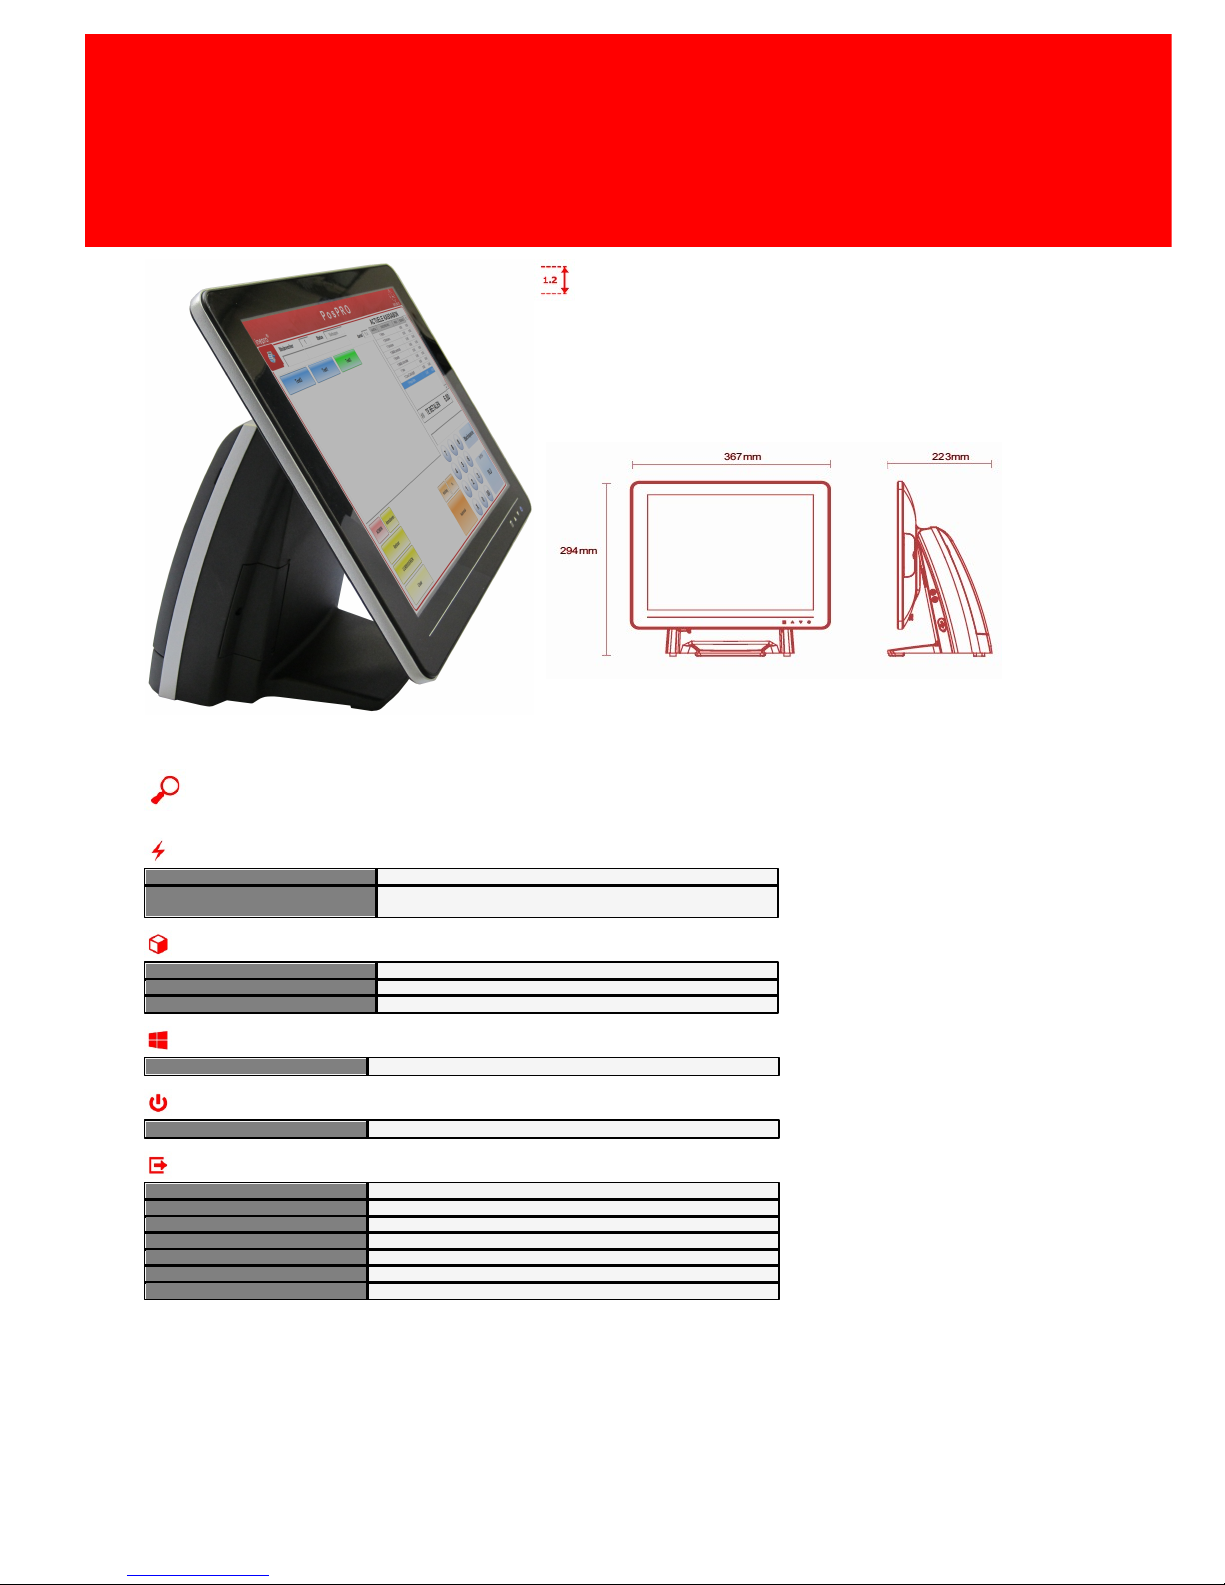
The AerPOS is 294 mm high, 367 mm width
and 223 mm deep.
Specifications
Power
Power Supply
220V
Power Consumption DC
12V DC: At maximum (depending on the configuration)
7.5 A, 90 Watt
Housing
Material
Aluminium Die Casting / Plastic / Glass
Colour
Black with silver trim
Dimensions
367 x 294 x 223 mm.
OS
Windows
POSReady 7
Graphics
Graphics Chip
Intel GMA 3150
Outputs
Serial port
3x COM1, COM2 (DB9), COM4 (RJ-45)
Audio Port
Line Out
USB Port
5x External (4x rear, 1 side)
Cash Drawer Port
1x RJ-45 12 Volt
Printer port
1x Bi-directional Parallel port
VGA Port
1x VGA
DC Output
1x 12 Volt DC 2.5 mm. Jack
Page 15
Version 7.5.6 - 9
Hardware installation
User Interface
Touch Screen
15" TFT-LCD / 1024 x 768
Optional Keyboard
PS2 (1x) or USB
Optional Mouse
PS2 (1x) or USB
Audio
Speakers
2x 2 Watt
Environmental conditions
EMI / Safety
CE, FCC Class A
Operating Temperature (Metric)
0-40 degrees Celsius
Operating Temperature (Non-Metric)
32-104 degrees Fahrenheit
Relative Humidity (Non Condensing)
10%-90%
The printer
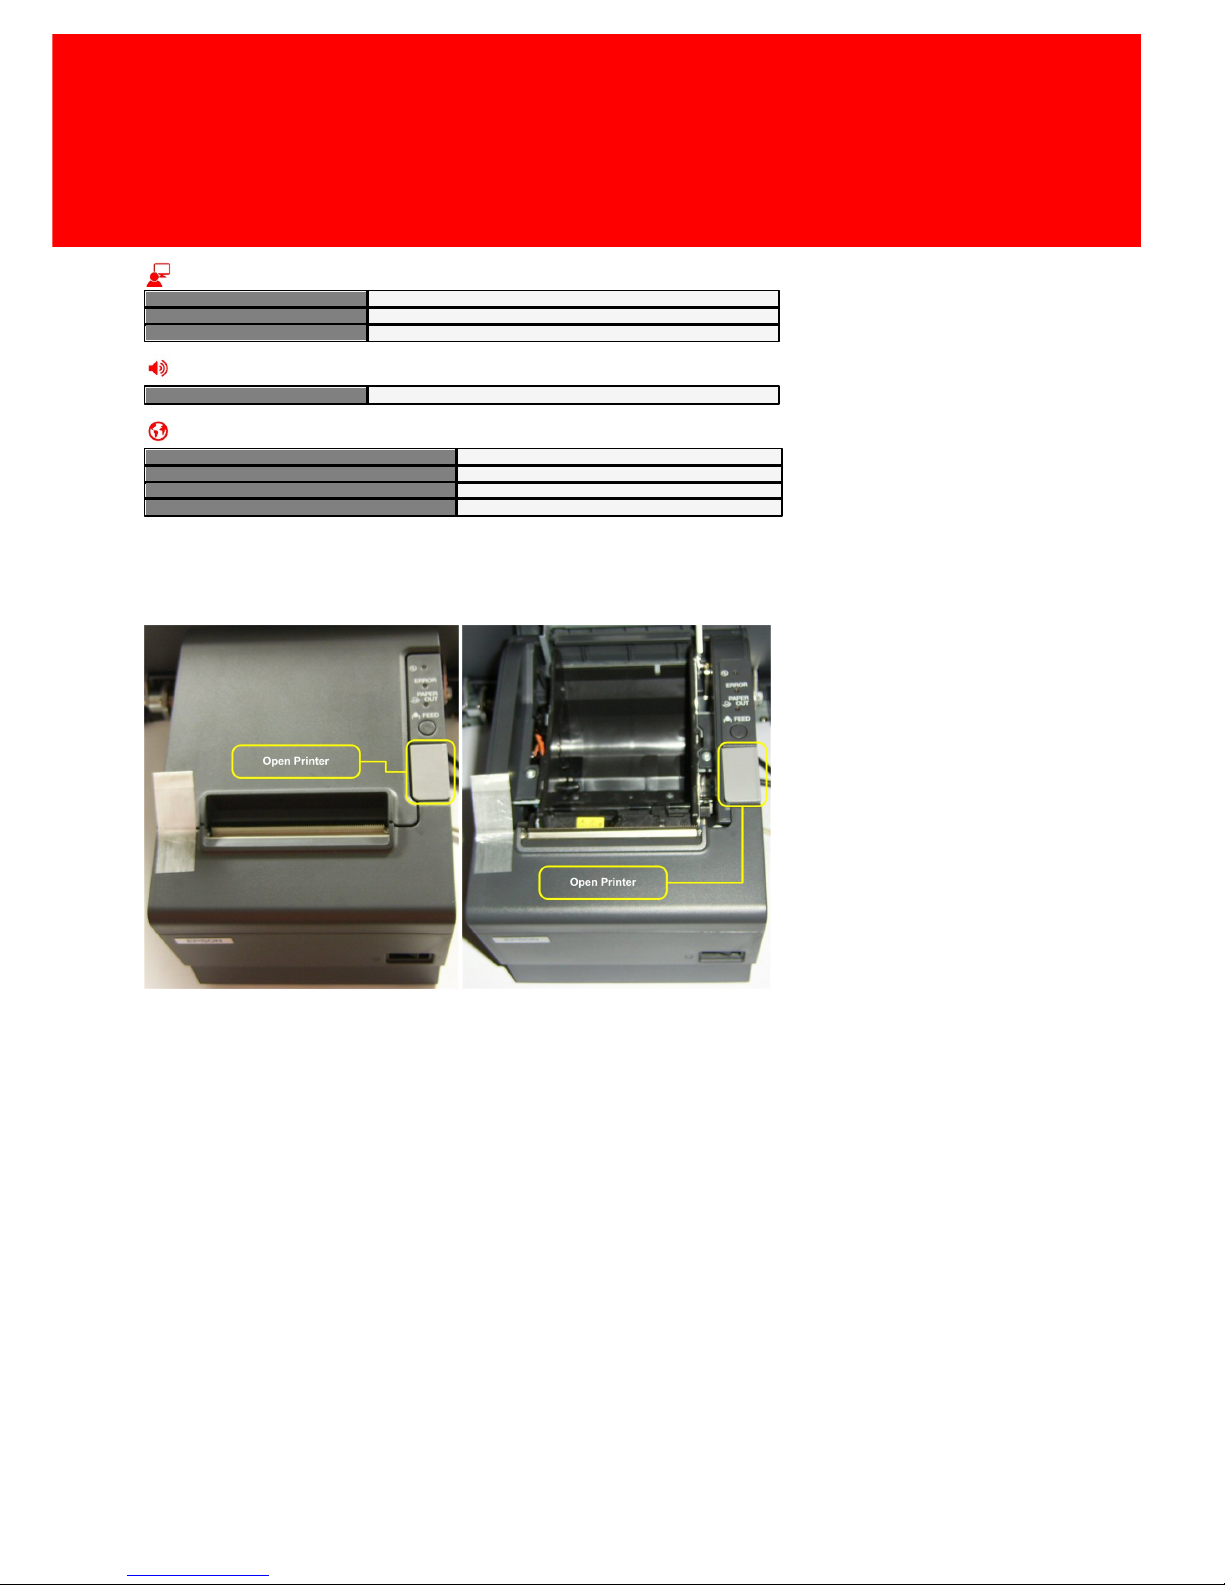
1. Open the printer by pressing the light grey button on the side of the printer. The lid will spring
open, insert a roll of paper and close the printer.
Page 16
10 - PosPRO
Setup
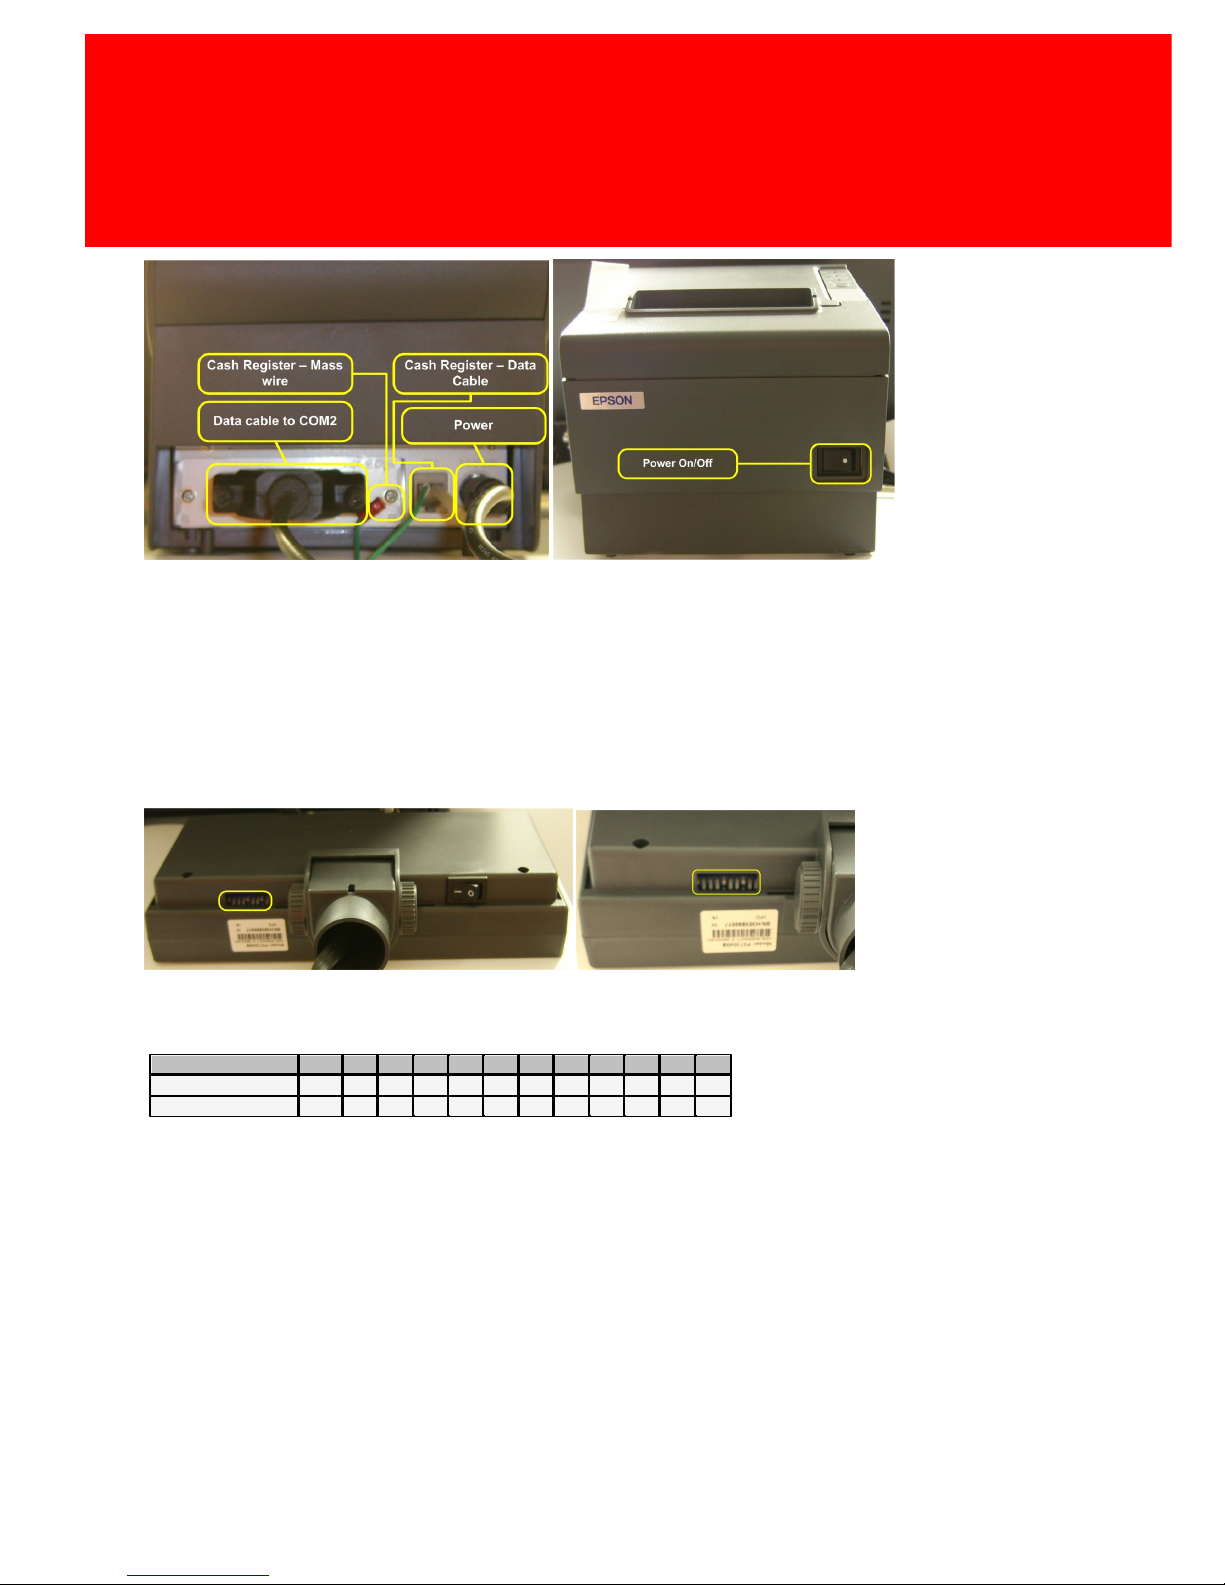
2. Attach the communication cable of the printer to the till on COM 5 if a PayCon is used for
electronic payments, in all other cases use COM 2.
3. Connect the communication cable of the printer and the cash drawer to the printer.
4. Make sure to connect the earth wire of the cash drawer to the connection bolt.
5. Connect the power cord to the adapter.
6. Plug the power connector into the wall socket.
7. Turn the printer on.
The line display
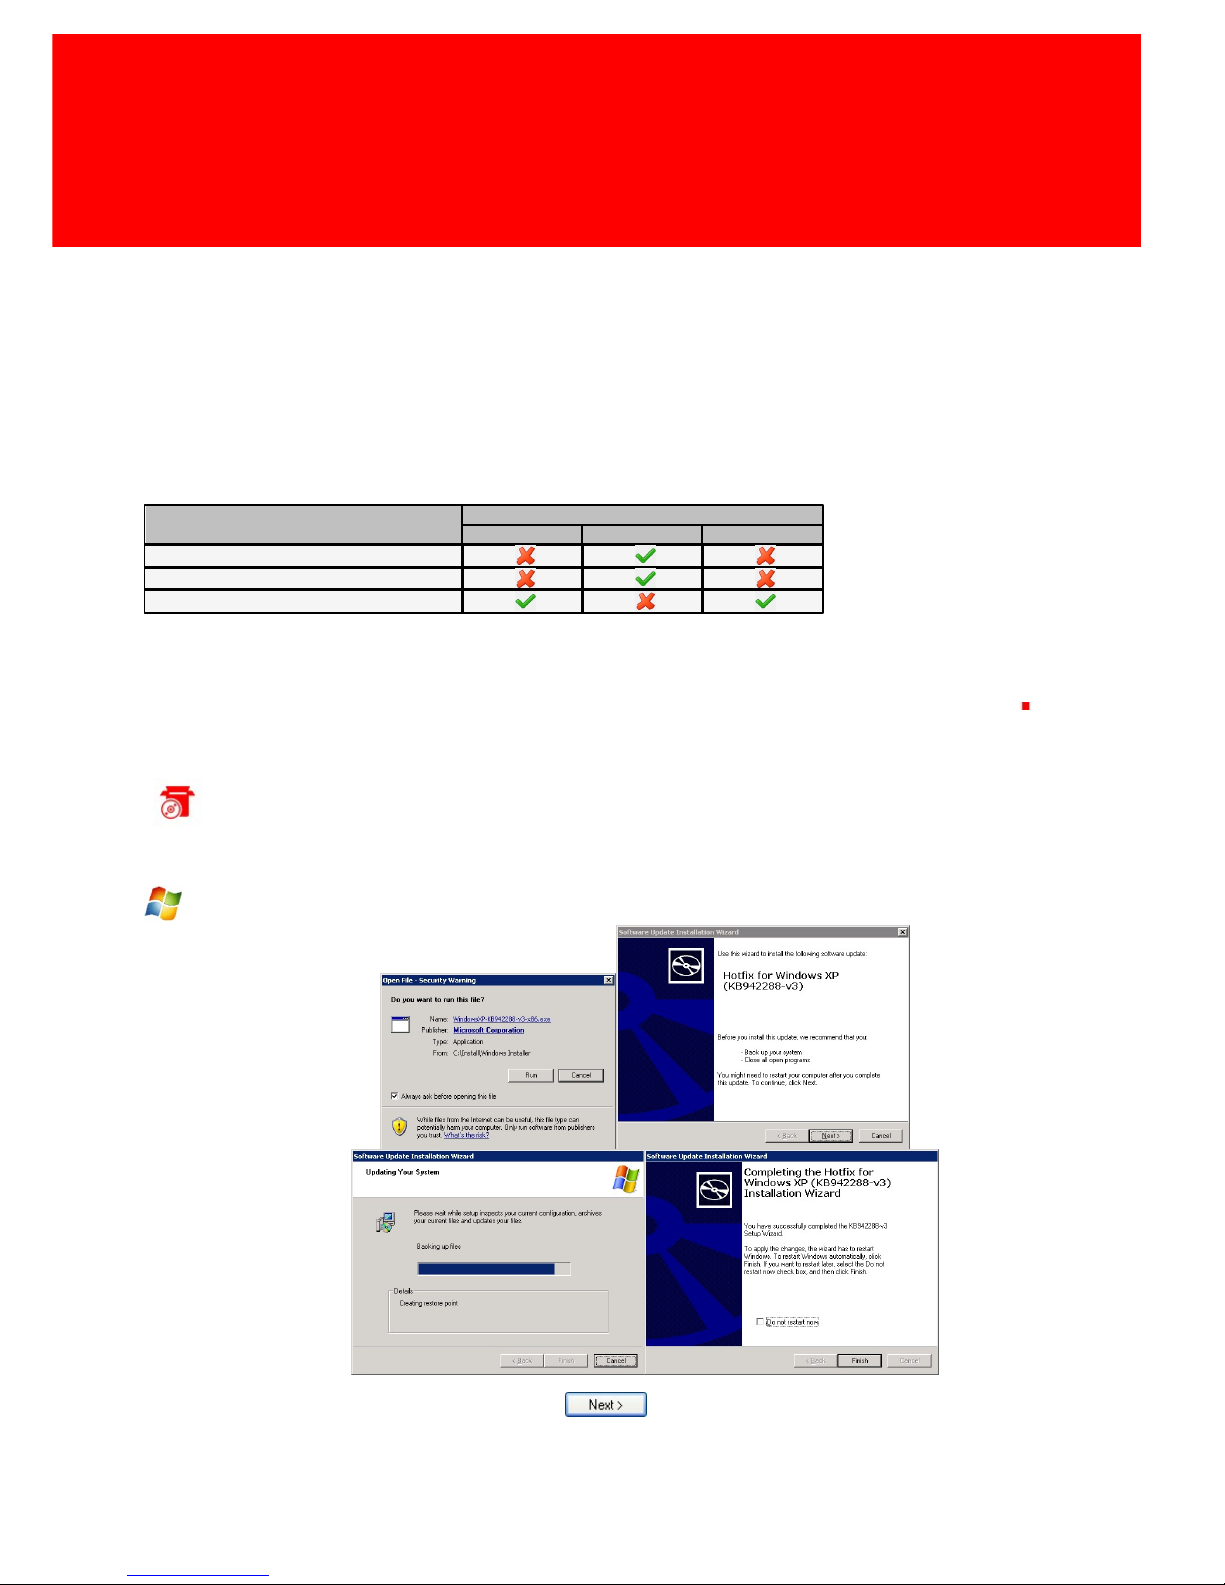
8. The line display has a number of DIP switches that signify character sets. Check that this setting
is set to the West-European character set. See table below:
Setting
1234567891011
12
Standaard
OnOnOn
OffOnOnOnOffOnOn
Off
On
Inepro West Europe
OffOnOnOnOffOnOn
OffOnOn
Off
On
Set the DIP switches to the West-European character set.
9. Mount the line display foot and pull the cable trough the cylinder.
10. Connect the cable to COM 4. The text 'Mode A' should momentarily be shown on the display
when the system will be started.
Page 17
Version 7.5.6 - 11
Hardware installation
EFT or PayCon
When the user wants to pay with other means then cash, opt for the PayCon or for an EFT terminal.
When the Inepro system is also used for printing payments, purchases at vending machines or
building access, the user can pay with the money in their Inepro account or on their Inepro card by
using the PayCon. In those cases a reloader will often already be available that has the ability to put
money on their account or card by PIN, credit card, coins or banknotes. If the Inepro card or Inepro
account are not wanted as a source of payment with the PosPRO cash till, but the ability to pay with
PIN or credit card is, an EFT terminal is needed.
Asset
Availability
PayCon
EFT terminal
Omni reader
PIN
Credit Cards
Inepro Card or Accounts
The difference between a PayCon and EFT terminal
11. The hardware is now connected, in the next chapter we will configure the hardware
Software installation
The installation of the Windows Installer software
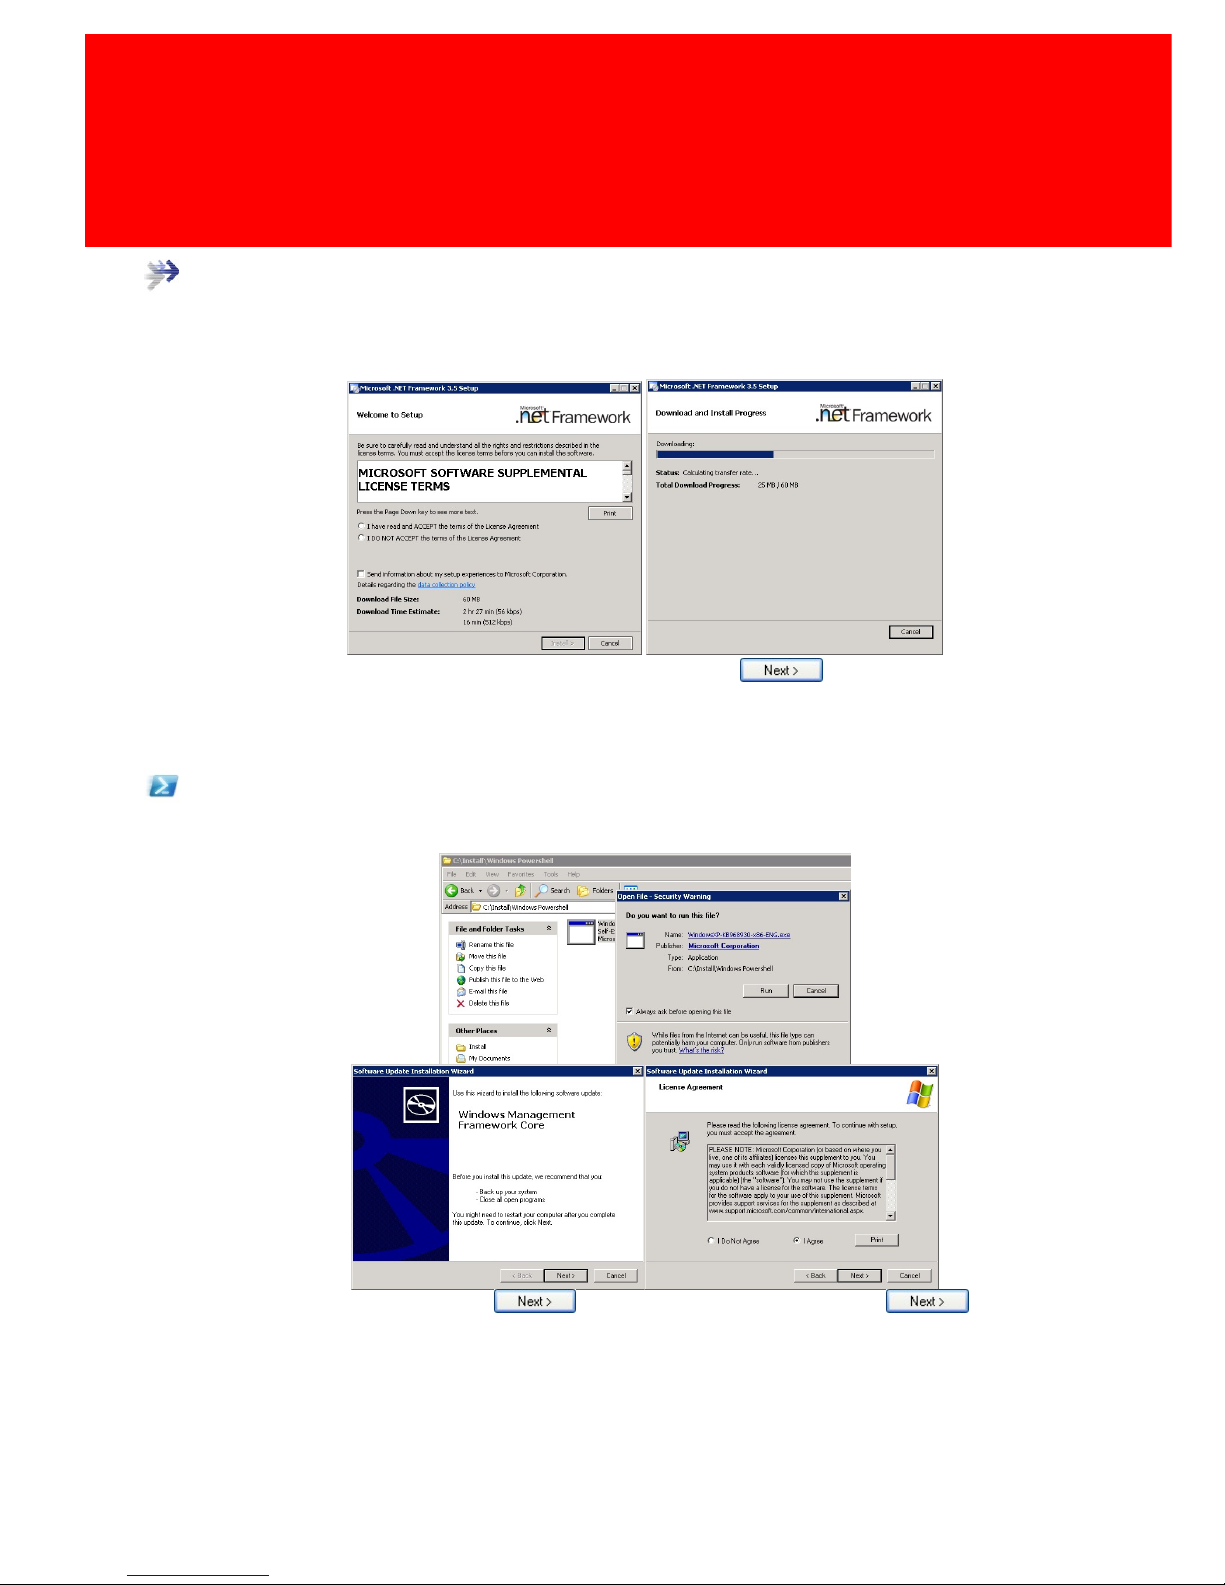
1. Run the Windows Installer setup, click until the 'finished', then click 'Finish'.
Page 18
12 - PosPRO
Setup
The installation of the .NET Framework software
2. Run the .NET Framework setup.
3. Check the overview to if all setting are correct, if so click , the installation will now start.
Complete the installation.
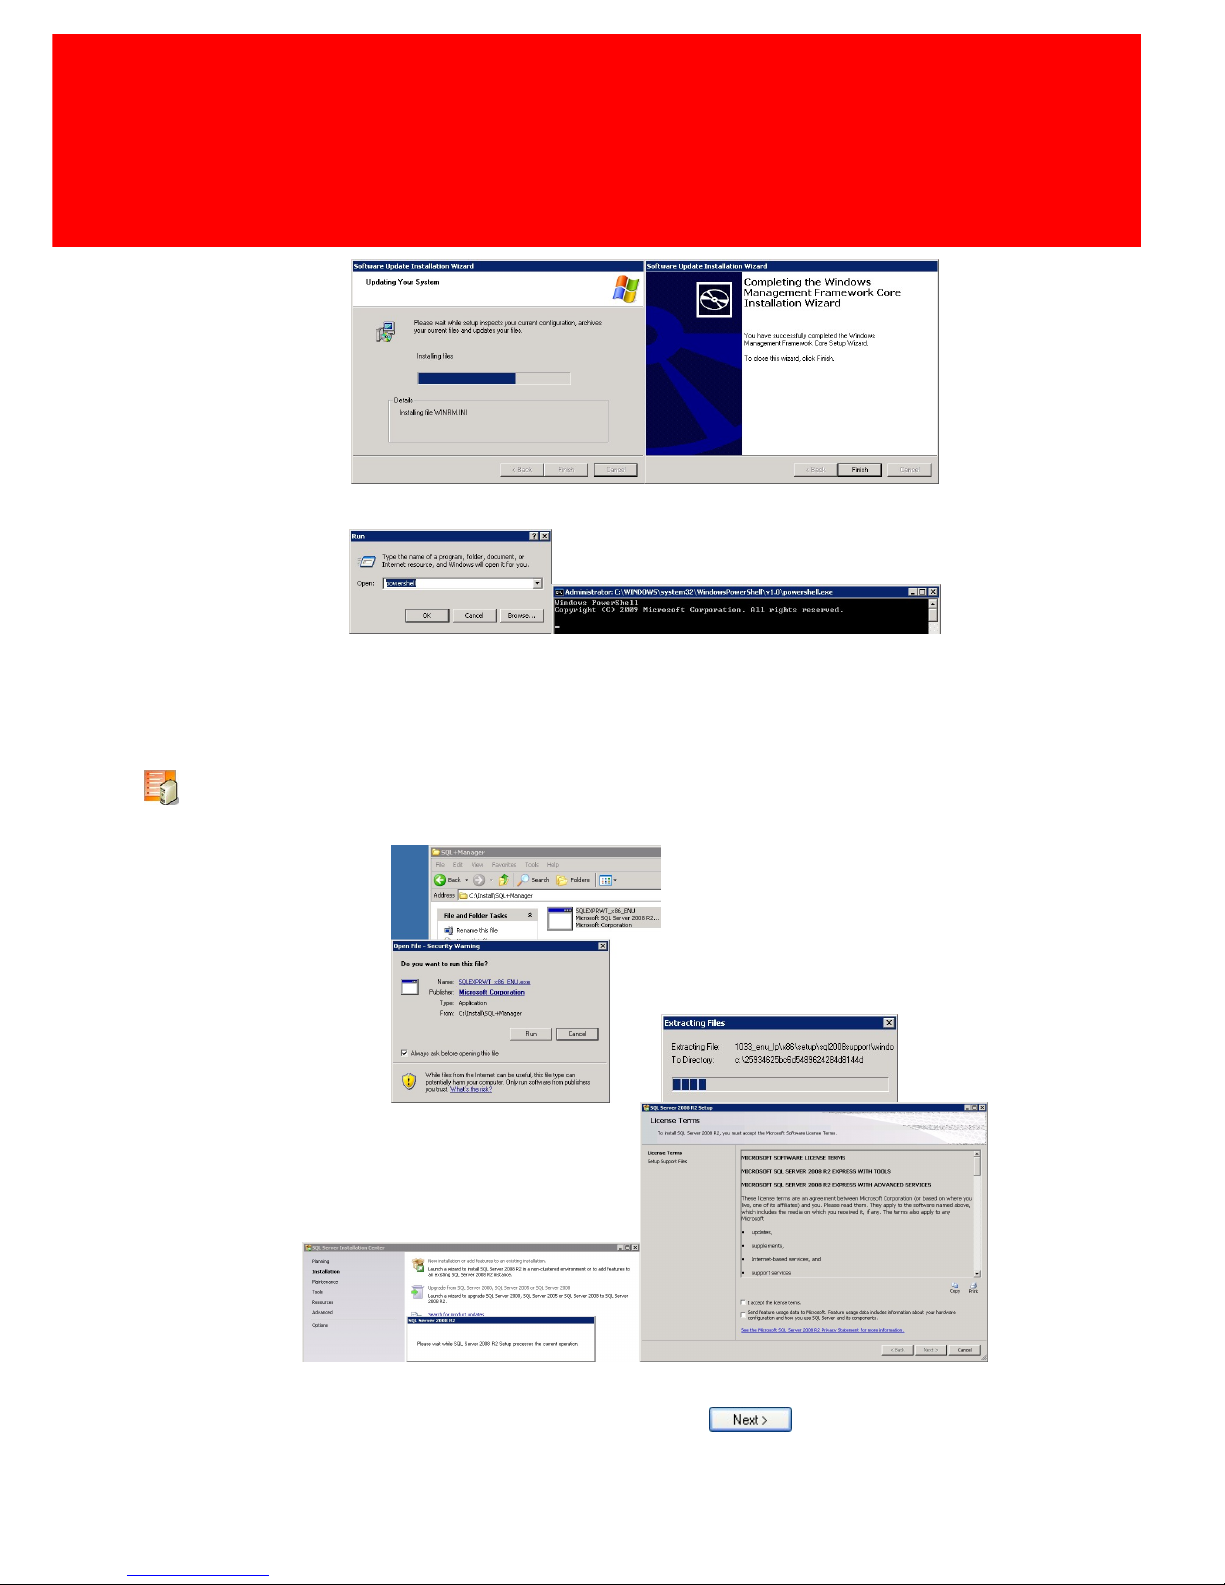
The installation of the Windows Powershell software
4. Run the Powershell setup, click , agree to the license and click .
Page 19
Version 7.5.6 - 13
Software installation
5. Finish the installation.
6. Check by clicking the Windows Start button and executing the 'Run' command 'Powershell' (as
seen in the left screen) if the Powershell is working. If a window like the right screen is seen,
Powershell is working correctly.
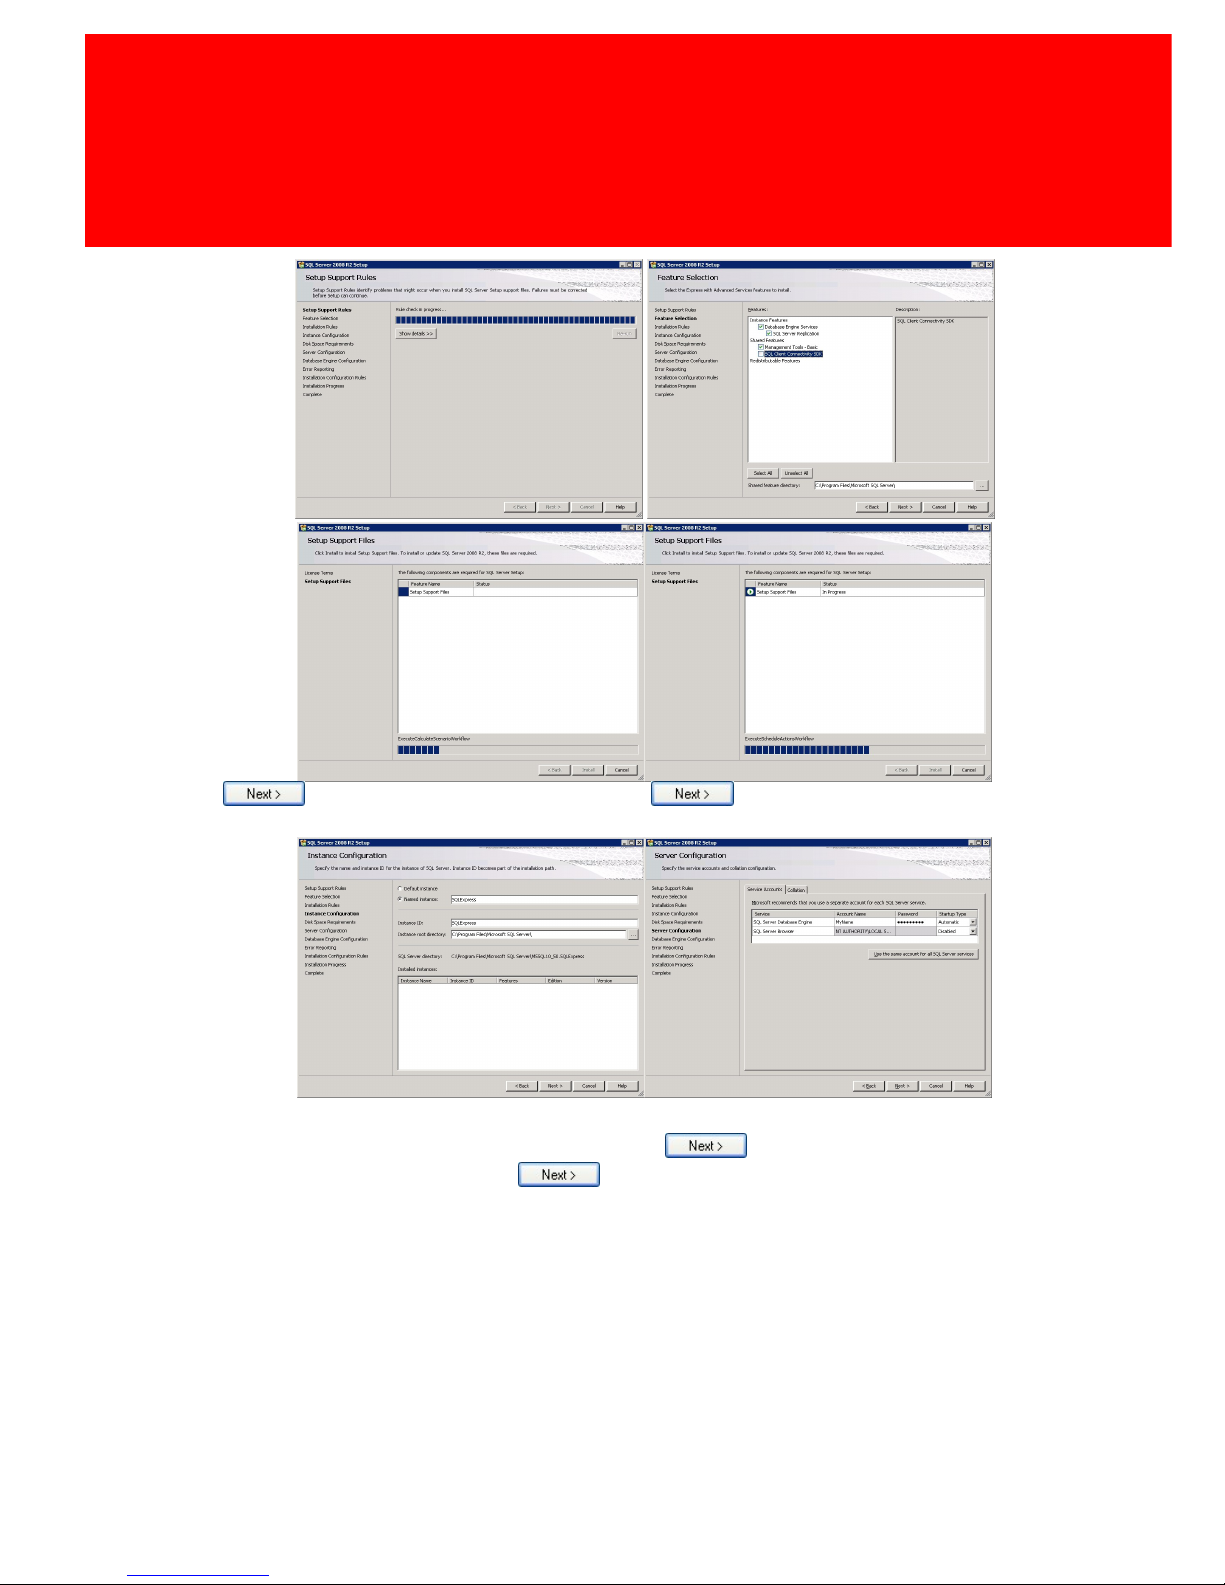
The installation of the Microsoft SQL Server software
7. Run the SQL setup.
8. Tick the box to show the licence is accepted and click . The SQL setup will now start
installing.
Page 20
14 - PosPRO
Setup
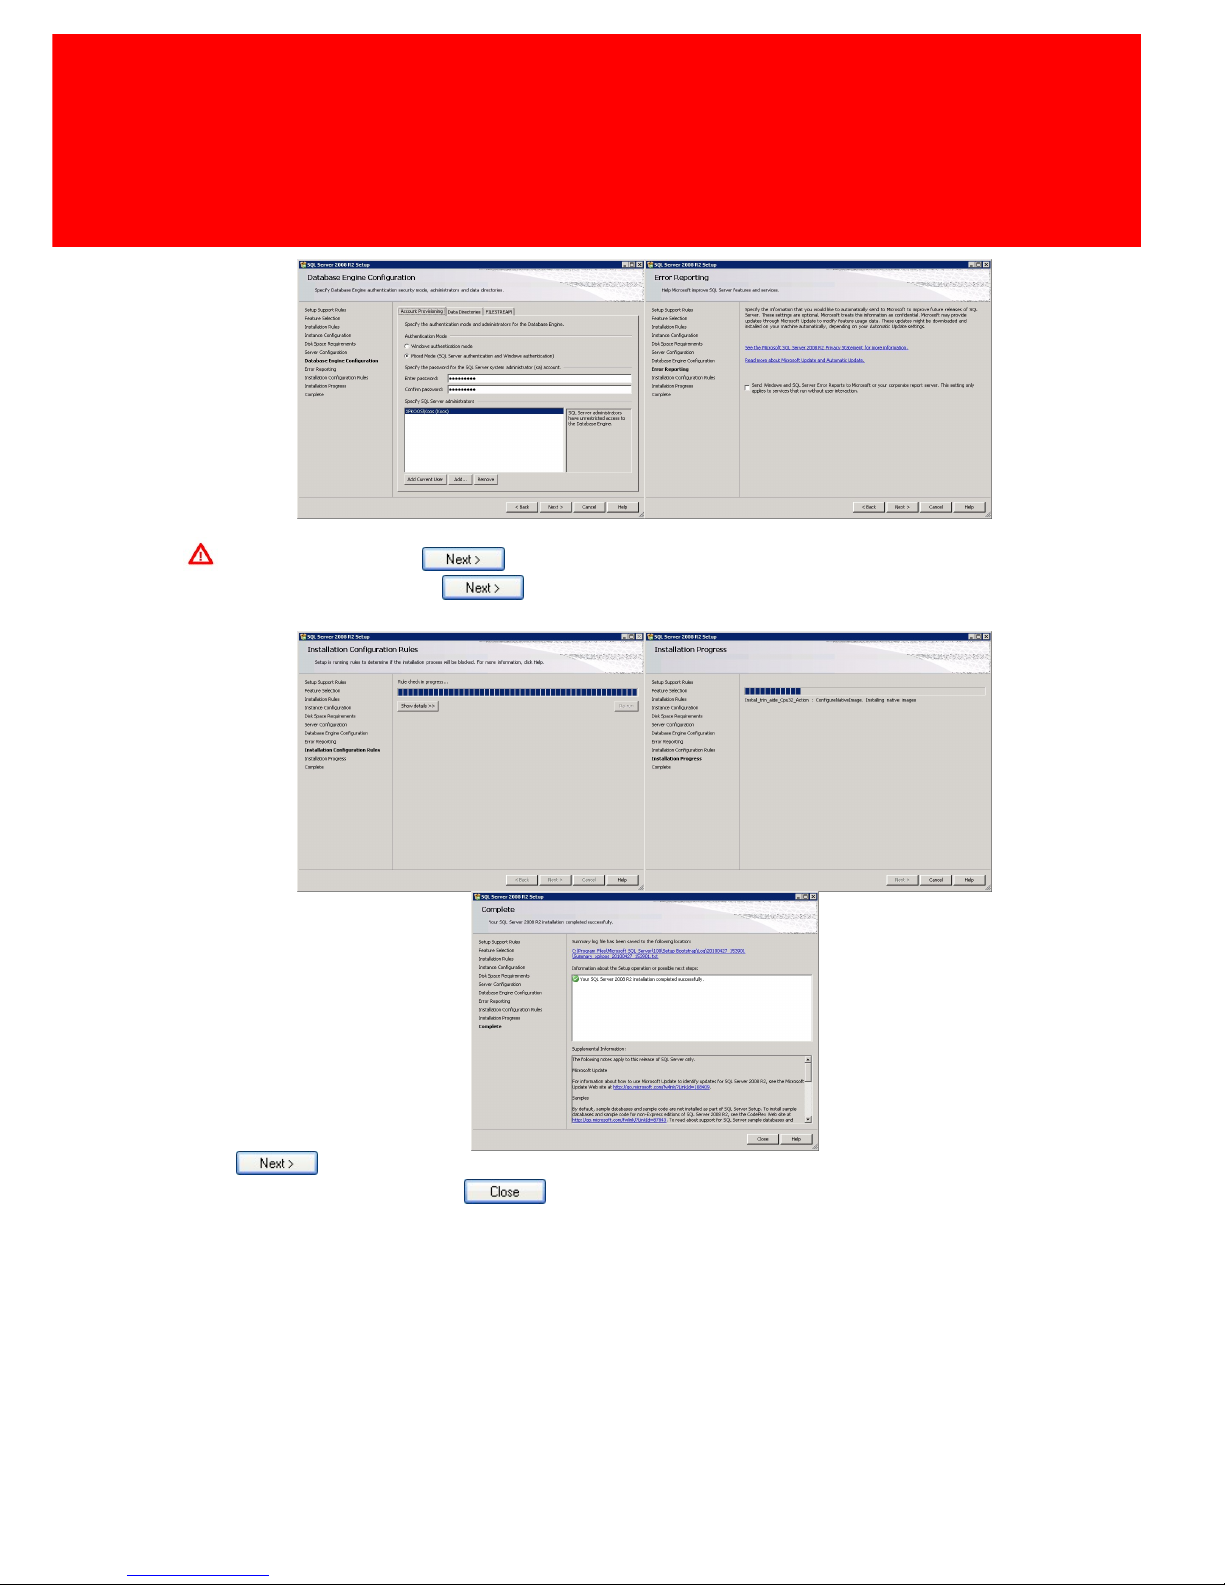
9. Click , check the configuration and click to install the files.
10. Keep the default settings for the instance, click , enter an Windows Account with
Administrator credentials and click .
Page 21
Version 7.5.6 - 15
Software installation
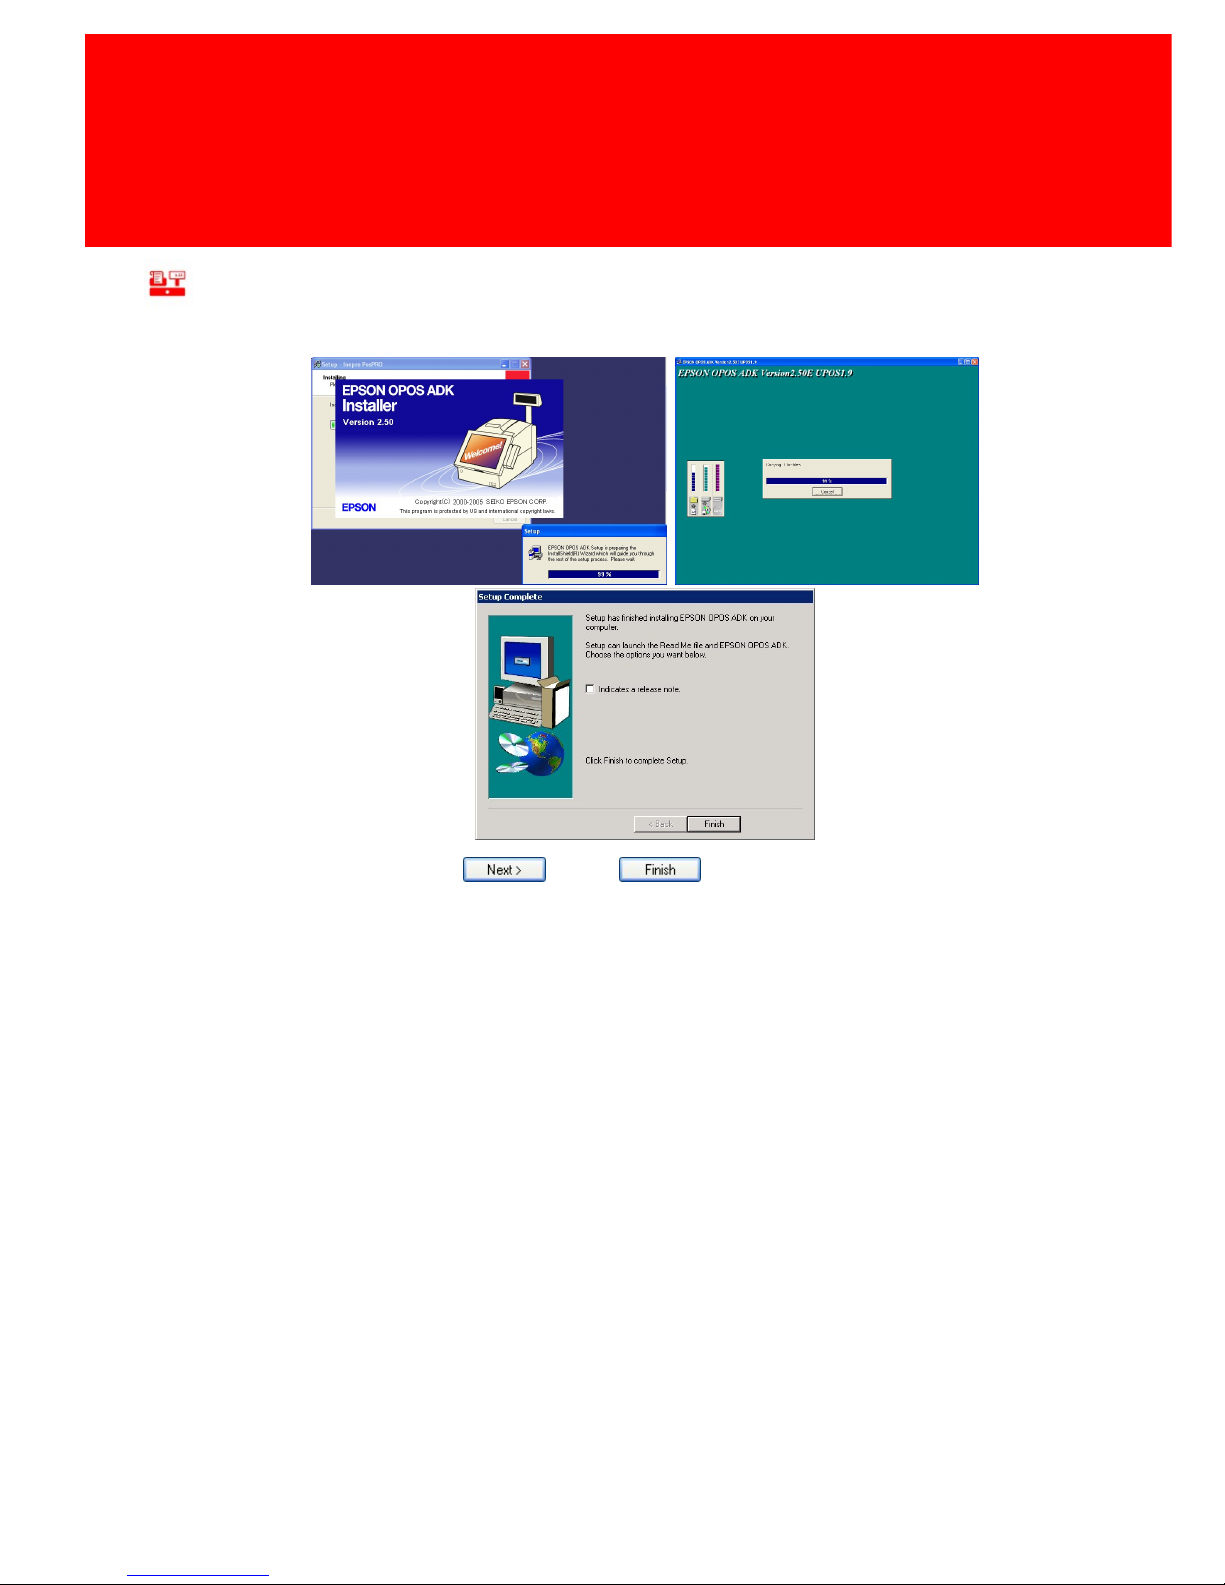
11. Important! Click on , choose the option 'Mixed Mode' and insert a strong
password, after that click .
12. Click until the 'Complete' window has been reached, check the overview to see if all
setting are correct, if so click .
13. The Microsoft SQL Server is now installed.
Page 22
16 - PosPRO
Setup
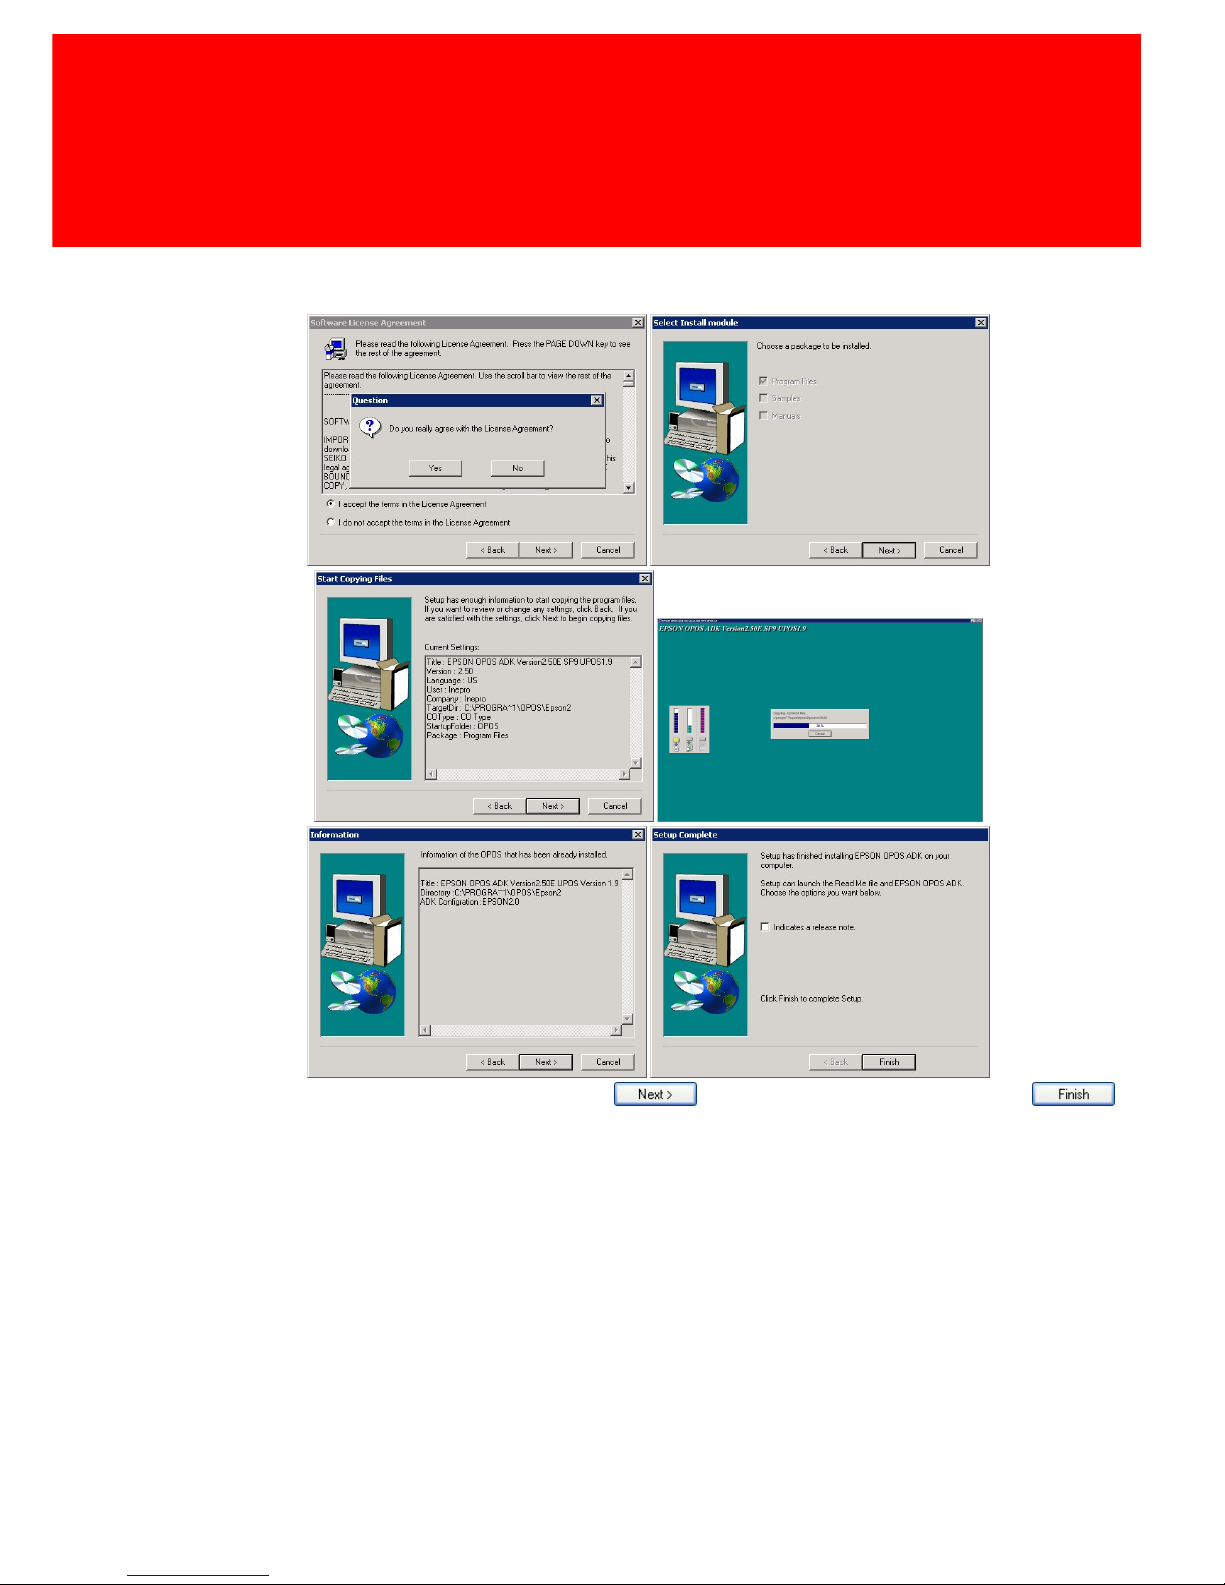
The installation of the OPOS software
14. Run the OPOS Setup, press , press .
Page 23
Version 7.5.6 - 17
Software installation
15. Run the OPOS Upgrade.
16. Agree to the License Agreement and press until the final window, then click .
17. The installation is now finished.
Page 24
18 - PosPRO
Setup
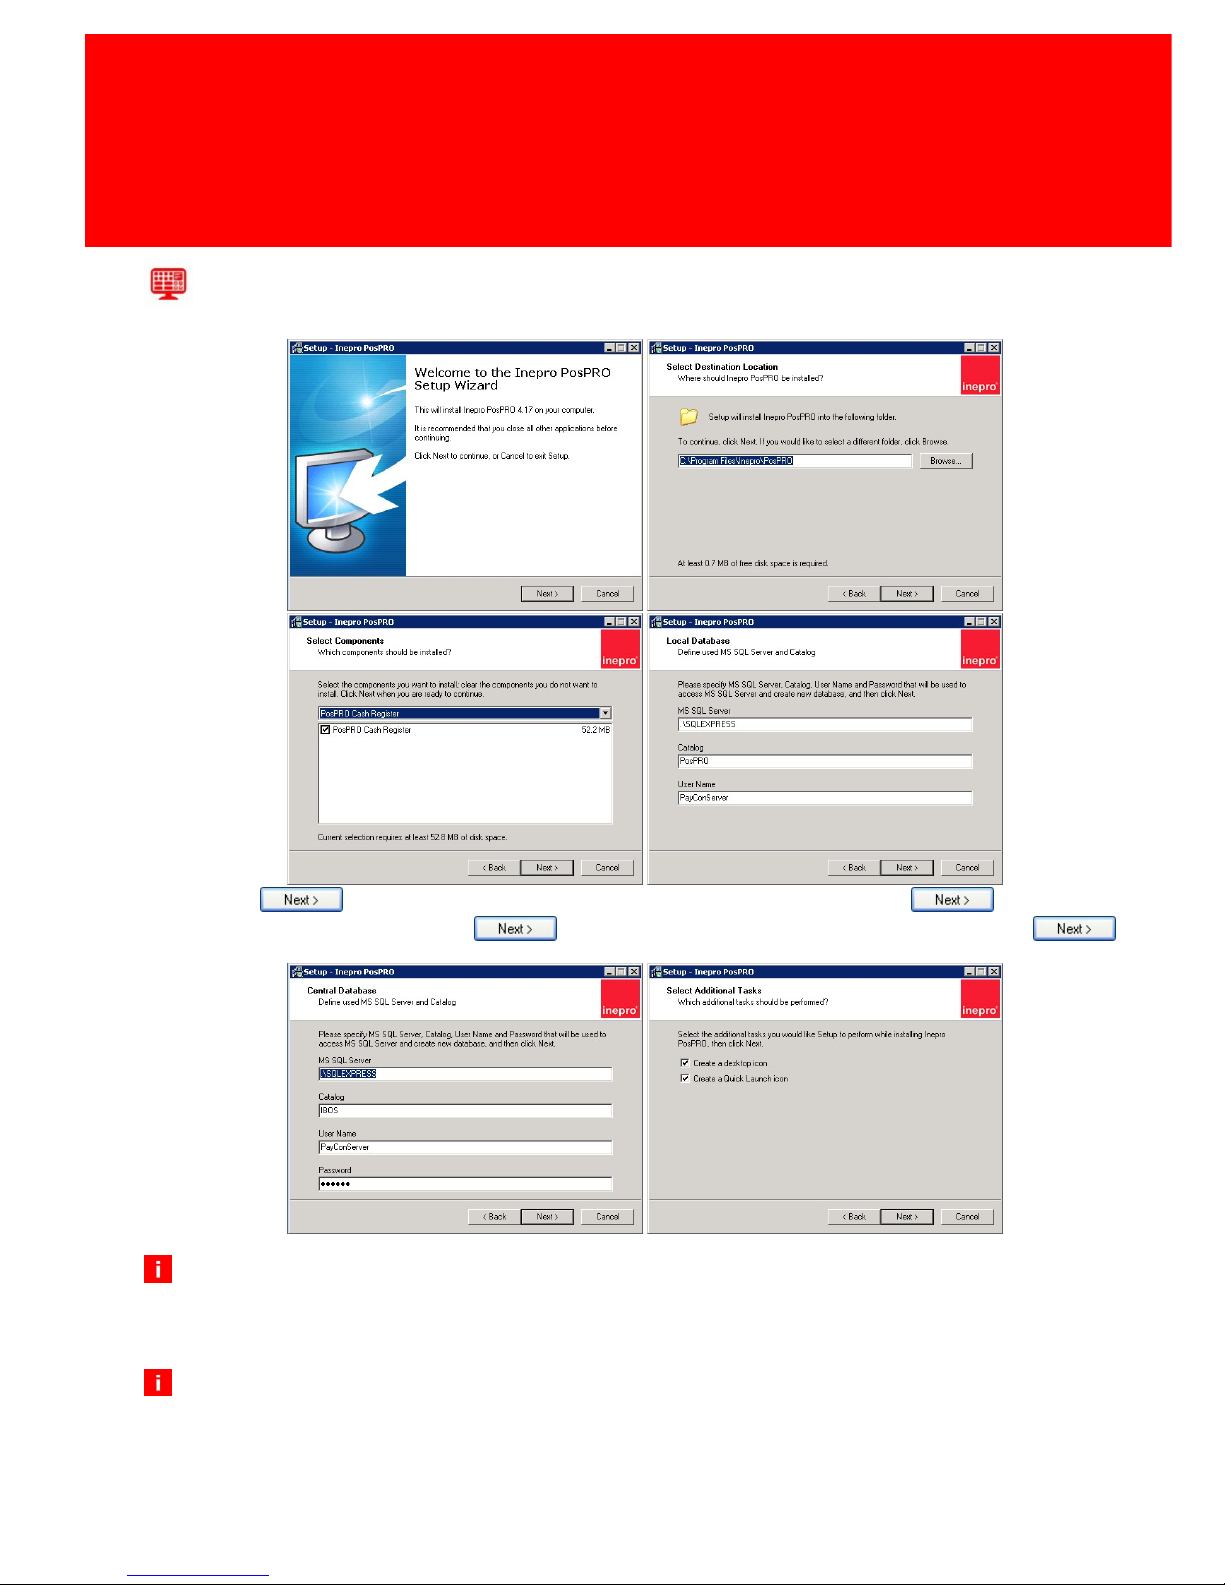
The installation of the PosPRO software
18.Click on and edit the installation path if necessary. Then click on .
19.Agree to the license and click where necessary, check the paths and click on .
If a central database is used the Inepro Back Office Suite Database server name should be
entered and the instance of the database at the field MS SQL Source. (In this format
"YOURIBOSSERVER\SQLEXPRESS" the MS SQL server name is :'YOURIBOSSERVER' and your
instance name is :'SQLEXPRESS'.)
If a remote server is not available, and 'stand-alone' tills are used, the Inepro Back Office Suite
(or at least the database) should be installed locally.
Page 25
Version 7.5.6 - 19
Software installation
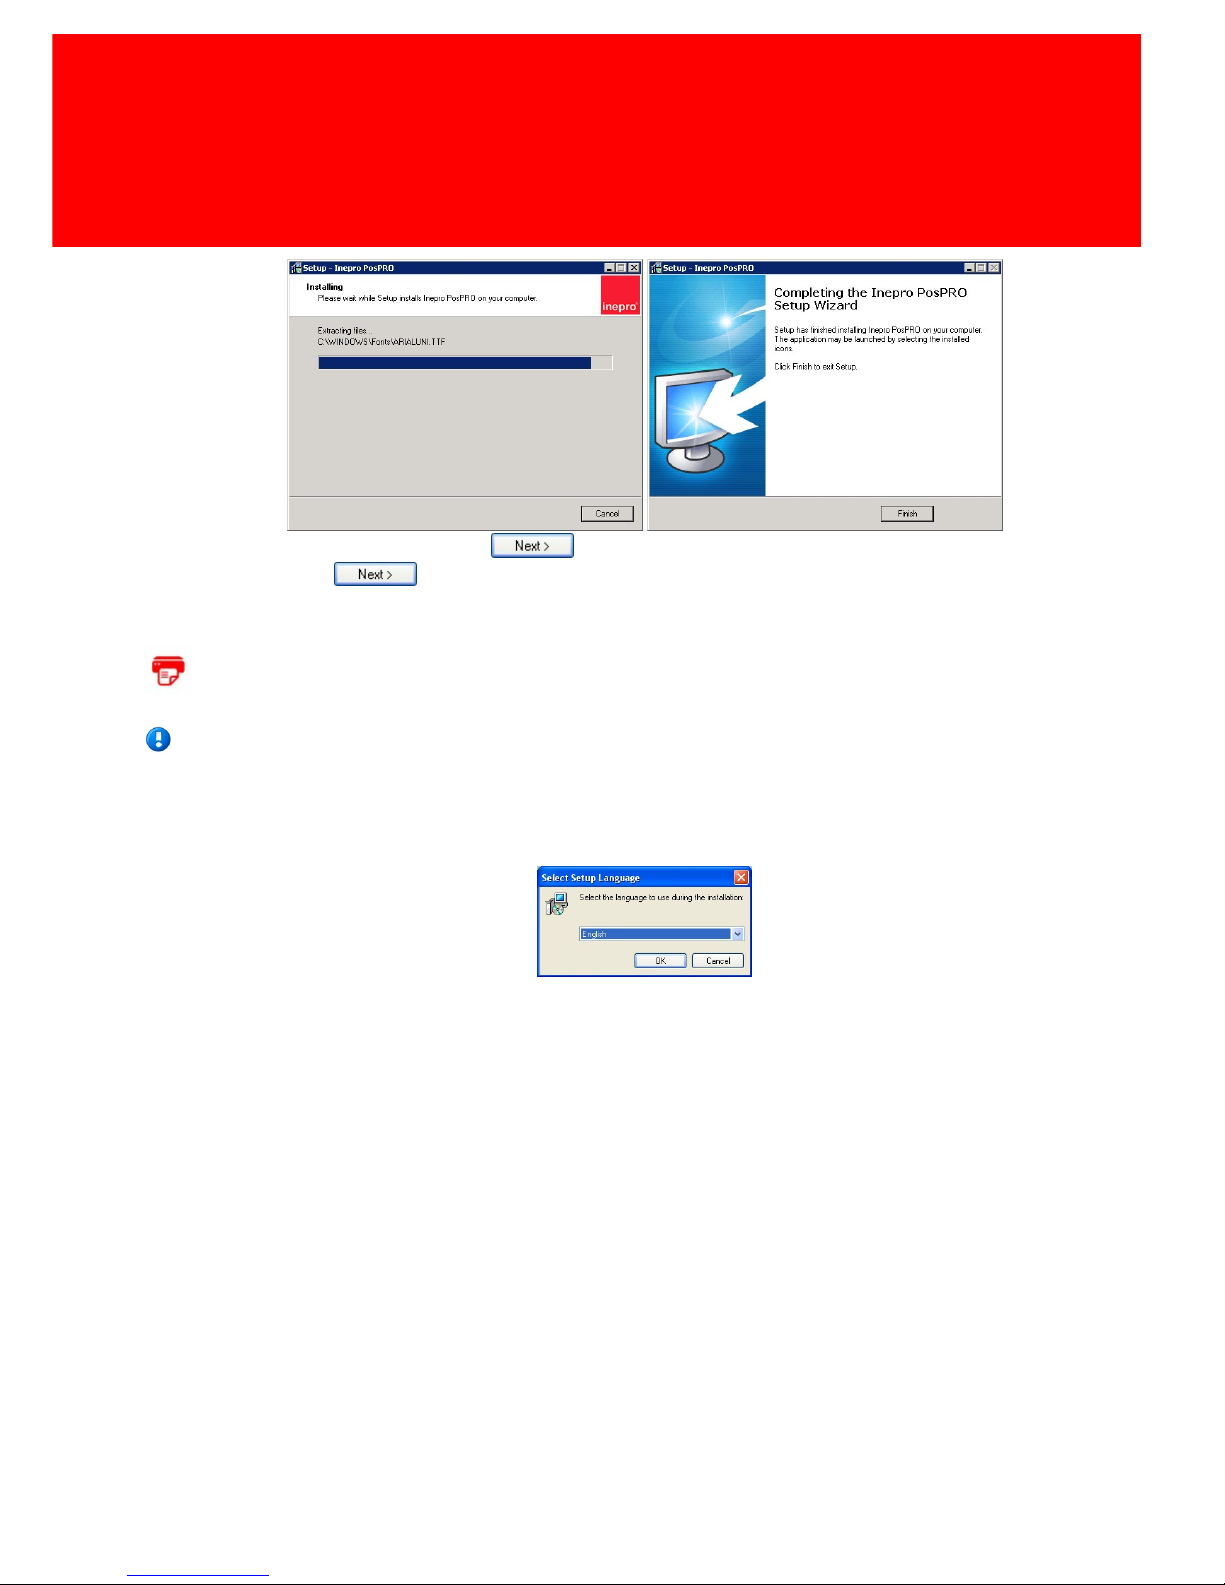
20.Check the settings and click on , select the locations where a shortcut icon must be
placed and click .
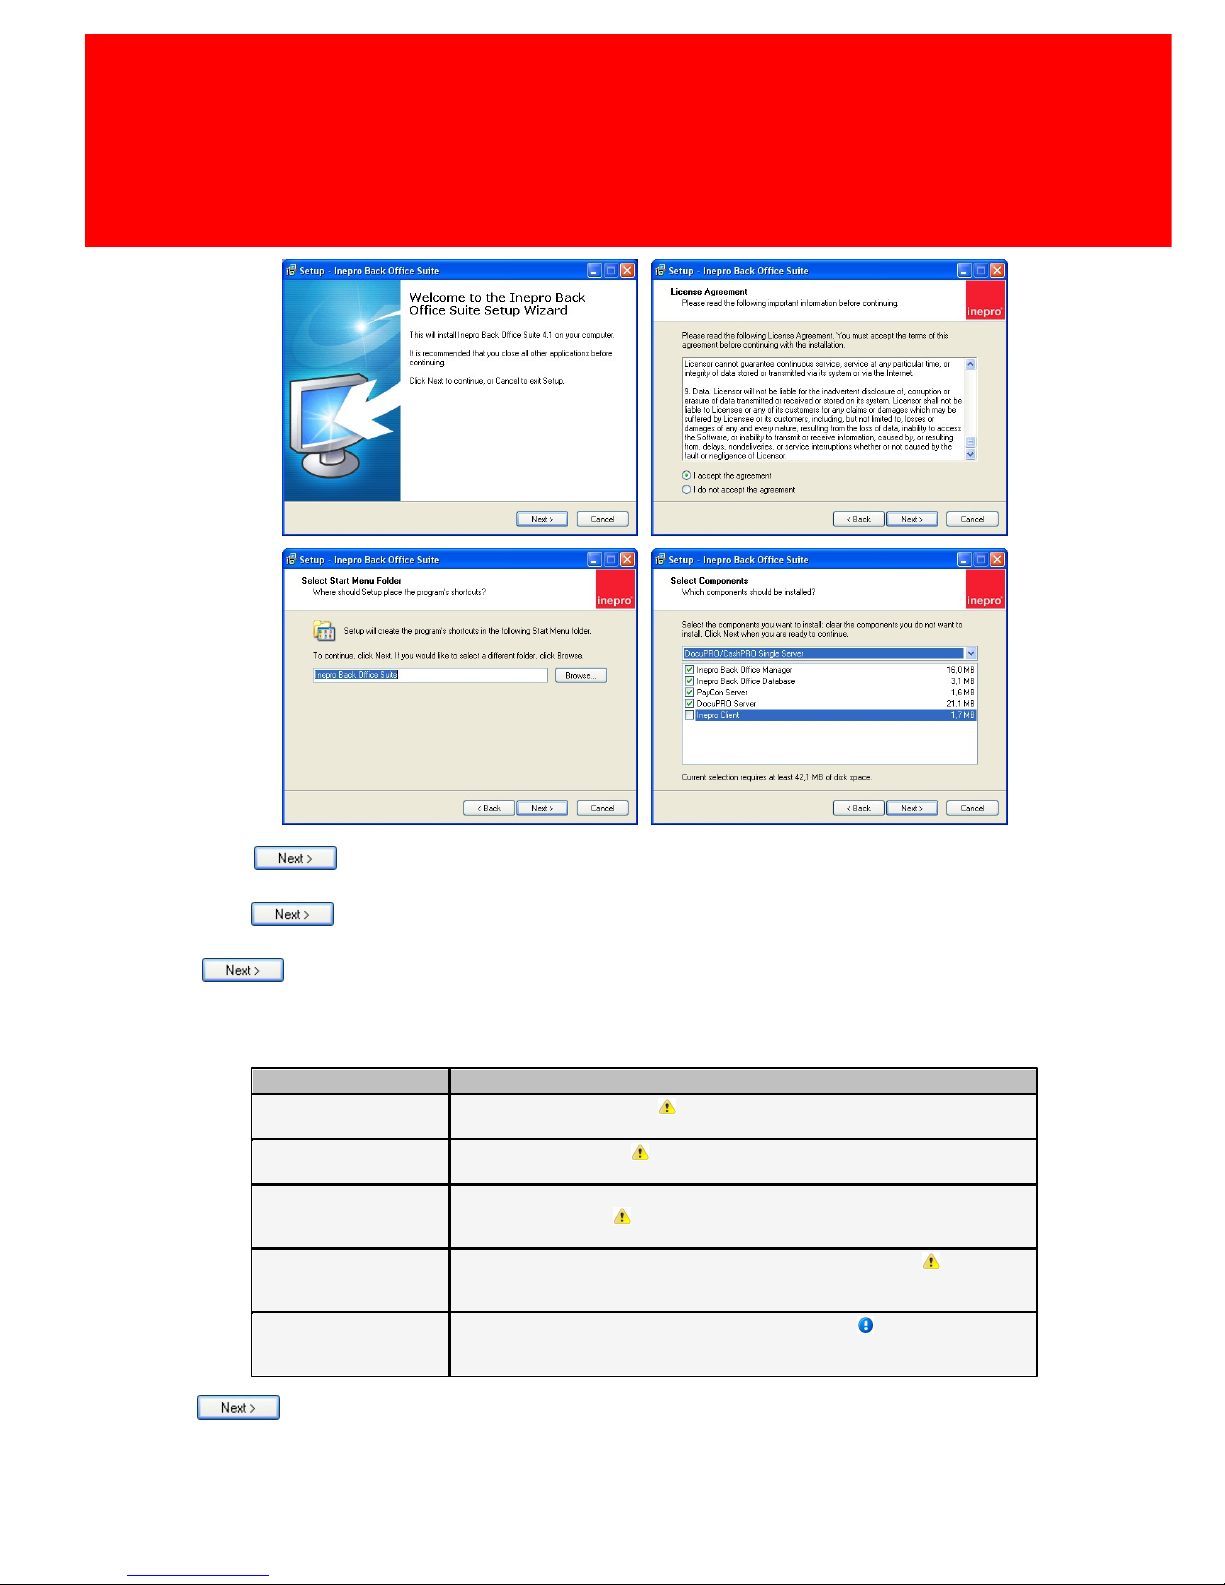
The Inepro Back Office Manager installation
The installation of the Inepro Back Office Manager is only needed if the terminal is a
stand-alone till or if the provided PosPRO Manager is not preferred.
First choose the language, in the language dialog:
Page 26
20 - PosPRO
Setup
1. Click on to continue with the installation of the PosPRO on the computer.
2. Read the licence and if the terms have been accepted, tick "I accept the licence agreement" and
click on .
3. Browse to the path (or typ it in) of the location where the software should be installed, and click
on again.
4. Select the components that should be installed. A pre-selection can be chosen by clicking on the
combobox. Or make a selection by ticking or unticking the checkbox.
Installation
Description
Full Installation
Installation of all components. Do not install all the components, not all
components will be needed!
DocuPRO (server)
Managing the print traffic. Do not install the DocuPRO server, this module is
not needed in this model type / configuration!
Inepro Client
The client pop-ups will be the graphical user interface will show the printjobs and the
Print Codes if available. Do not install the client, this is not needed in this
model type / configuration!!
Terminal Sever
Provides the communication between the database and the terminals. Do not
install the Terminal Server, this is not needed in this model type /
configuration!!
Inepro Database
This option will install the system database on this machine. Install the database
if this is a stand-alone machine. If it is not a stand-alone machine do not
install the database here, but link the manager to the central database.
Click to continue.
Page 27
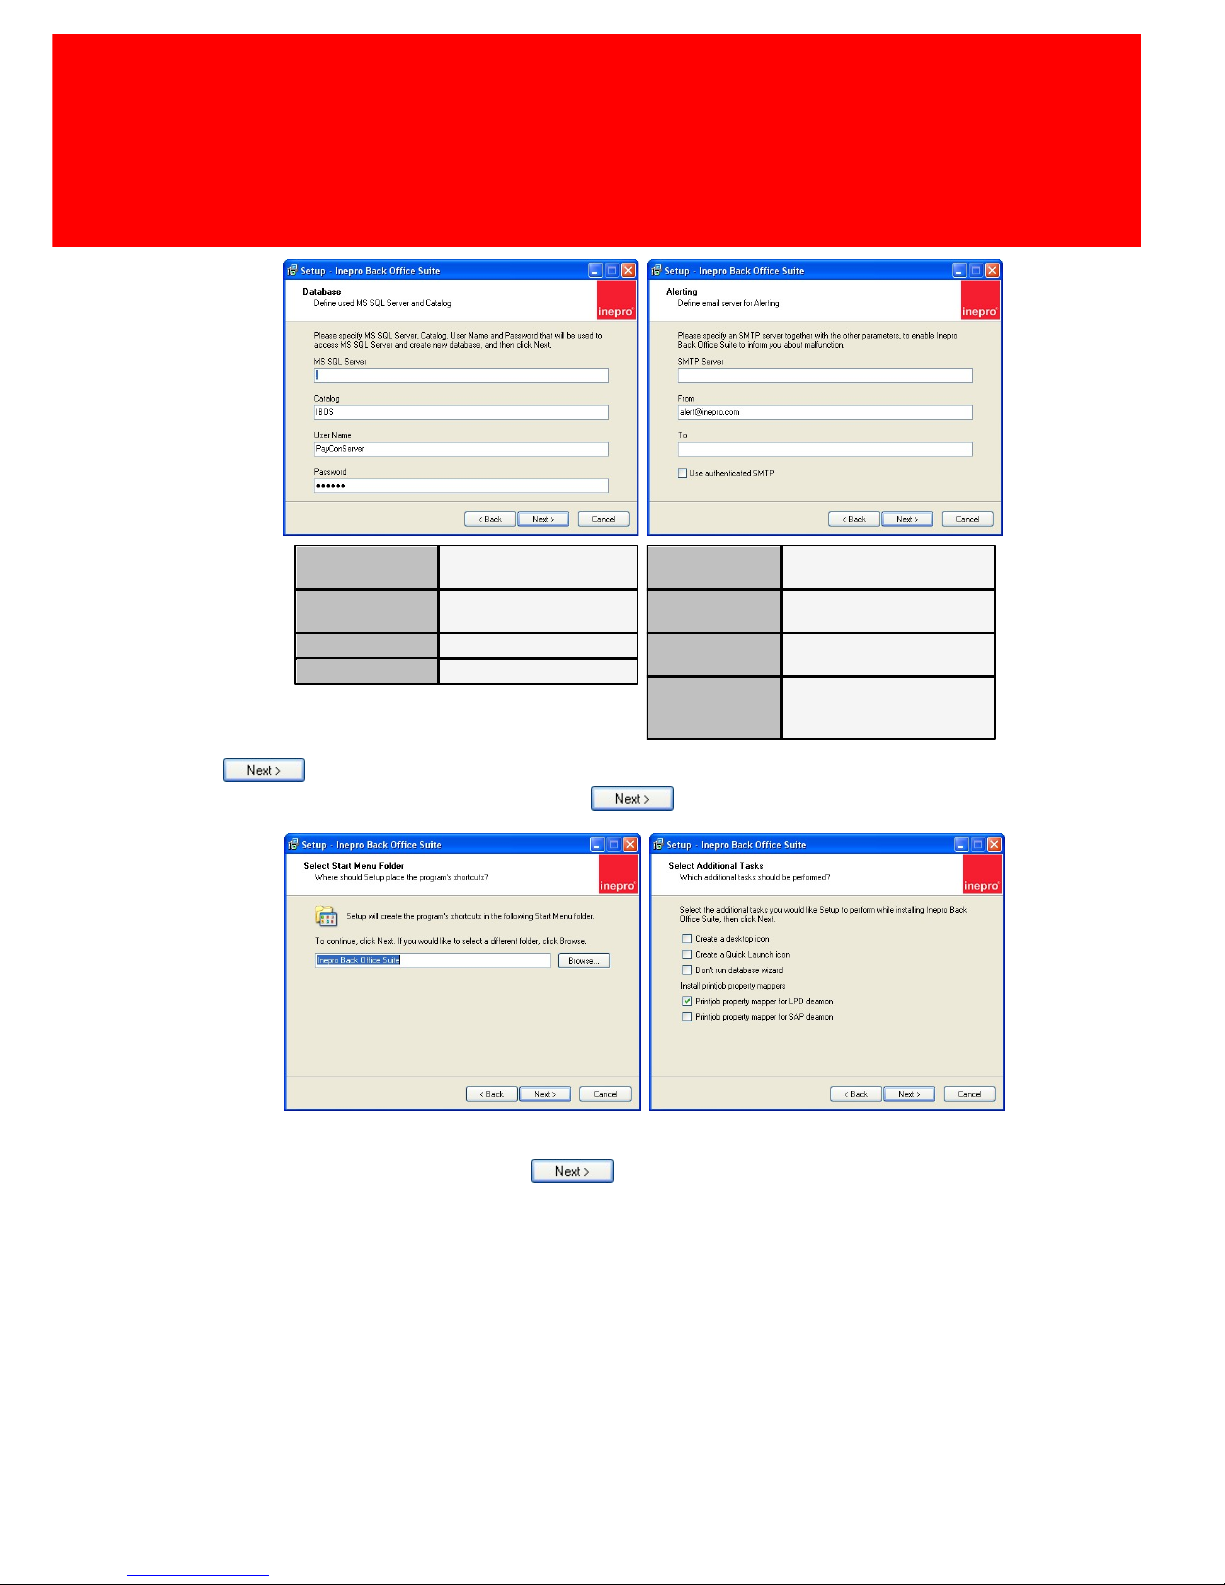
Version 7.5.6 - 21
Software installation
MS SQL Server
The database server adres
(. = the locale machine)
Catalogus
The database name
(standard IBOS)
User Name
The database user name
Password
The database password
SMTP Server
The server that will used to
send email
Sender
The address that will appear in
the 'from' field.
Address
The email address where the
warning email is send to.
Use
authenticated
SMTP
Check if a secure SMTP server
is used
1. Click to continue.
2. Fill out the SMTP server address and click to continue.
Fill out the name of the directory to install it in this directory and tick the boxes to create shortcuts
to the Start menu or desktop. Click on to continue.
Page 28
22 - PosPRO
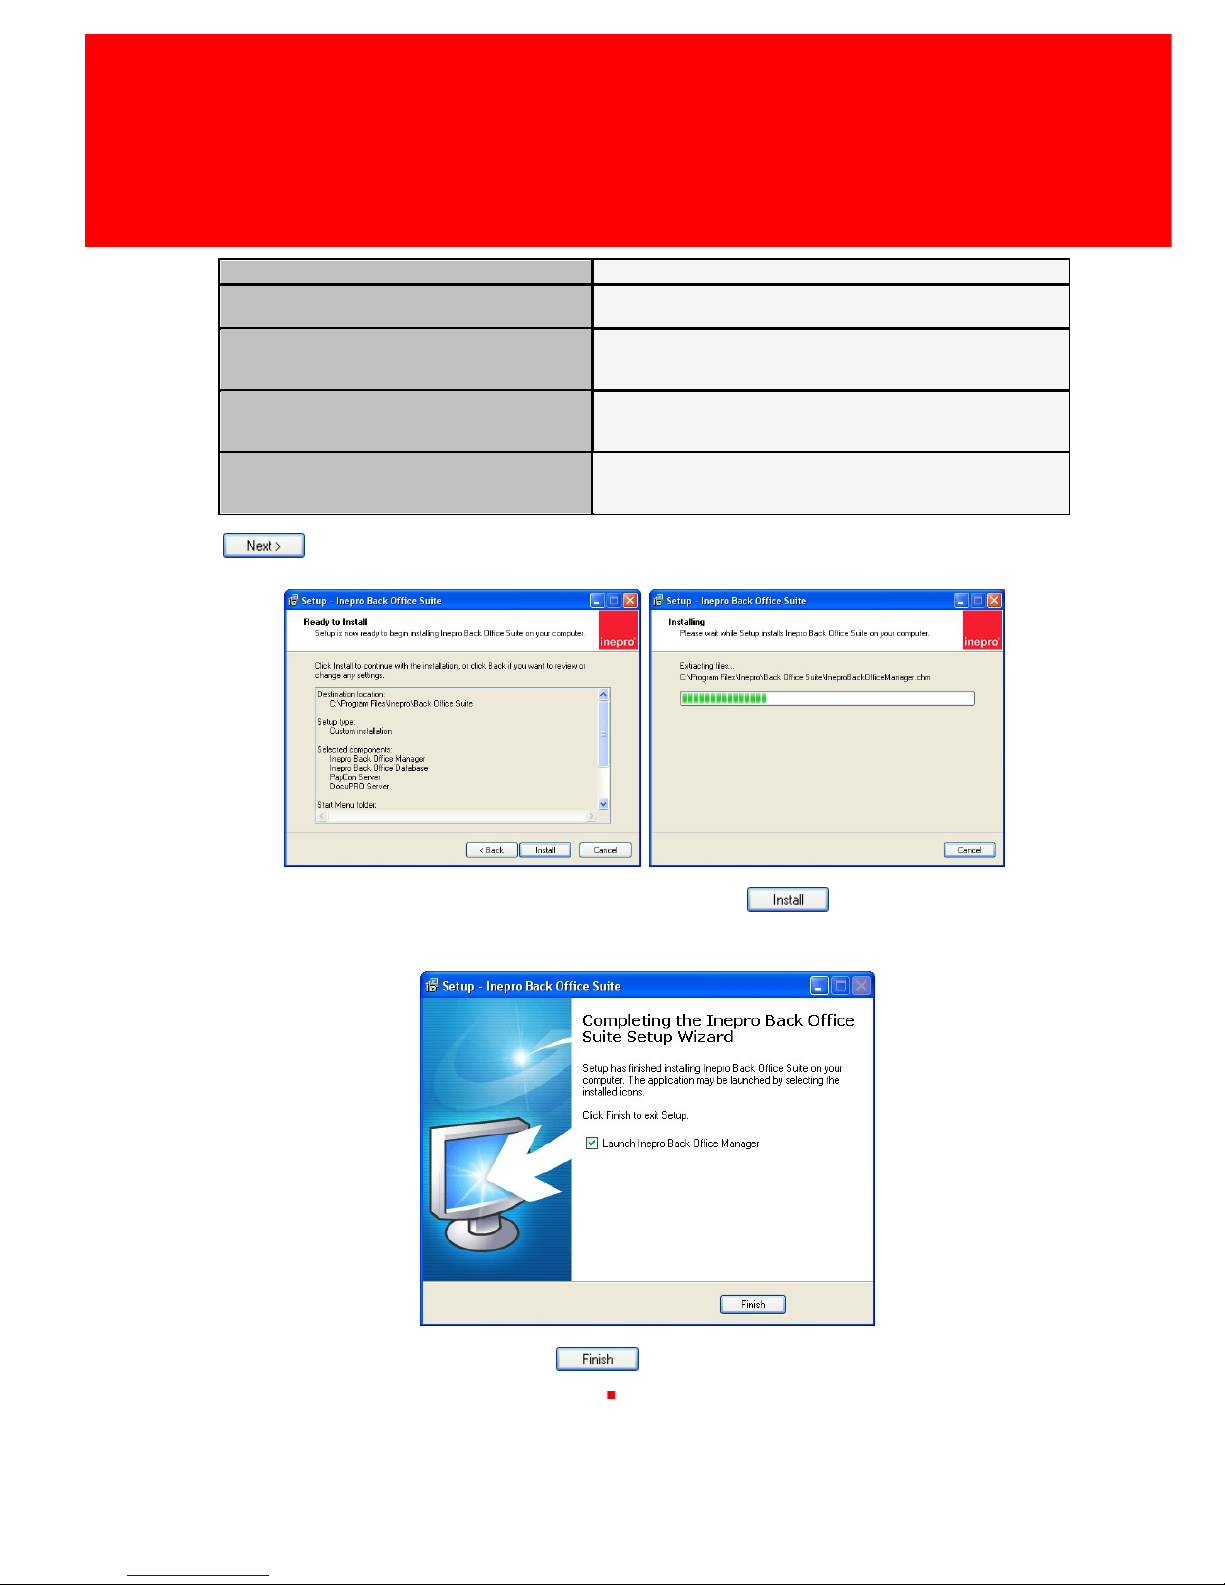
Setup
Create a shortcut to the desktop
Places an icon on the desktop. (standard setting = off)
Create a shortcut to the Quick launch bar
Places an icon on the Quick Launch bar (next to the Start button on
the task bar). (standard setting = off)
Don't execute the database wizard
Prevents the database wizard to be executed and creates an option to
execute the wizard manually with more advanced options. (standard
setting = off)
Print job property map for LPD daemon
This option is needed the define the user name, when Novell Netware
or Linux is used, but may also be used when this is not the case.
(standard setting = on)
Print job property map for SAP daemon
This option is needed to define the user name, when the SAP
application is used, in all other cases this setting should be set to off.
(standard setting = off)
3. Click to continue.
Check the overview to if all setting are correct, if so click on to start the installation.
The software has been installed, click on to close the setup and start the Inepro Back
Office Manager (if the option has been ticked)
Page 29

Configuration
Part
III
Page 30
24 - PosPRO
Configuration
Configuration
In this chapter we will configure the system.
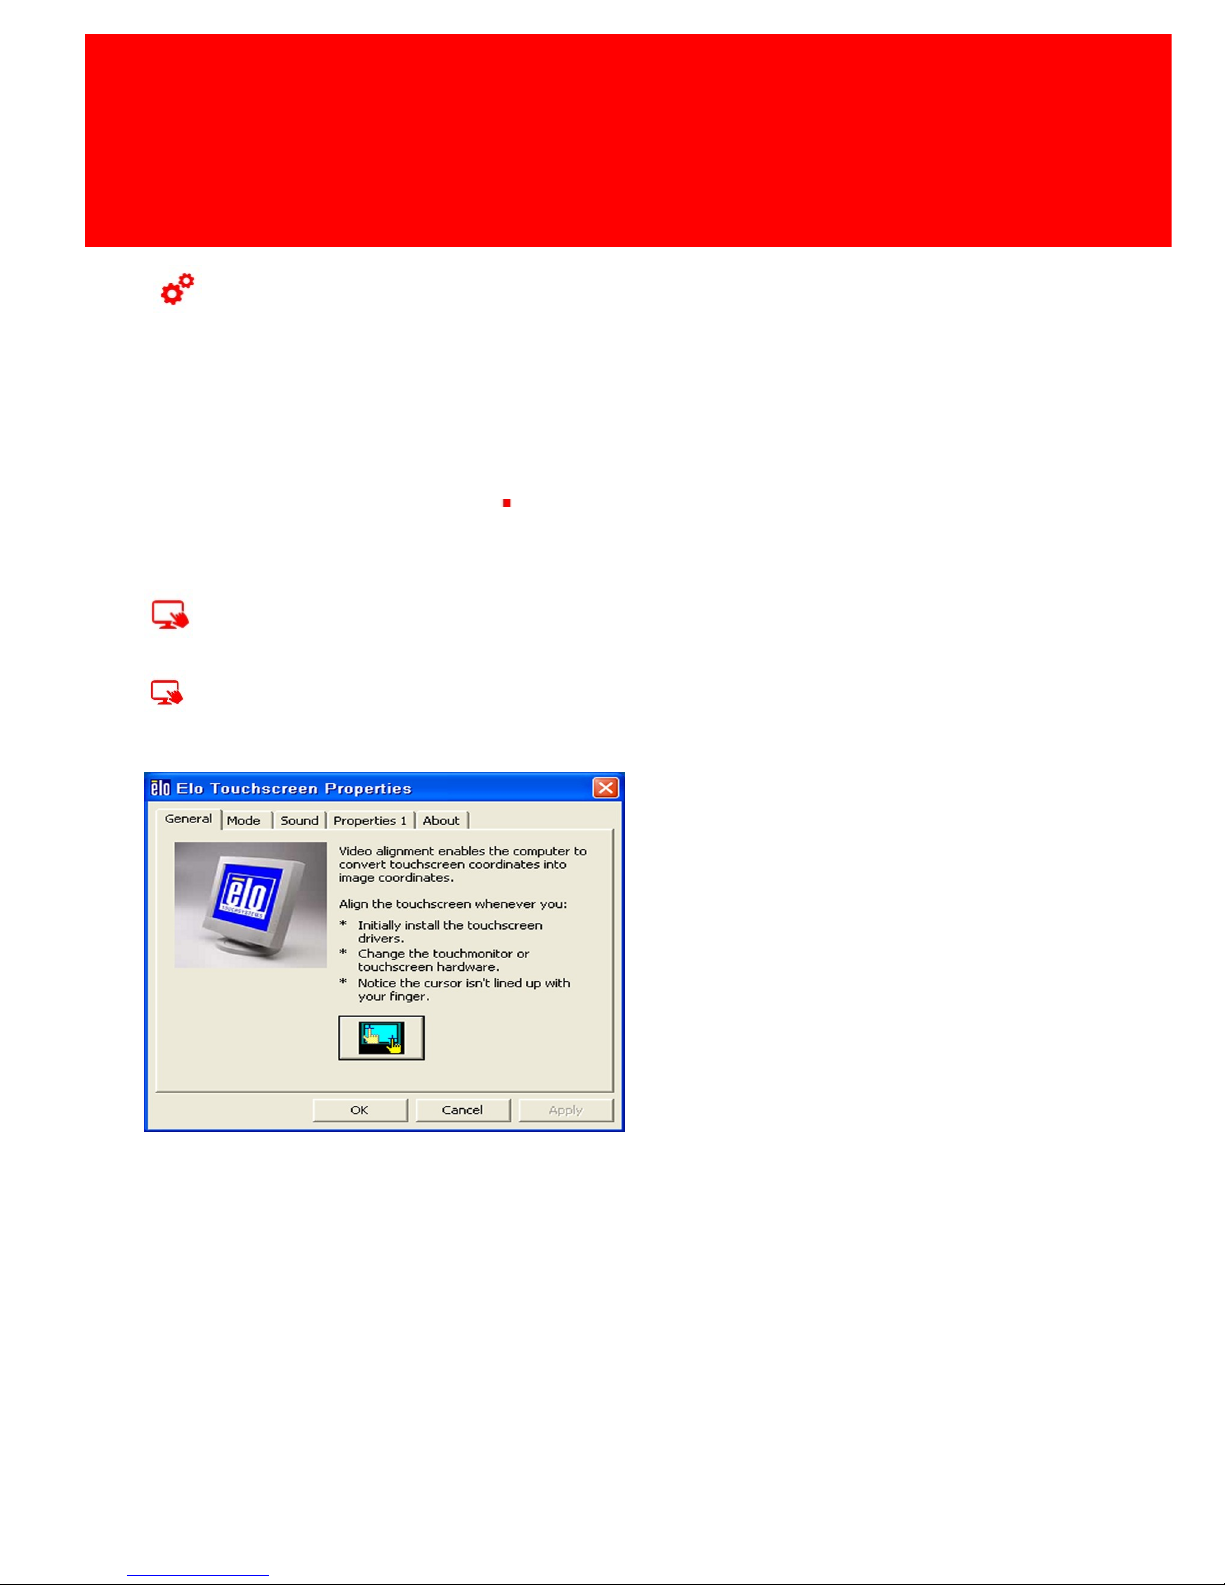
· The ELO touch screen display should be calibrated
· The OPOS devices should be connected to the OPOS drivers
· The Inepro Back Office Suite module CashPRO must be setup and the products should be created
· The till itself must be configured via the *.ini files
· The receipt layout must be set up
ELO Display
ELO Control Panel
This section explains the different options in the ELO control Panel.
Page 31
Version 7.5.6 - 25
ELO Display
General tab
The general tab allows to:
· Calibrate the touch screen with the Align button. Press the center of each of the four targets that
appear on the screen with your finger, like when normally using the application.
Please calibrate the touch screen right now to ensure a good working user interface
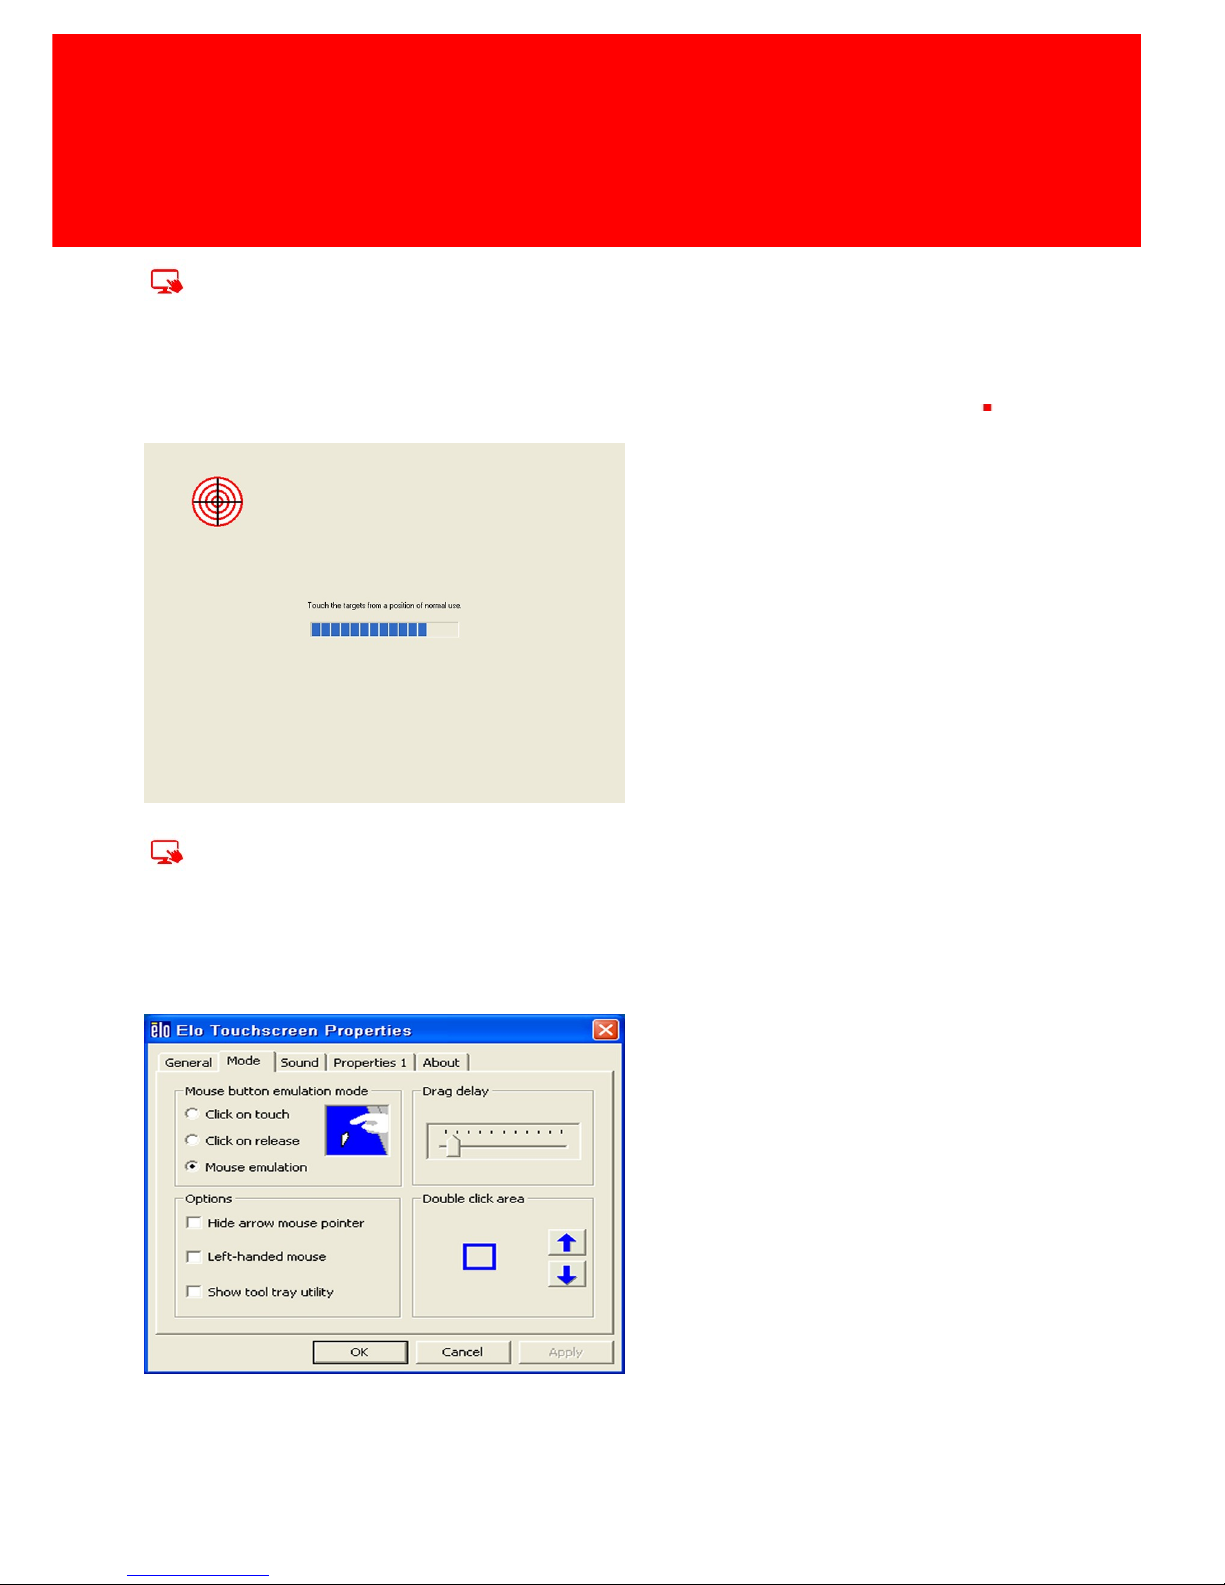
Mode tab
The Buttons tab are used to:
· Adjust all mouse emulation controls.
· Change cursor properties
These settings do not need to be changed for using the PosPRO software
Page 32
26 - PosPRO
Configuration
Sound tab
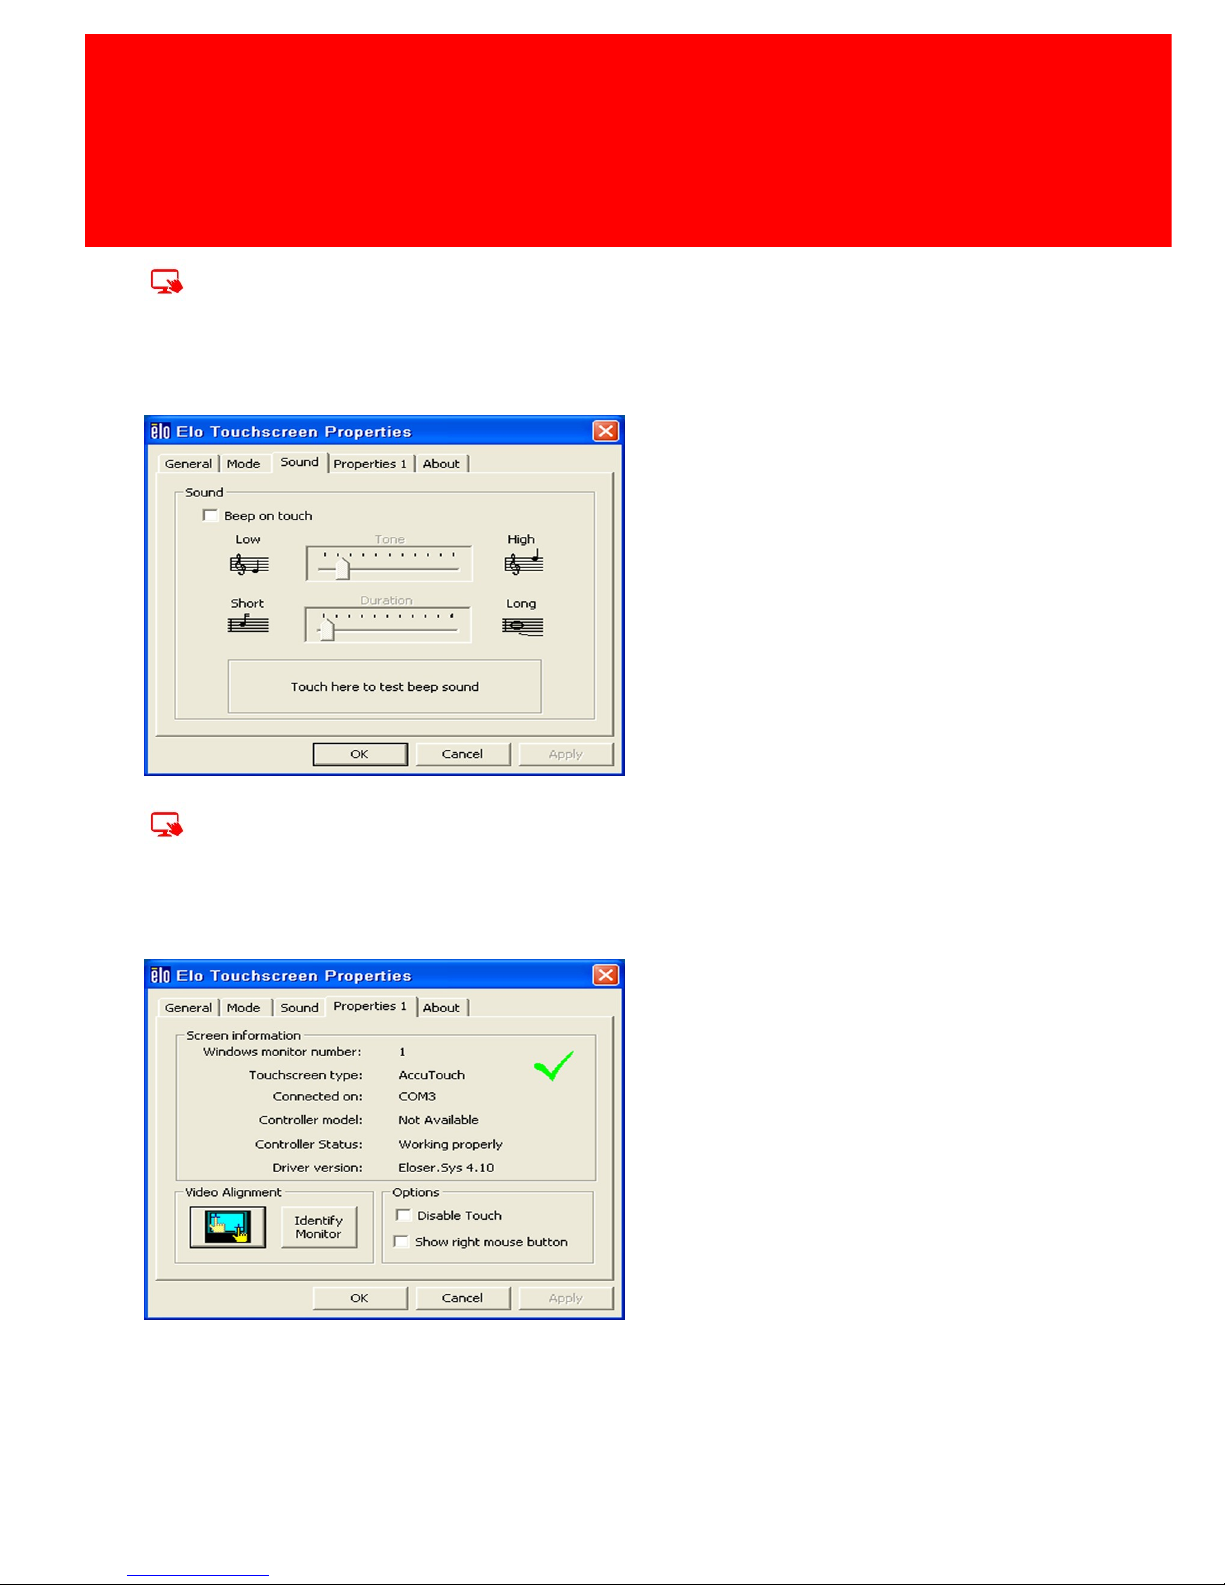
The Sound tab allows to:
· To change sound properties for ELO touch tools.
These settings do not need to be changed for using the PosPRO software
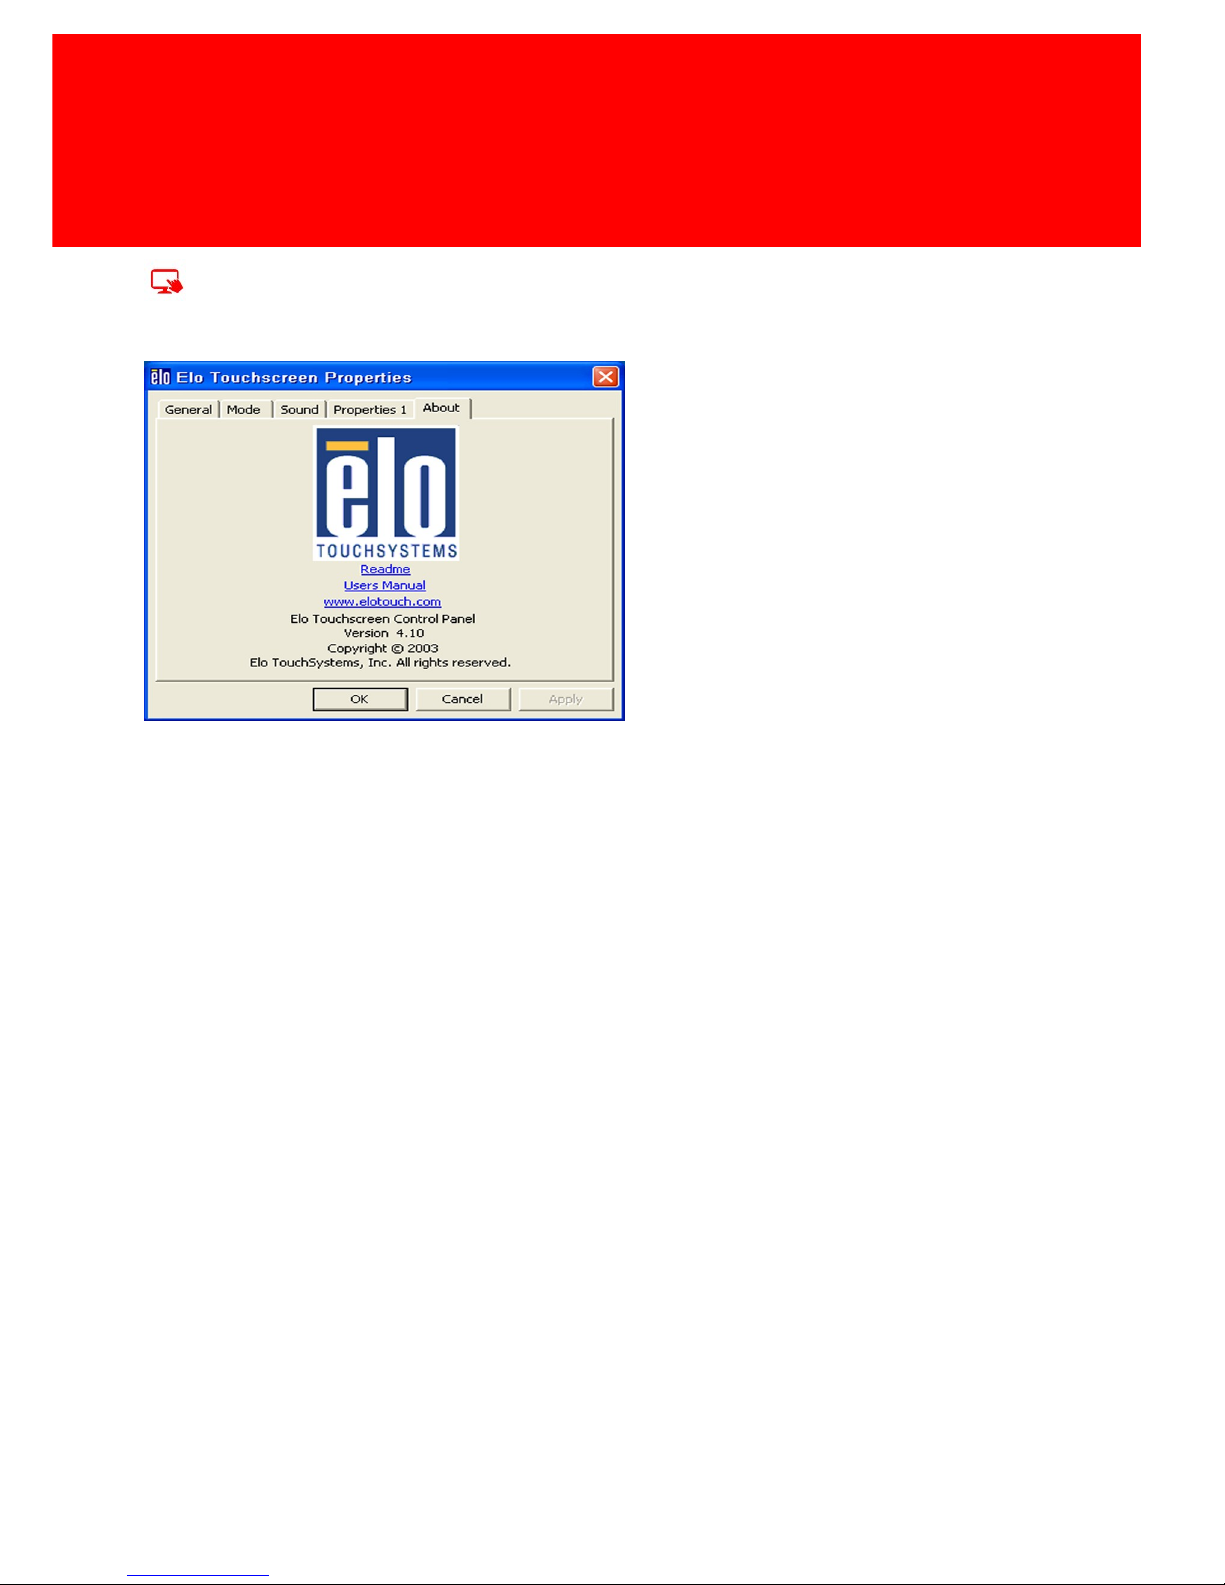
Properties tab
The Diagnostics tab harbors the:
· View Controller Information.
These settings do not need to be changed for using the PosPRO software
Page 33
Version 7.5.6 - 27
ELO Display
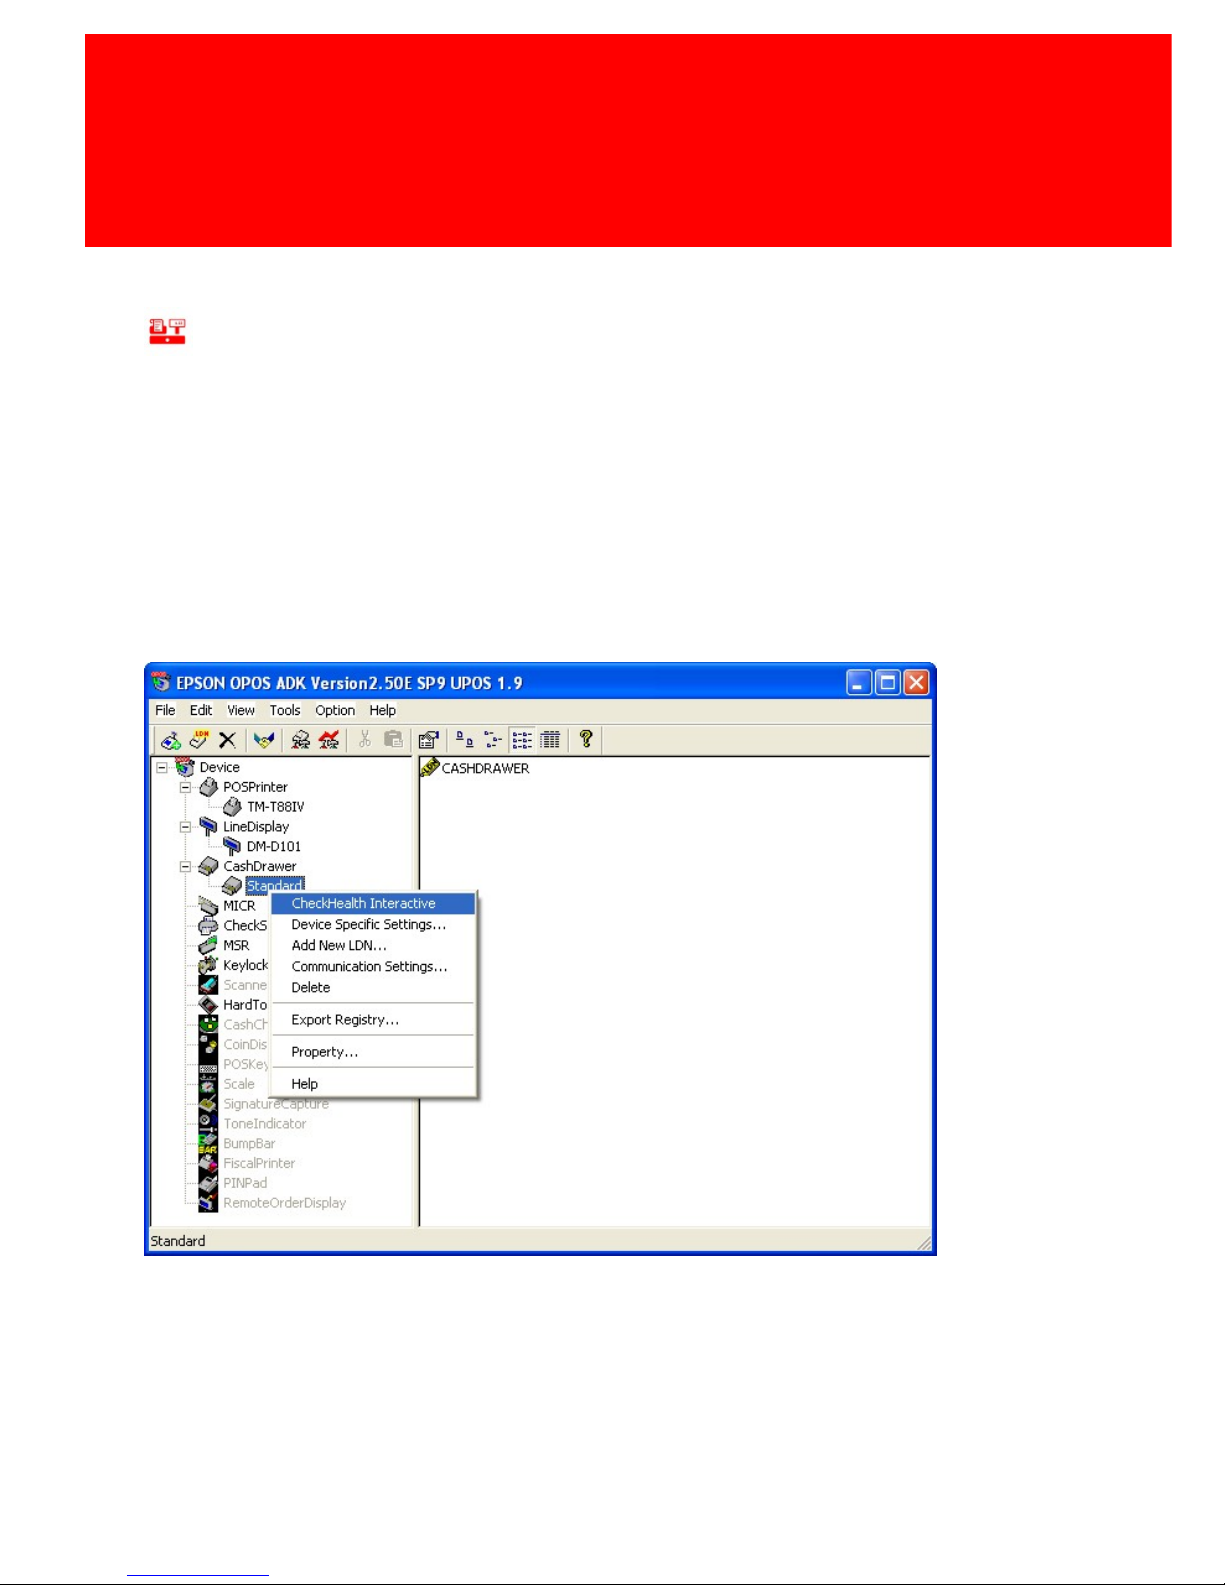
About tab
· The About tab displays Information about ELO Touchsystems
Page 34
28 - PosPRO
Configuration
OPOS:
OPOS, Object Linking and Embedding for Retail POS consists of an architecture for Win32-based
POS device access. Point of sale (POS) or checkout is the location where a transaction occurs, it is
sometimes falsely used to describe the POS terminal or till. OPOS also consists of a set of POS
device interfaces sufficient to support a wide range of POS solutions. It provides a consistent
interface to POS peripherals for use by application creators.
The Epson OPOS SDK gives easy access to the POS devices and their settings.
We will check the connection to the Line Display, printer and cash drawer.
Page 35
Version 7.5.6 - 29
OPOS
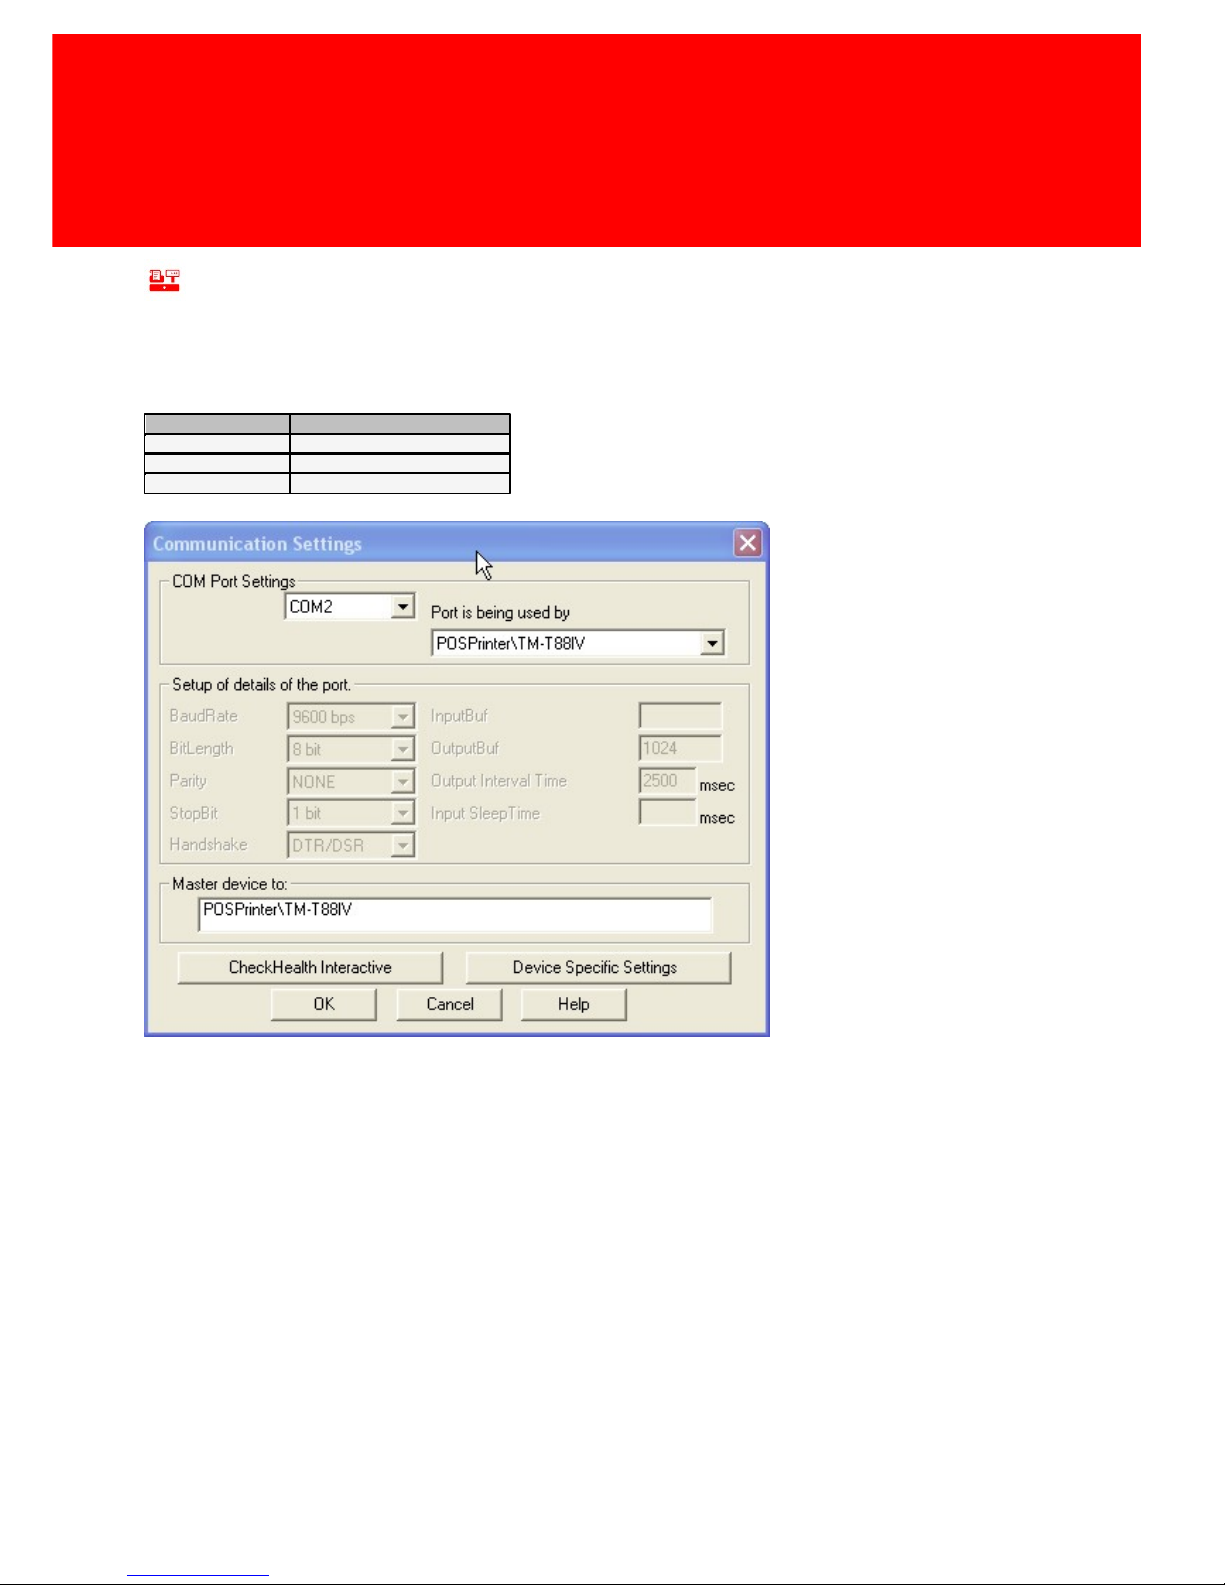
Communication Settings
Check via the context menu (right mouse button), 'Communication Setting' if the COM port is set
correctly.
The LDN (Device Name) should correspond with the table below.
Apparaat
LDN (Apparaat label naam)
Printer
RECEIPTPRINTER
Line Display
LINEDISPLAY
Cash Drawer
CASHDRAWER
The cash drawer is connected to the printer, so the COM port should be the same is that of the
printer.
Page 36
30 - PosPRO
Configuration
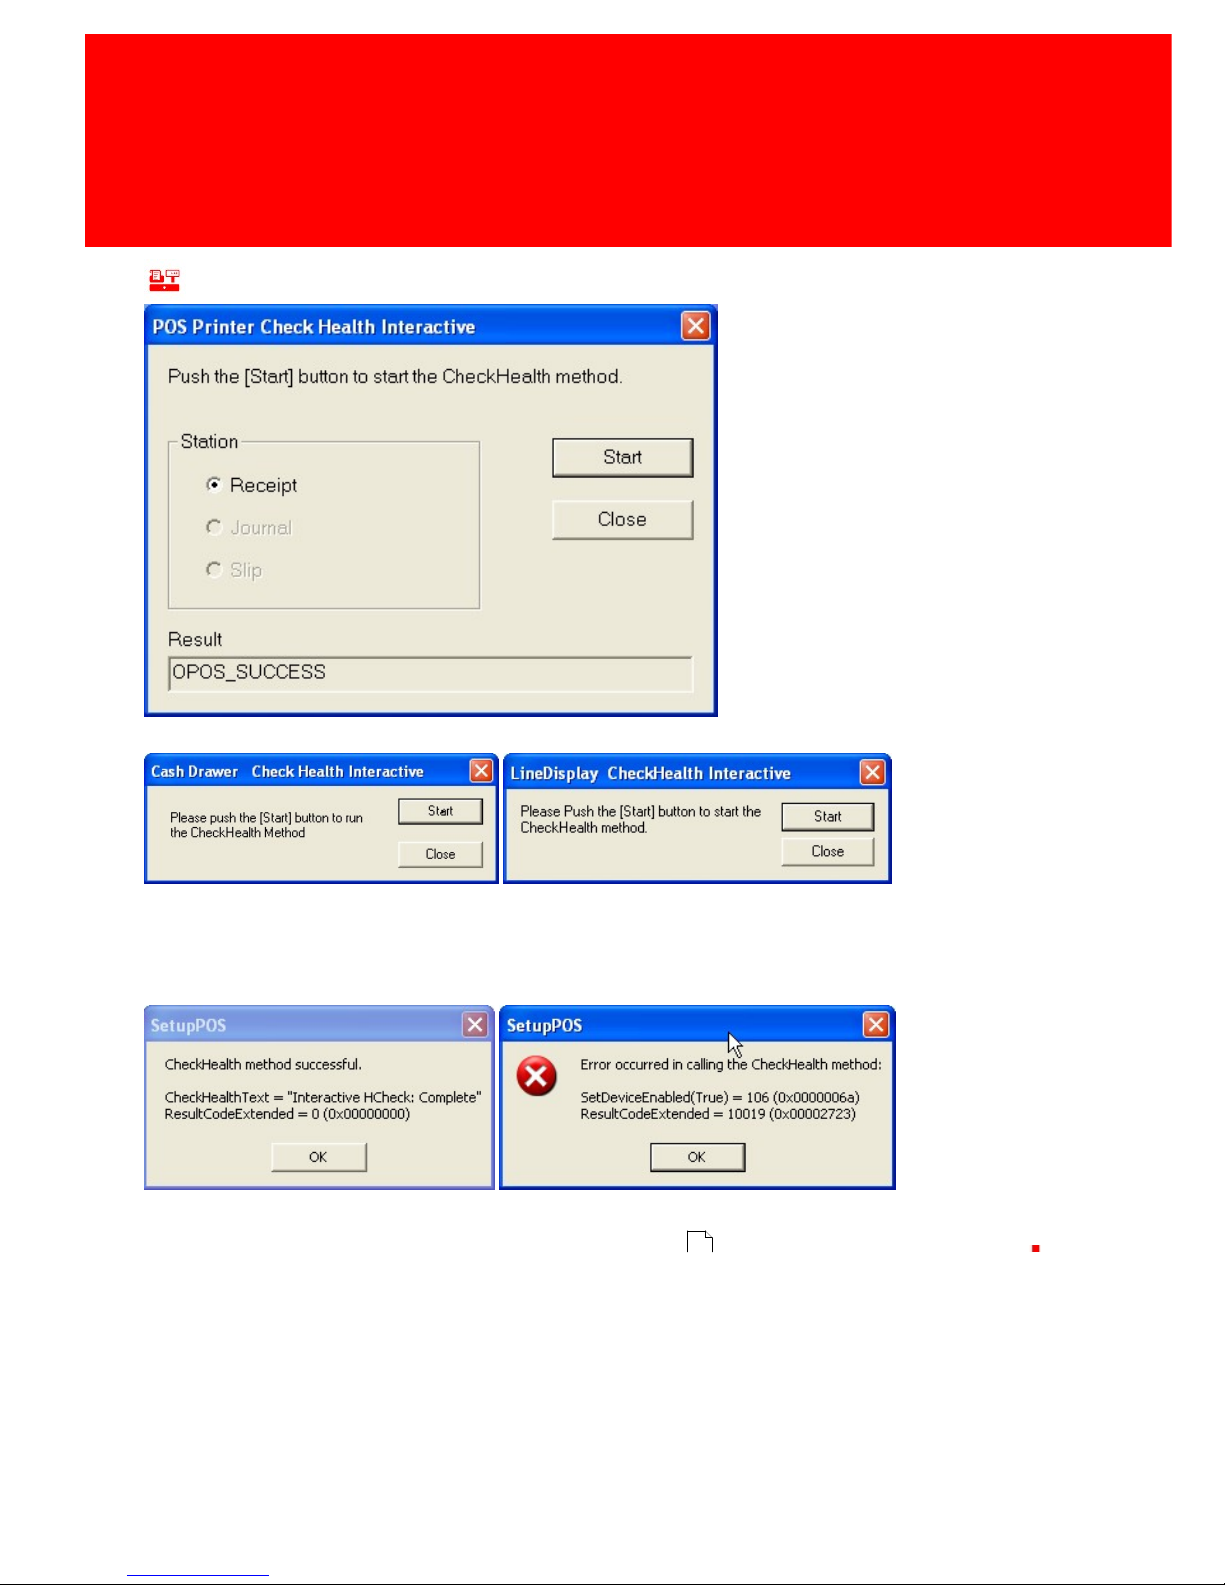
Health Check
Printer Health Check
Cash Drawer and Line Display Health Check
After this a message will come up, informing the user if the hardware test has succeeded or has
failed:
Security message
Try to reconnect, go to the solving challenges section, when the issue is not resolved
84
Page 37
Version 7.5.6 - 31
Configure IBOS - CashPRO
Configure IBOS - CashPRO
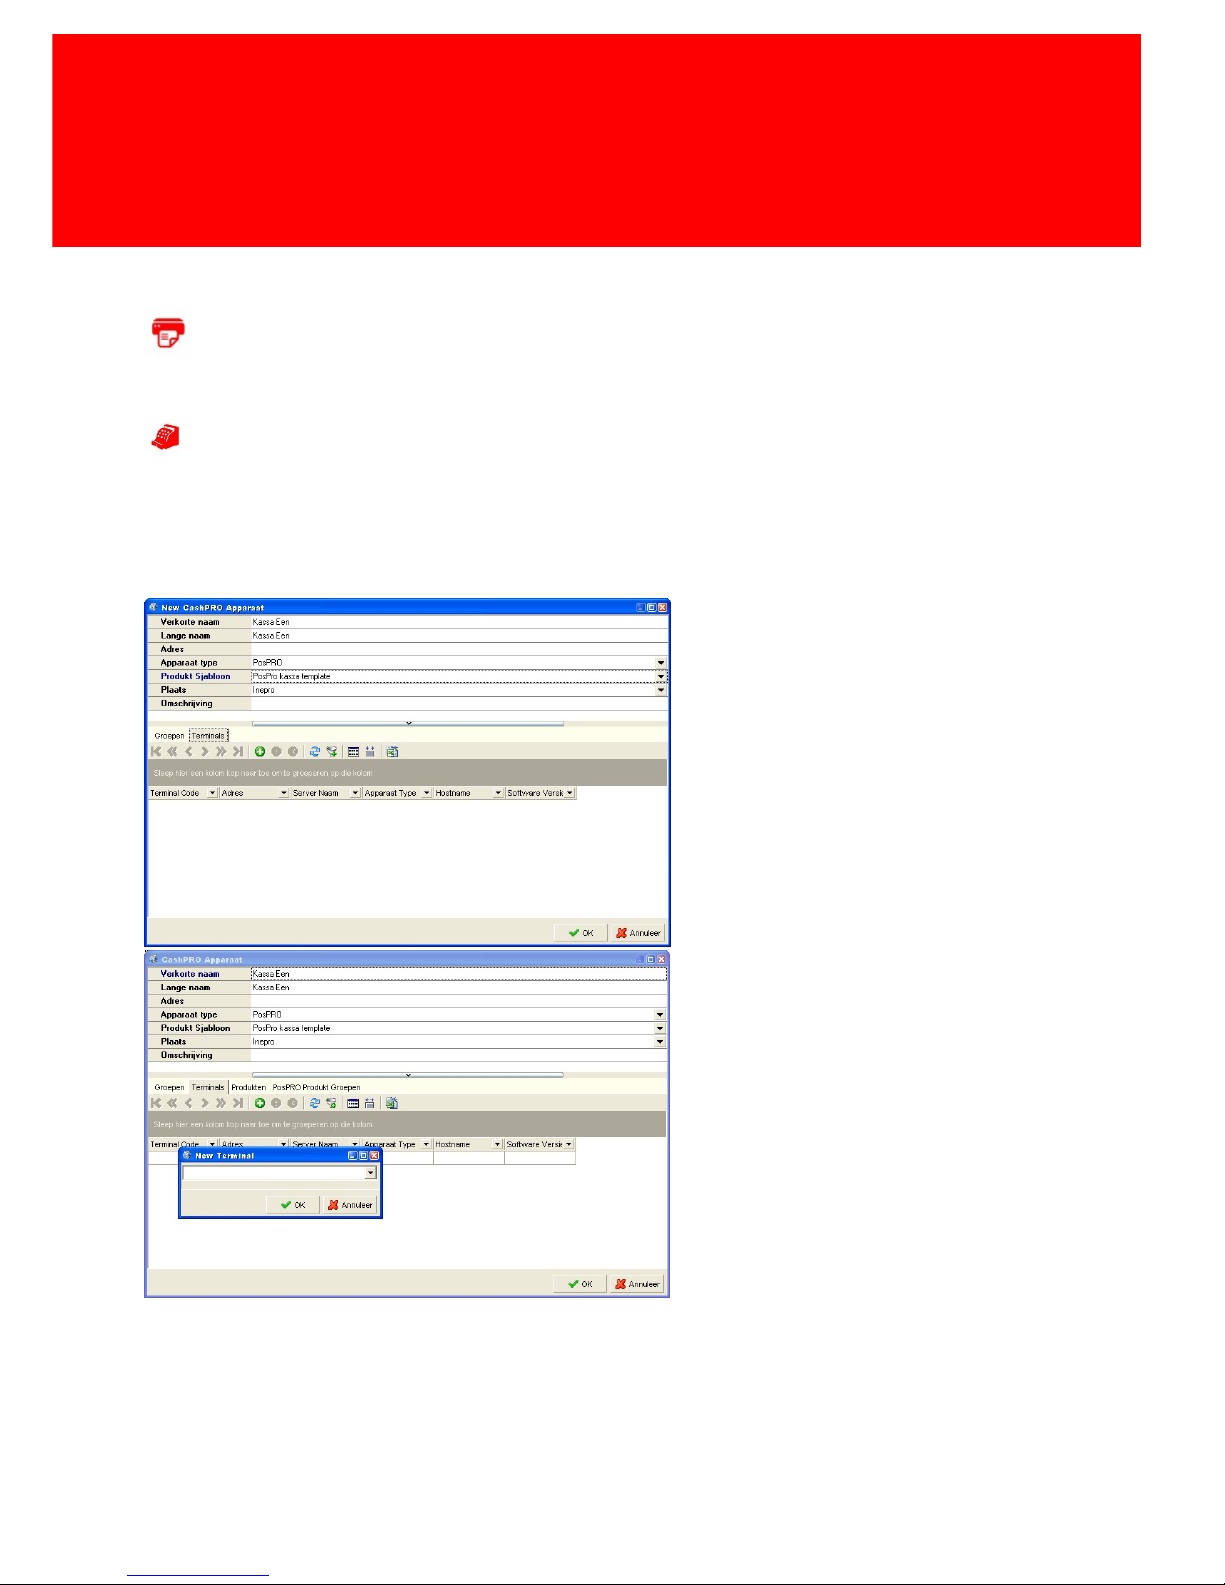
Creating and linking a PosPRO till
Before the PosPRO till can be managed, it must be linked to the Inepro Back Office Manager.
To create a PosPRO open CashPRO devices and add a new device. Then go to the terminal tab and
add a new terminal, this terminal is the PosPRO till.
Page 38
32 - PosPRO
Configuration
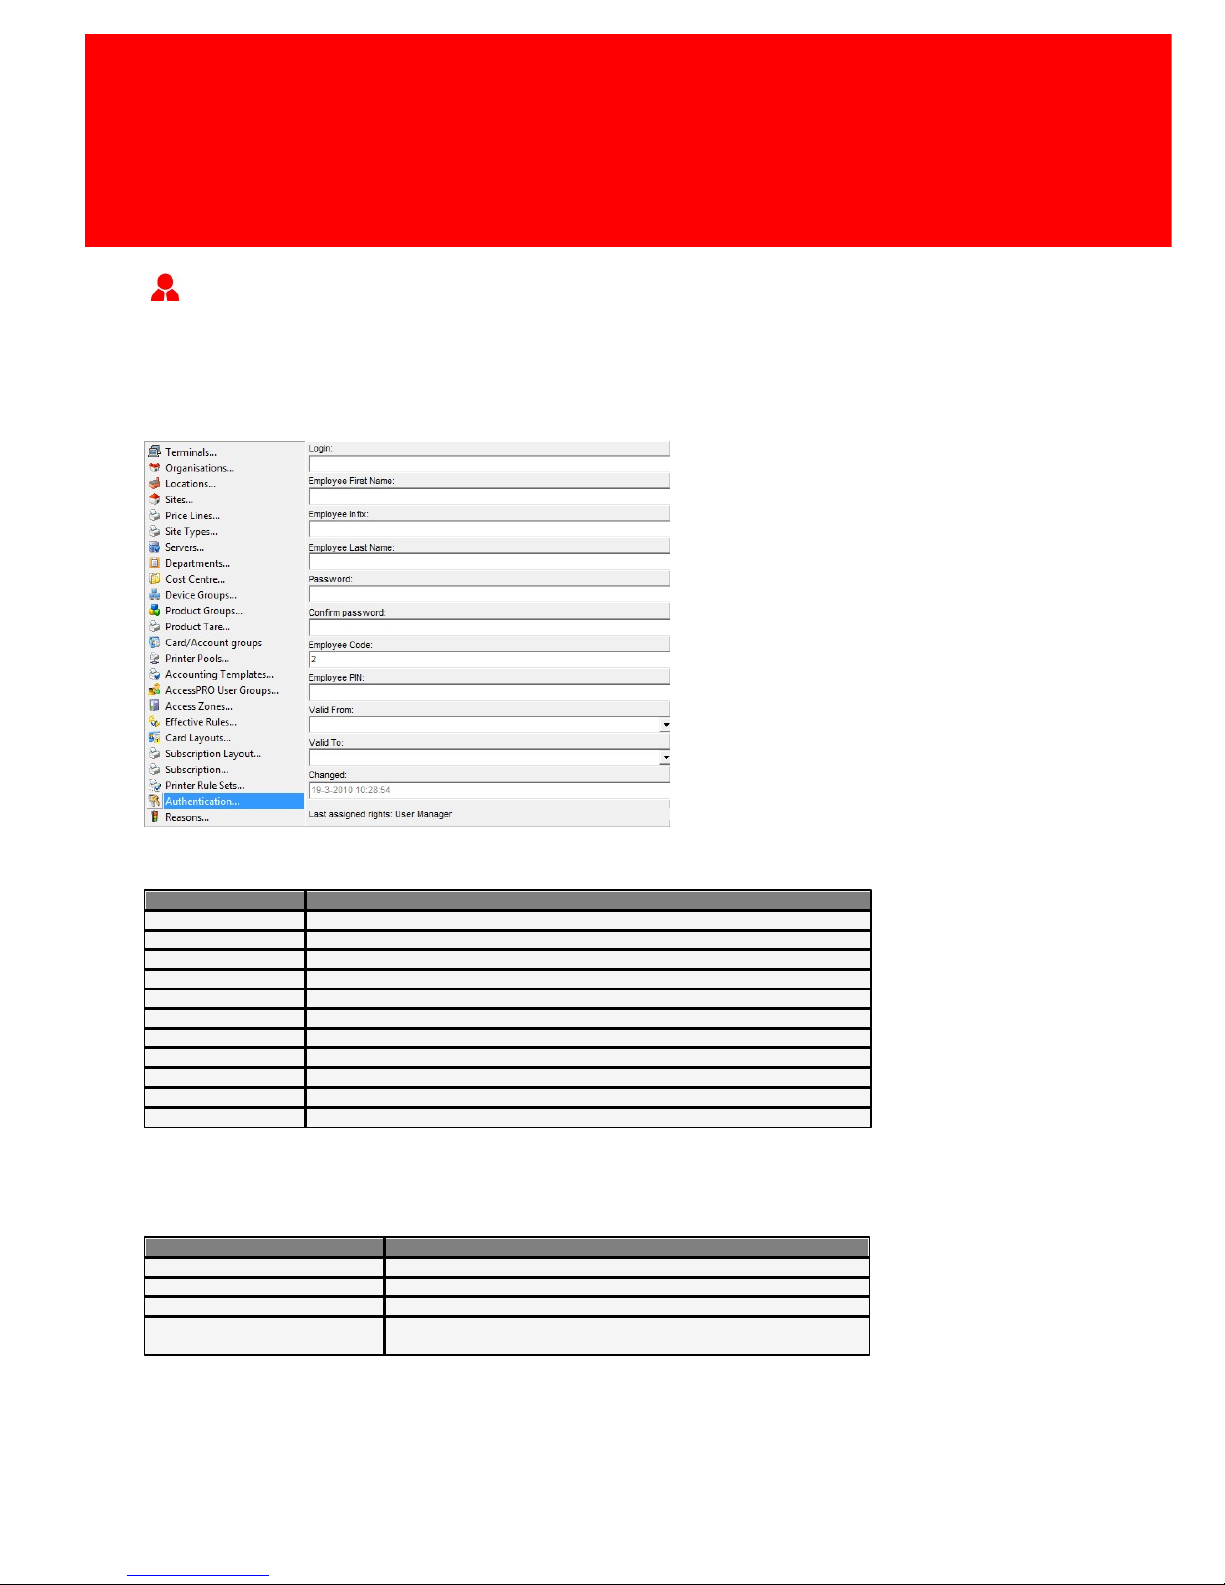
Creating an employee
Now a PosPRO till has been linked to the terminal, employees should be created who may operate
the till and or the CashPRO management module. To add an employee got to 'Advanced ->
Authentication' and add a new employee.
Fill out the values according to the table below and assign the rights.
Name
Description
Login
Login name for the Inepro Back Office Manager
Employee First Name
Self explanatory
Employee Infix
Self explanatory
Employee Last Name
Self explanatory
Password
Password to access the Inepro Back Office Manager
Confirm Password
Self explanatory
Employee Code
Employee ID for the PosPRO till
Employee PIN
Employee numeric password for the PosPRO till
Valid From
The date from which these rights will be valid
Valid Trough
The date trough which these rights will be valid
Changed
The date this record was last edited
The right should be set to set according to the rights this person should have in the Inepro Back
Office manager, see table below:
Name of default right
Description
CashPRO Read-only
Can only see the products and tills in the manager
CashPRO Employee, No Reports
Prices may be changed, but no reports may be created
CashPRO Employee
Prices may be changed, reports may be created
CashPRO Manager
Can execute management task like creating new tills, change location
names, database settings and create new employees.
Save the settings for this employee.
Page 39
Version 7.5.6 - 33
Configure IBOS - CashPRO
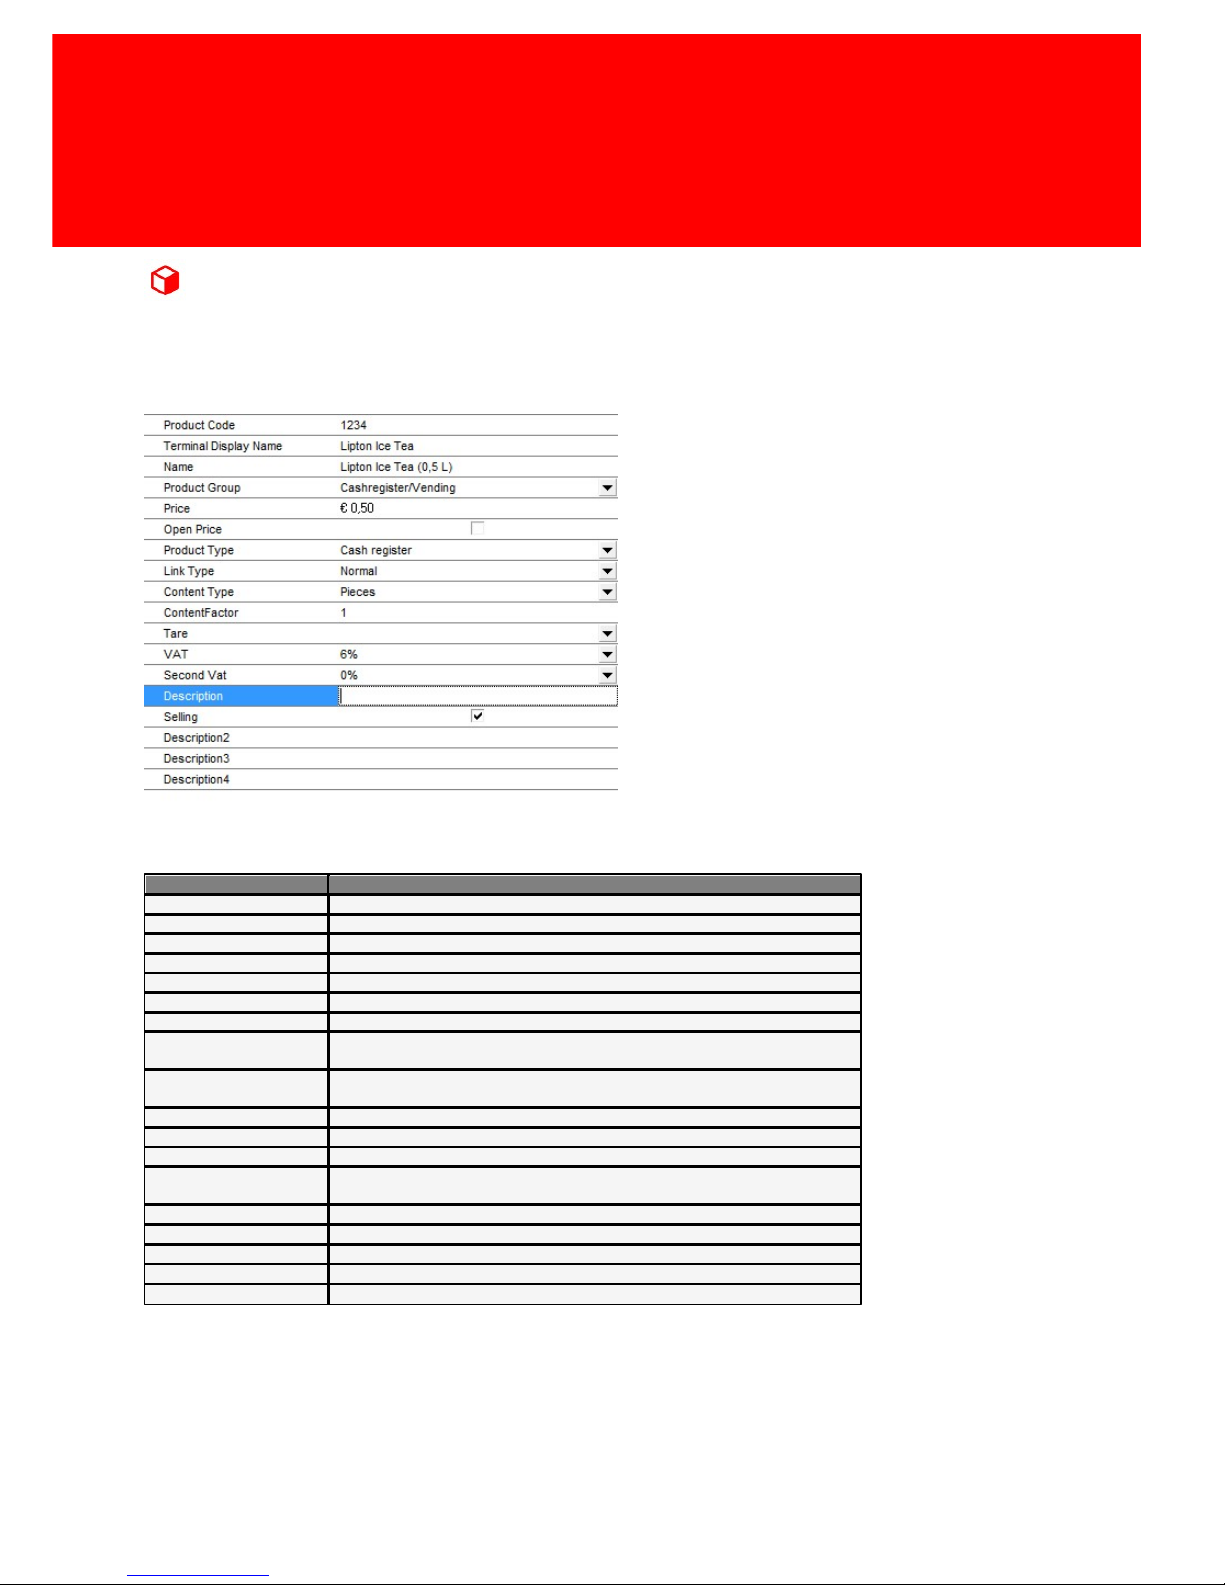
Creating a product
The final thing the PosPRO till needs is products. Products can also be created in the Inepro Back
Office Manager. Go to 'Products' and add a new product.
The values of the product are explained in the table below:
Name
Description
Product Code
A unique code (generated by default using the timestamp as seed)
Terminal Display Name
A short name 14-17 characters so it will fit on the PayCon display
Name
The long name of the product for display on reports
Product Group
Should always be 'Cashregister/Vending' for the PosPRO till
Price
The price of the product, leave it at 0,00 when using 'open price'
Open Price
Tick, if the employee should decide for which price this item is sold
Product Type
Should always be 'till' for the PosPRO till
Link Type
Is it a normal product, a compound product or part of a compound product
(linked to a compound product) by default set to 'normal'
Content Type
If the content of the product should be specified, it can be done here. By
default this is set to 'pieces', it can also be set to 'weight' or 'volume'.
Content Factor
How many of the content type the product consist of
Tare
The weight of the product container
VAT
Value Added Tax
Second Vat
Second Value Added Tax, if the product could be sold at both a high and a low
VAT rate.
Description
Selling
May this product be sold at this moment?
Description2
Description3
Description4
The Link and Content values are used for special products that will be sold based on their content
value or linked to other products.
Page 40
34 - PosPRO
Configuration
Creating special products
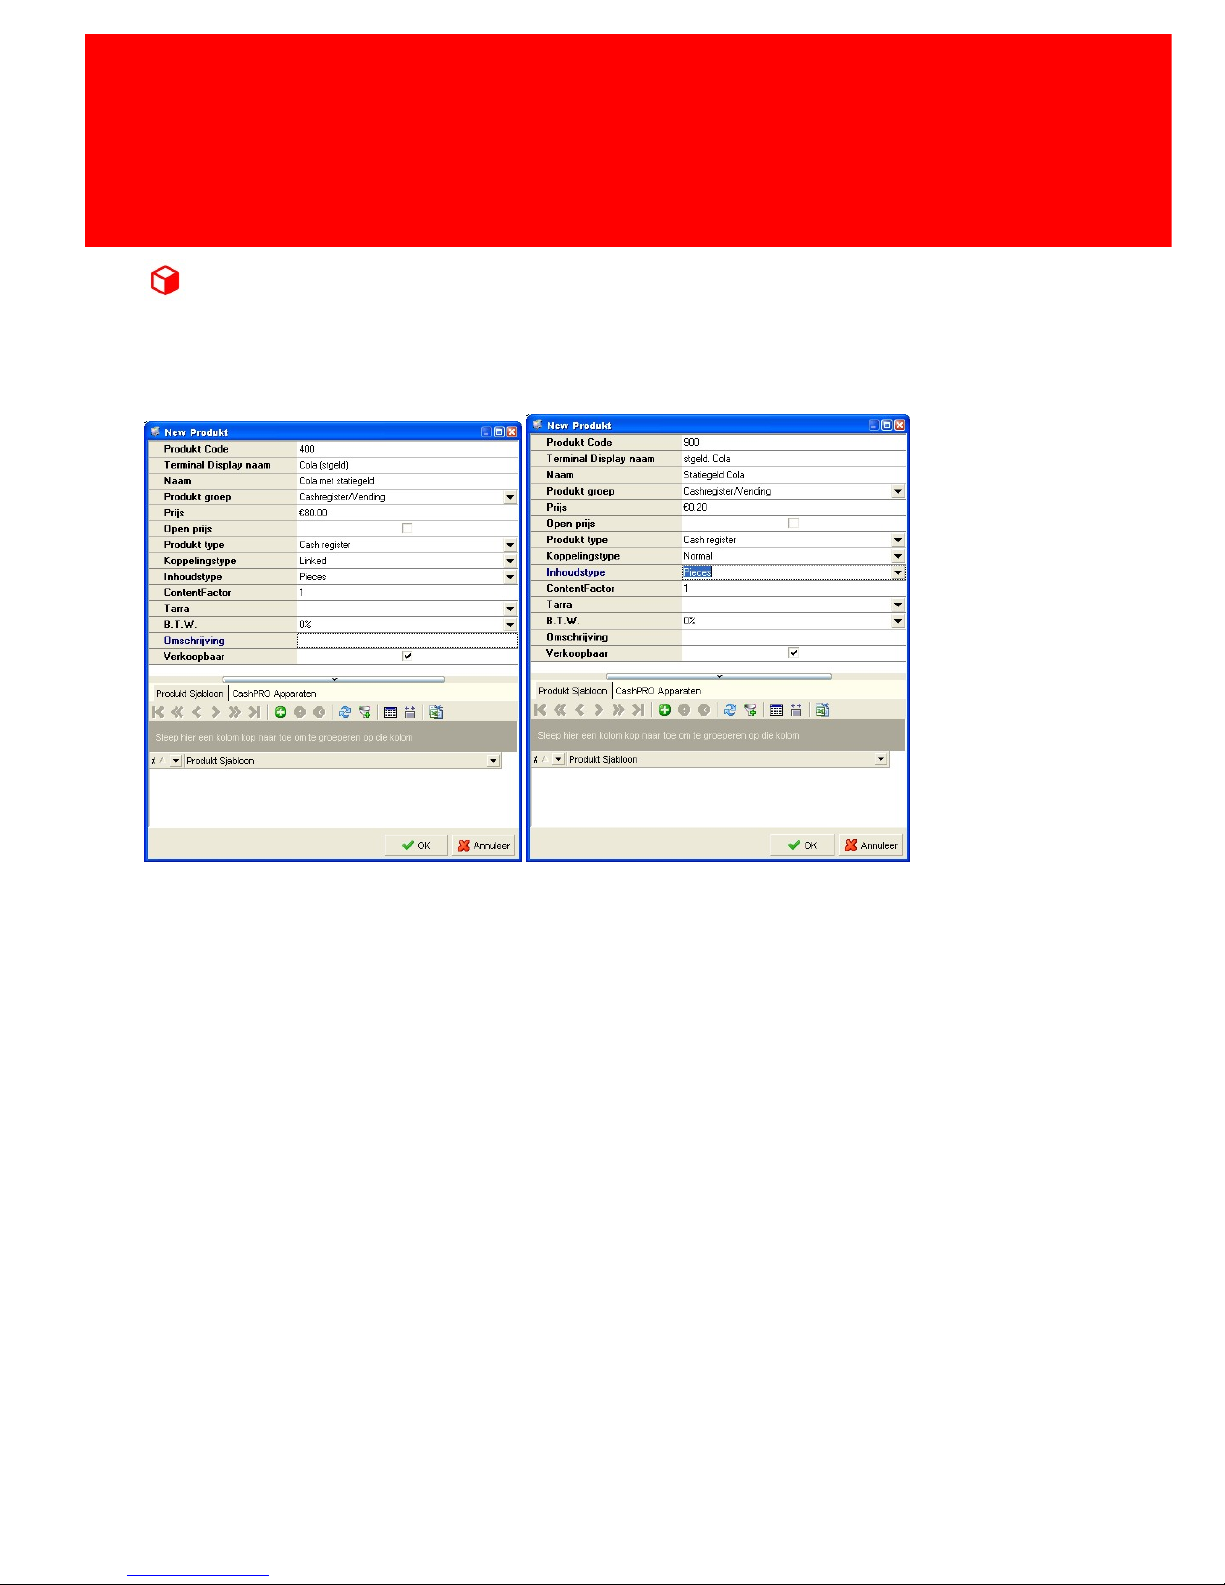
Some product need to be linked to other products or are sold based on their content or weight. We
will explain how to create these products.
To create products with the content property set the content type to 'Pieces' if it consists of more
then one item, to 'weight' of the price is based on the products mass, and to 'volume' if it is based
on the volume the product contains. Set the content factor, if the content type is 'weight' and the
content factor = '100', the price will be be per 100 gram of that product.
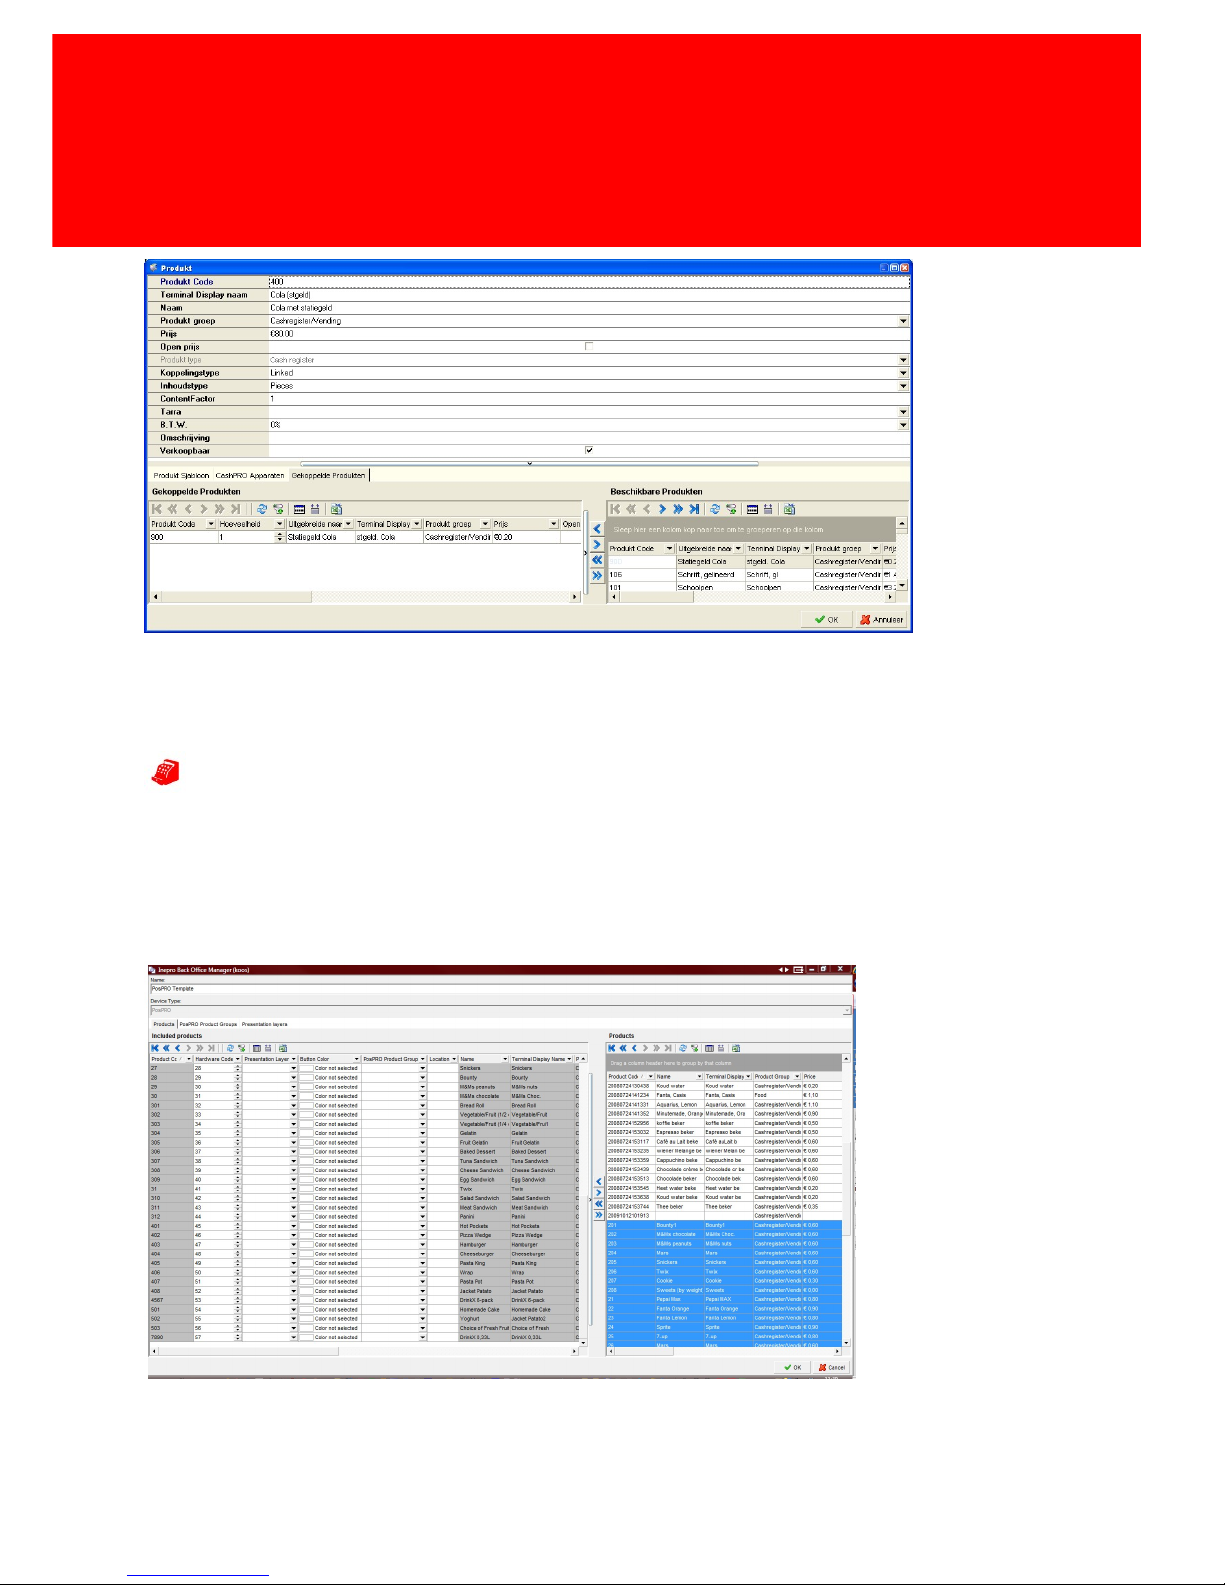
To create a linked product, have the main product have the link type 'Linked' and the linked product
have the link type 'Normal'.
Linked products and products with a content property may be combined.
Page 41
Version 7.5.6 - 35
Configure IBOS - CashPRO
Finally go to the main product, that has the link type 'Linked' and link the other product(s) to this
product.
The other products will be sold if this product is.
Creating a PosPRO product template
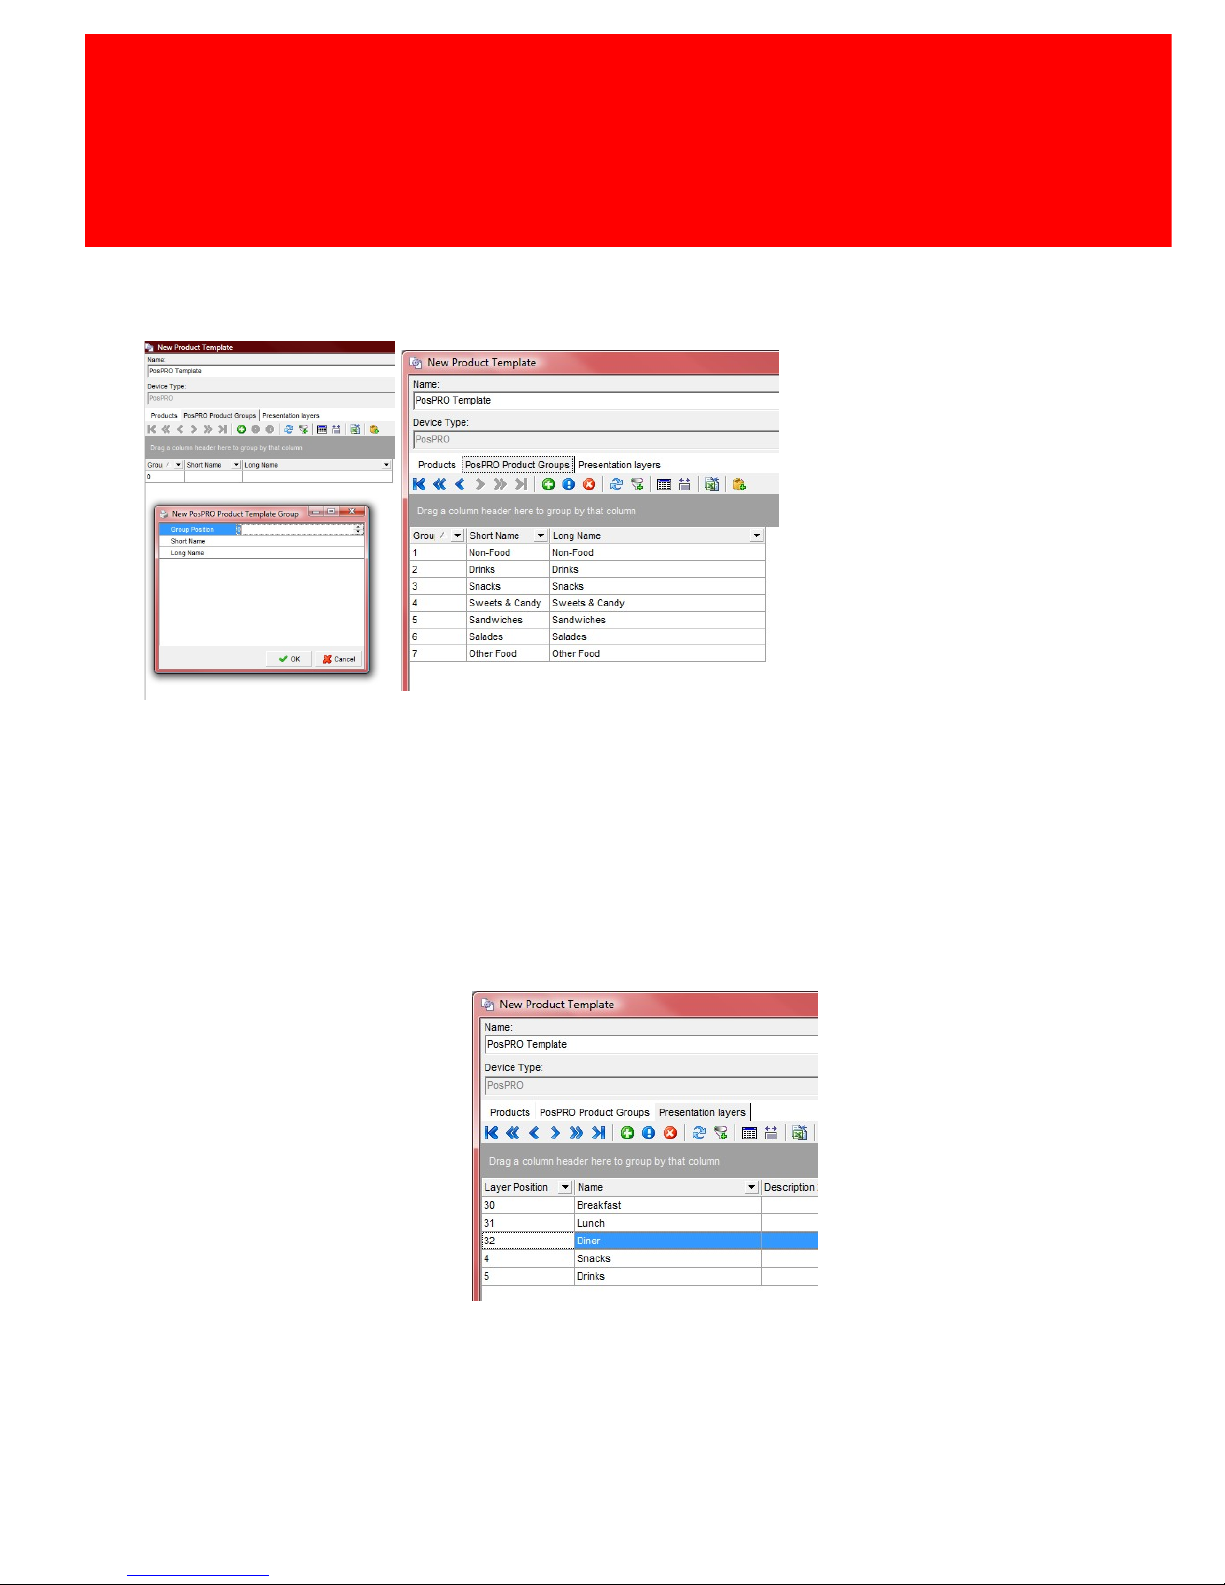
Finally we will gather a number of products in a PosPRO product template. In the PosPRO product
template we will be able to select the products that should be sold and link them to the PosPRO
reports and the presentation layers (a layer with a selection of product buttons). One PosPRO
template can be used for multiple PosPRO tills.
Page 42
36 - PosPRO
Configuration
Select the different product that need to be sold in this specific (range of) till(s), in the right section
of the window and drag them to the left section (or use the blue arrow buttons on the border).
1) Create Product Groups (these are used in reports created on the till)
a) Create the product groups that are needed, mind that the 'Group Position' can never be '0'.
2) Create Presentation Layers (these are layers with product buttons)
a) Create Presentation Layers, the normal layers should have a number from 1 to 24 (inclusive),
it can not be '0' and layers with an ID higher then 24 are not visible.
b) Special layers can be created, these layers can be used as the main screen, or a layer that has
the products that are sold most. For example create a breakfast and a lunch layer that will only
be shown at the appropriate times. These layers will need a number higher then 24.
i) A special period layer should be created for a maximum of 4 periods.
Page 43
Version 7.5.6 - 37
Configure IBOS - CashPRO
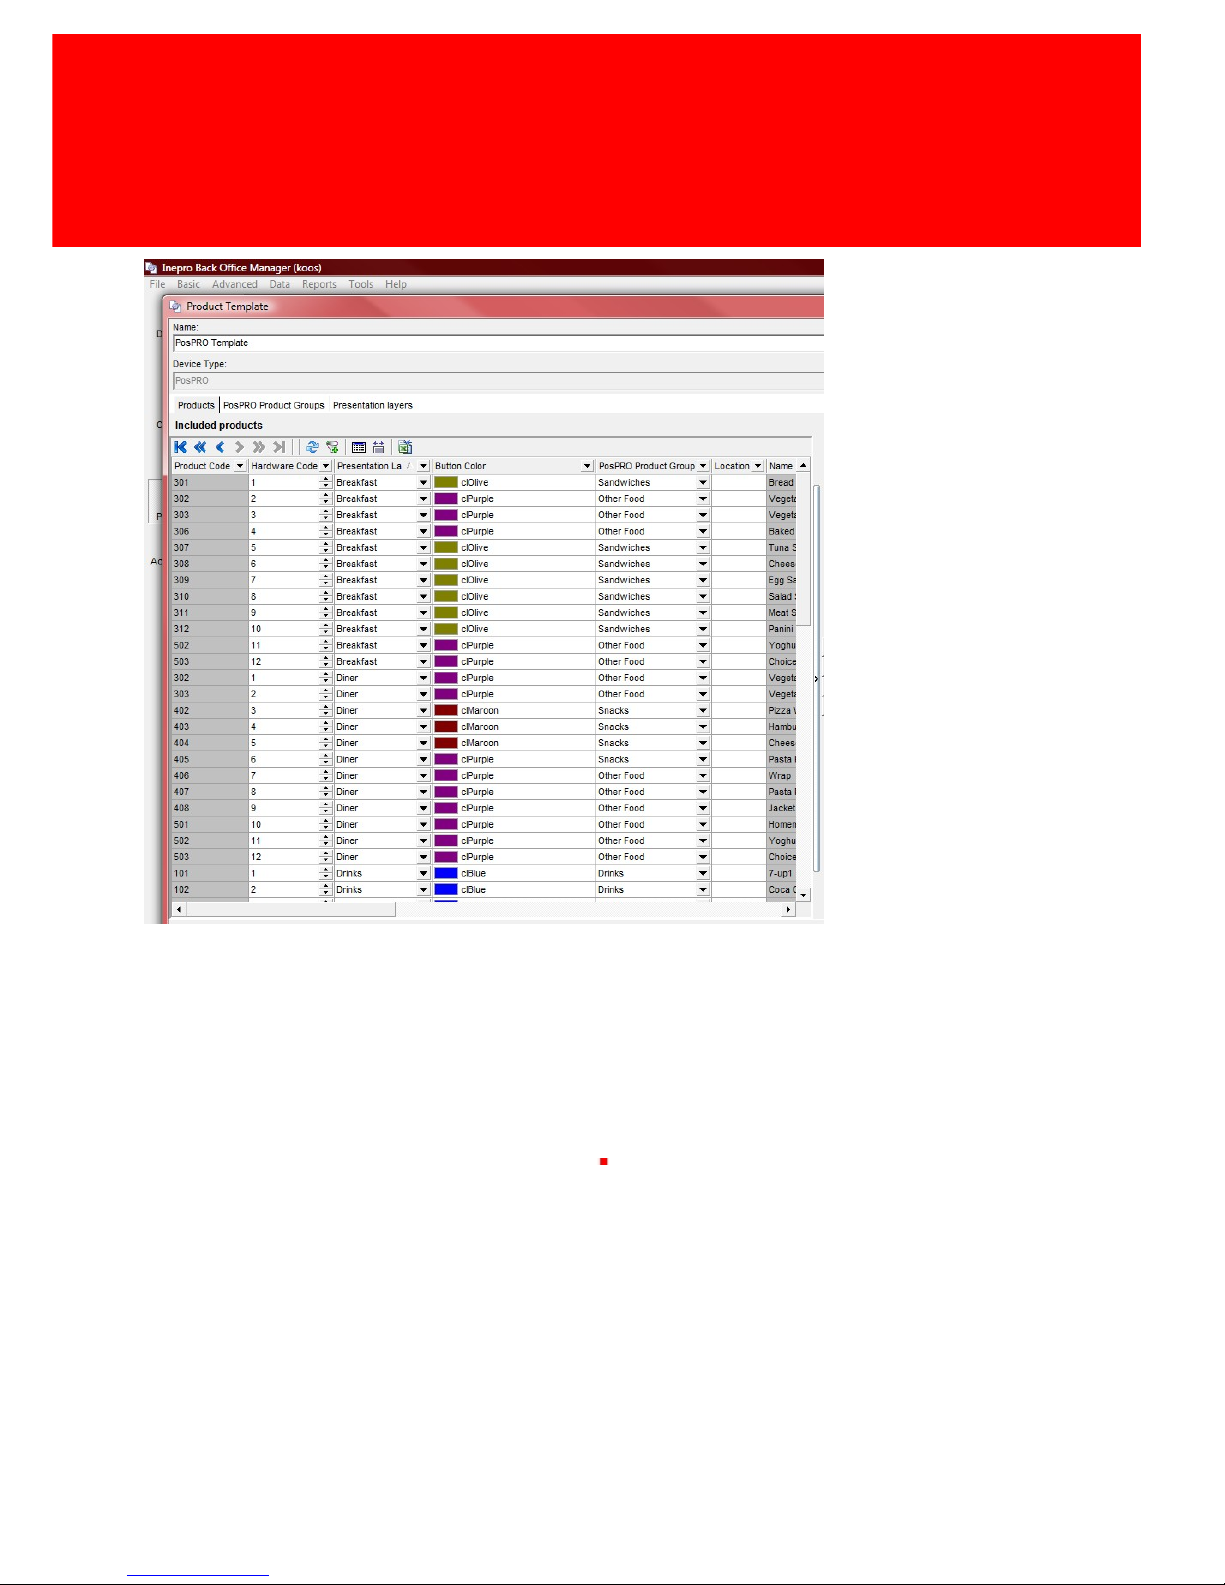
3) Assign the PosPRO Product groups in the Products tab, remember these are product groups,
which are used for the reports created on the till.
4) Assign the Presentation Layers, remember, one product can be on more then one presentation
layer, so then the same product must be added again.
5) Assign a Colour for the button, to make it easier to search for the right product.
6) Edit the PosPRO.ini
a) TabSheet Period = <Most sold / main layer ID>
b) Main tab = <Most sold / main layer ID>
Page 44
38 - PosPRO
Configuration
Receipt Layout
When a transaction has been made, the customer might want a receipt, this receipt is available in a
number of layouts and can be preset in the PosPRO.ini in de printer section .
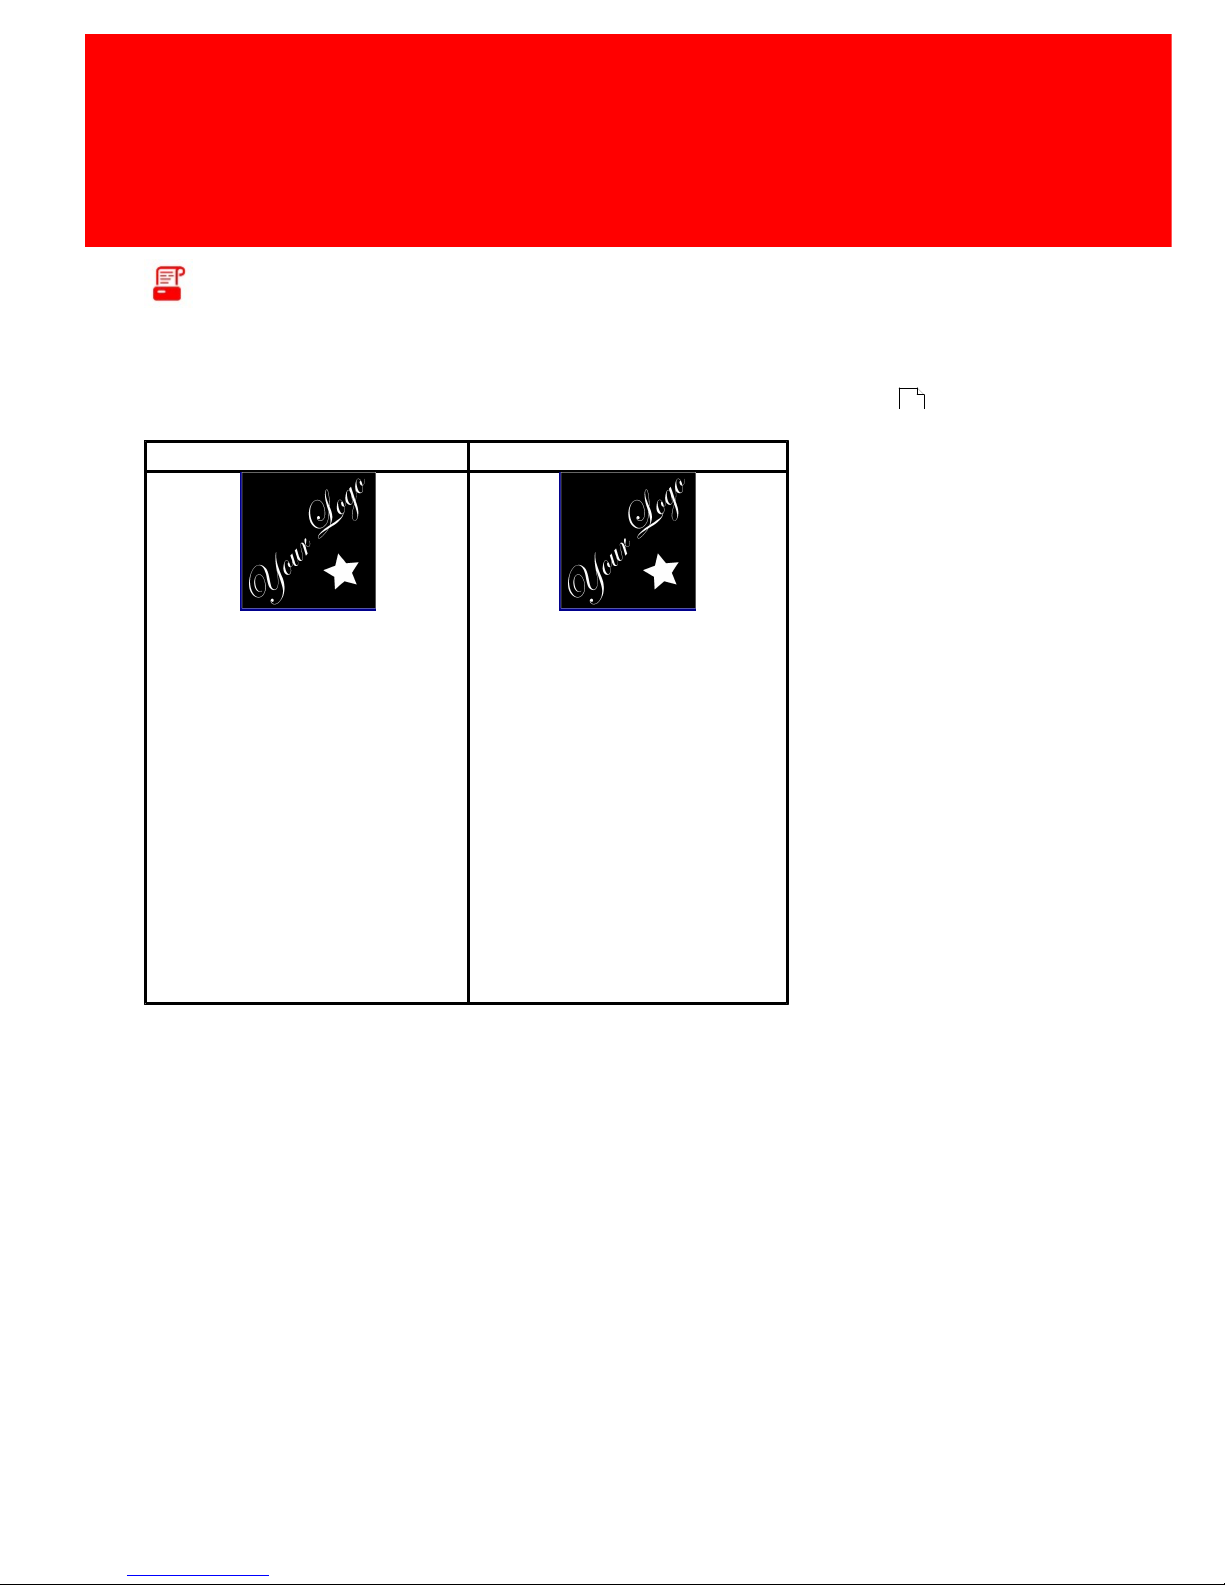
Receipt Type 0
Receipt Type 1
** INEPRO POSPRO **
QTY
DESCRIPTION
PRICE
AMOUNT
-------
-----------------------
---------
------------
1
Hamburger
1,30
1,301Pizza Wedge
2,25
2,251Tuna Sandwich
1,40
1,401Homemade Cake
0,85
0,851Bread Roll
0.35
0.35
SUBTOTAL 6,15
TOTAL 6,15
Cash 6,15
CHANGE 0,00
Thanks for your visit
And have a nice day
OPER:0001 Ticket:0039 2010-03-15 14:10:01
** INEPRO POSPRO **
QTY
DESCRIPTION
PRICE
AMOUNT
-------
-----------------------
---------
------------
1
Hamburger
1,30
1,301Pizza Wedge
2,25
2,251Tuna Sandwich
1,40
1,401Homemade Cake
0,85
0,851Bread Roll
0.35
0.35
SUBTOTAL 6,15
TOTAL 6,15
Cash 6,15
Thanks for your visit
And have a nice day
OPER:0001 Ticket:0040 2010-03-15 14:10:01
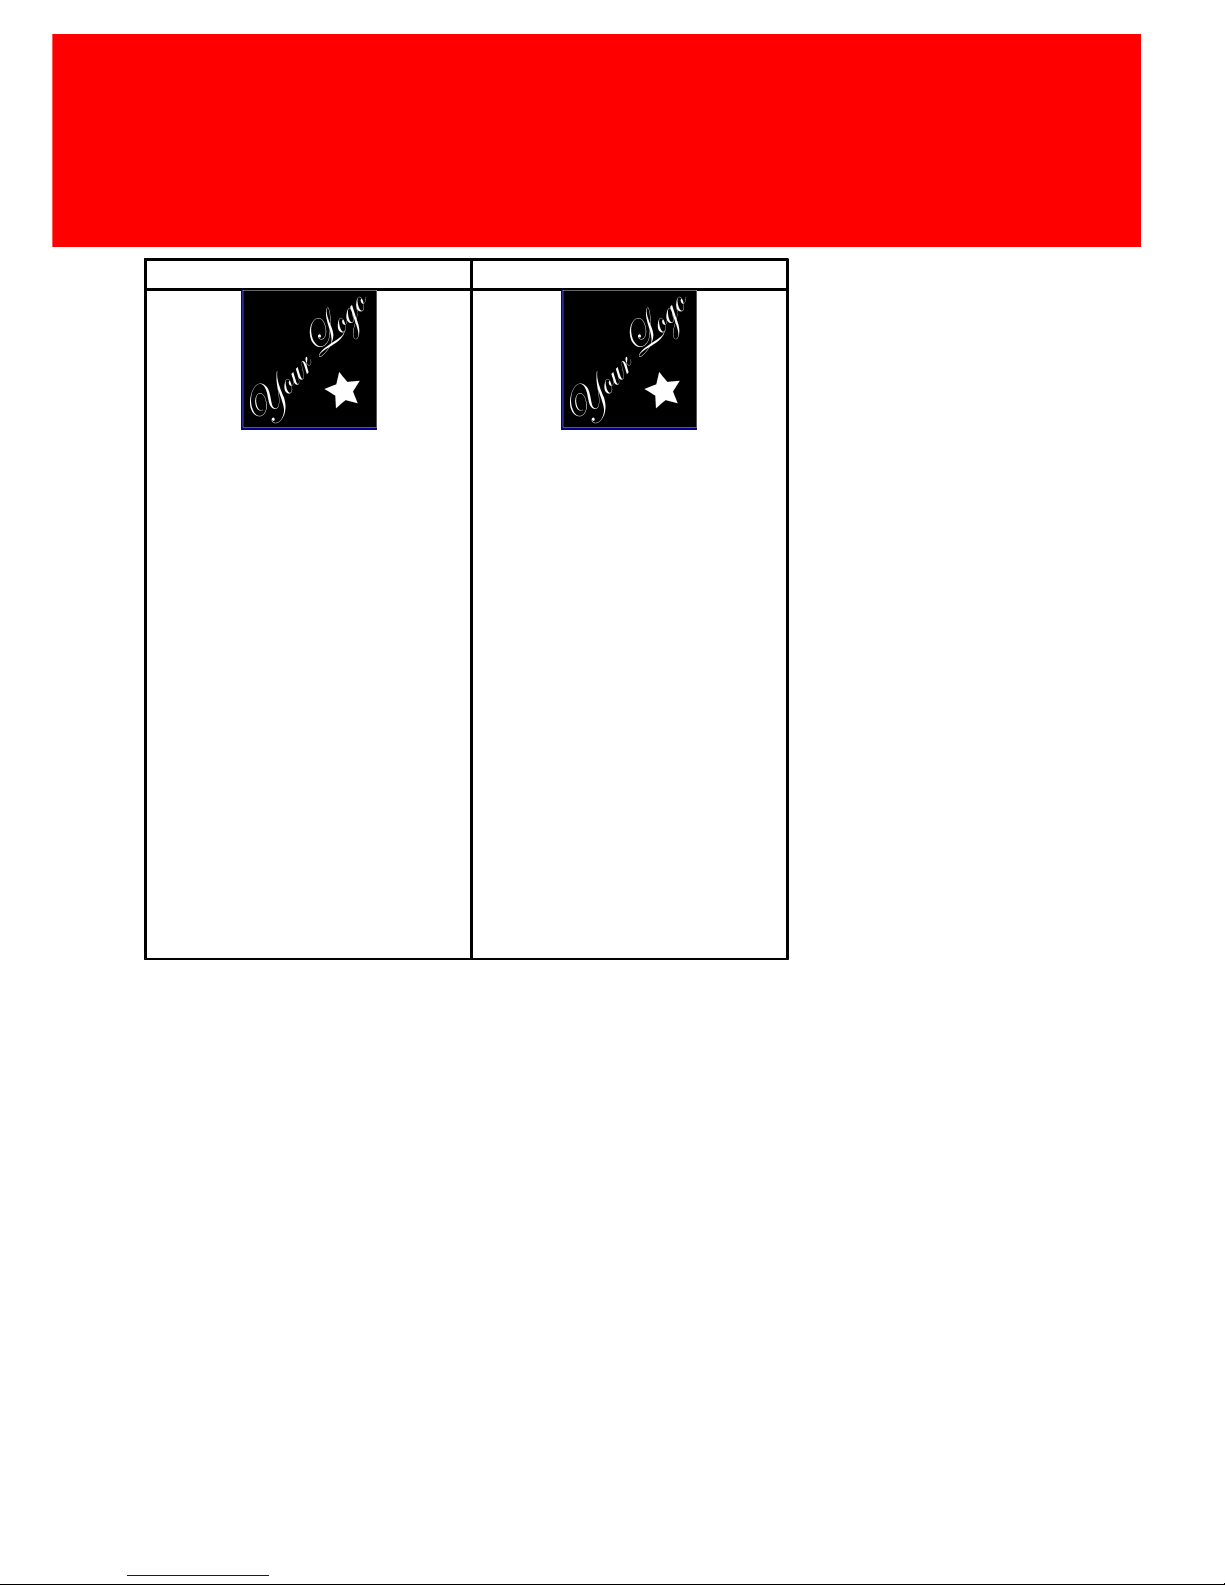
Layouts 0 en 1 have also the possibility to show VAT. This can be set in the PosPRO.ini under the
Printer header.
45
Page 45
Version 7.5.6 - 39
Configure IBOS - CashPRO
Receipt Type 2
Receipt Type 3
** INEPRO POSPRO **
-------
-----------------------
---------------------
DATE
15-03-2010
TIME
14:10:01
-------
-----------------------
---------------------
Hamburger
1x
1,30 Euro
Pizza Wedge
1x
2,25 Euro
Tuna Sandwich
1x
1,40 Euro
Homemade Cake
1x
0,85 Euro
Bread Roll
1x
0.35 Euro
Thanks for your visit
And have a nice day
OPER:0001 Ticket:0039 2010-03-15 14:10:01
** INEPRO POSPRO **
-------
-----------------------
---------------------
DATE
15-03-2010
TIME
14:10:01
-------
-----------------------
---------------------
Hamburger
1x
1,30 Euro
Pizza Wedge
1x
2,25 Euro
Tuna Sandwich
1x
1,40 Euro
Homemade Cake
1x
0,85 Euro
Bread Roll
1x
0.35 Euro
SUBTOTAL 6,15
TOTAL 6,15
Cash 6,15
Thanks for your visit
And have a nice day
OPER:0001 Ticket:0040 2010-03-15 14:10:01
Page 46
40 - PosPRO
Configuration
Receipt Type 4
Receipt Overview
** INEPRO POSPRO **
QTY
DESCRIPTION
PRICE
AMOUNT
-------
-----------------------
-----------------------
Hamburger
1x
1,30 Euro
Pizza Wedge
1x
2,25 Euro
Tuna Sandwich
1x
1,40 Euro
Homemade Cake
1x
0,85 Euro
Bread Roll
1x
0.35 Euro
SUBTOTAL 6,15
TOTAL 6,15
Cash 6,15
Thanks for your visit
And have a nice day
OPER:0001 Ticket:0039 2010-03-15 14:10:01
<-- PosProLogo.bmp
<Header text>
QTY
DESCRIPTION
PRICE
AMOUNT
-------
-----------------------
---------
--------------
1
Hamburger
1,30
1,301Pizza Wedge
2,25
2,251Tuna Sandwich
1,40
1,401Homemade Cake
0,85
0,851Bread Roll
0.35
0.35
SUBTOTAL 6,15
TOTAL 6,15
Cash 6,15
<Footer text>
OPER:<OperatorID> Ticket:<TicketID> <Date> <Time>
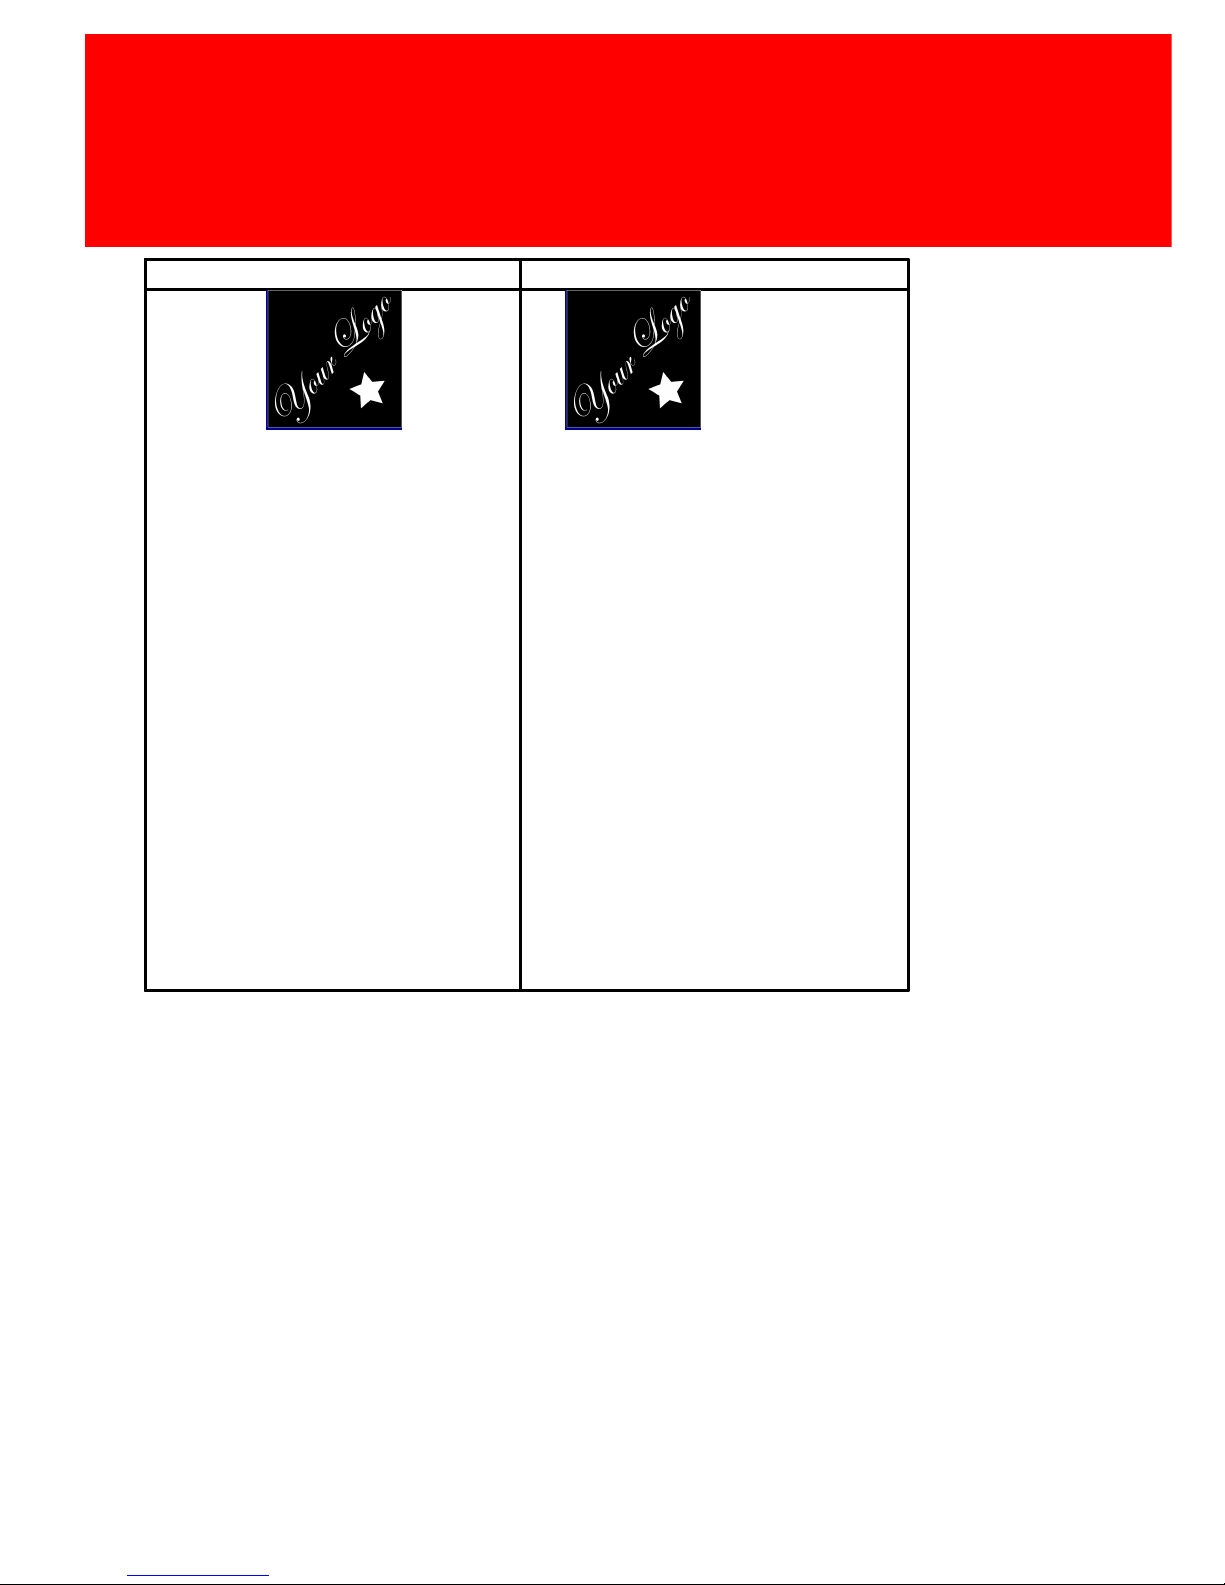
A receipt consist of the following elements:
· The logo (In the example a square with the text 'Your Logo' and a star)
· Header text (In the example " ** Inepro POSPRO **")
· Product List with prices
· Subtotal
· Total
· (optional) Cash amount
· (optional) amount of change
· Footer text (In the example "Thank you for visiting,"<EOL><CR> "And have a nice day")
· Ticket properties
The logo can be customized on the receipt choose the layout and adapt the header and footer text.
All the changes are made in the PosPRO directory (by default C:\Program Files\Inepro\PosPRO).
Page 47

Version 7.5.6 - 41
Configure IBOS - CashPRO
Logo
The logo is an image printed on the top of the receipt, aligned in the center. If no image is present
in the directory, no image is printed on the receipt.
To change the logo go to C:\Inepro\Pictures and create or change the PosPROlogo.bmp file.
The file should be monochrome and should be less then 4 Kilobyte in size. If these restrictions are
not adhered the image will not be printed.
Header text
The header text is the text directly printed under the logo image (if one is present).
It is usually used for presenting the company name.
To change the logo go to C:\Inepro\Text and edit the file header.text
There are no known restrictions for the header text.
Receipt content (Product list with prices)
The receipt content is the transaction information and can not be changed. It will show per line how
many items are sold, the item description, price per item and the price for the items sold.
Furthermore it will show the subtotal and the total price, if used VAT, and depending on the layout,
with how many cash was payed, and the amount of change that should be returned.
Footer text
The footer text is printed directly underneath the receipt content.
It is usually used to thank the customer for their visit and wish them a nice day.
To change the text go to C:\Inepro\Text and edit the file footer.txt
There are no known restrictions for the footer text.
Receipt properties
The bottom line of the receipt has the receipt information.
Like the Operator: 'OPER:0001', Ticket sequencial ID: 'Ticket:0039' and a date time stamp: '201003-15 14:10:01'.
The timestamp is in the format: 'yyyy-dd-mm HH:MM:SS'
Page 48
42 - PosPRO
Configuration
PosPRO.ini:
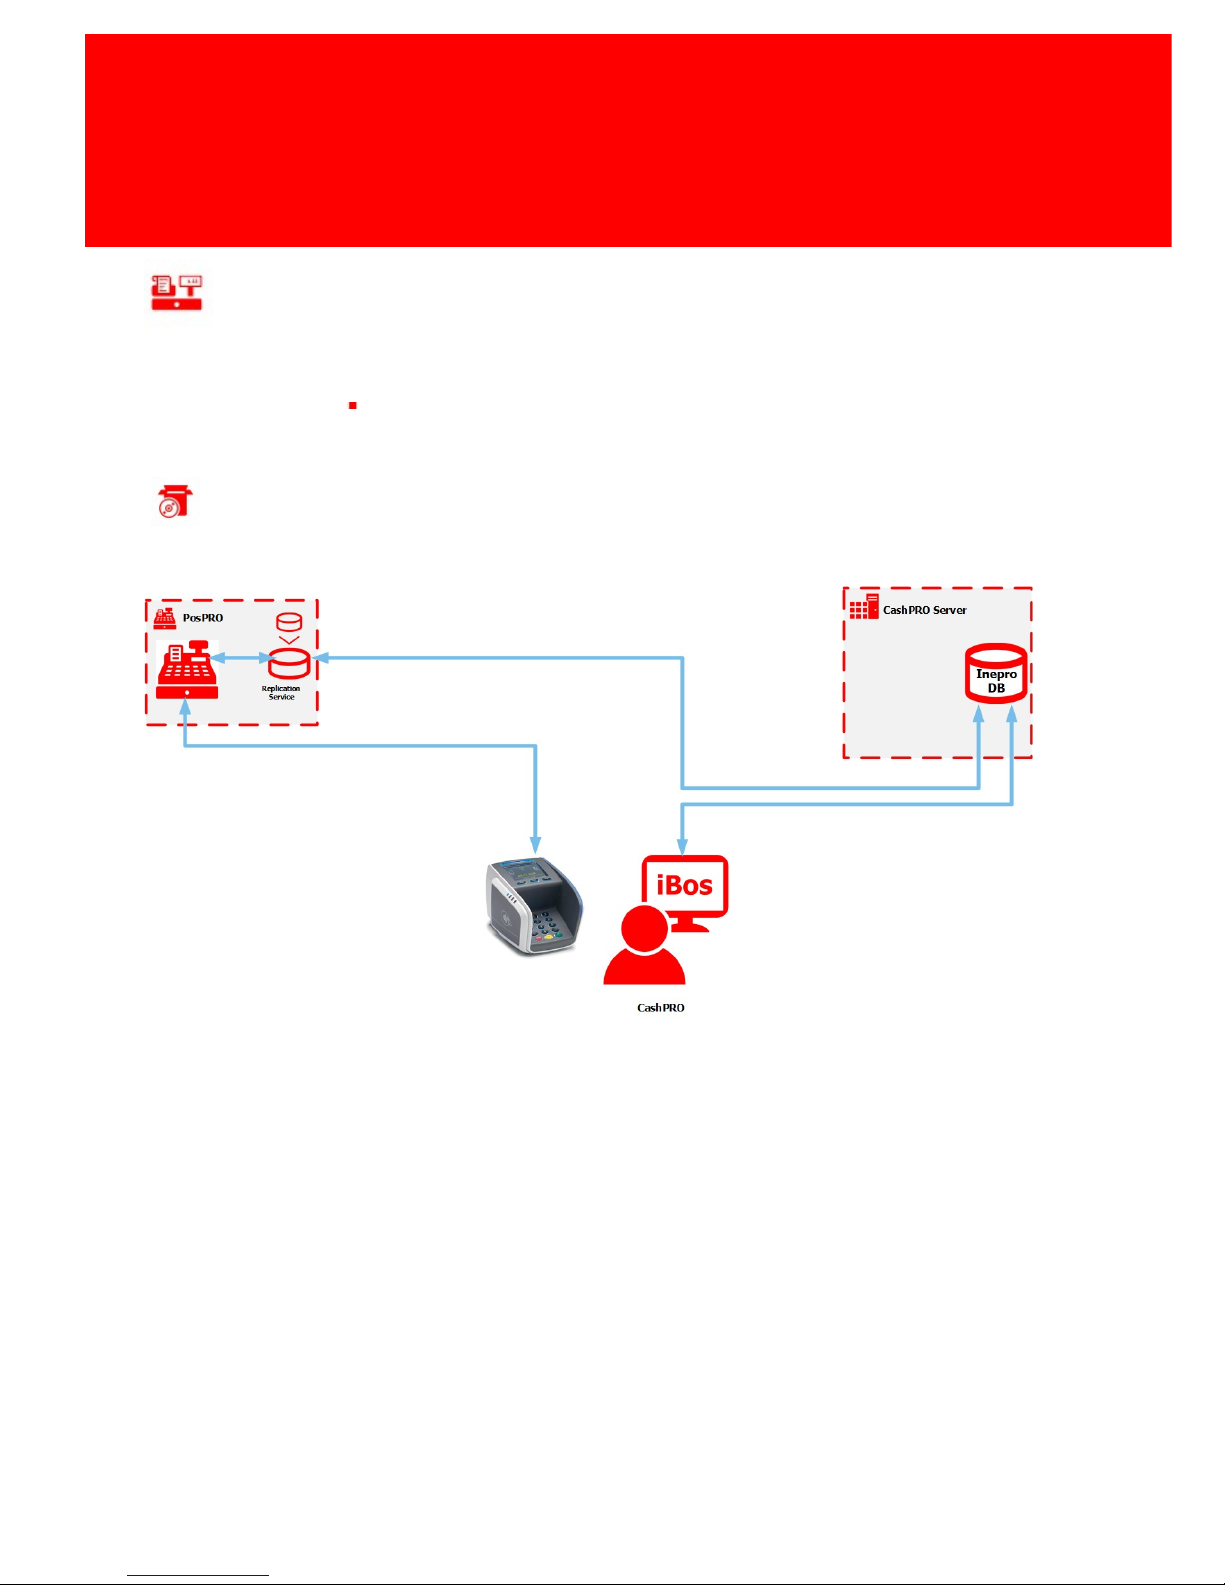
The PosPRO application will store everything in a local database (named PosPRO by default). When
the Inepro Back Office Suite with the CashPRO module is used the transactions must be send to the
Inepro Back Office Suite database (by default IBOS) and settings, new products, price adjustments
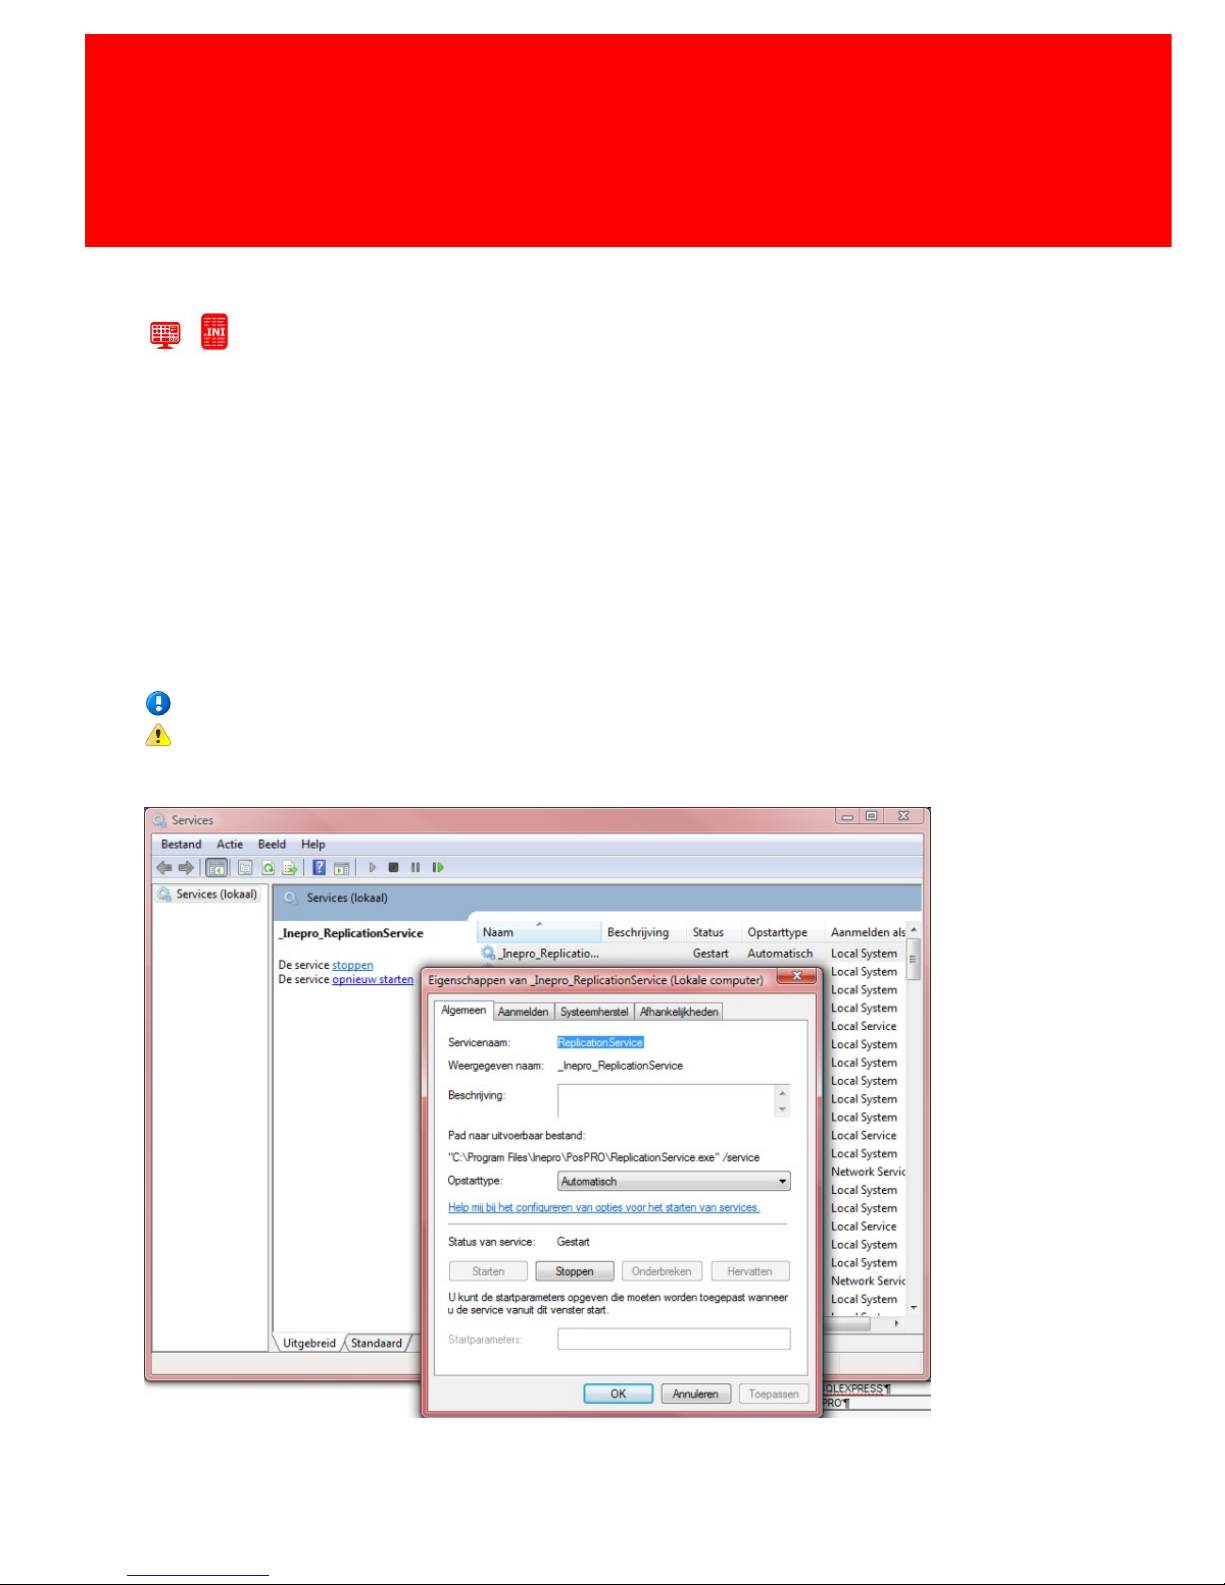
etcetera need to be send from the IBOS database to the PosPRO database. The replicationService
will handle these tasks.
It will monitor both tables for changes and replicate them according to the intervals specified in the
PosPRO.ini.
The service can be stopped and started via Windows Services.
When the services are started manually the replication process can be monitored.
Make sure the Windows Service settings are left, so the replication service will start at Windows
startup!
Page 49
Version 7.5.6 - 43
PosPRO.ini
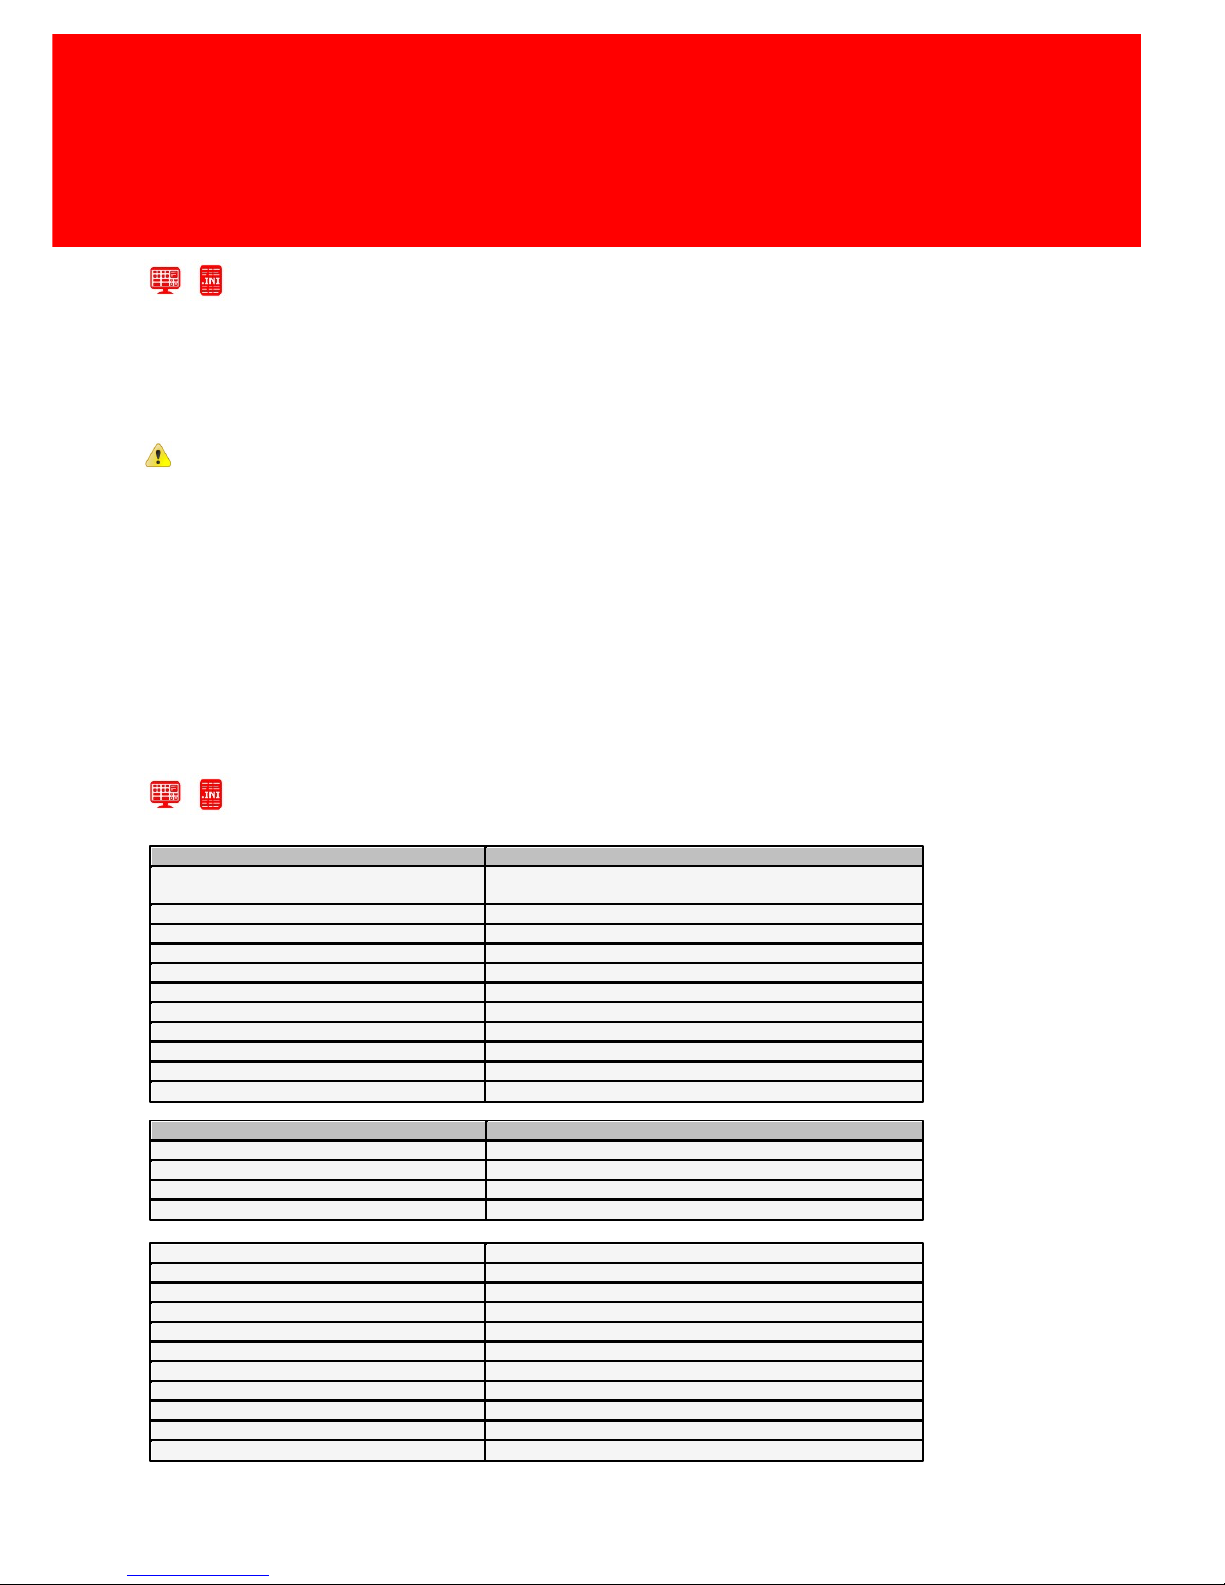
Configuration via the *.ini file
In the ini directory in your PosPRO directory (by default:'C:\Program Files\Inepro\PosPRO\Ini') the
'PosPRO.ini' file should be found: this file can be edited to change the advanced settings in the
PosPRO application.
Always create a backup before changes are made in the *.ini files, so the changes made can
always revert back to the original *.ini files.
The *.ini file consist of a number of headers and below those header a number of keys that have a
value.
For example:
[Header]
Key=Value
A value of '0' will normally mean 'disabled' and a value of '1' will usually mean 'enabled'.
PosPRO.ini
[location]
Station ID=0
Unique ID (per Inepro project) to identify the till (for instance
on the receipt and in the transaction log
Operator ID Loader=1
NOT USED IN POSPRO APPLICATION
PayCon EmployeeID=2097152
NOT USED IN POSPRO APPLICATION
Number of Terminals=0
NOT USED IN POSPRO APPLICATION
Station Name=
Name of the till (for human readable ID on the receipt)
SMTP Address=
SMTP Address
SMTP User=
SMTP Username
SMTP Password=
SMTP Password
SMTP Sender=
Sender Email On Demand (EOD)
SMTP Use Authentication=0
0=no, 1=yes
EMAIL Address=
Email address recipient
[database]
Use SQL-SERVER database=1
NOT USED IN POSPRO APPLICATION
DataSource=.\SQLEXPRESS
De database instance = '.\SQLEXPRESS'
Catalog=PosPRO
De naam van de database is 'PosPRO'
User=PayConServer
Gebruikersnaam
Local use SQLSERVER database=1
Use SQLSERVER as local database
Local DataSource=.\SQLEXPRESS
The database instance = '.\SQLEXPRESS'
Local Catalog=PosPRO
The database name = 'PosPRO'
Local User=PayConServer
Database Log in name
Local Password=******
Database Password
Remote use SQLSERVER database=1
Use SQLSERVER as remote database
Remote DataSource=KOOS001\SQLEXPRESS
The database instance = '.\SQLEXPRESS'
Remote Catalog=IBOS_POSPRO
The database name = 'IBOS_PosPRO'
Remote User=PayConServer
Database Log in name
Remote Password=******
Database Password
Station Inifile=PosPro.ini
The location of the PosPRO.ini file
Page 50

44 - PosPRO
Configuration
[sales]
Card-Revalue sell item=10000
NOT USED IN POSPRO APPLICATION
Sales registration day offset in hours=0
NOT USED IN POSPRO APPLICATION
Item offset stations=10000
NOT USED IN POSPRO APPLICATION
Item offset subscription=8000
NOT USED IN POSPRO APPLICATION
Card sell item=100001
NOT USED IN POSPRO APPLICATION
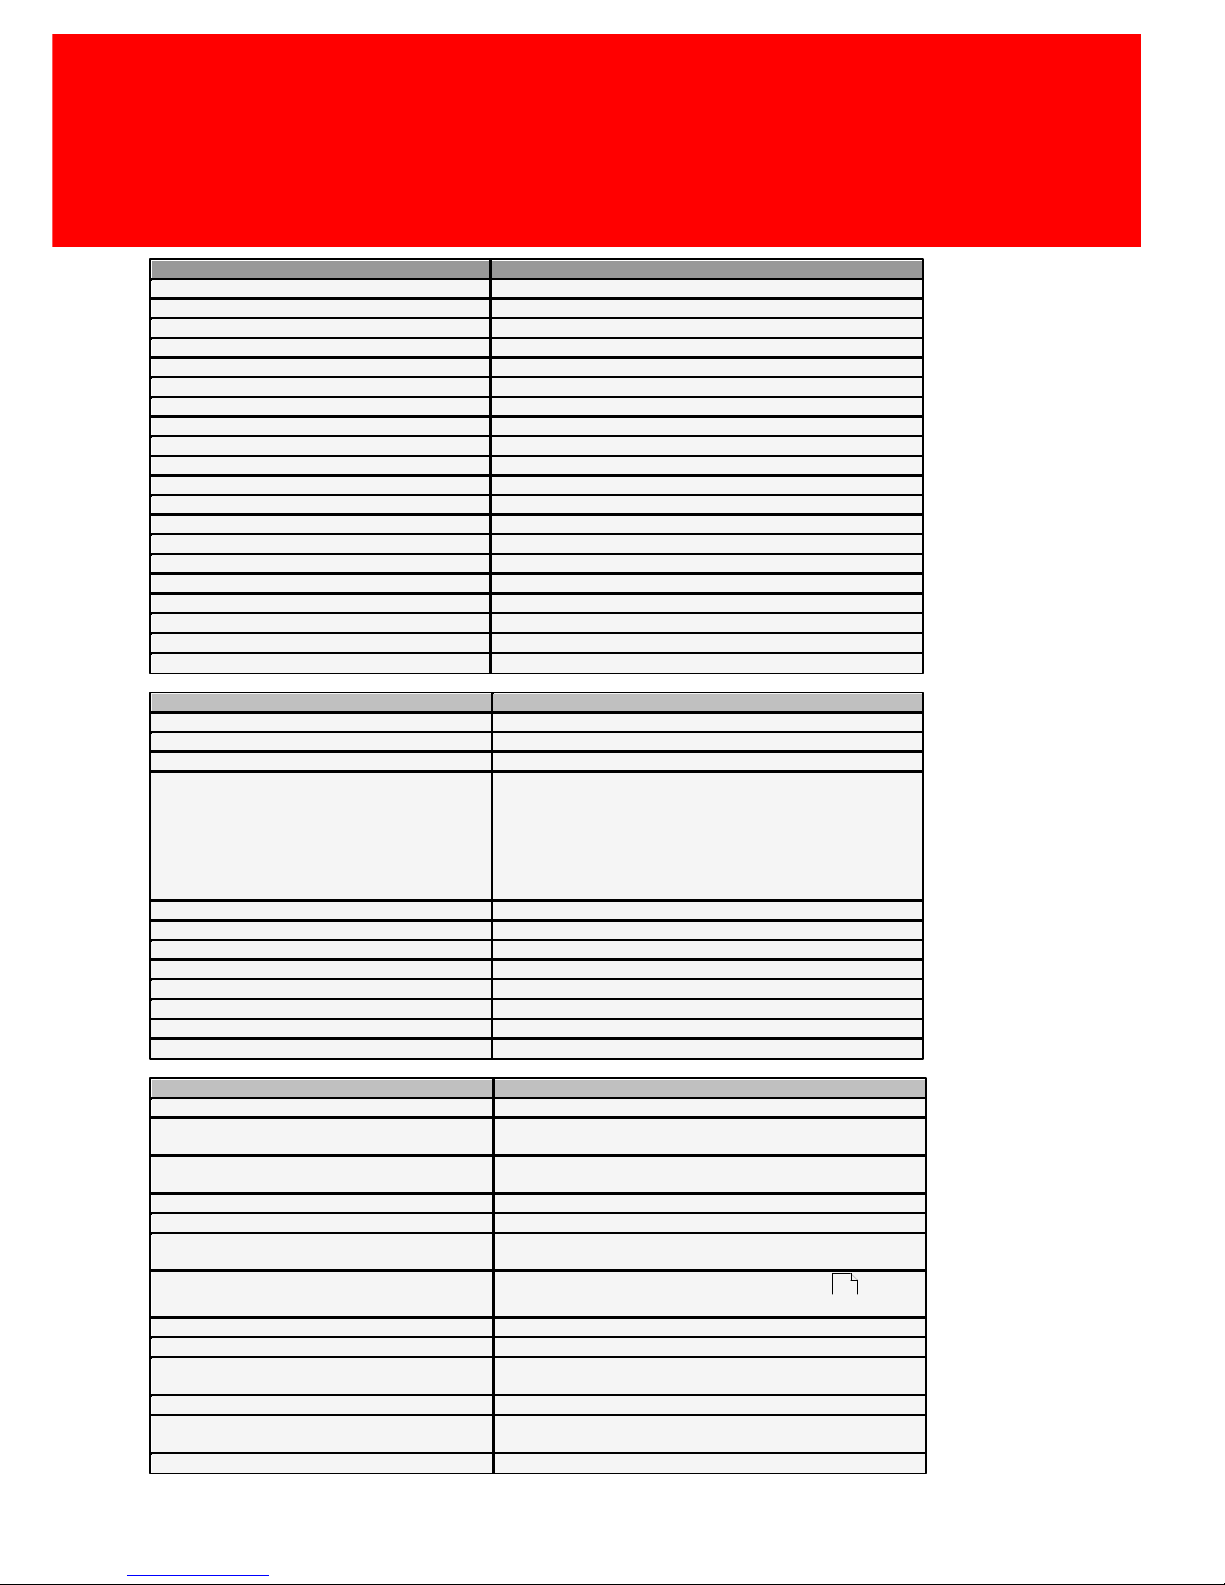
[general]
Max amount on card=15000
The maximum amount allowed on a card in cents.
Number of digits after decimal=2
How many digits after the decimal are used / shown
Use card-date validation=0
NOT USED IN POSPRO APPLICATION
External management=PosPRO_Manager.exe
Name and path of the application that can be started as
external management software
External reports=
Name and path of the application that can be started as
external report software
Default card id (no request)=0
CashCount Compulsory=1
Should CashCount be compulsory (Yes=1, No=0)
CashCount blind=0
Should CashCount made blind (no confirmation on what the
computer has counted
CashCount maximum quantity difference=0
Maximum of accepted difference in item quantity
CashCount maximum amount difference=0
Maximum of accepted difference in Amount
Cashcount print document=0
Does the CashCount document need to be printed (Yes=1,
No=0)
Cashcount export document=0
Must the CashCount document be stored (as a seperate file)
(Yes=1, No=0)
Use floating operators=0
Can multiple cashiers use 1 drawer?
Cashier auto logoff timeout in minutes=0
Time after which an employee is automatically logged off
Default card id (no request)=0
NOT USED IN POSPRO APPLICATION
Length card ID=0
NOT USED IN POSPRO APPLICATION
New card pincode=0
NOT USED IN POSPRO APPLICATION
Negative card payments allowed=1
Negative payments with a card are allowed. (Yes=1, No=0)
Currency=Euro
Currency description (human readable currency value)
Input currency=Cent
Smallest unit description (human readable currency value)
Automatic new card ID=0
NOT USED IN POSPRO APPLICATION
Use search account options=0
The ability to search a user in the database on for instance
department, or name (Yes=1, No=0)
Add extra account information=0
Activate the ability to add extra information to cost centre
payments. (Yes=1, No=0)
Add budgets=0
Use the personal budget (limited to an item quantity or the
total amount of all the products per periode
Use Cash Rounding=0
Apply rounding on cash payments. (Yes=1, No=0)
Accept partly payments=1
Enable customers to pay a part of the amount they owe.
(Yes=1, No=0)
Export directory=
Directory in which CashCount documents are placed
Update directory=
NOT USED IN POSPRO APPLICATION
Use stock control=0
Activate the stock management module (Yes=1, No=0)
Default Cashier=0
The employee ID that is used by default when PosPRO starts.
Use Nett Weight=0
Registration of gross or nett mass (respectively the mass with
or without packaging). If set to active the nett mass is
calculated by deducting the tare massa from the gross mass.
Display card balance on Customerdisplay=1
Displays the customers credit on the customer display (Yes=1,
No=0)
Display Change on Customerdisplay=1
Displays the change to customer will receive on the customer
display. (Yes=1, No=0)
Budget calculation with linked items=0
Process the linked products (mostly this will be the deposit for
nondisposable products) within the budget. (Yes=1, No=0)
Reboot time=05:00
Everyday the till will reset itself (if a time has been set), fill in a
time "nn:nn" value to specify at which time this happens.
Manual create unknown items=0
Allow adding unknown products on the till. (Yes=1, No=0)
Page 51
Version 7.5.6 - 45
PosPRO.ini
[general] (continued)
Obligation of Customer Data=1
NOT USED IN POSPRO APPLICATION
Card payment only for sunbed=0
NOT USED IN POSPRO APPLICATION
Use Card-Credits=0
NOT USED IN POSPRO APPLICATION
Card-Credits value=1
NOT USED IN POSPRO APPLICATION
Sunbed discount on seperate row=0
NOT USED IN POSPRO APPLICATION
Use cleaning status=0
NOT USED IN POSPRO APPLICATION
Use skintype detection=0
NOT USED IN POSPRO APPLICATION
Loader customer form=0
NOT USED IN POSPRO APPLICATION
Extended loader reports=1
NOT USED IN POSPRO APPLICATION
Tender overview=0
NOT USED IN POSPRO APPLICATION
External loader application=
NOT USED IN POSPRO APPLICATION
External marketing application=
NOT USED IN POSPRO APPLICATION
Loader accept cash=1
NOT USED IN POSPRO APPLICATION
Activate Subscription=0
NOT USED IN POSPRO APPLICATION
Minimum hours between session=0
NOT USED IN POSPRO APPLICATION
Minutes before reservation=0
NOT USED IN POSPRO APPLICATION
Minutes to start reservation=0
NOT USED IN POSPRO APPLICATION
Sunbed time in seconds=0
NOT USED IN POSPRO APPLICATION
SelectedTimeConfirmation=0
NOT USED IN POSPRO APPLICATION
Void allowed=1
NOT USED IN POSPRO APPLICATION
[paycon]
Comport paycon=0
NOT USED IN POSPRO APPLICATION
PayCon balancetype 1=5
Purse Type 1 on the card
PayCon balancetype 2=19
Purse Type 2 on the card
Paycon2 port=
The COM port on the PayCon used to connect the PayCon to
the PosPRO till.
1=COM1
etc.
If a PayCon isn't used leave this value empty.
Use timer Paycons=0
NOT USED IN POSPRO APPLICATION
Print EFT ticket=0
NOT USED IN POSPRO APPLICATION
Print EFT reports=0
NOT USED IN POSPRO APPLICATION
Type of EFT terminal=0
NOT USED IN POSPRO APPLICATION
Amount preset1=100
NOT USED IN POSPRO APPLICATION
Amount preset2=100
NOT USED IN POSPRO APPLICATION
Amount preset3=100
NOT USED IN POSPRO APPLICATION
Amount preset4=100
NOT USED IN POSPRO APPLICATION
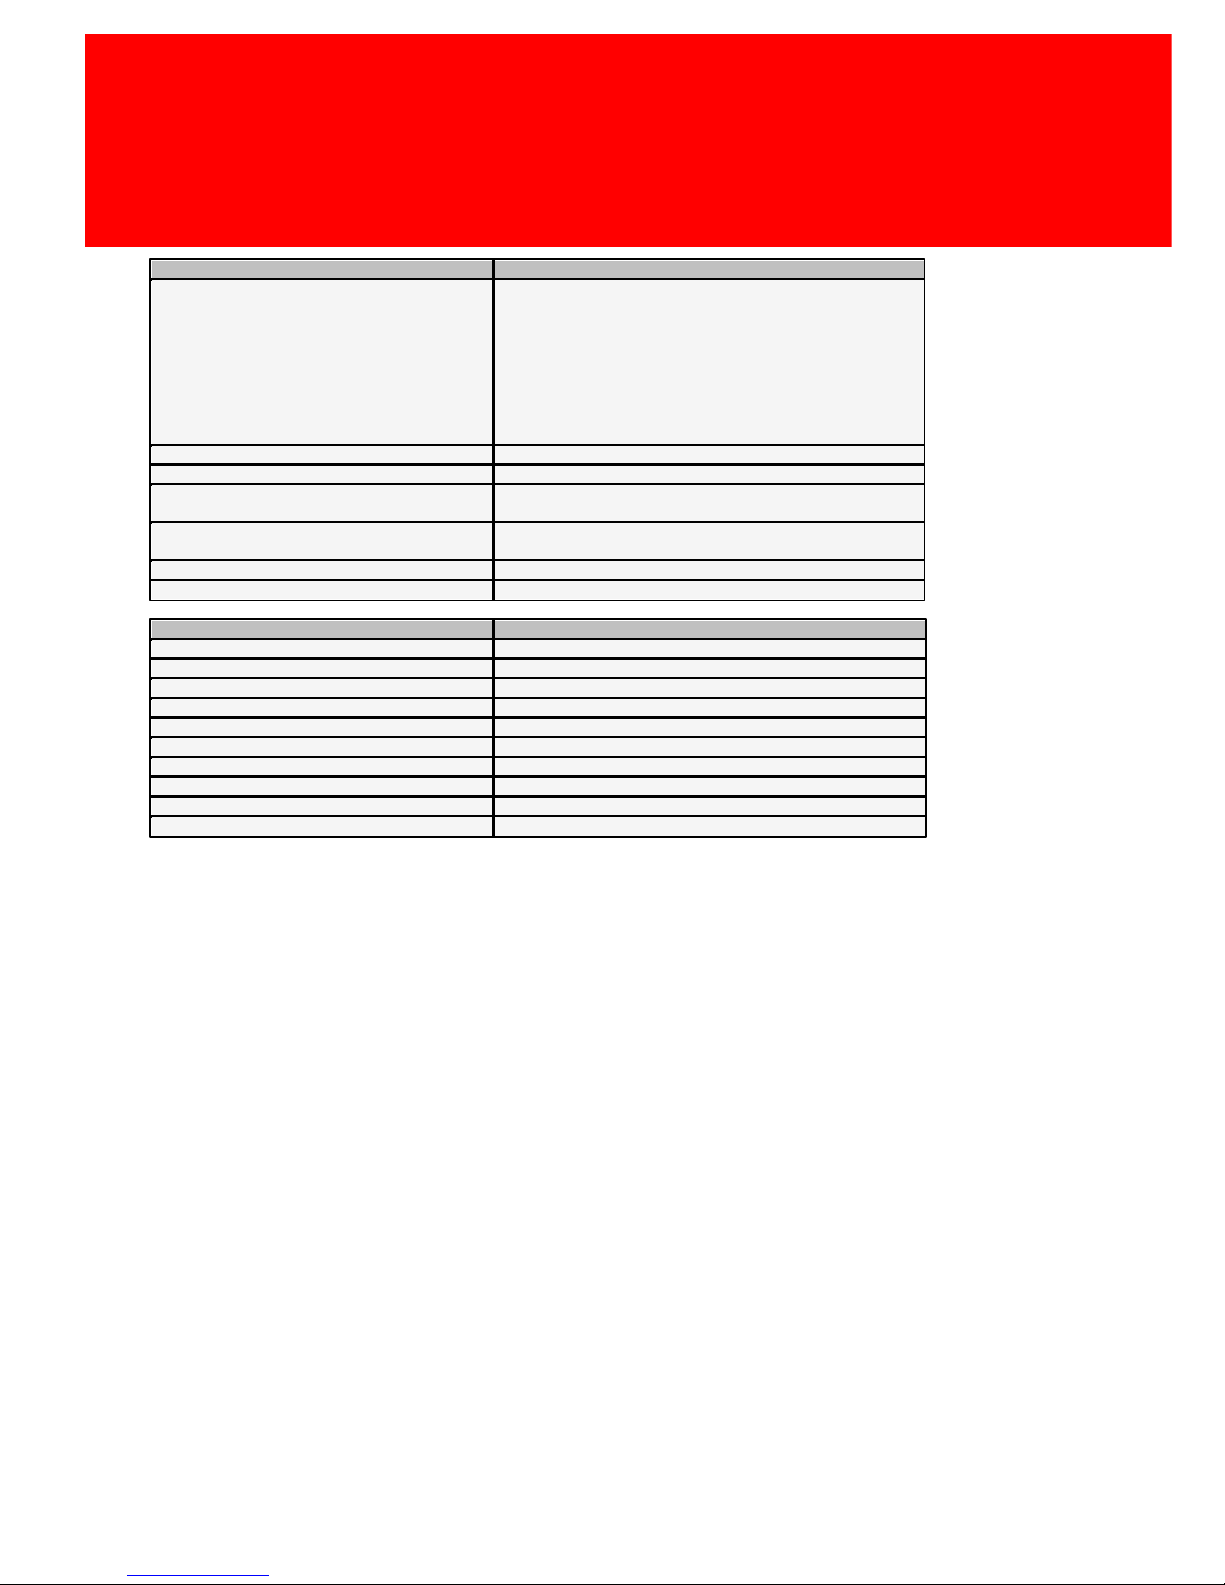
[printer]
OPOS devices available=1
Activate the ability to use OPOS devices (0=No, 1=Yes)
Laserprinter available=0
Is a laserprinter connected to print out the reports? (0=No,
1=Yes)
Print direct=1
Print a receipt directly when the transaction has been
concluded? (0=No, 1=Yes)
Print VAT receipt=1
Always print a VAT receipt (0=No, 1=Yes)
Print duplicate receipt=0
Always print a duplicate receipt (0=No, 1=Yes)
Forced closedrawer check=0
Activate 'Closed Drawer Check' (check if the drawer is closed at
the end of every transaction (0=No, 1=Yes)
Ticket layout=2
Choose the layout of the receipt (0-4) See page for an
overview of the available layouts
Print VAT Mark for every item=0
Print a VAT mark for each item on the receipt (0=No, 1=Yes)
Print discounts on receipt=0
Print the discounts on the receipt (0=No, 1=Yes)
Print large code for Picture Items=0
Print the item code large on items that have a photo (0=No,
1=Yes)
Print name=0
Print the name of the customer on the receipt (0=No, 1=Yes)
TMT90=0
Activate the alternative layout for the TMT90 printer (0=No,
1=Yes)
Print customer name on receipt=0
Duplicate of the 'Print Name' value
38
Page 52
46 - PosPRO
Configuration
[system]
Type of EFT terminal=0
The connected type of EFT terminal:
0=<No terminal connected>
1=HFT201 - PIN only
2=HFT201 - Creditcard only
3=HFT201 - ChipKnip (Dutch system) only
4=BAXX (Norwegian system)
5=PayCon Connected EFT terminal
6=Xenta / Xenteo terminal
7=CCV / CTAP terminal
Print EFT ticket=0
Print the EFT log on the receipt (0=No, 1=Yes)
Print EFT reports=0
Print the EFT reports (0=No, 1=Yes)
EFT terminal time synchronisation=1
Synchronize the realtime clock of the till with the time from the
EFT terminal
Early swipe=0
Activate the early swipe option of the EFT terminal (0=No,
1=Yes)
IP address gateway=
IP-address of the EFT gateway
Comport EFT device=0
COM port on which the EFT terminal is connected
[end of day]
Print report01=0
Use the Terminal report in the end-of-day report
Print report02=0
Use the Department report in the end-of-day report
Print report03=0
Use the Article report in the end-of-day report
Print report04=0
Use the Payment Type report in the end-of-day report
Print report05=0
Use the Revalue report in the end-of-day report
Print report06=0
Use the Card report in the end-of-day report
Print report07=0
Use the Product Changes report in the end-of-day report
Print report08=0
Use the Hour report in the end-of-day report
Print report09=0
Use the Cost Centre report in the end-of-day report
Print report10=0
Use the Cost Centre Detail report in the end-of-day report
Page 53

Version 7.5.6 - 47
PosPRO.ini
[screen]
Use PayIn PayOut function=0
Use the Pay-in / Pay-Out function (0=No, 1=Yes)
Info-messages timeout=15
Timeout for the info message windows (in seconds)
GroupTab as default tab=1
Use the Article groups as default tab (0=No, 1=Yes)
Always Return to main tab=1
Jump to the default tab at the entry of each item (0=No,
1=Yes)
Initialise tabs by new transaction=1
Jump to the default tab at the end of a transaction (0=No,
1=Yes)
Main tab=
The ID of the Presentation Layer that should be the Main tab
Tabsheet Period 1=
The ID of the Presentation Layer that should be the Main tab
for the first period.
Time start Period 1=00:00
Start time of the first period
Tabsheet Period 2=0
The ID of the Presentation Layer that should be the Main tab
for the second period.
Time start Period 2=
Start time of the second period
Tabsheet Period 3=0
The ID of the Presentation Layer that should be the Main tab
for the third period.
Time start Period 3=
Start time of the third period
Tabsheet Period 4=0
The ID of the Presentation Layer that should be the Main tab
for the fourth period.
Time start Period 4=
Start time of the fourth period
Use only one product tab=0
Use only one product tab (0=No, 1=Yes)
Cummulate linked items=0
Cumulate linked items to 1 artikel line (0=No, 1=Yes)
Direct product search on productInfo=1
Activate the product search screen when pressing the info
button. (0=No, 1=Yes)
Use the Intuitive keyboard=1
Use the intuitive keyboard (keys that can not be used will
disappear) (0=No, 1=Yes)
Use Keyboard sound=0
Make a sound every time a button is pressed (0=No, 1=Yes)
Display price on presets=0
Show the price on the preset buttons (0=No, 1=Yes)
Display PLU-number on presets=0
Show PLU of a product on the preset buttons (0=No, 1=Yes)
Display shortname=1
Use the shortname for the description on the preset buttons
Use picture color as button color=0
FUNCTION NOT YET IMPLEMENTED
Subtotal visible in Idle mode=0
Subtotal button visible in IDLE mode (0=No, 1=Yes)
Use second status monitor=0
NOT USED IN POSPRO APPLICATION
Subscreens timeout=15
NOT USED IN POSPRO APPLICATION
Stretch pictures=1
NOT USED IN POSPRO APPLICATION
Use sunbed minute stepper=1
NOT USED IN POSPRO APPLICATION
Extended welcome screen=0
NOT USED IN POSPRO APPLICATION
Name bitmap background=
NOT USED IN POSPRO APPLICATION
ShowInfoScreenSunbeds=1
NOT USED IN POSPRO APPLICATION
ShowInfoScreenCards=1
NOT USED IN POSPRO APPLICATION
ShowInfoScreenProducts=1
NOT USED IN POSPRO APPLICATION
Screen-layout type=0
NOT USED IN POSPRO APPLICATION
VAT Toggle type=2
0=Always use first VAT tariff (VAT), 1=Use the VAT tariff
chosen by the employee (if available in the product definition) also known as 'eat-in / eat-out', 2=Overwrite the complete
transaction with this VAT tariff.
[coinco]
Comport MDB devices=0
COM port of the Multi Drop Bus (MDB) device (NOT USED IN
POSPRO APPLICATION)
Changer maximum overtender=0
Maximum amount of overtender (the surplus of the payed
amount) (NOT USED IN POSPRO APPLICATION)
Changer overtender round value=500
NOT USED IN POSPRO APPLICATION
Changer minimal level coins=0
NOT USED IN POSPRO APPLICATION
Changer display tubes=1
Display the tube content of the CoinCo (0=No, 1=Yes) (NOT
USED IN POSPRO APPLICATION)
Changer use automatic dispense function=1
The denomination division method for dispensing change.
(0=PosPRO method 1=CoinCo method) (NOT USED IN
POSPRO APPLICATION)
Page 54
48 - PosPRO
Configuration
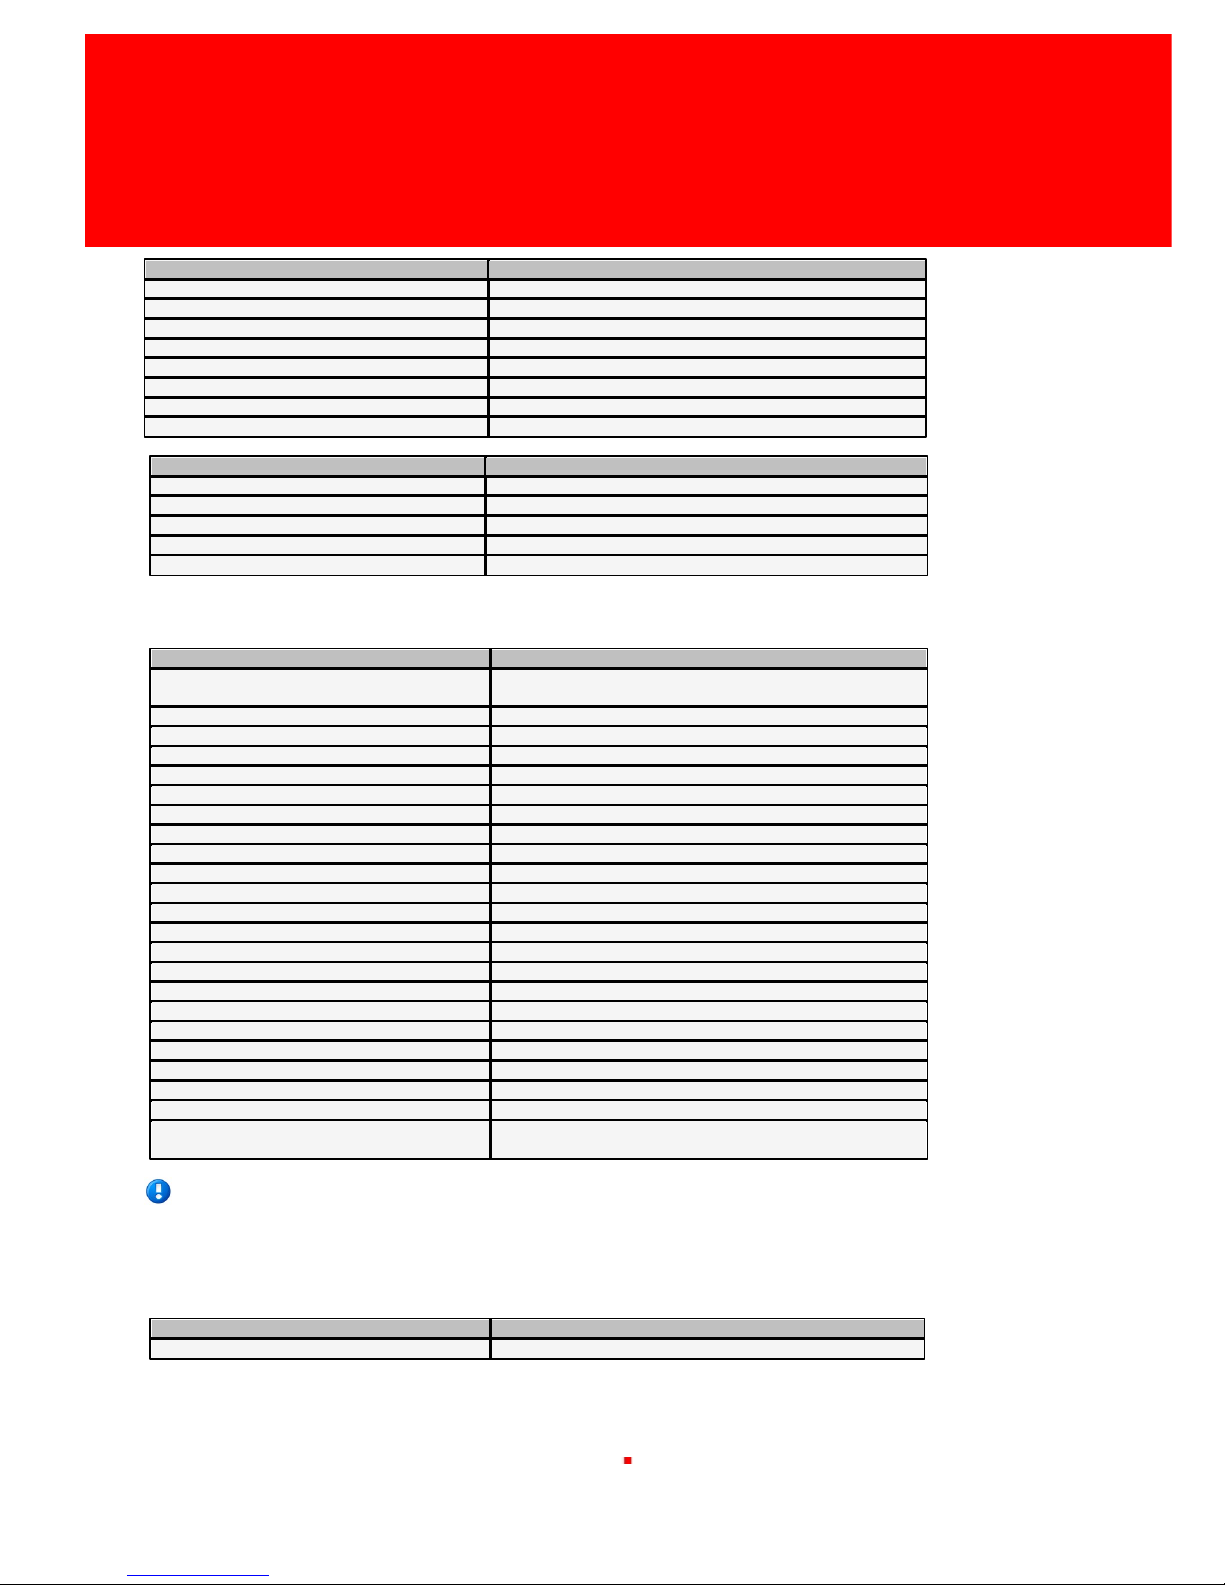
[vending]
Comport vending=0
NOT USED IN POSPRO APPLICATION
Baudrate=9600
NOT USED IN POSPRO APPLICATION
DataBits=8
NOT USED IN POSPRO APPLICATION
StopBits=1
NOT USED IN POSPRO APPLICATION
Parity=0
NOT USED IN POSPRO APPLICATION
FlowControl=0
NOT USED IN POSPRO APPLICATION
NumberOfItems=1
NOT USED IN POSPRO APPLICATION
TimeOut=5
NOT USED IN POSPRO APPLICATION
[relais]
Pre-time relais switch=0
NOT USED IN POSPRO APPLICATION
Cleaning button seconds=2
NOT USED IN POSPRO APPLICATION
Security relais=0
NOT USED IN POSPRO APPLICATION
Use whole session time relais=0
NOT USED IN POSPRO APPLICATION
Security relais time=120
NOT USED IN POSPRO APPLICATION
------------------------------------------------------------------------------------------------------------------------
[Replication]
Replication batch size=0
Number of records to send in one batch, '0' means 'Send one by
one'
Replicate PriceLines=0
Time in second, '0' means 'Do not replicate'
Replicate Transactions=15
Time in second, '0' means 'Do not replicate'
Replicate Items=3600
Time in second, '0' means 'Do not replicate'
Replicate VATs=7200
Time in second, '0' means 'Do not replicate'
Replicate StationItemGroups=3600
Time in second, '0' means 'Do not replicate'
Replicate Prices=3600
Time in second, '0' means 'Do not replicate'
Replicate Itemlinks=3600
Time in second, '0' means 'Do not replicate'
Replicate ItemGroups=3600
Time in second, '0' means 'Do not replicate'
Replicate Card Types=7200
Time in second, '0' means 'Do not replicate'
Replicate Employees=3600
Time in second, '0' means 'Do not replicate'
Replicate Cardgroups=7200
Time in second, '0' means 'Do not replicate'
Replicate Cards=120
Time in second, '0' means 'Do not replicate'
Replicate Customers=600
Time in second, '0' means 'Do not replicate'
Replicate Ledgers=1200
Time in second, '0' means 'Do not replicate'
Replicate CustomerLedgerLinks=1200
Time in second, '0' means 'Do not replicate'
Replicate Customer departments=3600
Time in second, '0' means 'Do not replicate'
Replicate Budgets=7200
Time in second, '0' means 'Do not replicate'
Replicate AbsenceReasons=0
Time in second, '0' means 'Do not replicate'
Replicate CustomerPhotos=0
Time in second, '0' means 'Do not replicate'
Replicate ItemPhotos=0
Time in second, '0' means 'Do not replicate'
Replicate PresentationLayer=600
Time in second, '0' means 'Do not replicate'
Replicate Transactions in one Batch=0
'0' means 'Send one by one', '1'=send as specified by 'replication
batch size' value
Certain replication values could be set higher to lighten the network load at the cost of being a
little less up-to-date in the reports or vice versa.
Generic.ini
Hide mouse pointer=0
Hide the mouse pointer (0=No, 1=Yes)
Read the description of each setting, and when in doubt, do not take any chances but contact your
dealer support for information about the setting
Page 55

User Interface
Part
IV
Page 56
50 - PosPRO
User Interface
User Interface
In 'User Interface' we will deal with all the different modules of the PosPRO software.
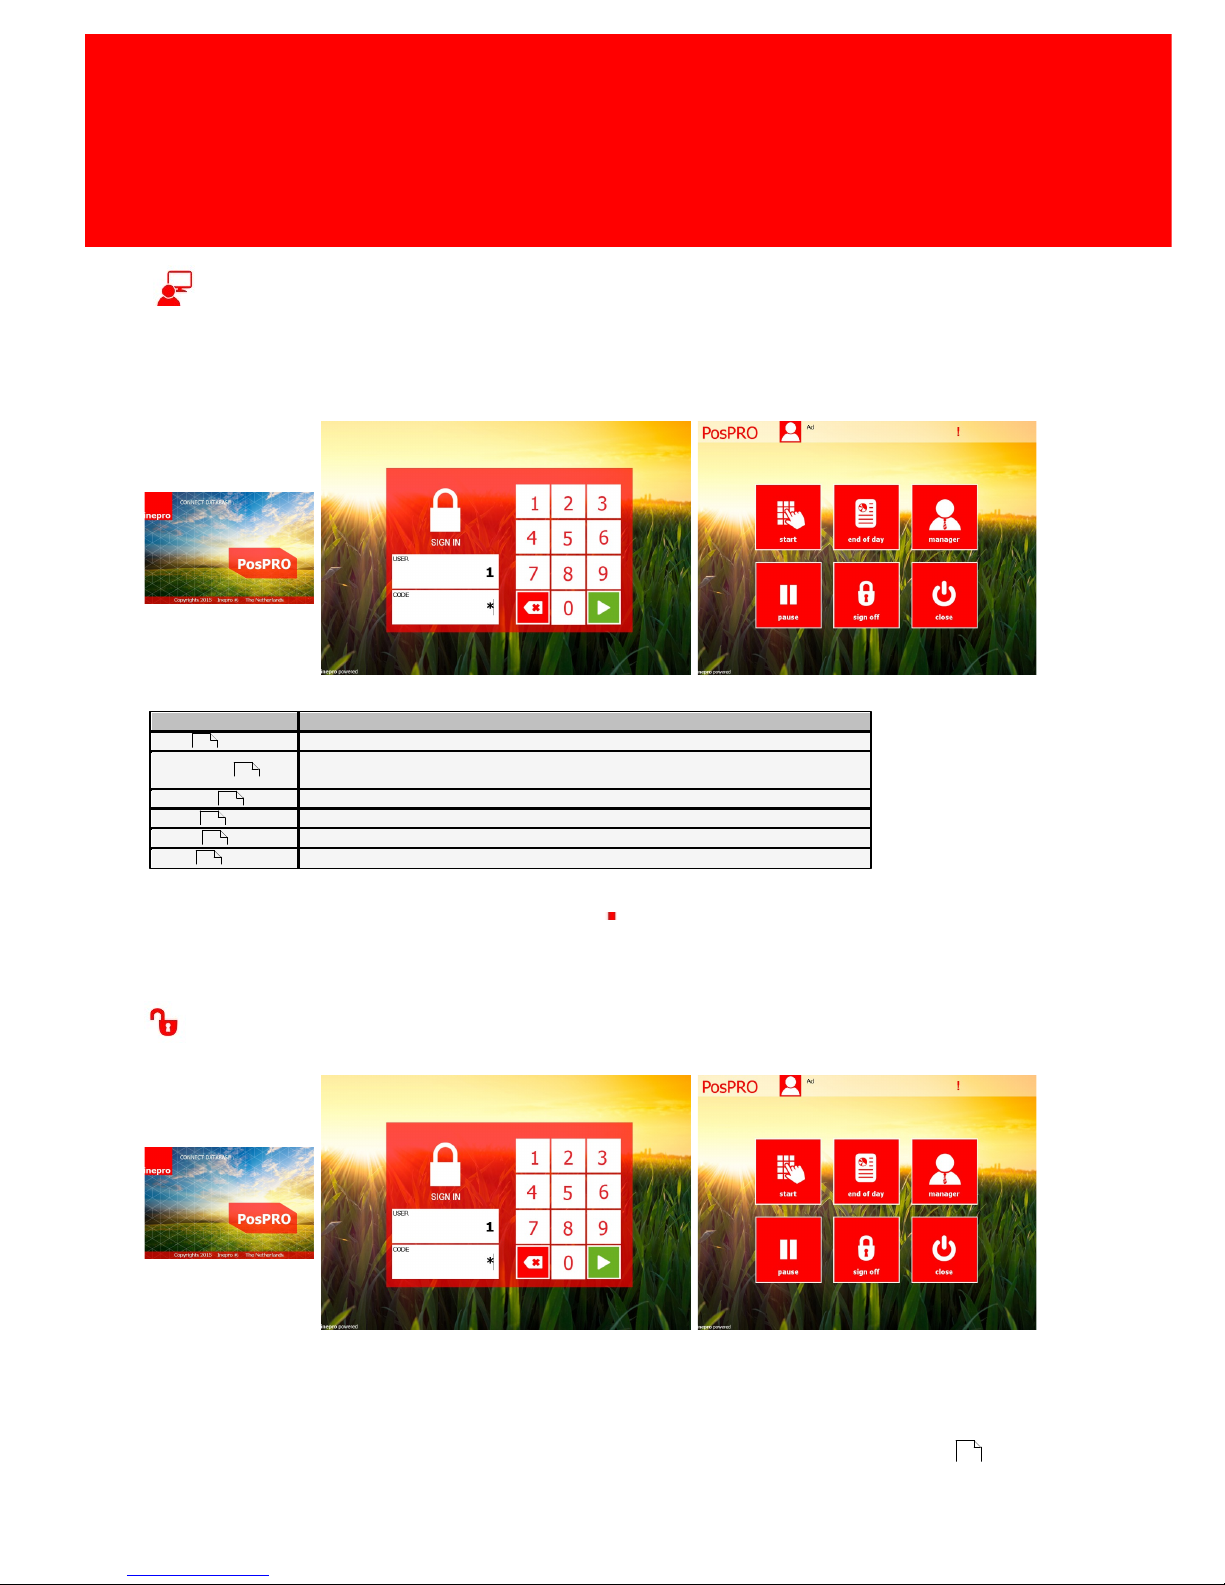
Below a short description of each button (module) in the main menu:
Module
Purpose
Start
Sales, the selling of products and operation of the cash drawer.
End of Day
Create a compound report by combining one or more reports (as specified in the
PosPRO.ini).
Manager
Manages higher PosPRO settings
Pause
Log off, the username is remembered, and only that user can log in again.
Logoff
Log off and everybody with a valid logon name and password can log in.
Close
Closing the application, for this action the right authorisation is required.
All the options will be described in this section
Log In
If PosPRO is started, you will be asked to log in. Enter your username and password. (To add or
edit a username and password use the Inepro Back Office Manager. In the Authorisation menu you
are able to grant an employee the rights for the Inepro Back Office manager and give him a
username and Password for the PosPRO tills. For more information look at page ).
52
58
59
72
73
74
32
Page 57

Version 7.5.6 - 51
Log In
After logging in you will enter the main menu. The most important option of the PosPRO till is of
course 'Start' (Sales), this will lead you to the Sales screen and will allow you to sell your products
Page 58
52 - PosPRO
User Interface
Sales
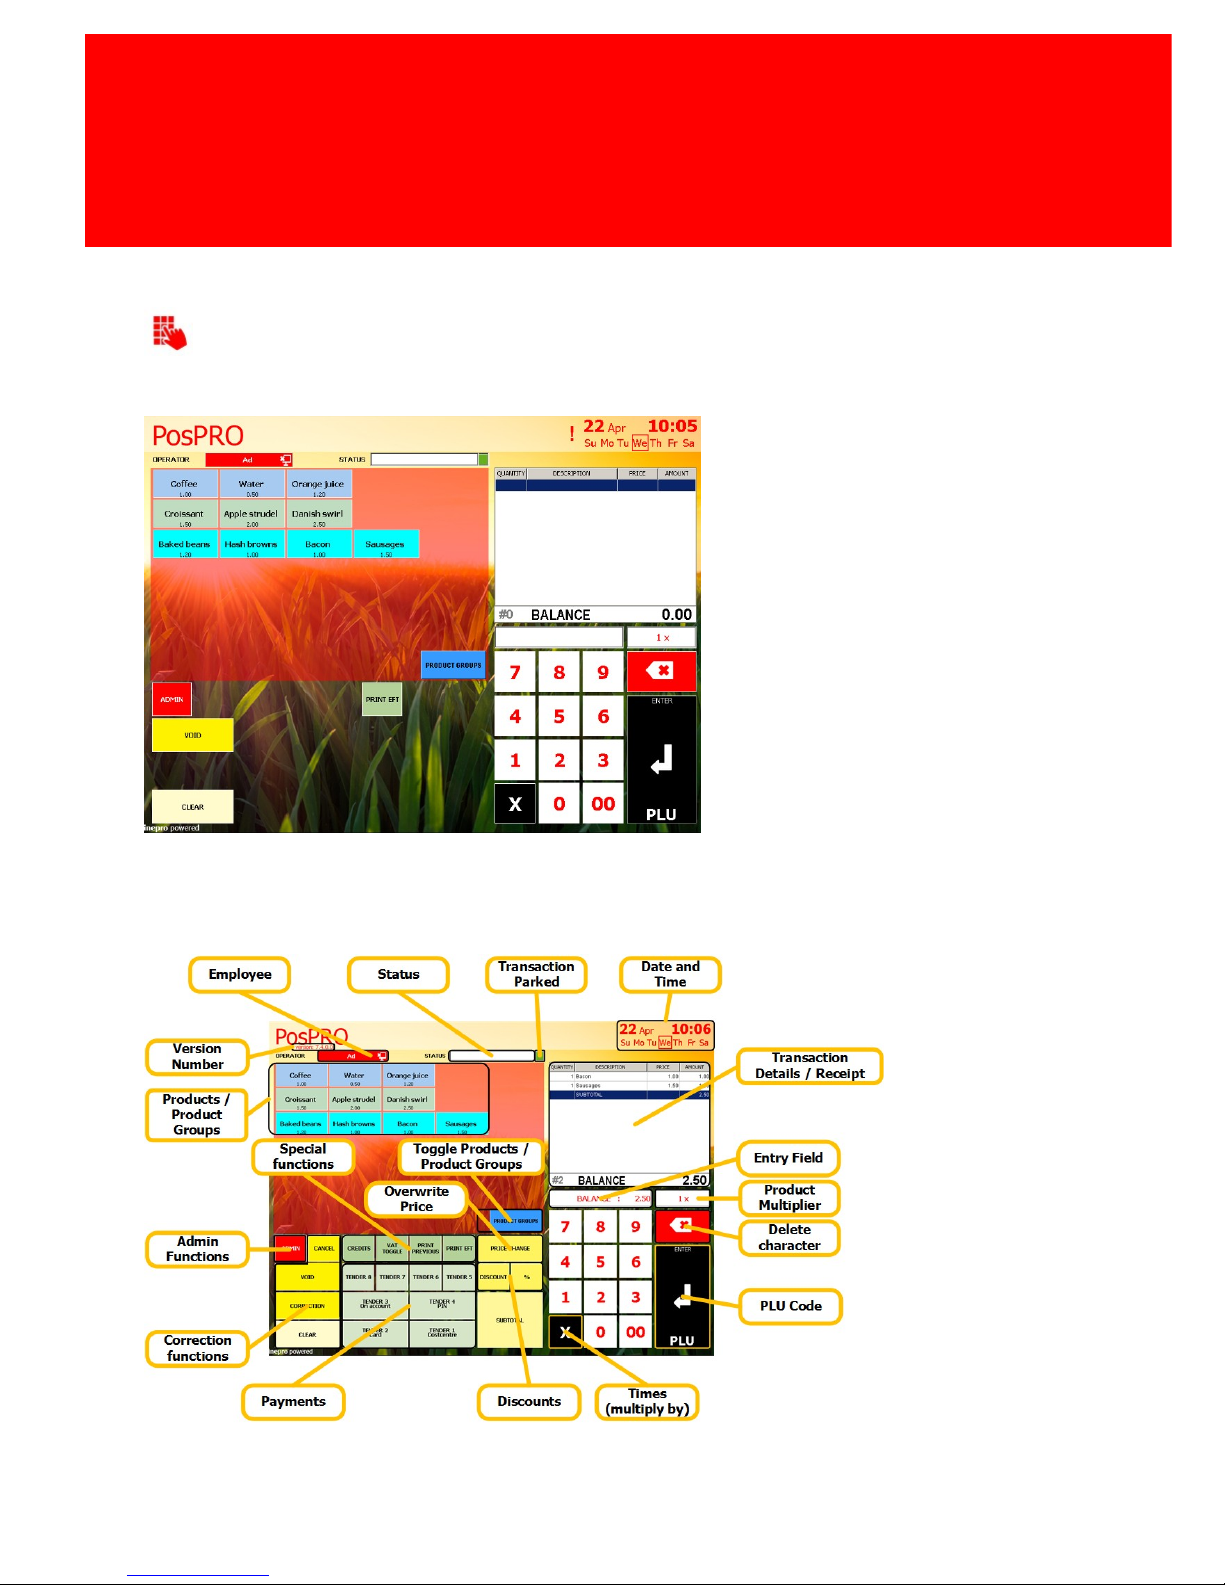
The sales window is one of the most important windows in the PosPRO application. In this windows
the products are being sold.
Let's take you trough the different buttons that can appear on the screen.
Page 59

Version 7.5.6 - 53
Sales
Note: Most of these buttons are not visible, because of the intuitive keyboard function, which will
hide all the buttons that the employee will not need at that moment. Other configuration settings
can also cause buttons to be invisible.
Title bar
On top of the Sales screen you find the title bar with 'PosPRO' and the clock with date and time.
Version
When you click the title bar the PosPRO version text will appear, showing you which version of
PosPRO you are using.
Employee Name
Employee Name will show which employee is currently logged in.
Status
This will show the current status, in this example 'Waiting'.
Transaction Parked
Transaction Parked will show a 'P' when a transaction has been parked.
VAT description
This will show the description of the current VAT applied.
Product Multiplier
Product Multiplier will tell you how many times the product will be charged.
Product / Product Groups
Product / Product Groups will either show you the groups of products available on the till or it will
show you the products themselves.
Toggle Products / Product Groups
When you are selecting products, but you made a mistake and need to be in another product
group. Click this button to go back to the screen that has all the product groups.
Transaction Details / Receipt
Receipt will show you a preview on the receipt. It will show you in which quantity you are buying
the product and what it will cost.
Page 60
54 - PosPRO
User Interface
Entry Field
In the entry field you can enter the PLU code and the number to multiply the current product with.
Backspace / Delete character
The 'Backspace' will delete the last character in the entry field, just like the backspace on a
computer keyboard.
PLU-code
The Price Look-Up code button will allow you to quickly enter an article of which you know the
PLU-code. First enter the PLU-code and then click the PLU button.
Times / Multiply by
Click this button to sell the current product multiple times. Click the button and then enter the
quantity in which the product should be sold.
Correction Functions
Where people are working; errors will be made, this is unavoidable.
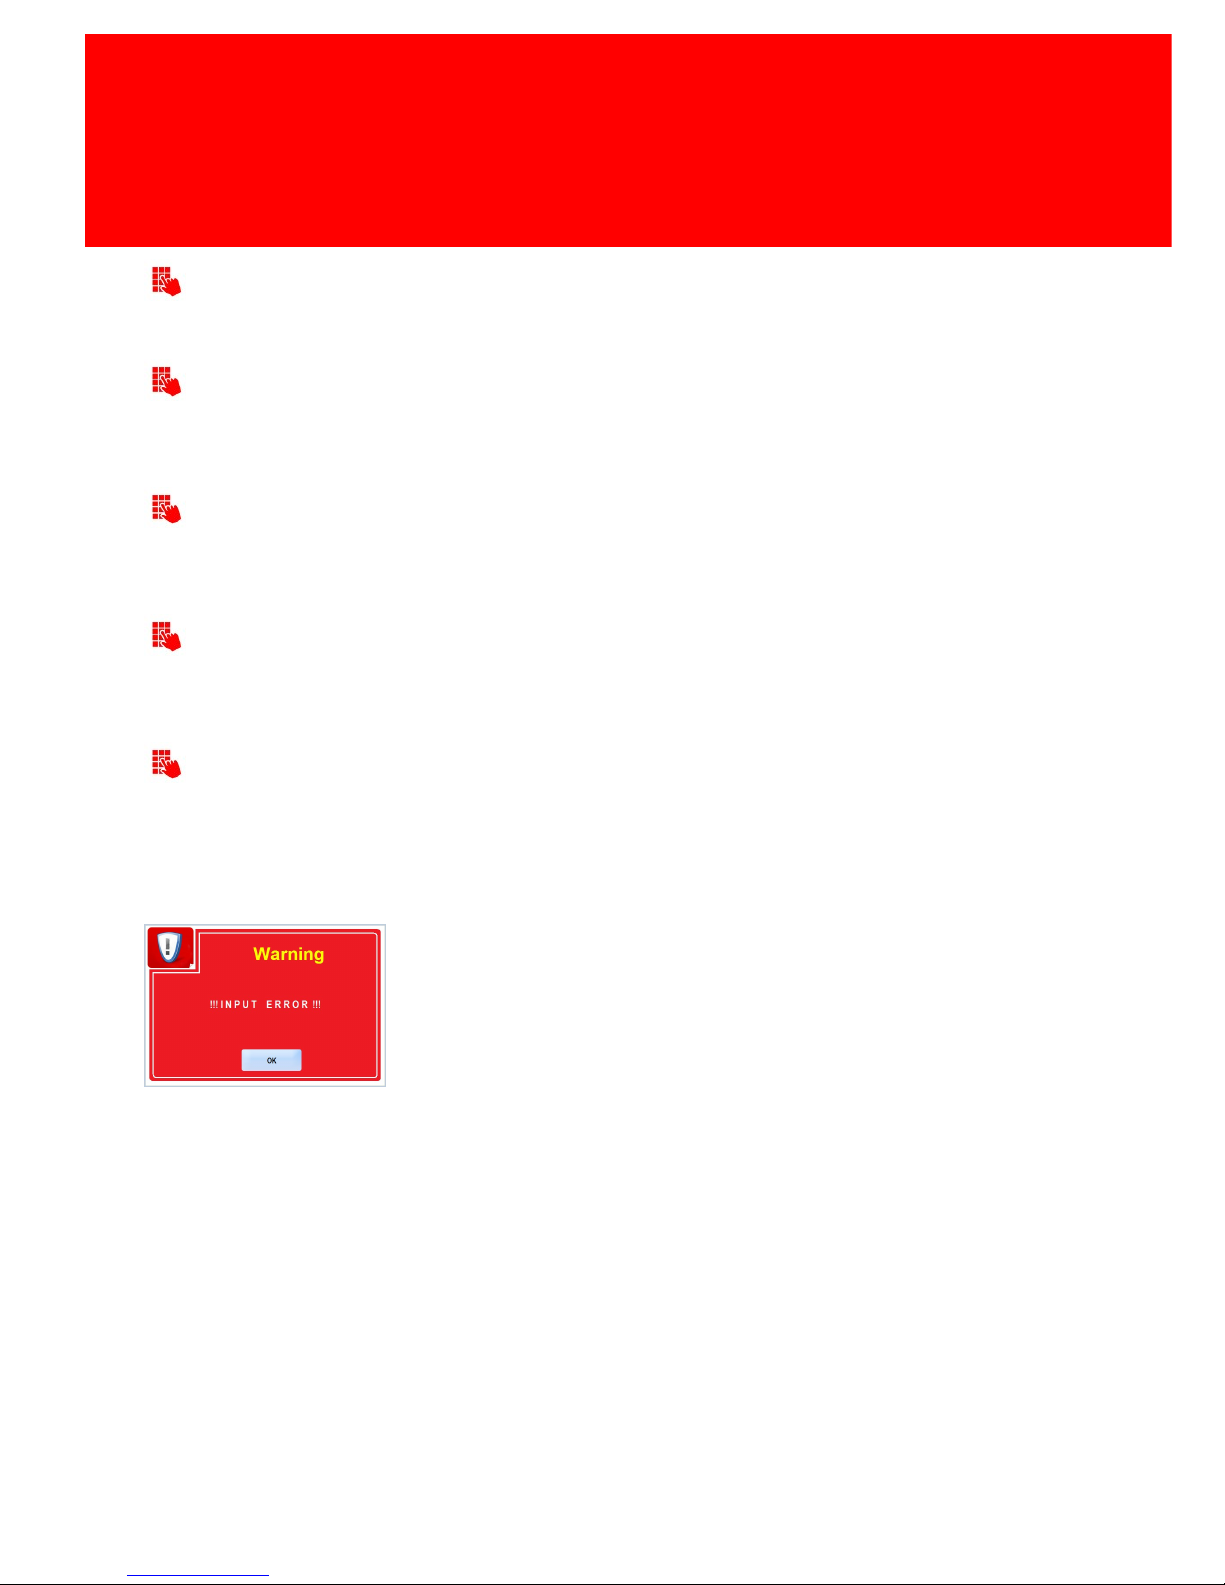
Input mistakes
But mistakes can not be overlooked, so the PosPRO till will block it's functions when an input error
has been detected. The following message will be shown:
You need to click on 'OK' to return to the till and then retry the action you needed to perform.
Input errors can be greatly reduced by using the intuitive keyboard.
Cancel
Use 'Cancel' to cancel the complete transaction.
Page 61
Version 7.5.6 - 55
Sales
Void
Use 'Void' to handle a sale return.
Correction
Use 'Correction' to delete the selected transaction line.
Clear
Use 'Clear' to empty the entry field or when you made a mistake and click to wrong payment type
(the payment type buttons, will reappear on the screen).
Admin Functions
When the 'Admin' button is pressed the window with the Admin functions opens. You need to have
elevated PosPRO rights (Manager) for this function.
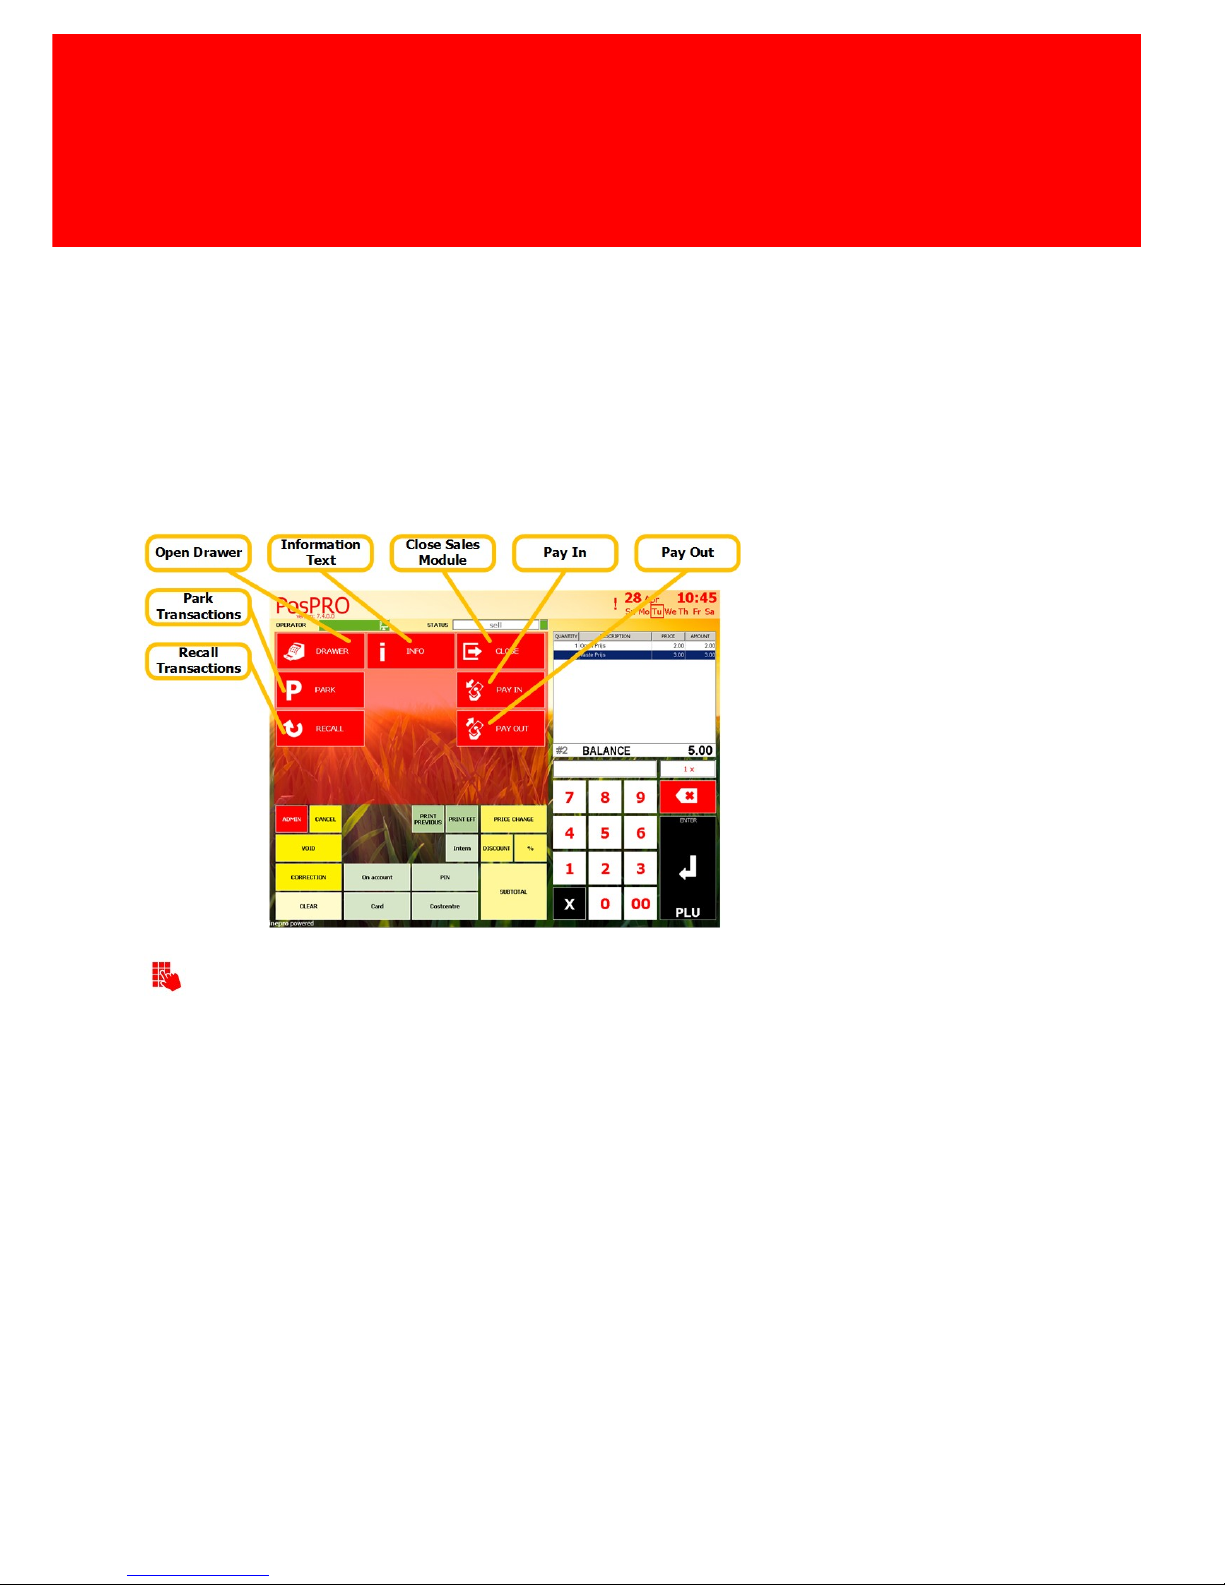
Open Drawer
Open Drawer will open the cash drawer.
Park Transaction
Park Transaction will allow you to 'park' a transaction. For instance when the customer has
forgotten his wallet, and must retrieve it. The employee can then park his transaction, keep the
items aside and go on with the other customers until the customer who forgot his wallet returns. He
will then pull up his transaction and finish it.
Page 62
56 - PosPRO
User Interface
Recall
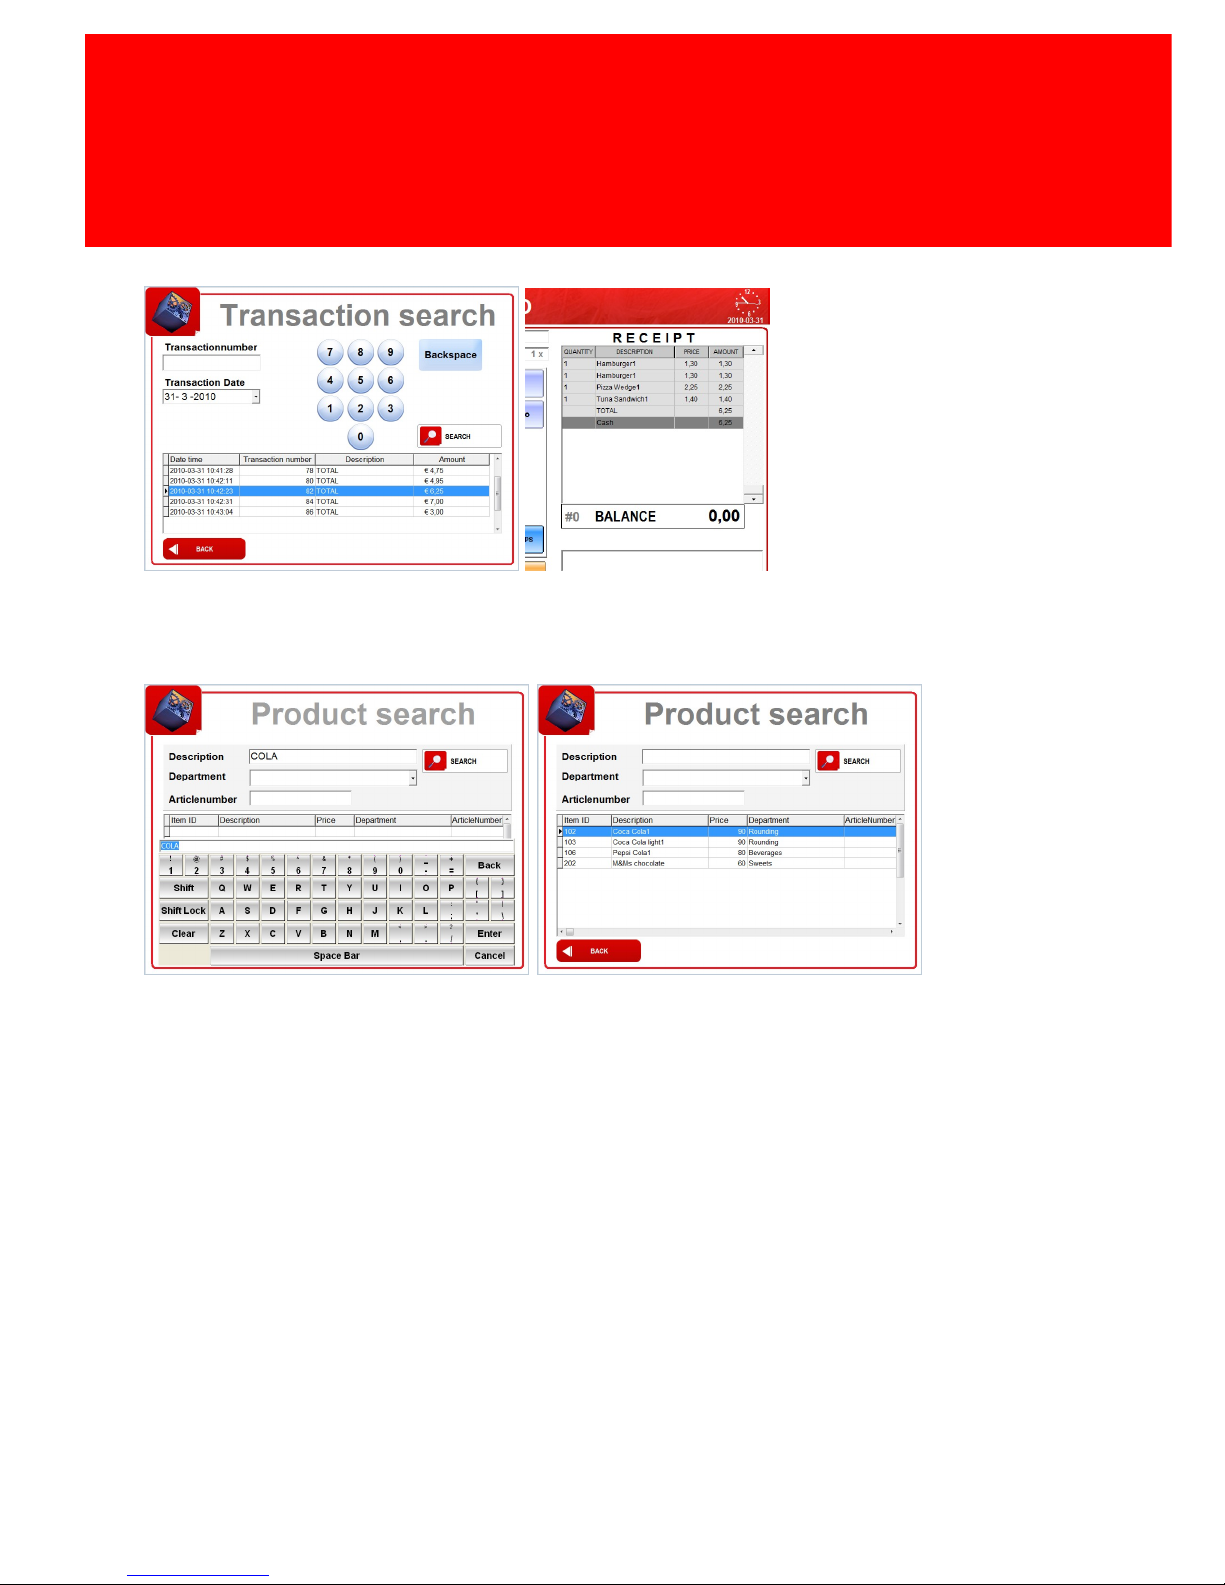
Use 'Recall' to search trough the old transactions, and review a transaction from the past. So you
can for instance check a claim from a customer.
Product Info
To find more information about a product, find a product, or to look up the article number you can
click the button 'Info'. In the information screen that will open you can enter a description, an
article number or pick a department and click 'Search' to see all the information about the product.
Return to Main screen
The 'Close' button will take you back to the main screen, where you can chose one of the other
modules, log off, take a break or close the application.
Pay Out / Pay In
In some cases it is needed to either add cash to the till or to make an external payment with money
from the till. For instance paying for a package that is being delivered or the service of a
window-cleaner. These payment can be registered with the 'Pay Out' and 'Pay In' buttons.
Page 63

Version 7.5.6 - 57
Sales
Special functions
The special function will handle printing, VAT functions and revaluing Inepro cards.
Revalue
Revalue allows you to add value to a Inepro user card. A special product with the product code
10000 should be added, the open price check should be ticked. This product should be added to the
PosPRO product template of the till, but doesn't have to be part of a PosPRO Product Group or a
Presentation Layer. To learn more about creating a product please refer to page .
Eat out / Overwrite all VAT
Eat out will charge the second VAT in stead of the VAT value of the product. This will be used when
the government wants you to charge a different VAT for products eaten inside and products eaten
outside your establishment.
EFT Print
EFT Print will print out the EFT receipt, this is driven from the EFT device itself, so the layout can
not be set or effected by the PosPRO application.
Print
Print wil print out the receipt, or a copy receipt if the receipt has already been printed. See page
for an overview of the available layouts and how to set them.
Price Change
Price Change will overwrite the base price of the article! The employee can set the price as if the
product had an open price. There are few circumstances in which you will need this function, if
possible either use discounts or 'open price'.
Discounts
You can give a discount by selecting the product, typ in the height of the discount and press '%' to
apply a percentile discount or 'Discount' to apply a absolute discount.
The discount will appear below the product on the receipt section (and on the receipt itself)
33
38
Page 64

58 - PosPRO
User Interface
End Of Day
The End of Day report is a compound report of the current day.
Line in PosPRO.ini
Description
[end of day]
Header, you wil find the values below in this section of the
PosPRO.ini
Print report01=n
Reserved for future use
Print report02=n
Use the Department report in the end of day report
Print report03=n
Use the VAT report in the end of day report
Print report04=n
Use the Revalue report in the end of day report
Print report05=n
Use the Item report in the end of day report
Print report06=n
Reserved for future use
Print report07=n
Reserved for future use
Print report08=n
Reserved for future use
Print report09=n
Reserved for future use
Print report10=n
Reserved for future use
Print report11=n
Reserved for future use
Print report12=n
Reserved for future use
Print report13=n
Reserved for future use
Print report14=n
Reserved for future use
Where n is either '1' or '0' meaning enabled or disabled.
You can decide of which reports will be shown in the End of Day report, in the PosPRO.ini file. Read
more about configuring the *.ini files in this chapter: PosPRO.ini '
42
Page 65
Version 7.5.6 - 59
PosPRO Manager
PosPRO Manager
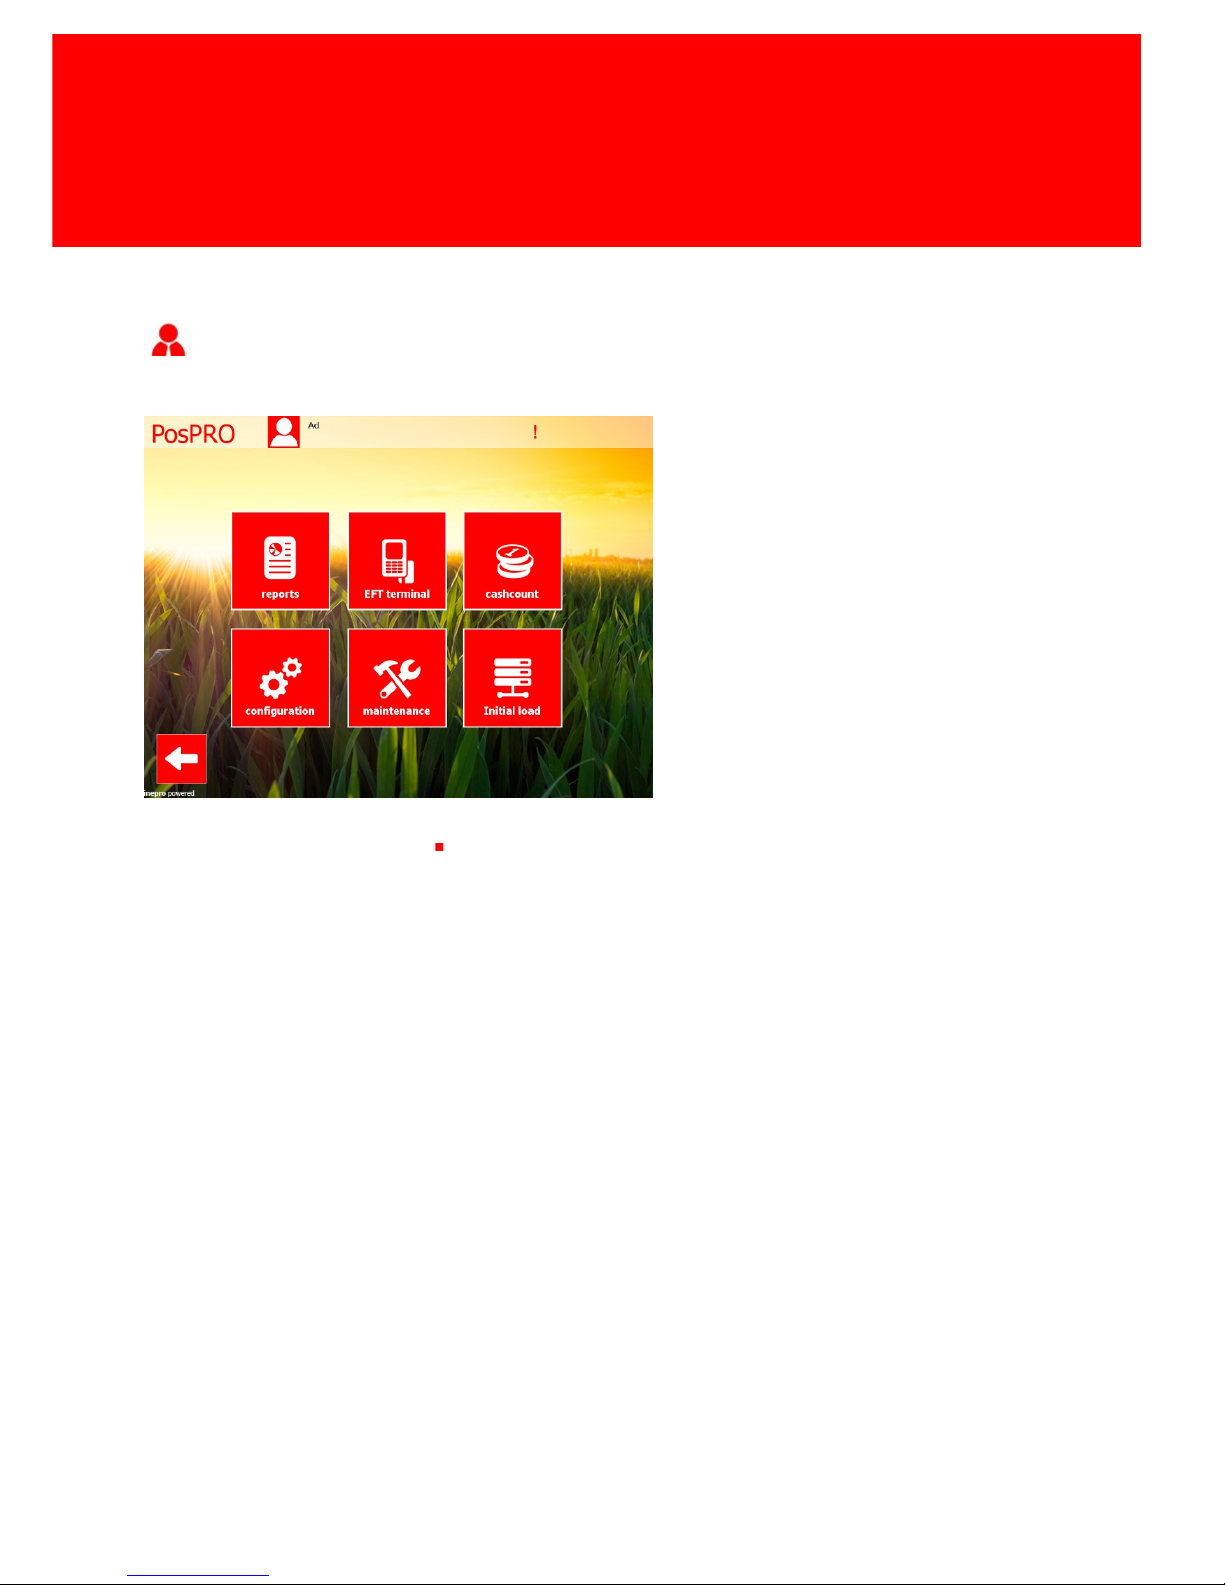
The manager is has a number of modules; Reports, EFT Terminal, Cash Count, Configuration,
Maintenance and Initial Load
Page 66
60 - PosPRO
User Interface
Reports
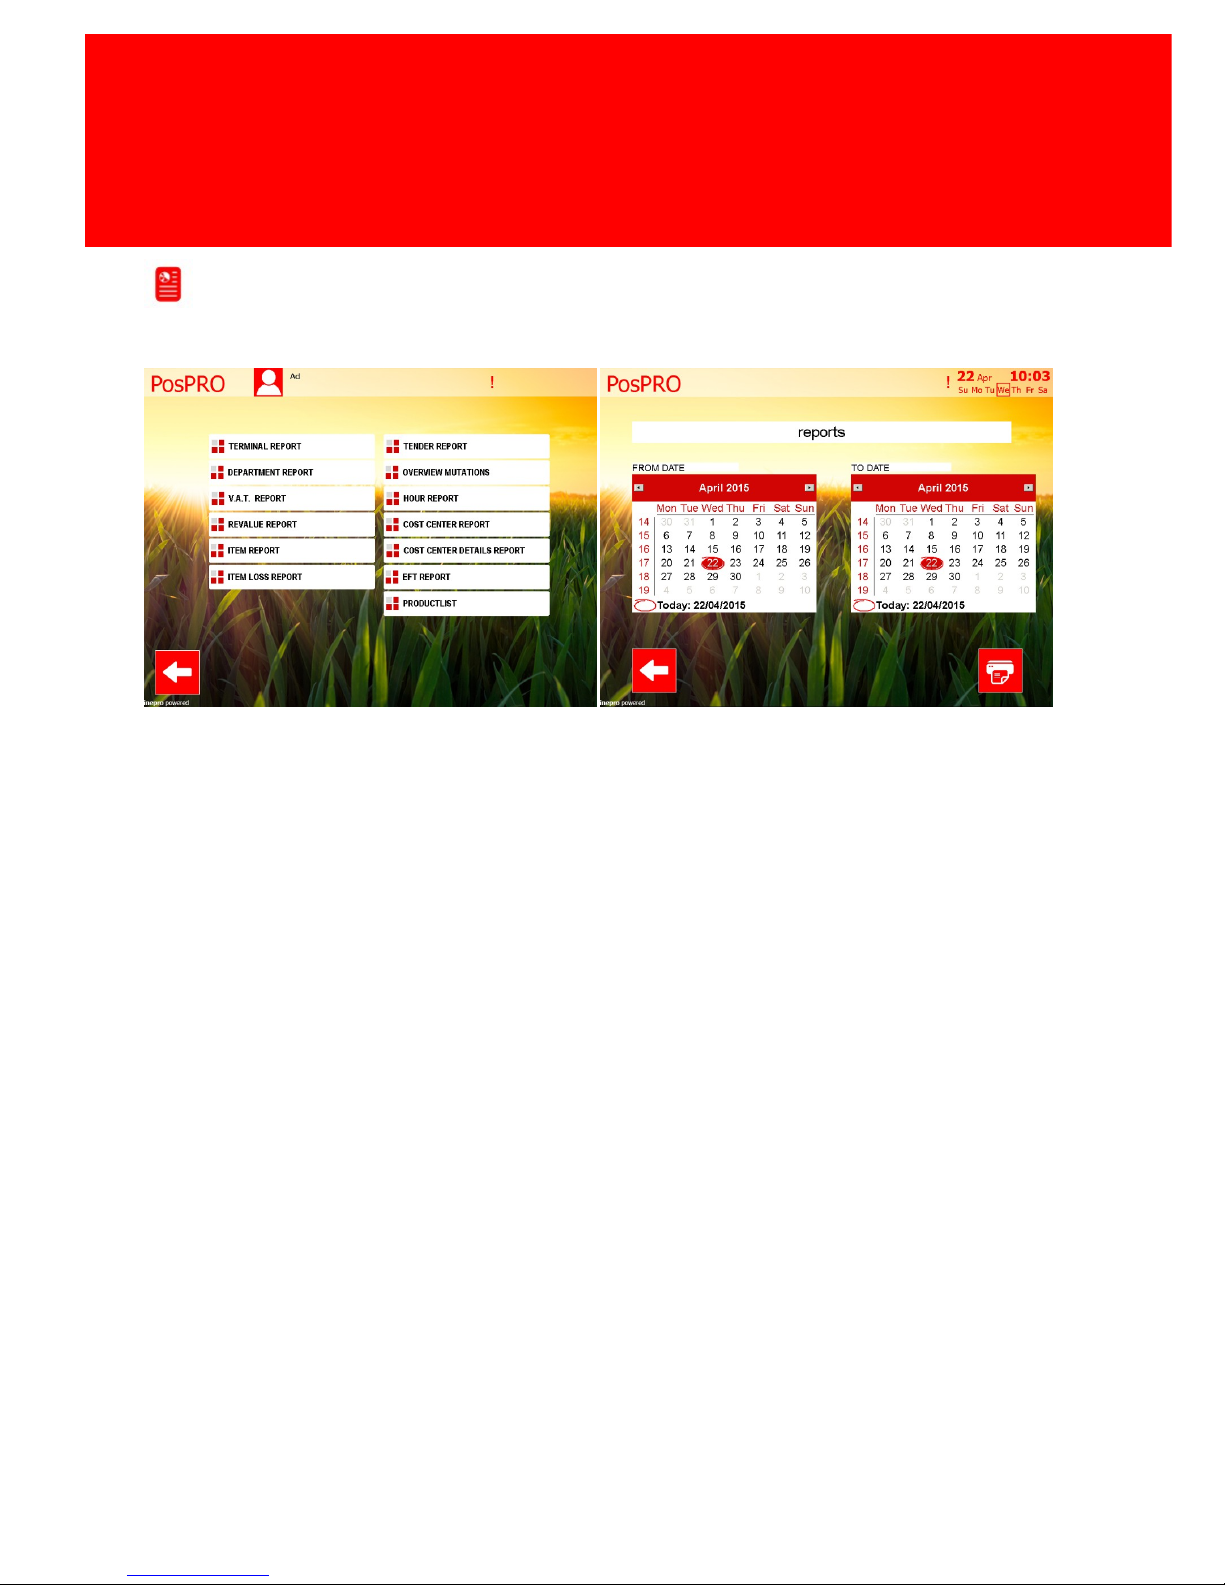
The PosPRO till has the ability to print a number of reports, for each report you select a start and
end date and click 'Print' to print out the report.
The reports are described below with an example receipt as reference.
Almost all reports will have the VAT, gross and net price, in all there cases the net price is used.
Page 67

Version 7.5.6 - 61
PosPRO Manager
Terminal Report
** INEPRO POSPRO **
TERMINAL REPORT
FROM DATE
31-03-2010
TO DATE
31-03-2010
Computer
MyComputerName
IP
127.0.0.1
Store
MyCompany
Inepro PosPRO
v4.18.0.0
Database
v4.18.0
-+- -+- -+- -+- -+- -+- -+-
CUSTOMERS
13
AMOUNT
75,50
NUMBER OF ITEMS
63
NUMBER OF DISCOUNTS
2
AMOUNT
2,17
-+- -+- -+- -+- -+- -+- -+-
TENDER
QUANTITY
TOTAL
----------------
--------------
---------
Cash1375,50
=====
=
TOTAL
75,50
PAY IN
0
0,00
PAY OUT
0
0,00
-+- -+- -+- -+- -+- -+- -+-
DESCRIPTION
VAT
NET
GROSS
----------------------
------
-------
----------
Vat None 0,00%
0,00
74,53
74,53
Vat Low 6,00%
0,03
0,42
0,45
Vat High 19,00%
0,08
0,44
0,52
------
-------
----------
TOTAL
0,11
75,39
75,50
-+- -+- -+- -+- -+- -+- -+-
DESCRIPTION
QTY
NET
VAT
GROSS
-------------------
------
--------
-------
----------
Cashregis
63
75,39
0,11
75,50
------
--------
-------
----------
63
75,39
0,11
75,50
-+- -+- -+- -+- -+- -+- -+-
HOURS
CUST
ITEMS
AMOUNT
AVG
----------
--------
--------
------------
----------
10 - 11
52225,95
5,19
11 - 12
84149,55
6,19
-+- -+- -+- -+- -+- -+- -+-
OPER:0001
2010-03-31 12:20:59
The terminal report is a compound report that
also has some specific data of the terminal and
the software.
It also contains the Tender, VAT, Department
and Hour report.
Page 68
62 - PosPRO
User Interface
Tender Report
** INEPRO POSPRO **
TENDER REPORT
FROM DATE
31-03-2010
TO DATE
31-03-2010
TENDER
QUANTITY
TOTAL
----------------
--------------
---------
Cash1375,50
=====
=
TOTAL
75,50
PAY IN
0
0,00
PAY OUT
0
0,00
OPER:0001
2010-03-31 12:20:59
The Tender report will tell you how many
products are sold, at which total amount per
Tender Type (Cash, Bank, Card, Cost Centre,
etcetera).
It will also show the Pay In and Pay Out
amounts.
Department Report
** INEPRO POSPRO **
DEPARTMENT REPORT
FROM DATE
31-03-2010
TO DATE
31-03-2010
DESCRIPTION
QTY
NET
VAT
GROSS
--------------------
------
--------
-------
----------
Cashregis
63
75,39
0,11
75,50
------
--------
-------
----------
63
75,39
0,11
75,50
OPER:0001
2010-03-31 12:21:35
The Department report will show you how many
products are sold per department, it will also
show the VAT, Net and Gross values.
56
Page 69

Version 7.5.6 - 63
PosPRO Manager
Overview Mutations
** INEPRO POSPRO **
OVERVIEW MUTATIONS
FROM DATE
31-03-2010
TO DATE
31-03-2010
-------------------------------------------------
[REMOVE]
101
7-up
0,80
[MUTATION]
109
Milk
0,90
[REMOVE]
18
Coca Cola
0,90
OPER:0001
2010-03-31 12:22:13
Overview Mutations is not so much a report as it
is a log of which products have undergone
changes in the specified period.
Warning: This can be a long report!
VAT Report
** INEPRO POSPRO **
V.A.T. REPORT
FROM DATE
31-03-2010
TO DATE
31-03-2010
DESCRIPTION
VAT
NET
GROSS
----------------------
------
-------
----------
Vat None 0,00%
0,00
74,53
74,53
Vat Low 6,00%
0,03
0,42
0,45
Vat High 19,00%
0,08
0,44
0,52
------
-------
----------
TOTAL
0,11
75,39
75,50
OPER:0001
2010-03-31 12:22:43
The VAT report will show the total amount of
applied VAT per VAT rate.
It will also show the Net and Gross values.
Page 70
64 - PosPRO
User Interface
Hour Report
** INEPRO POSPRO **
HOUR REPORT
FROM DATE
31-03-2010
TO DATE
31-03-2010
HOURS
CUST
ITEMS
AMOUNT
AVG
----------
--------
--------
------------
----------
10 - 11
52225,95
5,19
11 - 12
84149,55
6,19
OPER:0001
2010-03-31 12:22:59
The Hour report will show you per hour the
number of customers, number of products sold,
the total amount of product sold and the
average amount spend per customer.
So '10 - 11' and '11 - 12' means the data is
shown for the period between 10:00 and 11:00
on the first line, and for the period between
11:00 and 12:00 on the second line.
Revalue Report
** INEPRO POSPRO **
REVALUE REPORT
FROM DATE
31-03-2010
TO DATE
31-03-2010
CARD REVALUE (GROSS)
0,00
CARD REVALUE BONUS
0,00
-------------
CARD REVALUE (NET)
0,00
TOTAL BALANCE ON CARDS
0,00
OPER:0001
2010-03-31 12:22:13
Revaluations
It is possible to use the PosPRO till to revalue
Inepro User Cards. This report will show you an
overview of all card revaluations, and the
optional revalue bonuses.
Revaluations (Gross) is the total amount that a
customer have received as a revaluation on their
cards. This amount is split up into the net and a
bonus revaluations.
The net revaluating amount is the amount that
the customer has loaded on his card. But rules
can be created that will dictate that when a
customer revaluates a x amount, he will get a y
bonus amount added to the x amount.
These are the bonus revaluations.
Total balance on cards
The total balance on the cards is the total
amount of money all the users have on their
cards at exactly this moment, according to the
system.
Page 71

Version 7.5.6 - 65
PosPRO Manager
Cost Centre Report
** INEPRO POSPRO **
COST CENTER REPORT
FROM DATE
31-03-2010
TO DATE
31-03-2010
COST CENTRE
QTY
AMOUNT
-------------------------------------------------
test629,49
=======
==
TOTAL
29,49
OPER:0001
2010-03-31 13:29:15
The total number of products and the total
amount is shown per cost centre.
Item Report
** INEPRO POSPRO **
ITEM REPORT
FROM DATE
31-03-2010
TO DATE
31-03-2010
PRODUCT
QTY
AMOUNT
-------------------------------------------------
Pepsi Cola10,80
Bounty31,80
M&Ms chocolate
1
0,60
Mars21,20
Cookie41,20
Bread Roll51,75
Tuna Sandwhich
13
18,20
Pizza Wedge
10
20,33
Hamburger1522,70
Homemade Cake
7
5,95
OP Low10,45
Op High10,52
=======
==
TOTAL
29,49
OPER:0001
2010-03-31 12:23:42
The item report shows how many times a
product has been sold, the product name,
quantity and total amount is shown.
Page 72

66 - PosPRO
User Interface
Cost Center Details Report
** INEPRO POSPRO **
COST CENTER REPORT
FROM DATE
31-03-2010
TO DATE
31-03-2010
COST CENTRE
QTY
AMOUNT
-------------------------------------------------
[4] test
- 2010-03-31 13:23:49
4,95
(Cost Centre [4])
- 2010-03-31 13:27:46
10,15
(Cost Centre [4])
- 2010-03-31 13:28:01
5,41
(Cost Centre [4])
- 2010-03-31 13:28:12
3,55
(Cost Centre [4])
- 2010-03-31 13:28:33
1,53
(Cost Centre [4])
- 2010-03-31 13:28:59
3,90
(Cost Centre [4])
=======
==
TOTAL
29,49
OPER:0001
2010-03-31 13:29:27
The Cost Center detail report shows the total
amount for each cost centre transaction,
grouped by Cost Centre
Warning: This can be a long report!
Page 73
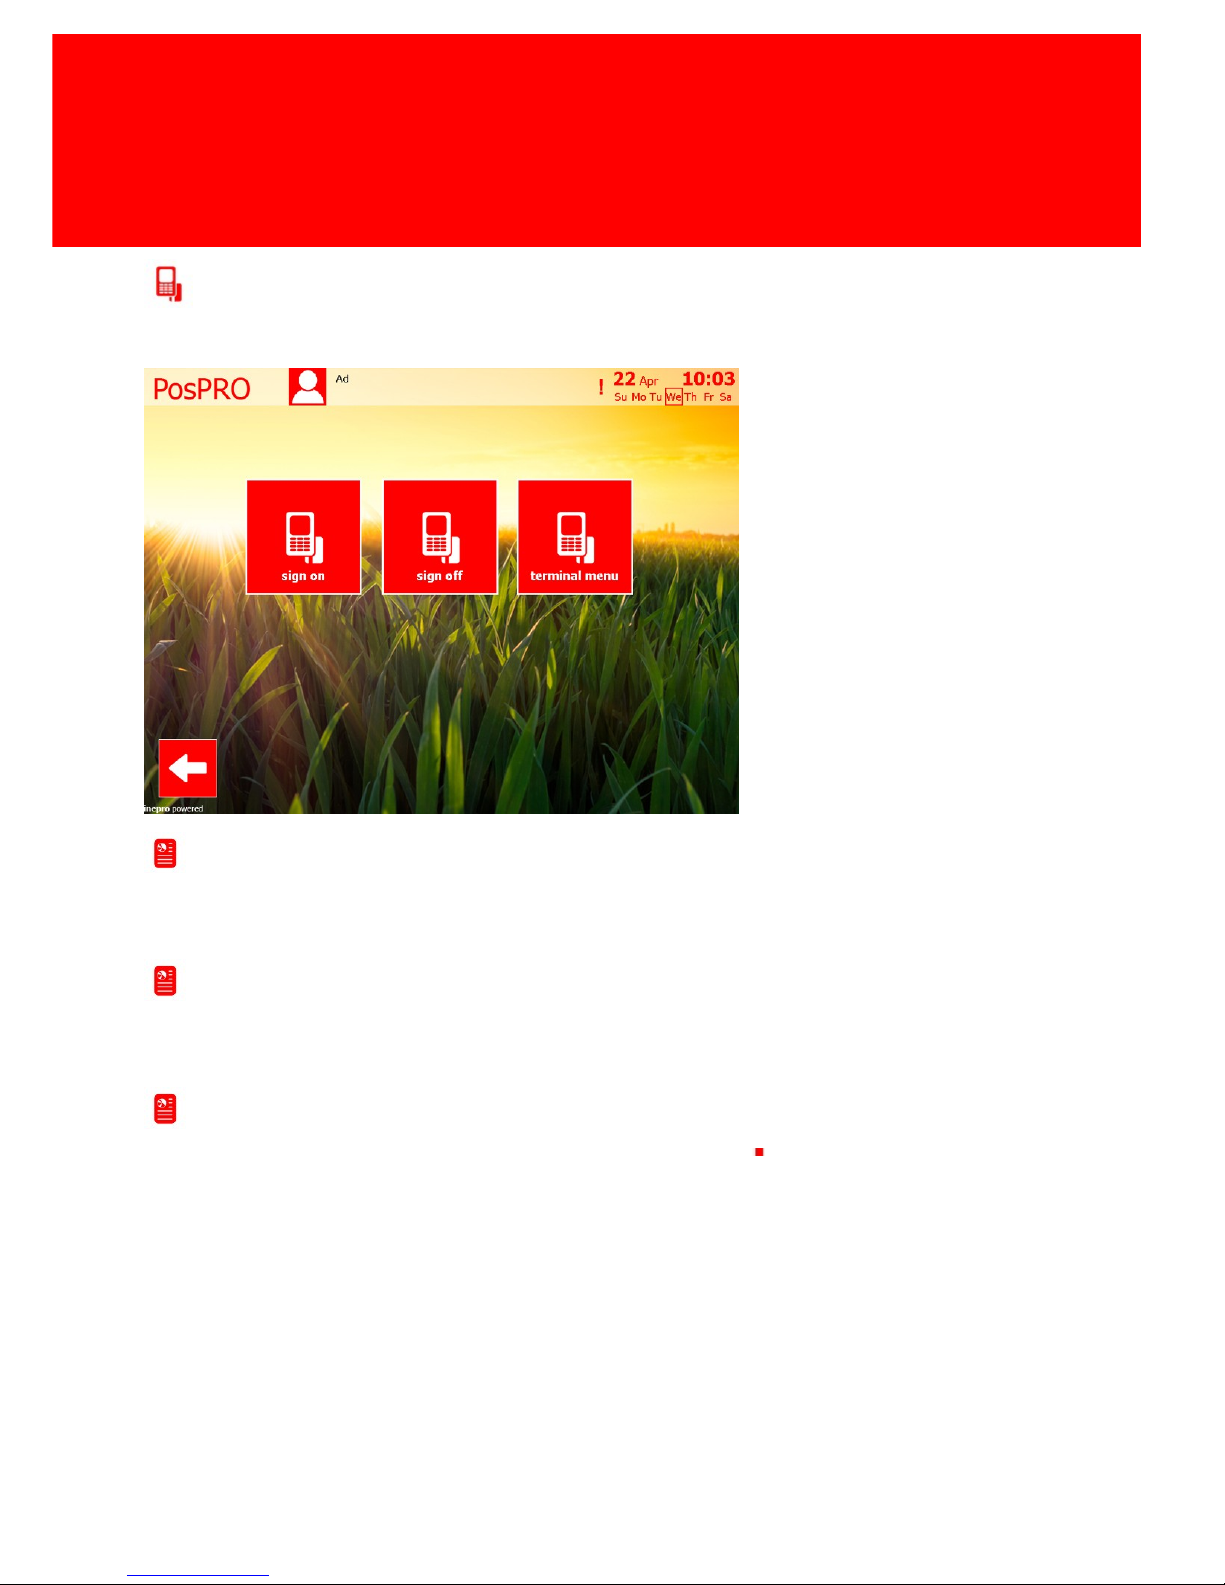
Version 7.5.6 - 67
PosPRO Manager
EFT Terminal
Sign On
Sign the EFT terminal on at the service provider.
Sign Off
Sign the EFT terminal off from the service provider.
Terminal Menu
Go into the EFT terminal menu. Continue at the EFT terminal
Page 74
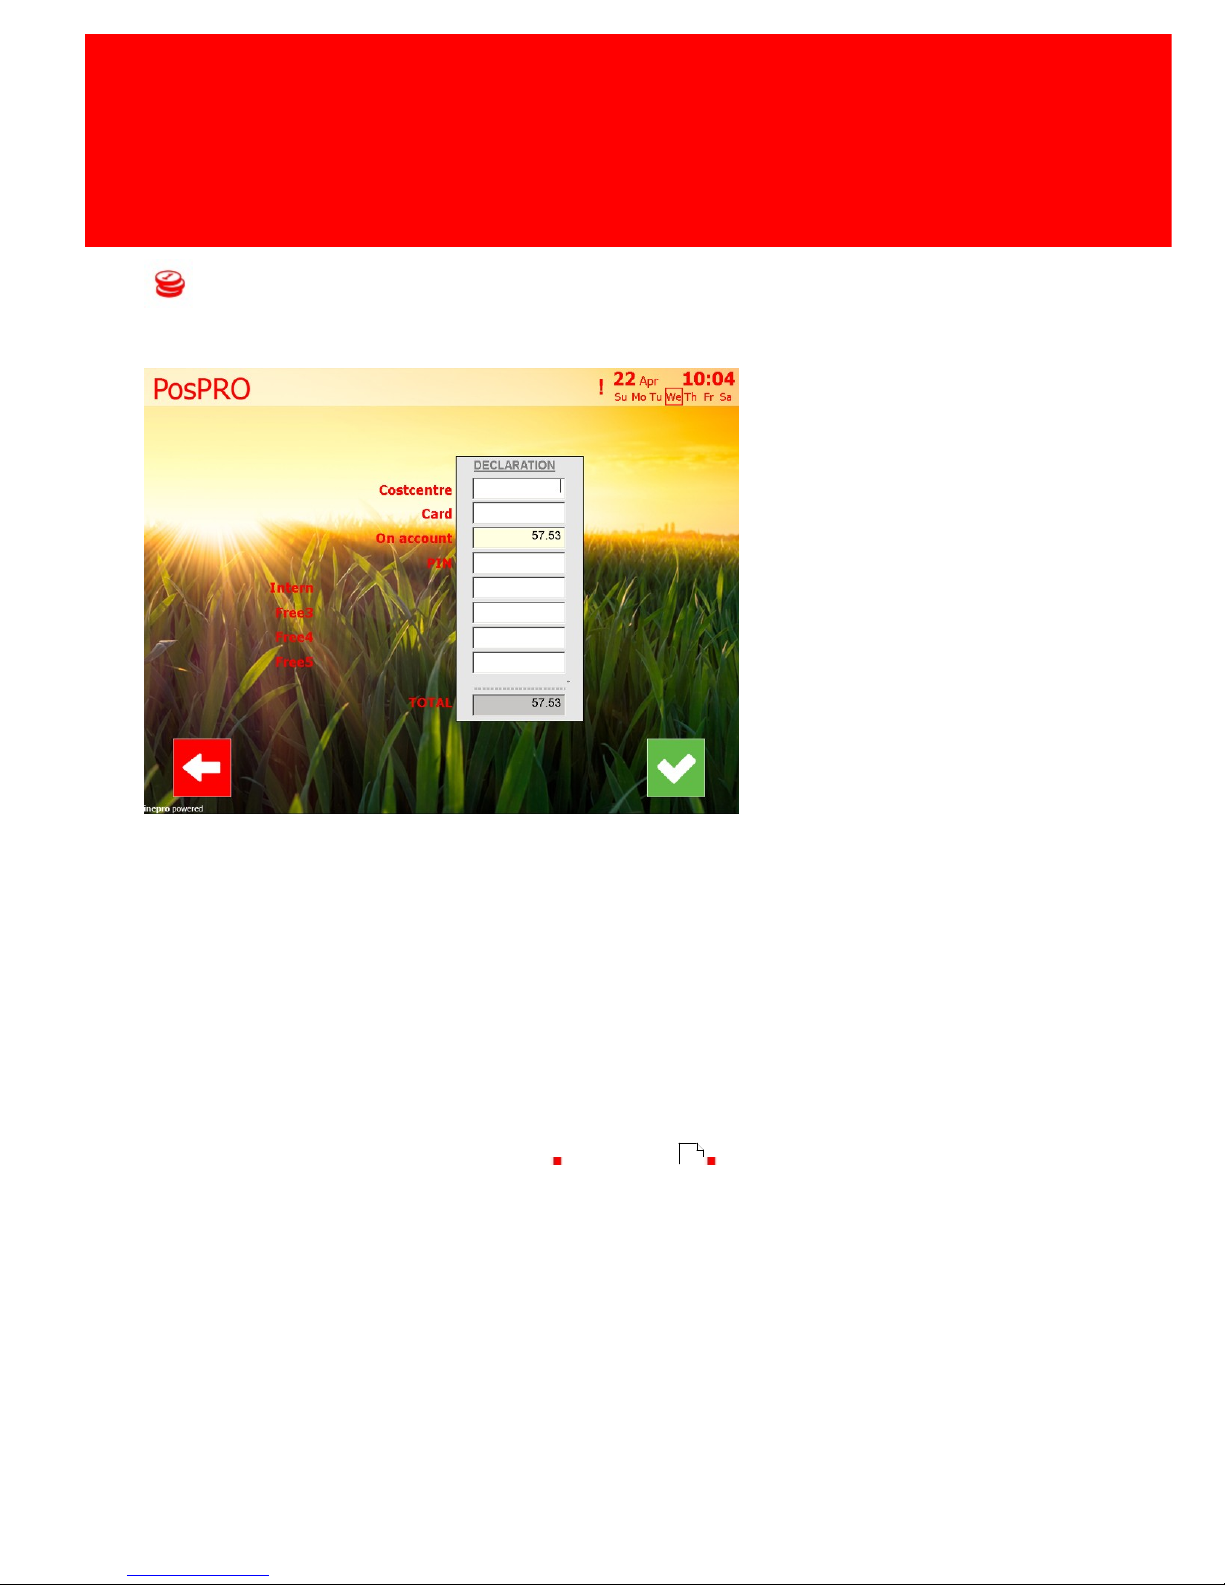
68 - PosPRO
User Interface
Cash Count
In the Cash Count module you are able to digitally perform the cash count procedure. It will show
you in the first column the total amount of money received per payment type. In the second column
you can declare what the amount counted is per payment type, the difference will be shown in the
third column. You are able to accept the differences (to a certain level or even zero-tolerance,
specified in the PosPRO.ini) by clicking the booking button. <Back> will leave the module without
performing the Cash Count procedure.
It is also possible to hide the first and last column, making it harder for an employee to perpetrate
fraud by entering the 'right' numbers. Of course it is possible to give a margin, so the Cash Count
procedure can be finished with minor cash differences.
This margin can be set in the PosPRO.ini See page
44
Page 75
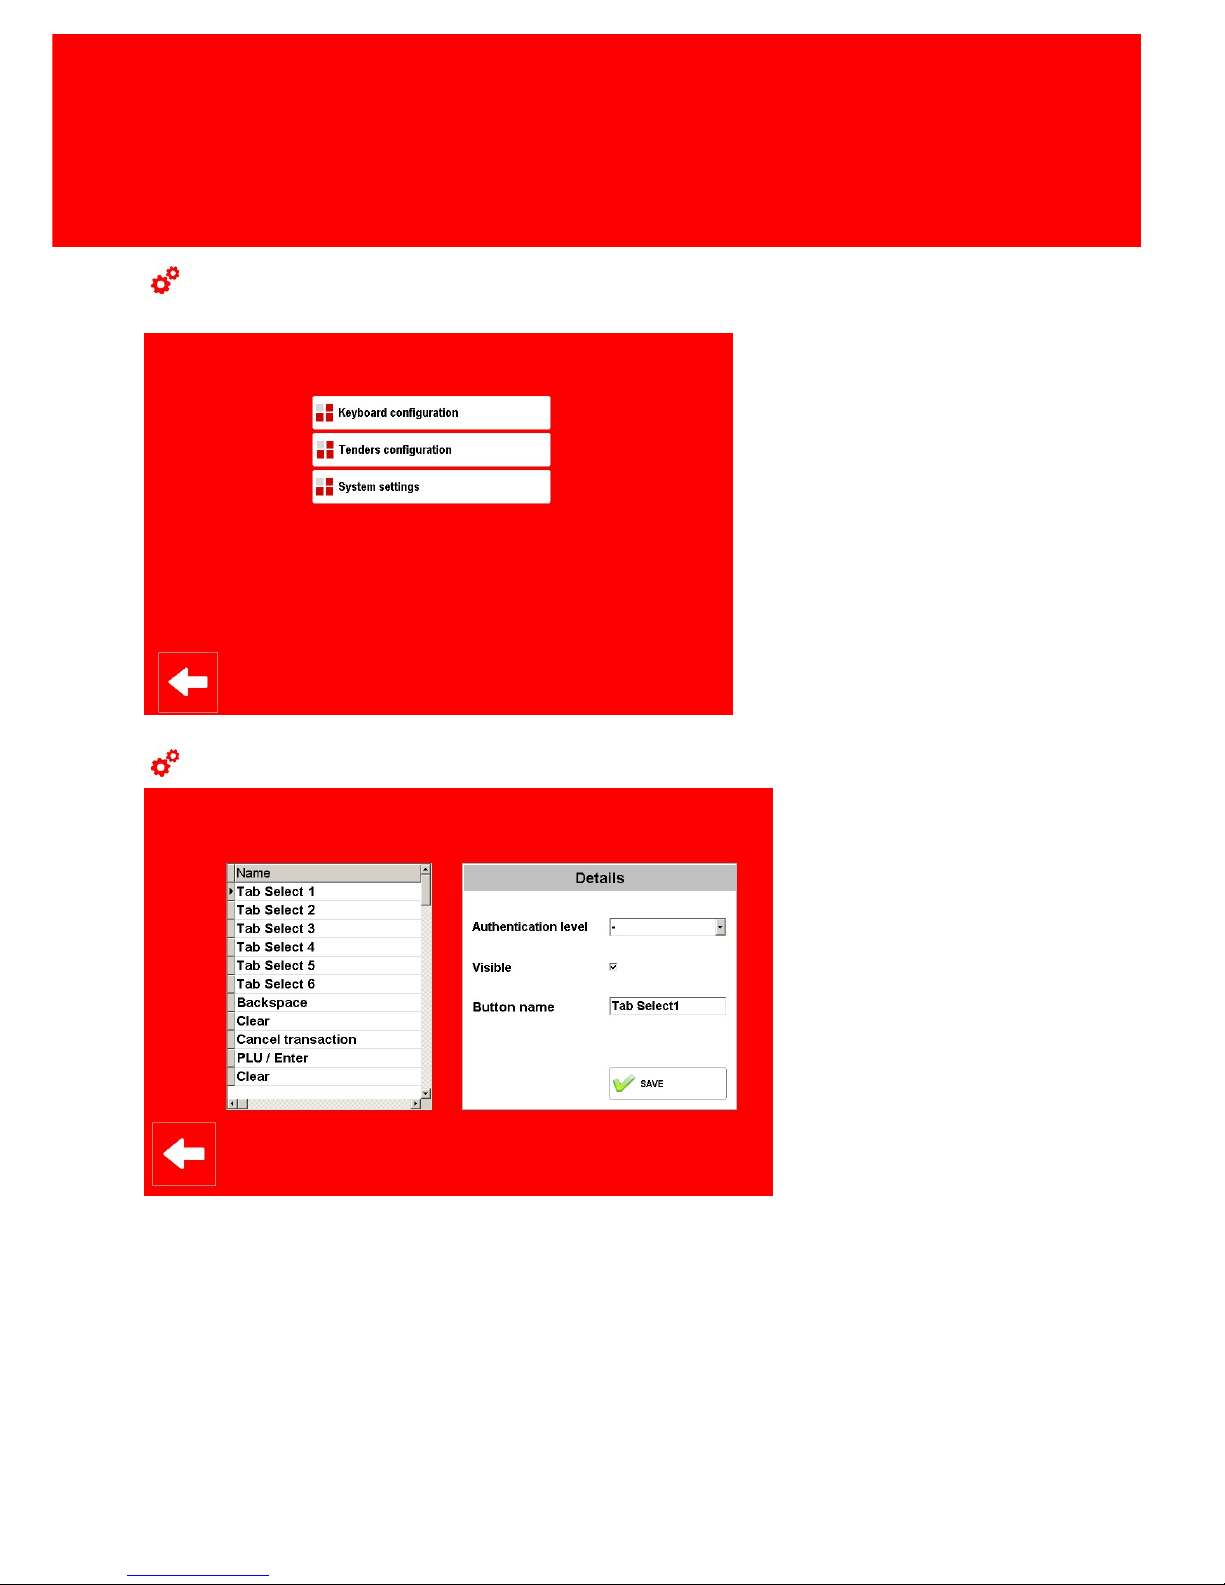
Version 7.5.6 - 69
PosPRO Manager
Configuration
Keyboard Configuration
Page 76
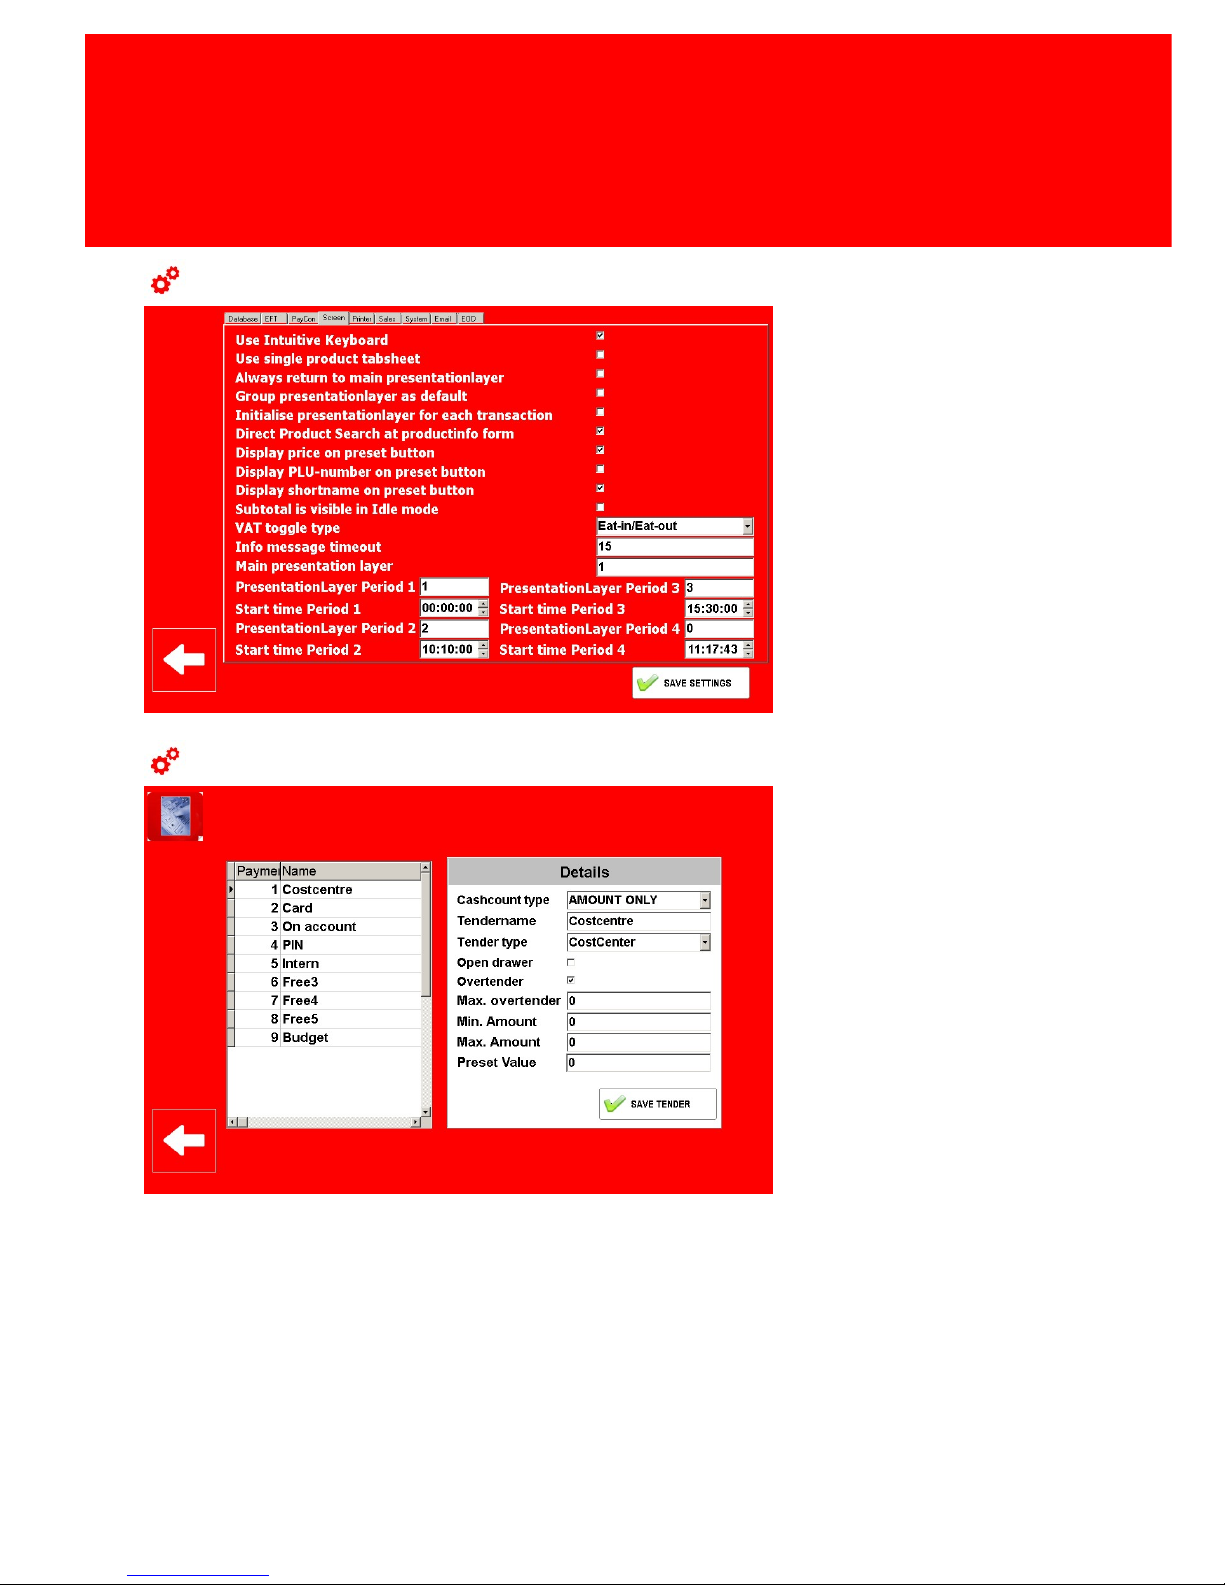
70 - PosPRO
User Interface
Tenders Configuration
System Settings
Page 77
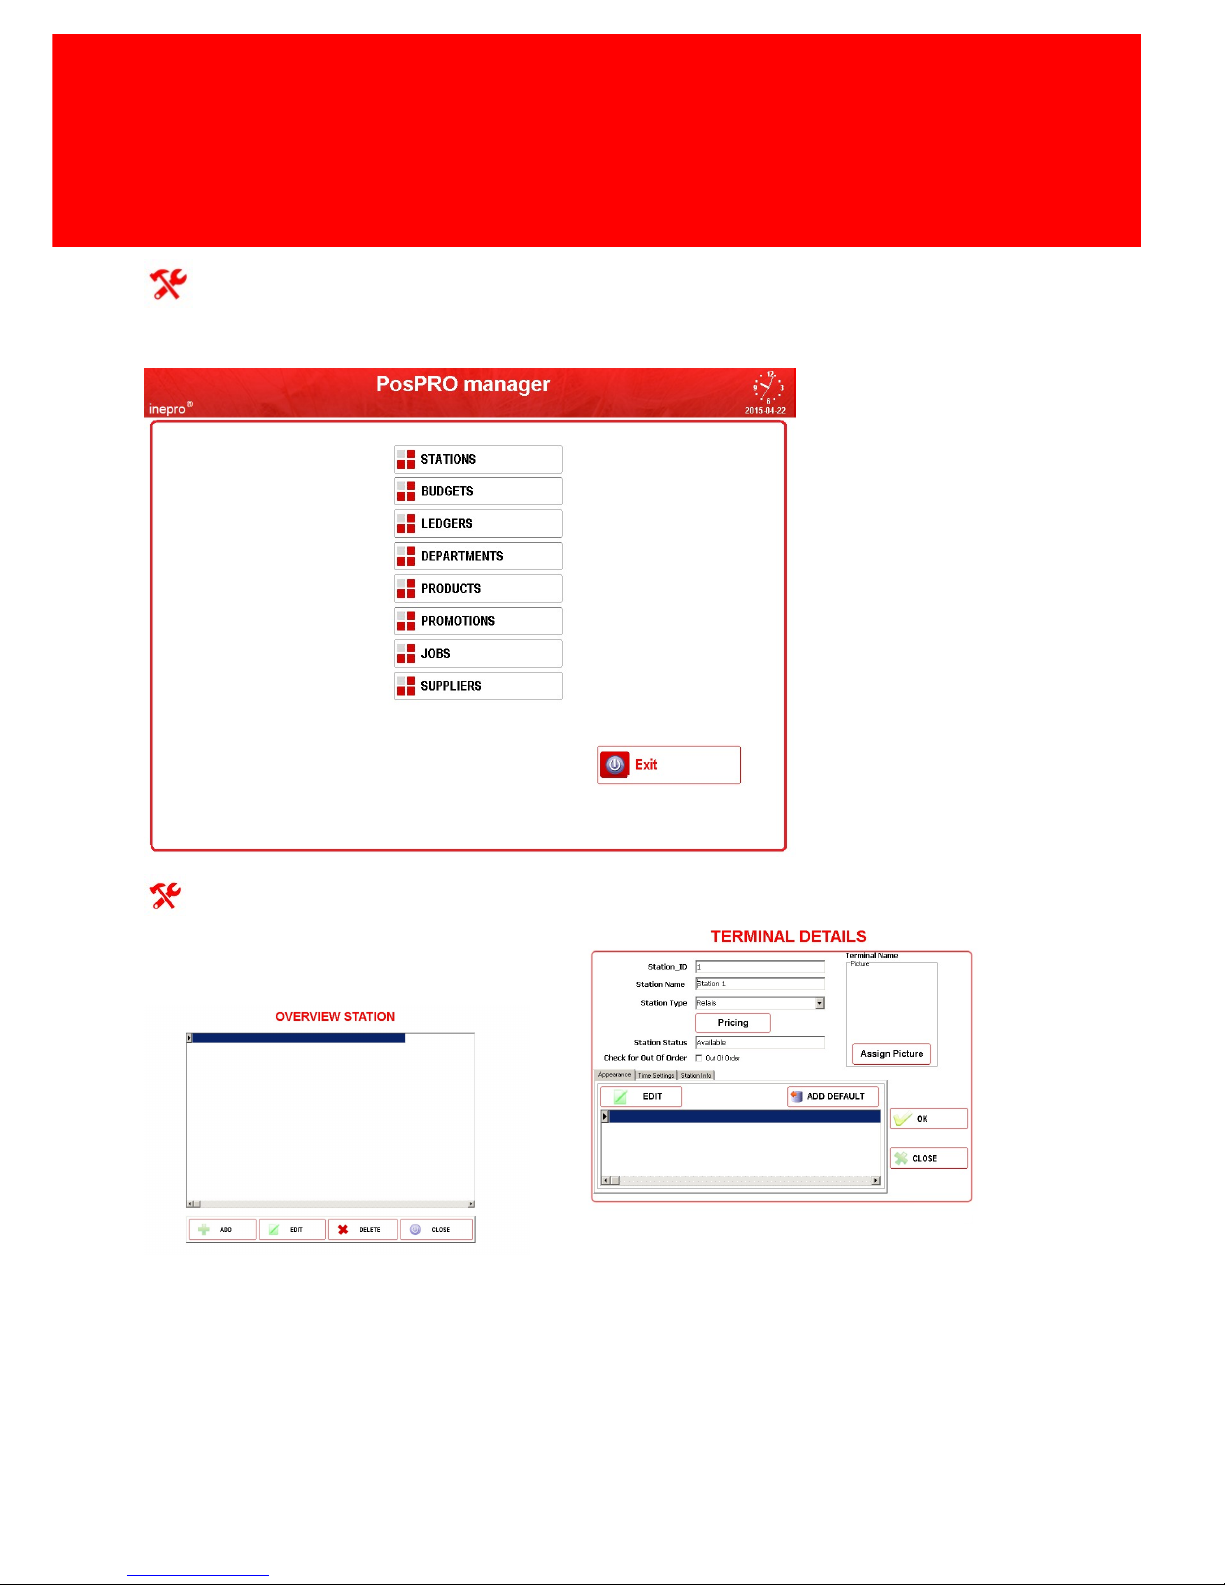
Version 7.5.6 - 71
PosPRO Manager
Maintenance
Station
Page 78
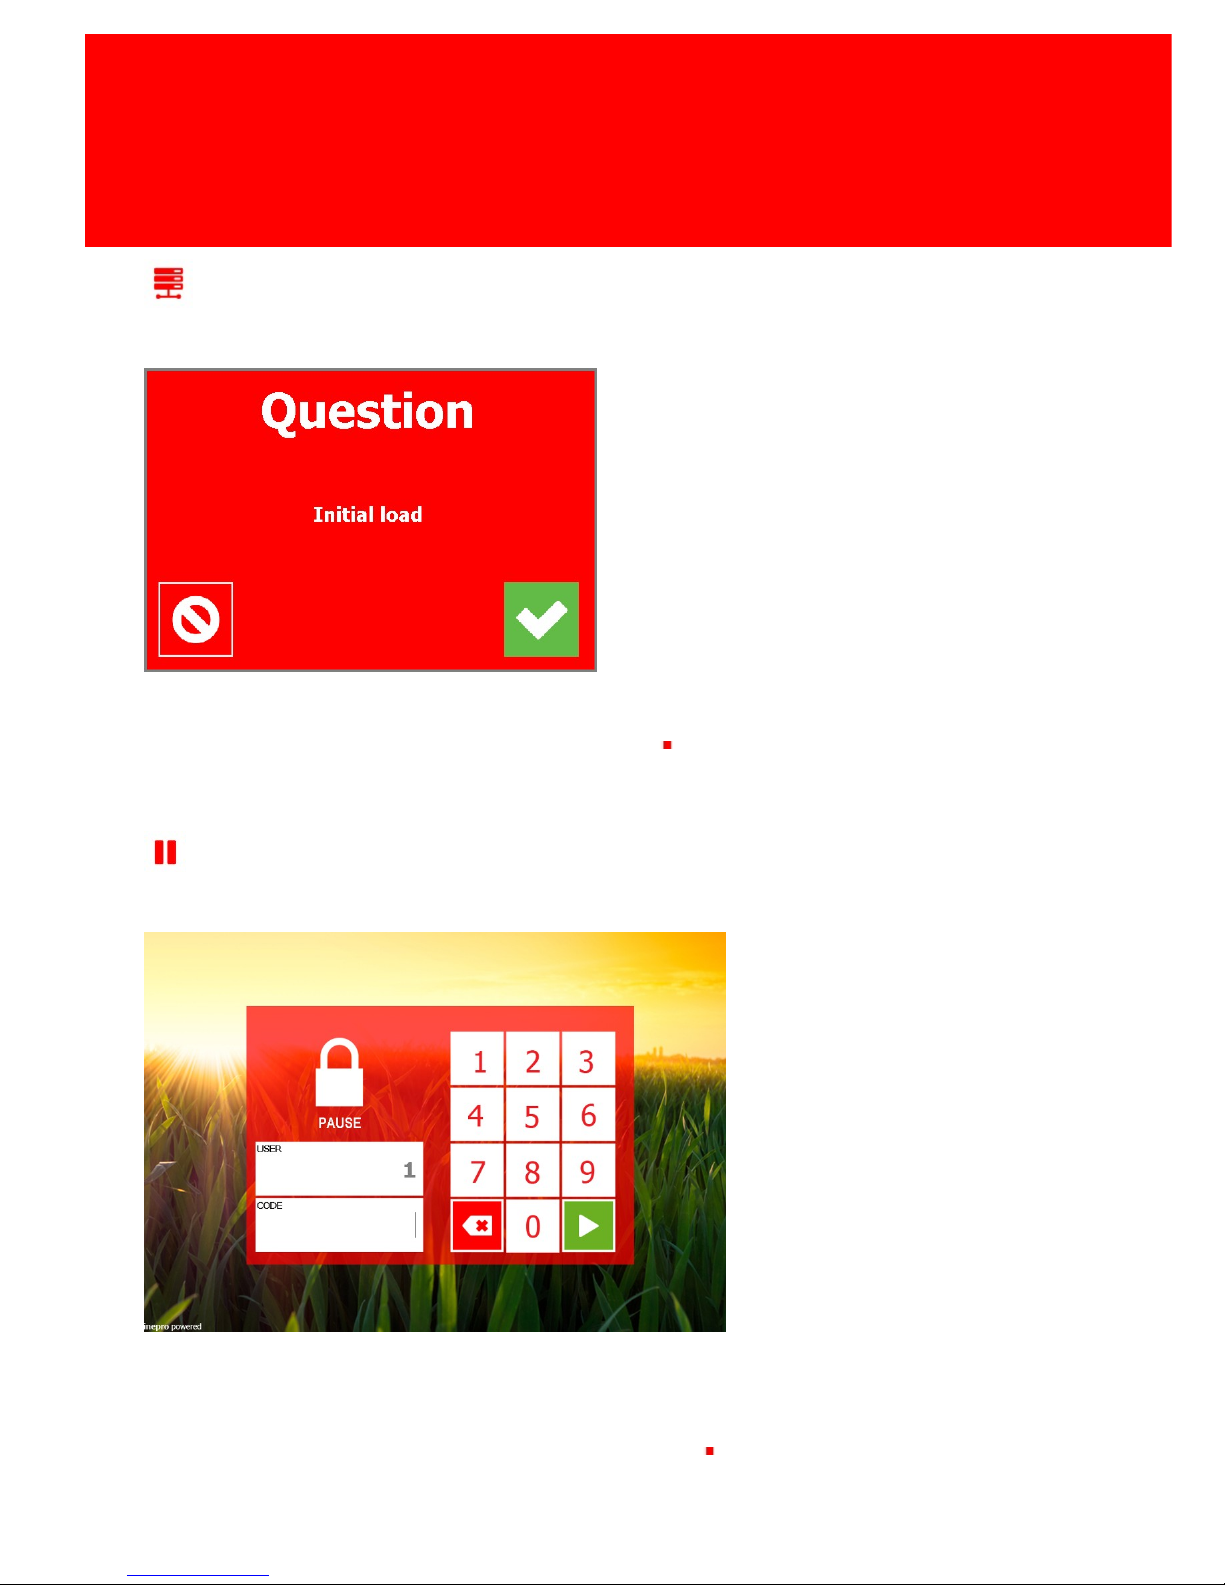
72 - PosPRO
User Interface
Initial Load
When Initial Load is activated, the initial set of products will be reloaded. This can also be used to
restore a serious replication error, should one occur
Pause
When an employee will take a break, he will need to use this option. The employee will log out, but
the username will stay fixed, ensuring that only this employee can log in again. In this way they
employee can still held responsable for the cash in his cash drawer. To give another employee the
possibility to log in, the 'Log off ' option must be chosen
Page 79
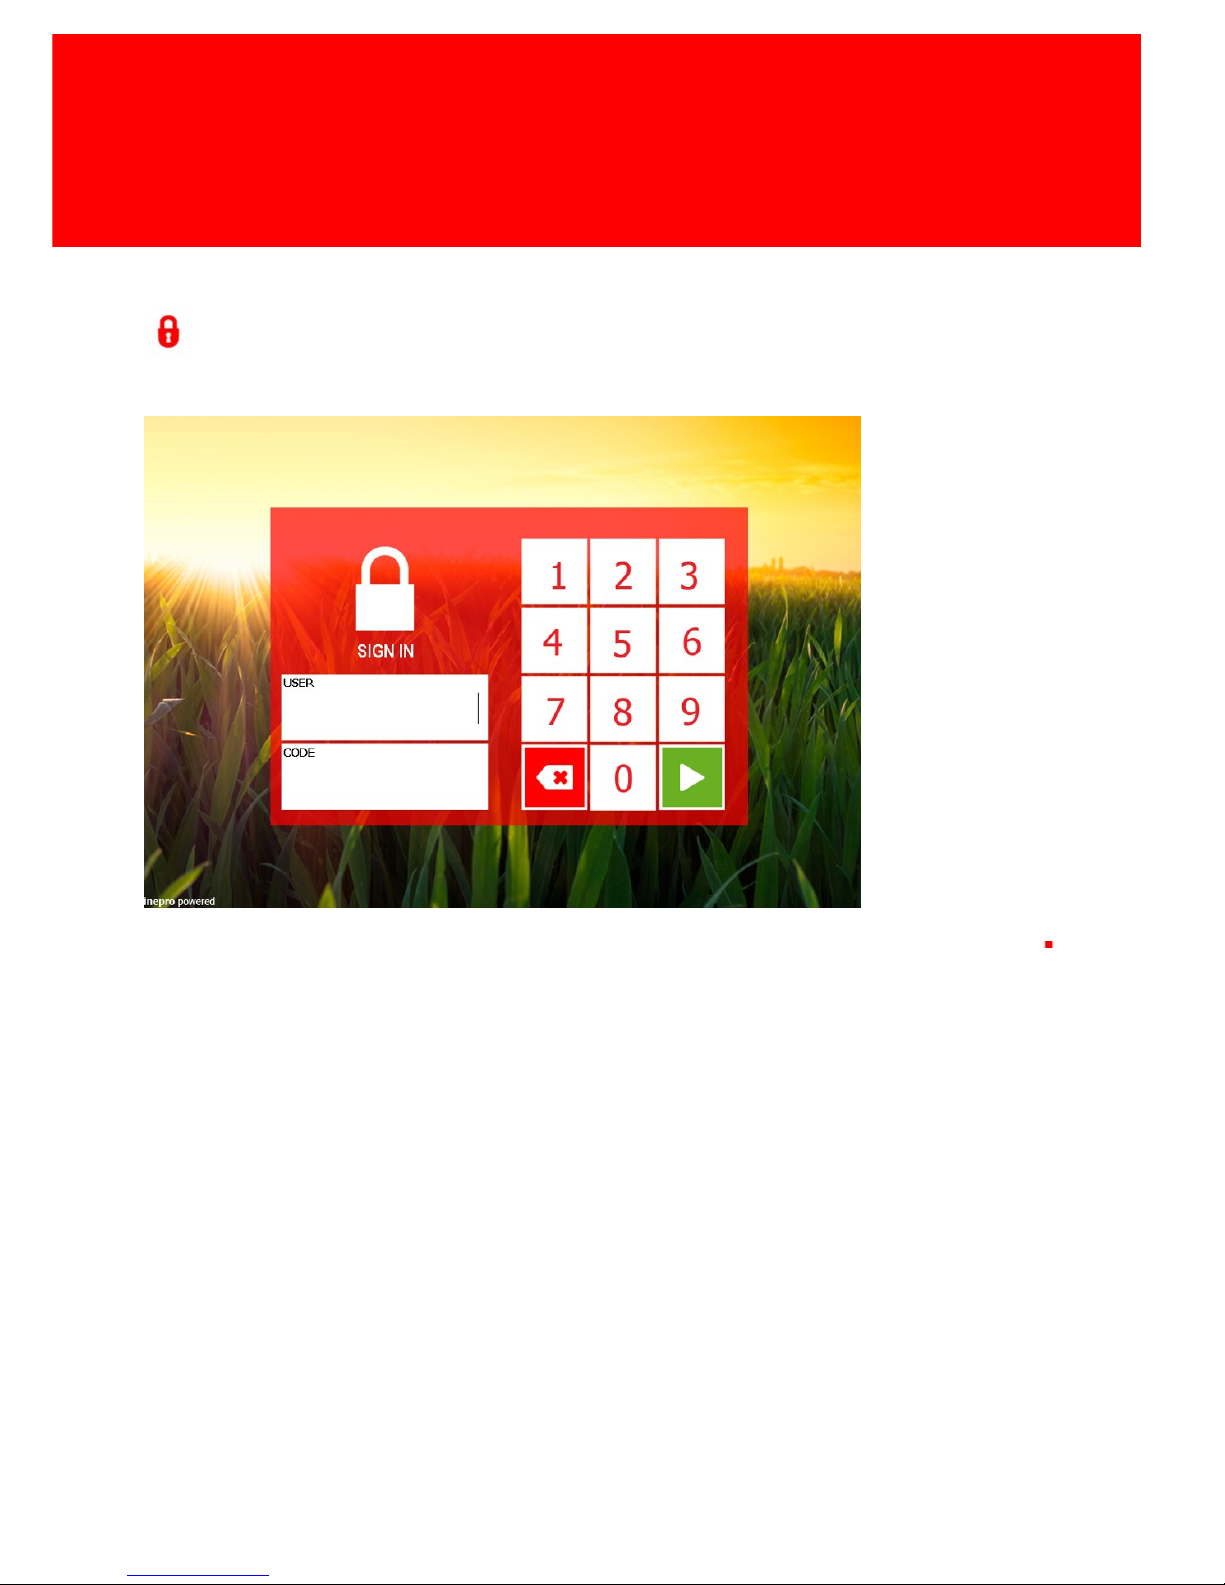
Version 7.5.6 - 73
Log Off
Log Off
Log off will be used when the employee or another employee must be able to log in again
Page 80
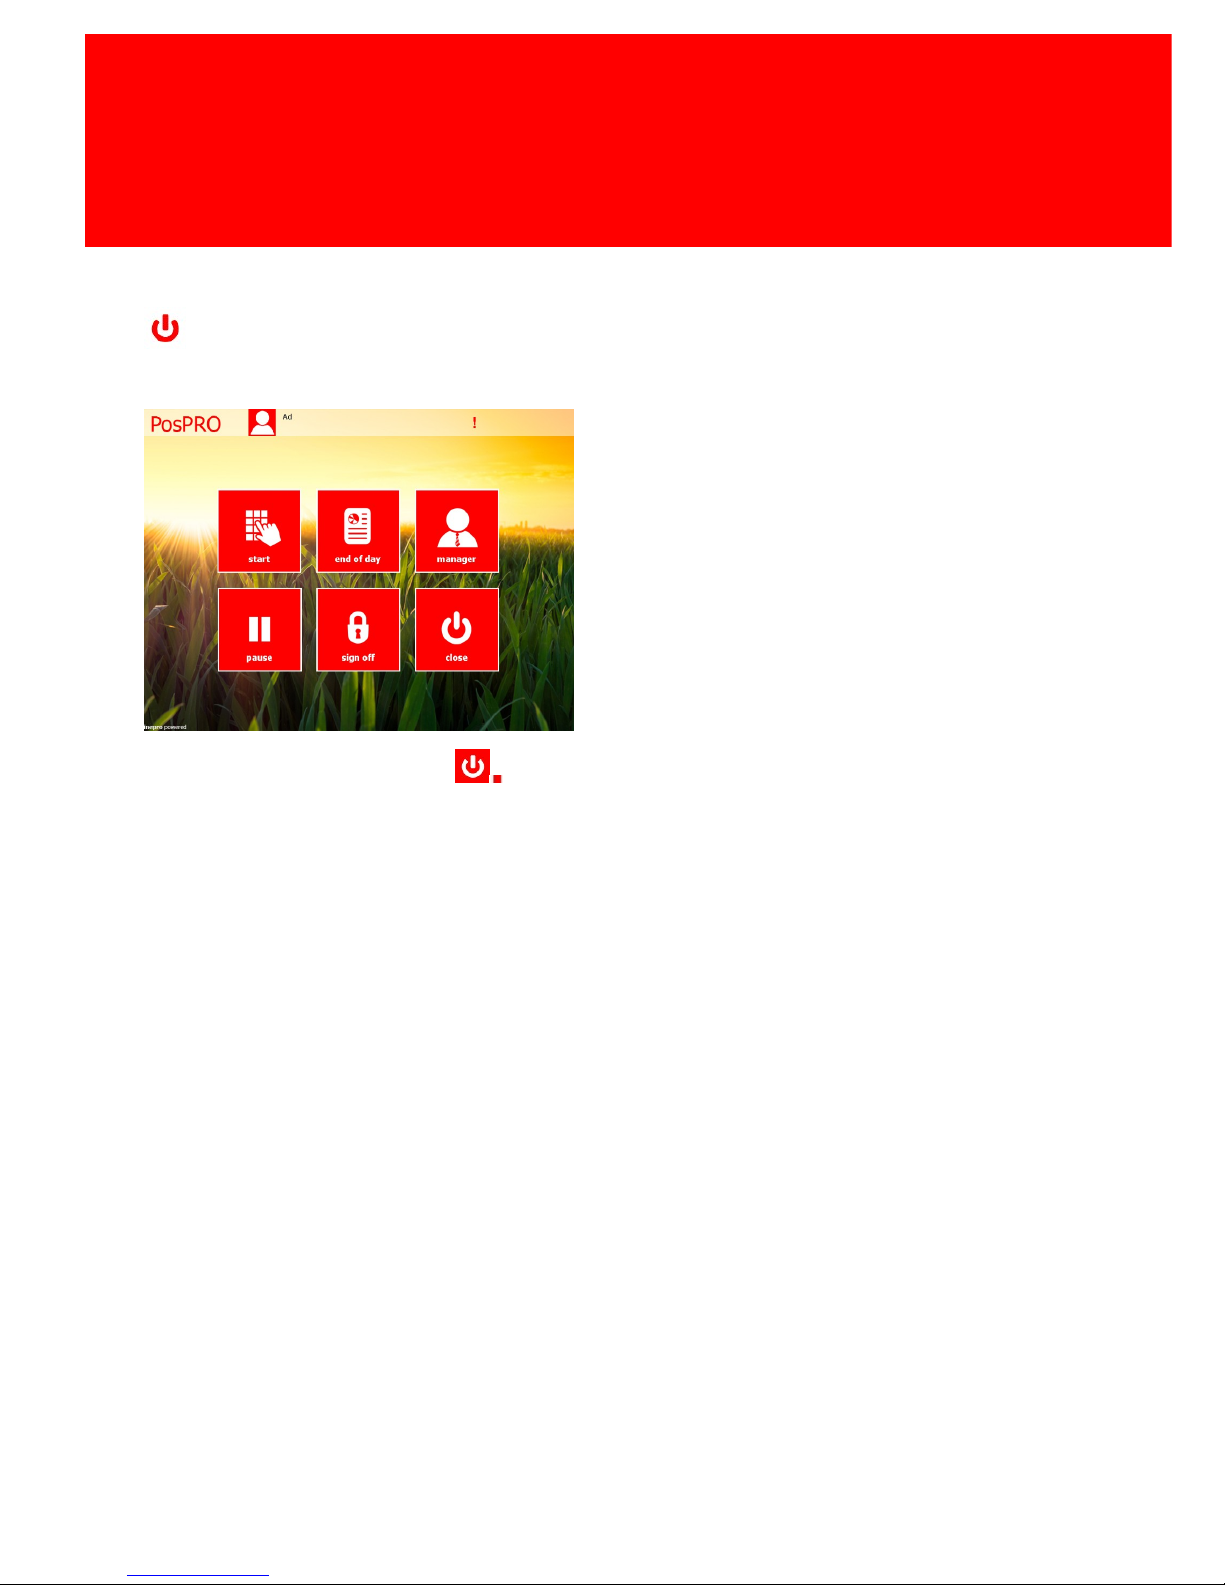
74 - PosPRO
User Interface
Close
To exit the application, choose
Page 81

Usage
Part
V
Page 82

76 - PosPRO
Usage
Usage
How can I sell a product?
In this example we will sell 3 Orange Juice and 1 Ham Cheese sandwich:
1. <3> <X> <Orange Juice>
2. <Ham Cheese>
3. <Sub Total>
4. Choose Payment Type (in this example 'On account' is chosen).
As demonstrated; the employee doesn't need to press the Oranje juice button 3 times to sell 3 Orange Juice
An Adjusting Entry
Correction
An adjusting Entry is executed by pressing '<Correction>' then the last Entry will be deleted. So when 100 Orange Juice
was sold, but only 10 should be sold:
1. <1> <0> <0> <Orange Juice> (mistake)
2. <Correction>
3. <1> <0> <Orange Juice>
3. <Sub Total>
4. Choose Payment Type (in this example 'On account' is chosen).
Now only 10 Orange Juice will be sold.
The adjustment will be visible in the log and on the receipt.
Void
It is also possible to deduct a number of products from the transaction and execute an adjusting entry in that way. This
has the advantage that it can also be executed at a later time then at the time the transaction took place (when the
error is detected). The payment type is then in fact reloaded, this function must be enabled in the PosPRO. You might
need a higher security login to execute this function, it is also possible that this function was not enabled on the
PosPRO.
1. <1> <0> <0> <Orange Juice> (mistake)
2. <Void>
3. <9> <0> <Orange Juice>
3. <Sub Total>
4. Choose Payment Type (in this example 'On account' is chosen).
Now only 10 Orange Juice will be sold.
Cancel
Cancel will delete the entire transaction
1. <1> <0> <0> <Orange Juice> (mistake)
2. <Cancel>
3. <1> <0> <Orange Juice>
3. <Sub Total>
4. Choose Payment Type (in this example 'On account' is chosen).
Now only 10 Orange Juice will be sold
Page 83
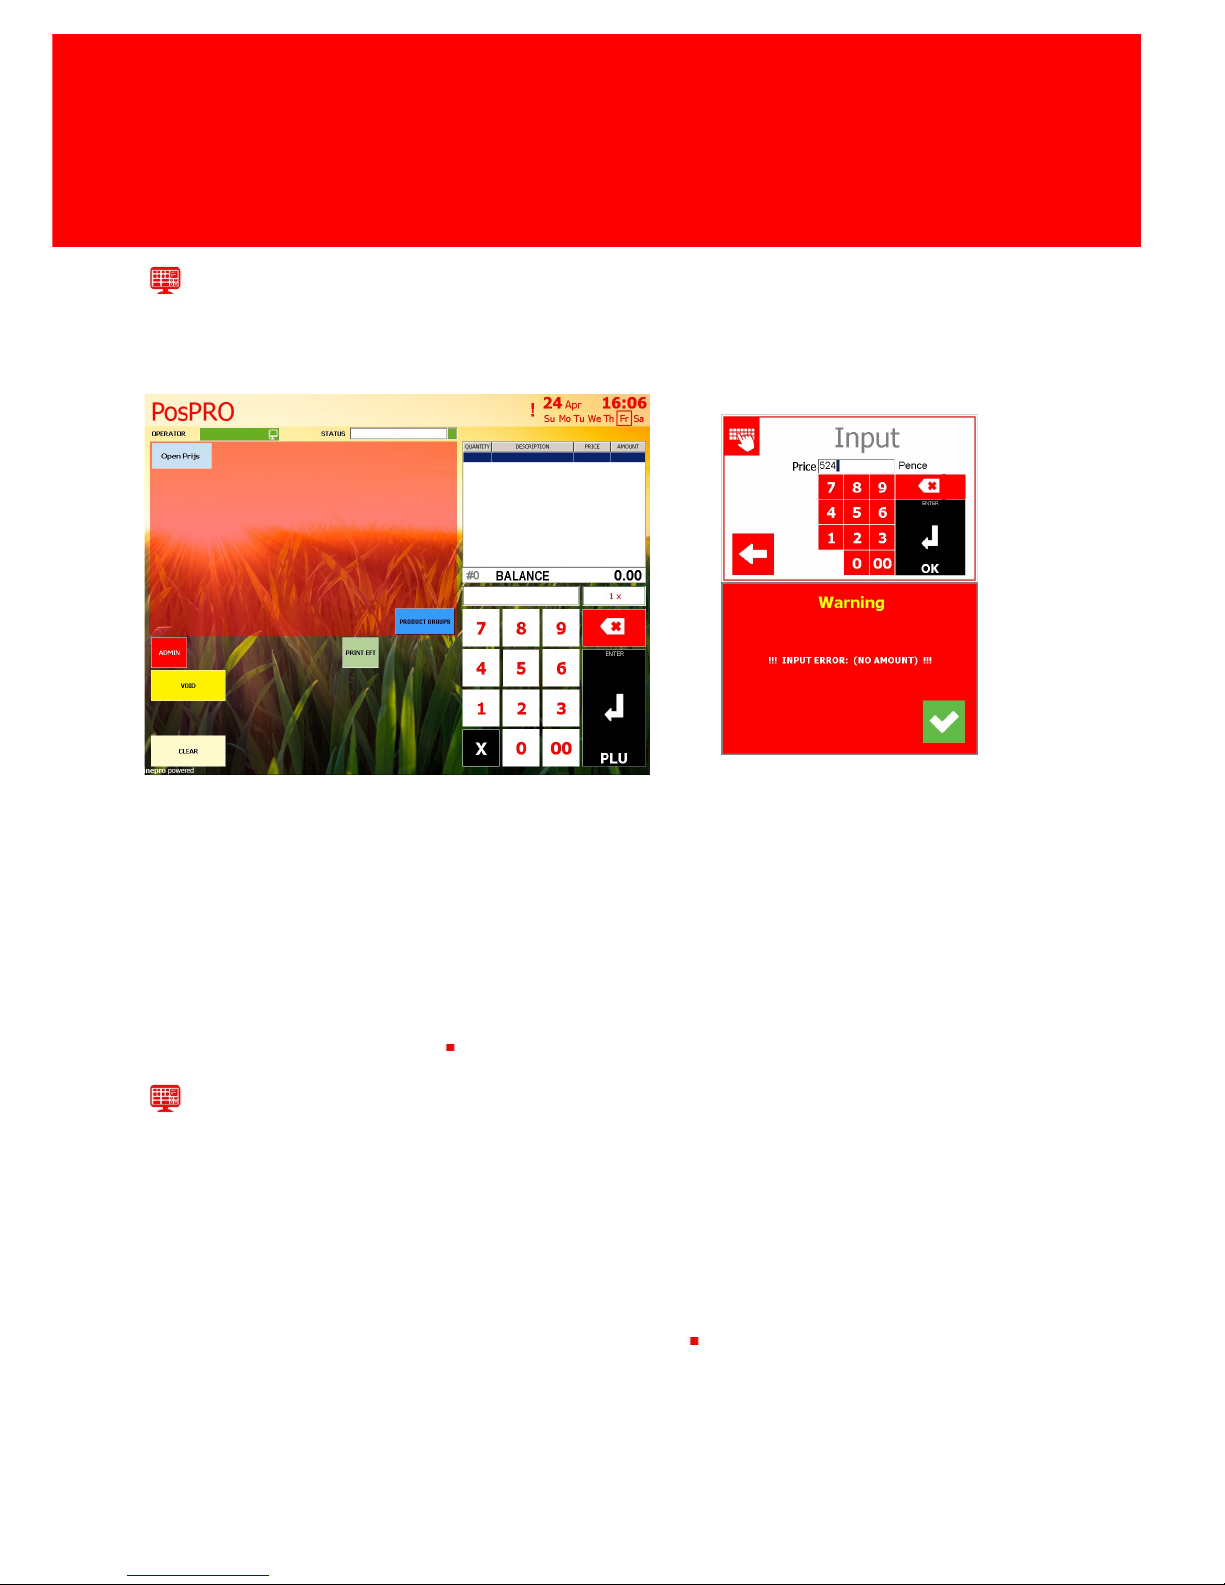
Version 7.5.6 - 77
Free amount / Open Price
Before a free amount can be used, this should be registered at the product (for instance by using the Inepro Back Office
manager).
For a detailed instruction on how this should be done, we refer you to the Inepro Back Office Manager manual.
Select an Open Price.
Enter the price in cents. Confirm.
If no price is entered an error will be shown.
A Free Amount or Open Price can be used for one or more products that have a different price each day or every week
like a 'Soup of the Day' . To sell the 'Soup of the Day' item twice, (today it's sold at a price of € 5,24), execute this
example procedure:
1. <2> <X> <'Soup of the Day'>
The price dialog window opens.
2. <5> <2> <4>
3. <Enter / PLU><Sub Total>
4. Choose Payment Type (in this example 'On account' is chosen).
Now 2 'Soup of the Day' will be sold
Grand example
As an example we will sell 10 Orange Juice, 1 Ham / Cheese sandwich, and 2 'Soup of the Day' (today only € 5,24):
1. <1> <0> <0> <Orange Juice> (mistake)
2. <Void>
3. <9> <0> <Orange Juice>
3. <Sub Total> (Because the customer wants to make sure that only 10 Orange Juice is registered).
4. <Ham Cheese> (1x Ham Cheese Sandwich)
5. <2> <X> <Soup of the Day> (2x 'Soup of the Day', an open price product (has a price of 0,00)
6. <5> <2> <4> (The price of the Soup of the Day)
7. <Sub Total>
8. Choose Payment Type (in this example 'On account' is chosen)
Page 84

Page 85

IBOM - CashPRO
Part
VI
Page 86
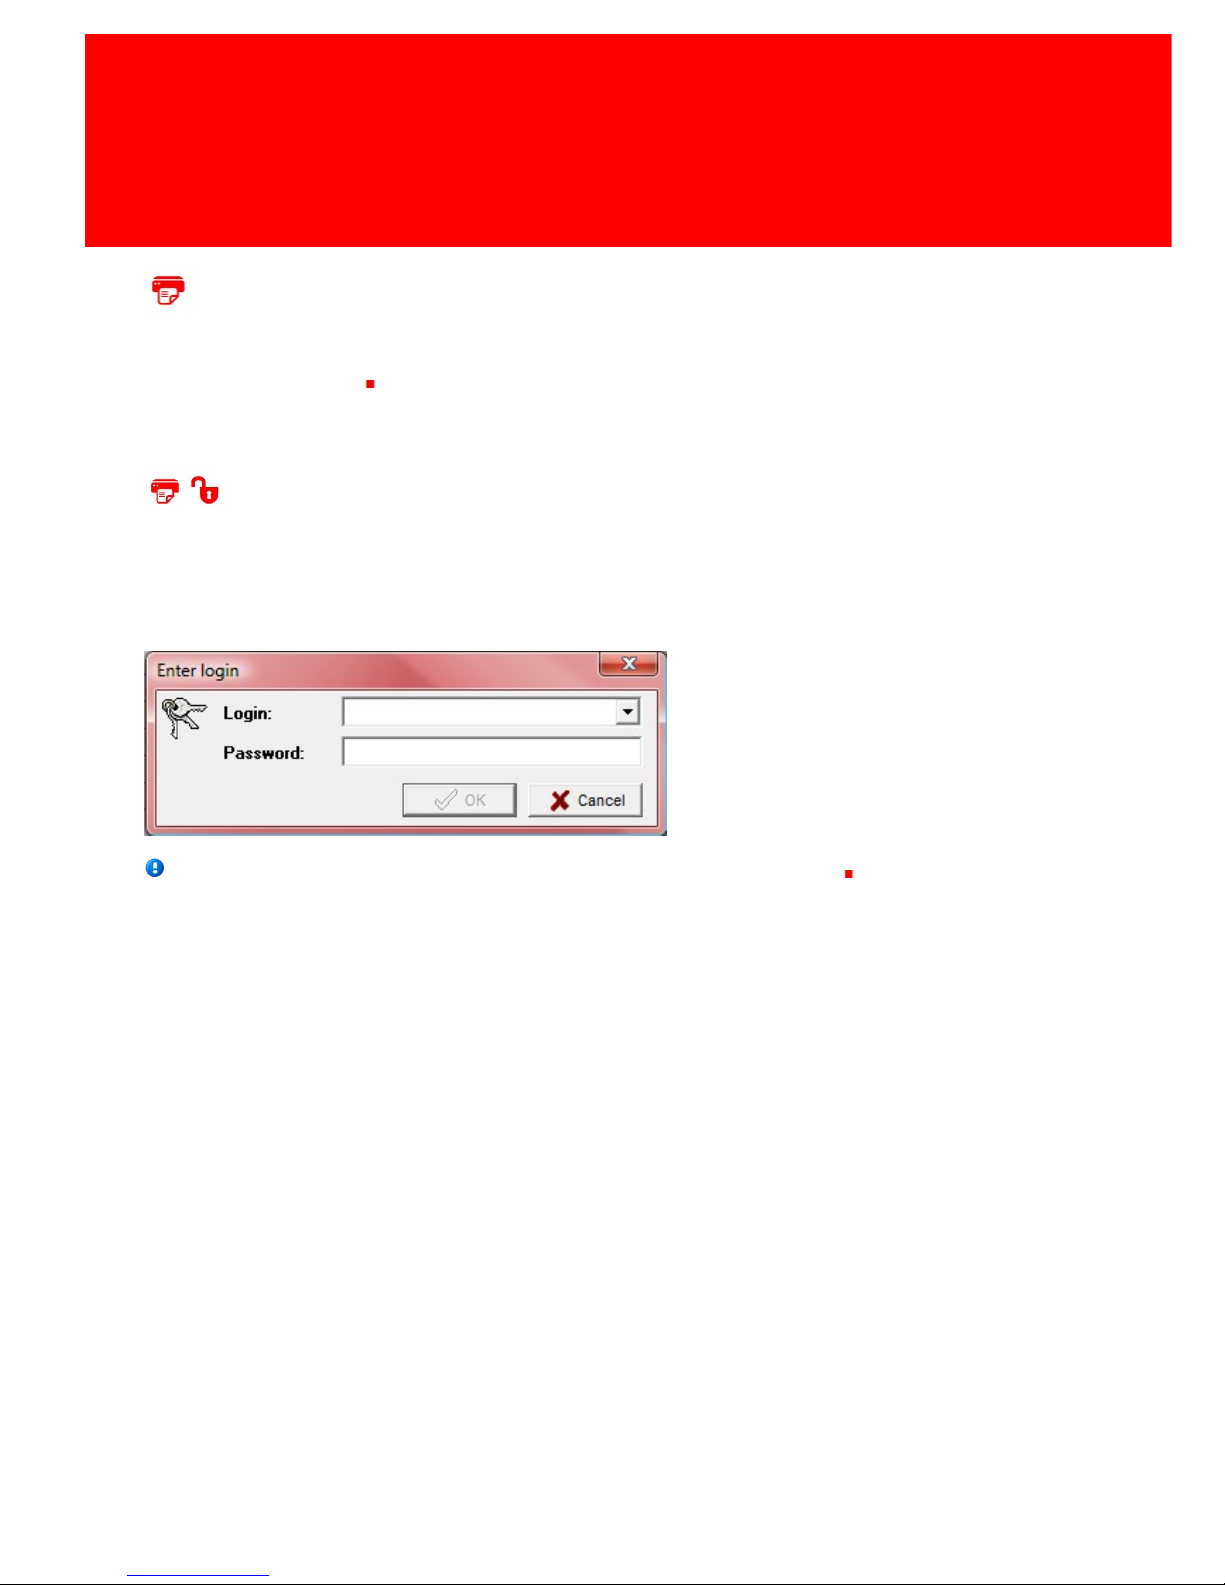
80 - PosPRO
IBOM - CashPRO
Inepro Back Office Manager - CashPRO
CashPRO is the Inepro Back Office Suite Module that manages all the transactions and products of the vending
machines and PosPRO tills
Start Inepro Back Office Manager
If the Inepro Back Office Manager is installed it can be opened in the Window start menu ('Start' -> 'Inepro Back Office
Manager'). A message with a Login and Password field will appear. Choose or type the correct username by clicking the
combobox list arrow, and enter the password with the help of the on-screen keyboard.
You can start the on-screen keyboard by clicking 'Start' -> 'On-Screen keyboard'
Page 87
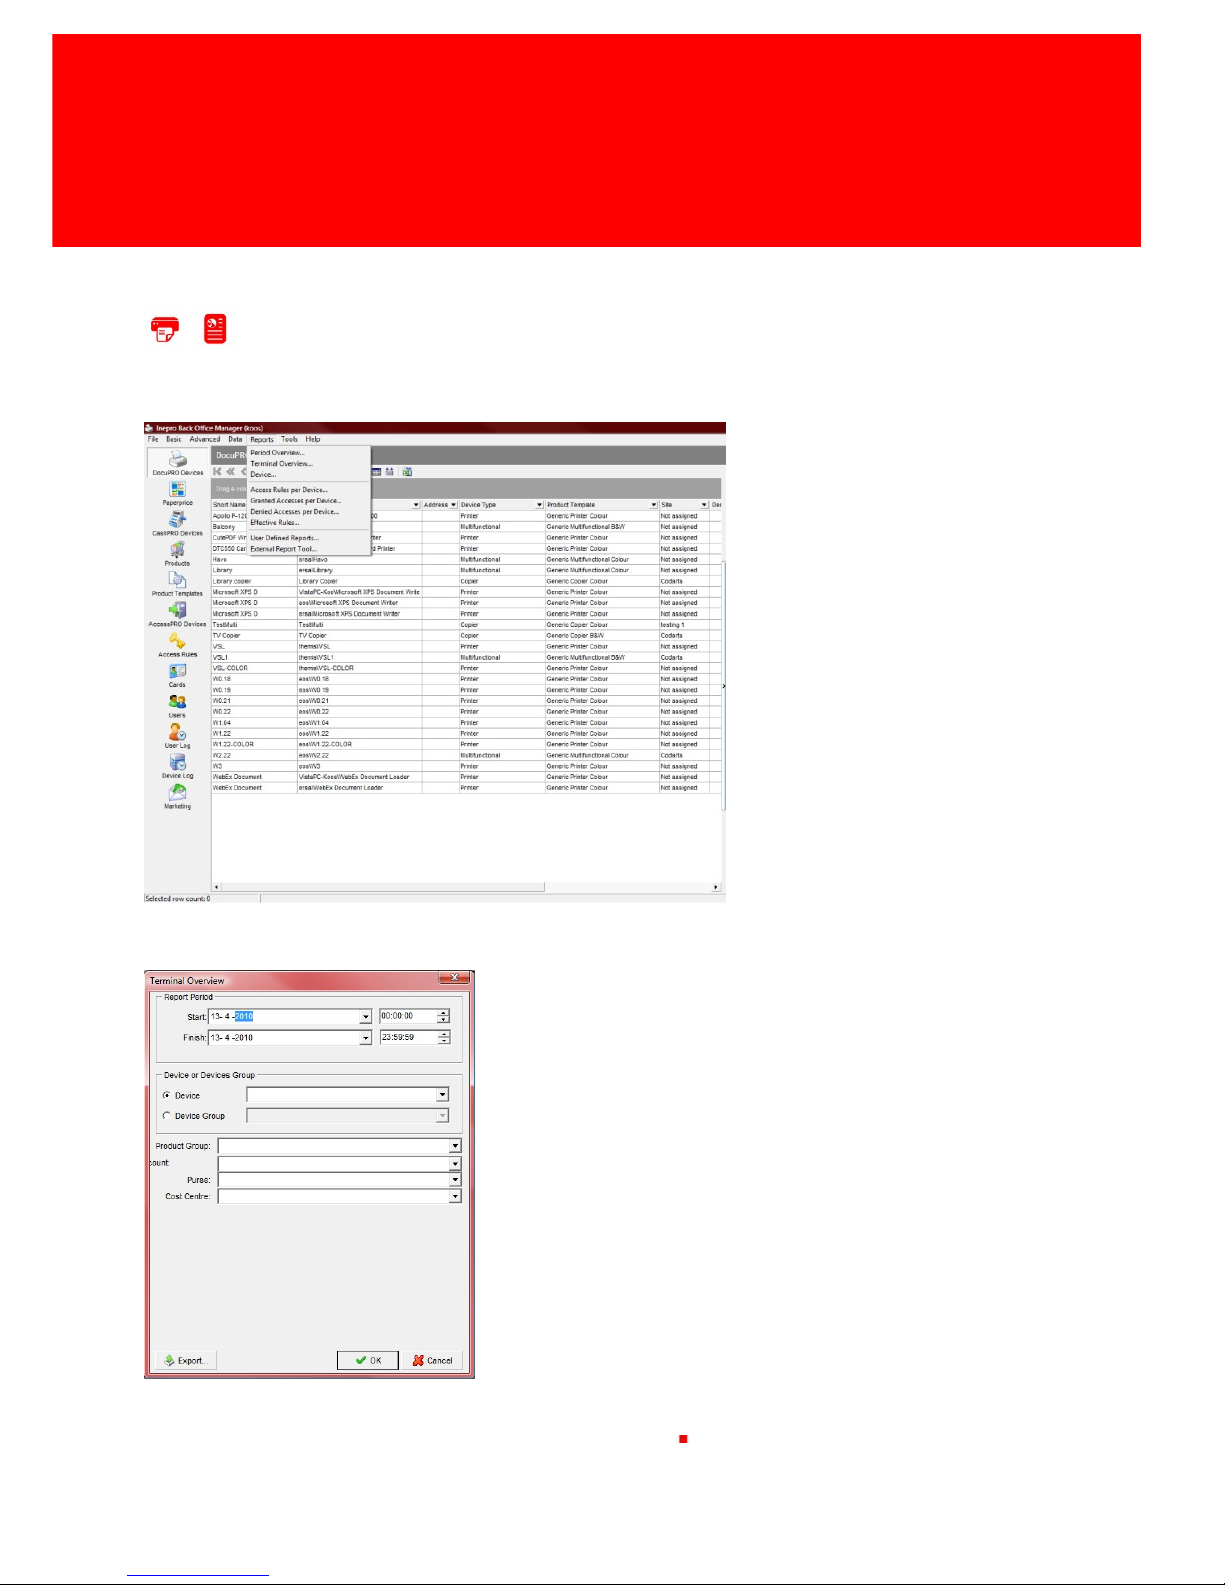
Version 7.5.6 - 81
Reports
Reports
The Inepro Back Office Manager offers you a great number of reports. These reports can be found in the 'Report' menu.
It is wise to always fill out the date fields and to specify the device or device group.
Reports can be printed at the printers connected to the network
Page 88
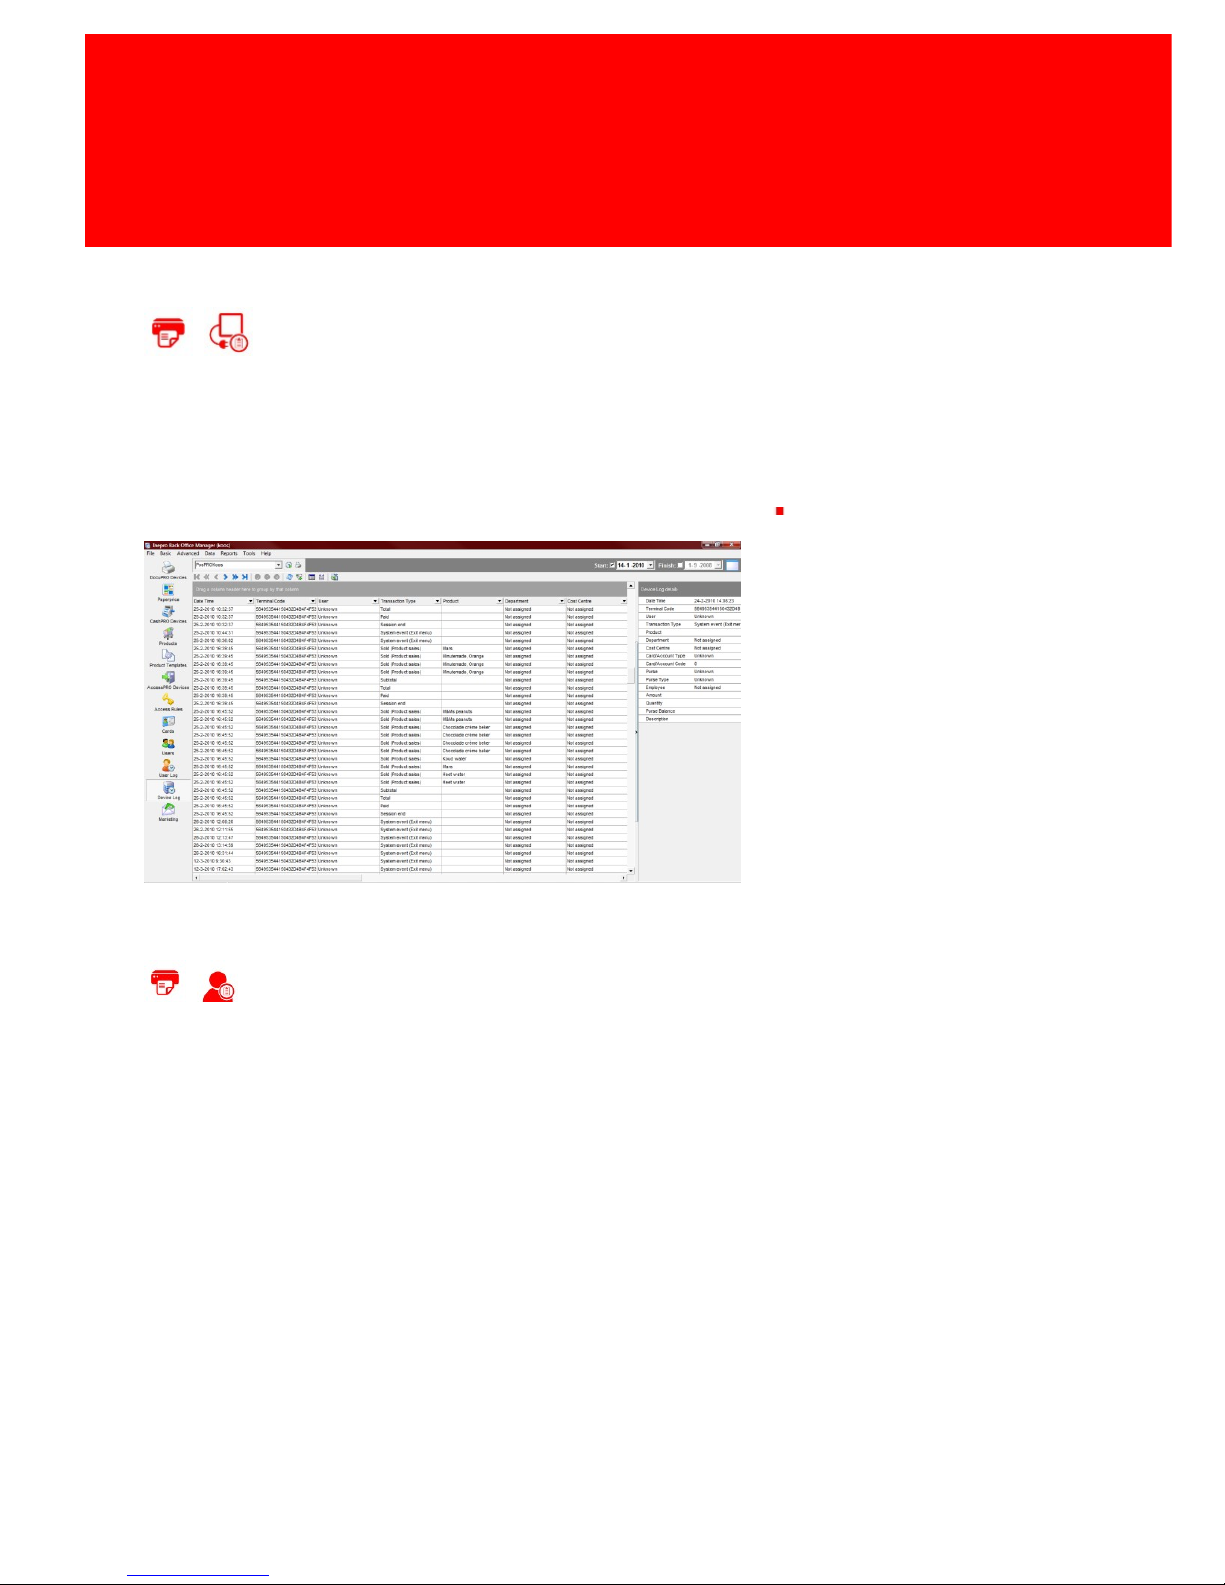
82 - PosPRO
IBOM - CashPRO
Device Log
In the device log you are able to look at all the transactions. Pick the PosPRO till in the Device field and set a period.
The list will be created when you click on the 'Run' button. Is the user unknown, it will usually concerns a cash payment.
In the transaction log you will always see the product(s) first, then the subtotal and total, followed by the payment.
If there is also a negative payment, then the customer has received change
User Log
In the User Log the user transactions are shown. The list will be shown per user, which you can choose in the
combobox. It is best to summon up the on-screen keyboard again to use text input the pick the user from the
combobox as the touchscreen interface might be inefficient for this purpose.
The instructions are almost the same as for the Device Log, so set a period and click on the 'Run' button to create the
list. Is the user unknown, it will usually concerns a cash payment. In the transaction log you will always see the
product(s) first, then the subtotal and total, followed by the payment. If there is also a negative payment, then the
customer has received change.
Page 89

Solving challenges
Part
VII
Page 90

84 - PosPRO
Solving challenges
Solving challenges
Symptom(s): The logo has been changed, but it does not show on the receipt?
Prognosis: It's the first receipt after changing the logo, the printer has already printed the
(previous) logo on the first part of the receipt (to save time). The first time after the logo is
changed, and PosPRO is restarted, the logo is not printed on the receipt.
Scope: Each device with a new logo configured
Resolution: Reprint the receipt, the logo should be on there now.
Prognosis: The logo is bigger than 4 K(kilobyte) and / or is not saved as a monochrome
image.
Scope: Each device with a new logo configured
Resolution: Our system supports only images that are smaller than 4 K and are saved as a
monochrome image.
Symptom(s): The header- and footer text have been edited, but only the footer text is
changed on the receipt?
Prognosis: This is the first receipt after the header text has been changed, the header text
has already been printed on the first part of the receipt.
Scope: Each device with a new header text
Resolution: Reprint the receipt, the header text should be on there now.
Symptom(s): The power is on, but the screen remain black?
Prognosis: The PosPRO is off
Scope: All devices.
Resolution: Check the power LED, if it is not on, press the power switch.
Prognosis: A hardware defect prevents the terminal from working correctly
Scope: All devices.
Resolution: Contact your dealer to switch or repair the terminal.
Symptom(s): A different problems prevents me from working with the PosPRO.
Prognosis: This problem probably cannot be resolved on site.
Scope: All devices.
Resolution: Contact your dealer for support
Page 91

Notes
Part
VIII
Page 92

86 - PosPRO
Notes
Notes
This area is meant for the reader's notes:
Page 93

Version 7.5.6 - 87
Page 94

88 - PosPRO
Notes
Page 95

END-USER LICENSE AGREEMENT
INEPRO BACK OFFICE SUITE BY INEPRO BV
THE PROGRAM IS COPYRIGHTED AND LICENSED (NOT SOLD). BY PURCHASING THE PROGRAM, YOU ARE ACCEPTING AND AGREEING TO
THE TERMS OF THIS LICENSE AGREEMENT. THIS LICENSE AGREEMENT REPRESENTS THE ENTIRE AGREEMENT CONCERNING THE
PROGRAM, BETWEEN YOU AND INEPRO BV, (REFERRED TO AS "LICENSOR"), AND IT SUPERSEDES ANY PRIOR PROPOSAL,
REPRESENTATION, OR UNDERSTANDING BETWEEN THE PARTIES.
1. License Grant. Licensor hereby grants to you, and you accept, a nonexclusive license to use the program in machine-readable, object code
form only, for use only as authorized in this License Agreement. The Programs may be used only on computers owned, leased or otherwise
controlled by you. The program shall only manage the number of devices specified in the purchase agreement. You agree that you may not
reverse assemble, reverse compile, or otherwise translate the Program.
2. Term (Demo Version Only). This License commences upon the installation of the software and is effective for 90 days following the date
you install the software. This License terminates automatically without notice from Inepro BV upon the expiration of the evaluation term or if
you fail to comply with any provision of this License. Upon termination you shall remove the SOFTWARE from your computer(s).
3. Licensor's Rights. You acknowledge and agree that the Program is proprietary to Licensor and protected under copyright law. You further
acknowledge and agree the all right, title, and interest in and to the Program, including associated intellectual property rights, are and shall
remain with Licensor. The License Agreement does not convey to you an interest in or to the Program, but only a limited right of use
revocable in accordance with the terms of this License Agreement.
4. No Warranty; Limitation of Liability. YOU ACKNOWLEDGE THAT THE PROGRAM IS PROVIDED ON AN "AS IS" BASIS WITHOUT WARRANTY
OF ANY KIND. LICENSOR MAKES NO REPRESENTATIONS OR WARRANTIES REGARDING THE USE OR PERFORMANCE OF THE PROGRAM.
LICENSOR EXPRESSLY DISCLAIMS THE WARRANTIES OF MERCHANTABILITY AND FITNESS FOR A PARTICULAR PURPOSE. LICENSOR
SHALL HAVE NO LIABILITY TO CUSTOMER OR ANY THIRD PARTY FOR ANY LOSS OR DAMAGE CAUSED, DIRECTLY OR INDIRECTLY, BY THE
PROGRAM, INCLUDING, BUT NOT LIMITED TO, ANY INTERRUPTION OF SERVICES, LOSS OF BUSINESS, LOSS OF DATA OR SPECIAL,
CONSEQUENTIAL OR INCIDENTAL DAMAGES.
5. Severability. Should any term of this License Agreement be declared void or unenforceable by any court of competent jurisdiction, such
declaration will have no effect on the remaining terms hereof.
6. No Waiver. The failure of either party to enforce any rights granted hereunder or to take action against the other party in the event of any
breach hereunder shall not be deemed a waiver by that party as to subsequent enforcement of rights or subsequent actions in the event of
future breaches.
7. Update Checks. You acknowledge and agree to allow Inepro Back Office Suite version and license status details to be sent to Inepro BV
when you request to "Check for updates". This allows the Inepro Back Office Suite software to determine whether software updates are
available in real-time.
8. Service. Licensor will utilize its best efforts to maintain acceptable performance of services, but Licensor makes absolutely no warranties
whatsoever, express or implied, including warranty of merchantability or fitness for a particular purpose. Licensor cannot guarantee
continuous service, service at any particular time, or integrity of data stored or transmitted via its system or via the Internet.
9. Data. Licensor will not be liable for the inadvertent disclosure of, corruption or erasure of data transmitted or received or stored on its
system. Licensor shall not be liable to Licensee or any of its customers for any claims or damages which may be suffered by Licensee or its
customers, including, but not limited to, losses or damages of any and every nature, resulting from the loss of data, inability to access the
Software, or inability to transmit or receive information, caused by, or resulting from, delays, nondeliveries, or service interruptions whether
or not caused by the fault or negligence of Licensor.
Version 7.5.6 - I
Page 96

 Loading...