

Inel YYGL45E-20/15, YYGL35E-10/17 Operating Instructions Manual
P. I. E. INEL Sp. z o. o., ul. Mostowa 1, 80-778 Gdańsk, inel@inel.gda.pl www.inel.gda.pl
Operating instructions
Obstacle detection motor with electronic limit switches
YYGL35E-10/17
YYGL45E-20/15
1.
SAFETY GUIDELINES
1.1 Basic guidelines
The obstacle detection motor is delivered in a condition allowing
for safe installation and operation, provided that all guidelines
herein as well as relevant safety and accident prevention
regulations are observed. Only qualified and licenced personnel is
allowed to install and repair electrical devices. It is prohibited to
make any changes or modifications to the drive. Warranty repairs
may be conducted only by the manufacturer. Use only original
spare parts and accessories during post-warranty repairs.
Operational safety of the drive can only be ensured if it is used for
its intended purpose. Do not exceed limit values given in technical
information.
1.2 Additional safety regulations
Observe relevant safety and accident prevention regulations
when installing, commissioning and maintaining the drive. The
following must be given special consideration:
1. Fire safety regulations.
2. Accident prevention regulations.
1.3 General notes on risks and safety measures
These notes are general guidelines for the use of INEL devices in
combination with other devices. These guidelines must be strictly
observed when installing and operating the devices.
Warning - against possible damage to the drive,
roller blind, roller blind cassette, elevation etc. if no
relevant safety measures are taken:
• Check if all screw connections are secure before
installing the drive and setting limit switches
Danger - means that there is a threat to life and limb
of the user if no relevant safety measures are
taken:
Check the compatibility of the permissible voltage
of the device with the local power supply before connecting.
Observe applicable safety and accident prevention
regulations.
Use an isolation switch allowing for safe power supply
disconnection (e.g. fuse cut-off switch) installed in such a
way that all connections can easily be cut out.
Inspect wires and cables regularly for damaged insulation
and conductor continuity.
If any damage is identified, cut off power immediately and
replace the damaged wiring.
1.4 Warning
Do not allow children to play with control devices.
Keep the remote control out of reach of children.
Observe the moving roller blind and keep people away until
it fully opens or closes.
The users of the roller blind must be instructed in its
operation and existing risks related to its usage. Persons are
deemed to have been trained if the employer,
administrator or owner allowed them to use the roller blind
and instructed them in its operation.
It is not permitted to dispose of waste equipment
together with other waste. Dispose only in specially
designated areas. The household plays a key role in the
recycling of waste equipment. By correct sorting of waste,
including waste equipment and batteries, household members
ensure that the equipment is not disposed together with
household waste, but in specially designated areas, and thus may
be used again after recycling.
2.
INSTALLATION INSTRUCTIONS
2.1 Safety regulations
Only persons with appropriate authorisation may install the
drive.
The weight of the roller blind may not exceed the maximum
load of the drive specified in the selection table (see the end
of the instructions)
Routing the cable properly (loop aimed downwards) will
protect the drive against any water damage.
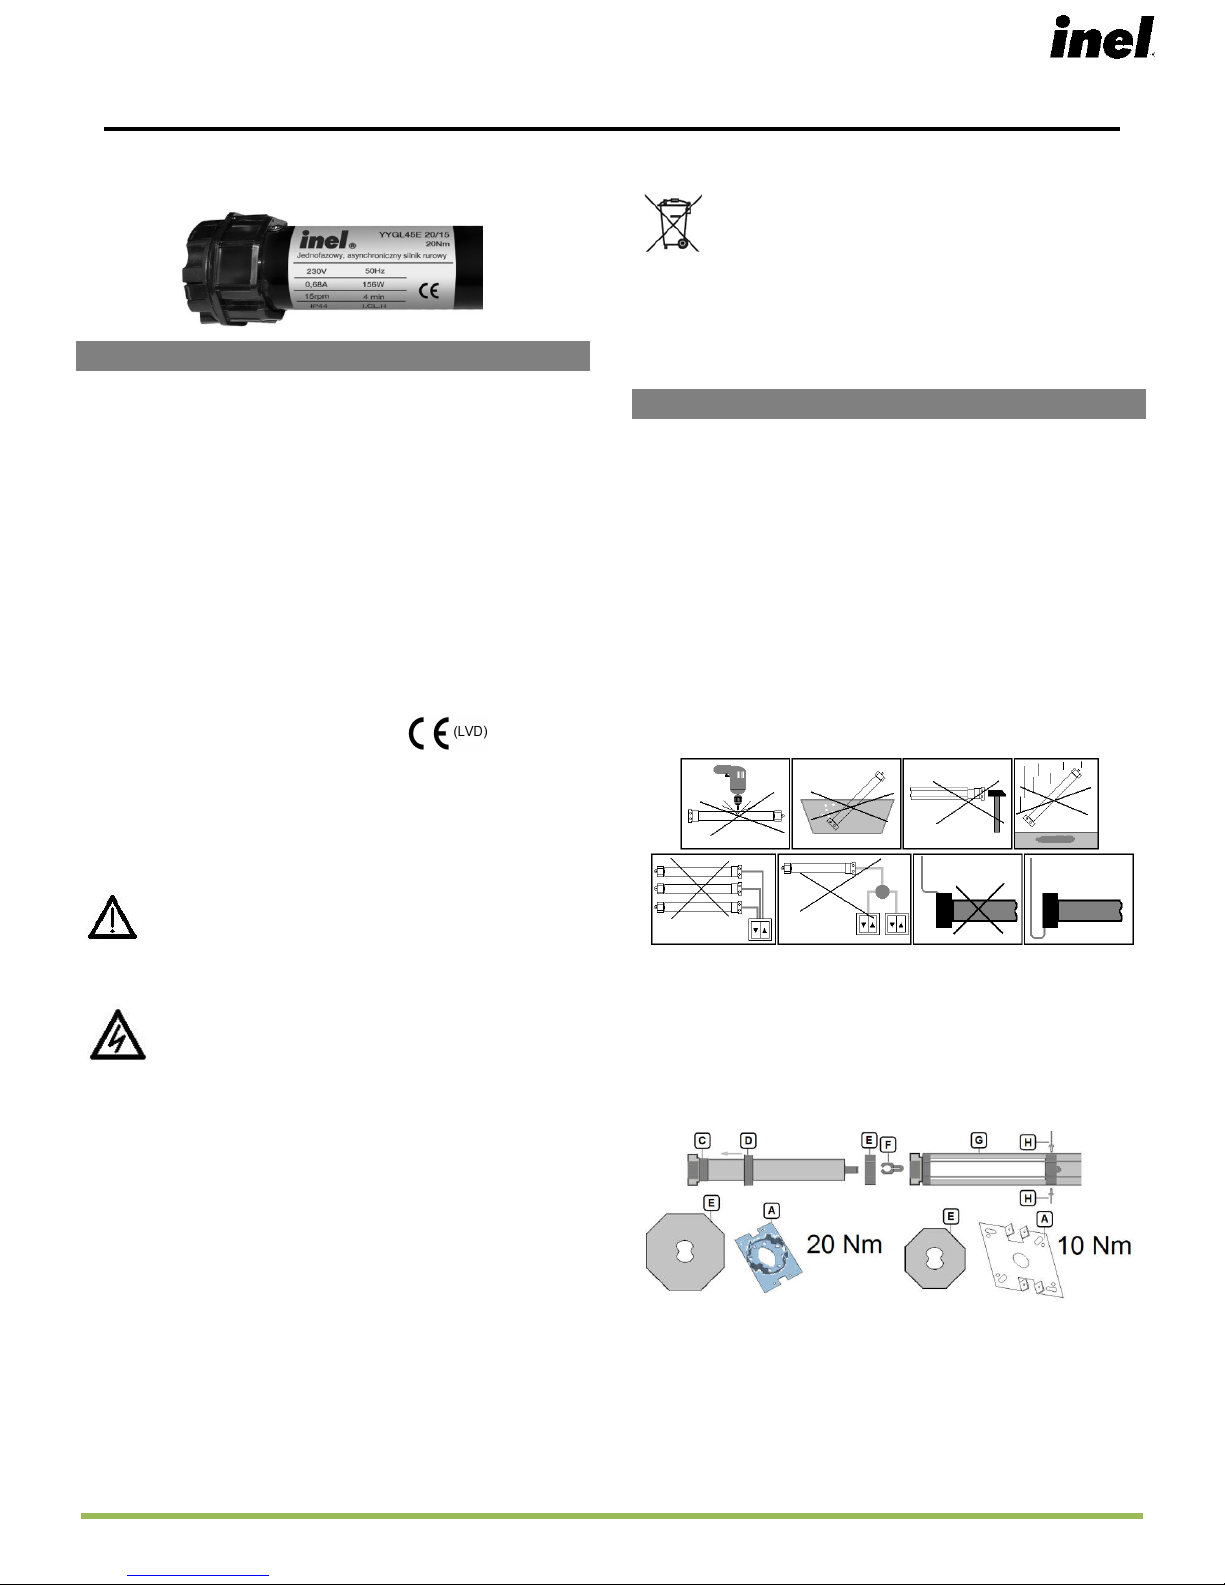
Do not drill holes in motor housing.
Protect the motor against contact with any liquids.
Avoid crushing and impacting the motor, protect the motor
against shock.
Do not connect more than one on/off switch to a single
motor.
Do not connect more than one motor to a single on/off
switch.
Figure 1
2.2 Installing the motor
Fix the mounting bracket (A) to the side of the roller blind
cassette, connect the adapter (D) to the thrust ring of the
motor (C).
Place an appropriate driver provided with the motor (E) on
the motor axis, secure it with a pin (F), and slide the entire
motor to the roller tube (G).
WARNING: The motor is fitted with an internal thermal cut-out
which allows the roller blind to work continuously for ca. 4 min.
After this time the temperature inside the motor will exceed the
permissible value, which will cause power cut-out. Subsequent
vertical movement of the roller blind will only be possible after the
motor cools down (it can take up to twenty minutes). Using this
cut-out greatly increases the life of the drive
Figure 2
NO
YES
P. I. E. INEL Sp. z o. o., ul. Mostowa 1, 80-778 Gdańsk, inel@inel.gda.pl www.inel.gda.pl
2.3 “Electrical connections
DISCONNECT POWER SUPPLY BEFORE MAKING
ANY CONNECTIONS!
Improper roller blind installation will cause the
motor to stop unexpectedly.
In order for the obstacle detection drive to function properly,
the following is required:
1. Use a special driver provided with the motor (diagram 2-E)
2. Ensure that the curtain can move freely in the guides and
the cassette. This movement may not be obstructed (e.g.
by increase of the roller blind cassette temperature,
mosquito net etc.)
3.
PROGRAMMING
WARNING: The drive is initially in factory mode which does not
allow the programming of limit positions. In order to set limit
positions you must switch into programming mode by using
service cable or blind switch.
In the factory mode and during limit position set-up the drive
will move with a 1-second pause immediately after start - this
means that no limit positions have been set.
BEFORE PROGRAMMING
A. Check whether the direction of roller blind movement is
consistent with the switch directional buttons (if they are
opposite, switch around the wires on the switch).
B. Place the lower edge of the curtain at half the height of
the guides. Starting the programming procedure too near
the roller blind cassette may damage it.
ENTERING PROGRAMMING MODE
3.1 With a service cable
When using a service cable, press and hold the and
buttons at the same time for at least 3 seconds. The
roller blind will confirm by moving up-down-up-down.
OR
3.2 With a blind switch
Press the buttons of the switch in the following order,
making the roller blind perform a short move each time:
↓
↓
↑
↓
↑
↑
↑
The presses should not be longer than 1 second counted
from the start of movement. The last press will confirm
the entered sequence - it should last at least 2 seconds.
The roller blind will confirm the start of programming by
moving up-down-up-down.
WARNING! Programming always starts with the set-up of
the upper limit.
AUTOMATIC LIMIT PROGRAMMING
The programming procedure may be performed
automatically only if blocking hangers and stoppers are
used. The window must be fitted with a sill. The length of
the curtain must be adjusted to the length of the guides.
1. Press and hold the "↑" button for the duration of the
entire programming procedure.
2. The drive will stop on stoppers, after 3 seconds it will
set the upper limit and then switch the movement
direction. At the bottom the drive will stop as soon as
it reaches the sill and set the lower limit, after which it
will return to the upper limit and confirm that
programming is finished.
When using a service cable, the entire programming may
be performed by setting the switch to
'I'
.
WARNING! Releasing the button during automatic
programming will automatically enter the SEMIAUTOMATIC programming mode.
SEMI-AUTOMATIC LIMIT PROGRAMMING
UPPER LIMIT
Upper limit in the desired position (if no stoppers are
present):
a. Press and hold the "↑" button.
b. Release the button in the desired upper limit
position. Fine tune the position by short pressing the
"↑" or "↓" buttons.
c. Press and hold the "↓" to confirm the upper limit.
The roller blind will make a short movement, and
then confirm that the upper limit position has been
saved by two down-up sequences. It will then start
moving down. At this point release the button and
start programming the lower limit.
OR
Upper limit by overload (if stoppers are used):
Before drive startup/programming check the
condition of the curtain, guides and roller blind
cassette and whether there is a sill mounted in the
window!
The roller blind cassette and guides should be free from any
contaminants and ensure unrestricted curtain movement
throughout the entire length. If the guides are contaminated
with building materials or are too tight, they can cause
damage to the drive and the roller blind, which is not
covered by the warranty.
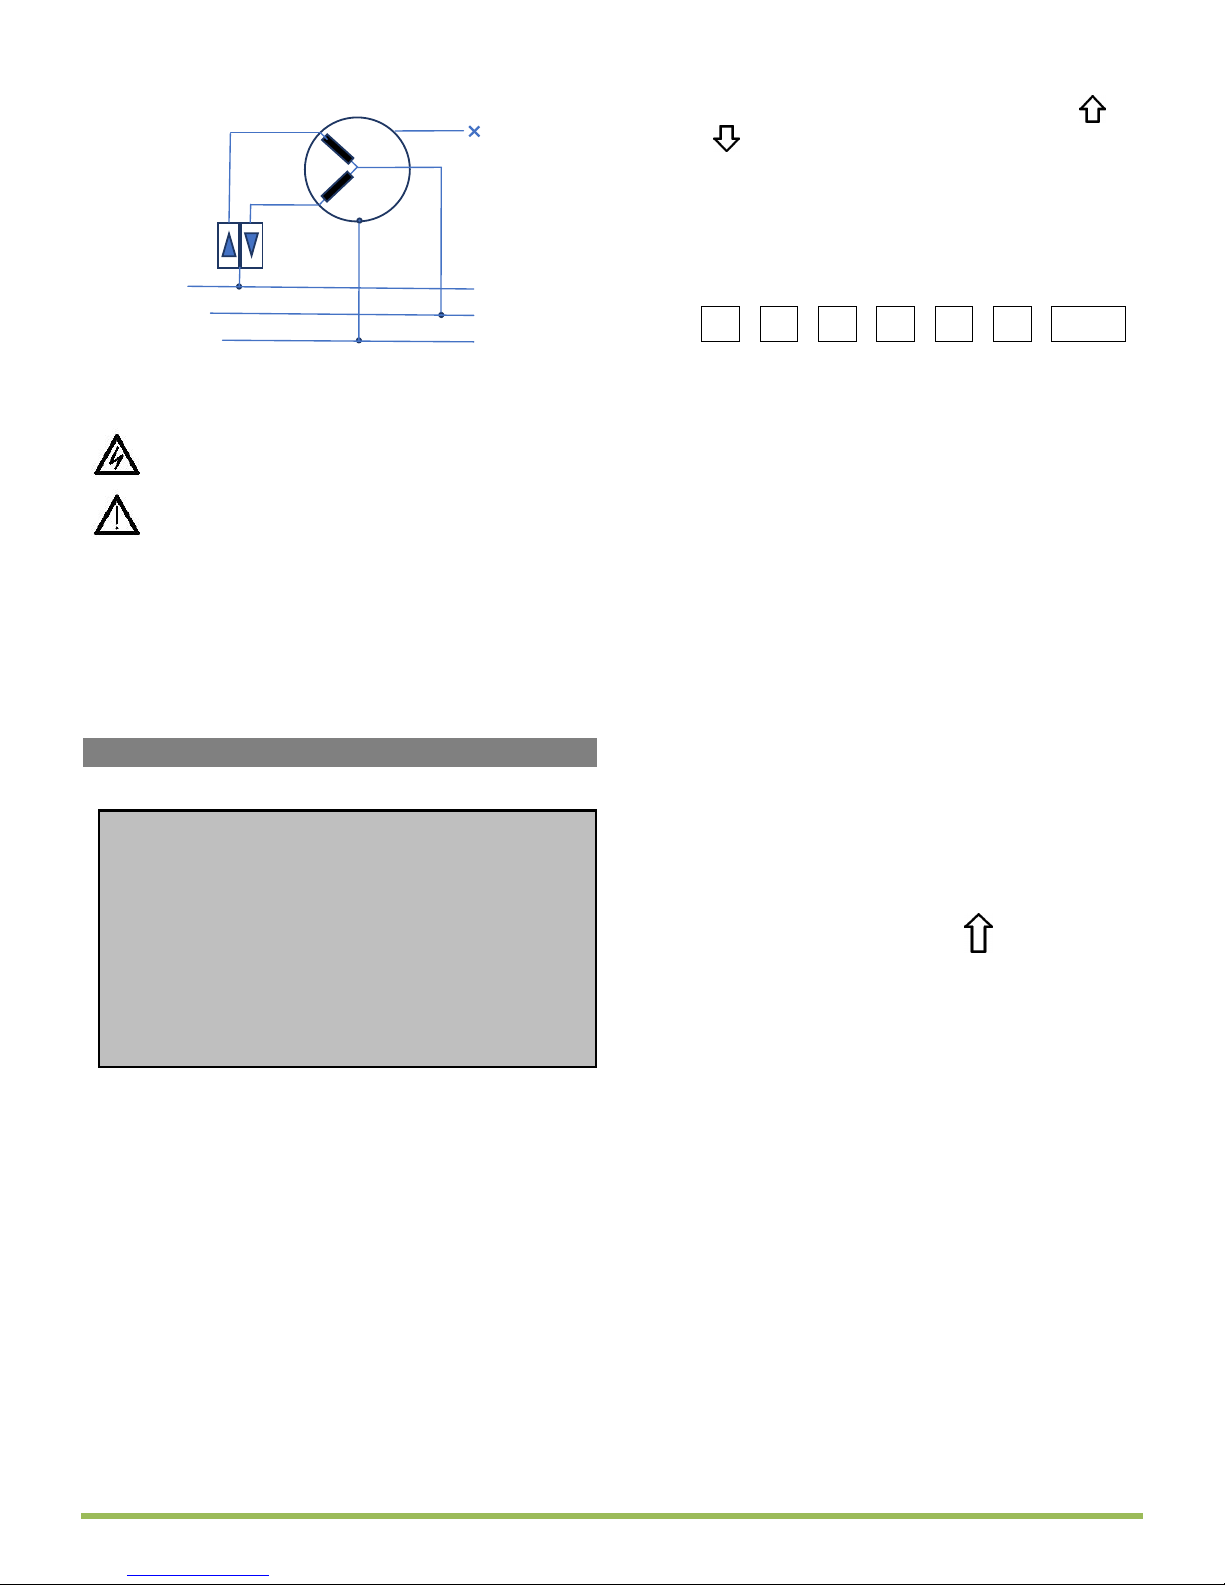
N - neutral
PE - protective
L - phase
black
yellow-green
grey
–
not used
blue
brown
Figure 3
Figure 4
 Loading...