

Product
Manual
DSX Standalone Mode
DSXi Cloud-connected Mode
iNet® Accounts
Edition: 1
May 4, 2015
Part Number: 17156005-1

Industrial Scientific Corporation.
Pittsburgh, PA USA
Shanghai, China
© 2015 Industrial Scientific Corporation
All rights reserved. Published 2015
Revision 0

Contents
Warnings and Cautionary Statements .............................................................................................................................................. 1
General Information .......................................................................................................................................................................... 3
Introduction ................................................................................................................................................................................... 3
Capabilities ................................................................................................................................................................................... 3
Compatibilities ............................................................................................................................................................................... 5
System Requirements and Supplies ............................................................................................................................................. 5
Certifications ................................................................................................................................................................................. 5
Care and Operating Guidelines .................................................................................................................................................... 5
Training ......................................................................................................................................................................................... 6
Getting Started .................................................................................................................................................................................. 7
Work-space Checklist ................................................................................................................................................................... 7
Unpack .......................................................................................................................................................................................... 7
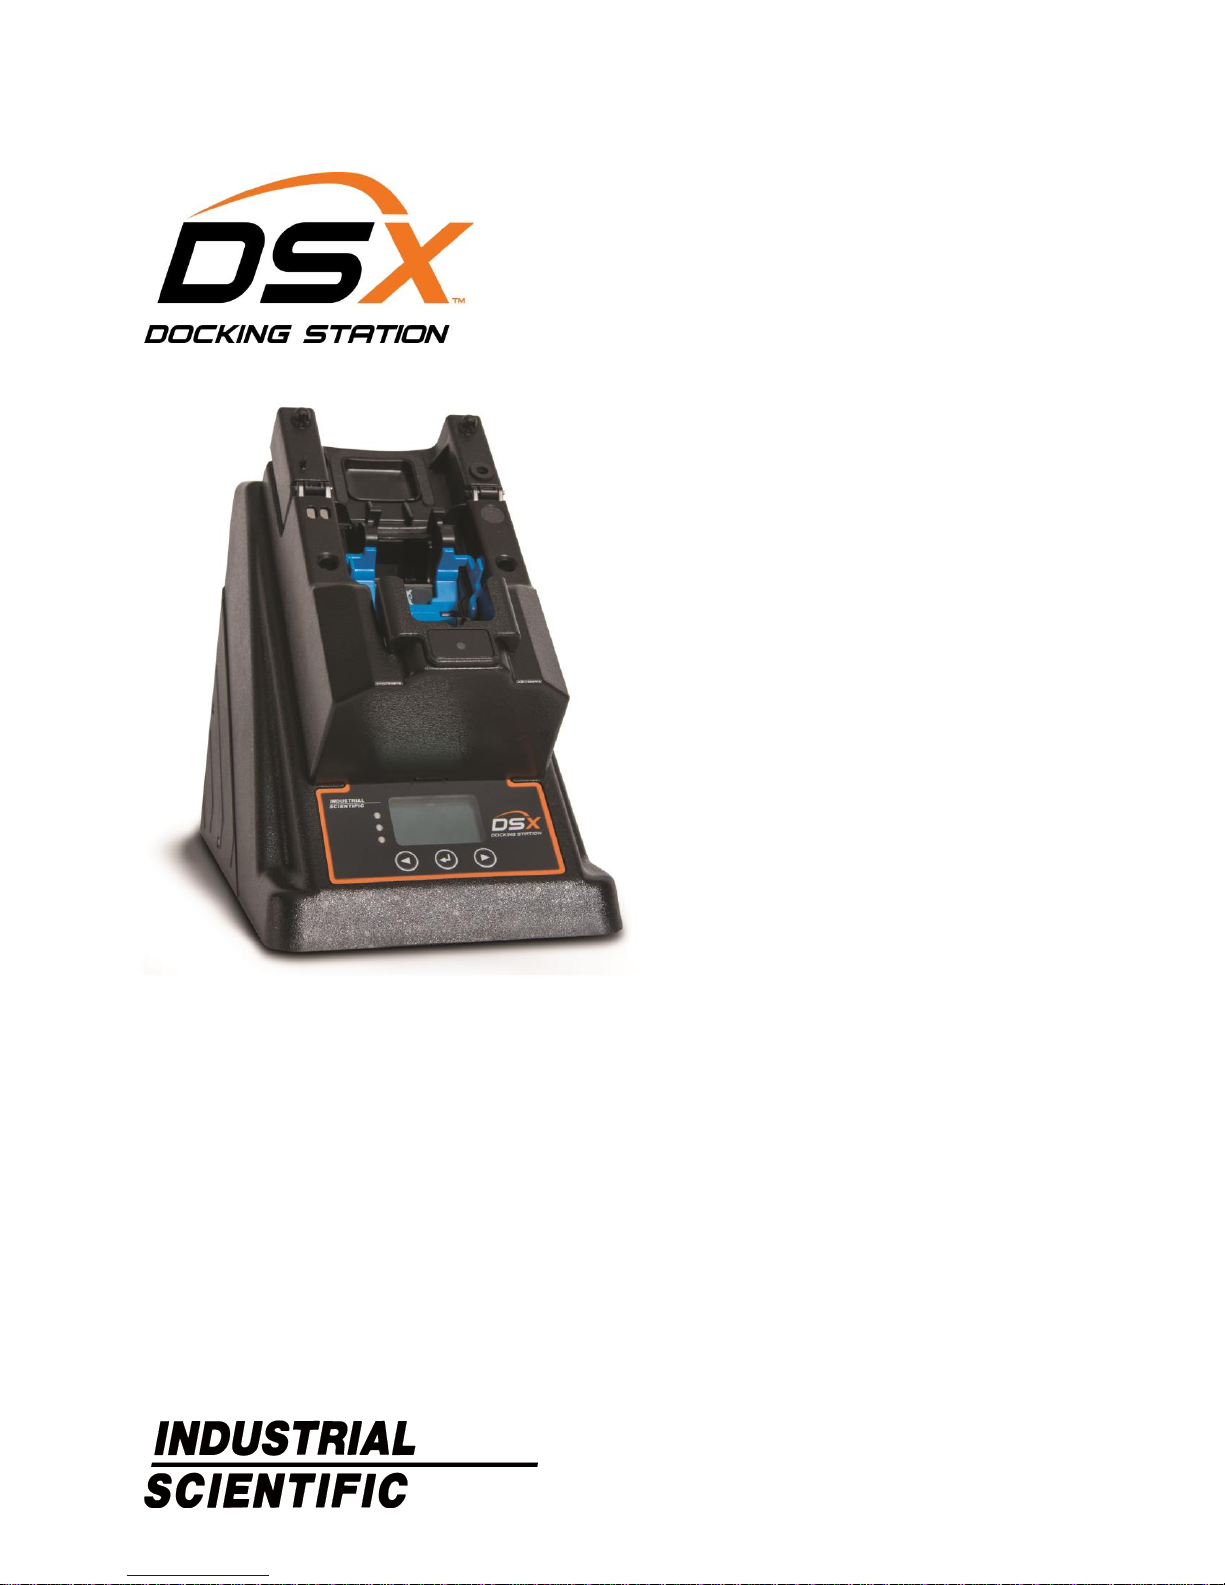
Hardware Overview ...................................................................................................................................................................... 8
Specifications ................................................................................................................................................................................ 9
Setup ............................................................................................................................................................................................... 11
Introduction ................................................................................................................................................................................. 11
Setup Instruction ......................................................................................................................................................................... 11
Use .................................................................................................................................................................................................. 19
Use Instruction ............................................................................................................................................................................ 19
Error Messages ........................................................................................................................................................................... 20
Warranty and Limitation of Liability ............................................................................................................................................. 23
Contact Information ......................................................................................................................................................................... 28

Warnings and Cautionary Statements
Failure to perform certain procedures or note certain conditions may impair the performance of this product. For
maximum safety and optimal performance, please read and follow the procedures and conditions listed below.
Use only in a clean-air environment known to be nonhazardous.
Use of this product in areas where it may be subject to large amounts of electromagnetic interference
may affect the reliable operation of this device and should be avoided. Sources of large amounts of
interference could be and are not limited to:
Operation near high radio frequency (RF) fields (near 2-way radio transmission antennas where the RF
fields may greatly exceed 10 V/M, etc.).
AC Power Mains that may have excessive power surges, spikes, or transients (from large AC motors
operating heavy loads, which may induce voltage sags, etc.).
Use only at altitudes below 2,000 m (6,000 ').
NOTE: This product has been tested to, and passes all EMC requirements to EN 61326:1998 Electrical
Equipment for Measurement, Control and Laboratory Use for Type 2 (Industrial) Apparatus, as well as
FCC Part 15, Class A emissions levels when installed to the requirements outlined within this manual.
Mandatory compliance to these standards helps to ensure controlled, reliable operation of this device
when exposed to typical levels of electromagnetic interference as well as ensuring that this device is not
the source of emissions that might interfere with other equipment installed nearby.
NOTE: Per 30 CFR 75.320(b), the product tests for oxygen deficiency of MSHA-approved oxygen
detectors compatible with the product that can detect 19.5% oxygen with an accuracy of ±0.5%.
NOTE: Per 30 CFR 22.7(d)(2)(i), the acceptable limit during calibration and bump testing with 2.5%
methane must be 10% for MSHA-approved instruments using Industrial Scientific certified calibration gas.
NOTE: This product has an internal pump that controls the flow of gas delivered to the system. As a
result of the internal pump, a demand-flow regulator must be used in conjunction with this product.
1


General Information
Introduction
Capabilities
Compatibilities
System Requirements and Supplies
Certifications
Care and Operating Guidelines
Training
Order type
Reference
DSX Standalone Mode
Standalone Mode (unit, order, etc.)
DSXi Cloud-connected Mode (DSXi)
DSXi (unit, order, etc.)
DSX-to-DSXi upgrade (DSXi)
DSXi (unit, order, etc.)
iNet® Account (replacement or add-on equipment)
iNet Account (unit)
Automatically performs one on-dock task (bump test [default setting] or calibration).
When a USB data storage device (included) is connected, the following are automatically downloaded to
the device when an instrument is docked:
Records for station-performed bump tests
Records for station-performed calibrations
2
Introduction
The DSX™ Docking Station can be installed for use with the gas detection instruments and program
platforms of Industrial Scientific. Within this manual, the docking station is referred by order type or the
references noted below:
Capabilities
The DSX Docking Station order types named above each provide the following.
Choice of 3 or 6 gas intake ports
Charging of compatible instruments
Choice of display-screen language: English, French, German, Portuguese (Brazilian), or Spanish
Automated and on-demand (“forced”) bump tests and calibrations
Each order type offers additional functionality as summarized below.
DSX Standalone Mode

General Information
Instrument data logs
Downloaded data are saved to the USB in CSV (comma separated values) file format, which can be
opened with (or imported to) a spreadsheet.
Automatically performs all scheduled instrument tasks on-dock including bump tests, calibrations, firmware
updates, and settings changes.
Instrument data logs and station-performed bump tests and calibrations are automatically uploaded to the
cloud-based Gas Detection Program Platform, iNet Control.
Access to the iNet Control software interface, which provides these capabilities:
View your gas detection program summary and learn of specific issues that need attention.
View alarm events, other instrument data, reports, and alerts.
Take care of basic Account administration including global (fleet) event settings and special events.
Use organizational tools to create equipment groups, and assign settings to equipment groups or
equipment items.
Set up users for iNet Control access; limit or expand a user’s access level and set up users for the
automatic receipt of reports and alerts.
Docking station firmware is automatically updated.
iGas cylinder compatibility data is automatically updated..
All iNet docking stations and instruments are leased from and maintained by Industrial Scientific. When an
equipment item is in need of service, iNet Control notifies the account administrators, removes the item
from service, and ships a replacement item.
DSXi Cloud-connected Mode
iNet Accounts
4

Compatibilities
The unit should be serviced by qualified personnel only. Contact Industrial Scientific for troubleshooting,
examination, or repair.
The unit is equipped with a fixed-voltage power supply and will operate at only one voltage (see the
regulatory label on the outside of the unit for its operating voltage).
To help protect the unit from sudden, transient increases or decreases in electrical power, use a surge
suppressor, line conditioner, or uninterruptible power supply (UPS).
Compatibilities
Each docking station is compatible with one of the following Industrial Scientific instruments:
GasBadge® Pro
MX6 iBrid™ Multigas Monitor
Tango™ TX1 Single-gas Monitor
Ventis™ LS Multigas Monitor
Ventis™ MX4 Multigas Monitor
The docking station is compatible with only iGas™ cylinders used with demand-flow regulators and cardreader-and-tubing assemblies, all from Industrial Scientific. The use of demand-flow regulators that have an
iGas pressure switch is recommended for DSXi units and required for iNet Accounts.
DSXi units are compatible with iNet for the cloud-based storage of and access to data. Standalone Mode
units use a USB storage device for data storage and access, and are compatible with some printers (HP
OfficeJet 100 Mobile Printer recommended).
System Requirements and Supplies
DSX Standalone Mode
A PC and Ethernet cable is recommended for setup.
DSXi Cloud-connected Mode and iNet Accounts
A network connection is required for setup and operation.
The network connection must provide 10/100 Ethernet support using an Ethernet cable that comprises
RJ45 connectors and is of the cable type Cat5 or greater. For longer cables, 14−110 m (46–360 '), use a
solid conductor shielded twisted pair cable.
The docking station does not natively support wireless networking. If a wireless connection is desired, it can
be established through third-party hardware solutions such as wireless bridges or mobile broadband
routers plugged into the unit’s LAN port. Use of such a wireless solution will not affect docking station
operation.
Certifications
The product is certified for use as indicated on the labels affixed to the docking station.
Care and Operating Guidelines
Use the following guidelines to enhance personal safety and protection of the docking station and working
environment.
5

General Information
To reduce the risk of electric shock or fire:
Do not use the unit during an electrical storm without proper protection.
Do not connect or disconnect any cables to or from the unit during an electrical storm.
Do not expose the unit to rain or moisture.
Do not push any objects into the openings of the unit.
To avoid possible damage to the unit's system board, wait 5 seconds after powering off the unit before
restarting.
To avoid shorting the unit when disconnecting a network cable, first unplug the cable from the unit, and
then from the network jack. When connecting a network cable, first plug the cable into the network jack,
then the other end into the unit.
Be sure nothing rests on the unit's cables or tubing. Ensure cables and tubing are not located where they
can be stepped on, cut, tripped over, loosened, or disconnected.
Do not place the unit on or near flammable materials.
Do not use corrosive chemicals or vapors near the unit.
Do not immerse the power cable or plug in water.
Do not drop the unit.
Before cleaning the unit, disconnect the power supply from the power source.
Clean the unit with a soft cloth dampened with water.
Do not spray water directly onto the unit.
Do not use liquid or aerosol cleaners, which may contain flammable substances.
Compressed gas cylinders and their contents may present specific hazards to the user. Use only in a wellventilated area. Use only in accordance with the instructions and warnings as marked on the cylinder and
the appropriate Material Safety Data Sheet (MSDS) or Safety Data Sheet (SDS).
Training
Industrial Scientific offers classroom and self-guided online training options for a variety of topics,
including the setup and operation of the docking station.
6

Getting Started
Work-space Checklist
Unpack
Hardware Overview
Specifications
Item (part number)
DSX Docking Station
GasBadge® Pro (18109331)
MX6 iBrid™ (18109329)
Tango™ TX1 (18109330)
Ventis™ LS (18109328)
Ventis MX4 (18109327; shown here)
3
Work-space Checklist
Set up and use the docking station in an area that is known to be nonhazardous.
Choose a work space that is large enough to accommodate the units and their accessories, and is in
close proximity to an accessible power source.
For DSXi and iNet Account units, choose a work space that is in close proximity to a network
connection; for DSX Standalone Mode units, a computer connection.
As needed, mount cylinder holders to the desired desk or wall locations.
Abide by all care and operating guidelines during setup and operation.
Unpack
The box contains those items listed and shown below (as ordered). Each ordered item should be
accounted for in the unpacking process.
After unpacking, if any item is missing or appears to have been damaged, contact Industrial Scientific
or a local distributor of Industrial Scientific products.

Getting Started
Item (part number)
iGas Card-reader-and-tubing Assembly (17155785)
Power Supply (17136623)
With adapters for Australia, Europlug, North America, and UK and Ireland
Power Cord, Dedicated (optional; use with power supply in place of adapter)
Australia (17155001)
Europlug (17155003)
North America (17155000)
UK and Ireland (17155005)
Fresh-air fitting (factory installed)
USB Data Storage Device (17156585; for DSX Standalone Mode orders only)
see hardware overview
Flipper Lock (17155133; for Ventis MX4 docking stations only)
Front (Ventis MX4 diffusion model shown)
Cradle lid (shown open)
Flipper lock
for use with Ventis MX4 diffusion
instruments only
Cradle
LCD
LEDs
From top to bottom:
green, amber, and red
Keypad
From left to right:
left arrow key (), enter key (),
and right arrow key ()
Hardware Overview
8

Specifications
Back
Back panel (six port-set unit shown)
iGas port sets
From left to right:
Port set 4
Port set 5
Port set 6
Power supply port
(12 VDC)
Network connection
(LAN PORT)
From left to right:
Port set 1
Port set 2
Port set 3
Note: The port sets 1, 2, and
3 are positioned in the same
location on the three port-set
unit.
USB port, type A
(USB)
For use with Standalone Mode units
(USB data storage device or
compatible printer)
Physical Specifications
Instruments supported
GasBadge Pro, MX6 iBrid, Tango TX1, or Ventis LS, or Ventis MX4
Dimensions
GasBadge Pro, Tango TX1: H: 22.66 cm (8.92 "); W: 16.89 cm (6.65 "); D: 27.31
cm (10.75 ")
Ventis MX4, Ventis LS: H: 24.97 cm (9.83 "); W: 16.89 cm (6.65 "); D: 27.31 cm
(10.75 ")
MX6 iBrid: H: 25.3 cm (9.96 "); W: 16.89 cm (6.65 "); D: 27.31 cm (10.75 ")
Gas and fresh-air intake ports
3-port configuration: two gas and one fresh air
6-port configuration: five gas and one fresh air
Pump flow rate
1.2 SCFH (550 mL/min)
Communication
10/100 Ethernet support using an Ethernet cable that comprises RJ45
connectors and is of the cable type Cat5 or greater (for longer cables, 14−110 m
[46–360 '], a solid conductor shielded twisted pair cable).
USB port for data storage device or printer (for use with Standalone Mode units
only).
Display
128 x 64 dot matrix LCD
Language options: English, French, German, Portuguese (Brazil), or Spanish
Performance Specifications
Specifications
9

Getting Started
Operating temperature range
0–50 ºC (32–122 ºF)
Operating humidity range
0–80% relative humidity (RH) up to 30 ºC (86 ºF), decreasing linearly to 50% RH
at 50 ºC (122 ºF)
External power supply ratings
Supply voltage: 100–240 VAC/12 VDC
Frequency range: 50–60 Hz
Current rating: 5A
10

Setup
Introduction
Setup Instruction
Based on your order type, complete the instruction steps noted
below. It is important to complete these tasks in the stated
order.
Order type
Complete these
steps*
DSX Standalone Mode
2–16
DSXi Cloud-connected Mode
1A and 2–14
DSX-to-DSXi upgrade
1B and 2–14
iNet Account (replacement or add-on
equipment)
2–14
*If the docking station will be dedicated to service only Ventis MX4
diffusion units, also complete step 17.
When setup is completed, your docking station will look similar
to the image shown here. It may differ based on the number or
type of connected cylinders and whether the unit is or is not
connected to a network or computer. If you have any questions
during setup, contact Industrial Scientific.
Step
Task
1
Activation for the order types:
DSXi Cloud-connected Mode
DSX-to-DSXi upgrade
You will need your Activation Certificate.
Reminder: Complete 1A or 1B, but not both,
depending on whether you ordered a DSXi unit (1A)
or a DSX-to-DSXi upgrade (1B).
1A
If you ordered a DSXi Cloud-connected unit, find its Activation Certificate in your docking station shipment.
To install your first unit, go to www.indsci.com/mydsx and follow the instructions provided there.
To install additional units, log into iNet Control. Click on the “Fleet” tab: from the drop-down menu, select
“Activate a Docking Station” and follow the on-screen instructions.
4
Introduction
Setup Instruction

Setup
1B
If you ordered the DSX-to-DSXi upgrade, you will receive an Activation Certificate from Industrial Scientific for each
unit you are upgrading. Go to www.indsci.com/mydsx and, with your certificate(s), follow the instructions
provided there.
2
Network connection for DSXi units and iNet Accounts
PC connection for Standalone Mode units
For DSXi units and iNet Accounts, a network
connection is required for setup and operation.
For Standalone Mode units, a PC connection is
recommended for setup. This allows you to access
and adjust the unit’s settings through the on-board,
easy-to-use DSX Configurator. For example, you
can change the unit’s date and time setting to match
your time zone so that bump test and calibration
records have accurate date-time stamps. Once
setup is completed, Standalone Mode units can be
disconnected from the computer.
─
Plug the cable into the
Network (or PC for
Standalone Mode orders).
Connect the other end to the
docking station’s LAN
PORT.
3-7
Start-up
The docking station comes with a power supply and plug adapters. If ordered, a dedicated power cord can
be used in place of the adapter, an option that works well with narrow power strips. Instruction is provided
for using either option.
3. Connect the power supply
to the docking station’s 12
VDC port.
4. From the other end of the
power supply, remove its
cover: press the release tab
and slide the cover in the
direction indicated. Store the
cover for possible future use.
5. In the manner the cover was removed, replace it with the
adapter that is suitable for your outlet (above left). If a
dedicated power cord was ordered, use it in place of the
adapter (above right).
The remaining setup steps are shown below in detail. Those pertaining to the back of the docking station
(steps 2-15) can also be viewed as part of a completed docking station setup on page 18.
12

Setup Instruction
There is no power switch on the docking station. The unit is powered on and off at the power source.
─
6. Plug the power cord into a suitable outlet.
7. Check the docking station’s display panel.
A series of start-up messages appear on the docking station’s
display screen to indicate the unit is receiving power.
The LEDs turn on to verify they are functioning and a chirp
will sound.
Note: If the unit doesn’t power on, check the power connections at
the back of the unit, power supply, and power source.
When start-up is successfully completed, the green LED will
be on and the “ready screen” should display this text:
For Standalone Mode units, “Cal Station” (above right).
For DSXi units and iNet Accounts, “Docking Station” and
“√ iNet” (above left). Note: If these messages don’t display
within 15 minutes, the unit is not cloud-connected. DSXi users,
recheck the work you did in Step 1, “Activation”. For iNet
Accounts, contact Industrial Scientific.
i iGas port sets
Each docking station features three (shown here) or
six port sets.
A port set comprises two items that are vertically
aligned, a numbered cable port (labeled iGAS X,
where X=1, 2, 3, 4, 5, or 6) and a corresponding
intake port for tubing.
Use the port set iGAS 1 for air only. Its intake port
is labeled ZERO AIR and is blue in color.
Use the port sets iGAS 2 through iGAS 6 for
calibration gas. Each set’s intake port is labeled
CAL GAS and is white in color.
intake port
for tubing
cable port
Fresh air port set
Calibration gas port set
Close-up of port sets 1, 2, and 3
8
Fresh-air fitting
The fresh-air fitting is installed at the factory and is connected to the blue intake
port labeled ZERO AIR (shown here). The corresponding iGAS 1 cable port is
not used with the fresh-air fitting.
If your application uses a fresh-air fitting, go to step 9.
If your application does not use a fresh-air fitting and requires a zero-grade-air cylinder, remove
the fresh-air fitting: turn its white swivel connector counterclockwise.
Cal station
123.456.321.654
SN: 101231B-123
13

Setup
9-14
iGas cylinder connections
The docking station is compatible only with iGas cylinders that
are equipped with demand-flow regulators. Each compatible
cylinder is connected to the docking station using an iGas cardreader-and-tubing assembly (assembly; shown at right).
Whether it contains calibration gas or zero-grade air, each
cylinder is connected to its port set in the same manner.
Connections for a calibration gas cylinder are shown and
described below using the port set, iGAS 2−CAL GAS.
If you are connecting a zero-grade-air cylinder, follow the
instructions below, but use the port set iGAS 1−ZERO AIR.
Depending on site needs, each calibration-gas port set can be
connected for use or left disconnected when not needed. The air
port set should always have either the fresh-air fitting or a zerograde-air cylinder connection.
Note: The docking station will recognize any incompatible cylinders on connection and
will indicate the error on the display screen. A Standalone Mode unit will recognize the
compatible cylinders contained in its memory, which can be updated by contacting
Industrial Scientific.
tubing and cable (connect to docking station)
card reader (connects to cylinder’s card)
iGas card-reading-and-tubing assembly
9. Attach the appropriate
demand-flow regulator to the
cylinder. Turn the cylinder
clockwise to tighten.
10. Slide the iGas card,
which is attached to the
cylinder, into the assembly’s
card reader.
11. Attach the open end of
the assembly’s tubing to the
regulator nipple.
12. If the regulator is
equipped with a pressure
switch (recommended for
DSXi units and required for
iNet Accounts), plug its tab
into the slot on the side of the
card-reader.
13. Attach the tubing's white
swivel connector to the CAL
GAS port located directly
above the iGAS 2 cable port.
Turn clockwise to tighten.
14. Plug the cable connector
(arrow faces up) into the
iGAS 2 cable port.
Note: The docking station will not recognize when any assembly’s tubing and cable are misconnected to two different port sets; bump test and
calibrations will fail.
Repeat steps 9-14 to connect additional calibration gas cylinders using the port sets iGAS 3, 4, 5, or 6.
14

Setup Instruction
15
Settings for Standalone Mode units ONLY
15.1 Find the unit’s IP address on
its display screen
(123.456.321.654 shown here).
Open a web browser and enter
https:// followed by the unit’s IP
address and press enter.
15.2 In the security dialog box, for both
user name and password enter DSX (case
sensitive). Click on OK.
15.3 At the security warning window,
choose the option that allows you to
continue. Note: it may say “not
recommended”.
The DSX Configurator will open.
15.4 Click on the configurator’s
Cal Station tab.
Set the date and time (24-hour
format). Click on Set Clock.
Set the on-dock task (bump test,
calibration, or none).
Enable the Download Data log
feature with a checkmark
(recommended). This enables the
automatic download of a docked
instrument’s data to a connected
USB data storage device. To
disable this feature (not
recommended), click on the box
to remove the checkmark.
Click on Save.
Cal station
123.456.321.654
SN: 101231B-123
15

Setup
15.5 Click on the configurator’s
Information tab.
From the Language drop-down
menu, choose the desired
language for the docking station
display.
The Audible alarm feature is
enabled with a checkmark and
causes the docking station to
alarm when an instrument is
docked. To disable this feature,
click on the box to remove the
checkmark and turn off the ondock alarm.
When the Menu Locked option is
enabled with a checkmark, the
docking station cannot be used
for on-demand tasks.
Click on Save & Reboot.
15.6 After the docking station reboots, you may disconnect it from the computer for Standalone Mode operation.
16
Records and data for Standalone Mode units ONLY
For Standalone Mode units, Industrial Scientific recommends that
a USB data storage device be connected to the docking station’s
USB port (type A). As shown here, the USB port is located on the
back of the unit next to the LAN port.
When connected, the following are automatically downloaded to
the device when an instrument is docked: instrument data logs
and records for docking station-performed bump tests and
calibrations. It is important to connect a USB device because no
records or data are ever saved to the docking station itself.
As noted earlier, records and data are saved to the USB device in
CSV file format, which can be opened with (or imported to) a
spreadsheet.
USB port
(type A)
Notes:
After a data log is downloaded to the USB device, the docking station will clear it from the instrument.
A compatible printer can be connected in place of the USB data storage device; however, only calibration and bump test records–not instrument
data logs–will be sent to the printer.
Either the USB device or printer can be connected at any one time, but not both at the same time.
16

17
Flipper lock installation ONLY for docking stations dedicated to Ventis MX4 diffusion
units
Locate the station’s cradle
flipper (lever).
Ensure the lever is in
its forward or down
position, exposing the
fan icon that has an X
through it.
Seat the flipper lock in the cradle; its Industrial Scientific logo
faces the user.
Setup Instruction
17

Setup
Setup Steps 2−16
1
See “Activation”.
11
9
10
12
13
14 15
See
“Settings”
16
iGas card-reader-andtubing assembly (use for
steps 10–14)
8 3 2
4 5 6 7
Cal Station
123.45.543.21
SN: 12345AB-543
iGas cylinder with a demand flow regulator that is equipped with a pressure switch
Card-reader-and-tubing assembly connects the cylinder to the port set iGAS 2−CAL GAS (also shown: fresh-air filter, power cord, and Ethernet cable)
18

Use
Use Instruction
Error Messages
Warranty
On-dock use
DSXi and iNet Account units will automatically
perform all scheduled tasks and updates for any
compatible instrument in the account.
Standalone Mode units will automatically perform
the on-dock task established in “Chapter 4, Step
15.4”. If a USB data storage or printer has been
connected, records or data will be sent to the device
as described in “Chapter 4, Step 16”.
Dock a compatible instrument (Ventis MX4 diffusion shown).
Based on the sensor configuration of the installed instrument,
the docking station will draw gas (or air), as needed, from the
appropriate cylinder(s).
5
Use Instruction
The docking station can be used when the green LED is on. If the red or yellow LED is on, check the
station’s display screen for a message. Yellow usually indicates that the docking station is performing some
task, such as UPLOADING FIRMWARE. Red means there is an error, which will be indicated on the
display screen. Error messages are covered later in this chapter.
All Industrial Scientific instruments are docked face up except the Tango TX1, which is docked face down.

Use
On-demand use
—
Main menu
Instrument menu
To perform an on-demand
task for a docked instrument,
press any key on the keypad
(, , or ) and release.
The main menu will display.
Press either arrow key ( or
) to highlight Instrument.
Press the enter button ();
the instrument menu will
display.
Press either arrow key ( or ) to highlight the desired option.
Press the enter button (). When prompted, press enter again
to confirm a request. Use the keypad to respond to any other
display message prompts.
Notes: The Instrument menu’s “Information” option will display the instrument type, firmware version, and serial number. For Standalone Mode
units, the “Download data log” option appears on the instrument menu only if a USB device is connected.
Instrument
Docking Station
iNet
Exit
Bump Test
Calibrate
Download Datalog
Information
Back
Like the Instrument Menu, there are Docking Station and iNet menus that are accessible from the main
menu. They feature these options:
Docking Station menu options
Diagnose*: use this to initiate docking station diagnostics.
Information: view basic information about the docking station, such as serial number.
Cylinder: view information about the cylinders that are connected to the docking station.
Troubleshoot: use this when instructed to do so by an Industrial Scientific representative.
iNet menu* options
Refresh Settings: refresh the docking station’s iNet settings between automatic settings updates.
Account: view the docking station’s account number for a cloud-connected unit. If the unit is not
associated with an account, the display message will read “Not activated”. Note: Standalone Mode
units may display an account number that is assigned for use by Industrial Scientific
representatives.
*Not available for Standalone Mode units.
Error Messages
The station’s red LED indicates one of these general conditions:
There is error with the docking station.
The docking station is unable to communicate with the gas cylinders, the internet, or iNet.
The instrument is in some state of failure.
Read the docking station’s display message and refer to Table 1 for information about possible causes,
status, and recommended actions.
20

Warranty and Limitation of Liability
Table 1. Understanding error messages
Message
Possible causes or status
Recommended actions
Bump Failure
One or more installed sensors failed bump
test. The display message will indicate the infailure sensors.
If the sensor type requires a manual bump
test, undock the instrument and bump test
the sensor; otherwise, use the docking
station to complete an on-demand bump
test.
Calibration Failure
One or more installed sensors failed
calibration. The display message will indicate
the in-failure sensors.
If the sensor type requires manual
calibration, undock the instrument and
calibrate the sensor; otherwise, use the
docking station to complete an on-demand
calibration.
Replace any sensors that will no longer pass
calibration.
Calibration Failure
Check Cylinders
Indicates a possible error in the cylinder
connections.
Check the cable and tubing connections at
the back of the station, the card-reader, and
the cylinder’s regulator. Be sure that each
cable and tubing pair is connected to one
port set (i.e., the cables or the tubes are
not “cross connected”).
Check Flipper and Lid Positions
The docking station has detected an open
cradle lid or an error in the positioning of the
flipper lock (used only with stations for Ventis
MX4 diffusion units).
Open the cradle lid.
If the station uses a flipper lock, undock the
instrument and correct for any flipper lock
installation errors. For an aspirated
instrument, remove the flipper lock and
position the station’s lever so its fan icon
faces up.
Redock the instrument.
Close the cradle lid. On closure, a slight
connection impact can be felt.
Communication Error
May indicate a low or dead battery.
May also indicate a temperature issue is
preventing the instrument from charging; for
example, the instrument was docked after
exposure to cold weather or excess heat was
generated during charging.
If the error persists, check the instrument’s
battery and replace if needed.
Instrument Error
The docked instrument is in system alarm.
Undock the instrument. Contact a member
of the safety team or Industrial Scientific.
Instrument Not Serialized
There is an issue with the docked
instrument’s serial number.
Undock the instrument. Contact Industrial
Scientific.
Instrument Pump Fault
The docked instrument is in a pump fault
state.
Undock and power off the instrument.
Check the instrument’s pump and correct for
debris, improper installation, or damage in
these areas: inlet cap, inlet barrel, and dust
filter.
Replace any damaged or consumed parts.
Instrument Upgrade Error
An error occurred during an update to the
docked instrument’s firmware.
Undock the instrument.
Contact a member of the safety team or
Industrial Scientific.
Lid Not Closed
An instrument is docked, but the station’s lid
Check the cradle lid. On closure a slight
21

Use
Table 1. Understanding error messages
Message
Possible causes or status
Recommended actions
is not closed.
connection impact can be felt.
For stations that serve aspirated
instruments, some have a detachable lid:
check that the lid is fully attached.
No Enabled Sensors
The instrument has no installed sensors or
the installed sensors are disabled.
Undock the instrument and address any
sensor installation or enablement issues.
Not Serialized
There is an issue with the docking station’s
serial number.
If available, the unit’s IP address is stated on
the display screen.
Contact Industrial Scientific.
Return Docking Station to
Industrial Scientific
(iNet Accounts only)
The station is inoperable. It has been
deactivated by iNet.
If an instrument is docked, undock it; redock
the instrument on another compatible
docking station.
Return the inoperable docking station to
Industrial Scientific.
Return Instrument to Industrial
Scientific
(iNet Accounts only)
The instrument is inoperable. It has been
deactivated by iNet.
Depending on the instrument type, it may
alarm or it may display a message similar to
“config”.
Undock the instrument and return it to
Industrial Scientific.
Saving to USB drive: FAILED
(DSX Standalone Mode units
only)
The instrument data download failed.
Check the USB drive connection.
Sensor Error
The docked instrument has no installed
sensors or an installed sensor is in an error
state.
The instrument display will indicate which
sensor caused the error.
Undock the instrument and address any
sensor installation issues.
Sensor Missing
The docked instrument uses DualSense
technology (sensor redundancy) and has only
one sensor installed.
The instrument display will indicate which
sensor caused the error.
Respond according to company safety
policy.
System Error
The docking station has a system level error
and is inoperable. The error code is stated on
the station’s display screen.
The unit requires factory service. Contact
Industrial Scientific.
Unable to Synchronize
(DSXi units and iNet Accounts
only)
The docking station is unable to connect to
iNet Control.
If available, the station’s IP address is stated
on its display screen.
Contact Industrial Scientific.
Unavailable
An internal error is preventing the docking
station from performing its normal operations.
Contact Industrial Scientific.
Unavailable Gas (H2S)
The installed cylinders do not contain the
needed gas (H2S shown here).
If the cylinder’s status is low, empty, or
expired, it will be indicated on the display.
Install compatible cylinders to account for
the unavailable gases.
Undocked Instrument
An instrument was undocked during a
docking station operation. The message
displays only for a short time.
Redock the instrument.
22

Warranty and Limitation of Liability
Table 1. Understanding error messages
Message
Possible causes or status
Recommended actions
Unsupported Cylinder on Port X
The docking station does not support the
cylinder that is installed on the port noted.
When Port 1 is indicated in the error
message, it is possible that a calibration gas
cylinder is connected to this port. Port 1 is
reserved for air only.
Connect a compatible cylinder to the port
noted on the error screen.
If Port 1 is indicated, a fresh-air fitting or
zero-grade-air iGas cylinder can be
connected.
Unsupported Instrument
The docking station does not support the
installed instrument type.
Undock the instrument. Dock it on a docking
station that is compatible with the instrument
type.
Warranty and Limitation of Liability
Warranty
Industrial Scientific Corporation’s DSX Docking Stations are warranted to be free from defects in material
and workmanship under normal and proper use and service as follows:
DSX Standalone Mode: for two years from the initial date of shipment by Industrial Scientific
Corporation.
DSXi Cloud-connected Mode: for as long as the docking station is supported by Industrial Scientific
Corporation.
Limitation of Liability
THE WARRANTY SET FORTH ABOVE IS STRICTLY LIMITED TO ITS TERMS AND IS IN LIEU OF ALL
OTHER WARRANTIES, GUARANTEES, EXPRESS OR IMPLIED, ARISING BY OPERATION OF LAW,
COURSE OF DEALING, USAGE OF TRADE OR OTHERWISE. INDUSTRIAL SCIENTIFIC MAKES NO
OTHER WARRANTIES, EITHER EXPRESSED OR IMPLIED, INCLUDING BUT NOT LIMITED TO THE
WARRANTIES OF MERCHANTABILITY OR FITNESS FOR PARTICULAR PURPOSE.
SHOULD THE PRODUCT FAIL TO CONFORM TO THE ABOVE WARRANTY, BUYER’S ONLY REMEDY
AND INDUSTRIAL SCIENTIFIC’S ONLY OBLIGATION SHALL BE, AT INDUSTRIAL SCIENTIFIC’S SOLE
OPTION, REPLACEMENT OR REPAIR OF SUCH NON-CONFORMING GOODS OR REFUND OF THE
ORIGINAL PURCHASE PRICE OF THE NONCONFORMING GOODS.
IN NO EVENT WILL INDUSTRIAL SCIENTIFIC BE LIABLE FOR ANY OTHER SPECIAL, INCIDENTAL
OR CONSEQUENTIAL OR OTHER SIMILAR DAMAGES, INCLUDING LOSS OF PROFIT OR LOSS OF
USE, ARISING OUT OF THE SALE, MANUFACTURE OR USE OF ANY PRODUCTS SOLD
HEREUNDER WHETHER SUCH CLAIM IS PLEADED IN CONTRACT OR IN TORT, INCLUDING STRICT
LIABILITY IN TORT AND WHETHER INDUSTRIAL SCIENTIFIC HAS BEEN ADVISED OF THE
POTENTIAL FOR SUCH DAMAGES.
Industrial Scientific’s total liability hereunder from any cause whatsoever (except liability from personal
injury caused by Industrial Scientific’s negligence), whether arising under contract, warranty, tort (including
negligence), strict liability, products liability or any other theory of liability, will be limited to the lesser of
Buyer’s actual damages or the price paid to Industrial Scientific for the Products that are the subject of
Buyer’s claim. All claims against Industrial Scientific must be brought within one year after the cause of
action arises, and Buyer expressly waives any longer statute of limitations.
23

Use
It shall be an express condition to Industrial Scientific’s warranty that all products be carefully inspected for
damage by Buyer upon receipt, be properly calibrated for Buyer’s particular use, and be used, repaired,
and maintained in strict accordance with the instructions set forth in Industrial Scientific’s product
literature. Repair or maintenance by non-qualified personnel will invalidate the warranty, as will the use of
non-approved consumables or spare parts. As with any other sophisticated product, it is essential and a
condition of Industrial Scientific’s warranty that all personnel using the products be fully acquainted with
their use, capabilities and limitations as set forth in the applicable product literature.
Buyer acknowledges that it alone has determined the intended purpose and suitability of the goods
purchased. It is expressly agreed by the parties that any technical or other advice given by Industrial
Scientific with respect to the use of the goods or services is given without charge and at Buyer’s risk;
therefore, Industrial Scientific assumes no obligations or liability for the advice given or results obtained.
24

Notes

Notes


Contact Information
Industrial Scientific Corporation
1 Life Way
Pittsburgh, PA 15205-7500
USA
Web: www.indsci.com
Phone: +1 412-788-4353 or 1-800-DETECTS (338-3287)
E-mail: info@indsci.com
Fax: +1 412-788-8353
Industrial Scientific France S.A.S.
5 Rue Frédéric Degeorge, CS 80097
62002 Arras Cedex,
France
Web: www.indsci.com
Phone: +33 (0)1 57 32 92 61
E-mail: info@eu.indsci.com
Fax: +33 (0)1 57 32 92 67
英思科传感仪器(上海)有限公司
地址:中国上海市浦东金桥出口加工区桂桥路290号
邮编:201206
电话:+86 21 5899 3279
传真:+86 21 5899 3280
E-mail: info@ap.indsci.com
网址: www.indsci.com
服务热线:+86 400 820 2515
如需查找就近的产品经销商或 Industrial Scientific 服务中心或业务办事处,请访问我们的网站 www.indsci.com。
To locate a nearby distributor of our products or an Industrial Scientific service center or business office, visit us at www.indsci.com.
Rendez-vous sur notre site Web www.indsci.com, si vous voulez trouver un distributeur de nos produits près de chez vous, ou, si vous
recherchez un centre de service ou un bureau Industrial Scientific.
Besuchen Sie uns unter www.indsci.com, um einen Vertriebshändler unserer Produkte oder ein Servicecenter bzw. eine Niederlassung von
Industrial Scientific zu finden.
Para buscar un distribuidor local de nuestros productos o un centro de servicio u oficina comercial de Industrial Scientific, visite
www.indsci.com.
 Loading...