

Inductosense 0001 User Manual

WAND Data Collector
User Manual
Document: 1.04.04 Rev6
Document: 1.04.04 Rev6

Disclaimer
This product supplied by Inductosense Ltd. Inductosense Ltd does not warrant that it
is suited to all environments and applications. Inductosense Ltd makes no warranty or
representation, either implied or expressed, with respect to the quality, performance,
merchantability, or tness for a particular purpose.
Inductosense Ltd has made every eort to ensure this manual is accurate and disclaims
liability for any inaccuracies or omissions that may have occurred. Information in this
manual is subject to change without notice and does not represent a commitment
on the part of Inductosense Ltd. Inductosense Ltd assumes no responsibility for any
inaccuracies that may be contained in this manual and makes no commitment to
update or keep current the information in this manual, and reserves the right to make
improvements to this manual at any time without notice. If you nd information in
this manual that is incorrect, misleading, or incomplete, we would appreciate your
comments and suggestions.
No part of this document can be reproduced, transferred, distributed or stored in
any format without prior permission of Inductosense Ltd.
Please contact Inductosense Ltd if you have any queries regarding this manual or the
product.
UnitDX, St.Phillips Central, Albert Road, Bristol, U.K.
Document: 1.04.04 Rev6
Inductosense Ltd.
info@inductosense.com

How to use this manual
The WAND Data Collector (referred to as WAND from this point forward) manual has been laid out to reect the menu bar that appears on the WAND screen.
This booklet includes:
Introduction to WAND Page 4
Description of Key Features Page 4
Powering up Page 5
Measure
Page 7
How to take
thickness
measurements
Measure
Settings
Page 10
Conguring the
WAND for a
measurement
Device
Settings
Page 12
Conguring
WAND for use
Other instruction manuals in the WAND series:
WAND IDM Software Manual
WAND TMS - Sensor Installation Manual
Document: 1.04.04 Rev6
History
Page 14
Retrieving stored
data

Introduction
The WAND is used to activate the Inductosense Thickness Monitoring Sensors (TMS)
in order to take ultrasonic thickness measurements from structures. The WAND
powers and subsequently acquires the thickness data from the installed sensors. The
TMS sensors can be installed on thickness/corrosion monitoring locations (CMLs/
TMLs). Measurements from the TMS sensors are displayed on the WAND’s screen
and can also be analysed using the Inductosense Data Management (IDM) software.
Description of Key Features
Transmission Coil
Scan Button
Navigation Button
Figure 1: The Key Features of the WAND Data Collector
Document: 1.04.04 Rev6
Screen
On/Off Button
Enter Button
Data & Power Connector
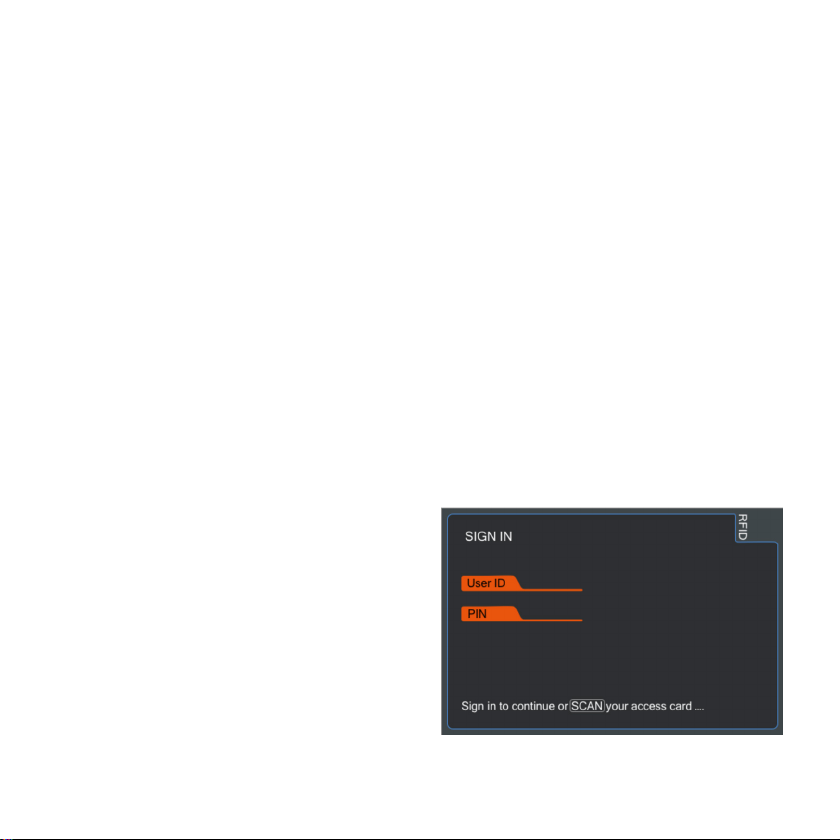
Powering-up the WAND
To switch the WAND on press the ON/OFF button. Once the WAND is turned
on, a user sign-in page will be displayed. A user can sign-in to the device by either
scanning a user RFID card or by entering a PIN Number against a specied user
name.
• When using an RFID card, simply hold the card under the WAND and
depress the scan button.
• With a USER ID and PASSWORD, press the enter button to reveal a list of
recorded users..
• Navigate to the appropriate user using the navigation buttons and select by
pressing the ENTER button.
• Navigate to the PIN eld and press the Enter Button
• Enter the 4-digit PIN number by scolling throught the numbers (up and down
buttons) and move to the next number using the left and right buttons.
• Once the PIN has been entered press the enter button
• If the PIN number entered is succesful the screen will change to the
MEASUREMENT screen
• If the PIN number is incorrect
an ‘Error’ message will appear.
• Clear the error message by
pressing the enter button and
retry the PIN.
Document: 1.04.04 Rev6
Figure 2: The Sign-in Screen
 Loading...