

IndigoVision 3000 Series Hardware Manual

Compact Network
Video Recorder Alarm Server 3000
Series
Hardware Guide

THIS MANUAL WAS CREATED ON APRIL 21, 2010.
LEGAL CONSIDERATIONS
LAWS THAT CAN VARY FROM COUNTRY TO COUNTRY MAY PROHIBIT CAMERA SURVEILLANCE. PLEASE ENSURE THAT
THE RELEVANT LAWS ARE FULLY UNDERSTOOD FOR THE PARTICULAR COUNTRY OR REGION IN WHICH YOU WILL BE
OPERATING THIS EQUIPMENT. INDIGOVISION LTD. ACCEPTS NO LIABILITY FOR IMPROPER OR ILLEGAL USE OF THIS
PRODUCT.
COPYRIGHT
COPYRIGHT © 2010 INDIGOVISION LIMITED. ALL RIGHTS RESERVED.
T
HIS MANUAL IS PROTECTED BY NATIONAL AND INTERNATIONAL COPYRIGHT AND OTHER LAWS. UNAUTHORIZED
STORAGE, REPRODUCTION, TRANSMISSION AND/OR DISTRIBUTION OF THIS MANUAL, OR ANY PART OF IT, MAY RESULT
IN CIVIL AND/OR CRIMINAL PROCEEDINGS.
I
NDIGOVISION IS A TRADEMARK OF INDIGOVISION LIMITED AND IS REGISTERED IN CERTAIN COUNTRIES. ALL OTHER
PRODUCT NAMES REFERRED TO IN THIS MANUAL ARE TRADEMARKS OF THEIR RESPECTIVE OWNERS.
S
AVE AS OTHERWISE AGREED WITH INDIGOVISION LIMITED AND/OR INDIGOVISION, INC., THIS MANUAL IS PROVIDED
WITHOUT EXPRESS REPRESENTATION AND/OR WARRANTY OF ANY KIND. TO THE FULLEST EXTENT PERMITTED BY
APPLICABLE LAWS, INDIGOVISION LIMITED AND INDIGOVISION, INC. DISCLAIM ALL IMPLIED REPRESENTATIONS,
WARRANTIES, CONDITIONS AND/OR OBLIGATIONS OF EVERY KIND IN RESPECT OF THIS MANUAL. ACCORDINGLY, SAVE
AS OTHERWISE AGREED WITH INDIGOVISION LIMITED AND/OR INDIGOVISION, INC., THIS MANUAL IS PROVIDED ON AN
“
AS IS”, “WITH ALL FAULTS” AND “AS AVAILABLE” BASIS. PLEASE CONTACT INDIGOVISION LIMITED (EITHER BY POST OR
BY E-MAIL AT PARTNER.SUPPORT@INDIGOVISION.COM) WITH ANY SUGGESTED CORRECTIONS AND/OR IMPROVEMENTS
TO THIS MANUAL.
S
AVE AS OTHERWISE AGREED WITH INDIGOVISION LIMITED AND/OR INDIGOVISION, INC., THE LIABILITY OF
I
NDIGOVISION LIMITED AND INDIGOVISION, INC. FOR ANY LOSS (OTHER THAN DEATH OR PERSONAL INJURY) ARISING
AS A RESULT OF ANY NEGLIGENT ACT OR OMISSION BY INDIGOVISION LIMITED AND/OR INDIGOVISION, INC. IN
CONNECTION WITH THIS MANUAL AND/OR AS A RESULT OF ANY USE OF OR RELIANCE ON THIS MANUAL IS EXCLUDED
TO THE FULLEST EXTENT PERMITTED BY APPLICABLE LAWS.

TABLE OF CONTENTS
ABOUT THIS GUIDE........................................5
Safety Notices ...........................................................5
1 CONFIGURATION........................................7
Overview ................................................................... 7
Important Safeguards ................................................8
NVR-AS Power Up Sequence.............................8
NVR-AS Power Off Sequence.............................9
NVR-AS Usage .........................................................9
Configuration ............................................................. 11
Using the Web Configuration Pages ...................11
Using the Serial Port Connection ........................18
Attaching the Device to the Network ...................20
Further NVR-AS Configuration ..................................20
3
2 HARDWARE DESCRIPTION ..........................21
NVR-AS Front View ..................................................21
NVR-AS Rear View ...................................................22
Port 1 / Port 2 Network Connector.......................23
Serial RS-232 Console Port ................................23
Power ..................................................................24
Removable Disk Hardware .......................................24
3 USING THE REMOVABLE DISK.....................25
Changing Disks .........................................................25
Protecting Recordings ...............................................27
Playing Back Recordings from an Archive Disk ........ 29
Troubleshooting ........................................................30
Checking a Disk...................................................30
Formatting a Disk ................................................30

4
4 HARDWARE SPECIFICATION........................ 31
Video .........................................................................31
Audio .........................................................................31
Storage ......................................................................31
Network Connections ................................................32
Performance ..............................................................32
NVR-AS Metrics .............................. ..........................32
Removable Disk Metrics ............................................33
Environment ..............................................................33
Regulatory .................................................................33
A GNU GENERAL PUBLIC LICENCE ............... 35
INDEX ........................................................37

ABOUT THIS GUIDE
This guide is written for users of the Compact Network Video
Recorder - Alarm Server 3000 Series.
It provides introductory information about the products, and a
description of their hardware and specifications.
For information on how to use the Web Configuration pages to
configure the units, see the Web Configuration Guide.
Note: Where the term “NVR-AS” is used in this guide, this refers
to the Compact Network Video Recorder - Alarm Server
3000 unless otherwise specified.
Safety Notices
This guide uses the following formats for safety no ti ce s:
5
Note: Additional information relating to the current section.
Caution: Potential hazard that could seriously impair
operations.
Warning: Potential hazard that could damage the product or
impair network function.

6

7
1
CONFIGURATION
Overview
The Compact Network Video Recorder - Alarm Server 3000
(NVR-AS) is a standalone video and audio recorder. It contains a
removable disk, which allows you to store recordings and play
them back at a later date. It provides a powerful and integrated
recording and playback system for video and audio from
cameras, transmitters, and receivers.
Each NVR-AS in a system can record from up to 10 cameras or
transmitters while simultaneously playing back up to 5
recordings, all at full frame rate. The NVR-AS is managed and
configured by the Control Center application. Video can be
played back to PCs, analog monitors, and standard VCRs.
The NVR-AS allows you to do the following:
• Record video and audio streams from IndigoVision 8000
• Play back video and audio streams to IndigoVision 8000
• Manage recordings (deleting, scheduling, etc.)
• Log and report significant events
• Review the recordings and alarm events on the disk which is
• Review recordings and alarm events on an archive disk
• Prepare disks for recording
(MPEG4) units, IndigoVision 9000 (H.264) units, and
IndigoVision 10000 (HD) units configured as transmitters; this
can be on-demand, time scheduled, or event driven
(MPEG4) units, IndigoVision 9000 (H.264) units, and
IndigoVision 10000 (HD) units configured as receivers, or
compatible PC software clients
currently being recorded

8
Important Safeguards
• You must read all the safety and operating instructions before
using the product.
• You should adhere to all warnings on the product and in the
operating instructions
• Holes in the cabinet are provided for ventilation. These
ensure reliable operation of the product and protect it from
overheating. These openings must not be blocked or
covered.
• This product should be operated only from the power source
indicated on the label.
• Do not attempt to service this product yourself as opening or
removing covers may expose you to dangerous voltages.
Refer all service to qualified service personnel.
NVR-AS Power Up Sequence
1 Ensure that the mains power is disconnected from the power
supply unit.
2 Connect the DC power connector from the power supply unit
to the NVR-AS ensuring that the mains power input to the
power supply is still disconnected.
3 Connect the mains input to the power supply unit using the
cable provided. Switch on the mains power.
The NVR-AS now powers up and goes through its boot
sequence. When the activity light (2nd from left as viewed
from front) is regularly flashing the boot sequence is
complete, and the NVR-AS is ready.

NVR-AS Power Off Sequence
1 To disconnect the device, press the Suspend/Resume button
on the front, or click the Shutdown button on the Diagnostics
web page.
2 Wait for both the CPU and Alarm LEDs on the front panel to
change from solid on, to flashing.
3 Remove the mains power from the power supply unit.
4 After removing mains power, remove the DC power
connector from the NVR-AS.
NVR-AS Usage
The removable disk offers a flexible solution for recording and
storing video footage. There are three main ways in which you
can use the removable disk:
• Archiving
You can store a disk as an archive. If you intend to do this,
you must calculate when the disk will become full and
ensure that it is replaced. You should also protect all the
recordings to make the disk read-only before you archive it
(see “Protecting Recordings” on page 27).
For more information on removing and replacing disks, see
“Using the Removable Disk” on page 25
• Reusing the same disk
If you do not need to store archive footage, you can use a
single removable disk and record over old recordings. To do
this, you should ensure that the appropriate disk space
management regime is in force, for example, by setting up
recording jobs to record at specific times.
Recordings are automatically deleted when remaini ng disk
space falls under a set threshold. In addition, you can specify
that recordings should be deleted once they reach a certain
age (see Chapter 3 for more information).
9

10
• Removing evidence of an incident
You may need to remove a disk containing footage of an
incident that has occurred for evidential purposes, and
replace it to continue normal recording. Before removing the
disk, you should ensure that all recordings on the disk are
protected (see “Protecting Recordings” on page 27).
For more information on removing and replacing disks, see
“Using the Removable Disk” on page 25

Configuration
You can configure your NVR-AS using the Web Configuration
pages or a serial connection.
Default IP Properties
The NVR-AS devices are programmed with the default IP
properties listed in step Table 1.
Table 1 Default I P Properties
Initial Configuration
IP Address 10.5.1.10
Subnet Mask 255.0.0.0
Default Gateway 10.0.0.1
Using the Web Configuration Pages
This section takes you through the steps required to configure
your NVR-AS using the Web Configuration pages.
1 Prepare an isolated network.
2 Prepare your PC for initial device configuration.
3 Configure your NVR-AS. This includes specifying its IP
address and subnet mask.
11
Configuration Prerequisites
To configure your NVR-AS using the Web Configuration pages,
you require one of the following:
• A CAT5 crossover cable suitable for connection between the
PC and the RJ45 connector on the NVR-AS
• An isolated hub or a switch
12
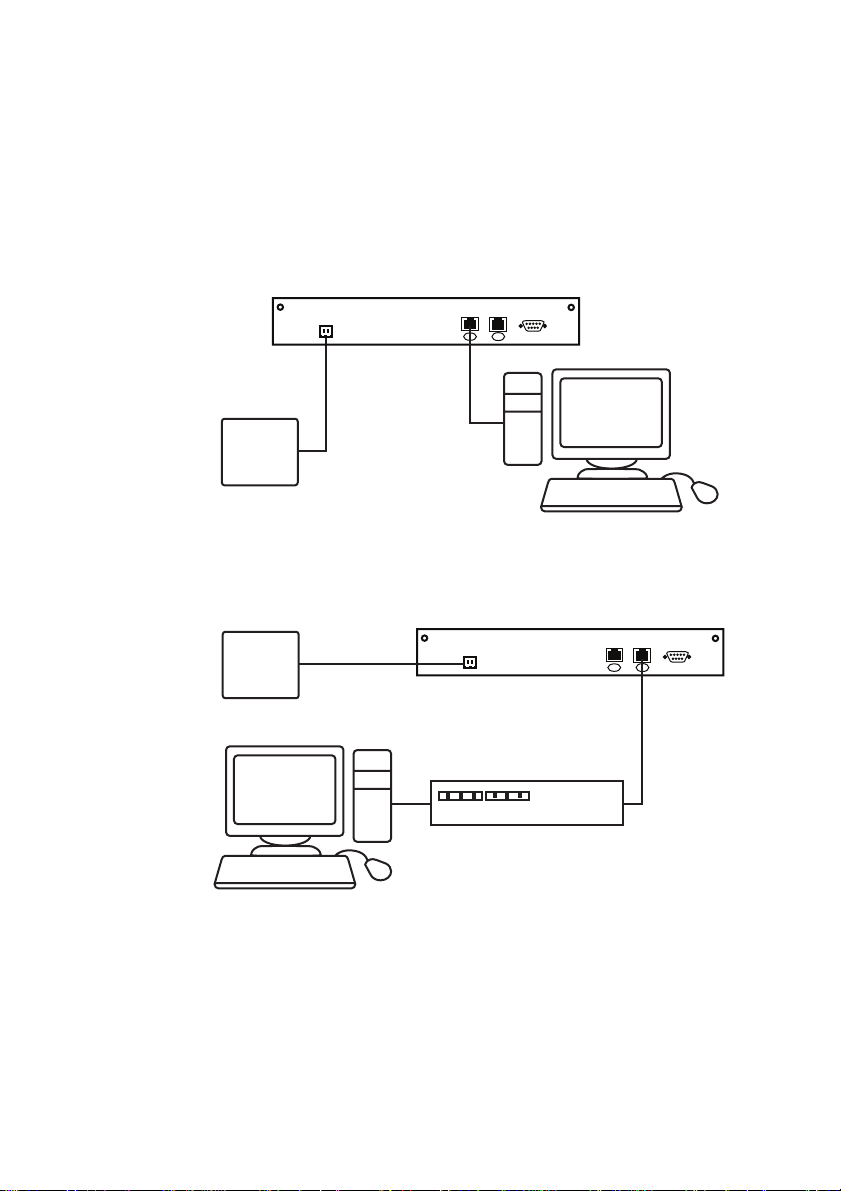
Step 1: Preparing an Isolated Network
Connect your NVR-AS and the PC you are using to configure it
on their own isolated network. To do this, connect the unit to the
PC using an Ethernet crossover cable (see Figure 1.) You can
use either the Port 1 or Port 2 Ethernet interface for the
connection.
Console Port
1
2
NVR-AS
PC
Cat5 crossover
cable
Power Supply
Figure 1 Connecting the unit and PC using a crossover cable
Alternatively, you can connect the unit and PC to the same
isolated hub or switch (see Figure 2).
Console Port
1
2
NVR-AS
Power Supply
PC
Isolated hub
or switch
Figure 2 Connecting the unit using an isolated hub/switch
 Loading...