


Main Features
Advanced QAM demodulation and MPEG-II decoding technologies, which is able
to receive and decode all digital cable TV programs compatible by DVB/MPEG II.
It is a high performance digital cable decoder characteristic of fast program
switching, automatic search for frequency and encoding rate, password locking,
conditional access, friendly user interface and ease of use.
² Support QAM16, 32, 64, 128 and 256 modulation systems
² Select Televising pattern automatically
² Friendly user interface
² Super-clear screen and hi-fi digital stereophonic output
² Conditional access system (CA)
² Electronic program guide (EPG)
² OTA Support
Packing list
Your Set-Top-Box also includes the following items:
ď1Đ1 Pcs Digital cable STB (Set-Top-Box)
ď2Đ1 Pcs AV cable 1.5M
ď3Đ1 Pcs Remote control unit (RCU)
ď4Đ2 Pcs battery
ď5Đ1 Pcs User's manual

Contents
1. Safety Instructions ........................................................................ 1
2. Description of the Receiver .......................................................... 2
1) Up panel .................................................................................................. 2
2) Rear panel ............................................................................................... 3
3) Connection .............................................................................................. 3
4) Remote control Unit (RCU) ..................................................................... 5
3. Function Introduce ........................................................................ 7
4. Installation ...................................................................................... 8
1) Automatic Scan ....................................................................................... 8
2) Manual Scan ........................................................................................... 9
3) Factory Reset .......................................................................................... 9
5. Record .......................................................................................... 10
1) Record program .................................................................................... 10
2) Playback Recording file ......................................................................... 10
3) Time Shift Record .................................................................................. 11
6. Software upgrade ......................................................................... 11
7. T roubleshooting .......................................................................... 12
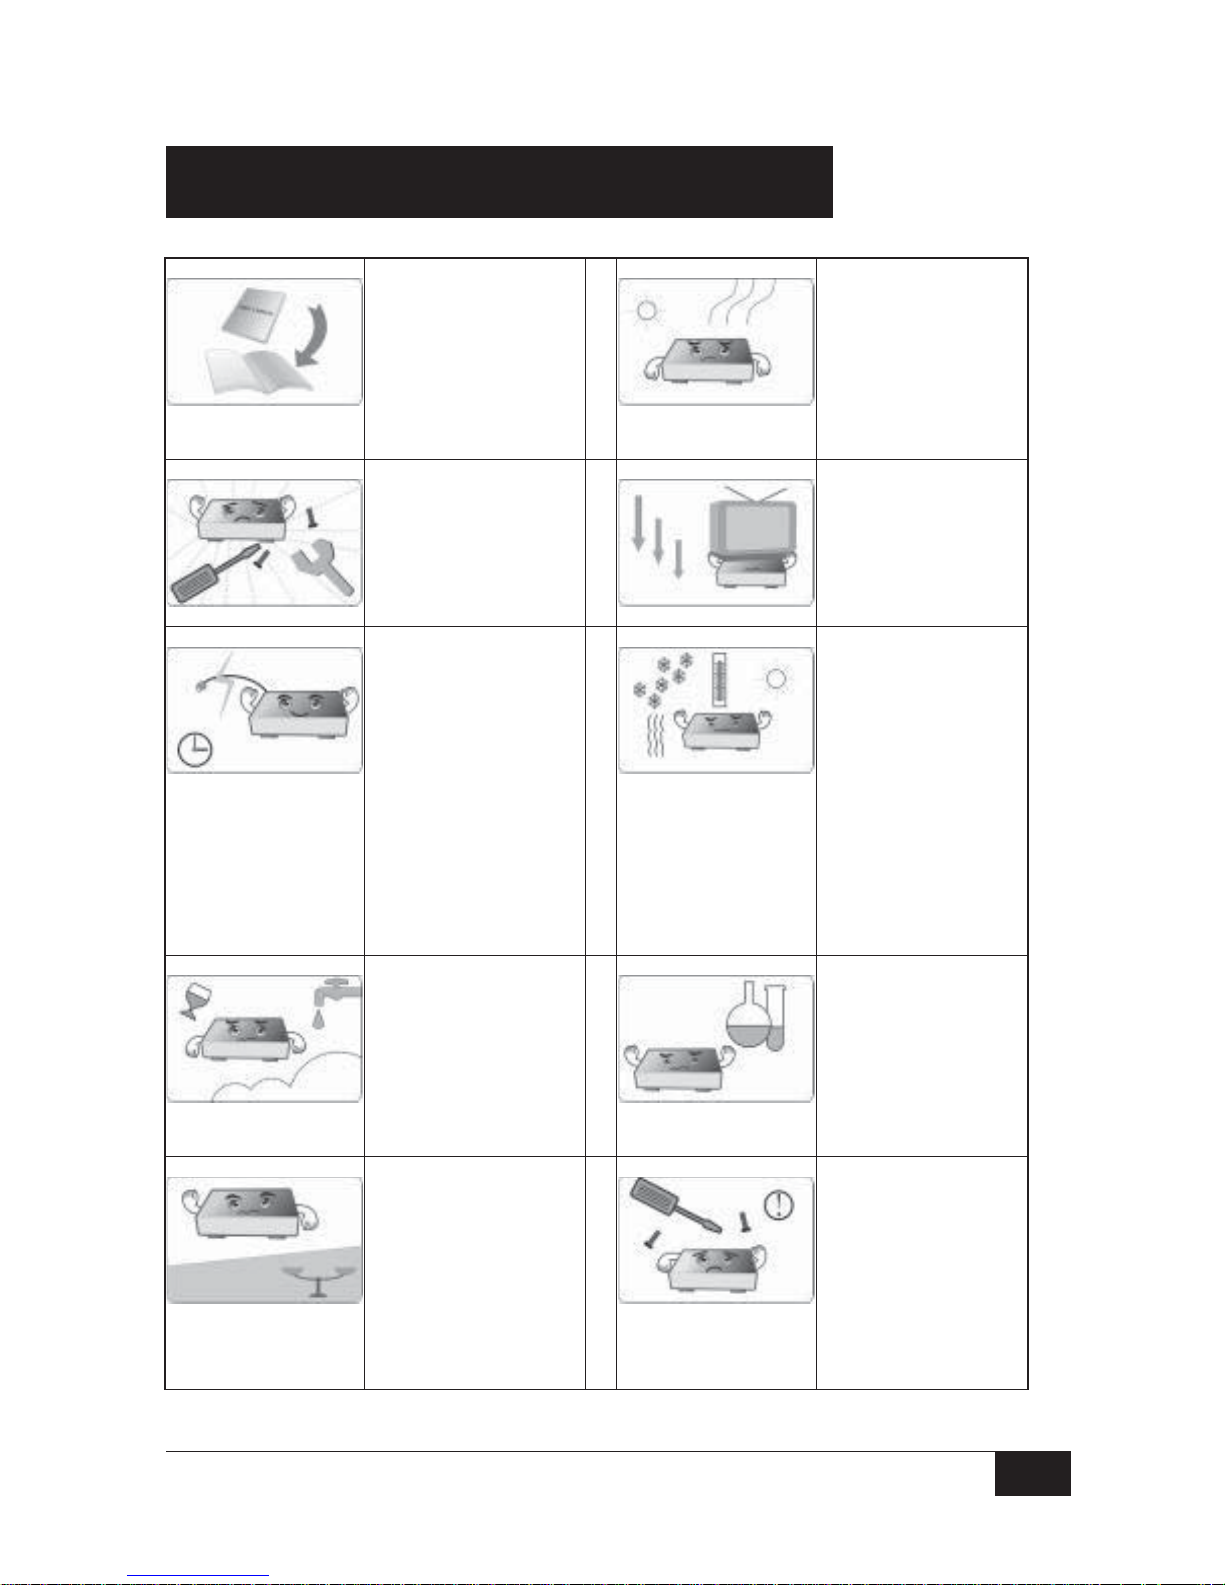
1
Please read this
user's manual
carefully before
using.
Do not allow the
Receiver to be
exposed to
extreme heat,
cold or humid
conditions.
Do not remote the
cover to prevent
electrical shock or
damage.
Do not put any
heavy object over
the Receiver.
If the Receiver
remains unused
for a long time
please unplug
power cord to
prevent from fire or
electrical shock.
Do not use a
damaged power
cord.
When the
Receiver is
moved to another
place with a sharp
temperature
difference, please
don't turn on the
Receiver
immediately until
1-2 hours later.
Never allow
liquids, spray or
other materials to
come into insider
of the Receiver.
Use a soft and
dry cloth to clean
casing. Prior to
clearing, please
pull off the power
cord.
Please place the
Receiver
horizontally to
prevent damaged.
Non-professional
personnel are
forbidden to open
the Receiver,
which may result
in electrical
shock.
1. Safety Instructions
2
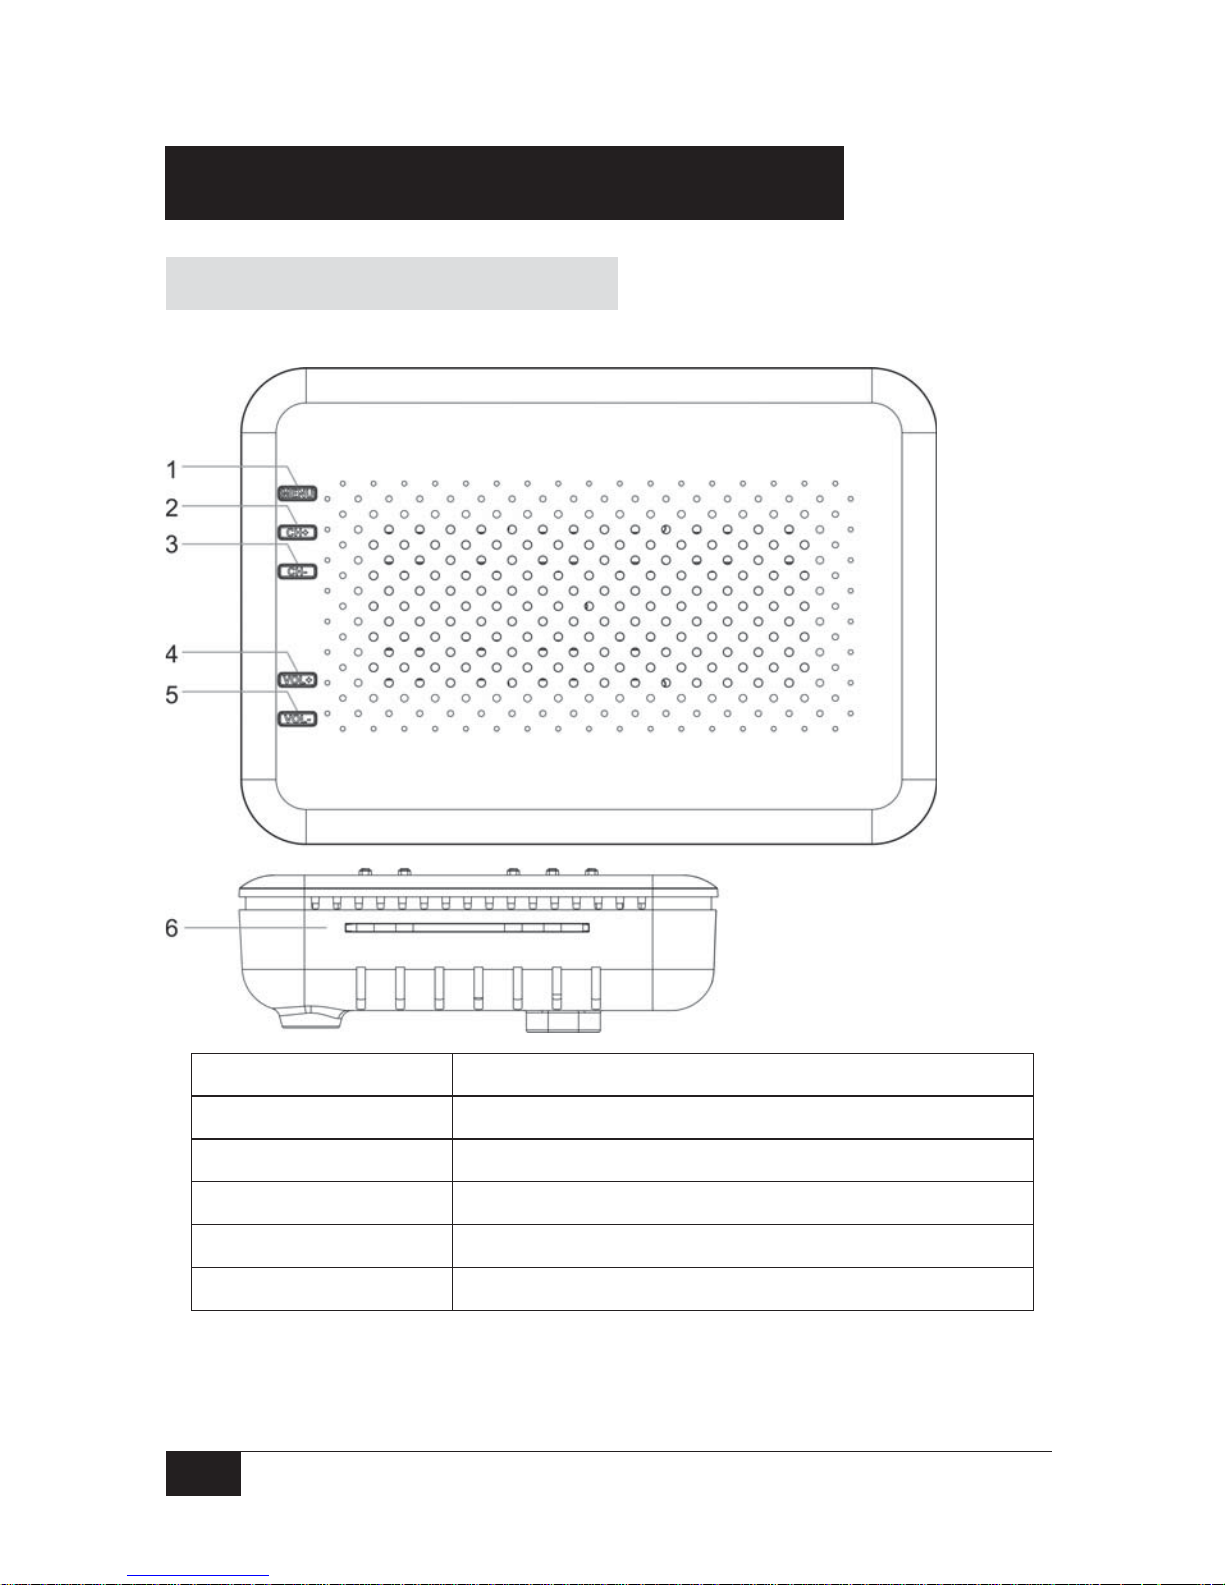
2. Description of the Receiver
1) Up panel
1 —Menu/exit Display main menu or exit to TV
2 —CH+ Change the channels
3 —CH- Change the channels
4 —VOL-/OK Adjusts the volume or Executes the selected item
5 —VOL+/RETURN Adjusts the volume or Back to previous menu
6 —Smart Card slot Interface of Smart Card

3
2) Rear panel
1 k DC power input
2 k Video output
3 k Right & Left-channel audio output
4 k USB input
5 k CABLE IN
6 k LOOP OUT
3) Connection
1. Connection of conditional access
Insert smart card with the
marked surface upwards into
the upper slot horizontally
according to the indication of
the arrow
(As the screen on the right).
Warning: Don’t insert or
draw out the smart card when it is
working.

4
2. Connection of rear panel
A. Choose the correct RF cable, connecting the Terminal of cable input to
receiver with RF cable. (As follow screen)
B. Connect the TV (Video) to Receiver “CVBS "using the AV cables (Yellow
color).
Connect the TV (L/R Audio) to Receiver “L/R" using the AV cables (Red/
White color).
If there's only one Audio terminal on the TV set, please connect L/R Audio
anyone from the Receiver to TV. (As follow screen
C. Connect power cord to DC 5V/1.5A
5
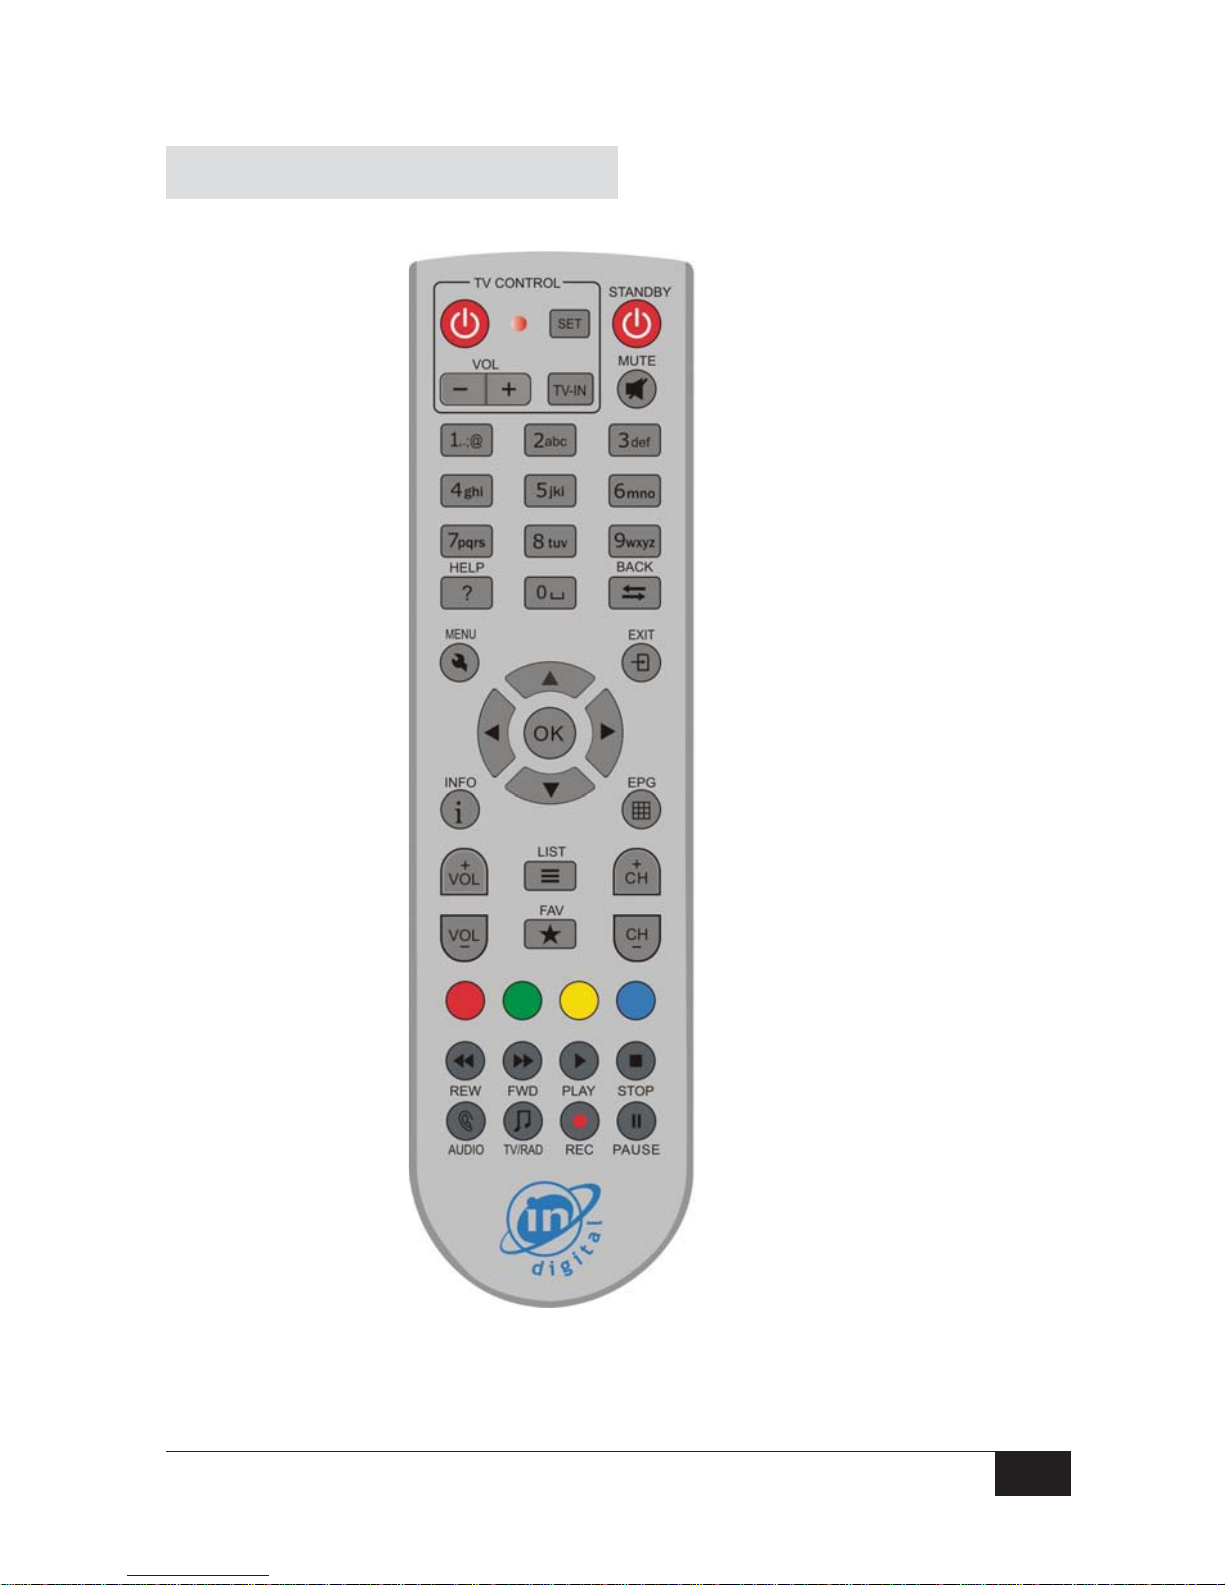
4) Remote control Unit (RCU)

6
1.
Standby
Turn on/off the Receiver by RCU
2 0-9
Directly selects a channel or changes a parameter
3
Ÿ / ź
Within a menu, moves to the next higher or lower item
In TV or Radio mode, moves to the next higher or lower
channel
4
Ż / Ź
Within a menu, moves to the left or right item in the
menu
In TV or Radio mode
,
adjusts the volume
5
EXIT
Returns to the previous menu or escapes out of the
menu
6
CH+/-
Change the channels
7.
Mutes the sound
8 FAV
Display the favorite channel list
9 VOL+/-
Adjusts the volume
10 EPG
Display the Electronic Program Guide
11 ME NU
Display main menu
12
OK
Executes the selected item or displays the list of
channels
13.
INFO
Display information about the current channel
14
TV/RADIO
Switch between TV mode and Radio mode
15. RED /GREEN
/YELLOW
/BLUE key
Functions are decided by specific applications
16 LIST
Display channel list
17
HELP
Display receiver help information
18
BACK
Recall to previous channel
19
REW/FWD/PLA
Y/STOP/REC/P
AUSE
PVR key:For control program recording and playback
20
Audio
Display audio list
21
TV: VOL+/-/
Power/AV
Learning key. For control TV directly after your setting.

7
After connections are completed, the
Receiver is switched on. The screen
displays the main menu. (As the
screen on the right)
It includes the following menus:
[Installation]: Manual or Auto scan for TV/Radio programs.
[Edit]: This menu is for edit channels.
[System]: In this menu. Users can set the working environment of the receiver
according to the actual needs.
[Utility]: Users can check calendar and update software. also can playback
recording file.
[CAS]: Users can check CA status and Smartcard status.
3. Function Introduce

8
4. Installation
ǏInstallationǐ In this menu, users can install the program.
Press <MENU> to display main
menu. Use <Ż> <Ź> keys to select
[Installation], then press <OK> key
for confirm.
[Installation] includes [Automatic
Scan], [Manual scan], [Factory
Reset].
1) Automatic Scan
In ǏInstallationǐ, use <Ÿ> <ź>
keys to select [Automatic Scan] and
press <OK> key for confirm
Then press<OK>key to go on to scan
During scan process, press
<Exit> key to stop and exit scan.

9
2) Manual Scan
In ǏInstallationǐ, use <Ÿ> <ź>
keys to select [Manual Scan] and
press <OK> key for confirm.
Need to input parameters for
[manual Scan], when you select
[manual Scan]. The page on the
right will appear; users need to input
the Freq (MHz), Symbol Rate, QAM
Mode and other options, then press
<OK> key to scan immediately.
3) Factory Reset
In ǏInstallationǐ, use <Ÿ> <ź> keys to select [Factory Reset] and press <OK>
key for confirm.
If you want to reset your receiver,
press <Yes> to confirm, if not move
to <No> to cannel. (As screen on the
right).
*You may be required to enter PIN
code (default is “0000”) once you
enter any sub-menu under
INSTALLATION
Warning:
Be careful to use the operation of [Factory Reset] for you will lose all of the data
that has been installed on your Receiver (channels, lists of favorites, etc.)
10
5. Record
Be careful of inserting USB device. Nonsupport inserting USB hard disk without
external power, the electric current maybe damages your disk.
1) Record program
After connected USB disk. In the
normal state of TV program, press
<ƽ> key, The receiver will be enter
the recording .
Press < Ƶ > key can stop the
recording.
The record size can configure in
ǏSystem]ǐuse <Ÿ> <ź> keys to
select ǏSystem Configurationǐand
press < OK > key for confirm . The
item ofǏRecord Sizeǐcan change
from 1 hours to 12 hours.
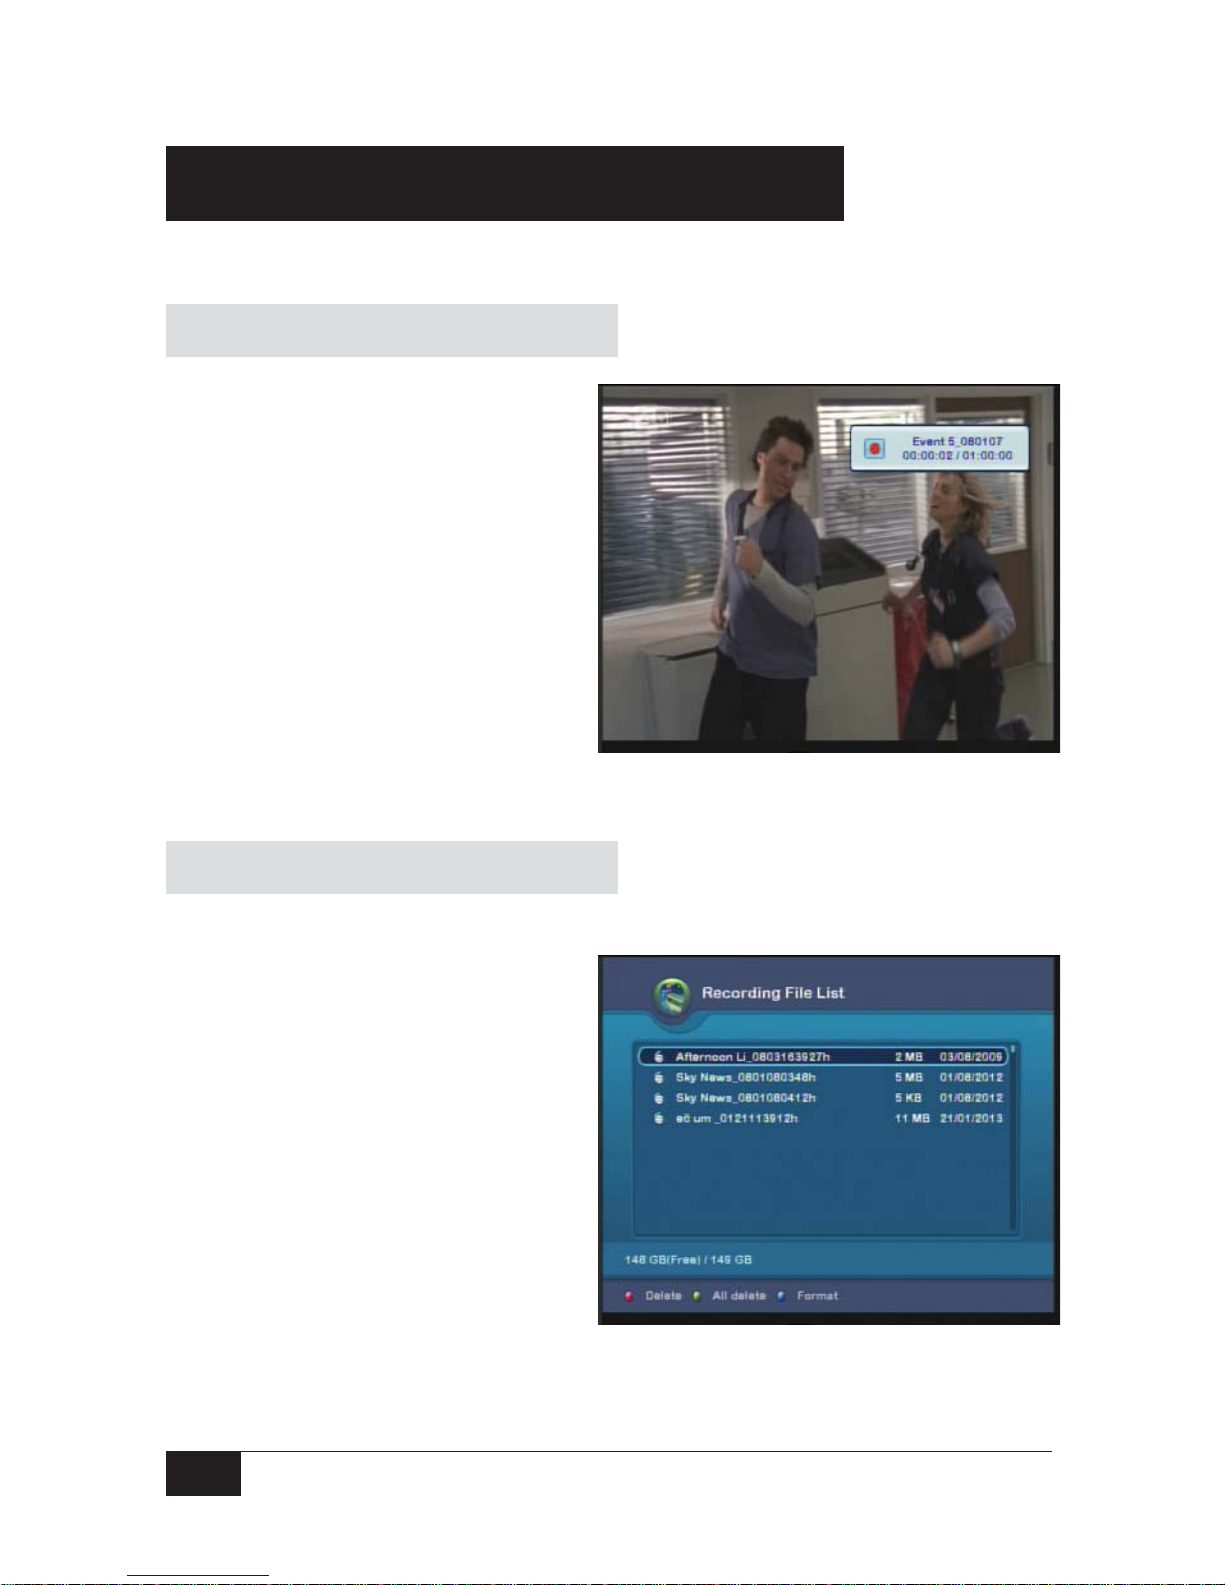
2) Playback recording file
The receiver has two methods to enter the recording file list
Method 1: in ǏUtilityǐ, use <Ÿ>
<ź> keys to select ǏRecording File
Listǐ
Method 2: in the normal state of TV
program, press <
LIST> key to direct
enter theǏRecording File Listǐ

11
3) Time Shift Record
After connected USB disk, in the
normal state of TV program press
<
> key can enter the time shift
mode that pause the program
playing.
When you want to continue watch
program press the <
Ź> key can
direct enter the time shift record play
from the pause time.
When you want to catch up the actually time press the <Ƶ> key to enter the
normal state.
6. Software upgrade
This Receiver has automatically
searching upgrade function. In
normal view mode, system will
detect and download the upgrade
information automatically.
Once relevant upgrade information is
detected, system will appear a
message box as the screen on the
right.
The update process will take a time;
during process don’t cut the power.
Once the upgrade process complete, the receiver will return back standby or play
TV.

12
7. Troubleshooting
In case of failures which are not necessarily breakdowns of the receiver. Before
they are sent for repair, please check as per the following table:
Failure Possible cause Troubleshooting method
After startup, there’s
nothing display on
the front panel.
Power plug is not
connected.
Insert the plug into the
socket firmly.
“No TV signal”
displayed on the
screen
Signal cable is not
connected properly.
Connect RF input cable
properly.
The parameter is not set
correctly.
Check and set parameters
correctly.
No voice in the
speaker properly
Audio cable is not
connected.
Connect the cable
according to wiring
diagram again.
Voice is closed.
Turn on voice and adjust
volume louder.
Output voice channel is
not correct.
Enter System Setup to try
other audio channels.
There’s just voice,
no image on the TV
screen
Video cable is not
connected properly.
Connect the cable
according to wiring
diagram again.
Radio program is tuned in
to.
Press <TV> key to switch
to TV program.
Remote controller
can’t be operated
Power of battery is
running out.
Replace battery.
Remote controller is not
aimed at properly or is too
far away.
Aim at the remote
controller and shorten the
distance.
There’s halt or
mosaic phenomena
on the images
Signals are too weak
Measures should be taken
to strengthen signals.


 Loading...