

Indiana Line Puro CDP, Puro 500, Puro 800 Owner's Manual

P U R O
5 0 0
8 0 0
C D P

IMPORTANTE
IMPORTANT
Prima di installare e mettere in funzione l’apparecchio,
leggete attentamente questo manuale,
seguite passo passo le istruzioni ed
osservate tutte le avvertenze: è necessario per la vostra
sicurezza e per ottenere le migliori prestazioni.
Conservate questo manuale: potrà servire in futuro.
Collocate l’apparecchio su una superficie solida e piana,
in posizione ben aerata e lontano da oggetti che generano calore, in
un luogo protetto da polvere ed umidità.
Assicuratevi che non ci siano gocce o spruzzi d’acqua nell’apparecchio.
Non collocate oggetti contenenti liquidi sull’apparecchio.
Non coprite l’apparecchio: le fessure di ventilazione non devono
essere ostruite per evitare il surriscaldamento.
220 ÷ 240 Volt - 50 Hertz è la corretta tensione di alimentazione:
verificate che il voltaggio sia corretto.
Prima di effettuare i collegamenti,
assicuratevi che tutti gli apparecchi siano spenti.
Non accendete l’amplificatore e/o il lettore CD
finché non è completamente installato in maniera corretta.
Before setting up the unit, please
read carefully this manual,
follow the instructions step by step and
observe all warnings: it’s necessary for your
safety and to obtain the best performances.
Keep this manual for future reference.
Place the amplifier and/or the CD player on a solid,
level surface, in a well ventilated location and away from heat
generating items, in a dust and moisture protected place.
Ensure no water dripping or splashing into the unit.
Do not place object containing liquid on the unit.
Do not cover the amplifier: the venting holes must not be blocked to
prevent overheating.
220 ÷ 240 Volt - 50 Hertz is the right power supply voltage:
ensure that the voltage is correct.
Before making connections,
make sure that all appliances are turned off.
Do not switch on the amplifier and/or the CD player
until it has been correctly and completely installed.
Disinserite il cavo di alimentazione dalla presa prima di pulire
l’apparecchio, semplicemente utilizzando un panno asciutto e morbido.
Non utilizzate detergenti liquidi o spray.
Disinserite il cavo di alimentazione dalla presa se l’apparecchio non
sarà utilizzato per un lungo periodo e durante i temporali.
Togliete le batterie dal telecomando
nel caso resti inutilizzato per molto tempo.
Per prevenire il rischio di scosse elettriche,
non aprite il cabinet: non vi sono controlli all’interno.
Nel caso sia necessario sostituire un fusibile, sostituitelo con uno
dello stesso valore, altrimenti la garanzia viene meno e si potrebbe
danneggiare l’apparecchio.
Vi consigliamo di conservare l’imballo originale per un utilizzo futuro:
i danni di trasporto a causa di imballaggio non corretto non sono coperti
da garanzia, anche in caso di assistenza.
Il mancato rispetto delle prescrizioni del seguente manuale implica il
decadimento della garanzia.
Unplug the power cord from the outlet before cleaning the unit,
simply by using a soft, dry cloth.
Do not use liquid or aerosol cleaners.
Unplug the power cord from the outlet when the unit will not be
used for a long time and during lighting storms.
Remove batteries from remote control
when not used for a long time.
To prevent the risk of electric shock,
do not open the housing: there are no controls inside.
If you experience blown a fuse, replace it with same value one,
otherwise the guarantee will avoid and you could damage your equipment.
We suggest you to retain the original packing for future use:
the freight damages, due to incorrect packaging, shall not be covered
by the warranty, in the event of servicing too.
Failure to comply with the requirements of this manual
will void the warranty.
2

puro 500 stereo integrated amplifier
puro 800 DAC stereo integrated amplifier
power (THD 0,1%) 50 watt rms / 2 channel driven (8 ohm)
75 watt rms / 2 channel driven (4 ohm)
frequency response 10 ÷ 80000 Hz +/- 0.5 dB
20 ÷ 20000 Hz +/- 0.5 dB (Phono)
total harmonic distortion 0.01% @ 1 KHz (80% nominal power)
signal noise ratio > 90 dB A weighted (CD, Aux)
> 81 dB A weighted (MM Phono)
analogic inputs Phono, CD, Aux 1, Aux 2, By-pass, Front in
input sensitivity 400 mV / 47 Kohm
1.2 mV (MM Phono)
outputs Speakers, Phones, Pre Out
pre output 750 mV / 600 ohm
power supply 220 ÷ 240 VAC / 50 Hz
power consumption 190 W max
fuse T 3.15 AL
dimensions 430 x 88 x 345 mm
weight 7.2 Kg
remote control included
power (THD 0,1%) 80 watt rms / 2 channel driven (8 ohm)
110 watt rms / 2 channel driven (4 ohm)
frequency response 10 ÷ 80000 Hz +/- 0.5 dB
20 ÷ 20000 Hz +/- 0.5 dB (Phono)
total harmonic distortion 0.006% @ 1 KHz (80% nominal power)
signal noise ratio > 92 dB A weighted (CD, Aux)
> 82 dB A weighted (MM Phono)
analogic inputs Phono, CD, Aux 1, Aux 2, By-pass, Front in
input sensitivity 400 mV / 47 Kohm
1.2 mV (MM Phono)
outputs Speaker A, Speaker B, Phones, Pre Out
pre output 750 mV / 600 ohm
digital to analogic conversion 24 bit / 192 KHz
digital inputs Coax, Optical, USB
coaxial input 500 mVpp / 75 Ohm
optical input JEITA format / CP-1212
÷
USB input sampling 32
power supply 220
power consumption 280 W max
fuse T 5 AL
÷
96 KHz
240 VAC / 50 Hz
puro CDP compact disc player
frequency response 20 ÷ 20000 Hz +/- 0.5 dB
total harmonic distortion 0.002% @ 1 KHz
signal noise ratio > 110 dB A weighted
channel separation > 102 dB @ 1 KHz
dynamic range > 95 dB
digital to analogic conversion 24 bit / 192 KHz
analogic output 2.2 Vrms / 100 Ohm
coaxial digital output 500 mVpp / 75 Ohm
optical digital output JEITA format / CP-1212
power supply 220 ÷ 240 VAC / 50 Hz
power consumption 30 W max
fuse T 1 AL
dimensions 430 x 88 x 325 mm
weight 5.6 Kg
remote control included
dimensions 430 x 88 x 345 mm
weight 8.2 Kg
remote control included
puro remote control
type infrared
batteries 2 x AAA (1.5 V) not included
dimensions 45 x 206 x 19 mm
weight 150 g
3
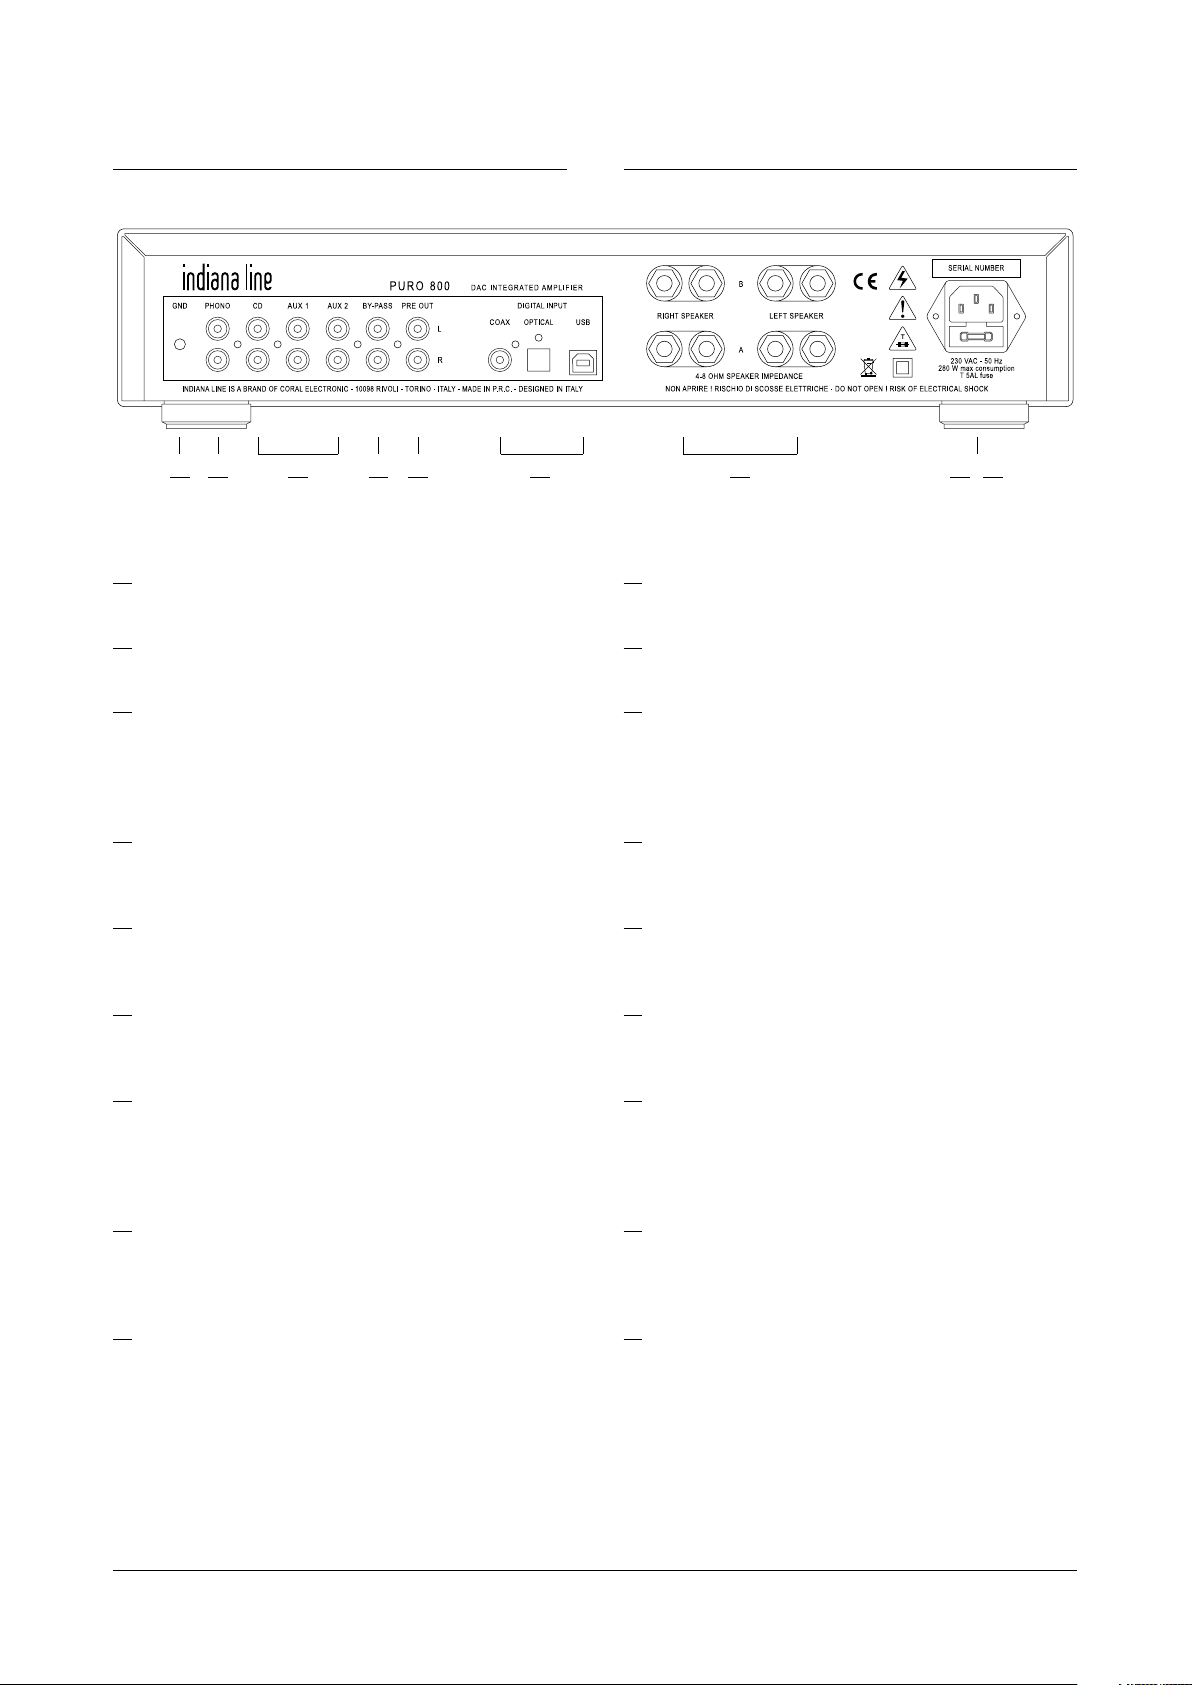
AMPLIFICATORE - RETRO
01 03 0402 0 5 07 08 0906
AMPLIFIER - REAR
01 GND
Utilizzate questo morsetto per collegare la massa del giradischi.
02 PHON O
Utilizzate questo ingresso per collegare un giradischi con testina MM.
03 CD, AUX 1 , AU X 2
Utilizzate questi ingressi di linea per collegare lettori CD, sintonizzatori
ecc. Questi ingressi sono solo per segnali audio analogici: non devono
essere collegati direttamente alle uscite digitali di un lettore CD o altro
apparecchio digitale.
04 BY-PASS
Collegate questo ingresso analogico
per utilizzare solo lo stadio finale dell’amplificatore.
05 PRE OU T
Utilizzate questa uscita analogica per collegare un subwoofer
amplificato o un ulteriore amplificatore di potenza.
06 DIGI TAL INPUT
Utilizzate questi ingressi, presenti solo su Puro 800,
per collegare apparecchi con uscita digitale.
07 LOUDSPEA KE RS
Collegate il diffusore sinistro ai morsetti “LEFT”
ed il diffusore destro ai morsetti “RIGHT”, rispettando le polarità.
Solo su Puro 800 è possibile collegare due coppie di diffusori,
utilizzando i morsetti “A” e “B”.
01
GND
Use this terminal to connect the ground of the turntable.
02
PHON O
Use this input for connecting a turntable with a MM cartridge.
03
CD, AUX 1, AUX 2
Use these line inputs to link CD players, tuners etc.
These inputs are only for analog audio signals:
they should not be connected directly to digital outputs of a
CD player or other digital device.
04
BY-PASS
Connect this analog input
to only use the power stage of the amplifier.
05
PRE OUT
Use this analogue output to connect a powered subwoofer
or a further power amplifier.
06
DIGI TAL INPU T
Use these inputs, present on Puro 800 only,
to connect devices with digital output.
07
LOUDSP EA KER S
Connect your left speaker to the terminals “LEFT” and the right
speaker to the terminals “RIGHT”, keeping the polarities.
Only on Puro 800 you can connect two pairs of speakers,
by using terminals “A” and “B”.
08 CONN ET TORE C AVO AL IMENTAZ IO NE
Una volta completate tutte le connessioni, utilizzate il cavo in
dotazione per collegare l’alimentazione ad una presa di rete
(220 ÷ 240 Volt - 50 Hertz). L’amplificatore è pronto per l’uso.
09 FUSIBI LE
Nel caso sia necessario sostituire un fusibile, sostituitelo
con uno dello stesso valore, altrimenti la garanzia viene meno
e si potrebbe danneggiare l’amplificatore.
08
POWE R CORD SOCKE T
Once you have completed all connections,
use the supplied cable to connect power to an appropriate main
socket (220 ÷ 240 Volt - 50 Hertz). Your amplifier is ready for use.
09
FUSE
If you experience blown a fuse, replace it
with same value one, otherwise the guarantee will avoid
and you could damage your amplifier.
4
 Loading...