

Indiana Line Arbour 5.02, Arbour 5.04, Arbour 4.02, Arbour 4.04, Arbour 4.06 Installation And Use Manual
...
Diffusori acustici serie Arbour / Arbour series loudspeakers
INSTALLAZIONE ED USO / INSTALLATION AND USE
I diffusori acustici Indiana Line sono stati sviluppati per
garantire le prestazioni necessarie a soddisfare le esigenze
di fedeltà, dinamica e tenuta in potenza richieste dalle
sorgenti digitali.
Questi diffusori, abbinati ad un impianto stereo od un sistema
Home Cinema, permettono di ricreare nell’ambiente d’ascolto
le coinvolgenti emozioni di un concerto live o l’atmosfera
della colonna sonora di un film, come al cinema.
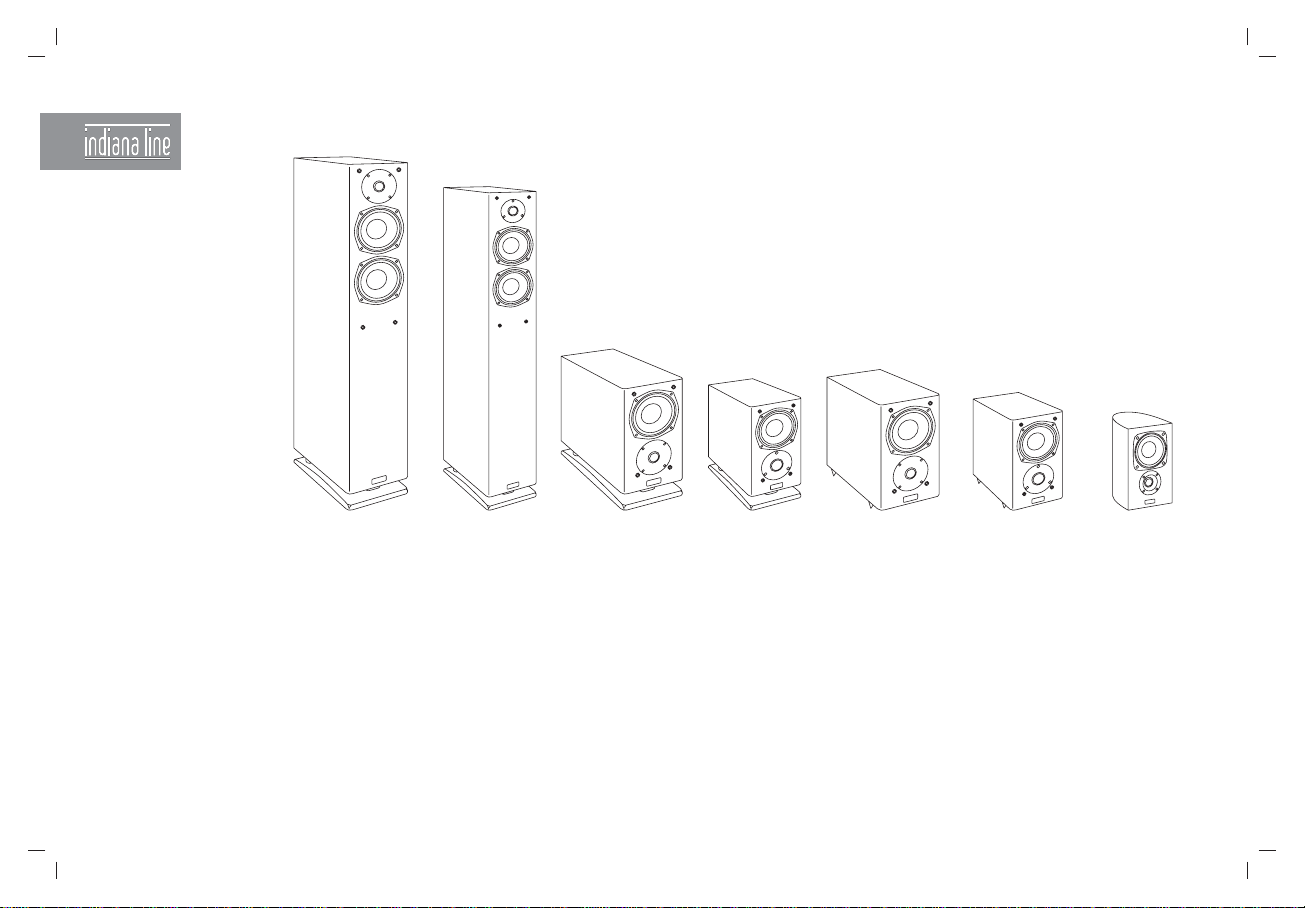
model Arbour 5.02 Arbour 4.02 Arbour 5.04 Arbour 4.04 Arbour 5.06 Arbour 4.06 Arbour 3.06
speaker system 3-way 3-way 3-way 3-way 2-way 2-way 2-way
enclosure type dual bass-reflex dual bass-reflex bass-reflex bass-reflex bass-reflex bass-reflex bass-reflex
suggested amplifier 30÷130 watt 30÷100 watt 30÷120 watt 30÷80 watt 30÷80 watt 30÷60 watt 20÷50 watt
impedance 4÷8 ohm 4÷8 ohm 4÷8 ohm 4÷8 ohm 4÷8 ohm 4÷8 ohm 4÷8 ohm
sensitivity (2.83 V/1m) 91 dB 90 dB 91 dB 90 dB 90 dB 89 dB 88 dB
frequency response 36÷22000 Hz 38÷22000 Hz 46÷22000 Hz 50÷22000 Hz 52÷22000 Hz 58÷22000 Hz 60÷22000 Hz
woofer diameter 135 mm 114 mm 135 mm 114 mm 135 mm 114 mm 90 mm
midrange diameter 135 mm 114 mm 135 mm 114 mm - - tweeter dome diameter 26 mm 26 mm 26 mm 26 mm 26 mm 26 mm 20 mm
dimension (WxHxD) 170x965x230 mm 150x880x200 mm 170x339x290 mm 150x275x250 mm 170x318x250 mm 150x252x190 mm 120x200x140 mm
weight 11.6 Kg 8.9 Kg 6.4 Kg 4.9 Kg 4.1 Kg 2.5 Kg 1.8 Kg
colour cherry cherry cherry cherry cherry cherry cherry
finishing real wood real wood real wood real wood real wood real wood real wood
2
The Indiana Line loudspeaker systems are been developed
to warrant high performances as to meet the musical quality
precision, dynamic range and power handling capability
required by the digital sources.
These speakers, matched with a hi-fi stereo or Home Cinema
system, allow to recreate in your listening room the
enrapturing emotion of a live concert or the atmosphere of
a movie sound track, like at the cinema.
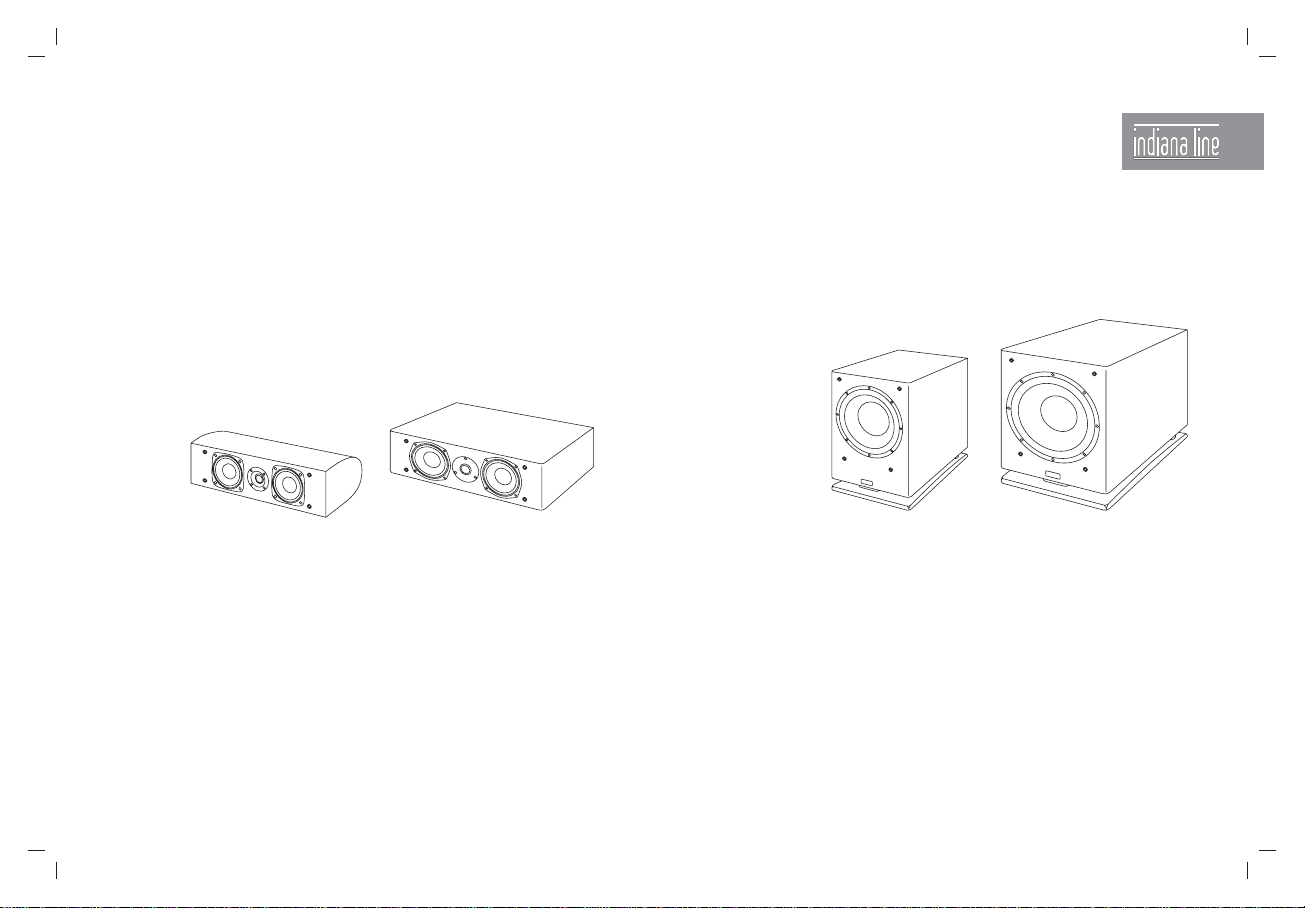
model Arbour C.3 Arbour C.4
speaker system 2-way, centre 2-way, centre
enclosure type bass-reflex bass-reflex
suggested amplifier 20÷80 watt 30÷100 watt
impedance 4÷8 ohm 4÷8 ohm
sensitivity (2.83 V/1m) 90 dB 92 dB
frequency response 60÷22000 Hz 53÷22000 Hz
woofer number 2 2
woofer diameter 90 mm 114 mm
tweeter dome diameter 20 mm 26 mm
dimension (WxHxD) 380 x 110 x 190 mm 430 x 130 x 260 mm
weight 3.5 Kg 5.6 Kg
colour cherry cherry
finishing real wood real wood
model Arbour S.8 Arbour S.10
speaker system active subwoofer active subwoofer
enclosure type bass-reflex bass-reflex
nominal power 100 watt 150 watt
max power 150 watt 200 watt
frequency response 35÷180 Hz 25÷180 Hz
crossover frequency 40÷180 Hz 40÷180 Hz
phase control 0/180° 0/180°
speaker diameter 210 mm 260 mm
power supply 220÷240 V (50 Hz) 220÷240 V (50 Hz)
dimension (WxHxD) 250 x 355 x 380 mm 300 x 400 x 400 mm
weight 12.2 Kg 19 Kg
colour cherry cherry
finishing real wood real wood
3
IT
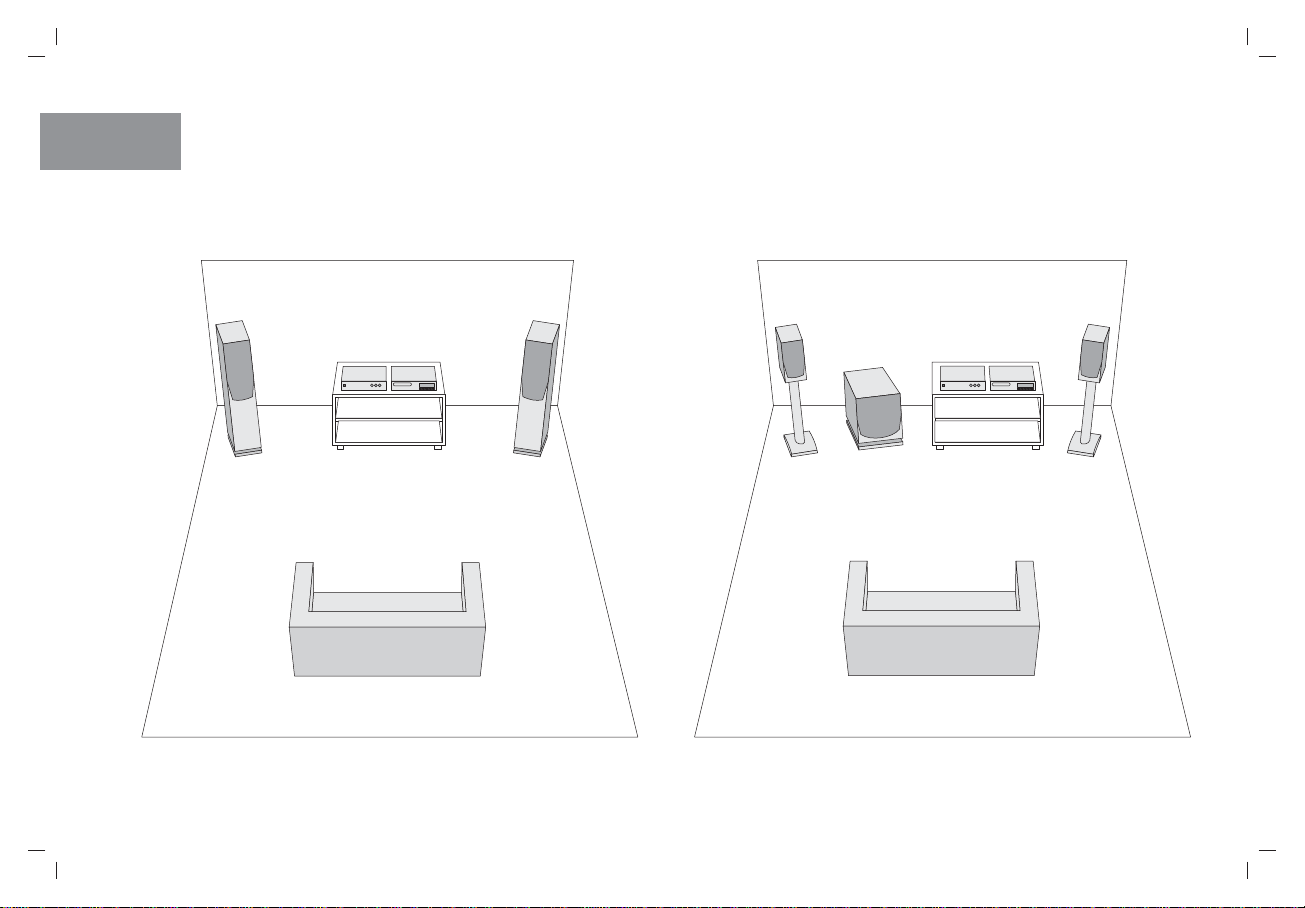
Sistema satelliti e subwoofer (2.1 canali)Sistema hi-fi stereo (2.0 canali)
4
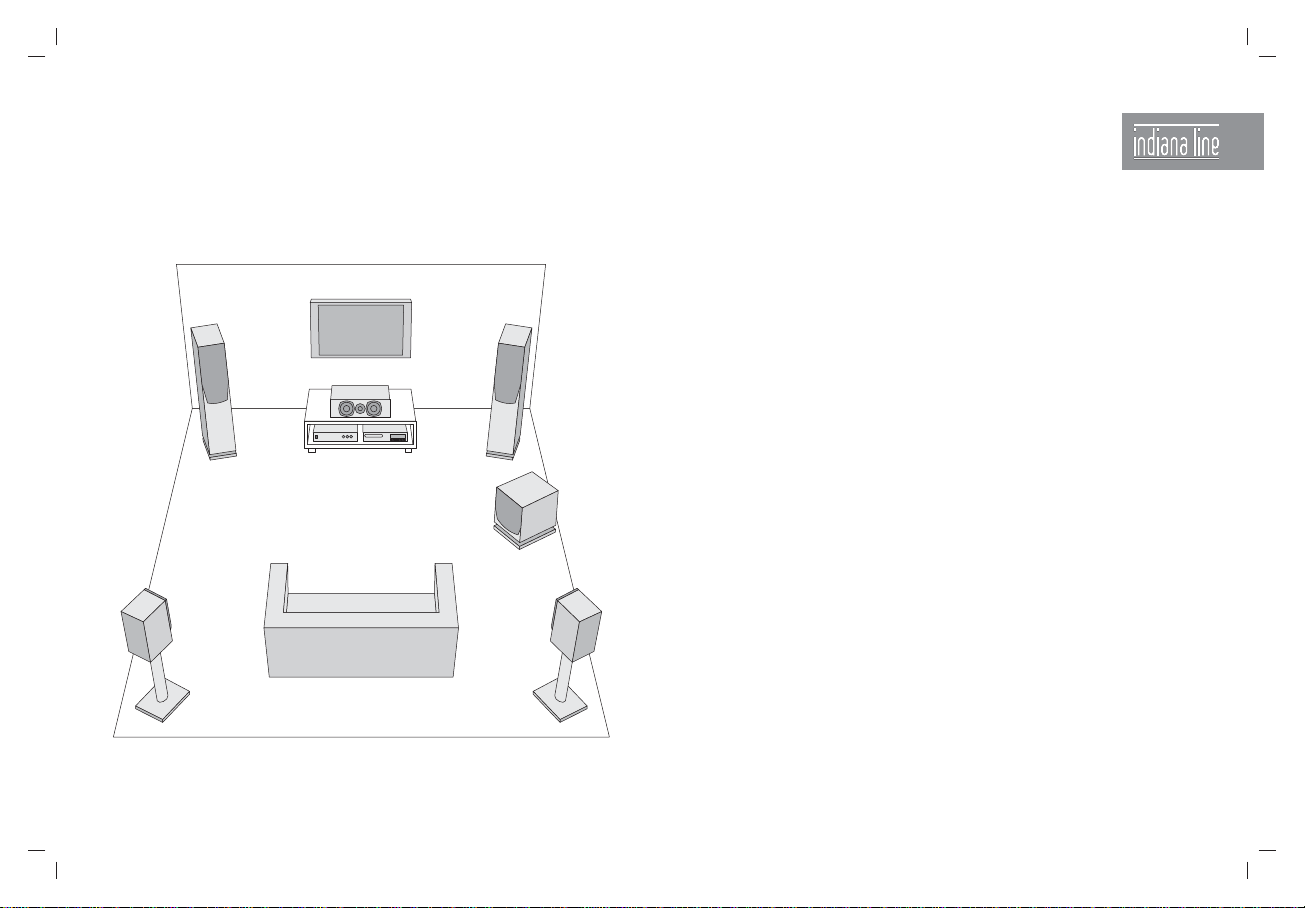
Sistema Home Cinema (5.1 canali)
Sistema hi-fi stereo (2.0 canali)
In un sistema stereo è necessario che la distanza tra i due
diffusori non sia inferiore ad un paio di metri.
Il punto d’ascolto ideale è posto al centro dei due diffusori,
ad una distanza pari a quella tra le due casse.
Sistema satelliti e subwoofer (2.1 canali)
La presenza di un subwoofer consente l’utilizzo di diffusori
di piccole dimensioni, senza rinunciare alle basse frequenze.
Per ottenere le massime prestazioni, è consigliabile posizionare
il subwoofer sulla stessa parete dei diffusori.
Sistema Home Cinema (5.1 canali)
La distanza tra i diffusori principali deve essere un paio di
metri; il canale centrale deve essere posizionato vicino al
televisore, subito sotto o sopra lo schermo; i diffusori posteriori
devono essere posizionati leggermente indietro rispetto la
zona d’ascolto; la posizione del subwoofer è indifferente.
5

IT
Leggete attentamente queste istruzioni prima di
installare il prodotto: vi aiuteranno ad ottenere le
migliori prestazioni.
I diffusori sono provvisti di griglia frontale per proteggere gli
altoparlanti. E’ possibile l’uso senza la griglia, ma raccomandiamo
questa protezione per evitare danni accidentali ai componenti.
Le particolari caratteristiche di progetto rendono i diffusori della
serie Arbour adatti a tutti gli amplificatori di buona qualità.
DISIMBALLAGGIO
Aprire la scatola, appoggiare per terra e rovesciare sotto-sopra
l’imballo, quindi sfilare la scatola con cautela.
Vi suggeriamo di conservare l’imballo originale: eventuali danni
da trasporto causati da un imballaggio non corretto non sono
coperti da garanzia, anche in caso di spedizione per assistenza.
INSTALLAZIONE
I modelli 4.06 e 5.06 sono bass-reflex con condotto esponenziale
posto nella parte inferiore del mobile: per il loro corretto
funzionamento è necessario fissare nelle apposite sedi i piedini
conici di cui è provvisto.
Per tutti gli altri modelli è bene utilizzare i gommini forniti in
dotazione, che rendono il box più stabile e lo isolano da eventuali
vibrazioni trasmesse attraverso il pavimento e/o lo scaffale.
Il modello 3.06
é dotato di staffa
di fissaggio a parete.
6
POSIZIONAMENTO
Tutti i diffusori della serie Arbour sono dotati di altoparlanti
schermati, possono pertanto essere posizionati in prossimità
di televisori senza disturbare l’immagine o alterare i colori.
Nel posizionare i diffusori, è importante tenere presente che le
caratteristiche acustiche del locale giocano un ruolo importante
nella riproduzione del suono:
• un ambiente con pochi mobili e/o grandi superfici vetrate
incrementa le alte frequenze;
• un ambiente con molti mobili e/o tappeti/tendaggi assorbe
le alte frequenze;
• avvicinando un box ad una parete o ad un angolo si
rinforzano le basse frequenze;
• è consigliabile mettere i diffusori ad una distanza minima
di 20 centimetri dai muri;
• porre i diffusori da scaffale ad una altezza di 60÷80
centimetri dal pavimento;
• porre il canale centrale il più vicino possibile al televisore,
indifferentemente sotto o sopra lo schermo;
• non inserire i diffusori all’interno di nicchie, ciò potrebbe
alterare la risposta in frequenza; se questa sistemazione
non può essere evitata, posizionare la parte anteriore del
box fuori dalla nicchia.

COLLEGAMENTO DIFFUSORI
Collegare i diffusori all’amplificatore, rispettando le polarità.
Eventuali errori di fase (inversione di polarità) possono influire
negativamente sulle prestazioni del sistema audio.
Abitualmente il colore rosso e/o il segno “+” indicano il positivo,
il colore nero e/o il segno “-” indicano il negativo.
Utilizzare cavi di sezione adeguata, come da tabella.
MESSA A PUNTO
Prima di effettuare la messa a punto del sistema, controllate
nuovamente tutti i collegamenti e le polarità.
Fate riferimento al manuale di istruzioni del vostro amplificatore
Home Cinema per regolare i livelli dei diffusori e/o per eventuali
ulteriori controlli. Utilizzando i diffusori 3.06, impostate il vostro
amplificatore su “small speaker”.
Spostate i diffusori all’interno della stanza per individuare
la posizione che fornisce le migliori prestazioni, anche
piccoli cambiamenti possono fornire grandi differenze
acustiche.
Inoltre, provate a ruotare i diffusori per individuare la posizione
che offre la migliore immagine acustica.
RODAGGIO
Il suono di tutti i diffusori migliora con il tempo: le prestazioni
ottimali si ottengono solo dopo alcune decine di ore di ascolto.
MANUTENZIONE
Generalmente, il cabinet ha solo bisogno di essere spolverato; se
necessario, limitatevi ad utilizzare un panno umido. La tela di
protezione può essere pulita con una normale spazzola da abiti,
dopo averla rimossa dal cabinet. NON toccate gli altoparlanti, in
particolare il tweeter, perché si possono danneggiare.
7

IT
Arbour S.10
ACTIVE SUBWOOFER
POWER LED
PHASE
180°
0°
OFF AUTO ON
POWER
VOLUME
CONTROL
MIN MAX
CROSSOVER
FREQUENCY
LINE
LINE
IN
OUT
R
18040 Hz
L/mono
1
2
Arbour S.8
ACTIVE SUBWOOFER
LINE
IN
R L/mono
VOLUME
CONTROL
CROSSOVER
FREQUENCY
3
6952 3 4 1
LINE
OUT
MIN MAX 18040
Hz
4
T
220-240 VAC
50 Hz
1.6A 250V
ATTENZIONE
Rischio di scosse
elettriche! Non
aprire il diffusore.
CAUTION
Risk of electrical
shock! Do not
open the cabinet.
0°
180°
PHASE POWER
POWER LED
serial number
OFF
AUTO
ON
8
5
6
7
8
9
T
1 A 250V
220-240 VAC
50 Hz
78
ATTENZIONE
Rischio di scosse
elettriche! Non
aprire il diffusore.
CAUTION
Risk of electrical
shock! Do not
open the cabinet.
serial number

COLLEGAMENTI DEL SUBWOOFER
Effettuare tutti i collegamenti prima di allacciare il cavo di rete.
Se il vostro amplificatore è dotato di uscite di segnale stereo,
collegatele con un cavo schermato (RCA) agli ingressi 1 LI NE
IN del subwoofer, rispettando i canali “R” e “L”.
Se il vostro amplificatore è dotato di una sola uscita monofonica
(subwoofer/LFE), collegatela con un cavo schermato (RCA)
all’ingresso 1 LINE IN L/mono del subwoofer.
E’ possibile collegare un eventuale amplificatore o subwoofer
amplificato alle uscite 4 LINE OUT, dove é presente lo stesso
segnale applicato agli ingressi 1 LINE IN.
Regolate la frequenza di taglio del subwoofer con il
controllo 3 CROSSOVER FREQUENCY: posizionate la
manopola al centro della sua escursione e ruotatela
sino ad individuare la posizione adatta al vostro impianto
ed all’ambiente d’ascolto.
Regolate il livello delle basse frequenze con il controllo 2
VOLUME CONTROL, scegliendo la posizione adatta al vostro
impianto ed all’ambiente d’ascolto.
Il corretto rapporto di fase tra i satelliti ed il subwoofer dipende
dal posizionamento in ambiente dei diffusori: provate a cambiare
la fase (0°/180°) agendo sul deviatore 5 PHASE, quindi scegliete
la posizione adatta al vostro impianto ed all’ambiente d’ascolto.
Collegate l’alimentazione 7 ad una presa di rete 220-240 Volt.
USO DEL SUBWOOFER
Posizionate il deviatore 6 POWER su “AUTO” (led 9 di colore
rosso). Il subwoofer entra in funzione automaticamente in
presenza di segnale (led 9 di colore verde) e ritorna in condizione
di riposo dopo quindici minuti di assenza del segnale stesso.
Se desiderate disattivare il subwoofer, posizionate il deviatore
6 su “OFF” (led 9 di colore rosso).
Posizionando il deviatore 6 POWER su “ON”, il subwoofer è
sempre in funzione (led 9 di colore verde).
Nel posizionare il subwoofer, è importante tenere presente che
la distanza dalle pareti gioca un ruolo importante sulle sue
prestazioni: provate a spostare il box per individuare la miglior
posizione.
Posizionare il subwoofer lontano da fonti di calore, polvere e
umidità. Evitare di coprire il subwoofer. Nel caso sia necessario,
sostituire il fusibile 8 con uno di eguale valore, altrimenti la
garanzia viene meno e si potrebbe danneggiare il subwoofer.
Per evitare scosse elettriche, non aprire il cabinet prima di aver
scollegato il cavo dalla presa di corrente. Nel caso di lunghi
periodi di inattività, scollegare il cavo dalla presa di corrente.
9

GB
10
Hi-Fi system with subwoofer (2.1 channels)Hi-Fi stereo system (2.0 channels)

Home Cinema system (5.1 channels)
Hi-Fi stereo system (2.0 channels)
The right distance between the two loudspeakers have to be
not closer than a couple of meters.
The ideal listening area is at the centre of the speaker systems,
at an equal distance from the boxes.
Hi-Fi system with subwoofer (2.1 channels)
Using a subwoofer, it is possible to achieve the low frequencies
with small size speaker systems too.
T o reach the best performances, the right subwoofer positioning
is on the same wall of the loudspeakers.
Home Cinema system (5.1 channels)
The distance between the main loudspeakers have to be a
couple of meters; the centre speaker should be placed close
to the television, just above or below the screen; the rear
speakers have to be placed a bit at the back of the listening
area; the subwoofer positioning makes no difference.
11

GB
Please read carefully these instructions before setting
up your loudspeakers: you will be able to obtain the
best performances.
The speakers are equipped with a front grille to protect drivers.
It is possible to use them without this grille, but we recommend
this protection to prevent accidental damage to the drivers.
The special project features make the Arbour loudspeakers
suitable for all the good quality amplifiers.
UNPACKING
Open the box and invert the carton with contents, then remove
the carton with care.
We suggest you to retain the original packing for future use:
the freight damages due to incorrect packaging shall not be
covered by the warranty, in the event of servicing too.
INSTALLATION
The 4.06 and 5.06 models are a bass-reflex system with the
exponential tube on the bottom side of the box: for a right
running it is necessary to screw in the supplied conical feet to
the inserts under the cabinet.
Fix the supplied self-adhesive pads to the base of all other
models to ensure more stability of the speakers, while limiting
resonance coming from ground and/or shelf.
The 3.06 model
is equipped by a
wall mounting bracket.
12
POSITIONING
All the Arbour speakers are equipped with shielded drivers,
hence they can be located near to the television, without giving
rise to image distortion or colour change.
Positioning speakers in a room, please remember that the
acoustical characteristics of the listening room play an important
role in the sound quality:
• a room with not much furniture and/or with large windows
increases the high frequencies;
• a room with a lot of furniture and/or carpets/curtains
decreases the high frequencies;
• moving a speaker close to a wall or a corner will increase
the level of low frequencies;
• we suggest to place the speaker at least 20 centimetres
from the walls;
• we suggest to place the bookshelf speaker at 60÷80
centimetres from the floor;
• place the centre speaker close to the television, just above
or below the screen;
• do not place the speaker in a niche: the frequency response
can be changed; if this location cannot be avoid, put the
front panel of the speaker outside the niche.

SPEAKER LINKING
Link the speakers to the amplifier, keeping the polarities. In the
event of wrong phase (opposite polarity) can reduce the
performances of the audio system.
Usually the positive is marked with the red colour and/or the
“+” sign, the negative with the black colour and/or the “-” sign.
Use right gauge cables, as on table.
FINE TUNING
Before fine tuning, please check that all the connections in the
installation are correct and the polarities too.
Follow the instruction manual of your Home Cinema amplifier
to adjust the speaker levels and/or further controls. By using
the 3.06 speakers, set your amplifier on “small speaker”.
T o locate the position supplying the best performances,
try to move the speakers inside your listening room,
even small differences can supply important acoustical
changes.
As well, try to rotate the speakers to find the position offering
the right acoustical scene.
RUNNING-IN
The sound of all speakers improves with the time: the better
performances can be matched just after several hours of
listening.
AFTERCARE
Usually, the cabinet only requires dusting; if needed, just use
at damp cleaning cloth. The protection grille fabric may be
cleaned with a normal clothes brush, while the grille is detached
from the cabinet. Do NOT touch the loudspeakers, especially
the tweeter, as damage may easily result.
13

GB
Arbour S.10
ACTIVE SUBWOOFER
POWER LED
PHASE
180°
0°
OFF AUTO ON
POWER
VOLUME
CONTROL
MIN MAX
CROSSOVER
FREQUENCY
LINE
LINE
IN
OUT
R
18040 Hz
L/mono
14
LINE
IN
LINE
OUT
T
220-240 VAC
1.6A 250V
ATTENZIONE
Rischio di scosse
elettriche! Non
aprire il diffusore.
R L/mono
50 Hz
CAUTION
Risk of electrical
shock! Do not
open the cabinet.
VOLUME
CONTROL
MIN MAX 18040
0°
180°
PHASE POWER
POWER LED
serial number
CROSSOVER
FREQUENCY
Hz
OFF
AUTO
ON
1
2
3
4
5
6
7
8
9
T
1 A 250V
220-240 VAC
50 Hz
6952 3 4 1
Arbour S.8
ACTIVE SUBWOOFER
78
ATTENZIONE
Rischio di scosse
elettriche! Non
aprire il diffusore.
CAUTION
Risk of electrical
shock! Do not
open the cabinet.
serial number

SUBWOOFER CONNECTIONS
Make all connections before connect the power supply cord.
If your amplifier is equipped with stereo signal outputs, link
them by using a shielded cable (RCA) to the 1 LINE IN subwoofer
inputs, keeping the “R” and “L” channels.
If your amplifier is just equipped with mono signal output
(subwoofer/LFE), link it by using a shielded cable (RCA) to the
1 LINE IN L/mono input of the subwoofer.
By using the 4 LINE OUT a (possible) amplifier or active
subwoofer can be linked; the same signal of the 1 LINE IN is
present on the 4 LINE OUT.
Adjust the cut frequency of the subwoofer by the
3 CROSSOVER FREQU ENCY control: put the knob
to the centre of its excursion and turn it until you
find the right position for your system and for the
listening room.
Adjust the bass frequencies level by the 2 VOLUME CONTROL,
choosing the right position for your system and for the listening
room.
The right phase relation between loudspeakers and subwoofer
depends on the boxes placement inside the room: try to change
the position of 5 PHASE switch (0°/180°), then choose the right
one for your system and for the listening room.
Connect the power supply 7 to a 220-240 Volt socket.
SUBWOOFER USE
Set the 6 POWER switch to the “AUTO” position (red-coloured
9 led). The subwoofer automatically switch-on as soon as a
signal is present (green-coloured 9 led) and turn to the standby mode about fifteen minutes after the signal is not present.
If you would like turn-off the subwoofer, set the 6 POWER switch
to the “OFF” position (red-coloured 9 led).
Setting the 6 POWER switch to the “ON” position, the subwoofer
is always running (green-coloured 9 led).
Placing the subwoofer, please remember that the distance from
the walls plays an important role on its performances: try to
move the box to find the right position.
Place the subwoofer in a location away from heat sources,
dust and moisture. Do not cover the subwoofer. If you
experience blown the 8 fuse, replace it with same type one;
doing otherwise, the warranty will avoid and the subwoofer
can be damaged. To prevent electrical shocks, do NOT open
the cabinet before having disconnected the power cord.
Disconnect the power cord in case of a long inactivity.
15

GARANZIA
La Coral Electronic garantisce le caratteristiche ed il perfetto funzionamento di questo apparecchio.
Qualora tuttavia, per un qualsiasi motivo non imputabile ad uso improprio, erronea installazione o manomissione, esso
dovesse presentare difetti di funzionamento, l’acquirente potrà usufruire dell’assistenza tecnica gratuita per il periodo di
due anni dalla data di acquisto, certificata dal documento di vendita.
In caso di necessità, l’acquirente consegnerà l’apparecchio accuratamente imballato, preferibilmente nell’imballo originale,
al rivenditore presso il quale è stato effettuato l’acquisto, che provvederà all’inoltro al nostro centro assistenza. In alternativa,
l’acquirente potrà inviare a proprie spese l’apparecchio direttamente al nostro laboratorio. In ogni caso l’apparecchio dovrà
essere accompagnato dal documento di vendita.
Prima di usufruire del servizio assistenza, oppure in caso di dubbi relativi al funzionamento ed all’utilizzo dell’apparecchio,
consigliamo di rileggere attentamente le istruzioni.
WARRANTY
Coral Electronic guarantees characteristics and perfect operation of its products. Coral Electronic will replace those parts
which should prove defective within two years from the date of purchase, certified by the sales receipt. The warranty is
void in case of misuse or illegal opening. For more details, please contact the official distributor in your country.
Indiana Line is a brand of Coral Electronic - 10090 Rivoli - Torino - Italy - www.coralelectronic.com
RICICLAGGIO • Al termine della durata, il presente prodotto deve essere smaltito in modo ecologico, in conformità alla legislazione vigente. Il simbolo del bidone
della spazzatura barrato indica che il presente prodotto rientra nell’ambito della Direttiva UE “Rifiuti di apparecchiature elettriche ed elettroniche” (RAEE) e della
Direttiva UE “Restrizione dell’uso di determinate sostanze pericolose nelle apparecchiature elettriche ed elettroniche” (ROHS), non ne è quindi consentito lo
smaltimento insieme ai rifiuti domestici.
RECYCLING • At end of life, you must ensure that this product is disposed off in accordance with the laws in force in your country. The crossed-out wheelie bin
symbol means that this product falls under the scope of the E.U. “Waste Electrical and Electronic Equipment” (WEEE) directive and “Restriction Of the use of certain
Hazardous Substances in electrical and electronic equipment” (ROHS) directive and should not be disposed off with your household waste.
Ci riserviamo il diritto di modificazioni senza preavviso. Decliniamo ogni responsabilità per eventuali errori o imprecisioni.
We reserve the right to change the specifications without notice. We decline each liability for any mistake or inaccuracy.
 Loading...