

Index Braille EVEREST Series User Manual

Verson 8.20/9.20
Manual Index Everest
Table of contents
January 2000
1. Unpacking 3
1.1 Unpacking instructions 3
1.2 Unpacking checklist 4
1.3 Safety instructions 4
2. Before start printing 5
2.1 How to use this manual 5
3 Operating the printer 5
3.1 How to start up 5
3.1.1 Loading paper 5
3.1.2 Document guide position 6
3.1.3 Paper support position 6
3.1.4. Paper length setting 6
3.1.5 Paper sensor calibration 6
3.1.6 Computer connection 6
3.1.7 Serial communication cable 6
3.1.8 Communication parameters 6
3.2 Front panel 7
3.2.1 Start embossing 7
3.3 Default setup 7
3.4 Setup 7
3.4.1 Number of printed pages 7
3.5 Flow schematic for Setup 8
4 The sheet feeder 9
4.1 General function 9
4.2 Paper quality 9
4.3 Loading the sheet feeder 10
4.3.1 Random double-feed 11
4.3.2 No paper feed. 11
5. Front panel 12
5.1 Standard commands 12
5.1.1 On/off line 12
5.1.2 Form Feed 12
5.1.3 Help 12
5.2 Print mode 13
5.2.1 Double sided 13
5.2.2 Single sided 13
5.2.3 Normal 13
5.2.4 Reformatted 13
5.2.5 Split page 14
5.3 Copy 14
5.3.1 Multiple 14
5.3.2 Repeat 14
5.3.3 Load buffer 14
6. Setup commands 15
6.1 Default setup = A/B/C 15
6.2 Setup 15
6.2.1 Change Setup 15
6.2.2 Setup keys 15
6.2.2.1 Group 15
6.2.2.2 Item 15
6.2.2.3 Value 15
6.2.2.3.1 Page layout information 15
6.3 Change Setup 16
6.3.1 Braille code 16
6.3.2 Serial communication 16
6.3.3 Page layout 16
6.3.3.1 Characters per line 17
6.3.3.2 Left margin 17
6.3.3.3 Binding margin 17
6.3.3.4 Top margin 17
6.3.3.5 Bottom margin 17
6.3.3.6 Line distance 17
6.3.3.7 Page mode 17
6.3.3.8 Print mode 17
6.3.3.9 Page number 17
6.3.3.10 Page layout Guideline 18
6.3.4 Options 18
6.3.4.1 Word wrap 19
6.3.4.2 Auto line-feed 19
6.3.4.3 Form Feed 19
6..4.4 Volume 19
6.3.4.5 Impact level 19
6.3.4.6 Delay time 19
6.3.4.7 Print quality 19
6.3.4.8 Graphic dot distance 19
6.3.4.9 Text dot distance 19
6.3.4.10 Set up 19
Sir N D:\PM-filer\Manualer\Edeng810.P65
Index Braille
Page 1

January 2000 Verson 8.20/9.20
Manual Index Everest
7 Support CD 20
7.1 CD contents 20
7.2 Start the CD 20
7.3 WinBraille system 20
7.3.1 Install WinBraille 21
7.3.2 Install printer driver for WinBraille 21
7.4 Embosser software installation. 22
7.4.1 Firmware upgrade 22
7.4.2 Select language 22
7.4.3 Set embosser in upgrade mode 23
7.4.4 Firmware transfer 23
7.4.5 Software Installation from CD. 24
7.4.6 Support Software for Everest 24
7.4.7 Paper sensor calibration 24
7.5 WinBraille 25
7.5.1 Start WinBraille 25
7.5.2 Register WinBraille 25
7.5.3 Upgrade WinBraille 25
8 Control sequences 26
8.1 Pro-printer emulation 26
8.2 Defined codes 27
8.3 ESC Sequences - Index commands. 27
8.4 VersaPoint graphic 27
8.5 Multiple copies selection by
ESC sequences 27
8.6 Changes in setup from computer 28
8.6.1 Change setup by ESC-sequences 28
8.7 Page numbering selection by
ESC sequences 31
8.8 Remaining copies to print 31
8.9 Transparent mode 31
8.10 Power on commands 32
8.10.1 Self test 32
8.10.2 Factory setting 32
8.10.3 Transport mode 32
8.10.4 Upgrade mode 32
8.11 Fault messages 33
8.11.1 Failure "No reference-pulse" 33
8.11.2 Failure Paper length fault 33
8.11.3 Failure Paper jam 33
8.11.4 Failure 140 - invalid setup command33
8.11.5 Failure invalid setup value 33
8.11.6 Failure 160 - EEPROM failure 33
8.11.7 Failure 170 - Printer buffer exceeded 33
9 Serial communication cables 33
9.1 Serial cable Everest-IBM 33
10. ASCII-table 34
Index 35
Page 2
Index Braille
Verson 8.20/9.20
Manual Index Everest
INDEX EVEREST
Interpoint Braille Embosser
USER manual
January 2000
1. Unpacking
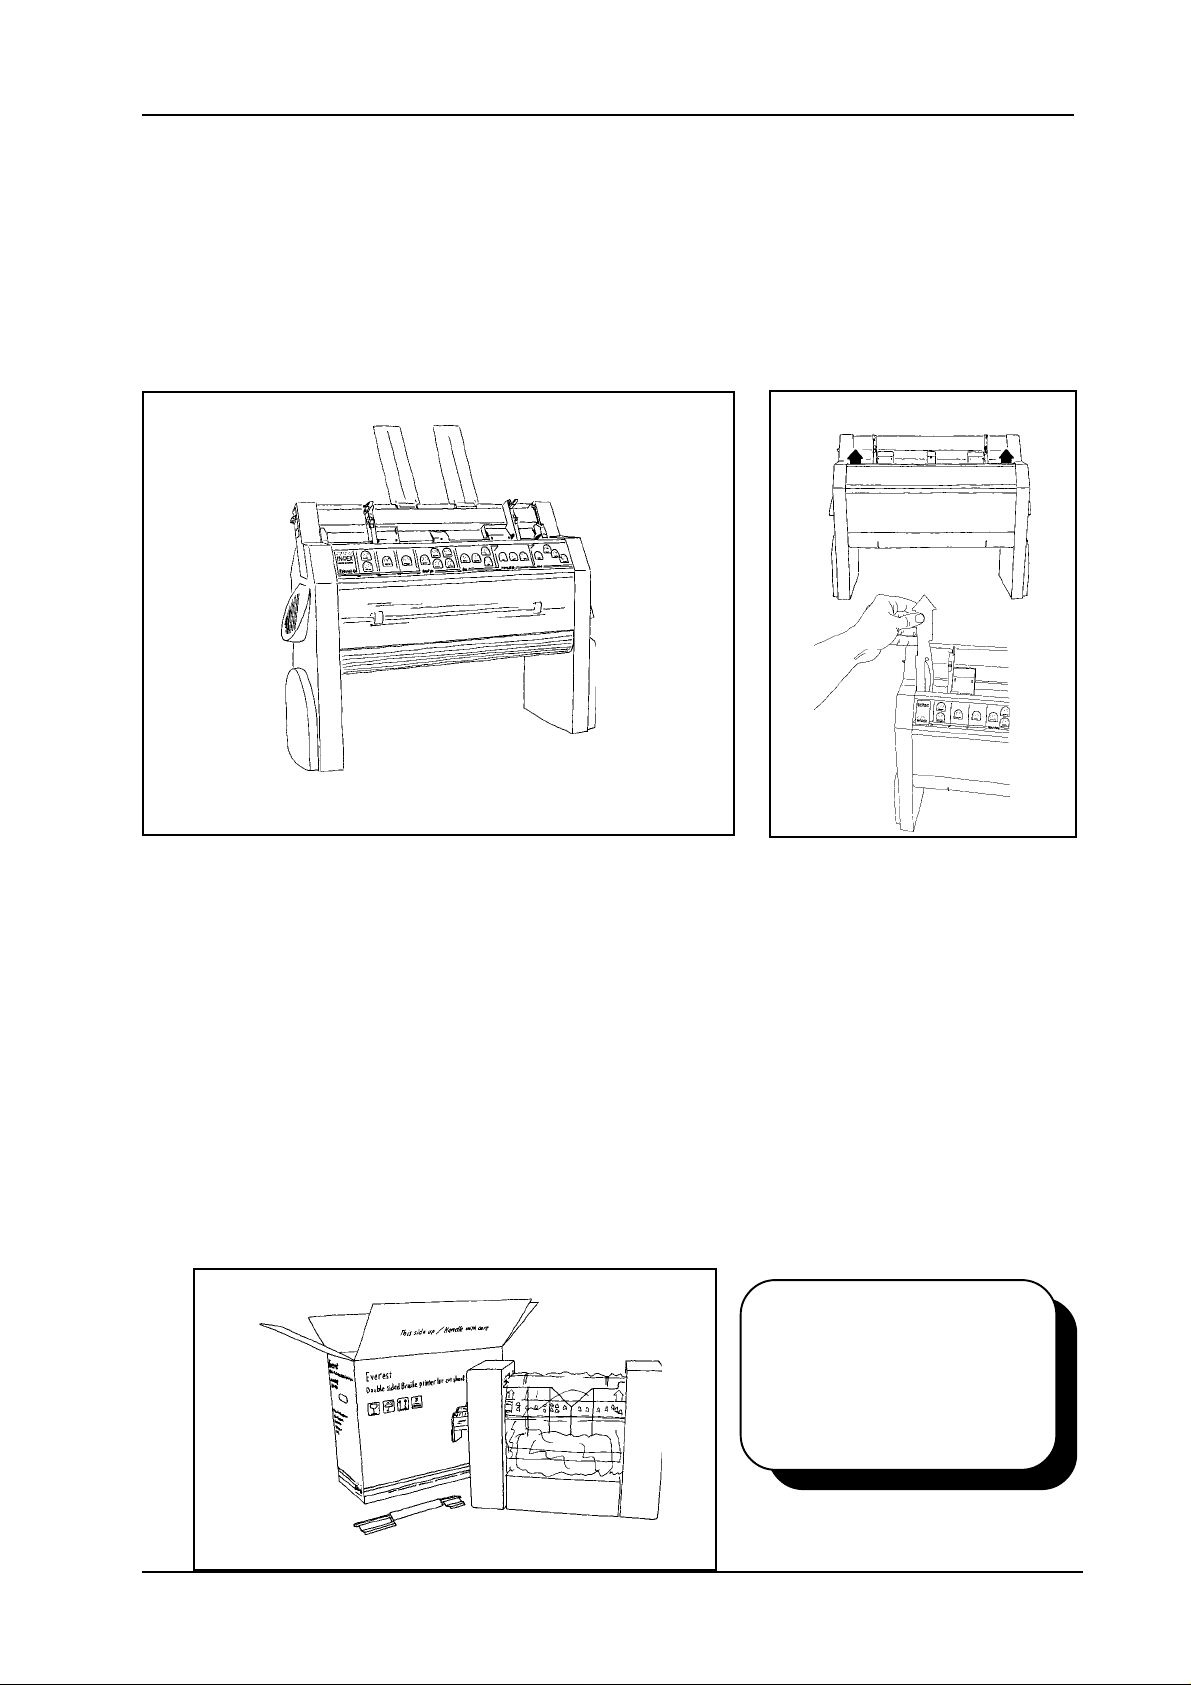
1.1 Unpacking instructions
Take the printer up from the box. Remove the two print-head transport locking, red coloured
plastics, placed inside the sheet feeder. Save the transportation material.
Note! When shipping the printer, it is important to replace the printing head lockers and use the
original packing!
Before installing the printer make sure that there is no visible damage to the printer and that the
delivery is complete. If you encounter any problems, contact your dealer.
PLEASE DO
NOT DISCARD
THE ORIGINAL
PACKAGING.
Index Braille
Page 3
January 2000 Verson 8.20/9.20
Manual Index Everest
1.2 Unpacking checklist
Index Everest Braille Embosser
Cables
Paper Supports and Sound cover
Everest user manual ink print
Installation CD
Braille paper
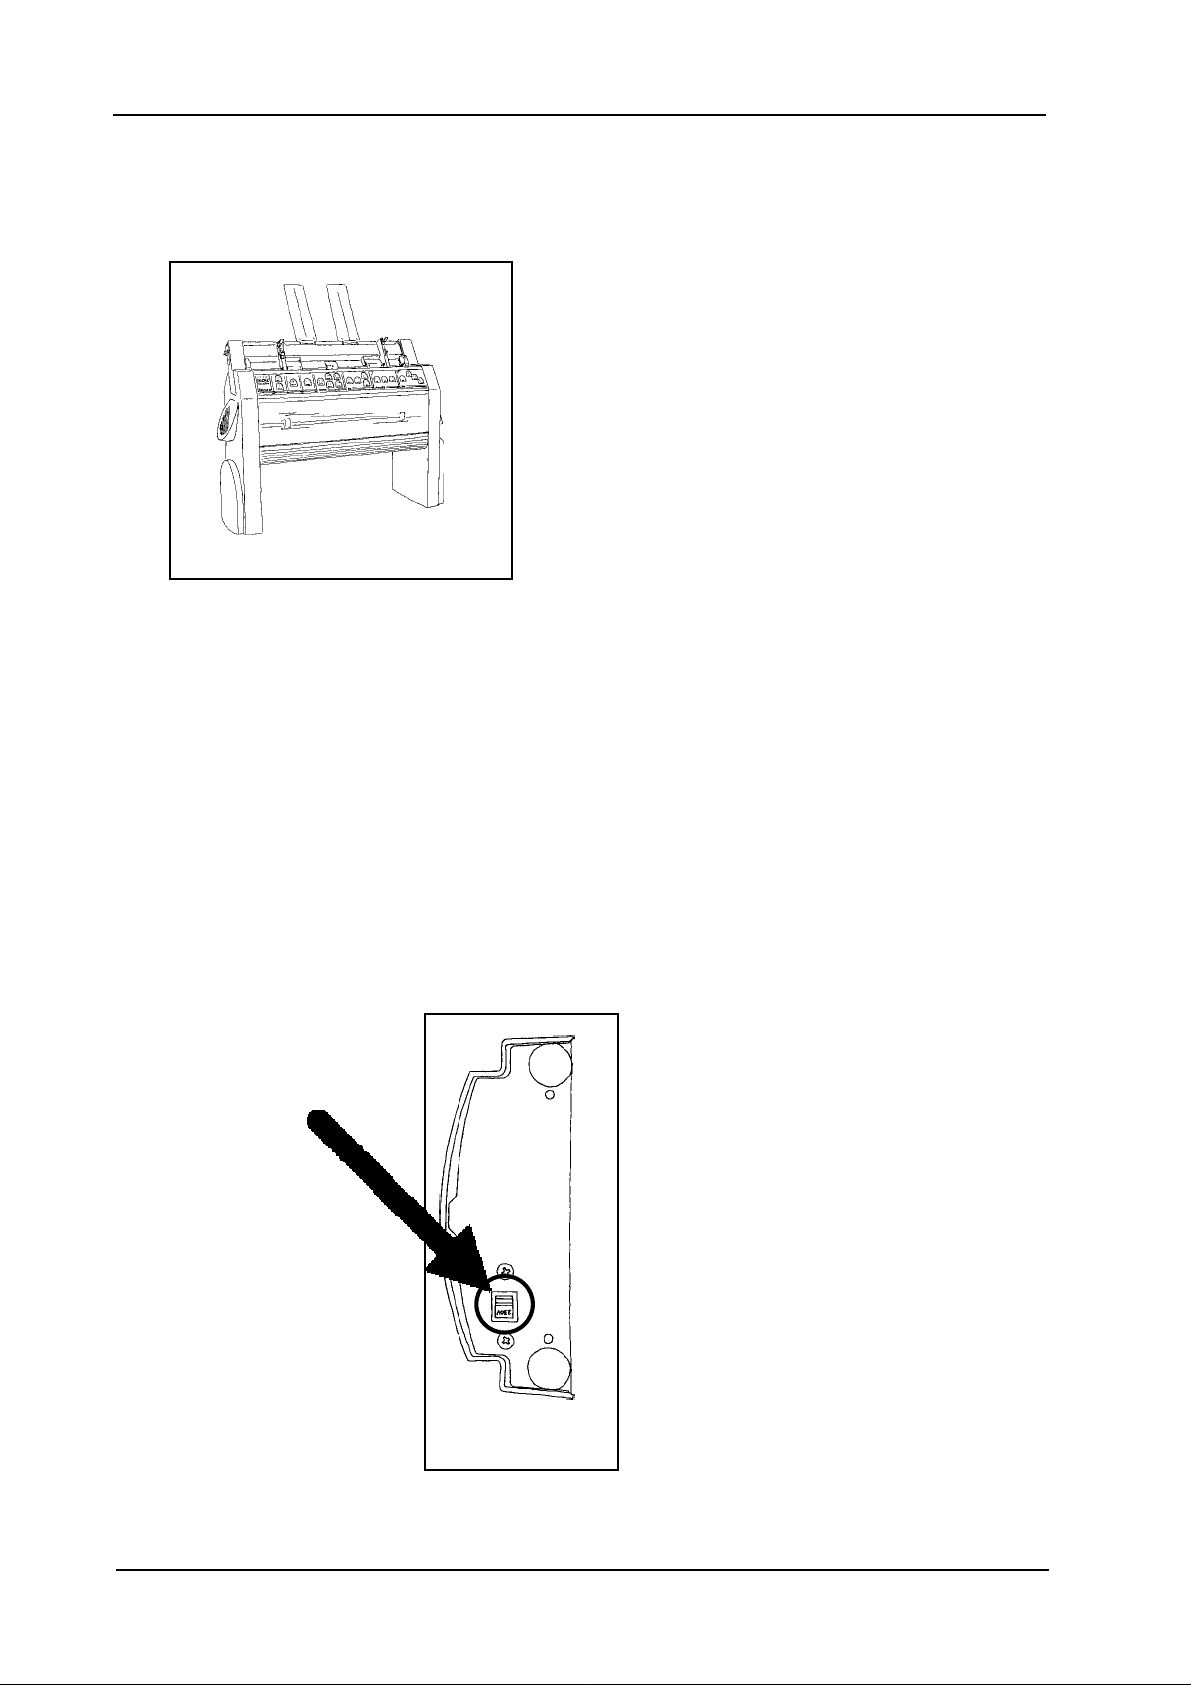
1.3 Safety instructions
Before power on, make sure that the voltage selection switch is set for the
correct value. The switch is located under the left leg of the printer.
Page 4
Index Braille
Verson 8.20/9.20
Manual Index Everest
January 2000
2. Before start printing
2.1 How to use this manual
This manual is organised in 10 chapters.
Chapters 1-3 contains basic information install the printer.
We recommend that you read these chapters before you start the printer.
Chapters 4-7 includes detailed information about the different functions of the Everest.
Chapter 8 is an appendix of ESC control sequences.
Chapter 9 contains information about different communication cables.
Chapter 10 is a complete ASCII table based on the IBM 437 standard table.
3 Operating the printer
3.1 How to start up
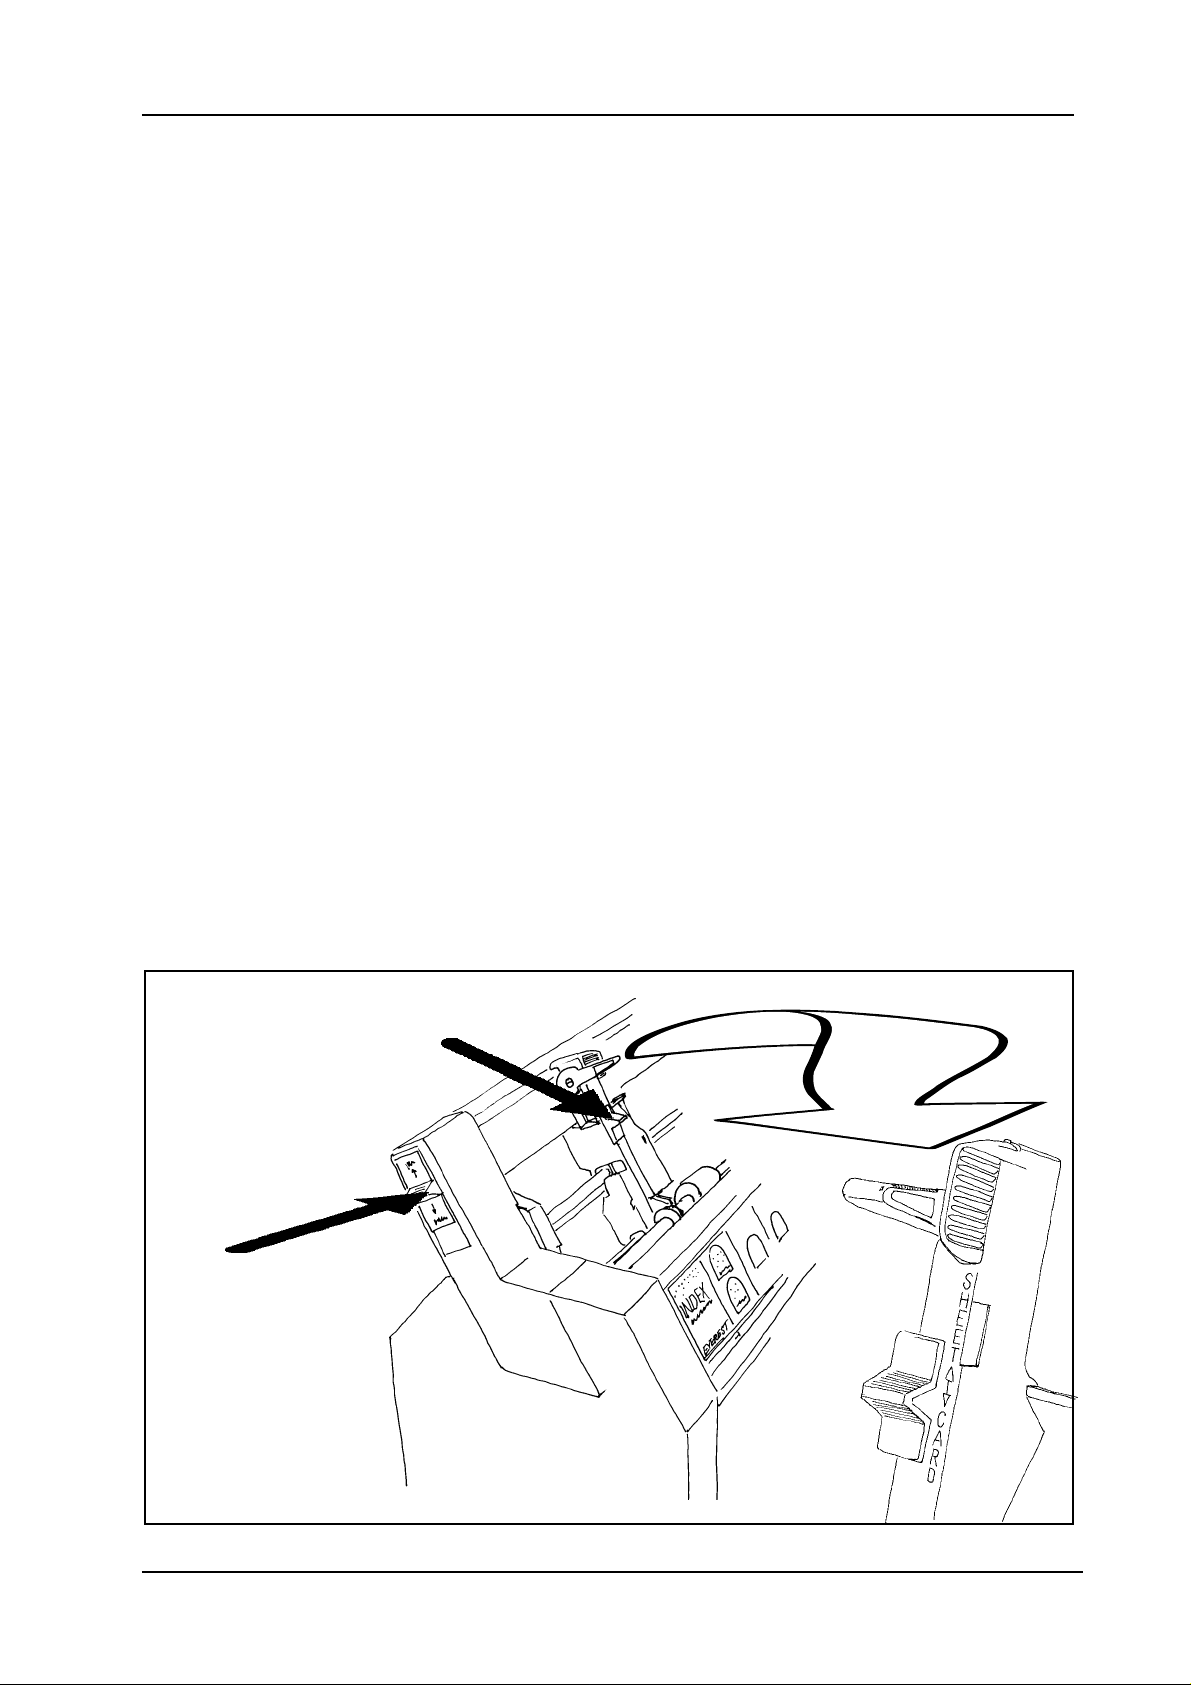
3.1.1 Loading paper
1. Release the pick-up rollers, by moving the control on the button on the side of the sheet feeder
upwards and fill it with paper.
2. Adjust the paper margins guides in the sheet feeder to the correct paper width and lock them,
with the lever on the top of each margin guide.
3. Set the Sheet/card selectors, located on the front of the paper margin guides in the correct
position. When using a more stiff paper like Braille paper, the sheet feeder should be in the
lower, card position, and when using softer paper like copy paper, the sheet feeder should be in
the upper, sheet position.
4. Do not overfill the paper magazine. Leave a space between the paper bin and the pick-up
rollers of about 1-2 mm before closing it.
Sheet / Card
selector
Open/close
sheetfeeder
Index Braille
Page 5

January 2000 Verson 8.20/9.20
Manual Index Everest
3.1.2 Document guide position
On the lower edge of the front panel cover there are two plastic document
guides. The correct position for these is to be lined up with the margin
guides and follow the side edges of the sheet, in order to lift the paper to
the correct position in the document stack.
Note! If the document guides are too close to the center or used together
with a stiff type of paper, it can cause paper jam.
3.1.3 Paper support position
The paper supports is used to keep the paper straight position to avoid multiple feeds.
On the top of the sheet feeder, there is a slot for the paper supports. Place the paper supports and
press them down into the slot so they are properly fixed and positioned at the margins of the
paper.
3.1.4. Paper length setting
The standard paper length for Everest is A4 (297 mm). If a paper with a different length should
be used, change the default paper length value by pressing the Form Feed. The printer will feed
one sheet of paper, in order to measure it and store the new value in the memory. The new length
will be stored until the next time the Form Feed key is pressed. Everest accepts all paper lengths
between 100-350 mm (4-14 Inch).
3.1.5 Paper sensor calibration
If the type of paper is changed, e.g. from a thick to a thin paper or from a dark to a light coloured
paper, the paper sensor has to be re-calibrated. Please refer to chapter 7.1.5, item A, B and C to
perform the paper calibration process.
The command to start the paper sensor calibration is ITEM + Power on.
3.1.6 Computer connection
Connect Index Everest to the computer with the Serial or Centronics interface. In stand-by mode,
both ports are open to recieve information.
3.1.7 Serial communication cable
Everest is equipped with a 9 pin female (D-sub) on the serial interface, and a standard centronics
connector for the centronics interface.
Serial Pin configuration:
2=RXD in, 3=TXD out, 4=DTR out, 5=GND, 6=DSR in, 7=RTS out, 8=CTS in.
Transmitting parameters (factory setting) are:
Baud Rate=9600, Data Bits=8, Parity=N, Stop Bits=1, Handshake=DTR hardware handshake.
3.1.8 Communication parameters
The communication parameters on the serial-port and centronics port on your PC are normally
set with the following command in the AUTOEXEC.BAT file.
MODE COM1:9600,N,8,1,P
MODE LPT1:,,P
Page 6
Index Braille

Verson 8.20/9.20
Manual Index Everest
January 2000
3.2 Front panel
The control panel and user logic on the Everest is designed to make the use and installation of
the printer as easy and efficient as possible. All the keys are marked both in Braille and ink print,
and organised in clearly marked modules. The user is guided by digitised speech.
Note! WinBraille will overtake all commands from the front panel. The commands on the front
panel are applicable only when the embosser is connected to a DOS operated computer or
together with a Braille editor working in Windows, controlling the embosser with a text based
driver, e.g. Duxbury.
3.2.1 Start embossing
Connect the printer to your computer, load the paper and turn it on. Everest is ready for use with
the default factory settings.
3.3 Default setup
To change the active default setup, press the DEFAULT SETUP KEY A, B or C. Each setup can
be individually set for different user preferences.
3.4 Setup
If you need to change the setup parameters use the front panel.
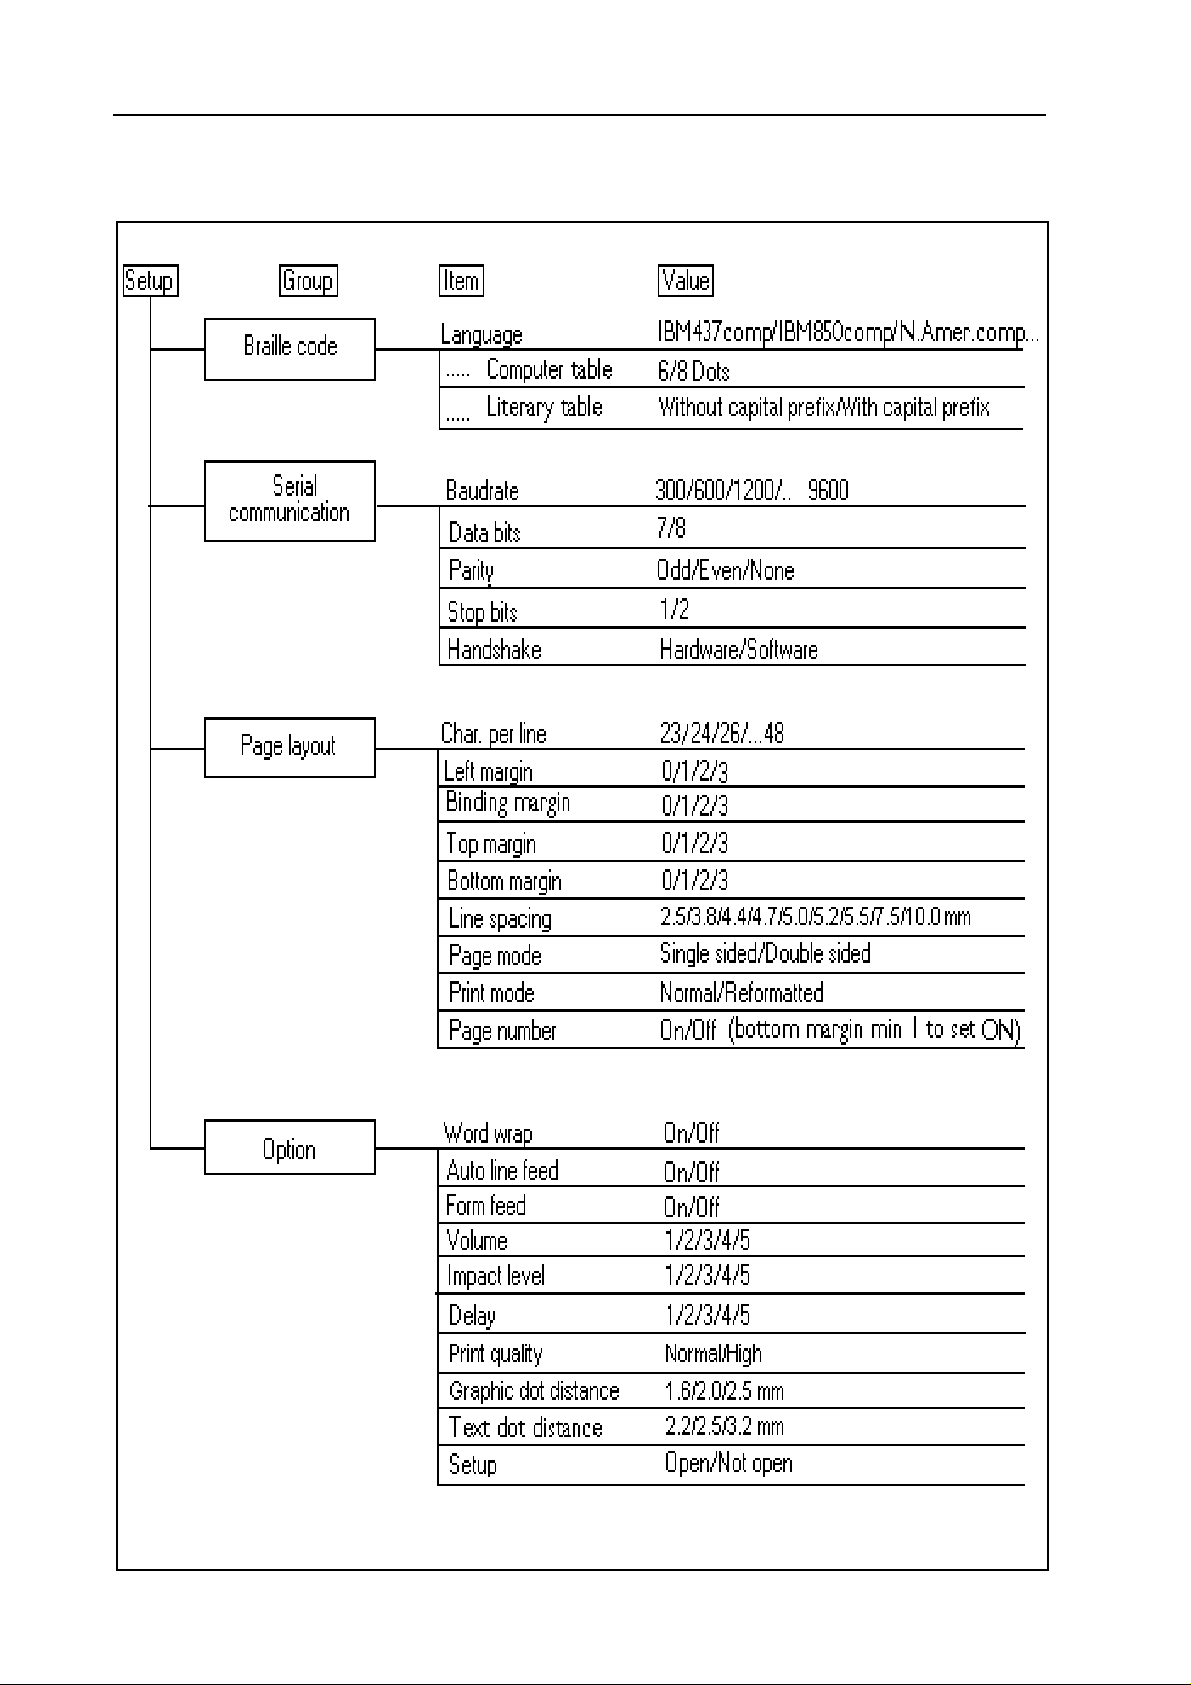
To start the setup sequence press SETUP. In setup mode you can change and save all parameters
in the group: BRAILLE CODE, SERIAL COMMUNICATION, PAGE LAYOUT and OPTION.
3.4.1 Number of printed pages
Press the key ITEM in stand by mode to get a spoken message of the total number of printed
pages.
Index Braille
Page 7
January 2000 Verson 8.20/9.20
Manual Index Everest
3.5 Flow schematic for Setup
Page 8
Index Braille
Verson 8.20/9.20
Manual Index Everest
January 2000
4 The sheet feeder
4.1 General function
The sheet feeder is designed to use paper in the weight range of 70-200 gsm. (grams per square
metre) Perfect function (a fault frequency maximum 1/1000) requires a paper suitable for the
printer, and a correctly installed sheet feeder. The experience we have from thousands of
Everest’s on the market, indicates that 80% of all good quality paper works perfectly with the
Everest.
4.2 Paper quality
There are a number of different paper qualities on the market which are labelled “Braille Paper”.
Normally they are in the range of 70-180 gsm (20-100 Pound).
To determine if the paper quality is suitable for the Everest check the following details:
a) The paper is properly cut. There should be a smooth and even surface when you feel with your
finger along the cutting edge of the paper.
b) Never use separated fan fold paper. The edges of this paper are very bad and can result in
double-feeding, or not feeding at all.
c) The paper must be a clean, with no holes or perforations on the sheet. Holes and perforation
are normally made with a punch, and as a result sheets can “stick” together.
d) Check that the surface of the paper has a texture similar to normal copy paper. The roughness
of the surface affects the difference between gliding and standing friction and is necessary for
proper function. The paper should not have a shiny or glossy surface. (Similar to playing cards.)
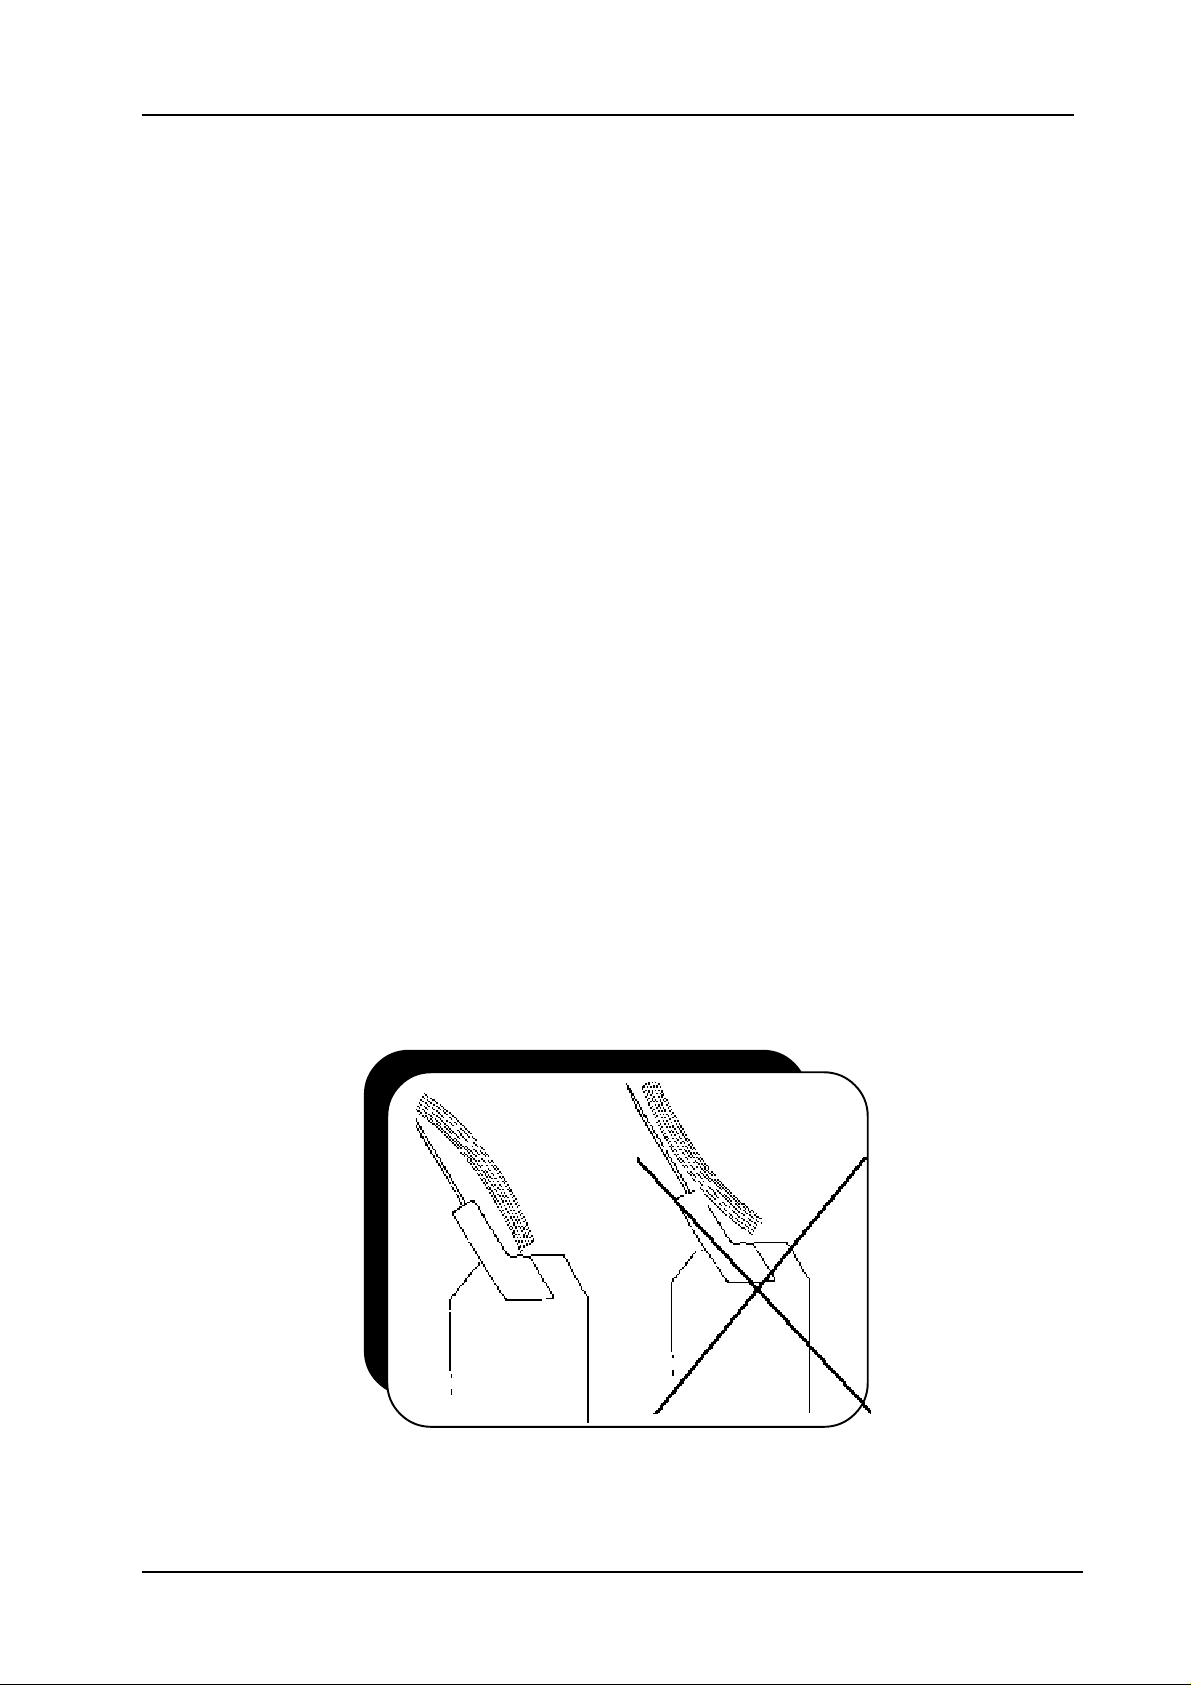
e) Ensure that the paper is flat and undamaged. If the paper is bent, it is important that the
curving of the paper is towards the front of printer. (See picture below)
f) Do not use dark coloured paper. It can interfere with the optical paper sensor.
Index Braille
Page 9
January 2000 Verson 8.20/9.20
Manual Index Everest
4.3 Loading the sheet feeder
a) Set the right margin guide to the correct position. To the right, if the margin is set by the
position of the paper, and to the left, if the margin is defined from the setup.
b) Open the sheet feeder with the button on the side of the sheet feeder.
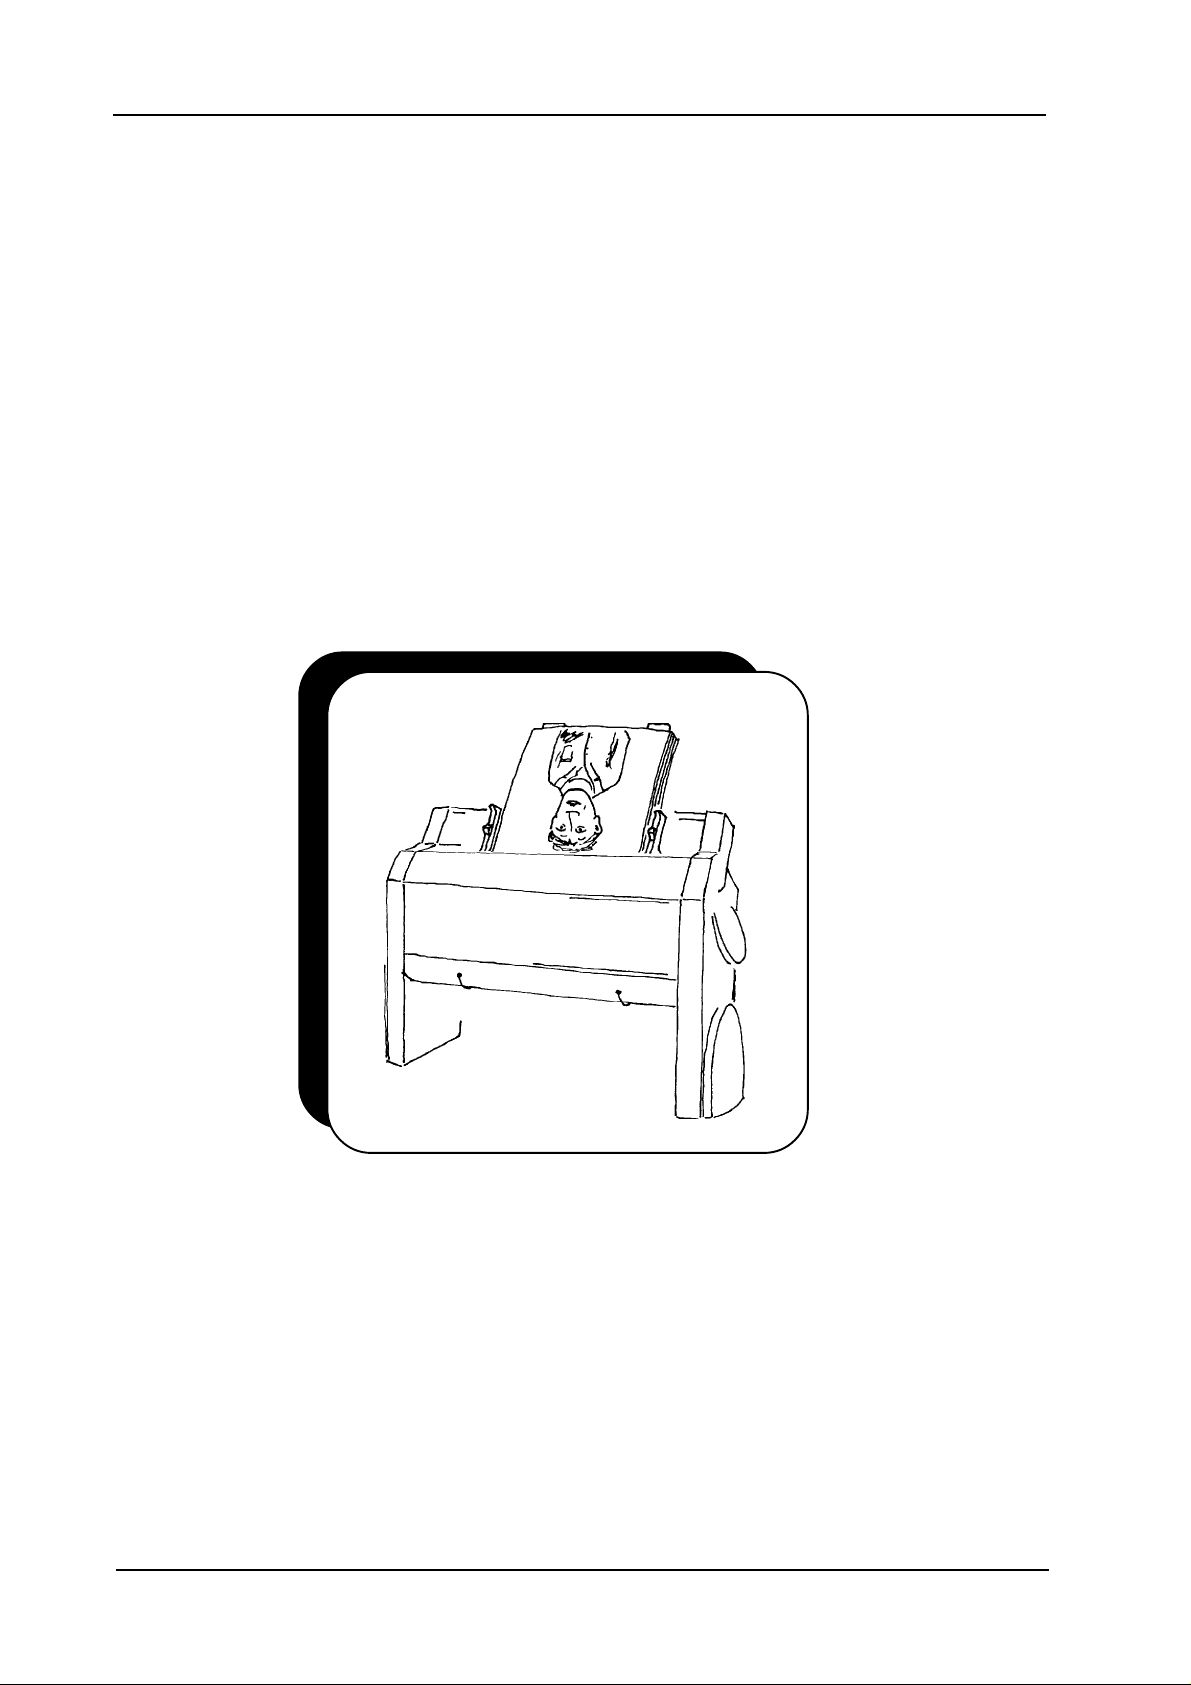
Load the paper and move the left paper guide until is slightly touch the paper and lock both paper
guides properly.
Note that Everest prints the page up-side-down so that the right paper margin guide is against the
left side of the printed paper. (See picture below)
c) When loading the sheet feeder with paper, make sure it is not overfilled. For the best possible
function it is necessary to leave 1-2 mm free space between the pick-up rollers and the paper
stack before closing the sheet feeder.
d) Set the two paper supports close to the margins of the paper.
e) Adjust the two green DOCUMENT GUIDES at the lower part of the front panel so that they
touch about 5 mm of the paper when it leaves the printer. When using a stiff paper, or a paper
with a weight above 150 gram (90lbs) the document guides can be placed beside the paper.
f) Select card or sheet mode on the sheet feeder. CARD mode is normally for paper of 120-200
gsm, and SHEET mode for paper below this weight. Make sure that the CARD/SHEET selection
is set to the same position on both side of the paper.
Page 10
Index Braille

Verson 8.20/9.20
Manual Index Everest
January 2000
4.3.1 Random double-feed
With good quality paper and correct installation of the sheet feeder, a random double feed rate on
maximum 1/1000 must be accepted. If the fault frequency is higher we recommend that you
check the paper and installation against the following priorities. This following is a summary
from our experiences of a large number of Everest printers on the market.
a. To ensure a good paper quality look at the following details:
* Properly cut paper - never use separated fan folded paper
* There should be no binding holes or perforations on the paper
* The paper should have a rough surface (similar to copy paper)
* Paper should be flat and without damage
* Check that the card/sheet selectors are in the correct position. Test by changing between
sheet and card, using the same paper. We recommend use of the sheet position if it picks
up the paper properly.
b) To ensure good installation of the sheet-feeder, look at the following details:
* The margin guides should slightly touch the paper and be properly locked
* Are the card/sheet selectors in the correct position?
* The paper supports must be correctly installed.
c) To ensure good paper out control, look at the following:
*The document guides (green plastic) should be in the correct position, especially if light paper
is used. The correct position is about 5 mm from the side edge of the paper.
* If heavy Braille paper is used we recommend not using the document guides. Simply slide
them out from the paper area.
d) Avoid low humidity locations.
If the Everest is used in a room with low humidity, static electricity can cause the paper to
stick together. In this case we recommend an increase in the humidity and opening a new sealed
package of paper. Low humidity can also occur in a low temperature area or in an air
conditioned room.
E) Maintenance of the sheet feeder.
* We recommend a clean and rub up of the surface of the pick up rollers after 2,000-10,000
pages.
Clean the pick-up rollers with soft soap solution, or even more efficient is to carefully ruff up the
surface with a piece of fine sand paper. Hold the clutch against the pick up rollers when pressing
Form Feed key.
4.3.2 No paper feed.
The “no paper feed” situation can occur when the sheet position is used for heavy or very stiff
paper.
We recommend switching to CARD position and testing again. No feed can also be a result of a
combination of reasons such as; dusty pick-up rollers, damaged or holed paper and improper
paper installation of the sheet-feeder.
Index Braille
Page 11
 Loading...