

D
Funk-Video-Türsprechanlage
Bedienungsanleitung Seite 2
F
Interphone vidéo sans fil
Mode d'emploi page 15
DVT50 SET
DVT50/2 SET
GB
Wireless Video Door Intercom
Operating instructions page 27

D
Bedienungsanleitung
1. Einleitung
Lesen Sie diese Bedienungsanleitung vollständig und
sorgfältig durch und klappen Sie dabei die Seite 3 mit
den Abbildungen aus. Die Bedienungsanleitung gehört zu
diesem Produkt und enthält wichtige Hinweise zur Inbetriebnahme
undHandhabung.
Beachten Sie immer alle Sicherheitshinweise. Sollten Sie Fragen
haben oder unsicher in Bezug auf die Handhabung der Geräte sein,
dannholenSiedenRateinesFachmannesein.
Bewahren Siediese Anleitung sorgfältigauf undgeben Siesie ggf.an
Dritteweiter.
2. BestimmungsgemäßeVerwendung
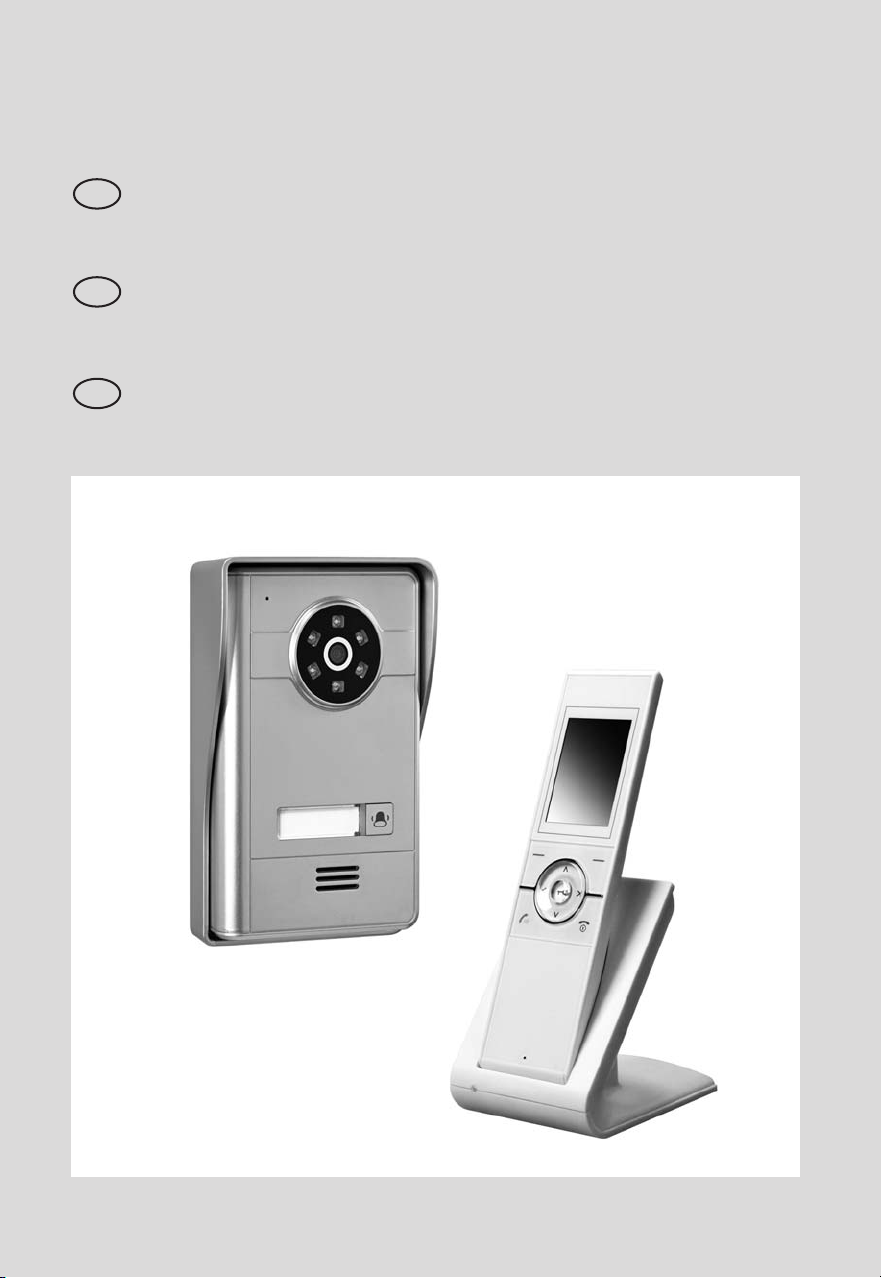
Die Funk-Video-Türsprechanlage DVT50 SET besteht aus einer
Türsprechstelle DVT50T inkl. Schutzhaube und einem Mobilteil
DVT50M mit Ladestation und Netzgerät. Die Funk-VideoTürsprechanlage DVT50/2 SET für ein Zweifamilienhaus besteht aus
einer Türsprechstelle DVT50T2 mit zwei Klingeltasten inkl.
SchutzhaubesowiezweiMobilteilenDVT50M.
DasMobilteilmit2,4Zoll-MonitorlässtsichüberTastenbedienen.
Beim Drücken der Klingeltaste an der Türsprechstelle erfolgt ein
Klingelton an Türsprechstelle und Mobilteil (Klingelton-Melodie des
Mobilteils sowie Klingelton-Dauer und -Lautstärke von Mobilteil und
Türsprechstelle sindeinstellbar). Das Livebildder Kamera erscheintauf
dem Bildschirm und ein Schnappschuss wirdim Mobilteil gespeichert
(Funktion deaktivierbar). Nach Drücken der Sprechtaste am Mobilteil
wird ein Gespräch im Halbduplexverfahren ermöglicht
(Wechselsprechbetrieb). Wahlweise können weitere Schnappschüsse
während des Gesprächs gespeichert sowie ein optional
angeschlossenerTüröffnerausgelöstwerden.
Das Kamerabild am Mobilteil kann auf Panorama-Ansicht oder
VollbildmitwählbaremBildausschnitteingestelltwerden.
Es ist jederzeitmöglich, das Kamerabildam Mobilteil perTastendruck
zur optischen Kontrolle einzuschalten und ein Gespräch mit der
Türsprechstelle zu beginnen sowie Schnappschüsse zu speichern oder
einenoptionalangeschlossenenTüröffnerauszulösen.
Das Kamerabild erscheint in Farbe. Bei Dunkelheit werden die in der
Türsprechstelle integrierten weißen LEDs aktiviert, um das Gesicht
einer vor der Kamera stehenden Person auszuleuchten. Auch hierbei
erscheint das Bild in Farbe. Durch eine zusätzliche Beleuchtung kann
dieBildqualitätbeischlechtenLichtverhältnissenverbessertwerden.
Die Bild- und Tonübertragung erfolgt drahtlos im Frequenzbereich
2,4GHz.
Das DVT50 SET kann durch eine zweite Türsprechstelle sowie ein
zweites Mobilteil erweitert werden, das DVT50/2 SET kann mit
maximal zwei Mobilteilen je Klingeltaste und einer zweiten
Türsprechstellebetriebenwerden.
Zusätzlich können optional folgende Geräte an der
Türsprechstelleangeschlossenwerden:
#
ein elektrischerTüröffner*, dervomMobilteil ausentriegelt
werdenkann
#
ein Signalgeber* (z. B. ein Gong oder ein Blitzlicht), der
durch Drücken der Klingeltaste (beim DVT50/2 SET der
oberenKlingeltaste)geschaltetwird
#
einTasterzumSchalteneinesangeschlossenenTüröffners
*jeweilsseparateStromversorgungerforderlich
Die Türsprechstelle ist für die Aufputzmontage gedacht und ist
wetterfest (Schutzart IP55) und somit zur Montage an einer
geschützten Stelle im Außenbereich geeignet. Die Ladestation
einschließlich Netzgerät sowie das Mobilteil müssenjedoch vor
FeuchtigkeitundNässegeschütztwerden.
Die Türsprechstelle kann entweder über 2x LR14(C) Batterien
oder über ein 9-12 V DC Netzgerät (beides nicht im
Lieferumfang)betriebenwerden.
Die automatische Aufladung des Lithiumakkus im Mobilteil
erfolgt überdie Ladestation,die amNetzstrom 230 V~, 50 Hz
über das mitgelieferte Netzgerät angeschlossen ist. Durch den
integriertenAkkuistdasMobilteiltragbar.
Jede andere Verwendung oder Veränderung der Geräte gilt als
nicht bestimmungsgemäß undbirgt erhebliche Unfallgefahren.
Der Hersteller haftet nicht für Schäden, die durch nicht
bestimmungsgemäßen Gebrauch oder falsche Bedienung
verursachtwerden.
Dieses Gerät ist nicht dafür bestimmt, durch Personen
(einschließlich Kinder) mit eingeschränkten physischen,
sensorischen oder geistigen Fähigkeiten oder mangels
Erfahrung und/oder mangels Wissen benutzt zu werden, es sei
denn, sie werden durch eine für ihre Sicherheit zuständige
Person beaufsichtigt oder erhielten von ihr Anweisungen, wie
das Gerät zubenutzen ist. Kindermüssen beaufsichtigtwerden,
umsicherzustellen,dasssienichtmitdemGerätspielen.
3. Lieferumfang(s. Abb.A)
!
Türsprechstelle
!
Schutzhaube inkl. Torx-Schraube und Torx-Schlüssel
!
Befestigungsmaterial
!
Mobilteil
!
Lithiumakku
!
LadestationfürMobilteilinkl.Netzgerät
!
Bedienungsanleitung
!
bei DVT50/2 SET: zusätzliches Mobilteil mit Akku,
LadestationundNetzgerät
D-2
DA
4
1
23
56
7
91011
8
12 13
14
16
15
17
18 19 20 21 22 23
DB
DVT50T
Taster für TÖ
ohne Funktion
DC9-12V
Adern für
SignalgeberAnschluss
Fils de raccordement de
l'émetteur de signal
Wires for signal generator
connection
24 25 26 27 28 29 30 31 32 33 34 35 36 37 38 39 40 41 42
DC9-12V
GND
ohne Funktion
COMNONC
Taster für TÖ
handelsüblicher
Türöffner mit eigener
Spannungsversorgung
Système d'ouverture de porte
disposant de sa propre
alimentation électrique
Standard door release with
separate power supply
Spannungsversorgung für
optionalen Türöffner
(max. 15 V AC/DC, max. 1 A)
Alimentation électrique pour système
d'ouverture de porte optionnel
_
Power supplyfor optionaldoor release
+
Spannungsversorgung für DVT50K
12 V DC, 200 mA
_
Alimentation électrique pour système
+
d'ouverture de porte
Power supply for DVT50K
_
+
Spannungsversorgung für externen
Signalgeber (Gong / Blitzlicht ...)
Alimentation électrique pour émetteur de signal
externe (carillon / flash...)
Power supply for external signal generator
(bell/flashing light ...)
GND
COM
optionaler Taster
zum Türöffnen
Bouton-poussoir en option
permettant d'ouvrir la porte
Optional button to open the door
NC
NO
optionaler externer Signalgeber (max.
Belastbarkeit des Relais: 15 V AC/DC, max. 1 A)
Émetteur de signal externe en option
Optional external signal generator
3- D
2019/03/25
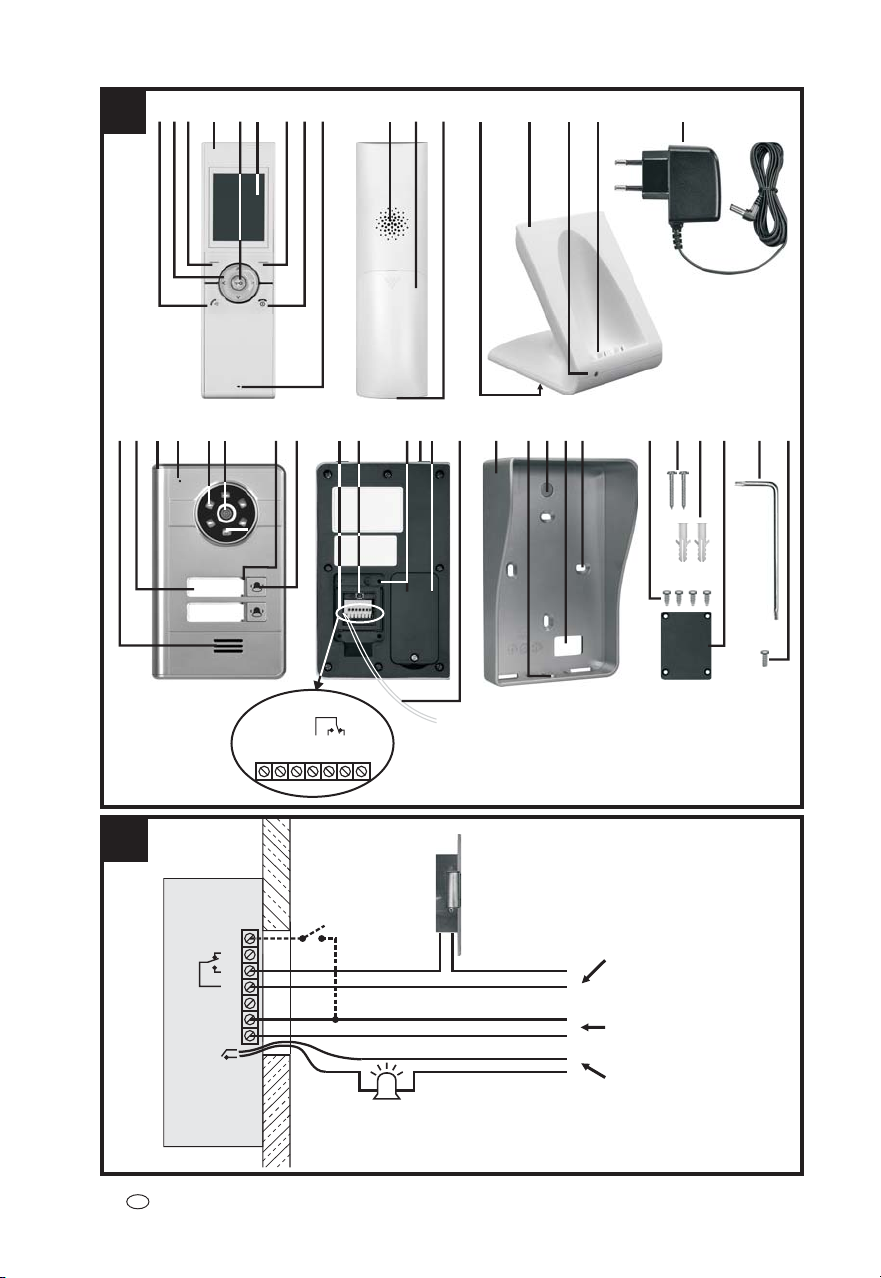
4. Ausstattung
MobilteilDVT50M(s.Abb A)
1 Sprechtaste
2 Tasten / / /
3 Taste links
4 Mobilteil
5 Türöffnertaste (leuchtet blau beim Aufladen des Akkus)
6 Bildschirm
7 Taste rechts
8 Ein- / Aus- Taste
9 Mikrofon
10 Lautsprecher
11 Akkufachdeckel
12 Kontakte für Ladestation
Ladestation DVT50L (s. Abb A)
13 Anschluss für Netzgerät
14 Ladestation
15 Power-LED
16 Kontakte zum Mobilteil
Türsprechstelle DVT50T / DVT50T2 (s. Abb A)
18 Lautsprecher
19 Namensschild
20 Türsprechstelle
21 Mikrofon
22 weiße LEDs
23 Kameraobjektiv
24 Beleuchtung der Klingeltaste (blinkt nach Drücken der
25 Klingeltaste
—
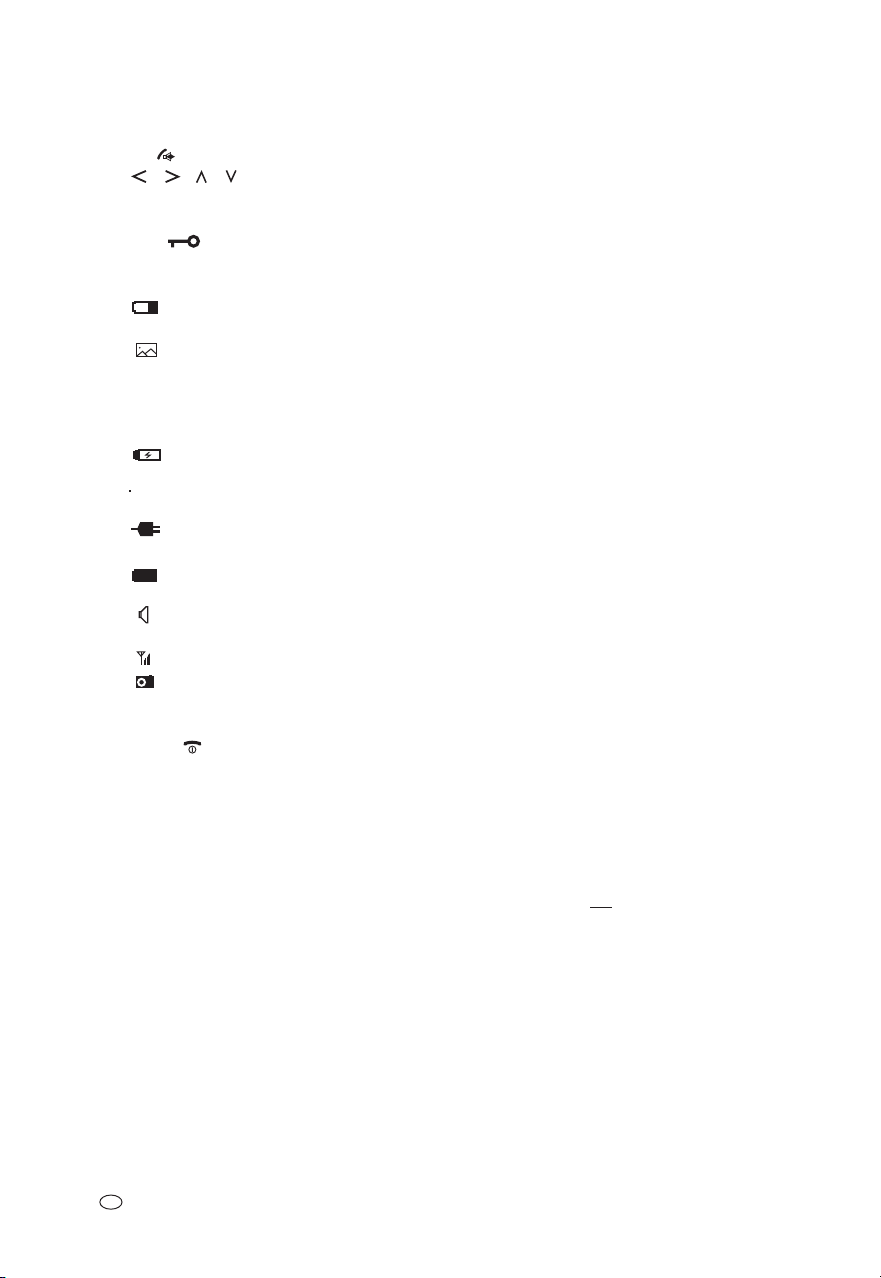
Anzeigen auf dem Startbildschirm:
Akkuanzeige für Mobilteil
14:37 aktuelle Uhrzeit
an der Türsprechstelle wurde geklingelt, das
Gespräch jedoch nicht angenommen und dabei
wurde ein Schnappschuss gespeichert (Symbol
blinkt rot - verschwindet, sobald Menüpunkt
“Bilder zeigen” geöffnet wurde)
Akku im Mobilteil fast leer, unbedingt laden
Anzeigen auf dem Kamerabild-Bildschirm:
1# Angabe der Türsprechstelle 1 oder 2
aktuelle Türsprechstelle wird über Netzgerät mit
Spannung versorgt
aktuelle Türsprechstelle wird über Batterien mit
Spannung versorgt
Anzeige, dass Gespräch angenommen wurde
und der Wechselsprechbetrieb aktiv ist
Funkverbindungs-Anzeige
Schnappschuss wurde gespeichert
14:37 aktuelle Uhrzeit
—
Klingeltaste und danach ggf. für die Dauer eines Gespräches)
4- D
26 Klemmenanschlüsse
Taster für TÖ/GND Anschluss eines optionalen externen
Tasters zum Türöffnen
DC 9-12V / GND Spannungsanschluss
NO/COM Klemmen zur Steuerung eines
optionalen Türöffners
27 Paarungstaste
28 Loch für Schraube
29 Laschen für Arretierung in der Schutzhaube
30 Batteriefachdeckel
31 Adern zur Steuerung eines externen optionalen Signalgebers
(reagiert bei DVT50T2 auf obere Klingeltaste)
Zubehör (s. Abb A)
17 Netzgerät für Ladestation
32 Schutzhaube
33 Loch für Sicherheitsschraube
34 Magnet für Sabotagealarm
35 Durchführungsloch für Anschlussadern
36 Loch zur Befestigung
37 Schraube
38 Schraube
39 Dübel
40 Abdeckung für Anschlussfach
41 Torx-Schlüssel
42 Torx-Schraube
Anschluss-Beispiel (s. Abb B) für:
#
optionalen Taster zum Türöffnen
#
optionalen Türöffner mit eigener Spannungsversorgung
#
Netzgerätanschluss
#
optionaler Signalgeber mit eigener Spannungsversorgung
5. Technische Daten
Türsprechstelle DVT50T / DVT50T2
Stromversorgung: 9- 12 V DC
Stromaufnahme: max. 200 mA (bei 12 V DC)
Türöffnerrelais: potentialfreier Wechsler, Schaltleistung
Relais zur
Signalgebersteuerung: potentialfreier Schließer, Schaltleistung
Kamera-Bildsensor: 1/4” CMOS Farbe
"
(stabilisiert, min. 300 mA)
oder
2 Stück LR14 (C), 1,5 V alkalische
Batterien
max. 500 mA (bei 2x LR14 (C), 1,5 V)
max. 1 A bei bis zu 15 V AC/DC
(Schaltdauer einstellbar zwischen 1 und 9
Sekunden)
max. 1 A bei bis zu 15 V AC/DC
(Schaltdauer ca. 3 s)
"

Kamera-Bildauflösung: 640 x 480 Pixel
Erfassungswinkel: 96° horizontal, 53° vertikal
Ausleuchtung: 6 weiße LEDs (zur Ausleuchtung des
Nahbereichs, bis 0,8 m, bei Dunkelheit)
Sendefrequenz: 2412 MHz bis 2472 MHz
Abstrahlungsstärke: < 100 mW
EIRP
Funk-Modulation: GFSK
Funkreichweite: max. 100-150 m bei freier Sicht
(abhängig von baulicher und Funk-
Umgebung)
Bildrate: max. 15 Bilder/Sekunde
Betriebstemperatur: -20° C bis + 50° C
(Hinweis: unter 0° C kann sich die Funk-
Reichweite verringern)
Schutzart: IP 55
Abmessungen: 104 x 165 x 50 mm (mit Schutzhaube)
Mobilteil DVT50M
Lithium Akku: 3,7 V, 1100 mAh
Akku-Leistungsabfall: ca. 10% nach 300 Ladezyklen
Ladespannung: über Ladestation
Erste Ladezeit: 5 Stunden
Bereitschaftszeit: bis zu ca. 18 Stunden ohne Ladestation
Gesprächszeit: bis zu 2-3 Stunden ohne Ladestation
Stromaufnahme: max. 400 mA
Sendefrequenz: 2412 MHz bis 2472 MHz
Abstrahlungsstärke: < 100 mW
EIRP
Funk-Modulation: GFSK
Bildschirmdiagonale: 2,4” (6,1 cm)
Monitor-Bildauflösung: 240 x 320 Pixel
integrierter Bildspeicher: Ringspeicher, max. 100 Schnappschüsse
Betriebstemperatur: ± 0° C bis + 40° C
Abmessungen: 53 x 187 x 26 mm
Ladestation DVT50L
Betriebsspannung: 12 V DC (Netzgerät)
"
Stromaufnahme: max. 300 mA
Betriebstemperatur: ± 0° C bis + 40° C
Abmessungen: 80 x 105 x 95 mm
Netzgerät für Ladestation
Stromversorgung: 230 V ~ AC, 50 Hz
Stromausgang: 12 V DC, 500 mA
"
Anwendung: nur im Innenbereich
6. Sicherheitshinweise
Diefolgenden Hinweisedienen IhrerSicherheitundZufriedenheitbeim
Betrieb des Gerätes. Beachten Sie, dass die Nichtbeachtung dieser
SicherheitshinweisezuerheblichenUnfallgefahrenführenkann.
Gefahr! Bei Nichtbeachtung folgender Hinweise werden
Leben,GesundheitundSachwertegefährdet.
!
Lassen Sie Kleinkinder nicht unbeaufsichtigt mit dem Gerät,
Verpackungsmaterial oder Kleinteilen! Andernfalls droht
LebensgefahrdurchErsticken!
!
Beschädigen Sie bei Bohrarbeiten und beim Befestigen keine
Leitungen für Gas, Strom, Wasser oder Telekommunikation!
AndernfallsdrohtLebens-,Verletzungsgefahr!
!
Behandeln Sie dieZuleitungen vorsichtig!Verlegen Siediese so,
dass sie nicht beschädigt werden können und keine
Stolpergefahr darstellen. ZiehenSie die Kabelnicht über scharfe
Kanten, und quetschen oder klemmen Sie sie nicht anderweitig
ein.AndernfallsdrohenLebens-undVerletzungsgefahr!
!
Um Verletzungen vorzubeugen, befestigen Sie die
TürsprechstellezuverlässiggemäßdenMontageanweisungen.
!
Verhindern Sie, dass die Geräte (außer Türsprechstelle: IP55)
und die Netzgeräte mit Feuchtigkeit in Berührung kommen.
Tauchen Sie die Geräte nicht ins Wasser ein! Andernfalls droht
Lebensgefahr!
!
Betreiben Sie die Ladestation ausschließlich mit dem
mitgelieferten Netzgerät. Vergewissern Sie sich vor dem
Spannungsanschluss des Netzgerätes, dass die Spannung
vorschriftsmäßig mit 230 V ~ AC, 50 Hz und mit einer
vorschriftsmäßigenSicherungausgestattetist.
!
Versorgen Sie die Türsprechstelle bei Spannungsanschluss über
Netzgerät mit der angegebenen Spannungsversorgung und
achten Sie darauf, dass die Spannung vorschriftsmäßig mit
230 V~AC, 50 Hz und mit einer vorschriftsmäßigen Sicherung
ausgestattetist.
!
Führen Sie den Anschluss und die Montage
der Türsprechstelle
getrennt von der Spannung durch! Andernfalls droht
LebensgefahrdurchStromschlag!
!
Schließen Sie keine Fremdspannung an die Anschlussklemmen
der Türsprechstellean. Andernfallsdrohen Lebens-,VerletzungsundBrandgefahr!
!
Achten Sie darauf, dass Batterien /Akkus nicht kurzgeschlossen
oder ins Feuer geworfen werden. Sie dürfen außerdem nicht
aufgeladen odergeöffnetwerden.Es bestehtLebensgefahrdurch
Explosion!
!
Ausgelaufene oder beschädigte Batterien / Akkus können bei
Berührung mit der HautVerätzungen verursachen, benutzenSie
deshalbindiesemFallgeeigneteSchutzhandschuhe.
!
Betreiben Sie die Geräte ausschließlich mit den angegebenen
Batterie-/Akkutypen.
!
Achtung! Explosionsgefahr bei unsachgemäßem Auswechseln
der Lithium-Batterie. Ersatz nur durch denselben oder einen
gleichwertigenTyp.
!
Achten Sie beim Einlegen der Batterien / Akkus auf die richtige
Polung.
!
Entfernen Siebei längerem Nichtbenutzendes Gerätes immerdie
Batterien.
D-5

!
Setzen Siedie Geräte unddie Batterien/ Akkusnicht der Nähevon
Feuer, Hitzeoder langandauernder hoherTemperatureinwirkung
aus!
!
Schützen Sie die Geräte vor starken mechanischen
BeanspruchungenundErschütterungen!
!
Schützen Sie die Geräte vor starken magnetischen oder
elektrischenFeldern!
!
Verwenden Sie die Geräte nur mit den mitgelieferten
OriginalteilenoderOriginalzubehör!
!
Überprüfen Sie vor dem Zusammenbau und der Inbetriebnahme
dieLieferungaufBeschädigungenundVollständigkeit!
!
Schließen Sie kein beschädigtes Gerät (z.B. Transportschaden)
an. Fragen Sie im Zweifelsfall Ihren Kundendienst. Reparaturen
und Eingriffe an den Geräten dürfen nur von Fachkräften
durchgeführtwerden.
!
Ziehen Sie bei längerem Nichtbenutzen des Gerätes immer das
NetzgerätausderNetzsteckdose.
!
Dieses System erzeugt und verwendet Funksignale. Wenn die
Geräte nichtin Übereinstimmung mitderAnleitunginstalliert und
betrieben werden, kann dies eine Störung anderer Geräte zur
Folge haben, bzw. können diese durch andere Geräte gestört
werden. Versuchen Siesolche Störungen zuvermeiden, indem Sie
dieLagederGeräteverändern.
7. Platzierungder Geräte
Bevor Sie die Türsprechstelle montieren, planen Sie zuerst deren
Montagestelle. ÜberprüfenSie von dortaus vor derMontage die FunkÜbertragung,dieSprechverbindungsowiedenBildausschnitt.
Achten Sieauf folgendePunkte:
Türsprechstelle:
!
Montieren Sie die Türsprechstellein solcher Höhe, dassBesucher
die Klingeltaste bequem erreichen können, und dass dasGesicht
des Klingelnden von der Kamera erfasst wird. Achten Sie dabei
auch auf die Größe von Kindern. Der vertikale Erfassungswinkel
der Kamera beträgtca. 53°.
!
Die Türsprechstelle wird üblicherweise seitlich von der
Eingangstür angebracht. Achten Siedarauf, dass dasGesicht des
Besuchers, der vor der Tür steht, auf dem Bildschirm zu sehen
ist. Der horizontale Erfassungswinkel der Kamera beträgt ca.
max. 96°, und ein Bildausschnitt links/Mitte/rechts ist
einstellbar.
!
Eine Halterung zur 45° Eckmontage rechts oder links ist
optional erhältlich (s.Kapitel “Optionales Zubehör”).
!
Bringen Sie die Türsprechstelle so an, dass möglichst kein
direktes Licht auf die Objektivöffnung fällt. Vermeiden Sie
starkes Gegenlicht hinter dem Besucher: Hierbei erscheint die
Person dunkler. Überprüfen Sie am Besten vor der Montage das
Kamerabild. Nehmen Sie hierzu das Gerät in Betrieb und halten
Sie die Türsprechstelle an die gewünschte Stelle. Verändern Sie
6- D
bei Bedarf die Position, bis Sie den optimalen Bildausschnitt
gefunden haben. Denken Sie daran, dass die Sonne nicht
immer an derselbenStelle steht.
!
Die Kamera besitzt eine Weißlichtausleuchtung [22] für den
Nahbereich. Diese wird bei Dunkelheit aktiviert. Durch eine
zusätzliche Beleuchtungder UmgebungbeiNachtkönnenSiedie
BildqualitätderKameraverbessern.
!
Wollen Siedie Türsprechstelle imAußenbereichmontieren, sollte
der Montageort nach Möglichkeit vor direktem Regeneinfall
geschützt sein. Bei Betrieb über Netzgerät muss dies im
Innenbereichsein.
!
Achten Sie darauf, dass sich bei Spannungsversorgung über
Netzgerät eine geeignete Durchführungsmöglichkeit für die
Spannungsversorgungskabel (verwendenSieeinAnschlusskabel
mit einem Adernquerschnittvon 0,2 -0,7 mm²)und ggf.für die
Anschlusskabel zum optionalen Türöffner / zum optionalen
Taster / zum optionalen externen Signalgeber am Montageort
befindet.
!
Wollen SieeinenTüröffner anschließen,dannbeachten Sie,dass
dieser eine eigeneSpannungsversorgung benötigt(max. 1 Abei
bis zu 15 V ACoder DC - s.Abb. B). Beachten Sieaußerdem die
AnleitungdesTüröffners.
!
Wollen Sie einen externen Signalgeber anschließen, dann
beachten Sie, dass dieser eine eigene Spannungsversorgung
benötigt (max. 1 A bei bis zu 15 V AC oder DC - s. Abb. B).
BeachtenSieaußerdemdieAnleitungdesSignalgebers.
Mobilteil:
!
Die Ladestation soll auf eine ebene und feste Fläche aufgestellt
werden, ambestenca.1-1,5 müberdem Bodenund nicht direkt
nebeneinerWand(bessereEmpfangsbedingungen).
!
Platzieren Sie die Ladestation an einer geeigneten zentralen
Stelle innerhalb der Wohnung, z.B. im Flur. Achten Sie darauf,
dass derKlingelton desMobilteilesin dergesamten Wohnungzu
hörenist.
!
Achten Sie darauf, dass sich eine Netzsteckdose für die
Netzstromversorgung innerhalb der Reichweite des Netzgerätekabels befindet.
Funkreichweite
Die maximale Reichweite der Funkübertragung beträgt ca. 100150 m bei Sichtkontakt zwischen Mobilgerät und Türsprechstelle.
In Gebäuden ist die Reichweite durch Wände (insbesondere
Stahlbeton-Wände) und Decken deutlich geringer (typisch ca.
20 m).
Eine Garantie für diese Reichweite ist jedoch nicht möglich, da die
örtlichen Gegebenheiten am Aufstellungsort diese negativ beeinflussen
können.
Um Fehlfunktionen zu vermeiden, darf pro Überwachungsort/
Haus/Wohnung nurein Funk-Systeminstalliertwerden.
Eine Verschlechterung der Reichweite ist z.B. zu erwarten durch folgende

Einflüsse:
#
Wände undDecken, insbesonderesolcheaus StahlbetonoderMetall
#
Blechflächen z.B.Kühlschrank, Blechregale
#
Beschichtete Fenster (z.B. Energiespar-Fenster), Heizkörper,
Metallflächen
#
Starke elektrische Felder und andere Funkgeräte, z.B.
Mikrowellenherde, Funktelefone, Handys, Funk-Geräte im 2,4 GHz
Bereich, elektrischeMotoren undStarkstromleitungen.
#
Geräte auf der gleichen oder benachbarten Funk-Frequenz (z.B. ein
WLAN-System)
8. Montage, Anschlüsse und
Inbetriebnahme der Türsprechstelle
!
NehmenSiedieTürsprechstelle[20]ausderSchutzhaube[32].
!
Halten Siedie Schutzhaubeandiegewünschte Montagestelleund
markieren Sie zwei zu bohrende Montagelöcher [36] sowie ggf.
einKabeldurchführungsloch[35].
!
Bohren Sie zwei geeignete Montagelöcher und setzen Sie ggf.
zweiDübel[39]ein.
!
Bohren Sie ggf. ein geeignetes Kabeldurchführungsloch für die
Spannungsversorgung der Türsprechstelle sowie ggf. für weitere
Anschlusskabel für einen optionalen Türöffner und/oder einen
externen Signalgeber (z.B. einenexternen Gong) und/oder einen
optionalenTasterzumTüröffnen.
!
Hinweis:
Um den Kabelanschluss zu erleichtern, kann eine
Unterputzdose in der Wand direkt hinter der Kabeldurchführung
hilfreichsein.
!
Führen Sie ggf. alle entsprechenden Anschlusskabel durch das
gebohrte Loch sowie durch das Kabeldurchführungsloch in der
Schutzhaube.
!
Fixieren Sie die Schutzhaube mit zwei Schrauben [38] an der
Wand.
!
BeiBatteriebetrieb:
!
Lösen Siedie Schraubeim Batteriefachdeckel[30] undheben
SiedenDeckelvonderTürsprechstelle.
!
Setzen Sie2 St.LR14 (C),1,5 ValkalischeBatterien (nichtim
Lieferumfang enthalten) polrichtig in das Batteriefach ein
(SetzenSiekeineAkkusein).
!
Befestigen Sie den Deckel mit der Schraube wieder auf der
Türsprechstelle.
!
Hinweis:
Bei Nutzung der Türsprechstelle mit Batteriebetrieb
ist das manuelleEinschalten desKamerabildes nichtmöglich,
da sich die Türsprechstelle im Lieferzustand im
Energiesparmodus
Mobilteil empfangen. Um dennoch das manuelleEinschalten
des Kamerabildes zu ermöglichen, müssen Sie die
Türsprechstelle inden umstellen (siehe
Kapitel 11.2 “Manuelles Einschalten des Kamerabildes der
Türsprechstelle”).
befindet, sie kann kein Signal vom
Dauerempfangsmodus
!
Hebeln Sie die Kunststoffabdeckung an der rechten Seite
vorsichtig vom Namensschild [19], entnehmen das
Namenschild, beschriftenes, setzendas Namenschildwieder ein
und setzen die Kunststoffabdeckung wieder auf das
Namensschild.
!
Bei Anschluss eines Netzgerätes und /oder weiteren Geräten
beachtenSiedasAnschlussdiagrammB.
Hinweise:
#
In jeden Klemmenanschluss sollte jeweilsnur ein Adernende
gesteckt werden. Maximal können jedoch 2 Stück
miteinander verdrillte I-Y(St)YAdern mit Durchmesser0,6 in
einen Klemmenanschluss gesteckt werden. Bei drei
Adernenden muss vor dem Klemmenanschluss mit
Zusammenführung der Adern über eine Lüster- oder
Verbindungsklemmegearbeitetwerden.
#
Das offene Adernende (10 -12 mm) muss in den
Klemmenanschlussgestecktwerden.
!
Für denAnschluss eines 9-12V DCNetzgerätes klemmenSie
die zwei Adern des Netzgerätesan die SpannungsanschlussKlemmen [26] GND und DC 9-12 V an.
Türsprechstelle darf nicht gleichzeitig über
BatterienUND Netzgerätbetrieben werden!
!
Schließen Sie ggf. einen optionalen Türöffner mit eigener
Spannungsversorgung überzweiAdern andie Klemmen[26]
NO/COM an (max. 1 A beibis zu 15 V AC/DC). Beachten Sie
dabeiauchdieAngabeninderAnleitungdesTüröffners.
!
Schließen Sie ggf. einen optionalen, externen Signalgeber
mit eigener Spannungsversorgung über die zwei Adern für
den Signalgeber-Anschluss [31] an (Schließerkontakt, max.
1 A beibis zu 15V AC/DC,reagiert bei DVT50T-2nur aufdie
obereKlingeltaste).
!
Schließen Sie ggf. einen optionalen Taster zum Türöffnen
über zwei Adern an die Klemmen [26] “Taster für TÖ” und
GNDan.
!
Wenn Sie dieAnschlussadern [31] fürden externen Signalgeber
nicht verwenden, dann schneiden Sie sie direkt neben den
Anschlussklemmenab.
!
Schrauben Siedie mitgelieferte Abdeckungfür dasAnschlussfach
[40] mit den vier mitgelieferten Schrauben [37] so auf die
Türsprechstelle, dass die ggf. vorhandenen Adern nach unten
überdieSchrägeausderTürsprechstelleherausführen.
!
Schieben Sie die Türsprechstelle in die Schutzhaube [32] und
schrauben Sie siemit dermitgelieferten Torx-Schraube [42]und
demmitgeliefertenTorx-Schlüssel[41]fest.
Beachten Sie bei Batteriebetrieb der Türsprechstelle
Hinweis:
beim Verlegen der angeschlossenen Adern, dass Sie die an der
Türsprechstelle angeschlossenen Adern etwas locker lassen, um
für einen zukünftigen Batteriewechsel an das Batteriefach der
Türsprechstellegelangenzukönnen.
komplett
Hinweis: Die
D-7

!
BeiBetriebüberNetzgerätschließenSiediesan230VACan.
!
Nach Anschluss an die Spannungsversorgung leuchtet die
BeleuchtungderKlingeltaste[24]grün.
!
EntfernenSiedie Schutzfolie vomKameraobjektiv [23].
9. Anschlussdes Mobilteils
!
Verbinden Sie den Kleinspannungsstecker des mitgelieferten
Netzgerätes [17] mit dem Netzgerätanschluss [13] der
Ladestation[14].
!
Stecken Sie das Netzgerät in eine geeignete Netzsteckdose, die
Power-Anzeige[15]leuchtetblau.
!
ÖffnenSiedasAkkufach[11]desMobilteils.
!
EntfernenSie dieSchutzfolie vomAkku.
!
LegenSiedenmitgeliefertenLithiumakkupolrichtigein.
!
SchließenSiedasAkkufachwieder.
!
EntfernenSiedieSchutzfolievomBildschirm[6].
!
Stellen Sie das Mobilteil in die Ladestation. Die Aufladung des
Lithiumakkus beginnt automatisch nach dem Einstellen in das
Ladegerät.
Hinweis:
Vor der ersten Inbetriebnahme lassen Sie das Mobilteil zuerst
5Stundenvollständigaufladen.
10. Inbetriebnahmedes Mobilteils
!
Umdas Mobilteil[4] einzuschalten,drückenSiedieEin/Aus-Taste
[8] am Mobilteil,bis der Start-Bildschirmerscheint. Nachca.
20SekundenerlischtderStartbildschirmautomatischwieder.
!
Ist das Mobilteileingeschaltet, kann derStartbildschirm jederzeit
durch Drücken einer Taste [1/2/3/5/7/8] für ca. 20 Sekunden
eingeschaltetwerden.
!
Die Akku-Ladeanzeige auf dem Startbildschirm [6] oben
rechtszeigtdenAkkuzustanddesMobilteilsan.
!
Um das Mobilteil auszuschalten, drücken Sie die Ein/Aus-Taste
[8] amMobilteil beieingeschaltetemBildschirm solange,bis
dieBildschirmanzeigeerlischt.
Hinweis:
IstdasMobilteilausgeschaltet:
#
reagiertesnichtaufKlingelnanderTürsprechstelle
#
wirdkeinKamera-Standbildgespeichert
#
ein ggf. angeschlossener optionaler Signalgeber reagiert
dennochaufdasKlingeln
#
ca. 6 Sekunden nach dem Klingeln ist an der Türsprechstelle
ein Doppelton als Signal dafür zu hören, dass kein Mobilteil
reagiert.
8- D
11. Basisfunktionen (bei einer
Türsprechstelle, einem Mobilteil und einem
angeschlossenen Türöffner)
11.1 An derTürsprechstellewirdgeklingelt
!
Klingeln:
DurchDrückenderKlingeltaste[25]
#
ertönteinleises“Plop”anderTürsprechstelle,
#
ertönen am Mobilteil und an der Türsprechstelle ein
Klingelton
sowie Klingelton-Dauer und -Lautstärke am
Mobilteil und an der Türsprechstelle können
eingestelltbzw.ausgeschaltetwerden.)
#
Am Mobilteilist amBildschirm[6] kurz“Eingehender Anruf”
zu sehenund dasKamerabildder Türsprechstelleerscheint als
Panoramabild. Durch Drücken der Taste kann ein
Bildausschnittals Vollbildgewählt werden,durch Drückender
Tasten und können der rechte, mittlere oder linke
Bildausschnitt zur Ansicht ausgewählt werden. Die Auswahl
kann während des Gesprächs erfolgen oder als
Grundeinstellung im Menü festgelegt werden. Wenn das
Signal nicht empfangen wird, erlischt das Kamerabild nach
ca.30Sekunden(bzw.nachdereingestelltenDauer).
#
Sobald das Symbol angezeigt wird, wird ein
Schnappschuss des Kamerabildes der Türsprechstelle im
Mobilteil gespeichert (wenn die Schnappschuss-Funktion im
Menüaktiviertist).
#
Die Beleuchtung [24] der Klingeltaste ander Türsprechstelle
blinkt. Wenn das Gespräch nicht angenommen wird, erlischt
das Blinken nach ca. 30 Sekunden (bzw. nach der
eingestellten Dauer) und es ertönt ein leises “Plop” an der
Türsprechstelle.
!
Sprechen:
Durch Drücken der Sprechtaste [1] können Sie das Gespräch
annehmen und die Sprechfunktion aktivieren, so lange das
KamerabildamBildschirmzusehenist:
#
DieAktivierungwirddurch das Symbol angezeigt.
#
Solange dieSprechfunktion aktivist, wirddas Kamerabildder
Türsprechstelle gezeigt und die Beleuchtung [24] der
Klingeltasteblinkt.
#
Nun kann abwechselndentweder derTonvom Mikrofon [21]
der Türsprechstelleüber denLautsprecher [10]des Mobilteils
oder der Ton vom Mikrofon [4] des Mobilteils über den
Lautsprecher [18] der Türsprechstelle gehört werden
(Wechselsprechfunktion).
#
Um ein weiteresStandbild der Kameraaufzunehmen undim
Mobilteil zuspeichern, drücken Siedie rechte Taste [7],
eserscheintkurzdasSymbol .
#
Die Sprechfunktion kann durch Drücken der Ein/Aus-Taste
(Klingelton-Melodie am Mobilteil
[8] beendet werden, ansonsten wird sie automatisch
—

nach ca. 45 Sekunden beendet, der Startbildschirm erscheint
wieder und nachca. 20 Sekundenerlischt derBildschirm. Das
Ende der Sprechfunktion wird durch ein leises “Plop” an der
Türsprechstelleangezeigt.
!
Tür öffnen:
Ist ein elektrischer Türöffner an der Türsprechstelle angeschlossen,
so kanndieser durchDrücken der Türöffnertaste [5] aktiviert
werden, sobald das Kamerabild der Türsprechstelle auf dem
Monitor zu sehen ist. Durch das Türöffnen wird der Klingelvorgang
bzw. dieSprechfunktionabgebrochen, ander Türsprechstelle istein
leises “Plop” zu hören, der Startbildschirm erscheint wieder am
Mobilteil undnach ca.20 Sekundenerlischt derBildschirm.
Hinweise:
#
Bei schlechten Lichtverhältnissen werden die weißen LEDs [22]
beim Klingeln oder manuellen Einschalten des Bildes über die
Monitor-Taste ("Mon") aktiviert. Der Nahbereich bis max. 0,8 m
vor der Türsprechstelle wird hierdurch ausgeleuchtet. Um ein
besseres Bildbei Dunkelheitzu bekommen, musseine zusätzliche
Beleuchtungangebrachtwerden.
#
B
Wenn: das Mobilteil nicht auf Drücken der Klingeltaste
reagiert aber der Gongton an der Türsprechstelle zu
hörenist,
B
bei Betrieb mit Netzgerät kein Kamerabild auf
demMobilteilsichtbarist,
B
dann: schalten Sie das Mobilteil durch Drücken der
Ein/Aus-Taste [8]ein,
B
oder reduzieren Sie die Entfernung zwischen
MobilteilundTürsprechstelle.
Ist dieFunktion immer nochnicht wie erwartet,auch wenn sichdie
Geräte direkt nebeneinander befinden, dann müssen sie erneut
miteinandergepaartwerden(sieheKapitel13.2“Verbindung”).
#
Die Stärke der empfangenen Funksignale wird oben rechts auf
dem Kamerabild am Bildschirm [6] durch das
Symbol angezeigt. Die Balken neben dem Antennensymbol
stellendieStärkedar.
#
Durch ein Symbol oben links auf dem Kamerabild am Bildschirm
wird angezeigt,ob dieTürsprechstelledesgezeigten Kamerabildes
über Netzgerät( ) oderüber Batterien ( ) mitSpannung
versorgtwird.
#
Wurde geklingelt und ein Schnappschussgespeichert, jedoch das
Gespräch an keinem Mobilteil angenommen, wird (mind.) ein
neuer Schnappschuss durch das blinkende roteSymbol oben
links auf dem Startbildschirm angezeigt. Sobald der Menüpunkt
“Bilderzeigen”ausgewähltwurde,erlischtdasSymbol.
#
Eine Tonübertragung ist nur während der aktivierten
Sprechfunktionvorhanden.
11.2 Manuelles Einschalten des Kamerabildes der
Türsprechstelle
!
Drücken Sie eine beliebige Taste [1/2/3/5/7/8] am
eingeschaltetenMobilteil[6],derStartbildschirmerscheint.
!
Drücken Siedie rechteTaste [7 -“Mon” (Monitor)].Bei nur
—
einer gepaarten Türsprechstelle erscheint automatisch deren
Kamerabild, bei zweigepaarten Türsprechstellenwählen Siemit
den Tasten und [2] die gewünschte Türsprechstelle aus
und bestätigen durch Drücken der linken Taste [3 -
—
“Wählen”], danacherscheintderenKamerabild.
Solange das Kamerabild zu sehen ist, bestehen folgende
Möglichkeiten:
!
Um ein Standbild der Kamera aufzunehmen und im Mobilgerät
zu speichern,drücken Siedierechte Taste [7], eserscheint
—
kurzdasSymbol .
!
Durch Drücken der Sprechtaste [1] können Sie die
Sprechfunktion aktivieren: es kann abwechselnd entweder der
TonvomMikrofon [21]der Türsprechstelle überden Lautsprecher
[10] desMobilteils oderder Ton vomMikrofon [4]des Mobilteils
über den Lautsprecher [18] der Türsprechstelle gehört werden
(Wechselsprechfunktion).
Die Sprechfunktion kann durch Drücken der Ein/Aus-
Taste [8] beendet werden, ansonsten wird sie automatisch
nach ca. 45 Sekunden beendet, der Startbildschirm erscheint
wiederundnachca.20SekundenerlischtderBildschirm.
!
Durch Drücken der Türöffnertaste [5] wird ein angeschlossener
Türöffner aktiviert,derStartbildschirmerscheint wiederund nach
ca.20SekundenerlischtderBildschirm.
!
Um das Kamerabild wieder auszuschalten, drücken Sie die
Ein/Aus-Taste [8], ansonsten geschieht dies automatisch
nach ca. 45Sekunden, der Startbildschirmerscheint wieder und
nachca.20SekundenerlischtderBildschirm.
Hinweis:
Bei Nutzungder Türsprechstellemit Batteriebetriebist
das manuelle Einschalten des Kamerabildes nicht
möglich,
Energiesparmodus
da sich die Türsprechstelle im Lieferzustand im
befindet, sie kann kein Signal vom Mobilteil
empfangen -“Monitor” erscheintauf dem schwarzenBildschirm.(Im
Energiesparmodus wird das Kamerabild nur nach Drücken der
Klingeltasteangezeigt).
Um dennoch das manuelle Einschalten des Kamerabildes zu
ermöglichen, müssen Siedie Türsprechstelle inden
umstellen (Achtung:Hierbeientleerensich dieBatterien in der
modus
Dauerempfangs-
Türsprechstellewesentlichschneller):
!
Drücken Sie die Paarungs-Taste [27] an der Türsprechstelle so
lange,bis ertönt.
!
einlangerPiepton
Drücken Sie die Paarungs-Taste an der Türsprechstelle ein
zweitesMalsolange,biseinzweimaligesDing-Dongunddanach
einlangerPiepton
ertönen.
D-9

!
Drücken Sie die Paarungstaste ein drittes Mal, bis
ertönen.
Pieptöne
UmdenEnergiesparmoduswiederherzustellen,
!
drücken Sie die Paarungs-Taste [27] an der Türsprechstelle so
lange, bis ein zweimaliges Ding-Dong und danach
zuhörensind.
Pieptöne
drei kurze
drei kurze
12. Optionale Erweiterung durch ein
Mobilteil DVT50M oder/und eine
Türsprechstelle DVT50T / DVT50T2
DVT50SET
Das Mobilteil des DVT50 SET wurde bereits werkseitig mit der
Türsprechstelle auf Kanal No. 1 gepaart. Beim DVT50 SET können
maximal
ein weiteres Mobilteil und/oder eine weitere Türsprechstelle
mitdemvorhandenenSystemverbundenwerden.
Um eine Funkverbindung zwischen einer Türsprechstelle DVT50T und
einemMobilteilDVT50Maufzubauen,paarenSiesiewiefolgt:
!
Die Türsprechstelle und das Mobilteil müssen mit Spannung
versorgtsein,dasMobilteilmusseingeschaltetsein.
!
Drücken SieeinebeliebigeTaste[1/2/3/5/7/8]am Mobilteil,der
Startbildschirmerscheint.
!
Drücken Sie die linke Taste [3 - “Menü”], um das Menü zu
öffnen.
!
Bewegen Sie sich mit den Tasten und [2] zum Menüpunkt
“Verbindung” und drücken Sie die linke Taste [3 “Wählen”]. Es kann zwischender Türsprechstelledes Sets(Kanal
No. 1) oder einer zweiten Türsprechstelle (Kanal No. 2) gewählt
werden.
!
Bewegen Sie die Raute # durch Drücken von [2] auf den
gewünschtenKanal.
#
Um ein zweites Mobilteil mit der Türsprechstelle desSets zu
verbinden,wählenSieKanalNo.1.
#
Um ein Mobilteil mit einer zweiten Türsprechstelle zu
verbinden,wählenSieKanalNo.2.
!
Drücken Sie die linke Taste [3 - ]. Das Mobilteil piept,
undSiehabennunca.20SekundenZeitfürdiePaarung.
!
Drücken Sie an der Türsprechstelle die Paarungstaste [27] so
lange, bis als Bestätigung der erfolgreichen Paarung drei kurze
Pieptöne anderTürsprechstelle zuhören sind.Am Mobilteil ertönt
nunein“Plop”undderStartbildschirmistwiederzusehen.
DVT50/2SET
Beide Mobilteile des DVR50/2 SET wurden bereits werkseitig mit der
Türsprechstelle aufKanal 1gepaart,einesmitderoberenund einesmit
der unteren Klingeltaste. Mit jeder Klingeltaste kann eine zweite
Türsprechstelleverbundenwerden.
Um ein zweitesMobilteil miteiner Klingeltasteder Türsprechstelledes
Sets aufKanal 1zu verbinden, gehenSie vor,wieim vorigenAbschnitt
beschrieben(DVT50),mitAusnahme desletzten Punktes:
10 - D
—
—
—
!
Drücken Sie an der Türsprechstelle die Paarungstaste [27] so
lange,biseinKlingeltonzuhörenist.
!
Drücken Siedann sofortauf die Klingeltaste,mit derdas Mobilteil
gepaart werden soll. Die Auswahl wird durch Blinken der
entsprechendenKlingeltastebestätigt.
!
Um ein Mobilteil mit einer zweiten Türsprechstelle zu verbinden,
wählenSieKanal2.
HinweisezurFunktionnachErweiterung:
!
Wird aneiner vonzweigepaarten Türsprechstellengeklingelt, ist
oben links auf dem Kamerabild zu sehen, an welcher
Türsprechstelle“1#”oder“2#”geklingeltwurde.
!
Wird an einer Türsprechstelle geklingelt, reagieren alle
gepaarten eingeschalteten Mobilteile entsprechend Kapitel
11.1.
!
Wird an einer Türsprechstelle geklingelt und das Gespräch an
einem von zwei gepaarten Mobilteilen angenommen, erlischt
das Kamerabild am anderen Mobilteil, der Startbildschirm
erscheint dort wieder und nach ca. 20 Sekunden erlischt der
Bildschirm.
13. Einstellungen
13.1 Einstellungen direktüberdieTastenamMobilteil
LautstärkedesKlingeltonsamMobilteil
!
Drücken Sie eine beliebige Taste [1/2/3/5/7/8] am Mobilteil,
derStartbildschirmerscheint.
!
Durch Drücken der Tasten und [2] verringern bzw.
erhöhenSiedieLautstärkedesKlingeltonsamMobilteil.
Bildschirm-Helligkeit
!
Drücken Sie eine beliebige Taste [1/2/3/5/7/8] am Mobilteil,
derStartbildschirmerscheint.
!
Durch Drücken der Tasten und [2] erhöhen bzw.
verringernSiedieBildschirmhelligkeit.
13.2 Einstellungen imMenü
BewegenimMenü
!
Um das Menü zuöffnen, drücken Sie zuersteine beliebige Taste
[1/2/3/5/7/8] amMobilteil, damitderStartbildschirm erscheint
und drücken danach die linke Taste [3 - “Menü”]. Es
erscheinendieMenüpunkteuntereinander.
!
Durch Drücken der Tasten und [2] können Sie zwischen
den Menüpunkten wechselnbzw. ineinem Menüpunktzwischen
denUntermenüpunktenwechseln.
!
Zum Auswählen eines Menüpunktes bzw. eines UntermenüpunktesdrückenSiedielinkeTaste [3 -“Wählen”].
!
Durch Drücken der Tasten und [2] können Sie die
bestehendeEinstellungverändern.
!
Um aus einem Menüpunkt zurück zum Menü zu gelangen bzw.
zum SchließendesMenüs drückenSie die rechteTaste [7 “Zurück”].
—
—
—

!
Ca. 15Sekunden nach demletztenTastendruckschließtdasMenü
automatisch.
LAUTSTÄRKE
des Klingeltons / des Gespräches / Klingelzeit und
DarstellungdesKamerabildesamMobilteil
Gesprächslautstärke: Einstellung der LautstärkedesLautsprechers am
Mobilteil(1bis9Balken)
Werkseinstellung:6Balken
Klingellautstärke: Einstellung der Lautstärke des Klingeltons am
Mobilteil(1bis9Balken)
Werkseinstellung:6Balken
Klingelzeit: Einstellungvon
Dauer des Klingeltons am Mobilteil zwischen
B
0 und 30Sekunden (Einstellung0 Sekunden
bedeutetausgeschalteterKlingelton)
Darstellungsdauer des Kamerabildes
B
zwischen 15 und 30 Sekunden; bei Auswahl
von 0 bis 14 Sekunden beträgt die
Darstellungsdauerautomatisch15s
Werkseinstellung:30Sekunden
HELLIGKEIT
desBildschirmes
EinstellungderBildschirmhelligkeit(1bis9Balken)
Werkseinstellung:3Balken
TASTENTON
Aktivierung (AN) bzw. Deaktivierung (AUS) des Bestätigungstones
nachjedemDrückeneinerTaste
Werkseinstellung:AN
KLINGELTON
Auswahl desMobilteil-Klingeltons (3Melodienwählbar)
Werkseinstellung: Melodie 1
SCHNAPPSCHUS
S-Aktivierung
Aktivierung (AN) bzw. Deaktivierung (AUS) des automatischen
Abspeicherns eines Schnappschusses, nachdem die Klingeltaste [25]
an der Türsprechstelle gedrückt wurde. Der Schnappschuss wird im
Mobilteilabgespeichert.
Werkseinstellung:AN
BILDERZEIGEN
!
Durch Drücken der Tasten und [2] können Siezwischen
-Schnappschüssebetrachten/löschen
denSchnappschüssenwechseln.
!
Um den aktuell auf dem Bildschirm gezeigten Schnappschuss zu
löschen, drückenSie dielinkeTaste [3 - ] undbestätigen
durcherneutesDrückenderlinkenTaste [3 - ].
!
Um alle im Mobilteil gespeicherten Schnappschüsse zu löschen,
—
—
drücken Sie die Türöffnertaste [5] undbestätigen durch
DrückenderlinkenTaste [3 - ].
—
Hinweise:
#
Alle Schnappschüsse werden im integrierten Ringspeicher des
Mobilteils gespeichert.Es könnenmaximal100 Schnappschüsse
gespeichert werden. Ist der Ringspeicher voll, werden die
ältestenSchnappschüsseautomatischüberschrieben.
#
Oben links auf dem Schnappschuss ist erkennbar, von welcher
Türsprechstellen-Kamera (1# oder #2) der Schnappschuss
gespeichert wurde, das wievielte Bild betrachtet wird und die
gesamte Anzahlder gespeichertenBilder(z.B. 014/089).Unten
in der Mitte wird das Datum und die Uhrzeit angegeben, wann
derSchnappschussgespeichertwurde.
Werkseinstellung: Beim Zurücksetzen auf Werkseinstellung werden
allegespeicherten Schnappschüsse gelöscht
DATUMUND ZEIT
!
Durch Drücken der Tasten und [2] wechseln Sie
nacheinander durch Stunde, Minuten (z. B. 21:04 Uhr) , Jahr,
MonatundTag(z.B.2017-08-30).
!
DurchDrückenderTasten und [2] verändernSiedieZahl.
Hinweise:
#
Um auf den gespeicherten Schnappschüssen den exakten
Datums- und Uhrzeit-Stempelzu erhalten, mussdie Einstellung
korrektvorgenommenwerden.
#
Nach einem Akkuwechsel müssen Datum und Uhrzeit erneut
eingestelltwerden.
Werkseinstellung:wirdnichtverändert beim Zurücksetzen
AUßEN EINST.
Lautstärke / Dauer des Klingeltons an der
Türsprechstelle/DauerderTüröffnerschaltung
Hinweise:
#
Bei Verwendung von zweiMobilteilen müssen die Einstellungen
fürdieTürsprechstelleübereinstimmen.
#
Bei Nutzung von zwei Türsprechstellen gelten die Einstellungen
fürbeideTürsprechstellen.
Lautstärke: Einstellung der Lautstärke des Klingeltons an der
Türsprechstelle(1bis9Balken)
Werkseinstellung:5Balken
Klingeldauer(s): Einstellung der Dauer des Klingeltons an der
Türsprechstelle zwischen 0 und 15 Sekunden,
Einstellung 0 Sekunden bedeutet ausgeschalteter
Klingelton
Werkseinstellung:1Sekunde
Entriegl.Zeit(s): Einstellung der Dauer der Türöffner-Relais-
schaltungzwischen1und9Sekunden
Werkseinstellung:3Sekunden
SPRACHE
EinstellungderBildschirm-Sprache
Werkseinstellung:Deutsch
D-11

HINTERGRUNDBILD
EinstellungdesBildschirm-Hintergrundes(3Bilderwählbar)
Werkseinstellung: Bild 1
VERBINDUNG
!
Werkseinstellung:Türsprechstelle(Kanal1)gepaart
Hinweise:
#
#
VERSION
Die oberen beiden Zeilen zeigen die Software-Version des Mobilteils
an, darunter befinden sich die Versionsangaben von Türsprechstelle
#1undggf.auchvon#2.
EINST. PIR
DieseFunktionistnichtverfügbar.
MONITORANZ.
Durch Drücken der Tasten und [2] können Sie zwischen
verschiedenen Bildansichten wählen: Panorama, Vollbild links,
VollbildMitte,Vollbildrechts.
Werkseinstellung:Panorama
-Paarung/LöschungeinerTürsprechstelle
BewegenSiedieRaute# auf diegewünschte Türsprechstelle.
Zur Paarung einer weiteren (an der Spannung angeschlossenen)
Türsprechstelle
!
drückenSiedielinkeTaste [3- ]. DasMobilteil piept.
!
Sie haben nun ca. 20 Sekunden Zeit, um die Paarung an der
Türsprechstelledurchzuführen.
#
DVT50 SET(1 Klingeltaste): DrückenSiediePaarungstaste
[27] so lange, bis als Bestätigung der erfolgreichen
Paarung drei kurze Pieptöne an der Türsprechstelle zu
hörensind.
#
DVT50/2 SET (zwei Klingeltasten): Drücken Sie die
Paarungstaste [27] so lange, bis ein Klingelton zu hören
ist. Drücken Sie dann sofort auf die Klingeltaste, mit der
dasMobilteilgepaartwerdensoll.
Am Mobilteil ertöntnun ein“Plop” undder Startbildschirmist
wiederzusehen.
ZumLöscheneinerTürsprechstelle
!
drückenSiedielinkeTaste [3 - ]und
!
drücken zur Bestätigung erneut die linke Taste
[3- ].
Ist dasMobilteilmiteiner Türsprechstellegepaart,wirddies durch
das Symbol hinter derTürsprechstellen-Nummer(No.1 oder
No. 2) angezeigt.
ProKlingeltaste könnenmaximal zwei Mobilteilegepaart werden.
EskönnenmaximalzweiTürsprechstellenverwendetwerden.
-Bildansicht
—
—
—
ZURÜCKSETZEN-Reset
Hinweise:
#
Beim Zurücksetzen werden alle gespeicherten Schnappschüsse
gelöscht.
#
Nach dem Zurücksetzen ist keine Türsprechstelle mehr mit dem
Mobilteilgepaart.
#
Datum und Uhrzeit werden nicht durch das Zurücksetzen
verändert.
!
Um die Einstellungen auf die Werkseinstellungen
zurückzusetzen,wählenSie“JA”aus.
!
Bestätigen Sie dann durch Drücken der linken Taste [3
-].
—
14. Funktion eines optionalen
Signalgebers / einer optionalen
Türöffnertaste
14.1 Optionaler Signalgeber
Durch Drücken der Klingeltaste [25] der Türsprechstelle, an dem der
Signalgeber angeschlossen ist, wird der Signalgeber für ca. 3
Sekunden geschaltet.
Die Türsprechstelle DVT50T2 verfügt nur über einen verdrahteten
Ausgang für einen Signalgeber. Dieser Ausgang ist der oberen
Klingeltaste zugeordnet, d.h. die Familie, die den Signalgeber
benötigt, mussdie obereKlingeltastewählen.
14.2 Optionale Türöffnertaste
Durch Drücken der angeschlossenen Türöffnertastewird der Türöffner,
der an derselben Türsprechstelle angeschlossen ist wie die
Türöffnertaste, fürdie amMobilteileingestellteDauergeschaltet.
15. Sabotagealarm
Wenn einegepaarte Türsprechstelle beiangelegter Spannung bzw.bei
eingelegter Batterie aus der Schutzhaube genommen wird, ertönt an
der Türsprechstelle und am Mobilgerät für ca. 5 Minuten ein
pulsierender Sabotagealarm.
!
Zum Ausschalten des Sabotagealarms drücken Sie die Ein/AusTaste [8]oderdieSprechtaste [1] einesMobilteils.
16. Funkreichweite
Die Reichweite der Funk-Übertragung ist abhängig von vielen
verschiedenen Faktoren.Im Idealfallsind beifreier Sichtbis zu150 m
erreichbar, inGebäudendagegennur nochbiszu20 m.Eine Garantie
für diese Reichweite ist jedoch nicht möglich, da die örtlichen
Gegebenheiten am Aufstellungsort diese negativ beeinflussen
können.
Um Fehlfunktionen zu vermeiden, darf pro Überwachungsort/
Haus/WohnungnureinFunk-Systeminstalliertwerden.
12 - D

Eine Verschlechterung der Reichweite ist z.B. zu erwarten durch
folgendeEinflüsse:
#
Wände und Decken, insbesondere solche aus Stahlbeton oder
Metall
#
Beschichtete Fenster (z.B. Energiespar-Fenster), Heizkörper,
Spiegel,Metallflächen
#
Elektrische Leitungen und elektrische Geräte (z.B. Elektromotor,
Mikrowellenherd)
#
Geräte auf der gleichen oder benachbarten Funk-Frequenz (z.B.
einWLAN-System)
#
Ziehen Sie vor der Reinigung die Netzgeräte aus der Steckdose
bzw.trennenSiedieSpannung.
#
Die Geräte dürfen äußerlich nur mit einem weichen,
nebelfeuchtenTuchoderPinselgereinigtwerden.
Verwenden Sie zur Reinigung keine Lösungsmittel-haltigen
Reinigungsmittel, Benzine, Alkohole oder ähnliches. Dadurch wird
die Oberfläche der Geräte angegriffen. Außerdem sind die Dämpfe
gesundheitsschädlich und explosiv. Verwenden Sie zur Reinigung
auch keine scharfkantigen Werkzeuge, Schraubendreher,
Metallbürsteno.ä.
17. Batterie-/Akkuwechsel
17.1 Türsprechstelle
Ist nach dem Drücken der Klingeltaste [25] kein Ton an der
Türsprechstelle zu hörenoder erscheint nachdem Klingelnnur noch 1
BalkeninderBatterieanzeige[6],isteinBatteriewechselerforderlich.
IndiesemFall:
!
Lösen Sie zuerst die Torx-Schraube [33] mit dem mitgelieferten
Torx-Schlüssel[41]undentfernen Siesie.
!
Heben Sie die Türsprechstelle [20] aus der Schutzhaube [32]
heraus. Sollte trotz schwacher Batterien ein Sabotagealarm
ertönen, schalten Sie ihn an einem Mobilteil durch Drücken der
Taste [8]oder [1]aus.
!
Entfernen Sie die Schraube im Batteriefachdeckel [30] und
entfernenSiedenDeckel.
!
Entfernen Sie die verbrauchten Batterien und setzen Sie 2 neue
LR14 (C),1,5V alkalischeBatterienpolrichtig indas Batteriefach
[30]ein.
!
Befestigen Sie den Batteriefachdeckel wieder mit der Schraube
aufderTürsprechstelle.
!
Schieben Sie die Türsprechstelle in die Schutzhaube und
schraubenSiesiedortmitderSicherheitsschraubewiederfest.
17.2 Mobilteil
Ist die Ladekapazität des eingelegten Akkus nicht mehr praktikabel,
ersetzenSiedenschwachenAkku,indemSie:
!
denAkkufachdeckel[11]desMobilteilesnachuntenschieben,
!
denAkkuentfernen,
!
einenneuenAkku(3,7V,1100mAh)polrichtigeinsetzenund
!
denDeckelwiederaufschieben.
!
Lassen Sie den neuenAkku vor derersten Inbetriebnahme zuerst
5Stundenvollständigaufladen.
19. OptionalesZubehör
#
Zusätzliches Mobilteil DVT50M inkl. Ladestation, Netzgerät und
Akku, Art. Nr.27087
#
LadestationmitNetzgerätDVT50LfürDVT50M,Art.Nr.27091
#
Zusätzliche Türsprechstelle DVT50T inkl. Schutzhaube,
Art.Nr.27089
#
Zusätzliche Türsprechstelle mit zwei Klingeltasten DVT50T2 inkl.
Schutzhaube,Art.Nr.27090
#
ABS-Winkelhalterung DWT40WH für 45° Eckmontage der
Türsprechstelle(Montagelinksoderrechts),Art.Nr.27083
#
ErsatzakkuDVT50MAKKUfürMobilteilDVT50M,Art.Nr.27084
#
ElektrischerTüröffnerET100,12VDC,255mA, Art.Nr. 37019
#
Schaltnetzgerät NG1000, 12 V DC, 1000 mA, Art. Nr. 32107
(SteckermussfürAnschlussabgeschnittenwerden)
#
Unterputz-Netzgerät ORBIT-12/2000V, 12 V DC, 2A,
IP64,Art.Nr.32163
20. Entsorgung
Sie dürfen Verpackungsmaterial und ausgedienteBatterien,
Akkus oder Geräte nicht im Hausmüll entsorgen, führen Sie
sie der Wiederverwertung zu.Den zuständigen Recyclinghof
bzw. die nächste Sammelstelle erfragen Sie bei Ihrer
Gemeinde.
21. Vereinfachte
EU-Konformitätserklärung
Hiermit erklärtINDEXA GmbH,dass derFunkanlagentyp DVT50Set/
DVT50/2 SETderRichtlinie 2014/53/EUentspricht.Der vollständige
Text der EU-Konformitätserklärung ist unter der folgenden
Internetadresseverfügbar:http://www.indexa.de/w2/f_CE.htm.
18. WartungundReinigung
#
Die Geräte sind wartungsfrei: Öffnen Sie sie deshalb niemals,
außerzumBatterien-bzw.Akkuwechsel.
#
Überprüfen Sie regelmäßig die technische Sicherheit und die
Funktion.
22. RechtlicheHinweise
Dieses Produktoderdiese Softwarekann Codeunter der GNU General
Public License v2, wie z.B. den linux kernel, unter der GNU Lesser
General Public License v2.1 oder unter der Apache Lizenz v2.0
enthaltenoderverwenden.
Wenn Sieweitere Informationenzu Lizenzbedingungen und– soweit
D-13

von der Lizenzverlangt – SourceCodes erhalten möchten, sendenSie
bitte eine E-Mail an copyrequest@indexa.de, um diese kostenlos zu
erhalten. Einige Lizenzen verlangen jedoch die Bereitstellung von
physikalischen Kopien des Source Codes. Auch in diesem Fall können
Sie eine Kopie der Source Codes erhalten, indem Sie uns unter
copyrequest@indexa.de kontaktieren. Für dieseLeistung werden wir
Ihnen diebei uns entstehendennominellenKostenberechnen (d.h.die
Kosten für die physikalische Durchführung der Bereitstellung des
23. Fehlersuche
Fehler
Leeres Bild
Flackerndes Bild
Ganz helles Bild
Es ist ein Pfeifton zu hören
Kein Ton an Mobilteil / Türsprechstelle
Dunkles Monitorbild bei Dämmerung /
Dunkelheit
Das Monitorbild zeigt einen hellen
Hintergrund, der Besuch jedoch erscheint
dunkel
Sabotagealarm ertönt
Die in der Türsprechstelle eingelegten
Batterien entleeren sich innerhalb kurzer
Zeit
Das Kamerabild kann manuell nicht
eingeschaltet werden
Mögliche Ursache
Türsprechstelle wird nicht mit Strom versorgt
Die Türsprechstelle befindet sich außer Reichweite
Verbindung wurde durch Objekte unterbrochen
Signal wurde gestört
Die Geräte sind nicht miteinander gepaart
Starke Lichtquelle im Erfassungsbereich der Kamera
Übersteuerung durch starkes Gegenlicht
Er entsteht durch akustische Rückkopplung
Die Lautstärke am Mobilteil / an der Türsprechstelle ist zu leise
bzw. ausgestellt
Die Türsprechstelle benötigt zusätzliches Licht, um ein gutes
Bild zeigen zu können
Im Hintergrund ist zu viel Gegenlicht
Mit Spannung versorgte Türsprechstelle wurde aus der
Schutzhaube entfernt
Türsprechstelle befindet sich im Dauerempfangsmodus und
verbraucht dadurch schneller die Batterien
Die durch Batterien mit Spannung versorgte Türsprechstelle
befindet sich im Energiesparmodus
SourceCodes.
Ihre Kopie des Produktes enthält möglicherweise keinen
Hinweis:
Code untereiner odermehrerer der Lizenzen,die hieraufgelistetsind,
abhängig von dem exaktenProdukt undder Version, dieSie gewählt
haben.
DieentsprechendenLizenztextefindenSieamEndederAnleitung.
v1.0
Indexa GmbH
Paul-Böhringer-Str. 3
74229 Oedheim
Deutschland
www.indexa.de
Änderungen vorbehalten
Behebung
Entfernen Sie die Schutzfolie vom Akku des Mobilteils
Prüfen Sie Spannungsanschluss, Kabelverbindung bzw.
Batterien
Verringern Sie den Abstand zwischen den Geräten
Entfernen Sie größere Objekte bzw. ändern Sie die
Platzierung von Türsprechstelle und Mobilteil
Stellen Sie sicher, dass sich keine Störquellen in der Nähe
der Kamera bzw. des Mobilteils befinden, beachten Sie
hierzu die Informationen zur “Funkreichweite” Kapitel 7.
Beachten Sie das Kapitel 13.2 (”Verbindung”)
Platzieren Sie die Türsprechstelle an einer anderen Stelle
Ändern Sie die Ausrichtung der Türsprechstellen-Kamera
oder ändern Sie die Platzierung
Platzieren Sie Türsprechstelle und Mobilteil weiter
entfernt von einander
Regeln Sie die Lautstärke am Mobilteil nach unten
Regeln Sie die Lautstärke / die Klingeldauer im Menü des
Mobilteils entsprechend für Mobilteil / Türsprechstelle
Bringen Sie eine Zusatzbeleuchtung an
Bringen Sie eine zusätzliche Beleuchtung an oder ändern
Sie die Montagestelle der Türsprechstelle
Zum Ausschalten des Sabotagealarms drücken Sie die
Ein/Aus-Taste [8] oder die Sprechtaste [1] eines
Mobilteils
Stellen Sie die Türsprechstelle in den Energiesparmodus
um (s. Hinweis unter Kapitel 11.2)
Stellen Sie die Türsprechstelle in den Dauerempfangsmodus um (s. Hinweis unter Kapitel 11.2 Achtung: Batterien entleeren sich wesentlich schneller)
14 - D

F
Instructionsd'utilisation
1. Introduction
Lisez intégralement et soigneusement ces instructions
d'utilisation et dépliez la page 3 avec les illustrations.
Ces instructions d'utilisation font partie intégrante du produit et
contiennent des informations importantes par rapport à sa mise en
serviceetsamanipulation.
Observez toujours les consignes desécurité. Au cas où vousauriez des
questions ousi vousaviez desdoutes parrapport àla manipulationde
l'appareil,prenezcontactavecunepersonnespécialisée.
Conservez soigneusement ces instructions et remettez-les le cas
échéantàuntiers.
2. Utilisationconforme auxinstructions
L'interphone vidéosans fil DVT50secompose d'unportier DVT50T doté
d'un capot de protectionet d'un élément mobileDVT50M avec station
d'accueil et adaptateur secteur.
SET pour des maisons à deux logements se compose d‘un portier
DVT50T2 avec deux sonnettes, avec uncapot de protection et dedeux
élémentsmobilesDVT50M.
L'élément mobileest munid'unécrande 2,4pouces ets'utiliseavecdes
touches.
En appuyantsur latouche "sonnette" duportier, unesonnerie retentit
à l'interphone et sur l'élément mobile (la mélodie de la sonnerie de
l'élément mobileainsique laduréeet levolume de l'élémentmobileet
de l'interphone sont réglables). L'image retransmis en direct par la
caméra apparaît à l'écran et une capture d'écran est enregistrée sur
l'élément mobile(fonction désactivable). Appuyersur latouche "parler
"del'élémentmobile permetd'établir uneconversationensemi-duplex
(les interlocuteursparlent chacun leurtour). Il estpossibled'enregistrer
d'autres captures d'écranpendant laconversation et dedéclencher, ou
non,uneouverturedeporte.
L‘élément mobile permet de changer l‘image de la caméra en format
panoramaoupleinécranavecdétailsélectionnable.
ll estégalement possibled'afficheràtoutmoment l'imagede lacaméra
en appuyantsur un boutonà desfins decontrôle visuel,de démarrerun
dialogue avec leportier etd'enregistrer descaptures d'écran ouencore
dedéclencher,ounon,uneouverturedeporte.
L'image esten couleur.Lorsqu'ilfaitsombre, lesLED blanchesintégrées
dans l'interphone s'activent, pour éclairer le visage d'une personne se
tenant face à la caméra. Dans ce cas, faisant ainsi apparaîtrel'image
en couleur. Si la luminosité est insuffisante, un éclairage
supplémentairepeutaméliorerlaqualitédel'image.
La transmissionsans fildes imageset duson versle récepteurs'effectue
defaçondansledomainedefréquence2.4GHz.
Le DVT50 SET peutêtre complété avecun deuxième portierDVT50T et
L‘interphone vidéo sans fil DVT50/2
un deuxième élément mobile. Le DVT50/2 SET peut être utilisé avec
deux éléments mobiles par sonnette etun deuxième portier DVT50T2
aumaximum.
Le système peut être complété avec un deuxième portier et un
deuxièmeélémentmobile.
De plus, les appareils suivants, disponibles en option, peuvent être
raccordésauportier:
#
un système d'ouverture de porte électrique* déverrouillable
depuisl'élémentmobile
#
un émetteur de signal*(par exemple un carillonou un flash) qui
s'active lorsque l'on appuie sur la touche "sonnette“
SET:surlatouche„sonnette“supérieure)
#
un bouton-poussoir permettant d'activer un système d'ouverture
deporteraccordé
*unealimentationélectriqueséparéeestnécessairedanschaquecas
La station extérieure est conçue pour un montage sous crépi et est
résistant aux intempéries (classe de protection IP55), et est donc
adapté à un montage en extérieur à un endroit abrité. La station
d'accueil (dotée d'un adaptateur secteur) et l'élément mobile doivent
toutefoisêtreprotégésdel'humiditéetdelapluie.
Le portier peut fonctionner soit avec 2 piles LR14(C), soit avec un
adaptateur secteur 9-12 V DC (aucun de ces deux éléments n'est
fourni). La batterie au lithium de l'élément mobile se recharge
automatiquement surla stationd'accueil, quise brancheà l'électricité
230 V~, 50 Hz à l'aide de l'adaptateur secteur fourni. Grâce à sa
batterieintégrée,l'élémentmobileestportatif.
Toute autre utilisation ou modification des appareils n'est pas
conforme et peut engendrer des accidents. Le fabricant décline toute
responsabilité pour les dommages résultants d'une utilisation nonconformeoud'unemauvaisemanipulation.
Cet appareil n'est pas prévu pour être utilisé par des personnes
présentant descapacitésphysiques, sensoriellesoumentales réduites,
ni par des personnes inexpérimentées ou ne connaissant par son
fonctionnement, ni pardes enfants, àmoins que cespersonnes soient
sous la surveillance d'une personne répondant de leur sécurité ou
qu'elles aientreçudes instructionssurle fonctionnementdel'appareil.
Les enfants doivent être surveillés pour qu'ils ne jouent pas avec
l'appareil.
(DVT50/2
3. Pièces fournies à la livraison (voir
illustr. A)
!
Stationextérieure
!
Capot de protection avec vis Torx et clé Torx
F-15

!
Accessoires de fixation
!
Élémentmobile
!
Batterieaulithium
!
Stationd'accueilpourélémentmobileavecadaptateursecteur
!
Instructiond'utilisation
!
DVT50/2 SET: un deuxième élément mobile avec batterie au
lithium,stationd'accueiletadaptateursecteur
4. Équipement
Élémentmobile DVT50M(voirimage A)
1 Touche " parler "
2 Touches / / /
3 Touche gauche
4 Élément mobile
5 Touche d'ouverture de porte (s'allume en bleu lorsque
6 Écran
7 Touche - droite
8 Bouton Marche / Arrêt
9 Microphone
10 Haut-parleur
11 Compartiment à piles
12 Connexion avec la station d'accueil
Stationd'accueil DVT50L(voirimage A)
13 Prise pour l'adaptateur secteur
14 Station d'accueil
15 Témoin de marche LED
16 Connexion élément mobile
16 - F
—
la batterie est chargée)
Affichage sur l'écran de démarrage :
Témoin de batterie pour l'élément mobile
14:37 Heure
Quelqu'un a sonné au portier, mais la
conversation n'a pas été engagée et une capture
d'écran a été enregistrée (le symbole clignote en
rouge et disparaît à l'ouverture du menu
“Afficher les images ")
Batterie dans l'élément mobile presque vide,
chargez-le
Affichage sur l'écran de la caméra :
1# Indique le portier 1 ou 2
Le portier en cours est alimenté en électricité par
un adaptateur secteur
Le portier en cours est alimenté en électricité par
batterie
Témoin indiquant que la conversation a été
engagée et que le mode semi-duplex est activé
Témoin de connexion radio
Une capture d'écran a été enregistrée
14:37 Heure
Station extérieure DVT50T / DVT50T2 (voir image A)
18 Haut-parleur
19 Plaquette patronymique
20 Station extérieure
21 Microphone
22 LED blanches
23 Objectif
24 Éclairage de la touche " sonnerie " (clignote lorsque l'on
appuie sur la touche " sonnette ", puis, le cas échéant, durant
la conversation)
25 Sonnette
26 Touche d'appariement
Taster für TÖ/GND Branchement d'un bouton-poussoir
externe en option permettant d'ouvrir
la porte
DC 9-12V / GND Branchement électrique
NO/COM Pinces permettant de contrôler un
système d'ouverture de porte en option
27 Touche de couplage
28 Orifice pour vis
29 Rabats de verrouillage dans le capot de protection
30 Couvercle du compartiment à piles
31 Fils permettant decommander unémetteurde signalexterne en
option
(DVT50T2:répondentàlatouchesonnettesupérieure)
Accessoires (voir image A)
17 Adaptateur secteur pour la station d'accueil
32 Capot de protection
33 Orifice pour vis de sécurité
34 Aimant pour alarme anti-sabotage
35 Orifice de passage pour fils de branchement
36 Orifice de fixation
37 Vis
38 Vis
39 Cheville
40 Capot pour compartiment de branchement
41 Tournevis de sécurité
42 Vis de sécurité
Exemple de branchement (voir image B) pour :
#
Bouton-poussoir en option permettant d'ouvrir la porte
#
Système d'ouverture de porte en option disposant de sa propre
alimentation électrique
#
Branchement à l'adaptateur secteur
#
Émetteur de signal en option disposant de sa propre
alimentation électrique

5. Données techniques
Station extérieure DVT50T / DVT50T2
Tension d'alimentation 9-12 V DC (stabilisé, min.300 mA)
Consommation électrique max. 200 mA (sous 12 V DC)
Relais d'ouverture Inverseur, puissance commutée max. 1
Relais de contrôle de
l'émetteur de signal
commutée Contact à fermeture, puissance
Capteur d'image caméra 1/4" CMOS couleur
Résolution caméra 640 x 480 pixels
Angles caméra env. 96° (horizontal), 53° (vertical)
Éclairage 6 LEDs infrarouges (pour éclairage du
Fréquence d'envoi 2,412 - 2,472 GHz
Rayonnement rayonnant < 100 mW EIRP
Modulation sans fil GFSK
Portée sans fil max. 100-150 m par vue dégagée
Débitd'images max.15images/seconde
Température de
fonctionnement entre -20 °C et + 50 °C (remarque : la
Classe de protection IP 55
Dimensions 104 x 165 x 50 mm (avec capot de
Élément mobile DVT50M
Batterie lithium 3,7 V, 1100 mAh
dégradation des performances environ 10% après 300 cycles de
Tension de charge sur la station d'accueil
Durée de la première
charge 5 heures
Durée de disponibilité jusqu'à 18 heures en dehors de la
Durée de conversation jusqu'à 2 ou 3 heures en dehors de la
Consommation en courant max. 400 mA
"
2x LR14 (C), 1,5 V piles alcalines
ou
max. 500 mA (sous 2x LR14 (C), 1,5 V)
A sous jusqu'à 15 V AC/DC (durée de
commutation réglable entre 1 et 9
secondes)
max. 1 A sous jusqu'à 15 V AC/DC
(durée de commutation environ 3
secondes)
périmètre proche 0.8m, en cas
d'obscurité)
(dépend de l'environnement
architectural et des interférences radio)
portée radio peut baisser lorsque les
températures sont négatives)
protection)
charge
station
station
"
Fréquence d'envoi 2,412 - 2,472 GHz
Rayonnement rayonnant < 100 mW EIRP
Modulation du signal GFSK
Diagonale de l'écran 2,4" (6,1 cm)
Résolution moniteur 240 x 320 Pixel
Mémoire d'images intégrée Mémoire circulaire, max. 100 captures
d'écran
Température de
fonctionnement entre ± 0 °C et + 40 °C
Dimensions 53 x 187 x 26 mm
Station d'accueil DVT50L
Tension d'alimentation 12 V DC (chargeur)
Consommation en courant max. 300 mA
Température de
fonctionnement ± 0° C bis + 40° C
Dimensions 80 x 105 x 95 mm
Adaptateur secteur pour la station d'accueil
Alimentation électrique 230 V ~ AC, 50 Hz
Sortie 12 V DC, 500 mA
Utilisation uniquement en inérieur
"
"
6. Consignes de sécurité
es consignes suivantes concernent votre sécurité et votre satisfaction
lors de l'utilisationde l'appareil.Veuillez notezque lenon-respect de
ces consignes de sécurité peut conduire à des dommages
conséquents.
Danger!
constituer une menace pour la vie, la santé et les objets
matériels.
!
Ne laissez pas l'appareil, l'emballage ou les petites pièces À
portéedesenfants.Risquedemortparétouffement!
!
N'endommagez aucunes conduitesde gaz,de courantélectrique
ou de télécommunication lors dela fixation! Il y aun danger de
mortoudeblessures!
!
Manipulez les câblesavec précaution.Posez-lesde manièreÀ ce
qu'ils ne soient pas endommagés et qu'ils ne présentent pas de
risque detrébucher. Netirezpas decâblessur desbords saillants
et neles fixezou écrasezpas autrement.Sinon dangerde mortou
deblessures!
!
Pour éviter les blessures, fixez l'appareil conformément aux
instructionsd'installation.
!
Faites en sorte que les appareils (sauf le portier : IP55) et les
adaptateurs secteurn'entrent pasencontactavecl'humiditéetne
plongezpaslesappareilsdansl'eau!Dangerdemort!
!
Utilisez uniquement le chargeur secteur fourni pour la station
d'accueil. Assurezvous avant debrancherle chargeursecteur que
le courantsecteur estconforme àune tensionde 230V ~,50 Hz
etestéquipéd'unfusibleadéquat.
Le non-respect des consignes suivantes peut
F-17

!
Raccordez le portier par câble à l'électricité et veillez à ce qu'il
reçoive la tension indiquée. Assurez vous avant de brancher le
chargeur secteurque le courantsecteur est conformeà une tension
de230V~,50Hzetestéquipéd'unfusibleadéquat.
!
Effectuez le branchement et le montage hors tension! Car il y
auraitdangerdemortparélectrocution!
!
Ne branchez aucune tension extérieure aux bornes de
branchement. Car il y aurait risque de blessure, d'incendie ou un
dangerdemort!
!
Vérifiez quelespiles nesoient pasen court-circuit etne soientpas
jetées au feu.De plus, les pilesne doivent pasêtre rechargées ou
ouvertes.Ceciengendreraitundangerdemortparexplosion!
!
Les piles vides ou endommagéespeuvent engendrer des brûlures
au contact de la peau. Veuillez donc utiliser des gants de
protectionadaptés.
!
Utilisezlesappareilsuniquementaveclestypesdepilesautorisés.
!
Attention! Risque d'explosion si la batterie au lithium n'est pas
remplacée correctement. Remplacer uniquement par le même
typeouéquivalent.
!
Vérifiezlapolaritédespiles.
!
Lorsqu'il n'est pas utilisé pendant une longue période, retirez
toujourslespilesdel'appareil.
!
Ne placezpas lesappareils etles pilesà proximité defeux, source
de chaleur et ne les soumettez pas à de hautes températures en
continu.
!
Protégez les appareils des fortes contraintes mécaniques et des
vibrations!
!
Protégezlesappareilsdeschampsmagnétiquesouélectriques!
!
N'utilisez les appareils qu'avec les pièces d'origine livrées ou les
accessoiresd'origine.
!
Vérifiez avant le montage et la mise en routeque la livraison est
complèteetenbonétat.
!
Ne connectezpas d'appareilendommagé (parex. dommagesdus
au transport). En cas de doute, contactez le service client. Les
réparations et interventions sur les boitiers ne doivent être
effectuéesquepardesexperts.
!
En cas de non-utilisation prolongée, débranchez les chargeurs
secteursdesprisesdecourant.
!
Ce système envoie et utilise un signal radio. Si les appareils ne
sont pasinstallés etutilisés enconformitéavec lesinstructions, ils
peuvent provoquer des interférences avec d'autres appareils ou
leur fonctionnement peut être perturbé. Essayez d'éviter ces
interférencesenchangeantparexemplelesappareilsdeplace.
7. Emplacementdes appareils
Avant d'installer le portier, commencez par déterminer son
emplacement de montage.Avant le montage, vérifiezla transmission
radio,lacommunicationvocale,etlecadragedel'image.
Veuillezprendregardeauxpointssuivants:
Stationextérieure:
!
Placez la station extérieure à une hauteur telle que les visiteurs
peuvent atteindre sans problèmes la touche de sonnerie et que
leurs visages soient dans le champ de la caméra. Faites
particulièrement attention à la taille des enfants, L'angle de
vision vertical dela caméra estd'environ 53°.
!
La station extérieure est en général montée sur le coté par
rapport à la porte d'entrée. Veillez à ce que levisage du visiteur
qui se trouve devant la porte soit visible sur l'écran. L'angle de
vision horizontal de la caméra est d'environ 96° et un cadrage
de l'image (gauche,centre, droîte) estsélectionnable.
!
Un support pour installation à 45° à gauche ou à droite est
disponible en option(voir chapitre "Accessoires en option").
!
Installez la station extérieure de telle sorte qu'aucune lumière
directe ne vienne frapper l'ouverture de l'objectif. Évitez les
contre jours derrière le visiteur : dans ce cas apparait-elle plus
sombre. Testez la qualité de l'image de la camera avant le
montage. Pour cela, allumez l'appareil et placez la station
extérieure à l'emplacement souhaité. Changez si besoin la
position, jusqu'à obtenir uneimage optimale. N'oubliez pasque
le soleil nese trouve pastoujours aumême endroit.
!
La camera possède des LED blanches [22] pour le périmètre
proche. Elles s'allument à la nuit tombante. Vous pouvez
améliorer la qualitéde l'imagede nuit eninstallant unéclairage
supplémentaire.
!
Si vous voulez monter station extérieure en extérieur,
l'emplacement doit être si possible protégé de la pluie. En cas
d'utilisation d'un adaptateur secteur, celui-cidoit être branché à
l'intérieur.
!
Si l'alimentation électrique se fait par un adaptateur secteur,
veillez au bon passage des câbles d'alimentation (utilisez un
câble de branchement d'une section de 0,2 - 0,7 mm²) et
éventuellement des câbles de branchement pour le système
d'ouverture de porte en option / le bouton-poussoir en option /
l'émetteurdesignalenoptionjusqu'aulieudemontage.
!
Si vous souhaitez raccorder un système d'ouverture de porte,
veuillez noter que celui-ci nécessite une alimentation électrique
(max. 1 A sous 15 V AC/DC, voir image B). Veuillez également
consulterlesinstructionsfourniesavecl'appareil.
!
Si vous souhaitez raccorder un émetteur de signal externe,
veuillez noter que celui-ci nécessite une alimentation électrique
(max. 1A sous15 VACou DC,voir imageB). Veuillez également
consulterlesinstructionsfourniesavecl'émetteurdesignal.
Stationintérieure:
!
La station intérieure doit être positionnée sur une surface fixe et
plane, idéalement 1 à 1,50 m au-dessus du sol et pas
directementàcôtéd'unmur(meilleuresconditionsderéception).
18 - F

!
Placez la station d'accueil à un endroit approprié et central à
l'intérieur du logement,par ex.dans lecouloir. Veillezà ceque la
sonneriesoitaudibledanstoutlelogement.
!
Veillez à ce qu'une prise électrique soit bien disponible pour le
raccordement de celui-ci à une distance suffisante pour effectuer
le branchement ducâble de raccordement.
Portéesansfil
Lorsque les conditions sont idéales, il est possible de capter avec une
visibilité dégagée jusqu'à 100 - 150 m, mais dans les bâtiments
seulement jusqu'à 20 m. Cette portée ne peut toutefois pas être
garantie car les conditions du site d'utilisation peuvent avoir une
incidencenégative.
Pour éviter les dysfonctionnements, seul un systèmesans fil peut être
installéparsitedesurveillance/maison/appartement.
Laportéepeutêtrealtéréedanslescassuivants:
#
Mursetplafonds,notamments'ilssontenbétonarméouenmétal
#
Des surfaces de tôle, par exemple réfrigérateur, étagères
métalliques
#
Fenêtres à double vitrage (par exemple les fenêtres pour
l'économied'énergie),lesradiateurs,lessurfacesmétalliques
#
Lignes électriques et appareils électriques (par exemple four à
micro-ondes, téléphones radio, téléphones mobiles, équipement
radio dans la gamme 2,4 GHz, moteurs électriques et câbles
d'alimentation)
#
Appareils à la même fréquence radio ou à une fréquence radio
avoisinante(parexempleunsystèmeWLAN)
8. Montage, branchements et mise en
marche du portier
!
Retirezleportier[20]ducapotdeprotection[32].
!
Placez le capot de protection à l'endroit de montage choisi,
marquez lesemplacements desdeux orificesde montageà percer
[36] et, si nécessaire, l'emplacement d'un orifice de passage de
câbles[35].
!
Percez deux orifices de montage et, si nécessaire, utilisez deux
chevilles[39].
!
Si nécessaire, percezun orifice de passagede câbles adaptépour
l'alimentation électrique du portier et, le cas échéant, d'autres
câbles pour un système d'ouverture deporte en option et / ouun
émetteur designal externe(par exempleun gongextérieur) et/ ou
unbouton-poussoird'ouverturedeporteenoption.
!
Remarque : Pour faciliter le branchement des câbles, il peut être
utile d'utiliserunboîtier encastrédansle murdirectement derrière
lepassagedecâbles.
!
Faites passer tousles câblesnécessaires àtravers l'orificepercé et
celuidepassagedecâblesdanslecapotdeprotection.
!
Fixezlecapotdeprotectionsurlemuràl'aidededeuxvis[38].
!
Encasdefonctionnementsurpile:
!
Dévissez le vis du couvercle de la station extérieure [30] et
soulevezlecouverclee.
!
Placez les 2 piles LR14 (C), 1,5 V piles alcalines (non inclus
dans les éléments livrés) en respectant la polarité dans le
logementdespiles.N'utilisezpasdepilesrechargeables..
!
Fixezlecouverclesurlastationextérieure.
!
Le cas échéant, réglez le mode de consommation d'énergie
selon l'indication du chapitre 11.2, " Affichage manuel de
l'imagedelacaméraduportier".
!
Remarque:
l'affichage manuel de la caméra n'est pas possible, car le
portier est livréen mode économied'énergie. Pour permettre
malgré tout l'affichage manuel de la caméra, vous devez
passer le portier en mode consommation d'énergie (voir
chapître11.2).
!
Détachez précautionneusement le couvercle en plastique de la
plaquette porte-nom [19], sortez l'étiquette, inscrivezle nom et
replacezlecouvercleenplastiquesurlaplaquette.
!
Si vousbranchezun adaptateursecteuret /ou un autreappareil,
respectezleschémaderaccordementB:
Remarques:
#
Chaque bornene doit servirà brancher qu'uneseuleextrémité
de fil.Toutefois, ilestpossible debrancher au maximum2fils
torsadés I-Y(St)Y de0,6 dediamètre dansune borne. S'ily a
trois fils, il convient d'utiliser une borne de connexion ou un
dominoavantlabornedebranchement.
#
L'extrémité de fil dénudé (10 à 12 mm) doit être
complètementenfoncédanslaborne.
!
Pour brancherun adaptateursecteur de9-12 V DC,branchez
les deux fils de l'adaptateur dans les bornes de tension [26]
GND et DC9-12V. :
fonctionner sur piles ET sur adaptateur secteur
dansle mêmetemps !
!
Si nécessaire, branchez un système d'ouverture de porte en
option avecune alimentation électriqueà deuxfils auxbornes
[26] NO/COM(max. 1A sous15V AC/DC).Lors dumontage,
veuillez respecter les instructions figurant dans la notice du
systèmed'ouverturedeporte.
!
Si nécessaire, branchez un émetteur de signal externe en
option avecune alimentation électriqueà deuxfils auxbornes
prévues à cet effet [31] (contact à fermeture, max. 1 A sous
15 V AC/DC; DVT50T2: ne
supérieure).
!
Si nécessaire, branchez un bouton-poussoir d'ouverture de
porteàdeuxfilsauxbornes[26]"TasterfürTÖ"et GND.
!
Si vousn'utilisez pasles filsde branchement[31]pour l'émetteur
designalexterne,coupez-lesdirectementauniveaudesbornes.
!
Avec les quatre vis fournies [37], vissez le couvercle de
branchement [40]fourni surleportierdefaçon àce quelesfils,le
caséchéant,sortentduportierverslebassurlepanincliné.
Lorsque le portier est utilisé avec des piles,
Remarque le portier ne doit pas
répond qu'à la touche sonnette
F-19

!
Appliquez la stationextérieure dansle capotde protection[32] et
vissezlevisTorx[42]àl'aideducléTorx[41] fourni.
Remarque:
extérieure surpiles, posezles câblesde raccordementavec dujeu,
afin de pouvoir accéder au logement des piles de la station
extérieurepourleurremplacementultérieur.
!
Si vous utilisez un adaptateur secteur, branchez-le sur du 230 V
AC.
!
Une foislebranchementau secteureffectué,latouche "sonnette"
s'allumeenvert[24].
!
Retirezlefilmprotecteurdel'objectifdelacaméra[23].
Dans le cas d'un fonctionnement de la station
9. Branchementde l'élémentmobile
!
Reliez la prise àbasse tension del'adaptateur secteur [17]fourni
au connecteur d'adaptateur secteur [13] de la station d'accueil
[14].
!
Branchez l'adaptateur secteur sur une prise secteur adéquate. Le
témoindemarche[15]s'allumeenbleu.
!
Ouvrezlecompartimentàbatterie[11]del'élémentmobile.
!
Retirezlefilm deprotection delabatterie.
!
Insérezlabatterieaulithiumfournieenrespectantlespolarités.
!
Refermezleboîtier.
!
Retirezlefilmprotecteurdel'écran[6].
!
Placez l'élément mobile dans la station d'accueil. Le chargement
de la batterie au lithium démarre automatiquement après
l'insertiondanslastation.
Remarque::
Avant la première mise en service, laissez l'élément mobile se
chargercomplètementpendant5heures.
10. Miseen servicedel'élément mobile
!
Pour mettre l'élément mobile [4] sous tension, appuyez sur la
touche marche/arrêt [8] jusqu'à ce que l'écran dedémarrage
apparaisse. Au bout de 20 secondes, l'écran de démarrage
disparaîtautomatiquement.
!
Pourchangerlalangued'affichagedel'écran:
!
Appuyez sur la touche de gauche [3],
!
appuyez cinq fois sur la touche [2] jusqu'à ce que
l'élément de menu soit sélectionné ;
!
confirmez avec la touche de gauche ,
!
choisissez la langue en appuyant sur les touches und
[2] “ 4 " pour le français.
!
Validez à nouveau avec la touche gauche ,
!
Si l'élément mobile est sous tension, il est possible d'afficher
l'écran de démarrage àtout moment en appuyantsur une touche
[1/2/3/5/7/8]pendantenviron20secondes.
!
Le témoinde chargedelabatterie enhaut à droitede l'écran
[6] de démarrage indique l'état de charge de la batterie de
l'élémentmobile.
—
—
—
!
Pour mettrel'élément mobilehorstension, appuyezsur latouche
marche/arrêt [8] de l'élément mobile pendant que l'écran
estalluméjusqu'àcequecederniers'éteigne.
Remarque:
Sil'élémentmobileesthorstension:
#
ilneréagitpasàlasonnerieauportier,
#
aucuneimagedelacaméran'estenregistrée
#
si unémetteur de signalen optionest branché,celui-ci réagit
àlasonnerie
#
environ 6 secondes après la sonnerie, un double bip retentit
au niveau du portier pourindiquer qu'il n'y apas de réaction
auniveaudel'élémentmobile
11. Fonctions de base
(pour un portier, un
élément mobile et un système d'ouverture de
porte)
11.1 On sonneauportier
!
Sonnerie:
Quandonappuiesurlatouche"sonnette"[25]
#
unléger"plop"retentitauniveauduportier,
#
une sonnerie retentit au niveau de l'élément mobile et du
mélodie réglable sur l'élément mobile,
portier (
durée et volume de la sonnerie réglables ou
désactivablessur l'élémentmobile etleportier
#
Le message " Appel " s'affiche à l'écran [6] de l'élément
mobile, etl'image dela caméraduportier apparaît
panorama. En appuyant sur la touche , il est possible de
sélectionner undétail del‘imageen pleinécran. Enappuyant
sur les touches < et >, il est possible de choisir le détail
gauche, centre oudroite. Le choix peuts‘effectuer pendant la
conversation ouen tantqueréglage debase danslemenu.
le signaln'est pasreçu,l'imagedelacaméradisparaît aubout
de30secondes( ).
#
Dès que le symbole s'affiche, une capture d'écran de
l'image delacaméra duportier est enregistréedansl'élément
mobile(silafonctioncaptured'écranestactivée).
#
L'éclairage [24]de latouche "sonnette"clignote surleportier.
Si laconversation est refusée,leclignotements'arrête aubout
de 30secondes ( ) et unléger "
plop"retentitauniveauduportier.
!
Parler:
Il est possible d'accepter la conversation en appuyant sur la
touche parler [1] et d'activer la fonction dialogue aussi
longtempsquel'imagedelacamérapeutêtrevusurl'écran:
#
lesymbole indiquequecettedernièreestactivée.
#
Tantque lafonction dialogueest active,l'image delacaméra
du portier s'affiche et l'éclairage [24] de la touche sonnette
clignote.
ouauboutdeladuréereglagée
ou aubout de ladurée reglagée
).
en format
Si
20 - F

#
Il est alorspossible d'entendre soitle sondu microphone [21]
du portier viale haut-parleur[10] del'élément mobile,soit le
son dumicrophone[4]de l'élémentmobileviale haut-parleur
[18]duportier(communicationensemi-duplex).
#
Pour prendre une autre capture d'écran de la caméra et la
sauvegarder dans l'élément mobile, appuyezsur la touche de
droite [7]. Lesymbole apparaîtbrièvement
—
#
La fonction dialogue peut être désactivée en appuyant sur la
touche marche/arrêt [8]. Sinon, elle s'arrête
automatiquement au bout de 45 secondes, l'écran de
démarrage réapparaît, puis s'éteintquant à luiau bout de20
secondes. Quand lafonction dialogue est désactivée,un léger
" plop " retentitau niveauduportier.
!
Ouvrir laporte :
Si un système d'ouverture de porte est raccordé au portier, il peut
être activé en appuyant sur le bouton d'ouverture de
porte [5]dès que l'imagede la caméradu portierapparaîtà
l'écran. Lorsque l'on ouvre la porte, la sonnerie et la conversation
sont interrompues. Un léger " plop " retentit au niveau du portier,
l'écran de démarrageréapparaît sur l'élémentmobile, puiss'éteint
à nouveauau boutde 20secondes.
Remarques:
#
Si laluminosité estmauvaise, lesLED blanches[22]sont activées,
si quelqu'un sonne la cloche ou allume manuellementl'image 'a
l'aide de la touche "moniteur" ("Mon"). La zone proche, dans un
rayon de 80 cm autour du portier, est ainsi éclairée. Installer un
éclairage supplémentaire permet d'obtenir une meilleure image
quandilfaitsombre.
#
Si: L'élément mobile ne réagit pas lorsque l'on appuie
B
sur latouche "sonnette",maisqu'ungong retentitau
niveauduportier
ou si l'image de la caméra ne s'affiche pas sur
B
l'élément mobileen casd'utilisationd'unadaptateur
secteur,
ilconvientalors
d'activer l'élémentmobileen appuyantsurla touche
B
marche/arrêt [8]
ou deréduirela distanceentre l'élément mobileetle
B
portier.
Sileproblème persistelorsque lesdeuxappareilssetrouventl'unà
côté de l'autre, il est nécessaire de les coupler à nouveau (voir le
chapitre13.2,"Couplage"-“Inscrip”)
#
Le volumedes signaux radioreçus est affichéà l'écran [6],en haut
à droitede l'imagede lacaméra, aveclesymbole . Lesbarresà
côté du symbole en forme d'antenne représentent l'intensité du
volume.
#
Le symbole en haut à gauche de l'image de la caméra à l'écran
indique si le portierqui envoie l'image fonctionne suradaptateur
secteur( ) ou surpiles ( ).
#
Si l'on sonne et qu'une captured'écran est enregistrée mais que
la conversation n'est pas engagée sur un élément mobile, une
nouvelle capture d'écran(au moins)sera priseet indiquéepar le
symbole rouge clignotant en haut à gauche de l'écran de
démarrage. Dès l'élément de menu " Photos " sélectionné, le
symboledisparaît.
#
La transmission du son est uniquement possible lorsque la
fonctiondialogueestactivée.
11.2 Affichage manuel de l'image de la caméra du
portier
!
Appuyez sur n'importe quelle touche [½/3/5/7/8] de l'élément
mobile[6]allumé;l'écrandedémarrageapparaît.
!
Appuyez sur la touchede droite [7 - “Mon” (Moniteur)]. Si
—
un seul portier est couplé, l'image de sa caméra apparaît
automatiquement ; s'il y en a deux, choisissez celui que vous
voulez à l'aide des touches et [2] et puis confirmez en
appuyant sur la touche de gauche [3 - “Sélect”] pour
—
afficherl'imagedesacaméra.
Tant quel'image delacaméra estaffichée, vousavez lechoix entreles
possibilitéssuivantes:
!
Pour prendre une capture d'écran de la caméra et l'enregistrer
dans l'élémentmobile, appuyezsurlatouchede droite [7],
—
lesymbole apparaît brièvement.
!
Vous pouvez activer la fonction dialogue en appuyant sur la
touche "parler"[1]. Ilestalorspossible d'entendresoitleson du
microphone [21]duportier surlehaut-parleur [10]del'élément
mobile, soit leson du microphone[4] del'élément mobile surle
haut-parleur[18]duportier(communicationensemi-duplex).
!
La fonction dialogue peut être désactivée en appuyant sur la
touche marche/arrêt [8] . Sinon, elle s'arrête
automatiquement auboutde45 secondes,l'écrandedémarrage
réapparaît,puiss'éteintquantàluiauboutde20secondes.
!
Le système d'ouverture de porte peut êtreactivé en appuyant sur
la touche correspondante [5]; l'écran de démarrage réapparaît,
puis s'éteint au bout de20 secondes. Pour éteindre à nouveau la
caméra, appuyez sur la touche marche/arrêt [8]. Sinon,
l'image disparaît automatiquement au bout de 45 secondes,
l'écran de démarrage réapparaît, puis s'éteint au bout de 20
secondes.
Remarque:
Lorsque le portierest utilisé avecdes piles, l'affichage
manuel de la caméra n'est pas possible
, car le portier est
livréen modeéconomie d'énergie.Lemessage"Mon(iteur)"apparaît
sur l'écran noir. (En modeéconomie d'énergie, l'image de lacaméra
nes'affichequ'enappuyantsurlatouche"sonnette"[25].)
Pour permettre malgré tout l'affichage manuel de la caméra, vous
devez passer le portier en mode consommation d'énergie(attention,
lespiless'épuiserontconsidérablementplusvite):
!
Appuyez sur la touche de couplage [27] du portier jusqu'à ce
qu'unlongbipretentisse.
F-21

!
Appuyez une deuxième fois sur la touche de couplage du portier
jusqu'à ce qu' retentisse(avant, un double ding-dong
retentit).
!
Appuyez une troisième fois sur la touche de couplage jusqu'à ce
quedeuxfois"DingDong"et retentissent.
Pourrétablirlemodeéconomied'énergie,
!
appuyez sur la touche de couplage [27] jusqu'à ce que deux fois
"DingDong"ettroisbipscourtsretentissent.
un long bip
troisbipscourts
12. Compléments en option: élément
mobile DVT50M et / ou portier
DVT50T / DVT50T2
DVT50SET
Lélément mobile du DVT50 SET a été associé en usine avec le canal
No. 1du portier. Le DVT50 SET peut être complété avec
mobilesupplémentaireet/ouunportiersupplémentaire
Pour permettreune liaisonradio entreun portierDVT50T etun élément
mobileDVT50M,ilconvientdelesassocierdelamanièresuivante:
!
Le portieretl'élémentmobile doiventêtrealimentés enélectricité,
etl'élémentmobiledoitêtresoustension.
!
Appuyez surn'importequelletouche [1/2/3/5/7/8] del'élément
mobile;l'écrandedémarrageapparaît.
!
Pour ouvrir le menu, appuyez sur la touche de gauche [3 “Menu”].
!
À l'aide des touches et [2] , naviguez jusqu'à l'élément de
menu " Inscrip " puis appuyez sur la touche de gauche [3 “Sélect”]. Vouspouvezchoisir entreleportier duset(canal No.1)
etunportiersupplémentaire(canalNo.2).
!
Déplacez le losange # sur le canal souhaité en appuyant
sur [2]:
#
Afin de connecter un deuxième élément mobile au portier du
set,choisissezlecanalNo.1.
#
Afin de connecter un élément mobile à un deuxième portier,
choisissezlecanalNo.2.
!
Appuyez sur la touche de gauche [3 - " "]. L'élément
mobilebipeetvousavez20secondespourprocéderaucouplage.
!
Appuyez sur latouche de couplage[27] du portierjusqu'à ce que
trois bips courts retentissent pour confirmer l'association;
l'élément mobile émet un "plop" et l'écran de démarrage
réapparaît.
DVT50/2SET
Les deux éléments mobiles du DVT50/2 Set ont été associés en usine
aucanal1 duportier, l‘unàlatouchesonnettesupérieureetl‘autreàla
touche sonnette inférieure. Il est possible d‘associer un deuxième
élémentmobileàchaquetouchesonnette.
Afin d‘associer un élément mobile supplémentaire à une touche
sonnette du portier du set (canal 1), procédez comme décrit dans le
paragraphe supérieur (DVT50 SET) en faisant attention au
changementsuivant:
22 - F
—
un élément
aumaximum.
—
—
!
Appuyez sur la touche d‘appariement [28]du portier jusqu‘à ce
quelasonnerieretentit.
!
Appuyez immédiatement sur la sonnette que vous voulez
connecter.Celle-ciconfirmel‘appariementenclignotant.
!
Afin d‘associer un élément mobile à un deuxième portier,
choisissezcanalNo.2.
Remarque sur le fonctionnement après ajout d'éléments
complémentaires:
!
Lorsque quelqu'un sonne à l'un des deux portiers associés, ilest
possibledevoirenhautà gauchede l'imagedelacamérasil'ona
sonnéauportier"1#"ou"2#".
!
Lorsque quelqu'un sonneà unportier, tous leséléments mobiles
associésréagissentcommedécritauchapitre11.1.
!
Lorsque quelqu'un sonne à un portier et que le dialogue est
accepté sur l'un des deux élémentsmobiles associés, l'image de
la caméra disparaît de l'autre élément mobile, l'écran de
démarrage réapparaît, puis s'éteint à nouveau au bout de 20
secondes.
13. Réglages
13.1 Réglages directement avec les touches de
l'élément mobile
Volumedesonneriedel'élémentmobile
!
Appuyez surn'importe quelletouche[1/2/3/5/7/8] del'élément
mobile;l'écrandedémarrageapparaît.
!
En appuyantsur lestouches et [2] ,vous pouvezbaisser
ouaugmenterlevolumedelasonneriedel'élémentmobile.
Luminositédel'écran
!
Appuyez surn'importe quelletouche[1/2/3/5/7/8] del'élément
mobile;l'écrandedémarrageapparaît.
!
En appuyant surles touches et [2] vous pouvez baisser ou
augmenterlaluminositédel'écran.
13.2 Réglages danslemenu
Naviguerdanslemenu
!
Pour ouvrirle menu,appuyezd'abord surn'importe quelletouche
[1/2/3/5/7/8] de l'élément mobile pour afficher l'écran de
démarrage, puis appuyez sur la touche de gauche [3 “Menu”]. Les différentes rubriques de menu apparaissent les
unessouslesautres.
!
En appuyant sur les touches et [2], vous pouvez passer
d'unmenuàl'autreoud'unsous-menuàl'autre.
!
Pour sélectionner un menu ou un sous-menu, appuyez sur la
touchedegauche [3 -“Sélect”].
!
En appuyant sur les touches et [2] , vous pouvez
modifierlesréglagesexistants.
!
Pour revenirau menuprincipalou pourfermer lemenu,appuyez
surlatouchededroite [7 -“Retour”].
—
—
—

!
Le menuseferme automatiquementenviron15 secondesaprès la
dernièrepressiondebouton.
VOLUME
de lasonnerie/de la conversation/la durée desonnerie et de
l'affichagedel'imagedelacaméradel'élémentmobile
VolumeVoix Réglage du volume du haut-parleur de
l'élémentmobile(1à9barres)
Réglaged'usine : 6 barres
VolumeSonette Réglage du volume de la sonnerie de
l'élémentmobile(1à9barres)
Réglaged'usine : 6 barres
DuréeConnerie Réglagedeladurée
dela sonneriede l'élémentmobileentre
B
0 et 30 secondes, un réglage de
0 seconde indique que la sonnerie est
désactivée
de l'affichage de l'image de la caméra
B
de l'élément mobile entre 15 et
30 secondes, avec une sélection de
0-14 secondes, la durée de l'affichage
estautomatiquementde15secondes
Réglaged'usine : 30 secondes
LUMINOSITÉ
del'écran
Réglagedelaluminositédel'écran(1à9barres)
Réglaged'usine : 3 barres
TONALITÈ
-bipstouches
Activation (MARCHE) ou désactivation (ARRÊT) des bips de
confirmationàchaquefoispressiondebouton
Réglaged'usine : MARCHE
SONNERIE
Choixdelasonneriedel'élémentmobile(3mélodiesauchoix)
Réglaged'usine : Son1
CONFPHOTO
-Activationdelacaptured'écran
Activation (MARCHE) ou désactivation (ARRÊT) de l'enregistrement
automatique d'une capture d'écran lorsque quelqu'un appuie sur le
bouton " sonnette" [25] duportier. La captured'écran est enregistrée
dansl'élémentmobile.
Réglaged'usine : MARCHE
PHOTOS
-consulter/supprimerlescapturesd'écran
!
En appuyantsurles touches et [2], vouspouvez naviguer
entrelesdifférentescapturesd'écran.
!
Pour supprimer la capture d'écran affichéeà l'écran, appuyez sur
la touche de gauche [3 - ] et confirmez en appuyant à
nouveausurlatouchedegauche [3 - ].
!
Pour supprimer toutes les captures d'écran enregistrées, appuyez
—
—
sur la touche d'ouverturede porte [5] puis confirmez en
appuyantsurlatouchedegauche [3 - ].
—
Remarques:
#
Toutes les captures d'écran sont enregistrées dans la mémoire
circulaire del'élément mobile. Ilest possible desauvegarder100
captures d'écran maximum. Quand la mémoire circulaire est
pleine,lesvieillescapturessontautomatiquementécrasées.
#
On peutvoir en hautà gauche dela captured'écran surla caméra
de quel portier (1# ou2#) cette dernière aété enregistrée, le
numéro delaphoto quel'on regarde etlenombre totaldephotos
enregistrées (par exemple 014/089). La date et l'heure de
l'enregistrement dela captured'écrans'affichentenbasaucentre
del'écran.
Réglage d'usine: Quand on réinitialise les paramètres d'usine,
toutesles captures d'écran enregistrées sont effacées
DATEETHEURE
!
En appuyant sur les touches et [2] , il est possible de
modifier, dansl'ordre,l'heure,les minutes(”horloge”arexemple
21h04),l'année,lemoisetlejour(parexemple2017-08-30).
!
En appuyant sur lestouches et [2] , vous pouvezmodifier
leschiffres.
Remarques:
#
Pour conserverun affichageprécis dela dateet del'heure surles
captures d'écran enregistrées, les réglages doivent avoir été
correctementeffectués.
#
Après unchangementdebatterie, ilfaut à nouveauréglerladate
etl'heure.
Paramètresd'usine : pas de modification lors de la réinitialisation
CONF DU PORTAIL
- Volume / durée de la sonnerie au portier /
duréedel'ouverturedeporte
Remarques:
#
Si vous utilisez deuxéléments mobiles, lesréglages doivent être
lesmêmespourleportier.
#
Sivousutilisezdeuxportiers,lesréglagess'appliquentauxdeux.
Volume Réglageduvolumedela sonneriedu portier(1
à9barres)
Réglaged'usine : 5 barres
Tempsdeson. Réglage de la durée de la sonnerie du portier
entre 0 et 15 secondes, un réglage de 0
secondeindiquequelasonnerieestdésactivée
Réglaged'usine : 1 seconde
Tpsd'ouv.Port. Réglage de la durée d'activation du relais
d'ouverturedeporteentre1et9secondes
Réglaged’usine : 3 secondes
LANGUE
Réglagedelalangued'affichage
Réglaged'usine : allemand
F-23

FONDÉCRAN
Réglagedufondd'écran(3imagesauchoix)
Réglaged'usine : Style 1
INSCRIP
-couplage/suppressiond'unportier
!
Déplacezlelosange#surleportiersouhaité.
Pourcouplerunautreportier(alimentéenélectricité)
!
appuyez sur la touche de gauche [3-“ ”]. L'élément
mobileémetunbip.
!
Vousavezalorsenviron 20secondes poureffectuerlacouplage
auportier.
#
DVT50 SET (1 sonnette): Appuyez sur la touche de
couplage [27] du portier jusqu'à ce que trois bips courts
retentissentpourconfirmerl'association.
#
DVT50/2 SET (2 sonnettes):
d‘appariement [28] du portier jusqu‘à ce que la sonnerie
retentit. Appuyezimmédiatement surlasonnette quevous
voulezconnecter.
L'élémentmobileémetun"plop"etl'écrandedémarrageréapparaît.
Poursupprimerunportier
!
appuyezsurlatouchedegauche [3 - ] ,
!
puis appuyez à nouveau sur la touche de gauche [3 -
]pourconfirmer.
Réglaged'usine : portier associé (canal 1)
Remarques:
#
Si l'élémentmobile estassocié àunportier, ceciest indiquépar le
symbole sous lenuméroduportier(no1ouno2).
#
Vous pouvez associer au maximum deux éléments mobiles à
chaque touche sonnette. Il est possible d‘utiliser au maximum
deuxportiers.
VERSION
Les deux lignes du haut indiquent la version du logiciel de l'élément
mobile ; on trouve dessous les informations concernant la version du
portierno1et,lecaséchéant,no2.
RÉGLAGEPIR
Cettefonctionn'estpasdisponible.
CONF.PAR MON.
En appuyant sur la touche et [2], vous pouvez choisir entre le
format panorama,plein éc
droite.
Réglaged'usine: format panorama
RÉIN
-Reset
Remarques:
#
Lors d'uneréinitialisation, toutesles capturesd'écranenregistrées
sonteffacées.
:-Format
ran gauche,plein écrancentre etplein écran
—
Appuyez sur la touche
—
—
#
Après la réinitialisation, plus aucun portier n'est associé à
l'élémentmobile.
#
Laréinitialisationn'affectepasladateetl'heure.
!
Pourréinitialiserlesparamètresd'usine,choisissez"Oui".
!
Ensuite,confirmezaveclatouchedegauche [3 - ].
—
14. Fonctionnement d'un émetteur de
signal en option/d'un système
d'ouverture de porte en option
14.1 Émetteur designalen option
Lorsque l'on appuie sur le bouton " sonnette " [25] du portier auquel
est raccordé l'émetteur de signal, ce dernier est activé pour environ 3
secondes.
Le portierDVT50T2 disposed‘une sortie permettantde commanderun
émetteur de signal externe. Cette sortie est attribuée à la touche
sonnette supérieure,c‘est-à-dire lafamillequi abesoin del‘émetteur,
doit choisirla touchesonnettesupérieure.
14.2 Système d'ouverturedeporte enoption
Lorsque l'on appuie sur la touche d'ouverture de porte connectée, le
système d'ouverture raccordé au même portier que la touche
d'ouverture de porte est activé pour la durée réglée dans l'élément
mobile.
15. Alarmeanti-sabotage
Si un portier associé est retiré du capot de protection alors qu'il est
sous tensionou quelabatterie estinsérée, unealarmeanti-sabotage
retentit pendant environ 5 minutes au niveau du portier et de
l'élémentmobile.
!
Pour désactiver l'alarme anti-sabotage, appuyez sur la touche
marche/arrêt [8] ou sur la touche " parler “ [1] d'un
élément mobile.
16. Portéesansfil
La portée du signal radioest dépendante de plusieursfacteurs. Dans
des conditionsoptimales sans obstacles(entre les deuxantennes) elle
peut atteindre 150 m, à l'intérieur de bâtiments en revanche
seulement20 m.Pour éviter lesdysfonctionnements, seulunsystème
sans fil peut être installé par site de surveillance / maison /
appartement.
Il n'est pas possible de garantir cette portée étant donné que les
paramètreslocauxdulieude l'installationpeuvent avoiruneinfluence
négativesurcelle-ci.
#
Murs et plafonds, notamment s'ils sont en béton armé ou en
métal
#
Des surfaces de tôle, par exemple réfrigérateur, étagères
métalliques
24 - F

#
Fenêtres à double vitrage (par exemple les fenêtres pour
l'économied'énergie),lesradiateurs,lessurfacesmétalliques
#
Lignes électriques et appareils électriques (par exemple four à
micro-ondes, téléphones radio, téléphones mobiles, équipement
radio dans la gamme 2,4 GHz, moteurs électriques et câbles
d'alimentation)
#
Appareils à la même fréquence radio ou à une fréquence radio
avoisinante(parexempleunsystèmeWLAN)
#
L'extérieur des appareilsne doitêtre nettoyé qu'avecun pinceau
ouserviettedouxethumide.
Pour le nettoyage, n'utilisez pas de nettoyants contenant des
solvants, commeessence,alcools,etc... Lasurface de l'appareilserait
attaquée. De plus lesvapeurs sont explosives et nuisiblesà la santé.
N'utilisez pasnon plusd'outilscoupants pourle nettoyagecommepar
ex.tournevis,brosseenmétal,etc...
17. Changementdes piles
17.1 Station extérieure
Si lasonnette [25]dela stationextérieurene produitpas desonou si,
après lasonnette, letémoin despiles [6]n'affiche qu'uneseule barre,
ildevientnécessairedechangerlespiles.
Procédezdelamanièresuivante:
!
Commencez par dévisser la visTorx [33]à l'aide du clé Torx [41]
fournietretirez-la.
!
Retirez précautionneusement la station extérieure [20] du capot
de protection[32]. Si unealarmeanti-sabotageretentit alorsque
les pilessont vides,éteignez-lasur l'élémentmobile enappuyant
surlatouche [8] ou [1] .
!
Dévissez le vis du couvercle du compartiment à piles [30] et
soulevezlecouvercledelastationextérieure.
!
Enlevez les piles usagées et insérez 2 nouvelles piles LR14 (C),
1,5 V piles alcalinesen respectantlapolarité.
!
Fixezlecouvercleduboîtieràpilessurleportieràl'aidedelavis.
!
Insérez leportier danslecapotdeprotectionetvissez-leavecla vis
desécurité.
17.2 Élément mobile
Si la capacité de charge de la batterie insérée n'est plus exploitable,
remplacezlabatterievideenprocédantdelafaçonsuivante:
!
poussez le couvercle du compartiment de batterie [11] de
l'élémentmobileverslebas;
!
retirezlabatterie;
!
placez unenouvelle batterie(3,7V, 1100mAh)en respectantles
polarités
!
puisrepositionnezlecouvercle.
!
Avant la première mise en service, laissez d'abord la nouvelle
batterie sechargercomplètement pendant5heures. sauf encas
deremplacementdespilesoudelabatterie.
18. Entretienet nettoyage
#
Les appareils ne nécessitent aucun entretien: Ne les ouvrez donc
jamais,saufpourlechangementdespiles.
#
Contrôlez régulièrement la sécurité de l'appareil et son bon
fonctionnement.
#
Débranchez le chargeurde la prisede courantavant le nettoyage
oucoupezl'électricité.
19. Accessoiresoptionnels
#
Élément mobile supplémentaireDVT50M avec stationd'accueil,
adaptateursecteuretbatterie,noderéf.27087
#
Station d'accueil avecadaptateur secteur
27091
noderéf.
#
Portier supplémentaire DVT50T avec capot de protection, no de
réf.27089
#
Portier supplémentaire DVT50T2 avec deux sonnettes capot de
protection,noderéf.27090
#
Équerre enABS DWT40WHpourmonter leportier enangle à45°
(à gaucheouà droite),n° de réf.27083Pourcela,tenez compte
des informations concernant la portée du signal énoncées au
chapitre 7.
#
Batterie de remplacement no de
27084
réf.
#
Ouvre porte électrique ET100, no de réf.
37019
#
Alimentation à découpage
32107
réf.
#
Alimentation cachée
32163
réf.
DVT50M AKKU pour DVT50M,
NG1000, 12 V DC, 1000 mA,
ORBIT-12/2000V,12VDC, 2A,IP64,
DVT50L pour DVT50M,
12 V DC, 255 mA,
no de
no de
20. Élimination
Ne jetez pas lematériel d'emballage, les pilesusagées et les
appareils directement,mais amenez-lesà desemplacements
de récupération. La déchetterie ou l'emplacement de
recyclage le plus proche vous seront communiqués par votre
administrationcommunale.
21. Déclaration de conformité
simplifiée
Le soussigné, INDEXA GmbH, déclare que l'équipement
radioélectrique du type DVT50 Set est conforme à la directive
2014/53/UE. Le texte complet de la déclaration UE de conformité
est disponible à l'adresse internet suivante
http://www.indexa.de/w2/f_CE.htm.
F -25

22. Mentionslégales
Ce produit ou ce logiciel peut contenir ou utiliser des codes sous la
licence GNU General Public License v2, comme par exemple le noyau
Linux (Linux kernel),sous la licenceGNU LesserGeneral PublicLicense
v2.1ousouslalicenceApachev2.0.
Si vous souhaitez recevoir de plus amples informations sur les
conditions applicables àla licence et -si celle-ci l'exige- sur lescodes
sources, nous vous prions d'envoyer un e-mail à l'adresse
copyrequest@indexa.de, pour les recevoir gratuitement. Quelques
licencesexigenttoutefoislamiseà dispositionde copiesmatériellesdes
codes sources. Dans cecas, vous pouvezégalement recevoir unecopie
des codes sources en nous contactant à l'adresse e-mail
copyrequest@indexa.de. Pourcette prestation,nous vousfacturerons
les frais nominaux générés auprès de nous (c'est-à-dire les frais
d'exécutionmatérielledemiseàdispositiondescodessources.
23. Résolutiondes problèmes
Problème
Écran vide
Image scintillante
Image très claire
Un bip se fait entendre
Pas de ton
Image de l'écran très sombre dans la
pénombre / l'obscurité
L'image montre un arrière plan très clair
mais le visiteur apparait foncé
L'alarme anti-sabotage sonne
Les piles du portier se vident rapidement
Impossible d'afficher manuellement l'image
de la caméra
26 - F
Cause possibles
La station extérieure n'est pas alimentée en courant
Les stations ne sont pas couplées l'une avec l'autre
La station extérieure est hors de portée
La connexion a été interrompue à cause d'objets
Le signal est perturbé
Forte source lumineuse dans le champ de vision de
lacaméra
Mauvais réglage à cause d'un contre -jour
Il est provoqué par un feed-back acoustique
Le volume de l'élément mobile / du portier est trop bas ou
éteint
La station extérieure requiert un éclairage supplémentaire
pour pouvoir afficher une image de qualité.
Trop de contre jour en arrière plan
Un portier sous tension a été sorti de son capot de
protection
Le portier est en mode consommation d'énergie
Le portier qui fonctionne sur piles est en mode économie
d'énergie
Remarque : Votre copie duproduit necontient peut-êtrepas de code,
que ce soit sous une ou plusieurs des licences listées ici,
indépendamment du produit exact et de la version que vous avez
choisis.
Vous trouverez les textes relatifs à la licence en fin de notice
explicative.
v1.0
Indexa GmbH
Paul-Böhringer-Str. 3
74229 Oedheim
Allemagne
www.indexa.de
Sous réserve de modifications
Rèparation
Vérifiez le chargeur, le câble de liaison et les piles
Retirez le film de protection de la batterie.
Suivre les instructions du chapitre 13.2
Réduisez la distance entre les appareils
Enlevez les gros objets ou bien changez les stations
intérieure et extérieure de place.
Assurez-vous qu'aucune source de perturbation ne
se trouve à proximité de la caméra ou du récepteur,
voir les instructions au chapitre 7 “Portée sans fil”.
Placer la station extérieure à un autre endroit
Changez l'orientation ou l'emplacement de la
caméra
Éloignez la station extérieure et la station interne
l'une de l'autre
Baissez le volume à la station intérieure
Réglez le volume / la durée de sonnerie dans le
menu de l'élément mobile pour l'élément mobile /
le portier
Installez un éclairage supplémentaire
Installez un éclairage supplémentaire ou changez la
station extérieure de place
Pour désactiver l'alarme anti-sabotage, appuyez sur
la touche marche/arrêt [8] ou sur la touche "
parler “ [1] d'un élément mobile.
Réglez le portier en mode économie d'énergie (voir
les instructions au chapitre 11.2)
Réglez le portier en mode consommation d'énergie
(voir les instructions au chapitre 11.2 -Attention:
les piles se vident beaucoup plus rapidement)

GB
Operatinginstructions
1. Introduction
Read through these operating instructions fully and
carefully and while doing so fold out page 3 with the
illustrations. The operatinginstructions belong to this productand
contain important points concerning bringing the appliance into
serviceanditsoperation.
Always pay attention to all safety instructions. Should you have any
questions or beunsure aboutoperating the applianceask aspecialist.
Keep these instructions ina safe placeand should the needarise pass
themontoathirdparty.
2. Properuse
The DVT50 wireless video intercom system consists of a DVT50T door
intercom with a protective cover and a DVT50M mobile unit with
charging station and power supply unit. The DVT50/2 wireless video
intercom system for a two family house consists of a DVT50T2 door
intercom with a protective cover and two doorbell buttons, and two
DVT50Mmobileunits.
Themobileunithasa2.4inchmonitorandisoperatedbybuttons.
When the bell button on the door intercom is pressed, it rings on the
intercom itselfand onthemobile unit(ring toneofthe mobileunitcan
bechanged,ascantheringdurationandvolumeofthemobileunitand
door intercom).The liveimage fromthe cameraappears onthe screen
and a snapshot is saved on the mobile unit (this function can be
deactivated). When the talk button is pressed on the mobile unit, a
conversation can take place using the half-duplex method (intercom
mode). Snapshotscan optionallybe savedduring theconversation and
theoptionaldoorreleasecanbeactivated.
The camera picture can be set to panoramic view or full view with
selectablesections.
It is possible to switch on the camera image on the mobile unit for
visual monitoring,start a conversationthrough the doorintercom, save
snapshots or trigger the optional door releaseat the press of a button
andatanytime.
A colourpicture willbe displayed.When itis dark,thewhite LEDsbuilt
into the intercom are activated to illuminate the face of the person in
front of the camera and the image appears in colour. Additional
lighting can beinstalled toimprove thepicture qualityat low ambient
lightlevels.
The video and audio transmission is wireless using a frequency of
2.4GHz.
The DVT50 system can be extended to include a second intercom
DVT50T and a second mobile unit. The DVT50/2 system can be
operated witha maximumoftwo mobileunits perdoorbellbutton and
aseconddoorintercom.
c
The following devices can also be connected to the intercom if
required:
#
an electric door release* that can be unlocked from the mobile
unit
#
a signal generator* (e.g. a bell or a flashing light) that is
triggered when the doorbell buttonis pressed (DVT/2 SET: when
theupperdoorbellbuttonispressed)
#
abuttontoactivateaconnecteddoorrelease
*separatepowersupplyrequired
The outdoor station is for surface mounting and is weatherproof
(ProtectionclassIP55),itcanbemountedina locationoutdoors which
is sheltered from direct rainfall. The charging station with power
supplyunitandthemobileunitmustbeprotectedagainstmoisture.
The doorintercom canbeoperated eitherwith 2xLR14(C)batteries or
witha9-12VDCpoweradapter(neithersupplied).
The lithiumbattery inthe mobileunit ischarged automaticallyonthe
charging station, which is connected to the mains (230V~, 50 Hz)
via the power supplyunit supplied. Theintegrated battery makes the
mobileunitportable.
Any other use or modification of the device is not authorised. No
liability will be accepted for consequential damages or for damages
caused by improper use or incorrect operation. No liability will be
accepted for consequential damages caused by any function or by
malfunction. Unlessany liability isspecificallyrequired bylaw, claims
for damages, in particular those for personal injury or property
damage causedby non-functioningormalfunctioning ofthe machine,
areexcluded.
This appliance is not intended to be used by people (including
children) with restricted physical, sensory or mental capacities, or a
lack ofexperience and/orknowledge,unlesstheyare supervisedby, or
receive instructions how to use the appliance from a person
responsiblefortheirsafety.
3. Packagecontents(s. fig.A)
!
Outdoorstation
!
Protectivecoverincludingtorxscrewandtorxscrewdriver
!
Fixingmaterial
!
Mobileunit
!
Lithiumbattery
!
Chargingstationformobileunitwithpowersupplyunit
!
Usermanual
!
DVT50/2 SET: additional mobile unit with battery, charging
stationandpowersupplyunit
F -27
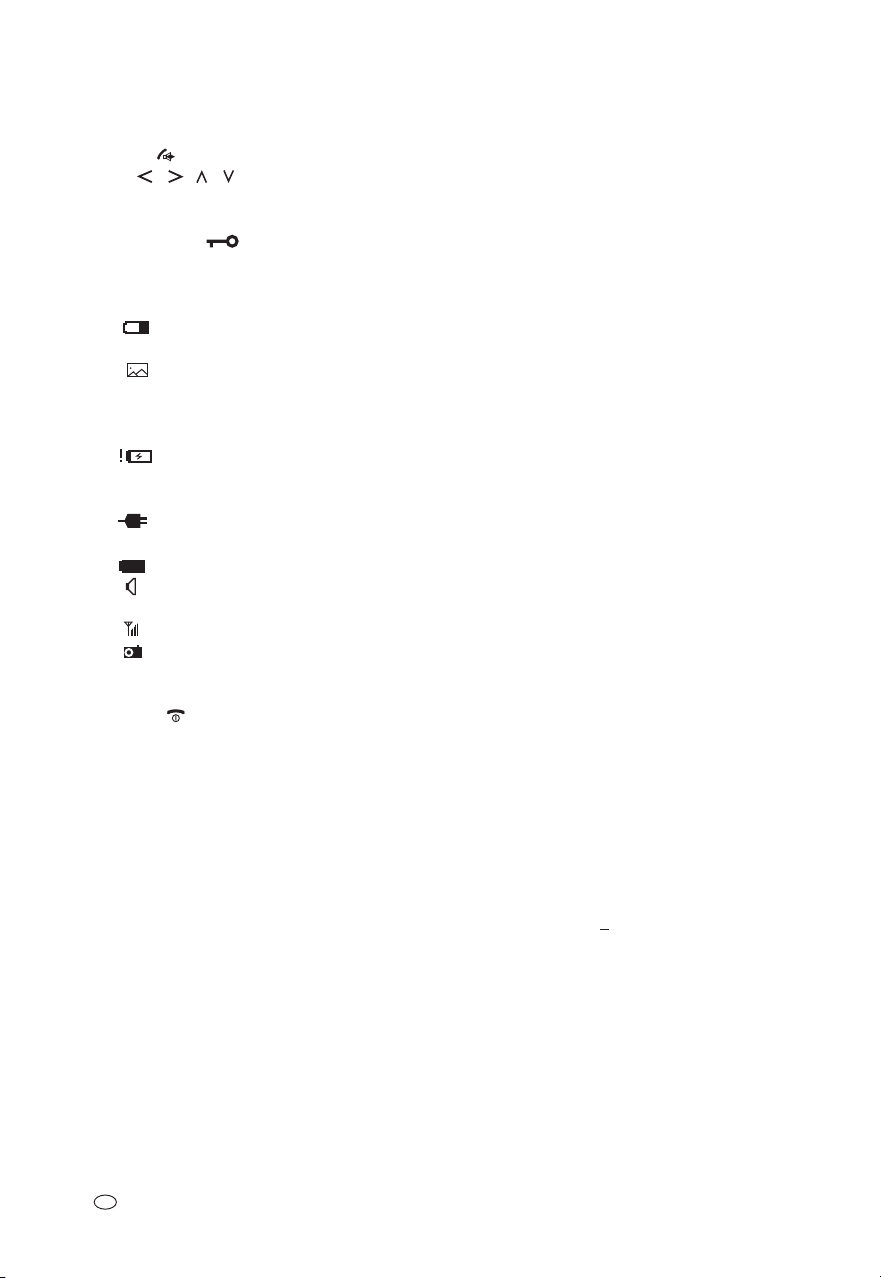
4. Featuresand Equipment
Mobileunit DVT50M(seeFig.A)
1 Talkbutton
2 Buttons / / /
3 Button left
4 Mobileunit
5 Door release button
6 Screen
7 Button right
8 On/Offbutton
9 Microphone
10 Speaker
11 Battery compartmentcover
12 Charging contact
Chargingstation DVT50L(seeFig.A)
13 Connection forpowersupplyunit
14 Charging station
15 Power LED
16 Contact formobileunit
Outdoorstation DVT50T(seeFig.A)
18 Speaker
19 Name plate
20 Outdoor station
21 Microphone
22 White LEDs
23 Lens
24 Light for ring button (flashes on pressing the ring button and
25 Doorbell button
28 - GB
—
(lights blue when the battery is
charged)
Displaysonthestartscreen:
Batterydisplayformobileunit
14:37 Currenttime
The door intercom rang but the conversation was
not accepted and a snapshot was saved (symbol
flashes red - disappears as soon as menu item
“Showimages"isopened)
Batteryinmobileunitalmostempty
Displaysonthecameraimagescreen:
1# Intercom 1or2isspecified
Current intercom is being powered via the power
supplyunit
Currentintercomisbeingpoweredbybatteries
Indication that the conversation has been
acceptedandintercommodeisactive
Connectionindicator
Snapshothasbeensaved
14:37 Currenttime
—
throughoutanyconversation)
26 Connections
Taster für TÖ/GND Connection for an optional external
button to release the door
DC 9-12V / GND Power connection
NO/COM Terminals for controlling an optional
door release
27 Pairing button
28 Hole forscrew
29 Lugs forlockingintotheprotectivecover
30 Battery compartmentcover
31 Wires for controlling an optional external signal generator
(DVT50T2:reactstopressingtheupperdoorbellbutton)
Accessories(see Fig.A)
17 Mains adapterforchargingstation
32 Protective cover
33 Hole forsecurityscrew
34 Magnet fortamperalarm
35 Opening forconnectingwires
36 Fixing hole
37 Screw
38 Screw
39 Plug
40 Cover forconnectioncompartment
41 Screwdriver
42 Security screws
Exampleof connection(see Fig.B)for:
#
Optionalbuttontoopenthedoor
#
Optionaldoorreleasewithseparatepowersupply
#
Powersupplyunitconnection
#
Optionalsignalgeneratorwithseparatepowersupply
5. Technicaldata
Outdoorstation DVT50T
Operatingvoltage 9 - 12 V DC (stabilised, min. 300
Currentconsumption max. 200mA (12V DC)
Doorreleaserelay potential-free changeover contact,
Relayfor
signal generator control potential-free changeover contact,
"
mA)
or
2x LR14 (C),1,5 Valcalinebatteries
max.500mA(2xLR14(C),1,5V)
switching capacitymax.1A withup to 15
V AC/DC (switching duration can be
adjustedbetween1and9seconds)
switching capacity max. 1 A with up to
15 V AC/DC (switching duration approx.
3 seconds)
"

Cameraimagesensor 1/4"CMOScolour
Cameraresolution 640x480pixel
Imageangle approx. 96°(horiz.), 53°(vert.)
Illumination 6 white LEDs (illuminate close range, up
to0.8m,indarkness)
Radiofrequency 2,412-2,472GHz
Radiantemittance <100mAEIRP
Modulation GFSK
Radiorange max. 100-150 m with clear line of sight
(depending on structural and wireless
environment)
Framerate max. 15images/second
Operatingtemperature -20° C to + 50° C (Note: below 0°C the
wirelessrangemaybereduced)
Protectionclass IP 55
Dimensions 104x165x50mm(withprotectivecover)
Mobileunit DVT50M
Lithiumbattery 3,7 V,1100 mAh
Batterypowerdrop app. 10%after300chargingcycles
Chargingpower viachargingstation
Initialchargingtime 5 hours
Standbytime upto18hourswithoutcharging
Conversationtime up to2-3hourswithoutcharging
Powerconsumption max. 400mA
Radiofrequency 2,412- 2,472GHz
Radiantemittance <100mAEIRP
Wirelessmodulation GFSK
Diagonalscreensize 2.4" (6.1cm)
Monitorresolution 240 x320pixel
Integratedimagestorage ring memory,max.100snapshots
Operatingtemperature ± 0°Cto+40°C
Dimensions 53x187x26mm
Chargingstation DVT50L
Powersupply 12 V DC(mainsadapter)
"
Powerconsumption max.300mA
Operatingtemperature ± 0°Cbis+40°C
Dimensions 80x105x95mm
Powersupplyforchargingstation
Powersupply 230 V~AC,50Hz
Output 12V DC,500mA
"
Application indooruseonly
6. Safetyinstructions
The following instructionsare providedfor yoursafety and satisfaction
during operation of the device. Note that non-observance of these
safetyinstructionsresultsinsignificantrisksofaccident.
Failure to complywith the followinginstructions can
Danger!
causefatalinjury,damagetohealthandmaterialdamage.
!
Do not leave small children unsupervised with the device,
packaging material or small parts. Otherwise there is a risk of
fatalinjuryduetochokingorsuffocation.
!
Do not damage any gas, electricity, wateror telecommunication
lines duringdrilling andfixingwork. Otherwisethere aredangers
offire,personalandfatalinjury.
!
Treat the cables carefully. Lay these so that they cannot be
damaged anddonot presentanytripping hazard.Do notpull the
cables over sharp edges and do not crush or crimp them
elsewhere. Otherwisetherearedangers offire,personal andfatal
injury.
!
To prevent injuries, secure the door inter- face reliably in
accordancewiththeinstallationinstructions.
!
Ensure thatthe devices(apart fromthe doorintercom: IP55)and
the powersupplyunit donot come intocontactwith moistureand
do not submerge in water. Otherwise there is a danger of fatal
injury.
!
Only operate the charging station from the supplied power
supply. Before connectingthe powersupply to themains, ensure
that the mains current complies with 230 V ~, 50 Hz and is
fittedwithafuseaccordingtoregulations.
!
When connecting to the mains, ensure that the door intercom is
supplied with the specified voltage by cable and that the mains
current complies with 230 V ~, 50 Hz and is fitted with a fuse
accordingtoregulations.
!
Perform theconnection andinstallation whilethemains poweris
disconnected! Otherwise there is a risk of fatal injury due to
electricshock.
!
Do not connect anyexternal voltage tothe connection terminals.
Otherwisetherearedangersofpersonalandfatalinjuryandfire.
!
Ensure thatthe batteriesarenot shortcircuited orexposedto fire.
The batteriesmust not beopened or recharged.Otherwisethereis
ariskoffatalinjuryduetoexplosion!
!
Leaking or damaged batteries can cause burns by contact with
skin.Handletheseusingsuitableprotectivegloves.
!
Useonlytherecommendedbatterytypes.
!
Attention! Danger of explosion if the battery is not replaced
correctly.Replaceonlybythesameorequivalentbatterytype.
!
Insertthebatterieswiththecorrectpolarity.
!
If the device is not to be used for some period remove the
batteries.
!
Do notplace theequipment andthebatteries nearfire, heatorin
areasofhightemperature.
!
Protect the equipmentand thecables againststrong magneticor
electrical fields and against strong mechanical loads and
vibrations.
!
Only use the equipment with the supplied original parts or
originalaccessories.
!
Before assembly and use check that all parts are included and
thattheyareundamaged.
GB - 29

!
Do not connect any damaged device (e.g. damage in transit).
Repairsto the equipmentmust onlybeperformedbyspecialists.
!
Remove themains adapterfromthe mainsoutletwhen thedevice
isnotrequiredforalongertime.
!
This system transmitsand receives radio-frequencysignals. If the
system is not installed and used according to the instructions it
may cause interference with other apparatus and just as other
apparatus may interfere with the system. Interference can be
reducedbyrepositioningthesystem.
7. Locationof equipment
Before fitting the door intercom, you plan where you want it to go.
Check the wireless connection, the intercom funtion as well as the
imagesectionbeforefitting.
Observethefollowingpoints:
Outdoorstation:
!
Mount the outdoor station at such a height that visitors can
comfortably reach the doorbell button and that the face of the
person ringing the bell is in the field of view of the camera. Pay
attention to the height of children in doing so. The vertical field
of view ofthe camera isapprox. 53°.
!
The outdoor station is usually installed at the side of the
entrance door. Ensure that the face of a visitor standing in front
of the door can be seen on the monitor. The horizontal field of
view of the camera is approx. 96°, an image section
left/middle/right can beadjusted.
!
A bracket for 45° corner fitting on the right or left isavailable as
an option (see"Optional accessories" section).
!
Position the outdoor station so that no direct light or sunshine
falls on the lens. Avoid strong back lighting behindthe visitor: in
this case, the person appears darker on the image. Check the
camera image before mounting. Provisionally connect and
commission the device and hold the outdoor station in the
desired position. If necessary, change theposition until you have
found the desired view. Remember that the position of the sun
changes.
!
The camerahaswhiteillumination [22]for the closerange.Thisis
activated at dark. You can improve the quality of the image at
nightbyusingadditionalillumination
!
If you want to install the outdoor station outdoors, it must be
protected against direct rainfall. If operating with the power
supplyunit,theunitmustbepositionedindoors.
!
If operating with the power supply unit, ensure that there is a
suitable option forfeeding thepower supply cablethrough (use a
connection cablewith awire cross-sectionof 0.2- 0.7mm²) and,
if required,forthe connectioncables tothe optional doorrelease /
optional button/optionalexternal signalgenerator at thepointof
installation.
!
If you wish to connect a door release, please note that this
requires its ownpower supply(max. 1 Aat upto 15 VAC orDC see Fig. B). As well as this, please follow the door release
operatinginstructions.
!
If you wish to connect an external signal generator, please note
that thisrequiresitsown powersupply(max.1 Aatup to15 V AC
or DC - see Fig. B). As well as this, please follow the signal
generatoroperatinginstructions.
Mobileunit:
!
The chargingstation mustbe placedon asolidand levelsurface,
ideally approx.1-1.5 mabove theground andnot directlynext to
awall(optimalreception).
!
Place the charging station in a central position in the dwelling,
eg. in the hallway. Make sure that the chime can be heard
throughoutthedwelling.
!
Note that there must be a suitable power outlet within reach of
the mains adaptercable.
Wirelessrange
By free line of sight between a maximum wireless range of up to
100 -150 m is possible, within buildings this is reduced to maybe
20 m.
The range cannot be guaranteed as it is dependent on the local
conditions.
In order to avoid malfunctions, only one wireless system should be fitted
for eachmonitoring location/building/home.
A reductionof therangewill becausedby:
#
Walls and Floors, in particular those of metal or with metal
reinforcement
#
Sheet metalsurfaces e.g.refrigerator,metal shelves
#
Coated windows (eg. those with Insulating glass), radiators, and
metal surfaces
#
Strong electric fields and other radio equipment, eg. microwave
ovens, radio telephones, mobile phones, radioequipment in the 2.4
GHz range,electric motorsandpower cables
#
Devices usingthe sameorsimilar frequency(eg.WLAN-systems)
8. Fitting, connecting and starting up
the door intercom
!
Removethedoorintercom[20]fromthesafetycover[32].
!
Hold the mounting bracket in the desired location, mark the
position ofthe two fittingholes to bedrilled [36] andofaholefor
thecableifnecessary[35].
!
Drillthetwofittingholesandinserttwoplugs[39]ifrequired.
!
If necessary,drill a suitablehole throughwhich tofeed thecable
for the power supply to the door intercom and any other
connection cables for the optional door release and/or external
signal generator(e.g. anexternalbell)and/or optionalbutton for
openingthedoor.
30 - GB

!
Note: Aflush-mountedsocket inthewall directlybehind the cable
openingmaybehelpfultomakecableconnectioneasier.
!
Feed all the connection cables required through the drilled hole
andthroughthecableopeningintheprotectivecover.
!
Fixthemountingbrackettothewallusingtwoscrews[38].
!
Ifbatteriesaretobeused:
!
Release the battery compartment cover [30] screw and lever
thecoverfromtheoutdoorstation.
!
Insert 2 pcs. LR14(C), 1,5 V alkalinebatteries (not supplied)
into thebattery compartment, payingattentiontothe polarity.
Donotuserechargeablebatteries.
!
Refixthecoverontotheoutdoorstationwiththescrew.
!
Set theenergyconsumptionmode ifnecessary,asdescribed in
the note in section 11.2 "Switching on the intercom camera
imagemanually".
!
If the door intercom is used with batteries, the camera
Note:
image cannot be manually switched on, because the door
intercom isfactory set toenergysavingmode, itcannot receive
signals from themobile unit. To enable manualswitching on
the camera image, the door intercom must be switched to
energyconsumptionmode(seechapter11.2).
!
Carefully lever the plastic cover off the name plate [19], remove
the name plate,label it,re-insert thename plate andreplace the
plasticcoveroverit.
!
If connecting a power supply unit and/or other devices, follow
connectiondiagramB:
Notes:
#
Only one wire should be inserted into each terminal
connection. Amaximum of2J-Y(St)Y wireswith adiameterof
0.6 twisted together may, however, be inserted into one
terminal. With three wire ends, a terminal strip or connector
mustbeusedtojointhewiresbeforetheterminalconnection.
#
The exposed wireend (10-12mm) must beinserted fullyinto
theterminalconnection.
!
Toconnecta9-12 VDC power supplyunit, attachthe twowires
of the supply unitto the GND andDC9-12V power connection
terminals [26].
operated with batteries AND the power supply
unitat thesame time!
!
If you are using an optional door release with its own power
supply, connect it with two wires to terminals [26] NO/COM
(max. 1 A at up to 15 V AC/DC). Please also follow the
information provided in the door release operating
instructions.
!
If you are using anoptional external signal generator withits
own power supply,connect it withthe two wiresfor the signal
generator connection[31] (normallyopencontact, max.1 Aat
up to15 V AC/DC,DVT/2SET:onlyreacts topressingtheupper
doorbellbutton).
Note: The door intercom must not be
!
Ifyou areusing anoptionalbuttontoopenthedoor,connectit
withtwowirestotheterminals[26]"ButtonforDR"andGND.
!
If you are not using the connection cables [31] for the external
signal generator,cut themoff immediatelynext to theconnection
terminals.
!
Screw the connection cover [40] in place on the door intercom
with thefour screwssupplied [37]so thatany cablescome outat
thebottomoftheintercomovertheangledsurface.
!
Push the outdoor station into the mounting bracket [32] and
tighten these using the torx screwdriver [42] and the torx screw
[41].
that if batteries are to be used, any cables should have
Note
enough slackthat theoutdoor stationcanbe removedin orderto
changethebatteries.
!
Ifoperatingwiththepowersupplyunit,connectitto230VAC.
!
When a connectionis madeto thepower supply,the lighton the
ringbutton[24]turnsgreen.
!
Removetheprotectivefoilfromthecameralens[23].
9. Connectionof themobileunit
!
Connect the low voltage plug on the power supply unit [17]
provided to the power supply unit connection [13] on the
chargingstation[14].
!
Plug the power supply into a suitable power socket; the power
indicator[15]turnsblue.
!
Openthebatterycompartment[11]onthemobileunit.
!
Removetheprotectivefoil fromthe battery.
!
Insert the lithium battery provided with the terminals in the
correctposition.
!
Closethebatterycompartmentagain.
!
Removetheprotectivefilmfromthescreen[6].
!
Place the mobile unit on the charging station. Charging of the
lithium battery begins automatically when the mobile unit is
placeonthecharger.
Note:
Before usingfor thefirst time,allowthe mobileunit tocharge up
fullyfor5hours.
10. Using the mobile unit for the first
time
!
To switch on, press and hold the on/off button [8] on the
mobile unit [4] until the start screen appears. The start screen
switchesoffagainautomaticallyafterapprox.20seconds.
!
Tochangetothescreenlanguageofyourchoice:
!
presstheleftbutton [3],
!
press thebutton [2] five timesuntilthe menuitem is
highlighted,
!
confirmwiththeleftbutton ,
—
—
GB - 31

!
set the language by pressing buttons and [2] "0" for
Englishand
!
confirmagainwiththeleftbutton [”Select”].
!
Whenthemobileunitis switchedon, thestartscreencanbeturned
on for approx. 20 seconds at any time by pressing a button
[1/2/3/5/7/8].
!
The batterycharge display at the toprightof thestartscreen
[6]indicatesthechargestatusofthemobileunit.
!
To switch the mobile unit off, press and hold the on/off button
[8] onthe mobileunit withthe screenon untilthe displayon
thescreendisappears.
Note:
Whenthemobileunitisswitchedoff:
#
itdoesnotrespondtoaringonthedoorintercomand
#
nocameraimageissaved
#
but if an optional signal generator is connected, it will still
respondtoaring
#
approx. 6 seconds after a ring, a double tone on the door
intercom can beheard as asignal that thereis no mobileunit
torespond
11. Basic functions
—
(with a door intercom, a
mobile unit and a connected door release)
11.1 There isaringonthe doorintercom
!
Ringing:
Pressingthedoorbellbutton[25]resultsin
#
aquiet"plop"soundonthedoorintercom,
#
a bell rings on the mobile unit and the door intercom (
tone on the mobile unit and ring duration and
volume onthemobile unitanddoor intercomcan
beset orswitched off
#
"Call In" appears briefly on the screen [6] of the mobile unit
and the camera image from the door intercom appears in
panoramic view.By pressing thebutton , a selectedsection
can beshown asfull view,by pressingthe buttons
the right, middle, or left section can be selected. The
selectioncan be done during a call or set in the menu. If the
signal is not received, the camera image switches off after
approx.30seconds(orafterthesetduration).
#
As soon as the symbol is displayed, a snapshot of the
camera image from the door intercom issaved on the mobile
unit (provided that the snapshot function on the menu is
activated).
#
The light[24] onthering buttonon thedoorintercom flashes.
If the conversation is not accepted, the flashing light goes off
after approx.30 seconds (orafter the setduration) and thereis
aquiet"plop"soundonthedoorintercom.
!
Speaking:
By pressing the talk button [1] you can accept the
32 - GB
)
ring
and ,
conversation andactivate thetalkfunction aslong asthe camera
pictureisvisibleonthescreen:
#
Activationisindicatedbythe symbol.
#
As long as the talkfunction is active, thecamera image from
the door intercom is displayed and the light [24]on the ring
buttonflashes.
#
Now either the sound from the microphone [21] on the door
intercom can be heard over the loudspeaker [10] on the
mobile unit or the sound from the microphone [4] on the
mobile unit can be heard over the loudspeaker [18] on the
doorintercominalternation(intercomfunction).
#
Pressthe rightbutton [7] totake another staticimageon
the camera and save it on the mobile unit; the symbol
appearsbriefly.
#
The talk function can be ended bypressing the on/off button
[8]; otherwise, it ends automatically after approx. 45
seconds, the start screen appears again and the screen goes
off after approx. 20 seconds. Ending the talk function is
indicatedbyaquiet"plop"soundonthedoorintercom.
!
Opening thedoor:
If an electric doorrelease is connectedto the doorintercom, it can
be activated by pressing the door release button [5] as
soon as the cameraimage from the doorintercom can beseen on
the monitor. Opening the door stops the ringing process and the
talk function, a quiet "plop" sound can be heard on the door
intercom, the start screen reappears on the mobile unit and the
screen switchesoff afterapprox. 20seconds.
Notes:
#
In poorlight conditions,the whiteLEDs [22]areactivated assoon
as thedoorbell buttonispressed orthecamera imageis switched
on manually with the monitor button ("Mon"). The immediate
area uptomax. 0.8m infront of thedoor intercomisilluminated
by this. Additional lighting must be fitted to achieve a better
imageinthedark.
#
#
B
If: the mobile unit does not respond when the bell
button is pressed butthe ring tonecan be heardon
thedoorintercom
B
or no camera image is visible on the mobile unit
whenoperatingwiththepowersupplyunit,
B
then: switch the mobile unit on by pressing the on/off
button [8]
B
or reducethe distancebetween the mobileunit and
thedoorintercom.
If the system is still not working as expected, even when the
devices are next to one another, they must be paired again (see
section13.2"Register").
The strength of the incoming wireless signal is displayed by the
symbol on the top right of the camera image on the screen
[6].Thebarsnexttotheantennasymbolindicatethestrength.
—

#
A symbol on the top left of the camera image on the screen
indicates whetherthedoor intercomshowingthe cameraimageis
being suppliedwith powerby thepower supplyunit ( ) or by
batteries( ) .
#
If there is a ringon the intercom and asnapshot is saved but the
conversation is not acceptedon a mobile unit,(at least) onenew
snapshot is indicated by the flashing red symbol at the top
left of the screen. As soon as the "Snap Show" menu item is
selected,thesymboldisappears.
#
Transmission of sound is only available whilethe talk function is
activated.
note: inthiscase,the batteriesintheintercom willgoflatsignificantly
morequickly):
!
Press thepairing button[27] onthe doorintercom untilyouhear
longbeep
a.
!
Press thepairing buttonon thedoor intercoma secondtime until
youheartwoding-dongsanda .
!
Press the pairing button a third time until you hear
beeps
.
Toreturntoenergy-savingmode,
!
press thepairing button[27] onthe doorintercom untilyou hear
twoding-dongsand .
longbeep
three short
threeshortbeeps
11.2 Switching on the intercom camera image
manually
!
With the mobile unit switched on, press any button
[1/2/3/5/7/8]tomakethestartscreen[6]appear.
!
Press the right button [7 - “Mon” (Monitor)].With only one
paired door intercom, its camera image appears automatically;
with twopaired intercoms, usethe and [2] buttonstoselect
the intercomrequired,confirm bypressingthe leftbutton [3
-“Select”]andthecameraimageappears.
As long as the camera image is visible, the following options are
available:
!
To take a static image and save it on the mobile unit, press the
rightbutton [7]; the symbolappearsbriefly.
!
By pressingthetalk button[1],you canactivatethe talkfunction:
either the sound from the microphone [21] on thedoor intercom
can be heardover the loudspeaker[10] onthe mobile unitor the
sound from the microphone [4] on the mobile unit can be heard
over the loudspeaker [18] on the door intercom in alternation
(intercomfunction).
The talk function can be ended by pressing the on/off button
[8];otherwise,itends automaticallyafter approx.45seconds,
the start screen appears again and the screen goes off after
approx.20seconds.
!
Pressing the door release button [5] activates a connected door
release, thestartscreen appearsagain and thescreen switchesoff
afterapprox.20seconds.
!
To switch the camera off again, press the on/off button [8];
otherwise, this happens automatically after approx. 45 seconds,
the start screen appears again and the screen switches off after
approx.20seconds.
Note:
When operating the door intercom with batteries, it is
not possibleto switchthecamera imageon manually
the intercomissupplied inenergy-savingmode. "Monitor"appearson
the black screen. (In energy-saving mode, the camera image is
displayedonlywhentheringbutton[25]ispressed).
Ifyou stillwish tobeabletoswitchthecameraimageonmanually,you
have toswitch thedoor intercomtoenergy consumptionmode (please
—
—
—
12. Optional addition of a DVT50M
mobile unit and/or a DVT50T /
DVT50T2door intercom
DVT50SET
The mobile unit of the DVT50 SET has already been paired with the
door intercomon channelNo. 1.Amaximum of
and/or one more door intercom
system.
To establish a wireless connection between a DVT50T door intercom
andaDVT50Mmobileunit,pairthemasfollows:
!
The door intercom and mobile unit must both have a power
supplyandthemobileunitmustbeswitchedon.
!
Press any button [1/2/3/5/7/8]on the mobile unitto make the
startscreenappear.
!
Presstheleftbutton [3 -“Menu”] toopenthemenu.
!
Scroll throughthe menuwith the and [2] buttonsuntil you
reach "Register" and press the left button [3 - “Select”].
Youcan selectbetween doorintercom ofthe set(channel no.1) or
aseconddoorintercom(channel2).
!
Movethehash#tothechannelyourequirebypressing [2]:
#
To connectan additionalmobile unitto thedoor intercomof
theDVT50SET,selectchannelNo.1.
#
To connect a mobile unit to a second door intercom, select
channelNo.2.
!
Press theleft button [3 -“ ”]. Themobile unitbeepsand
younowhaveapprox.20secondstocompletepairing.
!
Press andhold thepairingbutton [27]on thedoorintercom until
you hear three short beeps on the intercom as confirmation that
pairing hasbeen successful;the mobileunitthen makesa "plop"
soundandthestartscreenappearsagain.
as
DVT50/2SET
Both mobile unitsof theDVT50/2 SET havealready beenpaired with
the door intercomon channelNo. 1,one with theupper andone with
the lower doorbell button. Each doorbell buttoncan be paired with a
secondmobileunit.
can be connected to the existing
—
—
one moremobile unit
—
GB - 33

Topaira secondmobile unit witha doorbell buttonof the DVT50/2SET
door intercom (channel No. 1), proceed as described above (DVT50
SET),exceptforthelastpoint:
!
Press thepairing button [28]on the intercomunit, untila ringing
soundcanbeheard.
!
Immediately press the doorbell button you wish to pair. The
selection is confirmed by a flashing of the respective doorbell
button.
!
To pair amobile unit with asecond door intercom, select channel
No.2.
Informationaboutoperationfollowingextension:
!
If there is a ring at oneof two door intercoms, you cansee at the
top left of the camera imagewhere the ring has comefrom: door
intercom"1#"or"2#".
!
When there is a ring at one of the door intercoms, all of the paired
mobile units that are switched on respond as described in section
11.1.
!
If there is a ring at a door intercom and the conversation is
accepted on one of two paired mobile units, the camera image
switches offon the othermobileunit,the startscreenappearson it
andthescreenswitchesoffafterapprox.20seconds.
13. Settings
13.1 Settings adjusted directly by the buttons on the
mobile unit
Volumeoftheringtoneonthemobileunit
!
Press any button [1/2/3/5/7/8] on the mobile unit tomake the
startscreenappear.
!
Pressing the and [2] buttons reduces or increases the
volumeoftheringtoneonthemobileunit.
Screenbrightness
!
Press any button [1/2/3/5/7/8] on the mobile unit to make the
startscreenappear.
!
Pressing the and [2] buttons increases or reduces the
brightnessofthescreen.
13.2 Menu settings
Scrollingthroughthemenu
!
To open the menu, first press any button [1/2/3/5/7/8] on the
mobile unit to make the start screen appear, then press the left
—
button [3 - “Menu”]. The menu items appear underneath
oneanother.
!
By pressingthe and [2] buttons,youcanscroll betweenthe
menuitemsandthroughthesub-menuofamenuitem.
!
Toselect amenu orsub-menuitem,presstheleftbutton [3 “Select”].
!
By pressing the and [2] buttons, you can change the
existingsetting.
34 - GB
—
!
To return to the menu from a menu item or to close the menu,
presstherightbutton [7 -“Back”].
!
Approx. 15 seconds after a button is pressed, the menu closes
—
automatically.
VOLUME
of the ring tone / conversation / ring and camera display
durationonthemobileunit
TalkingVolume Setting for the loudspeaker volume on the
mobileunit(1to9bars)
Factory setting: 6 bars
RingtoneVolume Setting for the ring tone volume on the
mobileunit(1to9bars)
Factory setting: 6 bars
RingingTime Setting for
the duration of the ring tone on the mobile
B
unit between 0 and30seconds. Asetting of0
seconds means that the ring tone is switched
off.
B the camera display duration 15
between and
30 seconds. A setting between 1-14 seconds
will automatically set the duration to 15
seconds
Factory setting: 30 seconds
BRIGHTNESS
ofthescreen
Settingthescreenbrightness(1to9bars)
Factory setting: 3 bars
KEYTONE
Activation (ON) anddeactivation (OFF)of the confirmationtone each
timeabuttonispressed
Factory setting: ON
RINGTONE
Selectionofthemobileunitringtone(from3tunes)
Factory setting: Ring Tone 1
SNAPSET
-snapshotactivation
Activation (ON) and deactivation (OFF) of automatic saving of a
snapshot when the ring button [25] on thedoor intercom is pressed.
Thesnapshotissavedonthemobileunit.
Factory setting: ON
SNAPSHOW
!
-view/deletesnapshots
By pressingthe and [2] buttons, youcan scrollthrough
thesnapshots.
!
To delete the snapshot currently shown on the screen, press the
left button [3 - ] and confirmbypressing theleftbutton
!
To delete all the snapshots saved on the mobile unit, press the
[3- ] again.
—
—
door release button [5] andconfirm bypressing theleft

button [3 - ]..
—
Notes:
#
All snapshots are saved to the integrated ring memory. A
maximum of100snapshots canbe saved.When the ringmemory
isfull,theoldestsnapshotsareoverwrittenautomatically.
#
At the top left of the snapshot you can see the door intercom
camera from which it was saved (#1 or #2), what number
image you are looking at and the total number of images (e.g.
014/089).Thedate andtime atwhichthesnapshotwassavedare
shownatthebottominthecentre.
Factory setting: Restoring the factory settings deletes all the
snapshots
DATEANDTIME
!
By pressing the and [2] buttons, you can change the
hours, minutes (e.g. 21:04), year, month and day (e. g. 2017 08-30)insuccession.
!
Pressingthe and [2] buttonschangesthefigure.
Notes:
#
The settingmust becorrecttogetthe exactdate andtimestampon
thesavedsnapshots.
#
Afterachangeofbattery,thedateandtimemustbereset.
Factory setting: not changed on reset
DOOR SET.
- Volume/duration of the ring tone on the door
intercom/durationofthedoorrelease
Notes:
#
When using two mobile units, the settings for the door intercom
mustbethesame.
#
When using two door intercoms, the settings apply to both
intercoms.
Volume Setting for the ring tone volume on the door
intercom(1to9bars)
Factory setting: 5 bars
RingTime(s) Setting for the duration of the ring tone on the
door intercom between 0 and 15 seconds. A
setting of 0 seconds means that the ring tone is
switchedoff.
Factory setting: 1 second
UnlockTime(s) Setting for the duration of the doorrelease relay
activationbetween1and9seconds
Factory setting: 3 seconds
LANGUAGE
Settingforthescreenlanguage
Factory setting: German
WALLPAPER
-backgroundimage
Settingforthescreenbackground(choiceof3images)
Factory setting: Image 1
-pairing/deletionofadoorintercom
REGISTER
!
Movethehash#tothedoorintercomrequired.
Topairanotherdoorintercom(connectedtothepowersupply)
!
presstheleftbutton [3-“ ”]. Themobileunitbeeps.
!
You now haveapprox. 20 secondsto complete pairingon the
—
doorintercom.
#
DVT50 SET(1doorbell button):Pressand holdthe pairing
button [27]on thedoor intercomuntil youhearthree short
beeps on the intercom as confirmation that pairing has
beensuccessful.
#
DVT50/2 SET (2 doorbel buttons): ress and hold the
pairing button [27] onthe door intercomuntil you heara
ringing sound,then immediately pressthedoorbellbutton
youwishtopair.
The mobile unit then makes a "plop" sound and the start
screenappearsagain.
Todeleteadoorintercom
!
presstheleftbutton [3 - ] ,
!
thenpresstheleftbutton [3 - ] againtoconfirm.
—
—
Factory setting: door intercom paired (channel 1)
Notes:
#
When a mobile unit is paired with a door intercom, this is
indicated by the symbol after the door intercom number
(no.1orno.2).
#
A maximumof twomobile unitscanbe pairedwith eachdoorbell
button.Uptotwodoorintercomscanbeused.
VERSION
The top two lines indicate the software version of the mobile unit;
belowthatistheversionofdoorintercom#1and(ifpresent)#2.
PIRSETTINGS
Thisfunctionisnotavailable.
MONITORSET.
-imageview
By pressing the buttons and you can select different image
views:panoramicview,fullviewleft,middleorright.
Factory setting: panoramic view
RESET
Notes:
#
Resettingdeletesallofthesnapshots.
#
Following a reset, the doorintercom is no longerpaired with the
mobileunit.
#
Thedateandtimearenotaffectedbythereset.
!
Torestorethefactorysettings,select"YES".
!
Thenconfirmbypressingtheleftbutton [3 - ].
—
GB - 35

14. Function of an optional signal
generator / optional door release
button
14.1Optional signalgenerator
When the bell button [25] on the door intercom to which the signal
generator is attached is pressed, the signal generator is activated for
approx.3seconds.
The door intercom DVT50T2 has only one wired output for a signal
generator. Thisoutputis assignedtothe upperdoorbell button, i.e.the
family whoneeds thesignalgeneratorhasto choosethe upperdoorbell
button.
14.2Optional doorrelease button
When the door release button is pressed, the door release that is
connected to the same door intercom as the door release button is
activatedforthetimesetonthemobileunit.
15. Tamperalarm
If apaired doorintercomthat isconnected tothepower supplyorwhich
has batteries fitted is removed from the protective cover, a pulsating
tamper alarm sounds on the door intercom and the mobile unit for
approx. 5minutes.
!
To switch off the tamperalarm, press the on/off button [8]or
the talkbutton [1]onthe mobileunit.
16. Wirelessrange
The wireless range is dependenton many factors. Inan ideal location
and by freeline ofsight betweenboth antennas) arange ofup to150
mispossible,withinbuildingsthisisreducedtomaybe20m.
The rangecannot beguaranteedas itisdependent onthelocal conditions.
In orderto avoidmalfunctions, onlyone wireless system shouldbe fittedfor
each monitoringlocation/building/home.
A reductionof therangewill becausedby:
#
Walls and Floors, in particular those of metal or with metal
reinforcement
#
Sheet metalsurfaces e.g.refrigerator,metal shelves
#
Coated windows (eg. those with Insulating glass), radiators, and
metal surfaces
#
Strong electric fields and other radio equipment, eg. microwave
ovens, radio telephones, mobile phones, radio equipment in the 2.4
GHz range,electric motorsandpower cables
#
Devices usingthe sameorsimilar frequency(eg.WLAN-systems)
17. Changingthe batteries
17.1 Outdoor station
If no sound can beheard after pressing the doorbell button [25] or if
there is only one bar in the battery status indicator [6], then the
batteriesmustbechanged.
36 - GB
Inthiscase:
!
First releasethe torx screwwiththetorx screwdriver[41] provided
andremoveit.
!
Lever the outdoorstation [20] outof themounting bracket [32].
If a tamper alarm sounds despite the battery charge being low,
switch itoff on themobile unit bypressingthe [8] or [1]
button.
!
Unscrew the battery compartment [30] cover screw and remove
thecover.
!
Remove the expired batteries and place 2 new LR14 (C), 1,5 V
alkaline batteries in the battery compartment observing the
correctpolarity.
!
Re-attach the battery compartment cover to the door intercom
withthescrew.
!
Push the doorintercom intothe protective coverand screwit into
positionagainwiththesecurityscrew.
17.2 Mobile unit
If the chargingcapacity ofthe battery insertedis nolonger adequate,
replacetheweakbatteryby:
!
sliding the battery compartment cover [11] on the mobile unit
down,
!
removingthebattery,
!
inserting a newbattery (3.7 V,1100 mAh) withthe terminals in
thecorrectpositionand
!
slidingthecoverbackintoplace.
!
Before using the new batteryfor the first time,allow it to charge
upfullyfor5hours.
18. Maintenanceand cleaning
#
The productsare maintenance-free: Neveropen this, exceptwhen
changingbatteries.
#
Checkthesafetyandfunctionregularly
#
Remove themainsadapters fromthemains socketsordisconnect
fromthepowersupplybeforecleaning
#
Useasoft,slightlymoistclothorbrushtocleanthesurfaces
Do not use cleaning agents containing solvents, Petrol, alcohol or
similar. These can be damage the surfaces. Also the fumes cause a
danger to health and of explosion. Do not use any sharp tools (eg
screwdrivers)ormetalbrushesforcleaning.
19. OptionalAccessories
#
Additional DVT50M mobile unit including charging station,
powersupplyunitandbattery,art.no.27081
#
ChargingstationwithpowersupplyunitDVT50L,art.no.27091
#
Additional door intercom DVT50T includingprotective cover, art.
no.27082
#
Additional door intercom with two doorbell buttons DVT50T2
includingprotectivecover,art.no.27090
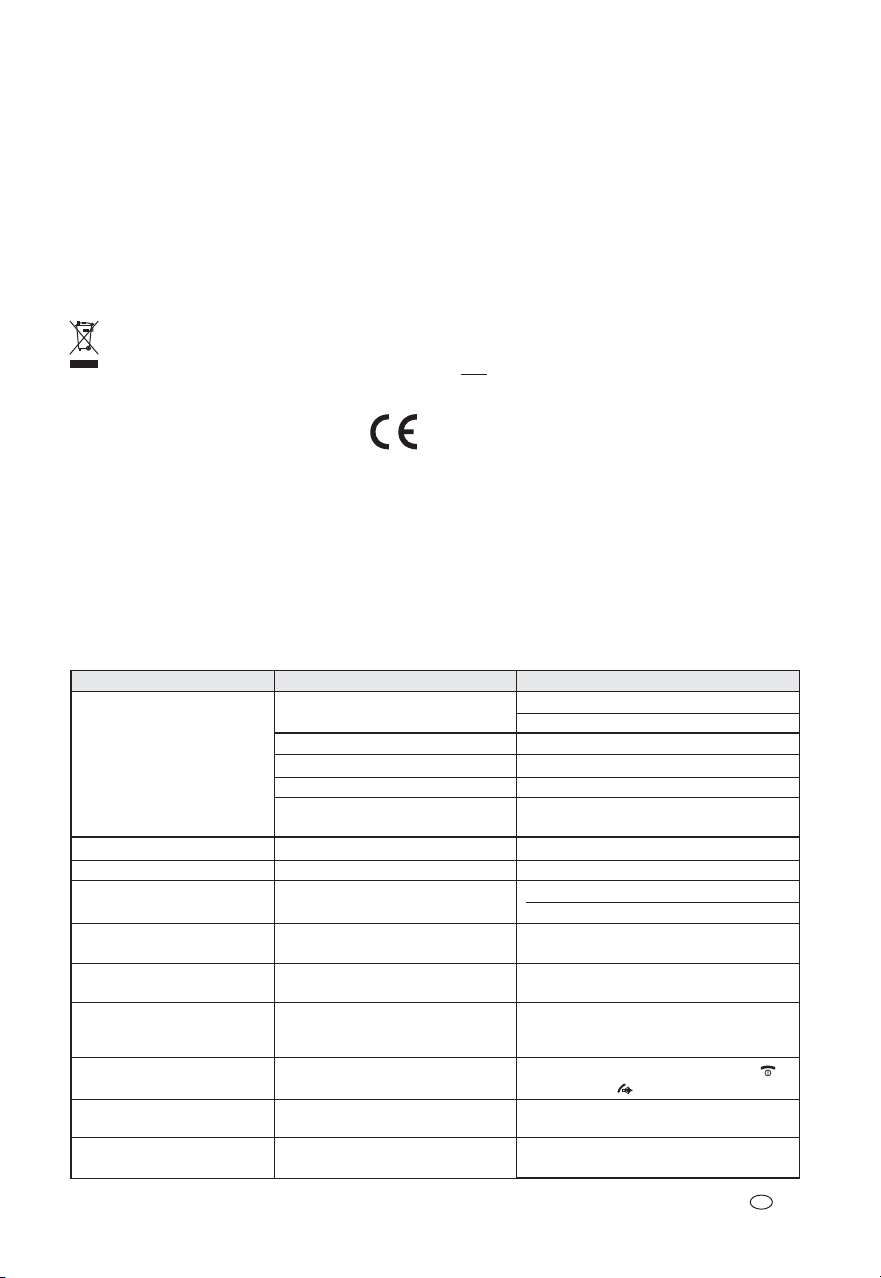
#
ABS angle bracket for 45° corner fitting of the door intercom
(fittingontheleftorright),art.no.27083
#
SparebatteryDVT50MAKKU,art.no.27084
#
DooropenerET100,art.no.37019
#
Switching power supply
NG1000, 12 V DC, 1000 mA, Art. Nr.
32107
#
Flush-mount power supply
ORBIT-12/2000V, 12 V DC, 2A,
Art.Nr.32163
20. Disposal
Do not dispose of packaging material, used batteries or
products as household waste. Please use your recycling
system.Detailsareavailablefromyourlocalauthority.
21. Simplified EU declaration of
conformity
Hereby, INDEXA GmbH declaresthat theradio equipment typeDVT50
Set isincompliance withDirective2014/53/EU. Thefull text ofthe EU
declaration ofconformityisavailable atthe following internetaddress:
http://www.indexa.de/w2/f_CE.htm.
23. Troubleshooting
Problem
Empty screen
Unstable image
Image too brightness
A whistling sound can be heard
No sound
Dark monitor image during twilight /
darkness
The monitor image displays a bright background, however the visitor is displayed
dark
Tamper alarm has been triggered
The batteries in the door intercom go flat very
quickly
The camera image cannot be switched on
manually
Cause
Outdoor station has no power
The devices are not paired with each other
Outdoor station is too far apart
Wireless connection is blocked
Interference with wireless signal
Strong light source in camera view
Overexposure due to strong light source
It is produced by acoustic feedbackg
The volume on the mobile unit / door intercom is too
low or is switched off
The outdoor station requires additional lighting to be
able to display a good image
There is too much backlighting in the background
Door intercom with power supply has been removed
from the protective cover
Door intercom (operated with batteries) is in energy
consumption mode
Door intercom (operated with batteries) is in energy-
22. LegalNotices
This product or software may contain or make use of code under the
GNU General Public License v2 e.g. the linux kernel, the GNU Lesser
GeneralPublicLicensev2.1ortheApachelicencev2.0.
For furtherinformation regardinglicense termsand –where required
by license – source codes please send an email to
copyrequest@indexa.de to get them free of charge. Some licenses,
however, requirethe provision ofphysical copies ofthe source code.In
this case, youmay obtaina copy ofthe sourcecodes by contactingus
as well via copyrequest@indexa.de. A nominal fee (i.e., the cost of
physically performing the sourcedistribution) will becharged for this
service.
Note:
your copyof thisproduct maynot containcodecovered byone or
more of the licenses listed here, dependingon the exact product and
versionyouchoose.
Thecorrespondinglicensetextscanbefoundattheendofthemanual.
v1.0
Indexa GmbH
Paul-Böhringer-Str. 3
74229 Oedheim
Germany
www.indexa.de
Subject to change
Remedy
Check the mains adapter, cable connections and batteries
Remove the protective foil from the battery of the mobile unit
See chapter 13.2
Reduce the distance between the devices
Remove large objects or change the location of the stations
Remove sources of interference from the devices, note the
information about "wireless range" in section 7 here
Relocate the outdoor station
Relocate the outdoor station
Place the stations further apart
Reduce the volume on the indoor station
Adjust the volume / ring duration for the mobile unit / door
intercom as necessary on the menu of the mobile unit
Install additional lighting
Install additional lighting or change the location of the outdoor
station
To switch off the tamper alarm, press the on/off button
[8]or the talk button [1] on the mobile unit.
Switch the door intercom to energy-saving mode (see note
under section 11.2)
Switch the door intercom to energy consumption mode (see note
under secrion 11.2, Note: the batteries will go flat very quickly)
GB - 37

LegalNotices
This product or software may contain or make use of code under the GNU General Public
License v2 e.g. the linux kernel, the GNU Lesser General Public License v2.1 or the Apache
licence v2.0.
For further information regarding license terms and – where required by license – source
codes please send an email to copyrequest@indexa.de to get them free of charge. Some
licenses, however,require the provision ofphysical copies ofthe source code. Inthis case, you
may obtaina copyof the sourcecodes by contactingus aswell via copyrequest@indexa.de.A
nominal fee(i.e., the cost ofphysically performing the sourcedistribution) will be chargedfor
this service.
your copy of this product may notcontain code covered byone or more of the licenses
Note:
listed here,depending onthe exact productand versionyou choose.
GNU GENERAL PUBLIC LICENSE Version 2, June 1991Copyright (C) 1989, 1991 Free
Software Foundation, Inc. 51 Franklin Street, Fifth Floor, Boston, MA 02110-1301, USA
Everyone is permitted to copy and distribute verbatim copies of this license document, but
changing it is not allowed. Preamble The licenses for most software are designed to take away
your freedom to share and change it.By contrast, the GNU General Public License is intended to
guarantee your freedom toshare and change free software--to makesure the software is free for
all itsusers. This GeneralPublic Licenseapplies to mostof the FreeSoftware Foundation'ssoftware
and to any other program whose authors commit to using it. (Some other Free Software
Foundation softwareis covered bythe GNULesser General PublicLicense instead.)You can applyit
to yourprograms, too. When wespeak of freesoftware, we arereferring to freedom,not price. Our
General Public Licensesare designed to make surethat you have the freedomto distribute copies
of freesoftware (and chargefor this serviceif you wish),that you receivesource code orcan get itif
you wantit, that youcan changethe software oruse pieces ofit innew free programs;and that you
know you can do these things. To protect your rights, we need to make restrictions that forbid
anyone todeny you theserights or toask you tosurrender the rights.These restrictions translateto
certain responsibilities for you if you distribute copies of the software, or if you modify it.For
example, if youdistribute copies of sucha program, whether gratis orfor a fee, you mustgive the
recipients all the rights that you have.You must make sure that they, too, receive or can get the
source code.And you mustshow themthese terms sothey know theirrights. We protectyour rights
with two steps: (1) copyright the software, and (2) offer you this license which gives you legal
permission to copy, distribute and/ormodify the software. Also, for each author's protection and
ours, we want to make certain that everyone understands that there is no warranty for this free
software. If the software is modified by someone else and passed on, we want its recipients to
know that what they have isnot the original, so that any problems introduced by others will not
reflect on the originalauthors' reputations. Finally, any free program isthreatened constantly by
software patents. We wish to avoid the danger that redistributors of a free program will
individually obtain patentlicenses, in effect making the program proprietary.To prevent this, we
have made it clear that any patent must be licensed for everyone's free use or not licensed at
all.The preciseterms andconditions for copying,distribution andmodification follow.
TERMS ANDCONDITIONS FORCOPYING, DISTRIBUTION ANDMODIFICATION
0. This License applies to any program or other work which contains a notice placed by the
copyright holder saying it may bedistributed under the terms of this General Public License. The
"Program", below,refers to anysuch program orwork, and a"work based onthe Program" means
either theProgram orany derivative workunder copyrightlaw: that isto say, awork containingthe
Program or a portion of it, either verbatim or with modifications and/or translated into another
language. (Hereinafter, translation is included without limitation in the term "modification".)
Each licensee is addressed as "you".Activities other than copying, distribution and modification
are not covered by this License; theyare outside its scope. The act of running the Program is not
restricted, and theoutput from the Programis covered only if itscontents constitute a work based
on theProgram (independent ofhaving been madeby running the Program).Whether that istrue
depends onwhat theProgram does.
1. You maycopy and distribute verbatim copies ofthe Program's source code as youreceive it, in
any medium, provided that you conspicuously and appropriately publish on each copy an
appropriate copyright notice and disclaimer of warranty; keep intact all the notices that refer to
this License and to the absence of any warranty; and give any other recipients ofthe Program a
copy of this License along with the Program. You may charge a fee for the physical act of
transferring acopy, andyou may atyour optionoffer warranty protectionin exchangefor a fee.
2. You may modify your copy or copies of the Program or any portion of it, thus forminga work
based on the Program, and copy and distribute such modifications or work under the terms of
Section 1 above, provided that you also meet all of these conditions: a) You must cause the
modified files to carry prominent notices stating that you changed the files and the date of any
change. b)You mustcause any workthat youdistribute or publish,that inwhole or inpart contains
or is derived from the Program or any part thereof,to be licensed as a whole at no charge to all
third parties under the terms of this License. c) If the modified program normally reads
commands interactively when run,you must cause it, when started runningfor such interactive
use in the most ordinary way, to print or display an announcement including an appropriate
copyright notice and a notice that there is no warranty (or else, saying that you provide a
warranty) and that users may redistribute the program under these conditions, and telling the
user howto view acopy of thisLicense. (Exception:if the Programitself is interactivebut does not
normally print such anannouncement, your work based on theProgram is not required to print
an announcement.)These requirements apply to the modified work as a whole. If identifiable
sections of that work are not derived from the Program, and can be reasonably considered
independent and separateworks in themselves, thenthis License, and itsterms, do not apply to
those sections when you distribute them as separate works. But when you distribute the same
sections as part ofa whole which is a work based onthe Program, the distribution of the whole
must be on the termsof this License, whose permissions for other licenseesextend to the entire
whole, andthus to eachand every part regardlessof who wroteit. Thus, itis not the intentof this
section toclaim rights orcontest your rightsto workwritten entirely byyou; rather, theintent is to
exercise the right to control the distribution of derivative or collective works based on the
Program. In addition, mere aggregation of another work not based on the Program with the
Program (orwith a workbased on theProgram) on avolume of astorage or distributionmedium
does notbring theother work underthe scopeof this License.
3. You may copy and distribute theProgram (or a work based on it, under Section 2) in object
code orexecutable form underthe terms ofSections 1 and2 above providedthat you alsodo one
of the following: a) Accompany it with the complete corresponding machine-readable source
code, which must be distributed under the terms of Sections 1 and 2 above on a medium
customarily used for software interchange;or, b) Accompany it with a written offer, valid for at
least three years, to give any third party, for a charge no more than your cost of physically
performing source distribution, acomplete machine-readable copy of the corresponding source
code, tobe distributed underthe terms ofSections 1 and 2above on amedium customarily used
for softwareinterchange; or, c) Accompany itwith the information youreceived as to theoffer to
distribute corresponding source code. (This alternative is allowed only for noncommercial
distribution and onlyif you received theprogram in object code orexecutable form with such an
offer, inaccord with Subsection babove.)The source codefor a work meansthe preferred formof
the workfor making modificationsto it. For anexecutable work, completesource code meansall
the sourcecode for all modulesit contains, plusany associated interfacedefinition files, plus the
scripts used to control compilation and installation of the executable. However, as a special
exception, the sourcecode distributed need notinclude anything that is normallydistributed (in
either source or binary form) with the major components (compiler, kernel, and so on) of the
operating system on which the executable runs, unless that component itself accompanies the
executable. If distributionof executable or object codeis made by offeringaccess to copy from a
designated place, then offering equivalent access tocopy the source code from the same place
counts asdistribution of thesource code, even thoughthird parties arenot compelled tocopy the
source alongwith theobject code.
4. Youmay not copy, modify, sublicense,or distribute the Program exceptas expressly provided
under thisLicense. Anyattempt otherwise tocopy, modify, sublicenseor distributethe Program is
void, andwill automatically terminateyour rights underthis License. However,parties who have
received copies, or rights,from you under this License willnot have their licenses terminated so
long assuch partiesremain in fullcompliance.
5. Youare notrequired to acceptthis License, sinceyou have notsigned it. However,nothing else
grants you permission tomodify or distribute the Program orits derivative works. These actions
are prohibitedby law ifyou do notaccept thisLicense. Therefore, bymodifying or distributingthe
Program (orany work based onthe Program), you indicateyour acceptance of thisLicense to do
so, and all itsterms and conditions for copying, distributing ormodifying the Program or works
based onit.
6. Each time you redistribute the Program (or any work based on the Program), the recipient
automatically receives a license from the original licensor to copy, distribute or modify the
Program subject to these terms andconditions. You may not impose any further restrictions on
the recipients' exercise of the rights granted herein. You are not responsible for enforcing
compliance bythird partiesto this License.
7. If, asa consequence of acourt judgment or allegationof patent infringement or forany other
reason (not limited to patent issues), conditions are imposed on you (whether by court order,
agreement or otherwise) that contradict the conditions of this License, they do not excuse you
from the conditions of thisLicense. If you cannot distribute so as to satisfysimultaneously your
obligations under this License and any other pertinent obligations, then as aconsequence you
may not distributethe Program atall. For example, ifa patent license would notpermit royaltyfree redistribution of the Program by all those who receive copies directly or indirectly through
you, thenthe only way youcould satisfy bothit and this Licensewould be torefrain entirely from
distribution of the Program.If any portion of this section is heldinvalid or unenforceable under
any particular circumstance,the balance of the sectionis intended to apply andthe section as a
38

whole isintended to applyin other circumstances.It is notthe purpose ofthis section toinduce you
to infringe anypatents or other property rightclaims or to contest validity ofany such claims; this
section has the sole purpose of protecting the integrity of the free software distribution system,
which isimplemented by publiclicense practices. Many peoplehave made generouscontributions
to thewide range of softwaredistributed through that systemin reliance on consistentapplication
of that system; it is up to the author/donor to decide if he orshe is willing to distribute software
through any other system and a licensee cannot impose that choice. This section is intended to
make thoroughlyclear whatis believed tobe aconsequence of therest ofthis License.
8. Ifthe distribution and/oruse of theProgram is restrictedin certain countries eitherby patents or
by copyrightedinterfaces, the original copyrightholder who placesthe Program under thisLicense
may add an explicit geographical distribution limitation excluding those countries, so that
distribution is permitted only in or among countries notthus excluded. In such case, this License
incorporates thelimitation asif written inthe bodyof this License.
9. The Free Software Foundation may publish revised and/or new versions of the GeneralPublic
License fromtime to time.Such newversions will besimilar in spiritto thepresent version, butmay
differ indetail to address newproblems or concerns.Each version is givena distinguishing version
number. Ifthe Program specifiesa version numberof thisLicense which appliesto it and"any later
version", youhave the option of followingthe terms and conditionseither of that versionor of any
later versionpublished by the FreeSoftware Foundation. If theProgram does notspecify a version
number of this License, you may choose any version ever published by the Free Software
Foundation.
10. If you wish to incorporate parts of the Program into other free programs whose distribution
conditions aredifferent, write tothe authorto ask forpermission. For softwarewhich is copyrighted
by the Free Software Foundation, write to the Free Software Foundation; we sometimes make
exceptions for this.Our decision will be guidedby the two goalsof preserving the free statusof all
derivatives ofour freesoftware and ofpromoting thesharing and reuseof softwaregenerally.
NO WARRANTY
11. BECAUSE THE PROGRAM IS LICENSED FREE OFCHARGE, THERE IS NO WARRANTY FOR THE
PROGRAM, TO THEEXTENT PERMITTED BY APPLICABLEL AW.EXCEPT WHEN OTHERWISE STATED
IN WRITINGTHE COPYRIGHT HOLDERS AND/OROTHER PARTIES PROVIDETHE PROGRAM "AS IS"
WITHOUT WARRANTY OF ANY KIND, EITHER EXPRESSED OR IMPLIED, INCLUDING, BUT NOT
LIMITED TO, THEIMPLIED WARRANTIES OF MERCHANTABILITYAND FITNESS FOR A PARTICULAR
PURPOSE. THE ENTIRERISK AS TO THEQUALITY AND PERFORMANCE OFTHE PROGRAM IS WITH
YOU. SHOULD THE PROGRAM PROVE DEFECTIVE, YOU ASSUME THE COST OF ALL NECESSARY
SERVICING, REPAIR OR CORRECTION.12. INNO EVENT UNLESS REQUIRED BY APPLICABLE LAW
OR AGREED TO IN WRITING WILL ANY COPYRIGHT HOLDER, OR ANY OTHER PARTY WHO MAY
MODIFY AND/OR REDISTRIBUTE THE PROGRAM AS PERMITTED ABOVE, BE LIABLE TO YOU FOR
DAMAGES, INCLUDING ANY GENERAL, SPECIAL, INCIDENTAL OR CONSEQUENTIAL DAMAGES
ARISING OUTOF THE USEOR INABILITY TOUSE THE PROGRAM(INCLUDING BUT NOTLIMITED TO
LOSS OF DATA OR DATA BEING RENDERED INACCURATE OR LOSSES SUSTAINED BY YOU OR
THIRD PARTIES OR A FAILURE OF THE PROGRAM TO OPERATE WITH ANY OTHER PROGRAMS),
EVEN IF SUCH HOLDER OR OTHER PARTY HAS BEEN ADVISED OF THE POSSIBILITY OF SUCH
DAMAGES.END OFTERMS ANDCONDITIONS
GNU LESSERGENERAL PUBLIC LICENSE
Version 2.1,February 1999 Copyright(C) 1991,
1999 Free Software Foundation, Inc. 51 Franklin Street, Fifth Floor, Boston, MA 02110-1301
USA Everyone is permitted to copy and distribute verbatim copies of this license document, but
changing it isnot allowed.[This is the firstreleased version of the LesserGPL. It also counts as the
successor ofthe GNULibrary PublicLicense, version 2,hence theversion number 2.1.]
Preamble
The licenses formost software are designedto take away yourfreedom to share and changeit. By
contrast, the GNU General Public Licenses are intended to guarantee your freedom to share and
change free software--to make sure the software is free for all its users. This license, the Lesser
General Public License, applies to some specially designated software packages--typically
libraries--of the Free Software Foundationand other authors who decide to use it. Youcan use it
too, but we suggest you first think carefully about whether this license or the ordinary General
Public Licenseis the betterstrategy to usein any particularcase, based on theexplanations below.
When we speak offree software, we are referring tofreedom of use, not price. OurGeneral Public
Licenses aredesigned to make surethat you have thefreedom to distribute copiesof free software
(and chargefor thisservice if youwish); that youreceive sourcecode or canget itif you wantit; that
you can changethe software and usepieces of it innew free programs; and thatyou are informed
that you can do these things. To protect your rights, we need to make restrictions that forbid
distributors to deny you these rights or to ask you to surrender these rights. These restrictions
translate to certainresponsibilities for you ifyou distribute copies of thelibrary or if you modifyit.
For example, if you distribute copies ofthe library, whether gratis or for a fee, you must give the
recipients allthe rights thatwe gave you. You mustmake sure that they,too, receive orcan get the
source code. If you link other codewith the library, you must provide complete object files to the
recipients, so that they can relink them with the library after making changes to the library and
recompiling it. And you mustshow them these terms so they know theirrights. We protect your
rights with a two-step method: (1) we copyright the library, and (2) we offer you this license,
which gives you legal permission to copy, distribute and/or modify the library. To protect each
distributor, wewant to make itvery clear that thereis no warranty forthe free library. Also,if the
library is modified by someone else and passed on, the recipients should know that what they
have is not the original version, so that the original author's reputation will not be affected by
problems that mightbe introduced by others. Finally,software patents pose aconstant threat to
the existence of any free program. We wish to make sure that a company cannot effectively
restrict the users of a free program by obtaining a restrictive license from a patent holder.
Therefore, weinsist thatany patent licenseobtained for aversion ofthe library mustbe consistent
with thefull freedomof use specifiedin this license.Most GNU software,including somelibraries,
is coveredby theordinary GNU GeneralPublic License.This license, theGNU LesserGeneral Public
License, applies to certain designated libraries,and is quite different from the ordinary General
Public License. We use this license for certain libraries in order to permit linkingthose libraries
into non-free programs. When a program is linked with a library, whether statically or using a
shared library, the combination ofthe two is legally speaking a combined work, a derivativeof
the originallibrary. The ordinary GeneralPublic License therefore permitssuch linking onlyif the
entire combinationfits its criteria offreedom. The Lesser GeneralPublic License permits morelax
criteria for linking other code with the library. We call this license the "Lesser" General Public
License because it does Less to protect the user's freedom than the ordinary General Public
License. Italso providesother free softwaredevelopers Lessof an advantageover competingnonfree programs.These disadvantages arethe reasonwe use theordinary General Public Licensefor
many libraries.However, theLesser license providesadvantages incertain special circumstances.
For example,on rare occasions,there maybe a specialneed to encouragethe widest possibleuse
of a certain library, so that it becomes a de-facto standard.To achieve this, non-free programs
must beallowed to usethe library.A more frequentcase is thata free librarydoes thesame job as
widely usednon-free libraries. Inthis case, thereis little togain by limitingthe free libraryto free
software only, so we use the Lesser General Public License. In other cases, permission to use a
particular libraryin non-free programsenables a greaternumber of peopleto use alarge body of
free software. For example, permission to use the GNU C Library in non-free programs enables
many morepeople to use thewhole GNU operating system,as well asits variant, the GNU/Linux
operating system. Although the Lesser General Public License is Less protective of the users'
freedom, itdoes ensure that theuser of aprogram that islinked with the Libraryhas the freedom
and the wherewithal to run that program using a modified version of the Library. The precise
terms andconditions for copying, distributionand modification follow. Pay closeattention to the
difference between a "workbased on the library" and a "workthat uses the library". The former
contains code derived from the library,whereas the latter must be combined with the library in
order torun.
TERMS ANDCONDITIONS FORCOPYING, DISTRIBUTION ANDMODIFICATION
0. This License Agreement applies to any software library or other program which contains a
notice placedby the copyrightholder or otherauthorized partysaying it maybe distributed under
the terms of this Lesser General Public License (also called "this License"). Each licensee is
addressed as"you". A "library" meansa collection ofsoftware functions and/or dataprepared so
as to be conveniently linkedwith application programs (which use some of thosefunctions and
data) toform executables. The "Library",below, refers toany such software libraryor work which
has beendistributed under theseterms. A"work based onthe Library" meanseither the Libraryor
any derivativework under copyright law:that is tosay, a workcontaining the Library ora portion
of it, either verbatim or with modifications and/or translated straightforwardly into another
language. (Hereinafter, translation is included without limitation in the term
"modification".)"Source code" for a work means the preferred form of the work for making
modifications toit. For a library,complete source code meansall the source code forall modules
it contains, plus any associated interface definition files, plus the scripts used to control
compilation and installation of the library. Activities other than copying, distribution and
modification are not covered by this License; they are outside its scope. The act of running a
program using theLibrary is not restricted, andoutput from such a programis covered only if its
contents constitutea work basedon the Library(independent of theuse of theLibrary in atool for
writing it).Whether thatis true dependson what theLibrary doesand what theprogram thatuses
the Librarydoes.
1. You may copy and distribute verbatim copies of the Library's complete source code as you
receive it, in any medium, provided that you conspicuously and appropriately publish on each
copy an appropriate copyright notice and disclaimer of warranty; keepintact all the notices that
refer tothis License and tothe absence ofany warranty; anddistribute a copy ofthis License along
with the Library.You may charge a fee forthe physical act of transferring acopy, and you may at
your optionoffer warranty protectionin exchangefor a fee.
2. Youmay modifyyour copy orcopies of theLibrary or anyportion ofit, thus forminga work based
on the Library, and copy and distribute such modifications or work under the terms of Section 1
above, provided that youalso meet all of these conditions: a)The modified work must itself be a
39

software library. b) You must causethe files modified to carry prominent notices stating that you
changed the files and the date of any change. c) You must cause the whole of the work to be
licensed at no charge to all third parties under the terms of this License. d) If a facility in the
modified Library refers to a function or a table of data to be supplied by an application program
that usesthe facility, otherthan as anargument passed whenthe facility isinvoked, then youmust
make agood faith effortto ensure that,in theevent an applicationdoes not supplysuch function or
table, thefacility still operates,and performswhatever part ofits purpose remainsmeaningful.(For
example, afunction in alibrary to compute squareroots has apurpose that isentirely well-defined
independent of the application. Therefore, Subsection 2d requires that any application-supplied
function or table used by thisfunction must be optional: if the application does not supply it, the
square root function must still compute square roots.)These requirements apply to the modified
work as a whole.If identifiable sections of that work are notderived from the Library, and can be
reasonably considered independent and separate works in themselves, then this License, and its
terms, do not apply to thosesections when you distribute them as separate works. But when you
distribute the same sections as part of a whole which is a work based on the Library, the
distribution of the whole must be on the terms of this License, whose permissions for other
licensees extend to the entire whole, and thus to each and every part regardless of who wrote it.
Thus, it isnot the intent ofthis section to claimrights or contest your rightsto work written entirely
by you;rather, the intent isto exercise the rightto control the distributionof derivative or collective
works based on the Library. In addition, mere aggregation of another work not based on the
Library with the Library (or with a work based on the Library) on a volume of a storage or
distribution mediumdoes not bringthe otherwork under thescope of thisLicense.
3. You may opt to apply the terms of the ordinary GNU General Public License instead of this
License to a given copy of the Library.To do this, you must alter all the notices that refer to this
License, sothat they refer tothe ordinary GNUGeneral Public License, version2, instead ofto this
License. (If a newer version than version 2 of the ordinary GNU General Public License has
appeared, thenyou can specifythat versioninstead if youwish.) Do notmake anyother change in
these notices. Once this change is made in a given copy, it is irreversible for that copy, so the
ordinary GNU GeneralPublic License appliesto all subsequent copies andderivative works made
from that copy. This optionis useful when you wish to copy partof the code of the Library into a
program thatis nota library.
4. You may copy and distribute the Library (or a portion or derivative of it, under Section 2) in
object code or executable form under the terms of Sections 1 and 2 above provided that you
accompany it with the complete corresponding machine-readable source code, which must be
distributed underthe terms of Sections1 and 2 aboveon a medium customarilyused for software
interchange. If distribution of object code is made by offering access to copy from a designated
place, then offering equivalent access to copy the source code from the same place satisfies the
requirement todistribute the source code,even though third partiesare not compelled tocopy the
source alongwith theobject code.
5. Aprogram that containsno derivative of anyportion of theLibrary, but isdesigned to work with
the Library by being compiled or linked with it, is called a "work that uses the Library". Such a
work, in isolation, is not aderivative work of the Library, and therefore falls outside the scopeof
this License.However, linking a"work that usesthe Library" withthe Library createsan executable
that is aderivative of the Library(because it contains portions ofthe Library), rather than a"work
that usesthe library". Theexecutable istherefore covered bythis License. Section6 states termsfor
distribution ofsuch executables. When a"work that uses theLibrary" uses material froma header
file that ispart of the Library, theobject code for the work maybe a derivative work ofthe Library
even though thesource code is not.Whether this is trueis especially significant if thework can be
linked without the Library, or if thework is itself a library. The threshold for this to be true is not
precisely defined by law.If such an object file uses only numerical parameters, data structure
layouts and accessors, and small macros and small inline functions (ten lines orless in length),
then the use ofthe object file is unrestricted, regardless ofwhether it is legally a derivative work.
(Executables containing this object code plus portions of the Library will still fall under Section
6.)Otherwise, if the work isa derivative of the Library, you may distribute theobject code for the
work underthe terms ofSection 6. Any executablescontaining that workalso fall underSection 6,
whether ornot theyare linked directlywith the Libraryitself.
6. As an exception to the Sections above, you may also combine or link a "work that uses the
Library" with theLibrary to produce a workcontaining portions of the Library,and distribute that
work under terms ofyour choice, provided that the termspermit modification of the work forthe
customer's own use and reverse engineering for debugging such modifications. You must give
prominent noticewith each copy of thework that the Libraryis used in itand that the Libraryand
its use are covered by this License. You must supply a copy of this License. If the work during
execution displayscopyright notices, you mustinclude the copyright noticefor the Library among
them, aswell as areference directing theuser to the copyof this License.Also, you mustdo one of
these things: a)Accompany the work with thecomplete corresponding machine-readable source
code forthe Library includingwhatever changes wereused in thework (which mustbe distributed
under Sections1 and 2 above);and, if the workis an executable linkedwith the Library, withthe
complete machine-readable "workthat uses the Library", as objectcode and/or source code, so
that theuser can modifythe Library and thenrelink to producea modified executablecontaining
the modifiedLibrary. (It is understoodthat the user whochanges the contents ofdefinitions files
in the Library will not necessarily be able to recompile the application to use the modified
definitions.) b) Use asuitable shared library mechanism for linking with theLibrary. A suitable
mechanism is one that (1) uses at run time a copy of the library already present on the user's
computer system, ratherthan copying library functionsinto the executable, and(2) will operate
properly with a modified version of the library, ifthe user installs one, as long as the modified
version isinterface-compatible with the versionthat the work wasmade with. c)A ccompanythe
work with a written offer, valid for at least three years, to give the same user the materials
specified in Subsection 6a, above, for a charge no more than the cost of performing this
distribution. d) If distribution ofthe work is made by offering access to copy from adesignated
place, offer equivalent access to copy the above specified materials from the same place. e)
Verify that theuser has already received acopy of these materials orthat you have already sent
this user a copy. For an executable, the required form of the "work that uses the Library"must
include any data andutility programs needed for reproducing the executable from it.However,
as aspecial exception, thematerials to be distributedneed not includeanything that isnormally
distributed (ineither source orbinary form) withthe majorcomponents (compiler, kernel,and so
on) of the operating system on which the executable runs, unless that component itself
accompanies the executable.It may happen that this requirement contradicts the license
restrictions of other proprietarylibraries that do not normally accompanythe operating system.
Such acontradiction means you cannotuse both them andthe Library together inan executable
that youdistribute.
7. You may place libraryfacilities that are a work based on the Library side-by-side ina single
library together with other library facilities not covered by this License, and distribute such a
combined library,provided that theseparate distribution of thework based onthe Library andof
the other library facilitiesis otherwise permitted, and provided that youdo these two things: a)
Accompany thecombined library witha copyof the samework basedon the Library,uncombined
with anyother libraryfacilities. This mustbe distributed underthe termsof the Sectionsabove. b)
Give prominent noticewith the combined library ofthe fact that part ofit is a work basedon the
Library, andexplaining whereto find theaccompanying uncombinedform of thesame work.
8. You may not copy, modify, sublicense, link with, or distribute the Library except as expressly
provided under this License. Any attempt otherwise to copy, modify, sublicense, link with, or
distribute the Library is void, and will automatically terminate your rights under this License.
However, parties who have received copies, or rights, from you under this License will not have
their licensesterminated so longas suchparties remain infull compliance.
9. Youare not required toaccept this License, sinceyou have not signedit. However, nothing else
grants you permissionto modify or distributethe Library or itsderivative works. These actions are
prohibited by law if you do not accept this License. Therefore, by modifying or distributing the
Library (or any workbased on the Library), you indicate your acceptanceof this License to do so,
and all its termsand conditions for copying, distributing ormodifying the Library or works based
on it.
10. Each time you redistribute the Library (or any work based on the Library), the recipient
automatically receivesa license from theoriginal licensor to copy,distribute, link with ormodify
the Librarysubject to these termsand conditions. Youmay not impose anyfurther restrictions on
the recipients' exercise of the rights granted herein. You are not responsible for enforcing
compliance bythird partieswith this License.
11. If,as a consequence of acourt judgment or allegationof patent infringement orfor any other
reason (not limited to patent issues), conditions are imposed on you (whether by court order,
agreement orotherwise) that contradictthe conditions ofthis License, theydo not excuseyou from
the conditions of this License. If you cannot distribute so as to satisfy simultaneously your
obligations under this License and any other pertinent obligations, then as a consequence you
may notdistribute the Libraryat all. For example,if a patentlicense would notpermit royalty-free
redistribution ofthe Library by allthose who receive copiesdirectly or indirectly throughyou, then
the onlyway you couldsatisfy both itand thisLicense would beto refrain entirelyfrom distribution
of the Library. If any portion ofthis section is held invalid or unenforceable under any particular
circumstance, the balance of the section is intended to apply, and the section as a whole is
intended to apply in other circumstances. It is not the purpose of this section to induce you to
infringe any patents or other property right claims or to contest validity of any such claims; this
section has the sole purpose of protecting the integrity of the free software distribution system
which isimplemented by publiclicense practices.Many people havemade generous contributions
to thewide range ofsoftware distributed throughthat system in relianceon consistent application
of that system; it is up to theauthor/donor to decide if he or she is willing to distribute software
through any other system and a licensee cannot impose that choice. This section is intended to
make thoroughlyclear what isbelieved tobe a consequenceof the restof thisLicense.
12. If thedistribution and/or use ofthe Library is restrictedin certain countries either bypatents
or by copyrighted interfaces, the original copyright holder who places the Library under this
40

License mayadd an explicitgeographical distribution limitationexcluding those countries,so that
distribution is permitted only inor among countries not thus excluded. In suchcase, this License
incorporates thelimitation asif written inthe bodyof this License.
13. TheFree Software Foundation may publishrevised and/or new versionsof the Lesser General
Public Licensefrom time to time.Such new versions willbe similar in spiritto the present version,
but may differ in detail to address new problems or concerns. Each version is given a
distinguishing version number. If the Library specifies a version number of this License which
applies to it and "any later version", you have the option of following the terms and conditions
either of that version or of any later version published by the Free Software Foundation. If the
Library does notspecify a license version number,you may choose any versionever published by
the FreeSoftware Foundation.
14. If you wish to incorporate parts of the Library into other free programs whose distribution
conditions are incompatible with these, write to the author to ask for permission. For software
which is copyrightedby the Free SoftwareFoundation, write to theFree Software Foundation; we
sometimes makeexceptions for this.Our decisionwill be guidedby the twogoals of preservingthe
free status of all derivatives of our free software and of promoting the sharing and reuse of
software generally.
NO WARRANTY
15. BECAUSE THE LIBRARY IS LICENSED FREE OF CHARGE, THERE IS NO WARRANTY FOR THE
LIBRARY, TO THE EXTENT PERMITTEDBY APPLICABLE LAW. EXCEPT WHEN OTHERWISE STATED
IN WRITING THE COPYRIGHTHOLDERS AND/OR OTHER PARTIES PROVIDE THELIBRARY "AS IS"
WITHOUT WARRANTY OF ANY KIND, EITHER EXPRESSED OR IMPLIED, INCLUDING, BUT NOT
LIMITED TO,THE IMPLIED WARRANTIES OFMERCHANTABILITY AND FITNESSFOR A PARTICULAR
PURPOSE. THE ENTIRE RISK ASTO THE QUALITY AND PERFORMANCE OF THE LIBRARYIS WITH
YOU. SHOULD THE LIBRARY PROVE DEFECTIVE, YOU ASSUME THE COST OF ALL NECESSARY
SERVICING, REPAIR ORCORRECTION.16. IN NO EVENT UNLESSREQUIRED BY APPLICABLE LAW
OR AGREED TO IN WRITING WILL ANY COPYRIGHT HOLDER, OR ANY OTHER PARTY WHO MAY
MODIFY AND/OR REDISTRIBUTE THE LIBRARY AS PERMITTED ABOVE, BE LIABLE TO YOU FOR
DAMAGES, INCLUDING ANY GENERAL, SPECIAL, INCIDENTAL OR CONSEQUENTIAL DAMAGES
ARISING OUTOF THE USE OR INABILITYTO USE THE LIBRARY(INCLUDING BUT NOT LIMITEDTO
LOSS OF DATA OR DATA BEING RENDERED INACCURATE OR LOSSES SUSTAINED BY YOU OR
THIRD PARTIESOR AFAILURE OF THELIBRARY TO OPERATEWITH ANYOTHER SOFTWARE), EVEN
IF SUCHHOLDER OR OTHERPARTY HASBEEN ADVISED OFTHE POSSIBILITY OFSUCH DAMAGES.
END OFTERMS ANDCONDITIONS
Apache LicenseVersion 2.0
, January 2004http://www.apache.org/licenses/ TERMS AND
CONDITIONS FORUSE, REPRODUCTION,AND DISTRIBUTION
1. Definitions. "License" shall mean the terms and conditions for use, reproduction, and
distribution as defined by Sections 1 through 9 of this document. "Licensor" shall mean the
copyright owner or entity authorized by the copyright owner that is grantingthe License. "Legal
Entity" shall meanthe union of the actingentity and all other entitiesthat control, are controlled
by, or are under common control with that entity. For the purposes of this definition, "control"
means (i) the power, direct or indirect, to cause the direction or management of such entity,
whether by contract or otherwise, or (ii) ownership of fifty percent (50%) or more of the
outstanding shares, or (iii) beneficial ownership of such entity. "You" (or "Your") shall mean an
individual or Legal Entity exercising permissions granted by this License. "Source" form shall
mean the preferred form for making modifications, including but not limited to software source
code, documentationsource, and configurationfiles. "Object" formshall mean any formresulting
from mechanical transformation or translation of a Source form, including but not limited to
compiled object code, generated documentation, and conversions to other mediatypes. "Work"
shall mean the work ofauthorship, whether in Source or Object form, made available underthe
License, asindicated by a copyrightnotice that isincluded in or attachedto the work (anexample
is providedin the Appendixbelow). "Derivative Works"shall mean anywork, whetherin Source or
Object form, that is based on (or derived from) the Work and for which the editorial revisions,
annotations, elaborations, or other modifications represent, as a whole, an original work of
authorship. Forthe purposes of thisLicense, Derivative Works shallnot include worksthat remain
separable from, or merely link (or bind by name) to the interfaces of, the Work and Derivative
Works thereof."Contribution" shall meanany work ofauthorship, includingthe original versionof
the Work and any modifications or additions to that Work or Derivative Works thereof, that is
intentionally submitted to Licensor for inclusion in the Work by the copyright owner or by an
individual orLegal Entity authorized tosubmit on behalf ofthe copyright owner. Forthe purposes
of this definition, "submitted" means any form of electronic, verbal, or written communication
sent to the Licensor or its representatives, including but not limited to communication on
electronic mailinglists, source codecontrol systems,and issue trackingsystems that aremanaged
by, or on behalf of, the Licensor for the purpose of discussing and improving the Work, but
excluding communication thatis conspicuously marked orotherwise designated in writingby the
copyright owner as"Not a Contribution." "Contributor"shall mean Licensor and anyindividual or
Legal Entity on behalf of whom a Contribution has been received by Licensor and subsequently
incorporated withinthe Work.
2. Grant of Copyright License. Subject to the terms and conditions of this License, each
Contributor herebygrants to Youa perpetual,worldwide, non-exclusive, no-charge,royalty-free,
irrevocable copyrightlicense to reproduce,prepare Derivative Worksof, publiclydisplay, publicly
perform, sublicense,and distributethe Work andsuch DerivativeWorks in Sourceor Objectform.
3. Grant of Patent License. Subjectto the terms and conditions of this License, each Contributor
hereby grants toYou a perpetual, worldwide,non-exclusive, no-charge, royalty-free, irrevocable
(except as stated in this section) patent license to make, have made, use, offer to sell, sell,
import, and otherwise transferthe Work, where such license applies only tothose patent claims
licensable by such Contributor thatare necessarily infringed by their Contribution(s) alone orby
combination of theirContribution(s) with the Workto which such Contribution(s)was submitted.
If You institute patentlitigation against any entity (including a cross-claim or counterclaimin a
lawsuit) alleging thatthe Work or a Contribution incorporatedwithin the Work constitutes direct
or contributory patent infringement, then any patent licenses granted to You under this License
for thatWork shallterminate as ofthe date suchlitigation isfiled.
4. Redistribution. You may reproduce and distribute copies of the Work or Derivative Works
thereof inany medium,with or withoutmodifications, and inSource orObject form, providedthat
You meetthe following conditions:1. Youmust give anyother recipients ofthe Work orDerivative
Works acopy of this License;and 2. Youmust cause any modifiedfiles to carry prominentnotices
stating that You changed thefiles; and 3. You must retain, in the Sourceform of any Derivative
Works that You distribute, all copyright, patent, trademark, and attribution notices from the
Source form ofthe Work, excluding thosenotices that do notpertain to any partof the Derivative
Works; and 4. If the Work includes a "NOTICE" text file as part of its distribution, then any
Derivative Works that You distribute must include a readable copy of the attribution notices
contained within such NOTICEfile, excluding those notices that do notpertain to any part of the
Derivative Works, in atleast one of the following places: within a NOTICEtext file distributed as
part ofthe Derivative Works;within the Source formor documentation, ifprovided along withthe
Derivative Works; or, within a display generated by the Derivative Works, if and wherever such
third-party notices normally appear. The contents of the NOTICE file are for informational
purposes only and do not modify the License. You may addYour own attribution notices within
Derivative Works that You distribute,alongside or as an addendum to the NOTICE text from the
Work, provided that such additional attribution notices cannot be construed as modifying the
License. You may add Your own copyright statement to Your modifications and may provide
additional or different license termsand conditions for use, reproduction, or distribution of Your
modifications, orfor any such DerivativeWorks as a whole,provided Your use, reproduction,and
distribution ofthe Workotherwise complies withthe conditions statedin thisLicense.
5. Submission of Contributions. Unless You explicitly state otherwise, any Contribution
intentionally submitted forinclusion in the Work byYou to the Licensorshall be under the terms
and conditions of thisLicense, without any additional terms or conditions.Notwithstanding the
above, nothing herein shall supersede or modify the terms of any separate license agreement
you mayhave executedwith Licensor regardingsuch Contributions.
6. Trademarks. This License does not grant permission to use the trade names, trademarks,
service marks,or product namesof theLicensor, except asrequired for reasonableand customary
use indescribing theorigin of theWork andreproducing the contentof theNOTICE file.
7. Disclaimer of Warranty. Unless required by applicable law or agreed to in writing, Licensor
provides the Work (and each Contributor provides its Contributions) on an "AS IS" BASIS,
WITHOUT WARRANTIES OR CONDITIONS OF ANY KIND, either express or implied, including,
without limitation, any warranties or conditions of TITLE, NON-INFRINGEMENT,
MERCHANTABILITY, or FITNESS FOR A PARTICULAR PURPOSE. You are solely responsible for
determining the appropriateness of using or redistributing the Work and assume any risks
associated withYour exerciseof permissionsunder this License.
8. Limitation of Liability. In no event and under no legal theory, whether in tort (including
negligence), contract, or otherwise, unless required by applicable law (such as deliberate and
grossly negligentacts) oragreed to inwriting, shall anyContributor beliable to Youfor damages,
including any direct, indirect, special, incidental, or consequential damages of any character
arising as aresult of this License orout of the use or inabilityto use the Work (includingbut not
limited to damagesfor loss of goodwill,work stoppage, computer failure ormalfunction, or any
and all other commercial damages or losses), evenif such Contributor has been advised of the
possibility ofsuch damages.
9. Accepting Warrantyor Additional Liability. While redistributing theWork or Derivative Works
thereof, You may choose to offer, and charge a fee for, acceptance of support, warranty,
indemnity, or other liability obligations and/or rights consistent with this License. However, in
accepting suchobligations, You mayact only onYour own behalfand on Yoursole responsibility,
not onbehalf of anyother Contributor, andonly ifYou agree toindemnify, defend, andhold each
Contributor harmlessfor any liabilityincurred by, or claimsasserted against, suchContributor by
reason ofyour acceptingany such warrantyor additionalliability.
END OFTERMS ANDCONDITIONS
41

 Loading...