

Indexa 1000, 1000 F1, 1000 ZS, 1000 P, 1000 R Installation And Operating Instructions Manual
Wirefree Burglar Alarm
SYSTEM 1000 E.A.S.
Installation and Operating Instructions
GB
1. Contents
1. Contents page 1 13. System Operation 9
2. Introduction 2 14. Anti-jamming 9
3. Kit Contents 2 15. Changing the Batteries 10
4. Safety Notes 2 16. Troubleshooting 11
5. Declaration of Conformity 2 17. Maintenance 11
6. How the System Works 3 18. Specifications 11
7. Planning your System 3 19. Optional Accessories 12
8. Accessories 4 20. Guarantee Conditions 13
9. Coding 4 21. Appendix: Door Contact
10. Fitting the Batteries 5 (optional) 13
11. Checking the Components 6 22. Drilling Template 16
12. Installation 7
System1000_GB_130705.doc Page 1

2. Introduction
The Wirefree Burglar Alarm System 1000 can provide protection for flats and detached family houses. It is
simple to install and to operate. The alarm system is armed with a wirefree remote keyfob on exit from
your property and disarmed on return. If, during this time, a movement is detected by the PIR, the siren
will be activated for two minutes. The siren is installed on the outer wall of the building. The control
panel is contained in the siren, so no wiring is needed. Solar cells convert the sun’s energy into electrical
power, while batteries provide power for the system at night or on overcast days.
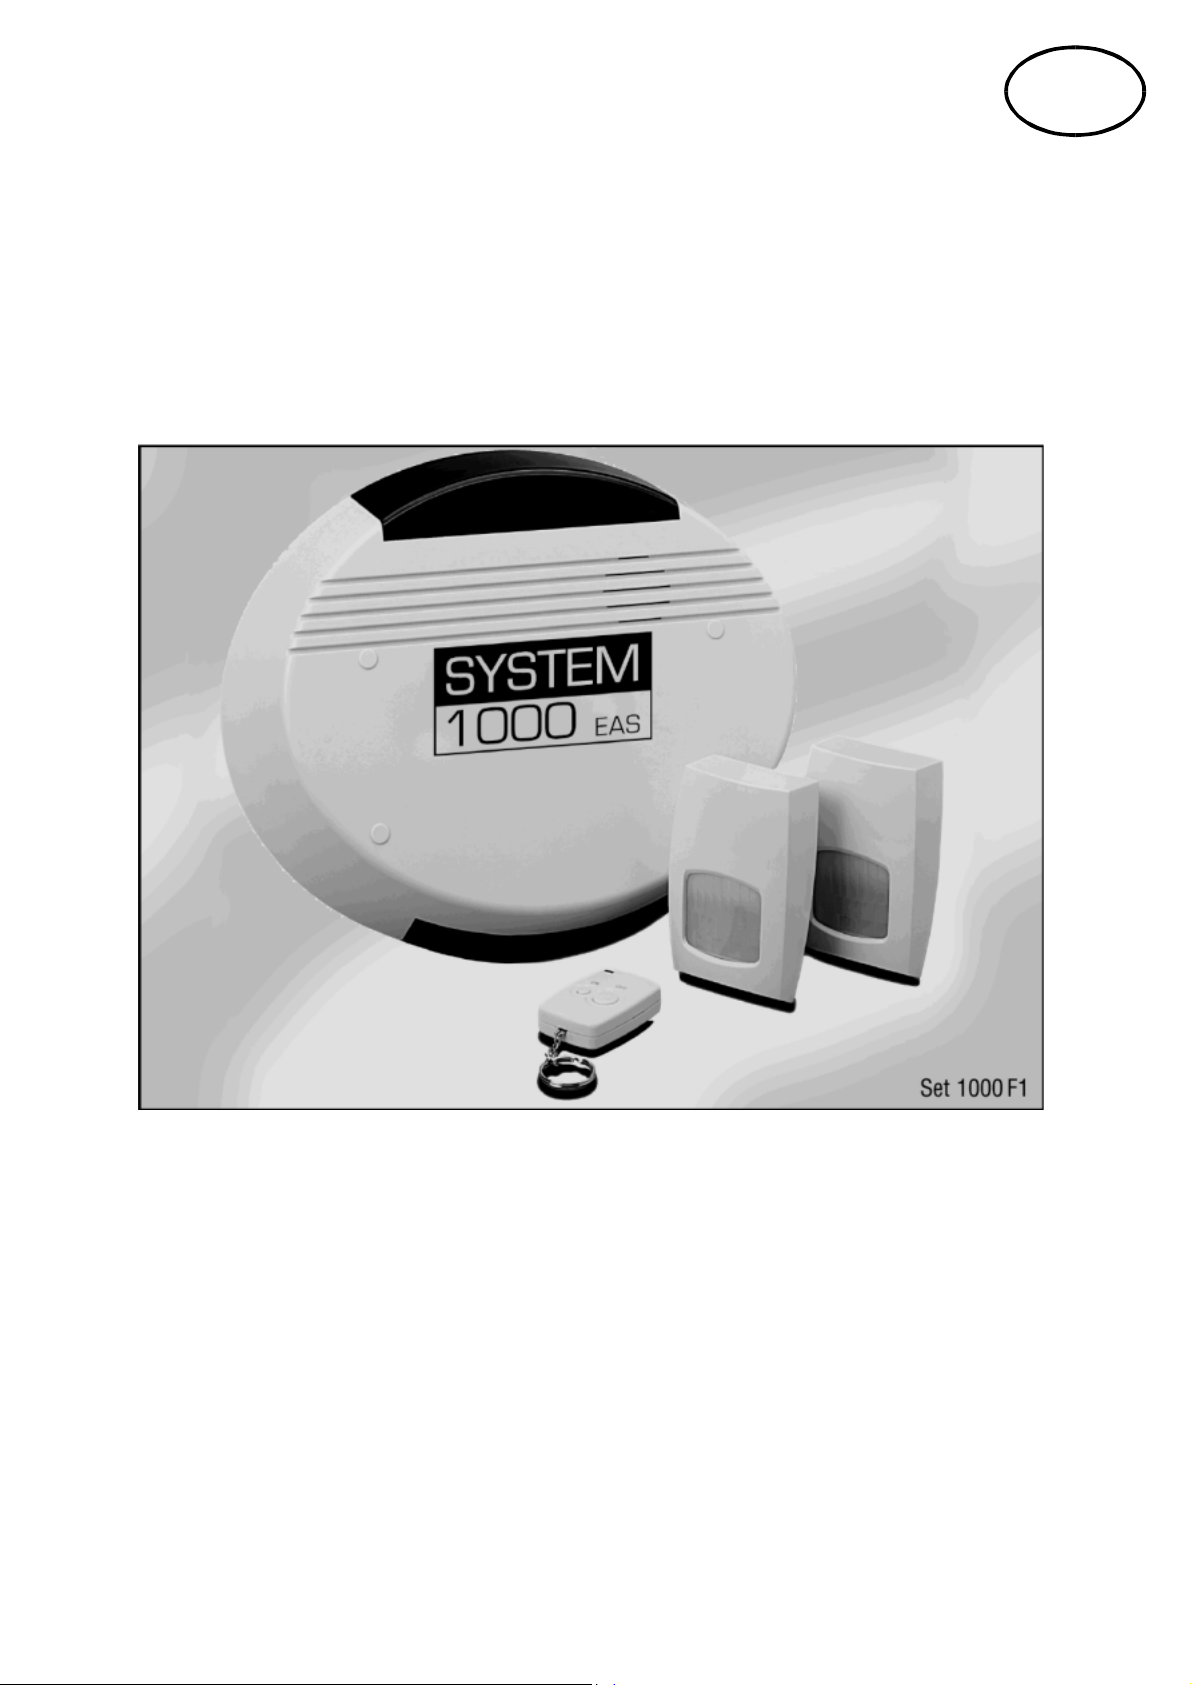
3. Kit Contents
Check the contents:
- siren
- RF keyfob
- 2 wirefree PIR sensors
- 4 self-adhesive sticky pads for the
PIRs
- 8 fixing screws and wall plugs
- installation and operating
instructions with drilling template
fig. 1
4. Safety Notes
• The PIRs must not come into contact with rain or humidity. They are suited for indoor use only.
• Before drilling, make sure that there are no electric cables hidden in the wall.
• As the siren is very loud, ensure that it is not operated close to a person’s ear (especially a child’s ear).
• Do not mount the control panel close to metal fittings or other objects which may disturb radio
signal transmission.
• Do not install any damaged units (e.g. by shipping damage). If in doubt, ask your customers service
or supplier. Repairs should be carried out by qualified persons or your customers service only.
• To clean the components, use a dry or moistened cloth. Do not dip the components into water.
• If the alarm system is not operated for a longer period of time, the batteries should be removed.
• Do not let children play with the components, and keep pets off the devices. Make sure that children
do not take individual parts into their mouth.
• Please read the battery safety notes carefully (see section 15.4).
Do not dispose of packaging material, used batteries or products as household waste. Please
use your recycling system. Details are available from your local authority.
5. Declaration of Conformity
Indexa GmbH declares the Wirefree Burglar Alarm SYSTEM 1000
complies with the standards of 1999/5/EG.
System1000_GB_130705.doc Page 2
6. How the System Works
The keyfob sends an RF signal which activates or deactivates the siren. In the armed state, when a PIR
senses a movement in its detection path, it sends an RF signal to the siren to activate. The siren then
sounds for two minutes, and the system is in the armed state again. The system may be deactivated at
any time with the keyfob. Always deactivate the system before entering your property.
A delay of 10 seconds enables you to activate or deactivate the system inside your property.
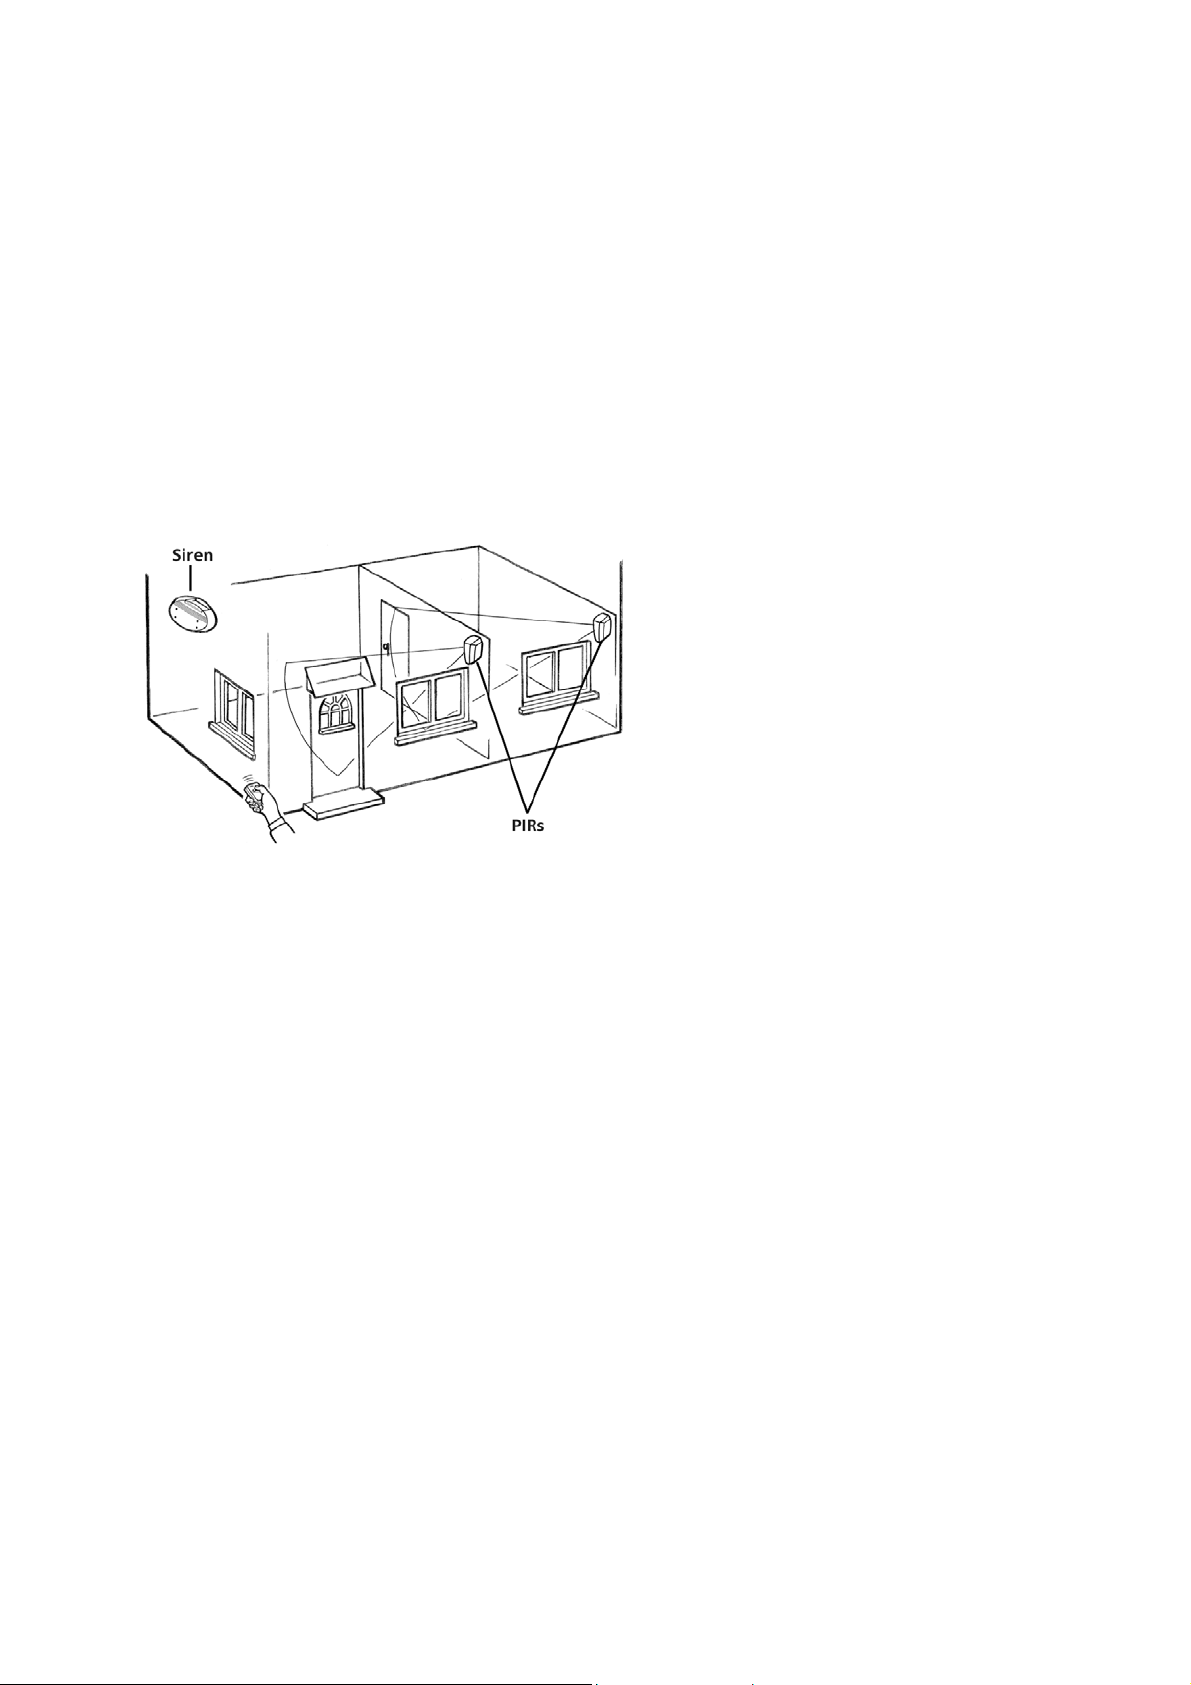
7. Planning your System
Before installing the components, you should plan their positions and check the function of the
components in these positions.
Fig. 2 shows an example:
fig. 2
Important points to consider:
- Do not mount the siren close to metal fittings such as metal downpipes or satellite dishes which may
affect radio signal transmission.
- The siren should be mounted at an outer wall, preferably in south direction, as this is where the solar
cells work best. Otherwise it can be mounted in east or west direction. North direction will work too,
but in this case the batteries will be used more. The solar cells also provide power when the sky is
cloudy. However, you should make sure that the solar cells are not placed in the shade of trees, walls
or roofs. Remember that the sun is in a lower position in the winter than in the summer.
- An anti-tamper switch protects the siren against tampering. However, you should install the siren as
high as possible to make tampering more difficult.
- The siren is for outdoor use, but it should be protected from direct rain.
- The siren should be installed at a place where it can reach the radio signals transmitted by the keyfob.
You should also be able to hear the bleeping sounds of the siren.
- Your property is monitored by PIR sensors located indoors. High security is not necessarily achieved by
a great number of sensors, but by reasonably installing them in key positions. Choose areas that will
probably be entered by a burglar, such as corridors, staircases or entrances.
- The PIRs must be fitted in radio range of the siren. The outdoor range is up to maximum 30m. This
range is reduced by walls and ceilings (especially reinforced concrete) as well as other sources of
interference, e.g. radio transmission from other devices in the frequency range of 433MHz such as
radio headsets. As such disturbances may change within a longer period of time, we recommend that
you install the PIRs within the maximum radio range. Whenever possible, locate the sensors as close
to the siren as you can.
- The PIRs react to warm moving bodies, e.g. a person’s movement within their detection range (up to
approx. 8m at 90° and a height of approx. 2,3m; see fig.3).
- A room can best be monitored, it the PIR is located in one of the corners.
- As the PIR reacts to warmth, it should not be positioned near a heat source such as radiators, air
conditioning, windows, stoves, fax machines or in draughty areas.
System1000_GB_130705.doc Page 3

- Pets may also trigger an alarm. When the system is armed, keep pets out of areas protected by PIR
sensors. If this is not possible, install the PIR upside down so that there is an area beneath the rays
left for the pet. In this case it is neccessary to check the detection range especially thoroughly.
- How quick a movement is detected depends also on the ambient temperature. A movement can be
detected more quickly in a cold environment.
- Movements that are at right angles to the PIR are detected more quickly than movements towards
the PIR. Install the PIRs in positions where a burglar would pass the PIR at right angles.
fig. 3
8. Accessories
The kit contains two PIRs and a wirefree remote keyfob. The system can easily be expanded by adding
additional PIRs. Additional keyfobs are also available. You can protect doors and windows with the door
contacts available as accessories. Accessory components must be adjusted to the codes of the original
system before use. This system will not work with wirefree accessories from other wirefree alarm systems
(see section 19 and 21).
9. Coding
For your security, each system is factory preset to an individual code. On the keyfob and PIRs are labels
with a row of numbers comprising of “0” and “1”. It is important that all the components have the same
identical row of numbers.This number is called the house code.
Please note your house code here:
Should you wish to expand your alarm system, you need this house code. If the numbers on the
components are not identical, please ask your supplier.
System1000_GB_130705.doc Page 4
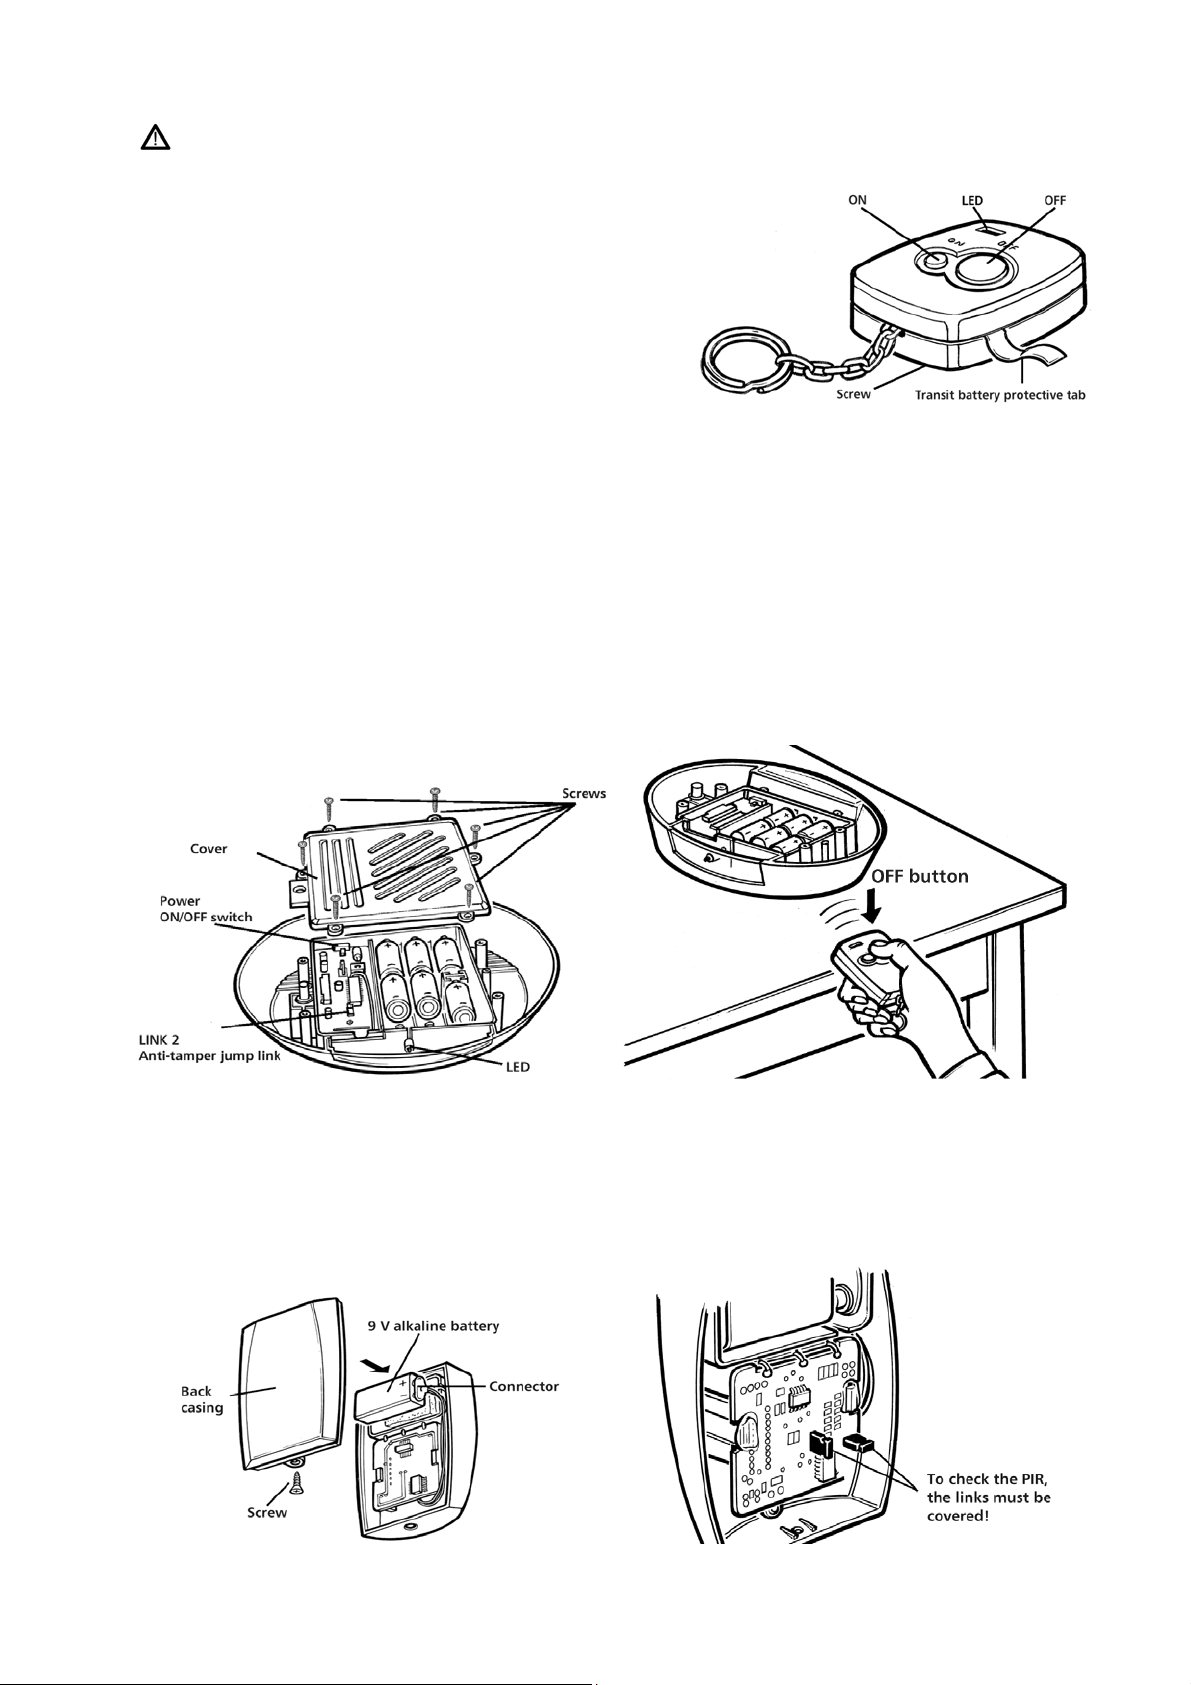
10. Fitting the Batteries
We recommend you to use good quality alkaline batteries (e.g. Duracell).
10.1. Keyfob
The keyfob is supplied with a 12V battery. Lightly
loosen the screw at the back side of the casing, and
pull out the transit battery protective tab. Retighten
the screw.
Press either the “ON” or “OFF” button to check that
the LED lights. If the LED does not light, the battery
may need replacing.
10.2 Siren
Remove the cover by releasing the six screws (see fig. 5). Switch the Power On/Off switch to the OFF
position. Check that the anti-tamper jump link covers both pins. (Factory set to cover both pins: antitamper circuit disabled.)
Insert six D-cell alkaline batteries (typeLR 20 or MN 1300) in the compartments so they face the same
direction and have the same polarity.
Now the siren must learn the house code from the keyfob. Turn the Power On/Off switch on the keyfob to
ON. The LED illuminates for 20 seconds, signalling the self-learn period.
Press the Power On/Off button on the keyfob within the 20 seconds.Two bleeps are heard, and the LED
goes out to confirm that the siren has learned the house code.
The siren can be operated with six or three batteries. If you use only three batteries, their operational life
is reduced accordingly. The batteries must be located in matched terminals, i.e. AAA or BBB.
fig. 4
fig. 5 fig. 6
10.3 PIR Sensors
Remove the screw to release the back casing. Place a 9V alkaline battery in the connector. Make sure that
both links are covered, so the PIR is in the test mode.
fig. 7 fig. 8
System1000_GB_130705.doc Page 5
 Loading...