

Page 1
Operating Instructions
FREEZER
GB
English, 1
TZA 1
TZA 1 S
Contents
GB
Installation, 2-4
Positioning and connection
Reversible doors
Description of the appliance, 5
Overall view
Start-up and use, 6
Starting the appliance
Using the freezer to its full potential
Maintenance and care, 7
Switching the appliance off
Cleaning the appliance
Avoiding mould and unpleasant odours
Defrosting the appliance
Precautions and tips, 8
General safety
Disposal
Respecting and conserving the environment
Troubleshooting, 9
Assistance, 10
Page 2

Installation
! Before placing your new appliance into operation please
GB
read these operating instructions carefully. They contain
important information for safe use, for installation and for
care of the appliance.
! Please keep these operating instructions for future
reference. Pass them on to possible new owners of the
appliance.
Positioning and connection
Positioning
1. Place the appliance in a well-ventilated humidity-free
room.
2. Do not obstruct the rear fan grills. The compressor and
condenser give off heat and require good ventilation to
operate correctly and save energy.
3. Leave a space of at least 10 cm between the top part of
the appliance and any furniture above it, and at least 5
cm between the sides and any furniture/side walls.
4. Ensure the appliance is away from any sources of heat
(direct sunlight, electric stove, etc.).
5. In order to maintain the correct distance between the
appliance and the wall behind it, fit the spacers supplied
in the installation kit, following the instructions provided.
Levelling
1. Install the appliance on a level and rigid floor.
2. If the floor is not perfectly horizontal, adjust the
refrigerator by tightening or loosening the front feet.
Electrical connections
After the appliance has been transported, carefully place it
vertically and wait at least 3 hours before connecting it to
the electricity mains. Before inserting the plug into the
electrical socket ensure the following:
• The appliance is earthed and the plug is compliant with
the law.
• The socket can withstand the maximum power of the
appliance, which is indicated on the data plate located on
the bottom left side of the fridge (e.g. 150 W).
• The voltage must be in the range between the values
indicated on the data plate located on the bottom left
side (e.g. 220-240V).
• The socket is compatible with the plug of the appliance.
If the socket is incompatible with the plug, ask an
authorised technician to replace it (
not use extension cords or multiple sockets.
! Once the appliance has been installed, the power supply
cable and the electrical socket must be easily accessible.
see Assistance
Your appliance is supplied with a 13amp fused plug that
can be plugged into a 13amp socket for immediate use.
Before using the appliance please read the instructions
below.
WARNING:
THIS APPLIANCE MUST BE EARTHED.
Replacing fuse covers:
When replacing a faulty fuse, a 13amp ASTA approved
fuse to BS 1362 should always be used and the fuse
cover re-fitted.
If the fuse cover is lost, the plug must not be used until
a replacement is obtained.
Replacement fuse covers:
If a replacement fuse cover is fitted, it must be of the
correct colour as indicated by the coloured marking or the
colour that is embossed in words on the base of the plug.
Changing the plug:
Removing the plug
If your appliance has a non-rewireable moulded plug
and you should wish to remove it to add a longer cable
or to re-route the mains cable through partitions, units
etc. please ensure that either:
- The plug is replaced by a fused 13amp rewireable plug bearing the BSI mark of
approval.
or
- The mains cable is wired directly into a
13amp cable outlet, controlled by a
switch (in compliance with BS 5733)
which is accessible without moving the
appliance.
Disposing of the plug
Cut off and dispose of the supplied plug if it does not fit
your socket. The cable should be cut as close as
possible to the moulded plug.
Remove the fuse.
). Do
WARNING:
T o avoid a shock hazard do not insert the discarded
plug into a socket anywhere else.
! The cable must not be bent or compressed.
! The cable must be checked regularly and replaced by
authorised technicians only (see Assistance).
! The manufacturer declines any liability should these
safety measures not be observed.
2
Page 3
Fitting a new plug
IMPORTANT
WIRES IN THE MAINS LEAD ARE COLOURED IN
ACCORDANCE WITH THE FOLLOWING CODE...
Green and Yellow - Earth
Blue - Neutral
Brown - Live
As the colours of the wires in the mains lead may not
correspond with the coloured markings identifying the
terminals in your plug, proceed as follows:
- Connect Green and Yellow wire to terminal marked
'E' or
- Connect Brown wire to terminal marked 'L' or
coloured red or brown.
- Connect Blue wire to terminal marked 'N' or
coloured Black or Blue.
If a 13amp plug (BS 1363) is used it must be
fitted with a 13amp fuse. A 15amp plug must be
protected by a 15amp fuse, either in the plug or adaptor
or at the distribution board.
:
or coloured Green and Yellow.
GB
If you are in any doubt about the electrical
supply to your machine, consult a qualified
electrician before use.
CE Marking certifies that this appliance conforms to
the following EEC directives :
Low Voltage Equipment - 73/23/EEC & 93/68 EEC
Electromagnetic Compatibility 89/336/EEC, 92/31/EEC
& 93/68/EEC
3
Page 4
Reversible doors
GB
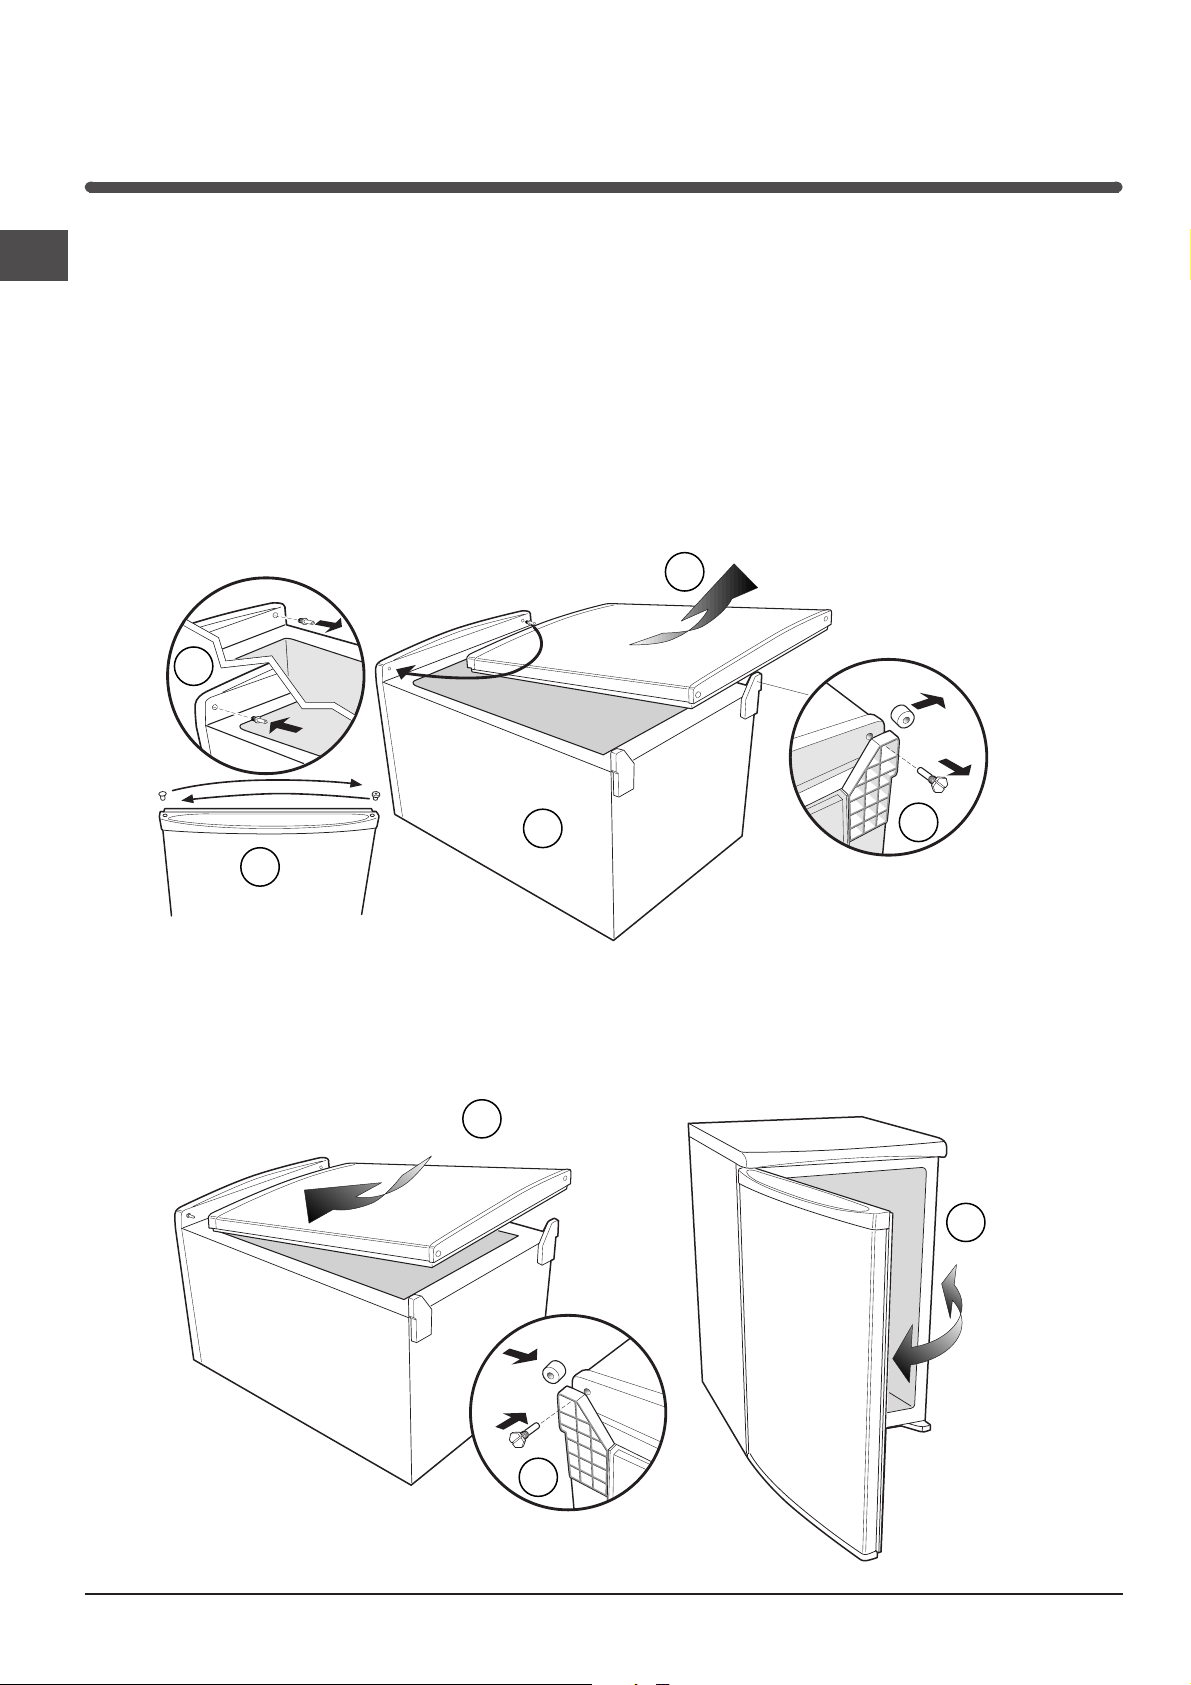
Warning: Before attempting to remove the door, switch off the electrical supply and pull out the mains plug.
It is recommended that you remove any loose items/fittings from inside the appliance and place food into insulated containers
whilst carrying out this operation.
You may require assistance to carefully lay the appliance onto its back onto suitable protective materials (i.e. original packaging).
Remove the door
1. Lay down the appliance on its back.
2. Unscrew, remove and retain the bottom hinge pin.
3. Slightly open the door and slide downward, remove and carefully place to one side.
4. Unscrew the hinge pin from the top right hand side and refit the pin into the hole in left hand side.
5. Use a thin blunt instrument to remove the top and bottom hinge bushes and blanking plugs from the
door, take care not to mark the door handle. Reposition the blanking plugs and bushes on the opposite side.
3
4
1
2
5
Replacing the door
1 .Carefully slide the door upward into the hinge pin.
2 .Fit the bottom hinge pin making sure that the door is aligned to the cabinet.
3. Carefully stand the appliance upright in it’s required location and make sure it is sitting level on the floor. Open and
close the door checking that the gasket makes a good seal without any gaps when the door is closed.
Note: Replace loose items/fittings back into the appliance and leave for at least 15 minutes before switching back on.
1
3
2
4
Page 5
Description of the
appliance
Overall view
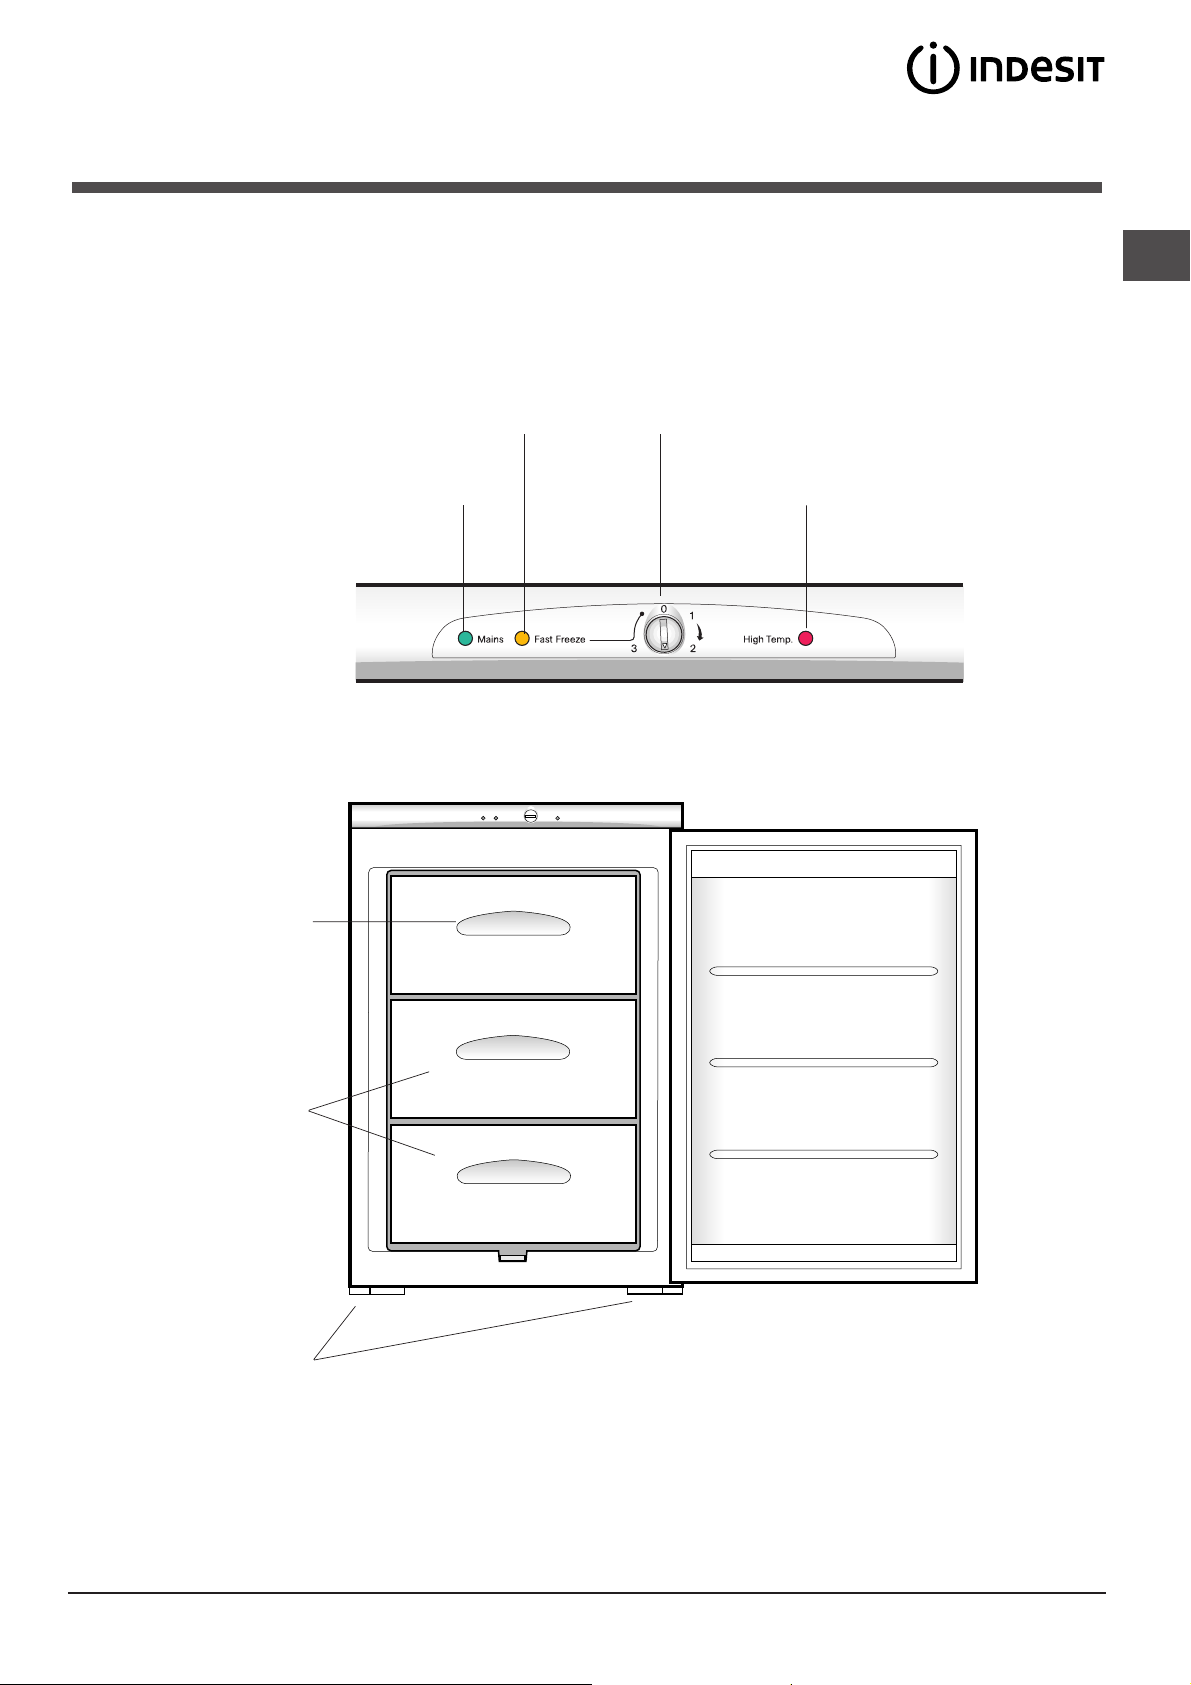
The instructions contained in this manual are applicable to different model refrigerators. The diagrams may not
directly represent the appliance purchased.
FAST FREEZE
Indicator light
POWER
Indicator light
TEMPERATURE
CONTROL Knob
WARNING
Indicator light
GB
Flap
FREEZING and
STORAGE
compartment
STORAGE
compartment
Levelling FEET
Varies by number and/or position.
5
Page 6

Start-up and use
Starting the appliance
GB
! Before starting the appliance, follow the installation
instructions (
! Before connecting the appliance, clean the
compartments and accessories well with lukewarm
water and bicarbonate.
1. Insert the plug into the socket and ensure that the
green POWER indicator light illuminates (the
TEMPERATURE CONTROL knob must not be on 0).
2. Turn the TEMPERATURE CONTROL knob to the “Fast
Freeze” setting (the yellow FAST FREEZE Indicator
light will come on).
3. When the red WARNING Indicator light turns off, turn the
TEMPERATURE CONTROL knob to one of the normal
settings. At this point, the freezer is ready for use.
see Installation
).
Using the freezer to its full potential
• Use the FREEZER OPERATION knob to adjust the
temperature (
• Do not re-freeze food that is defrosting or that has
already been defrosted. These foods must be cooked
and eaten (within 24 hours).
• Fresh food that needs to be frozen must not come into
contact with food that has already been defrosted.
Fresh food must be stored in the top FREEZER and
STORAGE compartment where the temperature drops
below -18°C and guarantees rapid freezing.
• Do not place glass bottles which contain liquids, and
which are corked or hermetically sealed in the freezer
because they could break.
• The maximum quantity of food that may be frozen daily is
indicated on the plate containing the technical properties
located within the freezer (for example: Kg/24h: 4).
• To freeze (if the freezer is already operating):
- Turn the TEMPERATURE CONTROL Knob to the
“Fast Freeze” setting (the yellow FAST FREEZE
Indicator light will come on).
- Place the fresh food that is being frozen into the top
FREEZING and STORAGE compartment, making sure
not to place them near food that has already been
frozen, but preferably in contact with the cooling
surfaces. In fact, proper food storage depends on the
speed at which the fresh food is frozen. For this
reason, we suggest that the temperature knob be
placed on the “Fast Freeze” setting 24 hours before
fresh food is placed in the appliance to be frozen.
This operation is necessary for large quantities of
food (up to the maximum capacity indicated on the
data plate).
see Description
).
! Do not open the door during freezing.
! If there is a power cut or malfunction, do not open the
freezer door. This will help maintain the temperature inside
the freezer, ensuring that foods are conserved for at least
9 -14 hours.
! WARNING Indicator Light. When this red WARNING light
comes on for a prolonged period of time, it means that the
freezer is not functioning properly and the temperature is
rising too much. (Call your Service Centre)
This warning light might come on for a brief period when:
a) the door is left open for an extended period of time
(when the freezer is being loaded or unloaded).
TEMPERATURE CONTROL
b) the
Fast Freeze
“
In these two cases, the fact that the warning light comes
on does not indicate that the freezer is malfunctioning or
there is a defect.
” setting.
knob is turned to the
6
Page 7
Maintenance and care
Switching the appliance off
During cleaning and maintenance it is necessary to
disconnect the appliance from the electricity supply:
It is not sufficient to set the temperature adjustment
knobs on “0” (appliance off) to eliminate all electrical
contact.
Cleaning the appliance
• The external and internal parts, as well as the rubber
seals may be cleaned using a sponge that has been
soaked in lukewarm water and bicarbonate of soda or
neutral soap. Do not use solvents, abrasive products,
bleach or ammonia.
• The removable accessories may be soaked in warm
water and soap or dishwashing liquid. Rinse and dry
them carefully.
• The back of the appliance may collect dust which can
be removed by delicately using the hose of a vacuum
cleaner set on medium power. The appliance must be
switched off and the plug must be pulled out before
cleaning the appliance.
Defrosting the appliance
! Follow the instructions below.
Do not speed up the defrosting process by using any
devices or tools other than the scraper provided, you
may damage the refrigeration circuit.
Remove frost regularly using the special scraper
provided. If the frost layer is greater than 5 mm, it is
necessary to defrost manually:
1. The day before defrosting, turn the TEMPERATURE
CONTROL knob to the “Fast Freeze” setting (the
yellow FAST FREEZE indicator light illuminates) to
further cool the food.
After 24 hours
2.
on “0” , which will switch the refrigerator off.
3. Wrap frozen foods in newspaper and place them in
another freezer or in a cool place.
4. Leave the door open until the frost has melted
completely. This can be made easier by placing
containers with lukewarm water in the freezer
compartment..
set the TEMPERATURE CONTROL knob
GB
Avoiding mould and unpleasant odours
• The appliance is manufactured with hygienic materials
which are odour free. In order to maintain an odour free
refrigerator and to prevent the formation of stains, food
must always be covered or sealed properly.
• If you want to switch the appliance off for an extended
period of time, clean the inside and leave the doors
open.
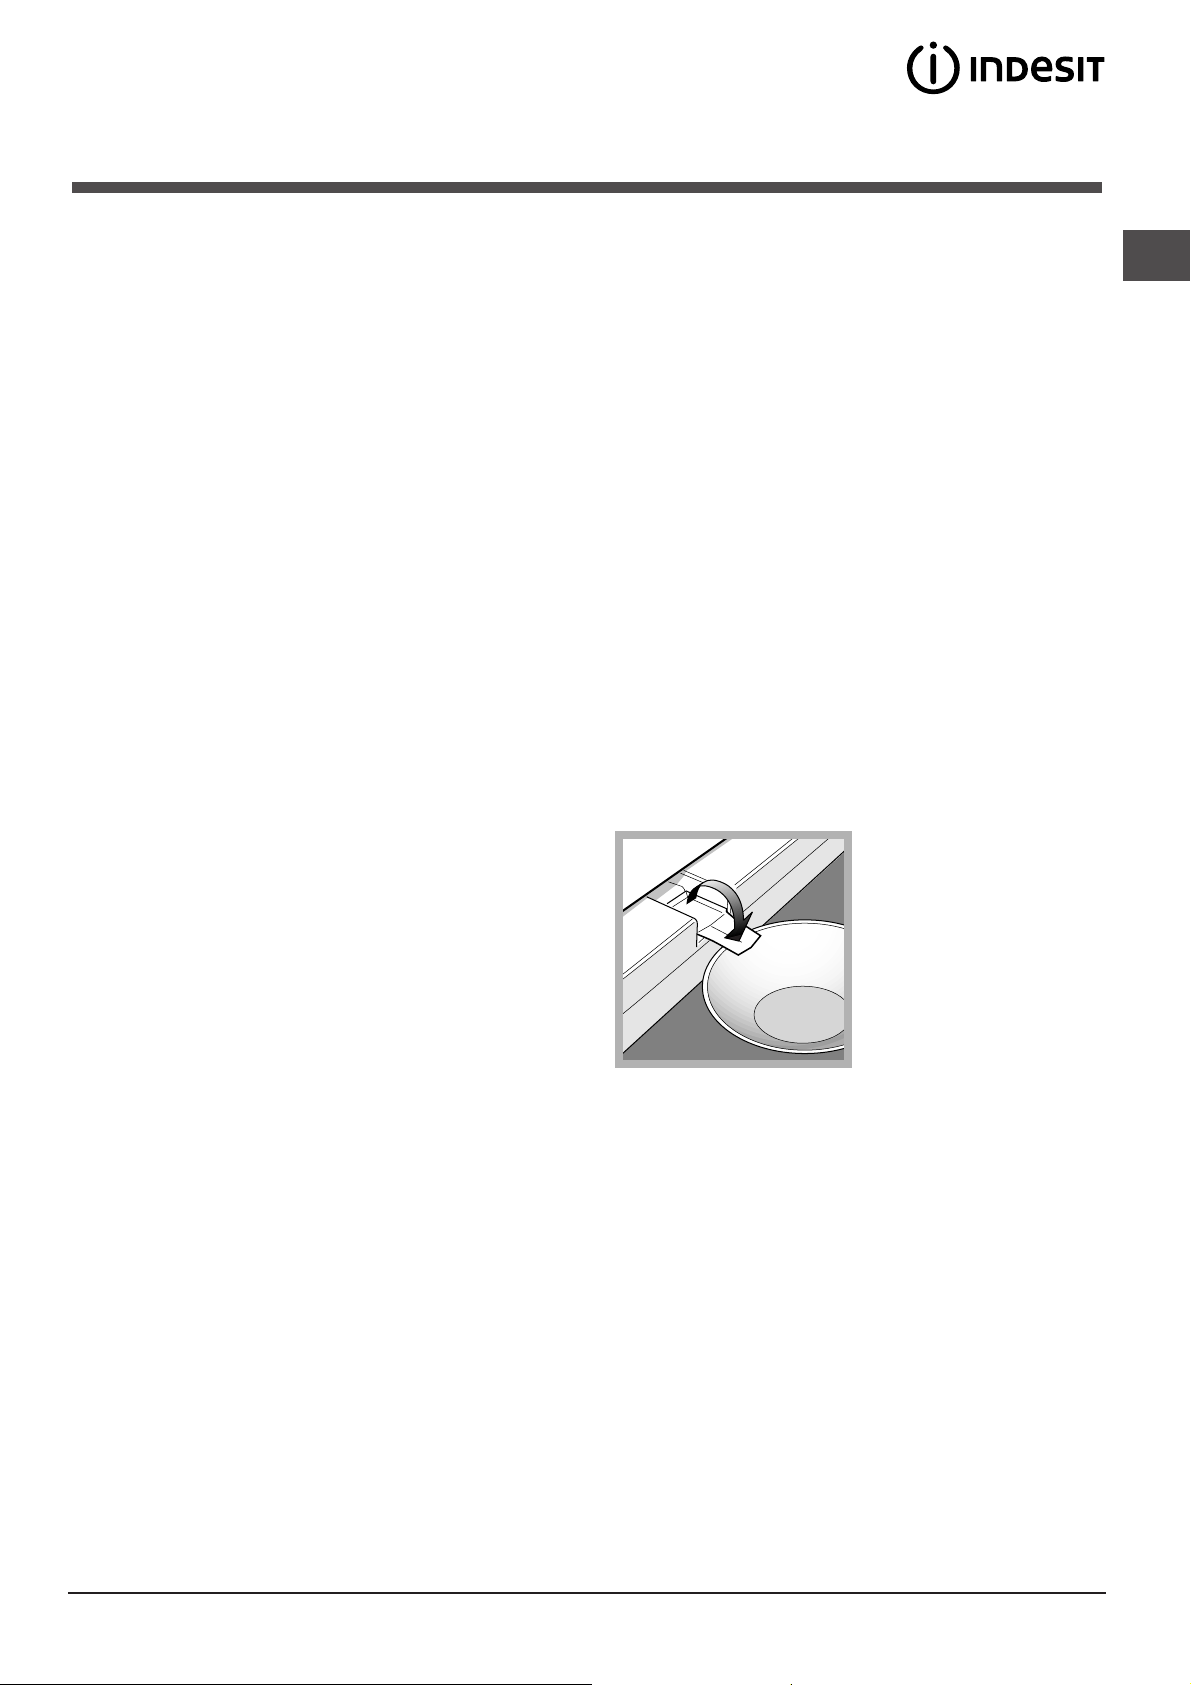
5. Certain appliances are
fitted with the DRAIN
SYSTEM to lead the water
outside. Let the water flow
into a container (
diagram
6. Clean and dry the freezer compartment carefully
before switching the appliance on again.
7. Wait for approximately 2 hours, i.e. until the ideal
storage conditions have been restored, before
placing food in the freezer compartment.
).
see
7
Page 8
Precautions and tips
! The appliance was designed and manufactured in
GB
compliance with international safety standards. The
following warnings are provided for safety reasons and
must be read carefully.
This appliance complies with the following
Community Directives:
- 73/23/EEC of 19/02/73 (Low Voltage) and
subsequent amendments;
-89/336/EEC of 03.05.89 (Electromagnetic
Compatibility) and subsequent amendments;
- 2002/96/CE..
General safety
• The appliance was designed for domestic use inside
the home and is not intended for commercial or
industrial use.
• The appliance must be used to store and freeze food
products by adults only and according to the
instructions in this manual.
• The appliance must not be installed outdoors, even in
covered areas. It is extremely dangerous to leave the
appliance exposed to rain and storms.
• Do not touch the appliance with bare feet or with wet or
moist hands and feet.
• Do not touch the internal cooling elements: this could
cause skin abrasions or frost/freezer burns.
Disposal
• Observe local environmental standards when
disposing packaging material for recycling purposes.
• The European Directive 2002/96/EC on Waste
Electrical and Electronic Equipment (WEEE), requires
that old household electrical appliances must not be
disposed of in the normal unsorted municipal waste
stream. Old appliances must be collected separately
in order to optimise the recovery and recycling of the
materials they contain and reduce the impact on
human health and the environment. The crossed out
“wheeled bin” symbol on the product reminds you of
your obligation, that when you dispose of the
appliance it must be separately collected.
Consumers should contact their local authority or
retailer for information concerning the correct disposal
of their old appliance.
Respecting and conserving the
environment
• Install the appliance in a fresh and well-ventilated
room. Ensure that it is protected from direct sunlight
and do not place it near heat sources.
• Try to avoid keeping the door open for long periods or
opening the door too frequently in order to conserve
energy.
• When unplugging the appliance always pull the plug
from the mains socket, do not pull on the cable.
• Before cleaning and maintenance, always switch off
the appliance and disconnect it from the electrical
supply. It is not sufficient to set the temperature
adjustment knobs on “0” (appliance off) to eliminate all
electrical contact.
• In the case of a malfunction, under no circumstances
should you attempt to repair the appliance yourself.
Repairs carried out by inexperienced persons may
cause injury or further malfunctioning of the appliance.
• Do not use devices or tools other than the special
scraper provided inside the compartments.
• Do not put ice cubes taken directly from the freezer
into your mouth.
• Do not allow children to tamper with the controls or
play with the appliance. Under no circumstance should
they be allowed to sit on the bins or to hang from the
door.
• Keep packaging material out of the reach of children! It
can become a choking or suffocation hazard.
• Do not fill the appliance with too much food:
cold air must circulate freely for food to be preserved
properly. If circulation is impeded, the compressor will
work continuously.
• Do not place hot food directly into the refrigerator. The
internal temperature will increase and force the
compressor to work harder and will consume more
energy.
• Defrost the appliance if ice forms (
A thick layer of ice makes cold transference to food
products more difficult and results in increased
energy consumption.
• Regularly check the door seals and wipe clean to
ensure they are free of debris and to prevent cold air
from escaping (
see Maintenance
see Maintenance
).
).
8
Page 9
Troubleshooting
If the appliance does not work, before calling for Assistance (
Malfunctions:
The green POWER indicator light
does not illuminate.
The indicator lights are on but the
light is dim.
The WARNING Indicator light is
Always On
The motor runs continuously.
The appliance makes a lot of noise.
Possible causes / Solutions:
• The plug has not been inserted into the electrical socket, or not far
enough to make contact, or there is no power in the house.
• Pull out and reverse the plug before putting it back in the socket.
• The door is closed properly and the seal is still OK?.
• The door is being opened too often.
• The TEMPERATURE CONTROL Knob is on the right setting.
• The TEMPERATURE CONTROL Knob is on “Fast Freeze” setting (rapid
freezing): the yellow FAST FREEZE light is (
• The door is not closed properly or is continuously opened.
• The outside ambient temperature is very high.
• The thickness of the frost exceeds 2-3 mm (
• The appliance has not been installed on a level surface (
)
Installation
• The appliance has been installed between cabinets that vibrate and
make noise.
• The internal refrigerant makes a slight noise even when the compressor
is off. This is not a defect, it is normal.
.
see Assistance
), check for a solution from the following list.
see Description
see Maintenance
).
).
see
GB
9
Page 10
Assistance
GB
Before calling for Assistance:
•
Check if the malfunction can be solved on your own (
see Troubleshooting
).
• If after all the checks, the appliance still does not operate or the problem persists, call the nearest Service
Centre
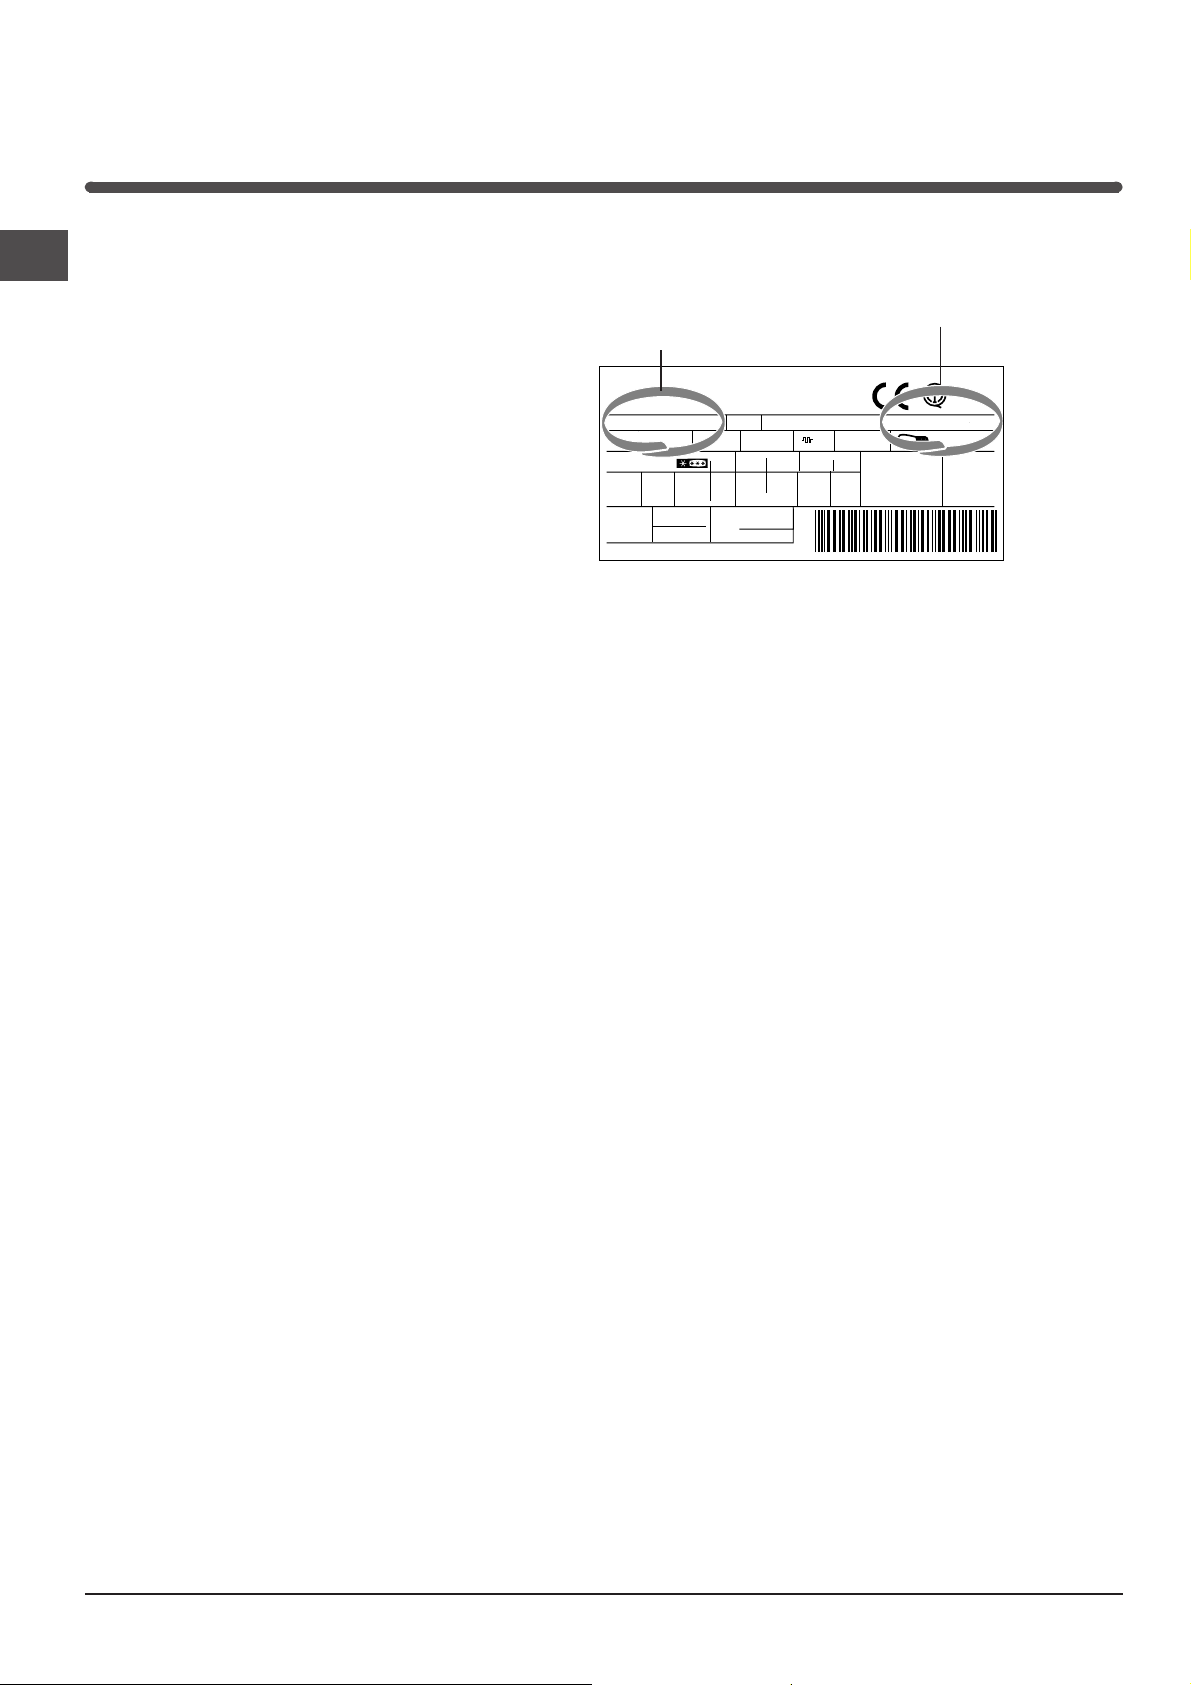
model serial number
Communicating:
• type of malfunction
• appliance model (Mod.)
• serial number (S/N)
This information can be found on the data
plate located on the bottom left side of the
refrigerator compartment.
Gross
Bruto
Brut
TI
75
Test
P.S-I.
RG 2330
Mod.
220 - 240 V- 50 Hz 150 W
340
Total
Gross
Bruto
Brut
Compr.
R 134 a
Syst.
kg 0,090
Kompr.
Made in Italy 13918
93139180000 S/N 704211801
Net
Util
Utile
Pressure
HIGH-235
LOW 140
Cod.
Gross
Bruto
Brut
Fuse
W
A
Freez. Capac
Poder de Cong
kg/24 h
4,0
Max 15 w
Class
Clase
N
Classe
Never call on unauthorized technicians and always refuse spare parts which are not originals.
10
Page 11
GB
11
Page 12

GB
195051960.01
07/2005 - Xerox Business Services
12
 Loading...