

Page 1
Istruzioni per luso
PIANO
IT
Italiano, 1
ES
Espanol, 34
TK 64 CL
TK 64 S IX
TK 64 S
TK 64 SD IX
TK 64 SD BI
TK 64 SD
TK 63 T
TK 63 T BI
GB FR
Français, 23English,12
NLPT
Português, 45 Nederlands,56
Sommario
IT
Installazione, 2-4
Posizionamento
Collegamento elettrico
Descrizione dellapparecchio, 5
Pannello di controllo
Avvio e utilizzo, 6-8
Accensione del piano cottura
Accensione delle zone di cottura
Accensione delle zone di cottura estensibili
Spegnimento delle zone di cottura
Blocco dei comandi
Spegnimento del piano cottura
Gli elementi riscaldanti
Consigli pratici per luso dellapparecchio
Dispositivi di sicurezza
Precauzioni e consigli, 9
Sicurezza generale
Smaltimento
Manutenzione e cura, 10
Escludere la corrente elettrica
Pulire lapparecchio
Smontare il piano
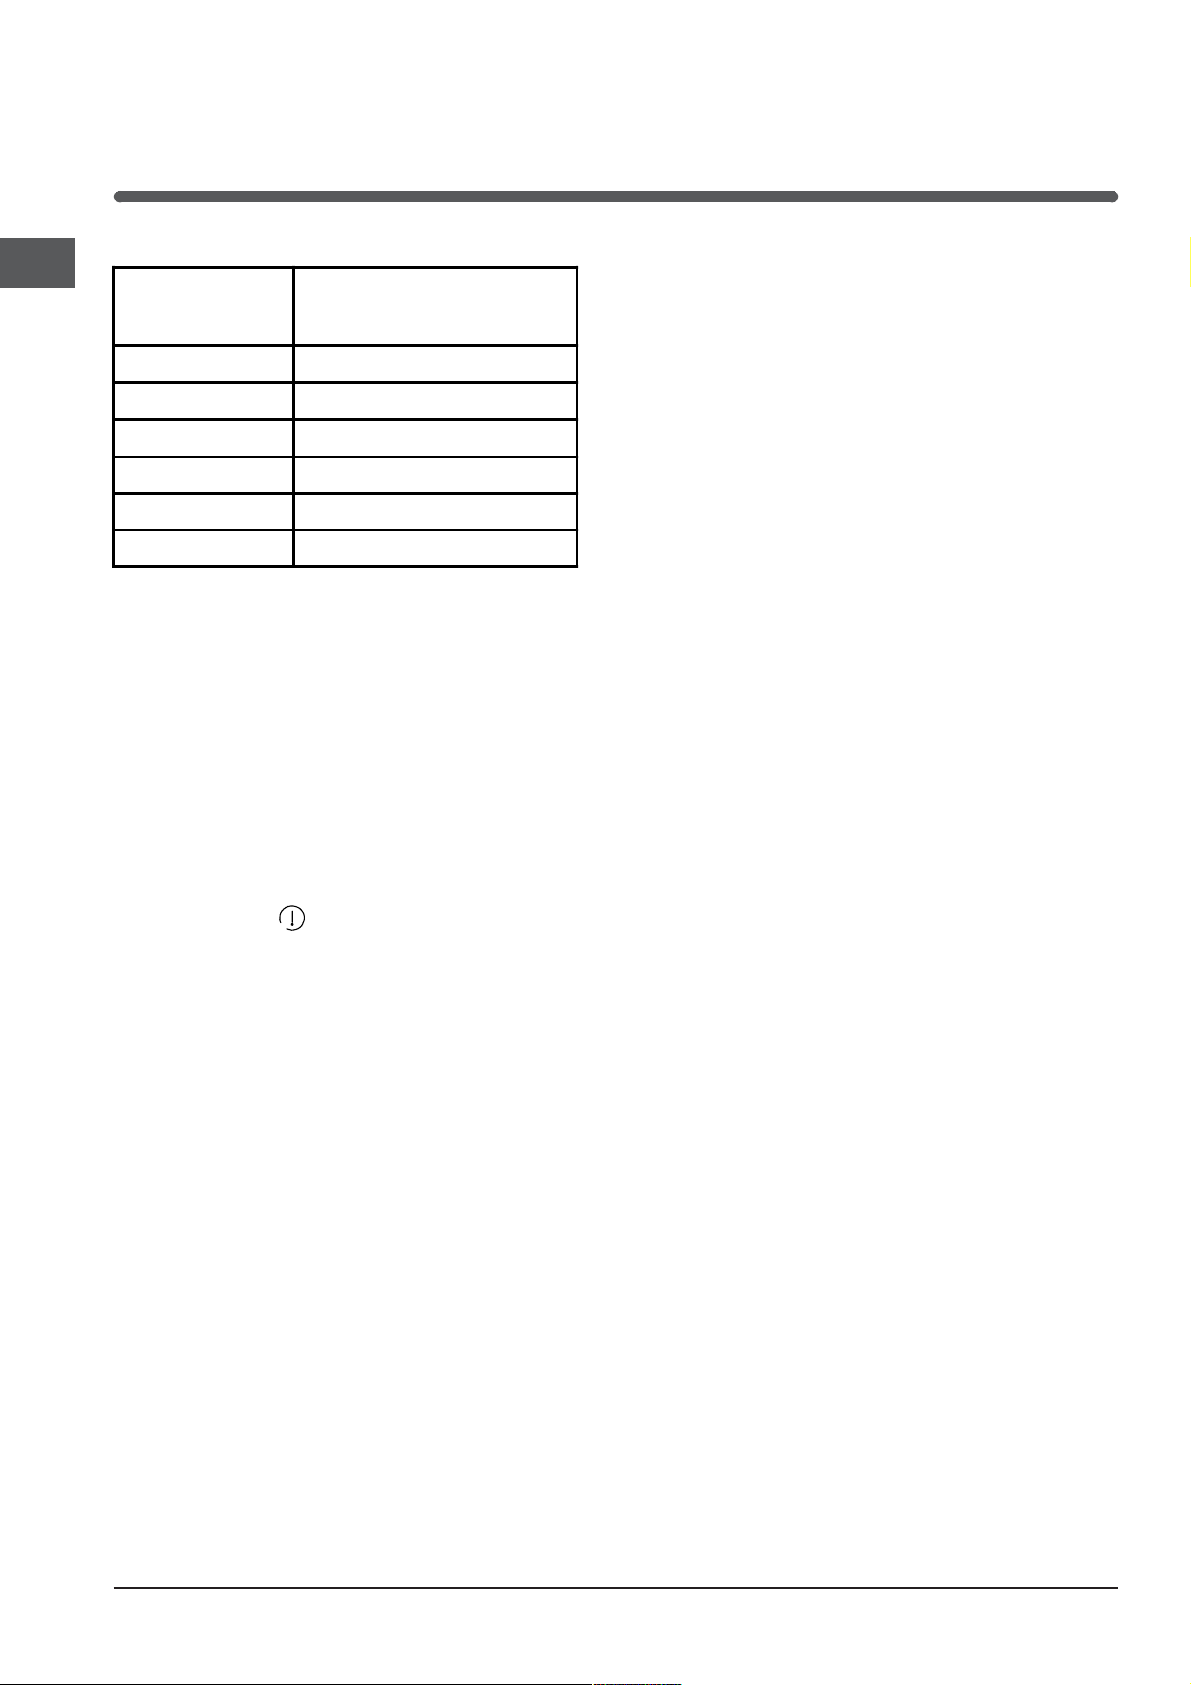
Descrizione tecnica dei modelli, 11
Page 2
Installazione
È importante conservare questo libretto per poterlo
IT
consultare in ogni momento. In caso di vendita, di
cessione o di trasloco, assicurarsi che resti insieme
allapparecchio per informare il nuovo proprietario sul
funzionamento e sui relativi avvertimenti.
Leggere attentamente le istruzioni: ci sono importanti
informazioni sullinstallazione, sulluso e sulla sicurezza.
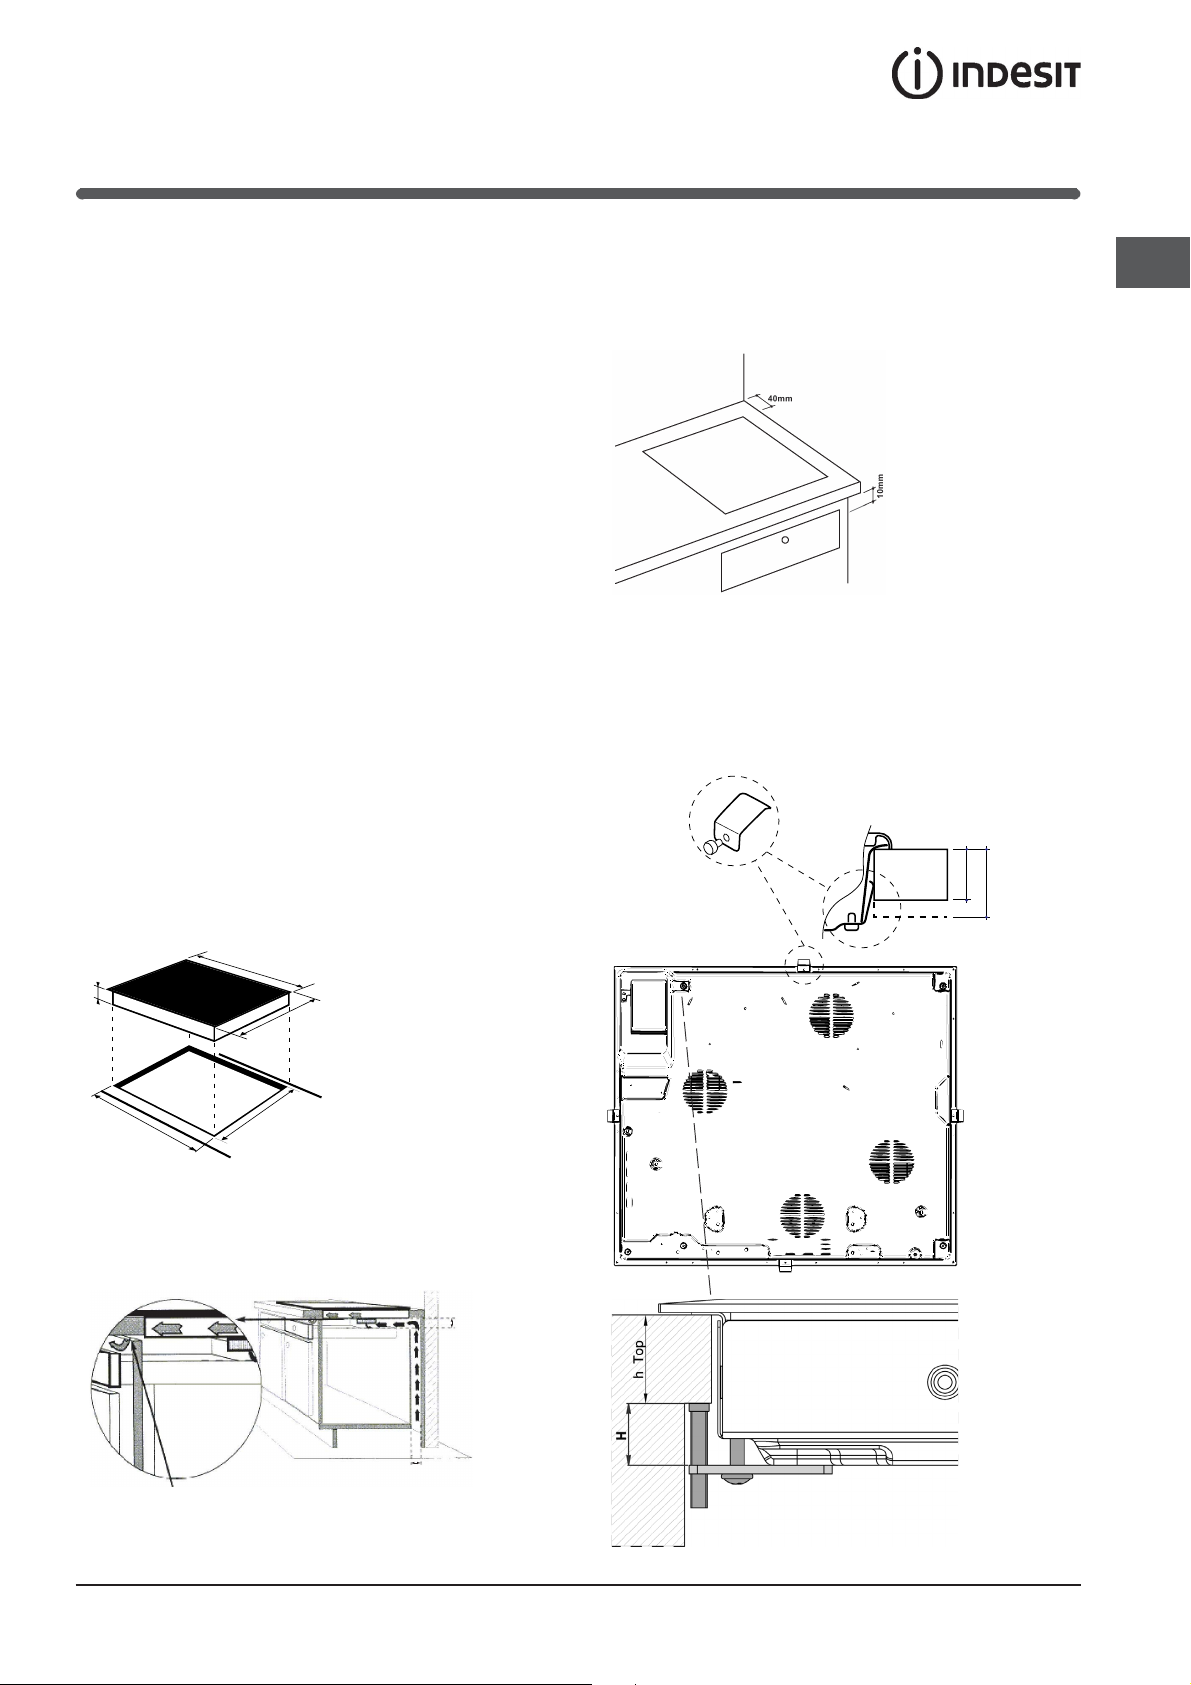
Posizionamento
Gli imballaggi non sono giocattoli per bambini e vanno
eliminati secondo le norme per la raccolta differenziata
(vedi Precauzioni e consigli).
Linstallazione va effettuata secondo queste istruzioni e
da personale professionalmente qualificato. Una errata
installazione può causare danni a persone, animali o
cose.
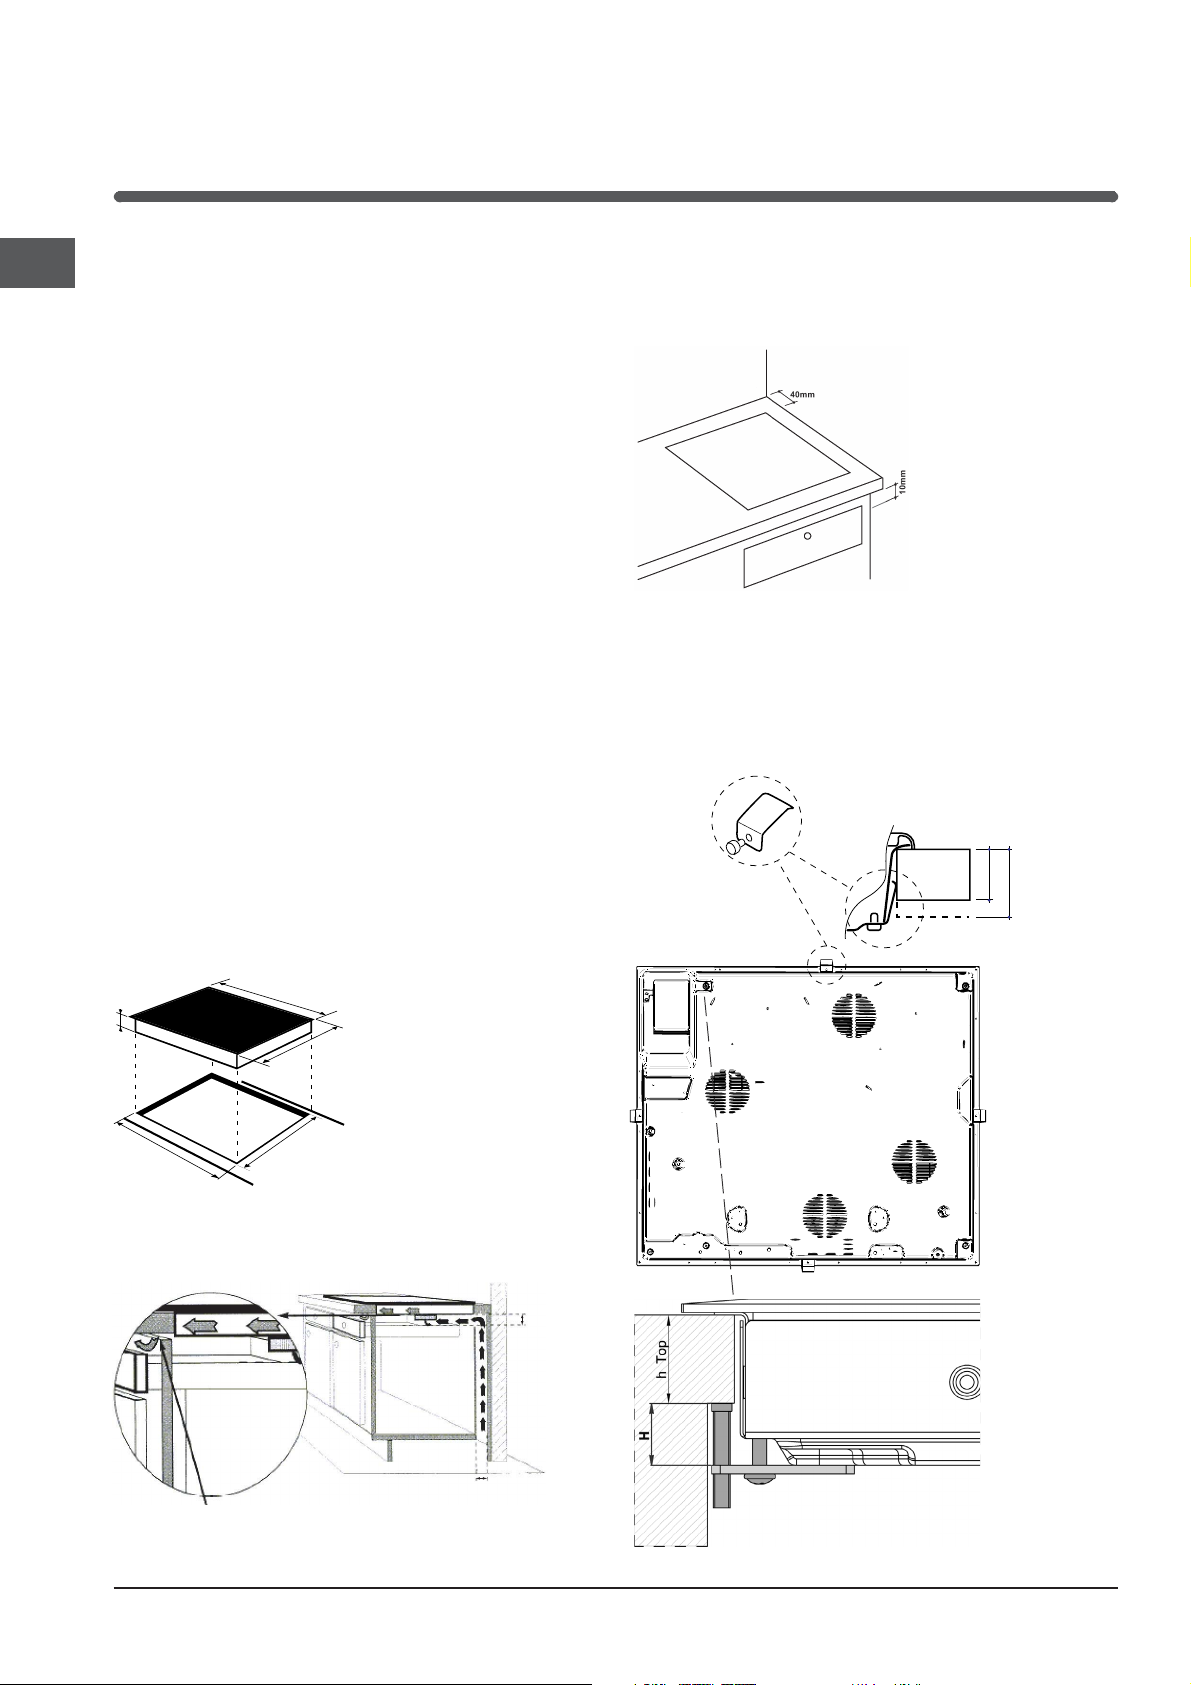
Incasso
Per garantire un buon funzionamento dellapparecchio è
necessario che il mobile abbia le caratteristiche adatte:
il piano dappoggio deve essere di materiale
resistente al calore, a una temperatura di circa
Aerazione
Per consentire unadeguata aerazione e per evitare
il surriscaldamento delle superfici attorno
allapparecchio, il piano cottura deve essere posizionato:
a una distanza
minima di 40 mm
dalla parete
retrostante e di 600
mm da qualsiasi
altra superficie
verticale;
in modo da
mantenere una
distanza minima di
10 mm fra il vano
per lincasso
mobile sottostante.
e il
Fissaggio
Linstallazione dellapparecchio deve essere effettuata
su un piano dappoggio perfettamente piano.
Le eventuali deformazioni provocate da un errato
fissaggio potrebbero alterare le caratteristiche e
le prestazioni del piano cottura.
LATO ANTERIORE
DEL PIANO COTTURA
100°C;
se si desidera installare il piano cottura sopra un
forno, questo deve essere provvisto di un sistema
PIANO DI
APPOGGIO
30
40
di raffreddamento a ventilazione forzata;
evitare di installare il piano cottura sopra una
lavastoviglie: alloccorrenza frapporre
590
di separazione a
tenuta stagna fra i due
un elemento
PIANO COTTURA
ROVESCIATO
apparecchi;
48
520
a seconda del piano
cottura che si desidera
installare (vedi figure),
il vano del mobile deve
560 +/- 1
490 +/- 1
avere le seguenti
dimensioni:
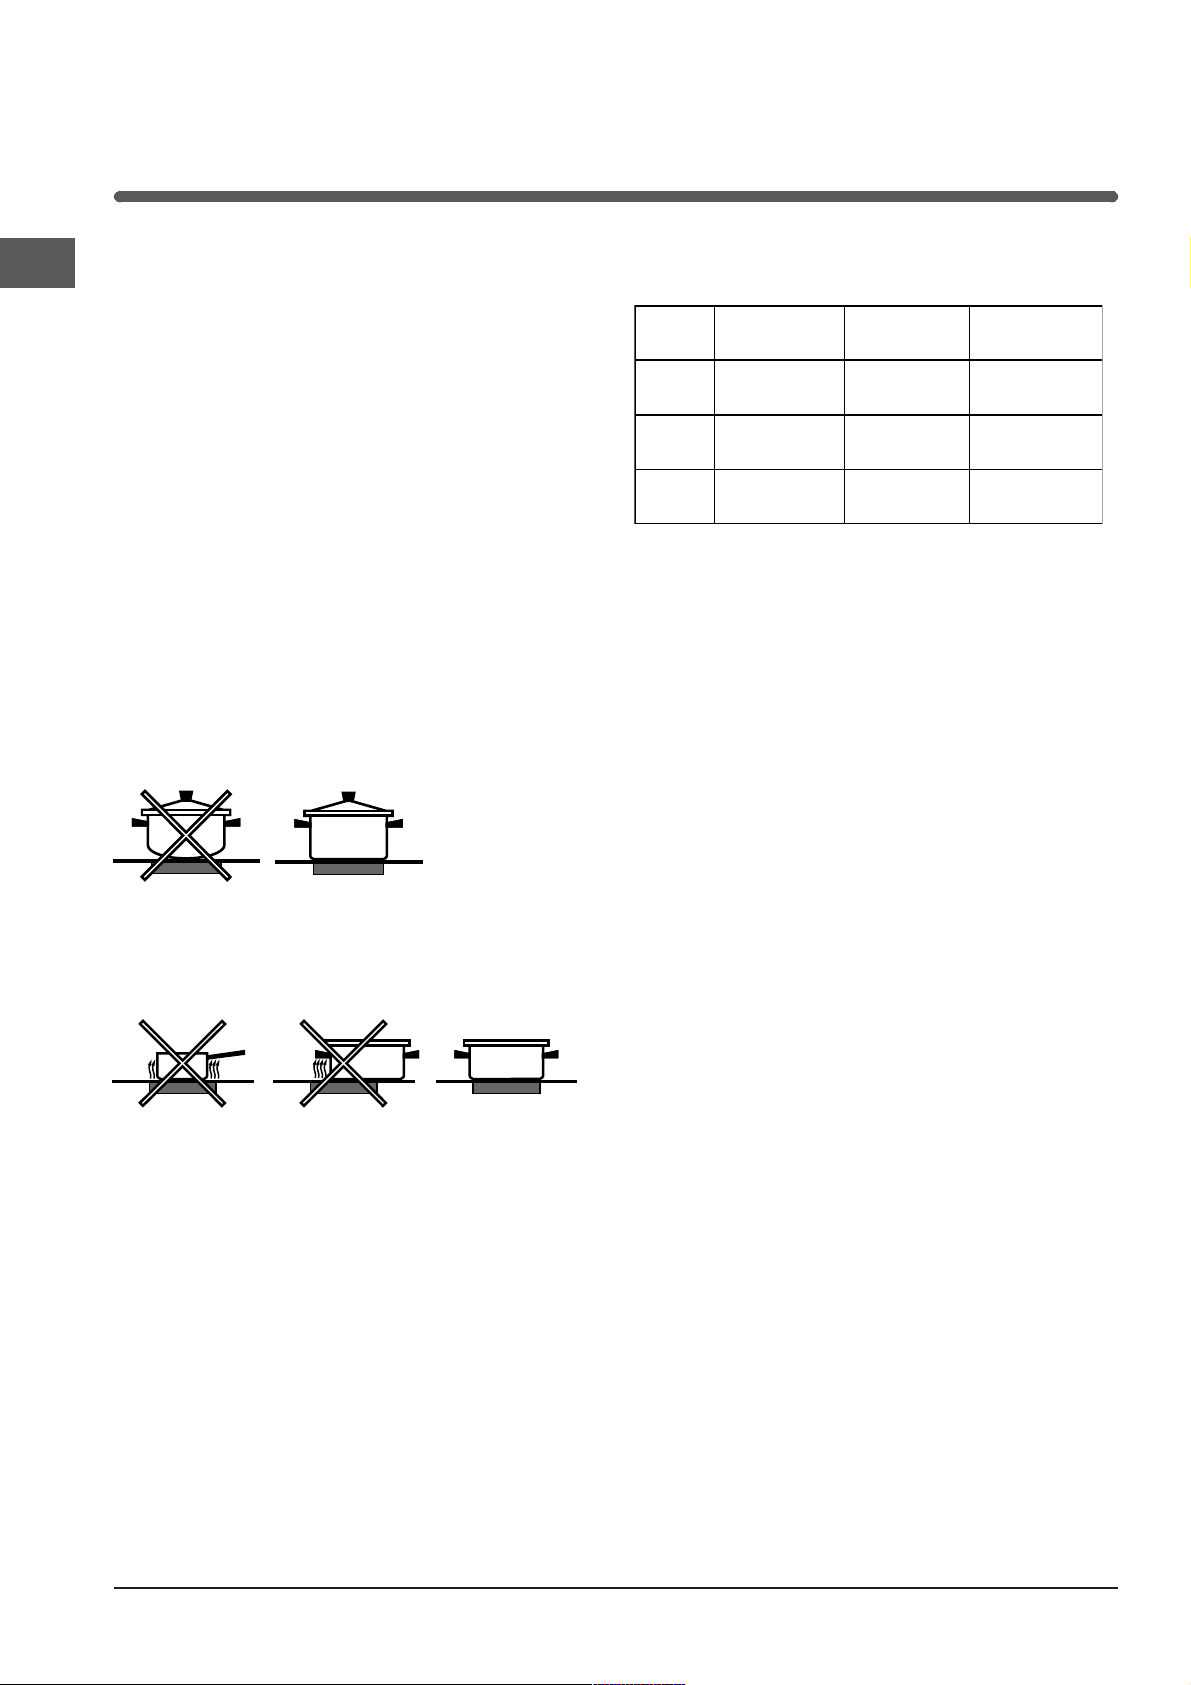
Sopra un mobile vuoto o un cassetto
È necessaria una intercapedine di almeno 40 mm
o una apertura di 5 mm sulla larghezza del mobile.
40 mm min.
40mm
Apertura di almeno 5 mm
sull'intera larghezza del piano.
2
Page 3
La lunghezza della vite di regolazione dei ganci
di fissaggio va impostata prima del loro montaggio,
in base allo spessore del piano dappoggio:
spessore di 30 mm: vite 17,55 mm;
spessore di 40 mm: vite 7,55 mm.
Per il fissaggio agire come segue:
1. Con le viti corte senza
punta, avvitare le 4 molle di
centraggio nei fori posti al centro di ogni lato del piano;
2. inserire il piano cottura nel vano del mobile, centrarlo
ed esercitare una adeguata pressione sullintero
perimetro affinché il piano di cottura aderisca bene al
piano dappoggio.
3. per i piani con profili laterali
: dopo aver inserito il
piano cottura nel mobile, inserire i 4 ganci di fissaggio
(ognuno con il suo perno) sul perimetro inferiore del
piano cottura, avvitandoli con le viti lunghe con punta
finché il vetro non aderisce al piano dappoggio.
È indispensabile che le viti delle molle di centraggio
rimangano accessibili
.
In conformità alle norme di sicurezza, una volta
incassato lapparecchio, non debbono essere possibili
eventuali contatti con le parti elettriche.
Tutte le parti che assicurano la protezione debbono
essere fissate in modo tale da non poter essere tolte
senza laiuto di qualche utensile.
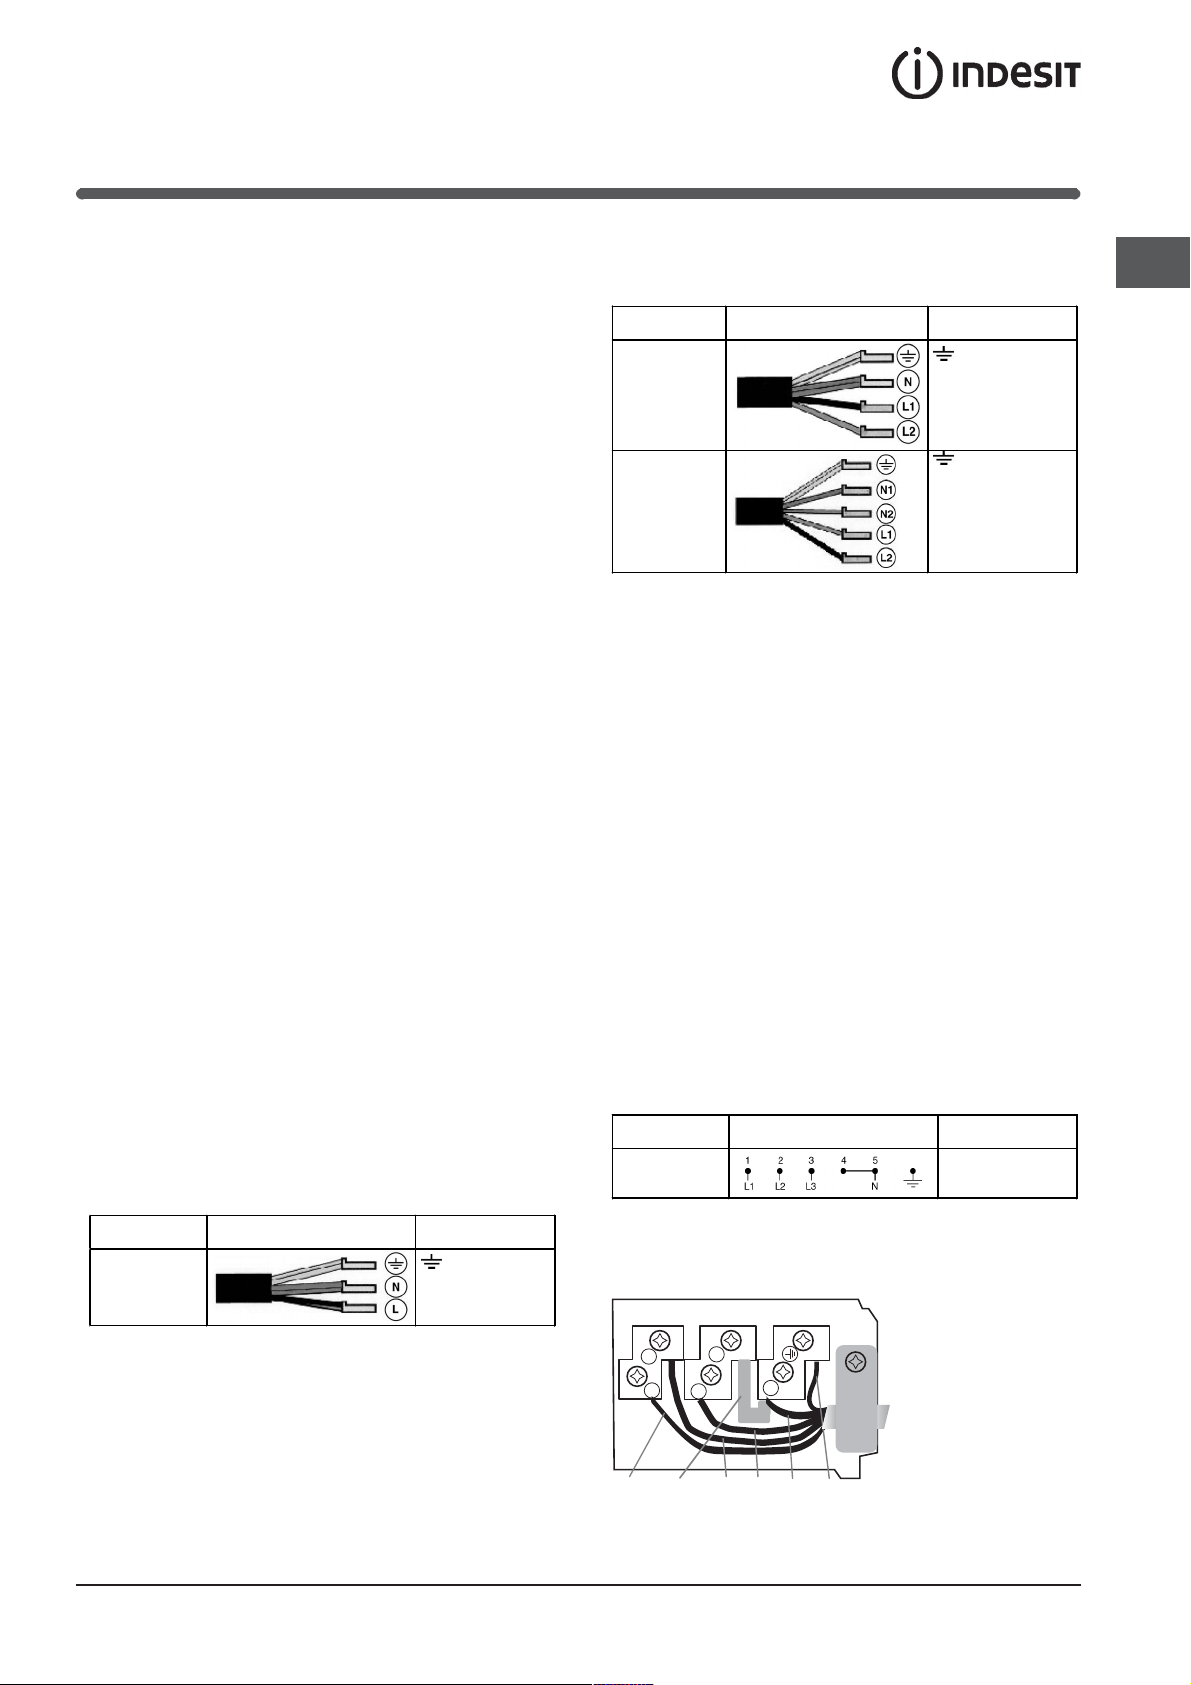
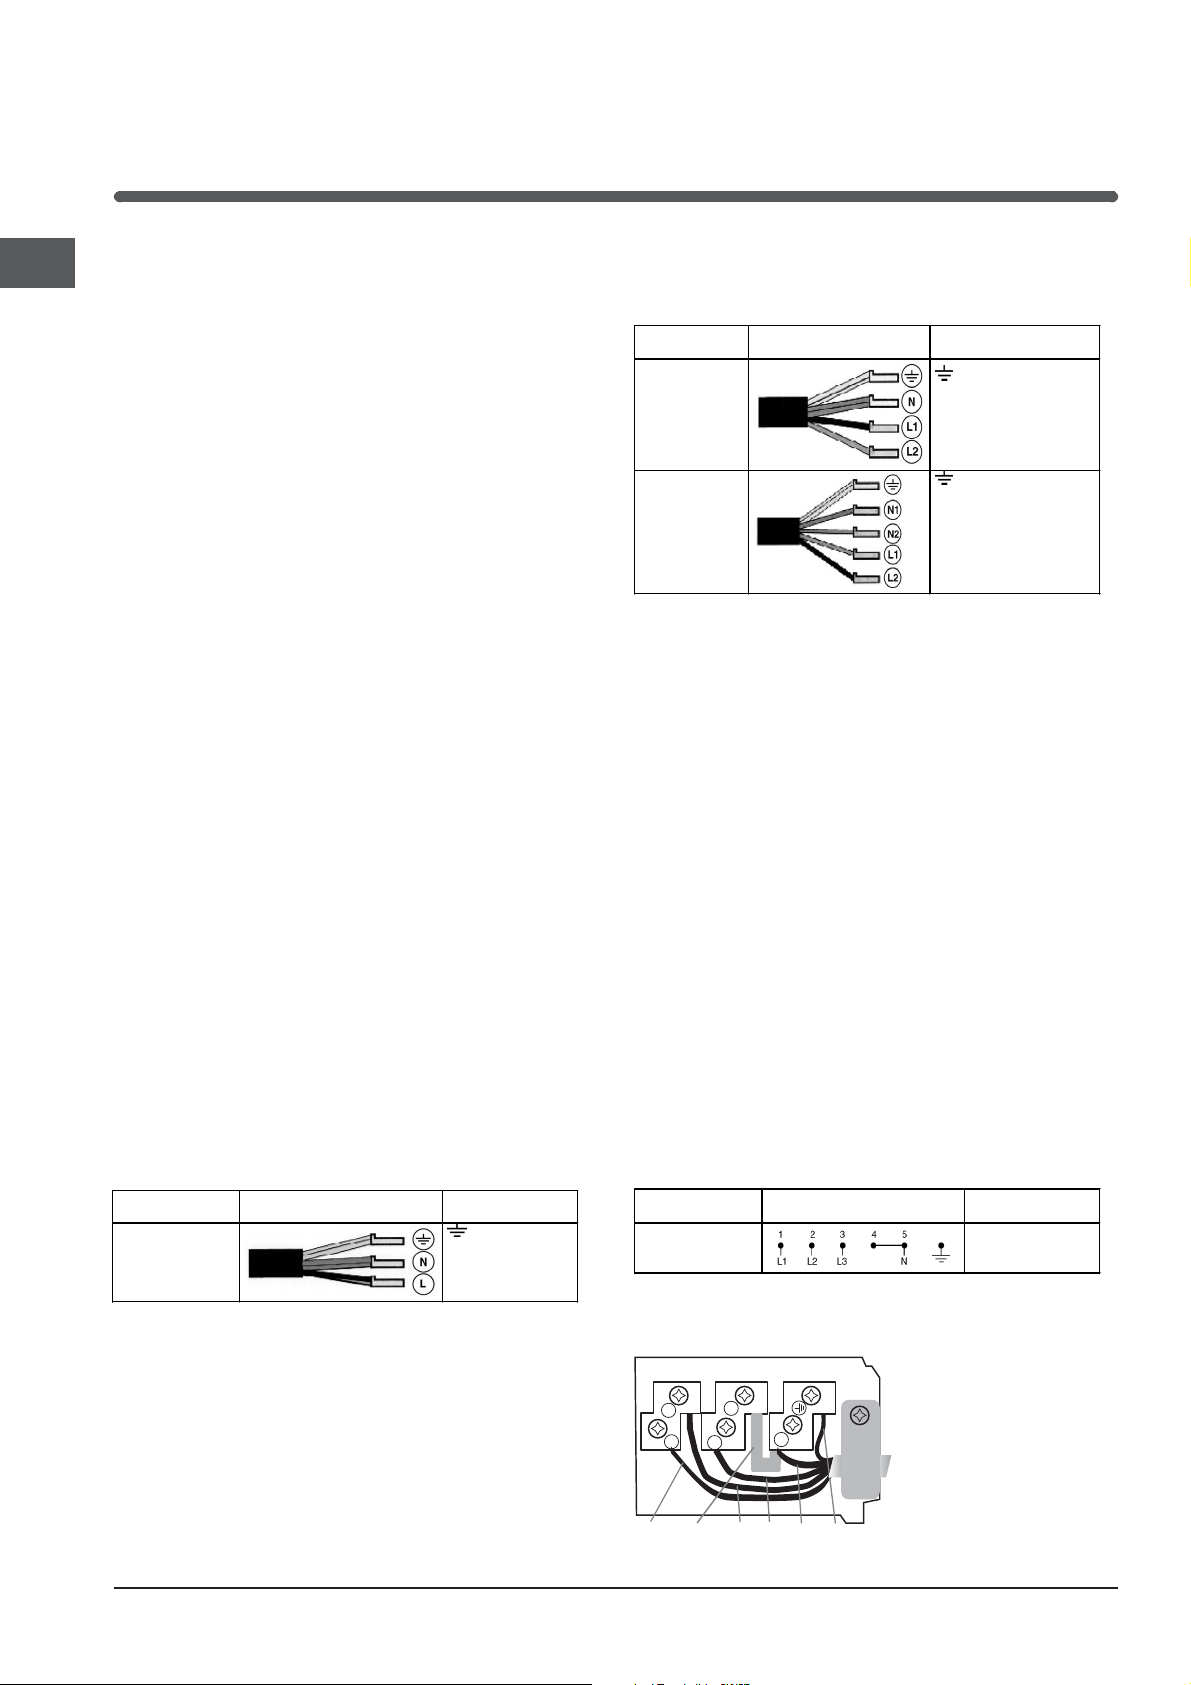
Collegamento elettrico
Lallacciamento elettrico del piano cottura e quello di
un eventuale forno da incasso devono essere realizzati
separatamente, sia per ragioni di sicurezza elettrica sia
per facilitare le operazioni di estrazione del forno.
Collegamento monofase
Il piano è dotato di cavo di alimentazione già collegato e
predisposto per il collegamento monofase. Effettuare
lallaccio dei fili in accordo con la tabella e i disegni che
seguono:
Separare i cavi ed effettuare il collegamento dei fili in
accordo con la tabella e i disegni che seguono:
Tensione tipo e
frequenza rete
400V - 2+N ~
50 Hz
230V 3 ~
50Hz
400V - 2+2N ~
50 Hz
Cavo elettrico Collegamento fili
: giallo/verde;
N: i 2 fili blu insieme
L1: nero
L2: marrone
: giallo/verde;
N1: blu
N2: blu
L1: nero
L2: marrone
Se limpianto elettrico corrisponde a una delle seguenti
caratteristiche:
Tensione tipo e frequenza di rete
400V 3 - N ~ 50 Hz
procedere come segue:
Leventuale cavo in dotazione non è utilizzabile per
questi tipi di installazione.
1. Utilizzare un cavo di alimentazione appropriato, tipo
H05RR-F o di valore superiore, delle
dimensioni adatte
(sezione cavo: 25 mm).
2. Servendosi di un cacciavite, far leva sulle linguette
del coperchio della morsettiera e aprirla (vedi immagine
Morsettiera).
3. Svitare la vite del serracavo e le viti dei morsetti
relativi al tipo di allaccio necessario e posizionare i
cavallotti di collegamento secondo la tabella e i disegni
seguono.
che
4. Posizionare i fili in accordo con la tabella e i disegni
che seguono ed effettuare il collegamento stringendo a
fondo tutte le viti dei morsetti.
Tensione tipo e
frequenza rete
400V 3-N ~
50 Hz
Collegamenti elettrici Morsettiera
Trifase 400
IT
Tensione tipo e
frequenza rete
230V 1+N ~
50 Hz
Cavo elettrico Collegamento fili
: giallo/verde;
N: i 2 fili blu insieme
L: marrone insieme
al nero
Altri tipi di collegamento
Se limpianto elettrico corrisponde a una delle seguenti
caratteristiche:
Tensione tipo e frequenza di rete
400V - 2+N ~ 50 Hz
230V 3 ~ 50 Hz
400V - 2+2N ~ 50 Hz
5. Fissare il cavo di alimentazione nellapposito
fermacavo e chiudere il coperchio.
2
1
4
3
5
Trifase 400
Fase Cavallotto Neutro TerraFase
Fase
3
Page 4

Allacciamento del cavo di alimentazione alla
IT
rete
In caso di collegamento diretto alla rete è necessario
interporre tra lapparecchio e la rete un interruttore
onnipolare con apertura minima fra i contatti di 3 mm.
Linstallatore è responsabile del corretto collegamento
elettrico e dellosservanza delle norme di sicurezza.
Prima di effettuare lallacciamento accertarsi che:
la presa abbia la messa
legge;
la presa sia in grado di sopportare il carico massimo
di potenza della macchina, indicato nella
targhetta caratteristiche posta sullapparecchio;
la tensione di alimentazione sia compresa nei valori
della targhetta caratteristiche;
la presa sia compatibile con la spina
dellapparecchio. In caso contrario sostituire la
o la spina; non usare prolunghe e multiple.
Ad apparecchio installato, il cavo elettrico e la presa
della corrente devono essere facilmente raggiungibili.
Il cavo non deve subire piegature o compressioni.
a terra e sia a norma di
presa
Il cavo deve essere controllato periodicamente e
sostituito solo da tecnici autorizzati.
Lazienda declina ogni responsa
norme non vengano rispettate.
bilità qualora queste
4
Page 5
Descrizione
dellapparecchio
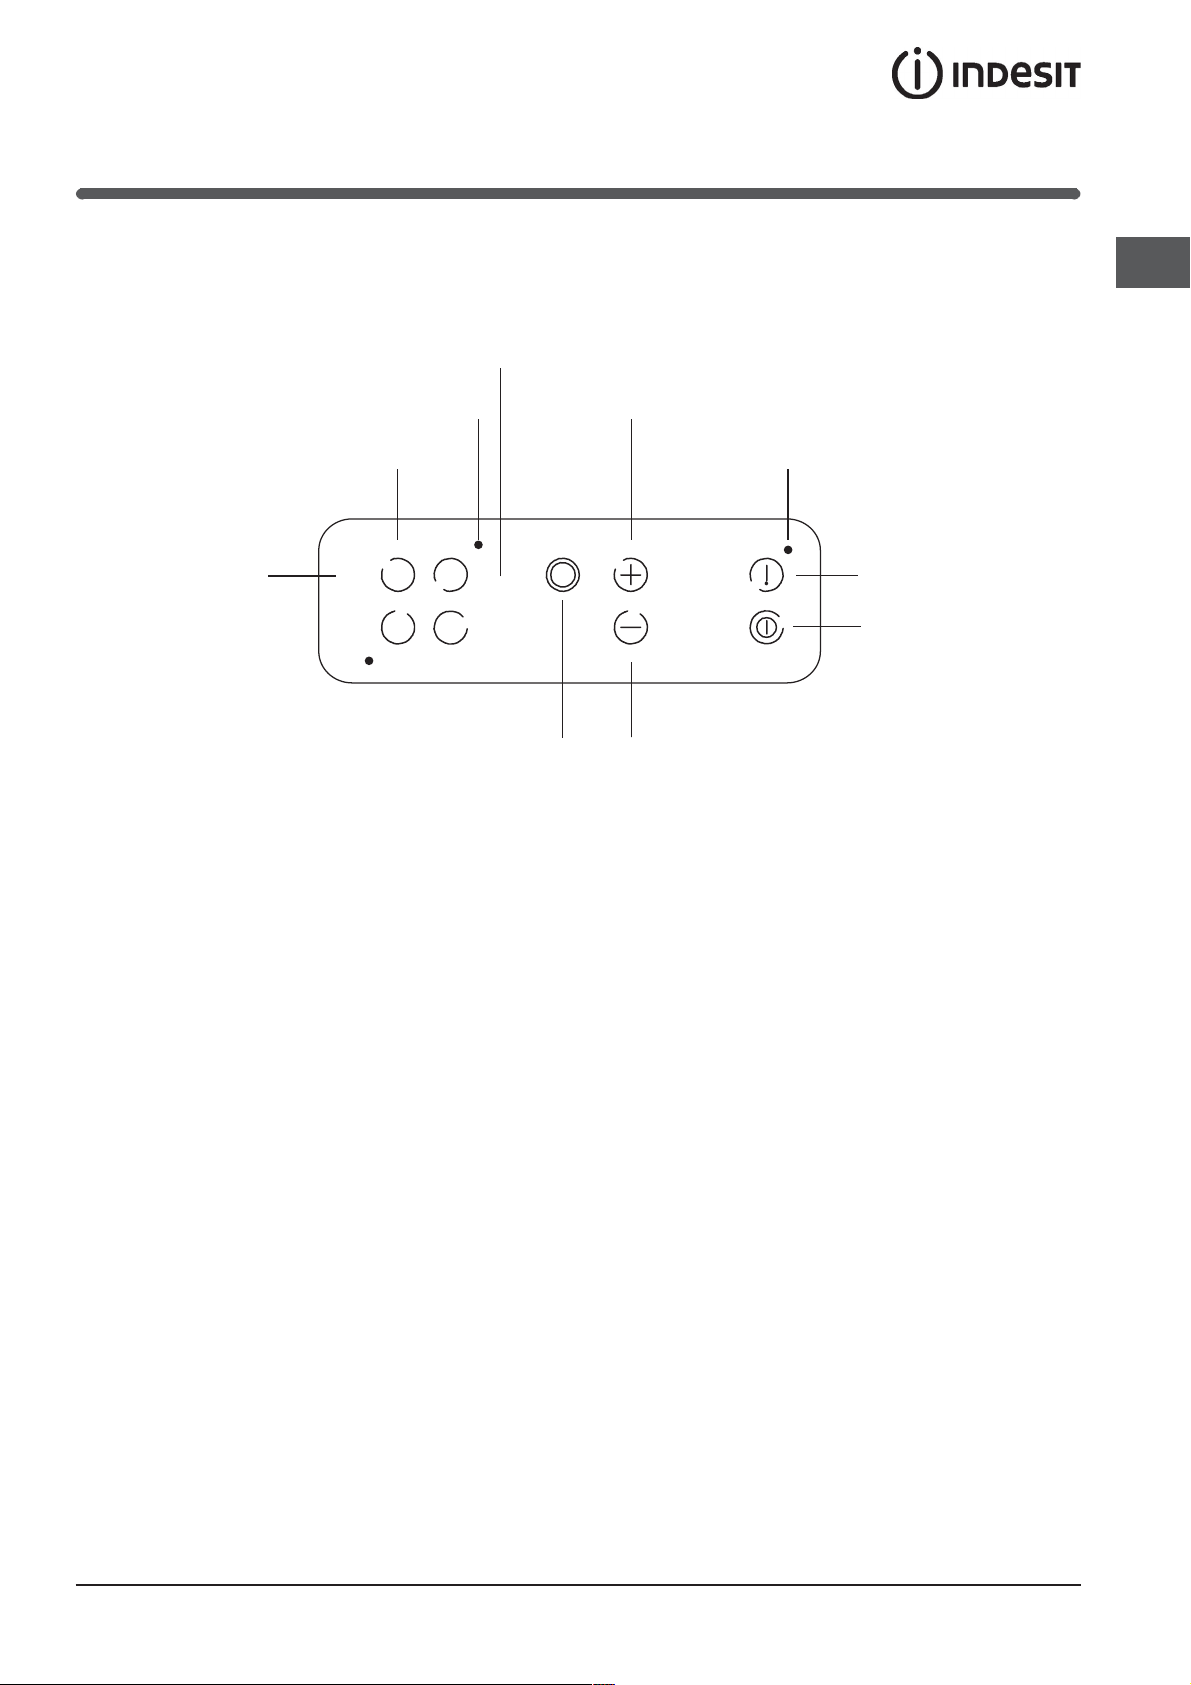
Pannello di controllo
Il pannello di controllo che qui viene descritto è rappresentato a fini esemplificativi: può non essere una esatta
riproduzione del modello acquistato.
Spia
ZONA DI COTTURA SELEZIONATA
Tasto
AUMENTO POTENZA
Spia
COMANDI BLOCCATI
Tasto
BLOCCO DEI COMANDI
Tasto
ON/OFF
Tasto
DIMINUZIONE POTENZA
PIASTRA ESTENSIBILE ACCESA*
SELEZIONE ZONA DI COTTURA
Indicatore
POTENZA
Tasto
5
5
.
PIASTRA ESTENSIBILE*
Spia
5
.
5
Tasto
IT
Tasto ON/OFF per accendere e spegnere
lapparecchio.
Tasto BLOCCO DEI COMANDI per impedire
modifiche fortuite alle regolazioni del piano cottura
(vedi Avvio e utilizzo).
Spia COMANDI BLOCCATI segnala lavvenuto
blocco dei comandi (vedi Avvio e utilizzo).
Spia ZONA DI COTTURA SELEZIONATA indica
che la zona di cottura relativa è stata selezionata e
quindi sono possibili le varie regolazioni
Tasto SELEZIONE Z
selezionare la zona di cottura desiderata
ONA DI COTTURA per
Indicatore POTENZA segnala visivamente il livello
di calore raggiunto.
Tasto AUMENTO POTENZA per accendere la
piastra e regolare la potenza (vedi Avvio e
utilizzo).
Tasto DIMINUZIONE POTENZA per regolare la
potenza e spegnere la piastra (vedi Avvio e
utilizzo).
Tasto PIASTRA ESTENSIBILE* per attivare la
piastra estensibile (vedi Avvio e utilizzo).
Spia PIASTRA ESTENSIBILE ACCESA*: segnala
laccensione della piastra estensibile.
* Presente solo su alcuni modelli
5
Page 6

Avvio e utilizzo
IT
La colla applicata sulle guarnizioni lascia alcune
tracce di grasso sul vetro. Prima di utilizzare
lapparecchio, si raccomanda di eliminarle con un
prodotto specifico per la manutenzione non abrasivo.
Durante le prime ore di funzionamento è possibile
avvertire un odore di gomma, che comunque
scomparirà presto.
Quando il piano cottura viene collegato
elettricamente, dopo acuni secondi viene emesso un
breve segnale acustico. Soltanto a questo punto è
possibile accendere il piano cottura.
Accensione delle zone di cottura
estensibili*
Piastra doppia:
1. Premere il tasto
cottura più interna.
2. Premere il tasto
seconda zona di cottura.
Piastra tripla:
1. Premere il tasto
cottura intermedia.
2. Premere 2 volte il tasto
zona di cottura.
per attivare la zona di
per attivare (o disattivare) la
per attivare la zona di
per attivare tutta la
Accensione del piano cottura
Per tornare ad una zona di cottura di grandezza
Laccensione del piano cottura avviene tenendo
premuto il tasto
per circa un secondo.
inferiore, premere nuovamente il tasto
.
Spegnimento delle zone di cottura
Accensione delle zone di cottura
Premere il tasto : la potenza della zona di
Ciascuna zona di cottura viene azionata tramite il
dispositivo di regolazione della potenza composto
da due tasti (- e +).
Premere il tasto
impostare la potenza desiderata agendo sui tasti
e .
per attivare la piastra, poi
cottura scende progressivamente, fino allo
spegnimento.
Oppure premere contemporaneamente i tasti
e : la potenza torna immediatamente a 0 e la
zona di cottura si spegne.
Per impostare direttamente la potenza massima,
premere brevemente il tasto
È possibile accelerare i tempi di riscaldamento di
una zona di cottura procedendo in questo modo:
1. regolare la potenza della zona di cottura al
massimo (9);
2.quindi premere il tasto
potenza appare A;
3. a questo punto, impostare la potenza che si
desidera raggiungere per la cottura (ad esempio,
5).
Quando viene raggiunta questa temperatura, la
funzione di riscaldamento rapido si interrompe
automaticamente e la cottura prosegue
normalmente alla potenza 5.
.
: sul display della
Blocco dei comandi
Quando il piano cottura è in funzione, è possibile
bloccare i comandi per evitare il rischio di modifiche
fortuite alle regolazioni (bambini, operazioni di
pulizia, ecc.). Premendo il tasto
bloccano e la spia che si trova sopra al tasto si
accende.
Per tornare ad agire sulle regolazioni (es. interrompere
la cottura) è necessario sbloccare i comandi: premere
il tasto
comandi si sbloccano.
per qualche istante, la spia si spegne e i
i comandi si
Spegnimento del piano cottura
Premendo il tasto lapparecchio si spegne.
Se i comandi dellapparecchio sono stati bloccati,
continueranno ad essere bloccati anche dopo aver
riacceso il piano di cottura. Per poter riaccendere il
piano è necessario prima sbloccare i comandi.
* Presente solo su alcuni modelli
6
Page 7

Gli elementi riscaldanti
gg
g
Sul piano cottura, a seconda dei modelli, possono
essere installati elementi riscaldanti di due tipi:
alogeni e radianti.
Gli alogeni trasmettono il calore tramite lirradiazione
della lampada alogena che contengono.
Si caratterizzano per le proprietà che ricordano
quelle tipiche del gas: rapida risposta ai comandi,
visualizzazione istantanea della potenza.
I radianti sono composti da una molteplicità di spire
che garantiscono la ripartizione uniforme del calore
sul fondo del recipiente, per una perfetta riuscita di
tutte le cotture a fuoco basso: stufati, salse o piatti
da riscaldare.
Consigli pratici per luso
dellapparecchio
Per ottenere le migliori prestazioni dal piano di
cottura:
adoperare pentole con fondo piatto per essere
certi che aderiscano perfettamente alla zona
riscaldante;
Livelli di potenza consigliati per i vari tipi di cottura:
Potenze
Medio Salsa
Maxi
Piastra
piccola
(1100 -> 1400 W)
Mini Cioccolato Riscaldare
Cuocere a
fuoco lento
Piastra media
(1800 -> 2000 W)
Cuocere a
fuoco lento
Bollir e liquidi
Piastra grande
(2300 -> 2500 W)
Cuocere a
fuoco lento
Bollir e liquidi
Fri
ere
/Gri
liare
Dispositivi di sicurezza
Indicatori di calore residuo
Finché la temperatura delle zone di cottura rimane
superiore a 60°C, anche dopo larresto gli indicatori
di calore residuo situati vicino alla zona di cottura
relativa restano accesi per prevenire il rischio di
ustioni.
Inattività
Se il piano viene acceso ma resta inutilizzato per
circa 2 minuti, viene attivata la funzione di blocco
comandi. Se la stessa situazione permane per altri 4
minuti circa, il piano si spegne automaticamente.
IT
Adoperare pentole di diametro sufficiente a
coprire completamente la zona riscaldante, in
modo da garantire lo sfruttamento di tutto il calore
disponibile.
Accertarsi che il fondo delle pentole sia sempre
perfettamente asciutto e pulito, per garantire la
corretta aderenza e una lunga durata, sia alle
zone di cottura che alle pentole stesse.
Evitare di utilizzare le stesse pentole utilizzate
sui bruciatori a gas: la concentrazione di calore
sui
bruciatori a gas può deformare il fondo della
pentola, che perde aderenza.
non lasciare mai una zona di cottura accesa
senza pentola poiché il suo riscaldamento,
raggiungendo rapidamente il livello massimo,
potrebbe danneggiare gli elementi riscaldanti.
Surriscaldamento
Un uso prolungato del piano di cottura può
provocare il surriscaldamento dei componenti
elettronici.
In questi casi un dispositivo di protezione termica
impone temporaneamente una potenza ridotta (pari
a 3) sulle zone di cottura anteriori finché la
temperatura non sarà scesa a un livello accettabile.
Interruttore di sicurezza
Lapparecchio è dotato di un interruttore di sicurezza
che spegne le zone di cottura automaticamente
quando viene raggiunto un tempo limite di utilizzo a
un dato livello di potenza. Durante linterruzione di
sicurezza, il display indica 0.
Esempio: la piastra posteriore destra è impostata su
5, mentre la piastra anteriore sinistra su 2. La
posteriore destra si spegnerà dopo 3 ore di
funzionamento, la anteriore sinistra dopo 10 ore.
7
Page 8
IT
Livello di
potenza
1-2 10 ore
35 ore
44 ore
5-6 3 ore
7-8 2 ore
91 ore
Segnale acustico
Alcune anomalie, quali:
un oggetto (pentola, posata, ecc.) posto per oltre
10 secondi sullarea dei comandi,
un versamento sullarea dei comandi,
una pressione esercitata a lungo su un tasto,
possono provocare lemissione di un segnale
acustico. Rimuovere la causa del
malfunzionamento per interrompere il segnale
acustico. In queste situazioni i comandi si
bloccano automaticamente: per sbloccarli
premere il tasto
mantenute. Se la causa dellanomalia non viene
rimossa, il segnale acustico persiste e il piano si
spegne.
Tempo limite di
funzionamento
, le impostazioni vengono
8
Page 9

Precauzioni e consigli
Lapparecchio è stato progettato e costruito
in conformità alle norme internazionali di sicurezza.
Queste avvertenze sono fornite per ragioni di
sicurezza e devono essere lette attentamente.
Questa apparecchiatura è conforme alle
seguenti Direttive Comunitarie:
- 73/23/CEE del 19/02/73 (Bassa Tensione) e
successive modificazioni
- 89/336/CEE del 03/05/89 (Compatibilità
Elettromagnetica) e successive modificazioni
- 93/68/CEE del 22/07/93 e successive modificazioni.
Sicurezza generale
Lapparecchio è stato concepito per un uso di tipo
non professionale allinterno dellabitazione.
Lapparecchio non va installato allaperto,
nemmeno se lo spazio è riparato, perché è molto
pericoloso lasciarlo esposto a pioggia e temporali.
Non toccare la macchina a piedi nudi o con le mani
o i piedi bagnati o umidi.
contenuto di zucchero. Fare particolare attenzione
a imballaggi e pellicole in plastica o alluminio:
se dimenticati sulle superfici ancora calde o
tiepide possono causare un grave danno al piano.
Assicurarsi che i manici delle pentole siano
sempre rivolti verso linterno del piano cottura per
evitare che vengano urtati accidentalmente.
Non staccare la spina dalla presa della corrente
tirando il cavo, bensì afferrando la spina.
Non fare pulizia o manutenzione senza aver prima
staccato la spina dalla rete elettrica.
Smaltimento
Smaltimento del materiale di imballaggio:
attenersi alle norme locali, così gli imballaggi
potranno essere riutilizzati.
IT
Lapparecchio deve essere usato per cuocere
alimenti, solo da persone adulte e secondo le
istruzioni riportate in questo libretto. Non utilizzare
il piano come superficie di appoggio, né come
tagliere.
Il piano in vetroceramica è resistente agli urti
meccanici, tuttavia può incrinarsi (o eventualmente
frantumarsi) se colpito con un oggetto appuntito,
quale un utensile. In questi casi, scollegare
immediatamente lapparecchio dalla rete di
alimentazione e rivolgersi allAssistenza.
Se la superficie del piano è incrinata, spegnere
l'apparecchio per evitare la possibilità di scosse
elettriche.
Evitare che il cavo di alimentazione di altri
elettrodomestici entri in contatto con parti calde
del piano cottura.
Non dimenticare che la temperatura delle zone di
cottura rimane piuttosto elevata per almeno trenta
minuti dopo lo spegnimento. Il calore residuo è
segnalato anche da un indicatore (vedi Avvio e utilizzo).
La direttiva Europea 2002/96/CE sui rifiuti di
apparecchiature elettriche ed elettroniche (RAEE),
prevede che gli elettrodomestici non debbano
essere smaltiti nel normale flusso dei rifiuti solidi
urbani. Gli apparecchi dismessi devono essere
raccolti separatamente per ottimizzare il tasso di
recupero e riciclaggio dei materiali che li
compongono ed impedire potenziali danni per la
salute e lambiente. Il simbolo del cestino barrato è
riportato su tutti i prodotti per ricordare gli obblighi
di raccolta separata.
Per ulteriori informazioni, sulla corretta dismissione
degli elettrodomestici, i detentori potranno
rivolgersi al servizio pubblico preposto o ai
rivenditori.
Tenere a debita distanza dal piano cottura qualsiasi
oggetto che potrebbe fondere, ad esempio oggetti
in plastica, in alluminio o prodotti con un elevato
9
Page 10

Manutenzione e cura
IT
Escludere la corrente elettrica
Prima di ogni operazione isolare lapparecchio dalla
rete di alimentazione elettrica.
Pulire lapparecchio
Evitare luso di detergenti abrasivi o corrosivi, quali
i prodotti in bombolette spray per barbecue e forni,
smacchiatori e prodotti antiruggine, i detersivi in
polvere e le spugne con superficie abrasiva:
possono graffiare irrimediabilmente la superficie.
Non utilizzare mai pulitori a vapore o ad alta
pressione per la pulizia dellapparecchio.
Per una manutenzione ordinaria, è sufficiente
lavare il piano con una spugna umida,
asciugando quindi con una carta assorbente per
cucina.
Se il piano è particolarmente sporco, strofinare
con un prodotto specifico per la pulizia delle
superfici
in vetroceramica, sciacquare e asciugare.
Telaio in acciaio inox (solo nei modelli con
cornice)
Lacciaio inossidabile può macchiarsi per effetto
di unacqua molto calcarea lasciata per un periodo
di tempo prolungato a contatto dello stesso oppure
a causa di prodotti per la pulizia contenenti fosforo.
Si consiglia di sciacquare abbondantemente e
asciugare con cura dopo la pulizia del piano. In
caso di versamenti dacqua, intervenire rapidamente
asciugando con cura.
Alcuni piani cottura hanno una cornice in alluminio
somigliante allacciaio inox. Non utilizzare prodotti
per la pulizia e lo sgrassaggio non idonei per
lalluminio.
Smontare il piano
Nel caso si renda necessario smontare il piano
cottura:
1. togliere le viti che fissano le molle di centraggio
sui lati;
2. allentare le viti dei ganci di fissaggio sugli angoli;
3. estrarre il piano cottura dal vano del mobile.
Per rimuovere gli accumuli di sporco più
consistenti servirsi di un apposito raschietto.
Intervenire non appena possibile, senza attendere
che lapparecchio si sia raffreddato, per evitare
lincrostazione dei residui. Eccellenti risultati si
possono ottenere usando una spugnetta in filo
dacciaio inossidabile - specifica per piani in
vetroceramica - imbevuta di acqua e sapone.
In caso sul piano cottura si fossero
accidentalmente fusi oggetti o materiali quali
plastica o zucchero, rimuoverli con il raschietto
immediatamente, finché la superficie è ancora
calda.
Una volta pulito, il piano può essere trattato
con un prodotto specifico per la manutenzione e
la protezione: la pellicola invisibile lasciata da
questo prodotto protegge la superficie in caso di
scolamenti durante la cottura. Si raccomanda
di eseguire queste operazioni con lapparecchio
tiepido o f
Ricordarsi sempre di risciacquare con acqua
pulita e asciugare accuratamente il piano: i residui
di prodotti potrebbero infatti incrostarsi durante la
successiva cottura.
reddo.
Raccomandiamo di evitare di accedere ai
meccanismi interni per tentare una riparazione. In
caso di guasto, contattare lAssistenza.
10
Page 11

Descrizione tecnica
dei modelli
In queste tabelle sono riportati, modello per modello, i valori di assorbimento energetico, il tipo di elemento
riscaldante (alogeno o radiante) e il diametro di ciascuna zona di cottura.
PIANI COTTURA TK 64 SD
TK 64 SD IX
TK 64 SD BI
Zone di cottura
Posteriore sx
Anteriore sx
Posteriore dx
Anteriore dx
Sinistra
Potenza totale 6500 6500 5100
R = radiante singolo, RD = radiante doppio RT = radiante triplo
Potenza
(in W)
RD 2300-1000
R 1200
R 1200
R 1800
Diametro
(in mm)
210 R 2300 210
145 R 1200 145
145 R 1200 145
180 R 1800 180
TK 64 CL
TK 64 S
TK 64 S IX
Potenza
(in W)
Diametro
(in mm)
RT 1050/1950/2700 250
TK 63 T
TK 63 T BI
Potenza
(in W)
R 600 120
R 1800 180
Diametro
(in mm)
IT
11
Page 12
Operating Instructions
HOB
GB
IT FR
Italiano, 1
GB
ES
Espanol, 34
Português, 45 Nederlands,56
TK 64 CL
TK 64 S IX
TK 64 S
TK 64 SD IX
TK 64 SD BI
TK 64 SD
TK 63 T
TK 63 T BI
Contents
Installation, 13-15
Positioning
Electrical connection
Français, 23English,12
Description of the appliance, 16
Control panel
NLPT
Start-up and use, 17-19
Switching on the hob
Switching on the cooking zones
Switching on the extendable cooking zones
Switching off the cooking zones
Control panel lock
Switching off the hob
Heating elements
Practical advice on using the appliance
Safety devices
Precautions and tips, 20
General safety
Disposal
Care and maintenance, 21
Switching the appliance off
Cleaning the appliance
Disassembling the hob
Technical description of the models, 22
Page 13
Installation
Before operating your new appliance please read this
instruction booklet carefully. It contains important
information concerning the safe operation, installation
and maintenance of the appliance.
Please keep these operating
reference. Pass them on to any new owners of the
appliance.
instructions for future
Positioning
Keep all packaging material out of the reach of
children. It may present a choking or suffocation hazard
(see Precautions and tips).
The appliance must be installed by a qualified
professional in accordance with th
provided. Incorrect installation may damage property or
cause harm to people or animals.
Built-in appliance
Use an appropriate cabinet to ensure that the appliance
operates properly.
The supporting surface must be heat-resistant up
to a temperature of approximately 100°C.
If the appliance is to be installed above an oven,
the oven must have a forced ventilation cooling
ystem.
s
Avoid installing the hob above a dishwasher: if
this cannot be avoided, place a waterproof
590
48
560 +/- 1
520
490 +/- 1
e instructions
separation device
between the two
appliances.
Depending on the
hob you want
to install,
the cabinet must have
the following
dimensions (see
figure):
Ventilation
To allow adequate ventilation and to avoid overheating
of the surrounding surfaces the hob should be
positioned:
At a minimum of 40 mm from the back panel and
600 mm from any
other vertical
surfaces.
So that a
minimum distance
of 10 mm is
maintained
between the
installation cavity
and the cabinet
underneath
.
Fixing
The appliance must be installed on a perfectly level
supporting surface.
Any deformities caused by improper fixing could alter
the features and the operation of the hob.
FRONT SIDE OF HOB
SUPPORTING
SURFACE
30
40
UNDERSIDE OF HOB
GB
Above an empty cabinet or a drawer
A space of at least 40 mm, or an opening of 5 mm on
the width measurement of the cabinet, should be created.
40 mm min.
40mm
Opening of at least 5 mm
on the overall width
measurement of the surface.
Page 14
GB
The thickness of the supporting surface should be taken
into account when choosing screws for the fixing hooks:
30 mm thick: 17.55 mm screws
40 mm thick: 7.55 mm screws
Fix the hob as follows:
1. Use short flat-bottomed screws to fix the 4 alignment
springs in the holes provided at the central point of each
side of the hob.
2. Place the
hob in the cavity, make sure it is in a central
position and push down on the whole perimeter until the
hob is stuck to the supporting surface.
3. For hobs with raised
sides: After inserting the hob into
its cavity, insert the 4 fixing hooks (each has its own pin)
into the lower edges of the hob, using the long pointed
screws to fix it in place
, until the glass is stuck to the
supporting surface.
Separate the wires and connect them in accordance
he instructions given in the following table and
with t
diagrams:
Voltage and
mains frequency
400V - 2+N ~
50 Hz
230V 3 ~
50Hz
400V - 2+2N ~ ı 50
Hz
Electrical cable Wire connection
: yellow/green;
N: the two blue wires together
L1: black
L2: brown
: yellow/green;
N1: bl ue
N2: bl ue
L1: black
L2: brown
The screws for the alignment springs must remain
accessible.
In order to adhere to safety standards, the appliance
must not come into
contact with electrical parts once it
has been installed.
All parts which ensure the safe operation of the
appliance must not be removable without the aid of a
tool.
Electrical connection
The electrical connection of the hob and any built-in
oven must be carried out separately, both for safety
purposes and to make extracting the oven easier.
Single-phase connection
The hob is equipped with a pre-connected electricity
supply cable, which is designed for single-phase
connection. Connect the wires in accordance with the
instructions given in the following table and diagrams:
Voltage an d
mains freq uency
230V 1+N ~
50 Hz
Electrical cable Wire connection
: yellow/green;
N: the t wo blue wires
together
L: brown and black
together
If the mains supply corresponds with one of the
following:
Voltage and mains frequency
400V 3 - N ~ 50 Hz
proceed as follows:
The cable provided is not suitable for the following
types of installation.
1. Use a suitable supply cable, H05RR-F or higher,
with the right dimensions (cable section: 25 mm).
2. To open the terminal board, insert a screwdriver
into the side tabs of t
he cover (see Terminal board
picture).
3. Loosen the cable clamp screw and the terminal
board screws in accordance with the type of
connection required and position the connection
supports as shown in the following table and
diagrams.
4. Position the wires according to the information
given in the following table and diagrams and
connect the appliance by tightening all the screws
for the springs as much as possible.
Voltage and
mains frequency
400V 3-N ~ ı 50
Hz
Electrical connections Terminal board
Three-phase 400
5. Fix the power supply cable in place by fastening
the cable clamp screw, then put the cover back on.
Other types of connection
If the mains supply corresponds with one of the
following:
Voltage and mains frequency
400V - 2+N ~ 50 Hz
230V 3 ~ 50 Hz
400V - 2+2N ~ 50 Hz
14
2
1
U-bolt
connection support
4
3
Phase PhasePhase Neutral Earth
5
Three-phase 400
Page 15

Connecting the electricity supply cable to the
mains
If the appliance is being connected directly to the
electricity mains an omnipolar switch must be installed
with a minimum opening of 3 mm between contacts.
GB
The installer must ensure that the correct
connection has been performed and that it is fully
compliant with safety regulations.
Before connecting the appliance to the power supply,
make sure that:
electrical
The appliance is earthed and the plug is
compliant with the law.
The socket can withstand the maximum power of
the appliance, which is indicated on the data
plate located on
the appliance itself.
The voltage is in the range between the values
indicated on the data plate.
The socket is compatible with the plug of the
appliance. If the socket is incompati
ble with the
plug, ask an authorised technician to replace it.
Do not use extension cords or multiple sockets.
Once the appliance has been installed, the power
supply cable and the electrical socket must be easily
accessible.
The cable must not be bent or compressed.
The cable must
authorised technicians only.
be checked regularly and replaced by
The manufacturer declines any liability should these
safety measures not be observed.
Page 16

Description
of the appliance
GB
Control panel
The control panel described in this manual is only a representative example: it may not exactly match the panel
on your appliance.
COOKING ZONE SELECTED
indicator light
EXTENDABLE HOTPLATE ON*
COOKING ZONE SELECTOR
POWER
indicator
button
5
.
5
EXTENDABLE HOTPLATE*
indicator light
5
5
.
button
INCREASE POWER
button
CONTROLS LOCKED
indicator light
CONTROL PANEL LOCK
button
ON/OFF
button
REDUCE POWER
button
ON/OFF button switches the appliance on and off.
CONTROL PANEL LOCK button prevents
accidental changes to the hob settings (see Start-
up and use).
CONTROLS LOCKED indicator light shows the
control panel has been locked (see Start-up and
use).
COOKING ZONE SELECTOR button shows a
particular cooking zone has been selected and
therefore various adjustments are possible.
COOKING ZONE SELECTOR button is used to
select the required cooking zone.
POWER indicator provides a visual display for the
current heat level.
IN
CREASE POWER button switches on the
hotplate and controls the power (see Start-up and
use).
REDUCE POWER button controls the power and
switches off the hotplate (see Start-up and use).
EXTANDABLE HOTPLATE* button switches on
the extendable hotplate (see Start-up and use).
EXTENDABLE PLATE ON* indicator light:
the extendable hotplate has been switched on.
shows
* Only available in certain models
16
Page 17
Start-up and use
The glue applied on the gaskets leaves traces of
grease on the glass. Before using the appliance, we
recommend you remove these with a special nonabrasive cleaning product. During the first few hours
of use there may be a smell of rubber which will
disappear very quickly.
A few seconds after the hob is connected to the
electricity supply, a buzzer will sound. The hob may
now be switched on.
Switching on the hob
To switch the hob on, press and hold the button
for approximately one second.
Switching on the cooking zones
Each cooking zone is controlled by a device
consisting of two buttons (- and +).
Press the
set the power to the required level using the
and buttons.
To set the power to maximum, hold down the
button briefly.
It is possible to accelerate the heating-up time of
a cooking zone as follows:
1. Adjust the power of the cooking zone so that
it is at the maximum level (9).
2. Press the
power level display.
3. At this point, set the desired power level to be
implemented for the actual cooking procedure (5,
for example).
When the correct temperature has been reached,
the rapid heating function stops automatically and
cooking continues normally at power level 5.
button to activate the hotplate, then
button: A appears on the
Switching on the extendable cooking
zones*
Double hotplate:
1. Press the
internal cooking zone.
2. Press the
cooking zone on (or off).
Triple hotplate:
1. Press the
intermediate cooking zone.
2. Press the
entire cooking zone.
To revert to a smaller-sized cooking zone, press
button again.
the
button to switch on the smaller
button to switch the second
button to switch on the
button twice to switch on the
Switching off the cooking zones
Press the button: the power of the cooking
zone will progressively decrease until it is
switched off.
Alternatively, the
pressed simultaneously. This immediately returns
the power setting to 0 and the cooking zone
switches off.
and buttons may be
Control panel lock
When the hob is switched on, it is possible to lock
the oven controls to avoid accidental changes being
made to the settings (by children, during cleaning,
etc.). Press the
the indicator light above the button will switch on.
To use any of the controls (e.g. to stop cooking),
you must switch off this function. Press the
button for a few moments, the indicator light will
switch off and the lock function will be removed.
button to lock the control panel:
GB
* Only available in certain models
Switching off the hob
Press the button to switch the appliance off.
If the control panel lock has been activated, the
controls will continue to be locked even after the hob
is switched on again. In order to switch the hob on
again, you must first remove the lock function.
Page 18
GB
g
g
g
g
g
Heating elements
It is possible to install two types of heating elements
according to the appliance model: halogen and
radiant elements.
Halogen elements emit heat via radiation from the
halogen lamps they contain.
They have similar properties to gas burners: they are
easy to control and reach set temperatures quickly,
allowing you to see the power used.
Radiant elements consist of a series of coils which
allow heat to be distributed evenly at the base of the
cookware, so that all slow-flame cooking may be
performed successfully, for example stews, sauces
or reheated dishes.
Recommended power levels for various types of
cooking:
Power
Medium Sauces
Maxi
Small plate
(1100 -> 1400 W)
Mini Chocolate Reheatin
Slow-flame
cookin
Medium plate
(1800 -> 2000 W)
Slow-flame
cookin
Boiling liquids Frying / Grillin
Large plate
(2300 -> 2500 W)
Slow-flame
cookin
Boiling liquids
Safety devices
Practical advice on using the appliance
To obtain the best results from your hob:
Use flat-bottomed pans to ensure that they adhere
to the cooking zone perfectly.
Always use pans with a diameter which is large
enough to cover the hotplate fully, in order to use
all the available heat.
Make sure that the base of the cookware is
always clean and dry, in order to fully utilise and
extend the life of both the cooking zones and the
cookware.
Avoid using the same cookware which has been
used on gas burners: the heat concentration on
gas burners may distort the base of the pan,
causing it not to adhere correctly.
Residual heat indicators
While the temperature of the cooking zone remains
above 60°C, even after the programme has finished,
the residual heat indicators placed near the relevant
cooking zone remain lit to prevent the risk of burns.
Inactive function
If the hob is on but has not been used for
approximately 2 minutes, the control panel will be
locked. If this continues for an additional 4 minutes,
the hob will switch off automatically.
Overheating protection
Prolonged use of the hob can cause the electronic
components to overheat.
When this happens, an overheating protection
device reduces the power level of the front cooking
zones (to about 3) until the temperature reaches a
safer level.
Safety swit
ch
The appliance has a safety switch which
automatically switches off the cooking zones when
they have been in operation for a certain amount of
time at a given power level. When the safety switch
has been triggered, the display shows 0.
For example: the right rear hotplate is set to 5 and
will switch off after 3 hours of continuous operation,
while the front left hotplate is set to 2 and will switch
off after 10 hours.
Never leave a cooking zone on without cookware
placed on it because it heats up and rapidly
reaches the maximum level, which could damage
the heating elements.
18
Page 19
Power level Maximum duration of operation
1-2 10 hours
3 5 hours
4 4 hours
5-6 3 hours
7-8 2 hours
9 1 hour
Buzzer
This can also indicate several irregularities:
An object (a pan, cutlery, etc.) has been placed
on the control panel for more than 10 seconds.
Something has been spilt on the control panel.
A button has been pressed for too long. All of the
above situations may cause the buzzer to sound.
Remove the cause of the malfunction to stop the
buzzer. The control panel locks automatically in
the above situations. To unlock the control panel
press the
button; the previous settings will
have been maintained. If the cause of the
problem is not removed, the buzzer will keep
sounding and the hob will switch off.
GB
Page 20
Precautions and tips
GB
This appliance has been designed and
manufactured in compliance with international safety
standards. The following warnings are provided for
safety reasons and must be read carefully.
This appliance conforms to the following
European Economic Community directives:
- 73/23/EEC dated 19/02/73 (Low Voltage) and
subsequent amendments;
- 89/336/EEC dated 03/05/89 (Electromagnetic
Compatibility) and subsequent amendments;
- 93/68/EEC dated 22/07/93 and subsequent
amendments.
General safety
The appliance was designed for domestic use
inside the home and is not intended for
commercial or industrial use.
The appliance must not be installed outdoors,
even in covered areas. It is extremely dangerous
to leave the appliance exposed to rain and
storms.
Keep any object which could melt away from the
hob, for example plastic and aluminium objects,
or products with a high sugar content. Be
especially careful when using plastic film and
aluminium foil or packaging:
if placed on surfaces which are still hot, they may
cause serious damage to the hob.
Always make sure that pan handles are turned
towards the centre of the hob in order to avoid
accidental burns.
When unplugging the appliance, always pull the
plug from the mains socket; do not pull on the
cable.
Never perform any cleaning or maintenance work
without having disconnected the appliance from
the electricity mains.
Disposal
Do not touch the appliance with bare feet or with
wet or damp hands and feet.
The appliance must be used by adults only for the
preparation of food, in accordance with the
instructions provided in this booklet. Do not use
the hob as a worktop or chopping board.
The glass ceramic hob is resistant to mechanical
shocks, but it may crack (or even break) if hit with
a sharp object such as a tool. If this happens,
disconnect the appliance from the electricity
mains immediately and contact a Service Centre.
If the surface of the hob is cracked, switch off the
appliance to prevent electric shocks from
occurring.
Make sure that power supply cables of other
electrical appliances do not come into contact
with the hot parts of the hob.
Remember that the cooking zones remain
relatively hot for at least thirty minutes after they
have been switched off. An indicator light
provides a warning when residual heat is present
(see Start-up and use).
When disposing of packaging material: observe
local legislation so that the packaging may be
reused.
The European Directive 2002/96/EC relating to
Waste Electrical and Electronic Equipment
(WEEE) states that household appliances should
not be disposed of using the normal solid urban
waste cycle. Exhausted appliances should be
collected separately in order to optimise the cost
of re-using and recycling the materials inside the
machine, while preventing potential damage to
the atmosphere and to public health. The
crossed-out dustbin is marked on all products to
remind the owner of their obligations regarding
separated waste collection.
For further information relating to the correct
disposal of exhausted household appliances,
owners may contact the public service provided
or their local dealer.
20
Page 21

Care and maintenance
Switching the appliance off
Disconnect your appliance from the electricity
supply before carrying out any work on it.
Cleaning the appliance
Do not use abrasive or corrosive detergents (for
example, products in spray cans for cleaning
barbecues and ovens), stain removers, anti-rust
products, powder detergents or sponges with
abrasive surfaces: these may scratch the surface
beyond repair.
Never use steam cleaners or pressure cleaners on
the appliance.
It is usually sufficient simply to wash the hob
using a damp sponge and dry it with absorbent
kitchen roll.
If the hob is particularly dirty, rub it with a special
glass ceramic cleaning product, then rinse well
and dry thoroughly.
To remove more stubborn dirt, use a suitable
scraper. Remove spills as soon as possible,
without waiting for the appliance to cool, to
prevent residues from forming crusty deposits.
You can achieve excellent results by using a rustproof steel wire sponge - specifically designed for
glass ceramic surfaces - soaked in soapy water.
Stainless steel f
frame)
Stainless steel can be marked by hard water which
has been left on the surface for a long time, or by
cleaning products containing phosphorus.
After cleaning, it is advisable to rinse the surface
well and dry it thoroughly. If water is spilt on the
surface, dry it quickly and thoroughly.
Some hobs have an aluminium frame which is
similar to stainless steel. Do not use any cleaning or
degreasing products which are not suitable for use
with aluminium.
rame (only in models with outer
Disassembling the hob
If it is necessary to disassemble the hob:
1. Loosen the screws fixing the alignment springs on
each side.
2. Loosen the screws holding the fixing hooks in
each corner.
3. Take the hob out of its installation cavity.
Do not attempt to repair the appliance yourself. If
the appliance breaks down, contact a Service
Centre.
GB
If any plastic or sugary substances are
accidentally melted on the hob, remove them
immediately with the scraper, while the surface is
still hot.
Once it is clean, the hob may be treated with a
special protective maintenance product: the
invisible film left by this product protects the
surface from drips during cooking. This
maintenance task should be carried out while the
appliance is warm (not hot) or cold.
Always remember to rinse the appliance well with
clean water and dry it thoroughly: residues can
become encrusted during subsequent cooking
processes.
Page 22

Technical description
of the models
GB
This table provides a model-by-model list of the energy absorption values, type of heating elements (halogen or
radiant elements) and diameters of each cooking zone.
HOBS TK 64 SD
TK 64 SD IX
TK 64 SD BI
Cooking zone
Back Left
Front Lef t
Back Right
Front Right
Left
Total power
R = radiant single, RD = radiant double, RT = radiant triple
Power
(W)
RD 2300-1000
R 1200
R 1200
R 1800
6500 6500 5100
Diameter
(mm)
210 R 2300
145 R 1200
145 R 1200
180 R 1800
TK 64 CL
TK 64 S IX
Power
(W)
TK 64 S
Diameter
(mm)
TK 63 T
TK 63 T BI
Power
210
145
145 R 600
180 R 1800
(W)
RT
1050/1950/2700
Diameter
(mm)
120
180
250
22
Page 23

Mode demploi
TABLE DE CUISSON
Italiano, 1
ES
Espanol, 34
TK 64 CL
TK 64 S IX
TK 64 S
TK 64 SD IX
TK 64 SD BI
TK 64 SD
TK 63 T
TK 63 T BI
GBIT
FR
Français, 23English,12
NLPT
Português, 45 Nederlands,56
Sommaire
FR
Installation, 24-26
Positionnement
Raccordement électrique
Description de lappareil, 27
Tableau de bord
Mise en marche et utilisation, 28-30
Mise sous tension de la table de cuisson
Allumage des foyers
Allumage des foyers extensibles
Extinction des foyers
Verrouillage des commandes
Extinction de la table de cuisson
Les éléments chauffants
Conseils dutilisation de lappareil
Les sécurités
Précautions et conseils, 31
Sécurité générale
Mise au rebut
Nettoyage et entretien, 32
Mise hors tension
Nettoyage de lappareil
Démontage de la table
Description technique des modèles, 33
Page 24

Installation
FR
Conserver ce mode demploi pour pouvoir le consulter
à tout moment. En cas de vente, de cession ou de
déménagement, veiller à ce quil suive lappareil pour
informer le nouveau prop
et lui fournir les conseils correspondants.
Lire attentivement les instructions : elles contiennent
des conseils importants sur linstallation, lutilisation et la
sécurité de lappareil.
riétaire sur son fonctionnement
Positionnement
Les emballages ne sont pas des jouets pour enfants, il
faut les mettre au rebut en respectant la réglementation
sur le tri sélectif des déchets (voir Précautions et
conseils).
Linstallation doit être effectuée par un pro
du secteur conformément aux instructions du fabricant.
Une mauvaise installation peut causer des dommages à
des personnes, des animaux ou des biens.
Encastrement
Pour garantir le bon fonctionnement de lappareil, il faut
que le meuble possède des caractéristiques bien
précises :
le matériau du plan dappui doit pouvoir résister à
une température denviron 100°C ;
en cas dinstallation de la table de cuisson au-
dessus dun four, il faut que ce dernier soit
équipé dun disp
ositif de refroidissement par
ventilation forcée ;
éviter dinstaller la table de cuisson au-dessus
590
dun lave-vaisselle : si
cest le cas, prévoir
une séparation étanche
48
520
entre les deux
appareils ;
selon la table de
cuisson à installer (voir
igures), la découpe du
560 +/- 1
490 +/- 1
f
meuble doit avoir les
dimensions suivantes :
fessionnel
Aération
Pour permettre une bonne aération et pour éviter toute
surchauffe des surfaces autour de lappareil, la table de
cuisson doit être positionnée :
à au moins 40
mm de distance
du mur arrière et à
au moins 600 mm
de distance de
toute autre surface
verticale ;
de manière à
ce quil reste au
moins 10 mm de
distance entre la
découpe dencastrement et le meuble en
dessous.
Fixation
Il est impératif dassurer lencastrement de lappareil sur
un plan dappui parfaitement plat.
Les déformations provoquées par une mauvaise fixation
risquent daltérer les caractéristiques de la
cuisson ainsi que ses performances.
table de
COTE AVANT
DE LA TABLE DE CUISSON
PLAN DE
TRAVAIL
30
40
TABLE DE CUISSON
RETOURNEE
Au-deussus d'un meuble vide ou tiroir
Un vide sanitaire de 40 mm minimum est nécessaire
ou qu'une ouverture de 5 mm sur la largeur du meuble.
40mm min.
40mm
Ouverture 5mm mini.
sur toute la largeur de
la table.
24
Page 25

La longueur de la vis de réglage des crochets de
fixation doit être réglée avant leur montage selon
lépaisseur du plan dappui :
épaisseur 30 mm : vis 17,55 mm ;
épaisseur 40 mm : vis 7,55 mm.
Pour sa fixation, procéder comme suit :
1. Se servir des vis courtes sans pointe pour visser les 4
ressorts de centrage dans les trous prévus sur chaque
côté de la table, en leur milieu ;
2. insérer la
table de cuisson dans la découpe prévue,
bien au centre et bien appuyer tout autour du cadre pour
que la table adhère parfaitement au plan dappui.
3. pour les tables avec pro
fils latéraux : après avoir
encastré la table de cuisson dans la découpe, insérer
les 4 crochets de fixation (chacun avec son goujon) sur
le périmètre inférieur de la table de cuisson et visser
avec
les vis longues à pointe jusquà ce que le verre
adhère bien au plan dappui.
Il faut absolument que les vis des ressorts de centrage
soient accessibles.
Conformément aux normes de sécurité,
après
encastrement de lappareil, il ne doit plus y avoir
possibilité de contact avec les parties électrifiées.
Toutes les parties qui servent de protection doivent être
fixées de manière à ne pouvoir
être enlevées quavec
laide dun outil.
Raccordement électrique
Le branchement électrique de la table de cuisson et
celui dun éventuel four à encastrer doivent être
effectués séparément, pour des raisons de sécurité
électrique et pour pouvoir démonter plus facilement
four en cas de besoin.
Raccordement monophasé
La table est fournie déjà équipée dun cordon
dalimentation prévu pour raccordement monophasé.
Procéder au raccordement des fils en suivant les
indications du tableau et des dessins suivants :
Tensi on type et
fréquence réseau
230V 1+N ~
50 Hz
Cordon électrique Raccordement fils
: jaune/vert;
N: les 2 fils bleus ensemble
L: le marron avec le noir
le
Séparer les câbles et procéder au raccordement des fils
suivant les indications du tableau et des dessins
en
suivants :
Tensi on type et
fréquence réseau
400V - 2+N ~
50 Hz
230V 3 ~
50Hz
400V - 2+2N ~ ı 50
Hz
Cordon électrique Raccordement fils
: jaune/ vert;
N: les 2 fils bleus ensemble
L1: noir
L2: marron
: jaune/ vert;
N1: bleu
N2: bleu
L1: noir
L2: marron
Si linstallation électrique correspond à une des
caractéristiques suivantes :
Tension type et fréquence réseau
400V 3 - N ~ 50 Hz
procéder comme suit :
Le câble éventuellement fourni nest pas prévu pour
ces types dinstallation.
1. Utiliser un câble dalimentation approprié, type
H05RR-F ou supérieur, aux dimensions adéquates
(section câble : 25 mm).
2. Faire levier à laide dun tournevis sur les
languettes du couvercle du bornier pour
louvrir (voir
figure Bornier).
3. Dévisser la vis du serre-câble et les vis des
bornes correspondant au type de raccordement
nécessaire et positionner les cavaliers de
raccordement conformément aux indications du
tableau et des figures ci-dessous.
4. Positionner les fils conformément aux indications
du tableau et des figures ci-dessous et procéder au
raccordement en serrant à fond toutes les vis des
bornes.
Tension type et
fréquence réseau
400V 3-N ~ ı 50
Hz
Raccordements électriques Bornier
Triphasé 400
5. Fixer le câble dalimentation dans le serre-câble
correspondant et fermer le couvercle.
FR
Autres types de branchement
Si linstallation électrique correspond à une des
caractéristiques suivantes :
Tension type et fréquence réseau
400V - 2+N ~ 50 Hz
230V 3 ~ 50 Hz
400V - 2+2N ~ 50 Hz
2
1
Phase Cavalier Neutre TerrePhase
4
3
Phase
5
Triphasé 400
25
Page 26

FR
Branchement du câble dalimentation au réseau
électrique
En cas de raccordement direct au réseau, il faut
intercaler entre lappareil et le réseau un interrupteur à
coupure omnipolaire ayant au moins 3 mm décartement
entre les contacts.
Linstallateur est responsable du bon raccorde
électrique de lappareil et du respect des normes de
sécurité.
Avant de procéder au branchement, sassurer que :
ment
la prise est bien munie dune terre conforme à la
loi ;
la prise est bien apte à supporter la puissance
maximale de lappareil, indiquée sur la plaque
signalétique de lappareil ;
la tension d
alimentation est bien comprise entre
les valeurs indiquées sur la plaque signalétique;
la prise est bien compatible avec la fiche de
lappareil. Si ce nest pas le cas, remplacer la
prise
ou la fiche, nutiliser ni rallonges ni prises
multiples.
Après installation de lappareil, le câble électrique et la
prise de courant doivent être facilement accessibles
Le câble ne doit être ni plié ni excessivement écrasé.
Le câble doit être contrôl
être remplacé que par un technicien agréé.
Nous déclinons toute responsabilité en cas de non
respect des normes énumérées ci-dessus.
é périodiquement et ne peut
26
Page 27

Description de lappareil
Tableau de bord
Le tableau de bord qui est décrit na quune valeur dexemple : il peut ne pas correspondre au modèle acheté.
FR
Touche ON/OFF pour allumer ou éteindre
lappareil.
Touche VERROUILLAGE DES COMMANDES pour
empêcher toute intervention extérieure sur les
réglages de la table de cuisson (voir Mise en
marche et Utilisation).
Voyant COMMANDES VERROUILLEES pour
signaler le verrouillage des commandes (voir Mise
en marche et Utilisation).
Voyant FOYER
le foyer correspondant a été sélectionné et que
les régulations sont donc possibles.
Touche SELECTION FOYER pour sélectionner le
foyer souhaité
SELECTIONNE pour signaler que
Indicateur de PUISSANCE, une colonne lumineuse
pour signaler le niveau de puissance atteint.
Touche AUGMENTATION DE PUISSANCE pour
allumer le foyer et régler sa puissance (voir Mise
en marche et
Touche DIMINUTION DE PUISSANCE pour régler
la puissance et éteindre le foyer (voir Mise en
marche et utilisation).
Touche FOYER EXTENSIBLE* pour activer le foyer
extensible (voir Mise en marche et Utilisation).
Voyant FOYER EXTENSIBLE ALLUME* : il
signale lallumage du foyer extensible.
utilisation).
* Nexiste
que sur certains modèles
27
Page 28

Mise en marche et utilisation
FR
La colle utilisée pour les joints laisse des traces de
graisse sur le verre. Nous conseillons de les éliminer
avant dutiliser lappareil à laide dun produit
dentretien non abrasif. Une odeur de caoutchouc
peut se dégager au cours des premières heures
dutilisation, elle disparaîtra très vite.
Un bip retentit quelques secondes après la mise
sous tension de la table de cuisson. A partir de ce
moment-là, lallumage de la table est possible.
Mise sous tension de la table de cuisson
Pour mettre la table de cuisson sous tension,
appuyer sur la touche
environ.
pendant une seconde
Allumage des foyers
Chaque foyer est actionné par un dispositif de
réglage de puissance à deux touches (- et +).
Appuyer sur la touche
puis sélectionner la puissance souhaitée à laide
des touches
et .
pour activer le foyer,
Allumage des foyers extensibles*
Double foyer :
1. Appuyer sur la touche
le plus à lintérieur.
2. Appuyer sur la touche
désactiver) le deuxième foyer.
Foyer triple :
1. Appuyer sur la touche
intermédiaire.
2. Appuyer 2 fois de suite sur la touche
activer le foyer tout entier.
Pour revenir à un foyer de dimension moindre,
appuyer à nouveau sur la touche
pour activer le foyer
pour activer (ou
pour activer le foyer
pour
.
Extinction des foyers
Appuyer sur la touche : la puissance du foyer
descend progressivement jusquà extinction.
Ou bien appuyer simultanément sur les touches
et : la puissance du foyer revient aussitôt
à 0 et le foyer séteint.
Pour sélectionner directement la puissance
maximale, appuyer brièvement sur la touche
Pour accélérer la montée en température dun
foyer, procéder comme suit :
1. régler la puissance du foyer au maximum (9);
2. appuyer sur la touche
puissance indique A ;
3. sélectionner alors la puissance de cuisson à
atteindre (5 par exemple).
Dès que cette température est atteinte, la fonction
de montée rapide en température est
automatiquement coupée et la cuisson continue
normalement à la puissance 5.
: laffichage de
.
Verrouillage des commandes
Pendant le fonctionnement de la table, il est
possible de verrouiller les commandes pour
empêcher toute intervention extérieure sur le réglage
(enfants, nettoyage...). Appuyer sur la touche
pour verrouiller les commandes, le voyant situé au-
dessus de la touche sallume.
Pour pouvoir modifier les réglages (interrompre la
cuisson par ex.) il faut déverrouiller les commandes :
appuyer sur la touche
instants, le voyant séteint et les commandes sont
déverrouillées.
pendant quelques
Extinction de la table de cuisson
Appuyer sur la touche pour éteindre lappareil.
Si les commandes de lappareil ont été verrouillées,
elles le seront encore au rallumage de la table. Pour
pouvoir rallumer la table de cuisson, il faut dabord
déverrouiller les commandes.
* Nexiste que sur certains modèles
28
Page 29

Les éléments chauffants
g
g
g
La table de cuisson, selon les modèles, peut être
équipée de deux types déléments chauffants :
halogènes et radiants.
Les halogènes transmettent la chaleur par irradiation
de la lampe halogène quils contiennent.
Ils se caractérisent par leurs propriétés qui
rappellent celles du gaz : une prompte réponse aux
commandes, visualisation immédiate de la
puissance.
Les radiants sont composés dune multitude de
spires qui garantissent une répartition uniforme de la
chaleur sur le fond du récipient pour réussir
parfaitement toutes les cuissons lentes et le
mijotage : daubes, sauces ou plats à réchauffer.
Niveaux de puissance conseillés pour les différents
types de cuisson :
Puissa-
nces
Mini Chocolat Réchauffer Mijota
Moyen Sauce Mijota
Maxi Mijota
Petit foyer
(1100 -> 1400 W)
e
Foyer moyen
(1800 -> 2000 W)
e
Ebullition
liquides
Grand foyer
(2300 -> 2500 W)
e
Ebullition
liquides
Frire / Griller
Les sécurités
Indicateurs de chaleur résiduelle
FR
Conseils dutilisation de lappareil
Pour obtenir de meilleures performances de la table
de cuisson :
utiliser des casseroles à fond plat pour quelles
adhèrent parfaitement à la zone de chauffe
Utiliser des casseroles dont le diamètre couvre
complètement la zone de chauffe de façon à ce
que toute la chaleur disponible puisse être
utilisée.
Veiller à ce que la base des casseroles soit
toujours parfaitement sèche et propre pour
garantir un bon contact et une longue durée de
vie des foyers mais aussi des casseroles.
Eviter dutiliser les mêmes casseroles que sur les
brûleurs à gaz. la concentration de chaleur sur les
brûleurs à gaz peut déformer le fond de la
casserole qui perd de son adhérence.
ne jamais laisser un foyer allumé sans casserole
car, dans ce cas, le niveau maximum de chaleur
est atteint très rapidement et les éléments
chauffants risquent de sendommager.
Tant que la température des foyers demeure
supérieure à 60°C, même après leur extinction, les
indicateurs de chaleur résiduelle, situés en bordure
du foyer correspondant, restent allumés pour éviter
tout risque de brûlure.
Inactivité
Si la table est allumée mais nest pas utilisée
pendant les 2 minutes qui suivent, la fonction de
verrouillage des commandes est activée
automatiquement. Si cette situation se prolonge
encore pendant 4 autres minutes, la table séteint
automatiquement.
Surchau
ffe
Une utilisation prolongée de la table peut provoquer
un échauffement des composants électroniques.
Dans ce cas, un dispositif de protection thermique
impose temporairement une puissance réduite
(égale à 3) sur les foyers avant tant que la
température nest pas redescendue à un niveau
acceptable.
Interrupteur sécurité
Lappareil est équipé dun interrupteur de sécurité
qui interrompt instantanément le fonctionnement des
foyers dès quun temps limite de fonctionnement à
un niveau de puissance donné est atteint. Pendant
linterruption de sécurité, lafficheur indique 0.
Exemple
: le foyer arrière droit est réglé sur 5, tandis
que le foyer avant gauche est réglé sur 2. Le foyer
arrière droit séteindra au bout de 3 heures de
fonctionnement tandis que le foyer avant gauche
séteindra au bout de 10 heures.
29
Page 30

FR
Niveau de
puissance
1-2 10 ore
35 ore
44 ore
5-6 3 ore
7-8 2 ore
91 ore
Signal sonore
Des anomalies, comme par exemple :
un objet (casserole, couvert, ...) placé plus de 10
secondes sur la zone de commande,
un débordement sur la zone de commande,
une pression prolongée sur une touche, peuvent
déclencher un signal acoustique. Eliminer la
cause de dysfonctionnement pour stopper le
signal sonore. Dans ces conditions, les
commandes se verrouillent automatiquement :
pour les déverrouiller, appuyer sur la touche
les sélections seront maintenues. Si la cause de
lanomalie nest pas éliminée, le signal sonore
continue à retentir et la table séteint.
Durée limite de
fonctionnement
,
30
Page 31

Précautions et conseils
Cet appareil a été conçu et fabriqué conformément
aux normes internationales de sécurité. Ces
consignes de sécurité sont très importantes et
doivent être lues attentivement.
Cet appareil est conforme aux Directives
Communautaires suivantes :
-73/23/CEE du 19/02/73 (Basse Tension) et
modifications successives
-89/336/CEE du 03/05/89 (Compatibilité
électromagnétique) et modifications successives
-93/68/CEE du 22/07/93 et modifications
successives.
Sécurité générale
Cet appareil a été conçu pour un usage familial,
de type non professionnel.
Cet appareil ne doit pas être installé en extérieur,
même dans un endroit abrité, il est en effet très
dangereux de le laisser exposé à la pluie et aux
orages.
Ne pas toucher à lappareil si lon est pieds nus
ou si lon a les mains ou les pieds mouillés ou
humides.
Cet appareil qui sert à cuire des aliments ne doit
être utilisé que par des adultes conformément aux
instructions du mode demploi. Ne pas utiliser la
table comme plan de dépose ou comme planche
à découper.
Le plan vitrocéramique résiste aux chocs
mécaniques, il peut toutefois se fendre (ou même
se briser) sous leffet dun choc provo
objet pointu, tel quun ustensile par exemple.
Dans ce cas, débrancher immédiatement
lappareil du réseau électrique et sadresser à un
centre dassistance technique.
Si la surface de la table est fêlée, éteindre
lappareil pour éviter tout risque délectrocution.
Eviter que le cordon dalimentation dautres petits
électroménagers touche à des parties chaudes de
la table de cuisson.
qué par un
Garder
tout objet qui pourrait fondre, des objets en
plastique ou en aluminium par exemple, ou des
produits à haute teneur en sucre. Faire très
attention aux emballages, au film plastique et au
papier aluminium :
au contact des surfaces encore chaudes ou
tièdes, ils risquent dendommager gravement la
table.
Sassurer que les manches des casseroles soient
toujours tournés vers lintérieur de la table de
cuisson pour éviter tout risque daccident.
Ne pas tirer sur le câble pour débrancher la fiche
de la prise de courant.
Neffectuer aucune opération de nettoyage ou
dentretien sans avoir auparavant débranché la
fiche de la prise de courant.
à bonne distance de la table de cuisson
Mise au rebut
Mise au rebut du matériel demballage : se
conformer aux réglementations locales, les
emballages pourront ainsi être recyclés.
La directive européenne 2002/96/CE relative aux
déchets déquipements électriques et
électroniques (DEEE), prévoit que les
électroménagers ne peuvent pas être traités
comme des déchets solides urbains courants.
Les appareils usagés doivent faire lobjet dune
collecte séparée pour optimiser le taux de
récupération et de recyclage des matériaux qui
les composent et empêcher tout danger pour la
santé et pour lenvironnement. Le symbole de la
poubelle barrée est appliqué sur tous les produits
pour rappeler quils
sélective.
Pour de plus amples renseignements sur la mise
au rebut des électroménagers, les possesseurs
peuvent sadresser au service public prévu à cet
effet ou aux commerçants.
font lobjet dune collecte
FR
Ne pas oublier que la température des foyers
reste assez élevée pendant trente minutes au
moins après leur extinction. La chaleur résiduelle
est aussi signalée par un voyant (voir Mise en
marche et Utilisation).
31
Page 32

Nettoyage et entretien
FR
Mise hors tension
Avant toute opération de nettoyage ou dentretien
couper lalimentation électrique de lappareil.
Nettoyage de lappareil
Ne jamais utiliser de détergents abrasifs ou
corrosifs, tels que des bombes aérosols pour
grilloirs et fours, des détacheurs et dérouilleurs, des
poudres à récurer ou des éponges à surface
abrasive : ils risquent de rayer irrémédiablement la
surface.
Ne jamais nettoyer lappareil avec des nettoyeurs
vapeur ou haute pression.
Pour un entretien courant, passer une éponge
humide sur la surface de la table et essuyer avec
du papier essuie-tout.
Si la table est sale, frotter avec un produit
dentretien adapté au verre vitrocéramique, rincer
et essuyer.
Pour enlever les salissures en relief, utiliser un
grattoir prévu à cet effet. Intervenir dès que
possible, ne pas attendre que lappareil ait
refroidi afin déviter toute incrustation des
salissures. Lutilisation dune éponge en fil dacier
inoxydable, spéciale verre vitrocéramique,
imprégnée deau savonneuse donne dexcellents
résultats.
Cadre en acier inox (uniquement pour les modèles
avec encadrement)
Un contact prolongé avec une eau très calcaire ou
lutilisation de nettoyants contenant du phosphore
peuvent tacher lacier inox.
Nous conseillons de rincer abondamment et de bien
essuyer après entretien. Il est pr
aussitôt tout débordement deau.
Certaines tables ont un cadre en aluminium
ressemblant à de lacier inox. Ne pas utiliser de
produits dentretien et de dégraissage ne convenant
pas pour laluminium.
éférable déliminer
Démontage de la table
Si le démontage de la table de cuisson savère
nécessaire :
1. enlever les vis qui fixent les ressorts de centrage
sur les côtés;
2. desserrer les vis des crochets de fixation dans
les coins;
3. dégager la table de cuisson du meuble.
Il est vivement déconseillé dessayer daccéder
aux mécanismes internes pour tenter une réparation.
En cas de panne, contacter le service dassistance
technique.
Tout objet, matière plastique ou sucre ayant
accidentellement fondu sur la table de cuisson
doit être aussitôt enlevé à
que la surface est encore chaude.
Une fois que la table est propre, elle peut être
traitée avec un produit dentretien et de protection
spécial : celui-ci forme un film invisible qui
protège la surface en cas de débordement
accidentel. Opérer de préférence quand lappareil
est tiède ou froid.
Prendre soin de toujours bien rincer à leau claire
et dessuyer la table : les résidus des produits
pourraient en effet sincruster lors dune prochaine
cuisson.
32
laide du grattoir tant
Page 33

Description technique
des modèles
Ces tableaux indiquent, modèle par modèle, les valeurs dabsorption dénergie, le type délément chauffant
(halogène ou radiant) et le diamètre de chaque foyer.
TABLES DE
CUISSON
Foyers
Arrière gauche RD 2300-1000 210 R 2300 210
Avant gauche R 1200 145 R 1200 145
Arrière droit R 1200 145 R 1200 145 R 600 120
Avant droit R 1800 180 R 1800 180 R 1800 180
Gauche RT 1050/1950/2700 250
Puissance totale 6500 6500 5100
R = radiant simple, RD = radiant double, RT = radiant triple
Puissance (en
TK 64 SD
TK 64 SD IX
TK 64 SD BI
W)
Diamètre
(en mm)
TK 64 CL
TK 64 S
TK 64 S IX
Puissance
(en W)
Diamètre
(en mm)
TK 63 T
TK 63 T BI
Puissance (en W)
Diamètre
(en mm)
FR
33
Page 34

Manual de instrucciones
ENCIMERA
ES
IT FR
Italiano, 1
GB
ES
Espanol,
34
Português, 45 Nederlands,56
TK 64 CL
TK 64 S IX
TK 64 S
TK 64 SD IX
TK 64 SD BI
TK 64 SD
TK 63 T
TK 63 T BI
Sumario
Instalación, 35-37
Colocación
Conexión eléctrica
Français, 23English,12
Descripción del aparato, 38
Panel de control
NLPT
Puesta en funcionamiento y uso, 39-41
Encendido de la encimera
Encendido de las zonas de cocción
Encendido de las zonas de cocción extensibles
Apagado de las zonas de cocción
Bloqueo de los mandos
Apagado de la encimera
Los elementos calentadores
Consejos prácticos para el uso del aparato
Dispositivos de seguridad
Precauciones y consejos, 42
Seguridad general
Eliminación
Mantenimiento y cuidados, 43
Interrumpir el suministro de corriente eléctrica
Limpiar el aparato
Desmontar la encimera
Descripción técnica de los modelos, 44
Page 35

Instalación
Es importante conservar este manual para poder
consultarlo en todo momento. En el caso de venta, de
cesión o de mudanza, verifique que permanezca junto
al aparato para informar al nuevo
propietario sobre su
funcionamiento y sobre las advertencias
correspondientes.
Lea atentamente las instrucciones: contienen importante
información sobre la instalación, el uso y la seguridad.
Colocación
Los embalajes no son juguetes para niños y se deben
eliminar según las normas para la recolección
diferenciada de desechos (ver Precauciones y consejos).
La instalación se debe realizar siguiendo estas
instrucciones y por personal profesional
calificado. Una instalación incorrecta puede producir
daños a personas, animales o cosas.
Empotramiento
Para garantizar un buen funcionamiento del aparato es
necesario que el mueble tenga las características
adecuadas:
el plano de apoyo debe ser de material resistente
al calor, a una temperatura de aproximadamente
100ºC;
si se desea instalar la encimera sobre un horno, el
mismo debe poseer un sistema de enfria
con ventilación forzada;
evite instalar la encimera sobre un lavavajillas:
pero si fuera necesario, interponga un elemento
de separación estanco
590
entre los dos aparatos;
según el tipo de
48
520
encimera que se desea
instalar (
figuras), el espacio
disponible en el
mueble debe tener las
560 +/- 1
490 +/- 1
siguientes
dimensiones:
mente
miento
ver las
Aireación
Para permitir una aireación adecuada y para evitar el
sobrecalentamiento de las superficies que rodean al
aparato, la encimera debe estar colocada:
a una distancia
mínima de 40 mm
de la pared
posterior y a 600
mm de cualquier
otra superficie
vertical;
de modo que se
mantenga una
distancia mínima
de 10 mm entre el
hueco para el empotramiento y el mueble q
ue se
encuentra debajo.
Fijación
La instalación del aparato se debe realizar sobre una
superficie de apoyo perfectamente plana.
Las deformaciones que se podrían provocar por una
mala fijación, pueden alterar las características y
las
prestaciones de la encimera.
PARTE DELANTERA
DE LA ENCIMERA
PLANO
DE APOYO
30
40
ENCIMERA
VOLCADA
ES
Sobre un mueble vacío o un cajón
Es necesario dejar un espacio intermedio de 40 mm como
mínimo, o una apertura de 5 mm en el ancho del mueble.
40 mm mín.
40mm
Apertura de 5 mm
como mínimo, en todo
el ancho de la encimera.
Page 36

ES
La longitud del tornillo de regulación de los ganchos de
fijación se debe determinar antes de su montaje en
base al espesor de la superficie de apoyo:
espesor de 30 mm: tornillo de 17,55 mm;
espesor de 40 mm: tornillo de 7,55 mm;
Para realizar la fijación, el procedimiento es el
siguiente:
1. Con los tornillos cortos sin punta, enrosque los 4
muelles de centrado en los orificios ubicados en el
centro de cada costado de la encimera;
2. introduzca la encimera
en el hueco del mueble,
céntrela y ejerza una adecuada presión sobre todo el
perímetro para que se adhiera perfectamente a la
superficie de apoyo.
3. en las encimeras con perfiles
laterales: después de
haber colocado la encimera en el mueble, introduzca
los 4 ganchos de fijación (cada uno con su perno) en el
perímetro inferior de la encimera enroscándolos con los
tornillos largos con punta hasta
que el vidrio se adhiera
a la superficie de apoyo.
Es indispensable que los tornillos de los muelles de
centrado permanezcan accesibles.
En conformidad con las normas de seguridad, una vez
empotrado el aparato, no se deben producir contactos
con las piezas eléctricas.
Todas las partes que garantizan la protección se
deben fijar de modo tal que no puedan ser quitadas sin
la ayuda de una herramienta.
Conexión eléctrica
La conexión eléctrica de la encimera y la de un horno
empotrado deben ser realizadas por separado, tanto por
razones de seguridad eléctrica como para facilitar las
operaciones de extracción del horno.
Conexión monofásica
La encimera posee un cable de alimentación eléctrica
ya conectado y preparado para la conexión
monofásica. Realice la conexión de los cables de
acuerdo con la tabla y los dibujos que se muestran a
continuación
Tensión tipo y
frecuencia de la red
230V 1+N ~
50 Hz
Otros tipos de conexión
Si las características de la instalación eléctrica
coincide con alguna de las siguientes:
Tensión tipo y frecuencia de la red
400V - 2+N ~ 50 Hz
230V 3 ~ 50 Hz
400V 2+2N ~ 50 Hz
:
Cable eléctrico Conexión de los cables
: amarillo/verde;
N: los 2 cables azules juntos
L: el marrón junto al negro
Separe los cables y realice la conexión de acuerdo
con
la tabla y los dibujos que se muestran a continuación:
Tensión ti po y
frecuencia de la red
400V - 2+N ~
50 Hz
230V 3 ~
50Hz
400V - 2+2N ~ ı 50
Hz
Cable eléctrico Conexión de los cables
: amarillo/verde;
N: los 2 cables azules j untos
L1: negro
L2: marrón
: amarillo/verde;
N1: azul
N2: azul
L1: negro
L2: mar rón
Si las características de la instalación eléctrica
coincide con alguna de las siguientes:
Tensión tipo y frecuencia de la red
400V 3 - N ~ 50 Hz
proceda de la siguiente manera:
El cable suministrado con el aparato no se puede
utilizar para estos tipos de instalación.
1. Utilice un cable de alimentación apropiado, tipo
H05RR-F o de valor superior y de dimensiones
adecuadas (sección del cable: 25 mm).
2. Utilizando un destornillador, haga palanca en las
lengüetas de la tapa del
tablero de bornes y ábrala
(ver la imagen Tablero de bornes).
3. Desenrosque el tornillo de la mordaza de terminal
de cable y los tornillos de los bornes
correspondientes al tipo de conexión necesaria y
coloque los puentes de conexión de acuerdo con la
tabla y los dibujos que se muestran a continuación.
4. Coloque los cables de acuerdo con la tabla y los
dibujos que se muestran a continuación y realice la
conexión apretando a fondo todos los tornillos de
los bornes.
Tensión tipo y
frecuencia de la red
400V 3-N ~ ı 50 Hz
Conexiones eléctricas Tablero de bornes
Trifásico 400
5. Fije el cable de alimentación en el
correspondiente sujetacable y cierre la tapa.
2
1
Fase Puente Neutro TierraFase
4
3
Fase
5
Trifásico 400
36
Page 37

Conexión del cable de alimentación eléctrica a la
red
En el caso de conexión directa a la red, es necesario
interponer entre el aparato y la red, un interruptor
omnipolar con apertura mínima entre los contactos de 3
mm.
ES
El instalador es responsable de la correcta conexió
eléctrica y del cumplimiento de las normas de
seguridad.
Antes de efectuar la conexión verifique que:
la toma tenga conexión a tierra y que sea
conforme con la ley;
la toma sea capaz de soportar la carga máxima
de potencia de la máquina indicada en la placa
de características que se encuentra en el a
parato;
la tensión de alimentación eléctrica esté
comprendida dentro de los valores indicados en
la placa de características;
la toma sea compatible con el enchufe del
aparato. Si no es así, sustituya la toma
o el
enchufe; no utilice prolongaciones ni conexiones
múltiples.
Una vez instalado el aparato, el cable eléctrico y la
toma de corriente deben ser fácilmente accesibles.
El cable no debe sufrir pliegues ni compresiones.
El cable debe ser revisado p
sólo por técnicos autorizados.
eriódicamente y sustituido
n
La empresa declina toda responsabilidad cuando
estas normas no sean respetadas.
Page 38

Descripción
del aparato
ES
Panel de control
El panel de control se describe a continuación a modo de ejemplo: puede no ser una exacta reproducción del
modelo adquirido.
Piloto
ZONA DE COCCIÓN SELECCIONADA
PLACA EXTENSIBLE ENCENDIDA
SELECCIÓN DE LA ZONA DE COCCIÓN
Indicador de
POTENCIA
Botón
5
.
5
Piloto
5
.
5
PLACA EXTENSIBLE*
Botón
Botón
AUMENTO DE POTENCIA
Piloto
MANDOS BLOQUEADOS
Botón
BLOQUEO DE MANDOS
Botón
ON/OFF
Botón
DISMINUCIÓN DE POTENCIA
Botón ON/OFF para encender y apagar el
aparato.
Botón BLOQUEO DE MANDOS para impedir
modificaciones fortuitas a las regulaciones de la
encimera (ver Puesta en funcionamiento y uso).
Piloto MANDOS BLOQUEADOS indica que se ha
producido el bloqueo de los mandos (ver Puesta
en funcionamiento y uso).
Piloto ZONA DE COCCIÓN SELE
indica que ha sido seleccionada dicha zona de
cocción y, por lo tanto, se pueden realizar las
distintas regulaciones
Botón SELECCIÓN DE ZONA DE COCCIÓN para
seleccionar la zona de cocción deseada
CCIONADA
Indicador de POTENCIA indica visualmente el
nivel de calor alcanzado.
Botón AUMENTO DE POTENCIA para encender
la placa y regular la potencia (ver Puesta en
funcionamiento y uso).
Botón DISMINUCIÓN
la potencia y apagar la placa (ver Puesta en
funcionamiento y uso).
Botón ENCENDIDO DE LA PLACA TRIPLE para
activar la placa triple (ver Puesta en
funcionamiento y uso).
Piloto PLACA EXTENSIBLE ENCENDIDA*: indica
el encendido de la placa extensible
DE POTENCIA para regular
.
* Presente sólo en algunos modelos
38
Page 39

Puesta en
funcionamiento y uso
La cola aplicada sobre las juntas deja algunas
trazas de grasa en el vidrio. Antes de utilizar el
aparato, se recomienda eliminarlas con un producto
específico para el mantenimiento, no abrasivo.
Durante las primeras horas de funcionamiento, es
posible advertir un olor a goma que pronto
desaparecerá.
Cuando la encimera se conecta a la red de
alimentación eléctrica, después de algunos
segundos se emite una breve señal sonora. Sólo a
partir de ese momento es posible encender la
encimera.
Encendido de la encimera
El encendido de la encimera se produce
manteniendo presionado el botón
segundo aproximadamente.
durante un
Encendido de las zonas de cocción
Cada zona de cocción se acciona utilizando el
dispositivo de regulación de potencia compuesto
por dos teclas (- y +).
Presione el botón
seleccione la potencia deseada utilizando los
botones
Para seleccionar directamente la potencia
máxima, pulse brevemente el botón
Es posible acelerar los tiempos de calentamiento
de una zona de cocción procediendo del
siguiente modo:
1. regule la potencia de la zona de cocción al
máximo (9);
2. luego pulse la tecla
potencia aparece A;
3. a partir de ese momento, puede seleccionar la
potencia que se desea alcanzar para la cocción
(por ejemplo, 5).
Cuando se alcanza esta temperatura, la función
de calentamiento rápido se interrumpe
automáticamente y la cocción prosigue
normalmente a la potencia 5.
* Presente sólo en algunos modelos
y .
para activar la placa, luego
.
: en el display de la
Encendido de las zonas de cocción
extensibles*
Placa doble:
1. Presione el botón
cocción más interna.
2. Presione el botón
la segunda zona de cocción.
Placa triple:
1. Presione el botón
cocción intermedia.
2. Presione 2 veces el botón
la zona de cocción.
Para volver a una zona de tamaño inferior, pulse
nuevamente el botón
para activar la zona de
para activar (o desactivar)
para activar la zona de
para activar toda
.
Apagado de las zonas de cocción
Presione el botón : la potencia de la zona de
cocción desciende progresivamente, hasta que
se apaga.
O bien, pulse simultáneamente los botones
: la potencia vuelve inmediatamente a 0 y la
zona de cocción se apaga.
y
Bloqueo de los mandos
Cuando la encimera está en funcionamiento, es
posible bloquear el panel de control para evitar el
peligro de modificaciones fortuitas de las
regulaciones (niños, operaciones de limpieza, etc.).
Presionando el botón
el piloto que se encuentra encima del botón se
enciende.
Para poder volver a realizar regulaciones (por ej.:
interrumpir la cocción), es necesario desbloquear los
mandos: presione el botón
instantes, la luz testigo se apagará y el panel de
control se desbloqueará.
, los mandos se bloquean y
durante algunos
Apagado de la encimera
Presionando el botón , el aparato se apagará.
Si los mandos del aparato fueron bloqueados,
continuarán estando bloqueados incluso después
de haber vuelto a encender la encimera. Para poder
encender nuevamente la encimera, es necesario
primero desbloquear los mandos.
ES
Page 40

ES
Los elementos calentadores
Según el modelo, en la encimera se pueden instalar
dos tipos diferentes de elementos calentadores:
halógenos y radiantes.
Los halógenos transmiten el calor debido a la
irradiación de la lámpara halógena que contienen.
Se caracterizan por las propiedades muy similares a
los típicos de gas: rápida respuesta a los mandos,
visualización instantánea de la potencia.
Los radiantes están compuestos por múltiples
espiras que garantizan la distribución uniforme del
calor en el fondo del recipiente, logrando perfectas
cocciones con el fuego bajo: estofados, salsas o
platos para calentar.
Consejos prácticos para el uso del aparato
Para obtener las mejores prestaciones de la
encimera:
utilice ollas con fondo plano para asegurarse que
se adhieran perfectamente a la zona calentadora;
Utilice ollas de un diámetro suficiente para cubrir
completamente la zona de cocción, de ese modo
se garantiza el aprovechamiento de todo el calor
disponible.
Niveles de potencia aconsejados para los distintos
tipos de cocción:
Potencias
Mini
Medio Salsa
Maxi
Placa pequeña
(1100 -> 1400 W)
Chocolate
Cocinar a fuego
lento
Placa mediana
(1800 -> 2000 W)
Calentar
Cocinar a fuego
lento
Hervir líquidos Freír / Asar
(2300 -> 2500 W)
Cocinar a fuego
lento
Hervir líquidos
Placa grande
Dispositivos de seguridad
Indicadores de calor residual
Mientras que la temperatura de las zonas de
cocción permanezca por encima de 60 ºC, aún
después del apagado, los indicadores de calor
residual, situados cerca de la zona de cocción
correspondiente, permanecerán encendidos para
prevenir quemaduras.
Inactividad
Si la encimera se enciende pero permanece
inutilizada durante 2 minutos aproximadamente, se
activará la función de bloqueo de mandos. Si dicha
situación continúa durante otros 4 minutos
aproximadamente, la encimera se apagará
automáticamente.
Sobrecalentamiento
Un uso prolongado de la encimera puede provocar
el sobrecalentamiento de los componentes
electrónicos.
En esos casos, un dispositivo de protección térmica
impone temporalmente una potencia reducida (igual
a 3) en las zonas de cocción delanteras hasta que la
temperatura haya descendido hasta un nivel
aceptable.
Verifique que el fondo de las ollas esté siempre
perfectamente seco y limpio para garantizar una
correcta adherencia y mayor duración, no sólo de
las zonas de cocción, sino también de las ollas.
Evite utilizar las mismas ollas utilizadas en los
quemadores a gas: la concentración de calor en
los quemadores a gas puede deformar el fondo
de la olla que, en consecuencia, pierde
adherencia.
no deje nunca una zona de cocción encendida sin
olla ya que su calentamiento, que alcanza
rápidamente el nivel máximo, podría dañar los
elementos calentadores.
40
Interruptor de se
guridad
El aparato posee un interruptor de seguridad que
apaga las zonas de cocción automáticamente
cuando se alcanza un tiempo límite de uso a un
determinado nivel de potencia. Durante la
interrupción de seguridad, el display indica 0.
Ejemplo: la placa posterior derecha se ha fijado en
5, mientras que la placa delantera izquierda en 2. La
posterior derecha se apagará después de 3 horas
de funcionamiento, la delantera izquierda después
de 10 horas.
Page 41

Nivel de
potencia
1-2 10 horas
35 horas
44 horas
5-6 3 horas
7-8 2 horas
91 hora
Señal sonora
Algunas anomalías, como:
un objeto (olla, cubierto, etc.) dejado sobre el área
de mandos durante más de 10 segundos
un derrame sobre el área de mandos,
la presión sobre un botón ejercida por demasiado
tiempo, pueden provocar la emisión de una señal
sonora. Para interrumpirla, elimine la causa del
mal funcionamiento. En estas situaciones, los
mandos se bloquean automáticamente: para
desbloquearlos, presione el botón
selecciones anteriores se mantendrán inalteradas.
Si no se elimina la causa de la anomalía, la señal
sonora persiste y la encimera se apagará.
Duración límite de
funcionamento
, las
ES
Page 42

Precauciones y consejos
ES
El aparato ha sido proyectado y fabricado en
conformidad con las normas internacionales sobre
seguridad. Estas advertencias se suministran por
razones de seguridad y deben ser leídas
atentamente.
Este aparato es conforme con las siguientes
Normas Comunitarias:
-73/23/CEE del 19/02/73 (Baja Tensión) y sucesivas
modificaciones
- 89/336/CEE del 03/05/89 (Compatibilidad
Electromagnética) y sucesivas modificaciones
- 93/68/CEE del 22/07/93 y sucesivas
modificaciones.
Seguridad general
El aparato ha sido fabricado para un uso de tipo
no profesional en el interior de una vivienda.
El aparato no se debe instalar al aire libre,
tampoco si el espacio está protegido porque es
muy peligroso dejarlo expuesto a la lluvia y a las
tormentas.
han apagado. El calor residual también está
señ
alado por un indicador (ver Puesta en
funcionamiento y uso).
Mantenga cualquier objeto que se pueda fundir a
una debida distancia de la encimera, por ejemplo,
objetos de plástico, de aluminio o productos con
un elevado contenido de azúcar. Tenga particular
cuidado con los embalajes y películas de plástico
o aluminio:
si se dejan sobre las superficies todavía calientes
o tibias pueden causar un grave daño a la
encimera.
Verifique que los mangos de las ollas estén
siempre dirigidos hacia dentro de la encimera
para evitar que sean chocados accidentalmente.
No desconecte el aparato de la toma de corriente
tirando del cable sino sujetando el enchufe.
No realice la limpieza o el mantenimiento sin
haber desconectado primero el aparato de la red
eléctrica.
No toque la máquina descalzo o con las manos y
pies mojados o húmedos.
El aparato debe ser utilizado para cocinar
alimentos, sólo por personas adultas y siguiendo
las instrucciones contenidas en este manual. No
utilice la encimera como superficie de apoyo ni
como tajo de cocina.
La encimera de vidriocerámica es resistente a los
choques mecánicos, no obstante, se puede rajar
(o eventualmente quebrantarse) si es golpeada
con un objeto con punta, como por ejemplo un
utensilio. Si esto sucediera, desconecte
inmediatamente el aparato de la red de
alimentación eléctrica y llame al Servicio de
Asistencia Técnica.
Si la superficie de la encimera está agrietada,
apague el aparato para evitar sacudidas
eléctricas.
Evite que el cable de alimentación eléctrica de
otros electrodomésticos entre en contacto con las
partes calientes de la encimera.
Eliminación
Eliminación del material de embalaje: respete las
normas locales, de esta manera los embalajes
podrán ser reutilizados.
La norma europea 2002/96/CE sobre la
eliminación de aparatos eléctricos y electrónicos
(RAEE), establece que los electrodomésticos no
se deben eliminar de la misma manera que los
desechos sólidos urbanos. Los aparatos en
desuso se deben recoger separadamente para
optimizar la tasa de recuperación y reciclaje de
los materiales que los componen e impedir
potenciales daños para la salud y el medio
ambiente. El símbolo de la papelera tachada se
encuentra en todos los productos para recordar la
obligación de recolección separada.
Para obtener mayor información sobre la correcta
eliminación de electrodomésticos, los poseedores
de los mismos podrán dirigirse al servicio público
responsable o a los revendedores.
No olvide que la temperatura de las zonas de
cocción permanece bastante elevada durante
treinta minutos, como mínimo, después que se
42
Page 43

Mantenimiento y cuidados
Interrumpir el suministro de corriente
eléctrica
Antes de realizar cualquier operación, desconecte el
aparato de la red de alimentación eléctrica.
Limpiar el aparato
Evite el uso de detergentes abrasivos o corrosivos,
como aerosoles para barbacoas y hornos,
quitamanchas y productos anticorrosivos, jabones
en polvo y esponjas con superficie abrasiva,
pueden rayar irremediablemente la superficie.
No utilice nunca limpiadores a vapor o de alta
presión para la limpieza del aparato.
Para un mantenimiento ordinario, es suficiente
lavar la encimera con una esponja húmeda,
secándola luego con un papel absorbente para
cocina.
Si la encimera está particularmente sucia,
refriéguela con un producto específico para la
limpieza de las superficies de vidriocerámica,
enjuáguela y séquela.
Estructura de acero inoxidable (sólo en los
modelos con marco)
El acero inoxidable puede mancharse por la acción
de agua muy calcárea dejada por un período de
tiempo prolongado en contacto con el mismo o
debido a productos para la limpieza con contenido
de fósforo.
Se aconseja enjuagar abundantemente y secar con
cuidado después de la limpieza de la encimera. Si
se derramara agua, seque rápidamente y con
cuidado.
Algunas encimeras poseen un marco de aluminio
que se asemeja al acero inoxidable. No utilice
productos para la limpieza y el desengrase no
adecuados para el aluminio.
Desmontar la encimera
Cuando sea necesario, se puede desmontar la
encimera:
1. quite los tornillos que fijan los muelles de
centrado en los costados;
2. afloje los tornillos de los ganchos de fijación en
las esquinas;
3. extraiga la encimera del mueble.
ES
Para eliminar las acumulaciones de suciedad más
consistentes utilice una raedera especial.
Intervenga lo antes posible, sin esperar que el
aparato se enfríe para evitar que los residuos
formen costras. Se pueden obtener excelentes
resultados usando una esponja con hilos de acero
inoxidable especial para encimeras de
vidriocerámica, embebida en agua y jabón.
Si sobre la encimera se hubieran fundido
accidentalmente objetos o materiales como
plástico o azúcar, elimínelos inmediatamente con
la raedera, mientras la superficie está todavía
caliente.
Una vez limpia, la encimera se puede tratar con
un producto específico para el mantenimiento y la
protección: la película invisible que deja este
producto protege la superficie en caso de
escurrimientos durante la cocción. Se recomienda
realizar estas operaciones con el aparato tibio o
frío.
R
ecuerde siempre enjuagar la encimera con agua
limpia y secarla cuidadosamente: en efecto, los
residuos de productos podrían encostrarse
durante la siguiente cocción.
Se recomienda evitar acceder a los mecanismos
internos para intentar una reparación. En caso de
avería, llame al Servicio de Asistencia Técnica.
Page 44

Descripción técnica
0
a
0
de los modelos
ES
En estas tablas se encuentran, modelo por modelo, los valores de absorción energética, el tipo de elemento
calentador (halógeno o radiante) y el diámetro de cada zona de cocción.
ENCIMERAS TK 64 SD
TK 64 SD IX
TK 64 SD BI
Zonas de
cocción
Posterior
izquier da
Delan t era
izquier da
Pos ter ior derech
Delan t era
derecha
Izquierda
Potencia total 6500 6500 5100
R = radiante individual; RD = radiante do ble; RT = radiante triple
Potencia
(en W)
RD 2300/-100
R 1200 145 R 1200 145
R 1200 145 R 1200 145 R 600 120
R 1800 180 R 1800 180 R 1800 180
Diámetro
(en mm)
210 R 2300 210
TK 64 CL
TK 64 S
TK 64 S IX
Potencia
(en W)
Diámetro
(en mm)
TK 63 T
TK 63 T BI
Potencia
(en W)
RT
1050/1950/270
Diámetro
(en mm)
250
44
Page 45

Instruções para
a utilização
IT FR
Italiano, 1
Espanol, 34
GB
PT
Português,45Nederlands,56
PLANO
Índice
PT
Instalação, 46-48
Posicionamento
Ligação eléctrica
Français, 23English,12
Descrição do aparelho, 49
Painel de comandos
NLES
Início e utilização, 50-52
Acender o plano de cozedura
Acender as zonas de cozedura
Acender as zonas de cozedura extensíveis
Desligar as zonas de cozedura
Bloqueio dos comandos
Desligar o plano de cozedura
Elementos aquecedores
Conselhos práticos para utilizar esta aparelhagem
Dispositivos de segurança
Precauções e conselhos, 53
Segurança geral
Eliminação
TK 64 CL
TK 64 S IX
TK 64 S
TK 64 SD IX
TK 64 SD BI
TK 64 SD
TK 63 T
TK 63 T BI
Manutenção e cuidados, 54
Desligar a corrente eléctrica
Limpeza do aparelho
Desmontar o plano
Descrição técnica dos modelos, 55
Page 46

Instalação
PT
É importante guardar este folheto para poder consultá-
lo a qualquer momento. No caso de venda, cessão ou
mudança, assegure-se que o mesmo permanece com o
aparelho para informar o novo
funcionamento e sobre as respectivas advertências.
Leia com atenção as instruções: há informações
importantes sobre a instalação, a utilização e a
segurança.
proprietário sobre o
Posicionamento
As embalagens não são brinquedos para as crianças
e devem ser eliminadas em conformidade com as
regras de colecta diferenciada (veja em Precauções e
Conselhos).
A instalação deve ser realizada segundo estas
instruções e por
instalação errada pode causar danos a pessoas,
animais ou objectos.
Encaixe
Para garantir um bom funcionamento do aparelho é
necessário que o móvel seja de características
adequadas:
o material do plano de apoio deve resistir a uma
temperatura de aproximadamente 100ºC;
se desejar instalar o plano de cozedura sobre um
forno, este deve ser equipado com de um
sistema
evite instalar o plano de cozedura sobre uma
máquina de lavar louça: se for faze-lo, instale um
48
560 +/- 1
Sobre um móvel vazio ou uma gaveta
É necessário deixar uma câmara-de-ar de pelo menos
40 mm ou uma abertura de 5 mm na largura do móvel.
pessoal profissional qualificado. Uma
de arrefecimento com ventilação forçada;
590
520
elemento de separação
entre os dois aparelhos
com retençã
o
hermética;
conforme o plano de
cozedura que desejar
instalar (veja figuras), o
vão do móvel deverá
490 +/- 1
ter as seguintes
dimensões:
Ventilação
Para consentir uma adequada ventilação e para evitar o
superaquecimento das superfícies ao redor do
aparelho, o plano de cozedura deve ser posicionado:
a uma distância mínima de 40 mm da parede de
trás e de 600 mm
de quaisquer
outras superfícies
verticais;
de forma a
manter uma
distância mínima
de 10 mm entre o
vão para o encaixe
e o
móvel abaixo
dele.
Fixação
A instalação do aparelho deve ser realizada sobre uma
superfície de apoio perfeitamente plana.
As deformações eventualmente provocadas por uma
fixação errada poderão alterar as características
performances do plano de cozedura.
LADO ANTERIOR
DO PLANO DE COZEDURA
PLANO
DE APOIO
30
e as
40
PLANO DE
COZEDURA VIRADO
Abertura de pelo menos 5 mm
em toda a largura do plano.
46
40 mm min.
40mm
Page 47

O comprimento do parafuso de regulação dos ganchos
de fixação deve ser configurado antes da sua
montagem, conforme a espessura do plano de apoio:
30 mm de espessura: parafuso 17,55 mm;
40 mm de espessura: parafuso 7,55 mm.
Para a fixação proceder da seguinte maneira:
1. Com os parafusos sem ponta, parafusar as 4 molas
de centragem nos furos colocados no centro de cada
lado do plano;
2. introduza o plano de cozedura no vão do mó
vel a
exercer uma adequada pressão no inteiro perímetro
para o plano de cozedura prender-se perfeitamente no
plano de apoio.
3. para os planos com perfis laterais: após ter inserido o
plano de cozedura
no móvel, inserir os 4 ganchos de
fixação (cada um com o seu perno) no perímetro inferior
do plano de cozedura, parafusando-os com os
parafusos compridos com ponta até que o vidro fique
aderente
ao plano de apoio.
É indispensável que os parafusos das molas de
centragem sejam acessíveis.
Em conformidade com as normas de segurança,
depois de instalar o aparelho encaixado, não deve
ser
possível o contacto com componentes eléctricos.
Todos os componentes de garantia da protecção
precisam estar presos de modo que não possam ser
tirados sem o emprego de uma ferramenta.
Ligação eléctrica
A ligação eléctrica do plano de cozedura e a de um
eventual forno de encaixar precisam ser realizadas
separadamente, seja por razões de segurança
eléctrica, seja para facilitar uma eventual remoção
forno.
Ligação monofásica
O plano está provido de cabo de alimentação já ligado
e predisposto na fábrica para a ligação monofásica.
Efectuar a ligação dos fios de acordo com a tabela e os
desenhos a seguir:
Tensão tipo e
frequência rede
230V 1+N ~
50 Hz
Cabo eléctrico Ligação fios
: verde/amarelo
N: os 2 fios azuis juntos
L: marrom junto ao preto
Outros tipos de ligações
Se o sistema eléctrico corresponder à uma dessas
características:
Tensão tipo e frequência de rede
400V 2+N ~ 50 Hz
230V 3 ~ 50 Hz
400V - 2+2N ~ 50 Hz
do
Soltar os cabos e efectuar a ligação dos fios de acordo
co
m a tabela e os desenhos a seguir:
Tensão tipo e
frequência rede
400V - 2+N ~
50 Hz
230V 3 ~
50Hz
400V - 2+2N ~
ı50 Hz
Cabo eléctrico Ligação fios
: verde/amarelo;
N: os 2 fios azuis juntos
L1: preto
L2: marrom
: verde/amarelo;
N1: azul
N2: azul
L1: preto
L2: marrom
Se o sistema eléctrico corresponder à uma dessas
características:
Tensão tipo e frequência de rede
400V 3 - N ~ 50 Hz
proceder da seguinte maneira:
O eventual cabo em dotação não pode ser utilizado
para estes tipos de instalação.
1. Utilizar um cabo de alimentação apropriado, tipo
H05RR-F ou de valor superior, com medias adaptas
(secção do cabo: 25 mm).
2. Utilize uma chave de fenda, para fazer ala
vanca
nas linguetas laterais da tampa da caixa de bornes
e abri-la (veja imagem Caixa de bornes).
3. Desatarraxe o parafuso do grampo do cabo e os
parafusos dos bornes relativos ao tipo de ligação
necessária e posicione os grampos de ligação
conforme a tabela e os desenhos a seguir.
4. Posicione os fios de acordo com a tabela e os
desenhos abaixo e efectue a ligação apertando
todos os parafusos dos bornes.
Tensão ti po e
frequência rede
400V 3-N ~ ı 50
Hz
Ligações eléctricas Caixa de bornes
Trifásica 400
5. Fixe o cabo de alimentação na apropriada
braçadeira e feche a tampa.
2
1
Fase Grampo Neutro TerraFase
4
3
Fase
5
Trifásica 400
PT
Page 48

PT
Ligação do cabo de alimentação à rede
No momento de efectuar a ligação directamente na
rede, instalar entre o aparelho e a rede um interruptor
omnipolar com uma abertura mínima de 3 mm entre os
contactos.
O técnico instalador é responsáv
certa da ligação eléctrica e da obediência das regras
de segurança.
Antes de efectuar a ligação, certifique-se que:
a tomada tenha uma ligação à terra e seja em
conformidade
a tomada tenha a capacidade de suportar a carga
máxima de potência da máquina, indicada na placa
de identificação colocada no aparelho;
a tensão de alimentação seja entre os
placa de identificação;
a tomada seja compatível com a ficha do aparelho.
Em caso contrário, substitua a tomada ou a ficha; não
empregue extensões nem tomadas múltiplas
Depois de ter instalado o aparelho, o acesso ao cabo
eléctrico e à tomada da corrente deve ser fácil.
O cabo não deve ser dobrado nem comprimido.
O cabo deve ser v
substituído somente por técnicos autorizados.
A empresa exime-se de qualquer responsabilidade
se estas regras não forem obedecidas.
com a legislação;
erificado periodicamente e
el pela realização
valores da
.
48
Page 49

Descrição do aparelho
Painel de comandos
O painel de comandos descrito a seguir está representado para fins explicativos: pode não ser uma exacta
reprodução do modelo comprado.
Indicador luminoso
ZONA DE COZEDURA SELECCIONADA
CHAPA EXTENSÍVEL LIGADA*
SELECÇÃO ZONA DE COZEDURA
Indicador da
POTÊNCIA
Indicador luminoso
Botão
5
5
.
5.
5
Botão
CHAPA EXTENSÍVEL*
Botão
AUMENTO DA POTÊNCIA
Indicador luminoso
COMANDOS BLOQUEADOS
Botão
BLOQUEIO DOS COMANDOS
Botão
ON/OFF
Botão
DIMINUIÇÃO DA POTÊNCIA
PT
Botão ON/OFF para ligar e desligar o aparelho.
Botão BLOQUEIO DOS COMANDOS para
impedir modificações acidentais das regulações
do plano de cozedura (veja Início e utilização).
Indicador luminoso COMANDOS BLOQUEADOS
sinaliza o bloqueio dos comandos (veja Início e
utilização).
Indicador luminoso ZONA DE COZEDU
SELECCIONADA indica que a zona de cozedura
relativa foi seleccionada e são portanto possíveis
as várias regulações.
Botão SELECÇÃO ZONA DE COZEDURA para
seleccionar a zona de cozedura desejada.
RA
Indicador POTÊNCIA sinaliza visualmente o nível
de calor alcançado.
Botão AUMENTO POTÊNCIA para ligar a chapa e
regular a potência (veja Início e utilização).
Botão DIMINUIÇÃO POTÊNCIA para regular a
potência e desligar a chapa (veja Início e
utilização).
Botão CHAPA EXTENSÍVEL* para activar a
chapa extensível (veja Início e utilização).
Indicador luminoso CHAPA EXTENSÍVEL
LIGADA*: indica que a chapa extensí
ligada.
vel está
* Presente apenas em alguns modelos.
Page 50

Início e utilização
PT
A cola aplicada nas guarnições deixa alguns
traços de graxa no vidro. Antes de utilizar o
aparelho, é recomendável eliminá-la com um
produto não abrasivo específico para a manutenção.
Durante as primeiras horas de funcionamento, pode
ser que note odor de borracha, que em todo o caso
logo desaparecerá.
Quando o plano de cozedura for ligado
electricamente, toca um breve sinal acústico depois
de alguns segundos. Somente neste ponto será
possível ligar o plano de cozedura.
Acender o plano de cozedura
Para acender o plano de cozedura manter
pressionada a tecla
segundo.
por aproximadamente um
Acender as zonas de cozedura
Cada uma das zonas de cozedura é accionada
mediante o dispositivo de regulação da potência
constituído por dois botões (- e +).
Carregue na tecla
seguida programe a potência desejada através
das teclas
e .
para activar a chapa, em
Acender as zonas de cozedura
extensíveis*
Chapa dupla:
1. Carregue no botão
cozedura mais interna.
2. Carregue no botão
desactivar) a segunda zona de cozedura.
Chapa tripla:
1. Carregue no botão
cozedura intermédia.
2. Carregue duas vezes no botão
toda a zona de cozedura.
Para voltar a uma zona de tamanho menor,
carregue novamente no botão
para activar a zona de
para activar (ou
para activar a zona de
para activar
.
Desligar as zonas de cozedura
Carregue na tecla : a potência da zona de
cozedura descerá progressivamente até desligarse.
Em alternativa carregue nas teclas
simultaneamente: a potência volta imediatamente
para 0 e a zona de cozedura desliga-se.
e
Para definir directamente a potência máxima,
carregue brevemente no botão
É possível acelerar os tempos de aquecimento de
uma zona de cozedura da seguinte maneira:
1. regule a potência da zona de cozedura no
máximo (9);
2. e, em seguida, carregue no botão
display da potência aparecerá A;
3. neste ponto, defina a potência a qual desejar
chegar para a cozedura (por exemplo: 5).
Quando chegar a esta temperatura, a função de
aquecimento rápido se interromperá
automaticamente e a cozedura prosseguirá
normalmente com a potência 5.
* Presente apenas em alguns modelos.
.
: no
Bloqueio dos comandos
Quando um plano de cozedura estiver a funcionar, é
possível bloquear os comandos para evitar riscos
de modificações acidentais das regulações
(crianças, operações de limpeza etc.). Carregando
no botão
indicador luminoso situado acima do botão se
acenderá.
Para voltar a modificar as regulações (por. exemplo
interromper a cozedura), será necessário
desbloquear os comandos: carregue no botão
por alguns instantes; o indicador luminoso se
apagará e os comandos se desbloquearão.
os comandos se bloquearão e o
Desligar o plano de cozedura
Carregue no botão ; o aparelho se desligará.
Se os comandos do aparelhagem estiverem
bloqueados, continuarão bloqueados mesmo depois
de ter acendido novamente o plano de cozedura.
Para poder acender novamente o plano, será
necessário primeiro desbloquear os comandos.
50
Page 51

Elementos aquecedores
No plano de cozedura, conforme os modelos,
podem ser instalados elementos aquecedores de
dois tipos: halógenos e irradiantes.
Os halógenos transmitem o calor mediante
irradiação da lâmpada halógena que contém.
Caracterizam-se pelas propriedades similares às
típicas do gás: rápida resposta aos comandos,
visualização instantânea da potência.
Os elementos radiantes são constituídos por uma
multiplicidade de espirais que asseguram uma
repartição uniforme do calor no fundo do recipiente,
para um resultado perfeito de todas as cozeduras
com fogo lento: cozidos, molhos ou para aquecer
pratos.
Níveis de potência aconselhados para os vários
tipos de cozedura:
Mini
Maxi
(1100 -> 1400 W)
Chocolate Esquentar
Cozinhar em
fogo brando
Potências
Médio Molho
Chapa pequena
Chapa média
(1800 -> 2000 W)
Cozinhar em fogo
brando
Ferver líquidos Fritar/ Grelhar
Dispositivos de segurança
Indicadores de calor resíduo.
PT
Chapa grande
(2300 -> 2500 W)
Cozinhar em fogo
brando
Ferver líquidos
Conselhos práticos para utilizar esta
aparelhagem
Para obter as melhores performances da placa:
empregue panelas com fundo chato, para ter a
certeza que haverá uma perfeita aderência à zona
de aquecimento.
Empregue panelas com diâmetro suficiente para
cobrir inteiramente a zona de aquecimento, de
maneira que se aproveite inteiramente o calor
disponível.
Certifique-se que o fundo das panelas esteja
sempre perfeitamente enxuto e limpo, para
assegurar uma aderência certa e uma longa
durabilidade não somente das zonas de
cozedura, mas também das próprias panelas.
Evite utilizar as mesmas panelas que emprega
nos queimadores a gás: a concentração de calor
nos queimadores a gás poderá deformar o fundo
das panelas, que desta maneira perderá
aderência.
nunca deixe uma zona de cozedura acesa sem
uma panela, porque o seu aquecimento, ao
chegar rapidamente ao nível máximo, poderá
danificar os elementos de aquecimento.
Enquanto a temperatura das zonas de cozedura
permanecer acima de 60°C, mesmo depois de
apagadas, os indicadores de calor resíduo situados
perto da zona de cozedura relativa permanecerão
acesos para evitar o risco de queimaduras.
Inactividade
Se o plano for ligado mas ficar inutilizado por
aproximadamente 2 minutos, será activada a função
de bloqueio dos comandos. Se a mesma situação
durar por outros 4 minutos, o plano irá desligar-se
automaticamente.
Aquecimento excessivo
Uma utilização prolongada do plano de cozedura
pode provocar aquecimento excessivo dos
componentes electrónicos.
Nestes casos um dispositivo de protecção térmica
impõe temporariamente uma pequena potência (de
nas zonas de cozedura dianteiras até a
3)
temperatura ter diminuído para um nível aceitável.
Interruptor de segurança
O aparelho é dotado de um interruptor de segurança
que desliga as zonas de cozedura automaticamente
quando é alcançado um tempo máximo de
utilização a um determinado nível de potência.
Durante uma interrupção de segurança, o display
indicará 0.
Exemplo: a chapa posterior direita está programada
no 5, enquanto a chapa anterior esquerda no 2. A
posterior direita irá desligar-se após 3 horas de
funcionamento, a anterior esquerda após 10 horas.
Page 52

PT
Nival de
potência
1-2 10 horas
35 horas
44 horas
5-6 3 horas
7-8 2 horas
91 horas
Sinal acústico
Algumas anomalias, nomeadamente:
um objecto (panela, talher etc.) foi deixado mais
de 10 segundos na área de comandos;
um derramamento na área dos comandos,
uma pressão exercida por muito tempo em um
botão, podem provocar uma sinalização acústica.
Resolva a causa do mau funcionamento para o
sinal sonoro deixar de tocar. Nestas situações os
comandos bloqueiam-se automaticamente: para
desbloqueá-los carregue na tecla
programações serão mantidas. Se a causa da
anomalia não for removida, o sinal acústico
persistirá e o plano irá desligar-se.
Duração limite de
funcionamento
, as
52
Page 53

Precauções e conselhos
Este aparelho foi projectado e fabricado em
conformidade com as normas internacionais de
segurança. Estas advertências são fornecidas por
razões de segurança e devem ser lidas com
atenção.
Este aparelho está em conformidade com
as seguintes Directivas da Comunidade
Europeia:
-73/23/CEE de 19/02/73 (Baixa Tensão) e posteriores
modificações
-89/336/CEE de 03/05/89 (Compatibilidade
Electromagnética) e posteriores modificações
-93/68/CEE de 22/07/93 e posteriores modificações.
Segurança geral
Este aparelho foi concebido para utilização de
tipo não profissional no âmbito de moradas.
Este aparelho não deve ser instalado ao ar livre,
mesmo num sítio protegido, porque é muito
perigoso deixá-lo exposto a chuva e temporais.
Não toque na máquina com os pés descalços ou
com as mãos ou os pés molhados ou húmidos.
Este aparelho deve ser empregado para cozer
alimentos, somente por pessoas adultas e
segundo as instruções apresentadas neste
folheto. Não utilize o plano como superfície de
apoio ou como tábua de cortar.
A placa de vitrocerâmica é resistente às batidas
mecânicas, entretanto pode rachar-se (ou
eventualmente partir-se) se for batida com um
objecto pontiagudo, com um utensílio. Nestes
casos, desligue imediatamente o aparelho da
rede de alimentação e contacte a assistência
técnica.
Se a superfície do plano estiver rachada, desligue
o aparelho para evitar a possibilidade de choques
eléctricos.
Evite que o cabo de alimentação de outros
electrodomésticos encoste-se em partes quentes
do plano de cozedura.
Mantenha a devida distância da placa quaisquer
objectos que podem se derreter, por exemplo,
objectos de plástico, de alumínio ou produtos
com um alto conteúdo de açúcar. Preste muita
atenção com as embalagens e as películas de
plástico ou alumínio:
se deixá-los sobre as superfícies enquanto ainda
estiverem quentes ou mornas, podem causar um
dano grave à placa.
Certifique-se que as pegas das panelas fiq
sempre viradas para o lado interno do plano de
cozedura para evitar batidas acidentais.
Não puxe pelo cabo para desligar a ficha da
tomada eléctrica, pegue pela ficha.
Não realize limpeza nem manutenção sem antes
ter desligado a ficha da rede eléctrica.
uem
Eliminação
Eliminação do material de embalagem: obedeça
as regras locais, de maneira que as embalagens
possam ser reutilizadas.
A directiva Europeia 2002/96/CE relativa aos
resíduos de equipamentos eléctricos e
electrónicos (REEE) prevê que os
electrodomésticos não devem ser eliminados no
normal fluxo dos resíduos sólidos urbanos. Os
aparelhos não mais utilizados devem ser
recolhidos separadamente para optimizar a taxa
de recuperação e reciclagem dos materiais que
os compõem e impedir potenciais danos à saúde
e ao meio ambiente. O símbolo da lixeira
cancelada está indicado em todos os produtos
para lembrar o dever de colecta selectiva.
Para maiores informações sobre a correcta
eliminação dos electrodomésticos, os
proprietários poderão contactar o serviço de
colecta público ou os revendedores.
PT
Não se esqueça que a temperatura das zonas de
cozedura permanece muito alta pelo menos trinta
minutos depois de apagadas. O calor resíduo é
sinalizado também por um indicador (veja Início e
utilização).
Page 54

Manutenção e cuidados
PT
Desligar a corrente eléctrica
Antes de realizar qualquer operação, desligue o
aparelho da alimentação eléctrica.
Limpeza do aparelho
Evite o emprego de detergentes abrasivos ou
corrosivos, tais como sprays para churrasqueiras e
fornos, tira-manchas e produtos contra ferrugem,
detergentes em pó e esponjas com superfície
abrasiva: podem arranhar irremediavelmente a
superfície.
Nunca utilize equipamento de limpeza a vapor ou
de alta pressão para limpar a aparelhagem.
Para a manutenção ordinária, é suficiente lavar o
plano com uma esponja húmida e, em seguida,
enxugar com papel absorvente de cozinha.
Se o plano estiver muito sujo, esfregue com um
produto específico para limpeza de superfícies
em vidro cerâmica *, enxagúe e enxugue.
Para tirar as acumulações de sujidade maiores,
use uma espátula apropriada. Intervenha assim
que possível, sem aguardar que o aparelho
arrefeça, para evitar que resíduos grudem.
Podem ser obtidos excelentes resultados se usar
uma esponja especial de fios de aço inoxidável -
específica para planos em vidro cerâmica-
molhada de água e sabão.
Quadro em aço inoxidável (somente nos modelos
com moldura)
O aço inoxidável pode manchar-se por causa da
alta quantidade de calcário na água em contacto
durante muito tempo com o metal, ou por causa de
produtos de limpeza muito agressivos que
contenham fósforo.
É aconselhável enxaguar com água abundante e
xugar com cuidado, depois de ter limpado o
en
plano. Se for derramada água, enxugue-a
rapidamente com cuidado.
Alguns planos de cozedura tem uma moldura de
alumínio parecida com o aço inoxidável. Não utilize
produtos para a limpeza e o desengorduramento
não idóneos para o alumínio.
Desmontar o plano
Caso seja necessário desmontar o plano de
cozedura:
1. remova os parafusos que fixam as molas de
centragem nos lados;
2. solte os parafusos dos ganchos de fixação nos
ângulos;
3. extraia o plano de cozedura do vão do móvel.
Recomendamos que se evite tentar o acesso aos
mecanismos internos para tentar uma reparação. Em
caso de avaria, contactar a Assistência técnica.
No caso em que no plano de cozedura tenham-se
acidentalmente fundidos objectos ou materiais
como plástico ou açúcar, remova-os
imediatamente com a espátula, até que a
fície esteja ainda quente.
super
Depois de limpo, o plano poderá ser tratado com
um produto específico para a manutenção e a
protecção: a película invisível deixada por este
produto protegerá a superfície se algo for
derramado durante a cozedura. É recomendável
realizar estas operações com o aparelho morno
ou frio.
Lembre-se sempre de enxaguar com água limpa e
enxugar o plano com cuidado: para não acontecer
de resíduos de produtos grudarem-se na
sucessiva cozedura.
54
Page 55

Descrição técnica
0
dos modelos
Nestas tabelas estão indicados, modelo por modelo, os valores de absorção energética, o tipo de elemento
aquecedor (halógeno ou radiante) e o diâmetro de cada zona de cozedura.
PT
PLANOS DE
COZEDURA
Zonas de
cozedura
Traseiro esq. RD 2300-100
Dianteiro es q. R 1200 145 R 1200
Traseiro dir. R 1200 145 R 1200
Dianteiro dir. R 1800 180 R 1800
Esquerda
Potência total 6500 6500 5100
R = irradiante único, RD = irradiante duplo, RT = irradiante triplo
TK 64 SD
TK 64 SD IX
TK 64 SD BI
Potência
(em W)
Diâmetro
(em mm)
210 R 2300
Potência
TK 64 CL
TK 64 S
TK 64 S IX
(em W)
TK 63 T
TK 63 T BI
Diâmetro
(em mm)
210
145
145 R 600 120
180 R 1800 180
Potência
(em W)
RT
1050/1950/2700
Diâmetro
(em mm)
250
Page 56

Gebruiksaanwijzingen
KOOKPLAAT
NL
IT FR
Italiano, 1
GB
PTES
Espanol, 34
Português, 45 Nederlands,56
TK 64 CL
TK 64 S IX
TK 64 S
TK 64 SD IX
TK 64 SD BI
TK 64 SD
TK 63 T
TK 63 T BI
Inhoud
Installatie, 57-59
Plaatsing
Elektrische aansluiting
Français, 23English,12
Beschrijving van het apparaat, 60
Bedieningspaneel
NL
Starten en gebruik, 61-63
Inschakelen kookplaat
Inschakelen kookgedeeltes
Inschakelen verlengbare kookgedeeltes
Uitschakelen kookgedeeltes
Blokkering van de bediening
Uitschakelen kookplaat
De verwarmingselementen
Praktische tips voor het gebruik van het apparaat
Veiligheidsmechanismen
Voorzorgsmaatregelen en advies, 64
Algemene veiligheid
Afvalverwijdering
Onderhoud en verzorging, 65
De elektrische stroom afsluiten
Reinigen van het apparaat
De kookplaat verwijderen
Technische beschrijving van de modellen,
66
Page 57

Installatie
Het is belangrijk dit boekje zorgvuldig te bewaren voor
eventuele verdere raadpleging.. Wanneer u het product
weggeeft, verkoopt, of wanneer u verhuist, dient u dit
boekje bij het apparaat
informatie voorhanden blijft.
Lees de gebruiksaanwijzingen zorgvuldig door: er staat
belangrijke informatie in over installatie, gebruik en
veiligheid.
te bewaren zodat alle nodige
Plaatsing
Het verpakkingsmateriaal is niet bestemd voor
kinderen en dient daarom te worden weggegooid
volgens de geldende normen (zie
Voorzorgsmaatregelen en advies).
De installatie moet worden uitgevoerd door een
bevoegde installateur en volgens de instructies van de
fabri
kant. Een verkeerde installatie kan schade
berokkenen aan personen, dieren of dingen.
Inbouw
Voor een goede werking van het apparaat moet het
keukenmeubel de juiste kenmerken hebben:
het keukenblad moet uit hittebestendig materiaal
zijn vervaardigd en een temperatuur van circa
100°C kunnen verdragen;
als de kookplaat boven een oven wordt
geïnstalleerd moet deze zijn voorz
geforceerd geventileerd afkoelingssysteem;
Installeer de kookplaat niet boven een
vaatwasser; mocht dit echter onvermijdelijk zijn,
breng dan een waterdicht scheidingselement
590
tussen de twee
a
48
520
afhankelijk van de te
installeren kookplaat
(zie afbeeldingen ),
moet de ruimte van het
meubel de volgende
560 +/- 1
490 +/- 1
afmetingen hebben:
ien van een
pparaten aan;
Ventilatie
Om een juiste ventilatie te verkrijgen en een
oververhitting van de oppervlakken rondom het apparaat
te voorkomen, moet de kookplaat geïnstalleerd worden:
op een minimum afstand van 40 mm van de
achterwand of op 600 mm van elk ander verticaal
oppervlak;
op zodanige
wijze dat er een
minimum afstand
overblijft van 1
0
mm tussen het
inbouwmeubel en
het onderstaande
meubel.
Bevestigen
Het apparaat moet op een absoluut horizontaal
oppervlak worden geïnstalleerd.
Eventuele door onjuiste installatie veroorzaakte
vervormingen kunnen de eigenschappen en de
prestaties van de kookplaat aantasten.
VOORZIJDE
VAN DE KOOKPLAAT
KEUKENBLAD
30
40
KOOKPLAAT
ONDERSTEBOVEN
NL
Boven een leeg meubel of een lade.
Er is een tussenruimte nodig van minstens 40 mm
of een opening van 5 mm op de breedte van het meubel.
40 mm min.
40mm
Een opening van minstens 5 mm
op de hele breedte van het vlak.
Page 58

NL
De lengte van de regelschroef van de
bevestigingshaken moet op basis van de dikte van het
keukenblad worden ingesteld voordat de haken worden
gemonteerd:
als de dikte 30 mm is: schroef 17,55 mm;
als de dikte 40 mm is: schroef 7,55 mm.
Voor het bevestigen moet u als volgt te werk gaan:
1. Schroef met korte, puntloze schroeven de 4
centreringsklemmen in de openingen in het midden van
elke zijde van het blad v
ast;
2. zet de kookplaat in het midden van de opening van
het keukenmeubel door gelijke druk uit te oefenen op de
hele omtrek totdat de kookplaat perfect aansluit op het
keuken
blad.
3. voor platen met zijprofielen: nadat u de kookplaat in
het keukenmeubel heeft geplaatst moet u de 4
bevestigingshaken (elk met zijn eigen pen) aan de
onderste rand van de koo
kplaat vastschroeven met
gepunte, lange schroeven, net zolang tot het glas goed
aan het blad vastzit.
De schroeven van de centreringsklemmen moeten te
allen tijde bereikbaar blijven.
Volgens de veiligheidsnormen mag er geen contact
meer mogelijk zijn met de elektrische onderdelen nadat
het apparaat is ingebouwd.
Alle beschermende onderdelen moeten zodanig
worden bevestigd dat ze niet k
unnen worden verwijderd
zonder gereedschap te gebruiken.
Elektrische aansluiting
De elektrische aansluitingen van de kookplaat en van
de eventuele inbouwoven moeten apart worden
uitgevoerd, zowel om elektrische veiligheidsredenen als
om de oven eventueel eenvoudiger te kunnen
verw
ijderen.
Eenfasige aansluiting
De kookplaat is voorzien van een voedingskabel
bestemd voor een eenfasige aansluiting. Voer de
draadverbinding uit zoals aangegeven in de volgende
tabel en tekeningen:
Spanningstype en
netfrequentie
230V 1+N ~
50 Hz
Elektrische kabel Draadverbinding
: geel/groen;
N: de 2 blauwe
draden samen
L: bruin en zwart
samen
Scheid de kabels en voer de draad
verbinding uit zoals
aangegeven in de volgende tabel en tekeningen:
Spanningstype en
netfr equenti e
400V - 2+N ~
50 Hz
230V 3 ~
50Hz
400V - 2+2N ~ ı 50
Hz
Elektrische kabel Draadverbinding
: geel/groen;
N: de 2 blauwe draden samen
L1: zwart
L2: bruin
: geel/groen;
N1: bl auw
N2: bl auw
L1: zwart
L2: bruin
Als het elektrische net overeenkomt met een van de
volgende eigenschappen:
Spanningstype en netfrequentie
400V 3 - N ~ 50 Hz
ga dan als volgt te werk:
De eventuele bijgeleverde kabel is niet geschikt voor
dit type installatie.
1. Gebruik een geschikte voedingskabel, type
H05RR-F of met een hogere waarde, met de juiste
afmetingen (diameter kabel: 25 mm).
2. Licht de lippen aan de zijkant van het de
ksel van
het klemmenbord op met een schroevendraaier en
open het. (zie afbeelding Klemmenbord).
3. Draai de schroef van de kabelklem en de
schroeven van de benodigde klemmetjes los en
bevestig de verbindingskabels volgens de
aanwijzingen van de volgende tabel en
afbeeldingen.
4. Plaats de draden zoals aangegeven in de
volgende afbeeldingen en tabel en stel een
verbinding tot stand door alle schroeven van de
klemmetjes goed vast te draaien.
Spanningstype en
netfrequentie
400V 3-N ~ ı 50
Hz
Elektrische aansluitingen Klemmenbord
Driefasen 400
5. Bevestig de voedingskabel in de speciale
kabelklem en sluit het deksel af.
Andere soorten aansluitingen
Als het elektrische net overeenkomt met een van de
volgende eigenschappen:
Spanningstype en netfrequentie
400V - 2+N ~ 50 Hz
230V 3 ~ 50 Hz
400V - 2+2N ~ 50 Hz
58
2
1
4
3
5
AardeNeutraalFaseVerbindingskabel FaseFase
Driefasen 400
Page 59

Het aansluiten van de voedingskabel aan het
elektrische net
Bij een rechtstreekse aansluiting op het net moet u
tussen het apparaat en het net een meerpolige
schakelaar aanbrengen met een minimum afstand van 3
mm tussen de contacten.
NL
De installateur is verant
elektrische verbinding en het in acht nemen van de
geldende veiligheidsnormen.
Voor het aansluiten moet u controleren dat:
woordelijk voor de correcte
de contactdoos geaard is en voldoet aan de
geldende normen;
het stopcontact in staat is het maximale
vermogen van het apparaat te verdragen, zoals
aangegeven op het typeplaatje dat zich op h
et
apparaat bevindt;
de spanning zich bevindt tussen de waarden die
staan aangegeven op het typeplaatje;
de contactdoos en de stekker overeenkomen. Als
dat niet zo is, dient u ofwel de
stekker ofwel de
contactdoos te vervangen; gebruik geen
verlengsnoeren of dubbelstekkers.
Wanneer het apparaat geïnstalleerd is, moeten het
snoer en het stopcontact makkelijk te bereiken zijn.
De kabel mag niet worden gebogen of samengedrukt.
De kabel moet van
mag alleen door erkende monteurs worden vervangen.
tijd tot tijd worden gecontroleerd en
De fabrikant kan niet aansprakelijk worden gesteld
wanneer deze normen niet worden na
geleefd.
Page 60

Beschrijving
van het apparaat
NL
Bedieningspaneel
Het bedieningspaneel dat hier wordt beschreven en afgebeeld geldt alleen als voorbeeld: het is mogelijk dat
het niet precies overeenkomt met het door u aangeschafte model.
Controlelampje
GESELECTEERDE KOOKGEDEELTE
VERLENGBARE PLAAT AAN*
SELECTEREN KOOKGEDEELTE
Indicator
VERMOGEN
Controlelampje
Toets
5
5
.
VERLENGBARE PLAAT*
5
5
.
To et s
To et s
MEER VERMOGEN
Controlelampje
BLOKKERING BEDIENINGSPANEEL
To et s
BLOKKERING VAN DE BEDIENING
Toets
ON/OFF
To et s
MINDER VERMOGEN
Toets ON/OFF voor het aan- en uitzetten van het
apparaat.
Toets BLOKKERING VAN DE BEDIENING om
ongeoorloofde veranderingen aan de kookplaat te
verhinderen (zie Starten en gebruik).
Controlelampje BLOKKERING
BEDIENINGSPANEEL geeft de blokkering van
de bediening aan (zie Starten en gebruik).
Controlelampje GE
KOOKGEDEELTE geeft aan dat betreffend
kookgedeelte geselecteerd is en dat u het kunt
regelen.
Toets SELECTEREN KOOKGEDEELTE voor het
kiezen van de gewenste kookzone
SELECTEERDE
Indicator VERMOGEN geeft het bereikte
warmteniveau aan.
Toets MEER VERMOGEN voor het inschakelen
van de kookplaat en het regelen van het
vermogen (zie Starten en gebruik).
Toets MINDER VERM
het vermogen en het uitschakelen van de
kookplaat (zie Starten en gebruik).
Toets VERLENGBARE PLAAT* voor het activeren
van de uittrekbare plaat (zie Starten en gebruik).
Controlelampje VERLENGBARE PLAAT AAN*:
geeft aan dat de dubbele kookplaat aan is..
OGEN voor het regelen van
* Alleen bij enkele modellen aanwezig
60
Page 61

Starten en gebruik
De lijm die gebruikt is voor de afdichtingen laat wat
vetvlekjes achter op het glas. Voordat u het
apparaat gebruikt raden wij u aan de vlekken te
verwijderen met een speciaal niet-schurend
schoonmaakmiddel. Gedurende de eerste paar uur
dat u het apparaat gebruikt kan het zijn dat u een
rubbergeur ruikt. Deze zal echter snel wegtrekken.
Als de kookplaat elektrisch wordt aangesloten
hoort u na enkele seconden een kort geluidssignaal
afgaan. Alleen dan kunt u de kookplaat aanzetten.
Inschakelen kookplaat
Druk ongeveer 1 seconde lang op de knop voor
het inschakelen van de kookplaat.
Inschakelen kookgedeeltes
Iedere kookgedeelte wordt door middel van een
stroomsterkteregelaar bediend. Deze regelaar
bestaat uit twee toetsen (- en +).
Druk op de toets
schakelen en stel vervolgens het gewenste
vermogen in door op de toetsen
drukken.
om de kookplaat in te
en te
Inschakelen verlengbare kookgedeeltes*
Dubbele kookplaat:
1. Druk op de toets
het meest interne kookgedeelte.
2. Druk op de toets
van het tweede kookgedeelte.
Driedubbele kookplaat:
1. Druk op de knop
tussenin liggende kookzone.
2. Druk 2 keer op de toets
kookzone te activeren.
Als u wilt terugkeren naar een kleinere zone drukt u
opnieuw op de toets
voor het inschakelen van
voor het in- of uitschakelen
voor het activeren van de
om de hele
.
Uitschakelen kookgedeeltes
Druk op de knop : het vermogen van de
kookzone vermindert geleidelijk, totdat hij uit is.
Of druk tegelijkertijd op de toetsen
vermogen gaat onmiddellijk terug naar 0 en het
kookgedeelte gaat uit.
en : het
NL
Om de kookplaat direct op het maximale vermogen
in te stellen drukt u kort op de toets
Het is mogelijk de verwarmingstijd van een
kookzone te versnellen door als volgt te werk te
gaan:
1. zet de stroomsterkte van de kookzone op
maximum (9);
2. vervolgens op de toets
display van het vermogen verschijnt A.
3. op dit punt stelt u het gewenste vermogen in
dat u wilt bereiken voor het koken (b.v.5)..
Als deze temperatuur is bereikt wordt de functie
van het snel verwarmen automatisch onderbroken
en gaat het koken normaal door op sterkte 5.
* Alleen bij enkele modellen aanwezig
drukken; op de
.
Blokkering van de bediening
Als de kookplaat in werking is kunt u het
bedieningspaneel blokkeren om een ongewenst
aanraken te vermijden (kinderen,
schoonmaakhandelingen, enz.). Door op de toets
te drukken zal het bedieningspaneel worden
geblokkeerd. Het controlelampje boven de toets
gaat aan.
Als u het bedieningspaneel weer wilt gebruiken (bv.
als u wilt stoppen met koken) moet u de blokkering
uitschakelen: druk even op de toets
controlelampje gaat uit en het bedieningspaneel
wordt weer geactiveerd.
. Het
Uitschakelen kookplaat
Druk op de toets ; het apparaat gaat uit.
Als het bedieningspaneel is geblokkeerd, blijft dit
ook geblokkeerd nadat u de kookplaat opnieuw
inschakelt. Als u de kookplaat opnieuw wilt
inschakelen moet u eerst het bedieningspaneel
deblokkeren.
Page 62

NL
g
g
g
De verwarmingselementen
Afhankelijk van het model kunnen op de kookplaat
twee verschillende typen verwarmingselementen
worden gemonteerd: halogeen of stralend.
De halogeenelementen verspreiden de warmte door
de uitstraling van de halogeenlamp die zich erin
bevindt.
Het bezit de eigenschappen van het gasfornuis:
snelle reactie op de bediening, onmiddelijk
zichtbaar worden van het vermogen.
De stralingselementen bestaat uit een hoeveelheid
spiralen die het gelijkmatig verspreiden van de
warmte op de bodem van de pan garanderen, dat
wil zeggen de perfecte functie voor het bereiden van
etenswaren op een laag vuur: voor stoofschotels,
sausen of het opwarmen van gerechten.
Aangeraden stroomsterktes voor verschillende
bereidingen:
Stroomsterktes
Middel-
maat
Maxi
Kleine
kookplaat
(1100 -> 1400 W)
Mini Chocolade Verwarmen
Saus
vuur
Op laa
koken
Middelste
kookplaat
(1800 -> 2000 W)
Op laa
vuur
koken
Vloeistoffen
koken
Grote
kookplaat
(2300 -> 2500 W)
Op laa
koken
Vloeistoffen
koken
Bakken/Grillen
Veiligheidsmechanismen
vuur
Praktische tips voor het gebruik van het
apparaat
Teneinde optimale resultaten te bereiken van het
kookvlak:
gebruik pannen met een platte bodem die perfect
aansluiten op het verwarmgedeelte;
Gebruik pannen die groot genoeg zijn om de
kookplaat geheel te bedekken zodat alle
beschikbare hitte wordt benut.
Houd de bodem van de pannen altijd goed
schoon en droog zodat ze goed aansluiten op het
kookvlak. Dit verlengt de levensduur van zowel
de pannen als het kookvlak zelf.
vermijd dezelfde pannen te gebruiken die u ook
op een gasfornuis gebruikt: de
warmteconcentratie van gasbranders kan de
bodem van pannen vervormen, waardoor ze niet
goed meer aansluiten.
laat nooit een kookgedeelte aan staan zonder een
pan erop. De verhitting, die snel het maximum
niveau bereikt, zou de verwarmingselementen
kunnen beschadigen.
Aanwijzers van de resterende warmte
Zolang de temperatuur van de kookgedeeltes ook
na het uitschakelen boven de 60°C blijft, blijven de
aanwijzers van de resterende warmte die zich naast
het betreffende kookgedeelte bevinden aan, zodat u
zich niet verbrandt.
Non-actief
Als een kookplaat wordt ingeschakeld maar 2
minuten lang niet wordt gebruikt, wordt de
blokkering van het bedieningspaneel geactiveerd.
Als deze situatie nog ongeveer 4 minuten lang
aanhoudt, gaat de kookplaat automatisch uit.
Oververhitting
Langdurig gebruik van de kookplaat kan het
oververhitten van de elektronische elementen
veroorzaken.
Een thermisch veiligheidsmechanisme stelt in deze
gevallen in de voorste gedeeltes tijdelijk een
beperkte stroomsterkte in (gelijk aan 3) totdat de
temperatuur is gezakt tot een acceptabel niveau.
Veiligheidsschakelaar
Het apparaat beschikt over een
veiligheidsschakelaar die de kookgedeeltes
automatisch uitschakelt als de tijdslimiet voor een
bepaald vermogensniveau is bereikt. Tijdens deze
veiligheidsonderbreking vertoont het display het 0.
B.v.: de kookplaat rechtsachter staat op 5, terwijl de
plaat linksvoor op 2 staat. De plaat rechtsachter zal
automatisch na 3 uur uitgaan, de plaat linksvoor na
10 uur.
62
Page 63

Vermogens-niveau Maximale werkingsduur
1-2 10 uur
35 uur
44 uur
5-6 3 uur
7-8 2 uur
91 uur
Geluidssignaal
Enkele storingen, zoals:
een voorwerp (pan, bestek, enz.) dat meer dan 10
seconden op het bedieningspaneel ligt,
gemors op het bedieningspaneel,
een lange druk op een toets, kunnen een
geluidssignaal veroorzaken. Verwijder de oorzaak
van de storing en het geluidssignaal houdt op. In
deze gevallen zal het bedieningspaneel
automatisch worden geblokkeerd: om het weer in
te schakelen moet u op de toets
drukken. De
instellingen worden behouden. Als de oorzaak
van de storing niet wordt verwijderd blijft het
geluidssignaal gaan en gaat het kookvlak uit.
NL
Page 64

Voorzorgsmaatregelen
en advies
NL
Dit apparaat voldoet aan de geldende
internationale veiligheidsvoorschriften. Deze
aanwijzingen zijn geschreven voor uw veiligheid en u
dient ze derhalve goed door te nemen.
Deze apparatuur voldoet aan de volgende
EU voorschriften:
- 73/23/EEG van 19/02/73 (laagspanning) en
successievelijke modificaties
- 89/336/EEG van 03/05/89 (elektromagnetische
compatibiliteit) en daaropvolgende modificaties
- - 93/68/EEG van 22/07/93 en daaropvolgende
wijzigingen.
Algemene veiligheid
Dit apparaat is vervaardigd voor niet-
professioneel gebruik binnenshuis.
Het apparaat dient niet buitenshuis te worden
geplaatst, ook niet in overdekte toestand. Het is
erg gevaarlijk als het in aanraking komt met regen
of als het onweert.
Houd voorwerpen die kunnen smelten op afstand
van de kookplaat, zoals bv. plastic, aluminium of
suikerhoudende etenswaren. Let vooral op plastic
of aluminium verpakkingen en folie:
als u ze op het nog warme of lauwe kookvlak
neerlegt, kunt u zware schade aanrichten.
Richt de handvaten van de pannen altijd naar de
binnenzijde van de kookplaat zodat u er niet per
ongeluk tegenaan stoot.
Trek nooit de stekker aan het snoer uit het
stopcontact, maar pak altijd de stekker direct
beet.
Maak het apparaat niet schoon of voer geen
onderhoud uit als de stekker nog in het
stopcontact zit.
Afvalverwijdering
Raak de machine niet aan als men op blote
voeten is of als de handenof voeten nat zijn.
Het apparaat dient om gerechten te koken. Het
mag uitsluitend door volwassenen worden
gebruikt en alleen volgens de instructies die
beschreven staan in deze handleiding. Gebruik
het kookvlak niet om voorwerpen op te plaatsen
en ook niet als snijplank.
Het glaskeramische kookvlak is bestand tegen
mechanische stoten. Het kan echter worden
beschadigd (of barsten) als het wordt geraakt
door een puntig object, bijvoorbeeld door
gereedschap. Als dit gebeurt moet u onmiddellijk
het apparaat afsluiten van de elektrische stroom
en contact opnemen met de Technische Dienst.
Als het oppervlak van de kookplaat gebarsten is
moet u het apparaat uitschakelen om te
voorkomen dat u een elektrische schok krijgt.
Voorkom dat elektrische snoeren van andere
kleine keukenapparaten op warme delen van de
kookplaat terechtkomen.
Verwijderen van het verpakkingsmateriaal: houdt u
aan de plaatselijke normen, zodat het
verpakkingsmateriaal hergebruikt kan worden.
De Europese richtlijn 2002/96/EG, betreffende
afgedankte elektrische en elektronische
apparatuur (AEEA), voorziet dat huishoudelijke
apparatuur niet met het normale afval mag worden
meegegeven. De verwijderde apparaten moeten
apart worden opgehaald om het terugwinnen en
recyclen van de materialen waaruit ze bestaan te
optimaliseren en te voorkomen dat er eventuele
schade voortvloeit voor de gezondheid en het
milieu. Het symbool van de afvalemmer met een
kruis staat op alle producten om de consument
eraan te herinneren dat dit gescheiden afval is.
Om meer informatie te verkrijgen betreffende een
juiste verwijdering van huishoudapparaten kan de
consument zich richten tot de gemeentelijke
reinigingsdienst of de verkopers.
Vergeet niet dat de temperatuur in het
kookgedeelte aanzienlijk hoog blijft tot minstens
30 minuten nadat u het uitschakelt. De restwarmte
wordt ook door een indicator aangegeven (zie
Starten en gebruik).
64
Page 65

Onderhoud en verzorging
De elektrische stroom afsluiten
Sluit altijd eerst de stroom af voordat u tot enige
handeling overgaat.
Reinigen van het apparaat
Vermijd het gebruik van schuurmiddelen of
bijtende middelen, zoals sprays voor barbecues en
ovens, vlekkenmiddelen, roestverwijderende
producten, schoonmaakmiddelen in poedervorm of
schuursponzen: deze kunnen het oppervlak
onherstelbaar krassen.
Gebruik nooit huishoudapparaten met stoom of
hoge druk voor het reinigen van de kookplaat.
Voor normaal onderhoud moet u de kookplaat met
een vochtige spons reinigen en afdrogen met
keukenpapier.
Als de plaat erg vuil is moet hij worden
schoongemaakt met een speciaal middel voor
keramiekplaten. Daarna moet u hem afspoelen en
afdrogen.
Voor het verwijderen van hardnekkig vuil kunt u
een hiervoor bestemd schrapertje gebruiken.Doe
dit zo snel mogelijk voordat het apparaat afkoelt,
zodat de etensresten niet aankoeken.Uitstekende
resultaten bereikt u ook met een speciaal voor
keramiekplaten vervaardigd roestvrij staal
sponsje dat u in een sopje doopt.
Frame van roestvrij staal (alleen in modellen met
lijst)
Roestvrij staal kan vlekken gaan vertonen als er voor
langere tijd kalkhoudend water op blijft liggen of als
gevolg van gebruik van schoonmaakmiddelen die
fosfor bevatten.
Spoel en droog de kookplaat altijd goed af nadat u
hem heeft schoongemaakt. Droog gemorst water
altijd meteen goed af.
Enkele kookplaten hebben een lijst van aluminium
die lijkt op roestvrij staal. Gebruik voor het reinigen
en ontvetten geen producten die niet geschikt zijn
voor aluminium.
De kookplaat verwijderen
Als u de kookplaat moet verwijderen:
1. verwijder de schroeven die de
centreringsklemmen aan de zijkant vasthouden;
2. maak de schroeven van de bevestigingshaken op
de hoeken los;
3. haal de kookplaat uit het meubel.
U mag nooit aan het interne systeem sleutelen om
een reparatie proberen uit te voeren. Als er een
storing is moet u contact opnemen met de Service
Dienst.
NL
Als er op de kookplaat onverhoopt voorwerpen of
plastic materiaal of suiker zouden smelten, moet
u ze onmiddellijk met het schrapertje verwijderen
zolang het oppervlak nog warm is.
Als hij schoon is kan de plaat met een speciaal
middel voor onderhoud en protectie worden
behandeld: dit laat een dun laagje achter dat de
plaat beschermt tegen eventueel overkooksel.Dit
soort handelingen moeten worden uitgevoerd als
de plaat lauw of koud is.
Vergeet niet de kookplaat altijd met schoon water
na te spoelen en zorgvuldig af te drogen: restjes
van schoonmaakmiddelen kunnen aankoeken
gedurende het volgende gebruik van de
kookplaat.
Page 66

Technische beschrijving
van de modellen
NL
In deze tabellen vindt u de waarden terug van de energieopname voor ieder afzonderlijk model, het type
verwarmingselement (halogeen of stralend) en de diameter van iedere kookplaat.
KOOKPLATEN TK 64 SD
TK 64 SD
TK 64 SD
Kookgedeeltes
Links achter
Links voor R 1200 145 R 1200 145
Rechts achter R 1200 145 R 1200 145 R 600 120
Rechts voor R 1800 180 R 1800 180 R 1800 180
Links
Totaal vermogen 6500 6500 5100
R = stralend enkel, RD = stralend dubbel, RT = stralend drie-dubbel
Vermog en
(in W)
RD 2300/-
1000
Diameter
(in mm)
210 R 2300 210
Vermog en
TK 64 CL
(in W)
TK 64 S
TK 64 S
Diameter
(in mm)
TK 63 T
TK 63 T
Vermog en
(in W)
RT
1050/1950/2700
Diameter
(in mm)
250
66
Page 67

NL
Page 68

NL
02/2007 - 195054000.02
XEROX BUSINESS SERVICES
68
 Loading...