

Page 1

TA 2 - TA 3 - TA 4 - TA 2 S - TA 3 S
Frigorifero
Installazione e uso
Refrigerator
Installation and use
Réfrigérateur
Installation et emploi
Koelkast
Installatie en gebruik
Frigorífico
Instalação e uso
Chladnièka
Návod na intaláciu a pouitie
Chladnièka
Návod kinstalaci a pouití
Frigider
Instalare ºi folosire
Hûtõszekrény
Üzembe helyezés és használat
Page 2
Frigocongelatore 2 porte
I
Istruzioni per l'installazione e l'uso
1
Two-doors refrigerator-freezer
GB
Instructions for installation and use
Réfrigérateur-congélateur 2 portes 16
F
Instructions pour l'installation et l'emploi
2 Deurs koel-vriescombinatie
NL
Gebruiksaanwijzingen voor de installatie en het gebruik
Frigorífico-congelador de 2 portas
P
Instruções para a instalação e o uso
SK
Kombinovaná 2-dverová chladnièka 29
IPokyny na intaláciu a pouitie
Kombinovaná 2-dveøová chladnièka 36
CZ
Pokyny proinstalaci a pouití
Frigider cu congelator 2 uºi 43
RO
Instrucþiuni de instalare ºi folosire
HU
2-ajtós fagyasztó-hûtõszekrény 50
Üzembe helyezési és használati útmutató
8
1
22
Per garantire lefficienza e la sicurezza di questo elettrodomestico:
- rivolgetevi esclusivamente a centri di assistenza tecnica autorizzati
- richiedete sempre lutilizzo di parti di ricambio originali
To maintain the EFFICIENCY and SAFETY of this appliance, we recommend:
- call only the Service Centers authorized by the manufacturer
- always use original Spare Parts
Pour garantir lefficacité et la sécurité de ce produit:
- adressez-vous exclusivement aux Centres dassistance technique agréés
- demander toujours lutilisation de pièces détachées originales
Om de doelmatigheid en veiligheid van dit toestel te garanderen raden wij u aan:
- voor reparaties alleen de Service Centers te bellen die door de fabrikant gemachtigd zijn
- altijd gebruik te maken van originele onderdelen
Para garantir a eficiência e a segurança deste electrodoméstico:
- dirija-se exclusivamente a centros de assistência técnica autorizados
- solicite sempre a utilização de peças originais
Úèinnos abezpeènos tohoto spotrebièa je moné zaisti:
- zverením opráv a údrby výhradne autorizovaným servisným strediskám
- vyadovaním výhradného pouitia originálnych náhradných dielov
Úèinnost a bezpeènost tohoto spotøebièe lze zajistit:
- svìøením oprav a údrby výhradnì autorizovaným servisním støediskùm
- vyadováním výhradního pouití originálních náhradních dílù
Pentru a garanta eficienþa ºi siguranþa acestui aparat electrocasnic:
- adresaþi-vã exclusiv centrelor de asistenþã tehnicã autorizatã.
- solicitaþi mereu folosirea de piese de schimb originale.
A háztartási eszköz hatékonyságának és biztonságosságának érdekében:
- kizárólag hivatalos szervizhez forduljon segítségért
- mindig ragaszkodjon eredeti cserealkatrészek használatához
Page 3

La sicurezza, una buona abitudine
ATTENZIONE
Leggete attentamente le avvertenze contenute nel presente libretto in quanto forniscono importanti indicazioni riguardanti la sicurezza di installazione, d’uso e di manutenzione.
Questa apparecchiatura è conforme alle seguenti Direttive Comunitarie:
- 73/23/CEE del 19/02/73 (Basse Tensioni) e successive
modificazioni;
- 89/336/CEE del 03/05/89 (Compatibilità Elettromagnetica)
e successive modificazioni.
1. Questo apparecchio non va installato all’aperto, nemmeno se lo spazio è riparato da una tettoia; è molto pericoloso
lasciarlo esposto alla pioggia e ai temporali.
2. Deve essere usato soltanto da adulti ed esclusivamente
per conservare e congelare i cibi, seguendo le istruzioni d’uso
scritte in questo manuale.
3. Non toccate né manovrate mai l’apparecchio a piedi nudi
o con le mani o i piedi bagnati.
4. Sconsigliamo di ricorrere a prolunghe e prese multiple. Se
il frigorifero è installato tra i mobili, controllate che il cavo
non subisca piegature o compressioni pericolose.
5. Non tirate mai il cavo né il frigorifero per staccare la spina
dalla presa a muro: è molto pericoloso.
6. Non toccate le parti interne raffreddanti soprattutto con
le mani bagnate poiché potreste ustionarvi o ferirvi. Né met-
tete in bocca cubetti di ghiaccio appena estratti dal freezer
poiché rischiate di ustionarvi.
7. Non fate né pulizia né manutenzione senza aver prima
staccato la spina; non basta, infatti, portare le manopole
per la regolazione della temperatura sulla posizione "0" per
eliminare ogni contatto elettrico.
8. Prima di farvi ritirare il vecchio frigorifero, mettete fuori
uso l’eventuale serratura per evitare che i bambini, giocando, possano rimanere chiusi dentro l’apparecchio.
9. In caso di guasto, prima di chiamare il servizio-assistenza,
controllate al capitolo “C’è qualche problema?” per verificare se è possibile eliminare l’eventuale inconveniente. Non
tentate di riparare il guasto, cercando di accedere alle parti
interne.
10. In caso di sostituzione del cavo di alimentazione rivolgersi ai nostri Centri di Assistenza. In alcuni casi le connessioni sono eseguite con terminali speciali, in altri è richiesto
l’uso di un utensile speciale per accedere ai collegamenti.
11. Non usate apparecchi elettrici all'interno dello scomparto conservatore di cibi, se questi non sono del tipo raccomandato dal costruttore.
12. Al termine della vita funzionale dell'apparecchio, contenente gas ciclopentano nella schiuma isolante ed eventualmente gas R600a (isobutano) nel circuito refrigerante, lo stesso dovrà essere messo in sicurezza prima dell'invio in discarica. Per questa operazione rivolgetevi al vostro negoziante
o all'Ente Locale preposto.
Installazione
Installazione
Per garantire un buon funzionamento e un consumo
contenuto di elettricità è importante che l’installazione sia eseguita correttamente.
L’aerazione
Il compressore ed il condensatore emettono calore e richiedono perciò una buona aerazione. Sono poco adatti ambienti con una non perfetta ventilazione. L’apparecchio va
quindi installato in un ambiente servito da un’apertura (finestra o portafinestra) che assicuri il necessario ricambio dell’aria e che non sia troppo umido.
Fare attenzione, durante l'installazione, a non coprire od
ostruire le griglie che permettono la buona ventilazione dell'apparecchio.
Per una buona aerazione dell'apparecchio occorre lasciare:
- una distanza di almeno 10 cm tra la parte superiore ed
eventuali mobili sovrastanti;
- una distanza di almeno 5 cm tra le fiancate ed eventuali
mobili/pareti laterali.
Lontano dal calore
Evitare di posizionare l'apparecchio in un luogo direttamente esposto alla luce solare, accanto alla cucina elettrica o
similari.
In piano
L'apparecchio deve essere ben in piano; se il pavimento non
è livellato, è possibile intervenire con gli appositi piedini regolabili posti anteriormente.
Collegamento elettrico e messa a terra
Prima di procedere al collegamento elettrico, controllare che
il voltaggio indicato sulla targhetta caratteristiche, posta in
basso a sinistra accanto alla verduriera, corrisponda a quello
del vostro impianto di casa, e che la presa sia dotata di una
regolare messa a terra, come prescrive la legge sulla sicurezza degli impianti 46/90. Se manca la messa a terra, la Casa
Costruttrice declina ogni responsabilità. Non usate prese multiple o adattatori. Posizionare l’apparecchio in modo che
la presa, a cui è collegato, sia accessibile.
La potenza è insufficiente?
La presa elettrica deve essere in grado di sopportare il carico massimo di potenza dell’apparecchio, indicato sulla targhetta caratteristiche posta in basso a sinistra accanto alla verduriera.
Prima di collegarlo elettricamente
Dopo il trasporto posizionare l’apparecchio verticalmente ed
attendere almeno 3 ore prima di collegarlo alla presa per
consentire un corretto funzionamento.
1
I
Page 4
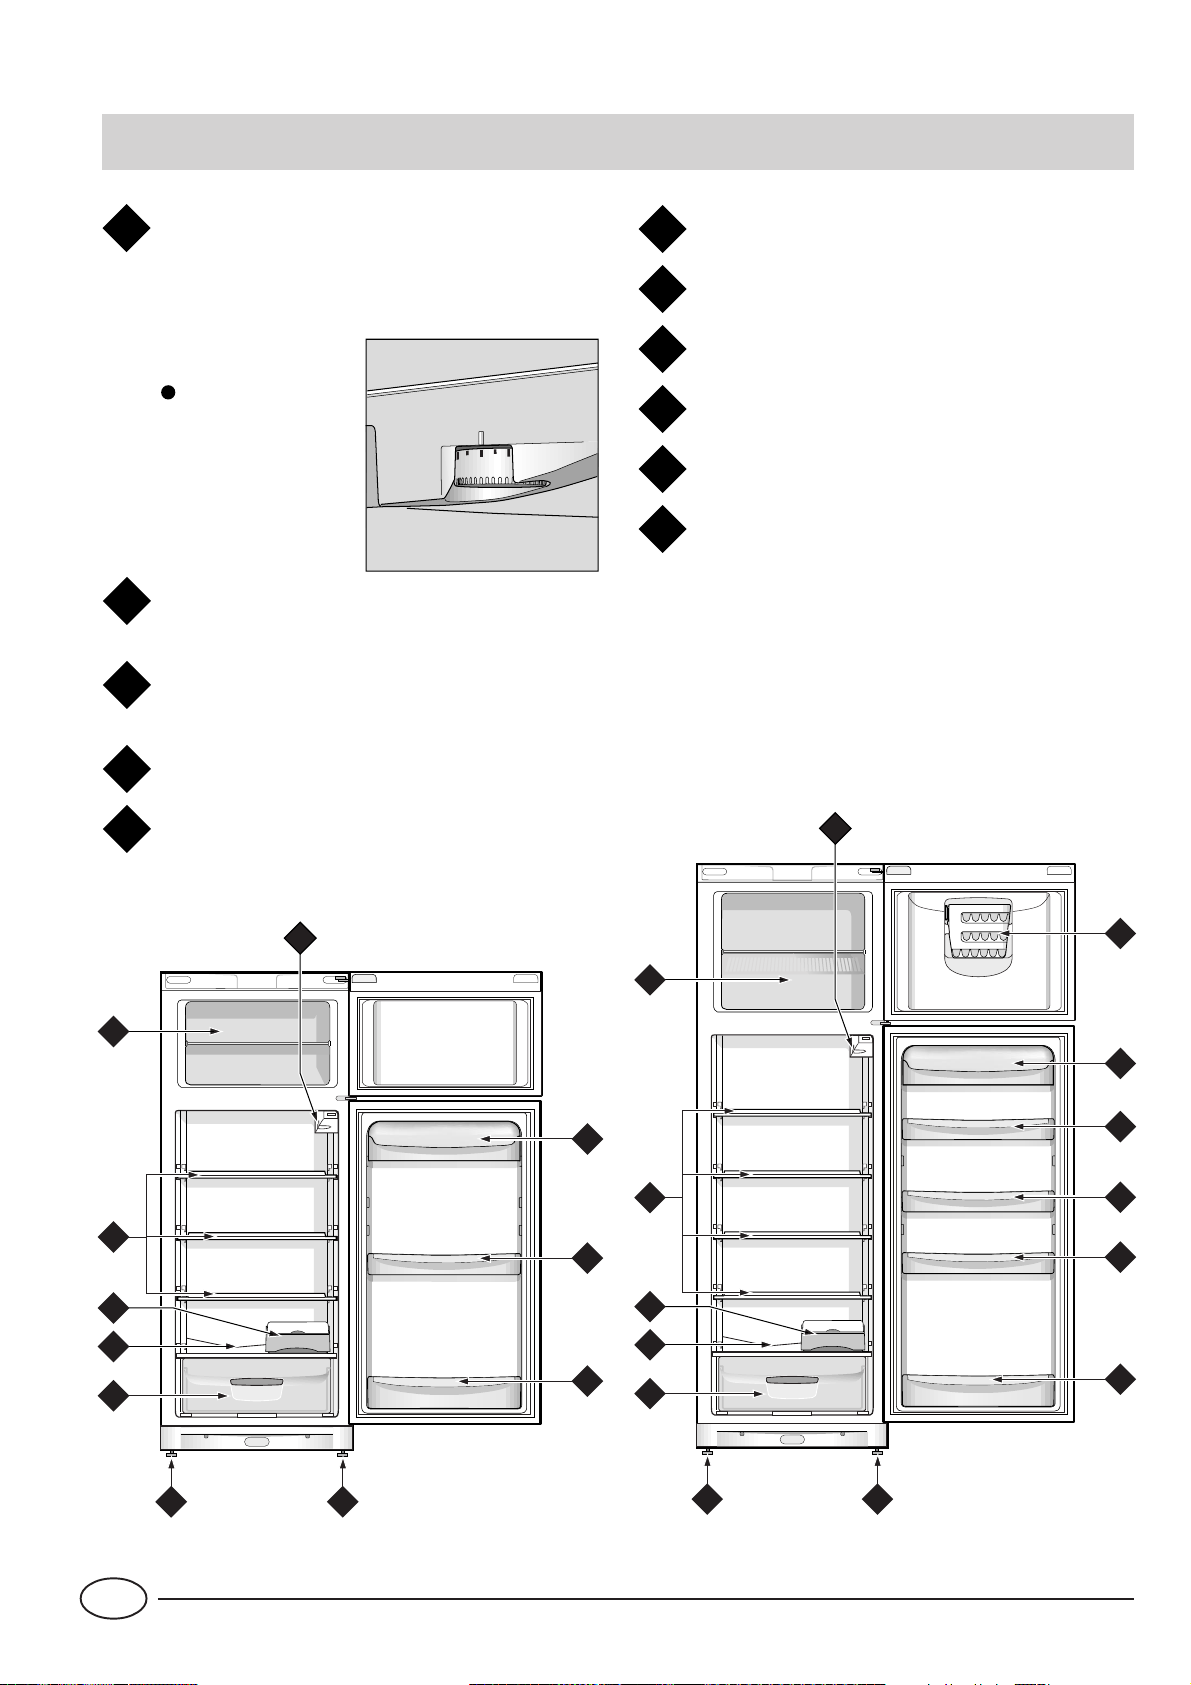
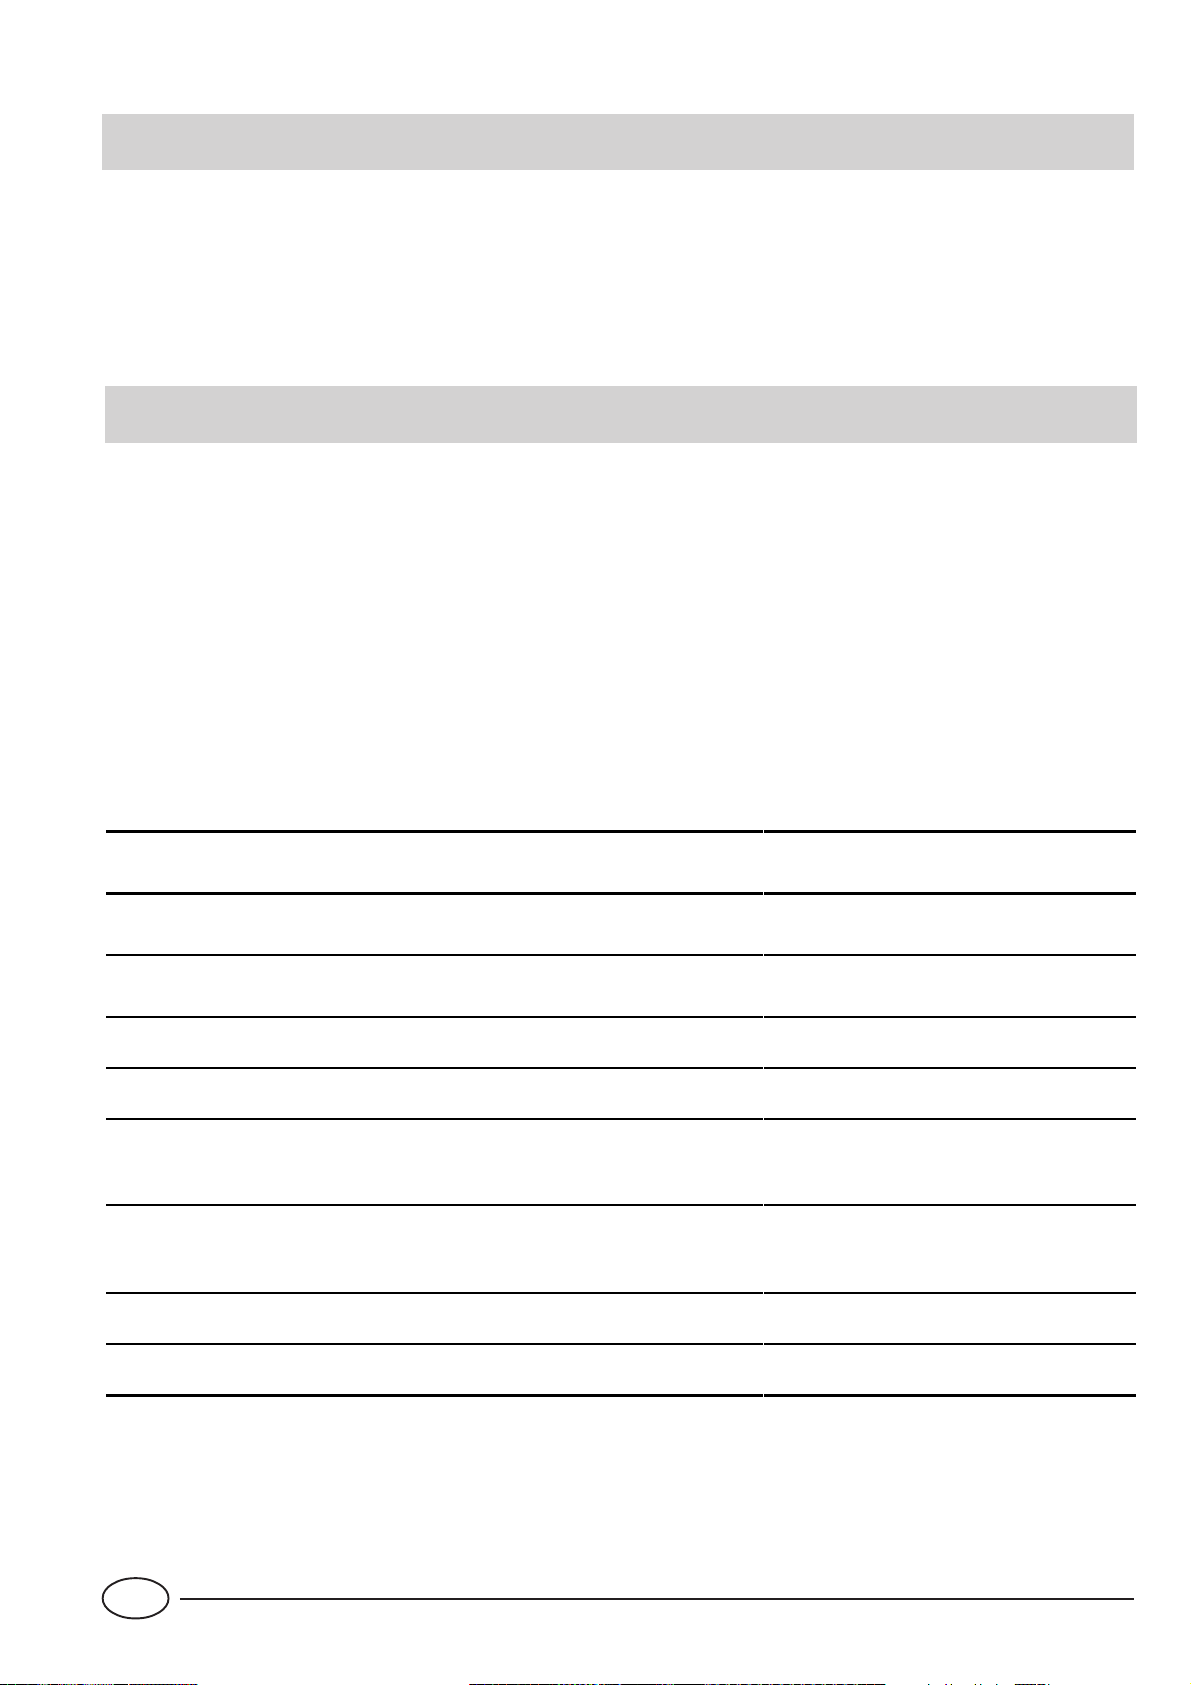
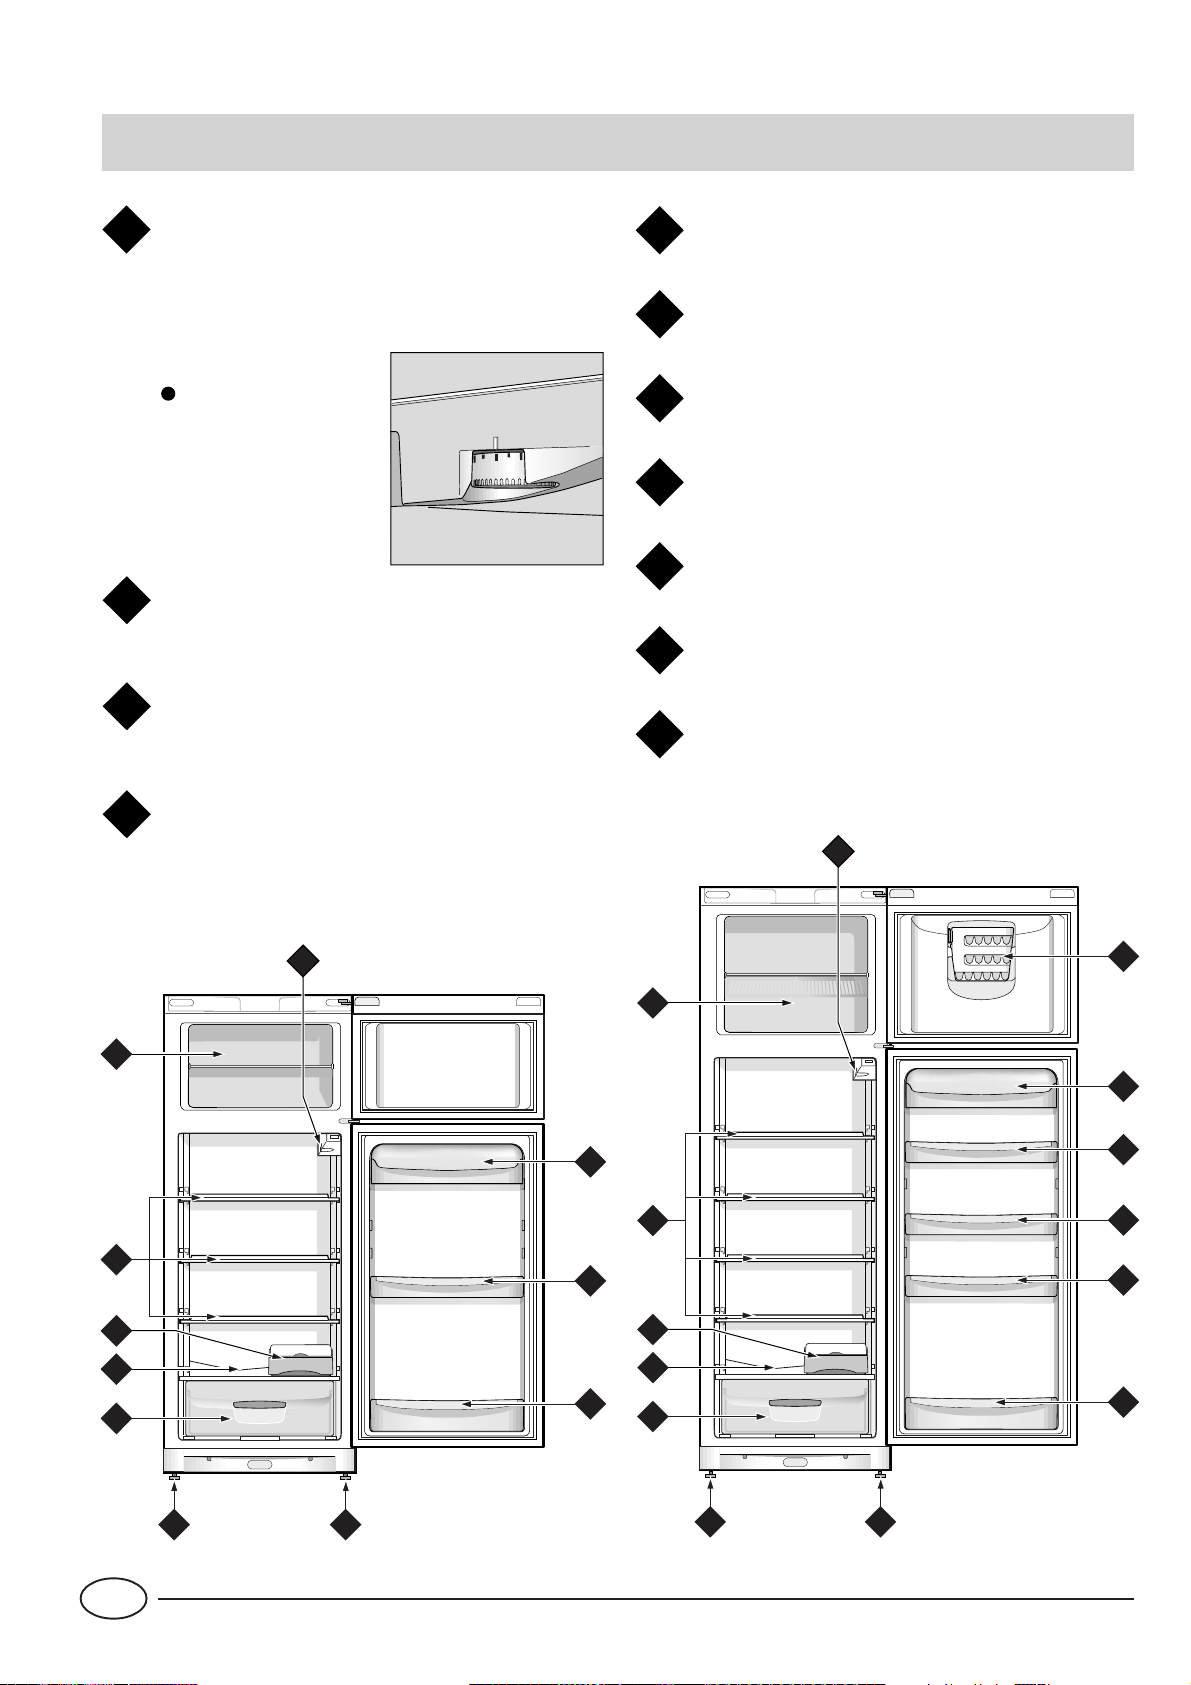
Visto da vicino
Manopola per la regolazione della
A
temperatura
Questa manopola consente di regolare la temperatura dei due sreparti su diverse posizioni:
il frigo è spento;
1 meno freddo;
5 più freddo
3
Contenitore per produzione ghiaccio
B
(presente solo su alcuni modelli)
Balconcino estraibile con coperchio e
C
portauova
Balconcini estraibili portaoggetti
D
Piedini di regolazione
F
Cassetto per la frutta e la verdura
G
Convogliatore acqua di sbrinamento
H
Scatola per carne e formaggio
I
Ripiani estraibili e regolabili in altezza
J
Scomparto per la conservazione di cibi surgela-
K
ti, la congelazione dei cibi freschi e la produzione del ghiaccio
Balconcino estraibile per bottiglie con
E
fermabottiglie
A
K
J
I
H
G
A
B
K
C
C
J
D
I
H
E
G
D
D
D
E
FF
I
2
FF
Page 5

Come avviare l'apparecchio
ATTENZIONE
Dopo il trasporto, posizionare l’apparecchio verticalmente ed attendere circa 3 ore prima di collegarlo alla presa
di corrente per favorire un buon funzionamento.
Prima di mettere gli alimenti nel frigorifero o nel freezer pulite bene l’interno con acqua tiepida e bicarbonato.
Dopo aver collegato la spina alla presa di corrente accertarvi
che la lampada di illuminazione sia accesa quindi ruotare la
manopola per la regolazione della temperatura “A” sulla
posizione “3” e dopo qualche ora potrete inserire i cibi freschi nel reparto frigo e quelli congelati nel freezer.
Come utilizzare al meglio il reparto frigorifero
La temperatura all'interno del reparto frigorifero si regola
automaticamente in base alla posizione della manopola del
termostato.
1 = meno freddo
5 = più freddo
Si consiglia, comunque, una posizione media
Per aumentare lo spazio e disposizione e migliorare l'aspetto estetico, questo apparecchio ha la "parte raffreddante"
posizionata all'interno della parete posteriore del reparto
frigo. Tale parete, durante il funzionamento, si presenterà
coperta di brina, oppure di goccioline di acqua a secondo se
il compressore è in funzione o in pausa. Non preoccupatevi
di questo! Il frigorifero sta lavorando in modo normale.
Se si imposta la manopola su numeri alti, con notevoli
quantitativi di cibi e con una temperatura ambiente elevata, l'apparecchio può funzionare di continuo favorendo la
formazione di brina sulla parete posteriore raffreddante con
conseguente aumento di consumo di energia elettrica.
Per ovviare a questo inconveniente è sufficiente spostare la manopola del termostato verso i numeri più
bassi in modo da permettere all'apparecchio un regolare sbrinamento automatico.
Guida alla sistemazione e conservazione dei cibi nel reparto frigorifero
Cibo
Carne e pesce pulito
(avvolgere in sacchetti o fogli di plastica)
Formaggi freschi 3 o 4 giorni
Uova 1 mese Nell'apposito contenitore della controporta
Burro e margarine Nel balconcino della controporta
Cibi cotti (chiudere in recipienti ermetici ed
introdurre dopo il raffreddamento)
Salumi crudi, pane in cassetta, cioccolata,
pasticcini alla crema, pomodori, ecc.
Bottiglie, latte, bibite, yogurt Negli appositi balconcini della controporta
Frutta e verdura Nella verduriera
Tempo di
conservazione
2 o 3 giorni
3 o 4 giorni Su qualsiasi ripiano
3 o 4 giorni Su qualsiasi ripiano
Disposizione nel frigo
Sopra la verduriera
(zona più fredda)
Sopra la verduriera
(zona più fredda)
Cosa non va in frigorifero
L’aglio (trasmette gli odori), la cipolla e i porri.
Le banane (anneriscono).
Gli agrumi (meglio al fresco, sul balcone).
Patate e tuberi (solo buio e niente umidità).
3
I
Page 6
- All’interno del frigorifero l’aria circola in modo naturale e
1
2
quella più fredda tende a scendere perché più pesante. Ecco
perché carne e formaggi è bene che siano posti sopra la
verduriera.
- Seguite attentamente i nostri consigli sulla durata massima della conservazione: qualsiasi cibo, anche il più fresco,
non rimane intatto molto a lungo.
- Contrariamente a quanto si crede, i cibi cotti non si mantengono più a lungo di quelli crudi.
- Non inserite i liquidi in recipienti scoperti perché provocherebbero l'aumento di umidità all'interno del frigorifero e di
conseguenza la formazione di brina.
- Inserite soltanto alimenti freddi o, al massimo, appena tiepidi, evitando di inserire quelli caldi: alzerebbero subito la
temperatura interna costringendo il compressore ad un
surlavoro che spreca tanta energia elettrica.
- Fate attenzione a non mettere contenitori (plastica,
vetro), cibi ed altro a diretto contatto della parete refrigerante (quella posteriore). Ciò potrebbe danneggiare i cibi, far aumentare i consumi di energia e facilitare
la formazione di condensa (sui cibi, contenitori, ecc.).
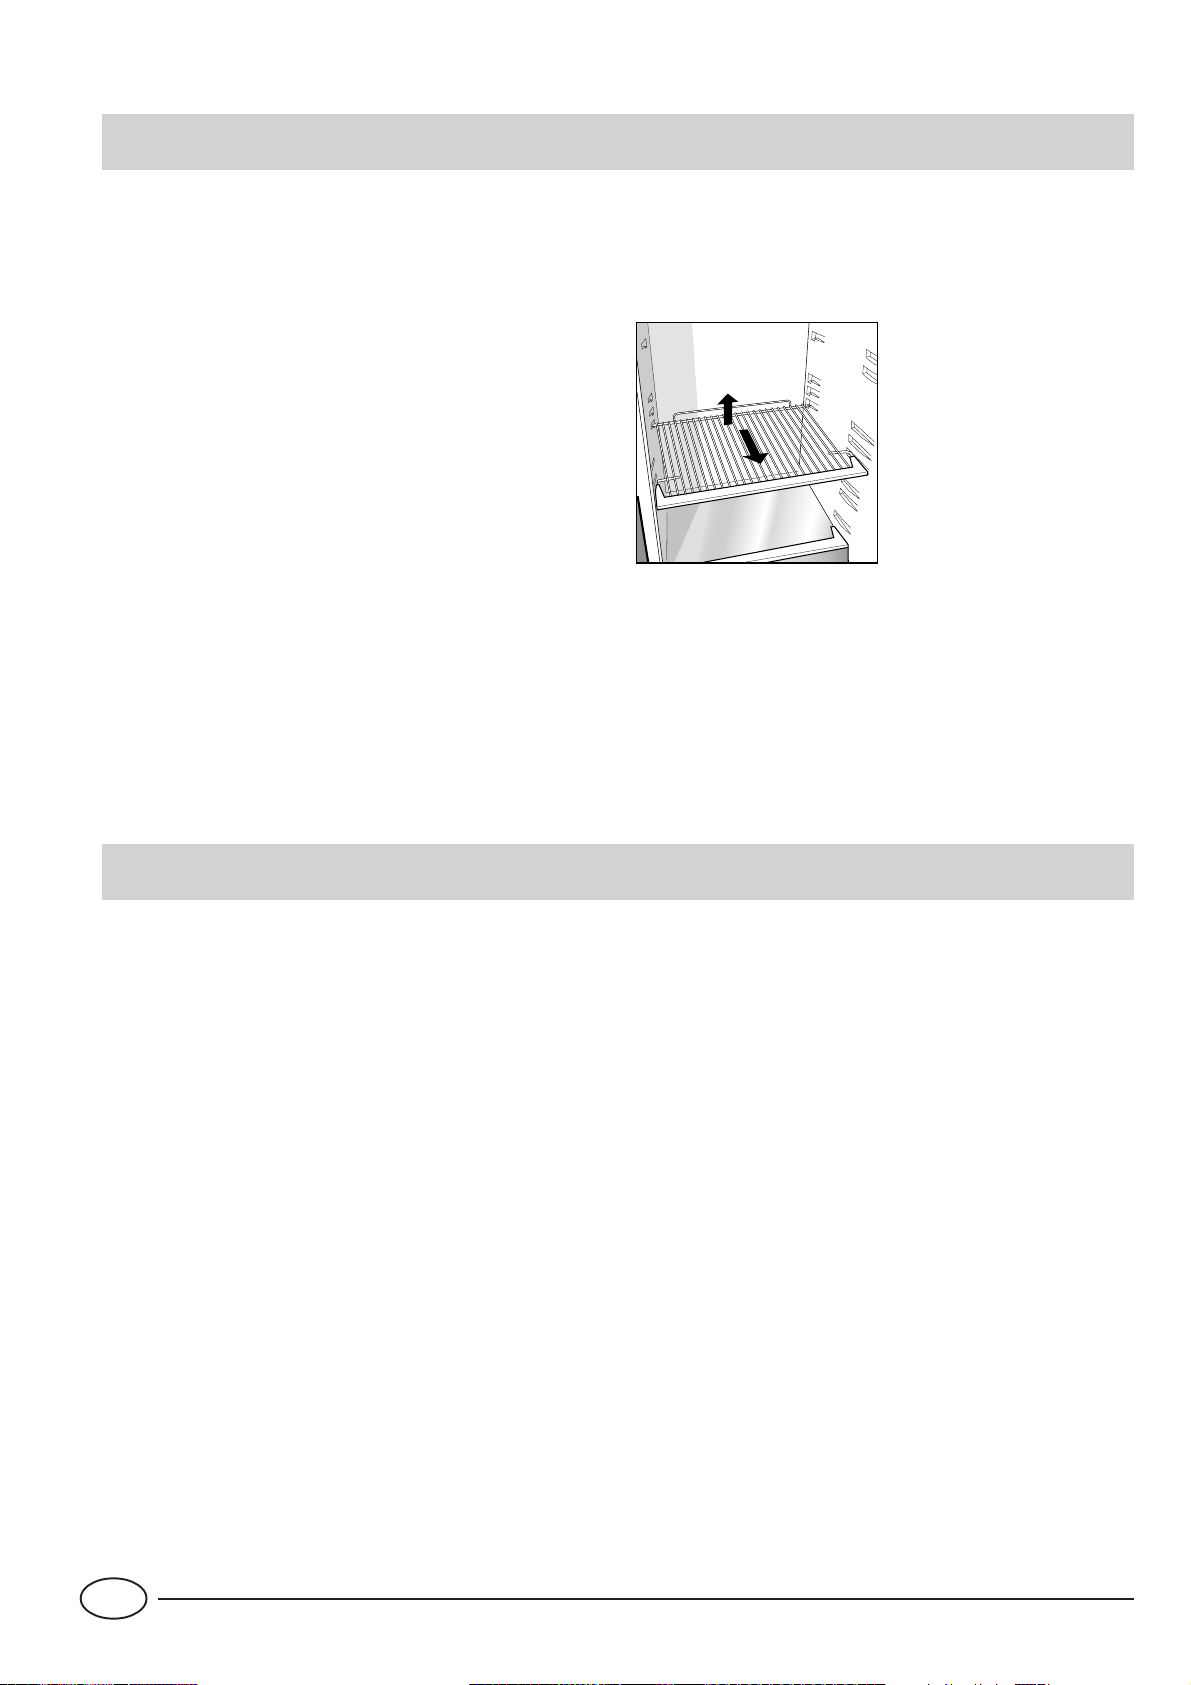
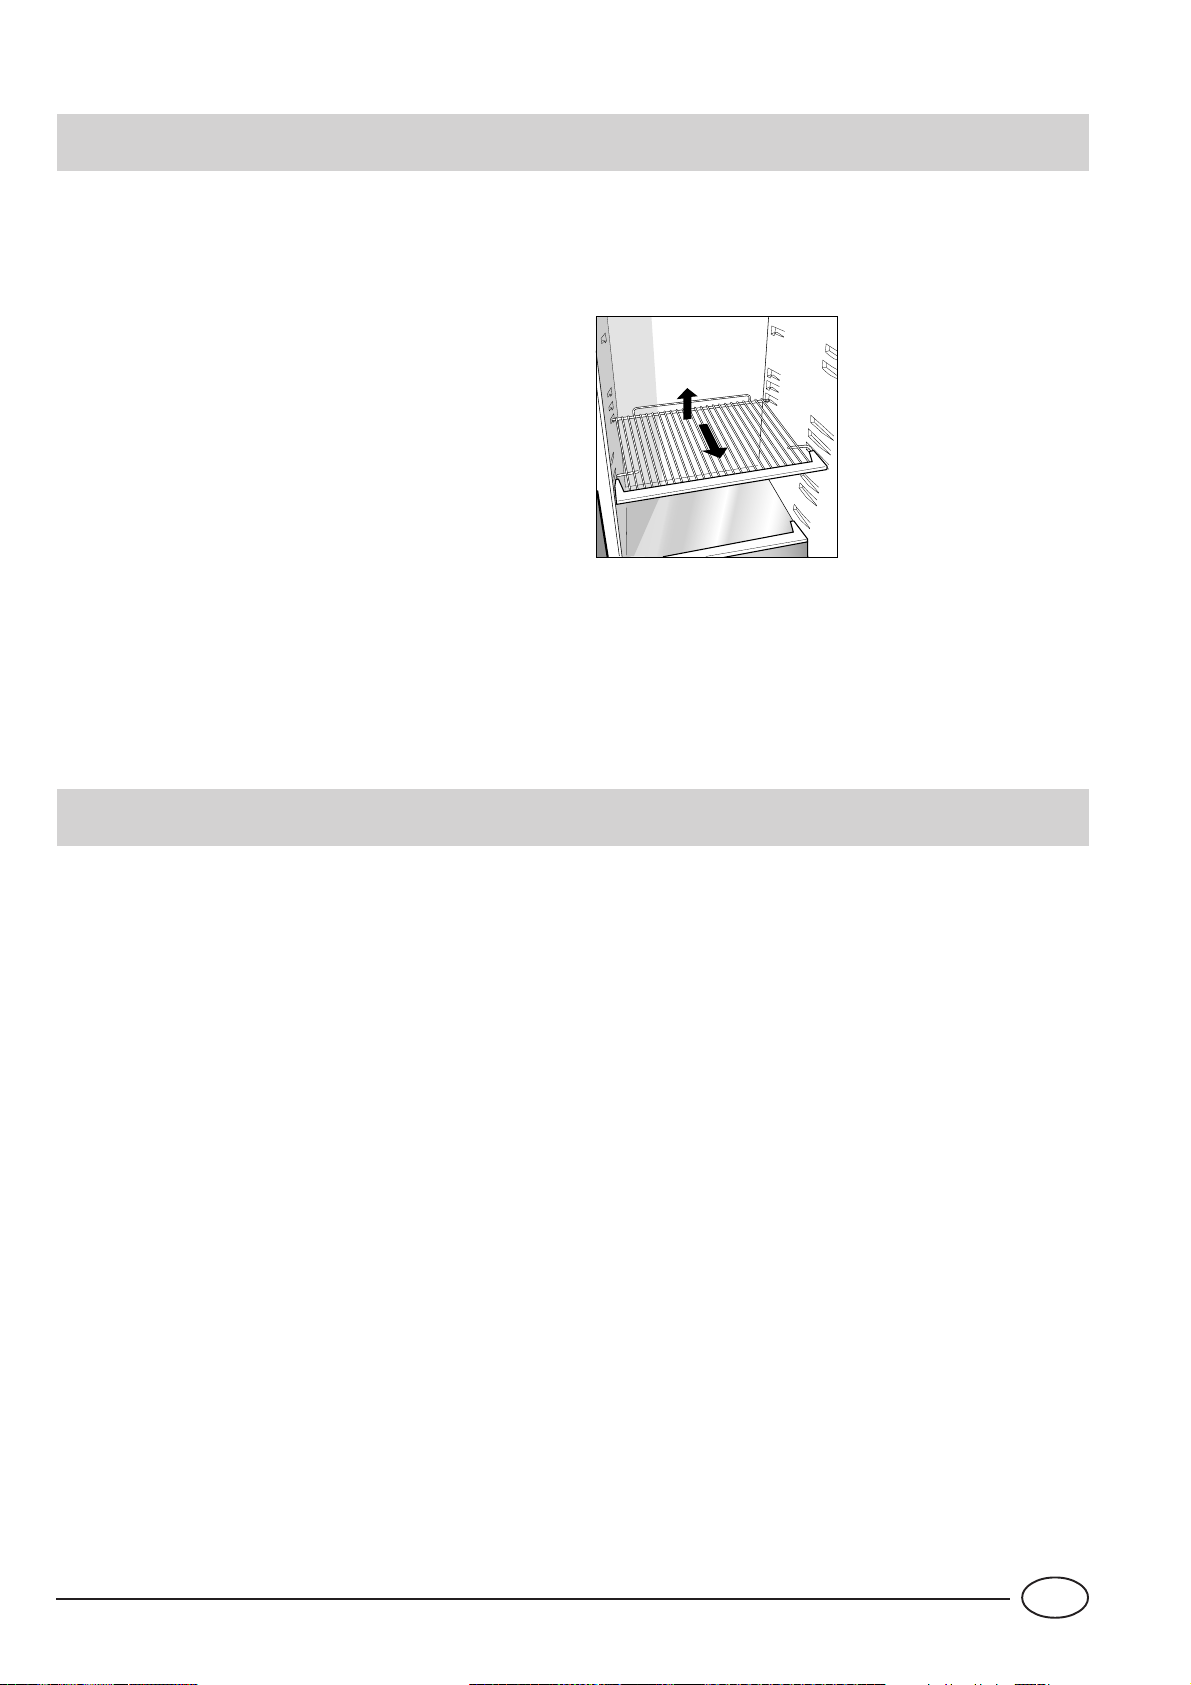
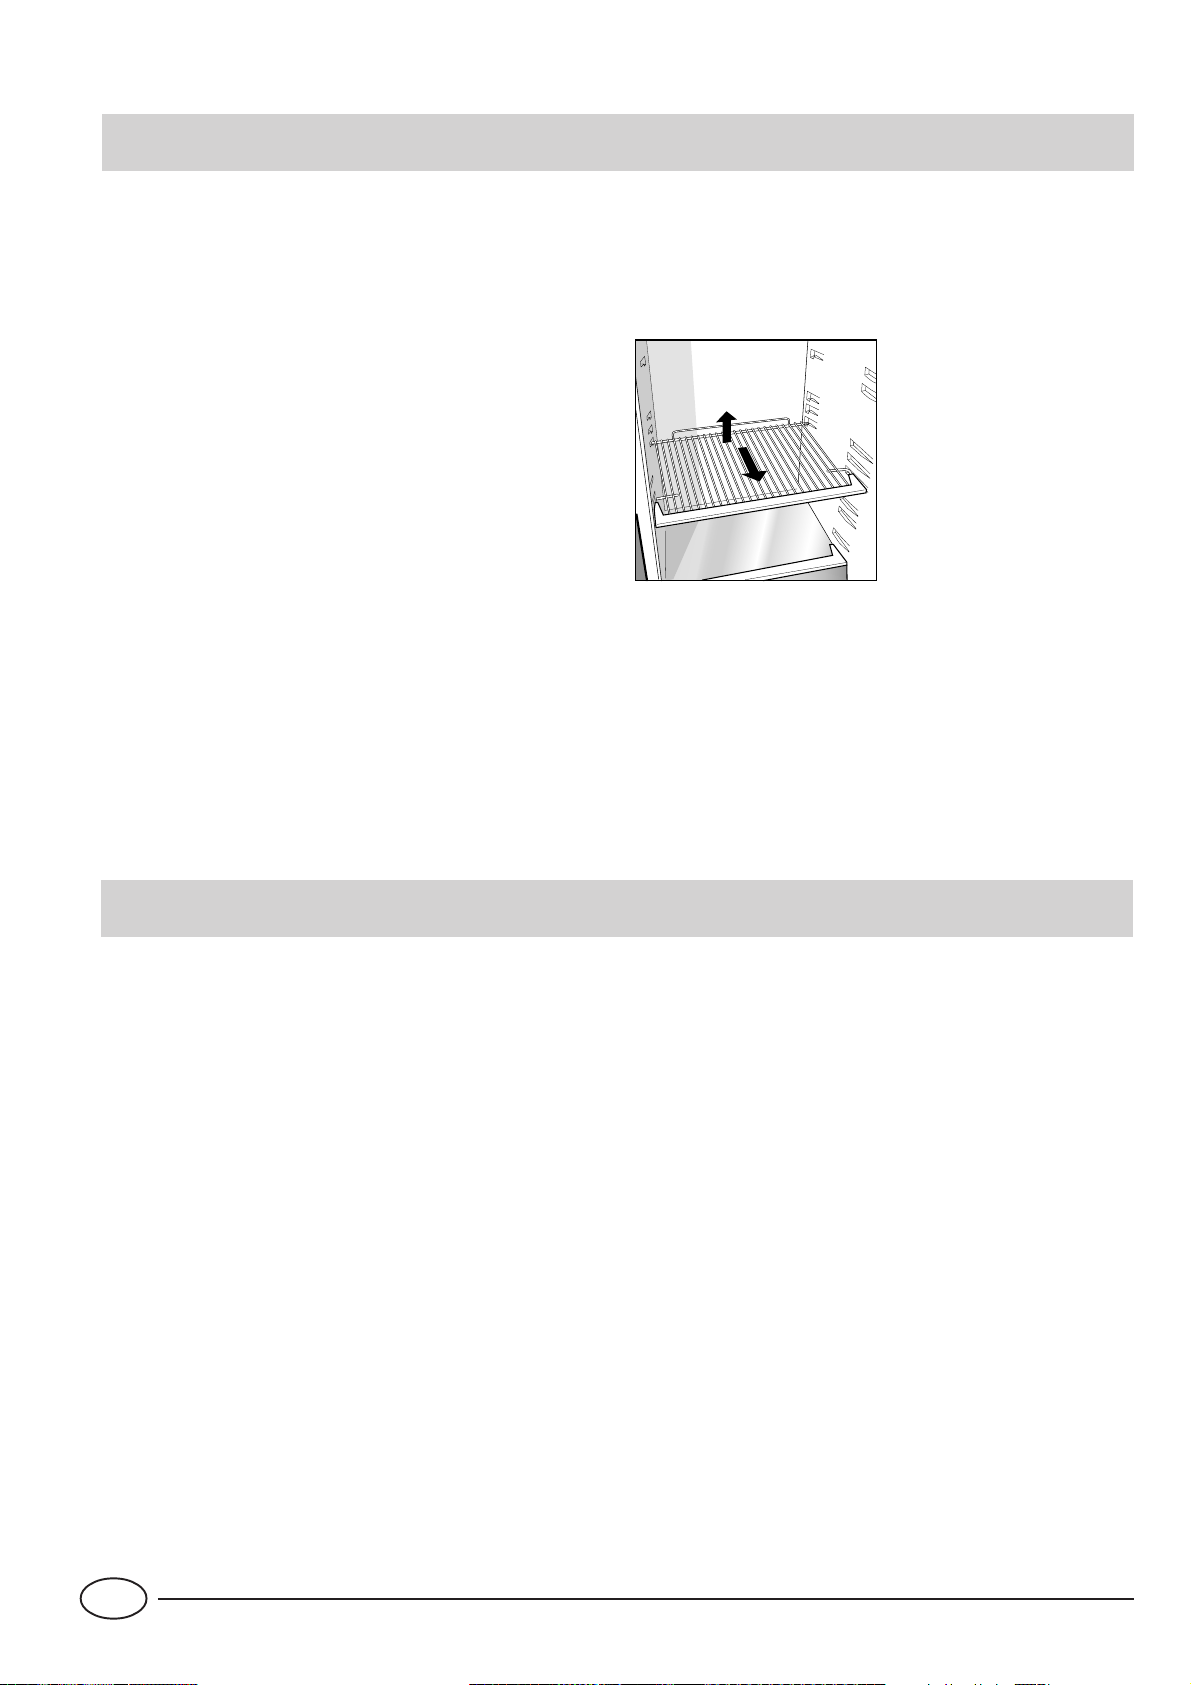
- Il reparto frigorifero è dotato di pratici ripiani estraibili (Fig.
1) e regolabili in altezza grazie alle apposite guide. Per questo è possibile inserire anche grandi contenitori e cibi di notevoli dimensioni.
Fig. 1
Per congelare bene
- Per la preparazione dei cibi da congelare consultare
un manuale specializzato.
- Un alimento scongelato, anche solo parzialmente, non deve
mai essere ricongelato: lo dovete cuocere per consumarlo
(entro 24 ore) oppure per ricongelarlo.
- Gli alimenti freschi da congelare non devono essere posti a
contatto con quelli già congelati o surgelati ma vanno messi
sopra la griglia del reparto freezer possibilmente a contatto
delle pareti (laterali e posteriore). Non bisogna infatti dimenticare che la buona conservazione degli alimenti congelati
dipende dalla velocità di congelazione.
- Durante la congelazione evitate di aprire la porta del freezer.
- La quantità massima giornaliera da congelare è indicata sulla targhetta caratteristiche posta a sinistra della verduriera.
- Per ottenere una congelazione e una successiva scongelazione ottimali è consigliabile dividere i cibi in piccole porzioni così si congeleranno rapidamente e in modo omogeneo.
Sulle confezioni riportate le indicazioni sul contenuto e sulla
data di congelamento.
- Non aprite la porta del freezer in caso di mancanza di corrente o di un guasto, ritarderete così l’aumento della temperatura al suo interno. In questo modo i surgelati e i congelati si conserveranno senza alterazioni per circa 9-14 ore.
- Non mettete nel freezer bottiglie piene: potrebbero rompersi poiché, gelandosi, tutti i liquidi aumentano di volume.
- Se per lungo tempo permane la temperatura ambiente più
fredda di 14°C, non si raggiungono completamente le temperature necessarie per una lunga conservazione nel reparto freezer e il periodo di conservazione risulterà pertanto
ridotto.
I
4
Page 7
Bacinella ghiaccio
Questo nuovo concetto di bacinella ghiaccio, è un brevetto
esclusivo Merloni. Il fatto di essere poste sulla controporta
del vano freezer assicura maggiore ergonomia e pulizia: il
ghiaccio non viene più a contatto con i cibi riposti nel vano
freezer; inoltre si evita lo sgocciolamento dell’acqua nella
fase di caricamento (in dotazione anche il coperchio per chiudere il foro dopo l’operazione di carico dell’acqua).
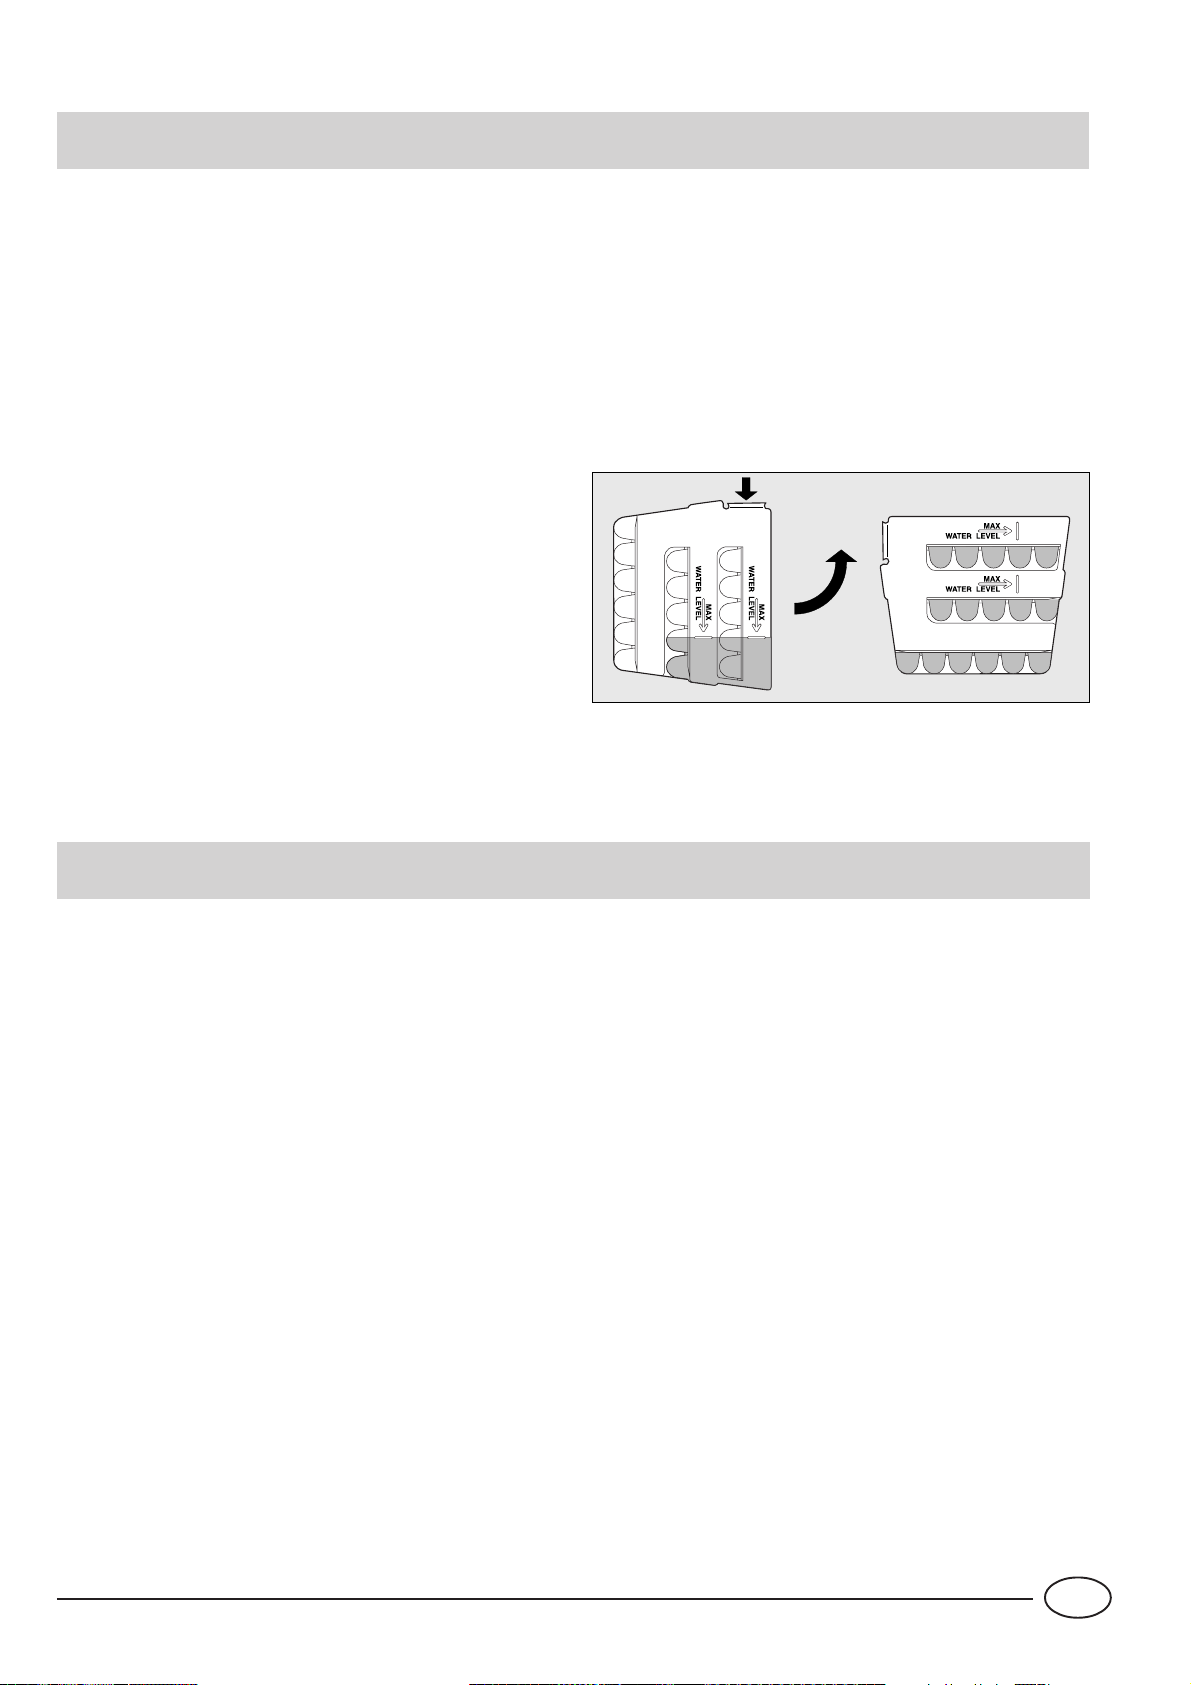
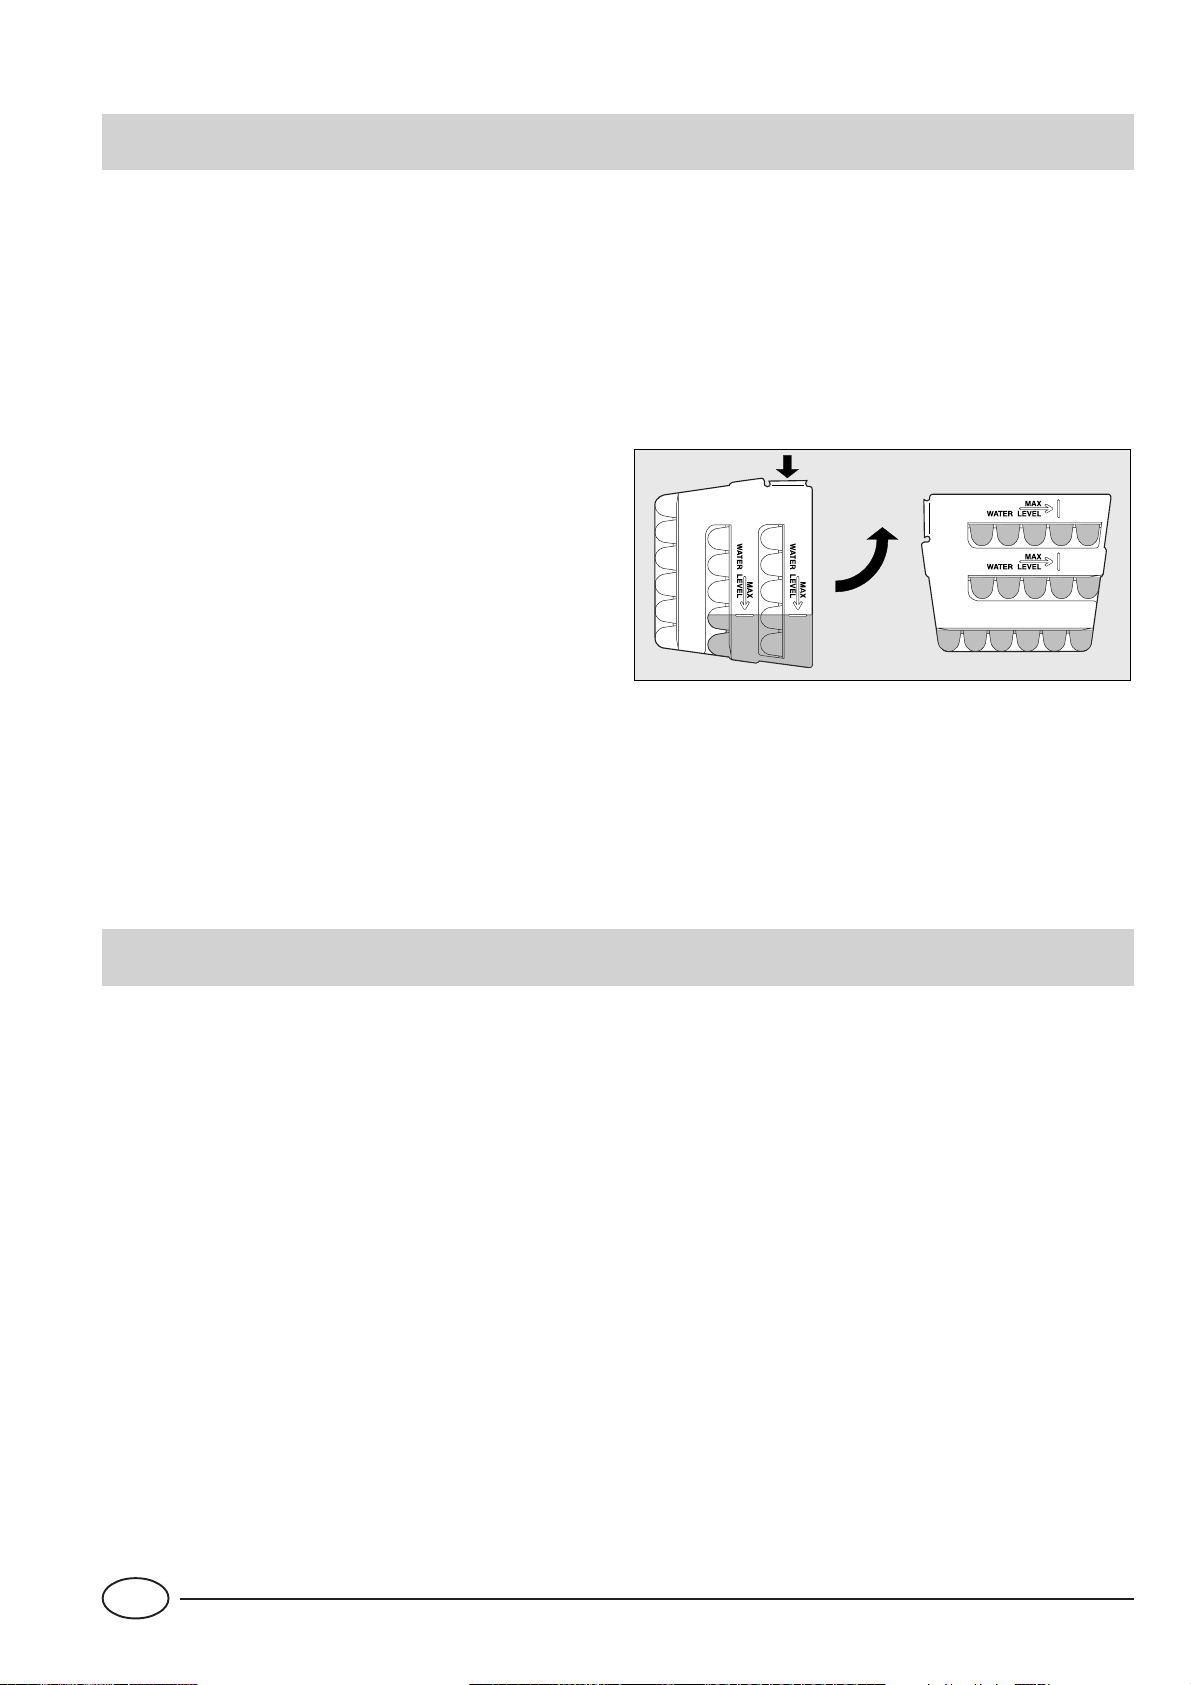
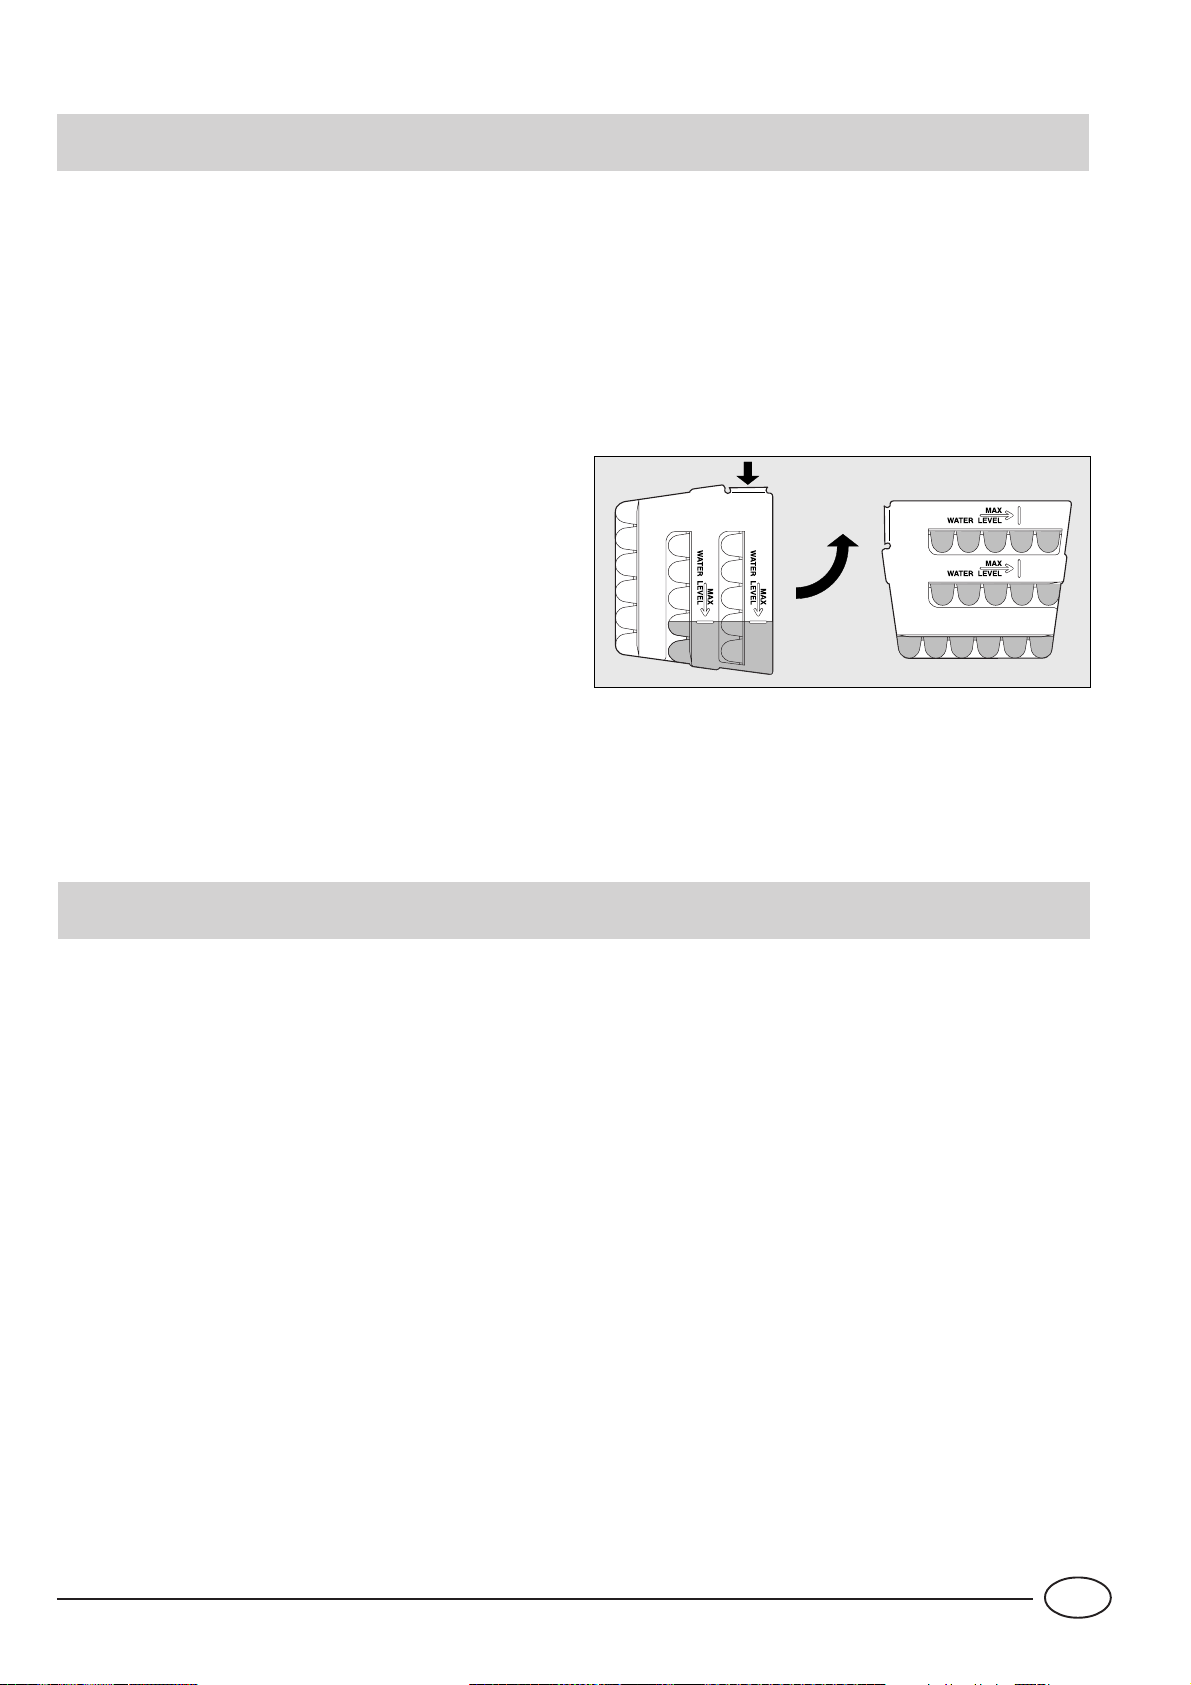
Modalità d’uso (Fig. 2)
Riempite la bacinella con acqua attraverso l’apposito foro
fino al livello indicato (MAX WATER LEVEL), prestando attenzione a non superarlo: l’inserimento dell’acqua in quantità superiore a quella necessaria, comporterà una tale formazione di ghiaccio che potrebbe ostacolare la fuoriuscita
dei ghiaccioli.
Nel caso in cui abbiate utilizzato una quantità eccessiva di
liquido, bisognerà attendere che il ghiaccio si sciolga, svuotare la bacinella, e ripetere l’operazione di carico.
Una volta effettuata l’operazione di carico attraverso il foro
indicato, ruotate la bacinella di 90 °. Per il principio dei vasi
comunicanti l’acqua va a riempire le apposite forme,
dopodichè si potrà chiudere il foro con l’apposito tappo ed
allocare la bacinella nella controporta.
Dopo che il ghiaccio si sarà formato, basterà battere la bacinella su una superficie dura affinché i ghiaccioli si stacchino
dalle loro sedi e siano fatti uscire dallo stesso foro da cui è
stata introdotta l’acqua. Per migliorare l’uscita dei ghiaccioli
bagnare con acqua l’esterno della bacinella.
ATTENZIONE: ogni volta che si effettua il caricamento con
acqua, verificare che la bacinella sia completamente vuota e
non siano presenti residui di ghiaccio.
Il tempo minimo necessario per una ottimale formazione di
ghiaccio è circa 8 ore.
Fig. 2
Consigli per risparmiare
- Installatelo bene
E cioè lontano da fonti di calore, dalla luce diretta del sole,
in locale ben aerato e con le distanze indicate nel paragrafo
"Installazione/L'aerazione".
- Il freddo giusto
Il troppo freddo fa aumentare i consumi
- Non riempitelo troppo
Per conservare bene i cibi il freddo deve circolare liberamente all’interno del frigorifero. Riempirlo troppo significa impedire questa circolazione facendo lavorare di continuo il
compressore.
- A porte chiuse
Aprite il vostro frigorifero il meno possibile perché ogni volta
che lo fate va via gran parte dell’aria fredda. Per ristabilire la
temperatura il motore deve lavorare a lungo consumando
molta energia.
- Occhio alle guarnizioni
Mantenetele efficienti e pulite in modo che aderiscano bene
alle porte; solo così non lasceranno uscire nemmeno un po’
di freddo.
- Niente cibi caldi
Una pentola calda messa nel frigorifero alza immediatamente
la temperatura di diversi gradi, lasciatela raffreddare a temperatura ambiente prima di introdurla nel frigorifero.
- Brina nel freezer
Controllate lo spessore della brina sulle pareti del freezer ed
effettuate subito lo sbrinamento se lo strato è diventato troppo spesso (Vedi più avanti “Come tenerlo in forma”).
5
I
Page 8
Come tenerlo in forma
Sbrinamento
ATTENZIONE: non danneggiare il circuito refrigerante.
Fare attenzione a non usare dispositivi meccanici o altri utensili per accelerare il processo di sbrinamento,
oltre a quelli raccomandati dal costruttore.
Come sbrinare il reparto frigorifero.
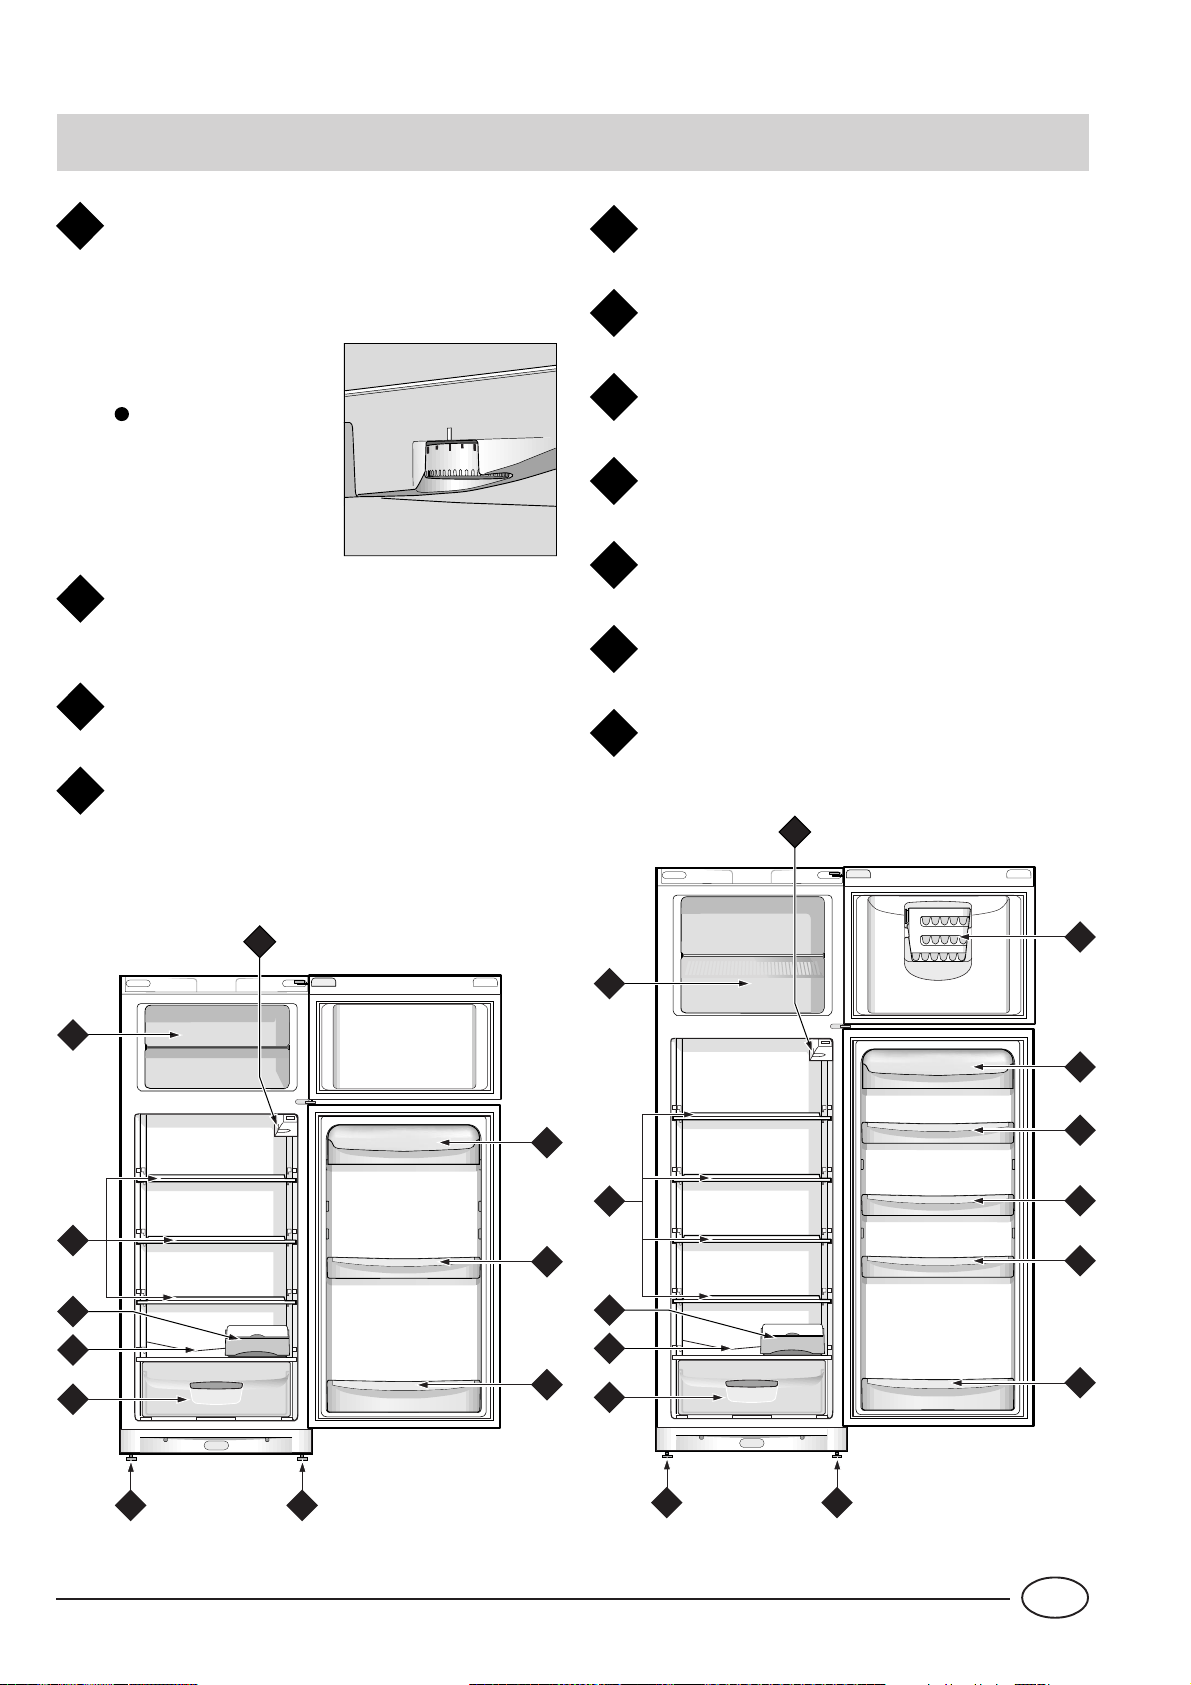
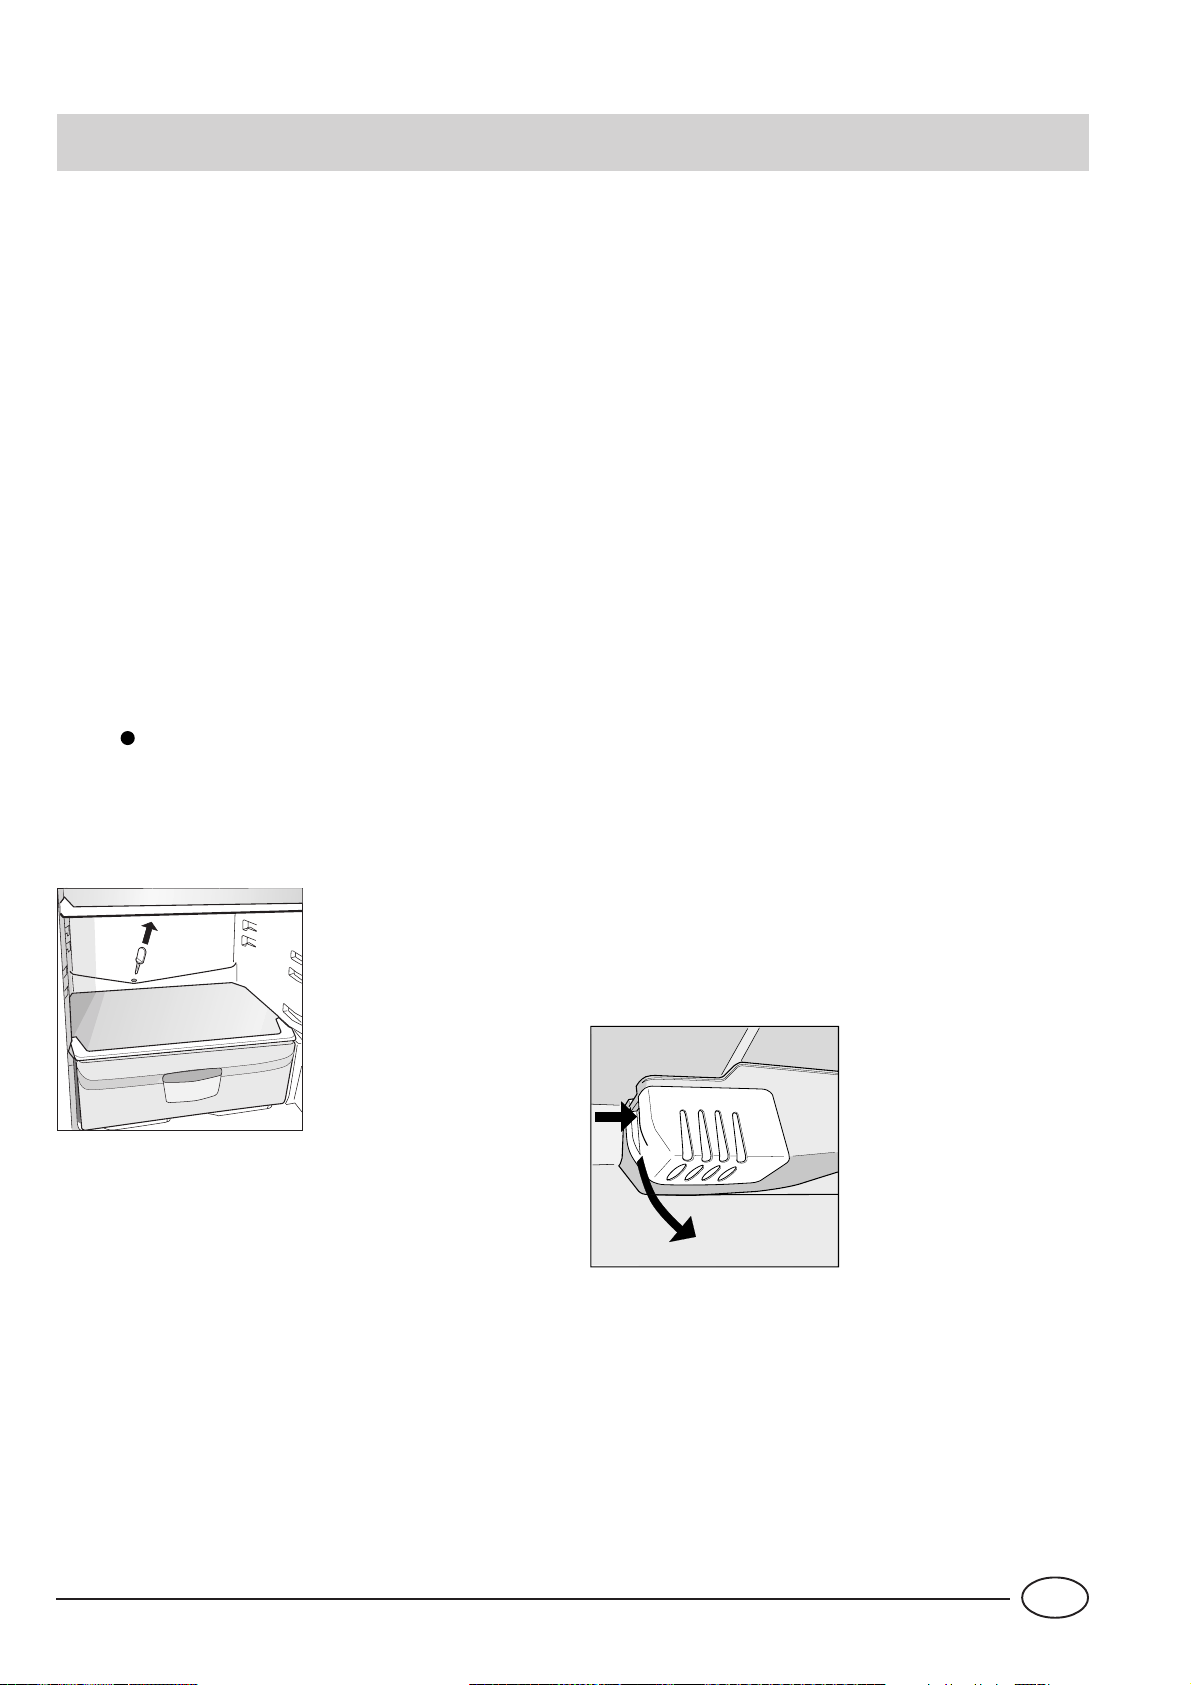
Questo apparecchio ha lo sbrinamento automatico e l’acqua viene convogliata verso la parte posteriore da un apposito scarico (fig. 3) dove il calore prodotto dal compressore
la fa evaporare. L’unico intervento che dovete fare periodicamente consiste nel pulire il foro di scarico che si trova dietro le verduriere affinché l’acqua passi regolarmente.
Come sbrinare il reparto freezer
- Eliminate ogni tanto la brina con l’apposito raschietto in
dotazione (niente coltelli od oggetti metallici).
- Se la brina ha superato i 5 mm bisogna fare lo sbrinamento.
Procedete così: posizionare la manopola per la regolazione
delle temperature A nella posizione ; avvolgete tutti i surgelati e i congelati in carta da giornale mettendoli o in frigorifero o in un luogo fresco. Lasciate aperta la porta in modo
che la brina si sciolga del tutto, aiutandola con dei contenitori pieni di acqua tiepida.
Pulizia e manutenzioni particolari
Prima di pulire il frigorifero staccate sempre la spina
dalla presa.
- I materiali con i quali è stato fabbricato il vostro apparecchio sono igienici e non trasmettono odori ma per mantenere queste qualità è necessario che i cibi vengano sempre
protetti e ben chiusi, per evitare macchie difficilmente rimovibili o la creazione di cattivi odori.
- Solo acqua e bicarbonato. Per pulire sia l’interno che l’esterno usate una spugnetta con acqua tiepida e bicarbonato di
sodio che, tra l’altro, è anche un buon disinfettante. Se non
l’avete in casa potete impiegare del sapone neutro (quello di
Marsiglia ad esempio).
- Cosa non usare. Mai abrasivi, mai candeggina, mai ammoniaca. Proibitissimi i solventi e altri prodotti simili.
- Tutto ciò che si può togliere, mettetelo a bagno in acqua
calda con sapone o detersivo per i piatti. E prima di rimetterli a posto, risciacquateli e asciugateli bene.
- E per il retro? Qui la polvere si ferma e si concentra provocando qualche problema al buon funzionamento dell’apparecchio. Usate la bocchetta lunga del vostro aspirapolvere,
alla potenza media, per eliminarla. E con molta delicatezza!
- Quando sta fermo a lungo. Durante il periodo estivo, se decidete di fermare il frigorifero, bisogna pulire l’interno e lasciare
le porte aperte, altrimenti si formeranno cattivi odori e muffe.
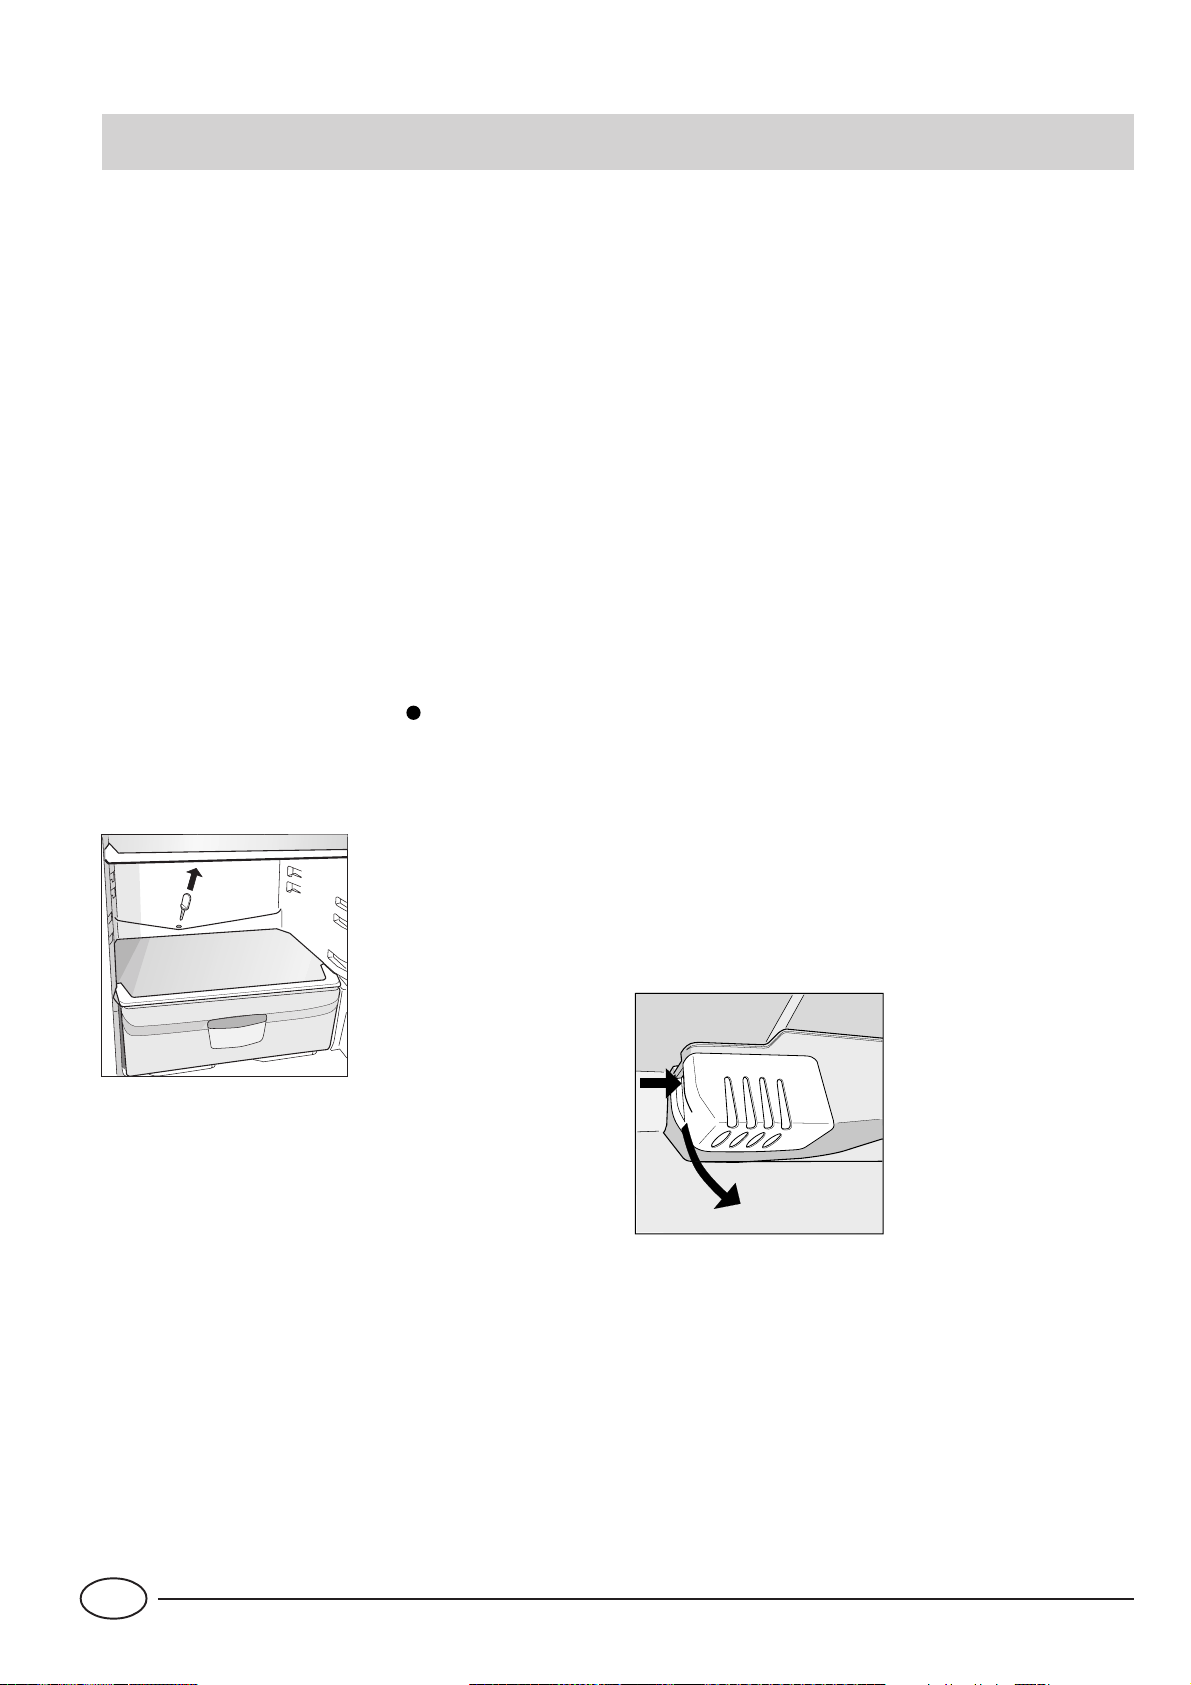
- Come sostituire la lampadina interna. Nella parte posteriore della scatola termostato è posta la lampada di illuminazione interna. In caso di sostituzione scollegare l’apparecchio dalla rete elettrica, svitare la lampada non funzionante
e sostituirla con un’altra di potenza non superiore a quella
indicata sulla protezione (15 W o 25 W) operando come
illustrato in figura 4.
Fig. 3
I
1
2
Fig. 4
6
Page 9

C'è qualche problema
Il frigorifero non funziona.
Avete controllato se:
· l’interruttore generale dell’appartamento è disinserito;
· la spina non è correttamente inserita nella presa di corren-
te;
· la presa non è efficiente; provate a collegare la spina ad
un’altra presa del locale.
Il frigorifero e il freezer raffreddano poco.
Avete controllato se:
· le porte non chiudono bene o le guarnizioni sono rovinate;
· le porte rimangono aperte per lungo tempo;
· la manopola di regolazione della temperatura non è in
posizione corretta;
· il frigorifero o il freezer sono stati riempiti eccessivamente.
Nel frigorifero gli alimenti si gelano troppo.
Avete controllato se:
· la manopola di regolazione della temperatura non è in
posizione corretta;
· gli alimenti sono a contatto con la parte posteriore, la più
fredda.
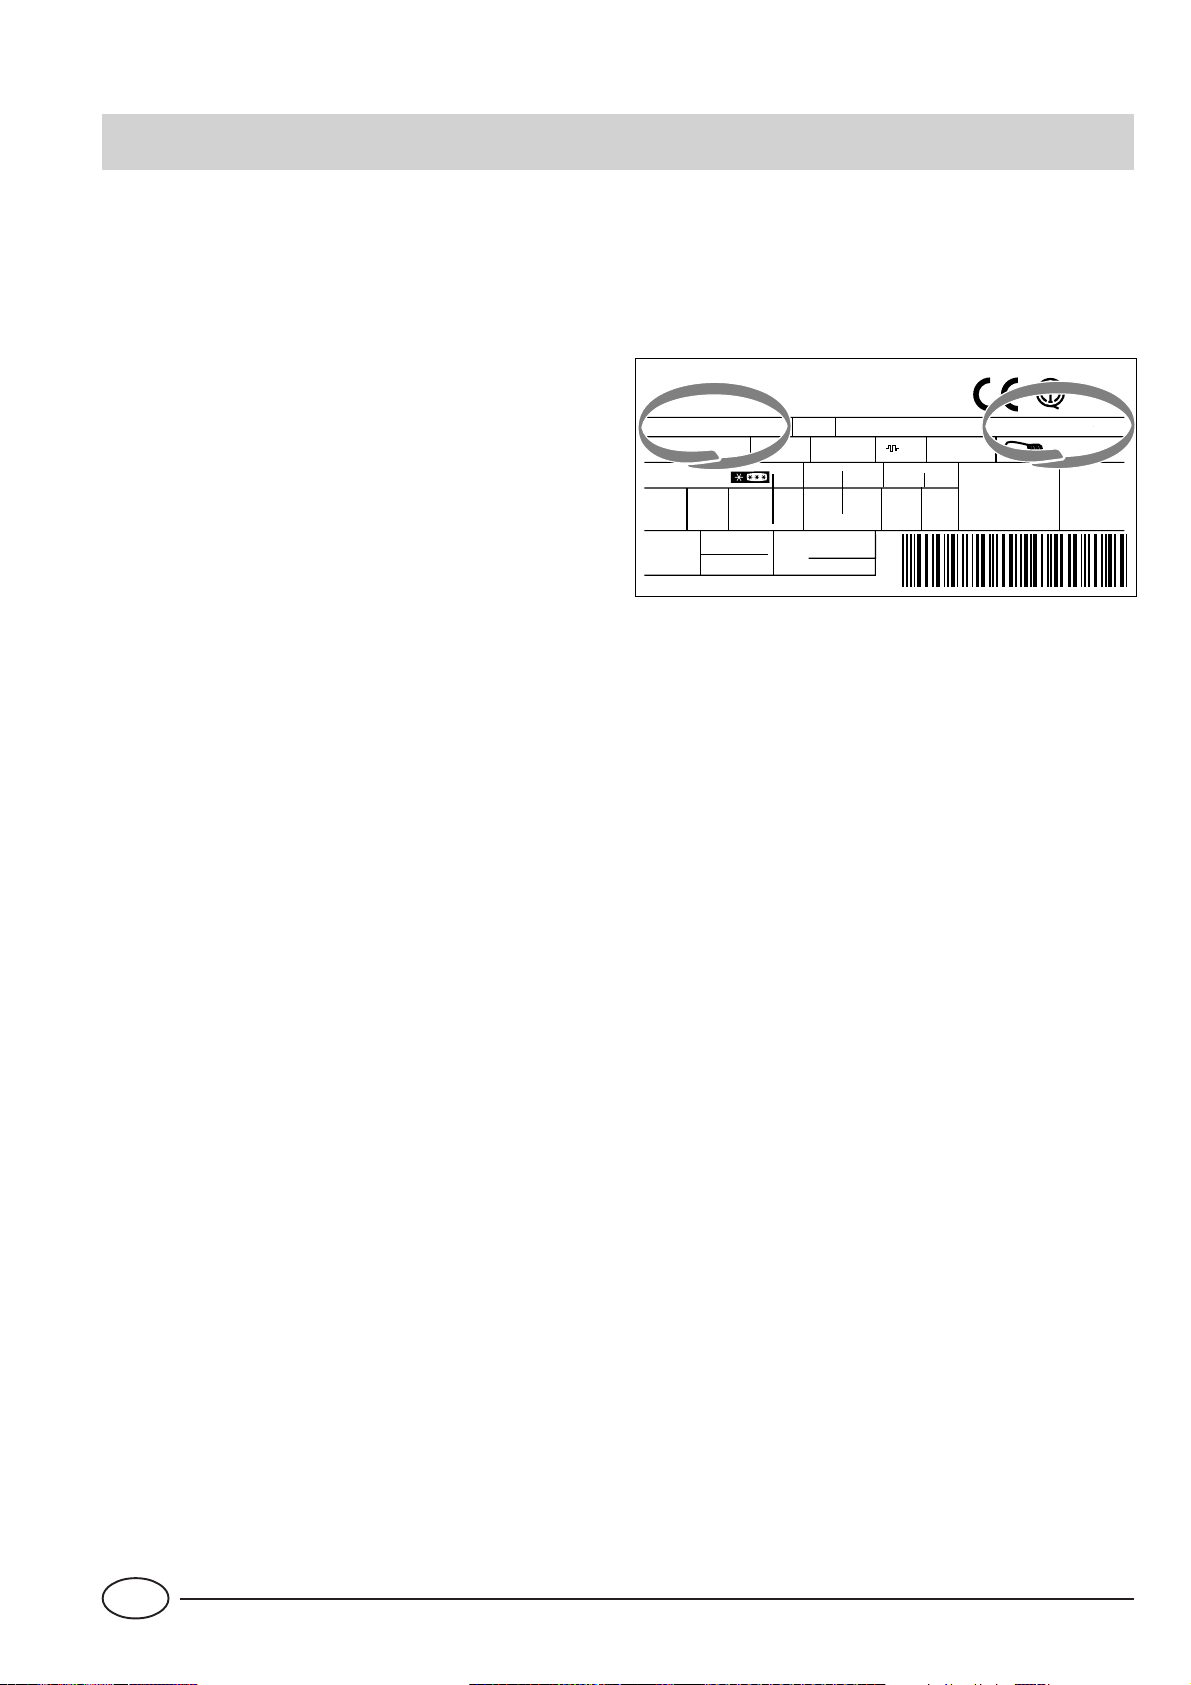
Se, nonostante tutti i controlli, l’apparecchio non funziona e
l’inconveniente da voi rilevato continua ad esserci, chiamate il Centro di Assistenza più vicino, comunicando queste
informazioni: il tipo di guasto, la sigla del modello (Mod.) e
i relativi numeri (S/N) scritti sulla targhetta delle caratteristiche posta in basso a sinistra, accanto alla verduriera (vedi
esempi nelle figure seguenti).
75
Test
P.S-I.
TI
Net
Util
Utile
Pressure
HIGH-235
LOW 140
RG 2330
Mod.
220 - 240 V- 50 Hz 150 W
340
Total
Gross
Bruto
Brut
Compr.
Syst.
Kompr.
Made in Italy 13918
Gross
Bruto
Brut
R 134 a
kg 0,090
93139180000 S/N 704211801
Cod.
Gross
Bruto
Brut
W
Fuse
A
Freez. Capac
Poder de Cong
kg/24 h
4,0
Max 15 w
Class
Clase
N
Classe
Non ricorrete mai a tecnici non autorizzati e rifiutate
sempre l’installazione di pezzi di ricambio non originali.
Il motore funziona in continuo.
Avete controllato se:
· le porte non sono ben chiuse o sono rimaste aperte per
lungo tempo;
· la temperatura esterna è molto alta;
· la manopola di regolazione della temperatura non è in
posizione corretta.
L’apparecchio emette troppo rumore.
Il gas refrigerante interno produce un leggero rumore anche quando il compressore è fermo (non è un difetto).
Avete controllato se:
· Il frigorifero non è posto ben in piano:
· è stato installato tra mobili o oggetti che vibrano ed emet-
tono rumori;
Sul fondo del frigorifero c’è dell’acqua.
Avete controllato se:
· il foro dello scarico dell’acqua di sbrinamento è otturato
(vedi fig. 3).
7
I
Page 10

Safety - a good habit to get into.
ATTENTION
Read your manual carefully since it contains instructions which
will ensure safe installation, use and maintenance of your
appliance.
Your Refrigerator is built to International safety standards
(EN60) and has been awarded the European approval mark
(IMQ) for compliance with UK electrical safety requirements.
It also meets the EC standards on the prevention and elimination of r adio interference (EC directive 87/308 - 02.06.89).
1. This appliance is designed to be used indoors and under
no circumstances should it be installed outside even if protected by a roof. Leaving the appliance exposed to the rain
and whether is exceedingly dangerous.
2. The appliance should be used only by adults and exclusively for storing foodstuffs in compliance with the instructions provided in this manual. Under no circumstances should
children be allowed to operate, or tamper with, this product.
3. Do not attempt to operate or handle this appliance when
barefoot, or with wet hands or feet.
4. It is highly recommended that you do not operate this
appliance by connecting it to the power supply with extensions or multiple socket plugs. If the refrigerator has been
installed between two cabinets, make sure that the supply
chord is not dangerously crimped or trapped beneath a heavy
object.
5. Never pull the cable or the appliance to remove the plug
from the socket; this is exceedingly dangerous.
6. Do not touch the internal cooling elements, especially if
your hands are wet, since you could burn or hurt yourself.
7. Before doing any cleaning, disconnect the appliance from
the electricity (by pulling out the plug or turning off the general switch in your home); it is not sufficient to place the
temperature regulation knob on to cut off the power.
8. Before disposing of your old appliance, remember to break
or remove the lock as a safety measure to protect children
who might lock themselves inside the appliance when playing. In addition, if the appliance is a new one with a lock,
keeo the key out of the reach of small children.
9. If your appliance is not operating properly, read the chapter entitled, “Trouble Shooting”, which might help you resolve the problem, before calling an after-sales service centre. Do not attempt to repair the appliance by tampering
with the internal components.
10. If the power supply cord must be replaced, please
contact one of our Customer Service Centers. In some
cases, the connections are made using special terminals
and in others a special tool must be used to access the
connections.
11. Do not use electric appliances inside the compartment
for food storage, if these are not those recommended by the
manufacturer.
12. At the end of the functional life of your appliance –
containing cyclopentane gas in the insulation foam and
perhaps gas R600a (isobutane) in the refrigeration circuit –
the latter should made safe before being sent to the dump.
For this operation, please contact your dealer or the Local
Organisation in charge of waste disposal.
Installation
Proper installation of the appliance is essential to ensure the best and most efficient performance of your
appliance.
Ventilation
The compressor and condenser generate heat and, therefore, need to be ventilated properly. Rooms with less than
perfect ventilation are not very suited for installation of the
appliance. Therefore, it should be installed in a room with
an opening (window or French window) that provide the
appropriate amount of air re-circulation. It is also important
that the room not be too humid.
During installation, make sure not to cover or obstruct the
grates that allow for proper ventilation of the appliance.
For proper ventilation of the appliance, you must leave:
- a space of at least 10 cm between the top part and any
cabinets above it;
- a space of at least 5 cm between the sides of the appliance
and any adjacent cabinets/walls.
Away from Heat
Avoid positioning the appliance in a place where it is
directly exposed to sunlight or near an oven, cook top
GB
8
or the like.
Levelling
The floor should be perfectly level; if not, you can adjust the
feet at the front of the appliance.
Earthing
Before making the electrical connection, check that the voltage shown on the data plate, that you will find on the bottom left hand side of the appliance next to the crisper, corresponds to that of your home and that the socket is earthed in
compliance with all current electrical regulations. If the system is not earthed, the manufacturer declines all liability for
consequent damages or losses. Do not use adapters or multiple sockets. Position the appliance in such a way that
you can access the socket where it is plugged in.
Check the power load
The electrical socket must support the maximum power load
of the appliance shown on the data plate (on the bottom left
hand side of the appliance next to the crisper).
Before plugging the appliance to the mains
Stand the appliance upright and wait at least 3 hours before
plugging the appliance into the mains to ensure proper performance.
Page 11
A closer look
A
Thermostat knob for regulating
A
the temperature
Use this knob to regulate the temperature of the
refrigerator. The following settings are available:
The refrigerator is off;
1 less cold;
5 colder
Ice tray (This container is not supplied with some
B
3
Removable door shelf for bottles
E
Adjustable feet
F
Fruit and vegetable drawer
G
Drainage system for defrost water
H
Meat/cheese storage box
I
models)
Removable shelf with lid and egg compartment
C
Removable door shelf for food products
D
A
K
Removable height adjustable shelves
J
Compartment for storing frozen foods, freezing
K
fresh foods and making ice
A
B
K
C
C
J
D
D
J
D
I
H
G
FF
E
I
H
G
FF
9
D
E
GB
Page 12
How to Start the Appliance
NOTICE
After the appliance has been delivered, stand it in the
upright position and wait approximately 3 hours before connecting it to the electrical outlet to guarantee
that it operates properly.
Before placing foodstuffs in the refrigerator or freezer, clean
the interior well with warm water and baking soda.
After putting the plug in the socket, make sure that the light
is on inside the appliance and then turn the thermostat knob
(A) to the “3” setting. After a few hours have passed, you
can place fresh food in the refrigerator compartment and
frozen foods into the freezer.
How to use the refrigerator compartment...
The thermostat automatically regulates the temperature inside the appliance
1 = less cold
5 = colder
It is recommended that a medium setting be used.
To increase the amount of space, optimize arrangement and
improve appearance, this appliance has a “cooling area”
located within the back panel of the refrigerator compartment. When the appliance is operating, this panel may be
covered with frost or droplets of water depending on whether
the compressor is operating or not at a given time. Do not be
concerned about this! The refrigerator is operating normally.
If the thermostat knob is positioned on higher settings while
the refrigerator is heavily filled and the ambient temperature
high, the appliance may run continuously, resulting in the
formation of frost on the back cooling area. This will lead to
an increase in energy consumption.
To avoid this situation, just turn the thermostat knob
to a lower setting so that the appliance defrosts automatically.
Storing Food in the Refrigerator Compartment
Food Storage Time Location in the Refrigerator
Wrapped meat and cleaned fish
(use plastic wrap or pack in plastic bags)
Fresh cheese 3 or 4 days
Eggs 1 month In special egg rack on door.
Butter, margarine On any shelf.
Cooked or precooked food
(placer in air-tight containers and when cool store
in refrigerator)
Sausages, salami, sandwich meats in general, fresh
pasta, custards,puddings, chocolates, cream
pastries, bread, dry pastries, red tomatoes
Bottled products, milk, drinks, yoghurt On special door shelves.
Fruits and legumes In vegetable crisper.
2 or 3 days
3 or 4 days On any shelf.
3 or 4 days On any shelf.
On the shelf above the vegetable crisper
(which is the coldest area).
On the shelf above the vegetable crisper
(which is the coldest area).
What Not to Store in the Refrigerator
Garlic (transmits odour), onions and leeks.
Bananas (they will turn black).
Citrus fruits.
Potatoes and root vegetables (store in dark, dry places).
GB
10
Page 13
- Within the refrigerator compartment, the air circulates naturally, with the colder air falling because it is heavier. This is
the reason why meat and cheeses should be placed above
the vegetable crisper.
- Please follow our instructions carefully on maximum storage time: any food, even the freshest, will not remain edible
for any extended amount of time.
- Contrary to popular belief, cooked foods do not store any
longer than raw food.
- Do not place liquids in containers without covering them
because this will lead to an increase in the level of moisture
within the refrigerator, causing the formation of frost.
- Remember to cool hot food before storing otherwise the
temperature inside the appliance will increase, causing the
compressor to work harder and use more energy.
- Be careful not to place containers (plastic or glass),
food or other objects in direct contact with the cooling area of the back wall of the refrigerator. This could
harm the food, increase energy consumption and facilitate the formation of condensate (on food, containers, etc.).
- The refrigerator compartment is equipped with convenient,
removable shelves (Fig. 1) which can be adjusted for height
using the shelf guides. This allows you to place even large
containers and foodstuffs in the refrigerator.
1
2
Fig. 1
Freezing Foods Properly
- For the preparation of food to be frozen, please con-
sult a specialized manual.
- Food that has be thawed, even partially, must not be re-
frozen: you must cook it in order to consume it (within 24
hours) or to freeze it once again.
- Fresh foods that you intend to freeze must not be placed in
contact with those that are already frozen or those that have
been fast-frozen. Rather, they must placed atop the grate in
the freezer compartment, in contact with the walls of the
compartment (back or side) if possible. Please keep in mind
that proper conservation of frozen foods depends on the speed
with which they are frozen.
- During the freezing process, avoid opening the door of the
freezer.
- The maximum daily quantity of food that can be frozen is
indicated on the rating plate located to the left of the vegetable crisper.
- In order to freeze and then thaw foods optimally, it is rec-
ommended that you divide food into small portions so that
they freeze quickly and uniformly. The packages should be
clearly marked with the content and the date they were
frozen.
- Do not open the freezer door in the event of a power
failure or malfunction. This precaution will slow the rise in
temperature within the compartment. If the door is not
opened, frozen and fast-frozen foods will remain in their
current state for approximately 9-14 hours.
- Do not place full bottles in the freezer: they could easily
burst because all liquids increase in volume when they freeze.
- If the ambient temperature remains below 14°C for an
extended period of time, the temperature needed for extended storage of food in the freezer will not be reached,
resulting in reduced storage life of the food.
11
GB
Page 14
Ice tray
This new concept of ice tray is an exclusive Merloni patent.
The fact that they are situated on the inner door of the freezer
compartment ensures greater ergonomics and cleanliness:
the ice no longer comes into contact with the food placed
inside the freezer compartment; furthermore, the dripping
of the water during filling is avoided (a lid to cover up the
hole after filling with water is also provided).
Instructions for use (Fig. 2)
Fill up the tray with water via the special hole up to the level
indicated (MAX WATER LEVEL), taking care not to exceed
it: inserting more water than is necessary will lead to the
formation of ice which could obstruct the exit of the ice
cubes.
If you have used an excessive amount of water, you will
have to wait until the ice has melted, empty out the tray
and re-fill it with water.
Once you have filled the ice tray up with water through the
hole indicated, turn it by 90 °. Thanks to the connected
compartments, the water fills up the special shapes, after
which you can cover the hole up with the special cap and
place the ice tray in the inner door of the freezer compartment.
Once the ice has formed, all you need to do is to knock the
tray against a hard surface so that the ice cubes come away
from their housing and come out of the same hole used to
fill the tray with water. To make it easier for the ice cubes to
come out, wet the outside of the tray.
WARNING: every time you fill up the ice tray with water ,
make sure that the same is completely empty and that there
are no traces of ice left inside it.
The minimum time required for ice to form well is
approximately 8 hours.
Fig. 2
Tips on Saving Energy
- Install the Appliance Properly
In other words, away from sources of heat and direct sunlight, in a well ventilated room complying with the minimum
distances indicated in the paragraph entitled, “ Installation/
Ventilation.”
- Use the Right Temperature Setting
A setting which is too cold increases energy consumption.
- Do not Overfill
To conserve food properly, the cold air must circulate freely
within the refrigerator. If it is overfilled, this will prevent proper
air circulation, forcing the compressor to work continuously.
- Close the Doors
Open your refrigerator as little as possible because each time
you do so you loose much of the cold air. To raise the temperature to the proper level again, the motor must work for
a long time, consuming energy.
- Keep an Eye on the Seals
Keep the seals clean and make sure that they adhere well to
the door. This alone will ensure that no cold air escapes.
- No Hot Foods
A hot pot or pan placed in the refrigerator immediately raises
the temperature several degrees. Let hot cookware and food
cool to ambient temperature before placing them in the refrigerator.
- Defrost the Freezer
Check the thickness of the frost on the walls of the freezer
and immediately defrost it if the layer of frost is too thick.
(see the section entitled, “Keeping your Appliance in Shape”).
GB
12
Page 15
Keeping Your Appliance in Shape
Defrosting
WARNING: do not damage the refrigeration circuit.
Do not use mechanical devices or other tools to speed
up the defrosting process, unless they have been recommended by the manufacturer.
How to Defrost the Refrigerator
This appliance defrosts automatically and the water is
channeled to the back toward the drain installed for this
purpose (fig. 3. Here, the heat produced by the compressor
will make it evaporate. The only thing you must do is to
periodically check and clean the hole of the drain, which is
located behind the vegetable crispers, so that the water drains
properly.
How to Defrost the Freezer
- Every so often, remove the frost with the scraper provided
with the appliance (do not use knives or metal objects).
- If the frost is more than 15 mm thick, the freezer must be
defrosted.
Proceed as follows: turn the thermostat knob (A) to the ·
setting . Then wrap all the frozen and fast-frozen food in
newspaper, placing it either in the refrigerator or in a cool
place. Leave the freezer door open so that the frost thaws
completely. You can speed this process by placing containers
of warm water in the compartment.
Cleaning and maintenance
Always unplug the appliance from the mains before
cleaning.
- Your appliance is manufactured with hygienic odourless
materials. To preserve these characteristics, always use sealed
containers for strong smelling foods to avoid the formation
of odours that are difficult to remove.
- Use only a water and bicarbonate solution: Clean the internal
and exterior of your appliance with a sponge soaked with a
warm water and sodium bicarbonate solution, which is also
a good disinfectant. If you do not have any sodium bicarbonate
at home, use neutral detergent.
- What not to use: Do not use abrasive detergents, bleach or
detergents containing ammonia. Never use solvent based
products.
- Dishwashable: All the removable parts can be cleaned by
soaking in hot soapy water or detergent. If you own a
dishwasher, you may wash these parts in the dishwasher.
Remember to dry thoroughly before replacing them.
- What about the back panel? Dust may deposit on the back
panel and affect the proper running of the appliance. To
remove dust, vacuum away the dust very carefully using the
appropriate vacuum cleaner accessory.
- Discontinued use of the appliance: If the appliance is not in
use for any length of time, remember to clean the interior
and dry thoroughly, leaving the doors open to prevent the
formation of bad odours and mould.
- How to replace the internal lamp. The lamp for the internal
light is situated at the rear of the thermostat box. To replace
it, disconnect the appliance from the electricity mains, unscrew
the faulty lamp and replace it with a new one featuring a
wattage no higher than that indicated on the protection (15
W or 25 W), as illustrated in figure 4.
Fig. 3
13
1
2
Fig. 4
GB
Page 16
Is There a Problem?
The refrigerator does not function.
Have you checked whether:
• The main switch for the electricity to the apartment or
home has been turned off;
• The plug is properly inserted in the outlet;
• The outlet is adequate; try inserting the plug into another
outlet in the room.
The refrigerator and the freezer do not cool
properly.
Have you checked whether:
• The doors do not close well or the seals are faulty;
• The doors are left open too long;
• The thermostat knob is not on the proper setting;
• The refrigerator or freezer is overfilled.
The food in the refrigerator becomes too cold.
Have you checked whether:
• The thermostat knob is on the proper setting;
• The food is in contact with the back wall - which is the
coldest part.
If after all the checks, the appliance still does not operate or
the problem persists, call the nearest Service Centre and
inform them of: the type of problem, the abbreviation of the
model name (Mod.) and the relative numbers (S/N) written
on the rating plate located at the bottom left next to the
vegetable crisper (see examples in the figures below).
75
Test
P.S-I.
TI
Net
Util
Utile
Pressure
HIGH-235
LOW 140
RG 2330
Mod.
220 - 240 V- 50 Hz 150 W
340
Total
Gross
Bruto
Brut
Compr.
Syst.
Kompr.
Made in Italy 13918
Gross
Bruto
Brut
R 134 a
kg 0,090
93139180000 S/N 704211801
Cod.
Gross
Bruto
Brut
W
Fuse
A
Freez. Capac
Poder de Cong
4,0
kg/24 h
Max 15 w
Class
Clase
N
Classe
Never call on unauthorized technicians and always
refuse spare parts which are not originals.
The motor runs continuously.
Have you checked whether
• The doors are not closed well or have remained open too
long;
• The ambient temperature is too high;
• The thermostat knob is not on the proper setting.
The appliance makes too much noise.
The gas refrigerant produces a slight noise even when the
compressor is not running (this is not a defect).
Have you checked whether:
• The refrigerator is level.
• The appliance was installed between cabinets or objects
that vibrate and make noise.
There is water on the bottom of the refrigerator.
Have you checked whether:
• The hole for draining the water from the frost is clogged
(see fig. 3).
GB
14
Page 17

La sécurité, une bonne habitude
ATTENTION
Lire attentivement les avertissements contenus dans ce livret car ils fournissent des indications importantes pour la
sécurité de l’installation, de l’utilisation et de l’entretien.
Ce réfrigérateur a été construit conformément aux normes
internationales de sécurité qui ont pour but de protéger le
consommateur. Cet appareil a en effet obtenu le label IMQ
que les techniciens de l’Institut Italien de Qualité n’accordent qu’aux appareils conformes aux normes du CEI: Comité Electrotechnique Italien.
1. Cet appareil ne doit pas être installé à l’extérieur, même à
l’abri d’un appentis, il est extrêmement dangereux de le laisser exposé à la pluie et aux orages.
2. Il ne doit être utilisé que par des adultes et uniquement
pour conserver et congeler des aliments, conformément à ce
mode d’emploi.
3. Ne touchez jamais ni ne manoeuvrez l’appareil pieds nus
ou avec les mains ou les pieds mouillés.
4. Nous déconseillons d’utiliser des rallonges ou des prises
multiples. Si le réfrigérateur est installé entre des meubles,
veillez par soucis de sécurité à ce que le cordon d’alimentation ne soit ni plié ni comprimé.
5. Ne tirez jamais sur le cordon ou le réfrigérateur pour débrancher la fiche de la prise murale: c’est extrêmement dangereux.
6. Ne touchez pas aux parties intérieures réfrigérantes surtout
avec les mains mouillées, vous pourriez vous brûler ou vous
blesser. Ne portez jamais à la bouche des glaçons à peine sortis du freezer, vous risqueriez de vous brûler.
7. Ne procédez à aucune opération de nettoyage ou d’entretien
sans avoir auparavant débranché la fiche de l’appareil; il ne suffit pas, en effet, d’amener la manette de réglage de la température sur la position
8. Avant d’envoyer votre ancien réfrigérateur à la déchetterie,
rendez sa serrure inutilisable. Vous éviterez ainsi que des enfants en jouant, ne restent enfermés à l’intérieur.
9. En cas de panne et avant de faire appel au service aprèsvente, consultez le chapitre «Quelque chose ne va pas?» pour
vérifier si vous pouvez vous-même résoudre le problème. Ne
tentez pas de réparer la panne en essayant d’accéder aux parties internes.
10. Si le câble d’alimentation de cet appareil est abîmé, seul
notre Service Après Vente peut le changer à l’aide d’outils
spéciaux.
11. Ne pas utiliser d’appareils électriques à l’intérieur du
compartiment de conservation des aliments s’ils
n’appartiennent pas aux catégories recommandées par le
fabricant.
12. Avant d’envoyer votre appareil hors d’usage à la
déchetterie, veillez à le rendre sûr car sa mousse isolante
contient du gaz cyclopentane et son circuit réfrigérant peut
contenir du gaz R600a (isobutane).
Pour cette opération, adressez-vous à votre revendeur ou au
Service local prévu à cet effet.
pour éliminer tout contact électrique.
Installation
Pour garantir le bon fonctionnement de votre appareil
tout en réduisant sa consommation d’électricité, il faut
qu’il soit installé correctement.
L’aération
Le compresseur et le condenseur produisent de la chaleur et
exigent par conséquent une bonne aération. Les pièces mal
ventilées sont par conséquent déconseillées. L’appareil doit
donc être installé dans une pièce munie d’une ouverture
(fenêtre ou porte-fenêtre) qui permette de renouveler l’air
et qui ne soit pas trop humide.
Attention, lors de son installation, à ne pas boucher les grilles
d’aération de l’appareil.
Pour une bonne aération de l’appareil, il faut prévoir:
- une distance de 10 cm au moins entre le haut de l’appareil
et les meubles situés au-dessus;
- une distance de 5 cm au moins entre les côtés de l’appareil
et des meubles ou des murs latéraux.
Loin de toute source de chaleur
Evitez d’installer votre appareil dans un endroit exposé à la
lumière directe du soleil ou près d’une cuisinière électrique
ou autre.
A plat
L’appareil doit être installé bien à plat; si le sol n’est pas ni-
velé, servez-vous des pieds réglables situés à l’avant de l’appareil pour le mettre à niveau.
Raccordement électrique et mise à la terre
Avant de procéder à tout raccordement électrique, contrôlez si le voltage indiqué sur la plaquette des caractéristiques,
placée en bas à gauche à côté du bac à légumes, correspond bien à celui de votre installation et contrôlez si la prise
est dotée d’une mise à la terre conforme, comme prescrit
par la loi 46/90 sur la sécurité des installations. S’il n’y a pas
de mise à la terre, le Fabricant décline toute responsabilité.
N’utilisez ni prises multiples ni adaptateurs.
l’appareil de manière à ce que la prise à laquelle il est
connecté soit parfaitement accessible.
La puissance est insuffisante?
La prise électrique doit être en mesure de supporter la charge
maximum de puissance de l’appareil, indiquée sur la plaquette des caractéristiques placée en bas à gauche à côté
du bac à légumes.
Avant de le raccorder électriquement
Après le transport, pour que votre appareil fonctionne bien,
placez-le à la verticale et attendez au moins 3 heures avant
de le brancher à la prise.
15
F
Page 18
Vu de près
Manette pour le réglage de la température
A
Cette manette permet de régler la température des
deux compartiments sur des positions différentes
le réfrigérateur est
éteint;
1 moins froid;
5 plus froid.
Bac à glaçons
B
(Cet accessoire n'est pas fourni avec certains modéles)
Balconnet amovible avec couvert et boîte à
C
oeufs
3
Balconnet amovible pour bouteilles
E
Pied de réglasge
F
Tiroir pour fruits et légumes
G
Convoyeur eau de dégivrage
H
Bac à viande/fromages
I
Clayettes coulissantes et réglables en hauteur
J
Chambre pour congeler les aliments frais et
K
pour conserver les aliments surgelés
Balconnets amovibles porte-objets
D
A
K
J
I
H
G
A
B
K
C
C
J
D
I
H
E
G
D
D
D
E
F
FF
16
FF
Page 19
Comment mettre en marche l'appareil
ATTENTION
Après le transport, pour que votre appareil fonctionne
bien, placez-le à la verticale et attendez au moins 3
heures avant de le brancher à la prise de courant.
Avant d’introduire les aliments dans le réfrigérateur ou dans
le freezer, nettoyez bien l’intérieur de l’appareil avec de l’eau
tiède et du bicarbonate.
Après avoir branché la fiche à la prise de courant, contrôlez
si la lumière à l’intérieur est bien allumée puis tournez la
manette pour le réglage de la température “A” jusqu’à la
position “3” , au bout de quelques heures vous pouvez commencer à introduire les aliments frais dans le compartiment
réfrigérateur et les aliments congelés dans le freezer..
Comment utiliser au mieux le compartiment réfrigérateur
Le thermostat règle automatiquement la temperature ù l’interne de l’appareil.
1 = moins froid
5 = plus froid
Une position intermédiaire est de toute manière conseillée.
Pour augmenter la place disponible et améliorer l’aspect
esthétique, la «partie réfrigérante» de cet appareil est située à l’intérieur de la paroi arrière du compartiment réfrigérateur. En cours de fonctionnement, cette paroi sera par
conséquent recouverte de givre ou de gouttelettes d’eau
suivant que le compresseur est en marche ou pas. Ne vous
en faites pas! Votre réfrigérateur fonctionne tout à fait normalement.
Si vous réglez la manette sur des chiffres plus élevés, en
emmagasinant des quantités importantes de nourriture et
avec une température ambiante élevée, votre appareil risque de fonctionner sans interruption favorisant ainsi la formation de givre sur la paroi arrière réfrigérante tout en consommant beaucoup plus d’électricité.
Pour résoudre cet inconvénient il suffit de déplacer la
manette du thermostat vers des chiffres plus bas permettant ainsi un dégivrage automatique de l’appareil.
Guide au rangement et à la conservation des aliments dans le réfrigérateur
Aliments
Viande et poisson vidé (mettre sous sachets ou
envelopper dans des feuilles plastique
Fromages frais 3 ou 4 jours
Oeufs 1 mois
Beurre et margarine Dans le balconnet de la contre-porte
Aliments cuits ou précuisinés (enfermer dans des
récipient étanches et introduire après refroidissement)
Charcuterie crue, pain de mie, pâtes fraîches, crème,
flans, chocolats, gâteaux à la crème, lard, gâteaux secs,
tomates
Bouteilles, lait, boisson, yaourt
Fruits et légumes Dans le bac à légumes
Durée de
conservation
2 ou 3 jours
3 ou 4 jours Sur une clayette quelconque
3 ou 4 jours Sur une clayette quelconque
Rangement à l'intérieur de
réfrigérateur
Au-dessus du bac à légumes
(zone la plus froide du réfrigérateur)
Au-dessus du bac à légumes
(zone la plus froide du réfrigérateur)
Dans le casier correspondant de la
contre-porte
Dans le balconnet correspondant de la
contre-porte
Ce qu'il ne faut pas mettre dans le réfrigérateur
L’ail (il transmet les odeurs), les oignons et les poireaux
Les bananes (elles noircissent)
Les agrumes (il vaut mieux les conserver au frais sur le balcon)
Les pommes de terre et les tubercules (un endroit sec et obscur est préférable)
17
F
Page 20
- A l’intérieur du réfrigérateur, l’air circule normalement et
1
2
l’air plus froid, qui est plus lourd, a tendance à descendre.
C’est pourquoi, les viandes et les fromages doivent être placés au-dessus du bac à légumes.
- Suivez attentivement nos conseils quant à la durée maximum de conservation: tout aliment, pour frais qu’il soit, ne
reste pas intact très longtemps..
- Contrairement à ce que l’on pense, les aliments cuits ne se
conservent pas plus longtemps que les aliments crus.
- N’introduisez pas de liquides dans des récipients ouverts,
ils entraîneraient une augmentation de l’humidité à l’intérieur du réfrigérateur et donc la formation de givre.
- N'introduisez que des aliments froids ou tièdes en évitant
d'y placer ceux qui sont encore chauds: ils augmenteraient
tout de suite la température interne en obligeant le compresseur a un surplus de travail qui représenterait un gaspillage d'énergie électrique.
- Attention à ne pas placer de récipients (plastique,
verre), aliments et autres contre la paroi réfrigérante
(paroi arrière). Les aliments pourraient s’abîmer, la consommation d’énergie augmenter et de la buée pourraient se former (sur les aliments, les récipients, etc.).
- Le compartiment réfrigérateur est équipé de clayettes amovibles extrêmement pratiques (Fig. 1) et réglables en hauteur grâce à des glissières spéciales. Vous pouvez ainsi introduire de grands récipients et des aliments particulièrement
volumineux.
Fig. 1
Pour bien congeler
- Lors de la préparation des aliments à congeler, consultez un manuel spécialisé.
- Un aliment décongelé, ne serait ce que partiellement, ne
doit jamais être remis à congeler : il faut le faire cuire pour le
consommer (dans les 24 heures) ou bien pour le congeler à
nouveau.
- Les aliments frais à congeler ne doivent pas être rangés
tout contre des aliments déjà congelés ou surgelés, ils doivent être posés sur la clayette du compartiment freezer et, si
possible, contre les parois (latérales et arrière). N’oubliez pas,
en effet, que la bonne conservation des aliments congelés
dépend de leur vitesse de congélation.
- En cours de congélation, évitez d’ouvrir la porte du freezer.
- La quantité maximum pouvant être congelée, par jour, est
indiquée sur la plaquette des caractéristiques située à gauche du bac à légumes.
- Pour obtenir une congélation et une décongélation parfaites, il vaut mieux congeler de petites portions d’aliments,
leur congélation n’en sera que plus rapide et homogène.
Indiquez sur vos sachets ou barquettes leur contenu et la
date de congélation.
- N’ouvrez pas la porte du freezer en cas de coupure de
courant ou de panne, vous éviterez ainsi d’accélérer la montée de la température à l’intérieur du freezer. Les produits
surgelés et congelés se conserveront ainsi inaltérés pendant
environ 9-14 heures.
- Ne mettez jamais de bouteilles pleines dans votre freezer:
elle pourraient se briser car tous les liquides augmentent de
volume en gelant.
- Si l’on a pendant longtemps une température ambiante
plus froide que 14°C, les températures indispensables à une
longue conservation ne pourront être atteintes à l’intérieur
du freezer et la durée de conservation sera par conséquent
réduite.
F
18
Page 21
Bac à glace
Le brevet exclusif de ce nouveau type de bac à glace a été
déposé par Merloni. Placés dans la contre-porte du
compartiment freezer, ils sont plus ergonomiques et
garantissent davantage de propreté: en effet, les glaçons ne
touchent plus aux aliments stockés dans le freezer; de plus,
fini l'eau qui dégouline lorsque vous rangez votre bac (un
couvercle est fourni pour boucher le récipient après l'avoir
rempli).
Mode d'emploi (Fig. 2)
Remplissez le bac d'eau jusqu'au niveau indiqué (MAX
WATER LEVEL) en veillant à ne pas le dépasser. Si vous
introduisez davantage d'eau, la quantité de glace qui se
formera risque d'empêcher la sortie des glaçons.
Si vous avez introduit trop de liquide, attendez que la glace
fonde, videz le bac et recommencez depuis le début.
Après avoir introduit la quantité d'eau nécessaire par l'orifice
prévu à cet effet, tournez le bac de 90°. Suivant le principe
des vases communicants, l'eau va remplir les cavités. Fermez
l'orifice à l'aide du couvercle prévu et placez le bac à glaçons
dans la contre-porte.
Une fois que la glace s'est formée, il vous suffit de taper le
bac contre une surface dure pour détacher les glaçons et les
faire sortir par l'orifice d'entrée de l'eau. Pour sortir plus
facilement les glaçons, mouillez l'extérieur du bac.
ATTENTION: avant d'introduire à nouveau de l'eau dans le
bac, vérifiez qu'il est bien vide sans le moindre débris de
glace.
Il faut attendre au moins 8 heures pour obtenir de beaux
glaçons.
Fig. 2
Quelques conseils pour faire des économies
- Installez-le bien
Autrement dit loin de sources de chaleur, de la lumière directe du soleil, dans une pièce bien ventilée et en respectant
les distances signalées dans le paragraphe «Installation/L’aération».
- Le froid nécessaire
Un froid excessif entraîne une augmentation de la consommation d’électricité.
- Ne le remplissez pas trop
Pour bien conserver les aliments, il faut que le froid puisse
circuler librement à l’intérieur du réfrigérateur. Si vous le remplissez trop, vous gênerez cette circulation et obligerez le
compresseur à fonctionner sans arrêt.
- Portes fermées
Ouvrez votre réfrigérateur le moins souvent possible car chaque fois que vous le faites, de l’air froid s’échappe. Pour
rétablir la température voulue, le moteur doit fonctionner
longtemps en consommant beaucoup d’électricité.
- Attention aux joints
Veillez à ce qu’ils soient toujours propres et en bon état pour
bien adhérer aux portes; ce n’est qu’ainsi qu’ils empêcheront toute fuite d’air froid.
- Jamais d’aliments chauds
Une casserole chaude mise au réfrigérateur entraîne automatiquement une hausse de la température de plusieurs
degrés, laissez-la refroidir à température ambiante avant de
l’introduire dans le réfrigérateur.
- Du givre dans le freezer
Contrôlez l’épaisseur du givre sur les parois du freezer et
procédez immédiatement au dégivrage si la couche est trop
épaisse (Voir plus bas “Comment le garder en forme”).
19
F
Page 22

Comment le garder en forme
Dégivrage
ATTENTION: ne pas endommager le circuit réfrigérant.
Attention: n’utilisez ni dispositifs mécaniques ni outils
pour accélérer l’opération de dégivrage, en dehors de
ceux conseillés par le fabricant.
Comment dégivrer le compartiment réfrigérateur.
Cet appareil est à dégivrage automatique, l’eau est acheminée vers l’arrière par un conduit spécial (fig. 3) où la chaleur
produite par le compresseur la fait évaporer. Vous n’avez
qu’une opération à faire périodiquement: nettoyer le trou
d’évacuation qui se trouve derrière les bac à légumes afin
que l’eau puisse s’écouler normalement.
Comment décongeler le compartiment freezer
- Eliminez de temps en temps le givre à l’aide du racloir fourni
avec l’appareil (jamais de couteaux ou d’objets métalliques).
- Si le givre dépasse 5 mm d’épaisseur, il faut procéder au
dégivrage.
Procédez comme suit: positionnez la manette pour le réglage des températures A sur ; enveloppez tous les produits surgelés et congelés dans du papier journal et mettezles au réfrigérateur ou dans un endroit frais. Laissez la porte
ouverte pour que le givre fonde complètement, accélérez
l’opération en introduisant des récipients pleins d’eau tiède.
Fig. 3
Nettoyage et entretien particuliers
Avant de nettoyer le combiné, débranchez toujours la
fiche.
- Les matériaux avec lesquels votre appareil a été fabriqué
sont hygiéniques et ne transmettent aucune odeur. Mais pour
conserver cette qualité il faut que les aliments soient bien
protégés pour éviter les taches et les mauvaises odeurs.
- Eau et bicarbonate de soude seulement. Pour nettoyer
votre appareil à l’intérieur et à l’extérieur, utilisez une éponge
avec de l’eau tiède et du bicarbonate de soude qui est aussi
un excellent désinfectant. Vous pouvez éventuellement le
remplacer par un savon neutre, savon de Marseille par exemple.
- Ce qu’il ne faut pas utiliser: les poudres abrasives, l’ammoniaque, l’Eau-de-Javel et les solvants.
- Toutes les pièces amovibles peuvent être lavées dans de
l’eau chaude et du savon ou avec du liquide vaisselle. Avant
d’être à nouveau rangées dans l’appareil, il faut soigneusement les essuyer.
- En ce qui concerne l’arrière de l’appareil? C’est ici que la
poussière se dépose et crée des problèmes pour le bon
fonctionnement de l’appareil. Utilisez votre aspirateur avec
l’embouchure allongée à une puissance moyenne et en
faisant très attention.
- L’appareil n’est pas utilisé pendant une longue période.
Dans ce cas, par exemple en été, si vous décidez d’arrêter
votre réfrigérateur, il faut nettoyer l’intérieur et laisser la porte
ouverte pour éviter la formation de mauvaises odeurs ou de
moisissures.
- Remplacement de la lampe intérieure. La lampe pour
l’éclairage intérieur est située dans la partie arrière du boîtier
du thermostat. Pour la remplacer, débranchez l’appareil du
réseau électrique, dévissez la lampe grillée et remplacez-la
par une autre dont la puissance ne dépasse pas la puissance
indiquée sur la protection (15 W ou 25 W) en procédant
comme illustré figure 4.
F
1
2
Fig. 4
20
Page 23

Quelque chose ne va pas
Le réfrigérateur ne fonctionne pas.
Avez-vous contrôlé si:
• l’interrupteur général de votre appartement est décon-
necté;
• la fiche n’est pas bien branchée dans la prise de courant;
• la prise n’est pas endommagée; essayez de la brancher
dans une autre prise de l’appartement.
Le réfrigérateur et le freezer ne réfrigèrent
pas assez.
Avez-vous contrôlé si:
• les portes ne ferment pas bien ou si les joints sont abîmés;
• les portes restent trop longtemps ouvertes;
• la manette de réglage de la température n’est pas bien
positionnée;
• le réfrigérateur ou le freezer ont été excessivement rem-
plis.
Les aliments à l’intérieur du réfrigérateur
gèlent trop.
Avez-vous contrôlé si:
• la manette de réglage de la température est bien position-
née;
• les aliments touchent à la paroi arrière qui est la plus froide.
Si, malgré tous ces contrôles, l’appareil ne fonctionne toujours pas et l’inconvénient persiste, faites appel au service
après-vente le plus proche de chez vous en indiquant: le
type de panne, le sigle du modèle (Mod.) ainsi que les chiffres (S/N) indiqués sur la plaquette des caractéristiques située en bas, à gauche, à côté du bac à légumes (voir exemples dans les figures suivantes).
75
Test
P.S-I.
TI
Net
Util
Utile
Pressure
HIGH-235
LOW 140
RG 2330
Mod.
220 - 240 V- 50 Hz 150 W
340
Total
Gross
Bruto
Brut
Compr.
Syst.
Kompr.
Made in Italy 13918
Gross
Bruto
Brut
R 134 a
kg 0,090
93139180000 S/N 704211801
Cod.
Gross
Bruto
Brut
W
Fuse
A
Freez. Capac
Poder de Cong
kg/24 h
4,0
Max 15 w
Class
Clase
N
Classe
Ne faites jamais appel à des techniciens non agréés et
refusez toujours des pièces détachées non originales.
Le moteur fonctionne sans arrêt.
Avez-vous contrôlé si:
• les portes sont bien fermées ou si elles sont restées ouver-
tes trop longtemps;
• la température extérieure est trop élevée;
• la manette de réglage de la température n’est pas bien
positionnée.
L’appareil est trop bruyant.
Il gaz réfrigérant interne produit un léger bruit même quand
le compresseur est à l’arrêt (ce n’est pas un défaut).
Avez-vous contrôlé si:
• le réfrigérateur est bien positionné à plat;
• s’il a été installé entre des meubles ou des objets qui vi-
brent en faisant du bruit;
Il y a de l’eau dans le fond du réfrigérateur.
Avez-vous contrôlé si:
• le trou d’évacuation de l’eau de dégivrage est bouché (voir
fig. 3).
21
F
Page 24

De veiligheid, een goede gewoonte
BELANGRIJK
Lees de inhoud van deze gebruiksaanwijzing aandachtig door
aangezien hij belangrijke instructies bevat betreffende de
veiligheid van installeren, gebruik en onderhoud.
Deze combinatie is vervaardigd volgens de internationale
veiligheidsnormen die gericht zijn op het beschermen van de
gebruiker. Dit apparaat heeft het merkteken IMQ verworven,
dat door het Italiaanse Instituut van Kwaliteit alleen wordt
uitgereikt aan apparaten die voldoen aan de normen van de
CEI, de Italiaanse Elektrotechnische Commissie.
1. Dit apparaat mag niet buiten worden geïnstalleerd, zelfs
niet onder een dakje; het is uiterst gevaarlijk het bloot te
stellen aan regen en onweer.
2. Het mag alleen door volwassenen worden gebruikt en
alleen voor het bewaren van etenswaren, volgens de gebruiksaanwijzingen in dit handboekje.
3. Raak het apparaat nooit aan als u blootsvoets bent of
met natte handen of voeten.
4. Wij raden het gebruik van verlengsnoeren en dubbelstekkers af. Als de koelkast tussen meubelen in wordt geïnstalleerd, controleer dan dat de kabel niet krom of onder
gevaarlijke druk ligt.
5. Trek nooit aan de kabel of aan de koelkast zelf om de
stekker uit het stopcontact te halen: dit is uiterst gevaarlijk.
6. Raak de verkoelingselementen binnen in de koelvriescombinatie nooit aan, vooral niet met natte handen; u kunt
zich branden of verwonden. Stop geen ijsblokje in uw mond
zodra het uit de freezer komt; u riskeert zich te branden.
7. Sluit altijd eerst de stroom af voordat u overgaat tot reinigen of onderhoud; het is namelijk niet voldoende de
temperatuurknop op de positie .. te zetten om ieder electrisch
contact te elimineren.
8. Voordat u uw oude koelkast weg laat halen, maak het
slot onklaar om te vermijden dat spelende kinderen erin
opgesloten worden.
9. Voordat u er de technische dienst bij haalt als er een storing optreedt, controleer eerst in het hoofdstuk “Is er een
probleem?” of het mogelijk is dit probleem te verhelpen.
Probeer niet zelf de reparatie uit te voeren door te trachten
toegang te krijgen tot de interne onderdelen.
10. Als de voedingskabel van dit apparaat vanwege schade
moet worden vervangen, dan moet dit door onze Technische
Dienst worden uitgevoerd aangezien er speciale
gereedschappen voor nodig zijn.
11. Gebruik geen elektrische apparaten in het bewaarvak
van de etenswaren tenzij van het soort dat door de fabrikant
wordt aangeraden.
12. Als het apparaat op is moet het veilig worden gemaakt
voordat het definitief wordt weggedaan, aangezien het
isolerende piepschuim cyclopentaangas bevat en zich
eventueel R600a gas (isobutaan) in het koelcircuit bevindt.
Wendt u zich voor deze ingreep tot uw handelaar of tot de
betreffende plaatselijke authoriteit.
Het installeren
Voor het goed functioneren en zuinig energieverbruik
is het belangrijk dat het installeren op de juiste wijze
wordt uitgevoerd.
Ventilatie
De compressor en de condensator geven warmte af en vragen dus om een goede ventilatie. Het apparaat moet dus
geplaatst worden in een vertrek met een raam of buitendeur, die de nodige luchtvervanging garanderen. Het vertrek mag niet vochtig zijn.
Let erop gedurende het installeren dat de ventilatieroosters
van het apparaat niet bedekt of verstopt worden.
Voor goede ventilatie van het apparaat is het noodzakelijk
te laten:
- een afstand van minstens 10 cm tussen de bovenkant en
een eventueel kastje erboven;
- een afstand van minstens 5 cm tussen de zijkanten eventuele meubelen ernaast.
Ver van de hitte
Plaats het apparaat niet op een zonnige plek, naast het fornuis of dergelijke.
Waterpas
Het apparaat moet goed horizontaal staan; als de vloer niet
vlak is kunnen de stelschroeven vooraan het apparaat geregeld worden.
Electrische aansluiting en aarding
Controleer om te beginnen of de gegevens op het typeplaatje, linksonder naast de groentenlade, overeenkomen
met die van het electrische net van uw woning en of het
stopcontact voorzien is van een aardleiding zoals voorgeschreven door de wet voor de veiligheid van installaties 46/
90. Als de aardleiding ontbreekt wijst de Fabrikant iedere
aansprakelijkheid af. Gebruik geen dubbelstekkers of
adapters.
Is het vermogen voldoende?
Het stopcontact moet in staat zijn de maximum lading van
het vermogen van het apparaat te verdragen; deze is aangegeven op het typeplaatje linksonder naast de groentenlade.
Voor de electrische aansluiting
Houd het apparaat vertikaal gedurende het vervoer en,voor
het goed functioneren, wacht minstens 3 uren voordat u
het aansluit.
NL
22
Page 25

Van dichtbij gezien
Temperatuurknop
A
Deze knop regelt de temperatuur van de twee afdelingen op verschillende posities:
de koelkast is uit;
1 minder koud;
5 kouder
3
Bakjes voor ijsbiokjes
B
Uitneembaar bakje met dekseltje en met
C
eierrekje
Uitneembare deurrekken die op hoogtr te
D
regelen zijn
Stelschroeven
F
Laden voor fruit en groenten
G
Afvoergootje voor dooiwater
H
Vlees/kaasdoos
I
Uitneembare rekken die in hoogte verstelbaar
J
zijn
Vriesgedeelte voor het maken van ijsblokjes
K
het invriezen van voedsel, voor het
konserveren van diepvritesprodukten en het
invriezen van vers voedsel
Uitneembare deurrek voor flessen
E
A
K
J
I
H
G
A
B
K
C
C
J
D
I
H
E
G
D
D
D
E
FF
23
FF
NL
Page 26

Het inschakelen van het apparaat
BELANGRIJK
Houd na het transport het apparaat vertikaal geplaatst
en wacht, voor het goed functioneren, ongeveer 3 uren
voordat u het aansluit.
Voordat u etenswaren in de koelkast of freezer plaatst, moet
de binnenkant met lauw water en soda gewassen worden.
Nadat u de stekker in het stopcontact heeft gestoken moet
de verlichting aan gaan en draait u de temperatuurknop
“A” op de positie “3”. Na enkele uren kunt u de verse etenswaren in de koelkast plaatsen en de diepvriesproducten in
de freezer.
De beste gebruikmaking van de koelafdeling
De thermostaatknop regelt automatisch de temperatuur in
de apparaat:
1 = minder koud
5 = kouder
Wij raden een gemiddelde stand aan.
Voor het creëren van ruimte en voor het esthetische aspect
bevindt het verkoelingselement zich in de achterwand van
de koelafdeling. Deze wand wordt met ijs of waterdruppels
bedekt gedurende het gebruik van het apparaat al naar
Gids voor het plaatsen en conserveren van de etenswaren in de koelafdeling
gelang de compressor in functie is of in rust. Maakt u zich
geen zorgen! De koelkast voert zijn normale taak uit.
Als u de knop op een hoog nummer zet, met veel etenswaren in de koelkast en een hoge kamertemperatuur, dan kan
het apparaat in werking blijven, hetgeen de vorming van ijs
op de verkoelende achterwand begunstigt met hieruitvolgend hoger energieverbruik.
Om dit te voorkomen kunt u de thermostaatknop op
een lager nummer zetten, zodat het apparaat automatisch regelmatig de ijs ontdooit.
Etenswaren Bewaartijd Plaatsing in koelkast
Vlees en vis
(in zakjes of plastic folie)
Kaas 3 of 4 dagen
Eieren 1 maand In het eierrek in de deur
Boter en margarine In de botervloot in de deur
Gekookt voedsel (goed afgedekt
en reeds afgekoeld)
Rauw beleg, brood, chocolade, taartjes,
tomaten enz.
Flessen, melk, frisdranken, yoghurt In de overeenkomstige deurrekken
Fruit en groenten In de groenten-la
2 of 3 dagen
3 of 4 dagen Op een willekeurig rek
3 of 4 dagen In het flessenrek in de deur
In de bak boven de groenten-la
(koelste plaats van de koelkast)
In de bak boven de groenten-la
(koelste plaats van de koelkast)
Wat niet in de koelkast gaat
Knoflook (vanwege de reuk), uien en prei.
Bananen (worden bruin).
Citrusvruchten (beter buiten, op het balkon).
Aardappelen en knollen (moeten donker en droog liggen).
NL
24
Page 27

- In de koelkast circuleert de lucht op natuurlijke wijze en de
koudere lucht daalt omdat hij zwaarder is. Daarom moeten
vlees en kaas boven de groentenlade geplaatst worden.
- Volg onze aanwijzingen voor de maximum conservatietijd
zorgvuldig: geen enkel type voedsel, hoe vers ook, blijft heel
lang goed.
- In tegenstelling tot wat over het algemeen geloofd wordt,
blijven gekookte etenswaren niet langer goed dan rauwe
etenswaren.
- Laat geen onafbedekte vloeistoffen in de koelkast staan
aangezien deze de vochtigheid verhogen en dus ijsvorming
bevorderen.
- Plaats alleen koude of heel lauwe etenswaren en nooit
warme: dit zou meteen de binnentemperatuur laten stijgen
met overwerk voor de compressor en energieverkwisting.
- Plaats geen containers (plastic, glas) of voedsel in
contact met het verkoelingselement (achterwand). Dit
kan het voedsel beschadigen, energieverbruik verhogen en de condensvorming op de etenswaren en containers bevorderen.
- De koelkast is voorzien van praktische, uitneembare rekken (Afb.1) die in hoogte versteld kunnen worden dankzij
de gleuven. Het is dus mogelijk ook hoge containers en voedsel van grote afmetingen te plaatsen.
1
2
Afb. 1
Invriezen
- Raadpleeg een gespecialiseerd boekje voor de voorbereiding van in te vriezen etenswaren.
- reeds ontdooide etenswaren, ook al zijn ze slechts gedeeltelijk ontdooid, mogen niet meer ingevroren worden: u moet
het koken en opeten (binnen 24 uren) of weer invriezen.
- De verse etenswaren mogen niet in contact komen met
reeds ingevroren producten; zij worden op het rek in de
freezer gelegd, liefst tegen de zij- of achterwand aan. Vergeet niet dat goede conservering afhangt van de snelheid
van invriezen.
- Open de deur van de freezer niet gedurende het invriezen.
- De maximum dagelijkse hoeveelheid die u kunt invriezen is
aangegeven op het typeplaatje links van de groentenlade.
- Voor de beste resultaten van invriezen en ontdooien raden
wij aan de etenswaren in kleine porties te verdelen zodat ze
snel en gelijkmatig bevriezen. Zet de datum en de inhoud
op de verpakking.
- Mocht de stroom uitvallen, open dan de deur van de freezer
niet teneinde de temperatuur binnenin niet te verhogen.
Op deze manier blijven de diepvriesproducten voor ongeveer 12-14 uren zonder verandering geconserveerd.
- Zet geen volle flessen in de freezer: alle vloeistoffen zetten
uit bij het invriezen en de flessen kunnen dus breken.
- Als de kamertemperatuur voor langere tijd lager dan 14°C
blijft, worden de temperaturen die noodzakelijk zijn voor
het langdurig conserveren in de freezer niet helemaal bereikt en de conservatieperiode wordt dus korter.
25
NL
Page 28

Ijsbakjes
Dit nieuwe type ijsbakjes is een exclusief Merloni patent.
Het feit dat ze in de deur van de freezer zitten zorgt voor
een ergonomisch en hygiënisch gebruik: de ijsblokjes komen
niet meer in contact met de etenswaren in de freezer:
bovendien wordt water knoeien tijdens het opvullen
vermeden (ook de deksel voor het afsluiten van het gat na
het opvullen is bijgeleverd).
Gebruik (Afb. 2)
Vul het ijsbakje door het gat met water tot het aangegeven
niveau (MAX WATER LEVEL) en let op dat u dit niet
overschrijdt: teveel water kan een zodanige ijsvorming
veroorzaken dat het naar buiten komen van de ijsblokjes
erdoor belemmerd wordt.
In het geval dat u de maximum hoeveelheid water heeft
overschreden moet u wachten tot het ijs gesmolten is, het
bakje leeg gieten en weer opnieuw opvullen.
Als het bakje is bijgevuld draait u het 90°. Volgens het principe van communicerende vaten worden de vakjes gevuld,
waarna het gat kan worden afgesloten met de deksel en
het bakje kan in de deur van de freezer worden geplaatst.
Als het ijs zich heeft gevormd slaat u het bakje op een harde
oppervlakte zodat de ijsblokjes los komen en door het gat
naar buiten komen. U kunt het bakje even onder de kraan
houden voor het gemakkelijker loskomen van de ijsblokjes.
BELANGRIJK: als u het bakje opvult met water moet u erop
letten dat het helemaal leeg is en er geen ijsresten zijn
achtergebleven.
Het invriezen van ijsblokjes neemt ongeveer 8 uren.
Afb.. 2
Raadgevingen voor energiebesparing
- Installeer op de juiste wijze
Dat wil zeggen ver weg van warmtebronnen, van rechtstreeks
zonlicht, in een goed geventileerd vertrek en op de afstanden
aangegeven in de paragraaf “Het installeren/De ventilatie”.
- De juiste koude
Te koud verhoogt het energieverbruik.
- Laad hem niet te vol
Teneinde de etenswaren goed te conserveren moet de koude
lucht vrijelijk circuleren binnen in de koelkast. Hem te vol
laden betekent dat u de circulatie belemmert terwijl u de
compressor voortdurend laat werken.
- Met dichte deuren
Open uw koelkast zo min mogelijk omdat iedere keer een
hoeveelheid koude lucht ontsnapt. De motor moet weer
werken om de temperatuur op peil te brengen en dit kost
energie.
- Let op de afdichtingen
Houd ze schoon en efficiënt zodat ze goed aan de deur aansluiten; zo laten ze geen koude ontsnappen.
- Geen warme gerechten
Een warme pan in de koelkast verhoogt de temperatuur
onmiddelijk met een paar graden; laat de pan afkoelen voordat u hem in de koelkast plaatst.
- Ijs in de freezer
Controleer de dikte van het ijslaagje op de wanden van de
freezer en ontdooi hem meteen als het ijslaagje te dik is (zie
verderop “Hoe onderhoud ik hem”).
NL
26
Page 29

Hoe onderhoud ik hem
Ontdooien
BELANGRIJK: let erop dat u het koelcircuit niet
beschadigt.
Gebruik geen mechanische middelen of andere voorwerpen om het ontdooiingsproces te versnellen, maar
alleen die door de fabrikant worden aanbevolen.
Hoe ontdooi ik de koelkast.
Dit apparaat ontdooit automatisch en het water wordt opgevangen en naar de afvoer aan de achterkant gevoerd
(Afb.3) waar de warmte van de compressor het verdampt.
Het enige dat u regelmatig moet doen is het afvoergat
schoonmaken; dit bevindt zich achter de groentenlade.
Hoe ontdooi ik de freezer
- Verwijder regelmatig de ijs met het bijgeleverde schrapertje
(geen messen of metalen voorwerpen).
- Als de ijs dikker is dan 5mm moet er ontdooid worden.
Ga als volgt te werk: zet de temperatuurknop A op de positie ; pak de inhoud van de freezer in kranten en leg het in
de koelkast of op een koele plaats. Laat de deur open staan
zodat alle ijs verdwijnt, ook met behulp van bakjes met lauw
water.
Speciale reiniging en onderhoud
Sluit altijd eerst de stroom af.
- De materialen van de vries-koelkast zijn van hygiënisch materiaal gemaakt en geven geen geuren af, maar om dit zo te
houden moeten de etenswaren altijd goed afgedekt zijn om
eventuele vlekken of luchtjes te vermijden.
- Alleen water en soda. Zowel voor de buitenkant als voor de
binnenkant gebruikt u een spons met lauw water en soda,
hetgeen bovendien een goede ontsmetter is. Als u dit niet in
huis heeft kunt u een neutrale zeep gebruiken.
- Wat niet te gebruiken. Nooit schuurmiddelen, nooit bleekwater,
nooit ammoniak. Ten strengste verboden zijn oplosmiddelen.
- Leg alle onderdelen die verwijderd kunnen worden in een
lauw sop. Goed spoelen en afdrogen vòòr het weer op hun
plaats zetten.
- En de achterkant? Hier verzamelt zich stof, hetgeen de goede
functionering van het apparaat kan belemmeren. Gebruik de
slang van uw stofzuiger op midden-sterkte voor het verwijderen van de stof. Ga voorzichtig te werk!
- Bij langdurig niet in gebruik zijn. Als u besluit de koelkast uit
te schakelen, maak dan de binnenkant schoon en laat de deuren open staan, ander kunnen zich luchtjes en schimmel ontwikkelen.
- Het vervangen van het lampje voor de binnenverlichting. Het
lampje voor de binnenverlichting bevindt zich achter de
thermostaatdoos. In het geval dat het moet worden vervangen
schakelt u de stroom van het apparaat uit; schroef het uitgebrande
lampje los en vervang het met een nieuw lampje dat niet sterker
is dan 15W of 25W. Ga te werk zoals aangegeven in afbeelding
4.
Afb. 3
27
1
2
Afb. 4
NL
Page 30

Er is een probleem
De koelkast functioneert niet.
Heeft u gecontroleerd of:
• de zekering is doorgeslagen;
• de stekker niet goed in het stopcontact zit;
• het stopcontact niet werkt; probeer de stekker in een an-
der stopcontact.
De koelkast en de freezer zijn niet koud
genoeg.
Heeft u gecontroleerd of:
• de deuren niet goed sluiten of de afdichtingen versleten
zijn;
• de deuren langdurig open zijn geweest;
• de temperatuurknop niet op de juiste positie staat;
• de koelkast of de freezer te vol zijn.
De etenswaren in de koelkast bevriezen.
Heeft u gecontroleerd of:
• de temperatuurknop niet op de juiste positie staat;
• de etenswaren tegen de achterwand aan staan, die het
koudst is.
Als ondanks alle controles het apparaat niet functioneert en
het door u geconstateerde gebrek er nog steeds is, wend u
zich dan tot een erkende installateur met deze informatie:
het soort gebrek, het codenummer van het model (Mod.)
en de betreffende nummers (S/N) op het typeplaatje dat zich
linksonder naast de groentenlade bevindt (zie de hiervolgende voorbeelden).
75
Test
P.S-I.
TI
Net
Util
Utile
Pressure
HIGH-235
LOW 140
RG 2330
Mod.
220 - 240 V- 50 Hz 150 W
340
Total
Gross
Bruto
Brut
Compr.
Syst.
Kompr.
Made in Italy 13918
Gross
Bruto
Brut
R 134 a
kg 0,090
93139180000 S/N 704211801
Cod.
Gross
Bruto
Brut
W
Fuse
A
Freez. Capac
Poder de Cong
4,0
kg/24 h
Max 15 w
Class
Clase
N
Classe
Wend u zich nooit tot een niet-erkende installateur en
weiger niet-originele onderdelen.
De motor blijft functioneren.
Heeft u gecontroleerd of:
• de deuren niet goed gesloten zijn of lang opengelaten;
• de buitentemperatuur hoog is;
• de temperatuurknop niet op de juiste positie staat.
Het apparaat maakt teveel lawaai.
Het verkoelende gas produceert een licht geluid ook als de
compressor stil staat (dit is geen gebrek).
Heeft u gecontroleerd of:
• de koelkast niet goed horizontaal staat;
• naast meubelen of voorwerpen staat die trillen of geluid
maken.
Er is water op de bodem van de koelkast.
Heeft u gecontroleerd of:
• het afvoergat verstopt is (zie afb. 3).
NL
28
Page 31

A segurança, um bom hábito
ATENÇÃO
Ler atentamente as advertências mencionadas neste livro de
instruções dado que fornecem importantes indicações relativas à segurança da instalação, à utilização e à manutenção.
Este aparelho foi concebido segundo as normas internacionais de segurança criadas fundamentalmente para a protecção do consumidor.
Na realidade, este aparelho obteve o certificado de homologação IMQ passado pelos técnicos do Instituto Italiano de
Qualidade, certificado que só é atribuido aos aparelhos que
cumpram as normas do CEI, Comitato Elettrotecnico Italiano.
1. Este aparelho não deve ser instalado ao ar livre, mesmo se
a área estiver protegida por uma cobertura; é muito perigoso
deixá-lo exposto à chuva e às intempéries.
2. Deve ser utilizado somente por adultos e exclusivamente
para conservar e congelar alimentos, de acordo com as
instruções de utilização contidas neste manual.
3. Nunca tocar nem manusear este aparelho com os pés descalços ou com as mãos ou os pés molhados.
4. Não é aconselhável a utilização de extensões e fichas múltiplas. Se o frigorífico for instalado entre móveis, controlar
que o cabo de alimentação não se dobre nem seja pressionado de maneira perigosa.
5. Nunca puxar o cabo de alimentação nem o frigorífico para
soltar a ficha da tomada de parede : é muito perigoso.
6. Não tocar as partes internas de refrigeração, sobretudo
com as mãos molhadas, porque poderá sofrer queimaduras
ou ferir-se. Também não colocar na boca cubos de gelo recém retirados do congelador porque podem provocar queimaduras.
7. Não limpar nem efectuar manutenção sem ter previamente retirado a ficha da tomada; de facto não basta colocar o
manípulo para a regulação da temperatura na posição para
interromper todos os contactos eléctricos.
8. Antes de desfazer-se do seu velho frigorífico, desmontar o
seu fecho para evitar que crianças a brincar possam ficar
trancadas dentro do aparelho.
9. No caso de avaria, antes de chamar o serviço de assistência
técnica, controlar no capítulo “Há um problema” para verificar se é possível resolver a eventual anomalia. Não tente proceder à reparação, mexendo nas partes internas do aparelho.
10. No caso de dano, o cavo de alimentação eléctrica deste
aparelho deve ser trocado obrigatoriamente pelo nosso
Serviço de Assistência Técnica, porque é necessário utilizar
ferramentas especiais.
11. não use aparelhos eléctricos no interior do compartimento
para guardar alimentos, excepto os de tipo recomendado pelo
fabricante.
12, No final da vida útil do aparelho – que contém gás
ciclopentano na espuma de isolamento e eventualmente gás
R600a (isobutano) no circuito de refrigeração – é necessário
colocar o mesmo em segurança, antes de mandar eliminá-lo.
Para esta operação, entre em contacto com o seu revendedor
ou com o organismo local encarregado.
Instalação
Para garantir um bom funcionamento e um consumo
reduzido de electricidade é importante que a instalação seja efectuada correctamente.
A ventilação
O compressor e o condensador emitem calor e portanto precisam de uma boa ventilação. São pouco adequados os ambientes com ventilação imperfeita. Portanto o aparelho deve ser
instalado num ambiente dotado de uma abertura (janela ou
porta externa) para assegurar a necessária renovação de ar. O
ambiente também não deve ser demasiado húmido.
Ter cuidado, durante a instalação, para não cobrir ou obstruir
as grelhas que permitem a boa ventilação do aparelho.
Para uma boa ventilação do aparelho é preciso deixar :
- uma distância de pelo menos 10 cm. entre a sua parte superior e móveis que eventualmente encontrem-se acima;
- uma distância de pelo menos 5 cm. entre as suas laterais e
móveis e paredes que eventualmente encontrem-se aos lados.
Para uma instalação entre móveis, siga as indicações
do folheto anexo
Afastado do calor
Evitar de posicionar o aparelho num ligar directamente exposto à luz solar, ao lado do fogão eléctrico ou similar.
Nivelado
O aparelho deve ser instalado bem nivelado; se o piso não
for nivelado, é possível proceder com os apropriados pés
reguláveis anteriormente colocados.
Ligação eléctrica e ligação à terra
Antes de proceder à ligação eléctrica, controlar se a tensão
indicada na placa de características, colocada embaixo à esquerda, junto ao recipiente para verduras, corresponde a
tensão da instalação eléctrica da casa e se a tomada está
equipada com uma ligação à terra regular, na maneira
indicada pelas leis relativas à segurança das instalações N°.
46/90. Se não houver uma ligação à terra, o Fabricador declina toda e qualquer responsabilidade. Não utilizar fichas
múltiplas ou adaptadores.
A potência é insuficiente ?
A tomada eléctrica deve ser capaz de suportar a máxima
carga de potência do aparelho, indicada na placa de características, colocada embaixo à esquerda, junto ao recipiente
para verduras.
Antes da ligação eléctrica
Depois do transporte, colocar o aparelho verticalmente e
aguardar pelo menos 3 horas antes de ligá-lo na tomada,
para permitir o seu funcionamento correcto.
29
P
Page 32

Descrição do aparelho
F
G
H
I
J
K
Manípulo para a regulação da temperatura
A
Este manípulo permite a regulação da temperatura dos dois
compartimentos com diversas posições :
frigorífico desligado;
1 frio mínimo;
5 frio máximo.
Recipiente para cubos de gelo
B
(só en algunos modelos)
Prateleira extraível com tampa e porta-ovos
C
Prateleiras extraível
D
3
Pés regoláveis em altura
Caixa para fruta e verdura
Canalizador água de descongelamento
Caixa carne/queijo
Grelha amovivel e regulável em altura
Compartimento para produção de gelo,
conservação de alimentos congelados e
surgelados e congelação de alimento frescos
Prateleira extraives para garrafas
E
A
K
J
I
H
G
A
B
K
C
C
J
D
I
H
E
G
D
D
D
E
P
FF
30
FF
Page 33

Como pôr em funcionamento o aparelho
ATENÇÃO
Depois do transporte, colocar o aparelho verticalmente
e aguardar cerca de 3 horas antes de ligá-lo na tomada
eléctrica, para assegurar o seu bom funcionamento.
Antes de guardar alimentos no frigorífico ou no congelador,
limpar bem o seu interior com água morna e bicarbonato de
sódio.
Depois de ter ligado a ficha à tomada eléctrica, verificar se a
lâmpada de iluminação está acesa, em seguida girar o
manípulo para a regulação da temperatura “A” até a posição “3” e depois de algumas horas, será possível guardar os
alimentos frescos no compartimento frigorífico e os congelados no congelador.
Como utilizar melhor o compartimento frigorífico
O termostato regula automaticamente a temperatura dentro do aparelho.
1 = frio mínimo
5 = frio máximo
Entretanto é aconselhável uma posição intermediária.
Para aumentar o espaço e a disposição, e melhorar o seu
aspecto, este aparelho tem a sua “parte refrigeradora” situada no interno da sua parede traseira do compartimento
frigorífico. Esta parede, durante o funcionamento, estará
coberta de gelo ou de gotinhas de água, isto depende do
compressor estar a funcionar ou numa pausa. Não se preo-
cupar com isto! O frigorífico está a funcionar normalmente.
Se regular o manípulo em números altos, com grande quantidade de alimentos e com uma temperatura ambiente alta,
o aparelho pode funcionar continuamente, isto propicia a
formação de gelo na parede refrigeradora traseira, com um
consequente aumento no consumo de energia eléctrica.
Para evitar este problema, é suficiente deslocar o
manípulo do termostato para números mais baixos,
de maneira que permita ao aparelho uma normal
descongelação automática.
Guia para arrumar e conservar os alimentos no compartimento frigorífico
Alimentos
Carne ou peixe limpos (guardar em sacos ou
envolver em película de plástico)
Queijos frescos 3 ou 4 dias
Ovos 1 mês No recipiente próprio. Na contraporta
Manteiga e Margarina Nas prateleiras da contraporta.
Alimentos cozinhados (colocar em recipientes
herméticos e guardar só depois de arrefecidos)
Enchidos, pão de forma, massa fresca, natas,
pudins, chocolates, bolos de creme, pastelaria
seca, toucinho, polpa de tomate, etc.
Garrafas, leite, bebidas, iogurte Nas prateleiras existentes na contraporta
Fruta e verduras Nas verdureiras
Tempo de
conservação
2 ou 3 dias
3 ou 4 dias Em qualquer uma das grelhas
3 ou 4 dias Em qualquer uma das grelhas
Disposição no frigorífico
Sobre a verdureira
(zona mais fria do frigorífico)
Sobre a verdureira
(zona mais fria do frigorífico)
O que não deve guardar no frigorífico
Alhos (provocam maus cheiros), cebolas e alho-porro - Bananas (enegrecem)
Citrinos (é preferível ao ar livre, sobre uma prateleira)
Batatas ou tubérculos (só se protegidos da luz e sem humidade)
31
P
Page 34

- No interior do frigorífico o ar circula de maneira natural,
1
2
portanto o ar mais frio tende a descer, porque é mais pesado. É por isto que a carne e os queijos devem ser colocados
acima do recipiente para verduras.
- Seguir atentamente os nossos conselhos relativos ao tempo máxima da conservação : qualquer alimento, mesmo os
mais frescos, não permanece intacto durante muito tempo.
- Contrariamente ao que se possa pensar, os alimentos cozidos não se conservam mais tempo que os crus.
- Não guardar líquidos em recipientes abertos, porque podem causar um aumento da humidade no interior do frigorífico com a consequente formação de gelo.
- Prestar atenção para não colocar recipientes (de matéria plástica, vidro), alimentos ou outra coisa em directo contacto com a parede refrigeradora (a traseira).
Isto poderia causar danos aos alimentos, aumentar o
consumo de energia e facilitar a formação de
condensação (nos alimentos, recipientes etc.).
- O compartimento frigorífico é dotado de práticas prateleiras extraíveis (Fig. 1) de altura regulável graças às apropriadas guias. Desta forma é possível guardar mesmo grandes
recipientes assim como alimentos de grandes dimensões.
Fig. 1
Para congelar bem
- Para a preparação dos alimentos a serem congelados
consultar um manual especializado.
- Um alimento descongelado, ainda que apenas parcialmente, nunca deve voltar a ser congelado : deverá cozinhá-lo
para o consumir (dentro de 24 horas) ou para o congelar
novamente.
- Os alimentos frescos a serem congelados não devem ser
colocados em contacto com os que já estão congelados;
devem ser colocados na prateleira do compartimento congelador, se possível encostados nas paredes (laterais e traseira). De facto, não se deve esquecer que a boa conservação dos alimentos congelados depende da rapidez da congelação.
- Durante a congelação, evitar abrir a porta do congelador.
- A quantidade máxima diária a ser congelada é indicada na
placa de características colocada à esquerda do recipiente
para verduras.
- Para obter uma congelação e uma sucessiva descongelação
ideal é aconselhável separar os alimentos em pequenas porções porque assim congelam-se rapidamente e de maneira
homogénea. Nas confecções indicar o conteúdo e a data de
congelação.
- Não abrir a porta do congelador em caso de falta de energia eléctrica ou de avaria, assim adiará o aumento da temperatura no seu interior. Deste modo, os alimentos comprados congelados e os congelados por si conservar-se-ão sem
alterações durante cerca de 9 - 14 horas.
- Não colocar no congelado garrafas cheias : poderão partir-se, dado que ao congelarem-se todos os líquidos aumentam de volume.
- Se por muito tempo a temperatura ambiente permanecer
abaixo de 14°C, não se conseguirá alcançar plenamente as
temperaturas necessárias para uma longa conservação no
compartimento congelador, portanto o período de conservação se reduzirá.
P
32
Page 35

Recipiente para gelo
Este novo conceito de recipiente para gelo, é uma patente
exclusiva da Merloni. O facto de ser colocado na parte interior
da porta do compartimento congelador, assegura maior
ergonomia e higiene : o gelo já não entra mais em contacto
com os alimentos guardados no compartimento congelador;
evita-se também que a água respingue-se na altura em que
carregar (também é fornecida a tampa para fechar a entrada,
depois de ter deitado a água dentro).
Modalidade de emprego (Fig. 2)
Encha o recipiente de água através do furo de entrada, até
o nível marcado (MAX WATER LEVEL - NÍVEL MÁXIMO
D'ÁGUA), tome cuidado para não ultrapassá-lo: se for
deitada uma quantidade de água superior à necessária,
haverá um formação de gelo que poderá impedir que os
cubos de gelo sejam tirados.
Se tiver sido deitada água demais, será necessário aguardar
o gelo derreter-se, esvaziar o recipiente e deitar água
novamente.
Depois de ter deitado água através do furo indicado, rode
90° o recipiente. Pelo princípio dos vasos comunicantes, a
água irá encher as apropriadas formas, em seguida pode-se
fechar o furo com a apropriada tampa e guardar o recipiente
na parte interior da porta.
Depois que gelo tiver se formado, será suficiente bater o
recipiente numa superfície dura, para que os cubos de gelo
soltem-se das formas e possam sair através do mesmo furo
por onde a água foi deitada. Para facilitar a saída dos cubos
de gelo, molhe com água a parte de fora do recipiente.
ATENÇÃO: todas as vezes que for deitar água no recipiente,
assegure-se antes que o mesmo esteja inteiramente vazio e
não haja dentro restos de gelo.
O prazo mínimo necessário para a melhor formação de gelo
é de aproximadamente 8 horas.
Fig. 2
Conselhos para economizar
- Instalar bem o aparelho
Isto é, longe de fontes de calor, da luz directa do sol, num
local bem ventilado e com as distância indicadas no parágrafo “Instalação/A ventilação”.
- O frio correcto
Demasiado frio aumenta o consumo de energia.
- Não encher demais o aparelho
Para conservar bem os alimentos, o frio deve circular livremente no interior do frigorífico. Enchê-lo demais significa
impedir esta circulação, isto obriga o compressor a funcionar continuamente.
- As portas fechadas
Abrir o seu frigorífico o menor número de vezes possível,
porque cada vez o fizer, virá para fora grande parte do ar
frio. Para restabelecer a temperatura o motor terá que funcionar durante muito tempo, isto consumirá muita energia
eléctrica.
- Cuidado com as guarnições
Manter sempre elásticas e limpas as guarnições de borracha
para a vedação das portas, de modo que adiram bem às
portas; só assim não deixarão sair nem um bocado de frio.
- Não guardar alimentos quentes
Uma panela quente guardada no frigorífico aumenta imediatamente a temperatura de diversos graus, deixá-la arrefecer
à temperatura ambiente antes de colocá-la no frigorífico.
- Gelo no congelador
Controlar a espessura do gelo nas paredes do congelador e
efectuar logo a descongelação se a camada estiver demasiado espessa (Ver a seguir : “Como mantê-lo em forma” ).
33
P
Page 36

Como mantê-lo em forma
Antes de começar as operações de limpeza lembre de
desligar o aparelho da corrente (desinserindo a ficha
da tomada ou o interruptor geral do apartamento)
Descongelamento
ATENÇÃO: não estrague o circuito de refrigeração.
Ter cuidado para não utilizar dispositivos mecânicos
ou outros instrumentos para tornar mais veloz o processo de descongelação, além dos recomendados pelo
fabricador.
Como descongelar o compartimento frigorífico.
Este aparelho tem descongelação automática e a água é
captada através de uma apropriada conduta para a parte
traseira (fig. 3) onde o calor produzido pelo compressor a
faz evaporar. A única intervenção que deve efectuar periodicamente consiste em limpar o furo de descarga que se
encontra atrás do recipiente para verduras afim de permitir
que a água passe regularmente.
Como descongelar o compartimento congelador
- Eliminar periodicamente o gelo com a apropriada espátula
fornecida com o aparelho (nunca utilizar facas ou objectos
metálicos).
- Se a camada de gelo for superior a 5 mm., é preciso efectuar a descongelação.
Proceder assim : colocar o manípulo para a regulação da
temperatura "A" na posição ; envolver os alimentos congelados em folhas de jornal e guardá-los no frigorífico ou
num lugar fresco. Deixar aberta a porta de modo que todo
o gelo derreta, para adiantar a descongelação poderá colocar dentro recipientes cheios de água morna.
Limpeza e manutenção especial
Antes de limpar o frigorífico desligá-lo da rede de alimentação eléctrica (retirar a ficha ou desligar o interruptor geral do apartamento).
- Os materiais com os quais foi fabricado o seu aparelho são
higiénicos e não transmitem odores, no entanto para manter esta qualidade é necessário que os alimentos seja sempre protegidos e bem fechados, para evitar manchas difíceis
de remover ou a criação de maus odores.
- Somente água e bicarbonato de sódio. Para limpar o aparelho por dentro e por fora utilizar uma esponja macia com
água morna e bicarbonato de sódio, que é também um bom
desinfectante. Se não houver bicarbonato em casa, poderá
utilizar um sabão neutro (o sabão de Marselha por exemplo).
- O que não deve utilizar : Nunca utilizar produtos abrasivos,
água de javel, amoníaco. É absolutamente proibido utilizar
solventes ou produtos similares.
- Todas as peças que puderem ser removidas, devem ser
colocadas de molho em água quente com sabão ou detergente para lavar loiça. Antes de as colocar novamente no
lugar, enxaguá-las e enxugá-las bem.
- E a parte de trás ? Aqui vai para e acumular-se o pó, isto
provoca alguns problemas para o bom funcionamento do
aparelho. Utilizar um bocal longo no seu aspirador de pó,
com uma potência média, para tirar o pó. Mas com muita
delicadeza!
- Quando estiver desligado durante muito tempo. Durante
o período do verão, se decidirem desligar o frigorífico, é preciso limpar o seu interior e deixar as portas abertas para
evitar a formação de maus odores e de bolor.
- Como substituir a lâmpada interna. Na parte traseira da
caixa do termostato há a lâmpada de iluminação interna. Se
for necessário substituir, desligue o aparelho da rede eléctrica,
desenrosque a lâmpada que não funcionar e substitua-a por
outra de potência não superior à indicada na protecção (15
W ou 25 W) da maneira indicada na figura 4.
Fig. 3
P
1
2
Fig. 4
34
Page 37

Há um problema
O frigorífico não funciona.
Controlou se:
• o interruptor geral do apartamento está desligado;
• a ficha não está correctamente inserida na tomada eléctri-
ca;
• a tomada eléctrica não funciona; experimentar ligar a fi-
cha em outra tomada eléctrica.
O frigorífico e o congelador esfriam pouco.
Controlou se:
• as portas não se fechem bem ou se as borrachas de vedação
estão estragadas;
• as portas permanecem abertas durante muito tempo;
• o manípulo para a regulação da temperatura não está na
posição correcta;
• o frigorífico ou o congelador foram enchidos excessiva-
mente.
No frigorífico os alimentos esfriam-se
excessivamente.
Controlou se:
• o manípulo para a regulação da temperatura não está na
posição correcta;
• os alimentos estão encostados na parte traseira do apare-
lho, a mais fria.
Se, apesar de todos os controlos, o aparelho não funcionar
e a anomalia que notou continuar a verificar-se, chamar o
Centro de Assistência Técnica mais próximo, comunicando
as seguintes informações : o tipo de avaria, a sigla do modelo (Mod.) e os respectivos números (S/N) escritos na placa
de características colocada embaixo à esquerda, junto ao
recipiente para verduras. (ver os exemplos nas figuras seguintes).
75
Test
P.S-I.
TI
Net
Util
Utile
Pressure
HIGH-235
LOW 140
RG 2330
Mod.
220 - 240 V- 50 Hz 150 W
340
Total
Gross
Bruto
Brut
Compr.
Syst.
Kompr.
Made in Italy 13918
Gross
Bruto
Brut
R 134 a
kg 0,090
93139180000 S/N 704211801
Cod.
Gross
Bruto
Brut
W
Fuse
A
Freez. Capac
Poder de Cong
kg/24 h
4,0
Max 15 w
Class
Clase
N
Classe
Nunca recorrer a técnicos não autorizados e recusar
sempre a instalação de peças sobresselentes não originais.
O motor funciona continuamente.
Controlou se:
• a portas não estão bem fechadas ou permaneceram aber-
tas durante muito tempo;
• a temperatura externa é muito alta;
• o manípulo para a regulação da temperatura não está na
posição correcta.
O aparelho emite demasiado ruído.
O gás refrigerante interno pode provocar um ligeiro ruído,
mesmo quando o compressor não estiver a funcionar (isto
não é um defeito).
Controlou se:
• frigorífico não está bem nivelado;
• foi instalado entre móveis ou objectos que vibram e emi-
tem ruídos.
Existência de água no fundo do frigorífico.
Controlou se :
• o furo da saída de água de descongelação está obstruído
(ver fig. 3).
35
P
Page 38

Bezpeènos dobrým zvykom
UPOZORNENIE
Pozorne si preèítajte upozornenia uvedené vtomto návode,
pretoe obsahujú dôleité pokyny týkajúce sa zachovania
bezpeènosti poèas intalácie, pouitia aúdrby tohoto
spotrebièa.
Tento spotrebiè je vzhode snasledujúcimi
smernicami Európskej únie:
- 72/23/EHS z19/02/73 (Nízke napätie) v znení neskorích
predpisov;
- 89/336/EHS z03/05/89 (Elektromagnetická kompatibilita)
v znení neskorích predpisov.
1. Tento spotrebiè nesmie by naintalovaný na otvorenom
priestore, ato ani vprípade, keï sa jedná opriestor krytý
prístrekom; jeho vystavenie daïu abúrkam je ve¾mi
nebezpeèné.
2. Smie by pouívaný len dospelými osobami ato výhradne
na konzerváciu azamrazovanie jedál, pod¾a pokynov
uvedených vtomto návode.
3. Nedotýkajte sa spotrebièa bosými nohami alebo mokrými
rukami èi nohami.
4. Neodporúèame vám pouíva predlovacie káble arozvodky.
Ak je chladnièka naintalovaná uprostred nábytkovej zostavy,
skontrolujte, èi kábel nie je nebezpeène prehnutý alebo
stlaèený.
5. Pri odpojovaní zástrèky zo zásuvky elektrického rozvodu
nikdy naahajte za kábel alebo za chladnièku: je to ve¾mi
nebezpeèné.
6. Nedotýkajte sa vnútorných chladiacich èastí, obzvlá
vprípade, keï máte mokré ruky, pretoe by ste si mohli spôsobi
omrzliny alebo sa zrani. Nevkladajte si do úst kocky ¾adu práve
vybraté zmraznièky, pretoe by ste si mohli spôsobi omrzliny.
7. Nezaèínajte èistenie ani údrbu bez toho, aby ste najprv
neodpojili el. zástrèku.
8. Pred odvozom starej chladnièky vyraïte zèinnosti prípadný
uzáver, aby sa zabránilo tomu, e hrajúce sa deti ostanú
uväznené vo vnútri spotrebièa.
9. Vprípade poruchy, skôr ako sa obrátite na servisnú slubu,
preèítajte si kapitolu Vyskytol sa nejaký problém?
askontrolujte, èi nemôete sami odstráni prípadnú poruchu.
Pri odstraòovaní poruchy sa nikdy nepokúajte oprístup
kvnútorným èastiam spotrebièa.
10. Svýmenou prívodného kábla sa obráte na Servisné
stredisko. Vniektorých prípadoch je zapojenie zrealizované
pomocou peciálnych svoriek, inokedy je pri prístupe kspojom
vyadované peciálne náradie.
11. Nepouívajte vo vnútri priestoru urèeného na uskladnenie
potravín elektrické prístroje, ktoré nie sú doporuèené výrobcom.
12. Po skonèení ivotnosti spotrebièa obsahujúceho plyn
cyklopentán ako súèas izolaènej peny aprípadne plyn R600a
(izobután) vchladiacom okruhu, je potrebné ho pred odvozom
na skládku odpadu patrièným spôsobom zabezpeèi. Za týmto
úèelom sa obráte na váho predajcu alebo na príslunú
miestnu organizáciu.
Intalácia
Pre správnu èinnos spotrebièa azachovanie nízkej
spotreby elektrickej energie je dôleité, aby bola správne
vykonaná jeho intalácia.
Ventilácia
Kompresor akondenzátor vydávajú teplo avyadujú preto
dobrú ventiláciu. Ich pouitie vprostredí snedostatoènou
ventiláciou sa preto neodporúèa. Spotrebiè má by
naintalovaný vprostredí vybavenom vetracím otvorom
(oknom alebo balkónovými dverami), ktorý zaistí dostatoènú
výmenu vzduchu anebude pritom zdrojom nadmernej
vlhkosti.
Poèas intalácie dbajte na to, aby nedolo kzakrytiu alebo
upchatiu vetracích mrieok, umoòujúcich potrebnú ventiláciu
spotrebièa.
Na zabezpeèenie dostatoènej ventilácie spotrebièa je
potrebné ponecha:
- vzdialenos medzi vrchnou èasou spotrebièa a prípadnými
kusmi nábytku nachádzajúcimi sa nad ním, minimálne 10
cm;
- vzdialenos medzi boènými èasami spotrebièa a prípadnými
kusmi nábytku / boènými stenami, minimálne 5 cm.
Vzdialenos od zdrojov tepla
Vyhnite sa umiestneniu spotrebièa na mieste vystavenom
pôsobeniu priamych slneèných lúèov, vblízkosti
elektrického poráka alebo podobných spotrebièov.
Vodorovná poloha
Spotrebiè musí by vyrovnaný do vodorovnej polohy; keï
nie je podlaha, na ktorej je umiestnený rovná, je potrebné
vodorovnú polohu nastavi prostredníctvom nastavite¾ných
predných noièiek.
Pripojenie kelektrickému rozvodu a uzemnenie
Pred pripojením kelektrickému rozvodu je potrebné
skontrolova, èi hodnota napätia uvedená na výkonovom
títku, umiestnenom v¾avej dolnej èasti, vblízkosti zásuvky
na zeleninu, odpovedá napätiu elektrického rozvodu váho
bytu / domu, aèi je zásuvka riadne uzemnená, vsúlade so
zákonom obezpeènosti elektrických rozvodov 46/90.
Vprípade chýbajúceho uzemnenia výrobca nezodpovedá za
prípadné následky. Nepouívajte rozvodky alebo redukcie.
Spotrebiè umiestnite tak, aby bol umonený vo¾ný
prístup kzásuvke, ku ktorej je pripojený.
Je kdispozícii dostatoèný príkon?
Zásuvka elektrického rozvodu musí by schopná
zabezpeèi príkon odpovedajúci maximálnemu výkonu
spotrebièa, uvedený na výkonovom títku, umiestnenom
v¾avej dolnej èasti, vblízkosti zásuvky na zeleninu.
Pred pripojením kelektrickému rozvodu
Po preprave spotrebièa je potrebné ho umiestni do
vertikálnej polohy apred jeho pripojením do zásuvky
elektrického rozvodu vyèka najmenej 3 hodiny.
SK
36
Page 39

Poh¾ad zblízka
Otoèný gombík regulácie teploty
A
Tento gombík umoòuje
nastavenie teploty
chladnièky do jednej
znasledujúcich polôh:
vypnutie chladnièky
1 mení chlad
5 väèí chlad
Misky na výrobu ¾adu
B
Vyahovate¾ný driak s vieèkom
C
Vyahovate¾ný driak na rôzne predmety
D
Driak na konzervy
E
3
Nastavite¾né noièky
F
Zásuvka na ovocie a zeleninu
G
Zberný kanálik na odmrazenú vodu
H
Nádoba na mäso ana syry
I
Vyahovate¾né avýkovo nastavite¾né police
J
Mraziaci priestor urèený na zamrazovanie a
K
konzerváciu
A
A
K
K
C
J
J
D
I
H
G
E
I
H
G
B
C
D
D
D
E
FF
37
FF
SK
Page 40

Uvedenie kombinovanej chladnièky do èinnosti
UPOZORNENIE
Po preprave spotrebièa je potrebné ho umiestni ho
do vertikálnej polohy apred jeho pripojením do
zásuvky elektrického rozvodu vyèka najmenej 3
hodiny.
Pred vloením potravín do chladnièky dokonale vyèistite
jej vnútro vlanou vodou abikarbonátom.
Po pripojení zástrèky do zásuvky elektrického rozvodu sa
uistite, e je iarovka vnútorného osvetlenia rozsvietená a
pretoète otoèný gombík regulácie teploty "A" do polohy "3".
Po nieko¾kých hodinách budete môc vloi èerstvé
potraviny do chladiaceho priestoru a zamrazené potraviny
do mraziaceho priestoru.
Rady pre optimálne vyuitie chladiaceho priestoru
Teplota vo vnútri chladiaceho priestoru je udrovaná
automaticky, na hodnote nastavenej prostredníctvom
otoèného gombíka regulácie teploty.
1 = mení chlad 5 = väèí chlad
Doporuèuje sa nastavenie strednej hodnoty.
Tento spotrebiè má chladiacu èas umiestnenú vo vnútri
zadnej steny chladiaceho oddelenia, kvôli zväèeniu
úloného priestoru a kvôli zlepeniu vzh¾adu. Tato stena
je poèas èinnosti pokrytá námrazou alebo kvapkami vody,
pod¾a toho, èi je kompresor vèinnosti, alebo èi je vypnutý.
Nejedná sa o dôvod k znepokojovaniu! Chladnièka pracuje
beným spôsobom.
Pri nastavení otoèného gombíka na jednu zvysokých
hodnôt a to vprípade ve¾kého mnostva potravín a pri
vysokej teplote prostredia, spotrebiè môe pracova
nepretrite, èím dochádza ku zvýenej tvorbe námrazy na
zadnej chladiacej stene,následným zvýením spotreby
elektrickej energie.
Uvedenému problému sa dá predís pretoèením
otoèného gombíka termostatu smerom kniím
hodnotám, èím spotrebièu umoníte nastavi
automatické rozmrazovanie.
1iYRGQDXNODGDQLHDNRQ]HUYiFLXMHGiOYFKODGLDFRPSULHVWRUH
'UXKMHGOD
9\þLVWHQpPlVRDU\E\
]DEDOL
GRSODVWRYêFKViþNRYDOHERIyOLH
ýHUVtvé syry 3 alebo 4 dni
Vajcia 1 mesiac V príslušnej nádobe na vnútornej strane dvierok
Maslo a margarín 9GUåLDNXQDYQ~WRUQHMVWUDQHGYLHURN
9DUHQpMHGOiXORåL GRKHUPHWLFN\X]DYUHWêFKQiGRED
YORåL
GRFKODGQLþN\DåSRY\FKODGQXWt
6XURYp~GHQLQ\FKOLHEYNUDELFLþRNROiGDNUpPRYp
NROiþHSDUDGDMN\DW
) DãN\POLHNRQiSRMHMRJXUW
Ovocie a zelenina V zásuvke na zeleninu
Èo sa nemá vklada do chladnièky
Cesnak (je zdrojom zápachu), cibu¾a apór. Banány (sèernejú).
Citrusové plody (je vhodnejie uskladni ich na chladnom mieste, napr. na balkóne). Zemiaky ah¾úza (v tmavom asuchom priestore).
'RED
NRQ]HUYiFLH
2 alebo 3 dni
3 alebo 4 dni 1DNWRUHMNR
3 alebo 4 dni 1DNWRUHMNR
8PLH VWQH QLHYRYQ~WULFKODG QLþ N\
Nad zásuvkou na zeleninu
QDMFKODGQHMãLDþDV
Nad zásuvkou na zeleninu
QDMFKODGQHMãLDþDV
9SUtVOXãQêFKGUåLDNRFKQDYQ~WRUQHMVWUDne
dvierok
YHNSROLFL
YHNSROLFL
SK
38
Page 41

Vo vnútri chladnièky sa vzduch pohybuje prirodzeným
spôsobom a ten chladnejí má tendenciu klesa, pretoe
je aí. To vysvet¾uje umiestnenie mäsa asyrov nad
priestorom pre zeleninu.
Pozorne sledujte nae rady týkajúce sa maximálnej doby
konzervácie: iadne jedlo, ani to najèerstvejie, nezostane
neporuené ve¾mi dlho.
Je potrebné ma tie na pamäti skutoènos, e ikeï opak
sa zdá pravdou, varené jedlá nie je moné skladova dlhie
ne surové.
Chladiaci priestor je vybavený praktickými vyahovate¾nými
policami, výkovo nastavite¾nými vïaka prísluným
vodiacim drákam (obr. 1). Toto rieenie umoòuje vklada
do uvedeného priestoru ive¾ké nádoby a znaène rozmerná
jedlá. Inovaèný tvar políc umoòuje ich výkové nastavenie
bez toho, e by bolo potrebné úplne vytiahnu policu.
Vkladajte len studené alebo, nanajvý vlané jedná, avyhnite
sa vkladaniu teplých jedál: spôsobili by bezprostredné
zvýenie vnútornej teploty snáslednou nadmernou záaou
kompresora azvýením spotreby elektrickej energie.
Taktie sa vyhnite vkladaniu tekutín votvorených
nádobách, pretoe by zapríèinili zvýenie vlhkosti vo vnútri
chladnièky s následnou tvorbou námrazy.
Venujte pozornos tomu, aby ste neumiestnili nádoby
(plastové, sklené) tak, aby boli vpriamom kontakte
schladiacou stenou (zadnou). Mohlo by to spôsobi
pokodenie potravín, zvýi spotrebu elektrickej
energie a u¾ahèi tvorbu kondenzátu (na potravinách,
na nádobách, atd.).
1
2
Obr. 1
Rady pre optimálne vyuitie mraziaceho priestoru
Pri príprave jedál urèených na zamrazenie postupujte
pod¾a prísluného návodu.
Potravina, ktorá bola rozmrazená, ikeï len èiastoène,
nesmie by nikdy opä zamrazená: je potrebné ju uvari
anásledne skonzumova (do 24 hodín) alebo opä zamrazi.
Èerstvé potraviny urèené na zamrazenie nesmú prís do styku
s u zamrazenými alebo mrazenými potravinami, ale je
potrebné ich umiestni do hornej èasti mraziaceho priestoru,
vktorej je teplota niia ne -18 °C a je preto ideálnou na
zamrazenie jedál. Netreba zabudnú na to, e správna
konzervácia zamrazených potravín závisí od rýchlosti ich
zamrazenia.
Poèas zamrazovania potravín neotvárajte dvierka mraznièky.
Maximálne denné mnostvo zamrazených potravín je
uvedené na výkonovom títku umiestnenom vo vnútri
chladiaceho priestoru.
Na zabezpeèenie optimálnej konzervácie a následného
rozmrazenia je vhodné rozdeli jedlá na menie porcie, aby
ich bolo moné rozmrazi rýchlejie arovnomernejie. Na
obaloch vyznaète ich obsah adátum zamrazenia.
Za úèelom zväèenia vyuite¾ného objemu vmraziacom
priestore môete vybra strednú zásuvku aumiestni
potraviny priamo na dosku výparníka. Po naplnení
mraziaceho priestoru sa presvedète, èi je moné bez
problémov zavrie dvierka.
Vprípade výpadku elektrického prúdu alebo pri výskyte
poruchy neotvárajte dvierka mraznièky vsnahe zabráni
zvýeniu vnútornej teploty. Pri dodraní uvedeného postupu
je moné uchova mrazené azamrazené jedlá bez zmeny
ich vlastností pribline 9-14 hodín.
Nevkladajte do mraznièky plné f¾ae: pri zamrazení, pri ktorom
vetky tekutiny zväèujú svoj objem, by mohli prasknú.
- Keï na dlhiu dobu zostane teplota prostredia chladnejia
ako 14 °C, nebudú úplne dosiahnuté podmienky potrebné
pre dlhodobejiu konzerváciu potravín vmraziacom
priestore a preto bude doba konzervácie kratia.
39
SK
Page 42

Misky na ¾ad
Tento nový spôsob pouitia misiek na ¾ad je chránený
výhradným patentom spoloènosti Merloni. Skutoènos, e
sú umiestnené na vnútornej strane dvierok chladiaceho
priestoru zabezpeèuje lepiu ergonómiu ajednoduchie
èistenie: ¾ad u tak viac neprichádza do styku sjedlami
umiestnenými vmraznièke; ïalej sa je moné, vïaka
tomuto umiestneniu, vyhnú sa kvapkaniu vody vo fáze
plnenia (súèasou prísluenstva je tie kryt slúiaci na
zakrytie otvoru po naplnení misiek vodou).
Spôsob pouitia (obr. 2)
Naplòte misku vodou prostredníctvom prísluného otvoru
a po oznaèenú úroveò (MAX WATER LEVEL), dbajúc
pritom, aby nedolo kjej prekroèeniu: naplnenie väèím
mnostvom vody ne je stanovené, bude ma za následok
tvorbu ¾adu, ktorý by mohol bráni vypúaniu kúskov ¾adu.
Vprípade, ak ste pouili nadmerné mnostvo tekutiny,
bude potrebné vyèka na rozpustenie ¾adu, vyprázdni
misku a zopakova celú operáciu naplnenia.
Po naplnení misky prostredníctvom prísluného otvoru,
ju pootoète o90°. Na základe princípu spojených nádob
voda naplní prísluné formièky a následne bude moné
zakry otvor prostredníctvom prísluného uzáveru
aumiestni misku na svoje miesto na vnútornej strane
dvierok.
Po vytvorení ¾adu postaèí pobúcha miskou o tvrdý
podklad, aby sa vytvorené kúsky ¾adu uvo¾nili a bolo ich
moné vysypa tým istým otvorom, ktorým bola naplnená
voda. Na u¾ahèenie uvo¾nenia kúskov ¾adu je potrebné
navlhèi vonkajiu stranu misky vodou.
UPOZORNENIE: pri kadom naplnení vodou je treba
skontrolova, èi je miska úplne prázdna aèi sa vnej
nenachádzajú zvyky ¾adu.
Minimálna doba potrebná na optimálnu tvorbu ¾adu je
pribline 8 hodín.
Obr. 2
Rady umoòujúce uetri
- Správna intalácia
To znamená ïaleko od zdrojov tepla, od pôsobenia
priamych slneèných lúèov, vdobre vetranej miestnosti, pri
repektovaní minimálnych vzdialeností uvedených
vkapitole Intalácia/Ventilácia.
- Správny stupeò chladu
Nadmerný chlad je synonymom nadmernej spotreby
-Správna miera naplnenia
Aby bolo moné správne konzervova vloené jedlá,
studený vzduch musí ma monos pohybova sa vo¾ne
vo vnútri chladnièky. Príliné naplnenie bráni tomuto
pohybu amá za následok zvýenú záa kompresora.
-Zatvorené dvierka
Otvárajte vau chladnièku èo najmenej, pretoe zakadým
keï ktomu dôjde, uniká znej ve¾ká èas studeného
vzduchu. Na obnovenie optimálnej teploty musí motor
pracova dlho, spotrebujúc ve¾ké mnostvo energie.
- Dobrý stav tesnení
Udrujte ich vèistom avdobrom stave, aby správne
priliehali na dvierka; iba tak bude moné zabráni úniku
chladu.
- iadne teplé jedlá
Teplá nádoba vloená do chladnièky zvýi teplotu
vpriemere onieko¾ko stupòov. Nechajte ho preto, pred
vloením do chladnièky vychladnú pri teplote prostredia.
- Kontrola stavu námrazy v mraznièke
Kontrolujte hrúbku námrazy na policiach mraznièky
avprípade vytvorenia nadmernej vrstvy vykonajte ihneï
odmrazenie (Viï nasledujúcu kapitola Ako ju udra vo
forme).
SK
40
Page 43

Ako je moné udra ju vo forme
Pred zahájením akejko¾vek operácie spojenej
sèistením, je potrebné odpoji prístroj od elektrického
rozvodu (vytiahnutím zástrèky zo zásuvky alebo
vypnutím hlavného vypínaèa elektrického rozvodu v
byte).
Odmrazenie
UPOZORNENIE: nepokoïte chladiaci okruh.
Pozor na to, aby ste vsnahe urýchli odmrazenie
nepouili mechanické èistiace prostriedky alebo iné
náradie ne to, ktoré doporuèuje výrobca.
Odmrazenie chladiaceho priestoru.
Tento spotrebiè je vybavený
automatickým odmrazovaním
arozmrazená voda je
odvádzaná smerom kzadnej
èasti, prostredníctvom
prísluného odpadu (obr. 3),
zktorého sa pôsobením tepla
pochádzajúceho ukompresora
odparuje. Jediná operácia,
ktorú musíte pravidelne
vykonáva spoèíva vo vyèistení
odpadového otvoru scie¾om
zabezpeèi plynulý odvod
rozmrazenej vody.
Spôsob odmrazenia mraziaceho priestoru
- Zèasu na èas odstráòte vytvorenú námrazu krabkou
zprísluenstva (nepoívajte noe alebo iné kovové predmety).
- Ak hrúbka námrazy presiahne 5 mm, je potrebné vykona
naozajstné odmrazenie. Postupujte nasledovne: pretoète otoèný
gombík termostatu "A" do polohy
Zaba¾te vetky mrazené azmrazené jedlá do novinového papiera
aulote ich buï do chladnièky alebo na iné chladné miesto.
Nechajte otvorené dvierka, aby dolo kúplnému odstráneniu
námrazy. Celú operáciu môete urýchli pouitím nádob svlanou
vodou.
Pred opätovným zapnutím spotrebièa ho vyèistite adôkladne
osute.
Obr. 3
.
Czyszczenie i konserwacja lodówko-zamra¿arki
Pred èistením chladnièky zakadým vytiahnite
zástrèku zo zásuvky.
- Vaa chladnièka bola vyrobená zhygienicky nezávadných
materiálov, ktoré neíria zápachy, ale na udranie tohto stavu
je potrebné zaisti, aby vkladané jedlá boli vdy riadne
chránené a uzatvorené, aby sa zabránilo vzniku ako
odstránite¾ných kvàn alebo nepríjemných zápachov.
- Len voda abikarbonát. Na èistenie vnútra ivonkajku
pouívajte mäkkú pongiu namoèenú vo vlanej vode so
sódou bikarbónou apridajte tie úèinný dezinfekèný
prostriedok. Vprípade, e doma iadny nemáte, môete
poui ineutrálne mydlo (napr. Marseillské mydlo).
- Èo sa nesmie pouíva. Nikdy nepouívajte drôtenky
sdrsnými èasticami, bielidlo ani amoniak. Pouitie
rozpúadiel apodobných prípravkov je prísne zakázané.
- Vetko, èo môe byt odstránené umyte vteplej vode,
mydlom alebo èistiacim prostriedkom na riad apred
uloením na pôvodné miesto riadne opláchnite aosute.
- A èo sa týka zadnej èasti? Tu sa zachytáva azhromaïuje
prach spôsobujúci niektoré problémy vriadnej èinnosti
prístroja. Na jeho odstránenie poite stredne ve¾ký nástavec
váho vysávaèa aodstráòte ho pri výkone nastavenom na
poloviènú úroveò. Ave¾mi opatrne!
- Po období dlhotrvajúcej neèinnosti. Keï sa rozhodnete
vletnom období chladnièku vypnú, je potrebné vyèisti
vnútrajok aponecha otvorené dvierka.
- Pri výmene iarovky vnútorného osvetlenia chladiaceho
priestoru odpojte prístroj od elektrického rozvodu avymeòte
pokodenú iarovku za inú svýkonom nepresahujúcim 15
W, postupujúc spôsobom znázorneným na obrázku 4.
1
2
41
Obr. 4
SK
Page 44

Vyskytol sa nejaký problém?
Chladnièka nefunguje.
Chladnièka nefunguje.
Skontrolovali ste, èi:
Skontrolovali ste, èi:
· nie je vypnutý hlavný vypínaè elektrického rozvodu vbyte;
· nie je vypnutý hlavný vypínaè elektrického rozvodu vbyte;
· je zástrèka správne zasunutá do zásuvky elektrického
· je zástrèka správne zasunutá do zásuvky elektrického
rozvodu;
rozvodu;
· je zásuvka fungujúca; vyskúajte zapoji zástrèku do inej
· je zásuvka fungujúca; vyskúajte zapoji zástrèku do inej
zásuvky vmiestnosti.
zásuvky vmiestnosti.
Chladnièka amraznièka chladia nedostatoène
Chladnièka amraznièka chladia nedostatoène
Skontrolovali ste, èi:
Skontrolovali ste, èi:
·
sú dvierka riadne zatvorené aèi nie sú pokodené
·
sú dvierka riadne zatvorené aèi nie sú pokodené
tesnenia;
tesnenia;
· dierka nie sú otvárané príli èasto;
· dierka nie sú otvárané príli èasto;
· sa otoèný gombík regulácie teploty nachádza vsprávnej
· sa otoèný gombík regulácie teploty nachádza vsprávnej
polohe;
polohe;
· chladnièka alebo mraznièka nie sú naplnené príli.
· chladnièka alebo mraznièka nie sú naplnené príli.
Potraviny vmraznièke sú zamrazené príli
Potraviny vmraznièke sú zamrazené príli
Skontrolovali ste, èi:
Skontrolovali ste, èi:
· otoèné gombíky regulácie teploty sa nachádzajú
· otoèné gombíky regulácie teploty sa nachádzajú
vsprávnej polohe;
vsprávnej polohe;
· potraviny nie sú vstyku schladnejou zadnou èasou.
· potraviny nie sú vstyku schladnejou zadnou èasou.
Motor zostáva vchode bez preruenia
Motor zostáva vchode bez preruenia
Skontrolovali ste, èi:
Skontrolovali ste, èi:
· sú dvierka správne zatvorené alebo èi nie sú príli èasto
· sú dvierka správne zatvorené alebo èi nie sú príli èasto
otvárané;
otvárané;
· nie je príli vysoká vonkajia teplota.
· nie je príli vysoká vonkajia teplota.
· hrúbka námrazy nepresahuje 2-3 mm.
· hrúbka námrazy nepresahuje 2-3 mm.
Keï aj po vetkých kontrolách prístroj naïalej nefunguje
ako by mal, aporucha, ktorú ste zistili naïalej pretrváva,
zavolajte do najbliieho Servisného strediska auveïte
nasledujúce informácie: druh poruchy, oznaèenie modelu
(Mod.) aprísluné èísla (S/N). uvedené na výkonovom
títku umiestnenom v¾avej dolnej èasti, vblízkosti zásuvky
na zeleninu (viï príklady na nasledujúcich obrázkoch).
75
Test
P.S-I.
TI
Net
Util
Utile
Pressure
HIGH-235
LOW 140
RG 2330
Mod.
220 - 240 V- 50 Hz 150 W
340
Total
Gross
Bruto
Brut
Compr.
Syst.
Kompr.
Made in Italy 13918
Gross
Bruto
Brut
R 134 a
kg 0,090
93139180000 S/N 704211801
Cod.
Gross
Bruto
Brut
W
Fuse
A
Freez. Capac
Poder de Cong
kg/24 h
4,0
Max 15 w
Class
Clase
N
Classe
Nikdy nezverujte opravu neautorizovanému
technickému personálu anepripuste intaláciu
neoriginálnych náhradných dielov.
Prístroj vydáva nadmerný hluk.
Prístroj vydáva nadmerný hluk.
Skontrolovali ste, èi:
Skontrolovali ste, èi:
· je chladnièky umiestnená do vodorovnej polohy:
· je chladnièky umiestnená do vodorovnej polohy:
· bola umiestnená medzi kusmi nábytku alebo predmety,
· bola umiestnená medzi kusmi nábytku alebo predmety,
ktoré vibrujú aspôsobujú hluk;
ktoré vibrujú aspôsobujú hluk;
· chladiaci plyn nachádzajúci sa vo vnútri spôsobuje ¾ahký
· chladiaci plyn nachádzajúci sa vo vnútri spôsobuje ¾ahký
hluk ajkeï je kompresor vypnutý (nejedná sa ovadu).
hluk ajkeï je kompresor vypnutý (nejedná sa ovadu).
Na dne chladnièky sa nachádza voda
Na dne chladnièky sa nachádza voda
Skontrolovali ste, èi:
Skontrolovali ste, èi:
· odpadový otvor na rozmrazenú vodu nie je upchatý
· odpadový otvor na rozmrazenú vodu nie je upchatý
SK
42
Page 45

Bezpeènost je dobrým zvykem
UPOZORNÌNÍ
Pozornì si pøeètìte upozornìní uvedená vtomto návodì,
nebo obsahují dùleité pokyny týkající se zachování
bezpeènosti pøi instalaci, pouití a údrbì tohoto spotøebièe.
Tento spotøebiè je ve shodì snásledujícími
smìrnicemi Evropské unie:
- 72/23/EHS z19/02/73 (Nízké napìtí) ve znìní pozdìjích
pøedpisù;
- 89/336/EHS z03/05/89 (Elektromagnetická kompatibilita)
ve znìní pozdìjích pøedpisù.
1. Tento spotøebiè nesmí být instalován na otevøeném
prostoru, a to ani vpøípadì, jedná-li se o prostor krytý
pøístøekem; jeho vystavení deti a bouøkám je velice
nebezpeèné.
2. Smí být pouíván pouze dospìlými osobami, a to výhradnì
na uskladnìní a zamrazování jídel, dle pokynù uvedených
vtomto návodì.
3. Nedotýkejte se spotøebièe bosýma nohama nebo mokrýma
rukama èi nohama.
4. Nedoporuèujeme vám pouití prodluovacích kabelù a
rozdvojek. Je-li chladnièka nainstalována uprostøed
nábytkové sestavy, zkontrolujte, zda kabel není nebezpeènì
prohnut nebo stlaèen.
5. Pøi odpojování zástrèky ze zásuvky elektrického rozvodu
nikdy netahejte za kabel nebo za chladnièku: je to velice
nebezpeèné.
6. Nedotýkejte se vnitøních chladicích èástí, zejména máte-li
mokré ruce, protoe byste si mohli zpùsobit omrzliny nebo
se zranit. Nevkládejte si do úst kostky ledu bezprostøednì
vytaené zmraznièky, protoe byste si mohli zpùsobit
omrzliny.
7. Nezahajujte èitìní ani údrbu, ani byste nejdøíve odpojili
zástrèku.
8. Døíve ne vám pøijdou vyzvednout starou chladnièku,
vyøaïte zèinnosti pøípadný uzávìr, aby se zabránilo
pøípadnému uvìznìní hrajících si dìtí uvnitø spotøebièe.
9. Vpøípadì poruchy, døíve ne se obrátíte na servisní slubu,
pøeètìte si kapitolu Vyskytl se nìjaký problém? a
zkontrolujte, zda nemùete sami odstranit pøípadnou
poruchu. Nikdy se pøi odstraòovaní poruchy nepokouejte o
pøístup kvnitøním èástem spotøebièe.
10. Svýmìnou pøívodního kabelu se obrate na Servisní
støedisko. Vnìkterých pøípadech je zapojení
realizovánopouitím speciálních svorek, jindy se pøi pøístupu
ke spojùm vyaduje pouití speciálního náøadí.
11. Nepouívejte uvnitø prostoru urèeného na uskladnìní
potravin elektrické pøístroje, které nejsou doporuèeny
výrobcem.
12. Po ukonèení ivotnosti spotøebièe obsahujícího plyn
cyklopentan jako souèást izolaèní pìny a pøípadnì plyn
R600a (isobutan) vchladicím okruhu, je nezbytné jej pøed
odvozem na skládku odpadu patøièným zpùsobem
zabezpeèit. Za tímto úèelem se obrate na vaeho prodejce
nebo na pøíslunou místní organizaci.
Instalace
Pro správnou èinnost spotøebièe a zachování nízké
spotøeby elektrické energie je dùleité, aby byla správnì
provedena jeho instalace.
Ventilace
Kompresor a kondenzátor vydávají teplo a vyadují proto
dobrou ventilaci. Jejich pouití vprostøedí snedostateènou
ventilací se proto nedoporuèuje. Spotøebiè má být
nainstalován vprostøedí vybaveném vìtracím otvorem
(oknem nebo balkónovými dveømi), který zajistí
dostateènou výmìnu vzduchu a nebude pøitom zdrojem
nadmìrné vlhkosti.
Bìhem instalace dbejte na to, aby nedolo kzakrytí nebo
ucpání vìtracích møíek, umoòujících potøebnou ventilaci
spotøebièe.
Kzabezpeèení potøebné ventilace spotøebièe je tøeba
ponechat:
- vzdálenost minimálnì 10 cm mezi vrchní èástí spotøebièe
a pøípadnými kusy nábytku nacházejícími se nad ním;
- vzdálenost minimálnì 5 cm mezi boèními èástmi
spotøebièe a pøípadnými kusy nábytku/boèními stìnami.
Vzdálenost od zdrojù tepla
Vyhnìte se umístìní spotøebièe na místì vystaveném
pùsobení pøímých sluneèních paprskù, poblí elektrické
trouby nebo podobných spotøebièù.
Vodorovná poloha
Spotøebiè musí být uveden do vodorovné polohy; není-li
podlaha, na ní je umístìn, rovná, je tøeba vodorovnou
polohu seøídit prostøednictvím nastavitelných pøedních
noièek.
Pøipojení kelektrickému rozvodu a uzemnìní
Pøed realizací pøipojení kelektrickému rozvodu je tøeba
zkontrolovat, zda hodnota napìtí uvedená na výkonovém
títku, umístìném vlevé dolní èásti, poblí zásuvky na
zeleninu, odpovídá napìtí elektrického rozvodu vaeho
bytu/domu, a zda je zásuvka øádnì uzemnìna,
vsouladuse zákonem o bezpeènosti elektrických rozvodù
46/90. Vpøípadì, e chybí uzemnìní, výrobce neodpovídá
za pøípadné následky. Nepouívejte rozvodky nebo
redukce. Spotøebiè umístìte tak, aby byl umonìn
volný pøístup kzásuvce, ke které je pøipojen.
Je kdispozici dostateèný pøíkon?
Zásuvka elektrického rozvodu musí být schopna
zabezpeèit pøíkon odpovídající maximálnímu výkonu
spotøebièe, uvedenému na výkonovém títku, který je
umístìn vlevé dolní èásti, poblí zásuvky na zeleninu.
Pøed pøipojením kelektrickému rozvodu
Po pøepravì spotøebièe je tøeba umístit jej do vertikální
polohy a pøed jeho pøipojením do zásuvky elektrického
rozvodu vyèkat nejménì 3 hodiny.
43
CZ
Page 46

Pohled zblízka
F
G
H
I
J
K
Otoèný knoflík regulace teploty
A
Tento knoflík umoòuje
nastavení teploty
chladnièky do jedné
znásledujících poloh:
vypnutí chladnièky;
1 mení chlad;
5 vìtí chlad
Misky pro výrobu ledu
B
Vytaitelný drák s víèkem
C
Vytaitelný drák na rùzné pøedmìty
D
Drák na láhve
E
Nastavitelné noièky
Zásuvka na ovoce a zeleninu
3
Sbìrný kanálek na odmraenou vodu
Krabice na maso a sýry
Vytaitelné a výkovì nastavitelné police
Mrazící prostor urèený k zamrazování a
konzervaci
A
A
K
K
C
J
J
D
I
H
G
E
I
H
G
B
C
D
D
D
E
CZ
FF
44
FF
Page 47

Uvedení kombinované chladnièky do provozu
UPOZORNÌNÍ
Po pøepravì spotøebièe je tøeba umístit jej do vertikální
polohy a pøed jeho pøipojením dozásuvky elektrického
rozvodu poèkat nejménì 3 hodiny.
Pøed vloením potravin do chladnièky dokonale vyèistìte
Po pøipojení zástrèky do zásuvky elektrického rozvodu se
ujistìte, e je árovka vnitøního osvìtlení rozsvícena, a
pøetoète otoèný knoflík regulace teploty "A" do polohy "3".
Po nìkolika hodinách budete moci vloit èerstvé potraviny
do chladicího a zmraené potraviny do mrazicího prostoru.
její vnitøek vlanou vodou a bikarbonátem.
Rady pro optimální vyuití chladícího oddílu
Teplota uvnitø chladícího prostoru je udrována automaticky
na hodnotì nastavené prostøednictvím otoèného knoflíku
regulace teploty.
1 = mení chlad
5 = vìtí chlad
Doporuèuje se nastavení støední hodnoty.
Spotøebiè má chladící èást umístìnou uvnitø zadní stìny
chladícího dílu. Je tomu tak proto, aby byl kdispozici vìtí
prostor a také kvùli lepímu vzhledu. Bìhem èinnosti je
tato stìna pokryta námrazou nebo kapkami vody, podle
toho, zda kompresor pracuje èi je vpauze. Není to vak
dùvod k vaemu znepokojení! Chladnièka pracuje bìným
zpùsobem.
Pøi nastavení otoèného knoflíku na jednu zvysokých
hodnot, a to vpøípadì velkého mnoství potravin a pøi
vysoké teplotì prostøedí, mùe spotøebiè pracovat
nepøetritì, èím dochází ke zvýené tvorbì námrazy na
zadní chladící stìnì snásledným zvýením spotøeby
elektrické energie.
Uvedenému problému lze pøedejít pøetoèením knoflíku
termostatu na nií hodnoty, èím se spotøebièi umoní
nastavit automatické odmrazování.
1iYRGSURXNOiGiQtDNRQ]HUYDFLMtGHOYFKODGLFtPSURVWRUX
'UXKMtGOD
0DVRDRþLãW QpU\E\
]DEDOLWGRSODVWRYêFKViþN
ýHUVWYpVêU\
Vejce
Máslo a margaríny
9D HQiMtGODXORåLWGRKHUPHWLFN\X]DY HQêFKREDO D
YORåLWGRFKODGQLþN\DåSRRFKOD]HQ
6\URYpX]HQLQ\FKOpEYNUDELFLþRNROiGDNUpPRYp
]iNXVN\UDMþDWDDWG
Láhve, mléko, nápoje, jogurt
Ovoce a zelenina V zásuvce na zeleninu
3 nebo 4 dny
QHERIyOLt
í)
Co se nemá vkládat do chladnièky
Èesnek (je zdrojem zápachu), cibule a pór. Banány (zèernají).
Citrusové plody (je lepí uskladnit je na chladném místì, napø. na balkónì). Brambory a hlízy (v tmavém a suchém prostoru).
'RED
NRQ]HUYDFH
2 nebo 3 dny
P VtF
3 nebo 4 dny Na kterékoli polici
3 nebo 4 dny Na kterékoli polici
QtXYQLW FKODGQLþN\
8PtVW
Nad zásuvkou na zeleninu
QHMFKODGQ
Nad zásuvkou na zeleninu
QHMFKODGQ
9S tVOXãQpQiGRE QDYQLW QtVWUDQ GYt HN
9GUåiNXQDYQLW QtVWUDQ GYt HN
9S tVOXãQêFKGUåiFtFKQDYQLW QtVWUDQ GYt HN
MãtþiVW
MãtþiVW
45
CZ
Page 48

- Uvnitø chladnièky se vzduch pohybuje pøirozeným zpùsobem
1
2
a chladnìjí má tendenci sestupovat dolù, protoe je tìí. To
je dùvodem uloení sýrù a masa nad zásuvkou na zeleninu.
- Pozornì sledujte nae rady ohlednì maximální doby
konzervace: ádné jídlo, ani to nejèerstvìjí, nezùstane pøíli
dlouho neporuené.
- Rovnì je tøeba mít na pamìti fakt, e, na rozdíl od
veobecného mínìní, vaøená jídla nelze skladovat déle ne
syrová.
- Rovnì nevkládejte dovnitø tekutiny v otevøených nádobách,
protoe by zapøíèinily zvýení vlhkosti uvnitø chladnièky a
následnou tvorbu námrazy.
- Neumísujte nádoby (plastové, sklenìné) tak, aby byli v
pøímém kontaktu se zadníchladící stìnou. Mohlo by dojít
ke zkaení potravin, ke zvýení spotøeby elektrické energie
nebo by se mohl zaèít tvoøit kondenzát (na jídle, na
nádobách, atd.).
- Chladící oddíl je vybaven praktickými vytaitelnými policemi,
výkovì nastavitelnými díky pøísluným vodicím drákám (obr.
1). Toto øeení umoòuje vkládat do uvedeného prostoru také
veliké nádoby a znaènì rozmìrná jídla. Inovaèní tvar polic
umoòuje jejich výkové nastavení bez nutnosti úplného
vytaení polic.
obr. 1
Rady pro optimální vyuití mrazícího oddílu
Pøi pøípravì jídel urèených na zamrazení postupujte
dle pøísluného návodu.
Potravina, která byla, i kdy jen èásteènì, rozmrazena,
nesmí být nikdy opìt zmrazena: je tøeba ji uvaøit a následnì
zkonzumovat (do 24 hodin) nebo opìt zmrazit.
Èerstvé potraviny urèené ke zmrazení nesmí pøijít do styku
s ji zmraenými nebo mraenými potravinami, ale je tøeba
umístit je do horní èásti mrazícího prostoru, ve které je
teplota nií ne -18 °C, a je proto ideální pro mraení
jídel. Je tøeba nezapomenout na to, e správná konzervace
mraených potravin závisí na rychlosti jejich zmrazení.
Bìhem zmrazování potravin neotvírejte dvíøka mraznièky.
Maximální denní mnoství mraených potravin je uvedeno
na výkonovém títku umístìném uvnitø chladícího oddílu.
K zabezpeèení optimální konzervace a následného
rozmrazení je vhodné rozdìlit jídla na mení porce, aby je
bylo moné rozmrazit rychleji a rovnomìrnì. Na obalech
vyznaète jejich obsah a datum zmrazení.
Pro získání vìtího vyuitelného prostoru vmrazícím
oddílu mùete vytáhnout støední zásuvku a umístit
potraviny pøímo na desku výparníku. Po naplnìní mrazícího
prostoru se pøesvìdète, zda lze bez problémù zavøít dvíøka.
V pøípadì výpadku elektrického proudu nebo pøi výskytu
poruchy neotvírejte dvíøka mraznièky, abyste zabránili
zvýení vnitøní teploty. Pouitím uvedeného postupu lze
uchovat mraená a zmraená jídla beze zmìny jejich
vlastností pøiblinì 9-14 hodin.
Nevkládejte do mraznièky plné láhve: pøi zmrazení, pøi
kterém vechny tekutiny zvìtují svùj objem, by mohly
prasknout.
- Pokud bìhem delí doby zùstane teplota prostøedí nií
ne 14 °C, nebude zcela dosaeno teplot potøebných pro
dlouhodobou konzervaci potravin vmrazicím prostoru, a
proto bude období konzervace kratí.
CZ
46
Page 49

Misky na led
Tento nový zpùsob pouití misek na led je chránìn
výhradním patentem spoleènosti Merloni. Fakt, e jsou
umístìny na vnitøní stranì dveøí chladícího oddílu,
zabezpeèuje lepí ergonomii a snadnìjí èitìní: led ji
tak více nepøichází do styku sjídly umístìnými vmraznièce;
díky tomuto umístìní se lze rovnì vyhnout kapání vody
ve fázi plnìní (souèástí pøísluenství je také kryt slouící k
zakrytí otvoru po naplnìní misek vodou).
Zpùsob pouití (obr. 2)
Naplòte misku vodou prostøednictvím pøísluného otvoru
a po oznaèenou úroveò (MAX WATER LEVEL), a dbejte
pøitom na to, aby nedolo kjejímu pøekroèení: naplnìní
vìtím mnostvím vody, ne je stanovené mnoství, bude
mít za následek tvorbu ledu, který by mohl bránit vypoutìní
kouskù ledu.
Vpøípadì, e jste pouili nadmìrné mnoství tekutiny, bude
tøeba vyèkat rozputìní ledu, vyprázdnit misku a zopakovat
celou operaci naplnìní.
Po naplnìní misky prostøednictvím pøísluného otvoru, ji
pootoète o 90°. Na základì principu spojených nádob
voda naplní pøísluné formièky a následnì bude moné
uzavøít otvor pøísluným uzávìrem a umístit misku na
její místo na vnitøní stranì dvíøek.
Po vytvoøení ledu postaèí poklepat miskou o tvrdý podklad,
aby se vytvoøené kousky ledu uvolnily a bylo je moné
vysypat stejným otvorem, kterým byla naplnìna voda. Pro
ulehèení uvolnìní kouskù ledu je tøeba navlhèit vnìjí
stranu misky vodou.
UPOZORNÌNÍ: pøi kadém naplnìní vodou je nutno
zkontrolovat, zda je miska zcela prázdná a zda se vní
nenacházejí zbytky ledu.
Minimální doba potøebná k optimální tvorbì ledu je pøiblinì
8 hodin.
Obr. 2
Rady umoòující uetøit
- Správná instalace
To znamená daleko od zdrojù tepla, od pùsobení pøímých
sluneèních paprskù, vdobøe vìtrané místnosti, s
respektováním minimálních vzdáleností uvedených
vkapitole Instalace/Ventilace.
- Správný stupeò chladu
Nadmìrný chlad je synonymem nadmìrné spotøeby
- Správná míra naplnìní
Pro správnou konzervaci vloených jídel musí být chladu
uvnitø chladnièky umonìn volný pohyb. Pøíliné naplnìní
brání tomuto pohybu a má za následek zvýenou zátì
kompresoru.
- Zavøená dvíøka
Otevírejte vai chladnièku co nejménì, protoe z ní
pokadé uniká velká èást studeného vzduchu. Pro
obnovení optimální teploty musí motor dlouho pracovat
pøi spotøebì velkého mnoství energie.
- Dobrý stav tìsnìní
Udrujte je èisté a vdobrém stavu, aby správnì pøiléhalo
na dvíøka; pouze tak lze zamezit úniku chladu.
- ádná teplá jídla
Teplý hrnec vloený do chladnièky zvýí teplotu vprùmìru
o nìkolik stupòù. Nechte jej proto pøed vloením do
chladnièky vychladit pøi teplotì prostøedí.
- Kontrola stavu námrazy v mraznièce
Kontrolujte tlouku námrazy na policích mraznièky a
vpøípadì vytvoøení nadmìrné vrstvy námrazy proveïte
ihned odmrazení (Viz následující kapitolu Jak ji udret ve
formì).
47
CZ
Page 50

Jak ji udret ve formì
Pøed zahájením jakékoli operace spojené sèitìním
je tøeba odpojit pøístroj od elektrického rozvodu
(vytaením zástrèky ze zásuvky nebo vypnutím
hlavního vypínaèe elektrického rozvodu v bytì).
Odmrazení
UPOZORNÌNÍ: nepokoïte chladící okruh.
Pozor na to, abyste ve snaze urychlit odmrazení nepouili
mechanické prostøedky anebo jiné náøadí ne doporuèuje
výrobce.
Odmrazení chladícího prostoru.
Tento spotøebiè je vybaven automatickým odmrazováním a
rozmraená voda je odvádìna smìrem kzadní èásti pøísluným
odpadem (obr. 3), ze kterého se pùsobením tepla pocházejícího
zkompresoru odpaøuje. Jediná operace, kterou musíte
pravidelnì provádìt, spoèívá ve vyèitìní odpadního otvoru
scílem zabezpeèit plynulý odvod rozmraené vody.
Zpùsob odmrazení mrazícího oddílu
Obèas odstraòte vytvoøenou námrazu krabkou
zpøísluenství (ádné noe nebo kovové pøedmìty).
Pøesáhne-li tlouka námrazy 5 mm, je tøeba provést skuteèné
odmrazení. Postupujte následovnì: Pøetoète otoèný knoflík
termostatu "A" do polohy "
zmraená jídla do novinového papíru a ulote je buï do
chladnièky anebo na jiné chladné místo. Ponechte otevøená
dvíøka, aby dolo kúplnému odstranìní námrazy. Celou operaci
mùete urychlit pouitím nádob svlanou vodou.
Pøed opìtovným zapnutím spotøebiè vyèistìte a dùkladnì
osute.
"; zabalte vechna mraená a
Èitìní a mimoøádná údrba
Pøed èitìním chladnièky pokadé vytáhnìte zástrèku
ze zásuvky.
- Vae chladnièka byla vyrobena zhygienicky nezávadných
materiálù, které neíøí zápachy, ale k udrení této vlastnosti
je tøeba zajistit, aby vkládaná jídla byla vdy øádnì chránìna
a uzavøena, èím se zabrání vzniku obtínì odstranitelných
skvrn nebo nepøíjemných zápachù.
- Pouze voda a bikarbonát. K èitìní vnitøku i vnìjku
pouívejte mìkkou houbu namoèenou ve vlané vodì s
bikarbonátem sodným (hydrogenuhlièitan sodný), který je mj.
také dobrým desinfekèním prostøedkem. Vpøípadì, e doma
ádný nemáte, mùete pouít i neutrální mýdlo (napøíklad
Marseillské mýdlo).
- Co se nesmí pouívat. Nikdy nepouívejte drátìnky
sdrsnými èásticemi, bìlidlo ani amoniak. Pouití rozpoutìdel
a podobných pøípravkù je pøísnì zakázáno.
- Vechny èásti, které lze vyjmout, umyjte vteplé vodì
mýdlem nebo èisticím prostøedkem na nádobí. A pøed
uloením na pùvodní místo je øádnì opláchnìte a osute.
- A co se týèe zadní èásti? Zde se zachycuje a shromaïuje
prach zpùsobující nìkteré problémy vøádné èinnosti pøístroje.
K jeho odstranìní pouijte støednì velký nástavec vaeho
vysavaèe, jeho výkon je nastaven na polovièní úroveò. A
velice opatrnì!
- Po období dlouhodobé neèinnosti. Pokud se rozhodnete
vletním období vypnout chladnièku, je tøeba vyèistit vnitøek
a ponechat otevøená dvíøka.
- Pøi výmìnì árovky vnitøního osvìtlení chladícího prostoru
odpojte pøístroj od elektrického rozvodu a vymìòte
pokozenou árovku za jinou, svýkonem nepøesahujícím 15
W, a to zpùsobem znázornìným na obrázku 4.
obr. 3
1
2
obr. 4
CZ
48
Page 51

Vyskytl se nìjaký problém?
Chladnièka je mimo provoz.
Zkontrolovali jste, zda:
· není vypnutý hlavní vypínaè elektrického rozvodu vbytì;
· je zástrèka správnì zasunuta do zásuvky elektrického
rozvodu;
· zásuvka funguje; zkuste zapojit zástrèku do jiné zásuvky
vmístnosti.
Chladnièka a mraznièka chladí
nedostateènì
Zkontrolovali jste, zda:
· jsou dvíøka øádnì uzavøena a zda nejsou pokozena
tìsnìní;
· dvíøka nejsou pøíli èasto otevírána;
· Chladnièka je mimo provoz;
· chladnièka èi mraznièka nejsou pøíli naplnìny.
Potraviny vmraznièce jsou pøíli zmrazeny
Zkontrolovali jste, zda:
· se otoèný knoflík regulace teploty nachází ve správné
poloze;
· potraviny nejsou ve styku schladnìjí zadní èástí.
Na dnì chladnièky se nachází voda
Zkontrolovali jste, zda:
· není ucpán odpadní otvor na rozmrazenou vodu
Jestlie pøístroj ani po vech provedených kontrolách
nefunguje tak, jak by mìl, a porucha, kterou jste zjistili,
nadále pøetrvává, zavolejte do nejbliího Servisního
støediska a uveïte následující informace: druh poruchy,
oznaèení modelu (Mod.) a pøísluná èísla (S/N). Tyto
informace jsou uvedeny na výkonovém títku umístìném
vlevé dolní èásti poblí zásuvky na zeleninu (viz pøíklady
na následujících obrázcích).
75
Test
P.S-I.
TI
Net
Util
Utile
Pressure
HIGH-235
LOW 140
RG 2330
Mod.
220 - 240 V- 50 Hz 150 W
340
Total
Gross
Bruto
Brut
Compr.
Syst.
Kompr.
Made in Italy 13918
Gross
Bruto
Brut
R 134 a
kg 0,090
93139180000 S/N 704211801
Cod.
Gross
Bruto
Brut
W
Fuse
A
Freez. Capac
Poder de Cong
kg/24 h
4,0
Max 15 w
Class
Clase
N
Classe
Motor zùstává vchodu bez pøeruení
Zkontrolovali jste, zda:
· jsou dvíøka správnì zavøena nebo zda nejsou pøíli èasto
otevírána;
· není vnìjí teplota pøíli vysoká;
· tlouka námrazy nepøesahuje 2-3 mm.
Pøístroj vydává nadmìrný hluk.
Zkontrolovali jste, zda:
· je chladnièka umístìna do vodorovné polohy:
· nebyla umístìna mezi kusy nábytku anebo pøedmìty,
které vibrují a zpùsobují hluk;
· chladicí plyn nacházející se uvnitø zpùsobuje lehký hluk,
i kdy je kompresor vypnutý (nejedná se o vadu).
Nikdy nesvìøujte opravu neautorizovanému
technickému personálu a nepøipuste instalaci jiných
ne originálních náhradních dílù.
49
CZ
Page 52

Siguranþa, o bunã obiºnuinþã
ATENÞIE
Citiþi cu atenþie avertizãrile conþinute în prezenta broºurã,
întrucât furnizeazã indicaþii importante cu privire la
siguranþa la instalare, la folosire ºi la întreþinere.
Acest aparat este conform cu urmãtoarele
Directive Comunitare:
- 73/23/CEE din data de 19/02/73 (Tensiuni Joase) ºi
modificãri succesive;
- 89/336/CEE din data de 03/05/89 (Compatibilitate
Electromagneticã) ºi modificãri succesive.
1. Acest aparat nu trebuie instalat afarã, nici chiar în cazul
în care spaþiul este adãpostit, deoarece este foarte
periculoasã expunerea acestuia la ploi ºi furtuni.
2. Trebuie folosit doar de persoane adulte ºi exclusiv pentru
a conserva ºi congela alimente, respectând instrucþiunile
de folosire din acest manual.
3. Nu atingeþi ºi nu manevraþi niciodatã aparatul fiind
desculþi sau cu mâinile sau picioarele ude.
4. Este recomandabil sã nu se foloseascã prelungitoare ºi
prize multiple; Dacã frigiderul este instalat între mobilã,
verificaþi cablul acestuia care nu trebuie sã fie îndoit sau
comprimat în mod periculos.
5. Nu trageþi niciodatã cablul sau frigiderul pentru a scoate
fiºa din priza de curent: este foarte periculos.
6. Nu atingeþi pãrþile interne cu rol de rãcire, mai ales când
aveþi mâinile ude deoarece v-aþi putea arde sau rãni. Nu
puneþi în gurã cuburi de gheaþã imediat dupã scoaterea
acestora din congelator deoarece v-aþi putea arde.
7. Nu efectuaþi nici curãþenie ºi nici întreþinere înainte de a
fi scos fiºa din prizã; nu este suficient sã se apese mai
mult de douã secunde pe butonul ON/OFF pe display
pentru a elimina orice contact electric.
8. Înainte de a renunþa la frigiderul vechi, eliminaþi eventual
dispozitivul de închidere pentru a evita posibilitatea copiilor
care jucându-se ar putea rãmâne închiºi în el.
9. În caz de defecþiune, înainte de a apela la serviciul de
asistenþã, controlaþi capitolul Este vreo problemã? pentru
a verifica dacã este posibilã eliminarea eventualului defect.
Nu încercaþi sã reparaþi defecþiunea încercând sã umblaþi
la pãrþile interne.
10. În caz de înlocuire a cablului de alimentare, adresaþivã Centrelor noastre de Asistenþã. În unele cazuri legãturile
sunt efectuate cu terminale speciale iar în altele este
necesarã folosirea unor unelte speciale pentru a avea
acces la legãturi.
11. Nu folosiþi aparate electrice în interiorul sectorului de
conservare a alimentelor, în cazul în care acestea nu sunt
de tipul celor recomandate de fabricã.
12. Când aparatul, conþinând gaz ciclopentan în spumã
izolantã ºi eventual gaz R600a (izobutan) în circuitul
refrigerent, nu va mai fi bun de folosit, acesta va trebui
pus în loc sigur înainte de a arunca frigiderul la gunoi.
Pentru aceastã operaþie adresaþi-vã magazinului dvs. sau
instituþiei locale corespunzãtoare.
Instalare
Pentru a garanta o bunã funcþionare ºi un consum
limitat de electricitate, este important ca instalarea sã
fie efectuatã în mod corect.
Aerare
Compresorul ºi condensatorul emit cãldurã ºi necesitã deci
o bunã aerare. Sunt puþin adecvate ambientele care nu
dispun de o aerisire perfectã. Aparatul va trebui instalat
într-un mediu care sã dispunã de o deschidere (fereastrã
sau uºã de balcon) care sã garanteze schimbul de aer
necesar, aer care nu trebuie sã fie foarte umed.
Fiþi atenþi pe parcursul instalãrii, sã nu acoperiþi sau
înfundaþi grãtarele care permit o bunã aerisire a aparatului.
Pentru o bunã aerisire a aparatului trebuie lãsate:
- o distanþã de cel puþin 10 cm între partea superioarã ºi
eventuale mobile situate deasupra;
- o distanþã de cel puþin 5 cm între laturi ºi eventuale mobile/
pereþi laterali.
Departe de cãldurã
Evitaþi poziþionarea aparatului într-un loc expus în mod
direct la lumina solarã, lângã aragazul electric sau aparate
similare.
În plan
Aparatul trebuie sã fie în plan; dacã podeaua nu este
nivelatã, este posibil sã se intervinã prin reglarea
picioruºelor reglabile situate în partea anterioarã.
Conectarea electricã ºi legãtura cu
pãmântul
Înainte de a trece la conectarea electricã, controlaþi ca
voltajul indicat pe tãbliþa cu caracteristici, situatã jos la
stânga, lângã sertarul pentru verdeþuri, sã corespundã
voltajului instalaþiei pe care o aveþi acasã, ºi ca priza sã
fie dotatã cu o împãmântare reglementarã conform legii
cu privire la siguranþa instalaþiilor 46/90. Dacã lipseºte
împãmântarea, fabrica îºi declinã orice responsabilitate.
Nu folosiþi prize multiple sau adaptatoare.
Poziþionaþi aparatul astfel încât priza la care este
conectat, sã fie accesibilã.
Puterea este insuficientã?
Priza electricã trebuie sã fie în gradul de a suporta sarcina
maximã de putere a aparatului, indicatã pe tãbliþa cu
caracteristici situatã în partea de jos în stânga lângã
sertarul pentru verdeþuri.
Înainte de a-l conecta la priza de curent
Dupã transportare, aºezaþi aparatul vertical ºi aºteptaþi
cel puþin 3 ore înainte de a-l conecta la prizã pentru a-i
permite o buna funcþionare.
RO
50
Page 53

Vãzut de aproape
Selector de reglare a temperaturii
A
Acest selector permite
reglarea temperaturii
frigiderului pe poziþii
diverse:
frigiderul este închis;
1 mai puþin rece;
5 mai mult rece;
Vãsuþe pentru producerea de gheaþã
B
Suport cu capac ce poate fi extras
C
Raft pentru obiecte ce poate fi extras
D
Suport sticle
E
Picioruºe de reglare
F
Sertar pentru fructe ºi verdeþuri
G
3
Transportor apã de dezgheþare
H
Casoleta pentru carne ºi brânzã
I
Rafturi ce pot fi extrase ºi reglate în înãlþime
J
Locaº utilizabil pentru congelare ºi conservare
K
A
A
K
K
C
J
J
D
I
H
G
E
I
H
G
B
C
D
D
D
E
FF
51
FF
RO
Page 54

Cum se porneºte combina
ATENÞIE
Dupã transportare, aºezaþi aparatul vertical ºi aºteptaþi
circa 3 ore înainte de a-l conecta la prizã pentru a-i
permite o buna funcþionare.
Dupã ce aþi introdus ºtecherul în prizã, asiguraþi-vã cã becul
este aprins; poziþionaþi selectorul de teperaturã "A" pe "3"
ºi, dupã câteva ore, introduceþi alimentele proaspete în
frigider ºi pe cele congelate în congelator.
Înainte de a introduce alimentele în frigider, curãþaþi bine
interiorul cu apã cãlduþã ºi bicarbonat.
Cum se foloseºte cel mai bine compartimentul frigider
Temperatura în interiorul compartimentului frigider, se
regleazã automat pe baza poziþiei selectorului pentru
reglarea temperaturii.
1 = mai puþin frig 5 = mai frig
Se recomandã reglarea sa într-o poziþie medie.
Pentru a mãri spaþiul la dispoziþie ºi a îmbunãtãþi aspectul
estetic al acestui produs, partea refrigerentã a fost
amplasatã în peretele posterior al compartimentului frigider.
În timpul funcþionãrii, peretele va fi acoperit cu un strat
subþire de brumã sau cu picãturi mici de apã, în funcþie de
starea compresorului (activat sau dezactivat). Nu vã
impacientaþi! Acesta este modul normal de funcþionare!
Dacã selectorul este poziþionat în dreptul unor valori mari,
cantitatea de alimente este de asemenea, mare, iar
temperatura exterioarã este ridicatã, atunci frigiderul poate
funcþiona în mod continuu. Acest lucru va duce la apariþia
brumei pe peretele posterior ºi va mãri consumul de
energie electricã.
Pentru a evita acest inconvenient, este suficient sã
poziþionaþi selectorul termostatului în dreptul unor
valori mai coborâte: frigiderul va avea astfel timp sã
se dezgheþe (în mod automat).
,QGLFD LLSHQWUXGLVSXQHUHDúLFRQVHUYDUHDDOLPHQWHORUvQIULJLGHU
$OLPHQWH
&DUQHúLSHúWHFXU DW
vQSXQJLGHSODVWLFVDXIROLHWUDQVSDUHQW
Brânzeturi proaspete 3 sau 4 zile
2X
8QWúLPDUJDULQ
$OLPHQWHSUHSDUDWHvQUHFLSLHQWHHUPHWLFHGXS U FLUH
6DODPSURSDVS WSkLQHIHOLDW FLRFRODW IXUVHFXULFX
URúLLHWF«
FUHP
6WLFOHODSWHE XWXULU FRULWRDUHLDXUW
)UXFWHúLYHUGHD
Ce nu se poate pãstra la frigider
Usturoi, ceapã sau praz (pentru a evita formarea de miros urât). Banane (se înnegresc).
Citrice (mai bine pe balcon, la rece). Cartofi sau tuberoase.
7LPSGH
FRQVHUYDUH
2 sau 3 zile
OXQ
3 sau 4 zile Pe orice raft
3 sau 4 zile Pe orice raft
'LVSXQHUHvQIULJLGHU
'HDVXSUDVHUWDUXOXLSHQWUXYHUGHD
(zona mai rece)
'HDVXSUDVHUWDUXOXLSHQWUXYHUGHD
(zona mai rece)
ÌQFRIUDJXOGHSHXú
ÌQUDIWXOGHSHXú
3HUDIWXULOHGHSHXú
ÌQVHUWDUXOSHQWUXYHUGHD
RO
52
Page 55

În frigider aerul circulã în mod natural; aerul rece tinde sã
coboare, deoarece e mai greu. Iatã de ce carnea ºi brânza
trebuie aranjate deasupra sertarului pentru verdeaþã.
Urmãriþi cu atenþie sfaturile noastre cu privire la durata
maximã de pãstrare: orice aliment, chiar ºi cel mai
proaspãt, nu rãmâne intact o perioadã de timp foarte lungã.
Contrar a ceea ce se crede, alimentele gãtite nu se
pãstreazã mai mult decât cele crude.
Compartimentul frigider este dotat cu rafturi practice ce
pot fi extrase ºi reglate în înãlþime mulþumitã suporturilor
respective (Fig. 1). Este deci posibil sã se introducã chiar
ºi recipiente mari ºi alimente cu dimensiuni elevate. Forma
inovatoare a rafturilor permite reglarea în înãlþime fãrã a
extrage complet raftul.
Introduceþi doar alimente reci sau, cel mult, puþin cãlduþe,
evitându-le pe cele calde: ar ridica imediat temperatura
internã obligând compresorul la o funcþionare forþatã care
ar consuma mult curent electric.
Nu introduceþi lichidele în recipiente descoperite deoarece
ar provoca creºterea umiditãþii în interiorul frigiderului ºi în
consecinþã formarea de brumã.
Fiþi atenþi ca recipientele (de plastic sau sticlã),
alimentele sau altceva sã nu atingã peretele refrigerent
(din spate) al frigiderului. Acest lucru poate deteriora
alimentele, mãri consumul de energie ºi facilita
formarea de condens (pe alimente sau pe recipiente).
1
2
Fig. 1
Cum se foloseºte cel mai bine compartimentul congelator
Pentru prepararea alimentelor de congelat,
consultaþi un manual specializat.
Un aliment decongelat, chiar ºi parþial, nu trebuie niciodatã
sã mai fie recongelat. Trebuie sã fie gãtit pentru a fi
consumat (în termen de 24 de ore) sau pentru a fi congelat
din nou.
Alimentele proaspete de congelat nu trebuie sã fie puse în
contact cu cele deja congelate ci trebuie aºezate în raftul
superior unde temperatura coboarã sub -18°C ºi este idealã
pentru a congela bine alimentele. Nu trebuie sã se uite cã o
bunã conservare a alimentelor congelate depinde de viteza
de congelare.
Pe timpul congelãrii evitaþi deschiderea uºii congelatorului.
Cantitatea maximã zilnicã de congelat este indicat pe tãbliþa
cu caracteristici situatã în interiorul compartimentului frigider.
Pentru a obþine o conservare ºi o congelare ulterioarã
optimale, se recomandã divizarea alimentelor în porþiuni mici
astfel încât sã se poatã congela rapid ºi în mod omogen.
Pe pachete, specificaþi indicaþii cu privire la conþinut ºi la
data de congelare.
Pentru a obþine un spaþiu mai mare în congelator, puteþi
scoate sertarul central, sprijinind alimentele direct pe placa
de evaporare. Verificaþi dupã introducerea alimentelor, ca
uºa sã se închidã corect.
Nu deschideþi uºa congelatorului în caz de lipsã de curent
sau de defecþiune; veþi întârzia astfel creºterea temperaturii
în interiorul acestuia. În acest mod alimentele îngheþate ºi
congelate se vor pãstra fãrã alteraþii pe o duratã de circa 914 ore.
Nu puneþi în congelator sticlele pline: s-ar putea sparge
deoarece, îngheþând, toate lichidele îºi mãresc volumul.
- Dacã temperatura ambientalã se menþine la mai puþin
de 14° C, atunci perioada de conservare a alimetelor se
reduce deoarece congelatorul nu poate ajunge la
temperatura idealã pentru pãstrarea acesstora pe timp
îndelungat.
53
RO
Page 56

Vase pentru gheaþã
Acest concept nou de vase pentru gheaþã, este un brevet
exclusiv Merloni. Faptul cã sunt situate pe partea interioarã
a uºii congelatorului garanteazã o ergonomie ºi o curãþenie
majore. Gheaþa nu mai vine în contact cu alimentele din
congelator; în afarã de aceasta, se evitã picurarea apei în
curs de încãrcare (în dotare ºi capacul de închidere a
orificiului dupã operaþia de încãrcare a apei).
Modalitãþi de folosire (Fig. 2)
Umpleþi vãsuþul cu apã prin intermediul orificiului respectiv,
pânã la nivelul indicat (MAX WATER LEVEL), fiind atenþi
a nu-l depãºi; introducerea apei în cantitate superioarã
celei necesare, va implica o astfel de formare de gheaþã,
cã ar putea împiedica ieºirea cuburilor de gheaþã.
În cazul în care aþi folosit o cantitate excesivã de lichid, va
trebui sã aºteptaþi ca gheaþa sã se topeascã, sã goliþi vasul
ºi sã repetaþi operaþia de încãrcare.
Dupã efectuarea operaþiei de încãrcare prin orificiul indicat,
rotiþi vasul la 90°. Pe baza principiului vaselor comunicante,
apa va umple formele respective, dupã care se va putea
închide orificiul cu dopul respectiv ºi se va putea amplasa
vasul în partea interioarã a uºii.
Dupã ce gheaþa va fi gata, va fi suficient sã se zbatã vasul
pe o suprafaþã durã astfel încât bucãþile de gheaþã sã se
desprindã ºi sã iasã prin acelaºi orificiu prin care a fost
introdusã apa. Pentru a îmbunãtãþi ieºirea bucãþilor de
gheaþã, udaþi cu apã exteriorul recipientului.
ATENÞIE: de fiecare datã când se va efectua încãrcarea
cu apã, verificaþi ca recipientul sã fie complet gol ºi sã nu
fie prezente reziduuri de gheaþã.
Timpul minim necesar pentru formarea optimã a gheþii este
de 8 ore.
Fig. 2
Sfaturi pentru a economisi
- Instalaþi-l bine
Adicã departe de surse de cãldurã, de lumina directã a
soarelui, într-o camerã bine aerisitã ºi respectând distanþele
indicate în paragraful Instalare/Aerisire.
-Rãcirea justã
Prea mult frig mãreºte consumurile.
- Nu-l umpleþi prea mult
Pentru a consuma bine alimentele, frigul trebuie sã circule
în mod liber în interiorul frigiderului. A-l umple prea mult
înseamnã a împiedica aceastã circulaþie obligând
compresorul la o activitate continuã.
- Cu uºile închise
Deschideþi frigiderul dvs. cât mai puþin posibil, deoarece
de fiecare datã când faceþi acest lucru, o mare parte din
aerul rece iese afarã. Pentru a restabili temperatura,
motorul trebuie sã lucreze din plin consumând multã
energie.
- Atenþie la garnituri
Menþineþi-le eficiente ºi curate astfel încât sã adere bine la
uºi; doar astfel nu vor permite frigului sã iasã.
- Nici un fel de aliment cald
O oalã caldã introdusã în frigider, ridicã imediat temperatura
cu diverse grade; lãsaþi-o sã se rãceascã la temperatura
ambientalã înainte de a o introduce în frigider.
- Brumã în congelator
Controlaþi grosimea brumei pe rafturile din congelator ºi
efectuaþi imediat eliminarea acesteia dacã stratul a devenit
prea gros (Vezi mai jos Cum se þine în formã).
RO
54
Page 57

Cum se întreþine
Înainte de a curãþa frigiderul, decuplaþi alimentarea
frigiderului (scoateþi ºtecherul din prizã sau stingeþi
întrrupãtorul general).
Eliminarea brumei
ATENÞIE: nu deterioraþi circuitul refrigerent.
Fiþi atenþi sã nu folosiþi dispozitive mecanice sau alte
unelte pentru accelerarea procesului de eliminare a
brumei, în afara celor recomandate de fabricã.
Cum se eliminã bruma din compartimentul frigider.
Acest aparat este dotat cu eliminarea automaticã a brumei
iar apa este condusã spre partea posterioarã de cãtre un
sistem adecvat de scurgere (fig. 3) unde cãldura produsã de
compresor o face sã se evaporeze. Unica intervenþie pe
care trebuie sã o efectuaþi periodic constã în curãþarea
orificiului de descãrcare pentru ca apa sã poatã trece normal.
Cum se eliminã bruma din compartimentul congelator
- Eliminaþi din când în când bruma cu respectiva rãzãtoare
aflatã în dotare (nu folosiþi cuþite sau obiecte metalice).
-
Dacã bruma a depãºit 5 mm este necesarã efectuarea
operaþiei de eliminare a acesteia. Procedaþi în felul urmãtor:
deplasaþi selectorul termostatului "A" pe poziþia " ".
Înveliþi toate alimentele îngheþate ºi congelate în hârtie de
ziar, punându-le în alt frigider sau într-un loc rãcoros. Lãsaþi
uºa deschisã astfel încât bruma sã se topeascã de tot,
ajutând-o cu recipiente pline de apã cãlduþã.
Curãþaþi ºi uscaþi cu grijã înainte de a porni din nou aparatul.
Curãþire ºi întreþinere specialã
Înainte de a curãþa frigiderul, scoateþi ºtecherul din
prizã.
- Materialele cu care a fost fabricat aparatul dvs. sunt
igienice ºi nu transmit mirosuri, însã pentru a menþine
aceste calitãþi este necesar ca alimentele sã fie mereu
protejate ºi închise, pentru a evita pete greu de eliminat
sau producerea de mirosuri urâte.
- Doar apã ºi bicarbonat. Pentru a curãþa atât interiorul cât
ºi exteriorul, folosiþi un mic burete cu apã cãlduþã ºi
bicarbonat de sodiu care, printre altele, este ºi un bun
dezinfectant. Dacã nu-l aveþi în casã, puteþi folosi sãpun
neutru (cel de Marsilia de exemplu).
- Ce nu trebuie folosit. Niciodatã substanþe abrazive,
niciodatã decoloranþi, niciodatã amoniac. Strict interziºi
solvenþii ºi alþi produºi similari.
- Tot ceea ce se poate demonta, puneþi-l la înmuiat în apã
caldã cu sãpun sau detergent pentru farfurii. Înainte de a
le pune la loc, clãtiþi-le ºi uscaþi-le bine.
- Pentru partea din spate? Aici praful se opreºte ºi se
concentreazã provocând probleme de funcþionare a
aparatului. Folosiþi dispozitivul lung de la aspiratorul dvs.,
cu puterea medie, pentru a-l elimina. Foarte delicat!
-
Când a fost oprit o perioadã de timp mai lungã. Dacã
decideþi sã opriþi frigiderul pe timp de varã, este necesar
sã curãþaþi interiorul ºi sã lãsaþi uºile deschise.
- Pentru a înlocui becul din interiorul frigiderului, scoateþi
aparatul din prizã ºi schimbaþi becul avariat cu o altã putere
care sã nu fie superioarã valorii de 15 W, respectând
instrucþiunile din figura 4.
Fig. 3
A
B
Fig. 4
55
RO
Page 58

Existã vreo problemã?
Frigiderul nu funcþioneazã
Aþi controlat dacã:
· întrerupãtorul general al apartamentului este deconectat;
· fiºa nu este introdusã corect în priza de curent;
· priza nu este eficientã; încercaþi sã conectaþi fiºa la o
altã prizã prezentã în spaþiul respectiv.
Frigiderul ºi congelatorul rãcesc puþin
Aþi controlat dacã:
·
uºile nu închid bine sau garniturile sunt stricate;
· uºile se deschid foarte des;
· sselectorul de temperaturã este corect poziþionat;
· frigiderul sau congelatorul au fost umplute excesiv.
În frigider alimentele se rãcesc prea mult
Aþi controlat dacã:
· selectorul de reglare a temperaturii nu este într-o poziþie
corectã;
· alimentele se aflã în contact cu partea posterioarã, cea
mai rece.
Motorul funcþioneazã încontinuu
Aþi controlat dacã:
· uºa nu este bine închisã sau a fost deschisã încontinuu;
· temperatura externã este foarte mare;
· grosimea brumei depãºeºte 2-3 mm.
Dacã, în ciuda tuturor controalelor, aparatul nu
funcþioneazã ºi problema observatã de dumneavoastrã
persistã, chemaþi centrul de asistenþã autorizat cel mai
apropiat, comunicând urmãtoarele informaþii: tipul de
defecþiune, sigla modelului (Mod.) ºi numerele respective
(S/N) scrise pe tãbliþa cu caracteristici situatã în partea de
jos în stânga, lângã sertarul pentru verdeþuri (vezi
exemplele din figurile urmãtoare).
75
Test
P.S-I.
TI
Net
Util
Utile
Pressure
HIGH-235
LOW 140
RG 2330
Mod.
220 - 240 V- 50 Hz 150 W
340
Total
Gross
Bruto
Brut
Compr.
Syst.
Kompr.
Made in Italy 13918
Gross
Bruto
Brut
R 134 a
kg 0,090
93139180000 S/N 704211801
Cod.
Gross
Bruto
Brut
W
Fuse
A
Freez. Capac
Poder de Cong
kg/24 h
4,0
Max 15 w
Class
Clase
N
Classe
Nu apelaþi niciodatã la tehnicieni neautorizaþi ºi
refuzaþi instalarea de piese de schimb neoriginale.
Aparatul emite prea mult zgomot.
Aþi controlat dacã:
· Frigiderul nu este în plan:
· a fost instalat între mobilã ºi obiecte care vibreazã ºi
emit zgomote;
· gazul refrigerent intern produce zgomote uºoare chiar ºi
atunci când compresorul este oprit (nu este un defect).
Pe partea inferioarã a frigiderului este
prezentã apã
Aþi controlat dacã:
· Orificiul de descãrcare a apei derivatã din dezgheþarea
brumei, este înfundat
RO
56
Page 59

A biztonság, jó szokás
FIGYELEM
Olvassa el figyelmesen a használati útmutató beszerelésre,
üzemeltetésre és karbantartásra vonatkozó fontos
javaslatait.
A készülék megfelel az alábbi EU
Direktíváknak:
- 73/02/19- es 73/23/CEE (Alacsonyfeszültségi
Direktíva) és az azt követõ módosítások;
- 89/05/03- as 89/336/CEE (Elektromágneses
kompatibilitás Direktíva) és az azt követõ módosítások;
1. A készülék nem helyezhetõ üzembe nyitott helyen, még
abban az esetben sem, ha a helyiséget tetõvel fedték; a
készüléket rendkívül veszélyes esõnek és viharnak kitenni.
2. Csak felnõttek használhatják és kizárólag élelmiszerek
tárolására és fagyasztására, a jelen használati útmutató
elõírásainak megfelelõen.
3. Soha ne érintse meg és ne mûködtesse a készüléket
mezítláb, vagy nedves kézzel, illetve lábbal.
4. Nem javasoljuk hosszabbító és elosztó használatát. Ha a
hûtõszekrényt bútorok közé helyezi, ügyeljen arra, hogy a
vezeték ne törjön meg, vagy ne nyomódjon túlságosan össze.
5. Nagyon veszélyes a villásdugó kihúzásához a vezetéket
rángatni, vagy a a hûtõszekrényt mozgatni.
6. Ne érjen hozzá a belsõ hûtõrészekhez, különösen ne
nedves kézzel, mivel az fagyási sérüléseket vagy balesetet
okozhat. Ne vegye a szájába a közvetlenül a fagyasztóból
kivett jégkockát, mivel az fagyási sérülést okozhat.
7. Takarítást és karbantartást csak akkor végezzen, miután
kihúzta a villásdugót.
8. Mielõtt a régi hûtõszekrényt használaton kívül helyezné,
annak esetleges zárát szerelje le annak elkerülése
érdekében, hogy a gyerekek, játék közben, be ne
záródhassanak a készülékbe.
9. Üzemzavar esetén, mielõtt szervizhez fordulna, nézze meg
a Hibaelhárítás címû fejezetet annak ellenõrzése
érdekében, hogy az esetleges kellemetlenség elkerülhetõ
legyen. Ne kísérelje a problémát megoldani úgy, hogy a belsõ
részekhez próbál hozzáférni.
10. A tápvezeték cseréje esetén forduljon
Márkaszervizünkhöz. Néhány esetben az összeköttetést
speciális kivezetéssel látták el, máskor speciális eszköz
használatára van szükség, hogy az összeköttetésekhez
hozzáférjenek.
11. Ne használjon élelmiszerek tárolására szolgáló rekeszben
olyan elektromos készüléket, mely nem tartozik a gyártó által
javasolt típusok közé.
12. A készülék élettartamának végén, mielõtt kidobná azt,
biztonságba kell helyezni az izoláló habban található
ciklopentán gázt és a hûtõ áramkörben esetleg megtalálható
R600a (izobután) gázt. Ennek a végrehajtásához forduljon a
forgalmazóhoz vagy a helyi illetékes szervhez.
Üzembehelyezés
A megfelelõ mûködés és áramfogyasztás biztosítása
érdekében fontos, hogy az üzembehelyezést helyesen
végezze el.
Légáramlás
A kompresszor és a kondenzátor hõt bocsát ki, ezért
megfelelõ légáramlásra van szükség. Az elégtelen
szellõzést biztosító helyek kevésbé megfelelõek. Ezért a
készüléket olyan szellõzõnyílással (ablak, vagy ablakos
ajtó) ellátott helyen kell üzembe helyezni, mely biztosítja a
szükséges levegõcserét és nem túl nedves.
Üzembehelyezéskor ügyeljen arra, hogy ne takarja el, vagy
ne akadályozza a készülék megfelelõ szellõzését biztosító
rácsokat.
A készülék megfelelõ szellõzéséhez hagyjon:
- legalább 10 cm távolságot a felsõ rész és a felette esetleg
elhelyezett bútorok között;
- legalább 5 cm távolságot az oldallemezek és az esetleges
bútorok/oldalfal között.
Tartsa hõtõl távol
Kerülje el, hogy a készülék olyan helyre kerüljön, ahol
közvetlenül ki lenne téve napsugárzásnak, elektromos
tûzhelynek vagy hasonlóknak.
Vízszintbe állítás
A készüléknek vízszintesen kell állnia; ha a padló nem
egyenes, az elöl elhelyezett speciális állítható lábakkal ezt
beállíthatja.
Elektromos csatlakoztatás és földelés
Mielõtt hozzáfogna az elektromos összeköttetés
végrehajtásához, ellenõrizze, hogy a készülék jellemzõit
feltüntetõ, a zöldségtároló mellett balra lent elhelyezett kis
fémlapon feltüntetett feszültség megfelel-e a lakásába
telepítettnek, valamint hogy a csatlakozó szabványos, az
elektromos berendezések biztonságára vonatkozó 90/46os törvénynek megfelelõ földeléssel van-e ellátva. Földelés
hiánya esetén a Hûtõgép Gyártója minden felelõsséget
elhárít. Ne használjon elosztót vagy adaptert.
Helyezze a készüléket úgy, hogy a csatlakozó, melyhez
kapcsolja, hozzáférhetõ legyen.
Nem megfelelõ a teljesítmény?
Az elektromos csatlakozónak támogatnia kell a készülék
maximális terhelési teljesítményét, mely a készülék
tulajdonságait tartalmazó, a zöldségtároló mellett balra lent
található kis fémlapon van feltüntetve.
Mielõtt az elektromos csatlakoztatást
elvégezné
A megfelelõ mûködés érdekében, a szállítás után helyezze
a készüléket függõleges helyzetbe és legalább 3 órát
várjon, mielõtt bedugná a csatlakozóba.
57
HU
Page 60

A készülék közelrõl
F
G
H
I
J
K
Kezelõgomb a hûtõrész hõmérsékletének
A
szabályozására
Ez a kezelõgomb lehetõvé
teszi a hûtõ
hõmérsékletének
beállítását:
a hûtõ ki van
kapcsolva;
1 kevésbé hideg;
5 hidegebb;
Jégkészítõ edények
B
Kivehetõ polc fedõvel
C
Kivehetõ ajtópolc
D
Állítható lábak
Zöldség-, gyümölcstartó
3
Olvadékvíz kivezetõ
Hús- és sajttároló rekesz
Kivehetõ és állítható magasságú polcok
Fagyasztásra és tárolásra használható rekesz
Jégkészítõ edények
E
K
J
I
H
G
A
A
K
C
J
D
I
H
E
G
B
C
D
D
D
E
HU
FF
58
FF
Page 61

Hogyan üzemeljük be a készüléket
FIGYELEM
A megfelelõ mûködés érdekében, a szállítás után
helyezze a készüléket függõleges helyzetbe és
legalább 3 órát várjon, mielõtt csatlakoztatná a
tápfeszültséghez.
Mielõtt berakná az élelmiszereket a hûtõszekrénybe,
tisztítsa meg a belsejét alaposan langyos vízzel és
bikarbonáttal.
Miután csatlakoztatta a villásdugót a dugaszoló aljzatba,
gyõzõdjön meg róla, hogy a lámpa bekapcsolódott, majd
tekerje az "A" hõmérséklet-szabályzó gombot "3" állásba
és néhány óra elteltével beteheti a friss ételeket a
hûtõrészbe, a fagyasztottakat pedig a fagyasztóba.
A hûtõrész optimális használata
A hûtõrész belsõ hõmérséklete automatikusan szabályozott
a hõmérséklet szabályozó kezelõgomb állásának alapján.
1 = kevésbé hideg
5 = hidegebb
A középsõ állást javasoljuk
A hely és az elhelyezés megnövelése érdekében és
esztétikai szempontok miatt, a készülék rendelkezik a
hûtõrész hátulsó oldalának belsejében elhelyezett hûtõ
rekesszel. A készüléknek ezt a falát mûködés közben dér,
vagy vízcseppek borítják aszerint, hogy a kompresszor
üzemel vagy sem. Emiatt nem kell aggódnia. A
hûtõszekrény megfelelõen mûködik.
Ha a tekerõgombot magasabb értékre állítja és a
hûtõszekrényben jelentõs mennyiségû étel van, valamint
a környezet hõmérséklete magasabb, a készülék lehet,
hogy folyamatosan mûködik és ez kedvez a készülék hátsó
oldalán a dér kialakulásának, ami megnövekedett
elektromos energia fogyasztással jár együtt.
Ennek a kellemetlenségnek a megelõzése érdekében
elegendõ a termosztát tekerõgombját alacsonyabb
értékre állítani, ami lehetõvé teszi a készülék
rendszeres automatikus dértelenítését.
ÒWPXWDWyD]pWHOHNHOKHO\H]pVpKH]pVWiUROiViKR]DK W UpV]EHQ
eWHO 7iUROiVLLG (OKHO\H]pVHDK W EHQ
Tisztított hús és hal
]DFVNyEDYDJ\P
Friss sajtok 3 vagy 4 nap
Tojás 1 hónap $]DMWyEHOV ROGDOiQWDOiOKDWyPHJIHOHO WDUWyEDQ
Vaj és margarin $]DMWyEHOV ROGDOiQWDOiOKDWyUHNHV]EHQ
) WWpWHOHNOpJPHQWHVHQ]iUKDWyHGpQ\EHQOHK OpV
után behelyezni)
Nyers szalámi, csomagolt kenyér, csokoládé, krémes
sütemények, paradicsom, stb.
hYHJHNWHMGtW NMRJKXUW $]DMWyEHOV UpV]pQHNSROFDLQ
Zöldség és gyümölcs A zöldségtartóban
Mit ne tegyen a hûtõszekrénybe
Fokhagymát (átadja a szagokat), hagymát és póréhagymát. Banánt (megbarnul).
Déligyümölcsöket (legjobb frissen, az erkélyen). Burgonya és gumósok (csak sötét, száraz hely).
DQ\DJIyOLiEDFVDYDUYD
2 vagy 3 nap
3 vagy 4 nap Bármelyik polcon
3 vagy 4 nap Bármelyik polcon
A zöldségtartó fölött
(leghidegebb rész)
A zöldségtartó fölött
(leghidegebb rész)
59
HU
Page 62

A hûtõszekrény belsejében a levegõ természetes módon
1
2
kering, a nehezebb hideg levegõ lefelé áramlik. Ez az oka,
hogy a hús és sajt számára a legmegfelelõbb hely a
zöldséges-rekesz fölött van.
Tanulmányozza figyelmesen a tárolás maximális idejére
vonatkozó tanácsainkat: semmilyen élelmiszer, még a
legfrissebb sem, marad változatlan minõségû túlságosan
hosszú ideig.
A hiedelemmel ellentétben, a fõtt élelmiszerek nem
tarthatóak el tovább, mint a nyersek.
A hûtõrészt praktikus kivehetõ és, a megfelelõ
polctartóknak köszönhetõen, állítható magasságú
polcokkal látták el (1. ábra). Ezért akár nagyméretû tartókat
vagy nagy terjedelmû ételeket is betehet. A polcok újszerû
alakja lehetõvé teszi a magasságbeli szabályozást anélkül,
hogy a polcot teljesen ki kellene húzni.
Csak hideg, esetleg langyos ételeket tegyen be, kerülje meleg
ételek behelyezését: azok azonnal megemelnék a belsõ
hõmérsékletet, többletmunkára kényszerítve a kompresszort,
ez pedig nagymértékû energiapazarláshoz vezet.
Ne tegyen be folyadékot tartalmazó fedõ nélküli tárolókat,
mivel az a hûtõszekrény belsõ páratartalmának
emelkedését, ez utóbbi pedig dér képzõdését idézheti elõ.
Ügyeljen rá, hogy semmilyen tárolóedény (mûanyag,
üveg), étel vagy más ne érintkezzen közvetlenül a hûtõ
faláva (a hátsó oldallal), mivel az tönkreteheti az
ételeket, növeli az energiafogyasztást és megkönnyíti
a kondenzvíz kialakulását (az ételeken,
tárolóedényeken, stb.).
1.ábra
A fagyasztórész optimális használata
A fagyasztandó ételek elõkészítésével kapcsolatban
forduljon szakkönyvhöz.
Felolvadt élelmiszert, ha az csak részben olvadt is ki, soha
ne fagyasszon vissza: azt (24 órán belül) étkezési célból
vagy a visszafagyasztáshoz meg kell fõznie.
A friss fagyasztandó élelmiszerek ne kerüljenek
kapcsolatba a már lefagyasztottakkal vagy
mélyhûtöttekkel, hanem kerüljenek a felsõ rekeszbe, ahol
a hõmérséklet -18°C alatti és ideális az ételek alapos
lefagyasztására. Ne feledkezzen el arról, hogy a fagyasztott
ételek jó tartósítása függ a lefagyasztás sebességétõl.
A fagyasztás ideje alatt kerülje a fagyasztó ajtajának
kinyitását.
A naponta lefagyasztható maximális mennyiség fel van
tüntetve a hûtõszekrény belsõ részén elhelyezett, a
hûtõszekrény adatait tartalmazó kis lapon.
A fagyasztás ideje alatt kerülje a fagyasztó ajtajának
kinyitását.
A konzerválás és az azt követõ optimális felolvasztás
érdekében, ajánlatos az ételeket kis adagokban elrakni,
így azok gyorsan és egyenletesen fagyaszthatóak le. A
csomagokon tüntesse fel a tartalmat és a fagyasztás
dátumát.
A középsõ rekesz kivételével több helyet nyerhet a
fagyasztóban, az élelmiszereket közvetlenül a párologtató
lemezre helyezve. Az élelmiszerek behelyezése után,
ellenõrizze, hogy az ajtó megfelelõen csukódik-e.
Ne nyissa ki a fagyasztó ajtaját áramszünet vagy
meghibásodás esetén, ezzel is késleltetve a belsõ
hõmérséklet emelkedését. Ily módon a mélyhûtött és
fagyasztott élelmiszerek változatlanok maradnak körülbelül
9-14 órán keresztül.
Ne tegyen a fagyasztóba tele üvegeket: széttörhetnek,
mivel fagyáskor minden folyadék térfogata megnõ.
- Ha a környezet hõmérséklete hosszú idõn keresztül 14°C
alatt marad, a fagyasztórészben nem alakul ki a hosszabb
tároláshoz szükséges hõmérséklet és az ételek
eltarthatósági ideje lecsökken.
HU
60
Page 63

Jégkészítõ
Ez az újfajta jégkészítõ a Merloni kizárólagos szabadalma.
Az, hogy a fagyasztórekesz ajtajába helyeztük,
ergonómikusabb és nagyobb tisztaságot biztosít: a jég nem
kerül többé kontaktusba a fagyasztórekeszben tárolt
ételekkel; továbbá elkerülheti feltöltéskor a víz
kicsepegését (a víz feltöltése után a nyílás lezárásához
kupakot is mellékeltünk).
Használat (2. ábra)
Töltse fel vízzel a jégkészítõt a nyílásán keresztül a jelzett
szintig (MAX WATER LEVEL), ügyelve arra, hogy ne lépje
azt túl: ha a szükségesnél több vizet tölt bele, olyan alakot
fog felvenni, ami megakadályozhatja a jéggolyók kivételét.
Abban az esetben, ha túl sok folyadékot tett bele, várja
meg, amíg a jég felolvad, ürítse ki a jégkészítõt, és
ismételje meg a feltöltési mûveletet.
Ha sikerült feltöltenie a jelzett nyíláson keresztül, fordítsa
el a jégkészítõt 90 °-al. A közlekedõedények törvénye
szerint a víz kitölti a rendelkezésre álló formákat, ezután
a nyílás lezárható a megfelelõ kupakkal és a jégkészítõ
felfüggeszthetõ az ajtó belsejére.
Miután kialakul a jég, elegendõ a jégkészítõt egy szilárd
felülethez ütni, hogy a jéggolyók kiessenek a formából és
ki lehessen venni õket ugyanazon a nyíláson keresztül,
amin a vízzel feltöltöttük. Hogy könnyebben kivehesse a
jéggolyókat, vizezze be kívülrõl a jégkészítõt.
FIGYELEM: minden alkalommal, mielõtt feltölti vízzel,
ellenõrizze, hogy a jégkészítõ teljesen üres legyen, és ne
maradjanak benne jégdarabok.
Az optimális jégképzõdés minimális ideje körülbelül 8 óra.
2. ábra
Takarékossági tanácsok
- Helyes beüzemelés
Azaz hõforrástól, közvetlen napfénytõl távol, jól szellõzõ
helyiségben, az Üzembehelyezés/Légáramlás részben
megadott távolságokat betartva.
- A megfelelõ hideg
A túl nagy hideg növeli a fogyasztást.
- Ne pakolja túlzottan tele
Az ételek megfelelõ tartósításához a hidegnek szabadon
kell keringenie a hûtõszekrényben. Ha túlságosan
telerakja, az azt jelenti, hogy gátolja ezt a keringés és a
kompresszornak folyamatosan mûködnie kell.
- Csukott ajtók
A lehetõ legkevesebbszer nyissa ki a hûtõszekrényt, mivel
minden kinyitáskor a hideg levegõ jelentõs része kiáramlik.
A hõmérséklet visszaállításához a motornak sok energiát
elfogyasztva, hosszú ideig kell mûködnie.
- Ügyeljen a tömítésekre
Tartsa karban és tisztítsa a tömítéseket úgy, hogy jól
tapadjanak az ajtókhoz; csak így gátolják teljesen a hideg
kiáramlását.
- Semmi meleg étel
A hûtõszekrénybe tett meleg fazék azonnal néhány fokkal
megemeli a hõmérsékletet, hagyja, hogy az edény
szobahõmérsékletûre hûljön, mielõtt betenné a
hûtõszekrénybe.
- Dér a fagyasztóban
Nézze meg a dér vastagságát a fagyasztó polcain és
kezdje meg azonnal a dérmentesítést, ha a réteg túl vastag
(Lásd alább a Karbantartás fejezetet).
61
HU
Page 64

Karbantartás
Mielõtt bármiféle tisztítást elvégezne, áramtalanítsa a
készüléket (húzza ki a villásdugót vagy a készülék
kapcsolóját).
Dérmentesítés
FIGYELEM: ne sértse meg a fagyasztó kört.
Ügylejen rá, hogy a gyártó által javasolt eszközökön
kívül ne használjon más mechanikus szerkezeteket
vagy egyéb eszközöket a dérmentesítés felgyorsítására.
Hogyan távolítsuk el a hûtõrészrõl a dérlerakódást?
A készülék automatikusan eltávolítja a dérlerakódást és a
víz a hátulsó vízelvezetõn keresztül távozik (3. ábra), ahol a
kompresszor által termelt hõ elpárologtatja. Az egyetlen
beavatkozás, amit rendszeresen el kell végeznie, a
vízelvezetõ nyílás tisztítása, hogy a víz akadálytalanul el
tudjon folyni.
Hogyan távolítsuk el a fagyasztórészrõl a dérlerakódást?
- Minden alkalommal a készülékhez mellékelt kaparókéssel
távolítsa el a dérlerakódást (ne használjon kést vagy más
fémeszközt).
-
A dér teljes eltávolítására van szükség, amennyiben annak
vastagsága eléri az 5 mm-t. Az alábbiak szerint járjon el: tekerje
a termosztát A kezelõgombját állásba.
Valamennyi mélyhûtött és fagyasztott ételt tekerje újságpapírba,
vagy helyezze át egy másik hûtõszekrénybe, vagy tegye hûvös
helyre. Hagyja nyitva az ajtót, hogy a dér teljesen leolvadjon,
ezt elõsegítheti langyos vizet tartalmazó edények segítségével.
Visszakapcsolás elõtt tisztítsa ki és óvatosan törölje szárazra
a készüléket.
Tisztítás és speciális karbantartás
A hûtõszekrény kitisztítása elõtt mindig húzza ki a
villásdugót a dugaszoló aljzatból.- A készülékét felépítõ
anyagok higiénikusak és nem eresztik át a szagokat,
azonban ennek megõrzéséhez szükség van arra, hogy az
ételeket mindig lefedje és jól lezárja, a nehezen
eltávolítható foltok és a kellemetlen szagok elkerülése
érdekében.
- Csak víz és bikarbonát. Mind a külsõ, mind a belsõ rész
tisztításához langyos vizes szivacsot és szódabikarbónát
használjon, mely többek között jó fertõtlenítõszer is. Ha
nincs otthon, használhat semleges szappant is (például
Marsiglia-t).
- Mit ne használjon. Soha ne használjon súrolószert,
fehérítõt, ammónium tartalmú vegyszereket. Teljességgel
tilos oldószert, vagy egyéb hasonló anyagokat használni.
- Mindent kivehetõ részt meleg, szappanos vízzel vagy
mosogatószerrel mosson le. Mielõtt visszatenné a helyére,
mossa le ismét vízzel és alaposan szárítsa meg.
- És mi a helyzet a hátoldallal? Itt a por megáll és lerakódik,
ez a készülék meghibásodását okozhatja. Ennek
eltávolításához használja a porszívó hosszú csövét,
közepes szívóerõ mellett. Nagyon óvatosan!
-
Ha sokáig üzemen kívül hagyjuk. Ha úgy dönt, hogy
nyáron leállítja a hûtõszekrényt, a belsejét ki kell tisztítani
és az ajtókat nyitva kell hagyni.
- A hûtõrész belsõ megvilágításának cseréjéhez húzza ki
a készüléket a hálózatból és cserélje ki a rossz izzót egy
másik, maximum 15 W teljesítményûre, a 4. ábrán
bemutatottaknak megfelelõen.
3.ábra
A
B
4.ábra
HU
62
Page 65

Hibaelhárítás
A hûtõszekrény nem mûködik.
Ellenõrizte, hogy:
· a lakás fõkapcsolója ki van-e kapcsolva;
· a dugó jól van-e bedugva az aljzatba;
· a csatlakozó mûködik-e; próbálja a dugót a helyiség egy
másik csatlakozójába dugni.
A hûtõszekrény és a fagyasztó alig hûl le
Ellenõrizte, hogy:
·
jól csukódnak-e az ajtók vagy a tömítések nem sérültek-
e meg;
· nem nyitogatják-e az ajtókat túl gyakran;
· a hõmérséklet-szabályzó gomb megfelelõ helyzetben
van;
· a hûtõszekrényt, vagy a fagyasztót nem pakolta-e
túlzottan tele.
A hûtõszekrényben az élelmiszerek
túlságosan megfagynak
Ellenõrizte, hogy:
· a hõmérséklet szabályzó kezelõgomb a megfelelõ
állásban van-e;
· az élelmiszerek nem érintkeznek-e a leghidegebb
résszel, a hátoldallal.
Ha, minden ellenõrzés ellenére, a készülék nem mûködik
és a hiba továbbra is fenn áll, hívja a legközelebbi
Márkaszervizt és adja meg az alábbiakat: a hiba típusát, a
modell jelét (Mod.) és az ahhoz tartozó számokat (S/N),
melyeket a zöldségtároló mellett, balra lent, a készülék
jellemzõit tartalmazó kis fémtáblán talál (lásd a következõ
ábrákon látható példákat).
75
Test
P.S-I.
TI
Net
Util
Utile
Pressure
HIGH-235
LOW 140
RG 2330
Mod.
220 - 240 V- 50 Hz 150 W
340
Total
Gross
Bruto
Brut
Compr.
Syst.
Kompr.
Made in Italy 13918
Gross
Bruto
Brut
R 134 a
kg 0,090
93139180000 S/N 704211801
Cod.
Gross
Bruto
Brut
W
Fuse
A
Freez. Capac
Poder de Cong
4,0
kg/24 h
Max 15 w
Class
Clase
N
Classe
Ne forduljon nem hivatalos szerelõhöz és utasítsa
vissza a nem eredeti alkatrészek beszerelését.
A motor állandóan megy
Ellenõrizte, hogy:
· jól van-e becsukva az ajtó vagy nem nyitogatják-e
folyamatosan;
· nem túl magas-e a külsõ hõmérséklet;
· a dérréteg vastagsága nem haladta-e meg a 2-3 mm-t.
A készülék túlságosan zajos
Ellenõrizte, hogy:
· A hûtõszekrény vízszintben áll-e:
· bútorok közé vagy olyan tárgyak közé helyezték-e,
melyek vibrálnak és zörögnek;
· a belsõ fagyasztógáz halk hangot ad akkor is, ha a
kompresszor áll (ez nem rendellenesség).
A hûtõszekrény aljában áll a víz
Ellenõrizte, hogy:
· A dérmentesítõ vízelvezetõ nyílása nincs-e eldugulva
63
HU
Page 66

Reversibilità apertura porte
Reversing the door opening
Réversibilité de l'ouverture des portes
Omkeerbaarheis deuropening
Reversibilidade da porta
1
Vymenite¾né otváranie dverí
Vymenite¾né otváranie dverí
Reversibilitate deschidere uºi
Zamìnitelné otevírání dveøí
2
3
Page 67

4
5
∅ 3
mm
Page 68

Merloni Elettrodomestici
Viale Aristide Merloni 47
60044 Fabriano
Italy
Tel +39 0732 661 1
Fax +39 0732 662501
www.merloni.com
02/2004 - 195038211.04 - Xerox Business Services - DocuTech
 Loading...