

Page 1
Kullaným talimatlarý
Iki kapýlý buzdolabý
TR
Türkçe, 1
T 5
T 5 S
GB
English, 11
Ýçindekiler
TR
Montaj, 2
Cihazýn yerleþtirilmesi ve baðlanmasý
Kapinin açilis yönünün degistirilmesi
Cihazýn tanýtýmý, 3
Genel görünüm
Çalýþtýrma ve kullanma, 4-5
Cihazýn çalýþtýrýlmasý
Buzdolabýnýn en iyi þekilde kullanýlmasý
Dondurucunun en iyi þekilde kullanýlmasý
Bakým ve özen, 6
Elektrik akýmýnýn kesilmesi
Cihazýn temizlenmesi
Küfün ve istenmeyen kokularýn önlenmesi
Buzun eritilmesi
Fýrýn lambasýnýn deðiþtirilmesi
Önlemler ve öneriler, 7
Genel güvenlik uyarýlarý
Atýklarýn tasfiye edilmesi
Tasarrufa yöneliniz ve çevreye saygýlý olunuz
Arýzalar ve onarýmlar, 8
Teknik Servis, 9
Page 2
Montaj
∅ 3
mm
! Bu kitapçýðý gerektiði her an danýþabilmeniz için özenle
TR
saklayýnýz. Satýþ, devir yada taþýnma halinde, çalýþma
sistemi ve bununla ilgili uyarýlar konusunda yeni sahibinin
bilgilenmesi için cihazla birlikte kalmasýný saðlamanýz
gerekmektedir.
! Talimatlarý dikkatlice okuyunuz: montaj, kullaným ve
güvenliðe iliþkin önemli bilgiler içermektedir.
Cihazýn yerleþtirilmesi ve baðlanmasý
Konumlandýrma
1. Cihazý nemsiz ve havadar bir yere yerleþtiriniz.
2. Arkadaki havalandýrma ýzgaralarýný kapatmayýnýz:
kompresör ve kondenser sýcak yapar, bu yüzden cihazýn
iyi çalýþmasýný ve tüketiminin azalmasýný saðlamak için
bunlarýn duvara dayanmamasý gerekir.
3. Cihazýn üst kýsmý ile üstüne konacak mobilya arasýnda
en azýndan 10 cm, mobilya/duvar yanýna yerleþtirilmesi
durumunda ise en az 5 cm açýklýk býrakýnýnz
4. Cihazэ эsэ kayaklarэndan uzak tutunuz (цr. direkt gьneю
эюэрэ, elektrik ocak).
5. Ürünün arka kýsmýyla duvar arasýndaki mesafeyi
saðlamak için kullaným talimatlarýna uygun olarak monte
etme kitinde mevcut olan uzaklaþtýrýcý çubuklarý monte
ediniz.
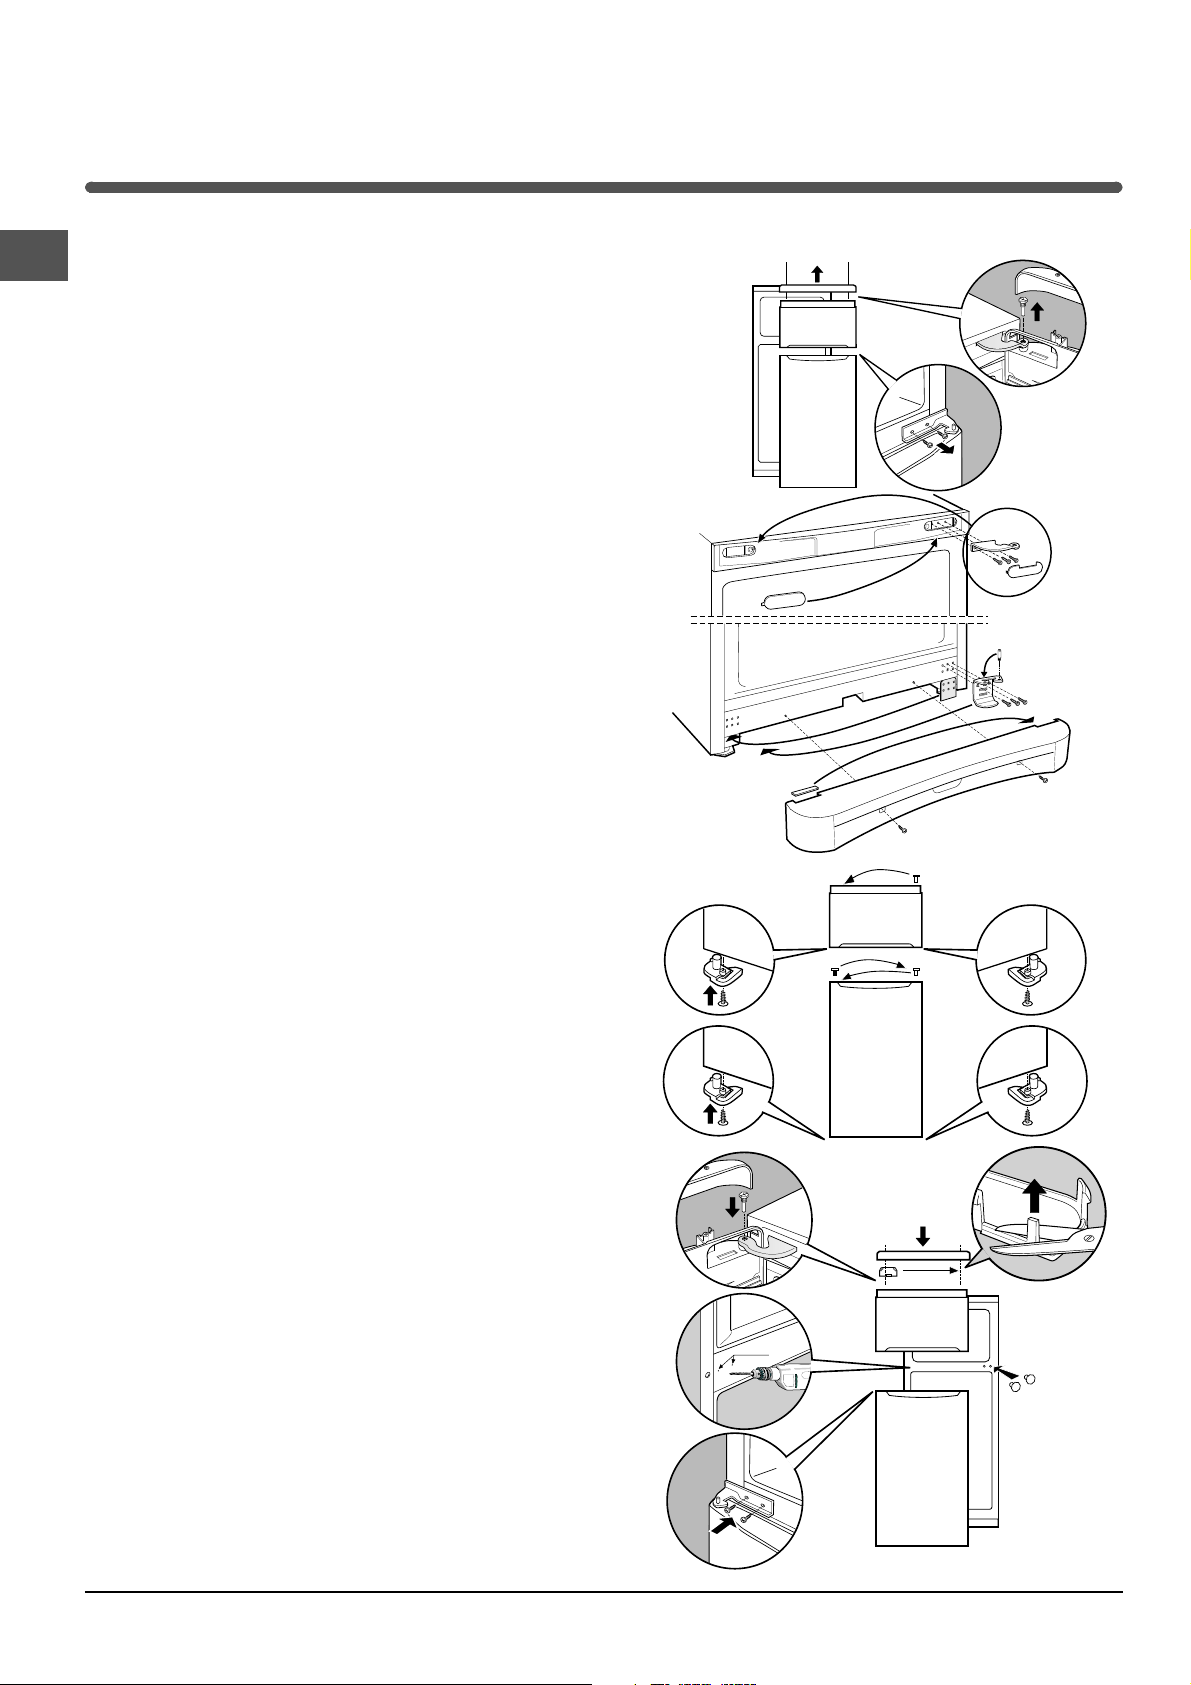
Kapinin açilis yönünün degistirilmesi
1
2
3
Cihazýn ayný seviyeye getirilmesi
1. Buzdolabýnýzý düz ve sert bir zemine yerleþtiriniz.
2. Zemin düz olmamasý durumunda ayarlanabilir ayaklarý
gevþeterek veya sýkarak cihazýn tamamen zemine
oturmasýný saðlayýnýz.
Elektrik baðlantýsý
Taþýnmadan sonra cihazý dik olarak yerleþtiriniz ve elektrik
tesisatýna baðlamak için en az 3 saat bekleyiniz. Fiþi prize
takmadan evvel aþaðýdaki hususlara dikkat ediniz:
Prizin topraklamasýnýn yürürlükteki normlara uygun
olmasý;
elektrik prizi, soðutucu bölmesinin sol tarafýnýn
aþaðýsýnda bulunan özellik etikentinde belirtilen
maksimum yükü taþýyabilmelidir;
besleme gerilimi soðutucu bölmesinin sol tarafýnýn
aþaðýsýnda bulunan özellik etiketinde belirtilen deðer
sýnýrý kapsamýnda olmalýdý (ör. 220-240 V);
Cihazýn fiþinin prizle uyumlu olmasý. Aksi takdirde
cihazýn fiþinin deðiþtirilmesi için yetkili Servise (Teknik
Servis bölümüne bakýnýz) baþvurmanýz gerekir,
uzatma kablosu ya da çoklu priz kullanmayýnýz.
! Cihaz monte edildikten sonra elektrik kablosu ve priz kolay
eriþilebilecek yerlerde olmalýdýrlar.
! Kablo kývrýlmalara, bükülmelere ve ezilmelere maruz
kalmamalýdýr.
! Kablo periyodik olarak kontrol edilmeli ve sadece yetkili
personel tarafýndan deðiþtirilmelidir.(bkz. Teknik Servis)
! Bu kurallara uyulmamasý halinde firma hiç bir
sorumluluk kabul etmemektedir.
4
5
2
Page 3
Cihazýn tanýmý
Genel görünüm
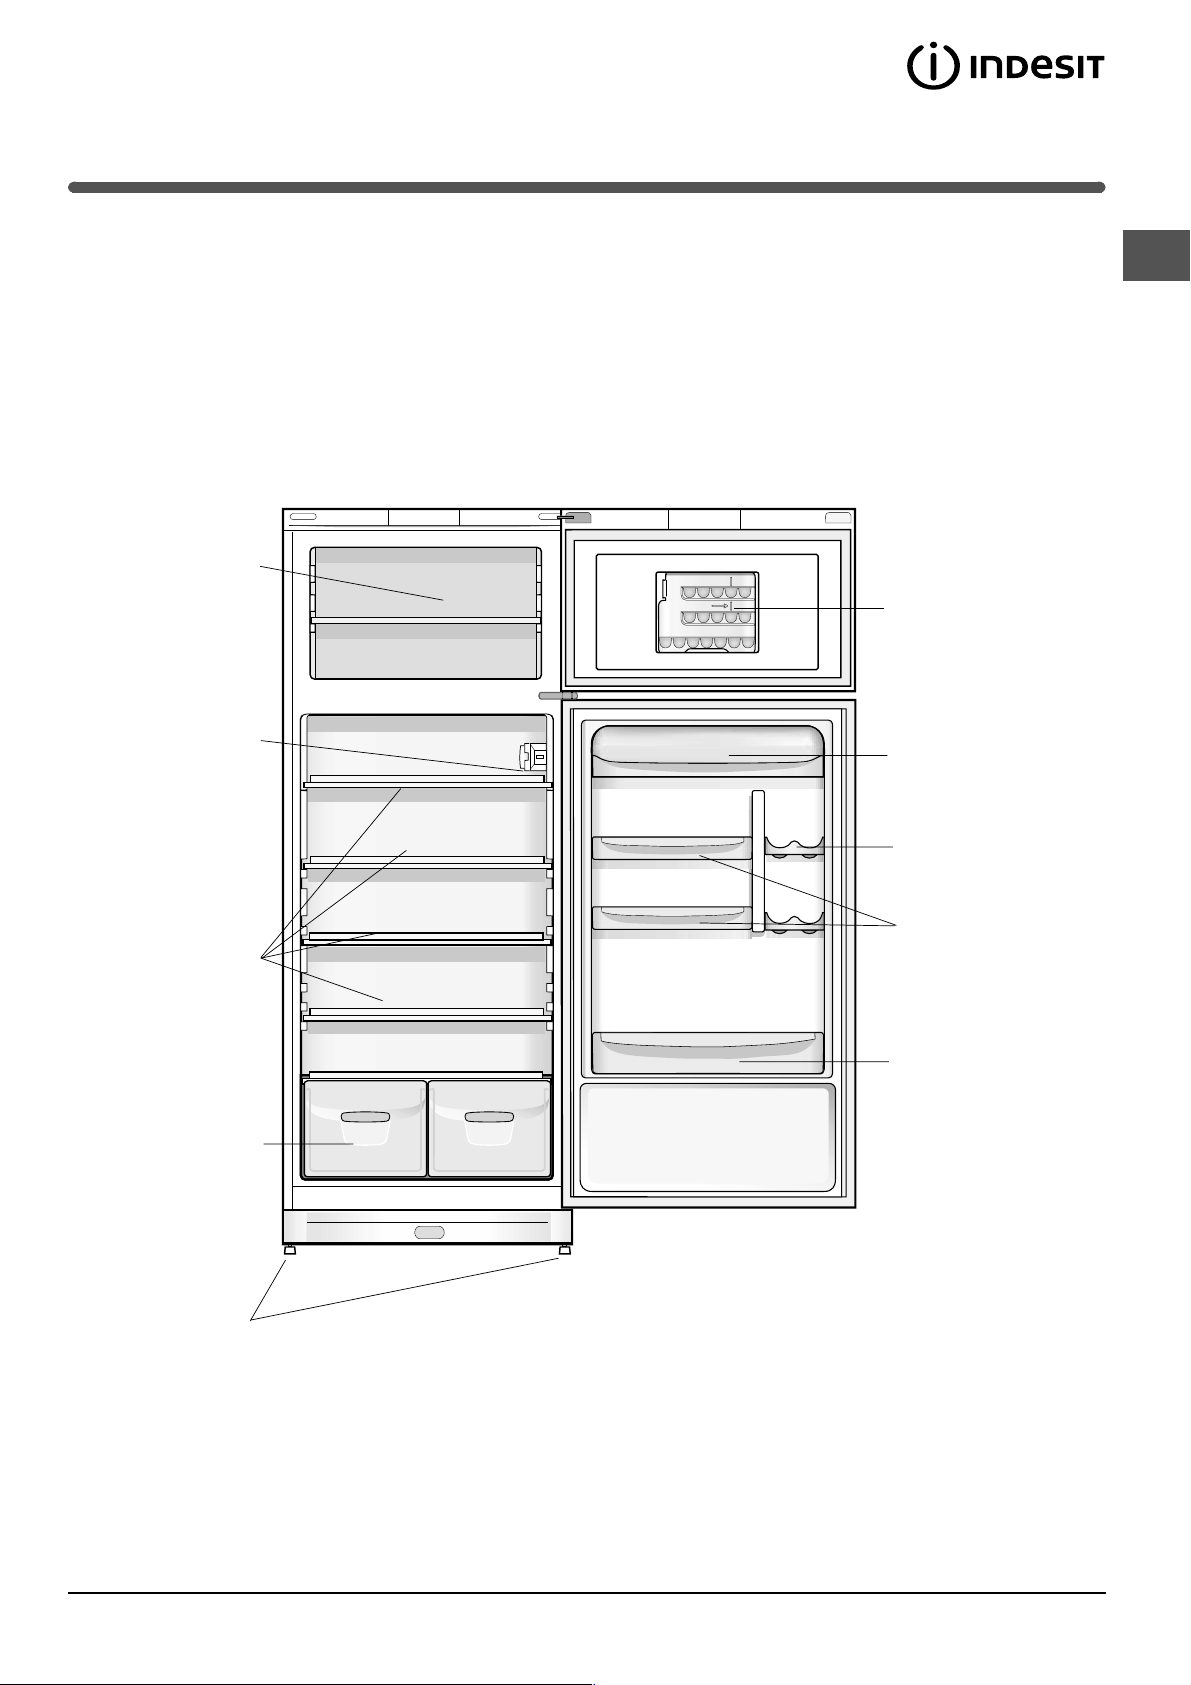
Kullaným talimatlarý birkaç model için geçerli olduðu için satýn aldýðýnýz cihazdaki olmayan deðiþik ayrýntýlarý
gösterebilir. Sonraki sayfalarda en karýþýk cisimler açýklanmýþtýr.
DONDURMA ve
SAKLAMA bölmesi
ISININ AYAR
düðmesi
WATER LEVEL
MAX
Buzluk
Çýkarýlabilen
KAPAKLI raf
TR
RAF
MEYVE VE SEBZE
çekmecesi
AYAK
KUTU MEÞRUBAT
tutucusu
Çýkarýlabilen
KAPI RAFI
ÞÝÞE Tutucusu
Sayýsý ve/ya pozisyonu deðiþebilir.
* Sadece bazý modellerde mevcuttur.
3
Page 4
Çalýþtýrma ve kullaným
Cihazýn çalýþtýrýlmasý
TR
! Cihazý çalýþtýrmadan önce montaj hakkýnda verilen
talimatlarý uygulayýnýz (Montaj bölümüne bakýnýz).
! Cihazý elektrik þebekesine baðlamadan önce tüm
bölmeleri ve aksesuarlarý bikarbonat kullanarak ýlýk su ile
yýkayýnýz.
1. Fiþi prize takýnýz ve iç lamba aydýnlanmasýný
saðlayýnýz.
2. ISI AYAR düðmesini orta bir deðere ayarlayýnýz.
Birkaç saat geçtikten sonra gýdalar buzdolabýnýza
yerleþtirilebilir.
Isýnýn ayarlanmasý
Soðutucu bölmesinde ýsý ayarlarýnýn otomatik olarak
termostatýn konumuna göre yapýlmasý saðlanýr.
1 = daha az soðuk
5 = daha çok soðuk
Orta bir deðere ayarlanmasý tavsiye edilir.
Mevcut alaný büyütmak ve dýþ görünümü güzelleþtirmek
amacýyla bu cihazýn soðutma ünitesi soðutucu
bölmesinin arka duvarýnýn içine yerleþtirilmiþtir.
Soðutucunun arka yüzeyinde; çið varsa kompresör
devrede, su damlacýklarý varsa kompresör devre dýþý.
Bunun için merak etmeyiniz! Buzdolabýnýz normal
çalýþmaktadýr.
ISI AYAR düðmesi yüksek deðerlere ayarlandýðýnda,
gýdanýn büyük miktarda yerleþtirilmiþ olmasý ve dýþ
ortam sýcaklýðý yüksek olmasý durumunda cihaz
devamlý çalýþabilir. Böylece çýð oluþmasýný engellemez
ve fazla enerji tüketir: tabii düðmeyi daha alçak bir
deðere ayarlanmalýdýr (otomatik eritme sistemi devreye
girecektir).
Statik cihazlarda hava doðal bir þekilde dolaþýr. soðuk
hava, daha aðýr olduðu için aþaðýya iner. Ýþte gýda
yerleþtirme þekli:
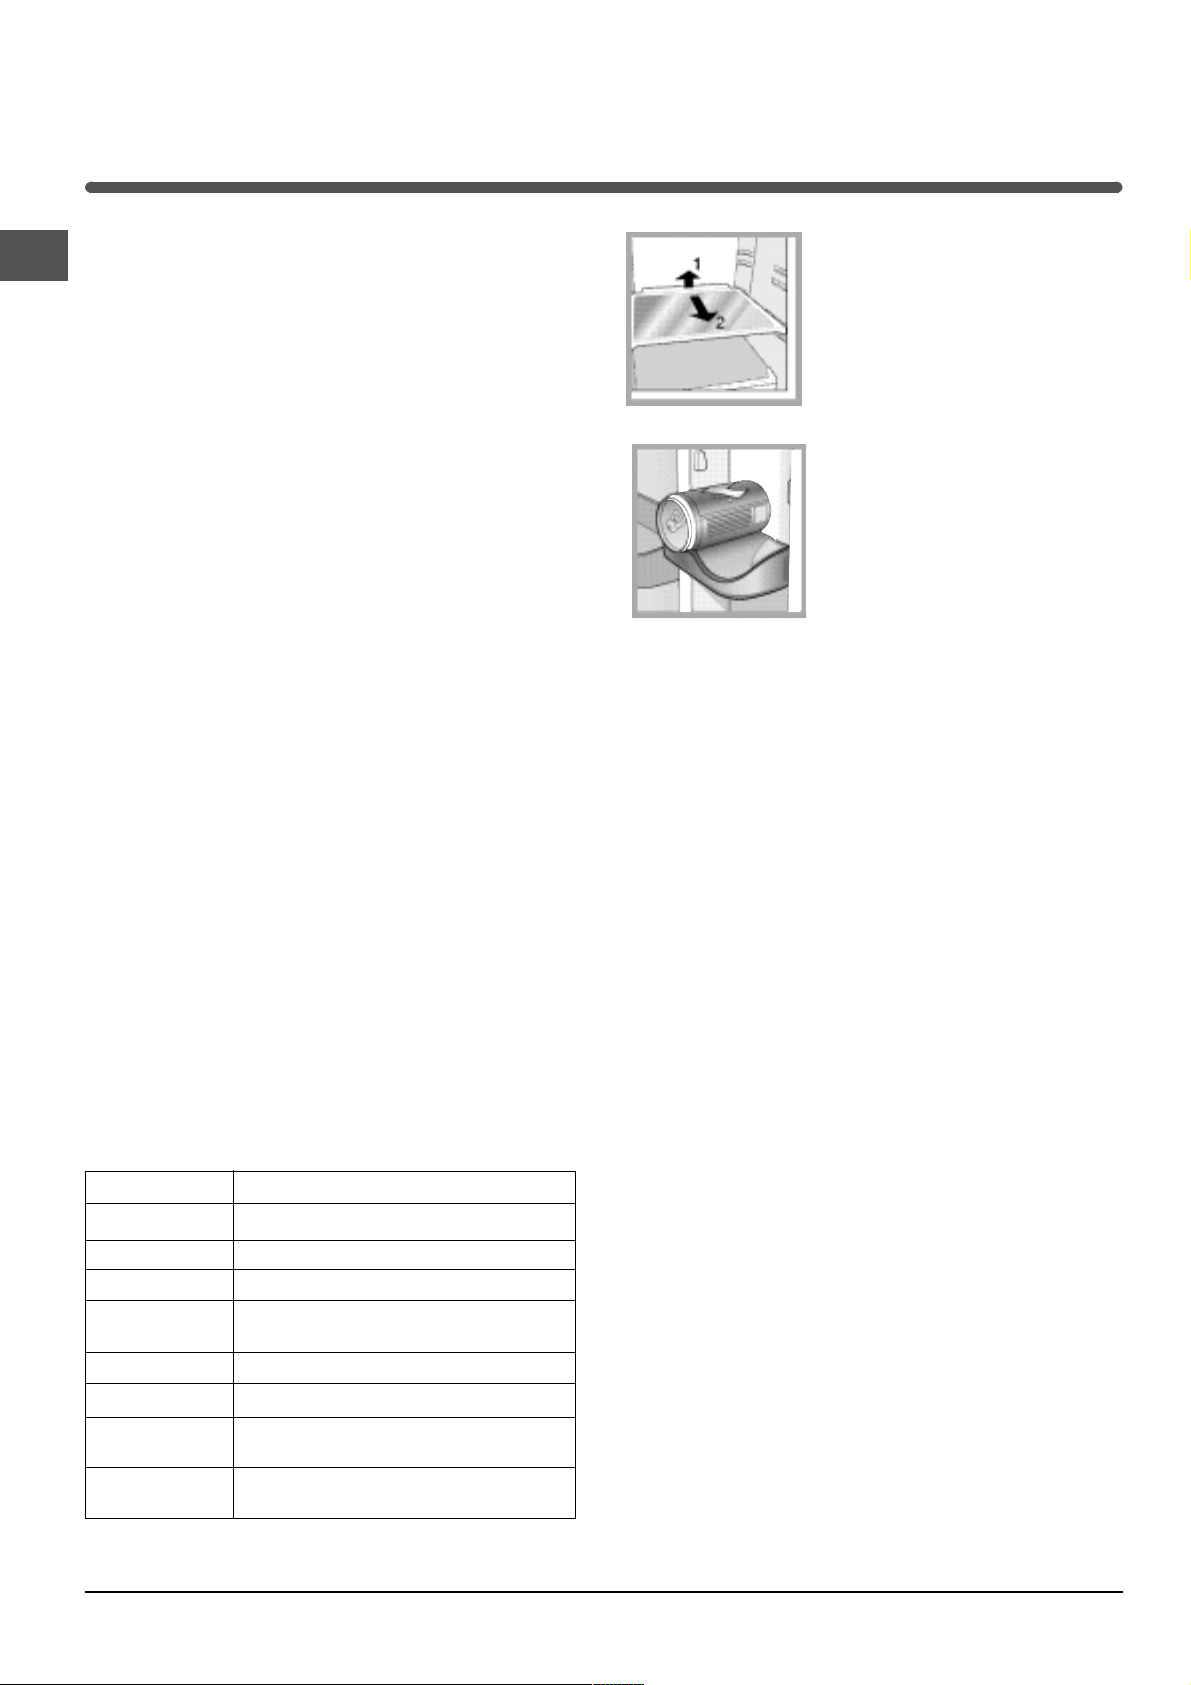
RAFLAR: tepsi veya tel raflar.
Büyük kaplar veya fazla yer kaplayan
gýdalarýn yerleþtirilmesi için mevcut
olan kýlavuzlar kullanýlarak çýkarýlabilir
ve yüksekliði ayarlanabilir (þekile
bakýnýz). Yüksekliði raf tamamen
çýkarýlmadan ayarlanabilir.
KUTU MEÞRUBAT tutucusu
Kutu meþrubat tutucusunun
kapýnýn iç tarafýnda olmasý
ihtiyaçlarýnýzý karþýlayacak þekilde
sadece kutu meþrubat deðil,
yoðurt, tereyað gibi baþka kaplarý
da yerleþtirmenizi saðlar.
Gýda Buzdolabýnda yerleþtirimesi
Et ve temiz balýk Meyve ve sebze çekmecelerinin üstüne
Taze peyner Meyve ve sebze çekmecelerinin üstüne
Piþmiþ yemekler Tüm raflara
Salam, tost
ekmei, çikolata Tüm raflara
Meyve ve sebze Meyve ve sebze çekmecesine
Yumurta Ilgili rafa
Tereya ve
margarin Ilgili rafa
Þiþe, içecek ve
kutu meþrubat Ilgili rafa
4
Page 5
Buzdolabýnýn en iyi þekilde kullanýlmasý
Isý derecesini ayarlamak için ISI AYAR düðmesini
kullanýnýz (Açýklama bölümüne bakýnýz).
Sadece soðuk, ýlýk ve sýcak olmayan gýda
yerleþtirilebilir (Önlemler ve öneriler bölümüne
bakýnýz).
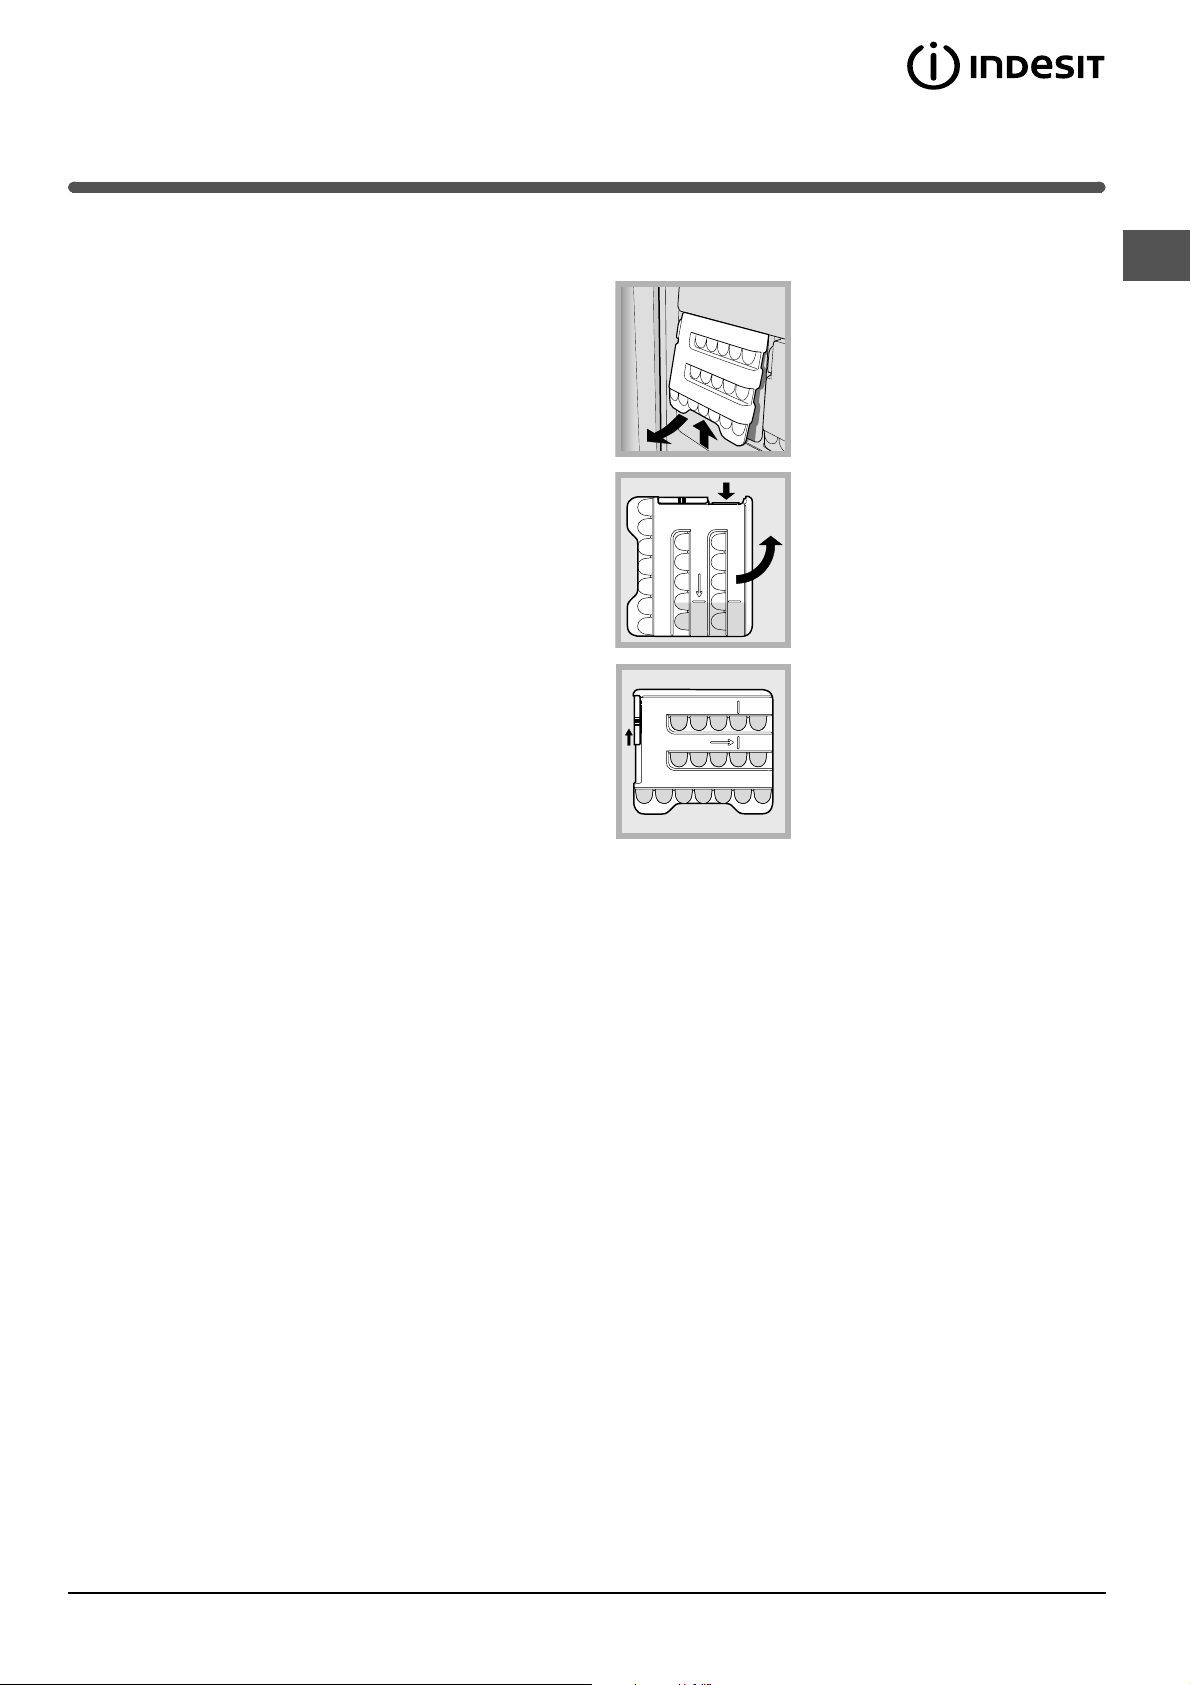
Buzluk : buz üretmek için kullanýlýr.
TR
1. Önce yukarýya, sonra dýsarýya
dogru iterek buzlugu çýkarýnýz
(sekile bakýnýz).
Buzlugun bos olup olmadýgýný
kontrol ediniz ve üstündeki deligin
içine su dökerek doldurunuz.
Piþmiþ gýda çið gýdadan daha uzun süre saklanmaz.
Sývý kapaksýz kaplara dökülmemlidir: nem oraný
yükselir ve kondens suyu oluþur.
Dondurucunun en iyi þekilde kullanýlmasý
Erimiþ veya erimek üzere olan yiyecekleri bir daha
dondurmayýnýz, bu gýdalar (24 saat içinde) tuketilmesi
için piþirilmelidir.
Dondurulacak taze gýdalar, daha önce donmuþ
olanlarla temas etmemelidir. Bu taze gýdalar
dondurucunun üst bolümündeki rafa iç duvarlarý ile
(yan ve arka duvarý) temasa geçecek þekilde
yerleþtirilmelidir, burada ýsý derecesi 18°cnin altýna
inerek hýzlý bir dondurma iþlemini garanti eder
Dondurucu içinde sývý olan kapaðý kapatýlmýþ þiþe
koymayýnýz, patlayabilir.
Günlük en fazla yiyecek dondurma miktarý soðutucu
içinde aþaðýda saðda bulunan teknik veriler etiketi
üzerinde yazýlýdýrlar (örneðin: Kg/24h 4).
WATER LEVEL
MAX
WATER LEVEL
2. Gösterilen seviyeyi (MAX
WATER LEVEL) geçmemelidir.
Fazla su varsa buzluktan buzun
çýkarýlmasý engellenir (böyle bir
durumda buzun erimesini
bekleyiniz ve içindeki suyu
dökünüz).
3. Buzlugu 90° döndürünüz: su
ile içindeki sekiller doldurulur
(sekile bakýnýz). Deligi kapakla
MAX
kapatýnýz ve yerine yerlestiriniz.
Buz olustugu zaman (minimum
süre 8 saattir) çýkarmak için
buzlugu sert bir yüzeye vurunuz.
! Dondurma iþlemi sýrasýnda kapaðý acmamaya özen
gösteriniz.
! Elektrik kesintisi veya ariza durumunda kapaðý
açmayýnýz: dondurulmuþ gýdalar 9-14 saate kadar, hiç
bir degisikliðe uðramadan korunurlar.
! Dýþ ortam sýcaklýðý uzun süre 14°Cden soðuk olmasý
durumunda dondurucu bölmesi uzun süre saklamak için
gerekli ýsý derecesine ulaþmaz ve böylece saklama
süresi kýsalmýþ olur.
5
Page 6
Bakým ve özen
Elektrik þebekesinin devre dýþý býrakýlmasý
TR
Temizlik ve bakým iþlemi sýrasýnda cihazýn fiþini prizden
çýkararak elektrik baðlantýsýný kesiniz.
Buzdolabýnýn tüm elektrik baðlantýlarýný kesmek için ISI
AYAR DÜÐMESÝNÝ
yeterli deðildir.
.
konumuna (cihaz kapalý) getirmek
Cihazýn temizlenmesi
Buzdolabýnýn dýþ, iç duvarlarýný ve contalarýný karbonat
(yemek sodasý) veya nötr sabun eklenmiþ ýlýk su ile
ýslatýlmýþ yumuþak bir sünger ile temizleyiniz. Aþýndýrýcý
maddeler ve çözücü, amonyak, beyazlatýcý türü
maddeleri kesinlikle kullanmayýnýz.
Sökülebilen aksesuarlarý deterjan veya sabun
eklenmiþ ýlýk su içine batýrýnýz. Çalkalayýnýz ve
dikkatlice kurulayýnýz.
Buzdolabýnýzýn arkasý toz dolu ise, cihazý kapatýp
elektrik baðlantýsýný kestikten sonra elektrik
süpürgesini orta watta ayarlayarak uzun ucu ile
arkasýndaki tozlarý iyice alýnýz.
Ýstenmeyen kokularýn ve küfün önlenmesi
Cihaz kokularý önleyici hijenik malzemelerle üretilmiþtir.
Bu özelliði kaybetmemek için gýdalarýn iyice sarýlýp
kapatýlmasý gerekir. Böylece leke oluþmasý engellenir.
Cihazýn uzun süre devre dýþý býrakýlmasý durumunda
içini iyice temizleyiniz ve kapaðý açýk býrakýnýz.
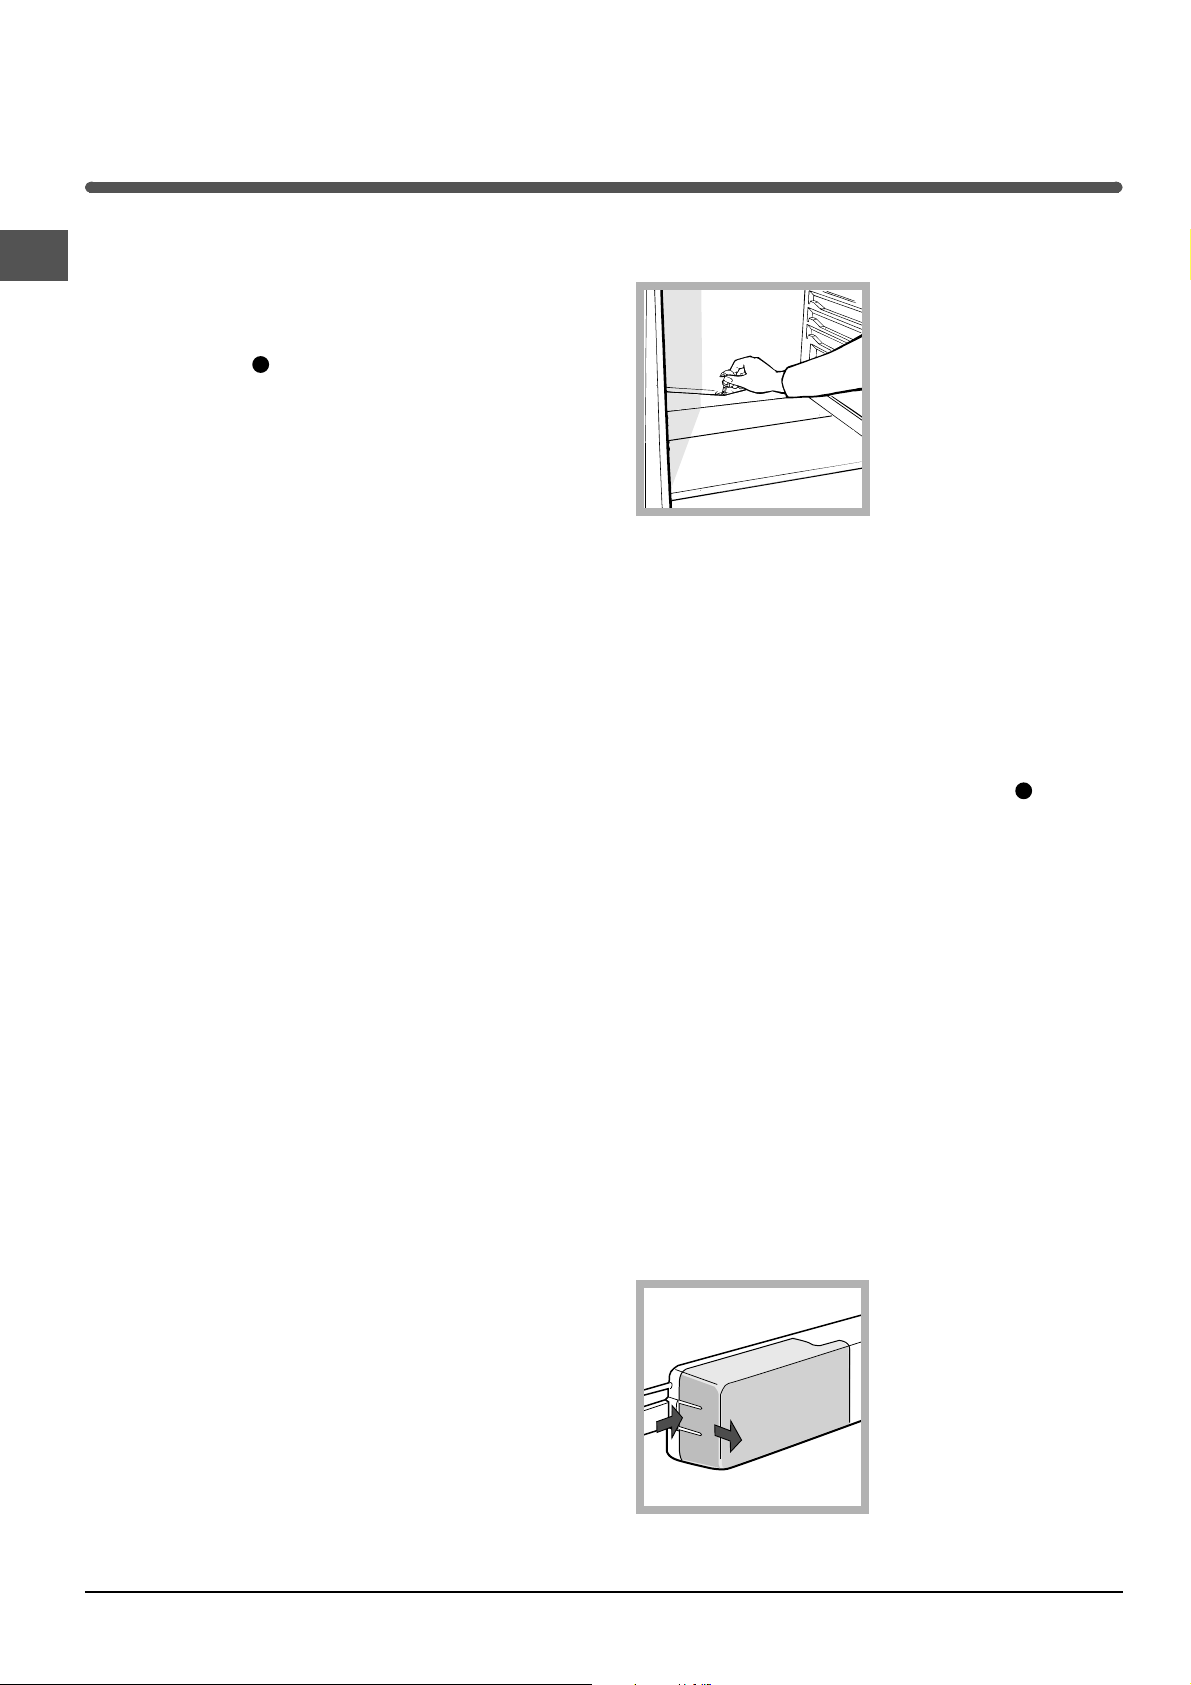
Soðutucu bölmesinin eritmesi
Buzdolabýnýz otomatik
eritme sistemine sahiptir:
Eritme sonucu oluþan su,
su boþaltma oluðundan
geçerek (þekile bakýnýz)
buzdolabýnýn arka kýsmýna
akar ve burada kompresör
tarafýndan üretilen
sýcaklýkla buharlaþýr.
Periyodik olarak su
boþaltma borusunun deliði
suyun rahatça akabilmesi için temizlenmelidir.
Dondurucu bölmesinin eritmesi
Oluþan karlar buzdolabýnýzla birlikte verilen buz kazýma
küreði ile belli aralýkla alýnmalýdýr. Oluþan karlarýn
kalýnlýðý 5 mmden fazla ise eritmeyi manuel olarak
yapýnýz:
1. ISININ AYAR düðmesini konuma getiriniz
2. Yiyecekleri gazete kaðýdýna sararak buzdolabýnýzýn
soðutucu bölmesine veya baþka dondurucuya
yerleþtiriniz.
3. Bu çözme iþlemi sýrasýnda karlar çözene kadar
dondurucunun kapaðýný açýk tutunuz; ayrýca buzun
çözülme iþlemini kolaylaþtýrmak amacýyla içine içi ýlýk
su dolu birkaç kap yerleþtiriniz.
4. Cihazý çalýþtýrmadan önce dondurucu bölmesini
özenle temizleyip kurulayýnýz.
5. Dondurucu bölümüne gýdalarý koymadan önce
muhafazanýn en ideal þartlarýna ulaþmasý için aþaðý
yukarý 2 saat bekletiniz.
.
Fýrýn lambasýnýn deðiþtirilmesi
Soðutucu bölmesinin ampulünü deðiþtirmeden önce
buzdolabýnýn fiþini prizden çýkarýnýnz. Aþaðýdaki
talimlatlarý özenle uygulayýnýz.
Þekilde gösterildiði (þekile
bakýnýz) gibi lamba
kapaðýnýn arkasýnda
bulunan sabitleme vidasýný
(B) çevirerek lambayý
çýkarýnýz. Ampulü aynýsýyla
2
1
6
deðiþtiriniz (gücü 15Wtan
daha yüksek olmamalýdýr).
Page 7
Önlemler ve öneriler
! Cihaz uluslararasý güvenlik normlarýna uygun þekilde
tasarlanmýþ ve imal edilmiþtir. Bu uyarýlar güvenlik amaçlý
olup dikkatlice okunmalýdýr.
Bu cihaz aþaðýdaki Avrupa Birliði Talimatlarýna
uygundur:
- 19/02/73 tarihli EAT 73/23 (Düþük Voltaj
Yönergesi) ve sonraki deðiþiklikler;
- 03/05/89 tarihli 89/336/CEE (Elektromanyetik
uyum) ve sonraki deðiþiklikler.
- EAT/2002/96
Genel güvenlik uyarýlarý
Cihaz meskenlerde kullanýlmak üzere tasarlanmýþ olup
profesyonel kullaným amaçlý deðildir.
Cihaz sadece gýda saklamasý için, yetiþkinler
tarafýndan ve bu kitapçýktaki talimatlar çerçevesinde
kullanýlmalýdýr.
Cihaz, üzeri kapalý bile olsa açýk alanlara monte
edilmez, zira yaðmur ve fýrtýnaya maruz kalmasý son
derece tehlikelidir.
Cihaza ayaklarýnýz çýplakken yada elleriniz veya
ayaklarýnýz ýslak yada nemliyken dokunmayýnýz.
Buzdolabýnýn soðutma yapan iç kýsýmlarýna
dokunmayýnýnz: yanma veya yaralanma tehlikesi
vardýr.
Fiþi prizden çekerken kablosundan deðil fiþin
kendisinden tutarak çekiniz.
Temizlik ve bakým iþleminden önce fiþ elektrik
þebekesinden çýkarýlmalýdýr. Buzdolabýnýn tüm elektrik
baðlantýlarýný kesmek için ISI AYAR DÜÐMESÝNÝ
konumuna (cihaz kapalý) getirmek yeterli deðildir.
Arýza halinde onarmak amacýyla iç mekanizmalarý
kurcalamayýnýz.
Bölmelerin ikisinin içinde buzu kazýmak veya eritmek
için baþka aygýtlar veya gerekçeler deðil, sadece
mevcut olan buz küreðini kullanýnýnz.
Atýklarýn tasfiye edilmesi
TR
Ambalaj malzemelerinin tasfiye edilmesi: yerel
yasalara uyunuz, bu þekilde ambalajlarýn geri
dönüþümü saðlanýr.
Eletrik ve eletronik cihazlarýn atýklarýný deðerlendirme
2002/96/CE sayýlý Avrupa Konseyi direktifinde; beyaz
eþyalarýn kentsel katý atýk genel yöntemi ile tasfiye
edilmemesi öngörülmüþtür. Kullanýlmayan cihazlarýn,
madde geri kazaným ve geri dönüþüm oranýný en
yüksek seviyeye yükseltmek, çevre ve insan saðlýðýna
olasý zararlarý engellemek için ayrý ayrý toplanmasý
gerekir. Tüm ürünlerin üzerinde; ayrý toplama
hükümlerini hatýrlamak amacýyla üstünde çarpý iþareti
olan sepet sembolü verilmiþtir. Cihazlarýn tasfiye
edilmesi konusunda daha geniþ bilgi almak için cihaz
sahiplerinin mevcut müþteri hizmetine veya satýþ
noktalarýna baþvurulmasý gerekir.
Tasarrufa yöneliniz ve çevreye saygýlý
olunuz
Buzdolabэ doрrudan gьneю эюэрэna maruz kalmayacak,
serin ve havadar uygun bir yere yerleþtiriniz. Ayrýca, ýsý
kaynaklarýndan uzakta olmalýdýr.
Gýdalarý almak ya da yerleþtirmek için cihazýn kapaðýný
mümkün olduðu kadar az açýk tutunuz.
Buzdolabýnýn kapaðý her açýldýðýnda enerji tüketilir.
Cihazý fazla gýda ile doldurmayýnýz: gýdalarýn iyi
saklanmasý için soðuk hava dolaþýmýnýn saðlanmasý
gerekir. Hava dolaþýmýnýn engellenmesi durumunda
kompresör devamlý çalýþmak zorunda kalacaktýr.
Buzdolabýnýn içine sýcak gýda koymayýnýz: ýsý derecesi
yükselir, kompresör yoðun çalýþmak zorunda kalýr ve
enerji büyük miktarda tüketilir.
Buz oluþumu halinde dondurucu bölmesindeki buzu
eritiniz ( Bakým bölümüne bakýnýz ); Kalýn bir buz
tabakasý soðutma iþlemini engellediði için daha fazla
enerji tüketilir.
Buz küplerini dondurucu bölmesinden çýkarýr çýkarmaz
aðzýnýza sokmayýnýz ve yemeyiniz.
Çocuklarýn cihazla oynamasýna izin vermeyiniz.
Kesinlikle çekmece üstüne oturmamalý ve kapýya
tutunup sarkmamaldýr.
Ambalajlar çocuklar için oyuncak deðildir.
7
Page 8
Arýzalar ve onarýmlar
Buzolabýnýz bazen size sorun çýkarabilir yada kötü çalýþabilir. Teknik Servise baþvurmadan önce (Teknik Servis
TR
bölümüne bakýnýz) aþaðýdaki liste yardýmýyla kolay çözülebilecek bir problem olup olmadýðýný kontrol ediniz.
Arýzalar:
Ýç lamba yanmýyor.
Soðutucu ve dondurucu az
soðutma yapýyor.
Soðutucu bölmesinde gýdalar
donuyor.
Motor devamlý çalýþýyor.
Cihaz çok ses yapýyor.
Buzdolabýnýn bazý dýþ kýsýmlarýnýn
ýsýsý yüksek
Olasý nedenler / Çözümler:
Fiþ prize takýlý deðil veya kontaða girecek kadar takýlý deðil veya evdeki
elektrik akýmý kesik.
Kapaklar tamamen kapanmýyor veya contalar bozuk.
Kapaklar sýk sýk açýlýyor.
ISININ AYAR düðmesini doðru þekilde ayarlanmamýþ.
Soðutucu veya dondurucu fazla doldurulmuþ.
ISININ AYAR düðmesini doðru þekilde ayarlanmamýþ.
Gli alimenti sono a contatto con la parete posteriore.
Kapak tam kapalý deðil veya devamlý açýlýp kapatýlýyor.
Dýþ ortam sýcaklýðý çok yüksek.
Buzlanma kalýnlýðý 2-3 mmyi geçiyor (Bakým bölümüne bakýnýz ).
Cihaz tamamen düz bir zemine montaj edilmemiþ (Montaj bölümüne
bakýnýz).
Cihaz ses ve sarsýntý yapan mobilya veya eþya arasýna yerleþtirilmiþ.
Ýçindeki gaz kompresör çalýþmadýðý zamanda hafif bir ses yapmýyor: bir
ariza deðildir, normaldýr.
Yüksek ýsý ürünün bazý özel bölgelerinde nem oluþmasýný engellemek
için gereklidir.
Soðutucu bolmesinin tabanýnda
ýslaklýk var.
Su boþaltma deliði týkalýymýþ (Bakým bölümüne bakýnýz)
.
8
Page 9
Teknik Servis
Servise baþvurmadan önce:
Servise baþvurmadan çözülebilecek bir ariza olup olmadýðýný kontrol ediniz (Ariza ve onarým bölümüne bakýnýz).
Sonucun olmusuz olmasý durumunda en yakýn Teknik Servise baþvurunuz.
model
seri numarasý
Þunlarý bildiriniz:
arýza tipini
cihazýn modeli (Mod.)
seri numarasý (S/N)
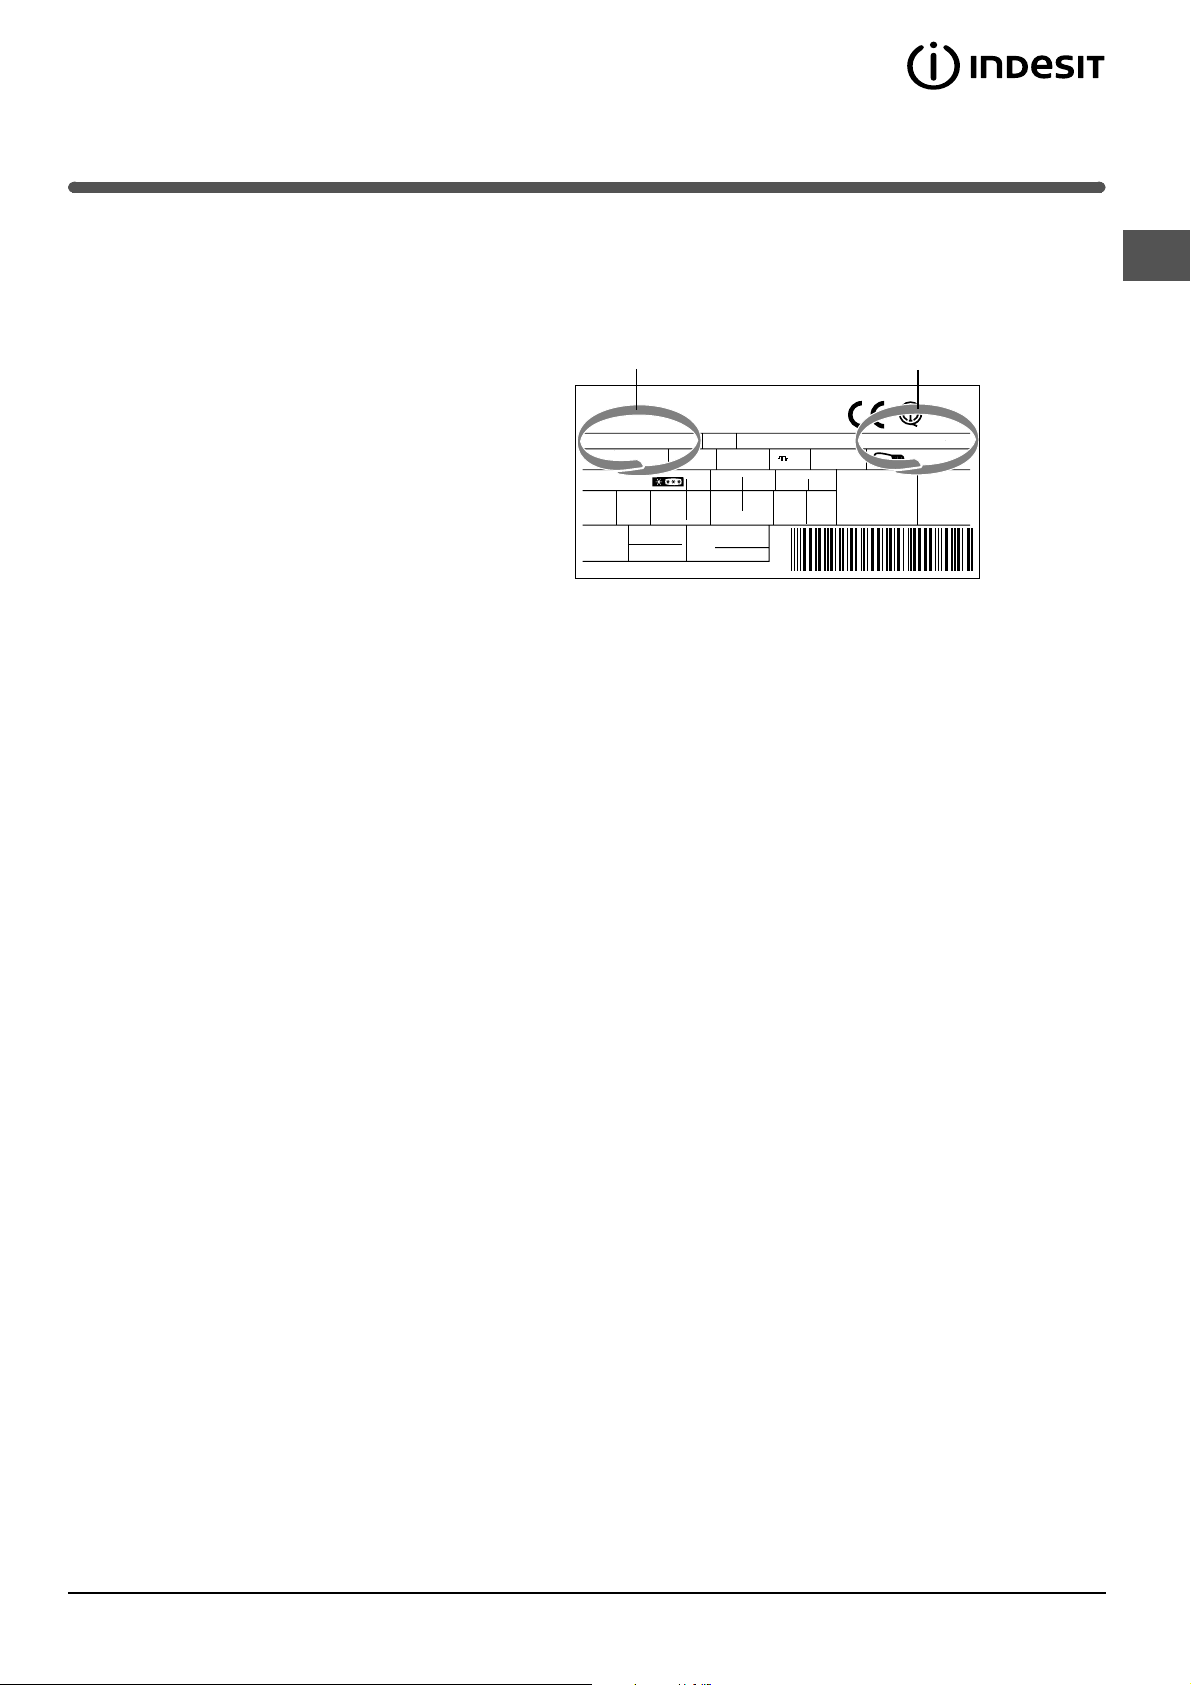
Ýstenilecek bilgiler soðutucu içinde aþaðýda saðda bulunan
teknik veriler etiketi üzerinde yazýlýdýrlar.
RG 2330
Mod.
220 - 240 V- 50 Hz 150 W
340
Total
Gross
Bruto
Brut
Compr.
R 134 a
Syst.
kg 0,090
Kompr.
Made in Italy 13918
Gross
Bruto
Brut
75
Test
P.S-I.
TI
Net
Util
Utile
Pressure
HIGH-235
LOW 140
93139180000 S/N 704211801
Cod.
Gross
Bruto
Brut
W
Fuse
A
Freez. Capac
Poder de Cong
kg/24 h
4,0
Max 15 w
Class
Clase
Classe
N
Kesinlikle sadece yetkili teknisyenlere baþvurunuz ve orijinal yedek parçalarý kullanýnýz.
TR
9
Page 10
TR
195042630.02
10/2006
10
Page 11
Operating Instructions
2-DOOR FRIDGE
TR
Türkçe, 1
T 5
T 5 S
GB
English, 11
Contents
GB
Installation, 12
Positioning and connection
Reversible doors
Description of the appliance, 13
Overall view
Start-up and use, 14-15
Starting the appliance
Using the refrigerator to its full potential
Using the freezer to its full potential
Maintenance and care, 16
Switching the appliance off
Cleaning the appliance
Avoiding mould and unpleasant odours
Defrosting the appliance
Replacing the light bulb
Precautions and tips, 17
General safety
Disposal
Respecting and conserving the environment
Troubleshooting, 18
Assistance, 19
Page 12
Installation
∅ 3
mm
! Before placing your new appliance into operation please
GB
read these operating instructions carefully. They contain
important information for safe use, for installation and for care
of the appliance.
! Please keep these operating instructions for future
reference. Pass them on to possible new owners of the
appliance.
Positioning and connection
Positioning
1. Place the appliance in a well-ventilated humidity-free room.
2. Do not obstruct the rear fan grills. The compressor and
condenser give off heat and require good ventilation to
operate correctly and save energy.
3. Leave a space of at least 10 cm between the top part of
the appliance and any furniture above it, and at least 5 cm
between the sides and any furniture/side walls.
4. Ensure the appliance is away from any sources of heat
(direct sunlight, electric stove, etc.).
5. In order to maintain the correct distance between the
appliance and the wall behind it, fit the spacers supplied in
the installation kit, following the instructions provided.
Levelling
1. Install the appliance on a level and rigid floor.
2. If the floor is not perfectly horizontal, adjust the refrigerator
by tightening or loosening the rear feet.
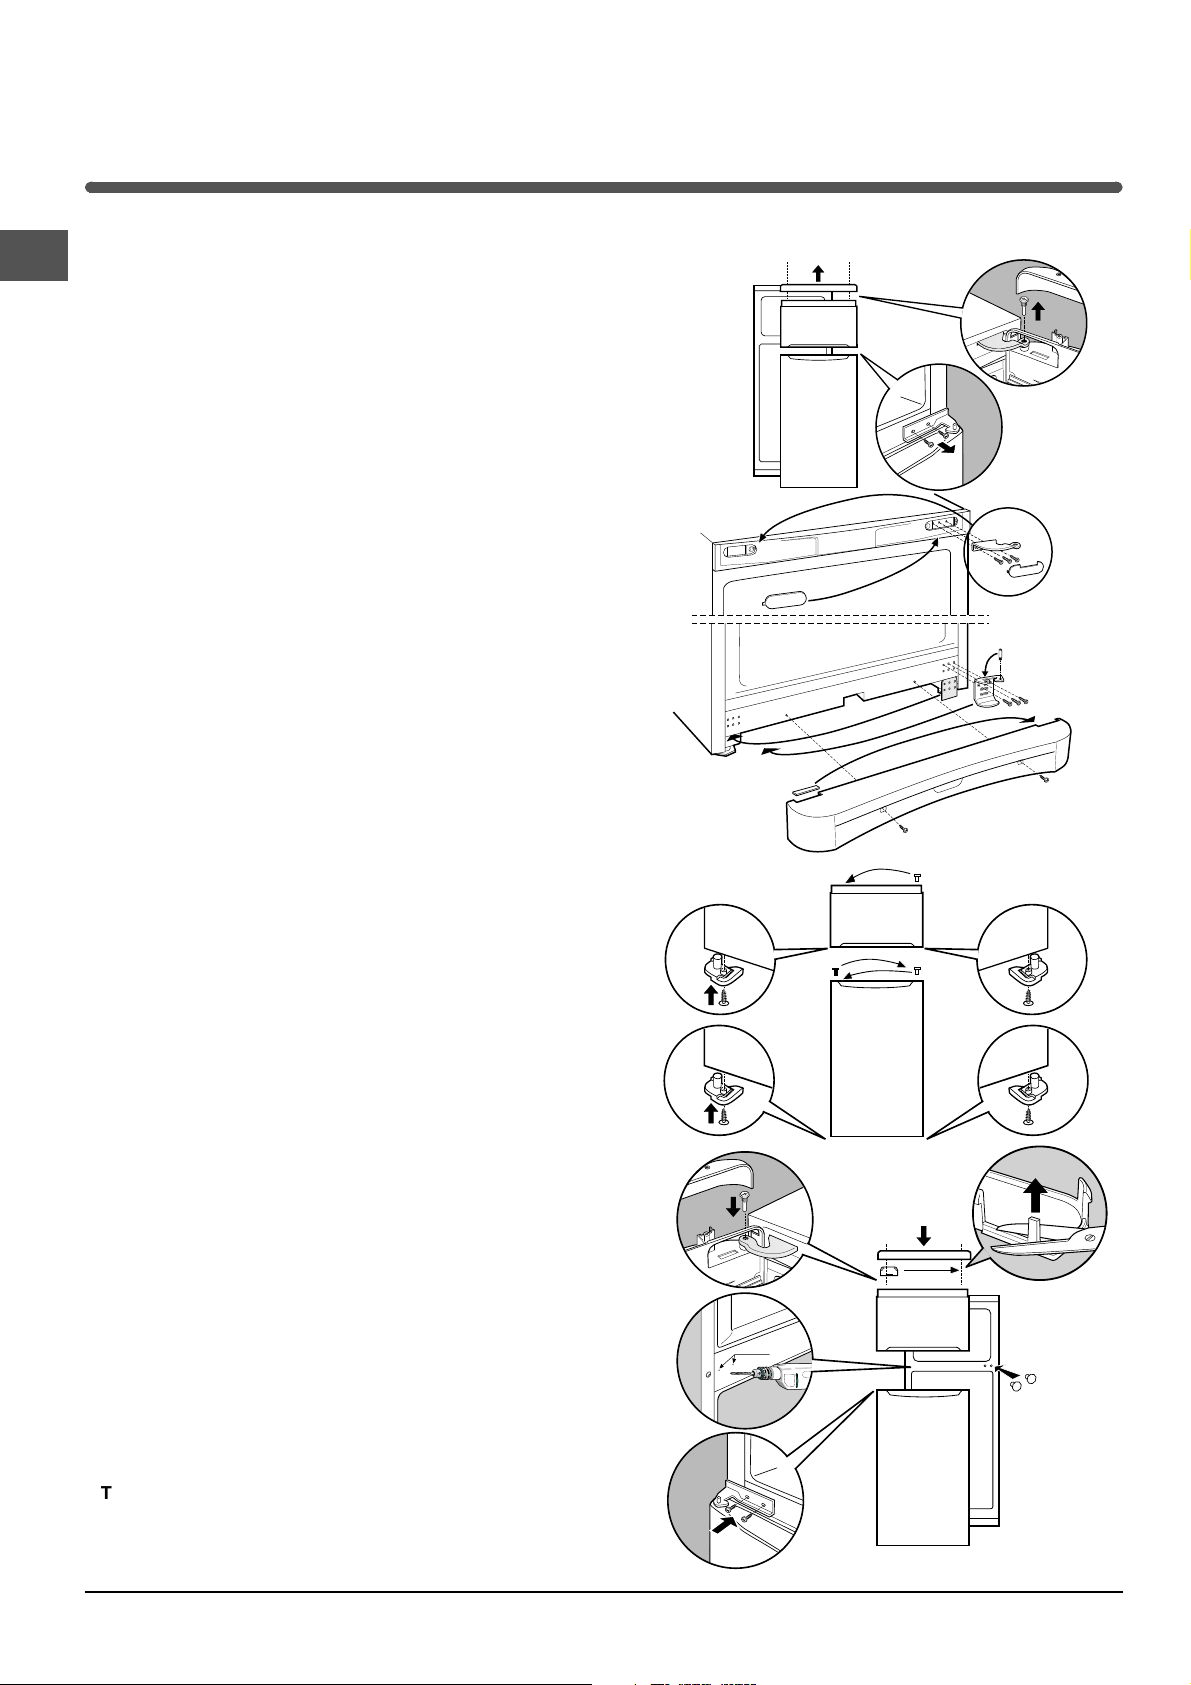
Reversible doors
1
2
3
Electrical connections
After the appliance has been transported, carefully place it
vertically and wait at least 3 hours before connecting it to the
electricity mains. Before inserting the plug into the electrical
socket ensure the following:
The appliance is earthed and the plug is compliant with the
law.
The socket can withstand the maximum power of the
appliance, which is indicated on the data plate located on
the bottom left side of the fridge (e.g. 150 W).
The voltage must be in the range between the values
indicated on the data plate located on the bottom left side
(e.g. 220-240V).
The socket is compatible with the plug of the appliance.
If the socket is incompatible with the plug, ask an
authorised technician to replace it (see Assistance). Do not
use extension cords or multiple sockets.
! Once the appliance has been installed, the power supply
cable and the electrical socket must be easily accessible.
! The cable must not be bent or compressed.
! The cable must be checked regularly and replaced by
authorised technicians only (see Assistance).
4
5
! The manufacturer declines any liability should these
safety measures not be observed.
12
Page 13
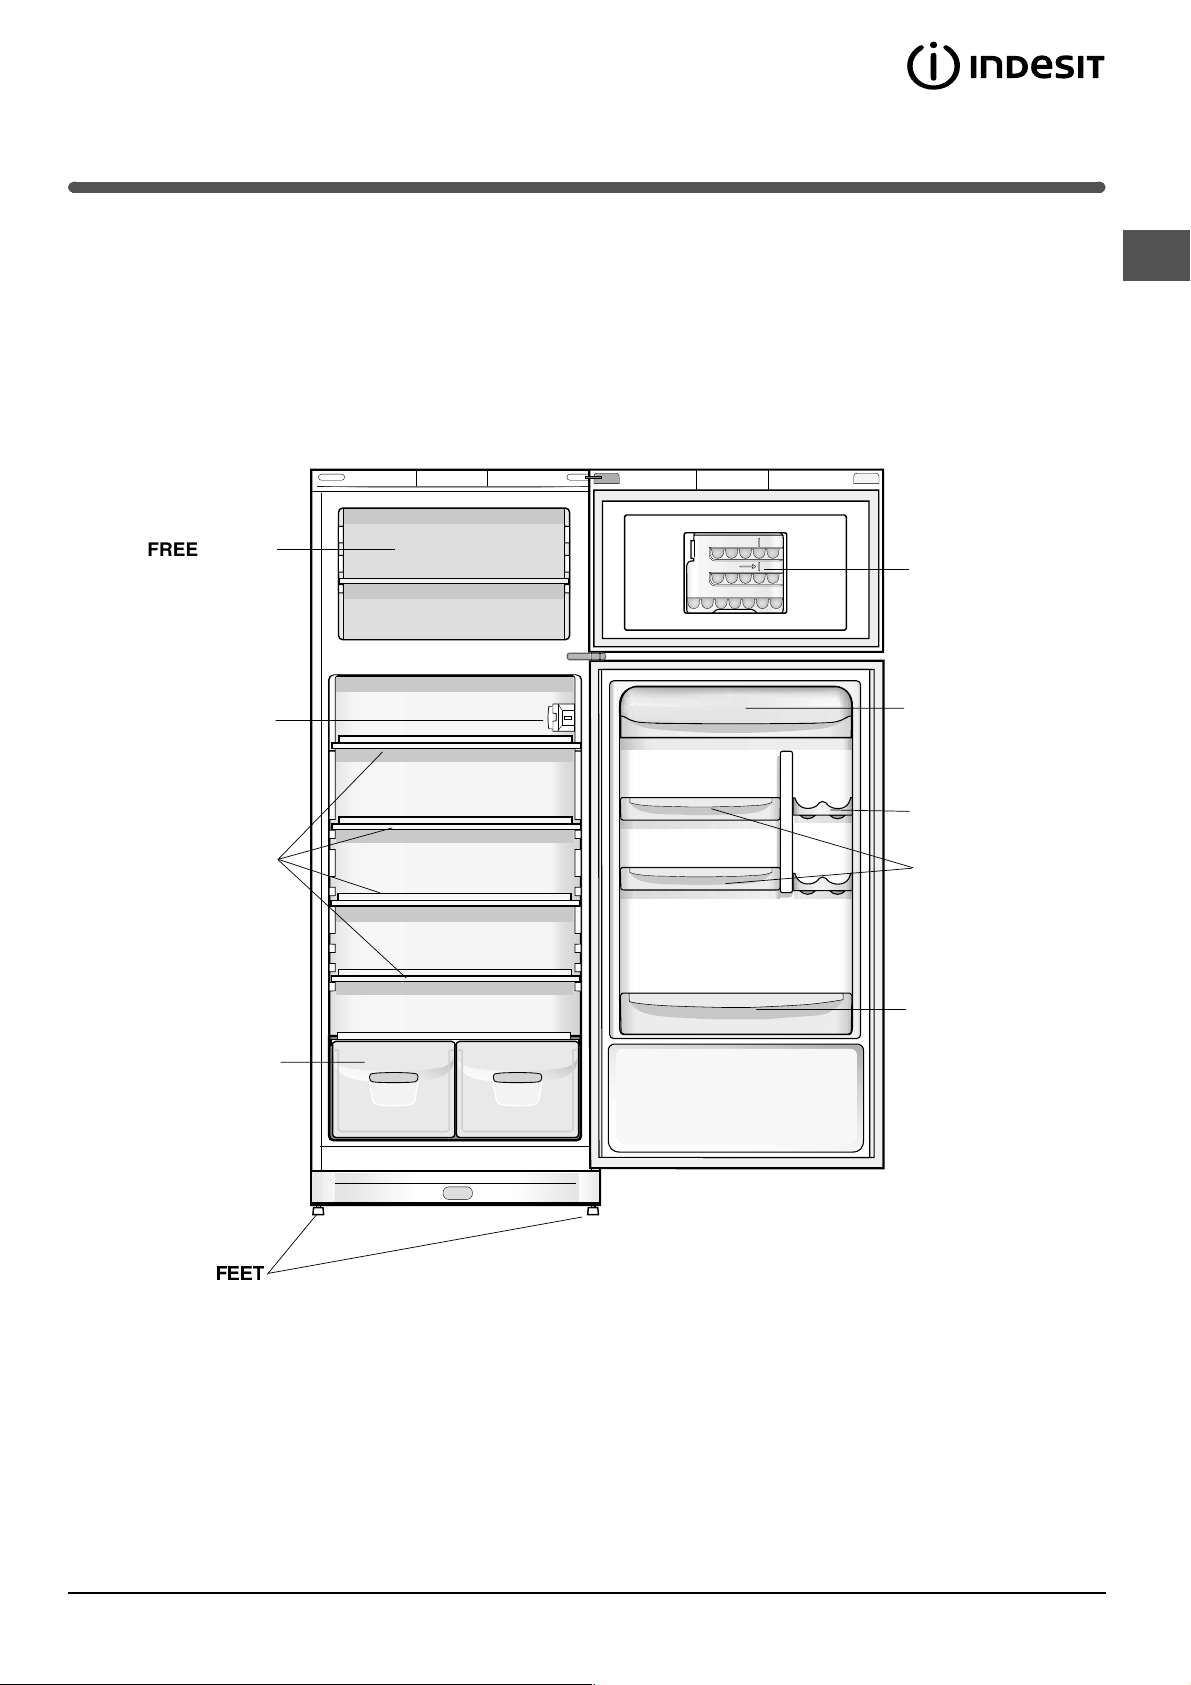
Description of the
appliance
Overall view
The instructions contained in this manual are applicable to different model refrigerators. The diagrams may not directly
represent the appliance purchased. For more complex features, consult the following pages.
FREEZER and
STORAGE
compartment
TEMPERATURE
CONTROL
WATER LEVEL
MAX
ICE tray
Removable lidded
shelf with EGG TRAY
CAN RACK
GB
SHELVES
FRUIT and
VEGETABLE bin
Levelling
FEET
Removable
multipurpose
SHELVES
BOTTLE shelf
Varies by number and/or position.
Available only on certain models.
*
13
Page 14
Start-up and use
Starting the appliance
GB
! Before starting the appliance, follow the installation
instructions (see Installation).
! Before connecting the appliance, clean the compartments
and accessories well with lukewarm water and
bicarbonate.
1. Insert the plug into the socket and ensure that the
internal light illuminates.
2. Turn the TEMPERATURE ADJUSTMENT knob to an
average value. After a few hours you will be able to put
food in the refrigerator.
Setting the temperature
The temperature inside the refrigerator compartment
automatically adjusts itself according to the position of the
thermostat knob.
1 = warmest
5 = coldest
We recommend, however, a medium position.
The cooling section of the refrigerator is located inside the
back wall of the refrigerator compartment for increased
space and improved aesthetics. During operation, the back
wall will be covered in frost or water droplets depending on
whether the compressor is operating or paused. Do not
worry, the refrigerator is functioning normally.
If the TEMPERATURE ADJUSTMENT knob has been set
on high values with large quantities of food and with a high
ambient temperature, the appliance can operate
continuously, resulting in excessive frost formation and
excessive energy consumption: compensate for this by
shifting the knob towards lower values (defrosting will
occur automatically).
In static appliances, the air circulates in a natural way: the
colder air tends to move downwards as it is heavier. The
food should be stored as follows:
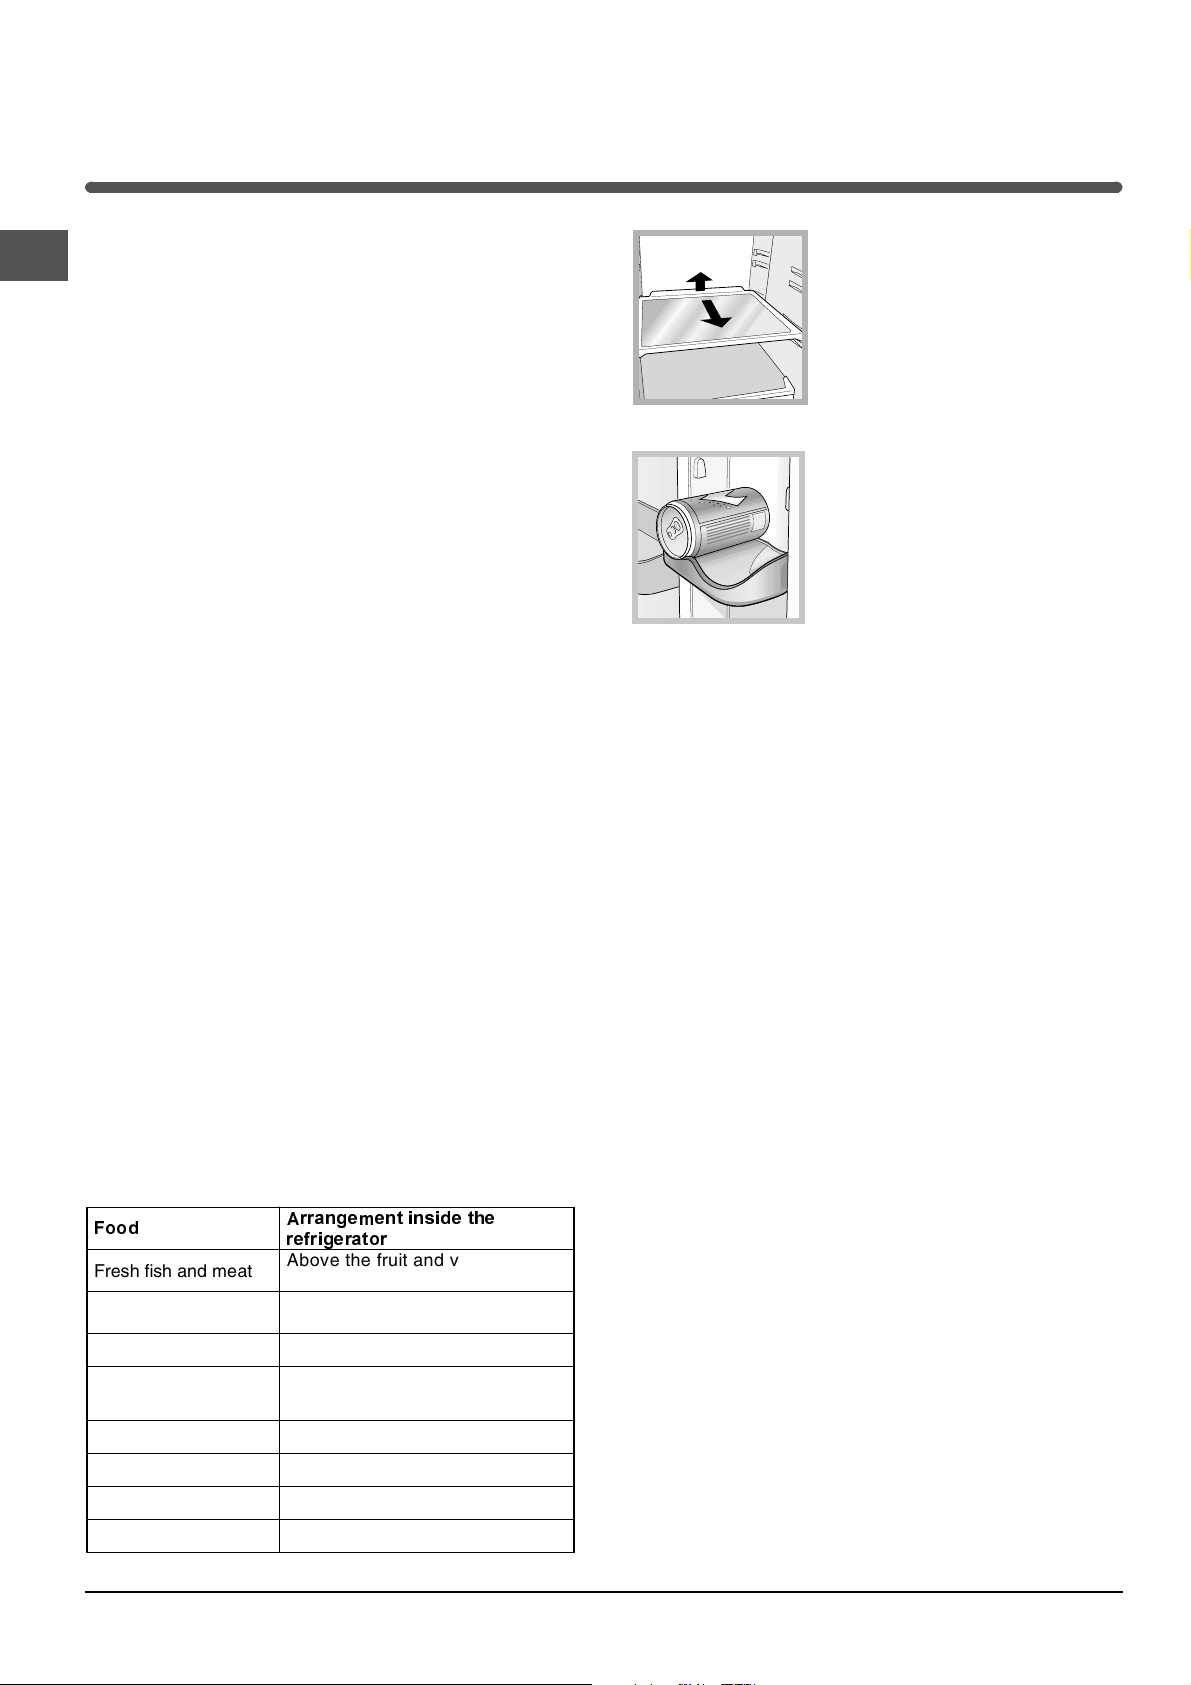
SHELVES: with or without grill.
1
2
Due to the special guides the
shelves are removable and the
height is adjustable (see diagram),
allowing easy storage of large
containers and food. Height can
be adjusted without complete
removal of the shelf.
The can rack
The can rack on the inner door
allows you to store not only cans,
but also yoghurt, butter and other
containers, according to your
requirements.
)RRG
Fresh fish and meat
Fresh cheese
Cooked food On any shelf
Salami, bread loaf,
chocolate
Fruit and vegetables In the fruit and vegetable bins
Eggs On the shelf provided
Butter and margarine On the shelf provided
Bottles, drinks, milk On the shelf provided
14
$UU D QJHPH QWLQVLGHWK H
UHIULJHUDWRU
Above the fruit and vegetable
bins
Above the fruit and vegetable
bins
On any shelf
Page 15
Using the refrigerator to its full potential
Use the TEMPERATURE ADJUSTMENT knob to adjust
the temperature (see Description).
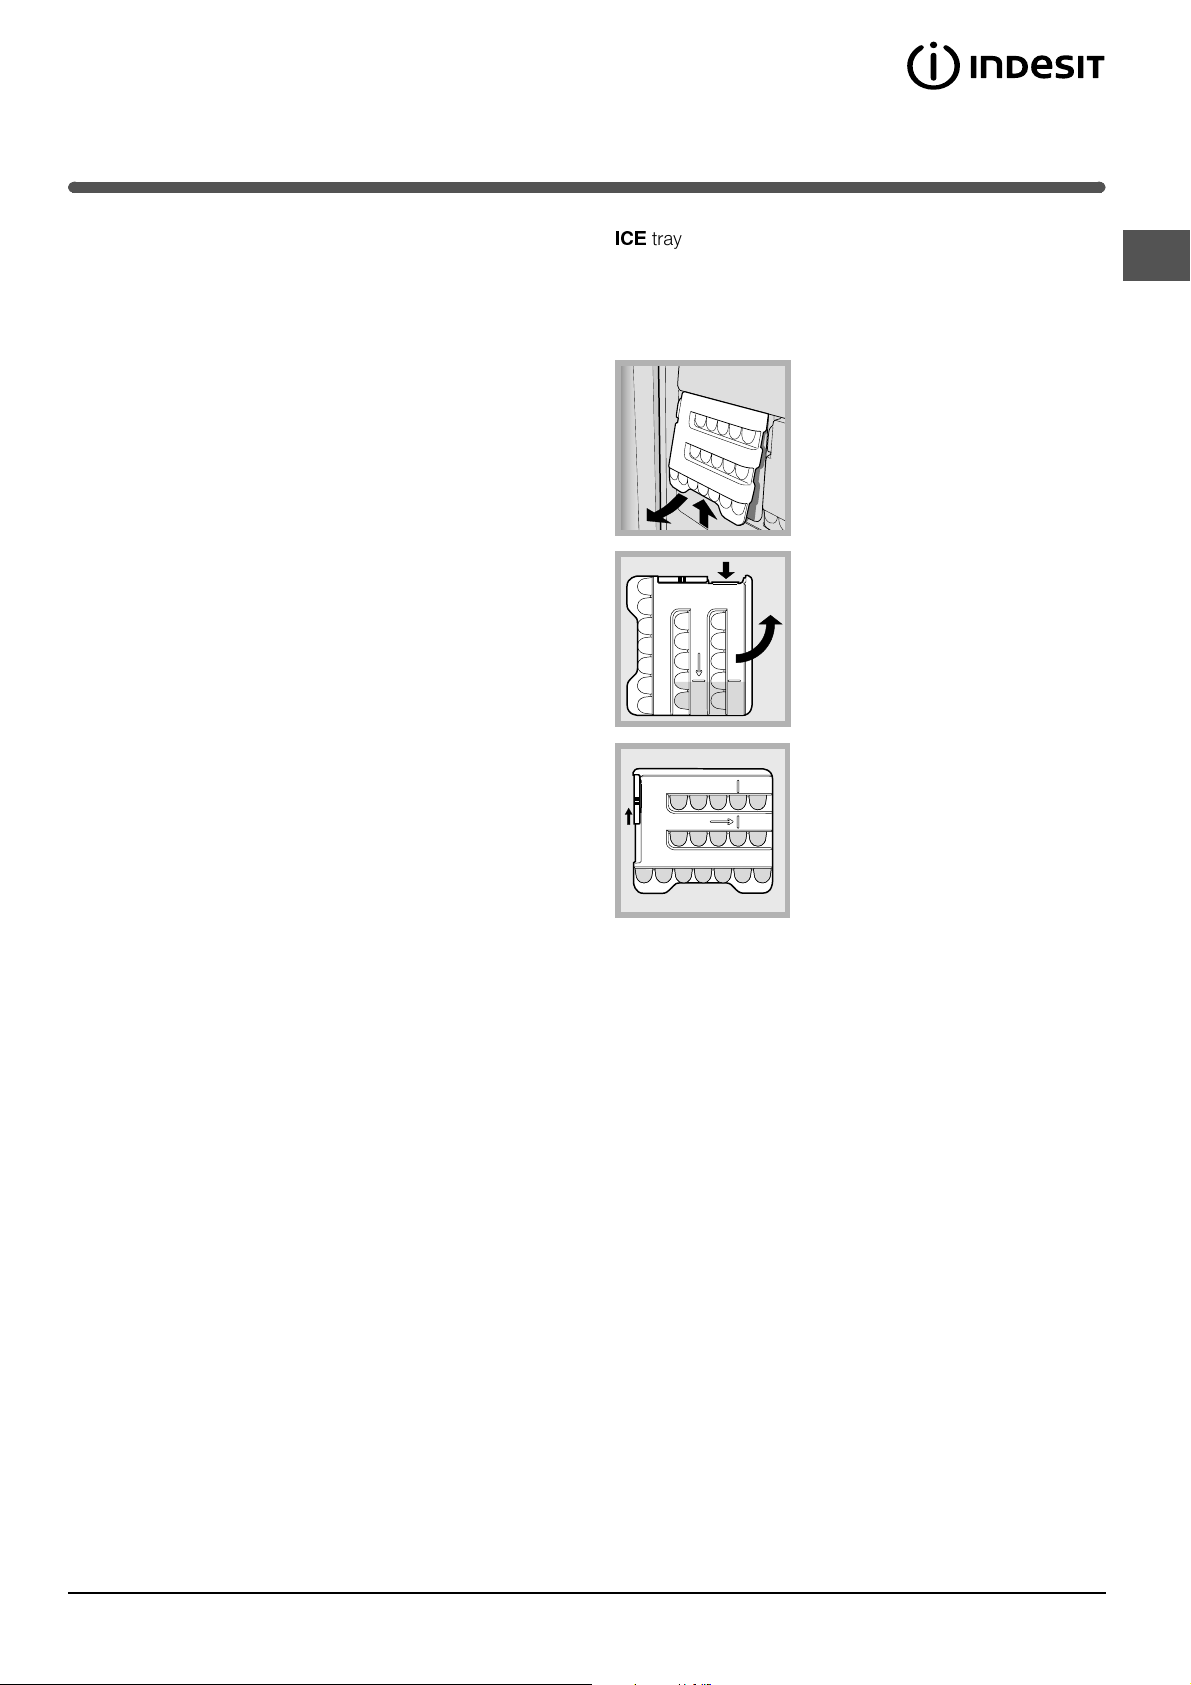
ICE
tray.
The Easy Ice trays are set into the freezer door to maximise
the space within the freezer. The trays are drip-free and
sealed to prevent food from tainting the ice cubes.
GB
Place only cold or lukewarm foods in the compartment,
not hot foods (see Precautions and tips).
Remember that cooked foods do not last longer than
raw foods.
Do not store liquids in open containers. They will increase
humidity in the refrigerator and cause condensation to
form.
Using the freezer to its full potential
Do not re-freeze food that is defrosting or that has
already been defrosted. These foods must be cooked
and eaten (within 24 hours).
Fresh food that needs to be frozen must not come into
contact with food that has already been defrosted.
Fresh food must be stored above the grill in the freezer
compartment and if possible be in direct contact with
the walls (side and rear), where the temperature drops
below -18°C and guarantees rapid freezing.
Do not place glass bottles which contain liquids, and
which are corked or hermetically sealed in the freezer
because they could break.
The maximum quantity of food that may be frozen daily is
indicated on the plate containing the technical properties
located on the bottom left side of the refrigerator
compartment (for example: Kg/24h: 4)
1. Pull out the tray by pushing it
up and then outwards (see
diagram).
Check that the tray is completely
empty and fill it with water through
the opening provided.
2. Take care not to exceed the
level indicated (MAX WATER
LEVEL). Excess water prevents the
ice cubes from dispensing (if this
WATER LEVEL
MAX
happens, wait for the ice to melt
and empty the tray).
3. Turn the tray 90°: due to the
connected compartments each
mould fills with water (see
diagram).
MAX
WATER LEVEL
4. Close the opening with the lid
provided and put the tray back,
placing the top part in the
corresponding housing and
allowing it to drop in again.
5. When the ice has formed (minimum time approximately 8
hours) knock the tray against a hard surface and wet the
outside so that the ice cubes come loose and take them
out through the opening.
! Do not open the door during freezing.
! If there is a power cut or malfunction, do not open the
freezer door. This will help maintain the temperature inside
the freezer, ensuring that foods are conserved for at least 9
-14 hours.
! If the room temperature drops below 14°C for an
extended period of time, the ideal temperature will not be
reached in the freezer compartment and food preservation
will be reduced.
15
Page 16
Maintenance and care
Switching the appliance off
GB
During cleaning and maintenance it is necessary to
disconnect the appliance from the electricity supply:
It is not sufficient to set the temperature adjustment
knobs on
contact.
(appliance off) to eliminate all electrical
Cleaning the appliance
The external and internal parts, as well as the rubber
seals may be cleaned using a sponge that has been
soaked in lukewarm water and bicarbonate of soda or
neutral soap. Do not use solvents, abrasive products,
bleach or ammonia.
The removable accessories may be soaked in warm
water and soap or dishwashing liquid. Rinse and dry
them carefully.
The back of the appliance may collect dust which can
be removed by delicately using the hose of a vacuum
cleaner set on medium power. The appliance must be
switched off and the plug must be pulled out before
cleaning the appliance.
Avoiding mould and unpleasant odours
The appliance is manufactured with hygienic materials
which are odour free. In order to maintain an odour
free refrigerator and to prevent the formation of stains,
food must always be covered or sealed properly.
If you want to switch the appliance off for an extended
period of time, clean the inside and leave the doors
open.
Defrosting the refrigerator compartment
The refrigerator has an
automatic defrosting
function: water is ducted to
the back of the appliance
by a special discharge
outlet (see diagram) where
the heat produced by the
compressor causes it to
evaporate. It is necessary to
clean the discharge hole
regularly so that the water
can flow out easily.
Defrosting the freezer compartment
Remove frost regularly using the special scraper provided.
If the frost layer is greater than 5 mm, it is necessary to
defrost manually:
1. Set the TEMPERATURE ADJUSTMENT knob to the
position
2. Wrap frozen foods in newspaper and place them in
another freezer or in a cool place.
3. Leave the door open until the frost has melted
completely. This can be made easier by placing
containers with lukewarm water in the freezer
compartment.
4. Clean and dry the freezer compartment carefully before
switching the appliance on again.
5. Wait for approximately 2 hours, i.e. until the ideal storage
conditions have been restored, before placing food in
the freezer compartment.
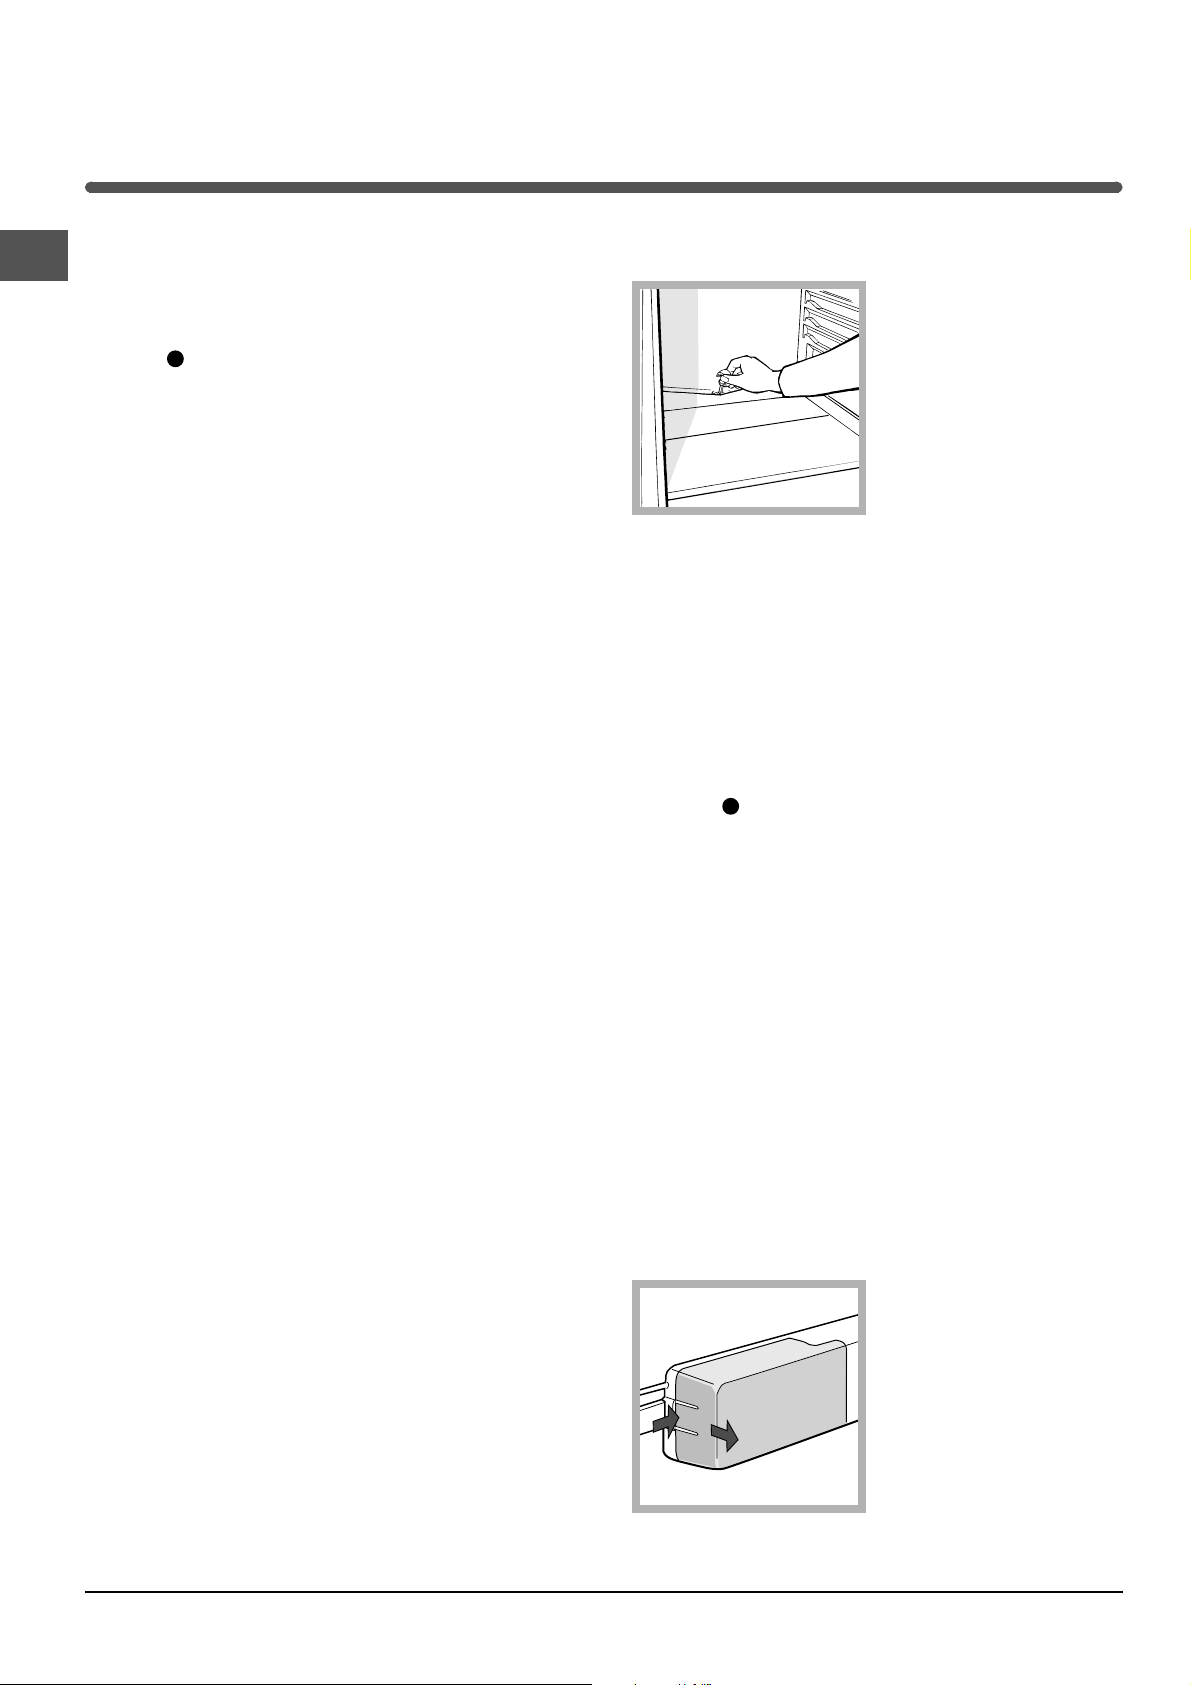
Replacing the light bulb
.
Defrosting the appliance
! Follow the instructions below.
Do not speed up the defrosting process by using any
devices or tools other than the scraper provided, you may
damage the refrigeration circuit.
16
To replace the light bulb in the refrigerator compartment,
pull out the plug from the electrical socket. Follow the
instructions below.
Access the light bulb by
removing the cover as
indicated in the diagram.
Replace it with a similar light
bulb within the power range
2
indicated on the cover (15W
or 25W).
1
Page 17
Precautions and tips
! The appliance was designed and manufactured in
compliance with international safety standards. The
following warnings are provided for safety reasons and
must be read carefully.
This appliance complies with the following
Community Directives:
- 73/23/EEC of 19/02/73 (Low Voltage) and
subsequent amendments;
-89/336/EEC of 03.05.89 (Electromagnetic
Compatibility) and subsequent amendments;
- 2002/96/CE.
General safety
The appliance was designed for domestic use inside the
home and is not intended for commercial or industrial
use.
The appliance must be used to store and freeze food
products by adults only and according to the
instructions in this manual.
The appliance must not be installed outdoors, even in
covered areas. It is extremely dangerous to leave the
appliance exposed to rain and storms.
Do not touch the appliance with bare feet or with wet or
moist hands and feet.
Do not touch the internal cooling elements:
this could cause skin abrasions or frost/freezer burns.
When unplugging the appliance always pull the plug
from the mains socket, do not pull on the cable.
Before cleaning and maintenance, always switch off the
appliance and disconnect it from the electrical supply. It
is not sufficient to set the temperature adjustment knobs
(appliance off) to eliminate all electrical contact.
on
In the case of a malfunction, under no circumstances
should you attempt to repair the appliance yourself.
Repairs carried out by inexperienced persons may cause
injury or further malfunctioning of the appliance.
Do not use utensils other than the scraper provided, or
electrical equipment which is not of the type specified by
the manufacturer, inside the frozen food storage
compartments.
Do not put ice cubes taken directly from the freezer into
your mouth.
Do not allow children to tamper with the controls or play
with the appliance. Under no circumstance should they
be allowed to sit on the bins or to hang from the door.
Keep packaging material out of the reach of children! It
can become a choking or suffocation hazard.
Disposal
GB
Observe local environmental standards when disposing
packaging material for recycling purposes.
The European Directive 2002/96/EC on Waste Electrical
and Electronic Equipment (WEEE), requires that old
household electrical appliances must not be disposed of
in the normal unsorted municipal waste stream. Old
appliances must be collected separately in order to
optimise the recovery and recycling of the materials they
contain and reduce the impact on human health and the
environment. The crossed out wheeled bin symbol on
the product reminds you of your obligation, that when
you dispose of the appliance it must be separately
collected.
Consumers should contact their local authority or retailer
for information concerning the correct disposal of their
old appliance.
Respecting and conserving the
environment
Install the appliance in a fresh and well-ventilated room.
Ensure that it is protected from direct sunlight and do
not place it near heat sources.
Try to avoid keeping the door open for long periods or
opening the door too frequently in order to conserve
energy.
Do not fill the appliance with too much food: cold air
must circulate freely for food to be preserved properly. If
circulation is impeded, the compressor will work
continuously.
Do not place hot food directly into the refrigerator. The
internal temperature will increase and force the
compressor to work harder and will consume more
energy.
Defrost the appliance if ice forms (see Maintenance). A
thick layer of ice makes cold transference to food
products more difficult and results in increased energy
consumption.
Regularly check the door seals and wipe clean to ensure
they are free of debris and to prevent cold air from
escaping (see Maintenance).
17
Page 18
Troubleshooting
If the appliance does not work, before calling for Assistance (see Assistance), check for a solution from the following list.
GB
Malfunctions:
The internal light does not
illuminate.
The refrigerator and the freezer do
not cool well.
The food inside the refrigerator is
beginning to freeze.
The motor runs continuously.
The appliance makes a lot of noise.
Possible causes / Solutions:
The plug has not been inserted into the electrical socket, or not far enough
to make contact, or there is no power in the house.
The doors do not close properly or the seals are damaged.
The doors are opened too frequently.
The TEMPERATURE ADJUSTMENT knob is not in the correct position
The refrigerator or the freezer have been over-filled.
The atmospheric temperature of the area surrounding the appliance is
lower than 14°C.
The TEMPERATURE ADJUSTMENT knob is not in the correct position.
The food is in contact with the back inside wall of the refrigerator.
The door is not closed properly or is continuously opened.
The outside ambient temperature is very high.
The thickness of the frost exceeds 2-3 mm (see Maintenance).
The appliance has not been installed on a level surface (see Installation).
The appliance has been installed between cabinets that vibrate and make
noise.
The internal refrigerant makes a slight noise even when the compressor is
off. This is not a defect, it is normal.
Some of the external parts of the
refrigerator become hot.
The back wall of the refrigerator unit
is covered in frost or droplets of
water.
There is water at the bottom of the
refrigerator.
These raised temperatures are necessary in order to avoid the formation of
condensation on certain parts of the product.
This shows the appliance is operating normally.
The water discharge hole is blocked (see Maintenance).
18
Page 19
Assistance
Before calling for Assistance:
Check if the malfunction can be solved on your own (see Troubleshooting).
If after all the checks, the appliance still does not operate or the problem persists, call the nearest Service
Centre
model serial number
Communicating:
type of malfunction
appliance model (Mod.)
serial number (S/N)
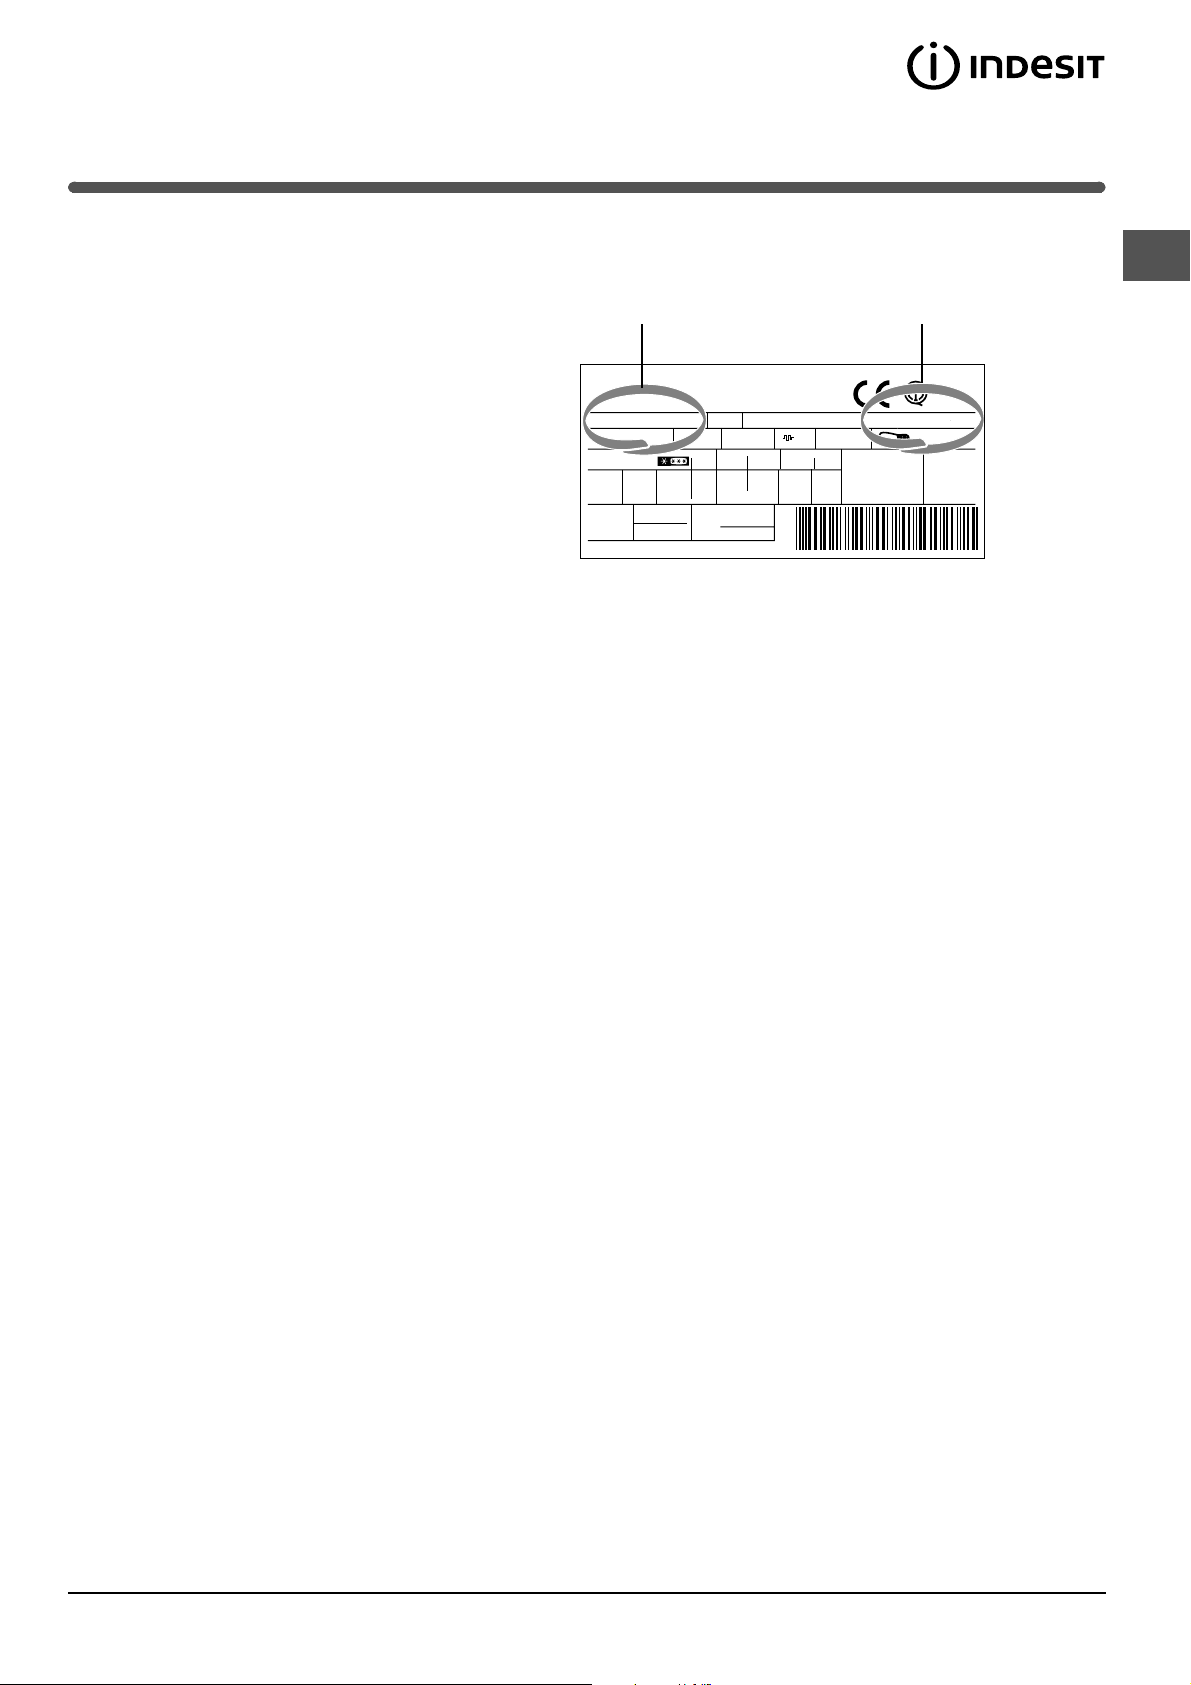
This information can be found on the data plate
located on the bottom left side of the
refrigerator compartment.
Gross
Bruto
Brut
TI
75
Test
P.S-I.
RG 2330
Mod.
220 - 240 V- 50 Hz 150 W
340
Total
Gross
Bruto
Brut
Compr.
R 134 a
Syst.
kg 0,090
Kompr.
Made in Italy 13918
93139180000 S/N 704211801
Net
Util
Utile
Pressure
HIGH-235
LOW 140
Cod.
Gross
Bruto
Brut
Fuse
W
A
Freez. Capac
Poder de Cong
kg/24 h
4,0
Max 15 w
Class
Clase
Classe
N
Never call on unauthorized technicians and always refuse spare parts which are not originals.
GB
19
Page 20
GB
195042630.02
10/2006
20
 Loading...