

Indesit SIXL125SEU, SIXL145UK, SIXL145SUK, SIXL145DUK, SIXL145DUK.1 Service Information Manual
...
Indesit Company UK Ltd
© 2008 Reg. Office: Peterborough PE2 9JB Registered in London: 106725
Service
Information
INDESIT
MOON
WASHING
MACHINES
Models Comm.
Covered Code
SIXL125SEU 44033
SIXL145UK 46406
SIXL145SUK 46401
SIXL145DUK 52171
SIXL145DUK.1 55589
SIXL145KUK 60185
SIXL145SKUK 60189
5407359 Issue 6 Nov. 2008
Colours may vary

2 of 28
Service Manual UK
Indesit Company
English
SAFETY NOTES & GENERAL SERVICING ADVICE
1. This manual is NOT intended as a comprehensive repair/maintenance guide to the appliance.
2. It should ONLY be used by suitably qualified persons having technical competence applicable
product knowledge and suitable tools and test equipment.
3. Servicing of electrical appliances must be undertaken with the appliance disconnected (unplugged)
from the electrical supply.
4. Servicing must be preceded by Earth Continuity, Earth Resistance and Insulation Resistance checks.
5. Personal safety precautions must be taken to protect against accidents caused by sharp edges on
metal and plastic parts.
6. After Servicing the appliance must be rechecked for Electrical Safety. In the case of appliances which
are connected to a water supply (i.e.: Washing Machines, Dishwashers & Food Centres etc.) checks
must be made for leaks from seals gaskets and pipe work and rectification carried out where
necessary.
7. It can be dangerous to attempt ‘DIY’ repairs / maintenance on complex equipment and the Company
recommends that any problem with the appliance is referred to its own Service Organisation.
8. Whilst the Company has endeavoured to ensure the accuracy of the data within this publication they
cannot hold themselves responsible for any inconvenience or loss occasioned by any error within.
SERIAL NUMBER / INDUSTRIAL CODE EXPLANATION
Serial Number Example
3 10 02 0895
Four remaining digits = Build number that day 895
th
built
Third two digits = Day of manufacture 2
nd
of month
Second two digits = Month of manufacture October
First digit = Year of manufacture 2003
Industrial Code Example
37 24455 0010
Last four digits = 0000 original production
Second five digits = COMMERCIAL CODE*
First two digits = Factory of origin
* Vital for correct model information and system identification
Other numbers denote major production changes

3 of 28
Indesit Company
Service Manual UK English
INDEX
Safety Notes & Servicing. . . . . . . . . . . . . . . . . . . . . . . . . . . . . . . . . . . . . . . . . . 2
Serial Number / Industrial Code Information . . . . . . . . . . . . . . . . . . . . . . . . . . 2
Technical Information . . . . . . . . . . . . . . . . . . . . . . . . . . . . . . . . . . . . . . . . . . . . 4
Introduction. . . . . . . . . . . . . . . . . . . . . . . . . . . . . . . . . . . . . . . . . . . . . . . . . . . . . 5
Installation. . . . . . . . . . . . . . . . . . . . . . . . . . . . . . . . . . . . . . . . . . . . . . . . . . . 6 - 7
Controls. . . . . . . . . . . . . . . . . . . . . . . . . . . . . . . . . . . . . . . . . . . . . . . . . . . . . 8 - 9
Wash Programmes. . . . . . . . . . . . . . . . . . . . . . . . . . . . . . . . . . . . . . . . . . . 9 - 10
Demo Mode. . . . . . . . . . . . . . . . . . . . . . . . . . . . . . . . . . . . . . . . . . . . . . . . . . . . 11
Door / Dispenser / Water Inlet System . . . . . . . . . . . . . . . . . . . . . . . . . . 12 - 13
Conductivity Sensor. . . . . . . . . . . . . . . . . . . . . . . . . . . . . . . . . . . . . . . . . . . . .14
Vent Tube . . . . . . . . . . . . . . . . . . . . . . . . . . . . . . . . . . . . . . . . . . . . . . . . . . . . . 14
Wiring Diagram. . . . . . . . . . . . . . . . . . . . . . . . . . . . . . . . . . . . . . . . . . . . . . . . . 15
Wiring Connection Chart. . . . . . . . . . . . . . . . . . . . . . . . . . . . . . . . . . . . . . . . . 16
Power Module. . . . . . . . . . . . . . . . . . . . . . . . . . . . . . . . . . . . . . . . . . . . . . . . . . 17
Eeproms . . . . . . . . . . . . . . . . . . . . . . . . . . . . . . . . . . . . . . . . . . . . . . . . . . . . . . 18
Controls Information / Main Board Programming. . . . . . . . . . . . . . . . . 19 - 20
Fault Codes / LED Indications. . . . . . . . . . . . . . . . . . . . . . . . . . . . . . . . . 21 - 23
Dismantling Instructions . . . . . . . . . . . . . . . . . . . . . . . . . . . . . . . . . . . . . 24 - 26

4 of 28
Indesit Company
Service Manual UK English
TECHNICAL INFORMATION
Models Covered SIXL125SEU - Field Trial Machine
SIXL145UK, SIXL145SUK, SIXL145DUK, SIXL145DUK.1,
SIXL145KUK, SIXL145SKUK
Colours SIXL125SEU - Metallic Grey (Blue Door / Handle)
SIXL145UK - White (Metallic Grey Door / Handle)
SIXL145SUK - Metallic Grey (Blue Door / Handle)
SIXL145DUK - Metallic Grey (Grey Door / Handle)
SIXL145DUK.1 - Metallic Grey (Grey Door / Handle)
SIXL145KUK - White (Black Door / Handle)
SIXL145SKUK - Metallic Grey (Black Door / Handle)
Country of Origin Italy - Comunanza Factory (80)
Dimensions Height: 850 mm
Width: 595 mm
Depth: 535 mm
Weight - Net: 66 kg
Spin Speed 1400 rpm, except SIXL125SEU - 1200 rpm
Electrical Supply 220/240 Volts @ 50 Hz
Energy Consumption 1.02 kWh @ 60°C
Maximum Power Consumption 1850W
Energy Structure Energy Class: A+
Wash Class: A
Spin Class: B
Water Consumption (60°C Cotton) 65 litres
Water remaining after Spin Cycle 52%
Features Full Wash 6 kg, Cotton Whites, Mixed Coloureds, Delicates,
Rapid 30 minute / Rinse only
Wash Heater 1700W @ 230V - 30 Ω approximately.
Water Supply Cold Fill Only. Max Pressure = 1 Mpa (10bar)
Minimum Pressure = 0.05 Mpa (0.5bar)
Drum Capacity Load size: 1 - 6 kg. Drum Volume: 52 litres. Material: Plastic.
Motor - Wash Single phase (52 mm stator)
Ceset P52 / 1400rpm - MCA 52/64.148/AD40.
Armature: 2.15 Ω @ 20°C ± 7%
Field Coil: 1.47 Ω @ 20°C ± 7%
Split Field: 0.66 Ω @ 20°C ± 7%
Tacho: 115.4 Ω @ 20°C ± 7%
Pump 2 Pole Synchronous. 220 / 240 Volt 25 Watt, Resistance = 165 Ω
Max Head 1.4 metres. Flow rate @ 0.9 metres / 30 Litres per minute
Torque Settings
Front Counterweight 30 ± 2Nm (Torx 40 bolt)
Top Counterweight 30 ± 2Nm
Pulley 35 - 40 Nm

5 of 28
Indesit Company
Service Manual UK English
INTRODUCTION OF THE INDESIT MOON WASHING MACHINE
New range of Washing Machine designed to save time without compromising the performance.
Easy selection of the correct wash programme with new circular programme selector and easily
identifiable programme symbols.
Available in various colour combinations:-
SIXL125SEU - Metallic Grey (Blue Door / Handle)
SIXL145UK - White (Metallic Grey Door / Handle)
SIXL145SUK - Metallic Grey (Blue Door / Handle)
SIXL145DUK - Metallic Grey (Grey Door / Handle)
SIXL145DUK.1 - Metallic Grey (Grey Door / Handle)
SIXL145KUK - White (Black Door / Handle)
SIXL145SKUK - Metallic Grey (Black Door / Handle)
Detergent dispenser is an integral part of the main door assembly, and can be removed easily for
cleaning / replacement by the customer.
An inner ring of LEDs indicate the progr amme pro gr ess , and i n th e e vent of a ma lfu nction th e LEDs
will indicate a Service fault code.
NOTES:
The appliance is Cold Fill only.
Models produced before August 2007 DO NOT have a Demo Mode.
Models produced from August 2007 have a Demo Mode - see Page 11.
If / when the Power Module is replaced, this will initiate the auto setting cycle with 5 Rinses,
which allows it to check the water alkalinity and calibrate itself.
PRODUCT TYPE
Key - For information only
SIXL125S
1st letter 2nd letter 3rd letter 4th letter 1st&2nd Number 3rd Number 5th letter
Product line Brand Type Type Max Spin Speed Specs Colour
S = Smart I = Indesit X = maxi 6 kg. L = led 8 = 800 0 S = silver unit
S = Slim D = display 10 = 1000 1 blank = white unit
..
..
..
14 = 1400 7
6 of 28
Indesit Company
Service Manual UK English
INSTALLATION
Unpacking
1. Unpack the washer.
2. Make sure that the machine has not been
damaged during transportation. If it has
been damaged, contact the retailer and do
not proceed any further with the installation
process.
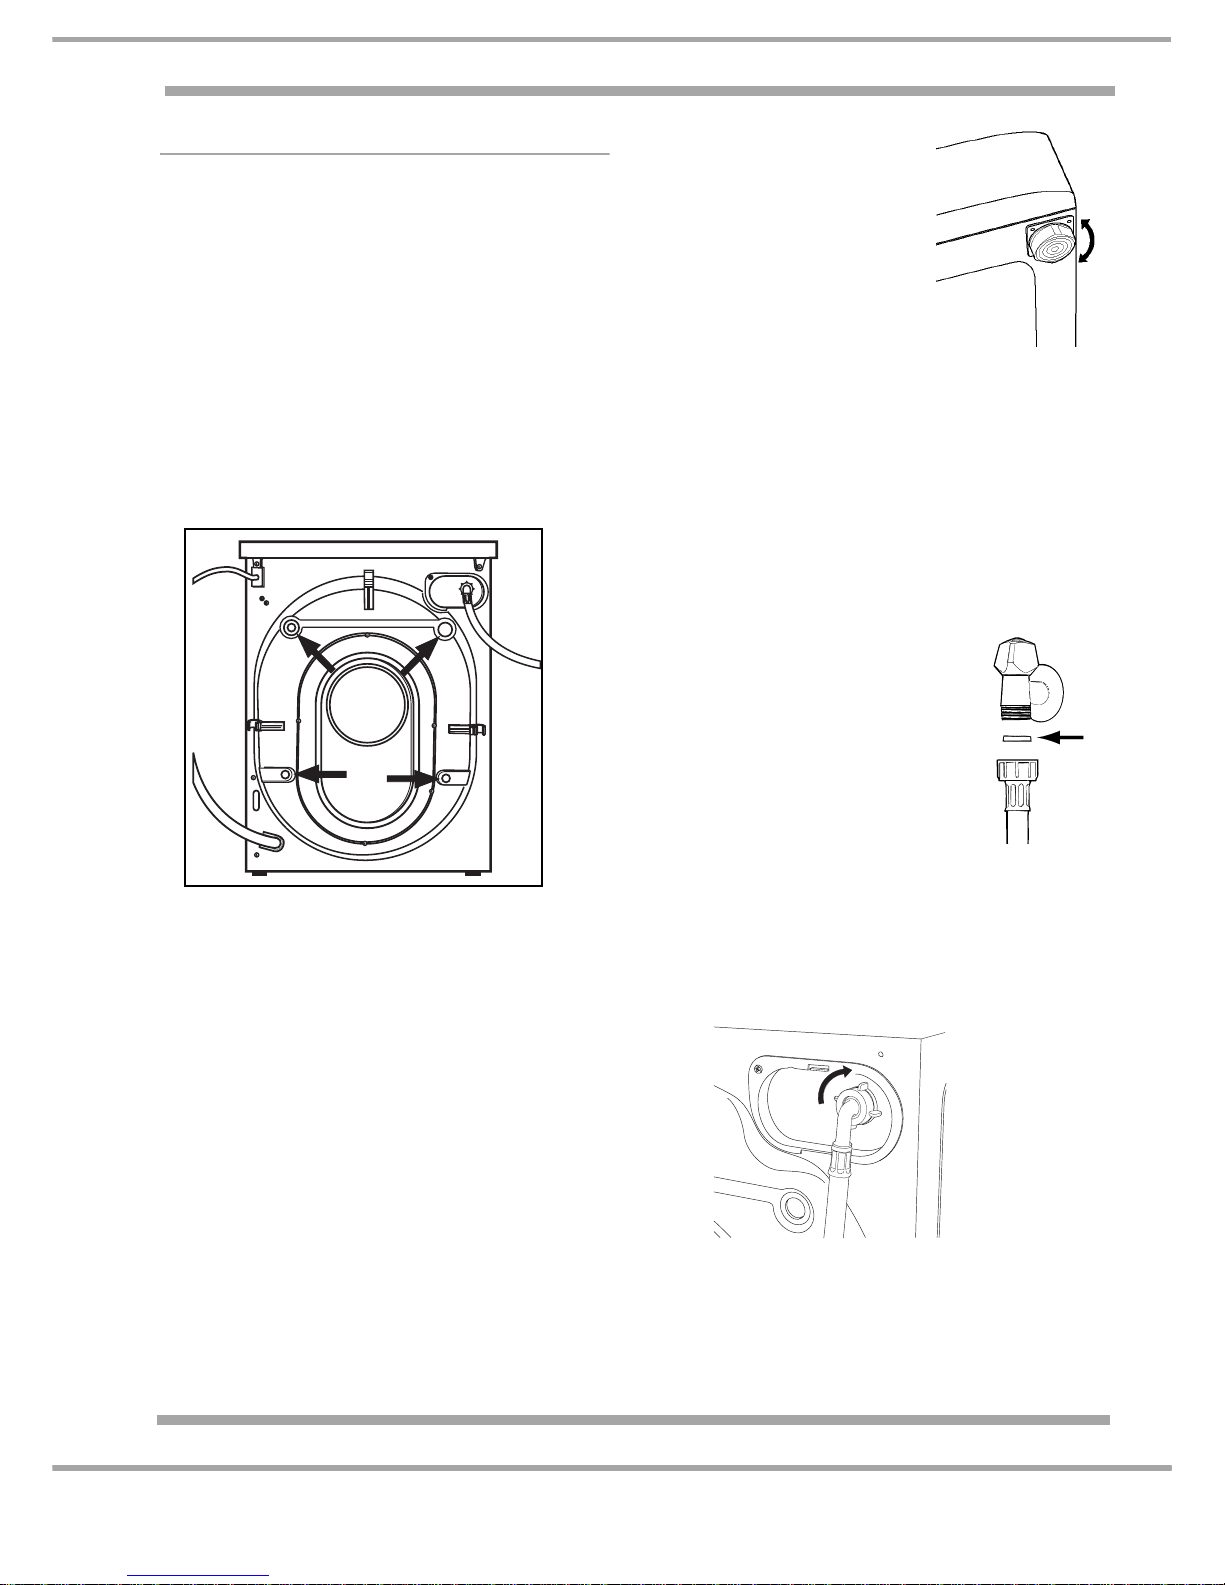
3. Remove the 4 protective screws (used
during transportation) and the rubber
washer with the corresponding spacer,
located on the rear part of the appliance.
See Figure.
4. Close off the holes using the plastic plugs
provided.
5. Keep all the parts in a safe place as they will
be needed again if the washing machine is
moved to another location.
Packaging materials should not be used as
toys for children.
Levelling
The machine may make a considerable
amount of noise if the 2 front feet have not
been adjusted correctly.
1. Install the washing machine on a flat and
sturdy floor, without placing it against walls,
cabinets or other furniture.
2. If the floor is not
perfectly level,
compensate for any
unevenness by
tightening or loosening
the adjustable front feet
(see figure); the angle
of inclination, measured
in relation to the
worktop, must not exceed 2°.
Levelling the machine correctly will provide
it with stability, help to avoid any vibrations
and excessive noise and prevent it from
shifting while it is operating. If it is placed on
a carpet or a rug, adjust the feet in such a
way as to allow a sufficient ventilation space
underneath the machine.
Water Connections
1. Insert seal A into the end of
the inlet hose and screw the
latter onto a cold water tap
with a 3/4 gas threaded
opening. See Figure.
Before making the
connection, allow the water
to run freely until it is
perfectly clear.
2. Connect the other end of the inlet hose to
the machine by screwing it onto the cold
water inlet of the appliance, which is
situated on the top right hand side on the
rear of the appliance. See figure.
3. Make sure there are no kinks or bends in
the hose.
NOTE: - If the machine does not fill with
water the Door Locked indicator li ght flashes
rapidly.
A
7 of 28
Indesit Company
Service Manual UK English
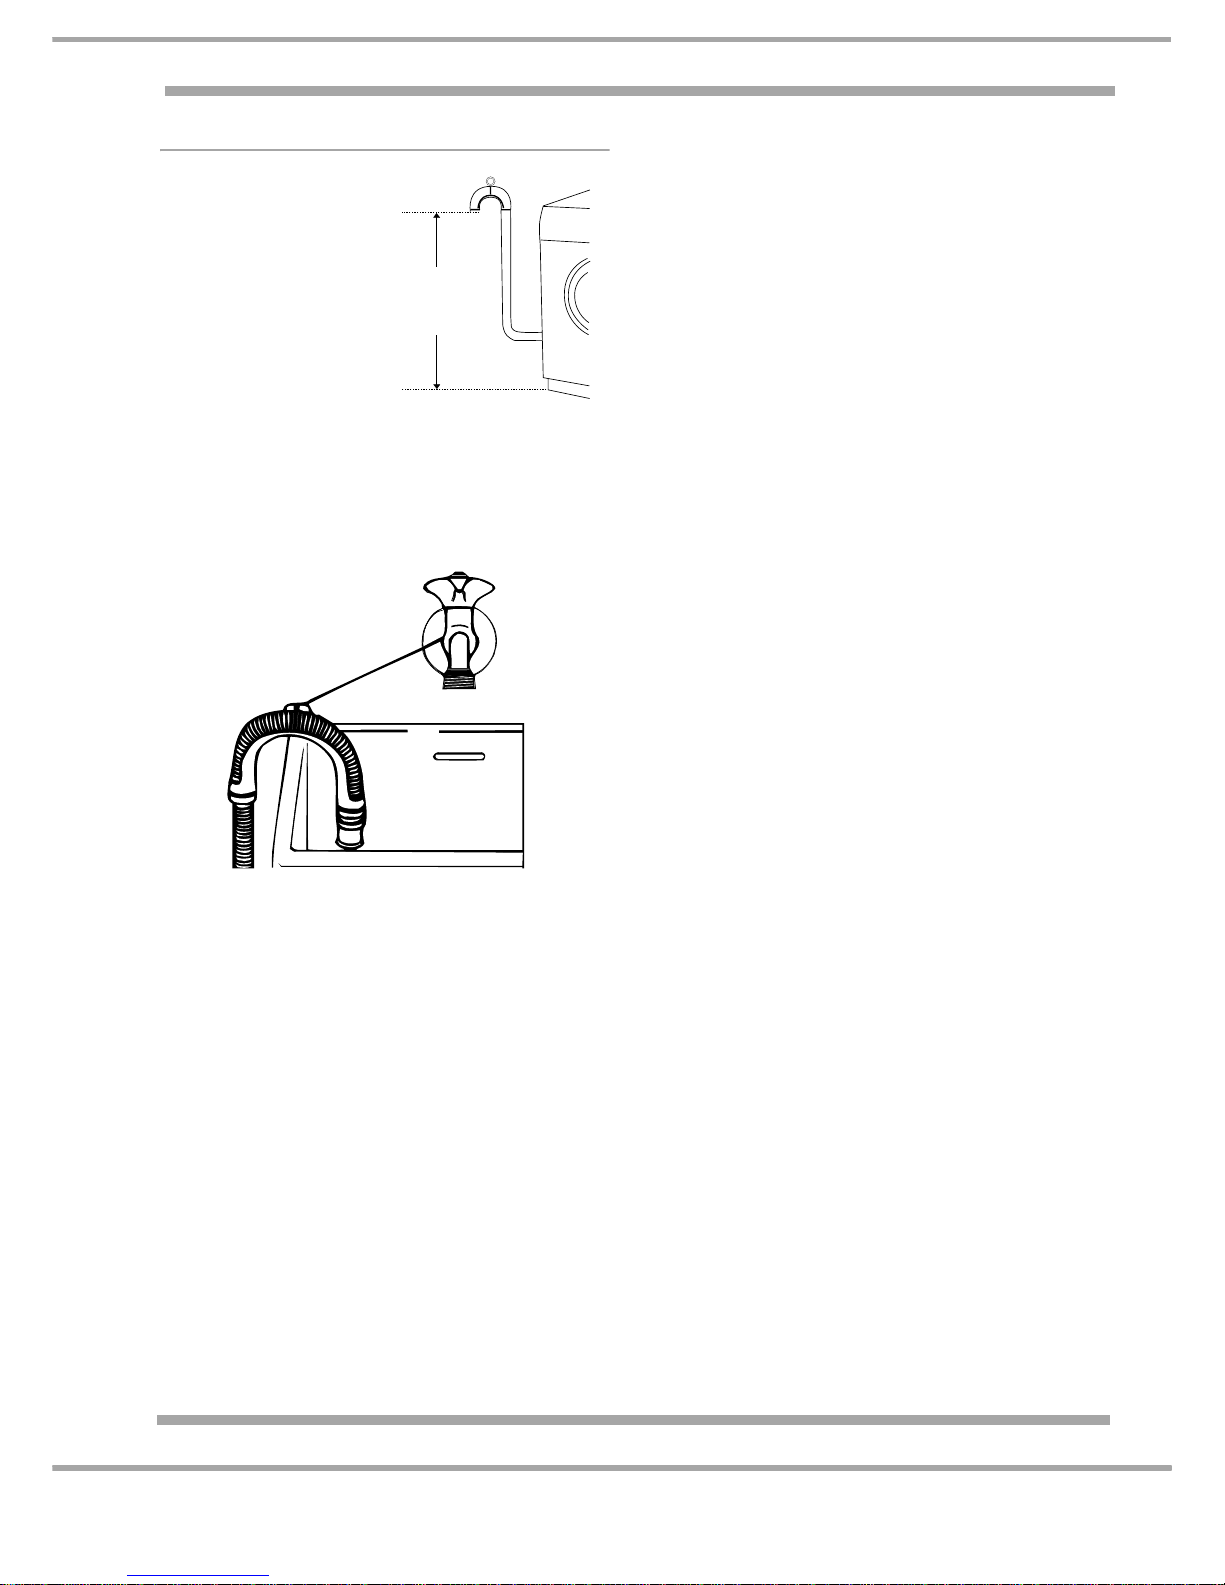
Drainage Connections
A. Connect the drain
hose, without
bending it, to a
draining duct or a
wall drain situated
between 65 and
100 cm from the
floor.
B. Alternatively, place it over the edge of a
basin, sink or tub, fastening the duct
supplied to the tap. See Figure.
The free end of the hose should not be
under water.
We advise against the use of hose
extensions. If it is absolutely necessary, the
extension must have the same diameter as
the original hose and must not exceed
150 cm in length.
Electrical Connections
Before plugging the appliance into the
mains socket, make sure that:
- the socket is able to withstand the
maximum power load of the appliance.
- the power supply voltage is falls within the
values indicated on the Technical
Information page.
- the socket is compatible with the washing
machines plug. If this is not the case,
replace the socket or the plug.
Location
! The washing machine must not be installed
outdoors, even in covered areas. It is
extremely dangerous to leave the appliance
exposed to rain, storms and other weather
conditions.
! When the washing machine is installed, the
mains socket must be within easy reach.
! Do not use extensions or multiple sockets.
! The power supply cable must never be bent
or dangerously compressed.
! The power supply cable must only be
replaced by an authorised serviceman.
WARNING!
The Company shall not be held responsible
in the event that these regulations are not
respected.
65 - 100 cm
8 of 28
Indesit Company
Service Manual UK English
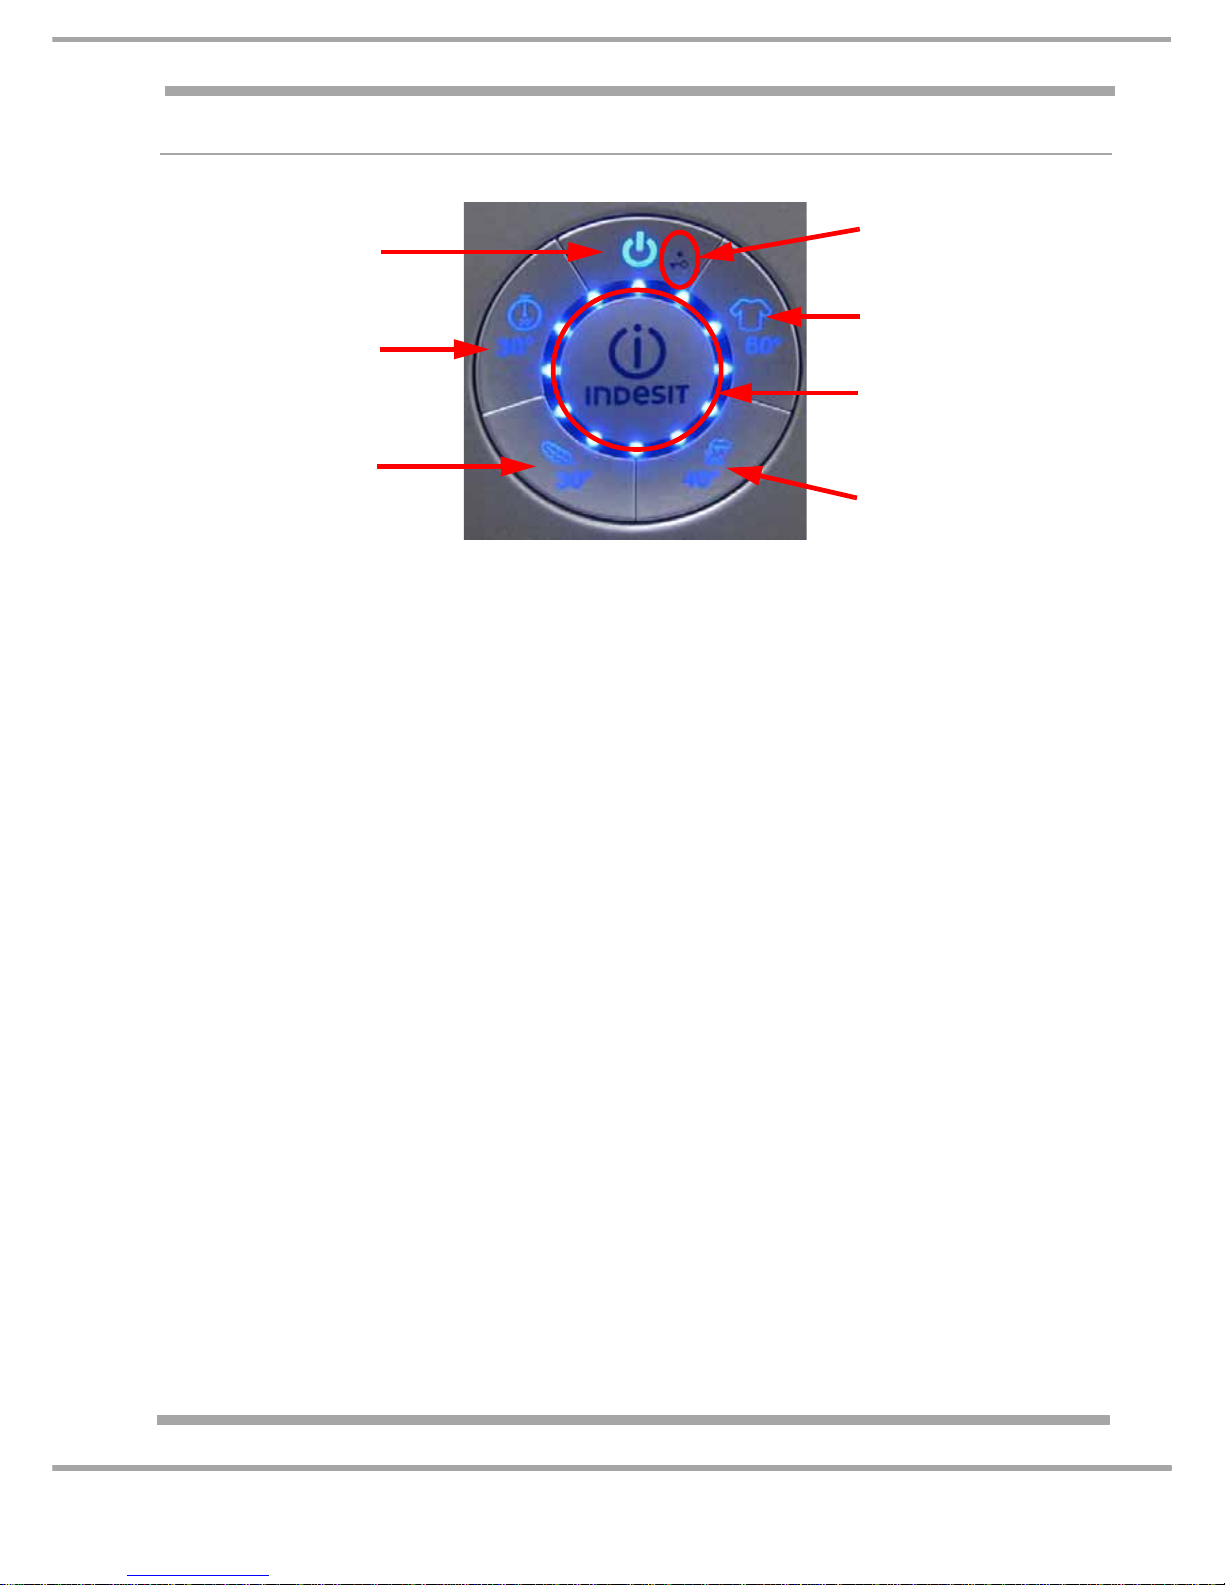
CONTROLS
THE PROGRAMME SELECTOR
Circular in shape and easy to use; each button has at least two functio ns.
In the centre of the selector there is a ring of 12 LEDs, which indicate programme progress, and, in
the event of malfunction the LEDs will illuminate in a specific sequence indicating a fault.
A RED LED on the On /Off button indicates when the door is locked and takes approximately 1 - 2
minutes.
NOTE: - This LED will flash if the machine fails to fill with water.
SWITCHING THE APPLIANCE ON
Switch machine on by pressing the On / Off button
The symbol on the On / Off button lights up and an audible sound will be heard.
The programme buttons start flashing and the inner ring of LEDs light up one after another
At this point the machine is in stand by and is ready for use.
SELECTING / STARTING A PROGRAMME
Load the machine with laundry.
Load detergent and fabric softener.
Start the required programme by pressing the relative programme button.
The programme will start after a brief pause.
The power on button and selected programme button LED will remain lit, all other programme LEDs
and the inner ring of LEDs will switch off.
On/Off Button
Rapid 30 Minute/
Rinse
Delicate Wool/Silk
Door closure LED
Cotton White 60°C
Ring of 12 LEDs
Mixed coloureds/
Easy Iron
9 of 28
Indesit Company
Service Manual UK English
PAUSING / RE-STARTING A PROGRAMME
To activate the washing machines "Pause" function press the programme button of the programme
in progress.
The Power On button remains lit, the LED of the programme in progress flashes slowly, and the
central ring of LEDs start to flash (depending how far the appliance is into its programme will depend
on how many central LEDs are lit).
To Re-start the programme after activating the Pause function, press the programme button once.
RE-SETTING A PROGRAMME IN PROGRESS
To reset a programme in progress, press and hold down the On / Off button for more than 2 seconds,
an audible sound will be heard. At this point the programme in progress will be cancelled and the
machine will switch off. (Approximately 1 - 2 minutes from power off the door lock will disengage.)
CAUTION: - Do not switch the appliance off during the drain cycle, as this will leave the water in the
drum potentially higher than the door seal lip depending on the programme.
NOTE: - BEFORE the machine switches off it will automatically run a drain cycle. This will happen
regardless if the appliance has water in it or not. Duri ng draining, the power on button will flash.
PROGRAMME PROGRESS
The inner ring of LEDs indicates the progress of the wash programme.
These start to light up in a clockwise direction, starting from the LED at the 12 O'clock position as
more LEDs light up, the previous ones remain lit.
AT THE END OF THE SELECTED PROGRAMME
When the wash programme ends, the Power On LED and the selected programme LED remain lit,
the inner ring of LEDs will begin to flash.
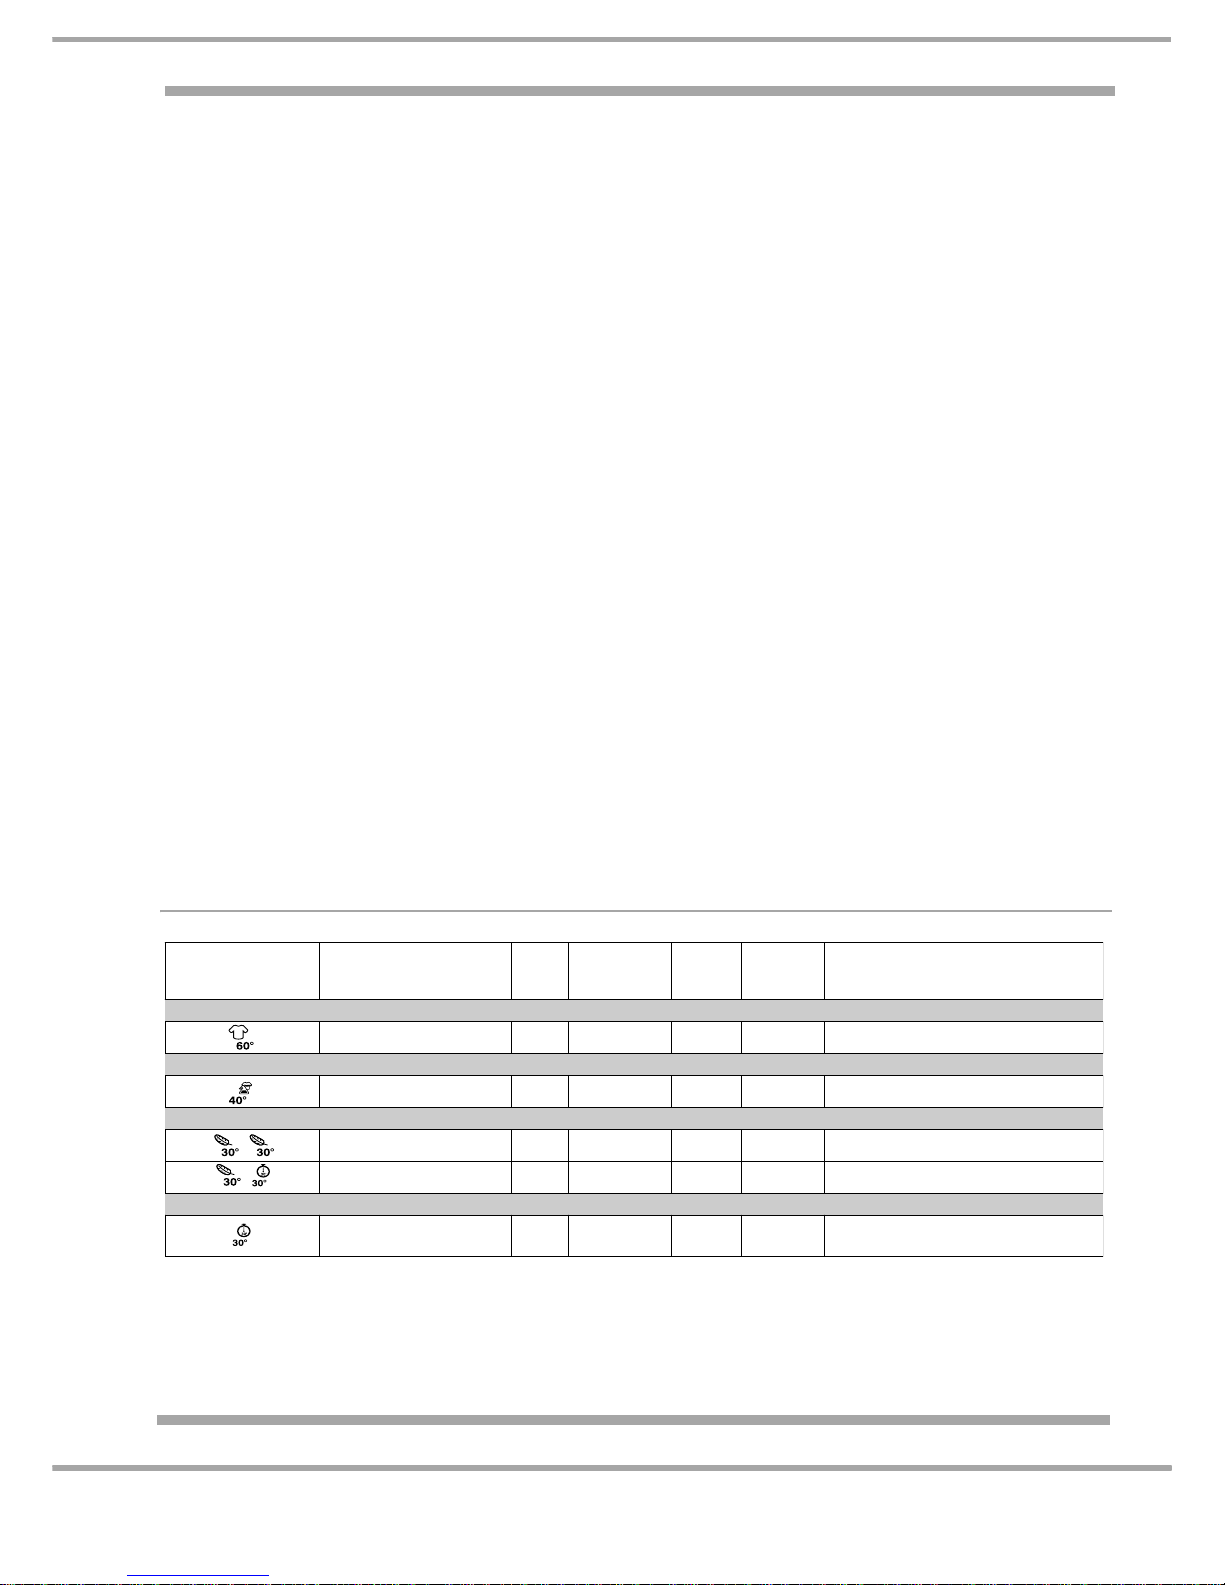
WASH PROGRAMMES
The duration of the programmes indicated in the table are for guidance purposes only, and are calculated based on an average load quantity.
Bu tton F abr ics
Max.
load
(kg)
Te m p e ra t u re
Spin
speed
(rpm)
Cycle
duration
(minutes)
Wash cycle description
WHITE COTTON
Durable w hit e cotton
6 60°C 1400 145
Wash cycle, rinse cycles, intermediate
and fin al s pin cycles
COLOR MIX 40° / EASY IRON
Coloured cotton
and synthetics
4,5 40°C 1000 105
Wash cycle, rinse cycles and delicate
spin cyc le
DELICATES
Wool (final delicate spin
cycle)
1,5 30°C 600 50
Wash cycle, rinse cycles and delicate
spin cyc le
Silk and curtains (without
final spin c ycle)
1,5 30°C no* 50
Wash cycle, rinse cycles and drainage
DAILY
WAS H / COLD WATER RINSE
Cotton and synthetics
3
30°/cold
water**
800 30
Wash cycle (only if the "
Rapid
wash"
programme activated), rinse cycles,
delicate spin cycle
+
+
145
 Loading...