

Page 1
说明书递交文档
设 计
DESIGN
刘克亮
2011.8.2
校 对
CO.BY
毛娅男
图号/物料编码 PART NO.
标准化
STANDARD
马凯
图纸名称 PART NAME
业务
seller
曹筱峰
图样标记
REL
版本号
REV.NO.
重量(g)
WEIGHT
比例
scale
材料 MATERIAL
封面120g、内文80g双胶纸
0
1:1
批 准
AUTHORIZE
共 页
TOTAL SHEETS
第 页
NO. OF SHEETS
美的冰箱事业部
MIDEA REFRIGERATION DIVISION
技术要求
1. 尺寸:16K
2. 印刷颜色:封面彩印,内文黑白。
3. 样板需送设计部门封样
4.
标记
MARKER
变更内容
修改日期 签名
①
②
③
④
⑤
INDESIT 冷柜通用
说明书(UK)
50200105B693
Page 2
Page 3
OF 1A 100 UK
OF 1A 200 UK
OF 1A 250 UK
OF 1A 300 UK
4.Do not store explosive substances such
as aerosol cans with a flammable propellant in this appliance.
5.This appliance is intended to be used in
household and similar applications such as
– staff kitchen areas in shops, offices and
other working environments;
– farm houses and by clients in hotels,
motels and other residential type environments;
– bed and breakfast type environments;
– catering and similar non-retail applications.
-WARNING Do not use mechanical devices
or other means to accelerate the defrosting
process, other than those recommended
by the manufacturer
-WARNING Do not damage the refrigerant
circuit
-WARNING Do not use electrical appliances inside the food storage compartments of the appliance,unless they are of
the type recommended by the manufacturer
R600
DANGER or WARNING:
-WARNING – Keep ventilation openings, in
the appliance enclosure or in the built-in
structure, clear of obstruction
1. Risk of child entrapment. Before you
throw away your old refrigerator or freezer:
-Take off doors.
-Leave the shelves in place so that children
may not easily climb inside.
2. Do not use extension cords.
3.This appliance can be used by children
aged from 8 years and above and persons
with reduced physical, sensory or mental
capabilities or lack of experience and knowledge if they have been given supervision or
instruction concerning use of the appliance
in a safe way and understand the hazards
involved. Children shall not play with the
appliance. Cleaning and user maintenance
shall not be made by children without supervision.
The refrigerator is provided with
R600a refrigerant and cyclopentane foaming material, and both are
combustible materials. Obsolete refrigerator
should be isolated from fire and combustion
treatment is forbidden.
Page 4
Temperature Control
The range of the temperature control is from
position" 1" the warmest to "6" the
coldest.Adjust the temperature control to the
setting that best suits your needs. The setting
of medium position should be appropriate for
home or office freezer use.
NOTE:
Turning the temperature control to "0"
position stops the cooling cycle but does not
shut off the power to the freezer.
If the unit is unplugged, lost power, or turned
off; you must wait 3 to 5 minutes before
Restarting the unit. If you attempt to restart
before this time delay, the freezer will not
start.
Large amounts of food will lower the cooling
efficiency of the appliance.
If you choose to change the thermostat
setting, adjust thermostat control by one
numerical increment at a time. Allow several
hours for temperature to stabilize between
adjustments.
Remove the drain plug on the inside floor of
the freezer by rotating it.
Place a shallow pan outside drain outlet.
The defrost water will drain out.
Check the pan occasionally so the water
does not overflow.
Clean the interior of the freezer.
Replace the plug on the inside floor.
Reset the thermostat to desired setting.
Allow the cabinet to cool for one hour.
Return food to the freezer.
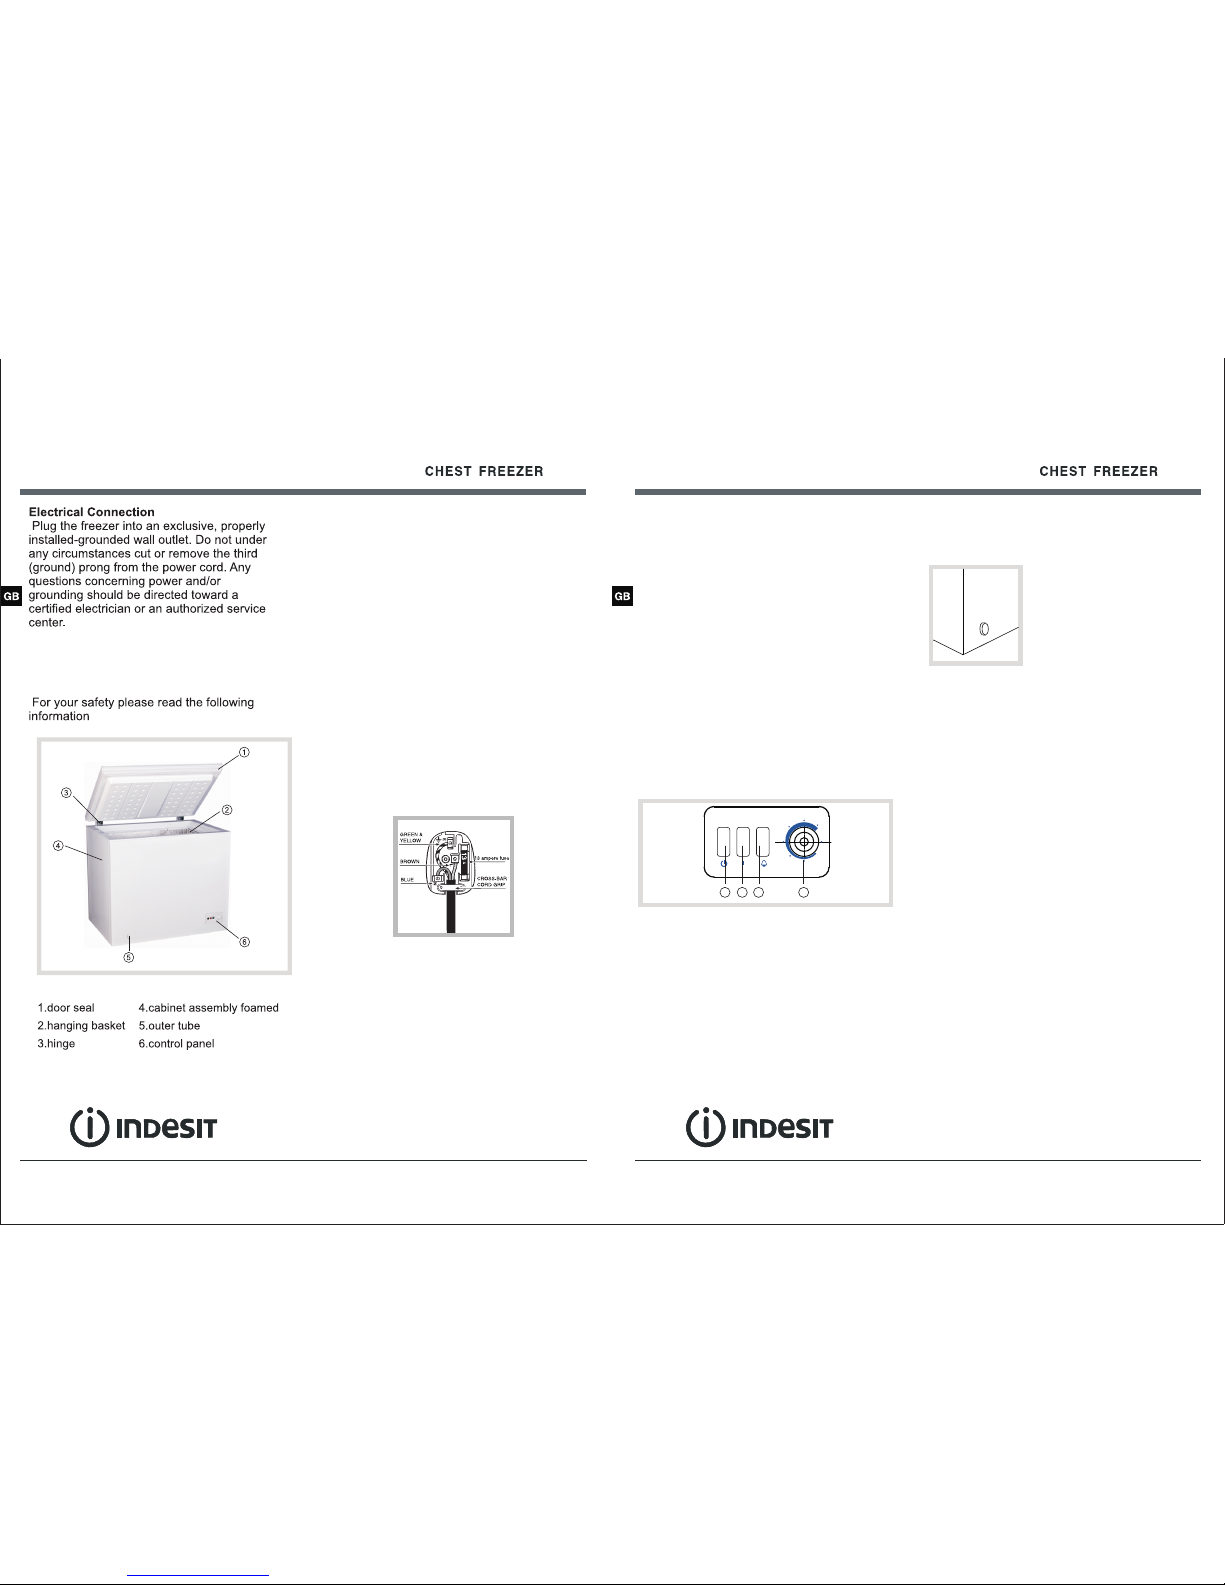
3. Right indicator light: when it turns on, it
signals that the internal temperature has not
yet reached the pre-set value.
4. Thermostat knob: allows for adjusting the
internal temperature.
Defrosting Your Freezer
When? For the most efficient operation and
minimum energy consumption, defrost the
OPERATING YOUR FREEZER OPERATING YOUR FREEZER
HELPFUL HINT:
Defrosting usually takes a few hours.
Leaving the door open will help speed the
process. Also, pouring warm water (not
boiling) on the ice/frost will help speed
melting. If you must use a scraper- please
use caution - it is very easy to damage the
freezer compartment and void your warranty.
freezer when the frost on the freezer walls is
excessive or 5 to 10 mm thick.
Choose a time when the stock of frozen food
is low.
CAUTION
Do not use boiling water because it may
damage the plastic parts. In addition, never
use a sharp or metallic instrument to remove
frost as it may damage the cooling coils and
will void the warranty. We recommend using
the plastic scraper .
Remove the frozen food from the freezer and
place it in a cooler to protect the food.
Turn the thermostat knob to “OFF”.
Unplug the freezer. The Power Supply light
should be off (green light out).
During defrosting, the ice melts into the
cabinet.
.Remove the drain plug on
the inside floor of the freezer
by rotating it.
.Place a shallow pan outside
drain outlet.
The defrost water will drain
out
3
4
Plug replacement(UK&lreland only)
Should you need to replace the plug,the
wires in the power cable are colour in the
following way:
Blue - Neutral ‘N’
Brown - Live ‘L’
Green&Yellow - Earth ‘E’
As the colours of the wires in the power cable
may not correspond with the coloured
markings identifying the terminals in your
plug,and proceed as follows:
The green&yellow wire must be connected to
the terminal in the plug that is marked with
the letter E or by the earth symbol.
The blue wire must be connected to the
terminal that is marked with the letter N.
The brown wire must be connected to the
terminal that is marked with the letter L.
If power supply cord is damaged,it must
replaced by the manufacturer or its service
agent or a similar qualified person in order to
avoid a hazard.
1. left indicator light: when on, it signals
that the product is operating.
2. Middle indicator light: during the
compressor's normal On/Off cycle, the
indicator light turns on to signal that the
compressor is in the On phase.
0
1
2
3
4
5
6
1 2 3 4
Replacing the light bulb
To replac e the l ight bu lb, p ull out t he
plug fr om th e elect ric al sock et. F ollow
the ins tru ction s bel ow.
Acces s the l ight bu lb by r emovi ng th e
cover a s ind icate d in th e diagr am.
Repla ce it w ith a sim ila r light b ulb w it hin
the pow er ra nge ind ica ted on th e cov er
(10W) .
After co nne cting t he fr eezer, t urn t he
tempe rat ure con tro l knob to a p osi tion '6 '
for 6 hou rs be fore lo adi ng your f ood
Page 5
PROBLEMS WITH YOUR FREEZER CARE AND MAINTENANCE
You can solve many common freezer
problems easily, saving you the cost of a
possible service call. Try the suggestions
below to see if you can solve the problem
before calling the servicer .
For household refrigerating appliances, in
normal temperature conditions, please
arrange the thermostat at the middle setting.
Before loading the appliance with packages
of fresh foods, make sure they are cooled to
ambient temperature.
Ice and frost layer increase energy
consumption, so do clean the appliance as
soon as the layer is 3-5 mm thick.
If it is the outer condenser, the rear wall
should be always clean, free of dust or any
impurities.
Always consider instructions stated in
sections Positioning and Energy Saving Tips,
otherwise the energy consumption is
substantially higher.
Moving Your Freezer
Remove all the food.
Securely tape down all loose items inside
your freezer.
Remove the rollers to prevent damage.
Tape the doors shut.
Be sure the freezer stays in the upright
position during transportation.
Energy Saving Tips
The freezer should be located in the coolest
area of the room, away from heat producing
appliances or heating ducts, and out of the
direct sunlight.
Let hot foods cool to room temperature
before placing in the freezer. Overloading
the freezer forces the compressor to run
longer. Foods that freeze too slowly may
lose quality, or spoil.
Be sure to wrap foods properly, and wipe
containers dry before placing them in the
freezer. This cuts down on frost build-up
inside the freezer.
Freezer storage bin should not be lined with
aluminum foil, wax paper, or paper toweling.
Liners interfere with cold air circulation,
making the freezer less efficient.
Organize and label food to reduce door
openings and extended searches. Remove
as many items as needed at one time, and
close the door as soon as possible.
Try not to open the door too often, especially
when the weather is wet and hot. Once you
open the door, mind to close it as soon as
possible.
Every now and then check if the appliance is
sufficiently ventilated (adequate air
circulation behind the appliance).
Cleaning Your Freezer
Upon installation of your new appliance, it is
recommended that it be cleaned thoroughly.
Turn the temperature control to "OFF",
unplug the freezer, remove the food and
storage basket.
Wash the inside with a damp warm cloth
containing a water and baking soda solution.
The solution should be about 2 tablespoons
of baking soda to a quart of water.
Wash the storage basket with a mild
detergent solution.
Be sure to keep the door gasket (seal) clean
to keep the unit running efficiently.
The outside of the freezer should be cleaned
with mild detergent and warm water.
Dry the interior and exterior with a soft cloth.
The condenser coils should be vacuumed
when they are dusty or dirty.
It is recommended that the unit be cleaned
each time it is defrosted to help keep the unit
odor free and running efficiently.
Vacation Time
Remove all the food.
Unplug the freezer.
Clean the freezer.
Leave the door open slightly to avoid
possible formation of condensation, mold, or
odors.
Use extreme caution in the case of children.
The unit should not be accessible to child's
play.
Short vacations: Leave the freezer operating
during vacations of less than three weeks.
Long vacations: If the appliance will not be
used for several months, remove all food and
unplug the power cord. Clean and dry the
interior thoroughly. To prevent odor and mold
growth, leave the door open slightly: blocking
it open if necessary or have the door
removed.
The electrical safety of the appliance can
only be guaranteed if the product is connected
to an approved earth connection.
Declaration of conformity
This appliance is designed to store food
and is manufactured in conformity with
European Directive 90/128/EEC,
02/72/EEC and Regulation(EC)No.1935/2004
This appliance is designed,manufactured,
and retailed in compliance with:
- the safety objectives of the Low Voltage
Directive 2006/95/CE(that substitutes
Directive 72/73/CEE and successive
amendments);
- the protection requirements of the’EMC’
Directive 89/336/EEC amended by Directive
93/68/EEC
5
6
The Freezer Compartment
This compartment is designed for the longterm storage of frozen food.
The storage life of frozen foods varies and
the recommended storage time should not be
exceeded. The instructions regarding the
care of frozen foods should be followed when
defrosting the freezer.
Pre-packed commercially frozen food should
be stored in accordance with the frozen foods
manufacturer's instructions for a four star
frozen food storage compartment or home
freezer.
Place frozen food into the freezer as quickly
as possible after purchase. If there are
instructions on the packet, carefully follow
these instructions regarding storage times.
The freezer door is susceptible to breaking
due to excessive ice build up. Be sure to
defrost when the ice reaches 5 to 10 mm
thick.
A storage basket is provided for the
organization of odd-shaped items. To reach
other packages in the freezer, just slide the
basket to one side, or lift it out.
Page 6
TROUBLESHOOTING GUIDETROUBLESHOOTING GUIDE
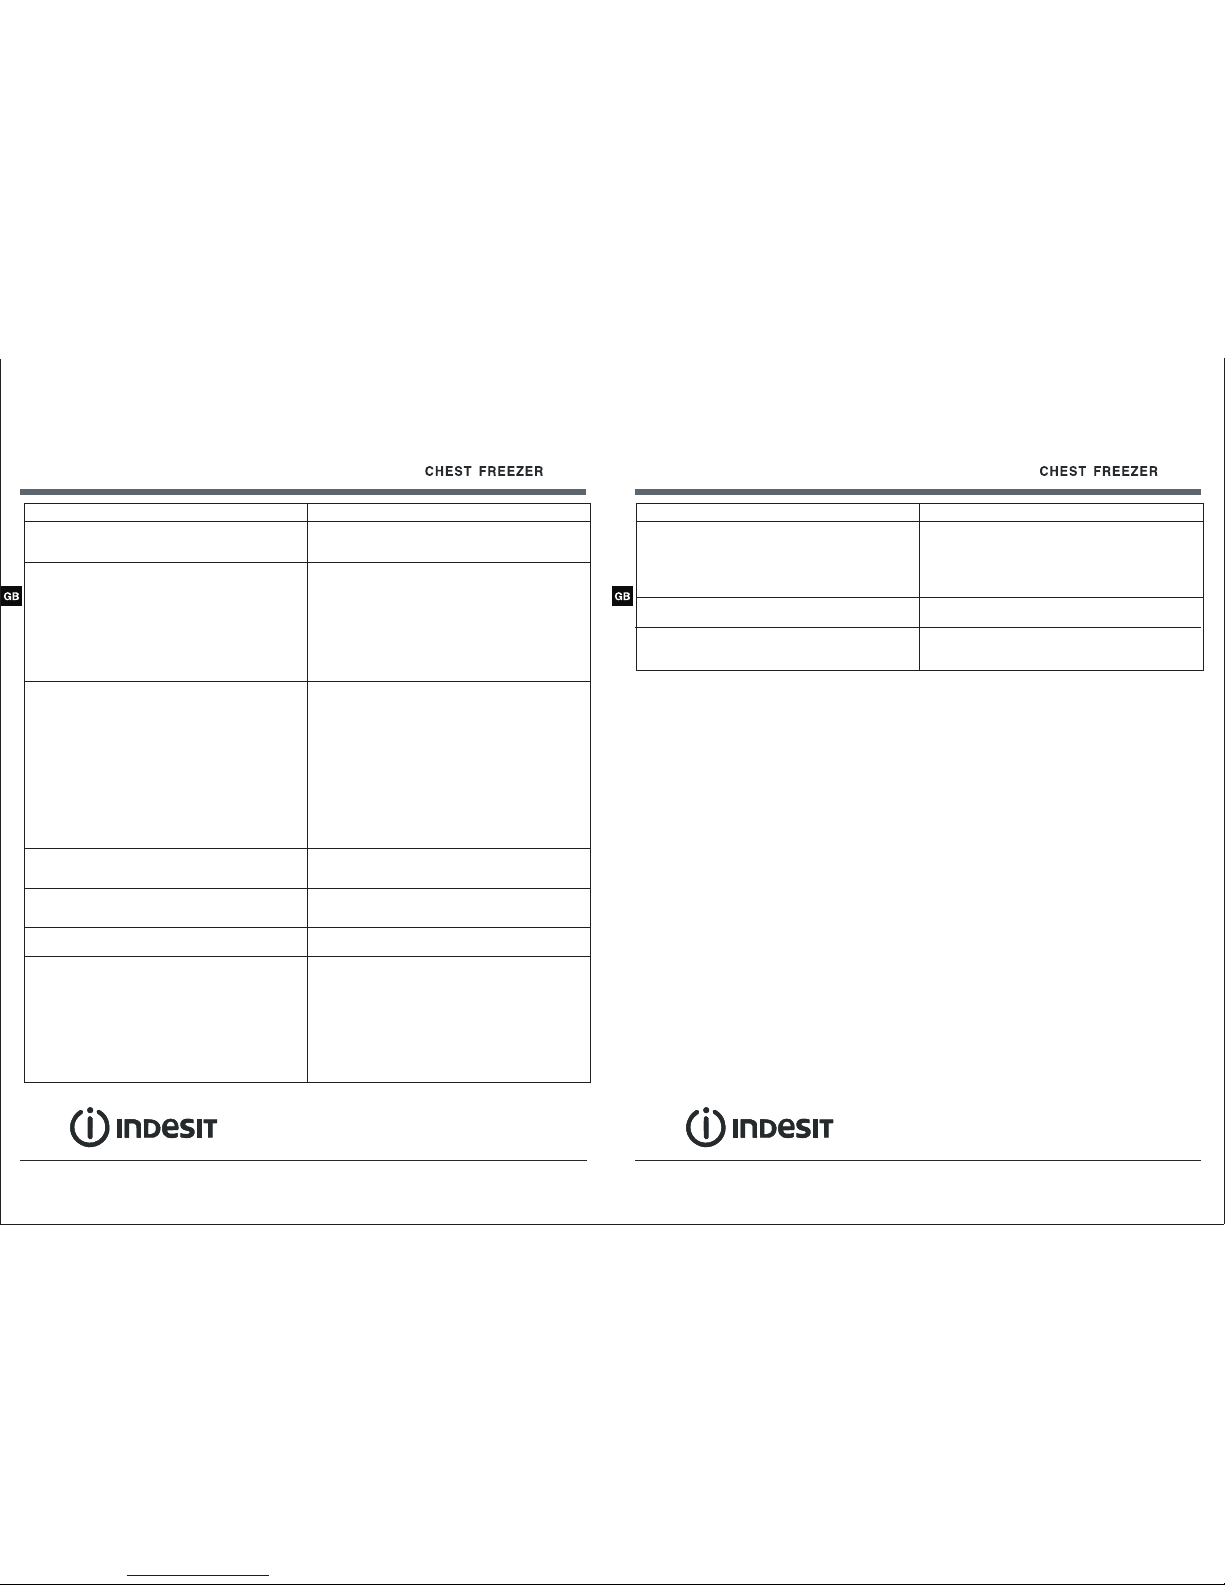
PROBLEM POSSIBLE CAUSE
Not plugged in.
The circuit breaker tripped or a blown fuse.
The freezer temperature control is set at "0/OFF”
The room temperature is hotter than normal.
A large amount of food has been added to the freezer.
The door is open too often.
The door is not closed completely.
The temperature control is not set correctly.
The door gasket does not seal properly.
The freezer does not have the correct clearances.
The freezer has recently been disconnected for a
period of time. Four hours are required for the freezer
to cool down completely
Temperature control is set too warm. Turn the control
to a cooler setting and allow several hours for the
temperature to stabilize.
Door is kept open too long or is opened too frequently.
Warm air enters the freezer every time the door is
opened. Open the door less often.
The door is not closed completely.
The door gasket does not seal properly.
A large amount of warm or hot food might have been
stored recently. Wait until the freezer has had a
chance to reach its selected temperature.
The freezer has recently been disconnected for a
period of time. Four hours are required for the freezer
to cool down completely.
Temperature control is set too cold. Turn the control to
a warmer setting and allow several hours for the
temperature to stabilize
Freezer does not operate
Compressor turns on and off frequently
Temperature inside the freezer is too warm
Temperature inside the freezer is too cold
PROBLEM POSSIBLE CAUSE
Metal parts undergo expansion and contraction, as in
hot water pipes. This is normal. Sound will level off or
disappear as freezer continues to run
Refrigerant (used to cool freezer) is circulating
throughout the system. This is normal
Check to assure that the freezer is level.
Floor is uneven or weak. Freezer rocks on the floor
when it is moved slightly. Be sure floor can adequately
support freezer. Level the freezer by putting wood or
metal shims under part of the freezer.
The freezer is touching the wall. Re-level the freezer
and move it from the wall.
See “Installation Instructions”
The freezer is not level.
The gasket is dirty.
The storage basket is out of position
Popping or cracking sound when compressor comes
on
Bubbling or gurgling sound, like water boiling
Vibrations
The door will not close properly
Weather is hot and humid, which increases internal
rate of frost build-up. This is normal.
Door is slightly open.
Door is kept open too long, or is opened too frequently.
Open the door less often.
The door is not sealed properly
Moisture forms on inside freezer walls
Door is slightly open, causing cold air from inside the
freezer to meet warm moist air from outside
Moisture forms on outside of freezer
7
8
Page 7
9
10
OF 1A 100 UK
00865600000
100 L
N/ST/T
0.040
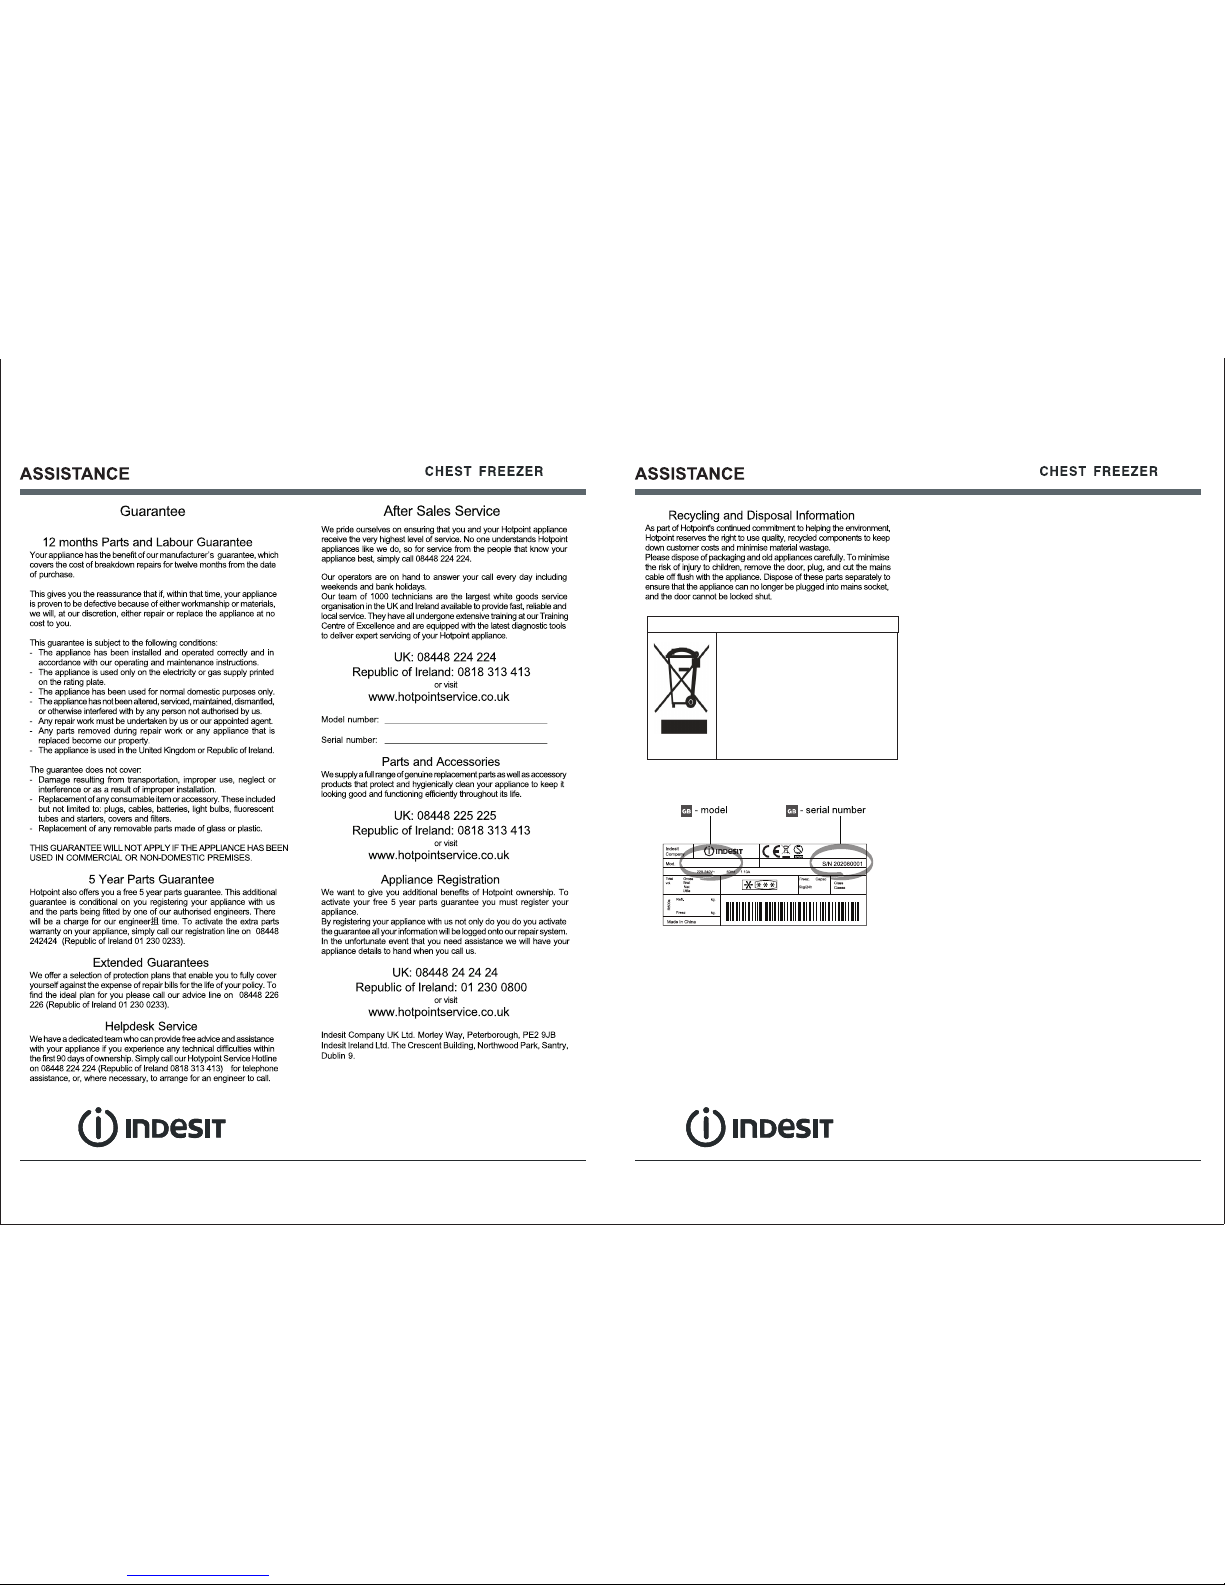
Correct Disposal of this product
This m arkin g indic ates th at this p roduc t shoul d
not be d ispos ed with o ther ho useho ld wast es
thro ughou t the EU. To pr event p ossib le harm t o
the en viron ment or h uman he alth fr om
unco ntrol led was te disp osal, r ecycl e it
resp onsib ly to pro mote th e susta inabl e reuse o f
mate rial re sourc es. To retu rn your u sed dev ice,
plea se use th e retur n and col lecti on syst ems or
cont act the r etail er wher e the pro duct wa s
purc hased . They ca n take th is prod uct for
envi ronme ntal sa fe recy cling .
 Loading...