

Indesit I6 EVAUK Instruction manual

Operating Instructions
COOKER AND OVEN
GB
English, 1
I6 EVA/UK I6 EVA/UK
Contents
GB
Warning,2
Installation, 2-3
Positioning and levelling
Electrical connection
Technical data
Description of the appliance, 4
Overall view
Control panel
Start-up and use, 5
Starting the oven
Using the cooking timer
Cooking advice, 6-7
Oven cooking advice table
Using the electric hob, 8
Practical advice on using the electric hotplates
Precautions and tips, 9
General safety
Disposal
Respecting and conserving the environment
Care and maintenance, 10
Switching the appliance off
Cleaning the appliance
Replacing the oven light bulb
Assistance
Removing and fitting the oven door

HOOD
420
Min.
min.
650
mm. with hood
min.
700
mm. without hood
mm.
600
Min. mm.
420
Min. mm.
GB
WARNING
WARNING: The appliance and its
•
accessible parts become hot
during use.
Care should be taken to avoid
•
touching heating elements.
•
Children less than 8 years of age
shall be kept away unless
continuously supervised.
This appliance can be used by
•
children aged from 8 years and
above and persons with reduced
physical, sensory or mental
capabilities or lack of experience
and knowledge if they have been
given supervision or instruction
concerning use of the appliance
in a safe way and understand the
hazards involved. Children shall
not play with the appliance.
Cleaning and user maintenance
shall not be made by children
without supervision.
WARNING: Unattended cooking
•
on a hob with fat or oil can be
dangerous and may result in fire.
NEVER try to extinguish a fire with
•
water, but switch off the appliance
and then cover flame e.g. with a
lid or a fire blanket.
Do not use harsh abrasive
•
cleaners or sharp metal scrapers
to clean the oven door glass since
they can scratch the surface,
which may result in shattering of
the glass.
The internal surfaces of the
•
compartment (where present) may
become hot.
Never use steam cleaners or
•
pressure cleaners on the
appliance.
Remove any liquid from the lid
•
before opening it.
Do not close the glass cover (if
•
present) when the gas burners or
electric hotplates are still hot.
WARNING: Ensure that the
•
appliance is switched off before
replacing the lamp to avoid the
possibility of electric shock.
! When you place the rack inside,
make sure that the stop is directed
upwards and in the back of the cavity.
2
Installation
! Before operating your new appliance please read
this instruction booklet carefully. It contains important
information concerning the safe installation and
operation of the appliance.
! Please keep these operating instructions for future
reference. Make sure that the instructions are kept with
the appliance if it is sold, given away or moved.
! The appliance must be installed by a qualified
professional according to the instructions provided.
! Any necessary adjustment or maintenance must be
performed after the appliance has been disconnected
from the electricity supply.
Positioning and levelling
! It is possible to install the appliance alongside
cupboards whose height does not exceed that of the
hob surface.
! Make sure that the wall in contact with the back of
the appliance is made from a non-flammable, heatresistant material (T 90°C).
To install the appliance correctly:
• Place it in the kitchen, dining room or the bed-sit
(not in the bathroom).
• If the top of the hob is higher than the cupboards,
the appliance must be installed at least 200 mm
away from them.
• If the cooker is
installed underneath a wall
cabinet, there must be a
minimum distance of 420
mm between this cabinet
and the top of the hob.
This distance should be
increased to 700 mm if
the wall cabinets are
flammable (
• Do not position blinds behind the cooker or less
than 200 mm away from its sides.
• Any hoods must be installed according to the
instructions listed in the relevant operating manual.
Levelling
If it is necessary to level the
appliance, screw the adjustable
feet* into the places provided on
each corner of the base of the
cooker (
see figure
see figure
).
).
The legs* provided with the
appliance fit into the slots on
the underside of the base of the
cooker.
Electrical connection
Electric cookers come without a power supply cable.
The cooker is designed to operate on an electricity
supply which conforms to the electrical data shown
on the Rating Plate. The cooker can be connected to
the mains only after removing the back panel of the
cooker itself with a screwdriver.
! the following installation procedure must be carried
out by a qualified electrician. The electrical
installation must comply with the IEE Regulations,
Building & local By-Lays.
1. Open the terminal
board by inserting a
screwdriver into the
side tabs of the cover.
Use the screwdriver as
a lever by pushing it
down to open the cover
see diagram
(
2. Loosen the cable
clamp screw and remove
it, using a screwdriver as
a lever (see figure).
3. Remove the wire
contact screws L-Nthen fasten the wires
under the screw heads,
respecting the colour
code: Black/Blue (N),
Red/Brown (L) and Bare
Wire/Yellow-Green (
• Once the connections have been made, tighten all
the terminal screws fully.
• Fasten the supply cable in place with the clamp and
close the cover of the terminal board.
Connecting the supply cable to the mains
WARNINGS: THIS APPLIANCE MUST BEWARNINGS: THIS APPLIANCE MUST BE
WARNINGS: THIS APPLIANCE MUST BE
WARNINGS: THIS APPLIANCE MUST BEWARNINGS: THIS APPLIANCE MUST BE
EARTHED.EARTHED.
EARTHED.
EARTHED.EARTHED.
! The cooker must be connected to the mains by a
switched (double pole) cooker outlet correctly fused
with a capacity appropriate to that shown on the
cooker Rating Plate. All electrical wiring from the
).
,
).
consumer unit to the cooker, via the switched double
pole cooker outlet, must be of an acceptable type
and current rating as above.
! the supply cable must be positioned so that it
never reaches at any point a temperature 50°C
higher than the room temperature. The cable must
be routed away from the rear vents.
HOT PARTS
Mains frequency and voltage of the electrical
section
Model Electric section
Voltage Power (W)
I6 EVA/UK
240V~ 50/60 Hz 9900
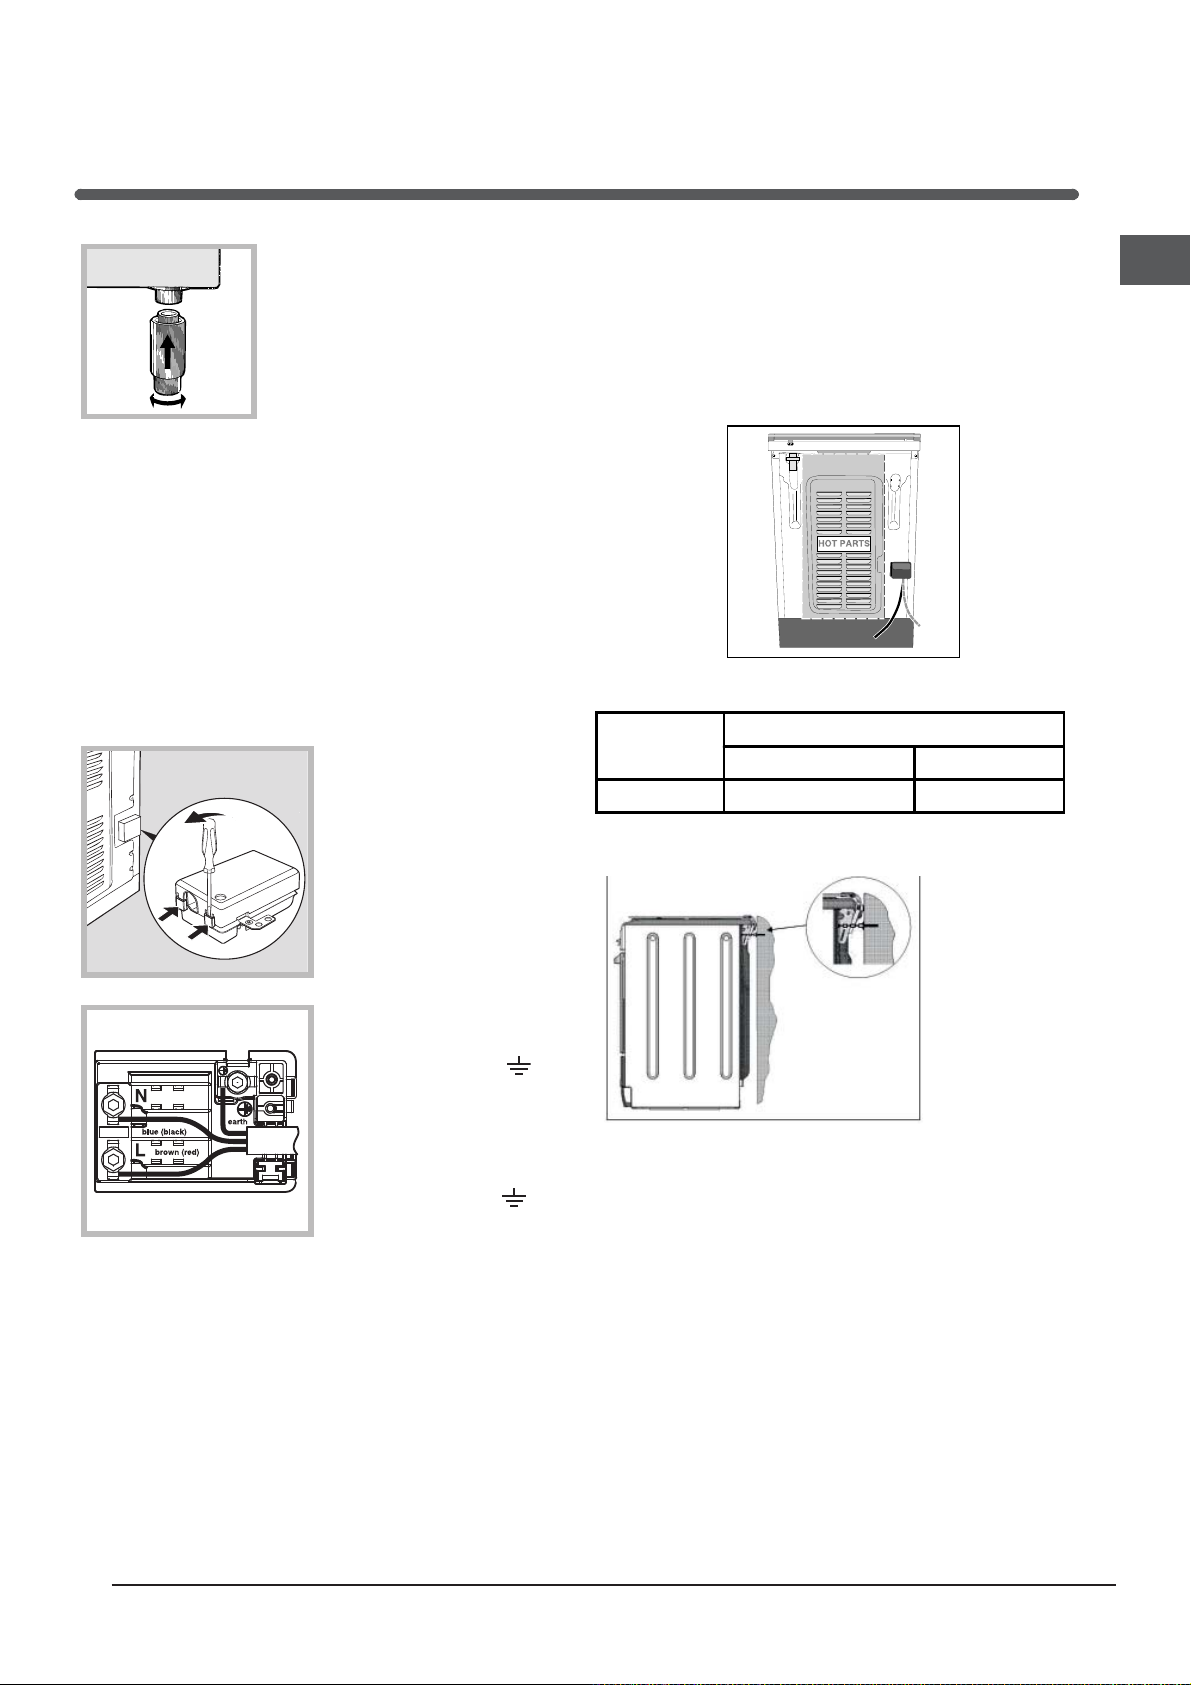
Safety Chain
! In order
to prevent
accidental
tipping of the
appliance, for
example by
a child climbing onto the
oven door, the
supplied safety
chain MUST be
installed!
The cooker is fitted with a safety chain to be fixed by
means of a screw (not supplied with the cooker) to
the wall behind the appliance, at the same height as
the chain is attached to the appliance.
Choose the screw and the screw anchor according
to the type of material of the wall behind the appliance. If the head of the screw has a diameter smaller
than 9mm, a washer should be used. Concrete wall
requires the screw of at least 8mm of diameter, and
60mm of length.
Ensure that the chain is fixed to the rear wall of the
cooker and to the wall, as shown in figure, so that
after installation it is tensioned and parallel to the
ground level.
GB
3

GB
Description of the appliance
Overall view
Tray for
Catching
Overflows
Control panel
Electric
plates
Control panel
GRILL rack
DRIPPING pan
Adjustable foot
Electric
plates
GUIDE RAILS
for the sliding racks
position 5
position 4
position 3
position 2
position 1
Adjustable foot
VARIABLE GRILL
4
knob
THERMOSTAT
indicator light
SELECTOR
knob
ACTIVE HOTPLATE
indicator light
ELECTRIC HOTPLATE
control knobs
 Loading...