

Page 1

Operating Instructions
COOKER AND OVEN
GB
English, 1
I6 EVA/UK I6 EVA/UK
Contents
GB
Warning,2
Installation, 2-3
Positioning and levelling
Electrical connection
Technical data
Description of the appliance, 4
Overall view
Control panel
Start-up and use, 5
Starting the oven
Using the cooking timer
Cooking advice, 6-7
Oven cooking advice table
Using the electric hob, 8
Practical advice on using the electric hotplates
Precautions and tips, 9
General safety
Disposal
Respecting and conserving the environment
Care and maintenance, 10
Switching the appliance off
Cleaning the appliance
Replacing the oven light bulb
Assistance
Removing and fitting the oven door
Page 2
HOOD
420
Min.
min.
650
mm. with hood
min.
700
mm. without hood
mm.
600
Min. mm.
420
Min. mm.
GB
WARNING
WARNING: The appliance and its
•
accessible parts become hot
during use.
Care should be taken to avoid
•
touching heating elements.
•
Children less than 8 years of age
shall be kept away unless
continuously supervised.
This appliance can be used by
•
children aged from 8 years and
above and persons with reduced
physical, sensory or mental
capabilities or lack of experience
and knowledge if they have been
given supervision or instruction
concerning use of the appliance
in a safe way and understand the
hazards involved. Children shall
not play with the appliance.
Cleaning and user maintenance
shall not be made by children
without supervision.
WARNING: Unattended cooking
•
on a hob with fat or oil can be
dangerous and may result in fire.
NEVER try to extinguish a fire with
•
water, but switch off the appliance
and then cover flame e.g. with a
lid or a fire blanket.
Do not use harsh abrasive
•
cleaners or sharp metal scrapers
to clean the oven door glass since
they can scratch the surface,
which may result in shattering of
the glass.
The internal surfaces of the
•
compartment (where present) may
become hot.
Never use steam cleaners or
•
pressure cleaners on the
appliance.
Remove any liquid from the lid
•
before opening it.
Do not close the glass cover (if
•
present) when the gas burners or
electric hotplates are still hot.
WARNING: Ensure that the
•
appliance is switched off before
replacing the lamp to avoid the
possibility of electric shock.
! When you place the rack inside,
make sure that the stop is directed
upwards and in the back of the cavity.
2
Installation
! Before operating your new appliance please read
this instruction booklet carefully. It contains important
information concerning the safe installation and
operation of the appliance.
! Please keep these operating instructions for future
reference. Make sure that the instructions are kept with
the appliance if it is sold, given away or moved.
! The appliance must be installed by a qualified
professional according to the instructions provided.
! Any necessary adjustment or maintenance must be
performed after the appliance has been disconnected
from the electricity supply.
Positioning and levelling
! It is possible to install the appliance alongside
cupboards whose height does not exceed that of the
hob surface.
! Make sure that the wall in contact with the back of
the appliance is made from a non-flammable, heatresistant material (T 90°C).
To install the appliance correctly:
• Place it in the kitchen, dining room or the bed-sit
(not in the bathroom).
• If the top of the hob is higher than the cupboards,
the appliance must be installed at least 200 mm
away from them.
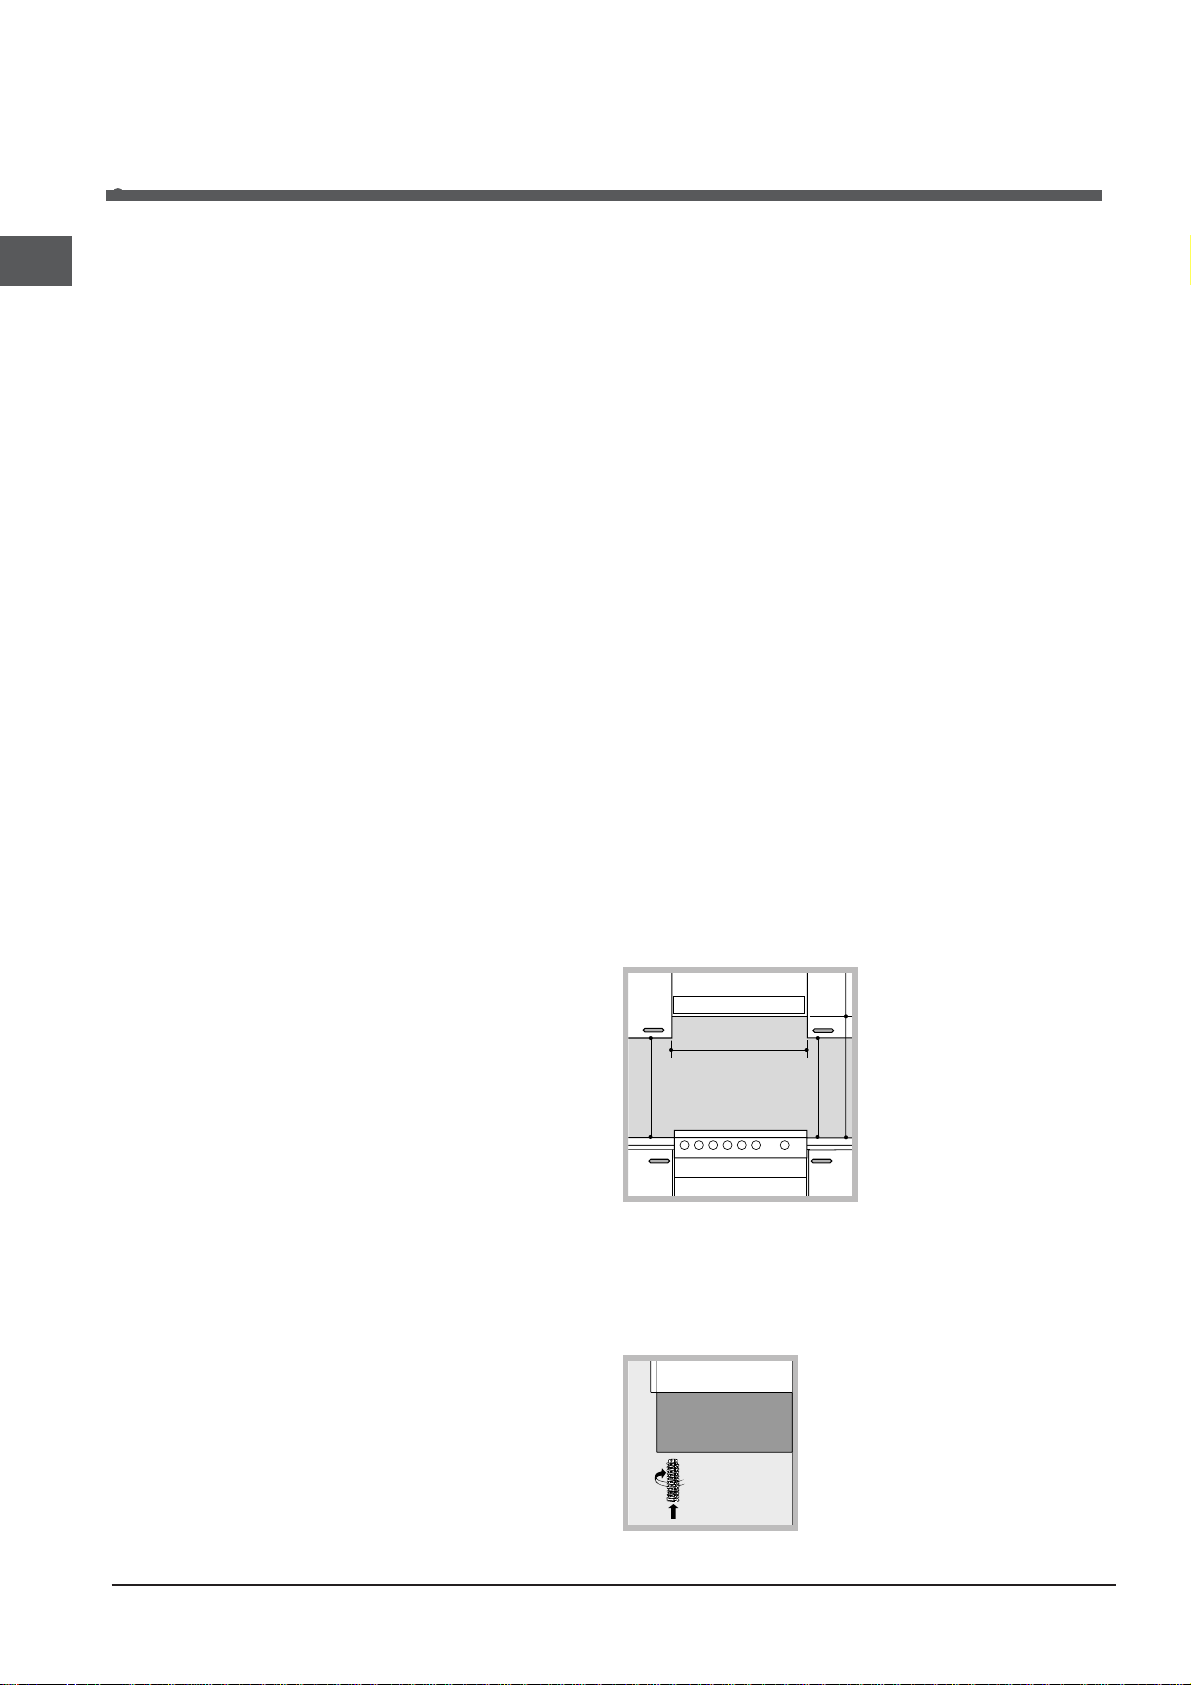
• If the cooker is
installed underneath a wall
cabinet, there must be a
minimum distance of 420
mm between this cabinet
and the top of the hob.
This distance should be
increased to 700 mm if
the wall cabinets are
flammable (
• Do not position blinds behind the cooker or less
than 200 mm away from its sides.
• Any hoods must be installed according to the
instructions listed in the relevant operating manual.
Levelling
If it is necessary to level the
appliance, screw the adjustable
feet* into the places provided on
each corner of the base of the
cooker (
see figure
see figure
).
).
Page 3
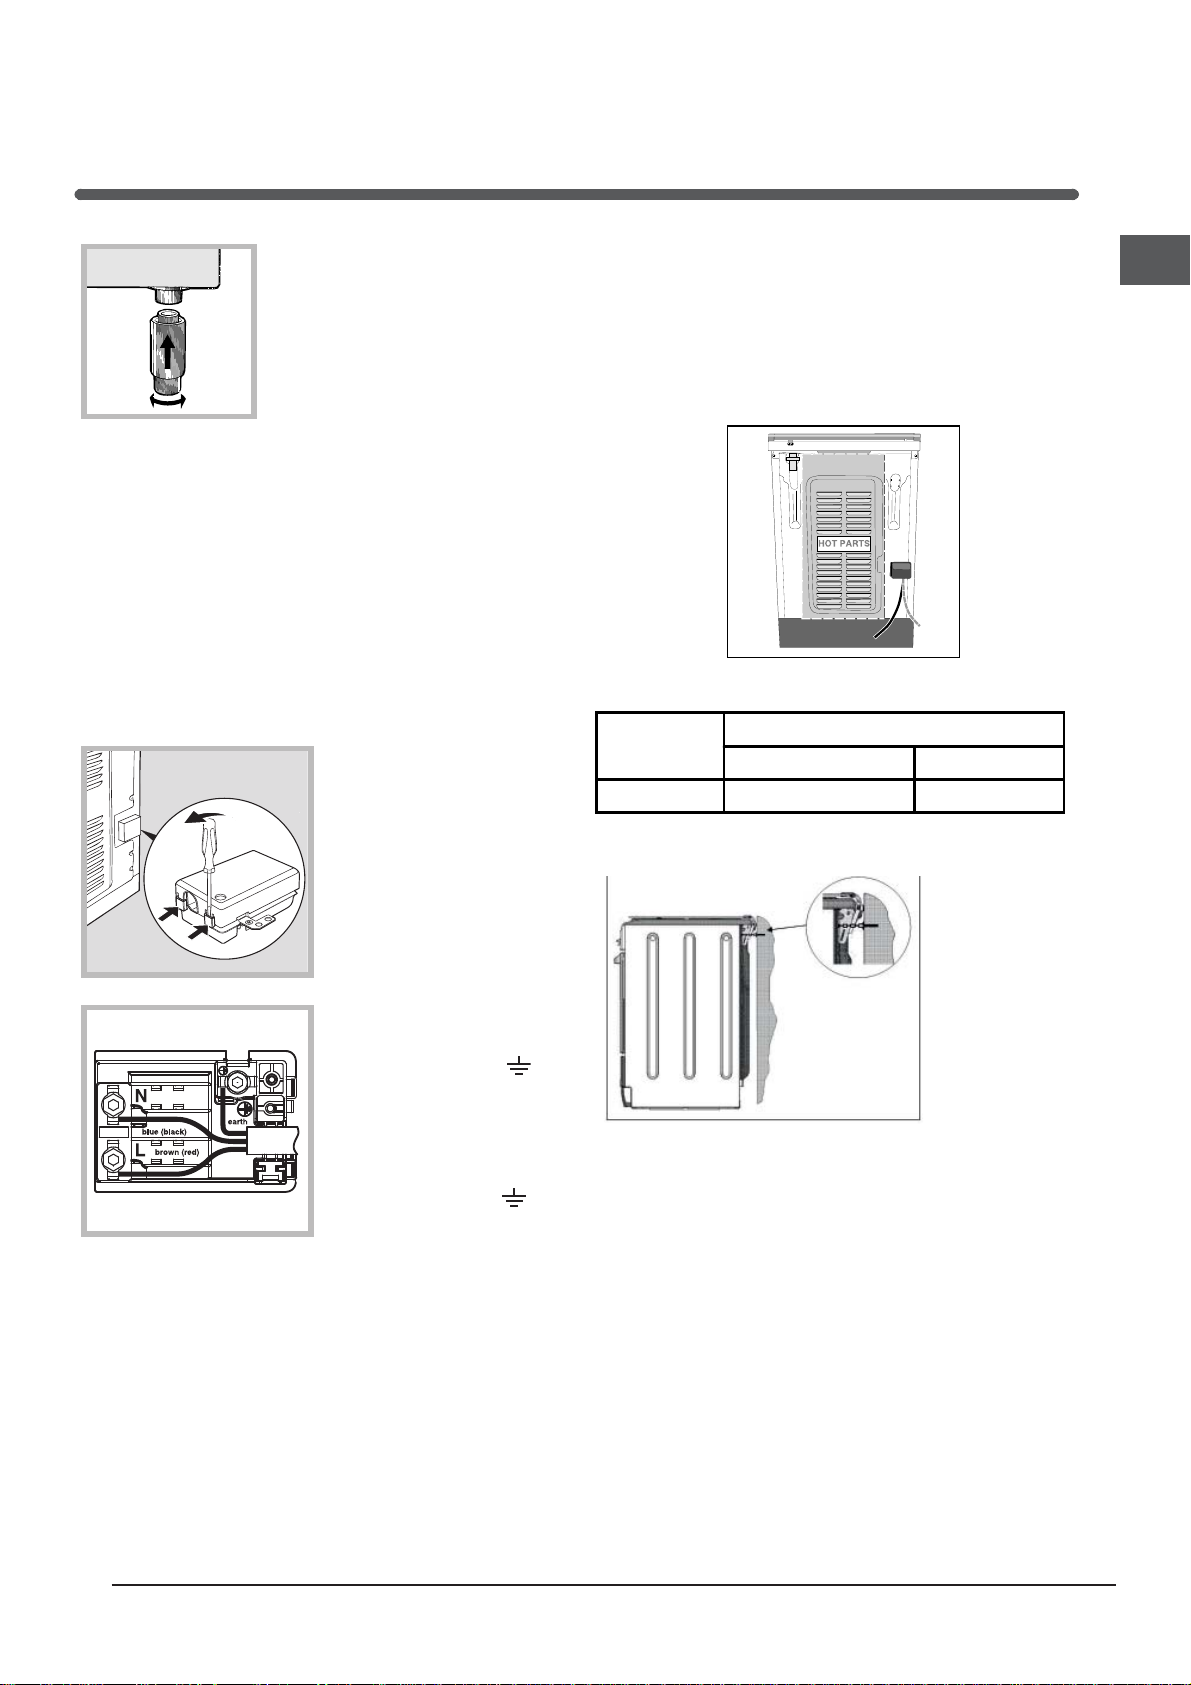
The legs* provided with the
appliance fit into the slots on
the underside of the base of the
cooker.
Electrical connection
Electric cookers come without a power supply cable.
The cooker is designed to operate on an electricity
supply which conforms to the electrical data shown
on the Rating Plate. The cooker can be connected to
the mains only after removing the back panel of the
cooker itself with a screwdriver.
! the following installation procedure must be carried
out by a qualified electrician. The electrical
installation must comply with the IEE Regulations,
Building & local By-Lays.
1. Open the terminal
board by inserting a
screwdriver into the
side tabs of the cover.
Use the screwdriver as
a lever by pushing it
down to open the cover
see diagram
(
2. Loosen the cable
clamp screw and remove
it, using a screwdriver as
a lever (see figure).
3. Remove the wire
contact screws L-Nthen fasten the wires
under the screw heads,
respecting the colour
code: Black/Blue (N),
Red/Brown (L) and Bare
Wire/Yellow-Green (
• Once the connections have been made, tighten all
the terminal screws fully.
• Fasten the supply cable in place with the clamp and
close the cover of the terminal board.
Connecting the supply cable to the mains
WARNINGS: THIS APPLIANCE MUST BEWARNINGS: THIS APPLIANCE MUST BE
WARNINGS: THIS APPLIANCE MUST BE
WARNINGS: THIS APPLIANCE MUST BEWARNINGS: THIS APPLIANCE MUST BE
EARTHED.EARTHED.
EARTHED.
EARTHED.EARTHED.
! The cooker must be connected to the mains by a
switched (double pole) cooker outlet correctly fused
with a capacity appropriate to that shown on the
cooker Rating Plate. All electrical wiring from the
).
,
).
consumer unit to the cooker, via the switched double
pole cooker outlet, must be of an acceptable type
and current rating as above.
! the supply cable must be positioned so that it
never reaches at any point a temperature 50°C
higher than the room temperature. The cable must
be routed away from the rear vents.
HOT PARTS
Mains frequency and voltage of the electrical
section
Model Electric section
Voltage Power (W)
I6 EVA/UK
240V~ 50/60 Hz 9900
Safety Chain
! In order
to prevent
accidental
tipping of the
appliance, for
example by
a child climbing onto the
oven door, the
supplied safety
chain MUST be
installed!
The cooker is fitted with a safety chain to be fixed by
means of a screw (not supplied with the cooker) to
the wall behind the appliance, at the same height as
the chain is attached to the appliance.
Choose the screw and the screw anchor according
to the type of material of the wall behind the appliance. If the head of the screw has a diameter smaller
than 9mm, a washer should be used. Concrete wall
requires the screw of at least 8mm of diameter, and
60mm of length.
Ensure that the chain is fixed to the rear wall of the
cooker and to the wall, as shown in figure, so that
after installation it is tensioned and parallel to the
ground level.
GB
3
Page 4
GB
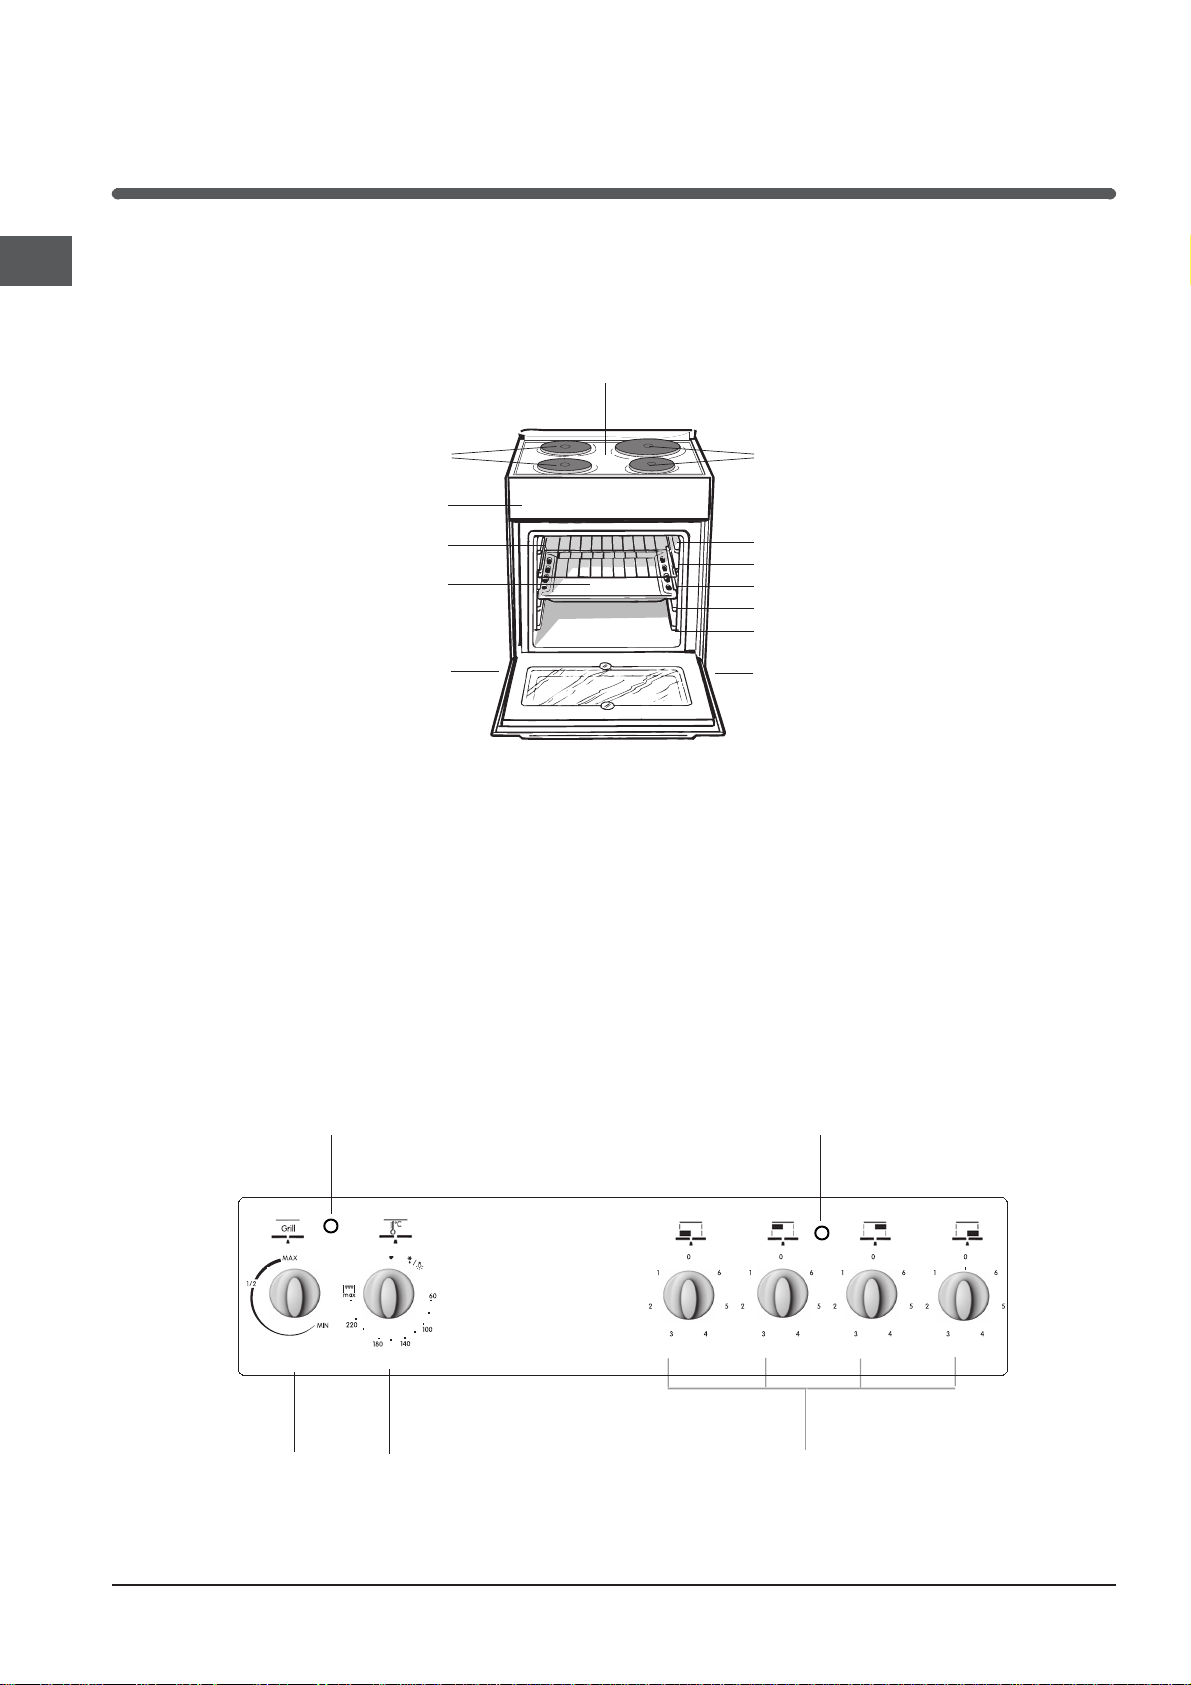
Description of the appliance
Overall view
Tray for
Catching
Overflows
Control panel
Electric
plates
Control panel
GRILL rack
DRIPPING pan
Adjustable foot
Electric
plates
GUIDE RAILS
for the sliding racks
position 5
position 4
position 3
position 2
position 1
Adjustable foot
VARIABLE GRILL
4
knob
THERMOSTAT
indicator light
SELECTOR
knob
ACTIVE HOTPLATE
indicator light
ELECTRIC HOTPLATE
control knobs
Page 5

Start-up and use
p
q
! The first time you use your appliance, heat the
empty oven with its door closed at its maximum
temperature for at least half an hour. Ensure that the
room is well ventilated before switching the oven off
and opening the oven door. The appliance may emit
a slightly unpleasant odour caused by protective
substances used during the manufacturing process
burning away.
! Before operating the product, remove all plastic
film from the sides of the appliance.
Starting the oven
When the SELECTOR knob is turned in a clockwise
direction to the symbol
will come on to assist in the defrosting of frozen
food. Rotating further to the complete range of
temperatures shown on the dial you can choose
which is most suitable for the food you are going to
cook (fan assisted mode). The temperature is
reached automatically and controlled by the oven
thermostat (from 60°C to 240°C).
! Whilst using tag oven for conventional cooking
VARIABLE GRILL knob must be set with “
line with the reference mark on the control panel.
Grill
The top heating element will come on. On this
setting, food is cooked by the thermal radiation
given off in the downward direction by the electric
heating element. The very high temperature and
direct heat of the grill make it possible to brown
meats on the surface while locking in the juices to
keep them tender.
! Never put objects directly on the bottom of the
oven; this will avoid the enamel coating being
damaged. Only use position 1 in the oven when
cooking with the rotisserie spit.
! Always place cookware on the rack(s) provided.
!
Always cook in this mode with
THERMOSTAT indicator light
When this is illuminated, the oven is generating
heat. It switches off when the inside of the oven
reaches the selected temperature. At this point the
light illuminates and switches off alternately,
indicating that the thermostat is working and is
maintaining the temperature at a constant level.
the fan and oven light
MAXMAX
MAX” in
MAXMAX
the oven door closed.
Oven light
This is switched on by turning the SELECTOR knob
to any position other than “0”. It remains lit as long
as the oven is operating. By selecting
knob, the light is switched on without any of the
heating elements being activated.
Cooling ventilation*
In order to cool down the external temperature of the
oven, some models are fitted with a cooling fan that
blows out air between the control panel and the oven
door.
! Once the cooking has been completed, the cooling
fan remains on until the oven has cooled down
sufficiently.
with the
Using the cooking timer
1. To set the buzzer, turn the COOKING TIMER knob
clockwise almost one complete revolution.
2. Turn the knob anticlockwise to set the desired
time: align the minutes shown on the COOKING
TIMER knob with the indicator on the control panel.
3. When the selected time has elapsed, a buzzer
sounds and the oven turns off.
4. When the oven is off the cooking timer can be
used as a normal timer.
! To use the oven manually, in other words when you
do not wish to use the end of cooking timer, turn the
COOKING TIMER knob until it reaches the
symbol.
TECHNICAL DATA
Oven dimensions
(HxWxD )
Volume 56 l
Useful
me asure men ts
relating to the oven
artment
com
Powe r s u ppl y
vol tage and
uency
fre
ENERG Y L A BEL
32x43 ,5x40 cm
width 42 cm
depth 44 cm
height 8, 5 cm
see data plate
Directi ve 2002/ 40/ EC on the
label of electric ovens.
Standard EN 50304
Decla red energy consumptio n
for Forc ed convec tion Class –
heating mode: Fa n assis ted
EC Directives: 2006/95/ECC
dated 12/1 2/06 (Low Volta ge)
and subsequent amendments 89/336/EEC dated 03/05/ 89
(Electromagnetic Compatibility)
and subsequent amendments 93/68/ EEC dated 22/07/9 3 an d
subsequent amendmen ts 2002/96/EC.
GB
5
Page 6

Cooking advice
GB
When using the oven, only one rack or drip pan
should be used at a time. The rack or pan should be
inserted into the bottom or top guides depending on
whether the food needs more heat from the top or
bottom.
Preheating
If the oven must be preheated (this is generally
required for leavened foods), we recommend using
the "conventional" oven feature which makes it
possible to reach the temperature desired in a very
short time. After the oven has been preheated, the
thermostat light will turn off. At this point, you can
select the most suitable setting to cook the dish.
Cooking Fish and Meat
Meat must weigh at least 1 Kg in order to prevent it
from drying out. When cooking white meat, fowl and
fish, use low temperature settings (150°C-175°C). For
red meat that should be well done on the outside
while tender and juicy in the inside, it is a good idea
to start with a high temperature setting
(200°C-220°C) for a short time, then turn the oven
down afterwards. In general, the larger the roast, the
lower the temperature setting. Place the meat on the
centre of the rack and place the drip pan beneath it
to catch the fat.
Make sure that the rack is inserted so that it is in the
centre of the oven. If you would like to increase the
amount of heat from below, use the low rack heights.
For savory roasts (especially duck and wild game),
dress the meat with lard or bacon on the top.
Cooking Pastries
Always preheat the oven when cooking pastries. Do
not open the door in order to prevent the pastry from
dropping.
The batter or dough should not be too liquidy so that
the cooking time is not excessive. In general:
Pastry is too dry
Increase the temperature by 10°C and reduce the
cooking time.
Pastry dropped
Use less liquid or lower the temperature by 10°C.
Pastry is too dark on top
Place it on a lower rack, lower the temperature, and
increase the cooking time.
Cooked well on the inside but sticky on the
outside
Use less liquid, lower the temperature, and increase
the cooking time.
The pastry sticks to the pan
Grease the pan well and sprinkle it with a dusting of
flour.
I used more than one level and they are not all at
the same cooking point
Use a lower temperature setting. It is not necessary to
remove the food from all the racks at the same time.
Using the Grill
Grilling may be carried out with a two stage heating
element situated in the top of the oven chamber. The
centre, or the complete area of the grill can be
selected by turning the SELECTOR knob in a
clockwise direction to align the symbols
the mark on the control panel. The VARIABLE GRILL
knob is positioned to right of the SELECTOR knob.
This knob will provide varying grill temperatures
when rotated from “
adjusted to vary the level of heat at any time during
the grilling operation.
To operate the grill
1. Turn the SELECTOR knob clockwise until the
required grilling symbol is in line with the mark on
the control panel. The element is now “on”.
2. The VARIABLE GRILL knob can now be operated
to select the required heat.
When utilizing the grill, place the rack at the lower
levels (see cooking table). To catch grease or fat
and prevent smoke, place a drip pan at the bottom
rack level.
maxmax
max” to “
maxmax
minmin
min” and may be
minmin
with
WARNING! The oven is
provided with a stop system to extract the racks
and prevent them from
coming out of the oven.(1)
As shown in the drawing,
to extract them completely, simply lift the racks,
holding them on the front
part, and pull (2).
6
Page 7

Oven cooking advice table
Food to be cooked Wt.
(wt)
Pasta
Lasagne 2.5 3 210 - 75-80
Cannelloni 2.5 3 210 MAX - 75-80
Oven-baked noodles 2.5 3 210 - 75-80
Meat
Veal 1.7 3 230 - 85-90
Chicken 1.5 3 220 - 110-115
Turkey 3.0 3 MAX MAX - 95-100
Duck 1.8 3 230 - 120/125
Rabbit 2 3 230 - 105/110
Pork 2.1 3 230 - 100/110
Lamb 1.8 3 230 - 90-95
Fish
Mackerel 1.1 3 210-230 - 55-60
Dentex 1.5 3 210-230 MAX - 60-65
Trout baked in paper 1.0 3 210-230 - 40-45
Pizza
Napolitan 1.0 3 MAX MAX 15 30-35
Cake
Biscuits 0.5 3 180 15 30-35
Tarts 1.1 3 180 MAX 15 30-35
Chocolate cake 1 3 200 15 45-50
Raised Cakes 1 3 200 15 50/55
Grill cooking
Toast n.° 4 4 5 5-6
Pork chops 1.5 4 3/4 5 20-30
Mackerel 1.1 4 5 20-30
Note: cooking times are approximate and may vary according to personal taste.
Cooking
position of
shelves from
bottom
Temperature
(°C)
Variable
grill
Pre-heating time
(min)
Cooking
time
(min.)
GB
7
Page 8

Using the electric hob
GB
!The position of the corresponding electric hotplate
is shown on every knob.
Electric hotplates
The corresponding knob may be turned clockwise or
anti-clockwise and set to any of the six different
positions:
Setting Normal or Fast Plate
0 Off
1
Low
2 - 5 Medium
6 High
When the selector knob is in any position other than
the off position, the ‘on’ light is illuminated.
Practical advice on using the electric
hotplates
To avoid heat loss and damage to the hotplates use
pans with a flat base, whose diameter is no less
than that of the hotplate itself.
Setting
0
1
2
3
4
5
6
! Before using the hotplates for the first time, you
should heat them at maximum temperature for
approximately 4 minutes, without placing any pans
on them. During this initial stage, their protective
coating hardens and reaches its maximum
resistance.
Setting
Off
Cooking vegetables, fish
Cooking patatoes (using steam) soups,
chickpeas, beans.
Continuing the cooking of large quantities of
food, minestrone.
For roasting (average)
For roasting (above average)
--------For browning and reaching a boil in a short
time
8
Page 9

Precautions and tips
! This appliance has been designed and
manufactured in compliance with international safety
standards.
The following warnings are provided for safety
reasons and must be read carefully.
General safety
• These instructions are only valid for the countries
whose symbols appear in the manual and on the
serial number plate.
• The appliance was designed for domestic use
inside the home and is not intended for
commercial or industrial use.
• The appliance must not be installed outdoors,
even in covered areas. It is extremely dangerous
to leave the appliance exposed to rain and
storms.
• Do not touch the appliance with bare feet or with
wet or damp hands and feet.
• The appliance must be used by adults only for the
preparation of food, in accordance with the
instructions provided in this booklet.
• The instruction booklet accompanies a class 1
(insulated) or class 2 - subclass 1 (recessed
between 2 cupboards) appliance.
• When the appliance is in use, the heating
elements and some parts of the oven door
become extremely hot. Make sure you don't touch
them and keep children well away.
• Make sure that the power supply cables of other
electrical appliances do not come into contact
with the hot parts of the oven.
• The openings used for the ventilation and
dispersion of heat must never be covered.
• Do not place unstable or misshapen pans on the
electric hotplates; this will help to avoid spills.
Position them on the hob with the handles turned
towards the centre of the appliance.
• Always use oven gloves when placing cookware
in the oven or when removing it.
• Do not use flammable liquids (alcohol, petrol,
etc...) near the appliance while it is in use.
• Do not place flammable material in the lower
storage compartment or in the oven itself. If the
appliance is switched on accidentally, it could
catch fire.
• Always make sure the knobs are in the ‘0’ position
when the appliance is not in use.
• When unplugging the appliance, always pull the
plug from the mains socket; do not pull on the
cable.
• Never perform any cleaning or maintenance work
without having disconnected the appliance from
the electricity mains.
• If the appliance breaks down, under no
circumstances should you attempt to repair the
appliance yourself. Repairs carried out by
inexperienced persons may cause injury or further
malfunctioning of the appliance. Contact
Assistance.
• Do not rest heavy objects on the open oven door.
• The internal surfaces of the compartment (where
present) may become hot.
• The appliance should not be operated by people
(including children) with reduced physical,
sensory or mental capacities, by inexperienced
individuals or by anyone who is not familiar with
the product. These individuals should, at the very
least, be supervised by someone who assumes
responsibility for their safety or receive
preliminary instructions relating to the operation of
the appliance.
Disposal
• When disposing of packaging material: observe
local legislation so that the packaging may be
reused.
• The European Directive 2002/96/EC relating to
Waste Electrical and Electronic Equipment
(WEEE) states that household appliances should
not be disposed of using the normal solid urban
waste cycle. Exhausted appliances should be
collected separately in order to optimise the cost
of re-using and recycling the materials inside the
machine, while preventing potential damage to
the atmosphere and to public health. The
crossed-out dustbin is marked on all products to
remind the owner of their obligations regarding
separated waste collection.
Exhausted appliances may be collected by the
public waste collection service, taken to suitable
collection areas in the area or, if permitted by
current national legislation, they may be returned
to the dealers as part of an exchange deal for a
new equivalent product.
All major manufacturers of household appliances
participate in the creation and organisation of
systems for the collection and disposal of old and
disused appliances.
Respecting and conserving the
environment
• You can help to reduce the peak load of the
electricity supply network companies by using the
oven in the hours between late afternoon and the
early hours of the morning.
• Check the door seals regularly and wipe them
clean to ensure they are free of debris so that
they adhere properly to the door, thus avoiding
heat dispersion.
GB
9
Page 10

Care and maintenance
GB
Switching the appliance off
Disconnect your appliance from the electricity supply
before carrying out any work on it.
Cleaning the appliance
! Never use steam cleaners or pressure cleaners on
the appliance.
• Clean the glass part of the oven door using a
sponge and a non-abrasive cleaning product, then
dry thoroughly with a soft cloth. Do not use rough
abrasive material or sharp metal scrapers as these
could scratch the surface and cause the glass to
crack.
• The stainless steel or enamel-coated external parts
and the rubber seals may be cleaned using a
sponge that has been soaked in lukewarm water
and neutral soap. Use specialised products for the
removal of stubborn stains. After cleaning, rinse and
dry thoroughly. Do not use abrasive powders or
corrosive substances.
• The inside of the oven should ideally be cleaned
after each use, while it is still lukewarm. Use hot
water and detergent, then rinse well and dry with a
soft cloth. Do not use abrasive products.
Inspecting the oven seals
Check the door seals around the oven regularly. If the
seals are damaged, please contact your nearest Aftersales Service Centre. We recommend that the oven is
not used until the seals have been replaced.
Replacing the oven light bulb
1. After disconnecting the oven
from the electricity mains,
remove the glass lid covering
the lamp socket (
2. Remove the light bulb and
replace it with a similar one:
voltage 230 V, wattage 25 W,
cap E 14.
3. Replace the lid and reconnect the oven to the
electricity supply.
see figure
).
Assistance
Please have the following information to hand:
• The appliance model (Mod.).
• The serial number (S/N).
This information can be found on the data plate located
on the appliance and/or on the packaging.
• The accessories can be washed like everyday
crockery, and are even dishwasher safe.
• Dirt and grease should be removed from the control
panel using a non-abrasive sponge or a soft cloth.
• Stainless steel can be marked by hard water that
has been left on the surface for a long time, or by
aggressive detergents containing phosphorus. After
cleaning, rinse well and dry thoroughly. Any
remaining drops of water should also be dried.
10
Page 11

Removing and fitting the oven door:
Removing and fitting the oven door:
1.Open the door
2.Make the hinge clamps of the oven door rotate
backwards completely (see photo)
3. Close the door until the clamps stop (the door will
remain open for 40° approx.) (see photo)
404040
°
6.Replace the glass.
WARNING! Oven must not be operated with inner
WARNING! Oven must not be operated with inner
WARNING! Oven must not be operated with inner
door glass removed!
door glass removed!
door glass removed!
WARNING! When reassembling the inner door
WARNING! When reassembling the inner door
WARNING! When reassembling the inner door
glass insert the glass panel correctly so that the
glass insert the glass panel correctly so that the
glass insert the glass panel correctly so that the
inscription written on the panel is not reversed and
inscription written on the panel is not reversed andinscription written on the panel is not reversed and
can be easily legible.
can be easily legible.
can be easily legible.
7.Replace the profile, a click will indicate that the
part is positioned correctly.
8.Open the door completely.
9.Close the supports (see photo).
GB
4.Press the two buttons on the upper profile and
extract the profile (see photo)
5.Remove the glass sheet and do the cleaning as
indicated in chapter: "Care and maintenance".
10.Now the door can be completely closed and the
oven can be started for normal use.
11
Page 12

GB
03/2013- 195109398.00
XEROX FABRIANO
12
 Loading...