


Cappa aspirante
Istruzioni per linstallazione e luso
Cooker hood
Instructions for installation and use
Hotte aspirante
Instruction pour linstallation et lemploi
Campana extractora
Instrucciones para la instalacion y uso
Exaustor
Instruções para a instalação e o uso
Afzuigkap
Gebruiksaanwijzingen voor de plaatsing en gebruik
Dunstabzugshaube
Informationen für installation und gebrauch
9
9
15
11
11
10
15
Installazione
Installation
Montage
Instalación
Instalação
Installatie
Installierung
1
7
2
2
3
3
16F
16F
6
7
8
8
13A
12A
12F
12F
13F
F
B
5
5
4a
4a
4b
O
C
G
N
E
P
E
I
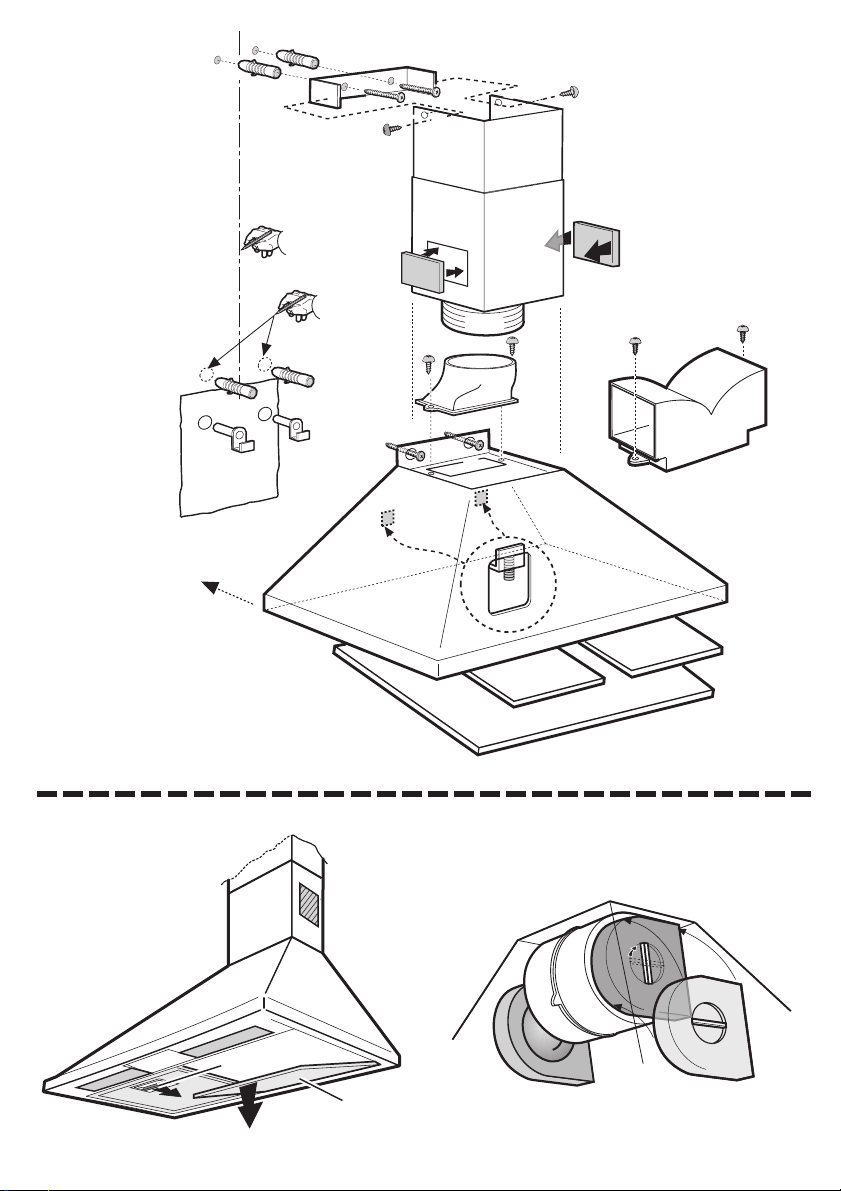
Consultare anche i disegni nelle prime pagine con i riferimenti
alfabetici riportati nel testo esplicativo.
Attenersi strettamente alle istruzioni riportate in questo manuale.
Si declina ogni responsabilità per eventuali inconvenienti, danni
o incendi provocati allapparecchio derivati dallinosservanza
delle istruzioni riportate in questo manuale.
Installazione
La cappa deve avere una distanza minima dal piano cottura
di 60 cm in caso di cucine elettriche e di 70 cm in caso di
cucine a gas o miste.
Utilizzazione
La cappa è fornita di una uscita daria superiore B per lo
scarico dei fumi verso l'esterno nel caso di modelli provvisti
di camino C (Versione aspirante A- tubo di scarico 13A
non fornito).
Nel caso non sia possibile scaricare i fumi e vapori della
cottura verso lesterno anche se si è in possesso del modello
con camino C, si può utilizzare la cappa in versione
filtrante F montando due filtri ai carboni attivi E, i fumi e
vapori vengono riciclati attraverso la sgrigliatura superiore
G .
Collegamento elettrico
La tensione di rete deve corrispondere alla tensione riportata
sulletichetta caratteristiche situate allinterno della cappa. Se
provvisto di spina allacciare la cappa ad una presa conforme
alle norme vigenti posta in zona accessibile. Se sprovvisto
di spina (collegamento diretto alla rete) applicare un interruttore
bipolare a norme con una distanza dei contatti in apertura non
inferiore a 3mm (accessibile).
Funzionamento
La cappa è provvista di un pannello di controllo posto
sulla parte anteriore della cappa a tasti o pulsanti.
In base al tipo posseduto consultare per il
funzionamento il testo sottostante ed il disegno
relativo:
a. ON/OFF luci
b. OFF motori
c. - d. - e. Potenza aspirazione minima (c.), media (d.),
massima (e.).
Usare la potenza di aspirazione maggiore in caso di
particolare concentrazione di vapori di cucina. Consigliamo
di accendere laspirazione 5 minuti prima di iniziare a
cucinare e di lasciarla in funzione a cottura terminata per altri
15 minuti circa.
ISTRUZIONI DI MONTAGGIO E DUSO
a
b-c-d-e
Manutenzione
Prima di qualsiasi lavoro di manutenzione scollegare la
cappa dalla corrente.
Pulizia
La cappa va frequentemente pulita, sia internamente che
esternamente. Per la pulizia usare un panno inumidito con
alcool denaturato o detersivi liquidi neutri. Evitare luso di
prodotti contenenti abrasivi.
Attenzione:
Linosservanza delle norme di pulizia della cappa e della
sostituzione e pulizia dei filtri comporta rischi di incendi. Si
raccomanda quindi di attenersi alle istruzioni suggerite.
Il filtro antigrasso metallico deve essere pulito una volta
al mese, con detergenti non aggressivi, manualmente
oppure in lavastoviglie a basse temperature ed a ciclo
breve.
Alcuni modelli sono provvisti di filtro metallico N senza
griglia supporto, questi vanno lavati come sopra descritto
e rimossi dalla sede spingendo le maniglie O verso il retro
ed estraendo il filtro N verso il basso.
Con il lavaggio in lavastoviglie il filtro antigrasso metallico
può scolorirsi ma le sue caratteristiche di filtraggio non
cambiano assolutamente.
Filtro al carbone
(2 pezzi - solo per versione filtrante)
Il filtro ai carboni attivi E non è né lavabile né rigenerabile.
Il filtro al carbone deve essere sostituito ogni 6 mesi.
Trattiene gli odori sgradevoli derivanti dalla cottura.
Applicarne uno per lato a copertura di entrambe le griglie di
protezione della girante del motore, dopodichè girare la
maniglia centrale P dei filtri in senso orario.
Per lo smontaggio girare la maniglia centrale P di ogni filtro
in senso antiorario.
Sostituzione lampade
Togliere la griglia supporto filtro antigrasso o il filtro antigrasso
per accedere al vano lampade. Togliere la lampada
danneggiata e sostituirla con lampada ovale ad
incandescenza max 40W E14.
Avvertenze:
Mai utilizzare la cappa senza griglia correttamente montata!
L'aria aspirata non deve essere convogliata in un condotto
usato per lo scarico dei fumi di apparecchi alimentati con
energia diversa da quella elettrica. Deve essere sempre
prevista un'adeguata areazione del locale quando una
cappa e apparecchi alimentati con energia diversa da quella
elettrica vengono usati contemporaneamente. E
severamente vietato fare cibi alla fiamma sotto la cappa.
Limpiego di fiamma libera è dannoso ai filtri e può dar luogo
ad incendi, pertanto deve essere evitato in ogni caso. La
frittura deve essere fatta sotto controllo onde evitare che lolio
surriscaldato prenda fuoco. Per le misure tecniche e di
sicurezza da adottare per lo scarico dei fumi attenersi
strettamente a quanto previsto dai regolamenti delle autorità
locali competenti.
GB
Consult the designs in the front pages referenced in the text by
alphabet letters. Closely follow the instructions set out in
this manual. All responsibility, for any eventual inconveniences,
damages or fires caused by not complying with the instructions
in this manual, is declined.
INSTRUCTION ON MOUNTING AND USE
Installation
The cooker hood must be placed at a minimum distance of
60 cm from the cooking plane for electric cookers and 70cm
for gas or mixed cookers.
Do not tile, grout or silicone this appliance to the wall. Surface
mounting only.
Do not fix chimney flue to furniture or fly over shelves unless
the chimney flue can be easily removed, in case maintenance
is ever required.
Use
The cooker hood is provided with an upper air exit B for
discharging fumes externally for models including chimney
flue C ( Suction Version A- exhaust pipe 13A not supplied).
In the instance where it is not possible to discharge cooking
fumes and vapours externally even if utilising the model with
chimney flue C, the cooker hood may be used in the filter
version F by mounting two active carbon filters E, the fumes
and vapours are then recycled via the upper grill G.
Electrical connection
The electrical tension must correspond to the tension noted
on the label placed inside the cooker hood. Connect the
electrical plug, where provided, to the an easily accessible
outlet in conformity with local standards in force.
Where an electrical plug is not provided (for direct connection
to electrical network) place a standards approved bipolar
switch with an aperture distance of not less than 3mm
(accessible) from the contacts.
Operation
The cooker hood is provided with a key or pushbutton control
panel situated of the frontal part of the cooker hood, depending
on the basis of the cooker hood type in possession. For
proper operation consult the text below and the relative
illustration:
a. ON/OFF lighting
b. OFF motors
c. - d. - e. Minimum suction power (c.), medium (d.),
maximum (e.).
a
b-c-d-e
Use the high suction speed in cases of concentrated kitchen
vapours. It is recommended that the cooker hood suction
is switched on for 5 minutes prior to cooking and to leave
in operation during cooking and for another 15 minutes
approximately after terminating cooking.
Maintenance
Prior to any maintenance operation ensure that the cooker
hood is disconnected from the electrical outlet.
Cleaning
The cooker hood should be cleaned regularly internally and
externally.
For cleaning use a cloth moistened with denatured alcohol
or neutral liquid detergents. Avoid abrasive detergents.
Warning:
Failure to carry out the basic standards of the cleaning of the
cooker hood and replacement of the filters may cause fire
risks. Therefore we recommend oserving these instructions.
Metallic anti grease filter must be cleaned once a month,
with non abrasive detergents, by hand or in dishwasher on
low temperature and short cycle.
This filter should be removed from its placing by pushing the
handles O towards the back and sliding the filter N downwards.
When washed in a dish-washer, the grease filter may
discolour slightly, but this does not affect its filtering capacity.
Carbon Filter
(2 pieces only for filter version)
The active carbon filters E are not washable nor regenerative.
It should be changed every 6 months in normal use.
The active carbon filters capture unpleasant cooking
odours.
Apply one on each side covering both grills protecting the
motor propeller, then turn the filter central handles P clockwise.
In order to dismantle turn the central handle P anti-clockwise
for each filter.
Replacing lightbulbs
Remove the anti-grease filter support grill or the anti-grease
filter to attain access to the lightbulb area. Remove the
damaged lightbulb and replace with an incandescent oval
bulb max. 40W E14.
If the cooker-hood comes with a halogen light, take off its
protection by unscrewing (Z1) or by removing it (Z2 lifting
with a small flat edged screwdriver). Remove the damaged
bulb and substitute it with a max 20W halogen bulb (G4).
Caution
This appliance is designed to be operated by adults. Children
should not be allowed to tamper with the controls or play with
the appliance.
Do not use the cooker hood where the grill is not correctly
fixed! The suctioned air must not be conveyed in the same
channel used for fumes discharged by appliances powered
by other than electricity. The environment must always be
adequately aerated when the cooker hood and other
appliances powered by other than electricity are used at the
same time. Flambé cooking with a cooker hood is
prohibited. The use of a free flame is damaging to the filters
and may cause fire accidents, therefore free flame cooking
must be avoided. Frying of foods must be kept under close
control in order to avoid overheated oil catching fire. Carry
out fumes discharging in accordance with the regulations in
force by local laws for safety and technical restrictions.
 Loading...