

Indesit FID10IX 1 S, FIMD E 23 IX S, FIMD 23 IX S, FIMD 23 S, FIMD 13 IX S Instruction manual
...
Instructions for
Installation and Use
Electric built-in
double oven
GBGB
GB
GBGB
English, 2
FID10IX/1 S
FIMD E 23 IX S
FIMD 23 IX S
FIMD 23 S
FIMD 13 IX S
BIMDS 23 B IX S
BIMDS 23 IX GB S
DID 10 IX/1
Contents
Introduction, 2
Safety Information, 3-4
Installation, 5
Tall Cabinet Ventilation, 6-7
Features, 8-9
Temperature Conversion Chart, 10
Controls, 11-12
FID10IX/1 S-FIMDE23 IX S-FIMD 13 IX S ), 13
The electronic programmer, 14
Grill Pan and Handle, 15
Operation when using the Top Oven for Grilling
DID 10 IX/1
FID10IX/1 S-FIMD23 IX S-FIMD13 IX SBIMDS23IX S, 16
Conventional Grilling, 17
Operation when using the Top Oven for Grilling
(FIMDE23 IX S), 18
Using the Top Oven as a Convection Oven, 19
Operation when using the Top Oven as a
Convection Oven, 20
Top Oven Cookery Notes, 21
Top Oven Temperature Charts, 22-23
Main Oven - Fan Grilling (FIMDE23 IX S only), 24
Main Oven - Fan Grilling Roasting Chart
(FIDM20,FIMDE23only), 25
Using the Main Oven for Other Functions, 26
Main Oven - Convention Oven (FIMDE23 IX S),
27
Main Oven - Fan Oven (all Models), 28
Main Oven - Fan Oven Cookery Notes, 29-30
Main Oven Temperature Chart, 31-32
Main Oven Grilling (FIMDE23 IX S), 33
Care and Cleaning, 34-36
If Something Goes Wrong?, 37
If it Still Won't Work/ Disposal of the appliance, 38
Guarantee Information, 39
Service Information, 40
BIMDS23IXGB S-
GB
You must read these instructions prior to using
your appliance and retain them for future use.
Safety Information
GB
• WARNING: The appliance and its
accessible parts become hot
during use.
• Care should be taken to avoid
touching heating elements.
• Children less than 8 years of age
shall be kept away unless
continuously supervised.
• This appliance can be used by
children aged from 8 years and
above and persons with reduced
physical, sensory or mental
capabilities or lack of experience
and knowledge if they have been
given supervision or instruction
concerning use of the appliance in
a safe way and understand the
hazards involved. Children shall
not play with the appliance.
Cleaning and user maintenance
shall not be made by children
without supervision
•
! When you place the rack inside,
make sure that the stop is directed
upwards and in the back of the cavity.
• During use the appliance becomes
hot. Care should be taken to avoid
touching heating elements inside the
oven.
• WARNING: Accessible parts may
become hot during use. Young
children should be kept away.
• Do not use harsh abrasive cleaners
or sharp metal scrapers to clean the
oven door glass since they can
scratch the surface, which may result
in shattering of the glass
• When cleaning the appliance do not
use steam cleaner.
• WARNING: Ensure that the
appliance is switched off before
replacing the lamp to avoid the
possibility of electric shock
• The appliance is not intended to be
operated by means of an external
timer or separate remote-control
system.
! VERY HOT SURFACES
! VERY HOT SURFACES! VERY HOT SURFACES
FOOD OR GREASE ON THESE
SURFACES COULD CAUSE
SMOKE AND POSSIBLY EVEN BURN
YOU MUST KEEP THE OVEN
AND GRILL CAVITIES CLEAN
! ATTENTION
! ATTENTION ! ATTENTION
DURING INSTALLATION
THE FEET OF THE APPLIANCE
MUST BE LOWERED SO THAT
AN AIR GAP OF AT LEAST
10MM (1CM) IS LEFT BETWEEN
THE BASE OF THE APPLIANCE
AND THE FLOOR.
10 mm
! ATTENTION
! ATTENTION! ATTENTION
WHEN USING THE MAIN OVEN
YOU MUST ENSURE THAT THE
BASE OF THE CAVITY IS NOT
COVERED WITH ALUMINUM
FOIL, UTENSIL OR ANY OTHER
FORM OF COVERING. FAILURE
TO DO THIS MAY RESULT IN
THE CAVITY BEING DAMAGED.
2
Introduction
Your new appliance is guaranteed* and will give
lasting service.This guarantee is only applicable if
the appliance has been installed in accordance with
the installation instructions detailed in this booklet.
To help make best use of your cooking equipment,
please read this booklet carefully.
The cooker is designed specifically for domestic use
and responsibility will not be accepted for use in any
other installation.
When the cooker is first used an odour may be
emitted, this will cease after a period of use.
When first using the cooker ensure that the room is
well ventilated (e.g. open a window or use an
extractor fan) and that persons who may be
sensitive to the odour avoid any fumes.
It is suggested that any pets be removed from the
room until the smell has ceased. This odour is due
to temporary finish on oven liners and elements and
also any moisture absorbed by the insulation.
* The guarantee is subject to the provisions that
the appliance:
(a) Has been used solely in accordance with the
Users Instruction Book.
(b) Has been properly connected to a suitable supply
voltage as stated on the rating plate attached to
this equipment.
(c) Has not been subjected to misuse or accident
or been modified or repaired by any person other
than the authorised employee or agent.
(d) Has been correctly installed.
Technical Characteristics
Top Oven
BIMDS 23 IX GB S
FIMD 23 S
FIMD E 23 IX S
FIMD 23 IX S
BIMDS 23 B IX S
FID10IX/1 S
DID 10 IX/1
FIMD 13 IX S
ENERGY LABEL AND ECODESIGN - Top Oven
Regulation (EU) No 65/2014 supplementing Directive 2010/30/EU.
Regulation (EU) No 66/2014 implementing
Directive 2009/125/EC.
Standard EN 60350-1
Standard EN 50564.
Declared energy consumption for
Natural convection Class
Main Oven
BIMDS 23 B IX S
FIMD 23 S
FIMD 23 IX S
BIMDS 23 IX GB S
FIMD E 23 IX S
DID 10 IX/1
FIMD 13 IX S
FID10IX/1 S
ENERGY LABEL AND ECODESIGN - Main Oven
Regulation (EU) No 65/2014 supplementing Directive 2010/30/EU.
Regulation (EU) No 66/2014 implementing
Directive 2009/125/EC.
Standard EN 60350-1
Standard EN 50564.
Usable Volume: 39 Litres
Usable Volume: 42Litres
heating mode: Conventional
Usable Volume: 71 Litres
Usable Volume: 74 Litres
GB
This appliance conforms with the followingThis appliance conforms with the following
This appliance conforms with the following
This appliance conforms with the followingThis appliance conforms with the following
European Economic Community directives:European Economic Community directives:
European Economic Community directives:
European Economic Community directives:European Economic Community directives:
EC EC
- 2006/95/
EC of 12/12/06 (Low Voltage) and
EC EC
subsequent modifications;
ECEC
- 2004/108/
EC of 15/12/04 (Electromagnetic
ECEC
Compatibility) and subsequent modifications;
ECEC
- 2009/142/
EC of 30/11/09 (Gas) and subsequent
ECEC
modifications (only for models which use gas);
EECEEC
- 93/68/
EEC of 22/07/93 and subsequent
EECEEC
modifications.
- 2002/96/
--
- 1275/2008 Stand-by/ Off mode
--
ECEC
EC
ECEC
Declared energy consumption for
Natural convection Class
heating mode: Fan Oven
Voltage and Frequency
230-240V~ 50Hz
3

For Your Safety
GB
When used properly your appliance is completely
safe but as with any electrical product there are
certain precautions that must be observed.
PLEASE READ THE PRECAUTIONS BELOW
BEFORE USING YOUR APPLIANCE.
Always
Always make sure you remove all packaging and
•
literature from inside the oven and grill
compartments before switching on for the first
time.
• Always make sure you understand the controls
prior to using the appliance.
• Always keep children away from the appliance
when in use as the surfaces will get extremely hot
during and after cooking.
• Always make sure all controls are turned off when
you have finished cooking and when not in use.
• Always stand back when opening an oven door to
allow any build up of steam or heat to disperse.
• Always use dry, good quality oven gloves when
removing items from the oven/grill.
• Always take care to avoid heat/steam burns when
operating the controls.
• Always turn off the electricity supply at the wall
switch before cleaning and allow the appliance to
cool.
• Always make sure the shelves are in the correct
position before switching on the oven.
• Always keep the oven and grill doors closed when
the appliance is not in use.
• Always take care when removing utensils from the
top oven when the main oven is in use as the
contents may be hot.
• Always keep the appliance clean as a build up of
grease or fat from cooking can cause a fire.
• Always follow the basic principles of food handling
and hygiene to prevent the possibility of bacterial
growth.
• Always keep ventilation slots clear of obstructions.
• Always refer servicing to a qualified appliance
service engineer.
• During use the oven becomes hot. Care should be
taken to avoid touching heating elements inside
the oven.
SAFETY ADVICE
3. LEAVE THE PAN TO COOL FOR AT LEAST 60
MINUTES BEFORE MOVING IT. Injuries are often
caused by picking up a hot pan and rushing
outside with it. NEVER USE A FIRE
EXTINGUISHER TO PUT OUT A PAN FIRE as the
force of the extinguisher is likely to tip the pan
over. Never use water to extinguish oil or fat
fires.
Never
• Never leave children unsupervised where a
cooking appliance is installed as all cooking
surfaces will be hot during and after use.
• Never allow anyone to sit or stand on any part of
the appliance.
• Never store items above the appliance that
children may attempt to reach.
• Never remove the oven shelves whilst the oven is
hot.
• Never heat up unopened food containers as
pressure can build up causing the container to
burst.
• Never store chemicals, food stuffs or pressurised
containers in or on the appliance, or in cabinets
immediately above or next to the appliance.
• Never operate the grill with the door closed as this
will cause the appliance to overheat.
• Never use the appliance as a room heater.
• Never use the grill to warm plates.
• Never dry any items on the oven doors.
• Never install the appliance next to curtains or other
soft furnishings.
• Never allow children to play with the appliance
controls.
• Never use 'steam cleaners'.
Children should be supervised to ensure that they
do not play with the appliance.
! The appliance should not be operated by people
(including children) with reduced physical, sensory
or mental capacities, by inexperienced individuals or
by anyone who is not familiar with the product.
These individuals should, at the very least, be
supervised by someone who assumes responsibility
for their safety or receive preliminary instructions
relating to the operation of the appliance.
IN THE EVENT OF A CHIP PAN OR ANY OTHER
PAN FIRE:
1. TURN OFF THE COOKER APPLIANCE AT THE
WALL SWITCH.
2. COVER THE PAN WITH A FIRE BLANKET OR
DAMP CLOTH, this will smother the flames and
extinguish the fire.
4
!The appliance must be used by adults only for the
preparation of food, in accordance with the
instructions outlined in this booklet. Any other use
of the appliance (e.g. for heating the room)
constitutes improper use and is dangerous. The
manufacturer may not be held liable for any
damage resulting from improper, incorrect and
unreasonable use of the appliance.

Installation
Electrical Requirements
For your own safety, we recommend that your cooker
is installed by a competent person such as one who
is registered with NICEIC (National Inspection
Council for Electrical Installation Contracting). The
cooker should be installed in accordance with the
latest edition of the IEE Regulations.
Warning: This appliance must be earthed.
Electrical Connections
The installer must check that the voltage shown on
the rating plate corresponds with the house
electricity supply. The cooker must be supplied via
a suitable double pole isolating switch, having a
contact separation of at least 3mm in all poles
placed in a readily accessible position adjacent to
the cooker. If the cooker is to be wired into a
connector unit, this may be positioned behind the
cooker providing the following requirements are met:
i) The connector unit must not project from the wall
more than 25mm.
ii) The top of the connector must not be more than
130mm above floor level.
Remove the terminal cover at the rear base of the
cooker. Pass the cable through the cable clamp and
connect to the appropriate terminals provided.
Allow sufficient cable for any future servicing.
Tighten the screws on the cable clamp and replace
the cover. Make main connections in the connector
unit or cooker control unit. This appliance conforms
to B.S. EN 55014 regarding suppression of Radio
and Television reception interference.
A double Pole control switch having a minimum
rating of 32 amps should be used to feed the cooker
using a suitably rated cable. Where a hob is fitted
adjacent to or over the cooker, a 45 amp Double
Pole control switch should be used to feed both
units via separate suitably rated cables.
We recommend a minimum of 4mm2 PVC insulated
twin and earth cable conforming to B.S. 6004 for
connection of each appliance.
In all cases adhere to routing details (see fig. 4).
This appliance must not be installed over any other
appliance that generates heat such as a plinth
heater.
Note: Due to many different types of installation,
a mains cable is not supplied with this product.
The installer will fit the correct type and length of
cable.
Important
It is essential that the lower cupboard is constructed in
the manner illustrated i.e. having side, back, and roof
panels so joined as to provide no apertures which
could permit access to the oven unit when installed.
1. General
The appliance is designed for mounting at a safe
level into an oven housing which must be secured to
the backing wall.
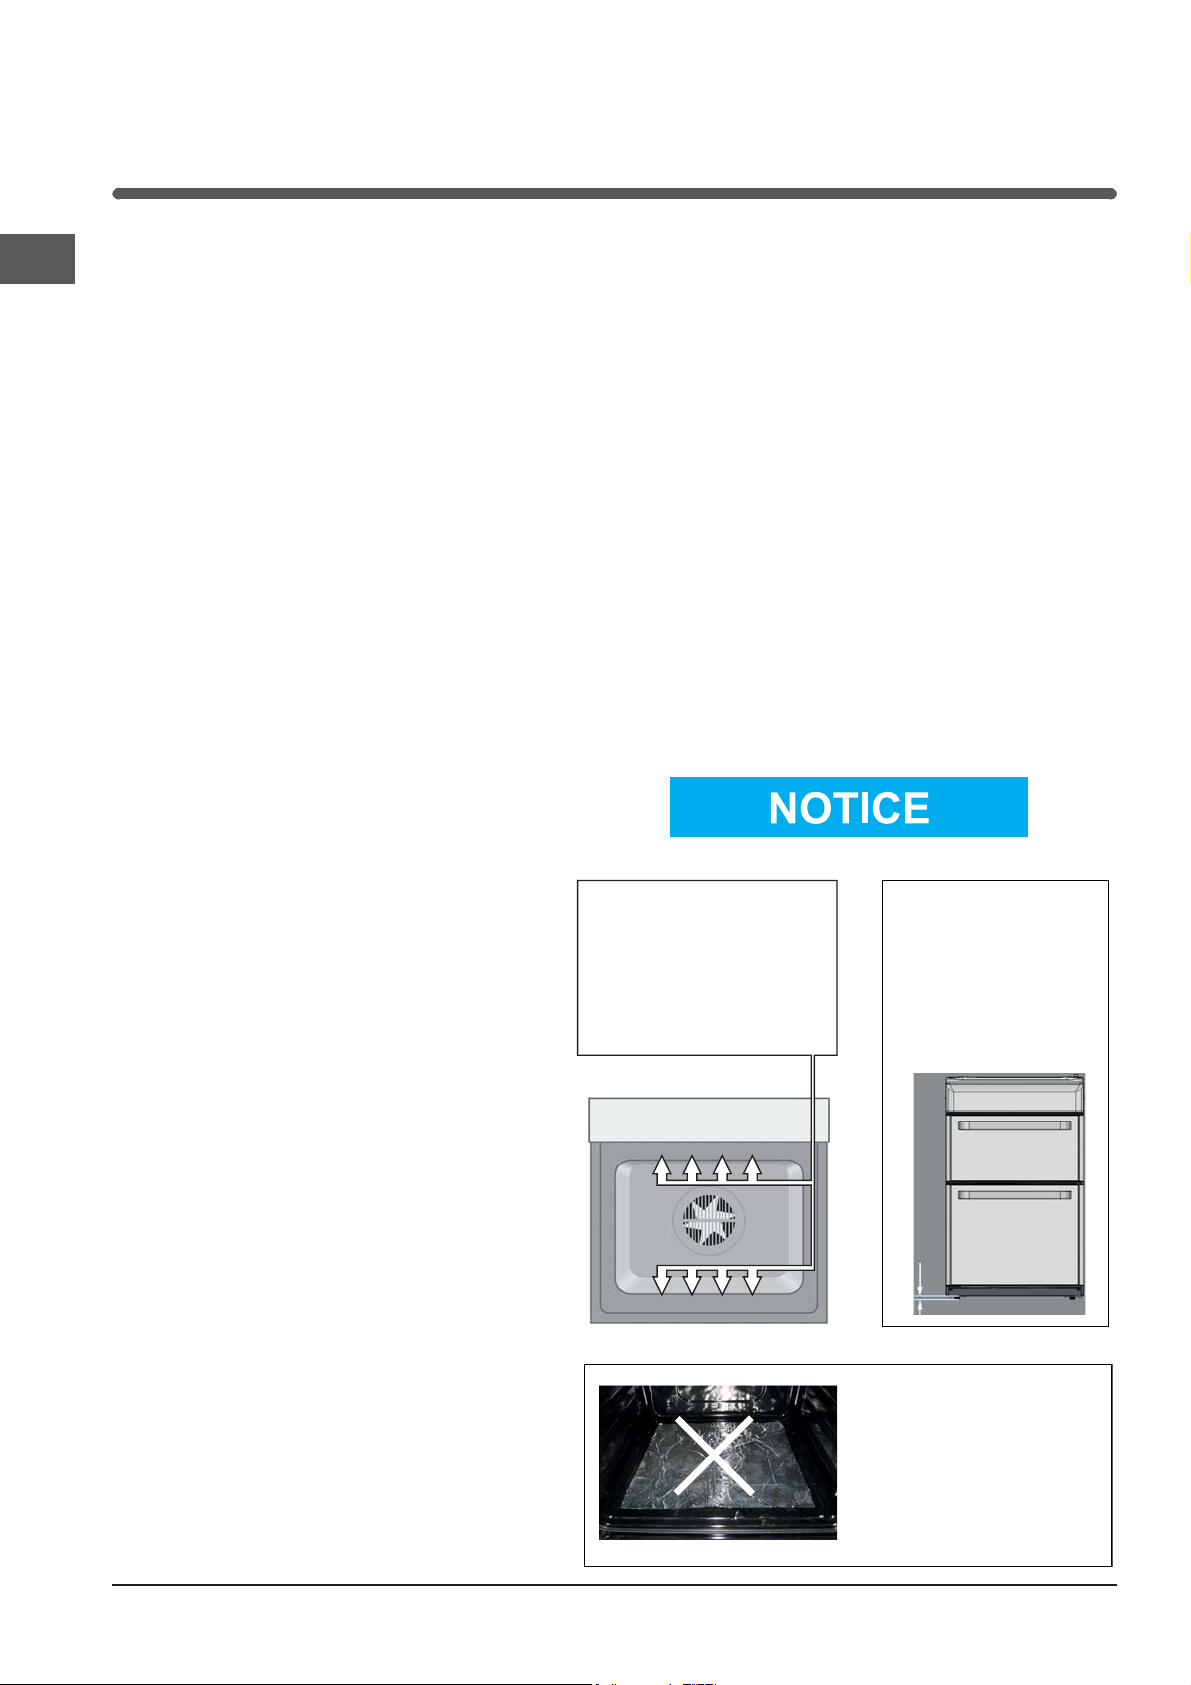
2. Ventilation
a. The oven housing unit cabinet dimensions must
comply with fig. 4.
b. An air gap of 50mm minimum must be provided at
the rear of any top or bottom cupboards or shelves
(see fig. 1).
c. It is necessary that the cabinets are provided with
unobstructed ventilation, i.e. from adjacent
cabinetry. This can be done by either raising the
base of the cabinets using the adjusting feet (or
spacers) or alternatively by providing a slot in the
cabinet plinth to the dimensions in fig. 1.
d. The air gap at rear allows the warmed air to pass out
of the inner cabinet space. Where it is intended to fit
cupboards above the oven unit to ceiling height, it is
essential that the warmed air is exhausted through
the front of the cabinet (see fig. 1).
e. If an oven unit is installed adjacent to a tall cabinet,
steam escaping from the oven when the door is
opened could condense on and maybe stain the
adjacent surface. To prevent permanent staining, the
adjacent surface should be made of a material that is
heat resisting and easy to clean. Adjacent tall cabinets
should not be deeper than the oven housing cabinet.
3. Final Installation
a. Using a spirit level, check that the housing cabinet
is level from side to side and from front to back in
its installed position.
b. Correct any unevenness by placing spacers under
the bottom of the cabinet. Make sure that the cabinet
rests firmly on the floor without rocking.
c. Before the oven is fitted, the cabinet must be firmly
secured to the backing wall for stability.
d. The oven unit should now be lifted (this is a two
person lift) into the cabinet and pushed fully home.
e. Finally, the oven is secured to the cabinet by means
of the four Phillips C/SK Head screws - two through
each side trim.
f. Remove all packaging material from the grill and
oven interior.
List of loose items:
4 x Phillips C/SK Head No. 6 x 25mm screws.
GB
5
GB
t
Tall Cabinet Ventilation
Fig. 1
Ventilation Slot required
here if cabinet does not
fit to ceiling - 51mm x 457mm min. area
50 mm
Air Gap
Ventilation Slot
required
here if the cabinet does no
fit to the ceiling
- 51mm x 457mm min.
area
50 mm
Air Gap
Ventilation Slot
required here
- 51mm x 457mm
min. area
6
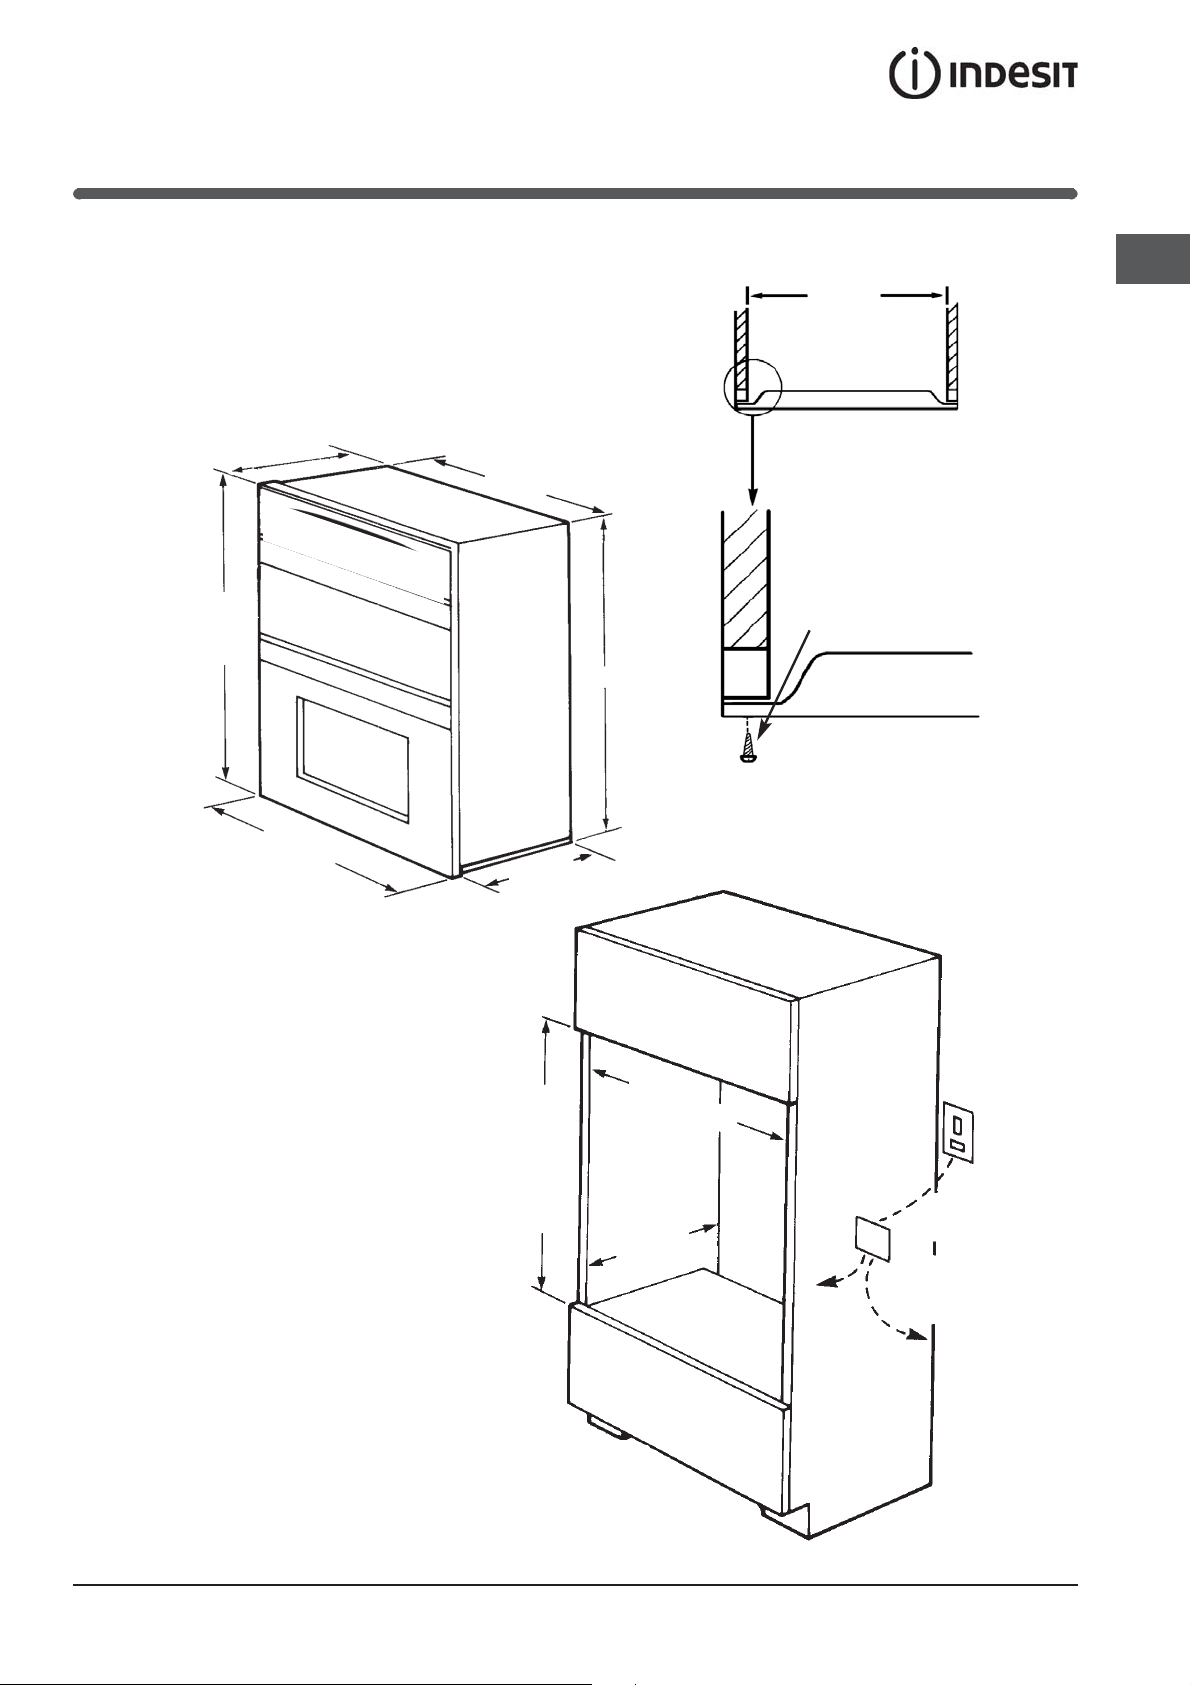
562mm
GB
570mm
exc. handle
knobs
882mm
Fig. 2
595mm
561mm
550mm
870mm
Viewed down through cabinet
Cabinet
No. 6x25mm screw
(4 supplied)
Fig. 3
Oven Door
882mm,
870mm if
cooker trim
is to overlap
top edge
of shelf
Fig. 4
* excluding pipe work
and other projections
562mm
550mm
min *
Connector
Box
2
4mm
Cable
To Oven
if hob fitted
2
Cable
4mm
to Hob if
if fitted
6mm
Cable
2
7
Features
DID 10 IX/1
WARNING: DO NOT TOUCH THE GLASS DOORS WHEN THE OVEN IS IN USE AS
GB
THESE AREAS CAN BECOME HOT.
FID10IX/1 S
TOP OVEN/GRILL
PILOT LIGHT
GRILL
SETTING
CONTROL
GRILL
ELEMENT
GRILL PAN &
FOOD SUPPORT
FIMD 23 IX S
FIMD 23 S
TOP OVEN
TEMPERATURE
CONTROL
TOP OVEN
THERMOSTAT
LIGHT
FIMD 13 IX S
MAIN OVEN TEMPERATURE
& FUNCTION CONTROL
TIMER
BIMDS 23 B IX S
MAIN OVEN THERMOSTAT LIGHT
MODEL &
SERIAL NUMBER
CATALYTIC LINER
(FID20 ONLY)
GRILLSHELF
BIMDS 23 IX GB S
OVEN LIGHT
CATALYTIC LINER
(FID20 ONLY)
INNER DOOR
GLASS
TOP OVEN
DOOR
FAN GRILL
ELEMENT
OVEN SHELF
OVEN FAN
MAIN OVEN
DOOR
NEVER line the shelves, floor or sides of the oven or grill with aluminium foil as
overheating and damage may result.
8
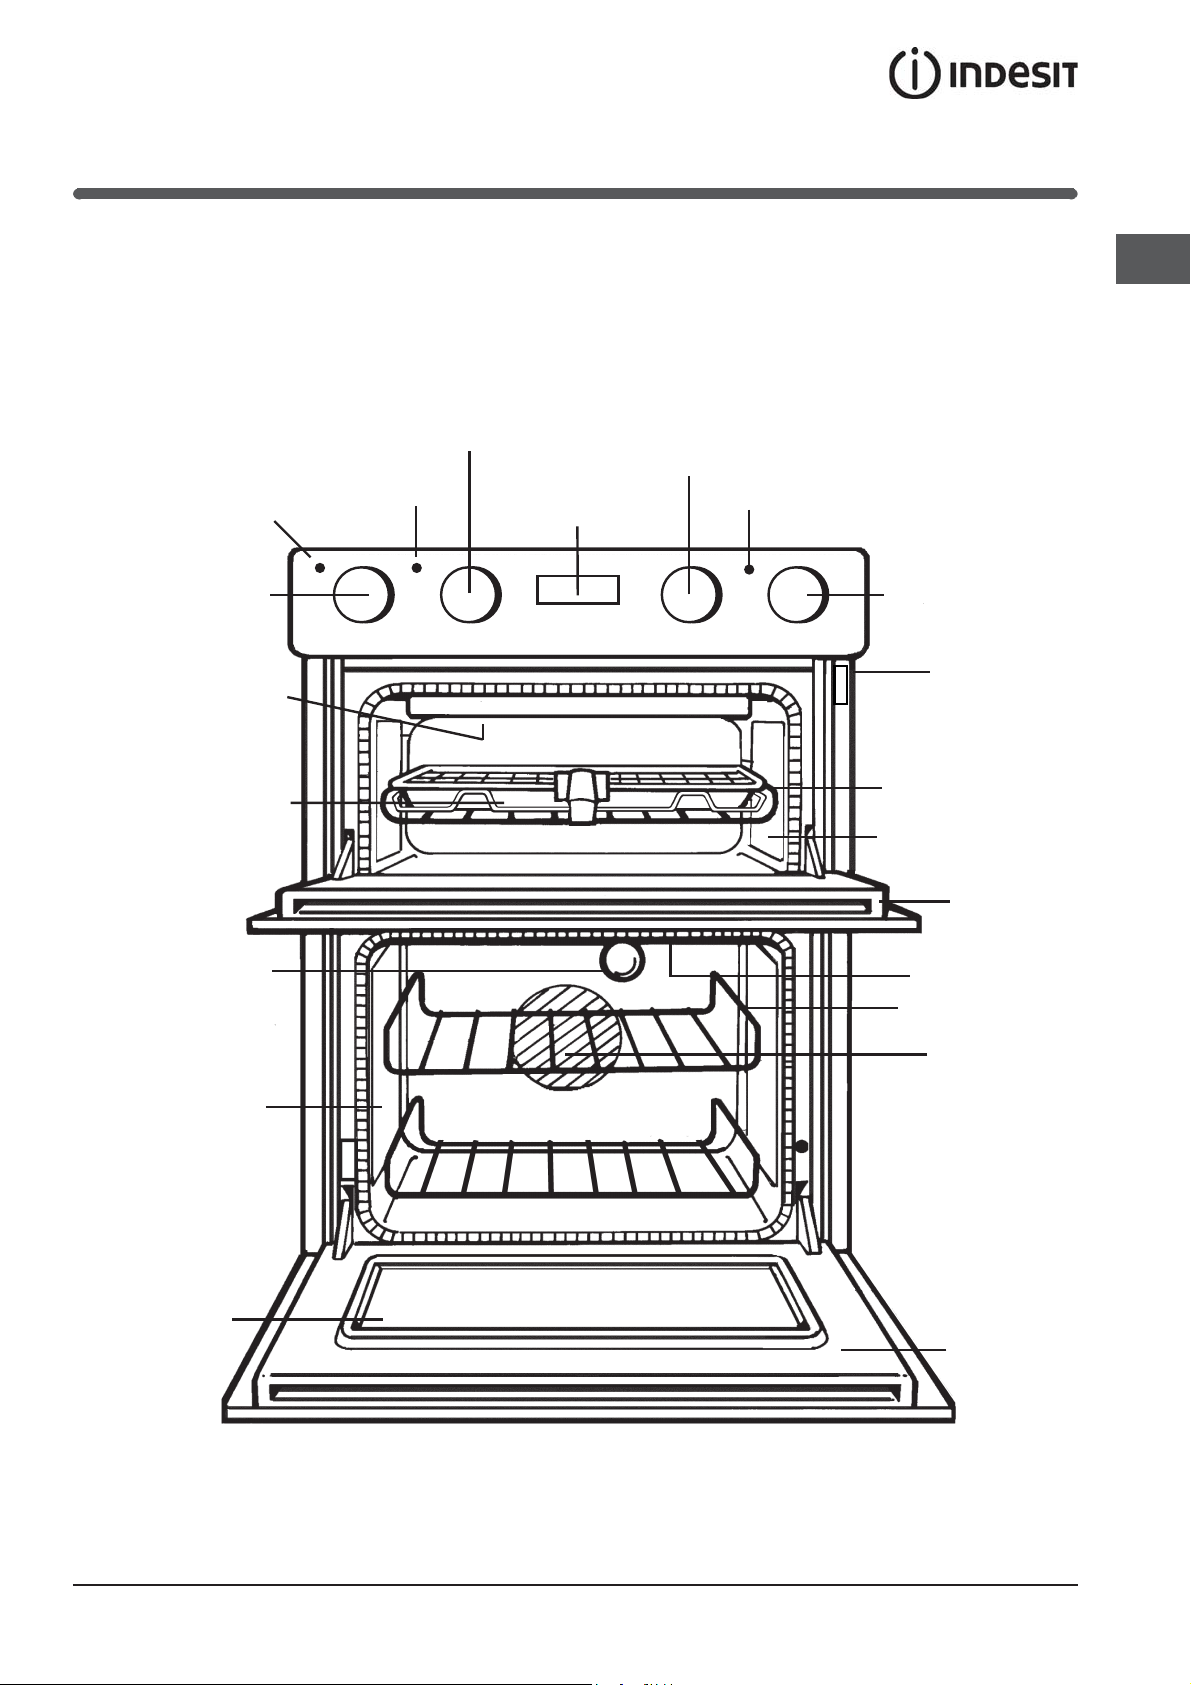
Features
FIMD E 23 IX S
WARNING: DO NOT TOUCH THE GLASS DOORS WHEN THE OVEN IS IN USE AS
THESE AREAS CAN BECOME HOT.
TOP OVEN
MAIN OVEN
TEMPERATURE
CONTROL
MAIN OVEN THERMOSTAT LIGHT
MULTIFUNCTION
SELECTOR
MODEL &
SERIAL NUMBER
GRILL SHELF
CATALYTIC
LINER
TOP OVEN/GRILL
PILOT LIGHT
GRILL
SETTING
CONTROL
GRILL
ELEMENT
GRILL PAN &
FOOD SUPPORT
TEMPERATURE
CONTROL
TOP OVEN
THERMOSTAT
LIGHT
TIMER
GB
MAIN OVEN
LIGHT
CATALYTIC
LINER
INNER DOOR
GLASS
TOP OVEN
DOOR
FAN GRILL
ELEMENT
OVEN SHELF
OVEN FAN
MAIN OVEN
DOOR
NEVER line the shelves, floor or sides of the oven or grill with aluminium foil as
overheating and damage may result.
9
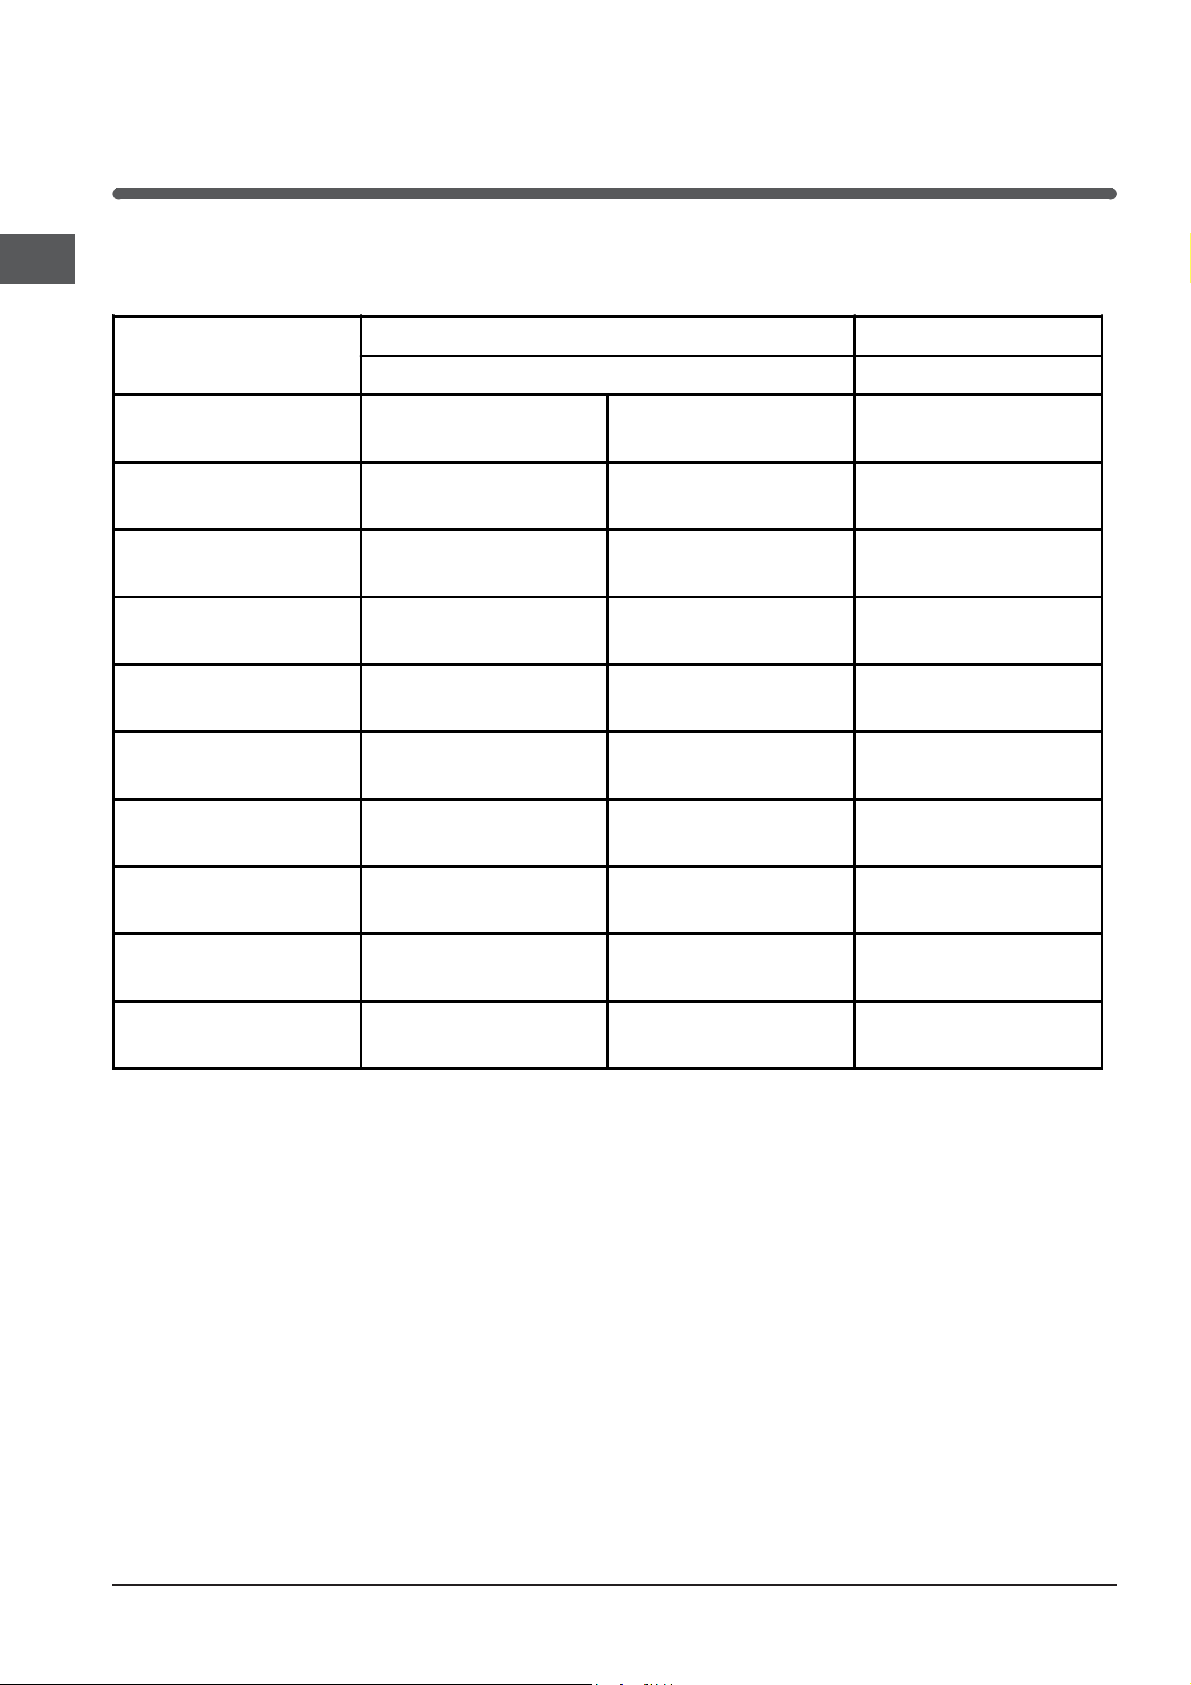
Temperature Conversion Chart
GB
The chart below gives details of comparisons of oven settings for gas conventional ovens and fan oven in
degrees °F and °C
Conventional Oven Fan Oven
Gas Mark
°F °C °C
½ 250 120 100
1 275 140 120
2 300 150 130
3 325 160 140
4 350 180 160
5 375 190 170
6 400 200 180
7 425 220 200
8 450 230 210
9 475 240 220
10

Controls
DID 10 IX/1
Control
Knob
FID10IX/1 S
TOP OVEN/GRILL
PILOT LIGHT
Description Function
FIMD 23 IX S
A
GRILL SETTING
CONTROL
TOP OVEN
THERMOSTAT LIGHT
B
TOP OVEN TEMPERATURE
FIMD 23 S
CONTROL
FIMD 13 IX S
TIMER
C
BIMDS 23 B IX S
BIMDS 23 IX GB S
MAIN OVEN
THERMOSTAT LIGHT
MAIN OVEN TEMPERATURE
AND FUNCTION
CONTROL
GB
Selects the heat at which the grill will cook the food.
A Grill Setting Control
B Top Oven Temperature Control
C
Cooling Fan
A gentle flow of air will be blown below the control
panel when the grill control is used and after a short
period of time when the ovens are used.
Note: Whenever the appliance has been used, the
cooling fan may run on or restart itself after all the
controls have been turned off. This indicates that the
appliance is still warm.
Main O v en Temperature &
Function Control
min - max Grill Contro l S e ttings:
Min = Low, Max = High
Selects the cooking temperature (Degrees
Centigrade) when using the top oven as a
conventional oven.
Fan Only Setting
- This is used to decrease the amount of time
required to defrost food items.
Oven Light Only
- Switches on the Main Oven Interior Light Only
Main Oven Temperature Scale
(In Degrees Centigrade).
- When cooking select the required
cooking temperature.
Slow Cooking
The main oven has a "Slow Cook Setting" this can be
used for slow cooking, keeping food warm and
warming plates for a short period.
Note: It is advisable to check that all oven controls
have been switched off when you have finished
using the appliance.
Oven Interior Lights
The oven lights are operated when their respective
oven control is used.
(N.B. Not all models have a top oven interior light).
The main oven has a light only position.
11

Controls
FIMD E 23 IX S
GB
TOP OVEN
THERMOSTAT
LIGHT
TOP OVEN/GRILL
PILOT LIGHT
B
TOP OVEN TEMPERATURE
CONTROL
A
GRILL SETTING
CONTROL
IMPORTANT
Before using your oven in the ordinary way,
ALWAYS make sure that the timer has been set to
MANUAL operation. Unless this is done, the main
oven cannot heat up. Before seeking assistance,
make sure this is done (refer to oven timer
operation).
MAIN OVEN
TIMER
THERMOSTAT
LIGHT
D
MULTIFUNCTION
SELECTOR
C
MAIN OVEN TEMPERATURE
CONTROL
TOP OVEN TEMPERATURE CONTROL
Turn the control clockwise to set the top oven
thermostat to the required temperature.
An indicator light will illuminate. This will remain on
until the oven reaches the required temperature. This
light will then cycle on and off as the thermostat
maintains control of the oven thermostat.
MULTIFUNCTION SELECTOR
Rotate the control knob in either direction to the
required function. Many of the functions will also
require the main oven thermostat to be set before
the oven will heat up.
MAIN OVEN TEMPERATURE CONTROL
This is used in addition to the multifunction selector.
This is used for the functions: fan oven, fan grill, half
grill and full grill and convection oven.
Turn the control clockwise to set the oven thermostat
to the required temperature.
If the timer is set correctly and the selector switch
set to a suitable function an indicator light will
illuminate (Fan Oven, Convection Oven and Fan
Grilling modes only). This will remain on until the
oven reaches the required temperature. This light will
then cycle on and off as the thermostat maintains
control of the oven temperature.
GRILL CONTROL
The grill control is designed to provide variable heat
control of either both grill elements on together or the
single left-hand grill element only.
To set the grill power, turn the grill control:
FULLFULL
- clockwise for
or
- anti-clockwise for
MAX.
COOLING FAN
A gentle flow of air will be blown below the control
panel when the grill control is used and after a short
period of time when the ovens are used.
Note: Whenever the appliance has been used, the
cooling fan may run on or restart itself after all the
controls have been turned off. This indicates that the
appliance is still warm.
FULL grill to any setting MIN - MAX,
FULLFULL
HALFHALF
HALF grill to any setting MIN -
HALFHALF
12
 Loading...