

INDESIT FIMB 63 K 0 IX (EE) User Manual
FIMB 63 K 0 IX (EE)
Slovensky
Návod na použitie
RÚRA NA PEČENIE
Obsah
Návod na použitie,1
Upozornenie,2
Servisná služba,4
Popis zariadenia,5
Popis zariadenia,6
Inštalácia,21
Uvedenie do činnosti a použitie,23
Elektonický programátor,23
Programy,24
Opatrenia a rady,26
Údržba a starostlivosť,26
English
Operating Instructions
OVEN
Contents
Operating Instructions,1
Warnings,2
Assistance,4
Description of the appliance,5
Description of the appliance,6
Installation,7
Start-up and use,9
The electronic programmer,9
Cooking modes,10
Precautions and tips,12
Maintenance and care,12
Česky
Pokyny pro použití
TROUBA
Obsah
Українскою
Довідник користувача
ДУХОВКА
Зміст
Довідник користувача,1
Запобіжні заходи,3
Допомога,4
Опис приладу,5
Опис приладу,6
Установлення,28
Запуск і використання,30
Електронний програматор готування,30
Програми,31
Запобіжні заходи та поради,33
Технічне обслуговування та догляд,33
Pokyny pro použití,1
Upozornění,2
Servisní služba,4
Popis zařízení,5
Popis zařízení,6
Instalace,14
Spuštění a použití,16
Elektronický programátor,16
Programy,17
Opatření a rady,19
Údržba a péče,19
Warnings
WARNING: The appliance and its accessible parts
become hot during use. Care should be taken to
avoid touching heating elements. Children less than 8
years of age shall be kept away unless continuously
supervised. This appliance can be used by children
aged from 8 years and above and persons with
reduced physical, sensory or mental capabilities or
lack of experience and knowledge if they have been
given supervision or instruction concerning use of the
appliance in a safe way and understand the hazards
involved. Children shall not play with the appliance.
Cleaning and user maintenance shall not be made
by children without supervision.
Do not use harsh abrasive cleaners or sharp metal
scrapers to clean the oven door glass since they can
scratch the surface, which may result in shattering
of the glass.
nebo které byly poučeny ohledně použití zařízení
bezpečným způsobem a které si uvědomují
související nebezpečí. Děti si nesmí hrát se
zařízením. Děti nesmí provádět operace čištění a
údržby bez dohledu.
K čištění skleněných dvířek trouby nepoužívejte
abrazivní výrobky ani ostré kovové špachtle, protože
by mohly poškrábat povrch a způsobit tak prasknutí
skla.
Nikdy nepoužívejte k čištění zařízení vysokotlaký
parní čistič.
UPOZORNĚNÍ: Před výměnou žárovky se ujistěte,
že je zařízení vypnuté, aby se zabránilo možnosti
zásahu elektrickým proudem.
! Při vložení mřížky se ujistěte, že se doraz nachází
v zadní části prohloubeniny a je obrácen směrem
nahoru.
Never use steam cleaners or pressure cleaners on
the appliance.
WARNING: Ensure that the appliance is switched
off before replacing the lamp to avoid the possibility
of electric shock.
! When you place the rack inside, make sure that the
stop is directed upwards and in the back of the cavity.
Upozornění
UPOZORNĚNÍ: Toto zařízení a jeho přístupné části
dosahují během použití velmi vysoké teploty. Je
třeba dávat pozor a zabránit styku s topnými články.
Udržujte děti mladší 8 let v dostatečné vzdálenosti,
pokud nejsou pod neustálým dohledem. Toto
zařízení mohou používat děti od 8 let a osoby se
sníženými fyzickými, senzorickými nebo duševními
schopnostmi nebo osoby bez zkušeností a znalostí,
které se nacházejí pod náležitým dohledem
Upozornenie
UPOZORNENIE: Toto zariadenie a jeho prístupné
časti dosahujú počas použitia veľmi vysokú teplotu.
Je potrebné venovať pozornosť a zabrániť styku
s výhrevnými článkami. Udržujte deti mladšie ako
8 rokov v dostatočnej vzdialenosti, ak nie sú pod
neustálym dohľadom. Toto zariadenie môže byť
použité deťmi staršími ako 8 rokov a osobami so
zníženými fyzickými, senzorickými nebo duševnými
schopnosťami nebo osobami bez skúseností
a znalostí, ktoré sa nachádzajú pod náležitým
dohľadom, alebo ktoré boli poučené ohľadne
použitia zariadení bezpečným spôsobom a ktoré
si uvedomujú súvisiace nebezpečenstvo. Deti sa
nesmú hrať so zariadením. Operácie čistenia a
údržby nesmú byť vykonávané deťmi bez dohľadu.
Nepoužívajte abrazívne výrobky ani ostré kovové
špachtle na čistenie sklenených dvierok rúry, pretože
by mohli poškrabať povrch a spôsobiť tak prasknutie
skla.
2
Nikdy nepoužívajte na čistenie zariadenia parné
čistiace zariadenia alebo zariadenia s vysokým
tlakom.
UPOZORNENIE: Pred výmenou žiarovky sa uistite,
že zariadenie je vypnuté, aby sa zabránilo možnosti
zásahu elektrickým prúdom.
! Pri vložení mriežky sa uistite, že sa doraz nachádza
v zadnej časti priehlbiny a je obrátený smerom nahor.
Запобіжні заходи
УВАГА! Під час роботи цей прилад, а також
його доступні частини нагріваються до високих
температур. Слід бути особливо обережними,
щоб не торкатися нагрівальних елементів. Діти
віком до 8 років мають знаходитися на небезпечній
відстані від приладу, якщо неможливо забезпечити
постійний контроль над ними. Дозволяється
користування цим приладом дітьми віком від 8
років, а також особами з обмеженими фізичними,
сенсорними або розумовими можливостями або
особами без належного досвіду і знань, якщо
вони перебувають під постійним контролем або
проінструктовані щодо правил з небезпечного
користування приладу і усвідомлюють ступені
ризику. Не дозволяйте дітям гратися з приладом.
Операції з очищення і догляду не повинні
виконуватися дітьми без належного контролю.
Не використовувати абразивні засоби ані металеві
загострені шпателі для очищення скляних дверцях
духовки, тому що вони можуть пошкрябати
поверхню, призводячи до розтріскування скла.
Забороняється використання апаратів для
очищення парою або високим тиском.
УВАГА! Щоб запобігти враженню електричним
струмом переконайтеся в тому, що прилад
вимкнений, перш ніж заміняти лампочку.
! Під част вставляння решітки слід переконатися,
що стопор повернутий вгору і всередину ніші.
3
Assistance
! Never use the services of an unauthorised technician.
Please have the following information to hand:
• The type of problem encountered.
• The appliance model (Mod.).
• The serial number (S/N).
The latter two pieces of information can be found on the data plate located
on the appliance.
Servisní služba
! Nikdy se neobracejte na neautorizované techniky.
Uveďte:
• Druh poruchy;
• Model zařízení (Mod.);
• Výrobní číslo (S/N).
Tyto informace se nacházejí na štítku s jmenovitými údaji, umístěném na
zařízení.
Servisná služba
! Vždy požiadať o pomoc oprávnených.
Uveďte:
• Typ anomálie;
• Model zariadenia (Mod.)
• Výrobné číslo (S/N)
Tieto informácie sú uvedené na štítku s technickými údajmi, nachádzajúcom
sa na zariadení a/alebo na obale.
Допомога
! Не звертайтеся по допомогу до не уповноваженого персоналу.
Повідомити:
• Тип несправності;
• Модель приладу (Mod.)
• Серійний номер (S/N)
Ці дані знаходяться на табличці з даними на самому приладі.
4
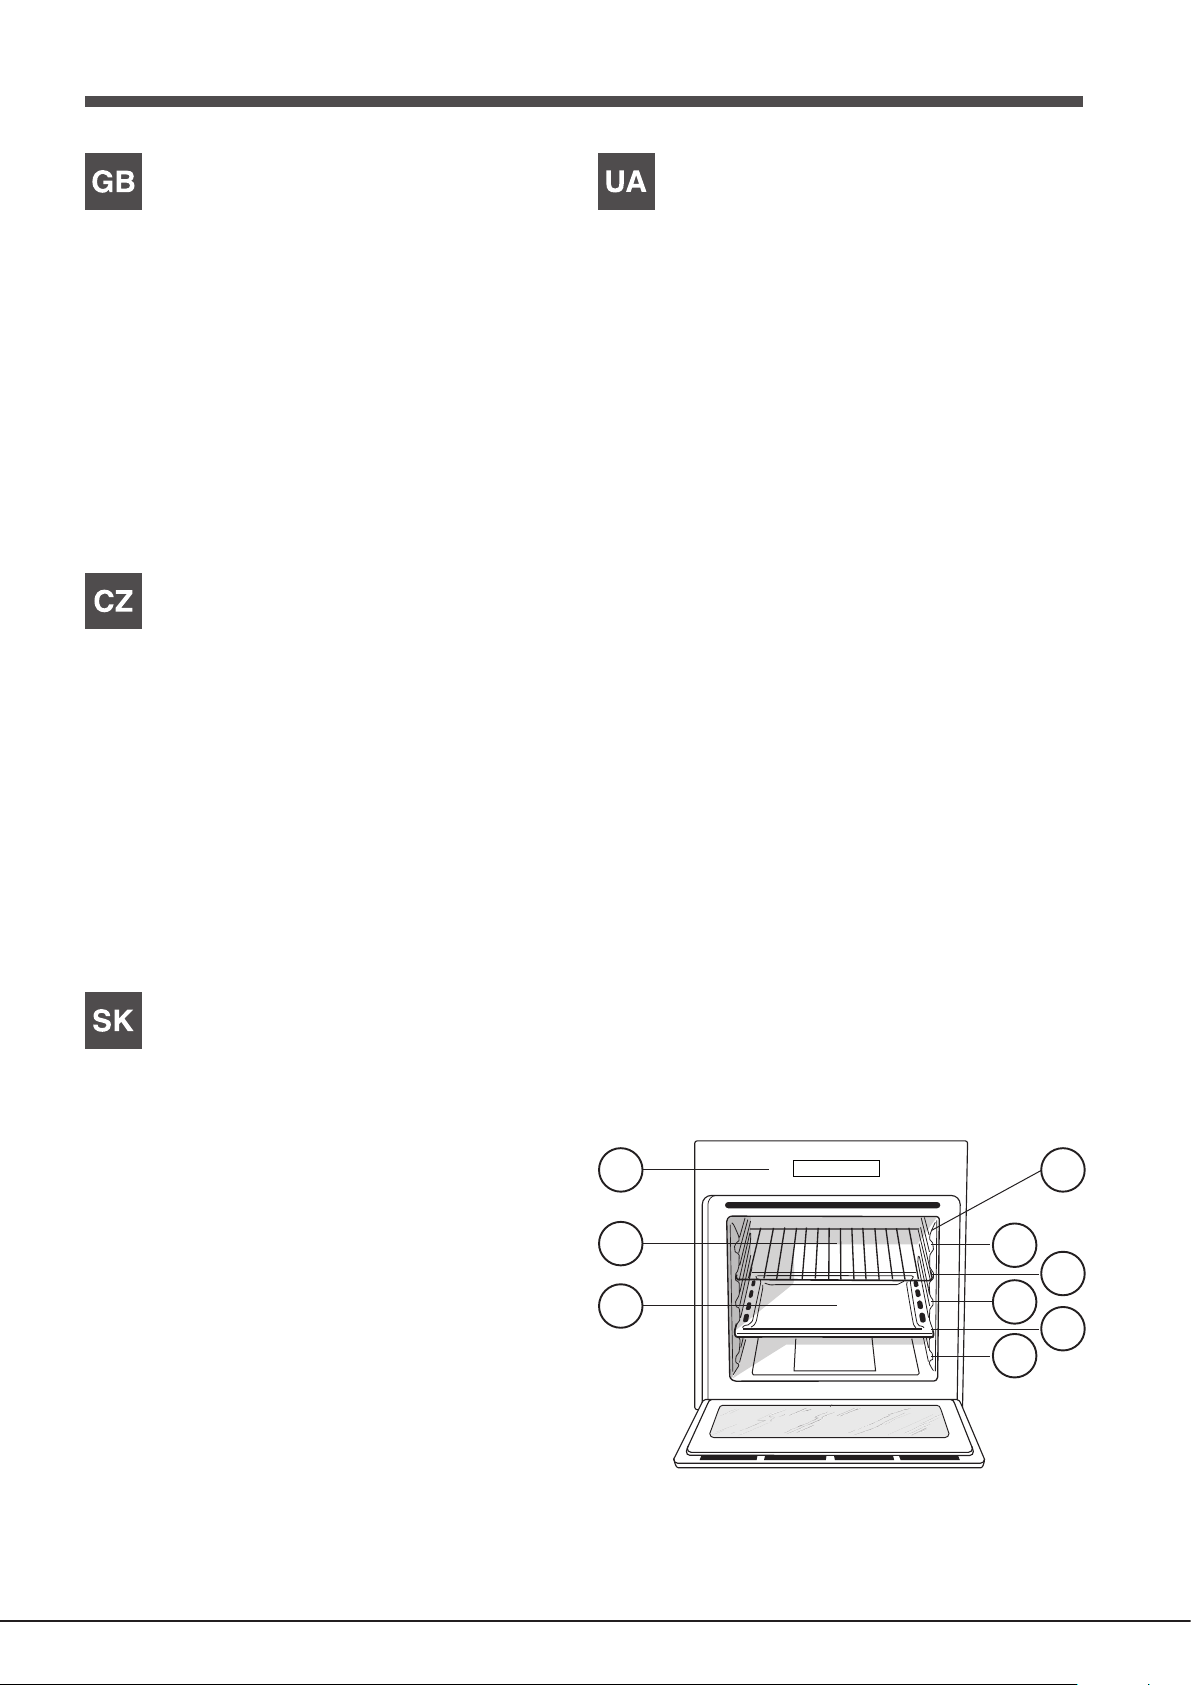
Description of the appliance
7
12345
Опис приладу
Overall view
1 POSITION 1
2 POSITION 2
3 POSITION 3
4 POSITION 4
5 POSITION 5
6 GUIDES for the sliding racks
7 DRIPPING PAN
8 GRILL
9 Control panel
Popis zařízení
Celkový pohled
1 POLOHA 1
2 POLOHA 2
3 POLOHA 3
4 POLOHA 4
5 POLOHA 5
6 VODICÍ LIŠTY pro posuv na jednotlivých úrovních
7 Úroveň SBĚRNÉ NÁDOBY
8 Úroveň ROŠTU
9 Ovládací panel
Загальний вигляд
1 ПОЗИЦІЯ 1
2 ПОЗИЦІЯ 2
3 ПОЗИЦІЯ 3
4 ПОЗИЦІЯ 4
5 ПОЗИЦІЯ 5
6 НАПРЯМНІ для дек та Граток
7 Рівень ДЕКО
8 Рівень ГРИЛЬ
9 Панель керування
Popis zariadenia
Celkový pohľad
1 POLOHA 1
2 POLOHA 2
3 POLOHA 3
4 POLOHA 4
5 POLOHA 5
6 VODIACE LIŠTY pre posuv na jednotlivých úrovniach
7 Úroveň ZBERNEJ NÁDOBY
8 Úroveň ROŠTU
9 Ovládací panel
9 6
8
5
Description of the appliance
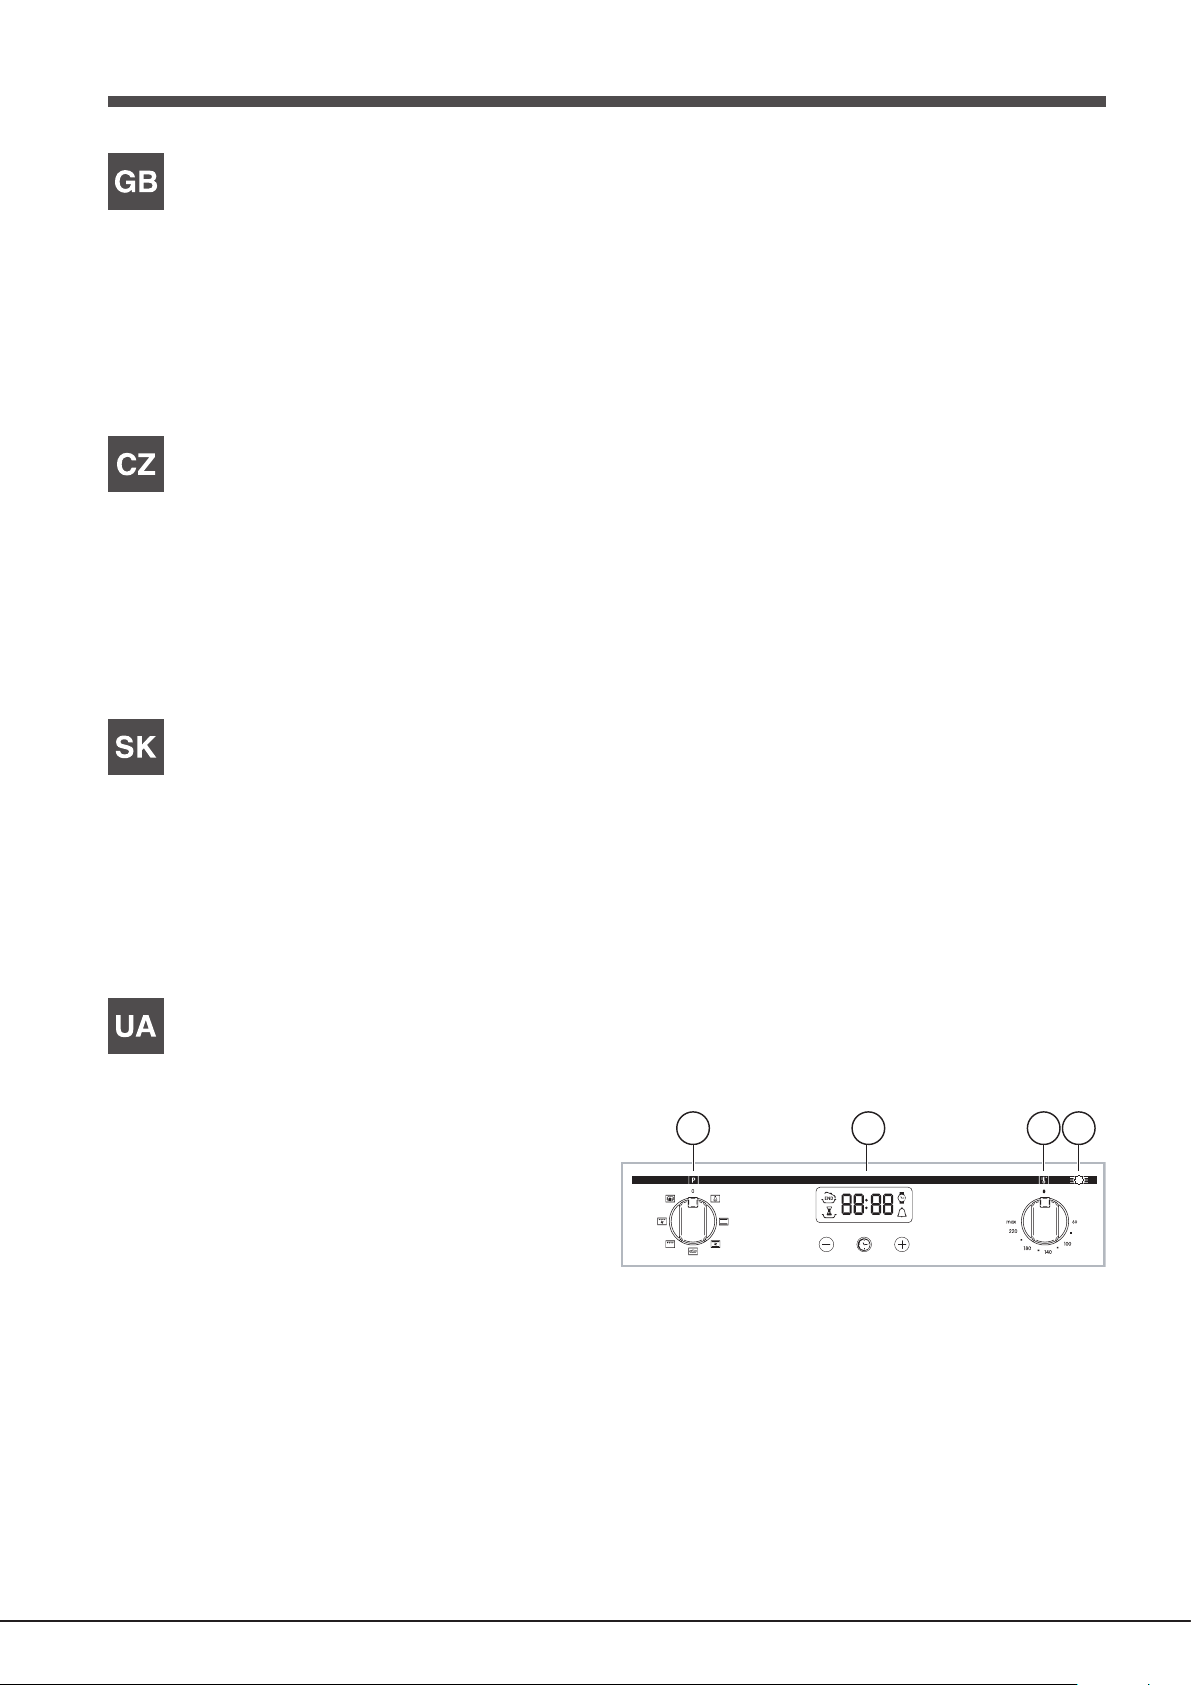
Control panel
1. SELECTOR knob
2. ELECTRONIC programmer
3. THERMOSTAT knob
4. THERMOSTAT indicator light
Popis zařízení
Ovládací panel
1. Otočný knoík VOLBY PROGRAMŮ
2. ELEKTRONICKÝ programátor
3. Otočný ovladač TERMOSTAT
4. Kontrolka TERMOSTAT
Popis zariadenia
Ovládací panel
1. Otočný ovládač VOĽBA PROGRAMOV
2. ELEKTRONICKÝ casovac
3. Otočný ovládač TERMOSTAT
4. Kontrolka TERMOSTATU
Опис приладу
Панель керування
1. Реґулятор ПРОГРАМ
2. EЛЕКТРОННЫЙ програмaтор
3. Реґулятор ТЕРМОСТАТУ
4. Індикатор ТЕРМОСТАТУ
2 3 41
6
Installation
! Please keep this instruction booklet in a safe place for future reference. If
the appliance is sold, given away or moved, please make sure the booklet is
also passed on to the new owners so that they may benet from the advice
contained within it.
! Please read this instruction manual carefully: it contains important information
concerning the safe operation, installation and maintenance of the appliance.
GB
Positioning
! Do not let children play with the packaging material; it should be disposed
of in accordance with local separated waste collection standards (see
Precautions and tips).
! The appliance must be installed by a qualied professional in accordance
with the instructions provided. Incorrect installation may damage property or
cause harm to people or animals.
Built-in appliances
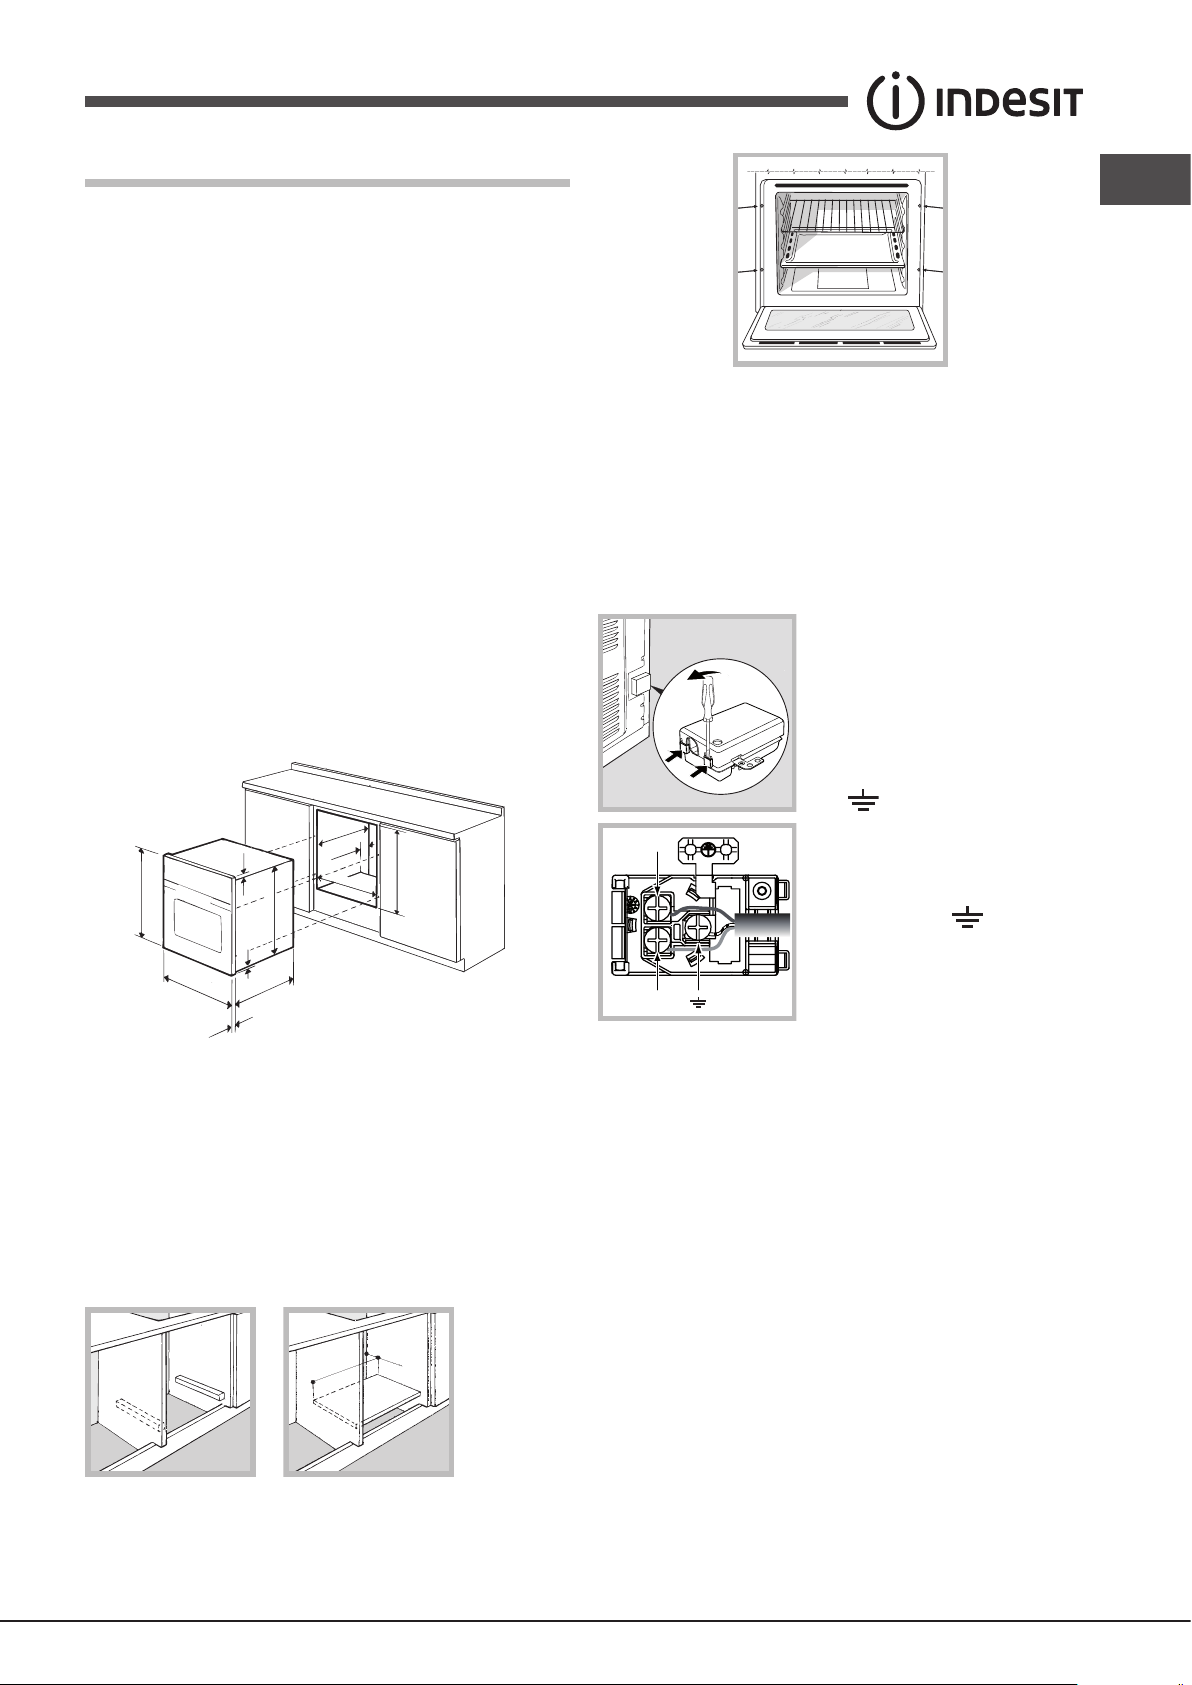
Use an appropriate cabinet to ensure that the appliance operates properly:
• The panels adjacent to the oven must be made of heat-resistant material.
• Cabinets with a veneer exterior must be assembled with glues which can
withstand temperatures of up to 100°C.
• To install the oven under the counter (see diagram) or in a kitchen unit,
the cabinet must have the following dimensions:
547 mm. min.
23 mm.
595 mm.
5 mm.
595 mm.
545 mm.
25 mm.
! The appliance must not come into contact with electrical parts once it has
been installed.
The indications for consumption given on the data plate have been calculated
for this type of installation.
Ventilation
To ensure adequate ventilation, the back panel of the cabinet must be
removed. It is advisable to install the oven so that it rests on two strips of
wood, or on a completely at surface with an opening of at least 45 x 560
mm (see diagrams).
45 mm.
560 mm.
575-585 mm.
567 mm.
! All parts which ensure the safe operation of the appliance must not be
removable without the aid of a tool.
Electrical connection
Ovens equipped with a three-pole power supply cable are designed to operate
with alternating current at the voltage and frequency indicated on the data
plate located on the appliance (see below).
Fitting the power supply cable
1. Open the terminal board by inserting a
screwdriver into the side tabs of the cover.
Use the screwdriver as a lever by pushing
it down to open the cover (see diagram).
2. Install the power supply cable by
loosening the cable clamp screw
and the three wire contact screws
L-N- .
N
N
L
L
Connecting the supply cable to the mains
Install a standardised plug corresponding to the load indicated on the data
plate (see table).
The appliance must be directly connected to the mains using an omnipolar
switch with a minimum contact opening of 3 mm installed between the
appliance and the mains. The switch must be suitable for the charge indicated
and must comply with current electrical regulations (the earthing wire must not
be interrupted by the switch). The supply cable must be positioned so that it
does not come into contact with temperatures higher than 50°C at any point
(the back panel of the oven, for example).
Connect the wires to the corresponding
terminals: the Blue wire to the terminal
marked (N), the Brown wire to the terminal
marked (L) and the Yellow/Green wire to
the terminal marked (see diagram).
3. Secure the cable by fastening the
clamp screw.
4. Close the cover of the terminal board.
45 mm.
560 mm.
Centring and xing
Secure the appliance to the cabinet by opening the oven door and inserting
4 screws into the 4 holes on the outer frame.
! The installer must ensure that the correct electrical connection has been
performed and that it is fully compliant with safety regulations.
Before connecting the appliance to the power supply, make sure that
• the appliance is earthed and the plug is compliant with the law.
• the socket can withstand the maximum power of the appliance, which is
indicated on the data plate.
• the voltage is in the range between the values indicated on the data plate.
• the socket is compatible with the plug of the appliance. If the socket is
incompatible with the plug, ask an authorised technician to replace it. Do
not use extension cords or multiple sockets.
7
! Once the appliance has been installed, the power supply cable and the
APPLIANCE SPECIFICATIONS
Dimensions*
width 43.5 cm
height 32,4 cm
depth 40.6 cm
Volume*
58 l
Dimensions**
width 45.5 cm
height 32,4 cm
depth 40.6 cm
Volume**
60 l
Electrical
connections
Voltage: 220-240V~ 50/60 Hz
maximum power absorbed 2800 W
Energy consum ption for Natural convection
heating mode: Convection
Declared energy consumption for Forced
convection Class heating mode:
Baking
EU Directive no 65/2014 supplementing
Directive 2010/30/EU.
EU Regulation no 66/2014 implementing
Directive 2009/125/EC.
Standard EN 60350-1
Standard EN 50564
ENERGY
LABEL e
ECODESIGN
This appliance conforms to the following
European Economic Community directives:
- 2006/95/EC dated 12/12/06 (Low Voltage) and
subsequent amendments.
- 2004/108/EC dated 03/05/89 (Electromagnetic
Compatibility) and subsequent amendments.
- 93/68/EEC dated 22/07/93 and subsequent
amendments.
- 2012/19/EU and subsequent amendments.
- 1275/2008 standby/off mode.
GB
electrical socket must be easily accessible.
! The cable must not be bent or compressed.
! The cable must be checked regularly and replaced by authorised technicians
only (see Assistance).
! The manufacturer declines any liability should these safety measures
not be observed.
8
Start-up and use
DISPLAY
SET TIME
button
END OF
COOKING icon
CLOCK
icon
DURATION
icon
TIMER icon
DECREASE TIME
button
INCREASE TIME
button
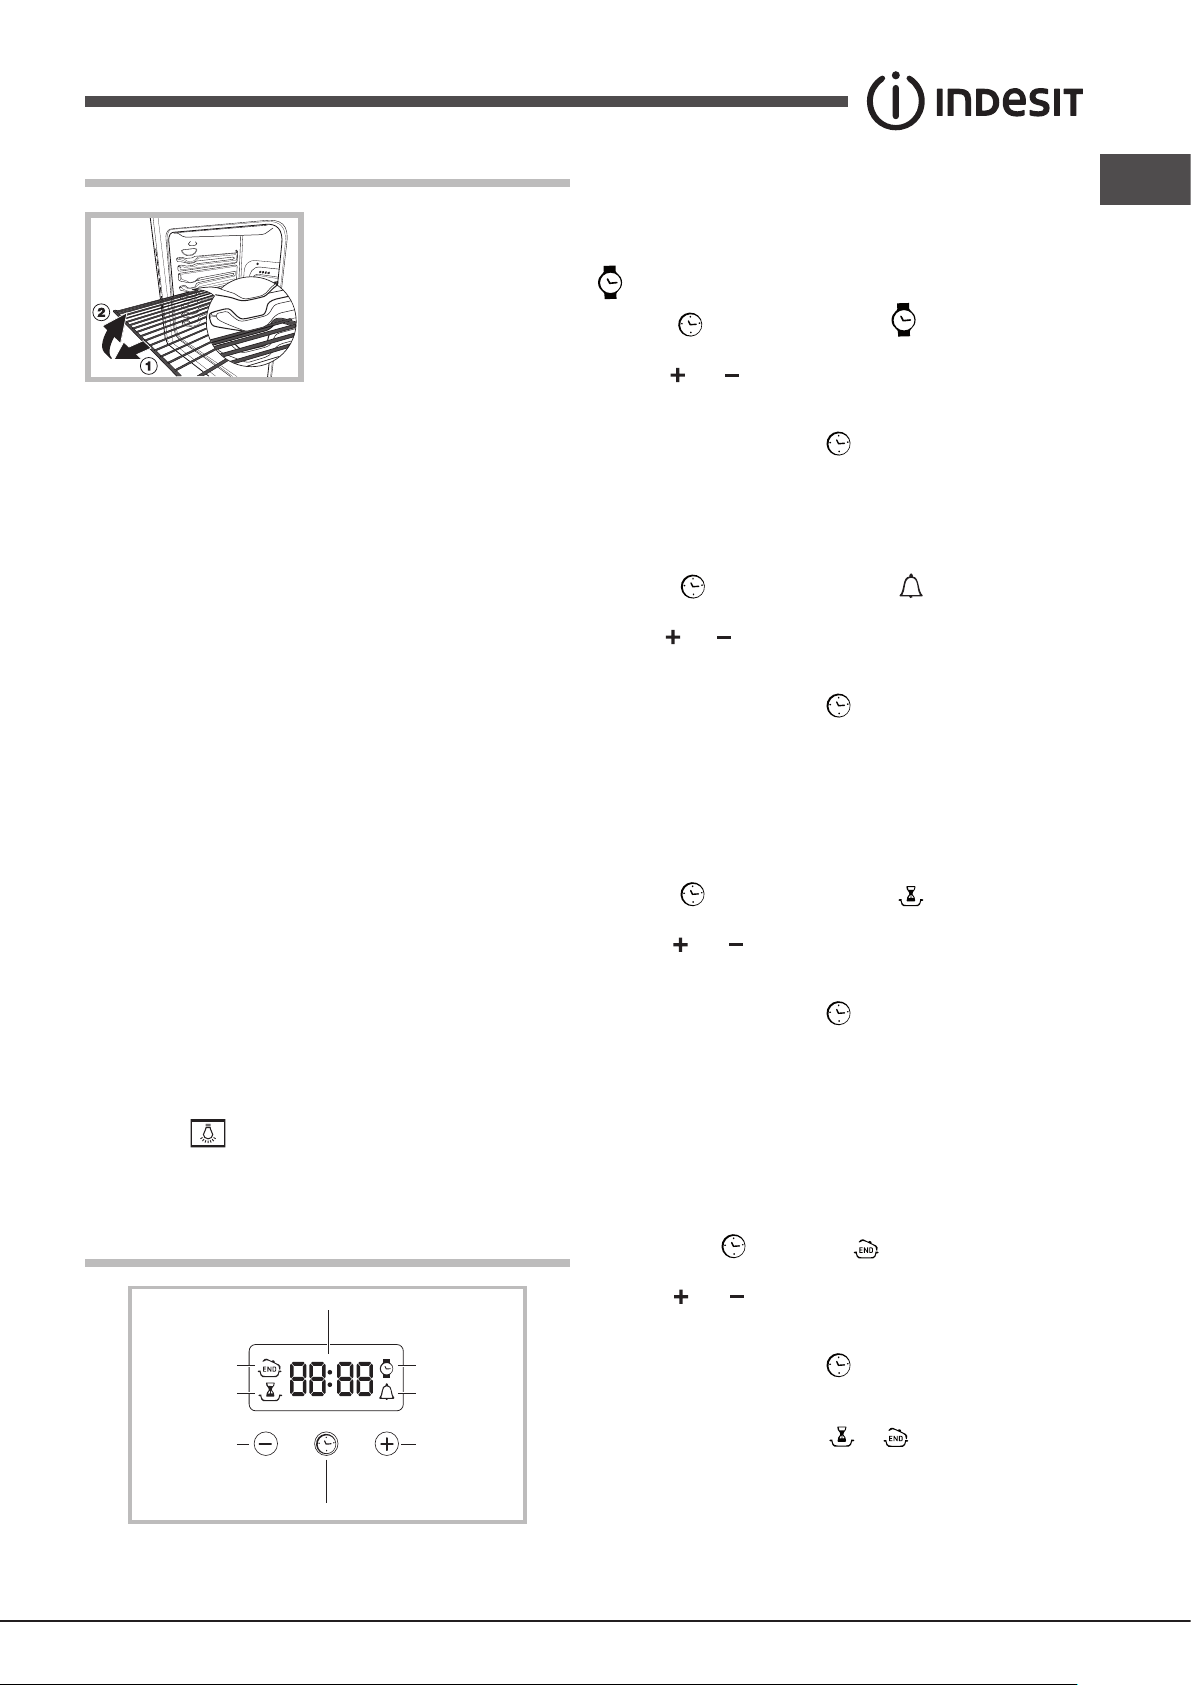
WARNING ! The oven is provided with
a stop system to extract the racks and
prevent them from coming out of the
oven (1).
As shown in the drawing, to extract
them completely, simply lift the racks,
holding them on the front part, and
pull (2).
! The rst time you use your appliance, heat the empty oven with its door
closed at its maximum temperature for at least half an hour. Ensure that the
room is well ventilated before switching the oven off and opening the oven
door. The appliance may emit a slightly unpleasant odour caused by protective
substances used during the manufacturing process burning away.
Starting the oven
1. Select the desired cooking mode by turning the SELECTOR knob.
2. Select the desired temperature using the THERMOSTAT knob. A list
detailing cooking modes and suggested cooking temperatures can be found
in the Cooking advice table (see Cooking modes).
3. The THERMOSTAT indicator light indicates that the oven is heating up to
the temperature set.
4. During cooking it is always possible to:
- change the cooking mode by turning the SELECTOR knob;
- adjust the temperature by turning the THERMOSTAT knob;
- stop cooking by turning the SELECTOR knob to the “0” position.
Setting the clock
! The clock may be set when the oven is switched off or when it is switched
GB
on, provided that a the end time of a cooking cycle has not been programmed
previously.
After the appliance has been connected to the mains, or after a blackout, the
icon and the four numerical digits on the DISPLAY will begin to ash.
1. Press the button several times until the icon and the four digits on
the display begin to ash.
2. Use the “ ” and “ ” buttons to adjust the time; if you press and hold either
button, the display will scroll through the values more quickly, making it quicker
and easier to set the desired value.
3. Wait for 10 seconds or press the button again to nalise the setting.
Setting the timer
! This function does not interrupt cooking and does not affect the oven; it is
simply used to activate the buzzer when the set amount of time has elapsed.
1. Press the button several times until the icon and the three digits
on the display begin to ash.
2. Use the “ ” and “ ” buttons to set the desired time; if you press and hold either
button, the display will scroll through the values more quickly, making it quicker
and easier to set the value.
3. Wait for 10 seconds or press the button again to nalise the setting.
The display will then show the time as it counts down. When this period of
time has elapsed the buzzer will be activated.
! Never put objects directly on the bottom of the oven; this will prevent the
enamel coating from being damaged.
! Always place cookware on the rack(s) provided.
Cooling ventilation
In order to cool down the external temperature of the oven, a cooling fan
blows a stream of air between the control panel and the oven door, as well
as towards the bottom of the oven door.
! Once cooking has been completed, the cooling fan continues to operate
until the oven has cooled down sufciently.
Oven light
When selecting with the SELECTOR knob the oven light goes on. It
remains lit when a cooking mode is selected.
The electronic programmer
Programming cooking
! A cooking mode must be selected before programming can take place.
Programming the cooking duration
1. Press the button several times until the icon and the three digits
on the DISPLAY begin to ash.
2. Use the “ ” and “ ” buttons to set the desired duration; if you press and
hold either button, the display will scroll through the values more quickly,
making it quicker and easier to set the value.
3. Wait for 10 seconds or press the button again to nalise the setting.
4. When the set time has elapsed, the text END appears on the DISPLAY,
the oven will stop cooking and a buzzer sounds. Press any button to stop it.
• For example: it is 9:00 a.m. and a time of 1 hour and 15 minutes is
programmed. The programme will stop automatically at 10:15 a.m.
Setting the end time for a cooking mode
! A cooking duration must be set before the cooking end time can be scheduled.
1. Follow steps 1 to 3 to set the duration as detailed above.
2. Next, press the button until the icon and the four digits on the
DISPLAY begin to ash.
3. Use the “ ” and “ ” buttons to adjust the cooking end time; if you press
and hold either button, the display will scroll through the values more quickly,
making it quicker and easier to set the desired value.
4. Wait for 10 seconds or press the button again to nalise the setting.
5. When the set time has elapsed, the text END appears on the DISPLAY,
the oven will stop cooking and a buzzer sounds.Press any button to stop it.
Programming has been set when the and buttons are illuminated. The
DISPLAY shows the cooking end time and the cooking duration alternately.
• For example: It is 9:00 a.m. and a duration of 1 hour has been programmed.
12:30 is scheduled as the end time. The programme will start automatically
at 11:30 a.m.
9
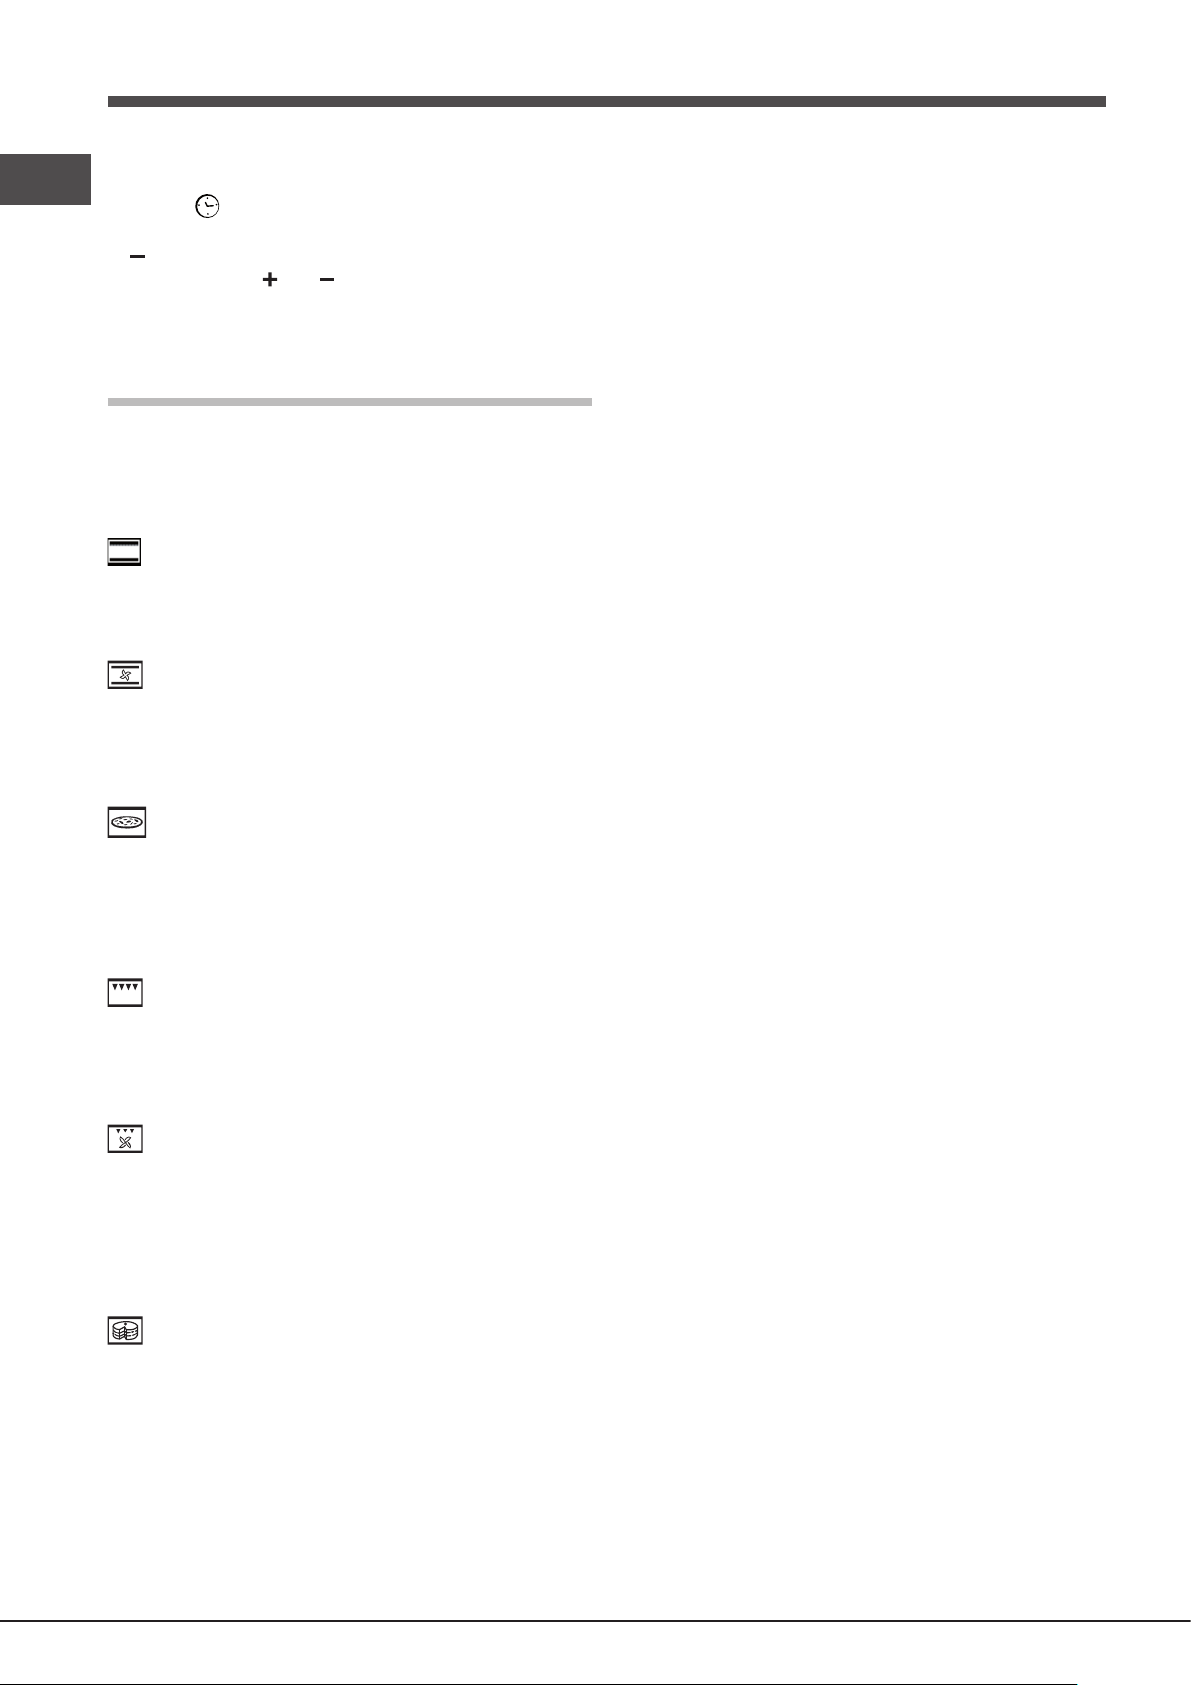
Cancelling a programme
GB
To cancel a programme:
• Press the button until the icon corresponding to the setting you wish
to cancel and the digits on the display are no longer ashing. Press the “
” button until the digits 00:00 appear on the display.
• Press and hold the “ ” and “ ” buttons; this will cancel all the settings
selected previously, including timer settings.
Cooking modes
Practical cooking advice
! Do not place racks in position 1 and 5 during fan-assisted cooking. This is
because excessive direct heat can burn temperature sensitive foods.
! In the BARBECUE and GRATIN cooking modes, particularly when using
the rotisserie spit, place the dripping pan in position 1 to collect cooking
residues (fat and/or grease).
MULTI-COOKING
• Use positions 2 and 4, placing the food which requires more heat on 2.
• Place the dripping pan on the bottom and the rack on top.
! A temperature value between 60°C and MAX can be set for all cooking
modes except the following:
• BARBECUE (recommended: set only to MAX power level)
• GRATIN (recommended: do not exceed 200°C).
TRADITIONAL OVEN mode
Both the top and bottom heating elements will come on. When using this
traditional cooking mode, it is best to use one cooking rack only. If more than
one rack is used, the heat will be distributed unevenly.
MULTILEVEL mode
All the heating elements (top, bottom and circular) switch on and the fan
begins to operate. Since the heat remains constant throughout the oven, the
air cooks and browns food in a uniform manner. A maximum of two racks may
be used at the same time.
PIZZA OVEN mode
The circular heating elements and the elements at the bottom of the oven
are switched on and the fan is activated. This combination heats the oven
rapidly by producing a considerable amount of heat, particularly from the
element at the bottom. If you use more than one rack at a time, switch the
position of the dishes halfway through the cooking process.
BARBECUE mode
The top heating element comes on.
The high and direct temperature of the grill is recommended for food which
requires a high surface temperature. Always cook in this mode with the oven
door closed.
BARBECUE
• Place the rack in position 3 or 4. Position the food in the centre of the rack.
• We recommend that the power level is set to maximum. The top heating
element is regulated by a thermostat and may not always operate
constantly.
PIZZA MODE
• Use a light aluminium pizza pan. Place it on the rack provided.
For a crispy crust, do not use the dripping pan as it prevents the crust from
forming by extending the total cooking time.
• If the pizza has a lot of toppings, we recommend adding the mozzarella
cheese on top of the pizza halfway through the cooking process.
GRATIN mode
The top heating element, as well as the fan, will come on. This combination
of features increases the effectiveness of the unidirectional thermal radiation
provided by the heating elements through forced circulation of the air
throughout the oven. This helps prevent food from burning on the surface
and allows the heat to penetrate right into the food. Always cook in this mode
with the oven door closed.
BAKING mode
The rear heating element and the fan are switched on, thus guaranteeing the
distribution of heat in a delicate and uniform manner throughout the entire
oven. This mode is ideal for baking temperature sensitive foods (such as
cakes, which need to rise) and for the preparation of “bitesize pastries” on 3
shelves simultaneously.
10
Cooking table
!
When cooking using the grill or gratin, the dripping pan must always be placed on the 1st oven rack from the bottom.
Cooking
Oven
Gratin
Duck
Roast veal or beef
Pork roast
Biscuits (short pastry)
Tarts
Pizza (on 2 racks)
Lasagne
Lamb
Roast chicken + potatoes
Mackerel
Plum cake
Cream puffs (on 2 racks)
Biscuits (on 2 racks)
Sponge cake (on 1 rack)
Sponge cake (on 2 racks)
Savoury pies
Soles and cuttlefish
Squid and prawn kebabs
Cod filet
Grilled vegetables
Veal steak
Cutlets
Hamburgers
Mackerels
Toasted sandwiches
Grilled chicken
Cuttlefish
Pizza
Focaccia bread
Tarts
Fruit cakes
Plum cake
Sponge cake
Stuffed pancakes (on 2 racks)
Small cakes (on 2 racks)
Cheese puffs (on 2 racks)
Cream puffs (on 3 racks)
Biscuits (on 3 racks)
Meringues (on 3 racks)
modes
Convection
Multi-cooking
Barbecue
Pizza Mode
Baking Mode
Cooking times are approximate and may vary according to personal taste.
Foods Weight
(kg)
1
1
1
-
1
1
1
1
1+1
1
1
0.5
0.5
0.5
1
1.5
1
1
1
1
1
1
1
1
n.° 4
1.5
1.5
0.5
1
0.5
1
0.7
0.5
1.2
0.6
0.4
0.7
0.7
0.5
Rack position Pre-heating
3
3
3
3
3
2 and 4
3
2
2 and 4
2
2
2 and 4
2 and 4
2
2 and 4
3
4
4
4
3 or 4
4
4
4
4
4
2
2
3
2 or 3
3
2 or 3
3
3
2 and 4
2 and 4
2 and 4
1 and 3 and 5
1 and 3 and 5
1 and 3 and 5
time (min)
15
15
15
15
15
15
10
10
15
10
10
10
10
10
10
15
5
5
5
5
5
5
5
5
5
10
10
15
10
15
15
15
15
15
15
15
15
15
15
Recommended
temperature
200
200
200
180
180
230
180
180
200
180
170
190
180
170
170
200
MAX
MAX
MAX
MAX
MAX
MAX
MAX
MAX
MAX
200
200
220
200
180
180
180
160
200
190
210
180
180
90
Cooking
time
(minutes)
65-75
70-75
70-80
15-20
30-35
15-20
30-35
40-45
60-70
30-35
40-50
20-25
10-15
15-20
20-25
25-30
8-10
6-8
10
10-15
15-20
15-20
7-10
15-20
2-3
55-60
30-35
15-20
15-20
20-30
40-45
40-50
25-30
30-35
20-25
15-20
20-25
20-25
180
GB
11
 Loading...