

INDESIT BAAN 40 FNF WD (TK) User Manual
BAN 40 FNF WD xx (TK)
BAAN 40 FNF WD xx (TK)
Türkçe Türkçe
Türkçe
Türkçe Türkçe
Kullaným talimatlarýKullaným talimatlarý
Kullaným talimatlarý
Kullaným talimatlarýKullaným talimatlarý
KOMBÝNE SOÐUTUCU/DONDURUCUKOMBÝNE SOÐUTUCU/DONDURUCU
KOMBÝNE SOÐUTUCU/DONDURUCU
KOMBÝNE SOÐUTUCU/DONDURUCUKOMBÝNE SOÐUTUCU/DONDURUCU
ÝçindekilerÝçindekiler
Ýçindekiler
ÝçindekilerÝçindekiler
Kullaným talimatlarý, 1
Teknik Servis 2
Cihazýn tanýmý3
Cihazýn tanýmý, 4
Montaj, 10
Aksesuarlar, 10-11
Çalýþtýrma ve kullaným, 11-12
Bakým ve özen, 12-13
Önlemler ve öneriler, 13-14
Arýzalar ve onarýmlar, 14
English
Operating Instructions
REFRIGERATOR/FREEZER COMBINATION
Contents
Operating Instructions, 1
Assistance,2
Description of the appliance,3
Description of the appliance, 4
Installation,5
Accessories,5-6
Start-up and use, 6-7
Maintenance and care, 7-8
Precautions and tips,8-9
Troubleshooting, 9
TT
eknik Serviseknik Servis
T
eknik Servis
TT
eknik Serviseknik Servis
TT
eknik Servis ile irtibata geçmeden önce:eknik Servis ile irtibata geçmeden önce:
T
eknik Servis ile irtibata geçmeden önce:
TT
eknik Servis ile irtibata geçmeden önce:eknik Servis ile irtibata geçmeden önce:
• Servise baþvurmadan çözülebilecek bir arýza olup olmadýðýný
kontrol ediniz (
• Sonucun olumsuz olmasý durumunda, en yakýn Teknik Servis ile
irtibata geçiniz.
Arýza ve Onarým bölümüne bakýnýz
).
Assistance
Before calling for Assistance:
•
Check if the malfunction can be solved on your own (
Troubleshooting
• If after all the checks, the appliance still does not operate or the
problem persists, call the nearest Service Centre
).
see
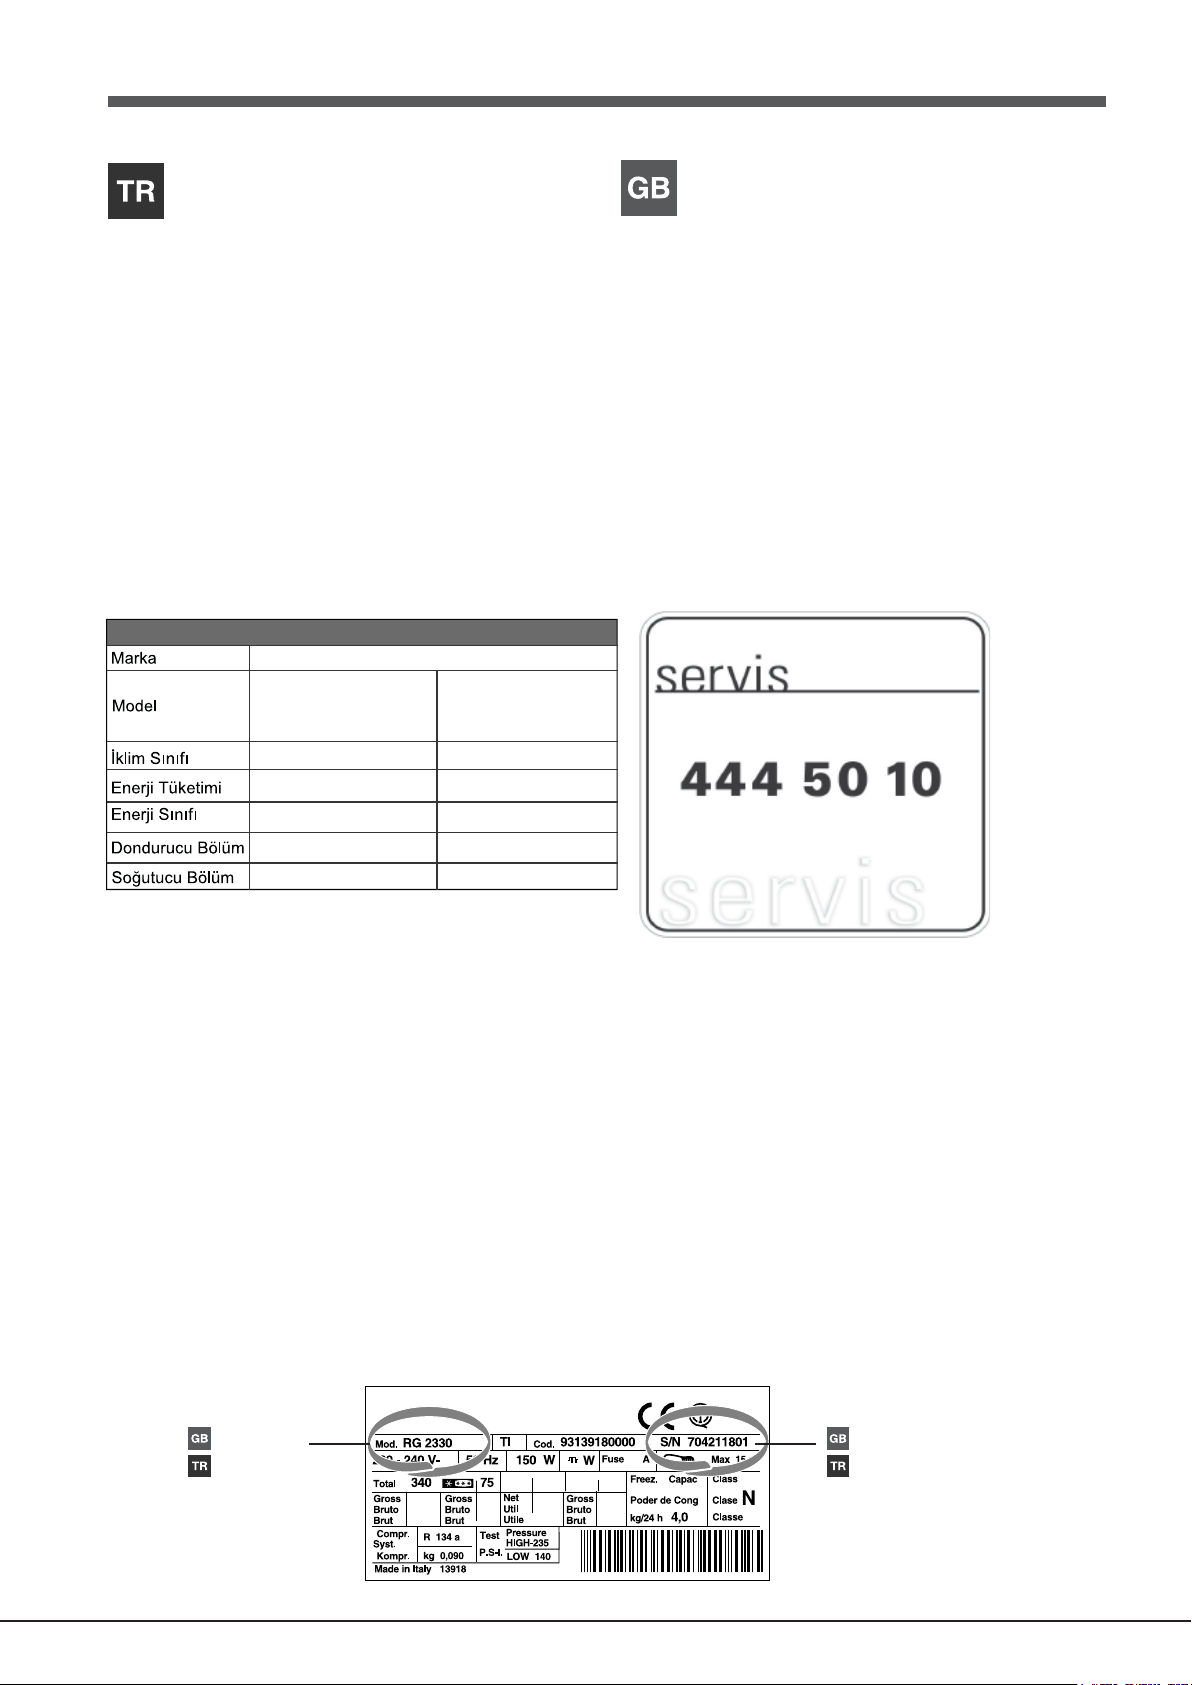
þaðýdaki bilgileri bildiriniz:þaðýdaki bilgileri bildiriniz:
þaðýdaki bilgileri bildiriniz:
þaðýdaki bilgileri bildiriniz:þaðýdaki bilgileri bildiriniz:
• arýza tipi
• cihazýn modeli (Mod.)
• seri numarasý (S/N)
Bu bilgiler, soðutucu bölmesi içinde aþaðýda solda bulunan teknik
veriler etiketi üzerinde bulunmaktadýr.
Kesinlikle sadece yetkili teknik elemanlara baþvurunuzKesinlikle sadece yetkili teknik elemanlara baþvurunuz
Kesinlikle sadece yetkili teknik elemanlara baþvurunuz
Kesinlikle sadece yetkili teknik elemanlara baþvurunuzKesinlikle sadece yetkili teknik elemanlara baþvurunuz
ve her zaman orijinal yedek parçalarý kullanýnýz.ve her zaman orijinal yedek parçalarý kullanýnýz.
ve her zaman orijinal yedek parçalarý kullanýnýz.
ve her zaman orijinal yedek parçalarý kullanýnýz.ve her zaman orijinal yedek parçalarý kullanýnýz.
Teknik Bilgiler
INDESIT
BAN 40 FNF WD (TK) BAAN 40 FNF WD (TK)
T
421kWh/y
A
94
295l t
T
340 kWh/y
A +
92
270 l t
INDESIT COMPANY BEYAZ EÞYA PAZARLAMA
A.Þ.
Karahasan Sok. No:11 Balmumcu 34349
Beþiktaþ/Ýstanbul
TEL: (+90) 212 355 53 00
FAKS: (+90) 212 212 95 59
WEB: www.indesit.com.tr
Communicating:
• type of malfunction
• appliance model (Mod.)
• serial number (S/N)
This information can be found on the data plate located on the
bottom left side of the refrigerator compartment.
Never call on unauthorized technicians and always refuse
spare parts which are not originals.
INDESIT COMPANY BEYAZ EÞYA SANAYÝ VE
TÝCARET A.Þ.
Organize Sanayi Bölgesi 45030 / MANÝSA
TEL:
TEL:
TEL: (+90) 236
TEL:
TEL:
F
F
AKS:
AKS:
F
AKS:
F
FAKS:
2
(+90) 236 233 16 52
AKS:
233 19 05 – 233 18 20
- model
- model - model
- model
- model - model
- serial number
- seri numarasý - seri numarasý
- seri numarasý
- seri numarasý - seri numarasý
Cihazýn tanýmýCihazýn tanýmý
Cihazýn tanýmý
Cihazýn tanýmýCihazýn tanýmý
Kontrol paneliKontrol paneli
Kontrol paneli
Kontrol paneliKontrol paneli
Description of the appliance
Control panel
1 SUPER COOL (hýzlý soðutma) tuþu, soðutucu bölmesi
içerisindeki sýcaklýk derecesini hýzlý bir þekilde düþürmek için
kullanýlýr. Bu tuþa basýldýðýnda SUPER COOL uyarý lambasý
yanar (
Çalýþtýrma ve kullaným
SOÐUTUCU KONTROLSOÐUTUCU KONTROL
2
SOÐUTUCU KONTROL ayar düðmesi ile soðutucu
SOÐUTUCU KONTROLSOÐUTUCU KONTROL
bölmesindeki sýcaklýk derecesi ayarlanýr:
daha az soðuk.
daha soðuk.
ECO düþük tüketim için optimal sýcaklýk derecesidir.
HOLIDAY tatil fonksiyonudur (
bakýnýz).
3 Sarý SUPER COOL (hýzlý soðutma) uyarý lambasý:
SUPER COOL tuþuna basýldýðýnda yanar.
4 Yeþil BESLEME uyarý lambasý: cihaz elektrik þebekesine baðlý
olduðu zaman açýlýr.
5 Sarý SUPER FREEZE (hýzlý dondurma) uyarý lambasý:
SUPER FREEZE tuþuna basýldýðýnda yanar.
6 DONDURUCU KONTROL ayar düðmesi ile dondurucu
bölmesindeki sýcaklýk derecesi ayarlanýr:
daha az soðuk.
daha soðuk.
ECOECO
ECO düþük tüketim için optimal sýcaklýk derecesidir.
ECOECO
soðutucu dahil olmak üzere cihazý kapatýr.
7 SUPER FREEZE (hýzlý dondurma) tuþu ile taze gýdalar
dondurulur. Bu tuþa basýldýðýnda SUPER FREEZE uyarý lambasý
yanar (
Çalýþtýrma ve kullaným
! Uyarý lambalarý dondurucu bölmesinde ýsýnýn anormal bir þekilde
arttýðýný belirtmek için de kullanýlýr (
bakýnýz).
bölümüne bakýnýz).
Bakým ve onarým
bölümüne bakýnýz).
Arýza ve onarým
bölümüne
bölümüne
1 SUPER COOL
refrigerator compartment rapidly. When it is pressed, the
SUPER COOL indicator light illuminates (
2 REFRIGERATOR OPERATION Knob
to regulate the temperature of the refrigerator compartment:
ECO is the optimal temperature for energy saving levels.
HOLIDAY is the holiday function (
3 SUPER COOL Yellow indicator light (rapid cooling)
illuminates when the SUPER COOL button is pressed.
4 POWER Indicator light illuminates when the appliance is
connected to the electricity network.
5 SUPER FREEZE Yellow indicator light (rapid freezing)
illuminates when the SUPER FREEZE button is pressed.
6 FREEZER OPERATION Knob
to regulate the temperature of the freezer compartment:
ECO is the optimal temperature for energy saving levels.
switches the appliance off, including the refrigerator.
7 SUPER FREEZE button (rapid freezing) to freeze fresh food.
When it is pressed, the SUPER FREEZE indicator light
illuminates (
! The indicator lights are also used to indicate an unusual
temperature increase in the freezer compartment (
Troubleshooting
(quick cool) to lower the temperature of the
warmer
colder.
see Maintenance and care
warmer.
colder.
see Start-up and use
).
).
see Start-up and use
see
).
).
271eps
1 2 3 4 5 6 7
3
Cihazýn tanýmýCihazýn tanýmý
Cihazýn tanýmý
Cihazýn tanýmýCihazýn tanýmý
Description of the appliance
Genel görünümGenel görünüm
Genel görünüm
Genel görünümGenel görünüm
Kullaným talimatlarý birkaç model için geçerli olduðu için þekil satýn
aldýðýnýz cihazda olmayandeðiþik ayrýntýlarý gösterebilir. Sonraki
sayfalarda en karýþýk cisimler açýklanmýþtýr.
11
1 Ayarlanabilir
11
22
DONDURMADONDURMA
2
DONDURMA ve
22
DONDURMADONDURMA
3 Buzluk
44
MEYVEMEYVE
4
MEYVE ve
44
MEYVEMEYVE
5 ET5 ET
5 ET ve
5 ET5 ET
66
ÞARAP RAFIÞARAP RAFI
6
ÞARAP RAFI*
66
ÞARAP RAFIÞARAP RAFI
7 RAF7 RAF
7 RAF•
7 RAF7 RAF
8 LAMBA8 LAMBA
8 LAMBA (Bakým bölümüne bakýnýz)
8 LAMBA8 LAMBA
99
9 Çýkarýlabilen kapaklý raf ve
99
1010
10 Çýkarýlabilen
1010
11
11
W W
ater Dispanser ater Dispanser
1
1
W
ater Dispanser
11
11
W W
ater Dispanser ater Dispanser
1212
ÞÝÞE ÞÝÞE
12
ÞÝÞE Rafý
1212
ÞÝÞE ÞÝÞE
• Sayýsý ve/veya pozisyonu deðiþebilir.
* Sadece bazý modellerde mevcuttur.
AA
YY
AKLARAKLAR
A
Y
AKLAR
AA
YY
AKLARAKLAR
SAKLAMASAKLAMA
SAKLAMA bölmesi
EASY ICEEASY ICE
EASY ICE
EASY ICEEASY ICE
BALIKBALIK
BALIK* için
BALIKBALIK
SAKLAMASAKLAMA
SEBZESEBZE
SEBZE çekmecesi
SEBZESEBZE
WINE RACK WINE RACK
WINE RACK*
WINE RACK WINE RACK
KAPI RAFIKAPI RAFI
KAPI RAFI•
KAPI RAFIKAPI RAFI
FLEX COOL BOX FLEX COOL BOX
FLEX COOL BOX haznesi
FLEX COOL BOX FLEX COOL BOX
TT
ankank
T
ank•
TT
ankank
YUMURYUMUR
YUMUR
YUMURYUMUR
TT
ALIKALIK
T
ALIK
TT
ALIKALIK
Overall view
The instructions contained in this manual are applicable to different
model refrigerators. The diagrams may not directly represent the
appliance purchased. For more complex features, consult the
following pages.
1 Levelling FEET
2 FREEZER and STORAGE compartment
33
3
33
IceIce
ice tray•
3
Ice
IceIce
4 FRUIT and VEGETABLE bin
5 FLEX COOL BOX for MEAT and CHEESE*
6 WINE RACK*
7 SHELVES•
8 LAMP (see Maintenance).
9 Removable lidded shelf with EGG TRAY
10 Removable multipurpose SHELVES•
Water Dispanser TankWater Dispanser Tank
11
Water Dispanser Tank•
Water Dispanser TankWater Dispanser Tank
12 BOTTLE shelf
• Varies by number and/or position.
* Available only on certain models.
9
8
10
7
6
5
11
4
3
646eps
2
1
4
Installation
! Before placing your new appliance into operation please read
these operating instructions carefully. They contain important
information for safe use, for installation and for care of the
appliance.
! Please keep these operating instructions for future reference.
Pass them on to possible new owners of the appliance.
Positioning and connection
Positioning
1. Place the appliance in a well-ventilated humidity-free room.
2. Do not obstruct the rear fan grills. The compressor and
condenser give off heat and require good ventilation to operate
correctly and save energy.
3. Leave a space of at least 10 cm between the top part of the
appliance and any furniture above it, and at least 5 cm between
the sides and any furniture/side walls.
4. Ensure the appliance is away from any sources of heat (direct
sunlight, electric stove, etc.).
5. In order to maintain the correct distance between the appliance
and the wall behind it, fit the spacers supplied in the installation
kit, following the instructions provided.
Levelling
1. Install the appliance on a level and rigid floor.
2. If the floor is not perfectly horizontal, adjust the refrigerator by
tightening or loosening the front feet.
FLEX COOL BOX*
This is the new box to keep meat, fish and cheese fresh. When
positioned in the “lower” part of the fridge compartment, it is ideal
for meat and fish; when moved to the “top” part of the fridge, it is
perfect for cheese. It can be taken out of the fridge when it is not
needed.
ODOUR FILTER
with active carbons, which ensures better air quality inside the
refrigerator.
The filter is located on the bottom right-hand side, inside the
ventilation opening.
*: Some models are fitted with a new odour filter
GB
Electrical connections
After the appliance has been transported, carefully place it
vertically and wait at least 3 hours before connecting it to the
electricity mains. Before inserting the plug into the electrical socket
ensure the following:
• The appliance is earthed and the plug is compliant with the law.
• The socket can withstand the maximum power of the appliance,
which is indicated on the data plate located on the bottom left
side of the fridge (e.g. 150 W).
• The voltage must be in the range between the values indicated
on the data plate located on the bottom left side (e.g. 220-240V).
• The socket is compatible with the plug of the appliance. If the
socket is incompatible with the plug, ask an authorised
technician to replace it (
cords or multiple sockets.
! Once the appliance has been installed, the power supply cable
and the electrical socket must be easily accessible.
! The cable must not be bent or compressed.
! The cable must be checked regularly and replaced by authorised
technicians only (see Assistance).
The manufacturer declines any liability should these The manufacturer declines any liability should these
!
The manufacturer declines any liability should these
The manufacturer declines any liability should these The manufacturer declines any liability should these
safety measures not be observed.safety measures not be observed.
safety measures not be observed.
safety measures not be observed.safety measures not be observed.
see Assistance
). Do not use extension
Accessories
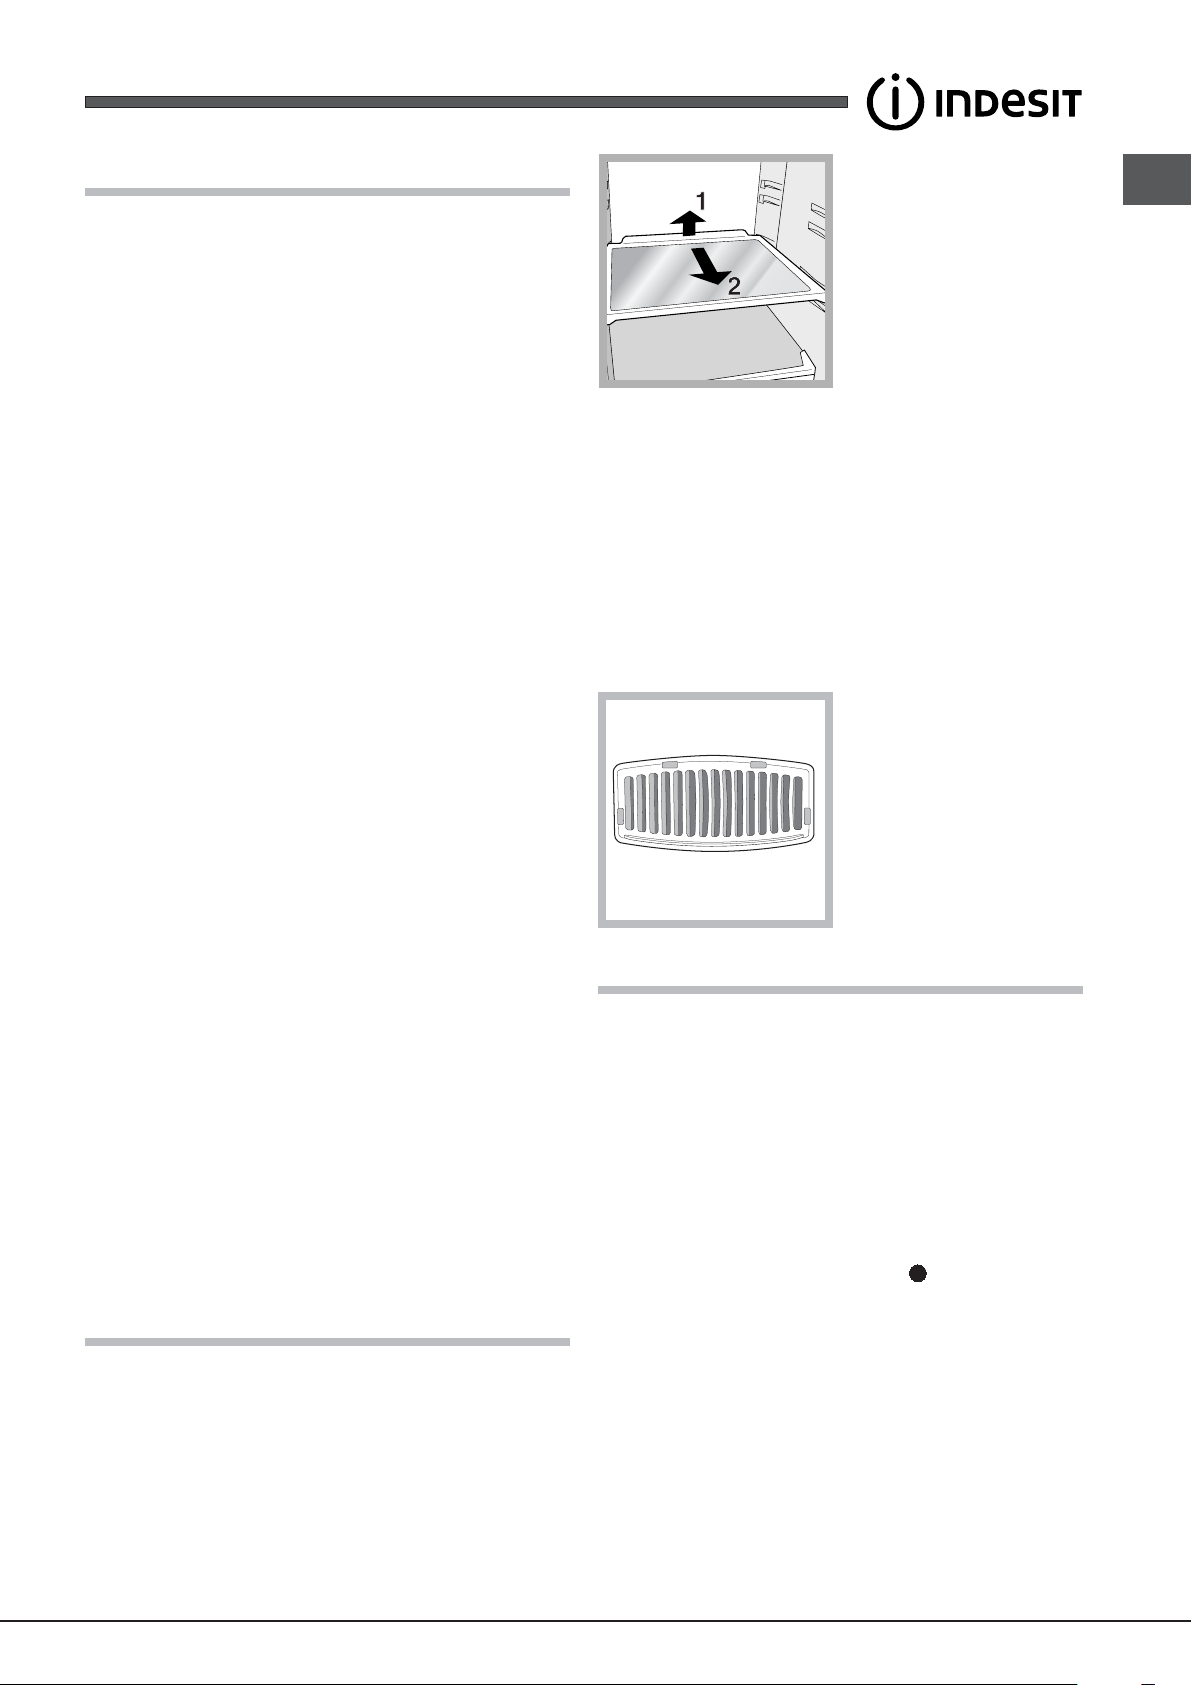
SHELVES•: with or without grill.
Due to the special guides the shelves are removable and the height
is adjustable (
containers and food. Height can be adjusted without complete
removal of the shelf.
see diagram
), allowing easy storage of large
Start-up and use
Starting the appliance
! Before starting the appliance, follow the installation
instructions (
! Before connecting the appliance, clean the compartments and
accessories well with lukewarm water and bicarbonate.
! The appliance comes with a motor protection control system
which makes the compressor start approximately 8 minutes after
being switched on. The compressor also starts each time the
power supply is cut off whether voluntarily or involuntarily
(blackout).
1. Set the FREEZER OPERATION knob on
2. Insert the plug into the socket and ensure that the green
POWER indicator light illuminates.
3. Turn the FREEZER OPERATION knob to an average value and
press the SUPER FREEZE button (rapid freezing): the SUPER
FREEZE indicator light will illuminate. Once the refrigerator has
reached the optimal temperature, the indicator light goes out
and you can begin food storage.
4. Turn the REFRIGERATOR OPERATION knob to an average
value. After a few hours you will be able to put food in the
refrigerator.
see Installation
).
.
• Varies by number and/or position.
* Available only on certain models.
5
 Loading...