

Independence Spider Owner's Manual
Owner´s manual 23.06.2005
Harness Spider
With the Spider you got one of the most comfortable and most functional harnesses, which is available on the market at
present. We thank you for the confidence, for buying the Spider harness.
Please read this operating instructions carefully and consider, that Independence can not be made liable for accidents
and damage, which result from disregarding of the operating instructions.
-DHV certified back protector (P2)
-Passing-trough shoulder belts for optimal comfort
-maximum pilot weight: 120 kg
-unloaded weight: 4.5 kg
-seat position in flight adjustable
Technical description:
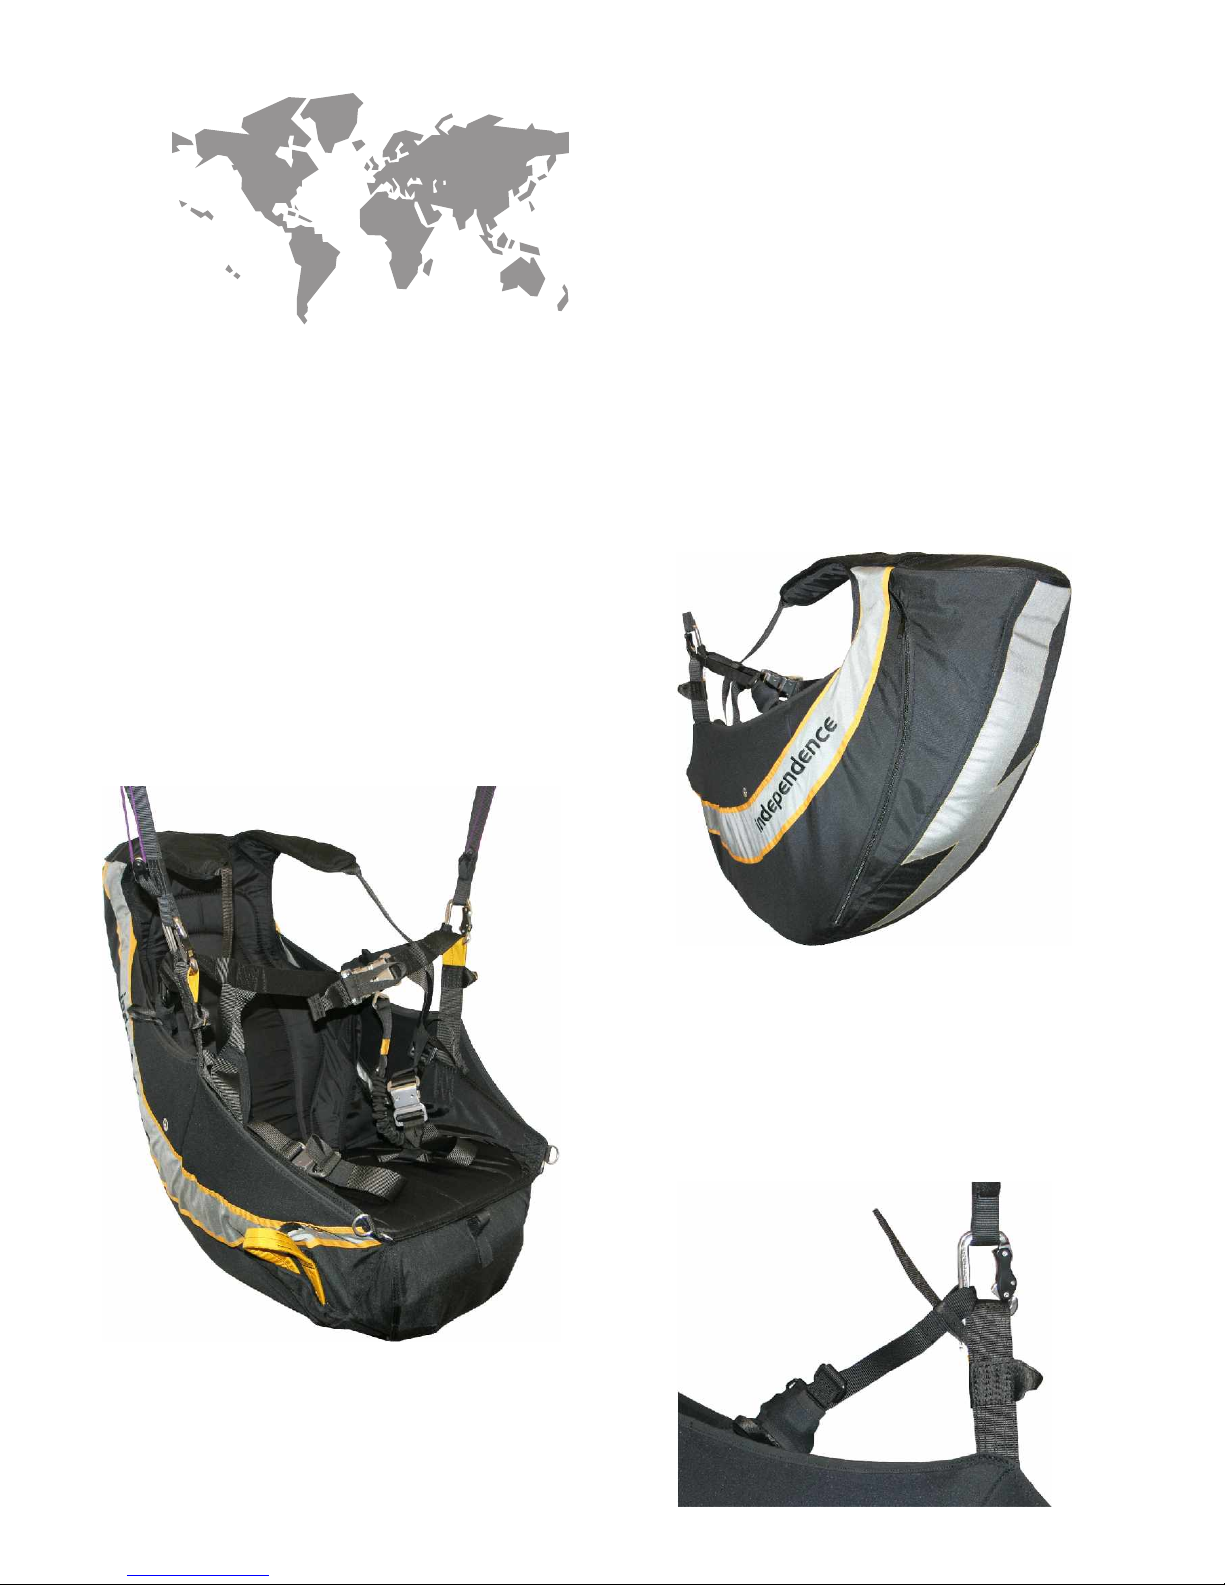
Overview:
Fly-market GmbH & Co. KG
Am Schönebach 3
D-87637 Eisenberg
Tel.: 08364-98330
Fax: 08364-983333
e-mail: info@independence-world.com
gliders for real pilots
independence
www.independence-world.com
f)
g)
b)
c)
f)
g)
a)
a)
d)
e)
g)
g)
h)
h)
i)
a) Rescue system container
b) Lateral chest-belt
c) Safety device lateral chest belt
d) Safe-T-System
e) Fixing loop for leg-strap (optional)
f) Main suspension
g) Attachment for towing release
h) Rings for speed-bar-line
i) Rescue system release-handle
1. Adjustment possibilities:
Adjustment possibilities exist at the shoulder belts, the chest belt, the lateral chest belts and the leg loops. By the
versatile adjusting possibilities of the Spider we recommend in any case that all adjustments are done in a simulator
before the first flight to guarantee an optimal seat comfort.
Adjusting of the chest belt:
The chest belt is closed with the Click-Lock-buckles. If the chest belt is closed, also the falling out safety device (Safe-TSystem) is closed. The Click-Lock-buckles must be closed audibly! The chest belt should not be tightened too closely.
Unintentional opening of this buckle is not possible, because both buttons at it´s side must be pressed at the same time to
open.
Adjusting of the shoulder belts:
Please note that with correct adjusting the shoulder belts are felt with light pressure on the shoulders. With the shoulder
belts you adjust the harness on the pilot´s height, but also you adjust the seat position between sitting and lying.
Adjusting of the lateral chest belts:
Adjusting the lateral chest belts takes place as third step and offers on the one hand again the variation of the seat position
between sitting and lying, on the other hand you adjust with the lateral chest belts the most comfortable seat position.
During adjusting it should be paid attention to the fact that the body load is distributed evenly on shoulder belt and lateral
chest belt. Please take care that the lateral chest belt is attached correctly to the main suspension´s carabiners as shown
at point c).
Adjusting of the leg loops:
When you put the harness on, please take care that the Click-Lock-buckles are closed correctly and audibly. The leg loops
should be fastened tight but should leave still enough space, for the starting and landing phase, where the legs should
have still some space to move.
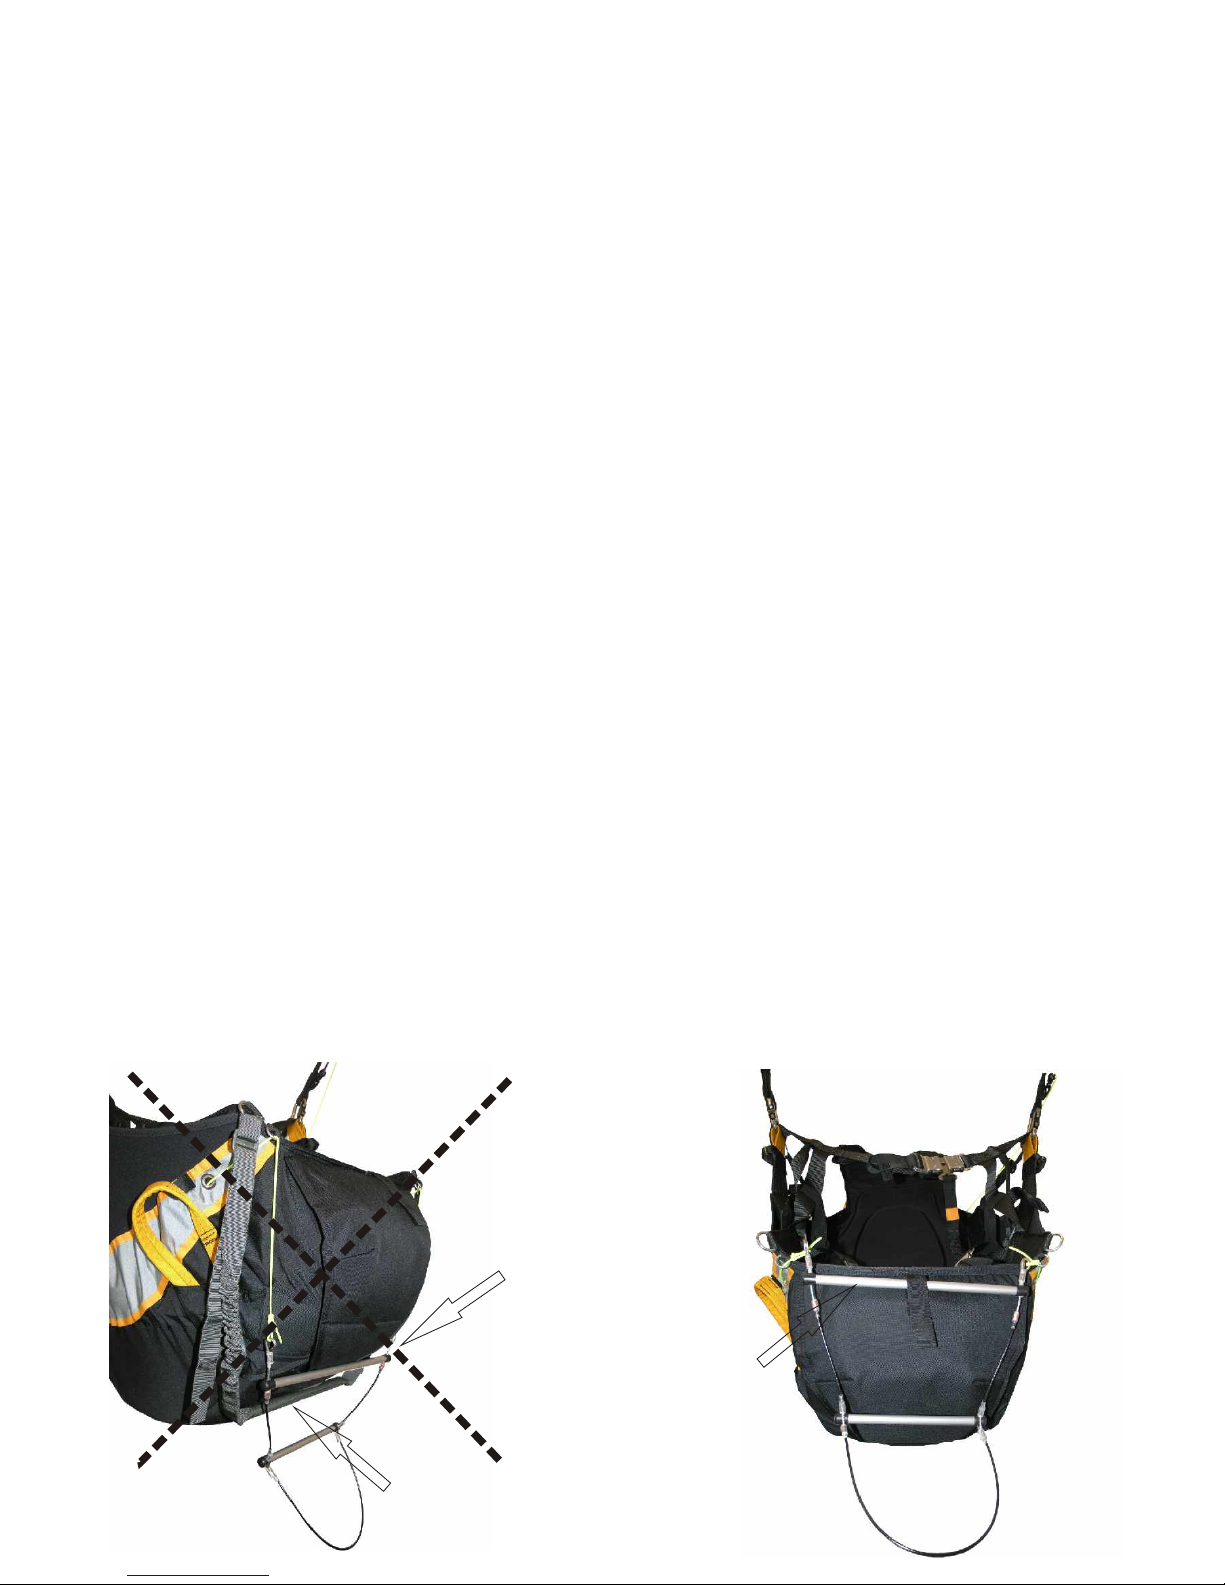
Attaching the speed-bar:
The speed-bar runs from the riser as follows: rear ring at the lateral cover, rear pulley-roll at the seatboard, frontal pulleyroll, frontal ring at the cover, small ring at the frontal edge of the seatboard.
You have to take care in any case, that the length of the speed-bar is adjusted so short, that the release of the
rescue-system is not hindered in any way (see illustration). Out of this reason the length of the speed-bar-line
have to be adjusted in a simulator before flight!
Attention: If you use an additional fixed leg-strap, you also have to take care, that the function of the rescuesystem-container under the seatboard is not hindered in any way!
If not in use, both the speed-bar and the leg-strap can cause the problem that they can be blown behind the
rescue-system-container, what makes a release of the rescue-system impossible!!
WRONG!!!
Leg-strap too deep!
Speed-bar
too deep!
Upper step
max. 5-8cm
under the frontal
edge of seatboard
Now the separable side of the legstrap is put through the upper, bigger metalring on the right side at the frontal
edge of the harness. The white loop runs first through the lower ring (a), and then through the upper ring (b) of
the legstrap. Then it gets fixed with the pin (c).
Attention:
By using this cut-away-system another part is added to the release-mechanism of the rescue-system, which
can hinder the release of the rescue-sytem, if it´s not attached or maintained correctly. Out of this reason the
function has to be checked in any case by a compatibilty-check.
Furthermore the function of the cut-away-mechanism has to be checked before every flight!
This is especially important if you use the leg-strap and and a speed-bar at the same time, because the speed-
bar´s line is running just a few centimeters below the release-band of the leg-strap´s cut-away mechanism.
Attaching a fixed leg-strap with cut-away-system:
By attaching a leg-strap with a cut-away-sytem, a release of the rescue-parachute cuts off the connection of the
legstrap automatically on one side. Thereby the rescue-parachute can be released correctly even if the length
of the legstrap is adjusted long.
Attaching like follows:
First the rescue-system have to be built-in as mentioned under point 2.
Then you have to attach the included release-band with pin for the cut-away-mechanism of the legstrap to the
release-handle of the rescue-system, as shown on the picture.
Finally the neopren-cover has to be put over the pin, and the rescue-release-handle has to be attached and
secured as mentioned under point 2. (Built-in of the rescue-system).
If an additional speed-bar is used at the same time, you have to take care that both systems (the lag-strap and
the speed-bar) are attached correctly and don´t hinder each other in any way, to be sure that both are working
properly.
 Loading...