

Inctel IN-X300 User Manual

IN-X300
N--
IIN
X330000
X
Usseerr
U
Guuiiddee
G
Inctel co,.ltd would like to thank you for purchasing this product.
- 1 -

IN-X300
Table of Contents
1. Product Features ..................................................................................................................................................................... - 3 -
What is the access terminal kit?.......................................................................................................................................... - 3 -
What is the terminal services software?.............................................................................................................................. - 3 -
Features............................................................................................................................................................................... - 3 -
Minimum System Requirements......................................................................................................................................... - 3 -
Operating Systems.............................................................................................................................................................. - 4 -
Conceptual Diagram ........................................................................................................................................................... - 4 -
2. Installation .............................................................................................................................................................................. - 4 -
Install the IN-X300 PCI Card............................................................................................................................................. - 4 -
Connect Peripheral Devices................................................................................................................................................ - 6 -
Install the software drivers.................................................................................................................................................. - 6 -
Install the terminal services software and register.............................................................................................................. - 7 -
3. Product Registration ............................................................................................................................................................. - 13 -
Online Registration........................................................................................................................................................... - 16 -
Offline Registration .......................................................................................................................................................... - 18 -
4. Uninstallation........................................................................................................................................................................ - 21 -
5. Updating the Terminal Services Software............................................................................................................................ - 21 -
6. Using the management console............................................................................................................................................. - 22 -
Local Settings ................................................................................................................................................................... - 22 -
Sessions............................................................................................................................................................................. - 23 -
Information & Settings ..................................................................................................................................................... - 26 -
USB-Device Assignment(s).............................................................................................................................................. - 30 -
7. Troubleshooting an error message........................................................................................................................................ - 31 -
Troubleshooting the access terminal................................................................................................................................. - 31 -
Troubleshooting the host PC............................................................................................................................................. - 32 -
8. Glossary................................................................................................................................................................................ - 32 -
9. FAQ ...................................................................................................................................................................................... - 33 -
- 2 -

IN-X300
1. P
Wh
of PCs. The kit includes three access terminals, one PCI card, and terminal services software that work together to
efficiently harness excess computing capacity and enable multiple users to share a single PC. Best of all, IT staff and
end users do not need special training because this end-to-end solution is easy to manage and is compatible with
standard PC applications.
Wh
"terminal services software “and” NCX-2000-XP".
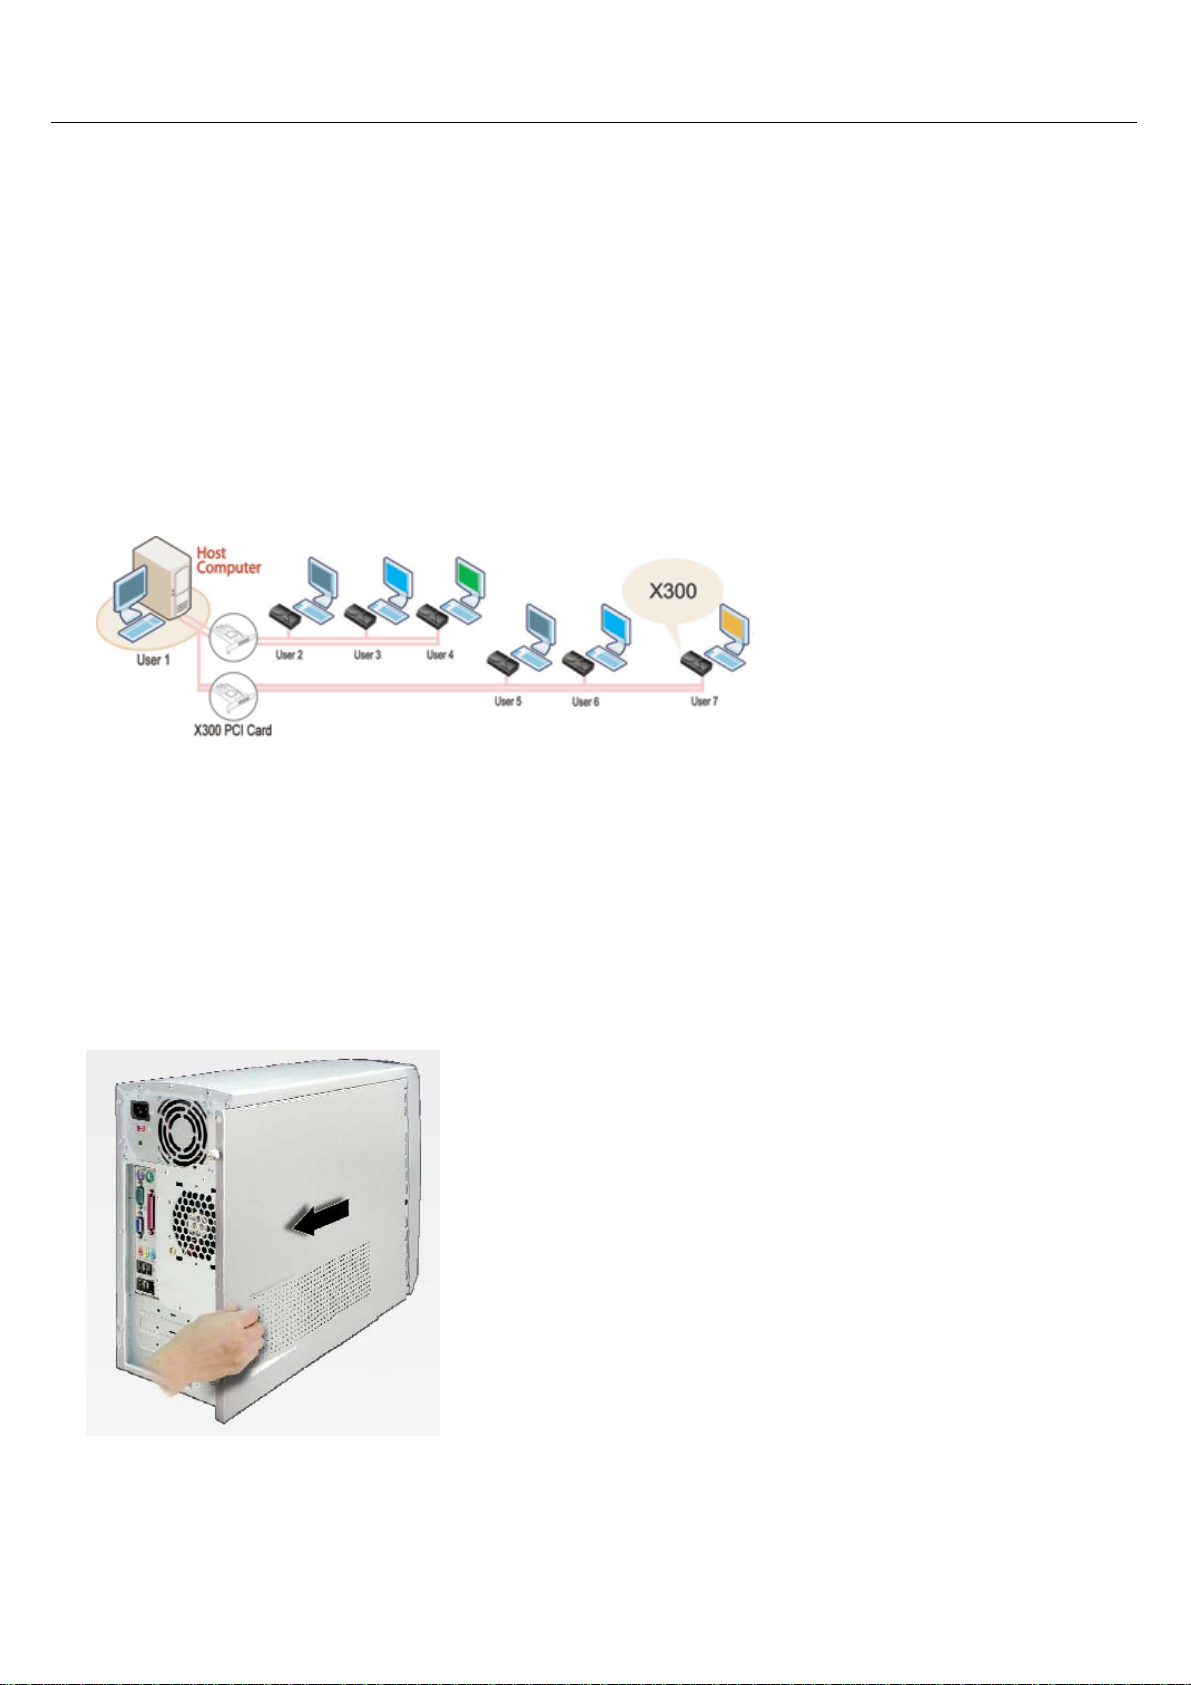
sessions that give each user their own robust PC experience. One PC can support up to seven users.
roduct Features
at is the access terminal kit?
The IN-X300 access terminal kit enables you to dramatically cut computing costs by sharing the untapped power
at is the terminal services software?
Note: This document uses the following terms interchangeably: "User software," "host INCTEL software,"
NCX-2000-XP, the terminal services software for the IN-X300, divides the host PC's resources into independent
Fea
tures
Cost effective
Save up to 70% on your computing costs versus buying a traditional desktop PC.
Minimal maintenance required
You only have to maintain and upgrade the host PC.
Simultaneous desktop operation
Each user can run their own applications.
Supports multiple resolutions
1024x768, 800x600, 16-bit color
Small, efficient and eco-friendly
With a small footprint and no moving parts, the IN-X300 runs completely silent and saves energy by using only
5 watts. Its design meets strict environmental guidelines and is ROHS compliant.
Min
imum System Requirements
For one IN-X300 PCI card, a host PC with at least the following:
• A 1.3 GHz processor
• 512 MB RAM
• Keyboard, mouse, and monitor required for each access terminal
• Speakers optional for each access terminal (amplified speakers recommended)
For two IN-X300 PCI cards, a host PC with at least the following:
• A 2.4 GHz processor
- 3 -
• 1 GB RAM
• Keyboard, mouse, and monitor required for each access terminal
• Speakers optional for each access terminal (amplified speakers recommended)
Op
erating Systems
• Windows
• Linux
nceptual Diagram
Co
IN-X300
2. I
Ins
nstallation
tall the IN-X300 PCI Card
1. Disconnect all peripheral and power cables from the host PC.
2. Remove the system cover of the host PC.
3. Find an available PCI slot for the IN-X300 PCI card.
- 4 -

4. Insert the IN-X300 PCI card and secure the end of the card to the chassis with a retaining screw.
Note: If required, you can use the included low profile bracket.
IN-X300
5. Replace the cover and reconnect all peripheral and power cables.
- 5 -
IN-X300
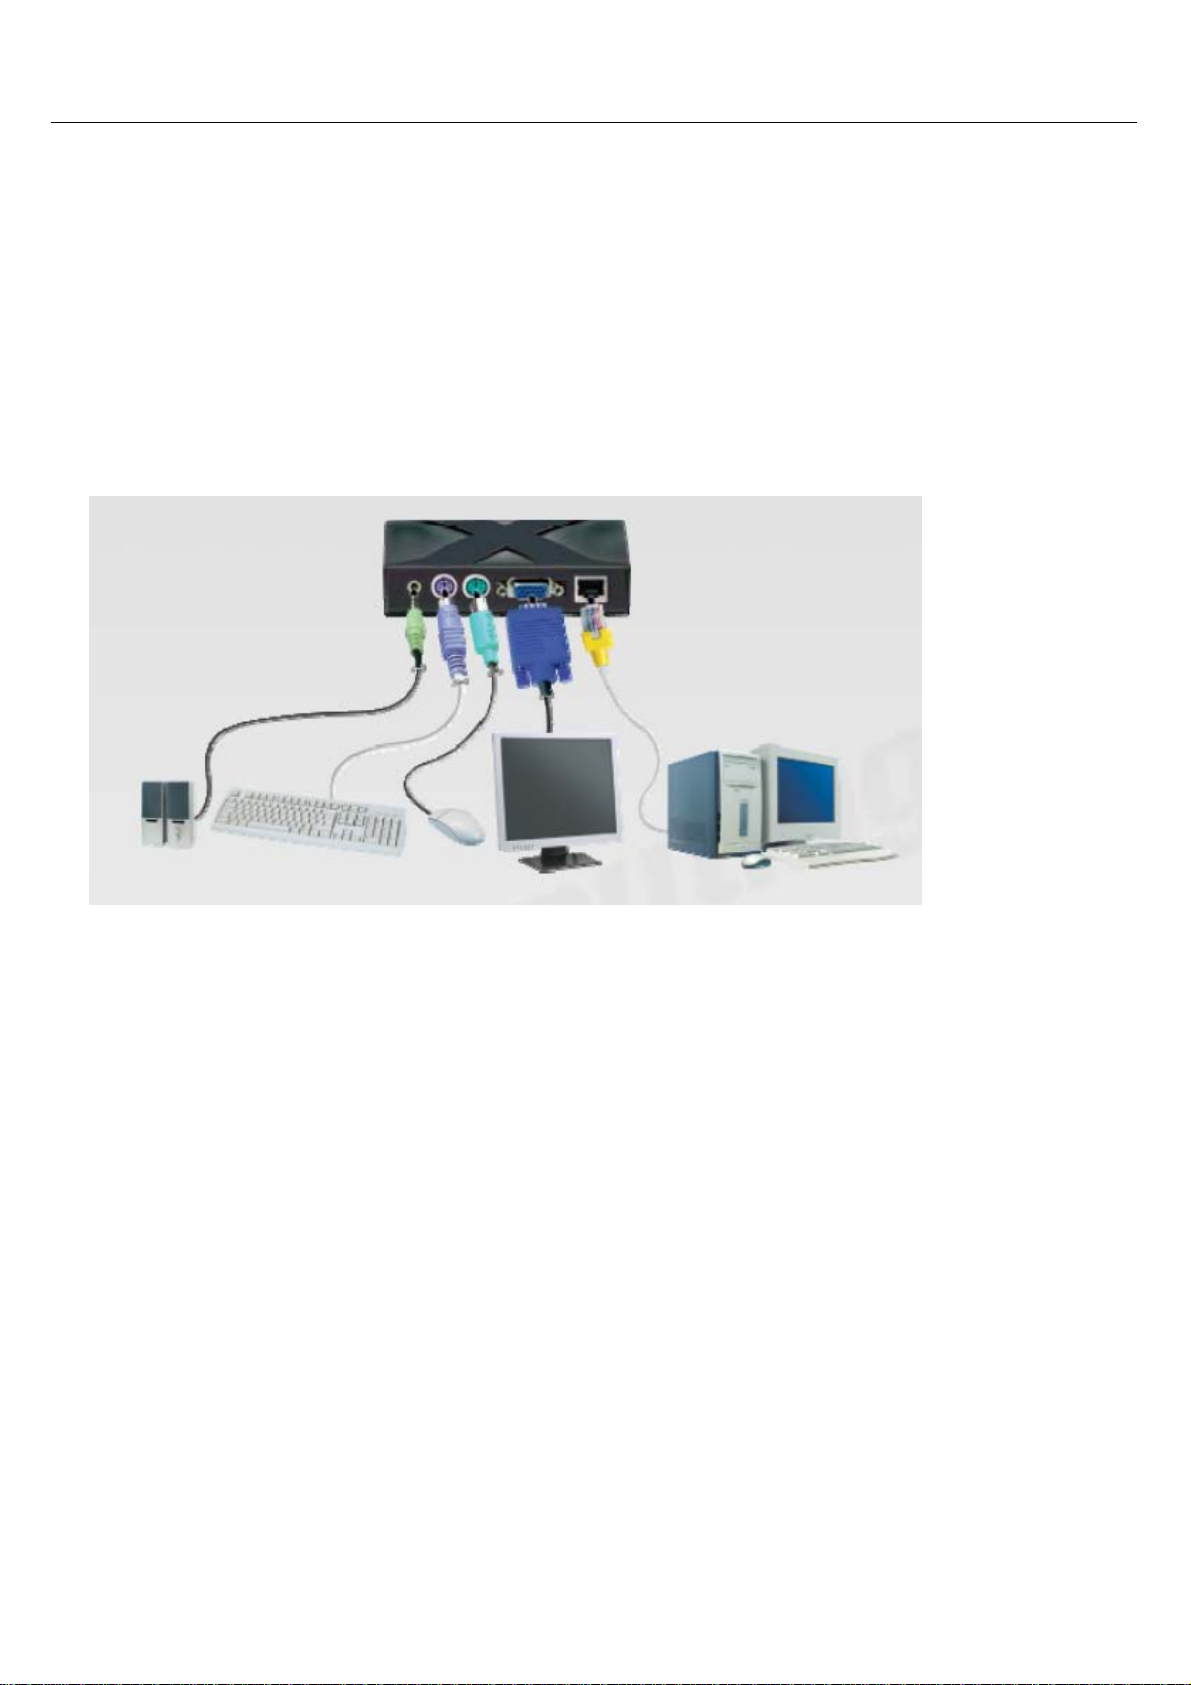
Connect Peripheral Devices
Connect each access terminal to a port on the PCI card using the included Ethernet cables. You can also use any
standard Ethernet cable. Do not exceed the length limit of 15 feet. Also, do not use any Ethernet equipment, such as
a hub or a switch, between the access terminal and the PCI card. Connect peripheral devices to each IN-X300 access
terminal.
Note: Please use amplified speakers.
Note: A LAN cable between the IN-X300 PCI card and the access terminal as long as 33 feet (10 meters) is
allowed if the cable is high quality. Category 6 (Cat6) cables are recommended. Lower quality cables can be a
maximum of 16 feet (5 meters) long.
Install the software drivers
Turn on the host PC. After Windows starts, it will automatically bring up a dialog box called “Hardware Update
Wizard.” Insert the Software Installation CD into the host PC's CD drive. The “Hardware Update Wizard” dialog
box will ask whether it is OK to contact Windows Update to find drivers for the IN-X300 PCI card. Note: Do not
install anything from Windows Update for the IN-X300 PCI card. The driver installation must be done using the
IN-X300 setup application. Select the “No, thanks” radio button and click the “Next” button.
Windows will now automatically bring up a window called, “Found New Hardware Wizard.” Select the “Install
the software automatically (Recommended)” radio button and click the “Next” button. Next, Windows will search
for an IN-X300 bus enumerator driver. Windows will display a message that says the IN-X300 bus enumerator
driver has been found and it has not passed Windows Logo testing to verify its compatibility with Windows XP.
Click on the “Continue Anyway” button. In the next window, click the “Finish” button.
Now Windows will bring up a similar set of dialog boxes as it did for the IN-X300 bus enumerator. This time it’s
for the IN-X300 graphics controller. In the “Hardware Update Wizard” dialog box, select “No, not this time” and
click on the “Next” button. In the “Found New Hardware Wizard” dialog box, select “Install the software
automatically (Recommended)” and click the “Next” button. Windows searches for the IN-X300 graphic controller
driver and brings up a dialog box that says the driver has been found and it has not passed Windows Logo testing.
Click on the “Continue Anyway” button and then the
- 6 -

“Finish” button in the next screen.
The previous paragraph’s process is repeated two more times.
Install the terminal services software and register
Go to "My Computer", open the CD drive's icon, and start the "Install.exe" application.
At the installation screen, click the "software" button.
IN-X300
Before the installation starts, the installation software attempts to connect to the Internet to compare the software
version on the CD with the latest software version on the host server. If there is a later version on the host server, a
prompt will appear to ask if you want to use the version on the CD or if you want to download the latest version and
use it.
Note: It is recommended to download the latest version and use it rather than use an older version on the CD.
At the "Welcome" screen, click the "Next" button.
- 7 -

IN-X300
At the antivirus and firewall warning screen, click the "Next" button.
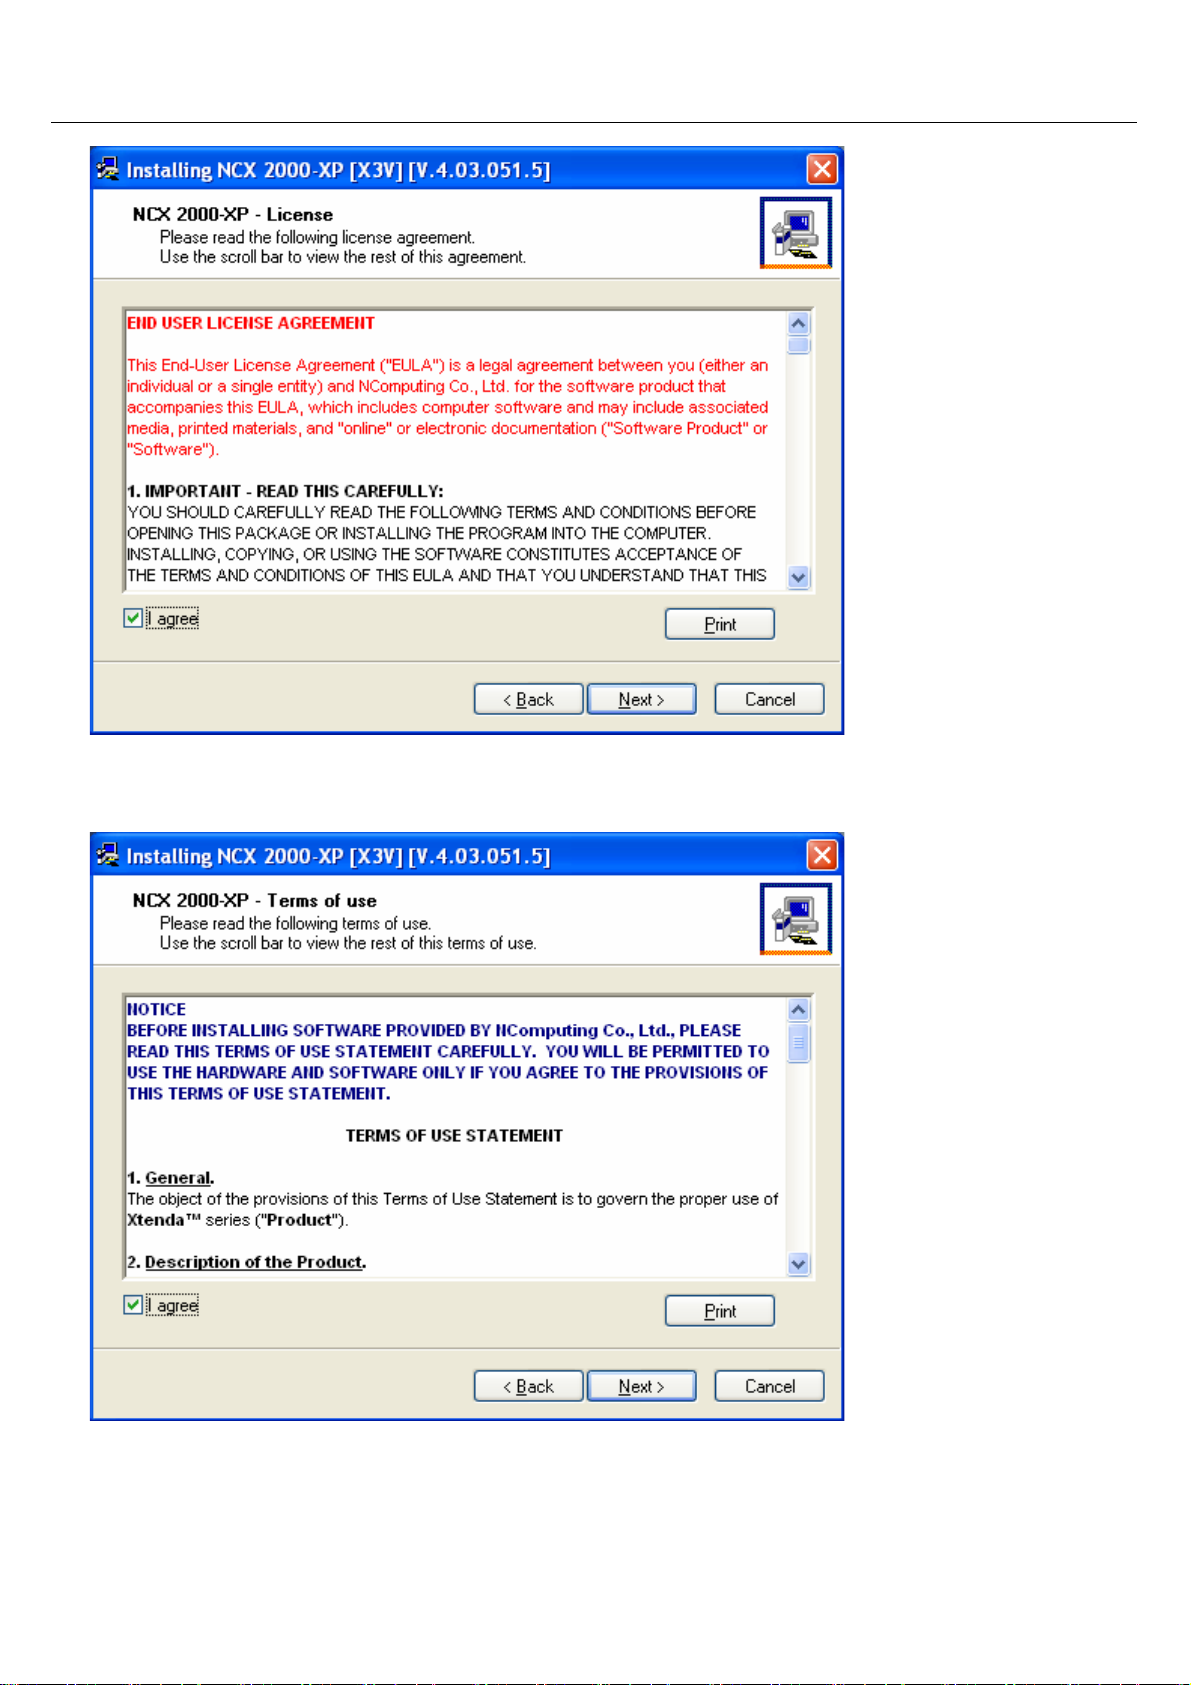
At the software license screen, you may view the software license and print it out. When you are finished, click
on the "I agree" checkbox, and then click the "Next" button.
- 8 -
IN-X300
At the software terms of use screen, you may view the software terms of use document and print it out.
When you are finished, click on the "I agree" checkbox, and then click the "Next" button.
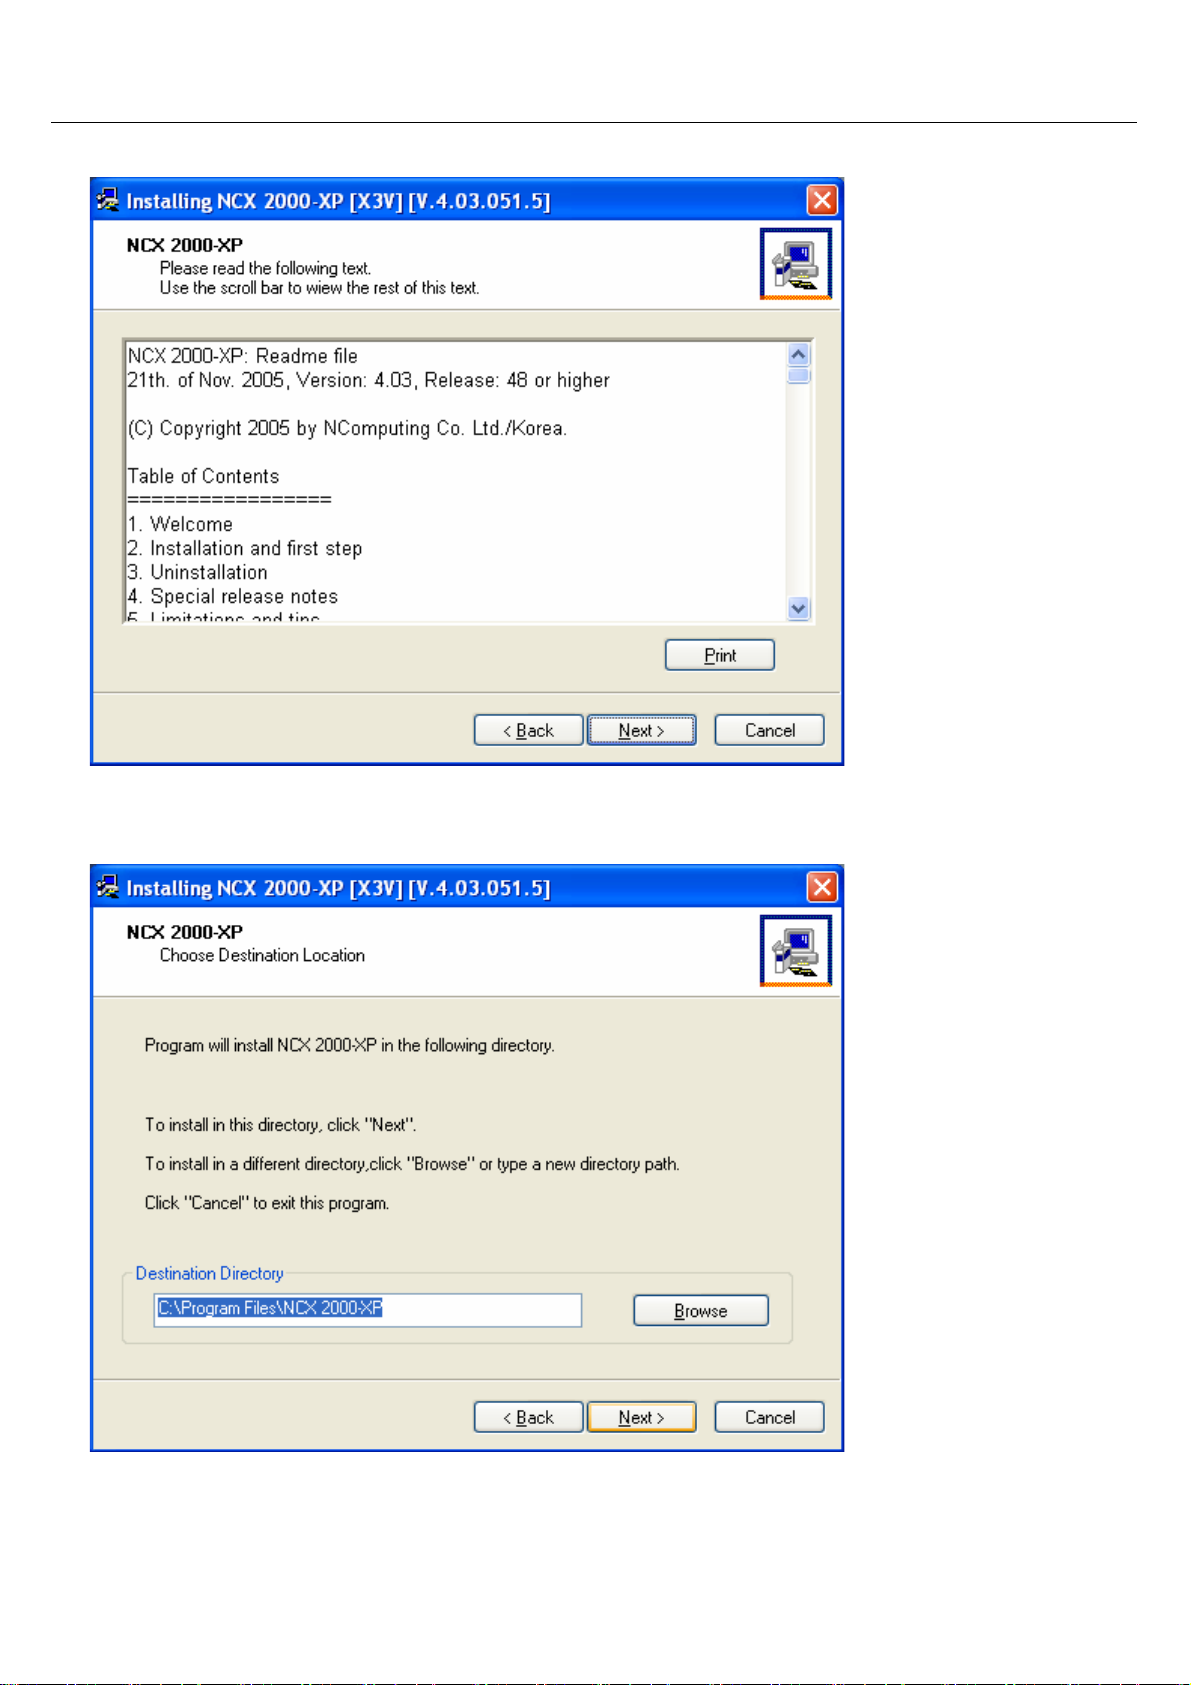
At the readme file screen, you may view the readme file and print it out. When you are finished, click the "Next"
button.
- 9 -
IN-X300
At the "Choose destination location" screen, you can install to the default location, or you can choose a different
location. When you are finished, click on the "Next" button.
At the "Choose Password for Administrator" screen, select whether or not to use an administrator password and
whether or not to install the Network Administration Console. If you choose to use an administrator password, enter
- 10 -
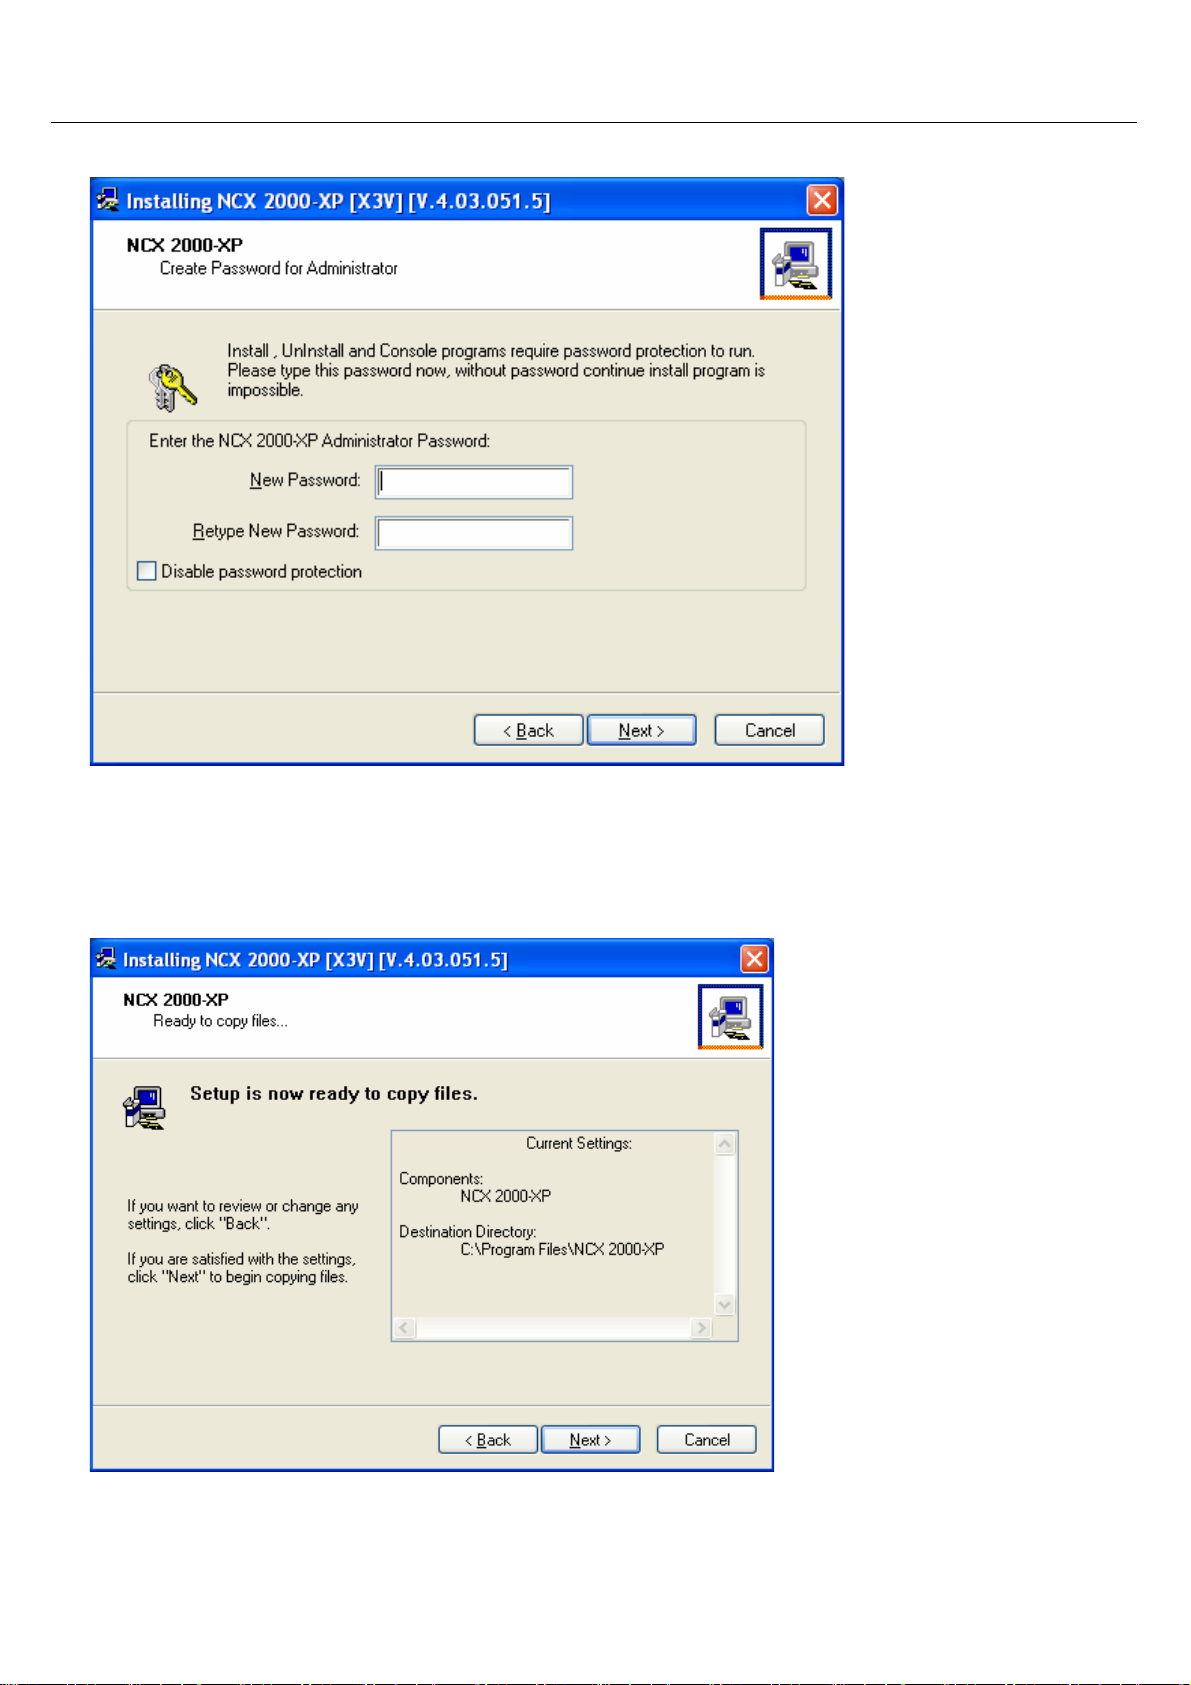
it and retype it. Click on the "Next" button.
IN-X300
Note: The Network Administration Console allows you to administer the terminal services software
and the access terminals in your network. It is recommended to be installed at least once on each
network to enable administration tasks. It may be installed on every software installation.
The next dialog box requires registration information.
The software is installed.
- 11 -
 Loading...