

Page 1

INCRA
®
Hinge
Crafter
OWNER’S MANUAL
Any Hinge, Any Size, Any Project!
Please read this owner’s manual
and keep it at hand for reference.
So you’ve designed and built
the ultimate jewelry box or
cabinet, and it is with some
apprehension that you
approach that final step,
installing the hinges.
Metal hinges are a pain.
Let’s face it. It’s not so
much the hinge itself, it’s
those darned brass screws.
When you finally do get the
pilot hole centered properly,
the head of the screw is
sure to twist right off during
installation. It makes you
wonder how many brass
screw heads are actually
glued instead of screwed in
the hinge.
What’s the solution? Well, you
could avoid the problem completely with
a lift-off lid, or perhaps a sliding dovetail
top. But let’s not sidestep the issue. The
following set of plans detail step by step
how to shape and cut a wooden hinge
that looks just like the metal version. It is
then glued, not screwed, into mortises cut
into your project. The resulting wooden
hinge makes both the craft and the
craftsman look pretty good.
SAFETY
Important safety instructions for using the INCRA HingeCrafter
■ Before attempting to make wooden hinges with
the INCRA HingeCrafter, read and follow all of the
instructions and safety information in this manual.
■ When using the INCRA HingeCrafter in conjunction
with any tool, first read and follow all instructions and
safety information in that tool’s owner’s manual.
■ Use appropriate safety devices. Keep hands clear
of the blade or bit at all times.
1 INCRA Woodworking Tools & Precision Rules
■ When appropriate, always use a push stick, rubber
soled push block, or other safety device to keep your
hands safely away from the cutting tool.
■ Always work with a full-sized hinge blank. Do
not attempt to cut blanks smaller than the sizes
recommended.
■ Always wear safety glasses and follow all normal
shop safety practices.
Page 2
SUPPLIES
Begin by gathering the necessary supplies to produce your hinges:
■ INCRA HingeCrafter (included)
■ Router Table
■ INCRA Fence Positioner
■ #30 (.128”) x 6” long drill bit (included)
■ Hardwood for hinges
■ 1/8” brass rod (available at some hardware and craft
stores, as well as all welder’s supply stores)
■ Fixed INCRAment™ Templates for 3/8”, 1/2”, 5/8” and
3
/4” spacing from the INCRA Master Template Library
(Templates # 45, 47, 48 and 49)
■ 3/8”, 1/2”, 5/8” or 3/4” bull nose router bit
(Bit size corresponds to hinge barrel diameter)
■ 3/8”, 1/2”, 5/8” or 3/4” straight router bit
(Bit size corresponds to hinge barrel diameter)
■ Rubber soled push block
GETTING STARTED
To better understand the process descriptions to follow, let’s first take a look at Fig. 1 showing the various stages of
production.
FIG. 1
Stages of
production
Prepare wood blanks
➀
Cut hinge knuckles
➄
Fig. 2 describes the finished
hinge in terms you will see
referenced later in this booklet.
Note:
Width always refers to
measurements across
the grain, while length
measurements are always
parallel to the grain.
Bull nose-first round
➁
Drill hinge knuckles
➅
FIG. 2
Hinge terminology
overall length
width
Bull nose-second round
➂
Crosscut ends from blanks
➆
knuckle
hinge leaf
hinge leaf
length
length
Increase hinge leaf length
➃
Rip hinge to desired width
➇
barrel
diameter
hinge leaf thickness
2 INCRA Woodworking Tools & Precision Rules
grain direction
Page 3
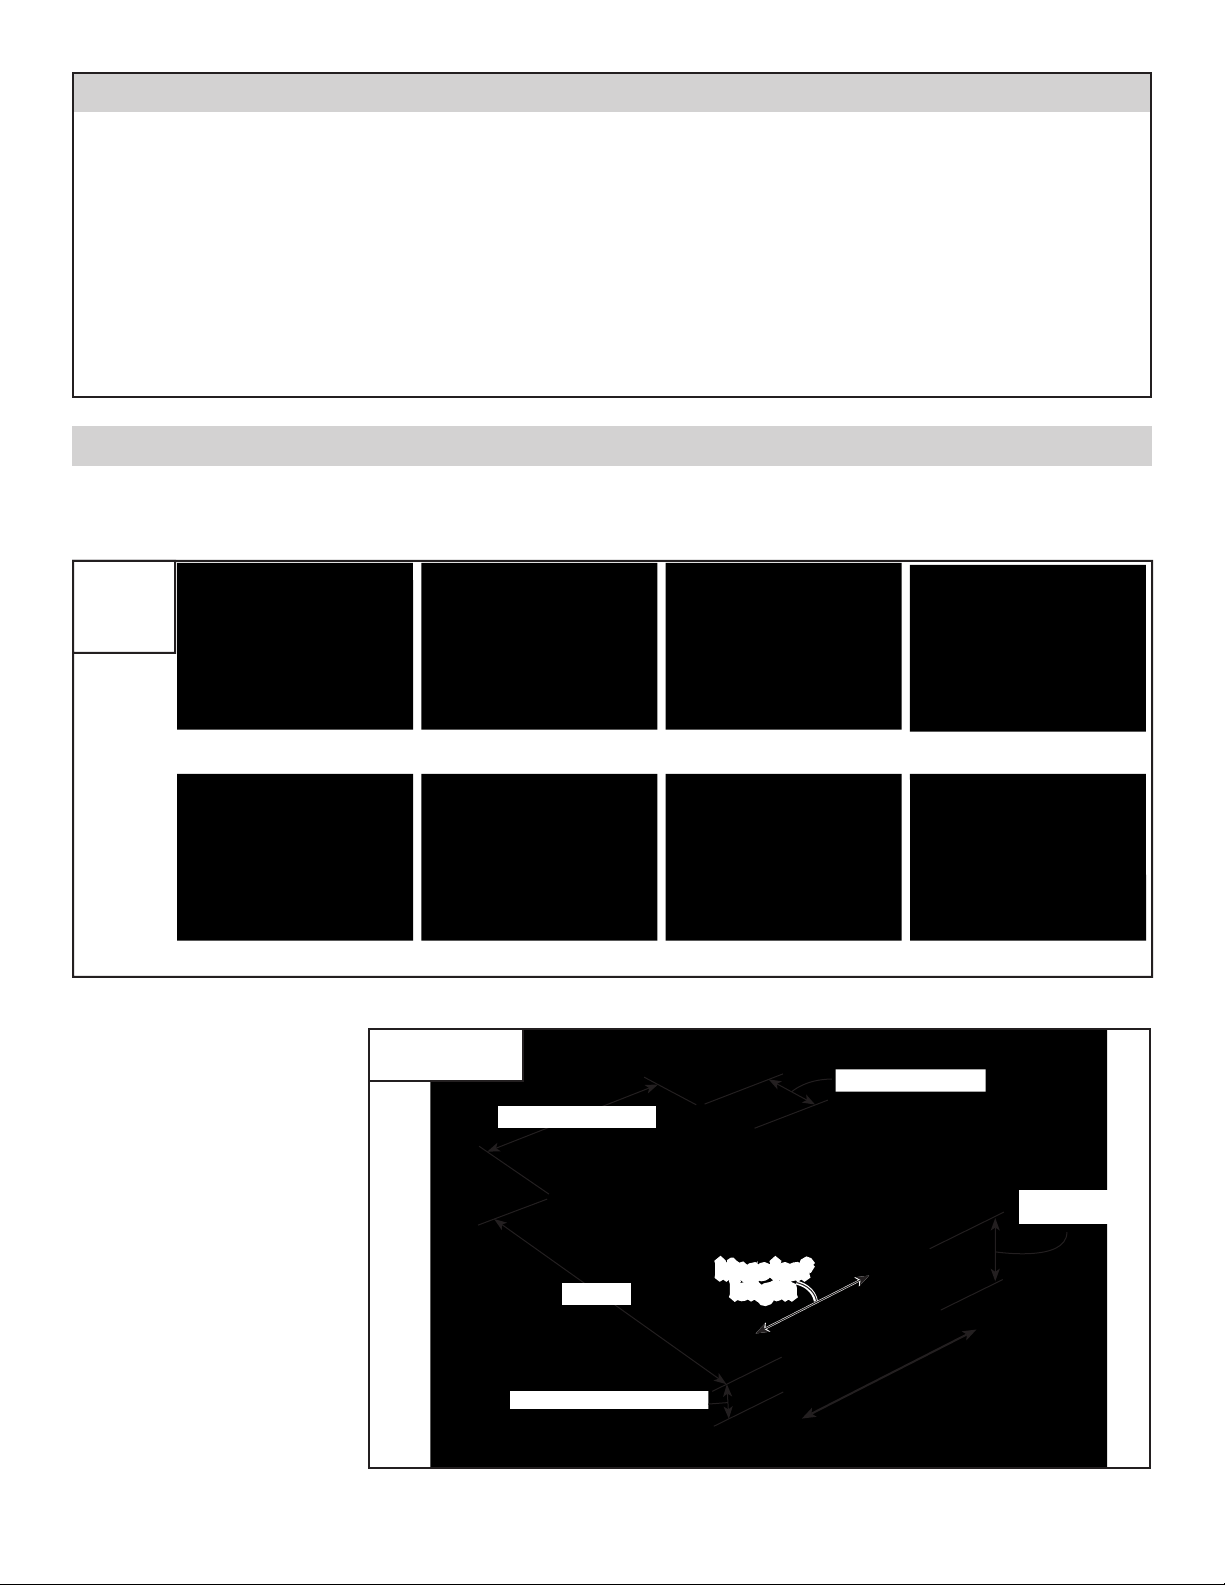
Choosing Your Hinge Size
Your INCRA HingeCrafter will allow you to produce four
hinge barrel sizes with hinge widths up to 10 1/2”. Use
the full-scale hinge profile illustrations shown in Fig. 3
to select the hinge size that you want to make for your
project. The larger 5/8” and 3/4” hinge barrel diameters
can be used for vertical hinge applications such as
cabinet doors, while the smaller 3/8” and 1/2” sizes are
better suited to horizontal applications, such as jewelry
boxes and humidors. The hinge barrel diameter you
select will require the same diameter bull nose bit and
straight bit. For example, if you select the 1/2” barrel
diameter, you will need a 1/2” diameter bull nose bit and a
1
” straight bit for the required cuts.
/2
PREPARE WOOD BLANKS
When selecting stock for your hinges, use close
grained hardwoods such as maple, cherry, walnut
or mahogany for best results. Avoid
highly figured woods such as bird’s-eye
maple or anything “curly”. You’ll need at
least 6” of width in your selection and at
least 12 1/4” of length in order to produce
two blanks. In general, the wider the
wood blank, the more hinges you’ll get.
If you want to make extra wide piano
hinges, prepare stock up to 10 5/8” in
width. (Trimming cuts made later in
the process will remove about 1/8” of
material width.) Thickness plane the
stock to match the hinge barrel diameter
that you have selected. For consistent
results it is important to thickness plane the stock
as accurately as possible. A machinist caliper
is very helpful in producing precise thickness.
Crosscut the stock to yield two 6” blanks, Fig. 4.
FIG. 4
Prepare blanks
6” minimum
width
Caution: Always thickness plane the 12
before cutting to (2) 6” long pieces.
FIG. 3
Hinge size
3
/4” barrel
diameter
5
/8” barrel
diameter
6”
1
/2” barrel
diameter
3
/8” barrel
diameter
6”
1
/4” long blank
BULL NOSE - FIRST ROUND
Bull Nose Bit And Fence Setup
Install in your router the bull nose bit that
matches the hinge barrel diameter you have
selected. The bull nose bit creates lots of
chips in the process of hinge making so
dust collection is a must. If you do not have
a split fence with dust collection capability
such as the WonderFence or the IntelliFence
mounted to the front of your Incra fence
positioner, it will be necessary to make
and attach the wooden auxiliary fence
shown in Fig. 5. This design allows for dust
collection using a standard shop vac wand.
Dimensioned plans for this user-made
auxiliary fence are shown on page 8.
INCRA HingeCrafter 3
FIG. 5
User-made auxiliary fence
Page 4

Adjust the depth of cut on the bull nose bit so that
the roundover is centered on your stock thickness.
Sight down the front face of the fence and position
the fence so that it extends just slightly into the
profile of the bit, Fig. 6. This setup will leave a tiny
flat on the end of your stock after cutting. This
flat is necessary to avoid snipe at the end of the
cut. It is a good idea to make a test cut to adjust
the depth of cut to match your stock thickness and
to adjust the fence position to leave a flat of only
about 1/16”.
FIG. 6
Bit and fence setup
Fence extends slightly
into radius of bit
Bull nose bit
Hinge stock
Place the end grain of the hinge blank against the
fence and, using a good rubber soled push block,
move the stock through the cut. Repeat the cut
on the opposite end of the stock, Fig. 7. The bull
nose cuts should always be made across the grain
as shown. Attempting to produce hinges with the
bull nose cuts made parallel to the grain will result
in hinge knuckles that splinter and break easily.
FIG. 7
Bull nose - first round
BULL NOSE - SECOND ROUND
Now stand the hinge blank on the rounded end
with the face grain against the fence and, using the
rubber soled push block, move the stock through
the cut, Fig. 8. Apply downward pressure to keep
the hinge blank on the table. Repeat the cut on
the opposite end of the blank. After making the
bull nose cuts on all of your blanks, remove the bull
nose cutter and any auxiliary fence you may have
attached.
FIG. 8
Bull nose - second round
Grain direction
4 INCRA Woodworking Tools & Precision Rules
Page 5

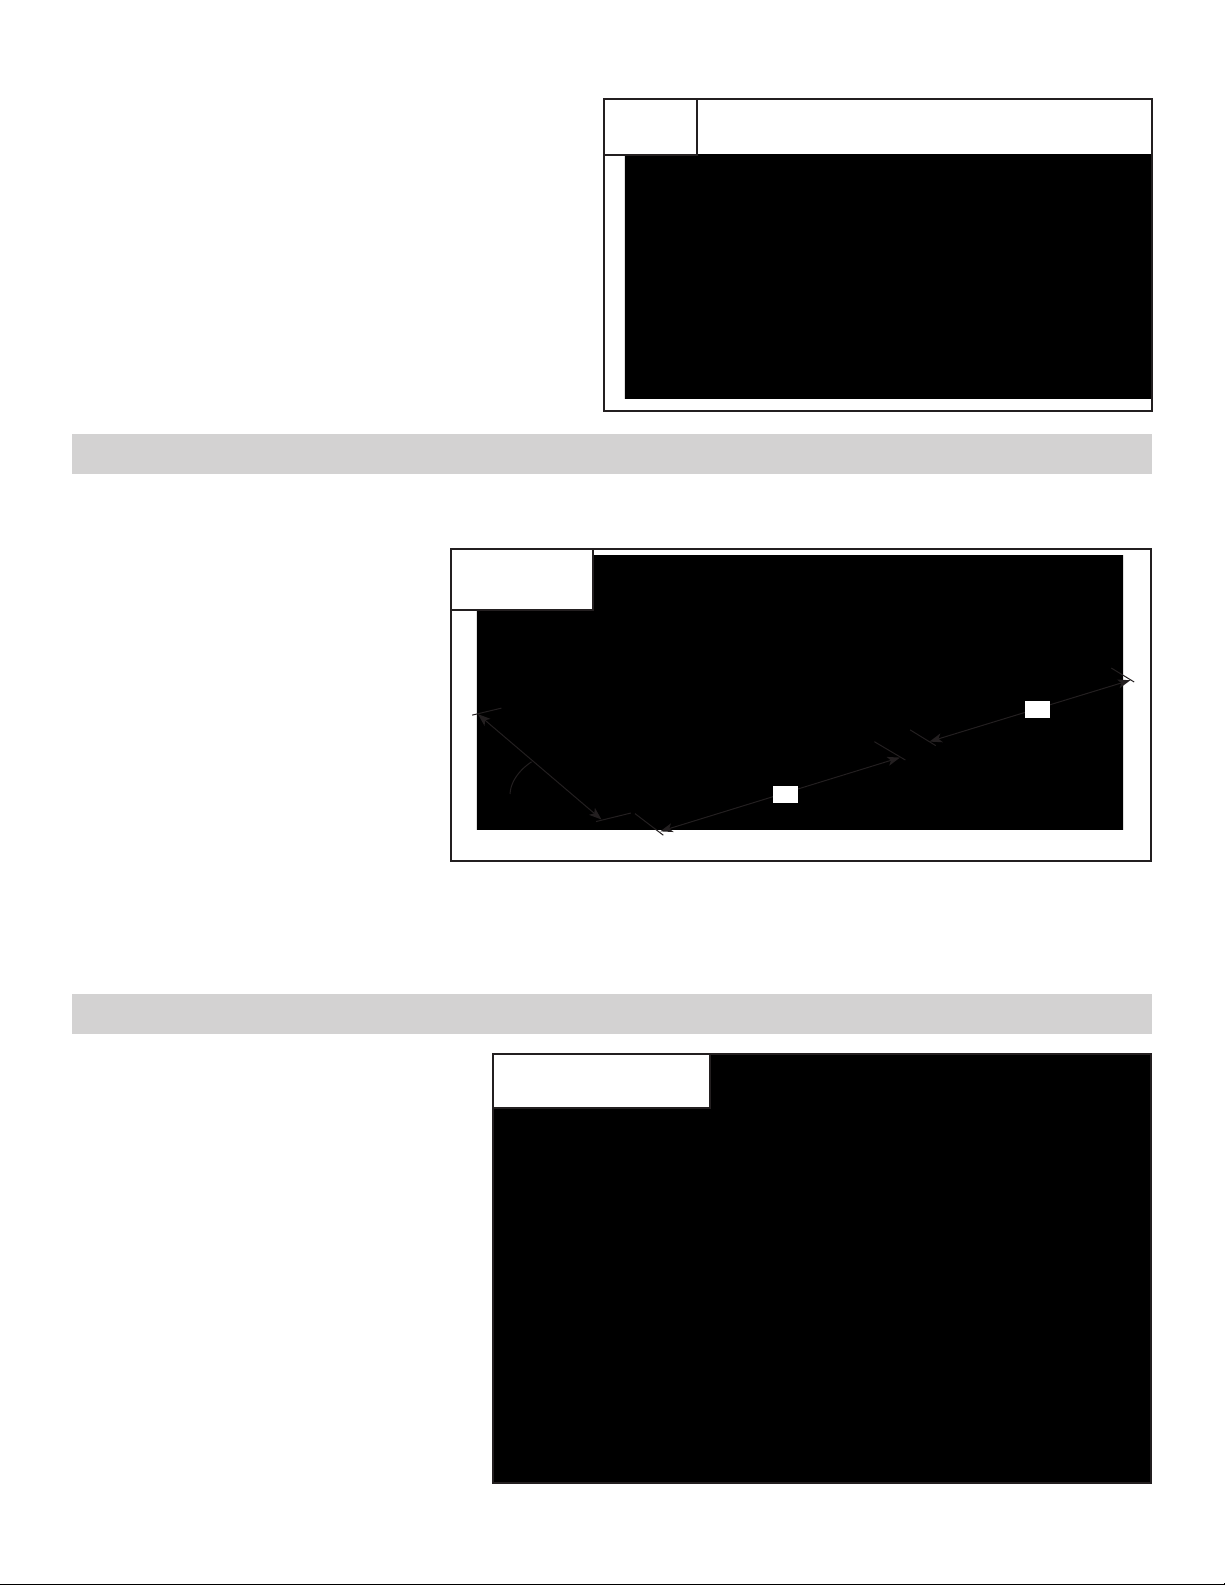
INCREASE THE HINGE LEAF LENGTH
In the next series of cuts you will increase the length
of the hinge leaf and determine its final thickness.
While the finished length of the hinge leaf can
be varied to suit your needs, the leaf thickness
is very important to the function of the hinge. If
the hinge leaf thickness is greater than half of the
barrel diameter, the hinge will not fully close when
FIG. 9
Use hinge
blank to
set fence
to bit
distance
assembled. Again, measuring accuracy is important
here. It is suggested that you set the initial depth of
cut described below a little shallow and after the first
cut, measure the leaf and adjust the depth of cut as
necessary.
Bit diameter
matches hinge
barrel diameter
Install in your router the straight bit that matches the hinge barrel diameter
you have selected. Set the depth of cut for the straight bit to half of the
hinge barrel diameter. For example, if making the 1/2” hinge barrel, install
a 1/2” diameter straight bit and set the depth of cut to 1/4”. Set the initial
fence to bit distance equal to your stock thickness (use your hinge blank as
a gauge), Fig. 9. Now slide your inch scale under the hairline cursor to a
reading equal to the straight bit diameter, Fig. 10.
Place the hinge blank on the router table with the rounded end against the
fence as shown in Fig. 11. Using a rubber soled push block, move the stock
through the cut. Repeat this cut for both ends of both blanks. Now move
the fence back 1/4” and repeat the cuts. Continue stepping the fence back
and cutting, making a final pass at 1 1/4” on the inch scale set previously.
TIP: The final fence setting will produce a hinge leaf length
of 1 1/4”. In other words, the final scale reading is a direct
readout of the dado width just cut, Fig. 12. To decrease the
number of passes when making large quantities of the smaller
barrel hinges, you can substitute a 5/8” or 3/4” diameter cutter.
Set up exactly as described above and finish the cuts at the
same dimension or any other dimension that suits your custom
application. Note: If using a dimension other than 1 1/4”, always
add 1/4” to your final desired hinge leaf length. A subsequent
trimming operation will remove the 1/4”.
Trim The Edges To Remove Tearout
At your table saw, trim about 1/16” from each edge of the hinge
blanks to remove any tear out that may have occurred during the
bull nose or dado cuts, Fig. 13. For extra wide hinge blanks, use
your miter gauge for these trimming cuts.
FIG. 10
Slide scale to a reading equal to
bit diameter
FIG. 11
Lengthen hinge leaf
FIG. 12
Hinge leaf dimensions
1 1/4”
1 1/4”
FIG. 13
Trim edges
Trim edges to remove
CUT HINGE KNUCKLES
Hinge Knuckles - Straight Bit And Fence Setup
Install in your router the straight bit that matches the hinge
any tearout from previous cuts
FIG. 14
Straight bit setup
barrel diameter you have selected. Set the depth of cut to
about 1/16” greater than the thickness of the hinge blank. Zero
the fence to the cutter with the cutter inside the fence opening.
To do this, move the fence to cover the cutter then place a
straightedge across the fence opening. Now micro adjust the
fence backward until the cutter just touches the straightedge,
Fig. 14. Clamp the fence positioner in place.
Adjust fence until bit touches straightedge
INCRA HingeCrafter 5
Page 6

Install the Fixed INCRAment™ template from your INCRA Master
Template Library that corresponds to the hinge barrel diameter you
have selected. For example, if you selected the 1/2” hinge barrel
diameter, use the Fixed INCRAment™ template with 1/2” spacing
(Template #47). Slide the template to position cut #1 on the template
directly under the hairline cursor, Fig. 15.
Cut The Hinge Knuckles
Clamp the two blanks back to back to your INCRA Right Angle Fixture
as shown in Fig.16 and mark the “fence” edges of the pieces. Turn
the router on and take a couple of passes to sneak up to cut #2 on the
template. Proceed by making cuts at each of the even numbered blue
cut marks on the template. Turn off the router.
Unclamp the two blanks and flip to cut the opposite ends. Before
clamping, make sure that the marked “fence” edges are against the
fence. Now proceed by making cuts at each of the odd numbered
blue cut marks on the template beginning with cut #3, Fig. 17
.
FIG. 15
Install Fixed INCRAment™
template
FIG. 16
Mark fence edge
on blanks
Install Fixed INCRAment™
template that matches
hinge barrel diameter
Slide template cut #1
under hairline cursor
DRILL HINGE KNUCKLES
Your HingeCrafter is equipped with four different bushing sizes, one
for each barrel diameter (3/8”, 1/2”, 5/8”, and 3/4”). The spacing set
for the bushings within the HingeCrafter makes matching the barrel
diameter to the correct bushings easy. Just find the bushing section
that allows your hinge knuckles to slide in between the bushings.
After identifying the correct section, clamp the HingeCrafter in a
bench vise as shown in Fig. 18. If you don’t have a bench vise, just
clamp the HingeCrafter to the corner of your workbench to allow
drilling from both sides of the fixture.
Slide your hinge blank into the drill guide as shown in Fig. 19 and use
the thumbscrew in one of the threaded holes to clamp the hinge blank
in place. To protect the hinge, slide the provided metal clamp pad
between the hinge and the thumbscrew before tightening. Make sure
that the hinge blank is pressed firmly and squarely into the bushings
before tightening the clamping thumbscrew.
Install the provided #30 (.128”) drill bit in a hand drill and drill the
hinge blank, Fig. 20
the chips are not cleared from time to time, the drill bit will load and
create tearout on the backside of the knuckle, or worse, crack the
hinge. Remember, a clean drill bit drills while a loaded drill bit just
pushes hard. For hole position accuracy, never drill more than one
knuckle beyond the last bushing of the drill guide. To complete the
hole, unclamp and reposition the hinge blank, then drill through the
opposite end of the drill
guide.
IMPORTANT:
Whenever
repositioning the
hinge blank, always
blow sawdust and
wood chips out of
the drill guide before
reinserting the hinge
blank.
. Clear the chips from the drill bit often. If
FIG. 20
Drill knuckles
To avoid tearout,
clear chips from
drill bit often
Clamp stock oriented
as shown to Right
Angle Fixture
FIG. 17
Cut knuckles
Use even numbered blue
marks for this end
Use odd numbered blue
marks for this end
FIG. 18
Clamp
HingeCrafter
in vise
FIG. 19
Clamp hinge
blank in
HingeCrafter
Metal clamp
Thumbscrew
6 INCRA Woodworking Tools & Precision Rules
Page 7

For extra long hinges, first drill one end of the hinge blank, then
unclamp, reposition and drill the opposite end of the hinge blank.
Finally, unclamp and reposition with the center of the hinge in the
HingeCrafter and drill through the existing outer holes to reach the
center. For the longest hinges it will be necessary to complete the
holes in the center by drilling from both ends and in a few cases a
third repositioning is required, Fig. 21.
FIG. 21
Drill extra long hinges
Second: Reposition blank
to drill interior holes
CROSSCUT ENDS
Before removing the hinges from each end of the blank, make the
safety push stick described in the full-scale plan included with this
manual. Use 3/4” plywood and cut out the push stick with a band saw
or scroll saw. Sand the push stick to remove any sharp edges around
the handle.
Set the fence to blade distance at your table saw equal to the hinge
barrel diameter plus 1”. (Example: For the 1/2” barrel diameter set the
fence to 1 1/2”.) With the rounded end of the blank against the fence
and the hinge leaf dado face up, use the push stick to move the blank
through the cut, Fig. 22. Repeat for the opposite end.
CAUTION: Never make the above-described cut with the hinge
leaf dados face down.
RIP HINGE TO FINAL WIDTH
Before cutting your finished hinge to final width, carefully assemble the
two halves of the hinge blank and install the brass hinge pin. If you
experience any difficulty installing the hinge pin, you can run the drill
bit back through the hinge to clean out any chips that may be blocking
the holes. After installing the brass pin, close the hinge and carefully
remove the hinge pin. This aligns the hinge parts for cutting, Fig. 23.
First: Use
HingeCrafter to
drill outer holes
FIG. 22
Crosscut ends
Use safety
push stick
Set fence to blade distance at
hinge barrel diameter plus 1”
FIG. 23
Align hinge parts
Make cut
with hinge
leaf dado
FACE UP
CAUTION: Never make final sizing cuts with the brass pivot pin
installed.
The final sizing of your finished hinge must be accomplished by
making the cuts using a crosscut box or miter gauge
carrier as shown in Figs. 24 and 25. Although these cuts
FIG. 24
Crosscut box
appear to be crosscuts, they are in fact short grain rip
cuts and require backing support for safe cutting. Each
of the methods of cutting shown provides necessary
backing support for the hinge blank on both sides of the
cut. Dimensioned plans for the miter gauge carrier can
be found on page 8. Hold the squared end of the hinge
assembly firmly against your crosscut box or miter gauge
carrier back fence
as you make the
cut. Determine
FIG. 25
Miter gauge carrier
the final cut width
depending on the
requirements for
your application. In
general, the smallest
hinge should have
five knuckles for
maximum strength
(three on one side
and two on the
other).
Install, then remove brass pin
to align hinge parts for cuing
NOTE: Owner’s manual photos
show the blade guard removed
for instructional clarity only. You
should use your blade guard and
other safety equipment whenever
appropriate to protect yourself.
Refer to your equipment manuals
for proper safety instructions.
INCRA HingeCrafter 7
Page 8

AUXILIARY FENCE PLANS
These auxiliary fence plans are intended for users who
do not own an INCRA WonderFence or another fence
with a wide cutter gap to accommodate the larger bull
nose router bits and dust collection.
3
Rip
/4” thick plywood to 3” wide and crosscut to yield
two pieces 22” long and one piece 28” long. Cut a
1
/4” deep groove on the 28” piece and one of the 22”
pieces as shown in Fig. 26. Adjust the width of the
groove for a good fit with the remaining 22” plywood
piece. Cut the fence openings on the 22” piece as
shown. Glue up the three pieces making sure to
check the fence for square before the glue sets. Cut
1
/4” x 3/4” x 3” fillers for the groove openings at the
ends of the 28” piece. Glue in place.
To use your auxiliary fence, clamp the 28” piece to
your existing INCRA fence with the appropriate sized
opening over the bull nose bit. The smaller opening
can be used with the
3
/8” and 1/2” bull nose bits. Use
the larger opening for the 5/8” and 3/4” bits. Protect
the rear of your INCRA fence by placing scrap wood
pads between the fence and your clamps. For dust
extraction, slide a standard shop vac wand into the
opening on the outfeed side of the fence, Fig. 27.
FIG. 26
User-made auxiliary fence
1”
1
/4” deep x 3/4” wide grooves
1
/4”x3/4”x3”
1”
FIG. 27
Clamp auxiliary
fence to Incra fence
28”
Insert vacuum
wand here
1 1/4”
1 7/8”
22”
3”
1”
1 3/8”
MITER GAUGE CARRIER
1
Rip and crosscut the stock as shown in Fig. 28.
Before gluing the pieces together, dry assemble the
parts to your miter gauge at the table saw. Allow 5” of
FIG. 28
Miter gauge carrier
/4” dia. through holes
with 5/8”dia. by 1/4” deep
counter bore
the fence to cross the line of cut. Mark hole locations
that will align with those in your miter gauge. Drill the
two 1/4” mounting holes and then counter bore with
a 5/8” forstner bit to a depth of 1/4”. Glue the fence
1”
to the support base, taking care to align the two
parts flush along the back edge. Attach to your miter
gauge using #10-32 x 1 1/2” pan head Phillips machine
screws with washers and hex nuts. In use, set the
blade depth to cut only through the thickness of the
hinge blank.
2”
1
/2”
4”
5”
18”
WARRANTY
Taylor Design Group, Inc. warrants this product for one year from date of purchase. We will repair any defects due
to faulty material or workmanship, or at our option, replace the product free of charge. Please return the failing
component only, postage prepaid, along with a description of the problem to the address below. This warranty does
not apply to parts which have been subjected to improper use, alteration, or abuse.
Made in America by:
Taylor Design Group, Inc.
Printed in the U.S.A.
■
P.O. Box 810262 ■ Dallas, Texas 75381 ■ Tel: (972) 242-9975 ■ Fax: (972) 243-4277
■
© 2004 Taylor Design Group, Inc.
■
INCRA is a registered trademark of Taylor Design Group, Inc.
■
www.incra.com
8 INCRA Woodworking Tools & Precision Rules
 Loading...