

Page 1
ww w.incra.com
C
LEANSWEEP
Downdraft Dust Collection Cabinet
Downdraft Dust Collection Cabinet
INCRA CleanSweep Adaptor
Note: The instructions below will replace Step 3 of the CleanSweep’s Owner’s Manual. Just assemble the CleanSweep through Step 2 of the CleanSweep Manual, then follow the instructions below. Finish the CleanSweep
assembly by picking up with Step 4 of the CleanSweep Manual.
The CleanSweep Adaptor is designed to provide a variety of functions. First and foremost it permits use of the CleanSweep
Downdraft Dust Collection Cabinet with router tables that do not have a rabbeted “lip” or “ledge” to support and level the router
plate. These table types often use corner mounted levelers or some other means to support the plate. The CleanSweep Adaptor
permits continued use of the corner mounted levelers but can also be used to augment or replace existing levelers with it’s built
in (10) plate levelers. The CleanSweep Adaptor is NOT required for INCRA Router Tables and will only work with tables that have
an opening sized to fit the standard 9-1/4” x 11-3/4” router plate or lift.
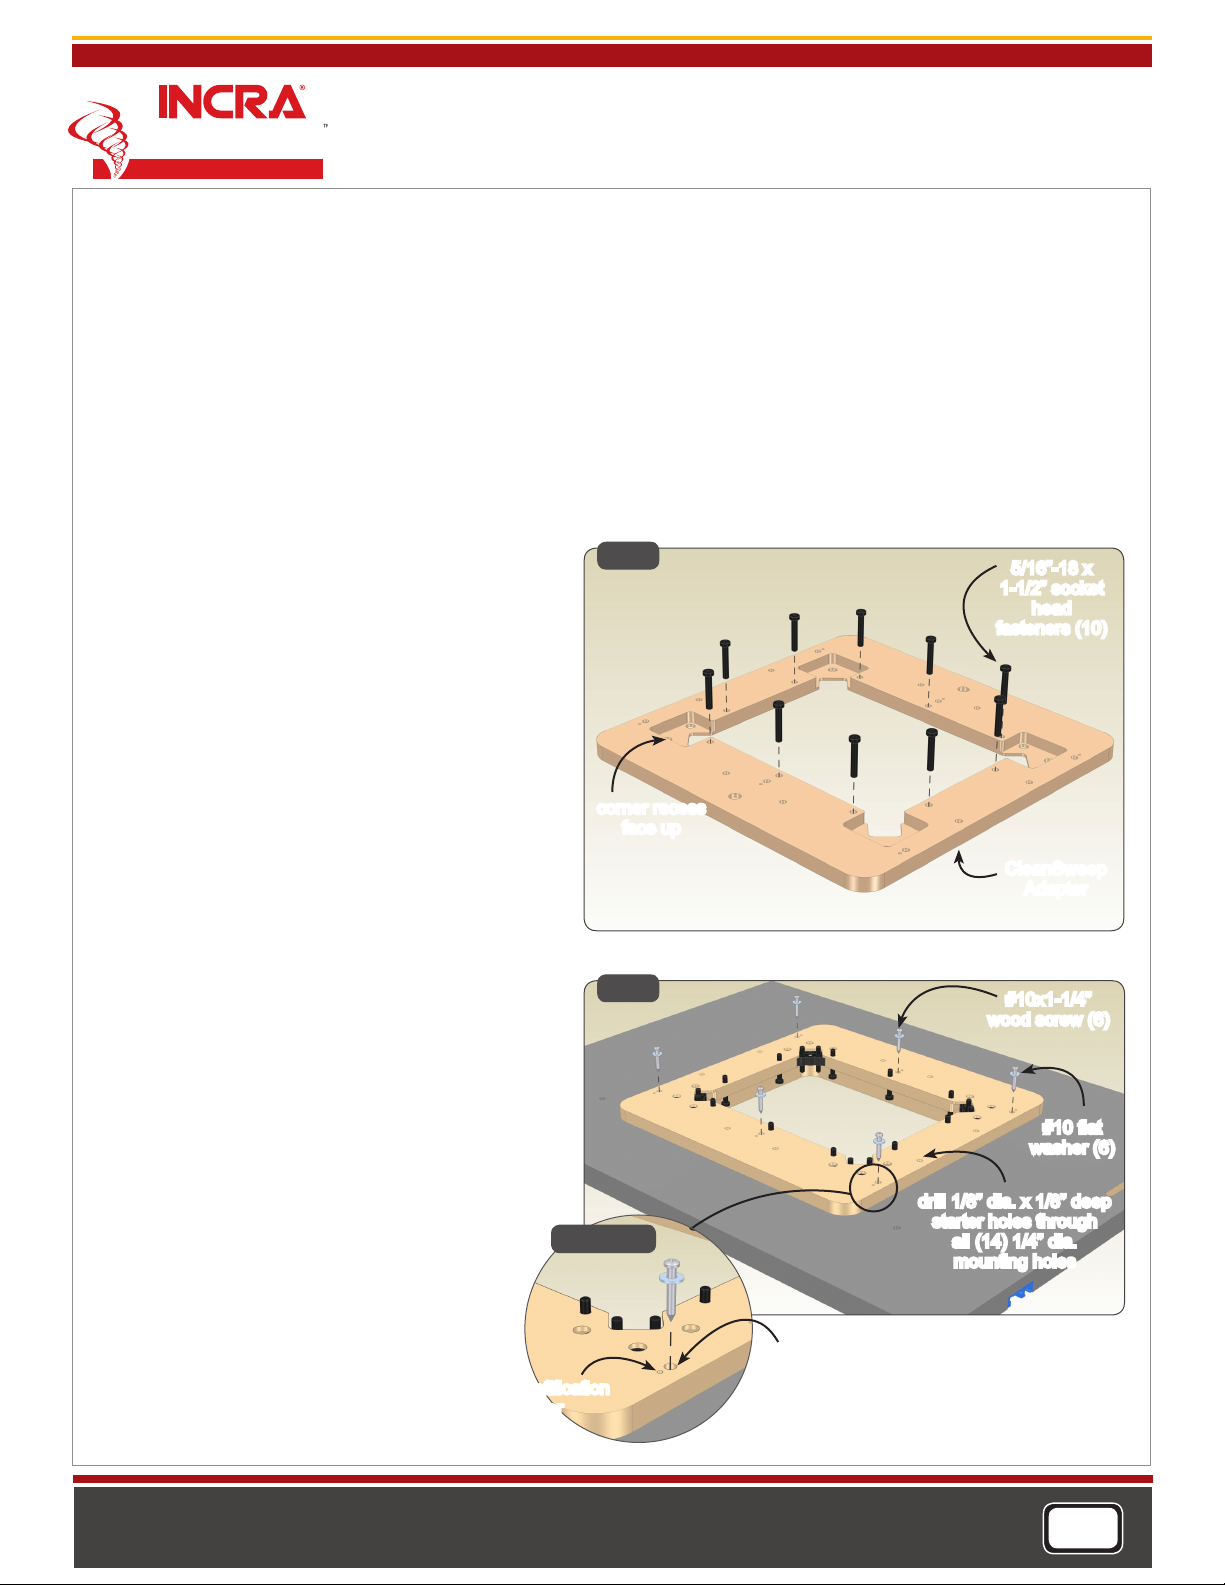
Attaching the CleanSweep Adaptor
1. Set the adaptor on your benchtop with the (4)
corner recesses face up and using the supplied 5/32”
straight hex tool and your power drill/driver, thread the
(10) 5/16-18 x 1-1/2” Socket head fasteners into the
(10) holes around the inside perimeter of the adaptor,
Fig 1. Screw the fasteners in until they just start to pro-
trude through the opposite face of the adaptor.
2. Remove any existing router plate or router lift and
router from your router table then turn the table up-
side down for ease of assembly. You can leave the (4)
corner mounted levelers in place but remove any addi-
tional leveling accessories provided by the router table
manufacturer. Lower the adaptor onto the table so
that the socket head fasteners set inside your table’s
plate opening and the corner levelers (if applicable)
nest into the recesses on the adaptor. Drill 1/8” diame-
ter starter holes to a depth of ONLY about 1/8” in your
router table through each of the (14) 1/4” diameter
mounting holes in the adaptor. Attach the adaptor us-
ing (6) #10 x 1-1/4” wood screws with washers through
the (6) holes that have a small diameter 1/8” diameter
hole next to them, Fig 2 and Detail 2A. The small hole
is only for the purpose of identifying the correct (6)
holes for mounting the adaptor.
Fig.1
corner recess
face up
Fig.2
Detail 2A
5/16”-18 x
1-1/2” socket
head
fasteners (10)
CleanSweep
Adapter
#10x1-1/4”
wood screw (6)
#10 at
washer (6)
drill 1/8” dia. x 1/8” deep
starter holes through
all (14) 1/4” dia.
mounting holes
Manufactured by:
Taylor Design Group, Inc.
P.O. BOX 810262 Dallas, TX 75381
www.incra.com
use larger 1/4” dia.
hole for mounting
1/8” hole for identication
of (6) adapter
mounting holes
INCRA is a R egistere d Trademark of Taylor Design Group © 2013 Taylor Design Group, Inc.
INCRA Tools a re protect ed by one or mor e of the following US patents:
#4,793,604, #4,930, 221, #5,195,730, #5,275,074, #5,423,360, # 5,716,045, #6,237,457,
#6,557,601, #6,672,190. rev.05/13
MADE IN THE
USA
Page 2
ww w.incra.com
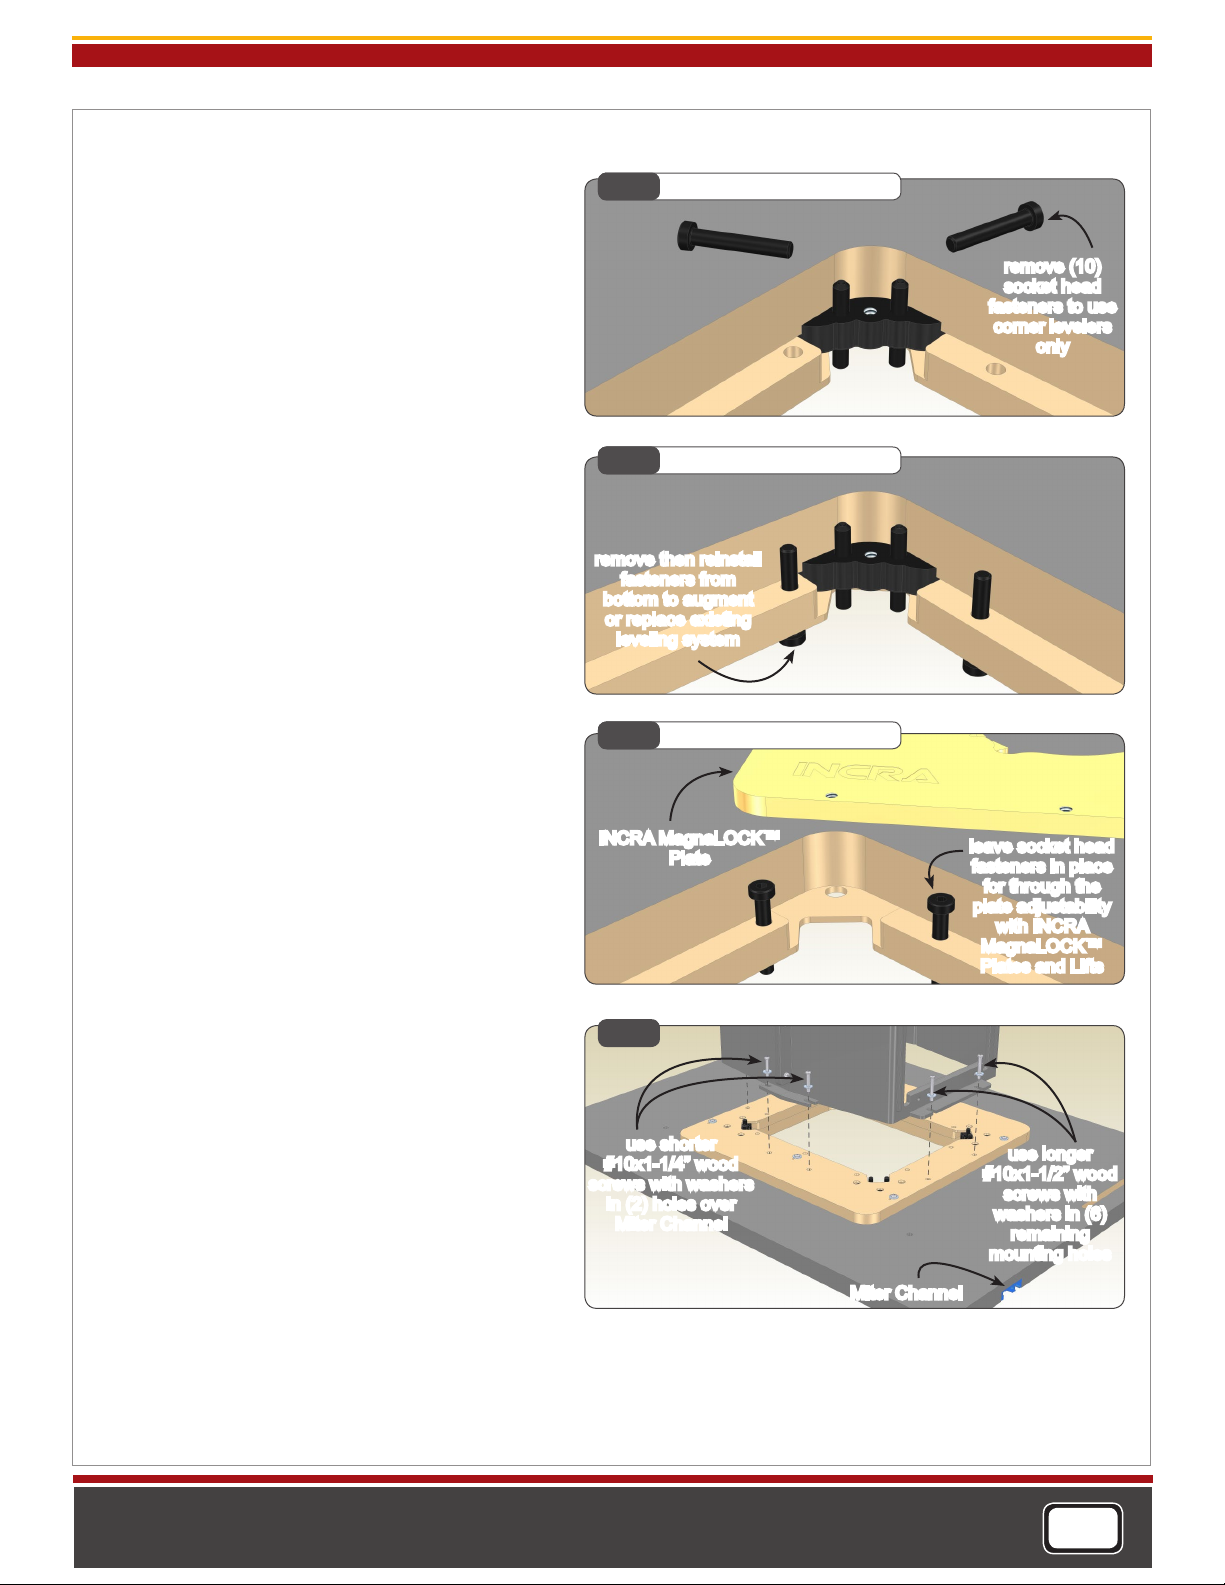
Plate Leveling Options
As previously mentioned, the CleanSweep Adaptor
provides a variety of options for later leveling your rout-
er plate or lift. Review the options below to determine
the best approach for your situation before mounting
your CleanSweep Cabinet.
OPTION 1: If you plan on using only your existing corner
mounted levelers to level your router plate, you can re-
move the (10) 5/16-18 X 1-1/2” Socket head fasteners,
Fig 3. Tip: The fasteners can also be left in place on the
adaptor. Just screw them down so the head does not
interfere with your router plate.
OPTION 2: If you would like to use some or all the
(10) 5/16-18 x 1-1/2 Socket head fasteners to supple-
ment or replace your existing equipment for leveling
any Non-INCRA router plate, remove then re-install the
fasteners so that the socket heads will be accessible
from the underside of the table, Fig 4.
OPTION3: If you want to upgrade to any INCRA Mag-
naLock Router Plate or Lift, the fasteners can be left in
place for easy adjustability from the top of the table
through the access holes provided in all INCRA MagnaLock Plates and Lifts, Fig 5.
Mounting the CleanSweep Cabinet
Align the CleanSweep Cabinet over the (8) remaining
mounting holes on the adaptor. The Blast Gate Slide
pull tabs should be oriented facing the infeed side of
the table. Through the (2) mounting holes over your
router table’s miter channel, use the shorter #10 x
1-1/4” wood screws with washers to attach the Clean-
Sweep to your table. For the remaining (6) holes, use
the longer #10 x 1-1/2” wood screws with washers, Fig 6.
You can now return to Step 4 in the CleanSweep Owner’s
Manual to complete your CleanSweep installation.
Fig.3 Plate Leveling Option 1
Fig.4 Plate Leveling Option 2
remove then reinstall
fasteners from
bottom to augment
or replace existing
leveling system
Fig.5 Plate Leveling Option 3
INCRA MagnaLOCK™
Plate
Fig.6
use shorter
#10x1-1/4” wood
screws with washers
in (2) holes over
Miter Channel
remove (10)
socket head
fasteners to use
corner levelers
only
leave socket head
fasteners in place
for through the
plate adjustability
with INCRA
MagnaLOCK™
Plates and Lifts
use longer
#10x1-1/2” wood
screws with
washers in (6)
remaining
mounting holes
Manufactured by:
Taylor Design Group, Inc.
P.O. BOX 810262 Dallas, TX 75381
www.incra.com
Miter Channel
INCRA is a R egistere d Trademark of Taylor Design Group © 2013 Taylor Design Group, Inc.
INCRA Tools a re protect ed by one or mor e of the following US patents:
#4,793,604, #4,930, 221, #5,195,730, #5,275,074, #5,423,360, # 5,716,045, #6,237,457,
#6,557,601, #6,672,190. rev.05/13
MADE IN THE
USA
 Loading...