

Page 1
NAOMI
©
HOME
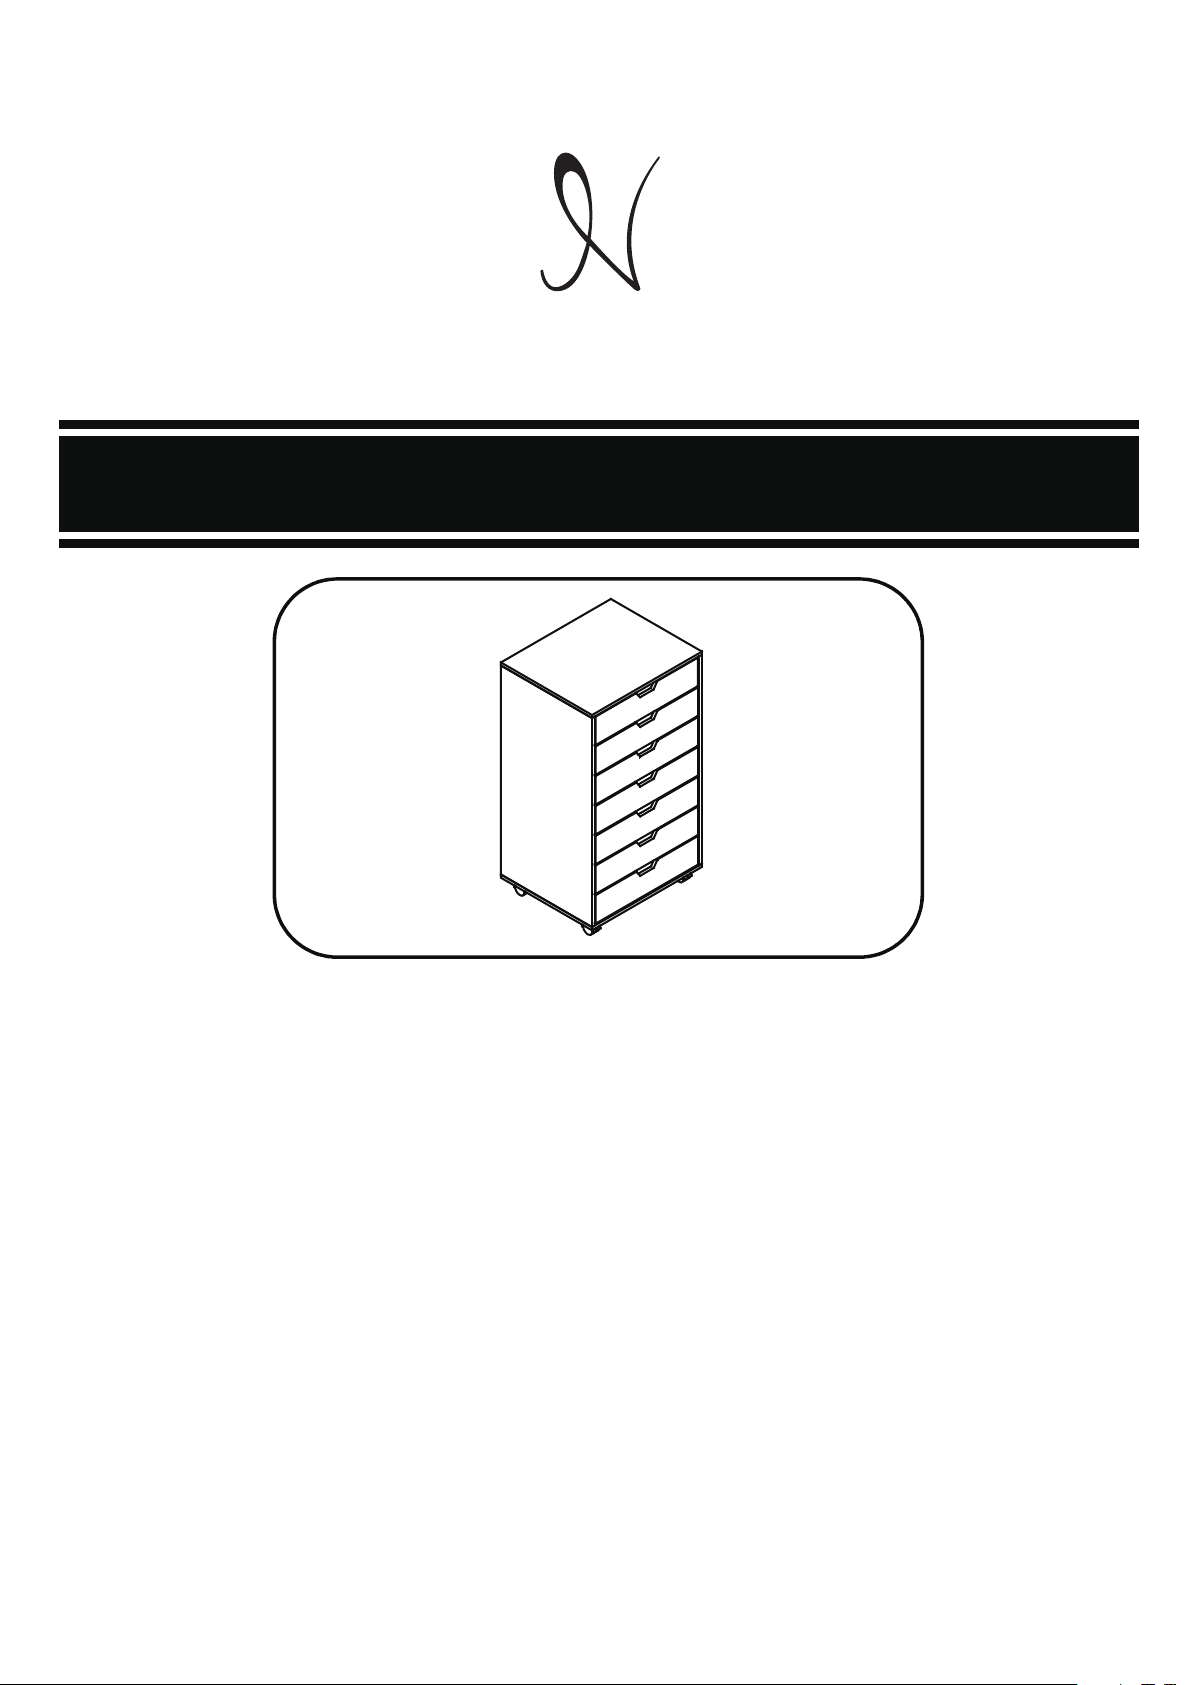
Naomi Home Debbie Office Cabinet
Assembly Instructions
Product Dimensions:
18.90”L×15.75”D×34.25”H
Please take a moment to read through the entire instruction booklet before assembly to
familiarize yourself with this product. Once you feel ready to start, follow the instructions
step by step and this should make this process as easy as we could make it for you.
If you need help or have damaged or missing parts, cont
www.NaomiHome.com.
act customer service at
2020 Naomi Home, Inc. - All Rights Reserved.
Page 1 of 10
Page 2
WARNING CAUTION
!
ADULT ASSEMBLY REQUIRED
CHOKING HAZARD
This product includes small parts, sharp points and sharp edges in its unassembled state.
•
Keep unassembled parts away from children under 3 years of age, and animals.
SAFETY WARNINGS
Follow the information on the warnings appearing on table and on the
•
carton. Do not remove warning label from cabinet.
Do not allow children under 3 years of age to use the cabinet.
•
Do not use substitute parts. Contact the manufacturer or dealer for replacement parts.
•
FURNITURE TIP-OVER HAZARD
Children have died from furniture tip-over
To reduce the risk of furniture tip-over:
•
ALWAYS install tip-over restraint especially if used by a wall or in the open.
NEVER put a TV on this product
•
NEVER allow children to stand, climb or hang on drawers, doors, or shelves.
•
NEVER open more than one drawer at a time.
•
ALWAYS place heaviest items in lowest cabinet.
•
PARENTAL SUPERVISION IS REQUIRED
Parents or Guardians should supervise use under the intended age specifically regarding
•
children that may have access to it and climb on the unit.
Do not allow horseplay on, under, or behind the unit and prohibit jumping on the cabinet.
•
If used improperly, your table may be pulled over or fall, creating risk of injury or
•
damage. Children should not be permitted to climb or pull on the cabinet.
USE, MAINTENANCE & ASSEMBLY
Periodically check and ensure that the components are in their proper position, free from
•
damage, and that all connectors are tight.
•
Use on level surfaces only. Assemble on a soft level surface to avoid damage to unit or floor.
•
Do not use this item if any components are missing or damaged.
•
Do not use substitute parts. Contact the manufacturer or dealer for replacement parts.
•
Only clean using damp cloth and mild detergent, do not use bleach or abrasive cleaners.
•
Check you have all components and tools listed on page 4
•
Do not stand or put weight on this product during assembly, this could cause damage.
•
Remove all hardware from the plastic bags and separate them into groups.
•
Assemble the item as close to its final position (in the same room) as possible.
•
Certain assembly steps may be easier with 2 people.
•
Dispose of all packaging carefully and responsibly.
•
We do not recommend power screwdrivers. Only use hand screwdrivers to prevent
•
damage to unit.
Keep these instructions for future reference.
•
Enfants morts suite au basculement d’un meuble.
Afin de limiter le risque de basculement de meuble:
TOUJOURS utiliser les fixations anti-basculement.
•
•
NE JAMAIS installer de TV sur ce produit.
•
NE JAMAIS laisser d’enfants se tenir debout sur les tiroirs,
portes ou etageres, y grimper ou s’y suspendre.
NE JAMAIS ouvrir plus d’un tiroir a la fois.
•
•
TOUJOURS placer les choses les plus lourdes dans les tiroirs du bas.
Han muerto ninos por el vuelco de meubles.
Para limitar el riesgo de vuelco de los meubles:
•
Utilisar SIEMPRE las fijaciones antivuelco que suministran.
•
NUNCA instalar un TV sobre este producto.
•
NUNCA permitar que los ninos se pongan de pie, trepen o
se cuelguen de los cajones, puertas o baldas.
•
NUNCA abrir mas de un cajon a la vez.
•
Colocar los objetos mas pesados en los cajones inferiores.
Page 2 of 10
Page 3
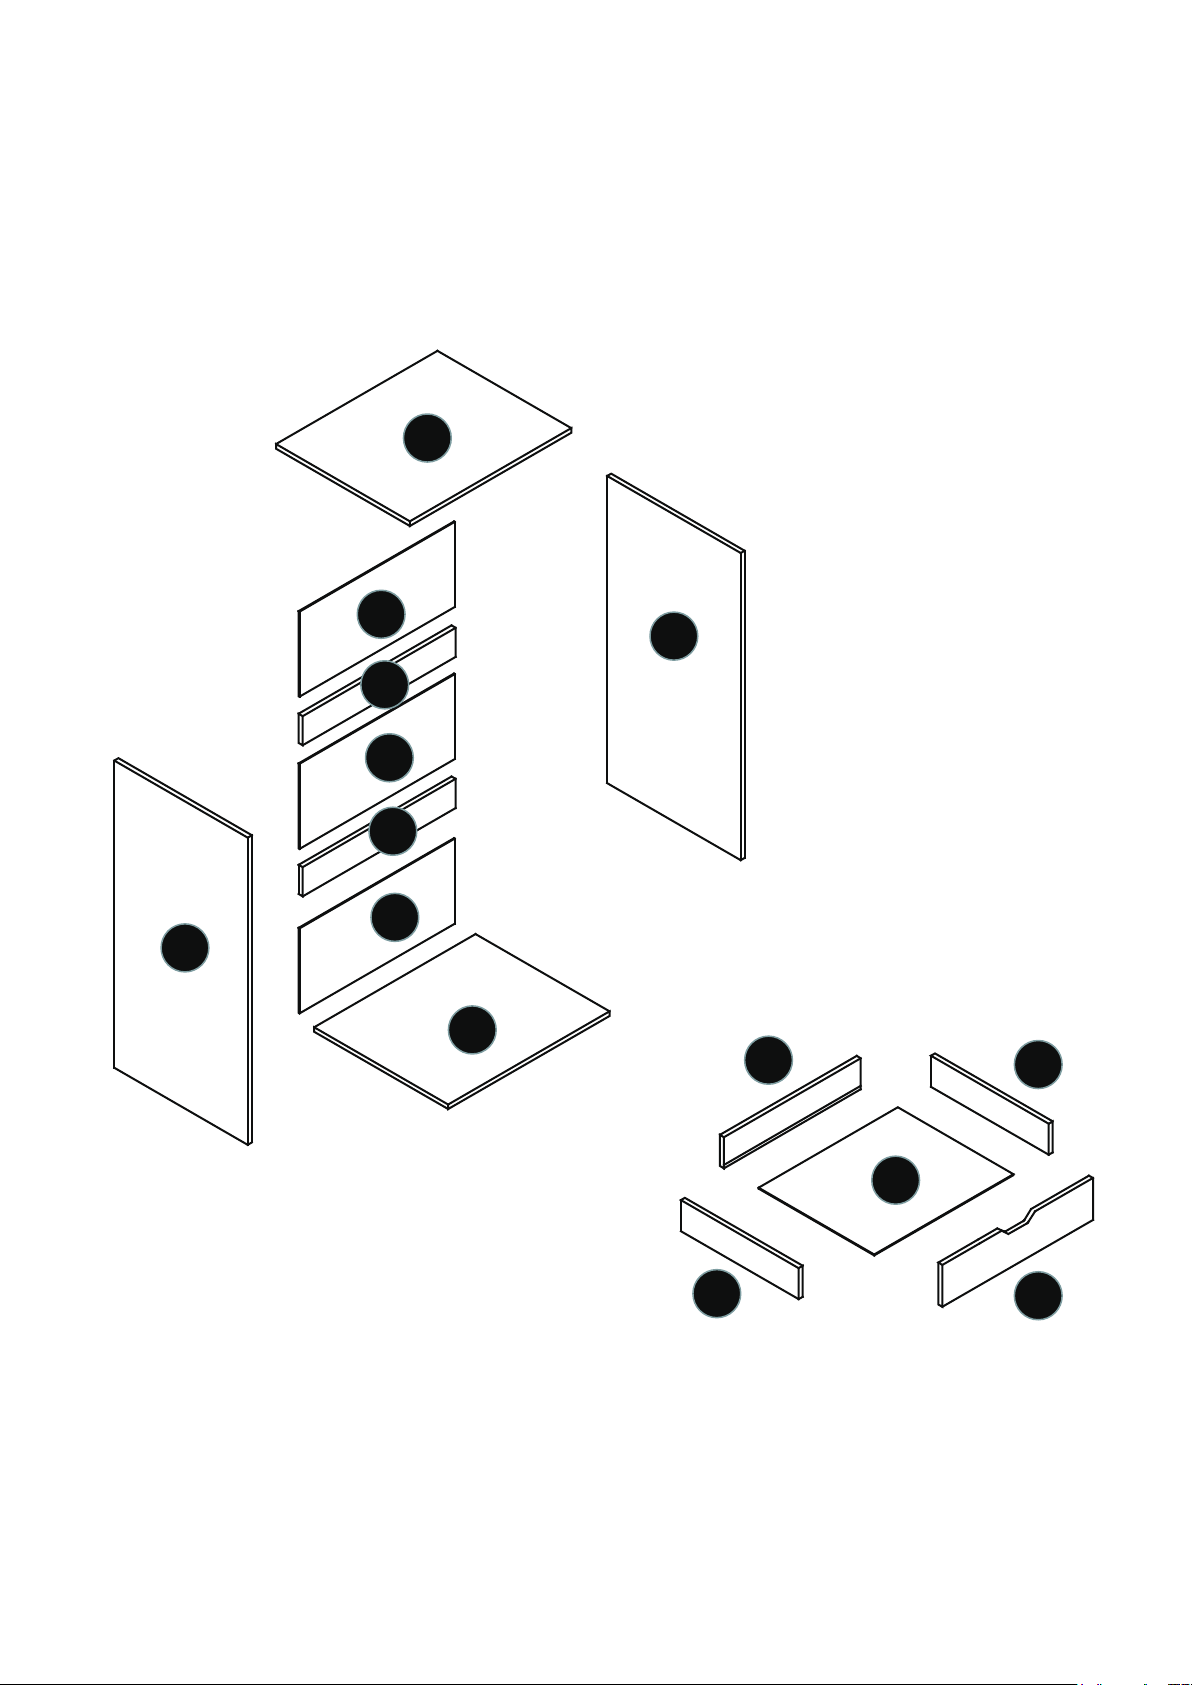
ASSEMBLY AT A GLANCE
Please take a moment to read through the whole instruction booklet before assembly to familiarize
yourself with this product. Once you feel ready to start, follow the instructions step by step and this should
make this process as easy as we could make it for you.
1
5
3
6
2
7
8
9
4
11
10
12
13
14
This drawing is to give you an overall idea only of how this assembly will go together
and does not replace the assembly instructions.
Page 3 of 10
Page 4
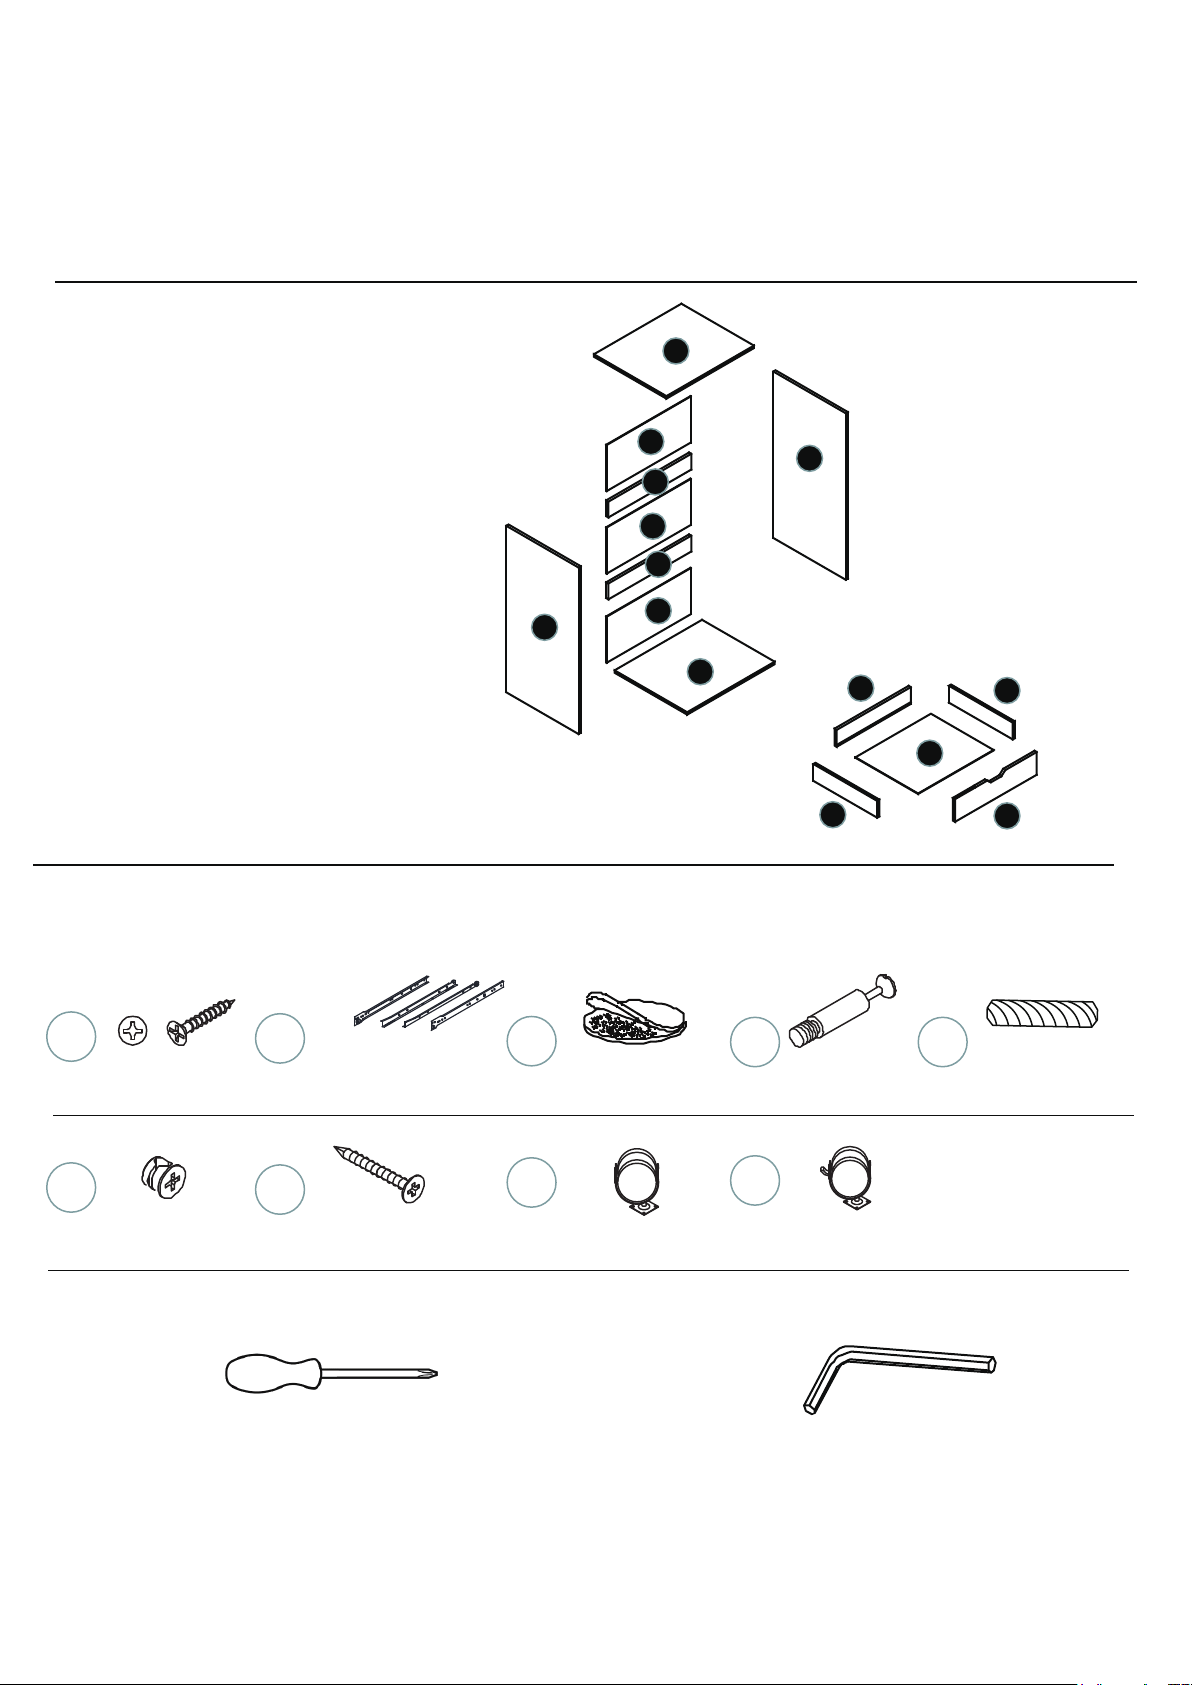
COMPONENT PARTS
Please check that you have all the parts listed below
1
1. Top Panel ×1
2. Left Side Panel×1
3. Right Side Panel×1
4. Bottom Panel×1
5. First Back Side Panel ×1
6. Second Back Side Panel ×1
7. Third Back Side Panel×1
8. Fourth Back Side Panel ×1
9. Fifth Back Side Panel ×1
10. Drawer Back ×7
11. Drawer Left ×7
12. Drawer Right ×7
13. Drawer Bottom ×7
14. Drawer Front ×7
2
5
6
7
8
9
4
3
10
13
12
A
F
B
Screw ×100
G
×18 Cam Lock
Tools Required Tools Required
ASSEMBLY HARDWARE
LD RD
Drawer Slide
Screw
× 40
CRCL
×7
C
Thread for screw hole×12
H
Rear Wheel×2
11
D E
Cam Bolt
×18
I
Front Wheel×2
14
Wood Dowel
Pin
×22
Phillips Screwdriver
(Medium) (not included)
*Do Not Use Power
Screwdriver or Drill.
Hex Screwdriver
(included)
Page 4 of 10
Page 5
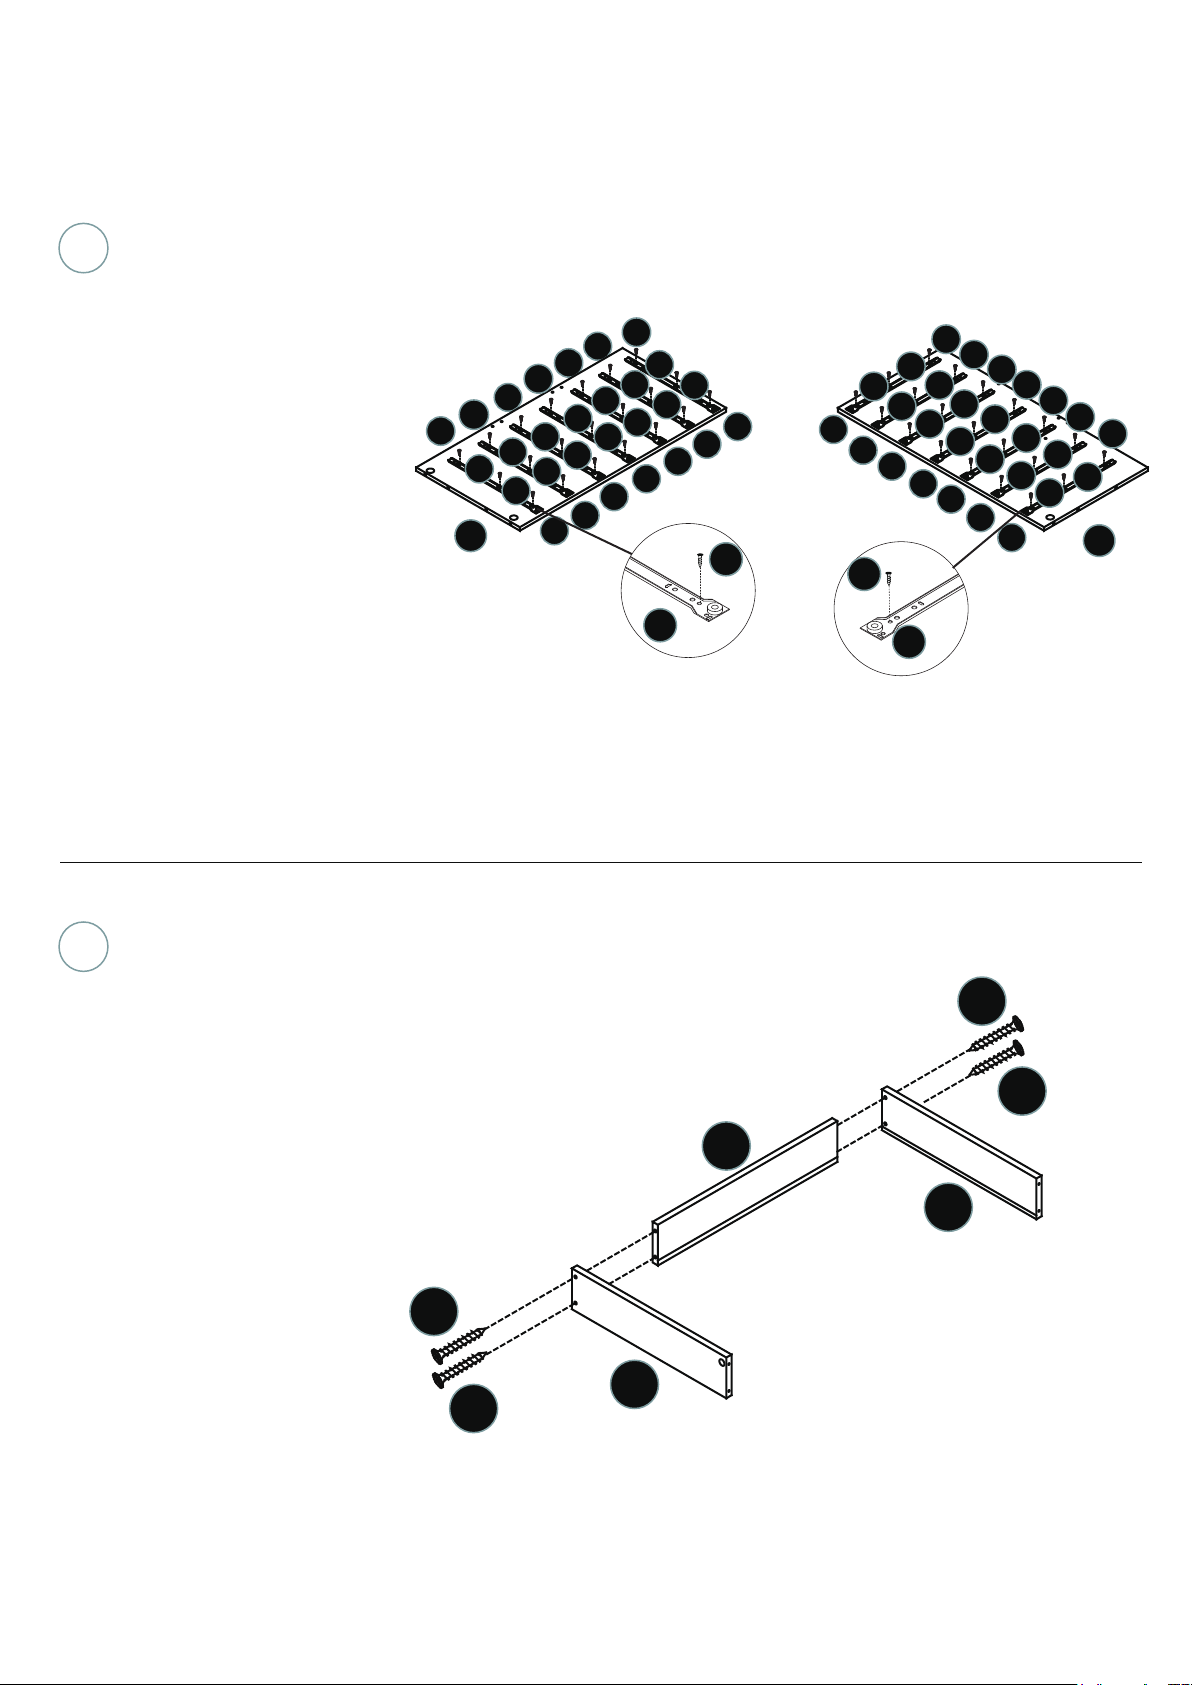
1
ASSEMBLY INSTRUCTIONS
Select A×42 and 2×1,
3×1. Position 2 in the left,
position 3 in the right. Insert
A×7 into the one side of the
B CL, other A×7 into the
middle of the B CL, other A×7
into the other side of the B
CL.Insert B CL×7 into the
2.Repeat the steps for B CR
and the 3.
A
A
A
A
A
A
A
A
A
A
2
A
A
A
A
B
B
A
A
A
A
B
A
A
A
B
B
B
B
A
B
CL
A
B
B
A
A
A
A
B
B
A
A
A
A
A
A
B
B
CR
A
A
A
A
B
B
A
A
A
A
A
A
A
3
2
Select 10×7,11×7,12×7, and
G×28. Insert G×2 into the
hole of the 11 into the 10.Repeat the steps for 10 and 12.
Repeat the steps for another
Drawer panels×6.
G
G
10
12
G
11
G
Page 5 of 10
Page 6
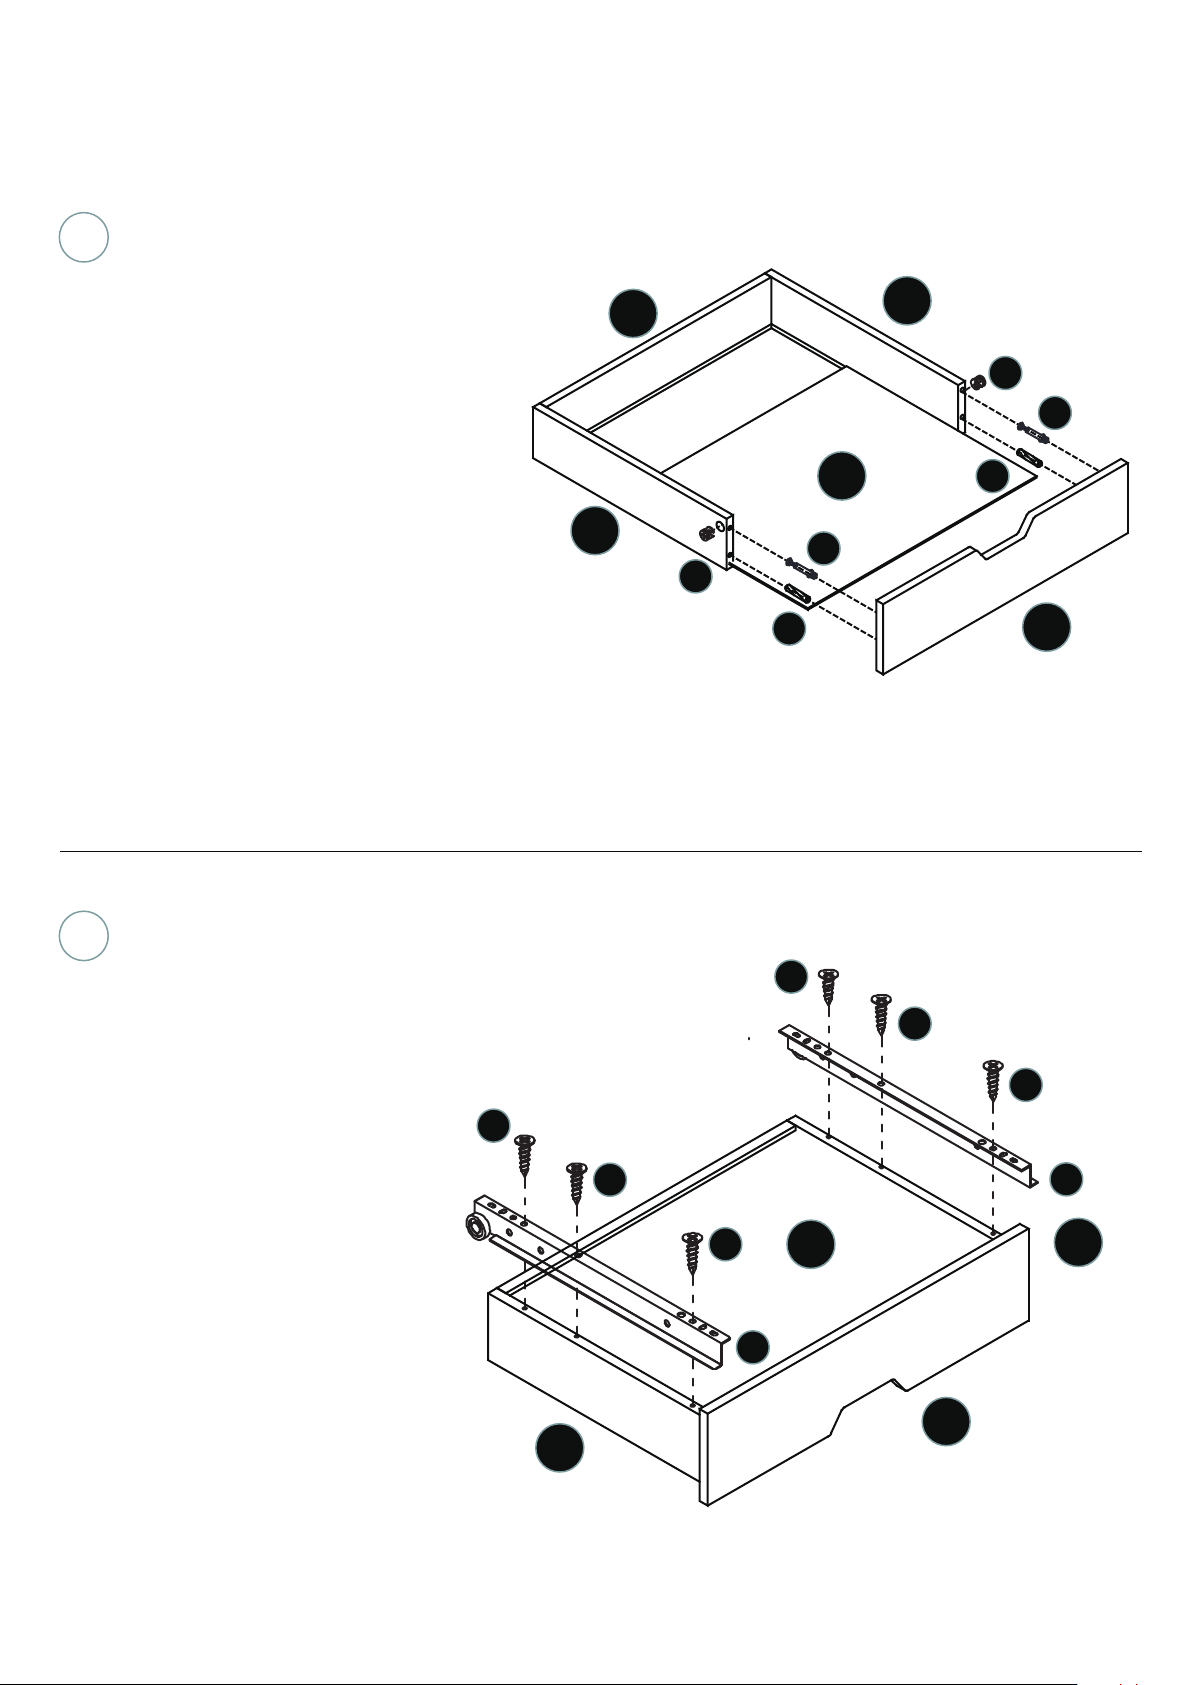
3
ASSEMBLY INSTRUCTIONS
Select 13×7 ,14×7 , D×14,
E×14, F×14. Install the 14
along the grooves on the
both sides of the 11 and 12.
Install the 13 on the 11 with
the D, E and F. Repeat the
steps for the 13 and the 12.
Repeat for another Drawer×6.
11
10
12
F
D
14
D
F
E
E
13
4
Select A × 42, B DR ×7, B DL
×7. Put the Drawer upside
down. Insert A×3 into the B
DR into the 12 tightly.
Repeat the steps for the
11.Repeat the steps for
another Drawer ×6.
A
A
A
A
B
A
A
14
DR
B
DL
11
13
12
Page 6 of 10
Page 7
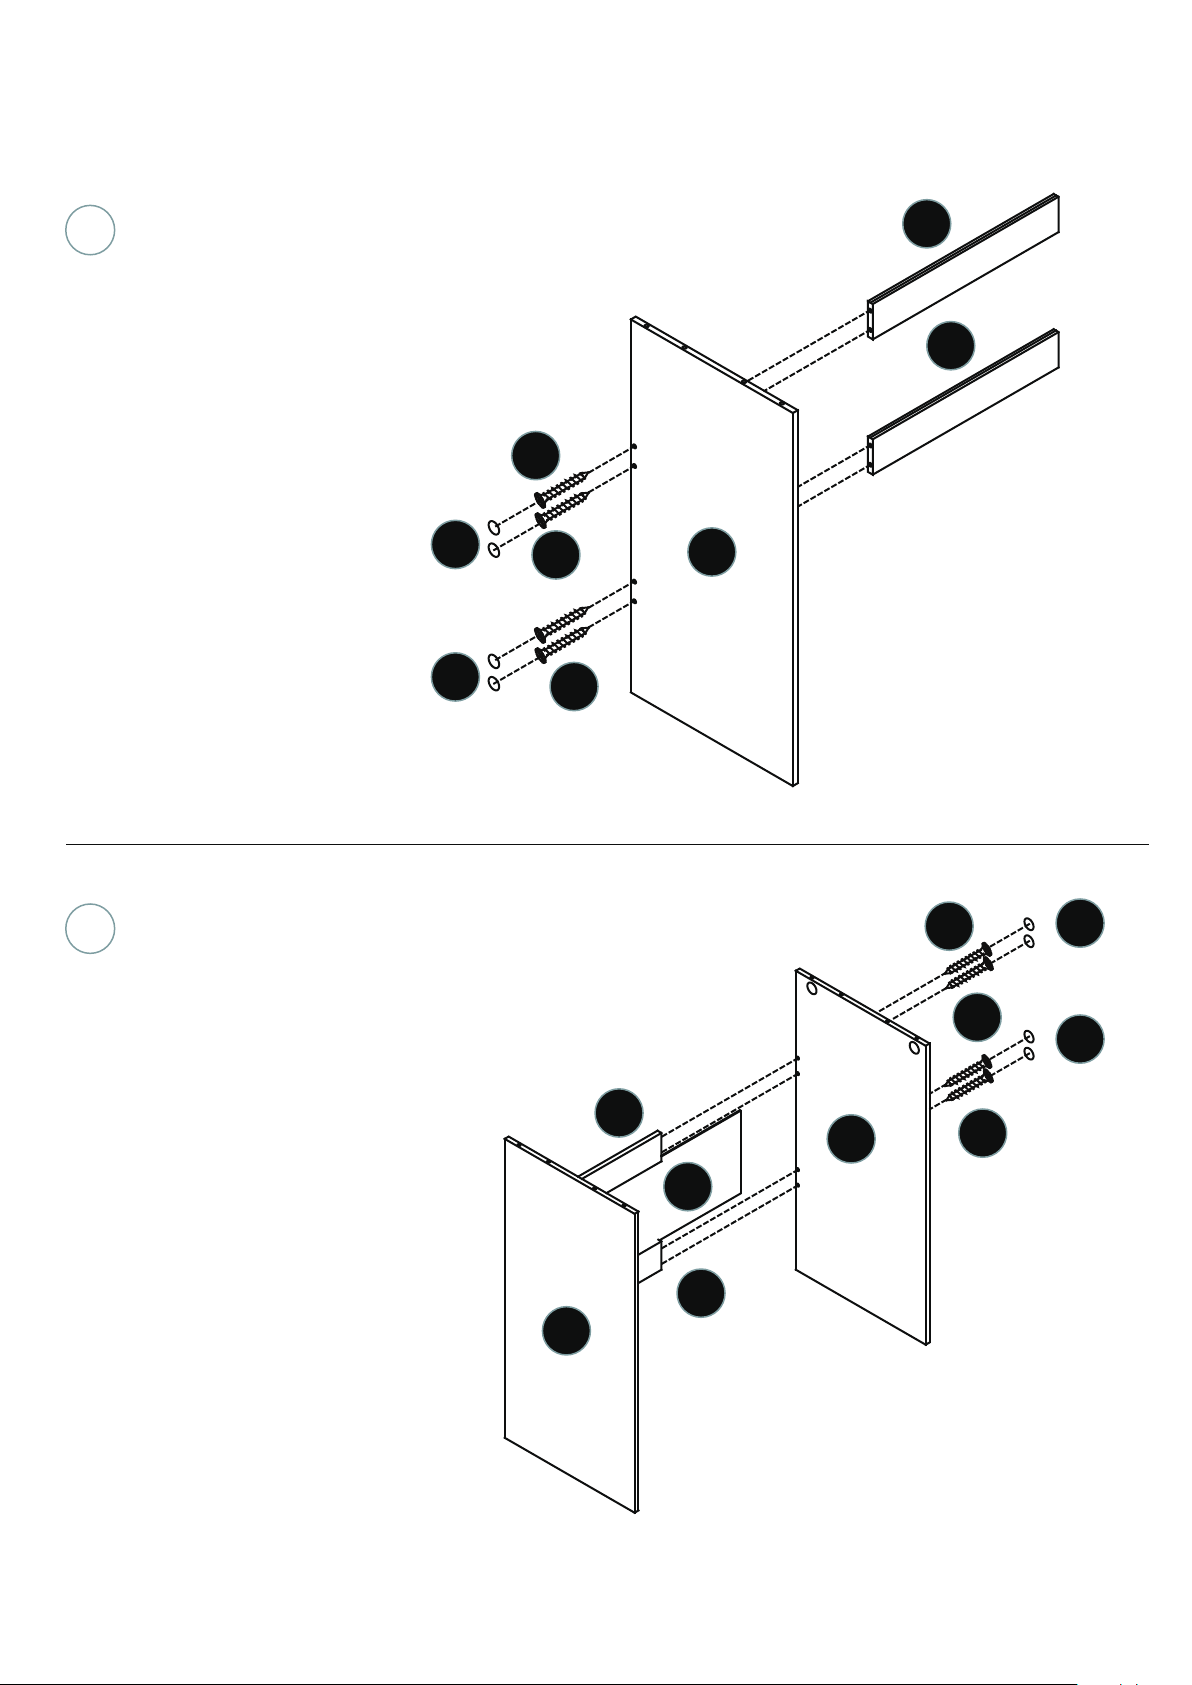
ASSEMBLY INSTRUCTIONS
5
Select 2,6,8,G×4, J×4. Insert
G×2 into the 2 into the onesides of the 6 with the J×2.
Repeat for the 2 and the 8.
C
C
G
G
6
8
2
G
6
Select 2,3,6,7,8,E×4,G×4,J×4.
Install the 7 along the
grooves of the 6 and 8. Insert
the 3 into the 6 and 8 with
the G×4,J×4.
2
6
7
8
3
G
C
G
C
G
Page 7 of 10
Page 8
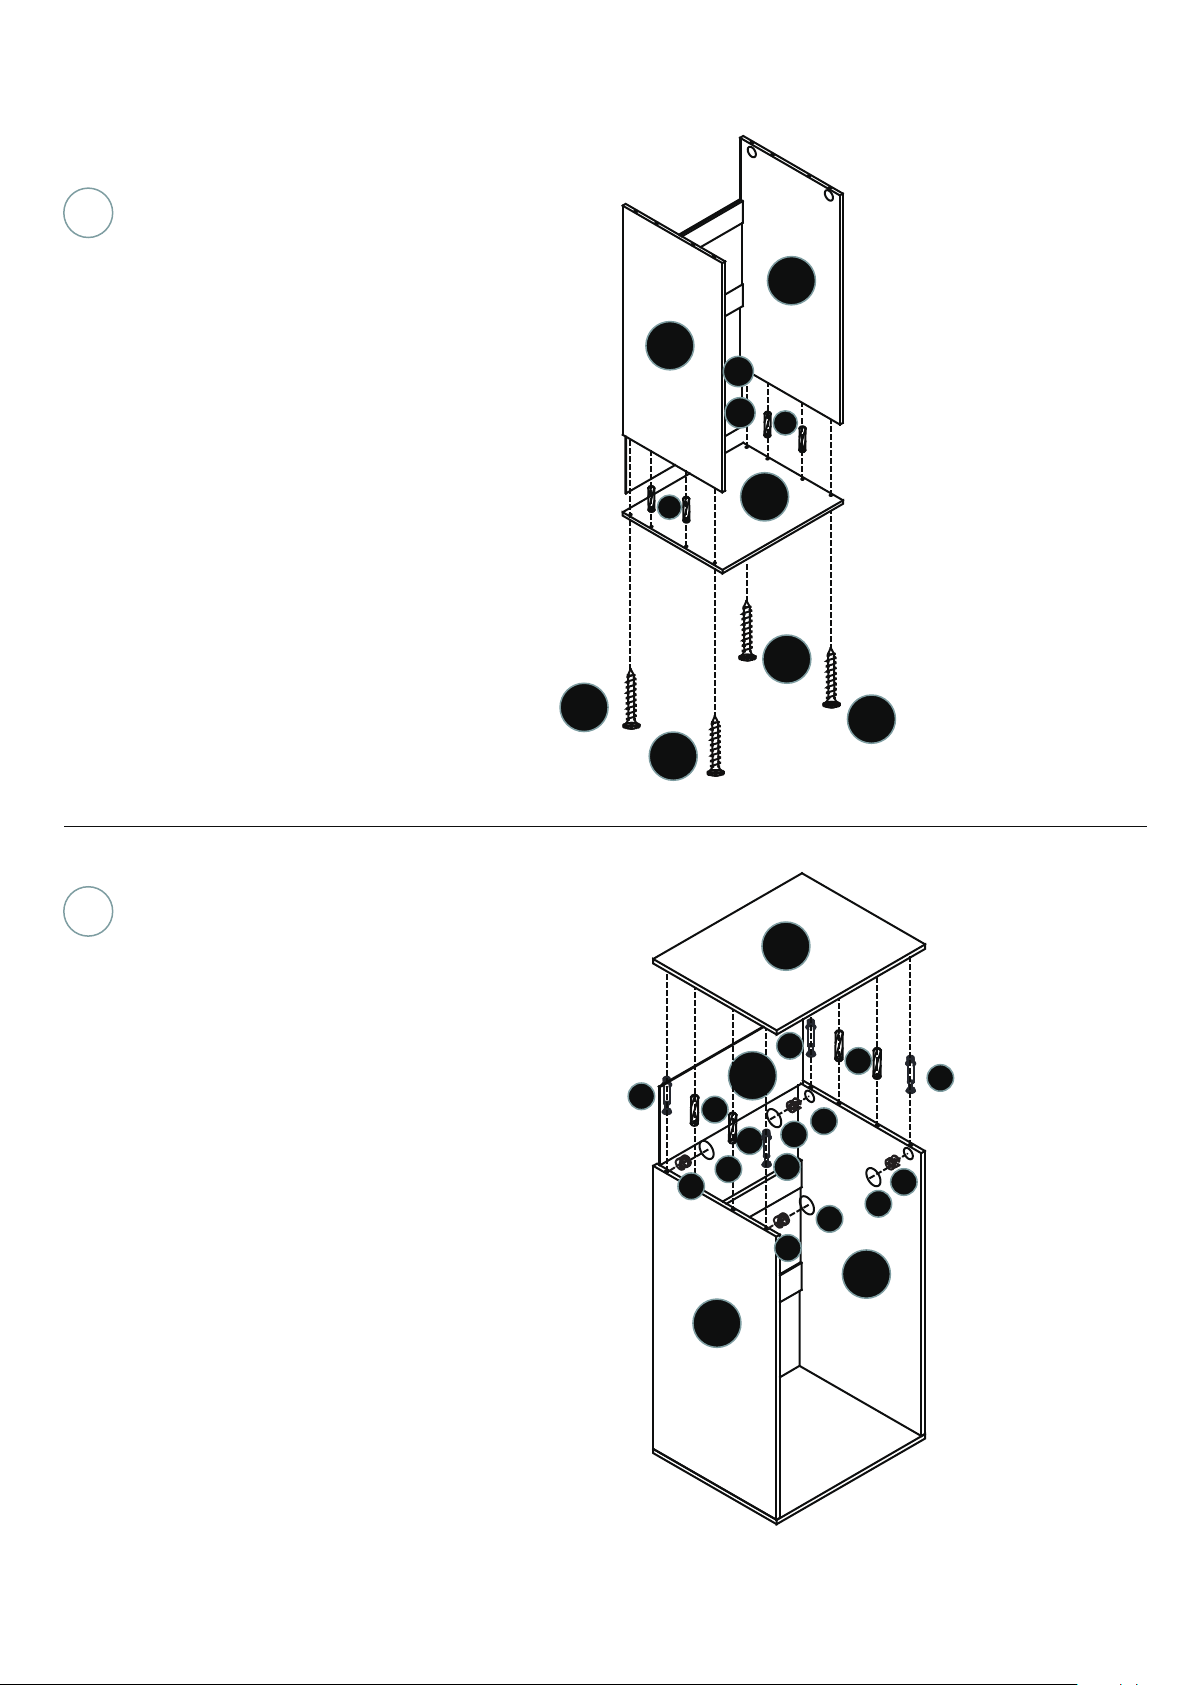
7
ASSEMBLY INSTRUCTIONS
Select 9,4, E×4,G×4.
Install the 9 along the
grooves of the 8. Insert one
side of the 4 into the 2 with
E×2,G×2.Repeat for the other
side of the 4 and the 3.
G
2
E
G
3
8
9
E
4
G
G
8
Select 1,5,D×4,E×4,F×4,J×4.
Install the 5 along the groove
of the 6.Insert one side of the
1 into the 2 with the
D×2,E×2,F×2,J×2. Repeat for
the 1 and the 3.
1
D
D
5
E
C
6
D
C
F
F
E
F
C
D
F
C
3
2
Page 8 of 10
Page 9
ASSEMBLY INSTRUCTIONS
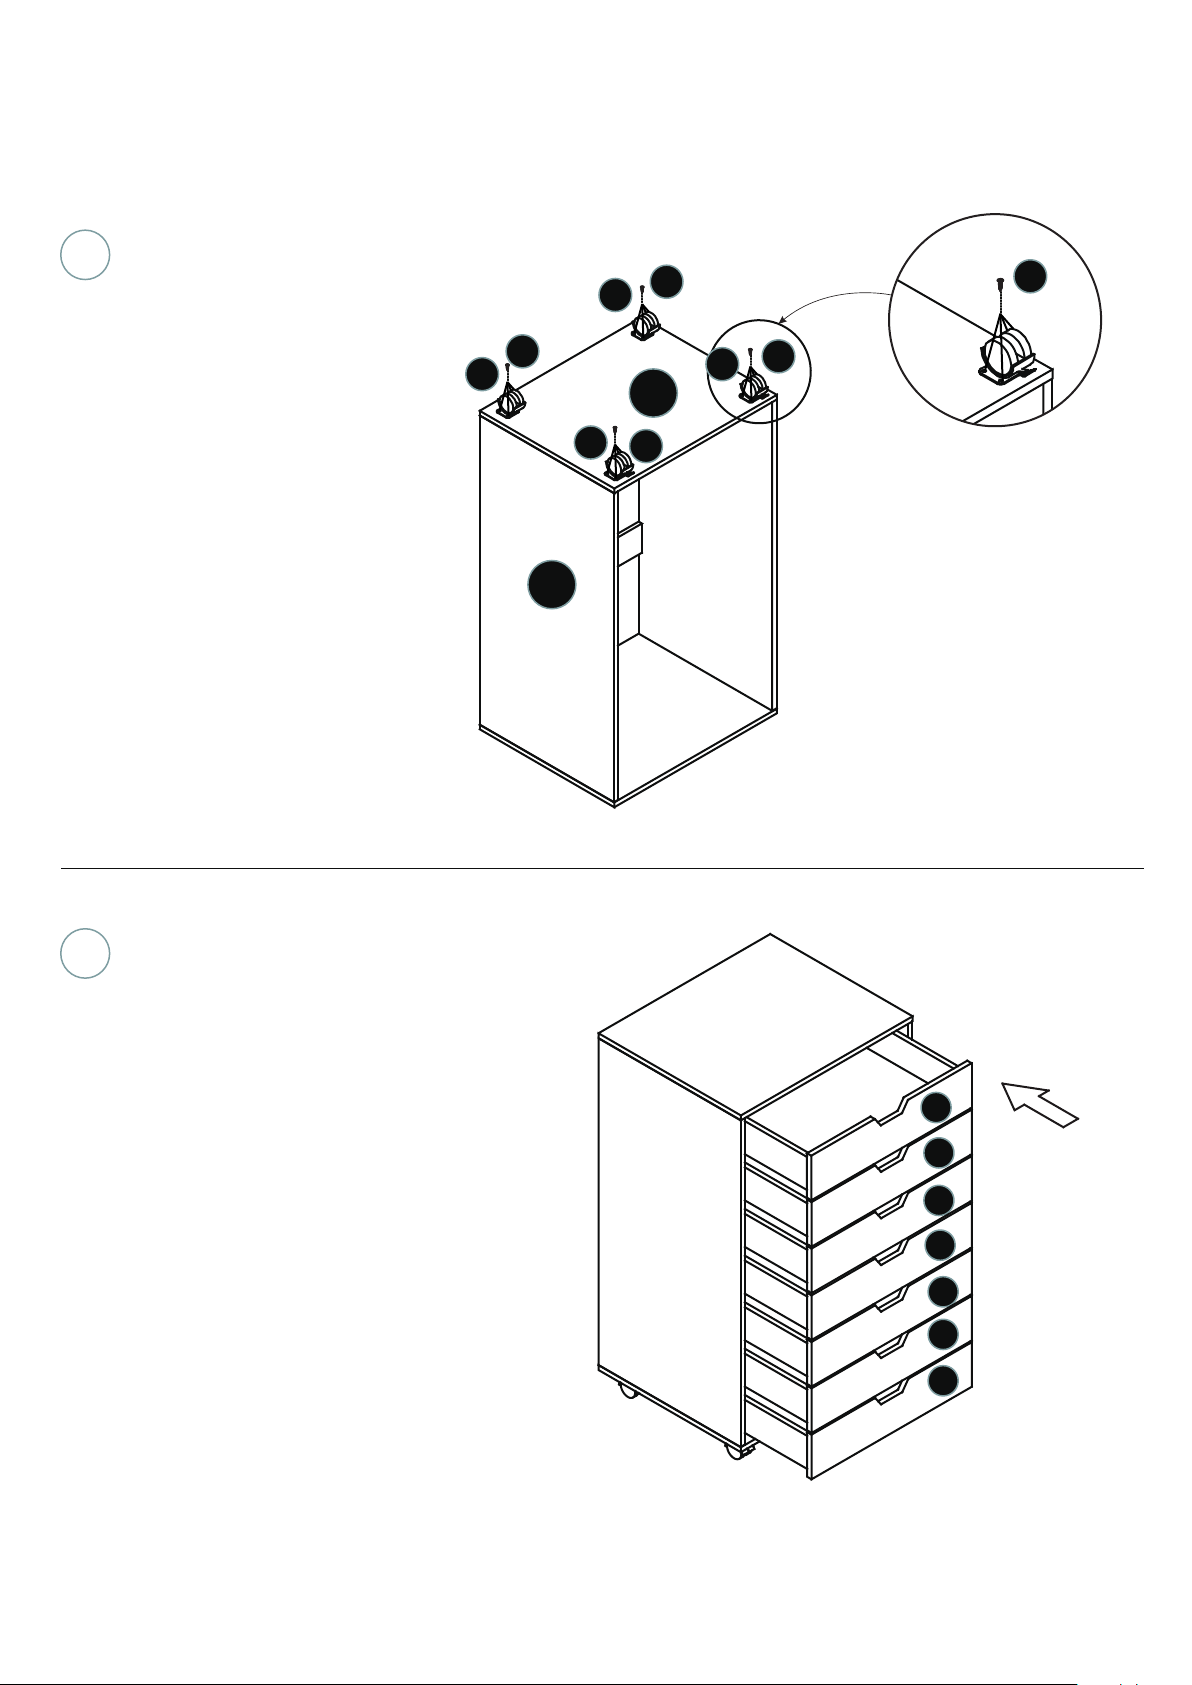
9
Select 4×1,H×2, I×2,the
A×16.
Put the cabinet upside down,
insert the H×2 into the 4 with
the A×8 tightly. Repeat for
the I×2.
H
H
A
A
A
I
A
4
A
I
3
10
Put the Drawers ×7 into the
Cabinet.
14
14
14
14
14
14
14
Page 9 of 10
Page 10
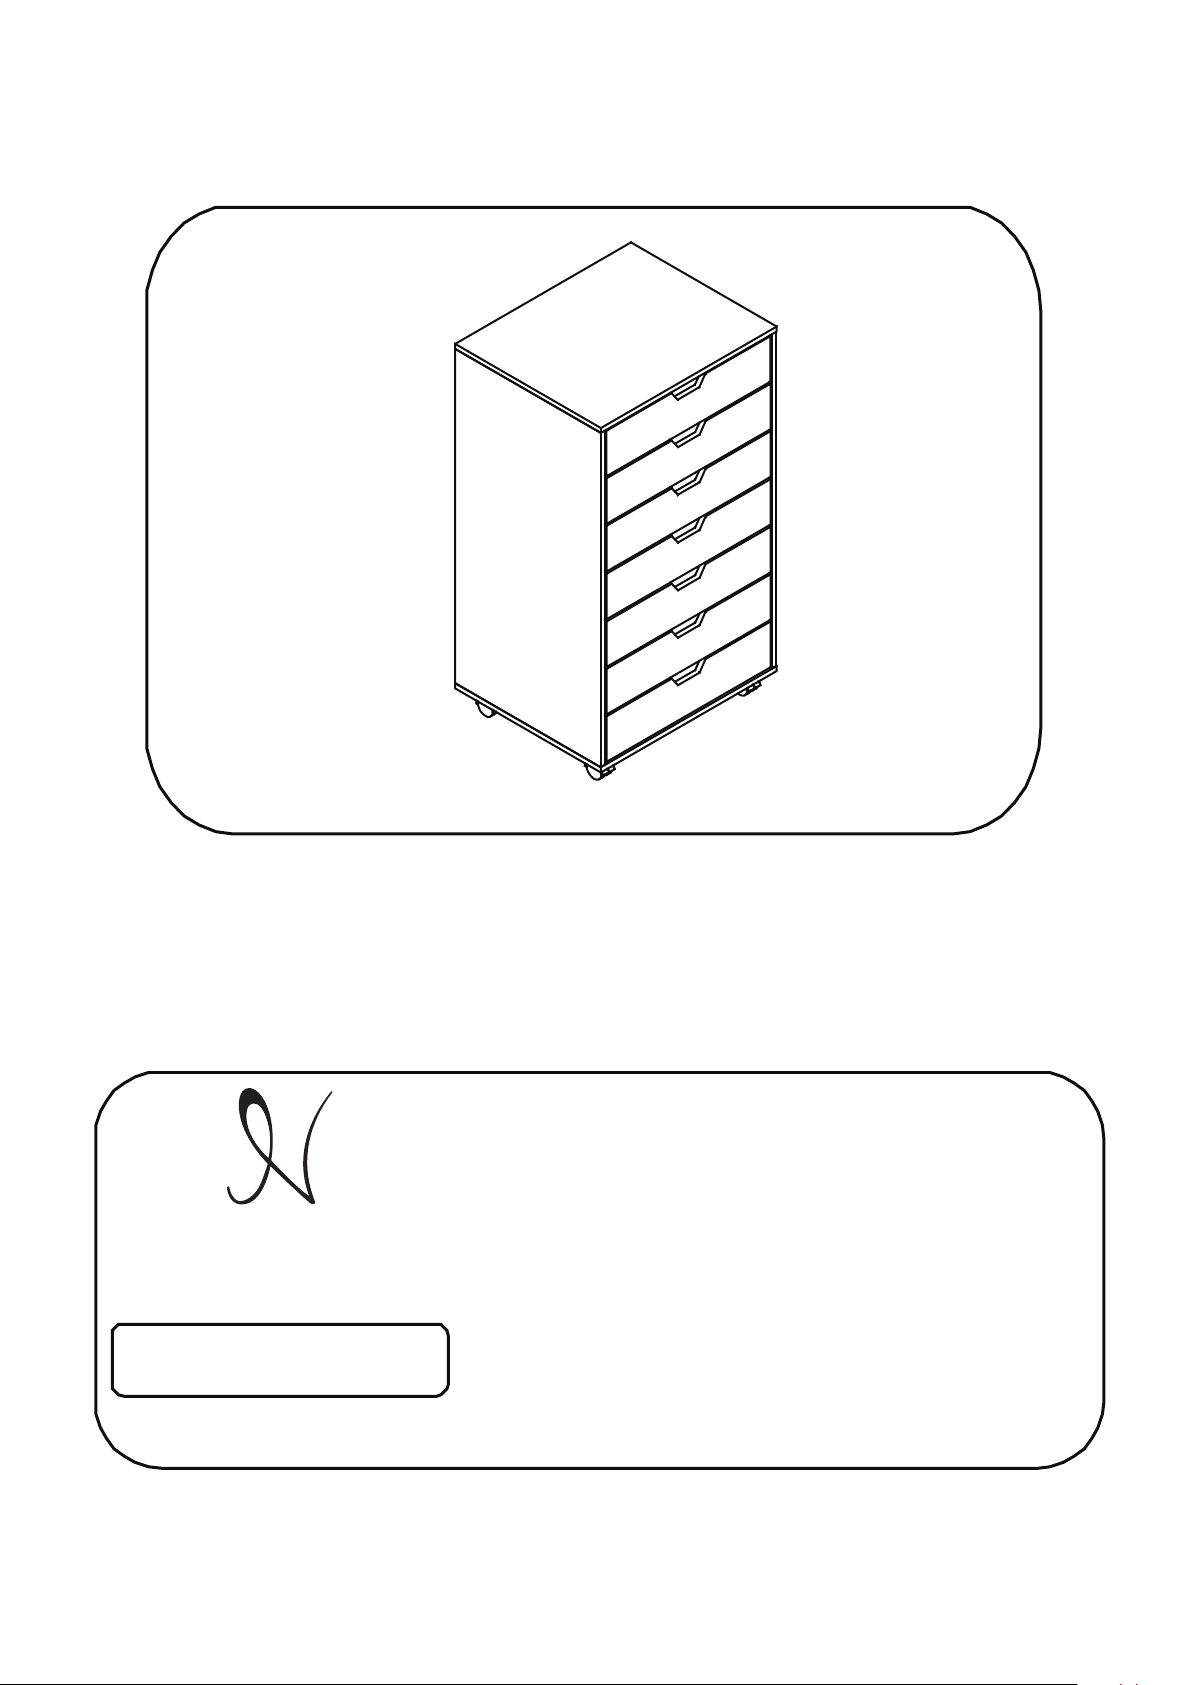
ASSEMBLY COMPLETE
A A YCONGR TUL TIONS, OUR NAOMI HOME DEBBIE OFFICE
CABINET IS COMPLETE!
N A O M I
H O M E
www.NaomiHome.com
MADE IN CHINA
Product Packaging Information
Model #:
Color:
Shipment Ref. #:
Date:
________________________________
__________________________________
_________________________
__________________________________
Page 10 of 10
 Loading...