

Inax Regio DV-R115-VL-US User Manual
User's Manual
REGIO
DV-R115-VL-US
Thank you for purchasing this product. After reading this manual, keep it in a place where you can refer to it easily.
Be sure to follow the safety precautions
Failure to follow the warning and cautions described on pages 7 - 13 may result in serious accidents under some circumstances. Each of these items is extremely important for safety, and should be strictly observed.
In the event that an accident occurs as a result of improper usage, our company will assume no responsibility for damages.
Please Read This First
REGIO Features
This product is designed so that people such as elderly, people with limited mobility, people with illness, and children
can use it without assistance.
To ensure proper usage of this product, please read this before using this product.
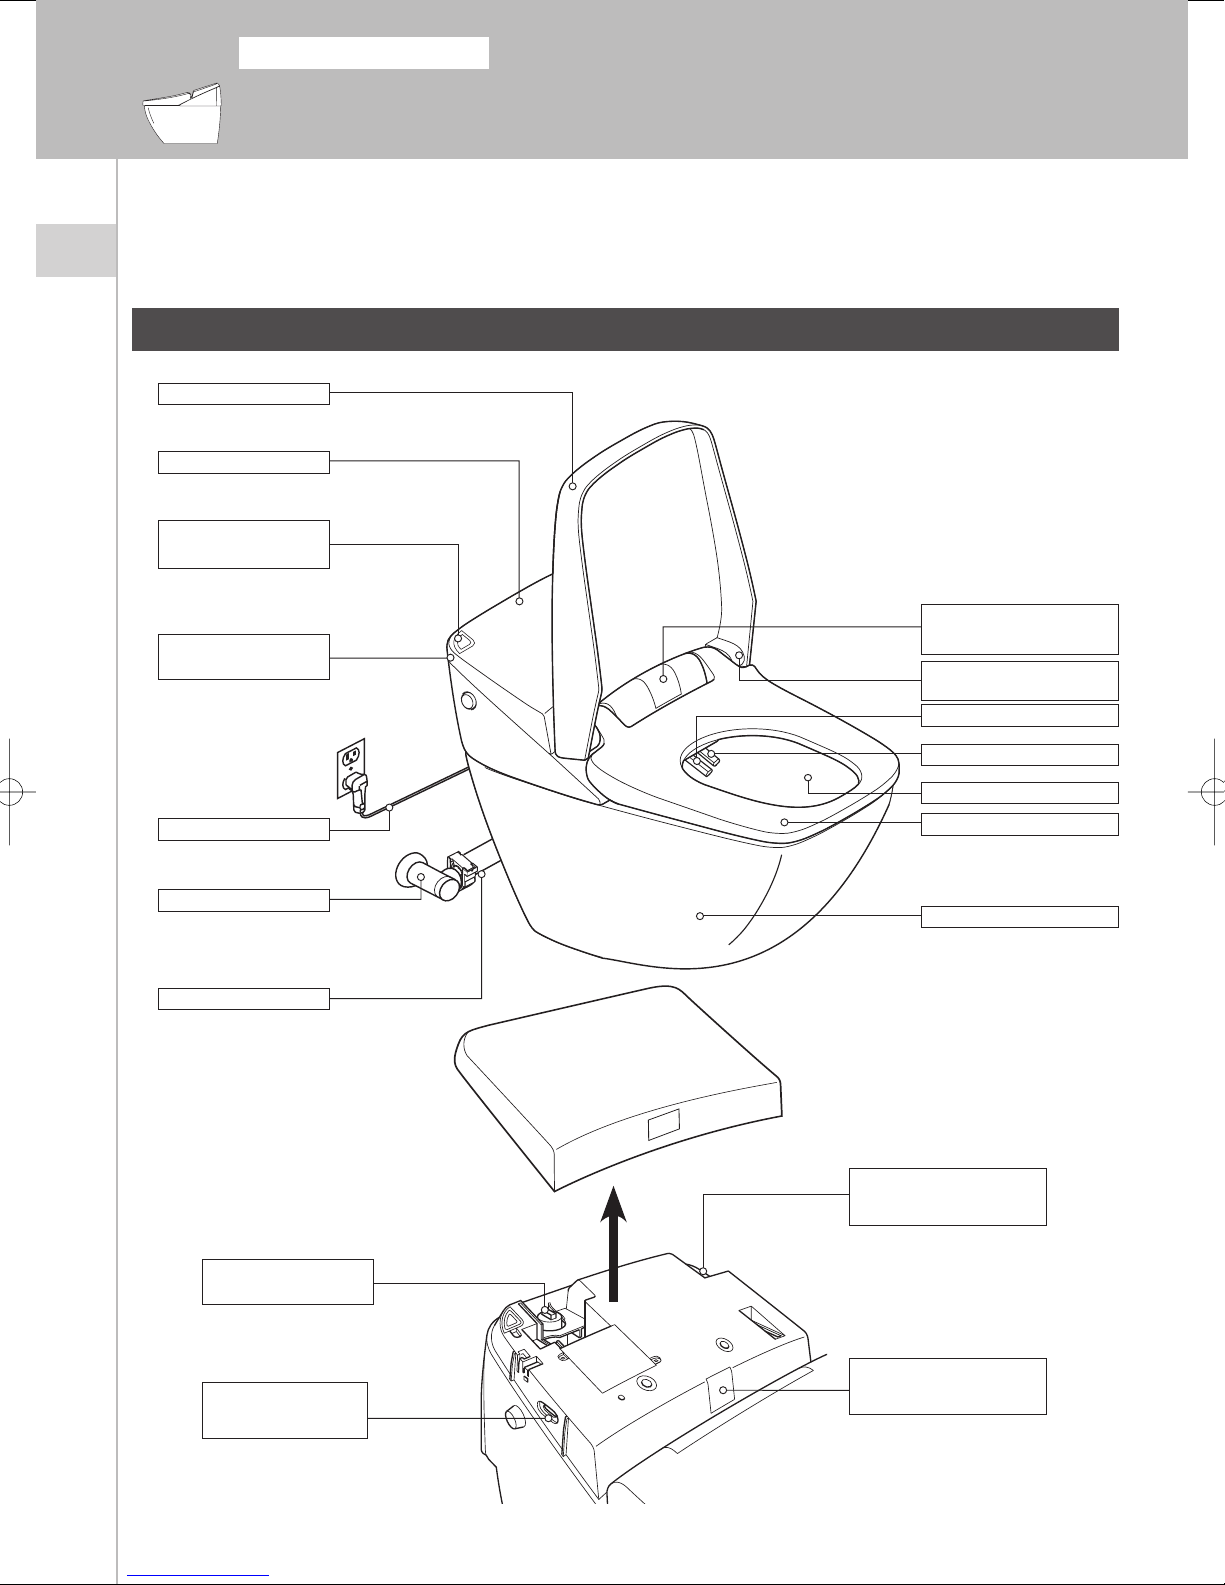
Overview
Toilet seat lid
Top cover
Remote control
signal receiver
Indicator (See page 2.)
Plasmacluster vent
Lower body sensor
Toilet seat lid release
lever
Nozzle (for front washing)
Power cord
Water shutoff valve
Water supply hose
Strainer
(See page 2.)
Nozzle (for rear washing)
Bowl
Toilet seat
Toilet
Deodorizer cartridge
(See page 2.)
SD memory card slot
(See page 2.)
Indicator (See page 2.)
Upper body sensor
1
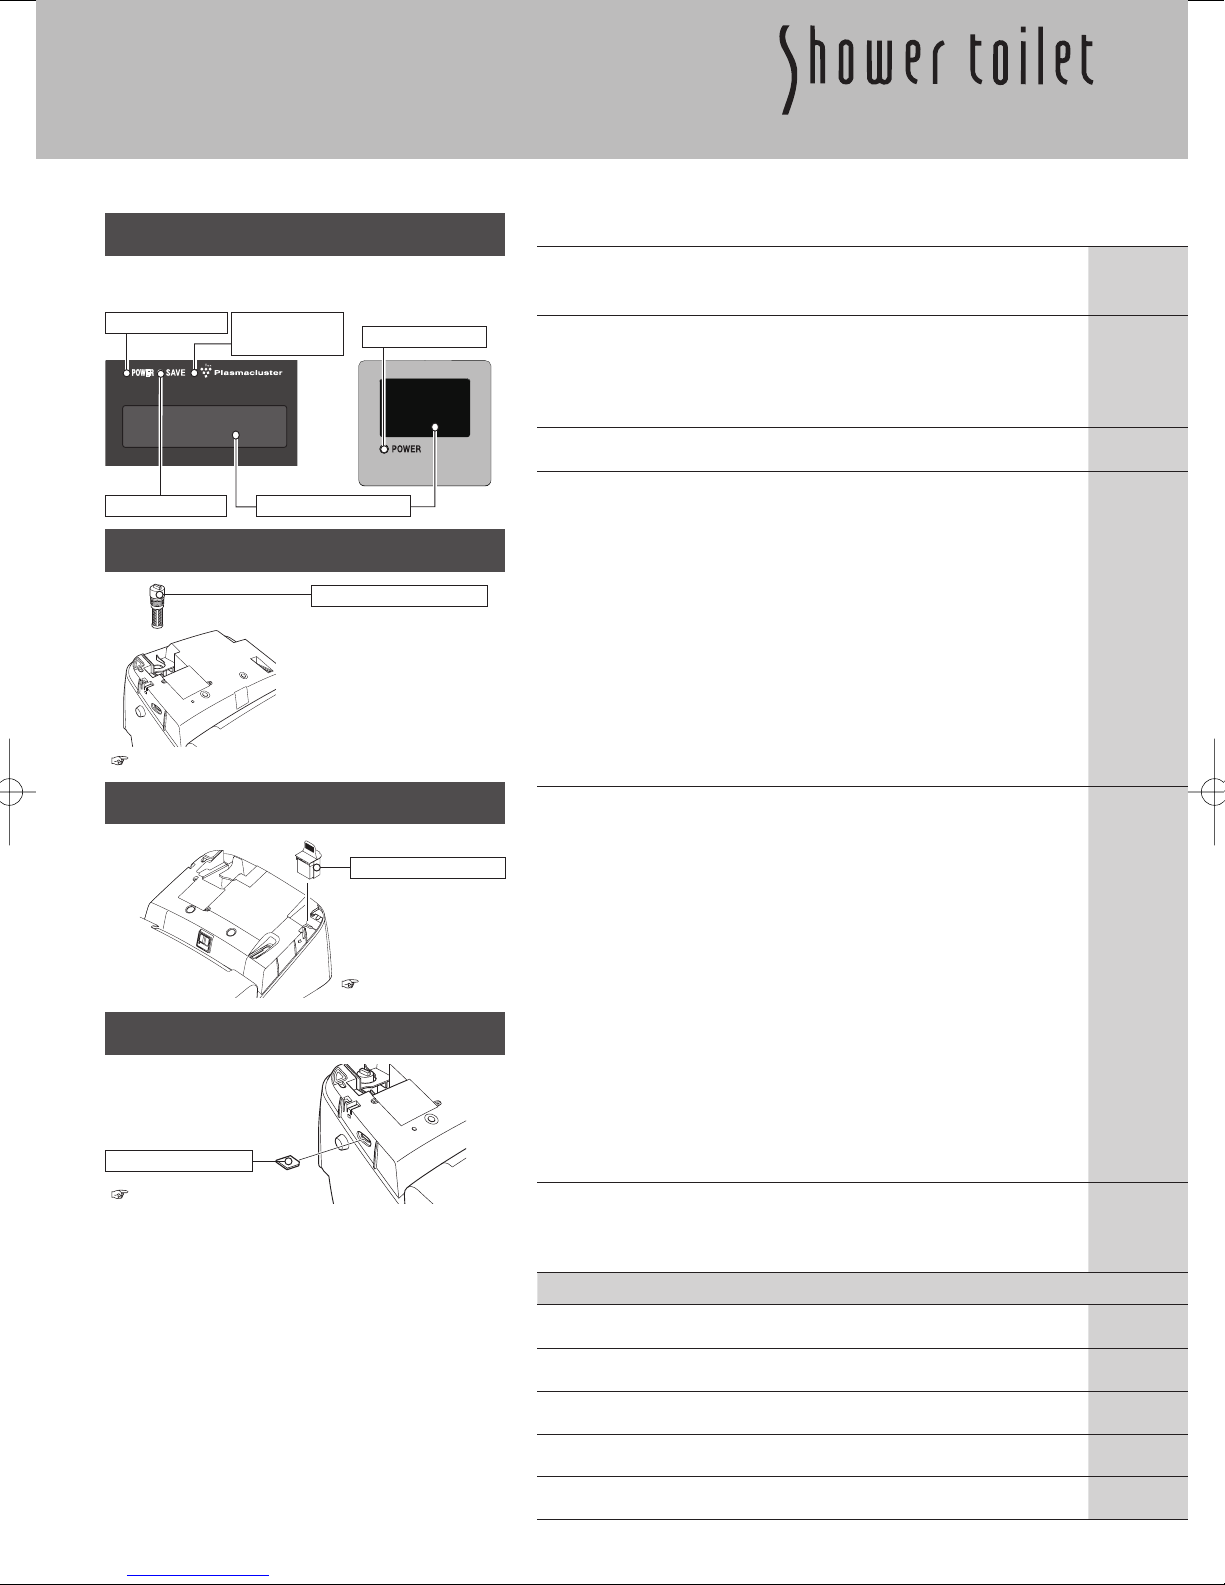
Indicator
●
Indicator
Lower body sensor
POWER LED
Energy Saver LED
Plasmacluster
LED
●
Indicator
Upper body sensor
Body sensor
Strainer
Strainer
*
The strainer removes
debris from the tap water.
*
Close the water shutoff valve
before removing the strainer.
*
A small amount of water will spill
out when removing the strainer.
( See page 65.)
Deodorizer cartridge
Deodorizer cartridge
( See page 64.)
SD memory card
SD memory card
( See page 80.)
POWER LED
Contents
■ Please Read This First
○ REGIO Features ..........................................................................................
○ Functions .......................................................................................................
■ Be Sure to Read This
○ Important Safeguards DANGER ............................................................ 7
WARNING .......................................................... 7
CAUTION ........................................................... 11
○ Safety Precautions GROUNDING INSTRUCTIONS ...................... 13
■ Precautions to Prevent Failure
○ Handling Precautions ...................................................................................
■ Operation
○ Preparation and Checks
Before Use
○ General Operation
■ Useful Functions
○ Power Save Function ................................................................................... 28
○ Deodorizer Function ..................................................................................... 29
○ Plasmacluster Function ............................................................................... 30
○ Music Function .............................................................................................. 31
○ Night Light Function ..................................................................................... 39
○ Attention Function ......................................................................................... 40
○ Comfort Features
■ Useful Information
○ Additional Important Information ................................................................
○ If You Have These Problems ......................................................................
○ Flushing the Toilet Manually .......................................................................
Cleaning and Maintenance 51
☆
■ Troubleshooting
○ Before Requesting Professional Repairs .................................................
■ Servicing the Regio Toilet ............................................................................ 77
(1) Check the Water Shutoff Valve ...................
(2) Insert the Power Plug into the Outlet ..........
(3) Check the Rear Washing Feature ..............
(4) Adjust the Water Temperature .....................
(5) Adjust the Seat Temperature .......................
(6) Set the Clock ................................................
(7) Conserving Electricity...................................
(1) Auto Open Function .....................................
(2) Auto Deodorizing Function ..........................
(3) Front and Rear Washing .............................
(4) Drying ............................................................
(5) Auto Flush Function .....................................
(6)
Auto Close Function .....................................
Auto Play .............................. 33
Manual Play ......................... 34
Preventing Low-temperature Burns .............
Adjusting the Water Pressure .......................
Adjusting the Dryer Temperature .................
Adjusting the Auto Flush Function ...............
Muting the Signal Reception Sound ............
Restoring the Default Settings ......................
Storing the Settings .........................................
1
5
14
15
15
16
17
17
18
18
19
20
21
25
26
27
41
41
42
43
44
45
45
47
48
49
71
■ Specifications .................................................................................................. 7 8
■ Replacement Parts ......................................................................................... 7 9
■ Limited Warranty ............................................................................................ 81
2
REGIO Features
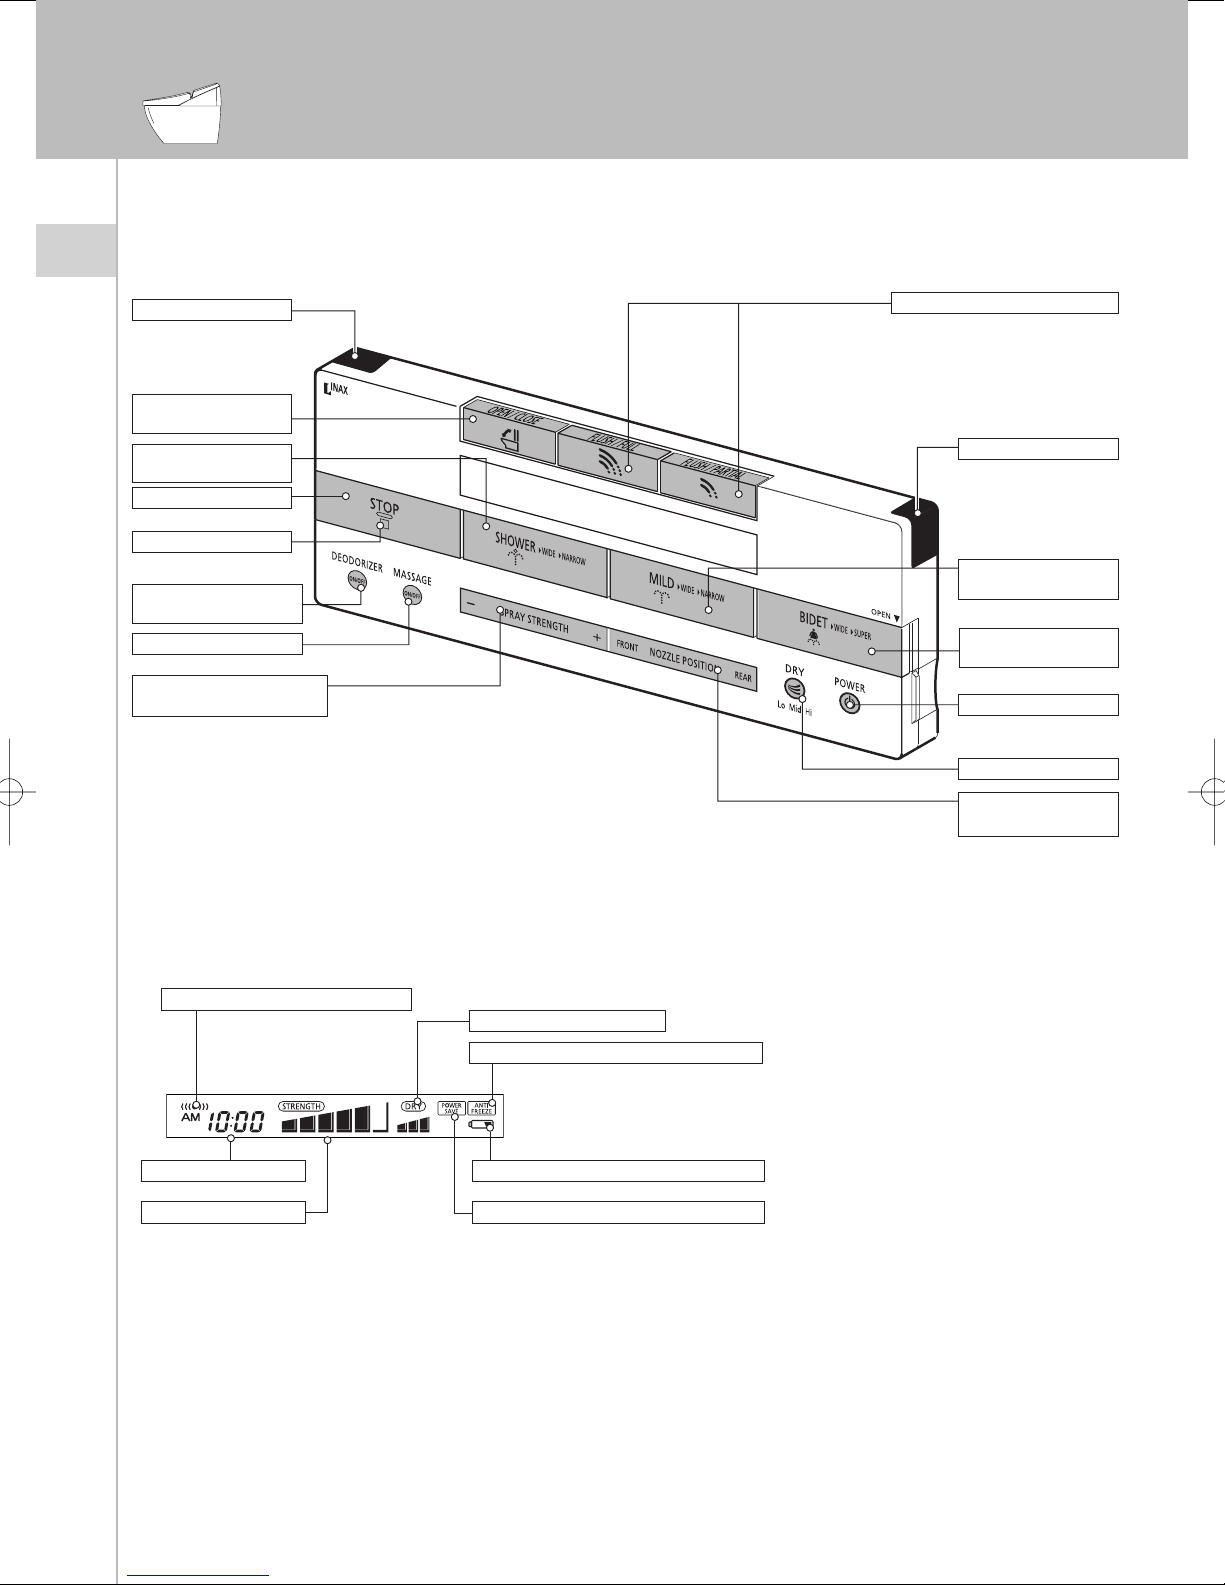
1. Remote Control Unit - Main Panel
(1) Transmitter
(2)
Toilet seat OPEN/
CLOSE button
(3) Rear washing
button
(4) STOP button
(5) Indicator LED
(6) DEODORIZER
button
(7)
MASSAGE button
(8) Water pressure
adjustment button
(9)
Flush buttons (Full/Partial)
(10) Transmitter
(11) Rear Washing-
Mild button
(12) Front washing
button
(13)
POWER button
2. Main Panel LCD
(1) Signal reception indicator
(2) Time
(3) Water pressure
(4) Dryer temperature
(5) Anti-freeze function activation
(6) Battery level indicator
(7) Energy saver function activation
(14) Dryer button
(15)
NOZZLE POSITION
adjustment button
3
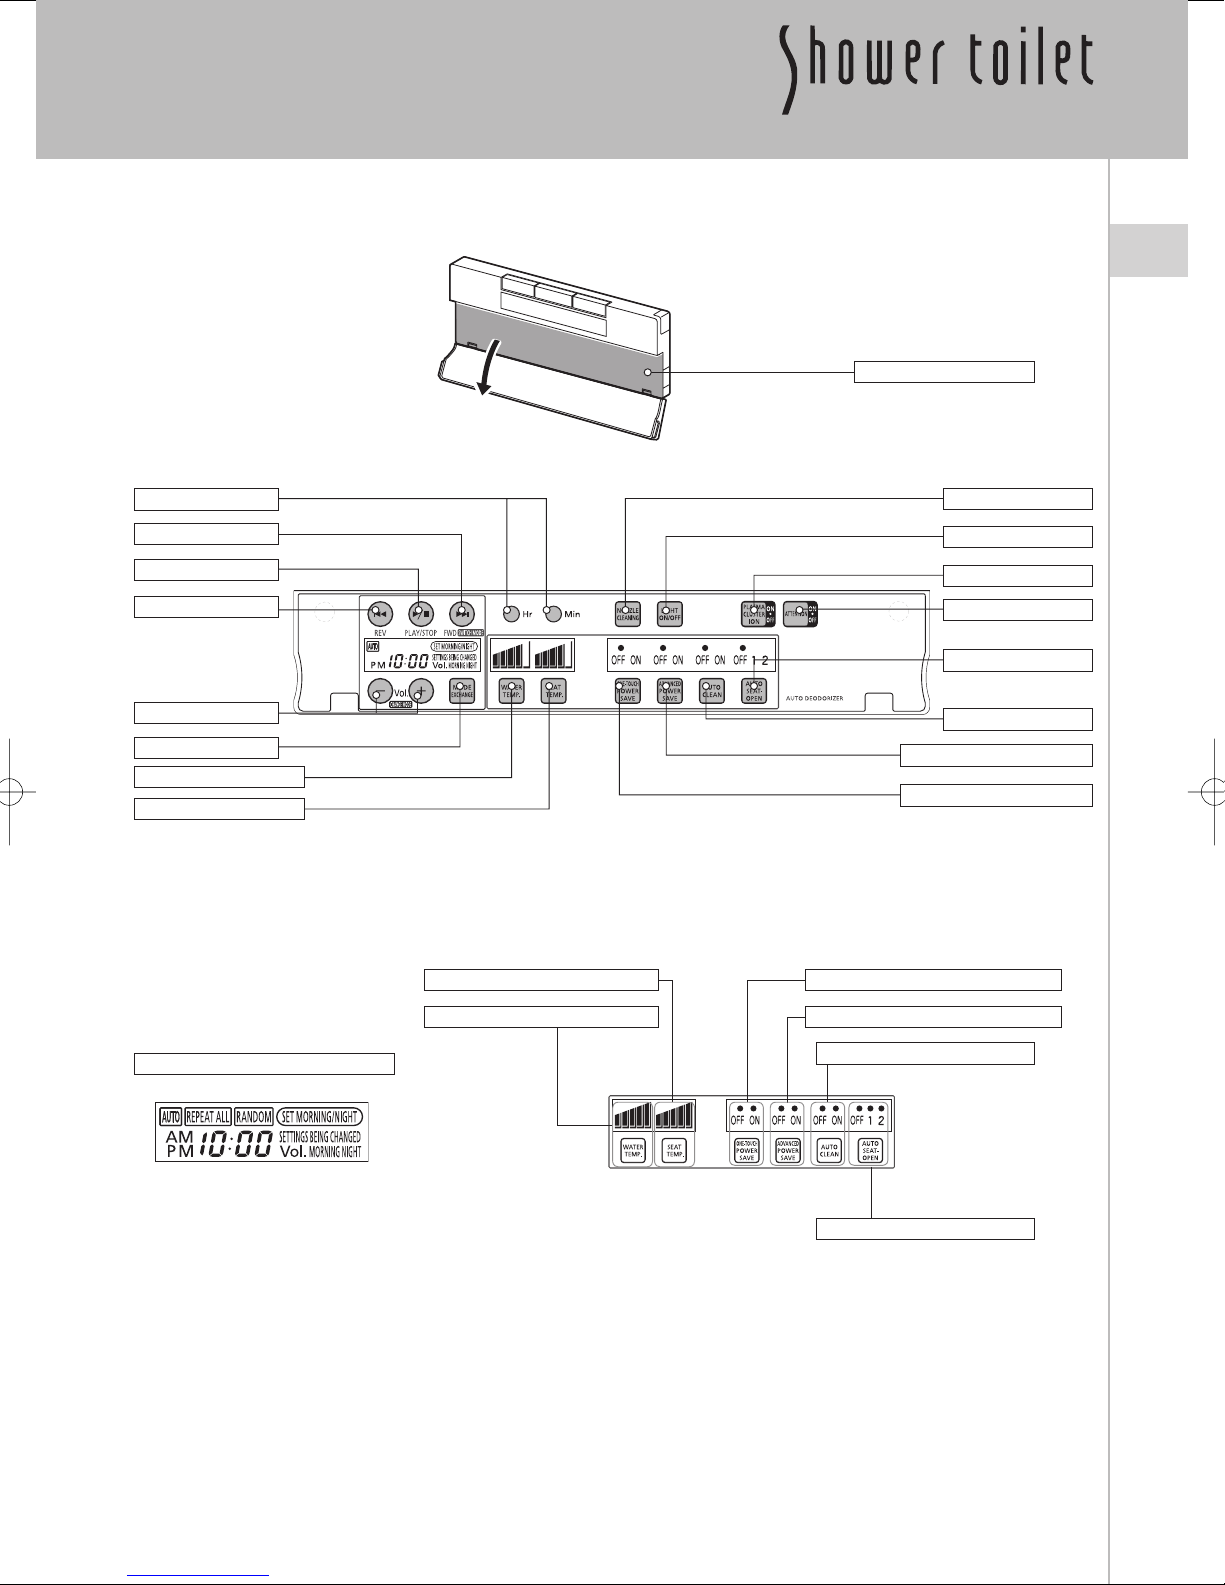
3. Remote Control Unit - Secondary Panel
Open the cover
as indicated.
Secondary Panel
Hr/Min
Forward (music)
Play/stop (music)
Reverse (music)
Volume
Exchange mode
Water temperature
Seat temperature
4. Secondary Panel LCD
Seat temperature indicator
Water temperature indicator
Music settings display
Nozzle cleaning
Night Light
Plasmacluster ion
Attention
Auto seat-open
Auto fl ushing
Advanced power save
One-touch power save
One-touch power save ON/OFF
Advanced power save ON/OFF
Auto fl ushing ON/OFF
Auto seat-open setting
4
Functions
Washing
Rear washing
Rear washing - mild
Oscillating spray
Rear washing
Oscillating spray narrow
Front washing
Page
21 Provides rear washing with a strong spray.
Page
22 Provides rear washing with a gentle spray.
Page 19, 20Moves the nozzle back and forth to wash a wide range.
Page 21, 22
Page
Moves the nozzle back and forth over a short span for a more thorough
washing.
23 Provides front washing for women, through a separate nozzle.
Oscillating spray wide
Oscillating spray -
Front washing
super
Nozzle position
adjustment
Water pressure
Massage
Comfort functions
Seat heating
Temperature control
Warm air dryer
Deodorizer
Page
23 Moves the nozzle back and forth to wash a wide range.
Page
23 Washes an extended range.
Page
24 Moves the nozzle to the desired position.
Page 21, 22
Page
24 Alternates the water pressure between two levels.
☞
☞
☞
☞
17
Page
Page 17
Page 25
Page 20
Adjusts the water pressure as desired.
Heats the seat to the user-defi ned setting.
Adjusts the water and seat temperatures.
Dries the user after front and/or rear washing.
Eliminates toilet bowl odors.
Deodorizer-turbo
Remote control
Seat Sensor
Auto seat open
Auto fl ush
Plasmacluster
☞
Page 29
−
☞
Page 47
Page 19, 27
☞
Page 26
☞
Page 30
Provides a more powerful deodorizing function.
Allows the user to operate the toilet from a comfortable position.
Detects the presence of a user and allow the washing function to
operate.
Automatically opens and closes seat/lid.
Automatically fl ushes the toilet after the user walks away.
Cleans the air with anti-bacterial ions.
5
Comfort functions
Music
☞
Page
Creates a more relaxing space in the bathroom.
31
Night light
Attention button
Seat heater auto OFF
Clock
Reset function
☞
☞
☞
☞
☞
Cleaning functions
Hyper clean surface
Automatic bowl rinse
Self-clearing nozzle
Removable toilet seat
lid
Removable nozzle
tips
Removable nozzle
guard
☞
☞
☞
Page 39
Page 40
Page 41
Page 18
Page 45
−
−
Page 22, 23
Page 55
Page 61
Page 58
Makes the toilet easy to fi nd at night.
Generates an alert from the seat unit.
Turns the seat heater off when a user sits on the seat. Turns the seat
heater on again when the user stands up.
Displays the current time on the main panel LCD.
Resets the settings to the factory defaults.
Both the toilet bowl and the seat unit have antibacterial properties that
allow for easy cleaning.
The toilet bowl is rinsed during each fl ush cycle.
The nozzle tips are automatically washed before and after washing.
The toilet seat lid can be removed for easy cleaning.
Both nozzle tips can be manually removed for either cleaning or
replacement.
The guard that covers the nozzles can be removed for easy cleaning.
Power saving functions
Advanced power save
One-touch power
save
Power button
ECO6
☞
☞
☞
Page 28
Page 28
Page
−
Power levels are increased to normal settings during regular usage
and lowered during period of non-use.
Power levels are reduced for an 8 hour period.
5 This product can be turned off during long periods of non-use.
This product uses 6 liters (1.6 gallons) for a full fl ush and 4 liters
(1.1 gallons) for a partial fl ush.
6
7!2.).'
Be Sure to Read This
Important Safeguards
READ ALL INSTRUCTIONS BEFORE USING
When using electrical products, especially
when children are present, basic safety precautions should always be followed.
The following safety signal terms are used in
this manual to indicate hazards of varying
degrees of severity:
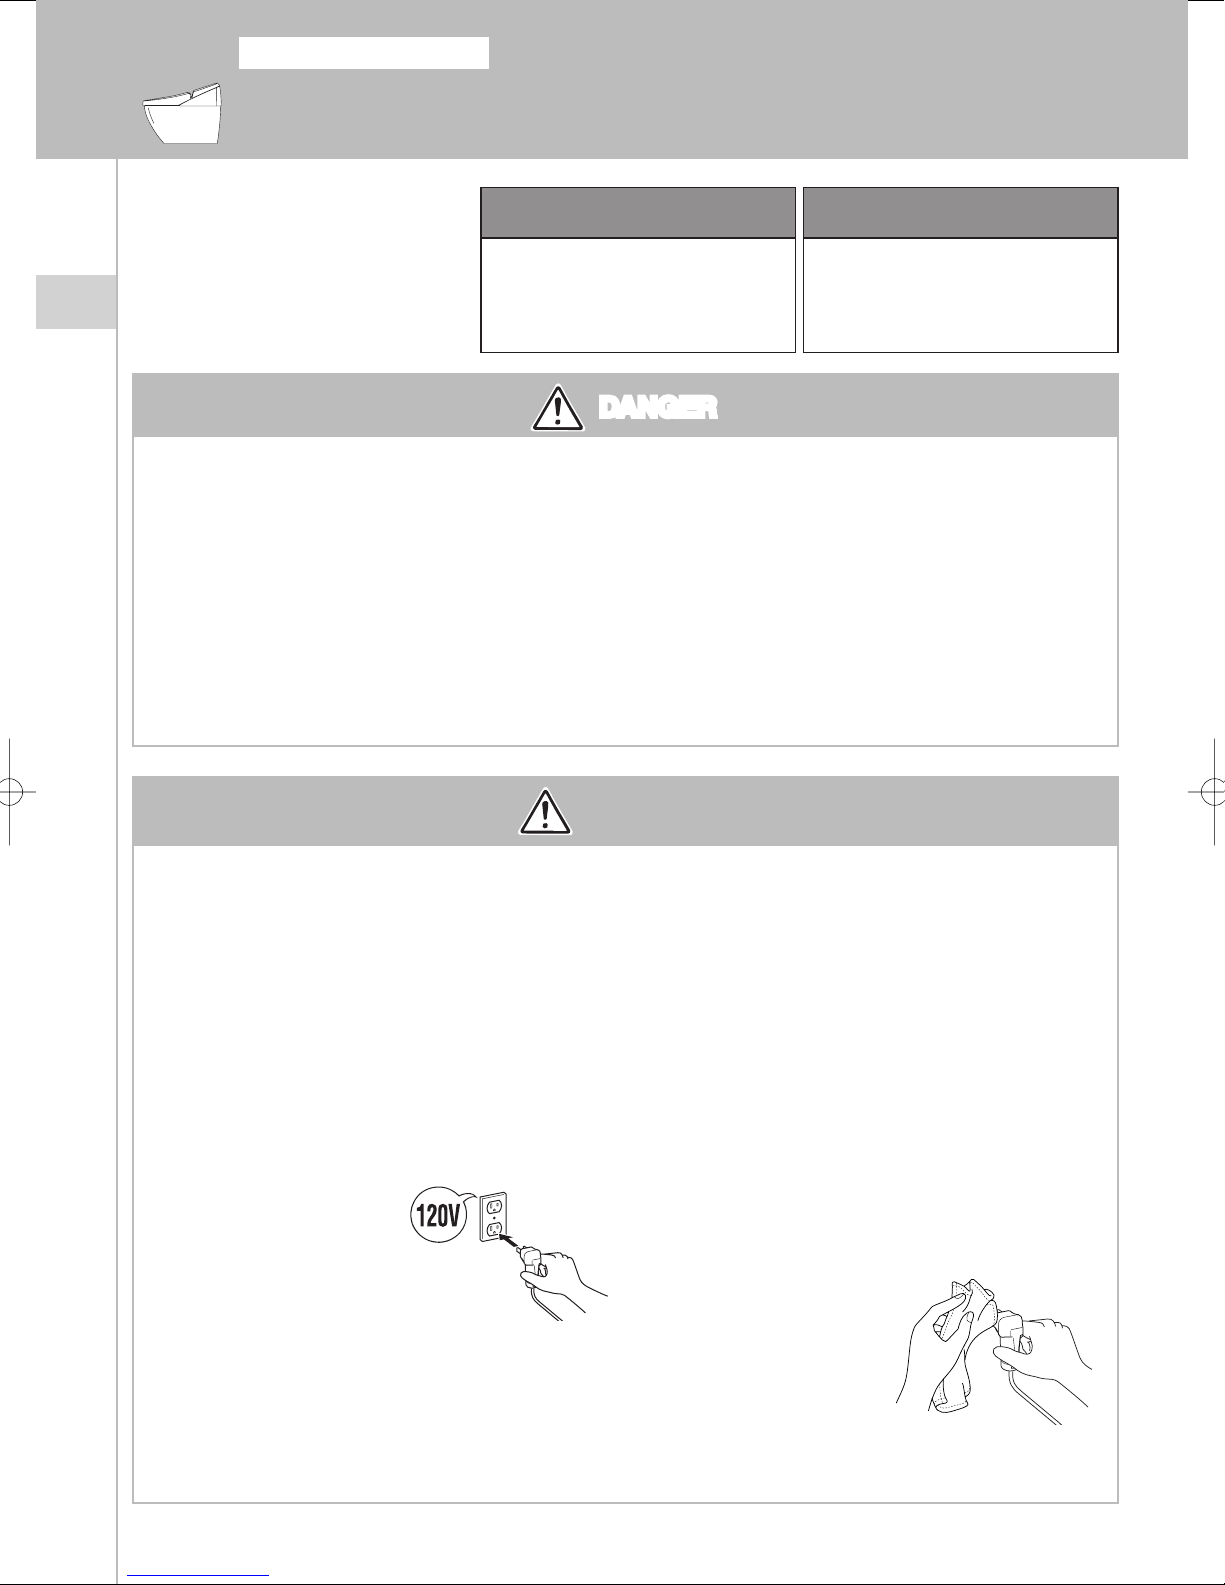
To reduce the risk of electrocution:
DANGER
Indicates an imminently hazardous
situation which, if not avoided, will
result in death or serious injury.
DANGERDANGER
WARNING
Indicates a potentially hazardous situation which, if not avoided, could
result in death or serious injury.
Improper use of the grounding plug can
result in a risk of electric shock.
Do not place or store product where it can
fall or be pulled into a tub or sink.
When installing either the toilet or the remote control,
avoid splashing water directly onto these items. In
Do not pour/drop into the water or
detergent inside/outside the power plug of
the product or remote control.
Do not reach for a product that has fallen
into water. Unplug immediately.
Do not use while bathing.
addition, the Regio toilet should not be installed in a
humid atmosphere (e.g. inside a shower room).
7!2.).'
7!2.).'
To reduce the risk of burns, electrocution, fi re, or injury to persons:
Do not pull out or insert the power plug
with wet hands.
* Neglecting to do so could cause electric shock.
Do not splash water or liquid cleaners
directly onto the toilet body or power plug.
* Electric shock or fi re may occur.
●
This product should only be connected to
a 120 VAC, 60 Hz GFCI-protected outlet.
● Do not connect
additional power
cords to the toilet's
electrical outlet.
* Fire may occur.
Make sure that the electrical outlet to which the
power cord is connected is properly grounded.
*
Failure of the toilet or short circuit may result in electric shock.
Hold the plug when inserting or
disconnecting the power plug.
* If the plug is inserted or disconnected by holding the
cord, the plug or cord may be damaged, resulting in fi re
or electric shock.
Disconnect the power plug periodically and
clean it with a dry cloth.
* Dust accumulated on the power plug may cause fi re.
Wait for about 10 seconds before inserting the power
plug again.
Do not damage, bend excessively, twist,
bind, or place heavy objects on the power
cord.
* The power cord may be damaged, resulting in electric
shock or fi re.
Completely insert the power plug.
* Electric shock or fi re may occur.
7
CAUTION
7!2.).'
Indicates a potentially hazardous situation which, if not avoided, may result in
minor or moderate injury or in damage
to the product or other property.
7!2.).'
7!2.).'
If water is leaking from the toilet body or
the water supply system, unplug the power
plug from the outlet and close the water
shutoff valve.
* Electric shock, fi re, or fl ooded fl oor may occur.
Never operate this product if it has a
damaged cord or plug, if the plug is loose
in the outlet, if it is not working properly, or
if it has been dropped or damaged. Please
contact your dealer for instructions on
resolving any of the above issues.
* Electric shock or fi re may occur.
If you use the toilet for a long period of
time, set the seat temperature to “OFF”.
* Using the toilet for a long period of time without
setting the seat temperature to “OFF” may result in
low temperature burns.
Low Temperature Burns
A low temperature burn may occur when the
skin has been in contact for some time, with
an object at relatively low temperature (about
104°F [40°C]). Susceptibility to burns also
depends on an individual’s skin sensitivity
and other factors.
In order to protect against the possibility
of a low temperature burn, the toilet seat
temperature should be set to “Low” or “Off”.
As low temperature burns can also occur
when the user skin is contact with heated air,
the dryer temperature should also be set to
“Low”. These precaution should especially
be observed when the following persons use
the toilet.
Be sure to set the dry temperature to “Low”
when the following persons use the toilet.
- Children
- Elderly persons
- Persons with an illness
- Persons with limited mobility
- Persons with sensitive skin
- Persons who are taking medication that causes
drowsiness
- Persons who are intoxicated
- Persons who are extremely fatigued
* If the dryer is used for a long period of time on a
setting higher than “Low”, the user may risk a low
temperature burn. For this reason, our company
recommends setting the dryer temperature to “Low”
during use.
8
Important Safeguards
7!2.).'
7!2.).'
7!2.).'
Observe the following precautions when
inserting the batteries from the remote control.
● Place the battery in the correct direction,
aligning the positive and negative terminals as
indicated inside the battery compartment.
● If the toilet will not be used for long periods
of time, remove the batteries from the remote
control.
● Immediately remove
remote control.
● Dispose of dead batteries according to local
regulation.
● Keep batteries out of the reach of children.
● Do not use old and new batteries together in
the remote control.
dead batteries from the
Never do the following while handling
batteries.
● Do not contact metal items (necklace, hair pin, etc.) or
store them with the battery.
● Do not use new and old batteries, or different types
of batteries together.
● Do not heat or disassemble the battery, or place it in
water or fi re.
* Battery liquid may leak, resulting in fi re.
This product should only be connected to
a potable water supply line. Failure to do
so will cause problems in the operation.
If there is any possibility of the water
freezing, be sure to activate the anti-freeze
function.
(☞See page 68.)
* Damage due to freezing may cause fi re or fl ooding.
A building contractor or professional
plumber should install the product.
When this product is used by children, the
elders or persons with limited mobility, our
company recommends close supervision
to avoid improper operation of the product.
Never disassemble or modify this product.
* Disassembly may result in electric shock, fi re, and/or
injuries. In addition, disassembly of the product will
void the warranty.
Keep the SD memory card out of the reach
of children.
This product should be used only as
described in this manual.
9
7!2.).'
7!2.).'
7!2.).'
Keep the cord away from heated surfaces.
(Example: Panel Heater)
Never use while sleeping or drowsy.
Never drop or insert any object into any
opening or hose.
Never block the air openings of the
product. If lint or hair, etc. is stuck in the
air opening, remove it immediately.
Connect this product to a properly
grounded outlet only. See Grounding
Instructions.
Do not use outdoors or operate where
aerosol (spray) products are being used or
where oxygen is being administered.
If connection is made to a potable water
system, the system shall be protected
against backfl ow.
Wipe off any dust adhering to the power
plug periodically. At that time, pull out the
power plug and wipe it off with a dry cloth.
10
Safety Precautions
#!54)/.
#!54)/.
#!54)/.
For care of the plastic parts, our company
recommends the use of a mild, liquid, allpurpose cleaner
.
Avoid using abrasive products (such as powdered
cleansers) and chlorine-based products (such as
bleach), as these products can damage the antibacterial properties of the plastic components.
Disconnect the power plug from the outlet
during cleaning.
* Neglecting to do so could cause electric shock.
Check that the clip ring is fi rmly attached to the
water supply hose.
* If the clip ring is not fi rmly attached, the water supply
hose may come off and water may leak.
Do not insert fingers into the deodorizer
cartridge slot.
* You may be injured.
Do not place your weight on or climb on the
water shutoff valve.
* Doing so could result in water leakage or cause injury.
Do not bend or crush the water supply hose.
* Doing so could result in water leakage or cause injury.
Do not apply any impact to the clip ring or pull
it when cleaning the toilet.
* The clip ring may break and the water supply hose
come off, resulting in fl ooding.
This product should be supplied with a cold
water line only.
* Supplying the toilet with a hot water line may damage
the internal components.
● Close the water shutoff valve when removing
the strainer.
● When installing the strainer, tighten it fully so
there is no gap.
● Check that the O-ring is free from foreign
materials when attaching it.
* Failure to do so could result in water leakage and
fl ooding.
Do not expose the toilet to any impact, as this
may lead to product damage, injuries, and
water leakage.
11

#!54)/.
#!54)/.
#!54)/.
If cracks appear anywhere on the toilet bowl,
do not touch the cracked areas. Contact your
dealer for instructions on bowl replacement.
Do not lean back against the lid during use,as
this may damage or break the lid.
Regularly check the area around pipes for
water leakage.
If you will not be using this product for an
extended period of time, close the water
shutoff valve and drain the water from the
toilet. In addition, disconnect the power cord
from the outlet. (
information.)
See page 67 for additional
☞
Do not stand on the toilet lid, as it may break.
* If the toilet seat or body cover becomes damaged,
contact your dealer for repair instructions.
If the toilet seat or body cover becomes damaged,
contact your dealer for repair instructions.
If it is necessary to modify the electrical wiring
or plumbing, our company recommends that
such work should be performed by a licensed
contractor.
When a small child is using the toilet, set the
AUTO SEAT OPEN switch on the remote control
to the OFF position. On rare occasions, the seat
sensor may not be able to detect the presence
of a small child. In such a case, the toilet lid may
start to close when the toilet is in use.
Avoid using front and rear washing functions
excessively or for long periods of time as such
overuse may increase the possibility of washing
away desirable resident bacteria and causing
an imbalance of bacteria in your body. If you are
pregnant, are being treated for a gynecological
condition, develop excessive irritation in the area
of use, or if you have questions, please speak to
your doctor before beginning or continuing use
of the product.
SAVE THESE INSTRUCTIONS
12
Safety Precautions
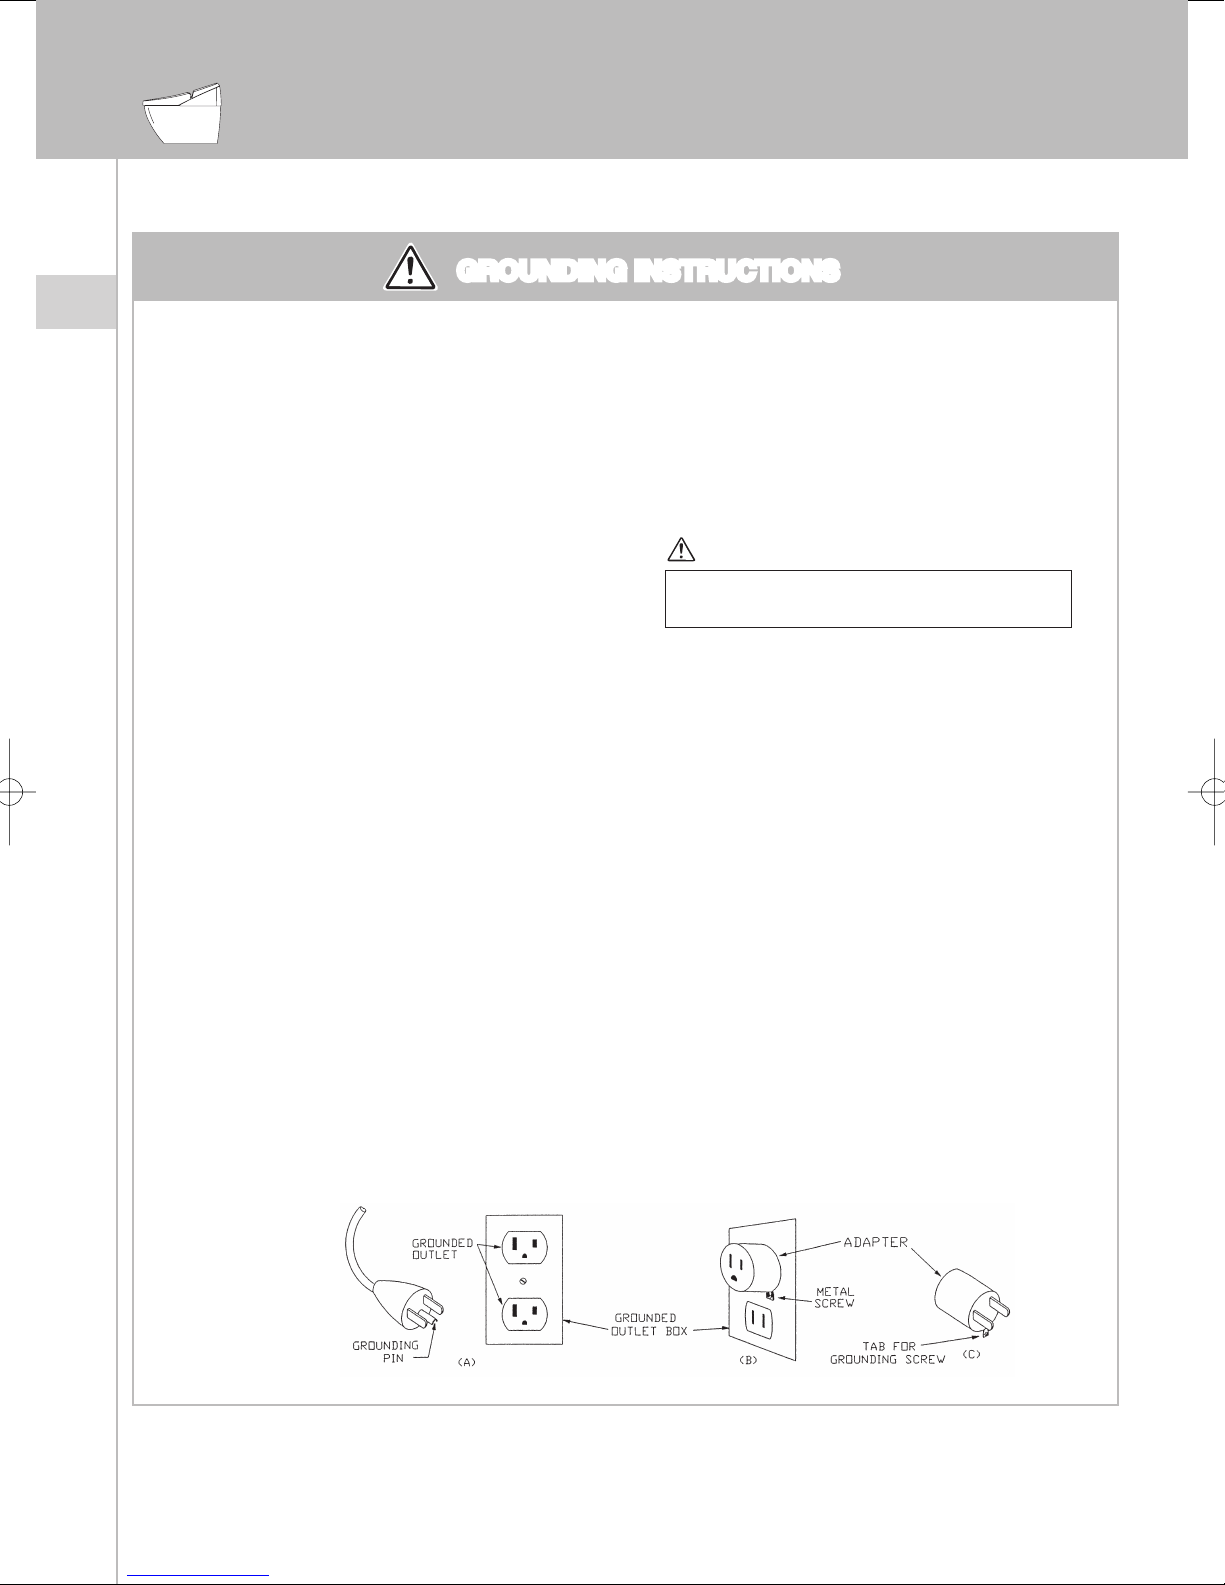
GROUNDING INSTRUCTIONSGROUNDING INSTRUCTIONS
The product is for use on a 120 V circuit, and
has a grounding plug that looks like the plug
illustrated in sketch A in Figure 1. A temporary
adapter, which looks like the adapter illustrated
in sketches B and C, may be used to connect
this plug to a 2-pole receptacle as shown in
sketch B if a properly grounded outlet is not
available. The temporary adapter should be
used only until a properly grounded outlet
(sketch A) can be installed by a qualified
electrician. The green colored rigid ear, lug,
and the like extending from the adapter must
be connected to a permanent ground such as
a properly grounded outlet box cover.
Whenever the adapter is used, it must be held
in place by the screw.
If it is necessary to use an extension cord,
use only a three wire extension cord that has
a three blade grounding plug, and a threeslot receptacle that will accept the plug on the
product. Replace or repair a damaged cord.
* If there is no electrical outlet in the bathroom, consult
a licensed electrician for the installation of a GFCIprotected outlet.
The product should be grounded. In the event
of an electrical short circuit, grounding reduces
the risk of electric shock by providing an
escape wire for the electric current.
* This product is equipped with a cord having a
grounding wire with a grounding plug.
* The plug must be plugged into an outlet that is
properly installed and grounded.
DANGERDANGER
Improper use of the grounding plug can
result in a risk of electric shock.
If repair or replacement of the cord or plug
is necessary, do not connect the grounding
wire to either fl at blade terminal. The wire with
insulation having an outer surface that is green
with or without yellow stripes is the grounding
wire.
Check with a qualified electrician or
serviceman if the grounding instructions are
not completely understood, or if in doubt as to
whether the product is properly grounded.
Figure 1
13

Precautions to Prevent Failure
Handling Precautions
Do not expose the toilet to direct
sunlight, as this may cause
discoloration.
Do not open or close the toilet
seat or lid roughly, as this may
cause either of these parts to fail.
If freezing weather is anticipated,
activate the anti-freeze function as
described on Page 68.
Do not place a heater near
the toilet as this may cause
discoloration of the plastic or
failure of the washing and drying
functions.
Do not use any paper other than
toilet paper. Be careful not to drop
any foreign materials in the bowl,
as they may clog the drain pipe.
If the toilet becomes clogged, use
a plunger to clear the clog. Do not
flush the toilet until the clog has
been cleaned.
* Doing so could cause sewage to
fi ll the toilet bowl and overfl ow onto
the fl oor.
Do not operate the remote control unit with wet hands.
* Failure may occur.
Do not wipe the body, toilet seat, toilet seat lid or other
plastic parts with a dry cloth or toilet paper.
Refer to page 51 for the details of cleaning.
* The surface of plastic parts may become scratched and
lose their gloss.
14
Operation
Preparation and Checks Before Use
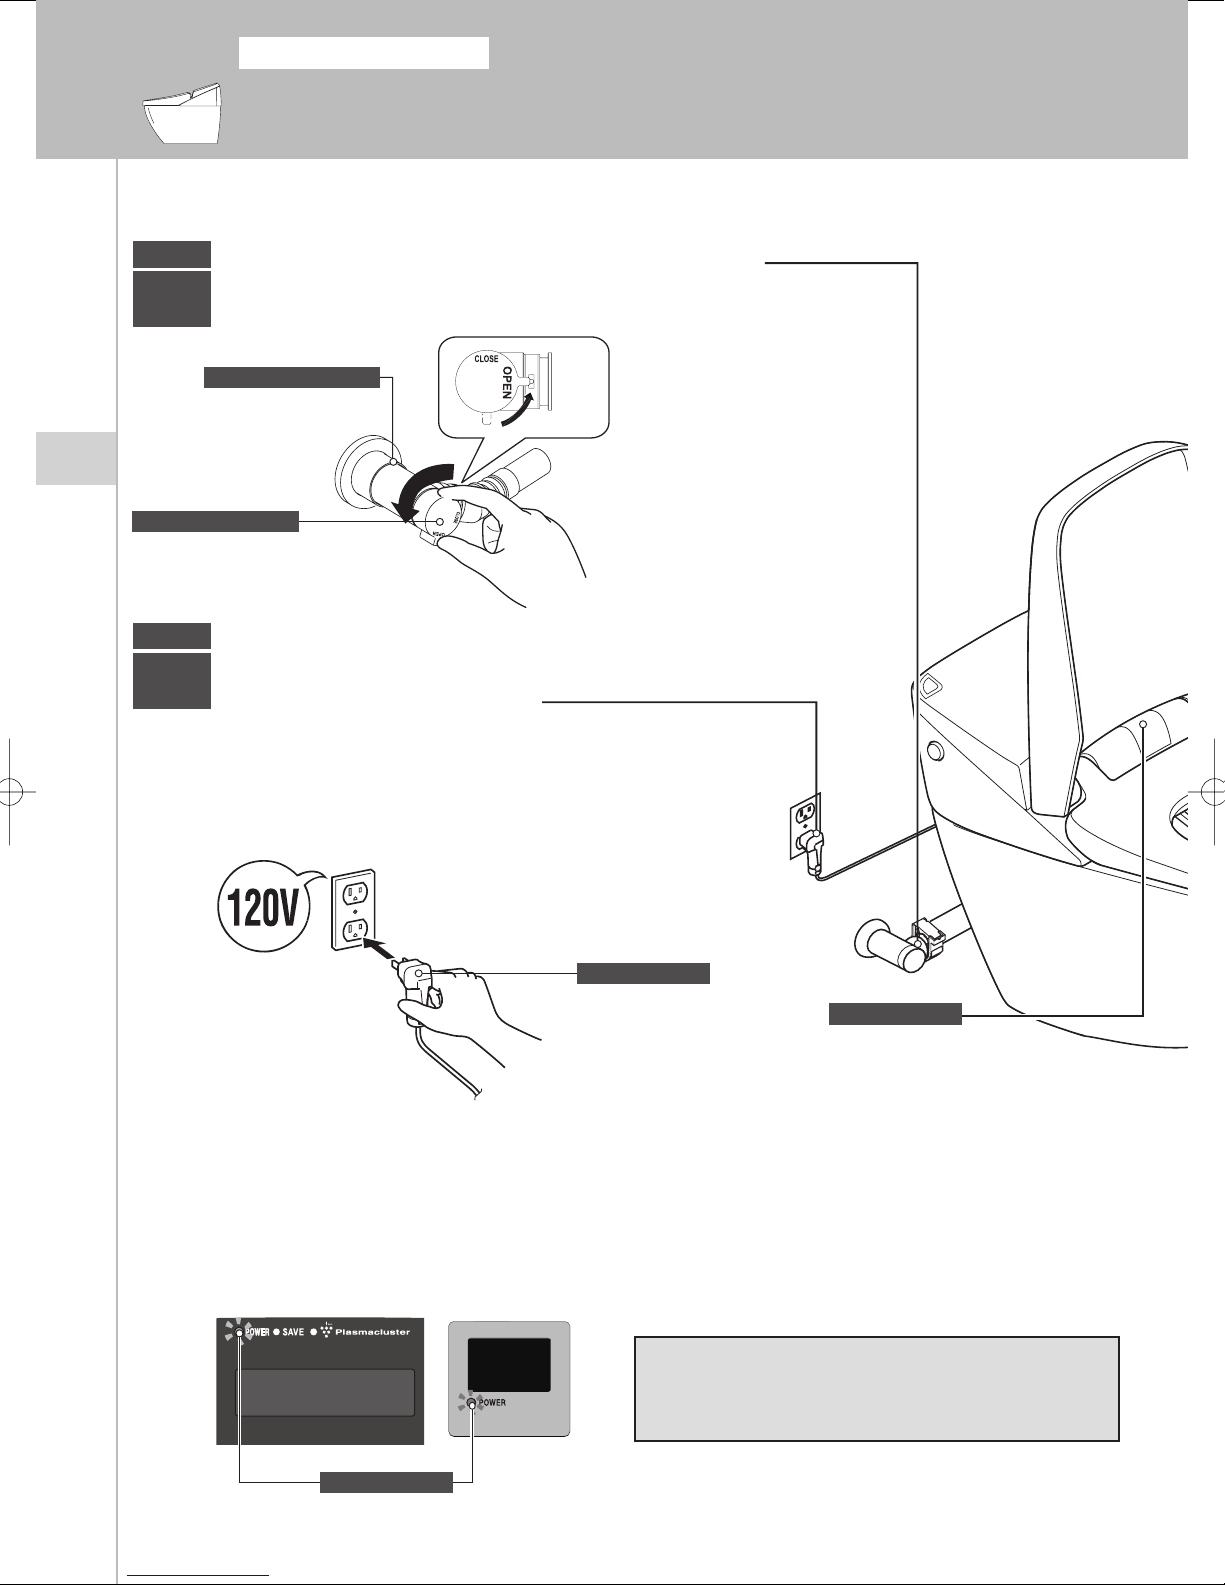
STEP
1
Open/Close handle
Operation
STEP
2
● Insert the power plug into the
Check the Water Shutoff Valve
* If the water shutoff valve is closed, turn it counterclockwise to fully open it.
Water shutoff valve
Open
Insert the Power Plug
into the Outlet
outlet (120 VAC).
● Check that the POWER LED is green.
* The POWER LED on the indicator will light (green).
● Indicator
Lower body sensor
POWER lamp
● Indicator
Upper body sensor
Power plug
Indicator
[Note]
Wait for about 10 seconds before inserting the power
plug again.
15
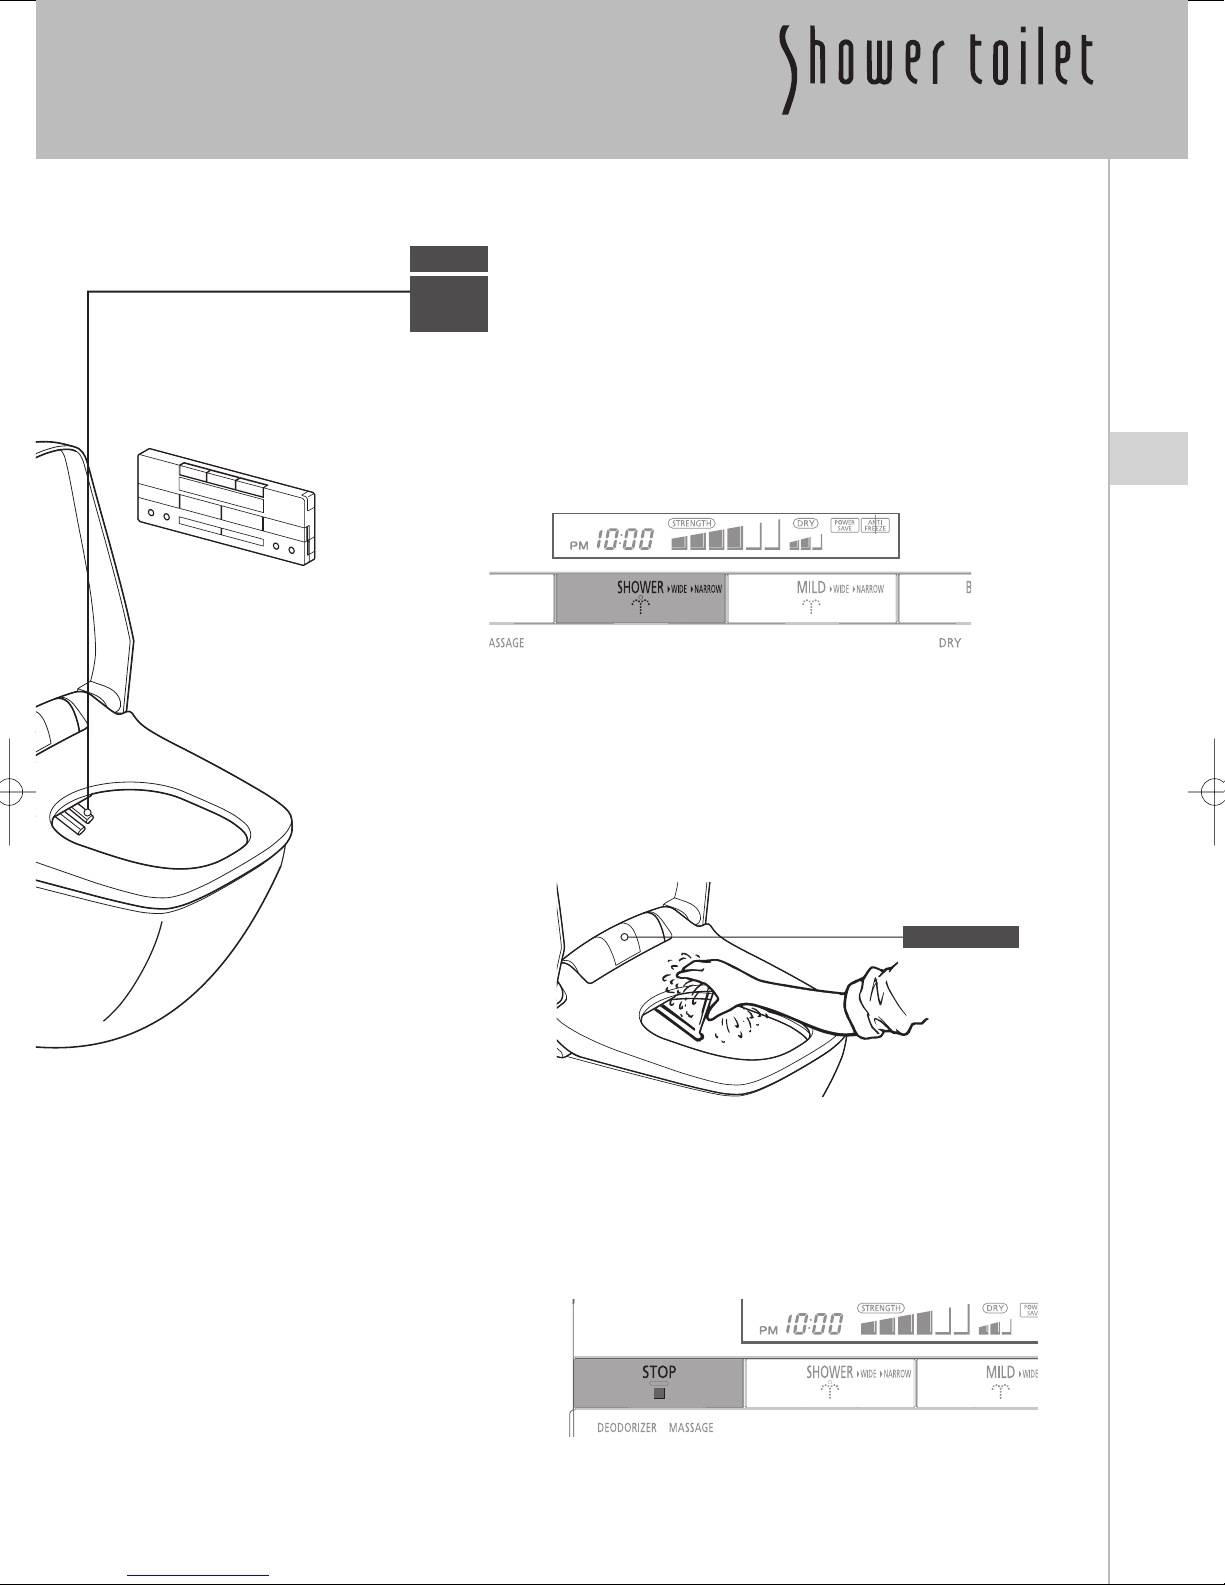
STEP
Check the Rear Washing
3
Feature
● Check that the seat sensor is covered.
*
When you fi rst install the product, there will be a small cover sheet placed
over the seat sensor. This is provided for the initial operation check. If no
cover sheet is attached, use a few sheets of toilet paper or a cloth.
● Press the SHOWER button.
● Verify that the rear washing nozzle
extends and sprays.
* A plastic shield is provided for this initial operation check.
During this initial operation check, water will drip from the nozzles.
This is normal operation for this product.
* It will take about one minute for the warm water reservoir to fi ll before
the nozzle will spray.
Operation
Seat sensor
●
Press the STOP button.
*
Verify that the spray stops and the nozzle retracts to its stored position.
* The toilet is equipped with a seat sensor, that detects the presence of
a user.
The toilet’s washing and drying functions will not operate unless a
user is detected.
16

STEP
Preparation and Checks Before Use
STEP
6
STEP
4
STEP
5
STEP
7
4
Operation
● Press the WATER TEMP. button.
STEP
5
● Press the SEAT TEMP. button.
Adjust the Water Temperature
<Remote Control Unit - Secondary Panel>
* The water temperature can be set to
one of six levels. At the lowest setting,
the water temperature is about 90 °F
(32 °C). At the highest setting, the water
temperature is about 104 °F (40 °C).
When the water heater is set to “OFF”,
the seat will be at room temperature.
Adjust the Seat Temperature
<Sub-operation panel on the remote control>
* The seat temperature can be set to six
levels (“OFF (room temperature)” and
within a range from “Low (about 28 °C)” to
“High (about 40 °C)” as desired.
[Reference]
Upon initial startup, please allow some time for the water and the seat to be heated to the desired temperature.
Depending on the temperature desired, this may take about 10 minutes.
● This toilet is equipped with a “seat heater auto off” function that automatically turns off the seat heater when
the seat is occupied. This is done to prevent low temperature burns. However, the seat temperature can still
be set by the user during use of the product.
(☞ See page 41.)
17
*
Pressing the buttons alters the indications on the LCD.
STEP
6
Set the Clock
<Remote Control Unit - Main Panel>
● Press the Hr or Min button.
* To advance the clock in one hour
or one minute increments, press
and release the Hr or Min button,
respectively. To advance the clock
rapidly, press and hold the Hr or
Min button.
STEP
7
Conserving Electricity
● Press the ADVANCED POWER SAVE button.
<Remote Control Unit - Secondary Panel>
<Remote Control Unit - Secondary Panel>
Operation
<Remote Control Unit - Main Panel>
Advanced power save
The advanced power save function lowers the water and toilet seat
temperatures when the toilet seat lid is closed to reduce power consumption.
Set
Set temperature
Temperature in
power-save mode
Off
Temperatures of water and seat
When used
Recovered
Power save
18
[Reference]
* When the One Touch Power Save and
the Advanced Power Save are both set
to the “ON” position, the reduction in
power usage is greater than when these
functions are used individually. See page
28 for further details.
General Operation
STEP
Auto Open Function
1
● Set the AUTO SEAT-OPEN
button to “1” or “2”.
Operation
AUTO SEAT-OPEN
Setting of AUTO SEAT-OPEN
When set to “1”, only the
toilet seat lid opens.
When set to “2”, both the
toilet seat lid and seat open.
* The body sensor is activated, and the
toilet seat lid and seat automatically
open and close.
To manually open and close the toilet seat lid and seat
Set the AUTO SEAT-OPEN function to “OFF”.
* When a small child uses the toilet, set the AUTO SEAT-
OPEN button on the remote control unit to the “OFF”
position. The occupied seat sensor may not be able
to detect a small child’s body, and, although rarely, the
toilet seat lid may start to close during use of the toilet.
To open and close only the toilet seat with the remote control unit
1 Press the OPEN/CLOSE button
to open the toilet seat.
2 Press the OPEN/CLOSE button
again to close the toilet seat.
OPEN/CLOSE
19
STEP
Auto Deodorizing Function
2
1 Turbo deodorizing starts when the toilet seat lid opens.
* When a person is detected, the
deodorizer fan is activated in "full
power mode" to remove odors.
2 The deodorizer operates in normal mode
while the user is sitting on the seat.
* The deodorizer changes to "power mode" to
remove odors.
3 Turbo deodorizing starts
when the user stands up.
* The deodorizer fan increases
output to “full power mode” and
removes odors.
4 Deodorizing stops.
* The deodorizer fan automatically stops 1 minute
after the user stands up.
* A deodorizer cartridge that absorbs odors is
installed in the toilet body.
■ To disable the automatic deodorizing function
Press the DEODORIZER button and BIDET button
simultaneously for 2 seconds or longer.
* When these buttons are held down, a short beep is heard. After
this operation is completed, the deodorizer fan does not operate
even when a user approaches the toilet.
* Press the DEODORIZER button and BIDET button simultaneously
for 2 seconds or longer to activate the automatic deodorizing
function again.
Operation
DEODORIZER + BIDET
20
STEP
3
General Operation
Front and Rear Washing
Rear washing
Provides rear washing with
a strong spray of water.
Rear washing-mild
Provides rear washing with
a gentle spray of water.
Rear washing
● Press the SHOWER button.
* Wate
r will drip from the nozzle. This washes the nozzle before use.
The nozzle extends and water sprays.
● Press the STOP button.
* The
Operation
spray will stop and the nozzle will retract.
Adjusting water pressure
Press the or SPRAY
STRENGTH button.
* The water pressure can be adjusted to any of 6 levels. Adjust the
water pressure as desired.
* The water pressure level is indicated on the LCD.
Oscillating spray
During rear washing, press the SHOWER button a second time.
* The nozzle moves back and forth to wash a wide range.
* Press the STOP button to stop the rear washing function.
SHOWER
STOP
SPRAY STRENGTH
or
Oscillating spray - narrow
During rear washing, press the SHOWER button a third time.
* The nozzle moves back and forth in a short stroke for more thorough washing.
* Press the STOP button to stop the rear washing function.
* Press the SHOWER button again to return to normal rear washing.
[Note]
● Sit further back on the toilet seat. If you sit
further back on the seat, there will be less
water splashing.
21
[Reference]
●
If you feel that the water pressure is too strong even
at the lowest setting, the water pressure can be
lowered even further. See page 41 for more detail.
Rear Washing - Mild
● Press the MILD button.
*
Water will drip from the nozzle. This washes the nozzle
before use. The nozzle extends and water sprays.
● Press the STOP button.
*
The spray will stop and the nozzle will retract.
Adjusting the water pressure
Press the or SPRAY
STRENGTH button.
* The water pressure can be adjusted to any of 6 levels. Adjust the
water pressure as desired.
* The water pressure level is indicated on the LCD.
Oscillating spray
STOP
MILD
Operation
SPRAY STRENGTH
or
During rear washing, press the MILD button a second time
* The nozzle moves back and forth to wash a wider range.
* Press the STOP button to stop the rear washing - mild function.
Oscillating spray - narrow
During rear washing, press the Mild button a third time.
* The nozzle moves back and forth in a short stroke for a more thorough washing.
* Press the STOP button to stop the rear washing - mild function.
* Press the MILD button again to return to mild rear washing.
Washing function
The bidet washing function includes an auto-stop function to stop washing after 2 minutes.
.
22
General Operation
Front washing
● Press the BIDET button.
*
Water will drip from the nozzle. This washes the nozzle
before use. The nozzle extends and water sprays.
● Press the STOP button.
*
The spray will stop and the nozzle will retract.
Adjusting the water pressure
Press the or SPRAY
Operation
STRENGTH button.
* The water pressure can be adjusted to any of 6 levels.
Adjust the water pressure as desired.
* The water pressure level is indicated on the LCD.
Oscillating spray - wide
During rear washing, press the BIDET button a second time.
* The nozzle moves back and forth to wash a wider range.
* Press the STOP button to stop the front washing function.
BIDET
STOP
SPRAY STRENGTH
or
Oscillating spray - super
During rear washing, press the BIDET button a third time.
* The nozzle moves back and forth to wash an even wider range.
* Press the STOP button to stop the rear washing - mild function.
* Press the BIDET button again to return to front washing.
Bidet washing
The front washing function includes an auto-stop function which terminates washing after two minutes.
2323
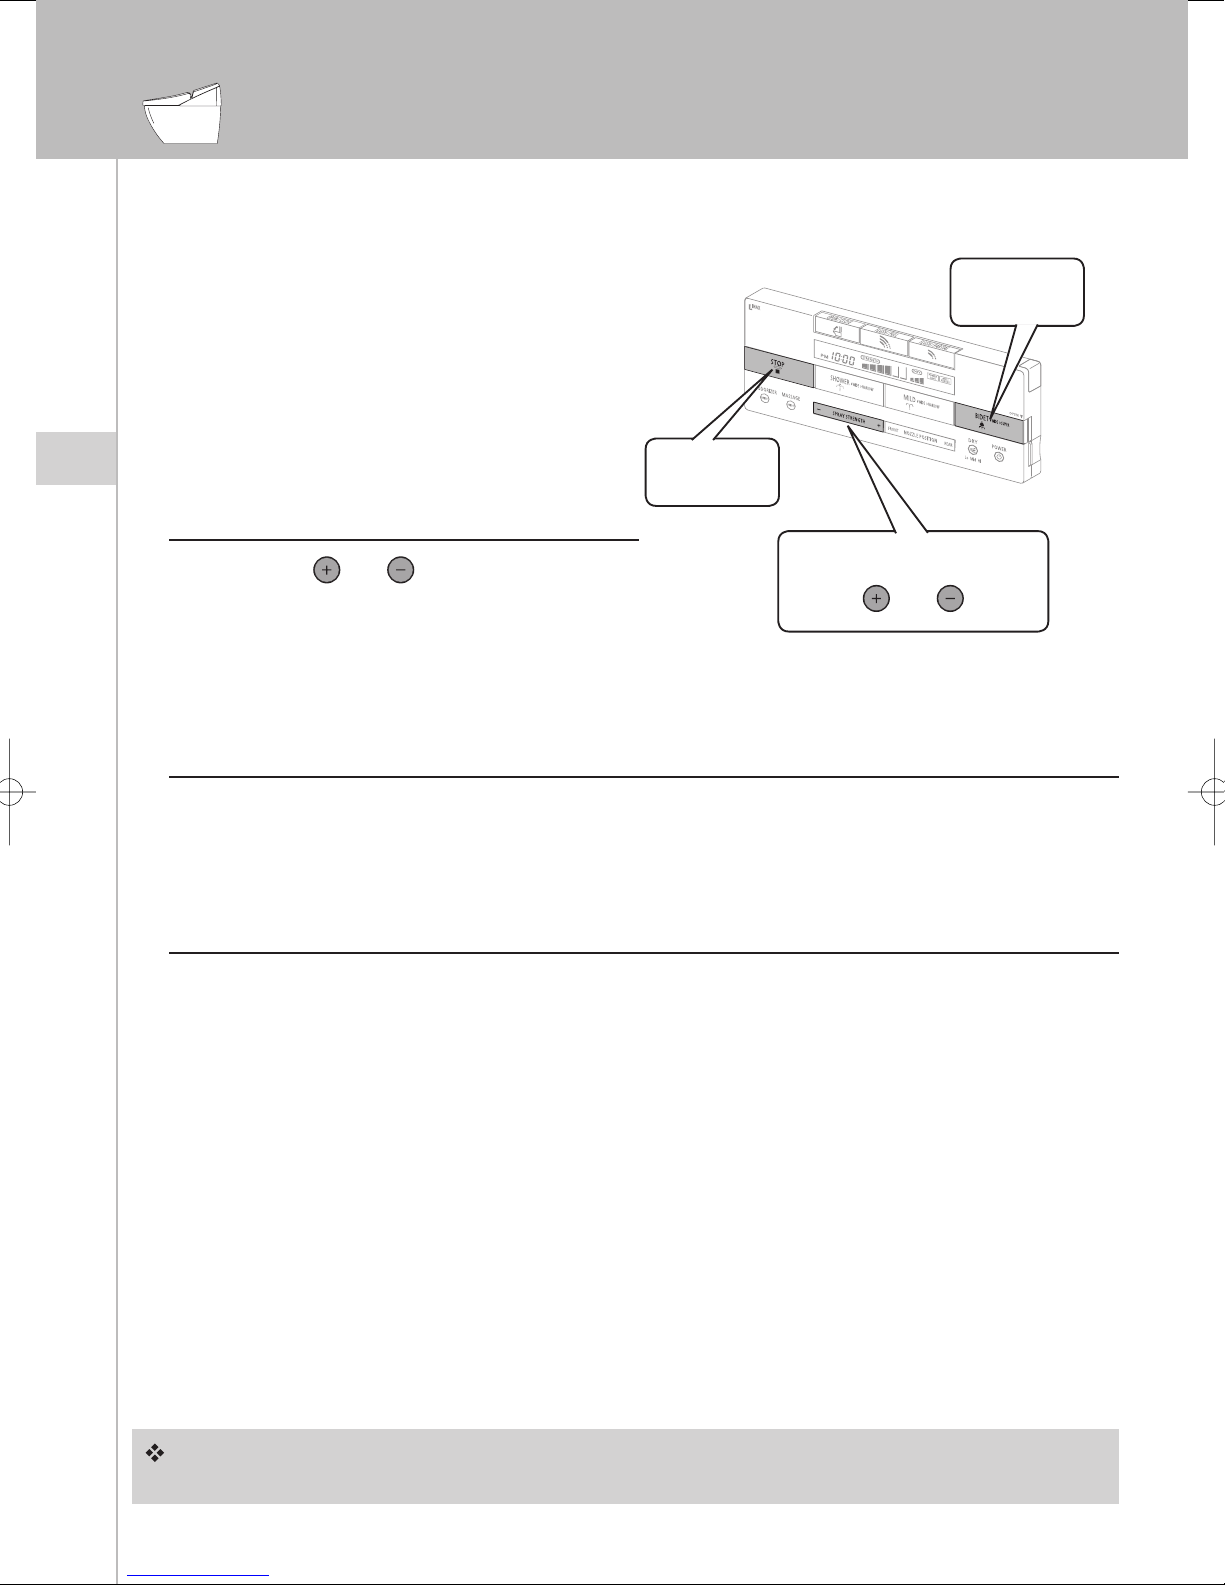
Massage Function
During rear washing, the massage function alternates between a strong spray and a gentle spray to provide a
massage effect.
● Press the MASSAGE button
during rear washing.
● Press the MASSAGE button
again to end this feature.
MASSAGE
Operation
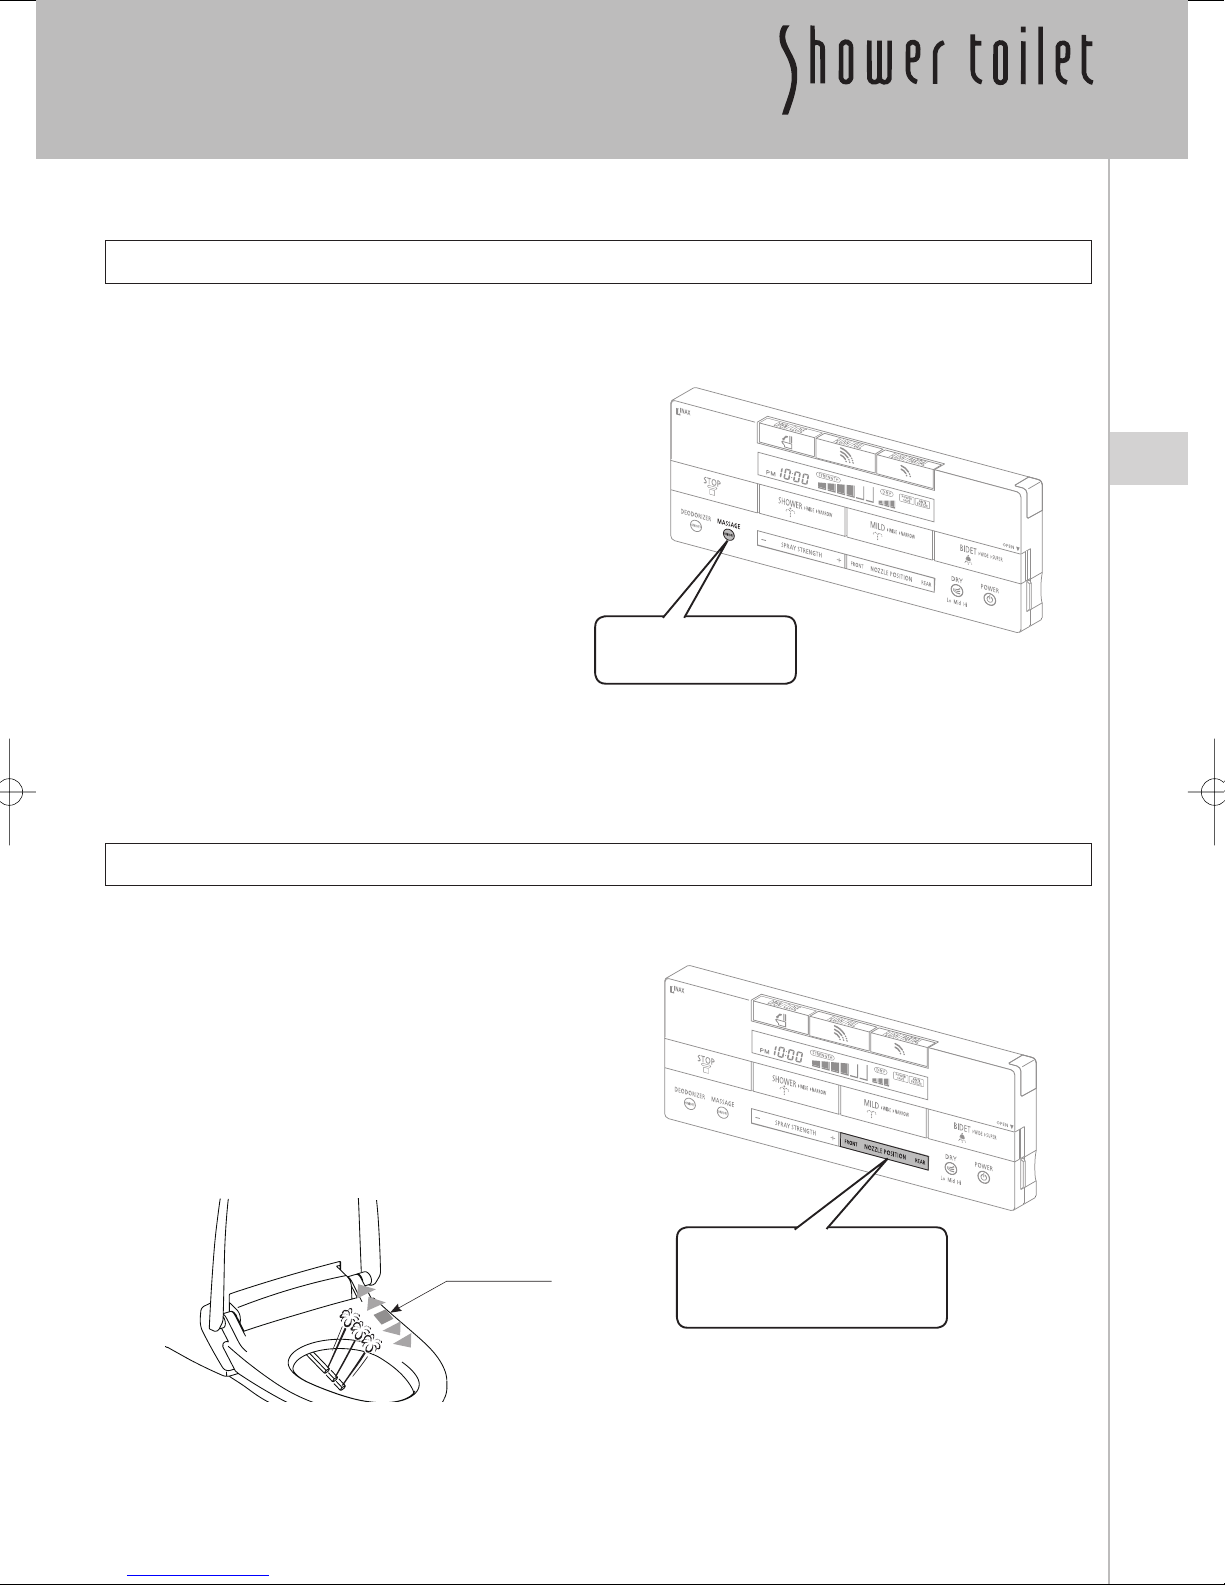
Nozzle Position
The nozzle position can be adjusted back and forth during rear washing and front washing.
Press the NOZZLE POSITION button,
as indicated in the diagram below.
*
The nozzle position can be adjusted to any of 5 different
settings. There are two settings in the front, the center position
(which is the default setting), and two positions in the rear.
* If the user stands up, the nozzle position will return to the
default setting.
Initial position
NOZZLE POSITION
FRONT or REAR
2424
 Loading...