

Inalsa Wonder Maxie Plus, Wonder Maxie Instruction Manual
FOOD
PROCESSOR
Instruction Manual

INDEX
Page No. Contents
1. Congratulations
2. Parts identification
3. Technical specifications
4-5. Important instructions
5-11. How to use
12. Disc selection guide
13. Cleaning and maintenance
14-22. Mouth watering recipes
23-24. Conversion table/English-Hindi index
25. Packing list
26. Warranty
27. Warranty card

Dear Customer,
Congratulations! On the purchase of your INALSA food processor, this is
designed to include many superior features that permit you the fullest
expression of your cooking skills and enthusiasm. You are now on the
threshold of a whole new world of cooking pleasure.
At INALSA, we have a reputation of manufacturing innovative, high quality
appliances such as Food Processors, Mixer Grinders, Juicer Mixer Grinders,
Juice Extractors, Cooktops, Microwave ovens, Oven Toaster Grillers, Hand
Blenders, Electric Kettles, Rice Cookers and Electric Chimneys. Your newly
acquired INALSA food processor bears the same distinctive hallmark of
excellence.
It is all the result of vigorous quality consciousness in INALSA's design and
development where uncompromising standards are maintained and rigid
quality control measures are exercised on raw materials, components and
finally, the finished product.
Your INALSA food processor has a lot of thoughtful features built in to
make your cooking convenient. Please read these instructions carefully, so
that you may get the best out of the power packed features in your INALSA
food processor.
Welcome to the INALSA world of cooking pleasure!
1

Part No. Part Name
1. Main body
2. Bottom 19. Atta kneading blade
3. Top socket 20. Citrus juicer
4. Bowl 21. Centrifugal juicer
5. Bowl cover 22. D.G. jar
6. Switch housing 23. D.G. lid
7. Switch knob 24. D.G. socket
8. Bottom pad 25. B.L. jar
9. French fries disc 26. B.L. lid
10. Coconut Shredding disc 27. B.L. socket
11. Shredding cum slicing disc 28. B.L. stopper
12. Citrus gear sleeve 29. Chutney jar
13. Stem rod 30. Chutney lid
14. Citrus gear cone 31. Food pusher
15. Egg whisker holder 32. Centrifugal juicer cover
16. Egg whisker 33. Centrifugal juicer pusher
17. Release button
Part No. Part Name
18. Chopper blade
2
Parts Identification
28 26
25
17
31
5
4
12
19
15
18
11
10
9
2021
2
8
13
7
6
1
16
3
27
29
30
24
22
23
14
33
32

Technical Specifications *
Model name Wonder Maxie Plus
Voltage 230V AC-50Hz.
Motor Universal
Power consumption 700 Watts
Rating (no load) 30 minutes continuous
Motor RPM at no load 18000
Cord plug 2-pin, 6A, 250V, PVC cord 1.75 M long
Speed control 3 speed with incher
Material of housing ABS
Jar capacity FP bowl- 1.0 litre
Liquidizer jar : 1.5 litre
Dry grinder jar : 1.0 litre
Chutney grinder jar : 400ml
Attachments · Centrifugal juicer
· Citrus juicer
· French fries disc
· Shredding cum slicing disc
· Coconut shredding disc
· Aata kneading blade
· Egg whisker blade
· Chopper blade
· Blender jar
· Dry grinder jar
· Chutney grinder jar.
Overload protector Manual re-setting type
* Due to continuous improvements in product, specifications are subject to change
without prior notice.
3

4
Important Instructions
Do's
1. Before connecting the appliance check the mains voltage comply with the
voltage specified.
2. Place your food processor at a convenient height so that you can operate it
easily. You should be able to look down into the attachments to check the
circulation of the ingredients.
3. Clear out some space around the machine and keep food processor away
from direct heat and sun.
4. Take care as the cutting edges of the blade cutters are very sharp.
5. Ensure that the bowl assembly is perfectly locked with the basic unit.
6 For unlocking the bowl cover turn the bowl cover clockwise by pressing
the release switch on the upper base.
7. While using different jars, fix the bowl and bowl cover as the machine
will not work till the bowl cover is in place.
8. While using centrifugal juicer place the juicer body with filter on to the
drive shaft and rotate the filter till it is locked with the body.
9. Always use a spatula during processing of the food.
10.Keep the food processor away from the reach of the children.
Don'ts
1. Do not apply undue pressure while using the coconut shredding disc.
2. Do not operate the centrifugal juicer unless juicer cover, filter is properly
clamped with the juicer body.
3. Do not leave the food processor in running condition unattended.
4. Do not touch the moving parts during operation as they revolve at
extremely high speeds and may cause injury.
5. Never allow the shredded, sliced or chipped food to touch the discs during
operation. It could force the disc upwards and cause damage. If bowl
begins to fill, empty it out in between.
6. Do not use fruits such as bananas & peaches which produce a thick paste
that can clog the juicer filter.
7. Do not feed larger sized fruits into the feeder tube by force. This can
overload the motor and juicer filter may get unbalanced.
8. Never lay a thin plastic sheet or cloth under the basic unit. It may get
sucked up and block the ventilation holes in the base.
9. For juicing do not allow the cord to hang over the edges of the table, or
touch hot surface.
10.Do not push food into the feeder table by fingers while it is in operation. If
fruit become clogged in the feeder tube, use pusher to push it down. If it
doesn't work turn off the motor, unplug the unit, then disassemble the food
processor to remove remaining food.
11.Do not immerse the appliance in water.
12.Do not attempt to repair the food processor at home or allow any
unauthorized person to do it either, in the event of any service problem
please call your nearest service center.
5
Before First Use
1. After unpacking the unit and before any use, make sure the mechanical
parts of the unit and all its attachments are not damaged.
2. Wash the parts of the processor, especially those will come into contact
with the fruits.
3. Carefully go through the instruction manual before starting the operation.
Hot to Use
Important Instructions:
- Some parts of the food processor are oiled & greased for smooth
operation of the machine, before first use, wash the parts of the
processor thoroughly with soapy water.
- While grinding in dry grinding and chutney jar, customers are
advised to keep one hand on the jar lid to avoid lid flying.
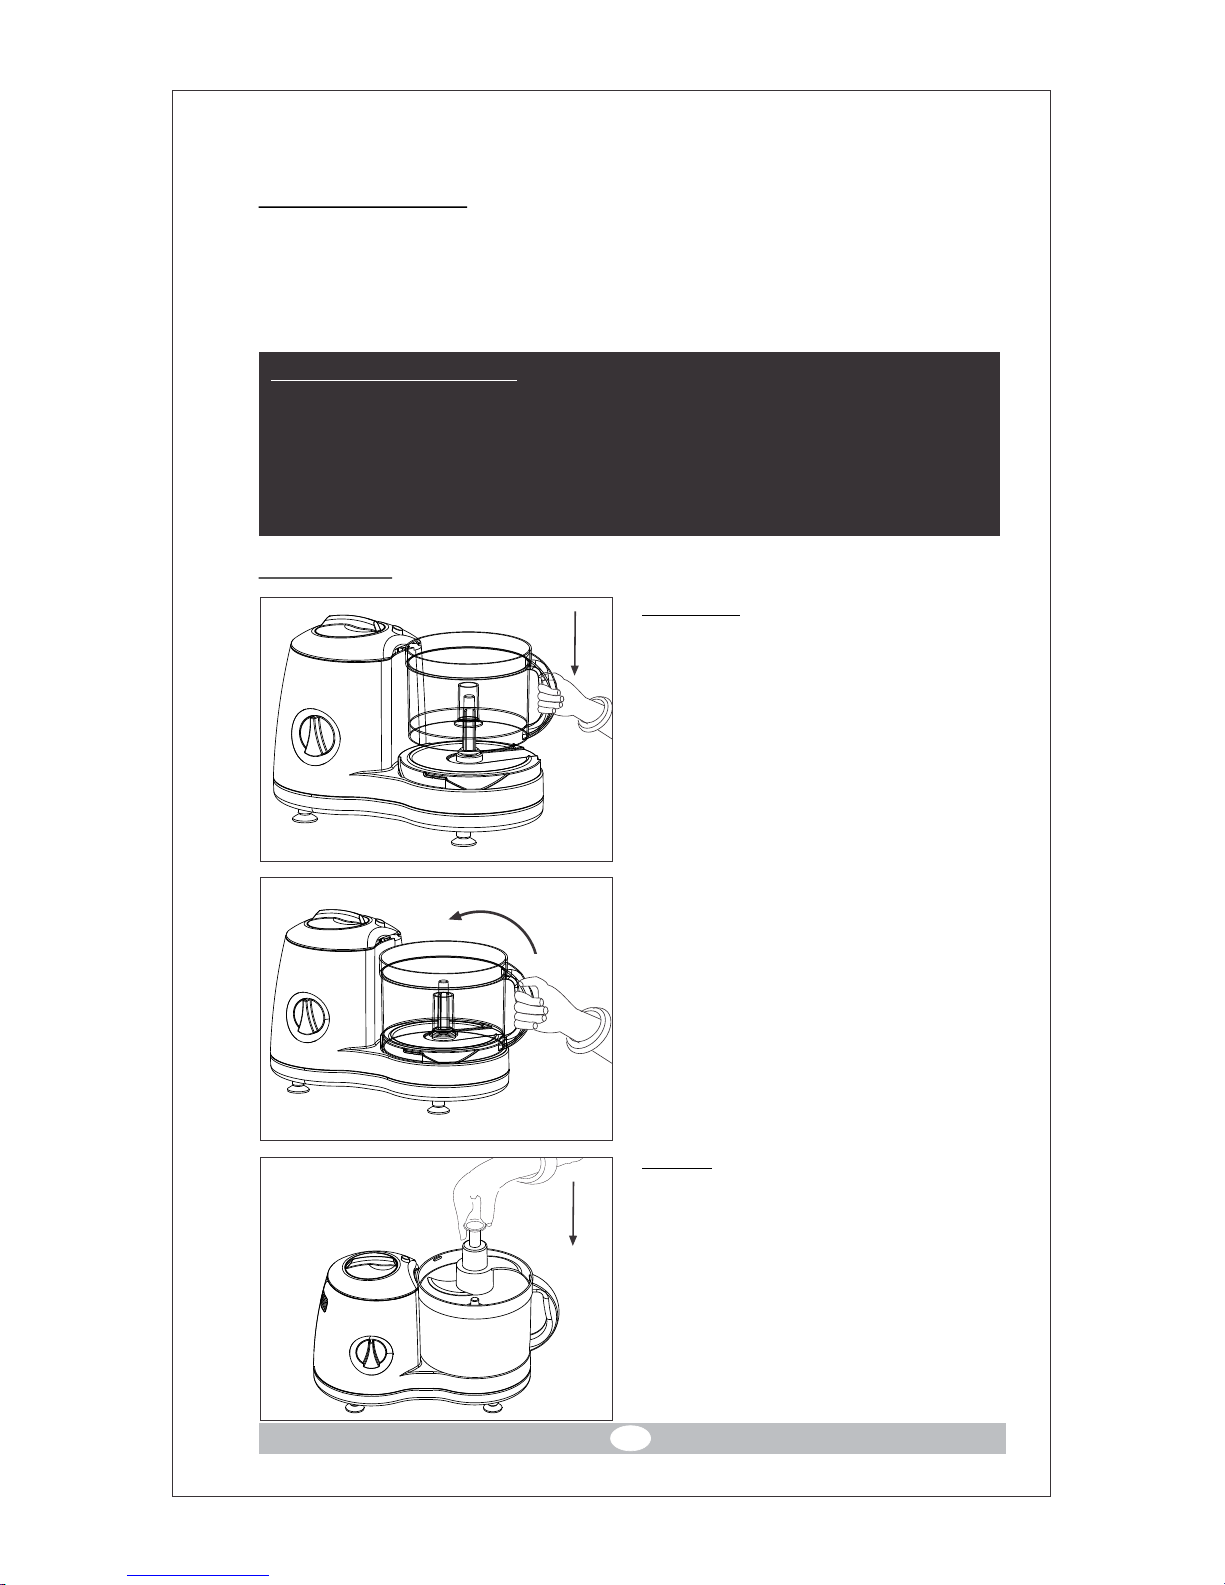
The Bowl
With the switch side of food
processor facing you, hold the all
purpose bowl by the handle and lower
it onto the power drive shaft of the
motor base, ensuring that the
serrations given at the bottom of the
bowl coincides with the arrow
provides on the basic unit.
Turn anti-clockwise to lock the lugs
on the basic unit, ensure that lugs are
properly fitted in the slots provided
on the bowl.
Blades
Lower the blade with centre knob
onto the power drive shaft and rotate
till it rests down.
The stainless steel blade and plastic
blade settles low down inside, while
the disc remain just above the rim of
the bowl.

6
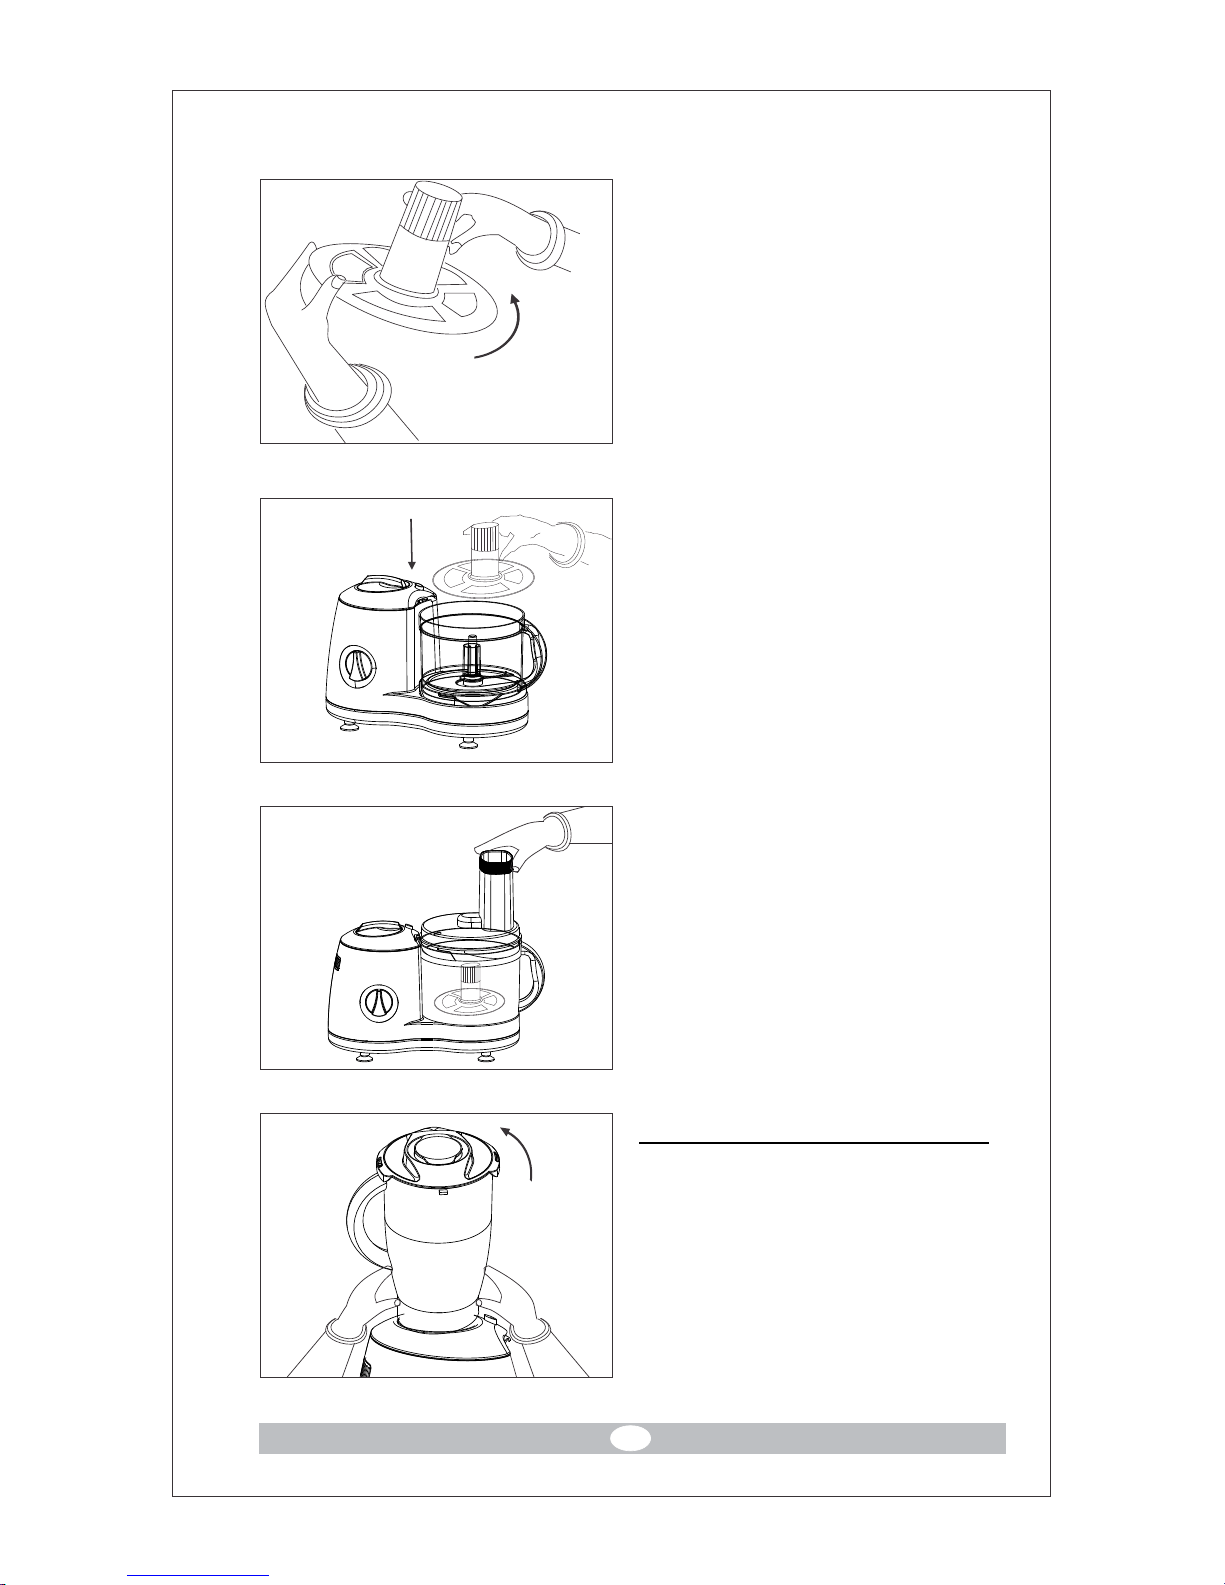
The bowl cover
Hold the bowl cover by the feeder
tube and place it on the bowl
pressing a little towards left of the
bowl's handle, such that serrations
given on the bowl cover coincide
with the arrow given at the top of the
bowl.
Slide the bowl cover anti-clockwise
until it get locked in position. For
unlocking the bowl cover, turn the
bowl cover clockwise by pressing
the release button on the top socket.
Note: As long as the bowl cover is
locked into position, the unit will not
switch 'ON'
Connect the food processor to a wall
AC outlet. The machine can be
switched 'OFF' or 'ON' by shifting
the rotary switch to different
position.
Now, the food processor is ready for
the action.
Whisker Disc
Hold the egg whisker disc with
embossed written matter on top side
and insert the holder into the disc.
o
c
k
l
i
-
n
n
g
U
g
n
i
k
c
o
L
To lock the holder turn anti-clockwise
Fix the bowl over the basic unit and
insert the whisker, assembly into
drive shaft till it rests down.
Add the food material into the bowl.
Lock the bowl cover on main bowl
and start the unit.
Liquidizer Jar & Dry grinding jar
Fit the liquidizer jar or dry grinder or
chutney grinder jar on the left hand
side of basic unit, by opening the top
lid, then align the locks with the
locking slots and turn anti-clockwise
so that the jar locks into the position.
Put the ingredients inside the
liquidizer jar or dry grinder jar and
close the lid.
7
 Loading...