

Inalsa WINDSTAR Use & Care Manual
Dear Customer,
Congratulations! On the purchase of your INALSA Ceiling Fan, this is
designed to include many superior features that permit you the fullest
expression of your freshness and enthusiasm.
At INALSA, we have a reputation of manufacturing innovative, high quality
appliances such as Food Processors, Mixer Grinders, Ceiling Fans,
Cooking Ranges, Juice Extractors, Cooktops, Microwave Ovens, Oven
Toaster Grillers, Hand Blenders, Electric Kettles, Rice Cookers, and
Electric Chimneys. Your newly acquired INALSA Ceiling Fan bears the
same distinctive hallmark of excellence.
It is all the result of vigorous quality consciousness in INALSA's design and
development where uncompromising standards are maintained and rigid
quality control measures are exercised on raw materials, components and
finally, the finished product.
Your INALSA Ceiling Fan has a lot of thoughtful features. Please read
these instructions carefully, so that you may get the best out of the power
packed features in your INALSA Ceiling Fan.
The visuals are indicative only
USE & CARE MANUAL
mi;ksx o ns[kHkky iqfLrdk
WINDSTAR
HO ME AP PLI AN CES
CEILING FAN
Nr ia[kk
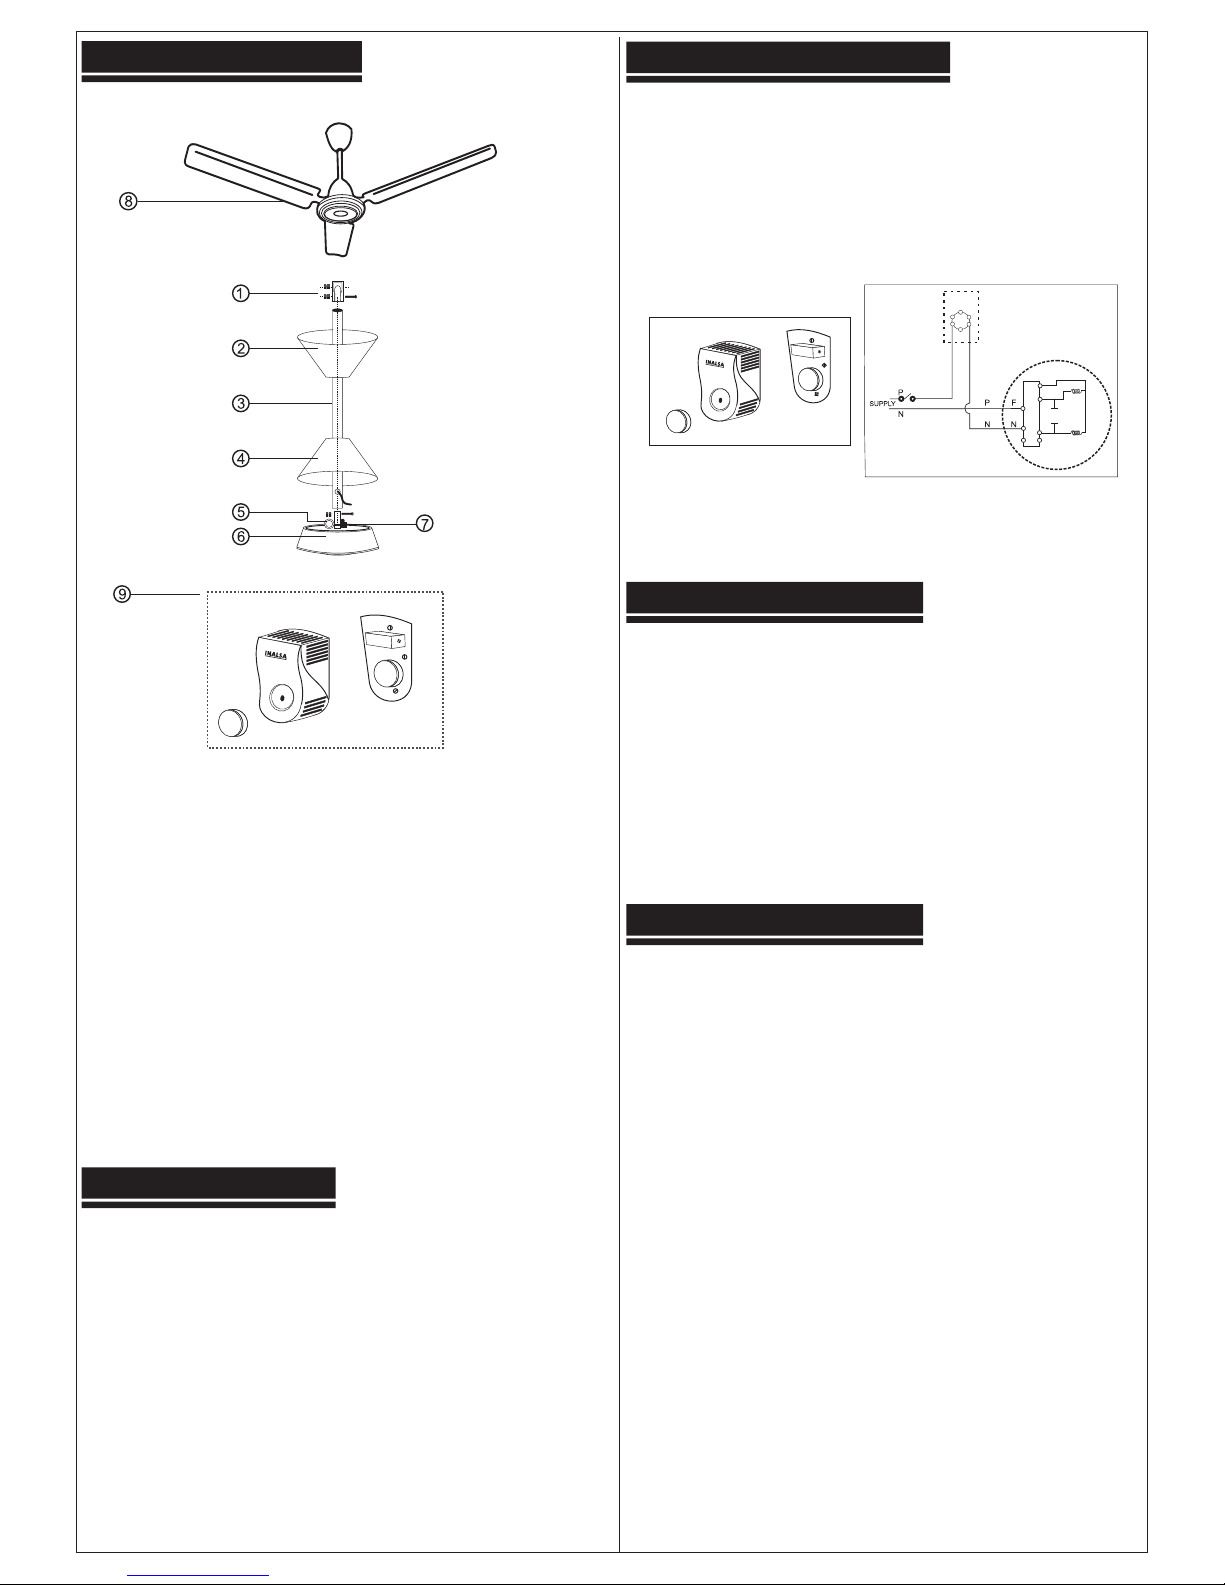
Part's Identifications
1 Hanger Clamp Assembly
2 Top Canopy
3 Down Rod
4 Bottom Canopy
5 Capacitor
6 Motor Body
7 Terminal Block
8 Blade
9 Regulator (Optional)
*D ue to cont inuous improvements in product,
specifications are subject to change without prior notice.
How to Assemble
Fan
1. Fix all 3 blades to the motor body with the screws
already provided on the motor body.
2. Insert the connecting wires and slip in canopies back to
back through the down rod.
3. Insert the bottom end of down rod on spindle of motor
body and tighten with hanger clamp.
4. Connect the wires to terminal block.
5. Place the bottom canopy in position and tighten the
screws provided on the canopy (Ensure 3 -4 mm gap
between canopy & motor body).
Regulator (OPTIONAL)
1. Remove the know by pulling out with the help of
screw driver.
2. Remove the top cover by unscrewing two screws
under the knob.
3. Take out the wires through the base plate. Make
series electrical connections at the switch as per the
circuit diagram (see the diagram below).
4. Fix the base plate to the wall / board with screws.
5. Fix the top cover by two screws and insert the knob.
How to Install
1. Remove the bolts and nuts from the hanger clamp
assembly.
2. Insert the down rod top end in the hanger clamp
assembly and tighten with nuts and bolts.
3. Place the rubber reel on the ceiling hook and insert
the hanger.
4. Tighten the hanger assembly with nuts & bolts.
5. Place the top canopy in position and tighten the
screws provided on the canopy.
Important Instructions
1. Read the instructions carefully before assembly /
installation of fan.
2. Check the assembled fan and regulator, ensure
proper installation before putting the fan “ON”.
3. The plane of the fan blades should be 2.4 to 2.7
meters from the floor.
4. Do not mix the blades of one set with another set as
these blades are balanced and packed as a set for
efficient air delivery.
5. For ball bearings, use grease of Bharat Petroleum
MP 2 or India oil servogem 3 and for bush bearing
3 - in - 1 or equivalent lubricating oil.
 Loading...