

Inalsa BEST BAKE 32T, BEST BAKE 32TRC, BEST BAKE 32TRC-SS, SMART BAKE 19T, SMART BAKE 19TRC Instruction Manual
...
Instruction Manual
LITTLE BAKE - N
SMART BAKE
19T/19TRC/19TRC-SS
BEST BAKE
32T/32TRC/32TRC-SS
OVEN TOASTER GRILLER

1
Dear Customer,
Congratulations! On the purchase of your INALSA Oven Toaster Griller, this is designed to
include many superior features that permit you the fullest expression of your cooking skill and
enthusiasm. You are now on the threshold of a whole new world of cooking pleasure.
At INALSA, we have a reputation of manufacturing innovative, high quality appliances such as
Food Processors, Mixer Grinders, Juicer Mixer Grinders, Cooking Ranges, Juice Extractors,
Cooktops, Microwave Ovens, Oven Toaster Grillers, Hand Blenders, Electric Kettles, Rice
Cookers, and Electric Chimneys. Your newly acquired INALSA Oven Toaster Griller bears the
same distinctive hallmark of excellence.
It is all the result of vigorous quality consciousness in INALSA's design and development
where uncompromising standards are maintained and rigid quality control measures are
exercised on raw materials, components and finally, the finished product.
Your INALSA Oven Toaster Griller has a lot of thoughtful features built in to make your
cooking convenient. Please read these instructions carefully, so that you may get the best out of
the power packed features in your INALSA Oven Toaster Griller.
Welcome to the INALSA world of cooking pleasure!!
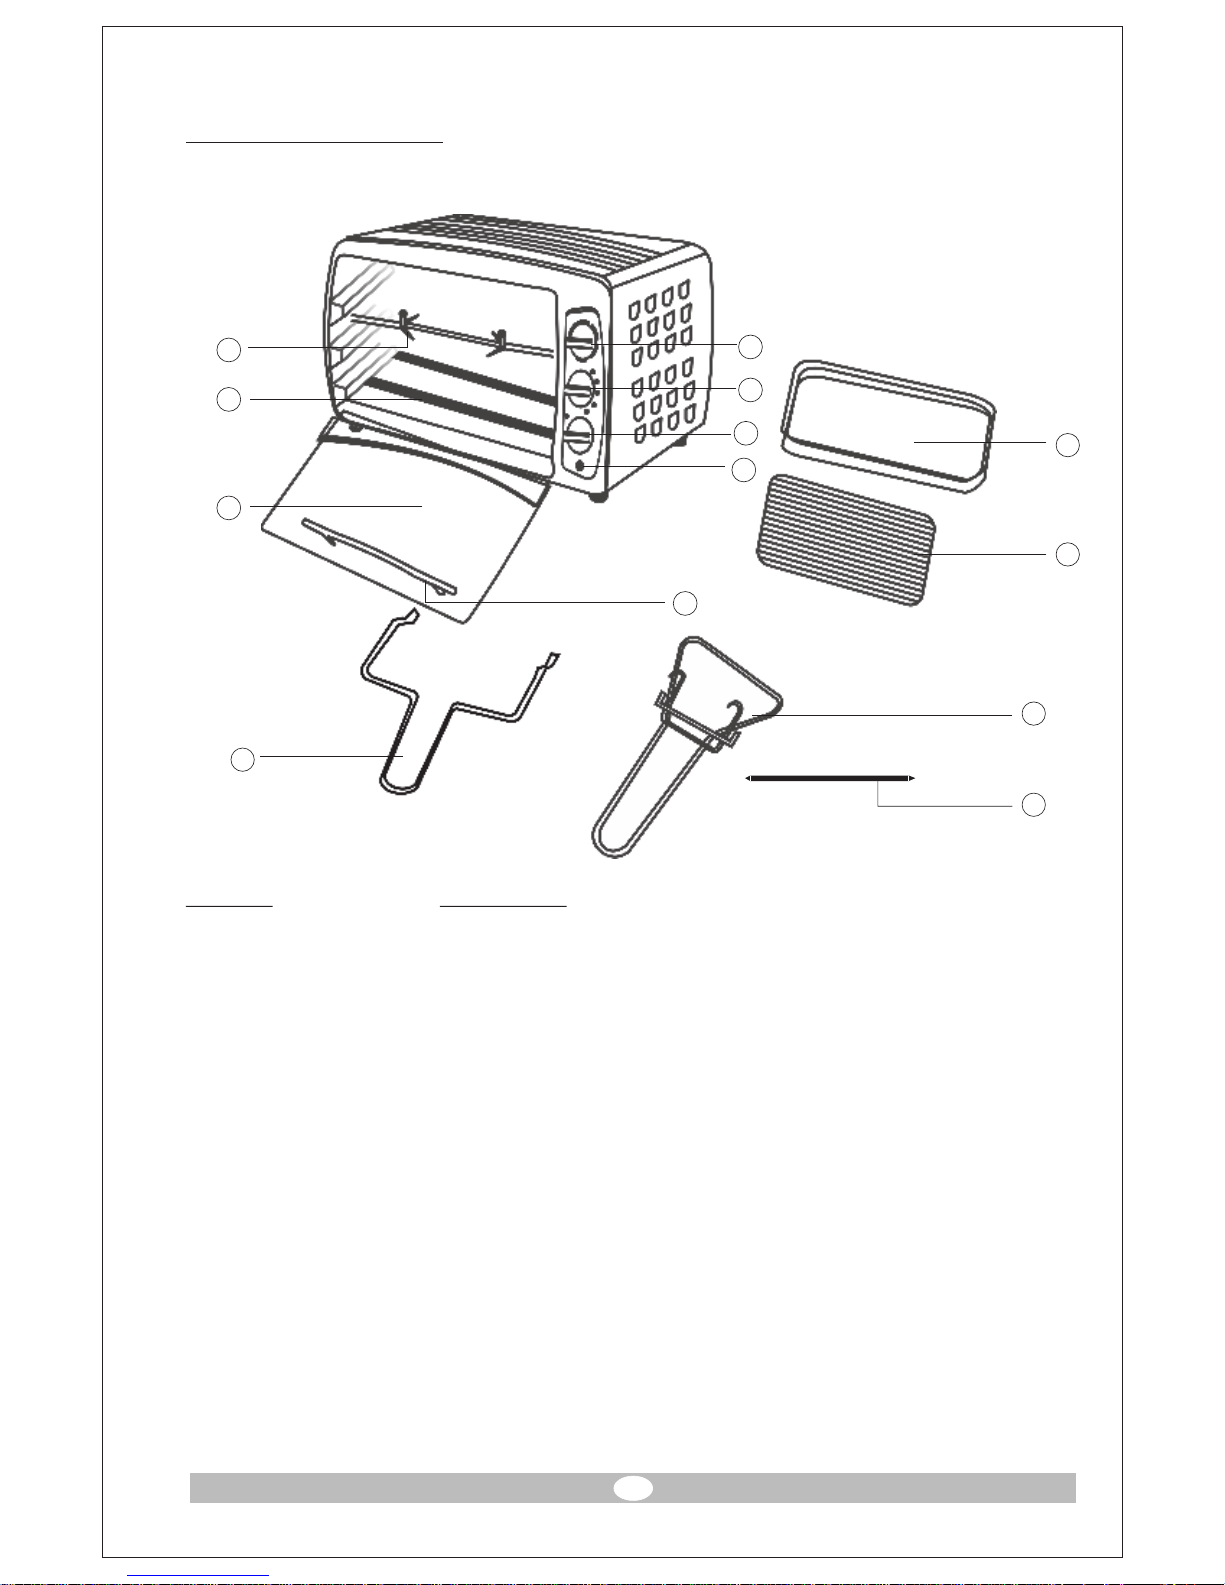
Parts Identification
(Smart Bake (19L) & Best Bake (32L)
Part No. Parts Name
1. Heating element
2. Glass door
3. Drip tray
4. Wire rack
5. Rotisserie attachment (Available in TRC & TRC-SS model)
6. Thermostat knob
7. Heat selector knob
8. Timer knob
9. Power indicator
10. Door handle
11. Rotisserie handle (Available in TRC & TRC-SS model)
12. Tray handle
13. Skewer rod
2
3
4
11
12
2
1
5
10
6
7
8
9
13

3
Parts Identification
Part No. Parts Name
1. Stainless steel housing
2. Handle
3. Thermostat knob
4. Timer knob
5. Power indicator
6. Quartz element
7. Drip tray
8. Wire grill
9. Tray handle
Model Little Bake N
Wattage 1000W
Voltage 220 - 240V AC-50Hz.
Capacity 10 ltr.
Cord Plug 3 Pins, 16A, 250V, moulded plug with cotton braided cord
Housing Stainless steel
Element Quartz tube element
* Due to continuous improvements in product, specifications are subject to change without
prior notice.
Technical Specification*
7
8
9
1
3
4
5
6
2
Little Bake N

Technical Specifications *
Specification Smart Bake Best Bake
19T 19TRC 19TRC-SS 32T 32TRC 32TRC-SS
Capacity 19lt. 19lt. 19lt. 32lt. 32lt. 32lt.
Voltage 220-240V, AC, 50Hz
Power 1500W
Heating element Stainless steel
Timer 0-120min. 0-120min. 0-120min. 0-120min. 0-120min. 0-120min.
Rotisserie Not provided Provided Provided Not provided Provided Provided
Convection Not provided provided Provided Not provided Provided Provided
Thermostat 100-250°C 100-250°C 100-250°C 100-250°C 100-250°C 100-250°C
Heat selection 4 Stages 6 Stages 6 Stages 4 Stages 6 Stages 6 Stages
Housing Metal powder coated Stainless steel Metal powder coated Stainless steel
* Due to continuous improvements in product, specifications are subject to change without
prior notice.
Important Instructions
Do's
1. Ensure that the appliance is placed on firm level surface and close to an electrical outlet.
2. A distance of at least 10cm should be maintained between the oven and the wall.
3. Before putting the food on the tray, spread a layer of edible oil onto the tray to avoid the
food sticking to the tray after baking.
4. If the supply cord is damaged, it must be replaced by the authorized service personnel of
the company in order to avoid a hazard.
5. Always keeps children away from the oven.
Don'ts
1. Never use the oven if it is damaged in any way.
2. When in use, the oven is hot! Never touch the oven and the glass door.
3. Don't let power cord hang oven the edge of the table or kitchen worktop or touch hot
surfaces.
4. Don't use out doors.
5. Don't sprinkle water on the glass window whilst it is still very hot, this could cause the
glass to crack.
6. The user must not leave the oven during use.
7. Remove the plug from the power socket after use.
8. The oven can not be put into water or washed with water.
9. Do not place the appliance near a source of heat.
10. Never place any paper, cardboard or plastic in the oven and do not place anything on top of
it (utensils, objects etc.)
11. Do not operate you appliance under a wall cupboard, shelves or close to flammable
materials such as blinds, curtain, etc.
4

5
Before using for the first time
1. Carefully unpack the oven making sure to remove all packing materials.
2. Wipe the oven and accessories with a damp cloth, and dry.
3. Remove all the accessories from the oven (rack, tray etc.)
4. Fully unwind the removable cord plug.
5. Plug in and adjust the thermostat knob at maximum setting.
6. Set the time knob of 15 minutes.
7. Run empty oven for 15 minutes, smoke etc.
Caution: During heating smoke may appear. This is normal and will soon disappear.
How to Use
Selector dial ( )
1. OFF
2. Top & bottom heating element & convection.
3. Top heating element & convection.
4. Top & bottom heating element.
5. Top heating element & rotisserie.
6. Top & bottom heating element & convection & rotisserie.
Selector dial ( )
1. OFF
2. Top heating element.
3. Bottom heating element.
4. Top & bottom heating element.
Before Use
1. Ensure that there is enough ventilation around the oven.
2. Ensure that the oven is completely dry before use.
3. The oven should not be placed on untreated wooden surface. Place the oven on a heat
resistant surface.
4. The feet of the oven can leave some marks on the table, if this happens, remove the
marks with a damp cloth.
Oven Use
1. Turn the thermostat dial clockwise to the desired temperature.
2. Turn the selector dial to the desired position.
3. Turn the timer dial clockwise to the desired cooking time.
4. The power light will light up after timer is turned on, and will go out when the timer is
turned to OFF.
5. When the cooking time is over, the timer will auto shut off and the bell will ring.
6. If the cooking is finished earlier than the set cooking time, please turn back the timer to
OFF to turn off the oven.
7. In the first use of this oven, there might be some light smoke coming out from the oven,
this is normal. After 5-15 minutes the smoke will disappear.
8. In order to get better cooking performance, it is recommended to pre-heat the oven about
10-15 minutes.
Rotisserie Use
1. Put one skewer through the pointed end of the spit, making sure the points of skewer face
towards the spit's pointed end. Slide the skewer towards the square end of the spit.
2. Insert the spit directly through the center of the food which you want to roast.
3. Put the other skewer through the pointed end of the spit, making sure the points of
skewer face the spit's square end.
Smart Bake 19TRC/19TRC-SS & Best Bake 32TRC/32TRC-SS
Smart Bake 19T & Best Bake 32T
Smart Bake 19T
Best Bake 32T
Smart Bake 19TRC/19TRC-SS
Best Bake 32TRC/32TRC-SS

6
4. Put the two skewers into the food, then secure both skewers with the thumbscrews.
5. Make sure the food is centered on the spit.
6. Insert the pointed end of the spit into the drive socket, make sure the square end of the spit
rests on the spit support.
7. Plug the oven.
8. Set the thermostat to 250W.
9. Turn the timer to the time which you require, the power indicator will light up. Normally it
takes 30 minutes to roast a 2.5Kg(5.5Pd) weight chicken.
10. Set the selector to ROTISSERIE or Full Function setting, the rotisserie starts rotating.
11. When roasting is completed, turn back the timer to OFF.
12. After the oven is cooled, place the hooks of the rotisserie handle under the grooves on both
sides of the spit. Lift the right side of the spit first, move towards right side a little bit, so
that the left side of the spit goes out of the drive socket. Then carefully move out the
roasted food from the oven.
13. Take the food off the spit.
Grill Cooking
1. Leave the door at the open point.
2. Turn the selector to GRILL setting (Top heating).
3. Turn the temperature dial to 250℃.
4. Turn the timer to the desired grill time.
5. When the grill cooking is done, turn back the timer to OFF to turn off the oven.
Practical Advice
1. When baking or grilling, it is advisable to always pre-heat the oven to the desired
temperature, to get the best possible cooking results.
2. Cooking time depends on the ingredient quality, the food temperature and on individual
taste. The time suggested in this manual are only indicative and thus susceptible to
variations and do not take into account the time needed to pre-heat the oven.
3. When cooking freeze-dried foods, check the time suggested in the products' packaging.
4. Do not leave the food in the oven for a long time as it may become too dry.
Cleaning and Maintenance
1. Allow appliance to cool completely before cleaning. Unplug cord from the outlet.
2. The grill & drip tray may be washed as other kitchen ware, either by hand or in the
dishwasher
3. To clean the outside surfaces always use a moist sponge. Avoid using abrasive products
that could damage the finish. Ensure water or soap does not penetrate the inside of the oven
through the vents.
4. Never immerse the appliance in water.
5. To clean the inside walls never use aluminum-corrosive products (spray detergents) and
never scrape the walls with sharp or pointed objects.
 Loading...