

inada HCP-G900 Operating Instructions Manual
感謝您購買 INADA ZERO-G 按摩椅。
本機能消除疲勞及舒展筋絡,帶給您多重按摩享受。
希望本產品能成為您永久的健康伴侶。
感谢您选购 INADA ZERO-G 按摩椅。
本产品能缓解并改善您的疲劳,带给您多种按摩享受。
愿本产品成为您永远的健康良伴。
Thank you for purchasing the INADA ZERO-G. You can enjoy various types
of massage for relieving or soothing fatigue.
We hope the INADA ZERO-G will be a valued partner in your daily health
preservation for many years to come.
HCP-G900
操作手冊
另附保固卡
● 使用前請詳細閱讀本操作手冊。
● 請妥善保管本操作手冊於方便查找之處,以備不時之需。
● 本機僅限於家庭使用。
Operating Manual
Warranty card provided separately
使⽤说明书
另附保修书
●
Please read this Operating Manual before use.
●
Keep this Operating Manual nearby so that you can refer to it anytime.
●
This product is designed for home use.
● 使⽤前请阅读本使⽤说明书。
● 请将本使⽤说明书妥善保管在便于使⽤者查找的地⽅,以备不时之需。
● 本机仅限于家⽤。
ENGLISH
繁體中文
中⽂

MEMO
Operating Manual
Warranty card provided separately
●
Please read this Operating Manual before use.
●
Keep this Operating Manual nearby so that you can refer to it anytime.
●
This product is designed for home use.
HCP-G900
SAFETY PRECAUTIONS
···································
1
MAIN FEATURES
··············································
4
COMPONENTS & DESCRIPTION
···················
5
BEFORE USE
·······················································
7
POSITION ADJUSTMENT
······························
11
AFTER USE
························································
13
PROGRAMS & SELECTION
···························
14
HOW TO OPERATE
··········································
15
TROUBLESHOOTING
·····································
17
REGULAR MAINTENANCE FOR SAFETY
··· 18
FAQ
·····································································
19
CARE AND STORAGE
·····································
20
CUSTOMER SERVICE AND WARRANTY
····
21
SPECIFICATIONS
············································
22
Contents
Thank you for purchasing the INADA ZERO-G. You can enjoy various
types of massage for relieving or soothing fatigue.
We hope the INADA ZERO-G will be a valued partner in your daily
health preservation for many years to come.
ENGLISH
1
[SAFETY PRECAUTIONS]
SAFETY PRECAUTIONS
Be sure that you have read these SAFETY PRECAUTIONS thoroughly before using your INADA ZERO-G for the rst time.
The Operating Manual contains important information about how to use the chair safely and correctly, avoiding possible
damage to property or injury to persons using the chair and others. First of all, you should understand well the meaning
of the indications and symbols described below, which are used throughout the Operating Manual to highlight important
safety instructions. Please adhere to all precautions. Descriptions of each chair component can be found on pages 5-6.
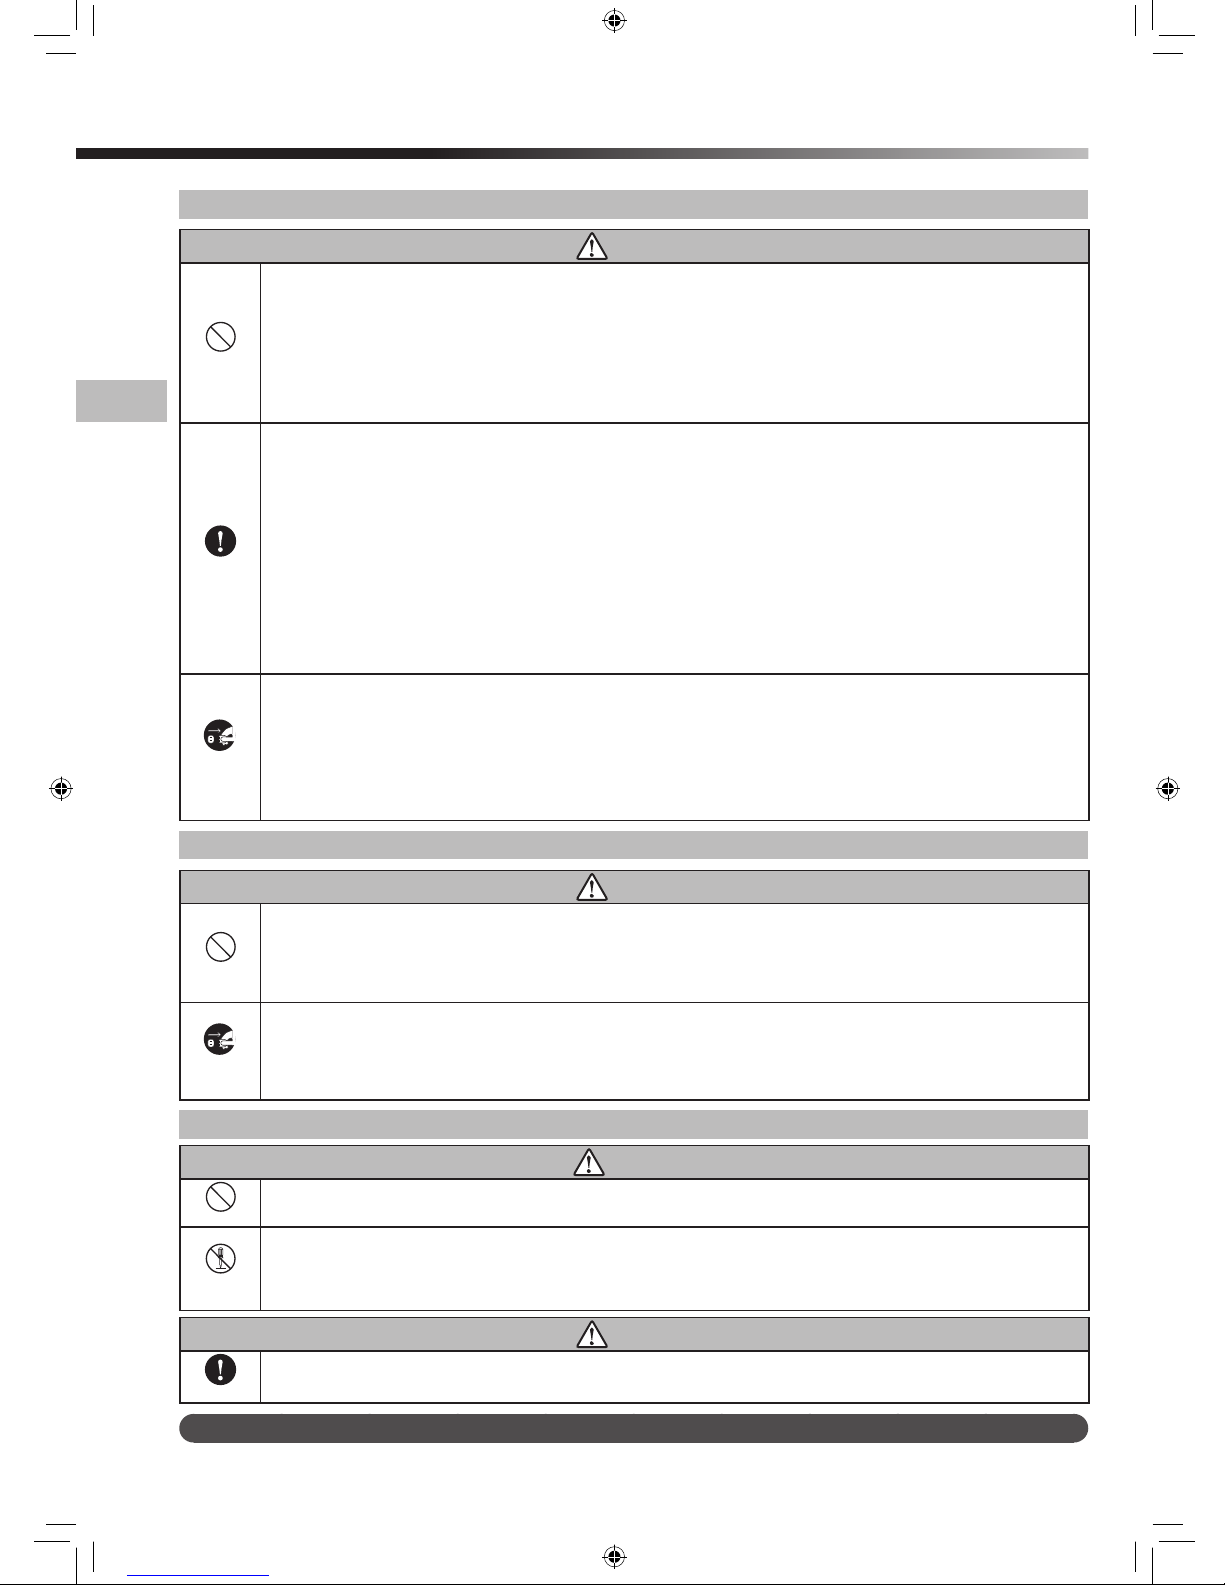
Types of Indications
Warning
This action could result in serious injury or death.
Caution
This action could result in personal injury or damage to property.
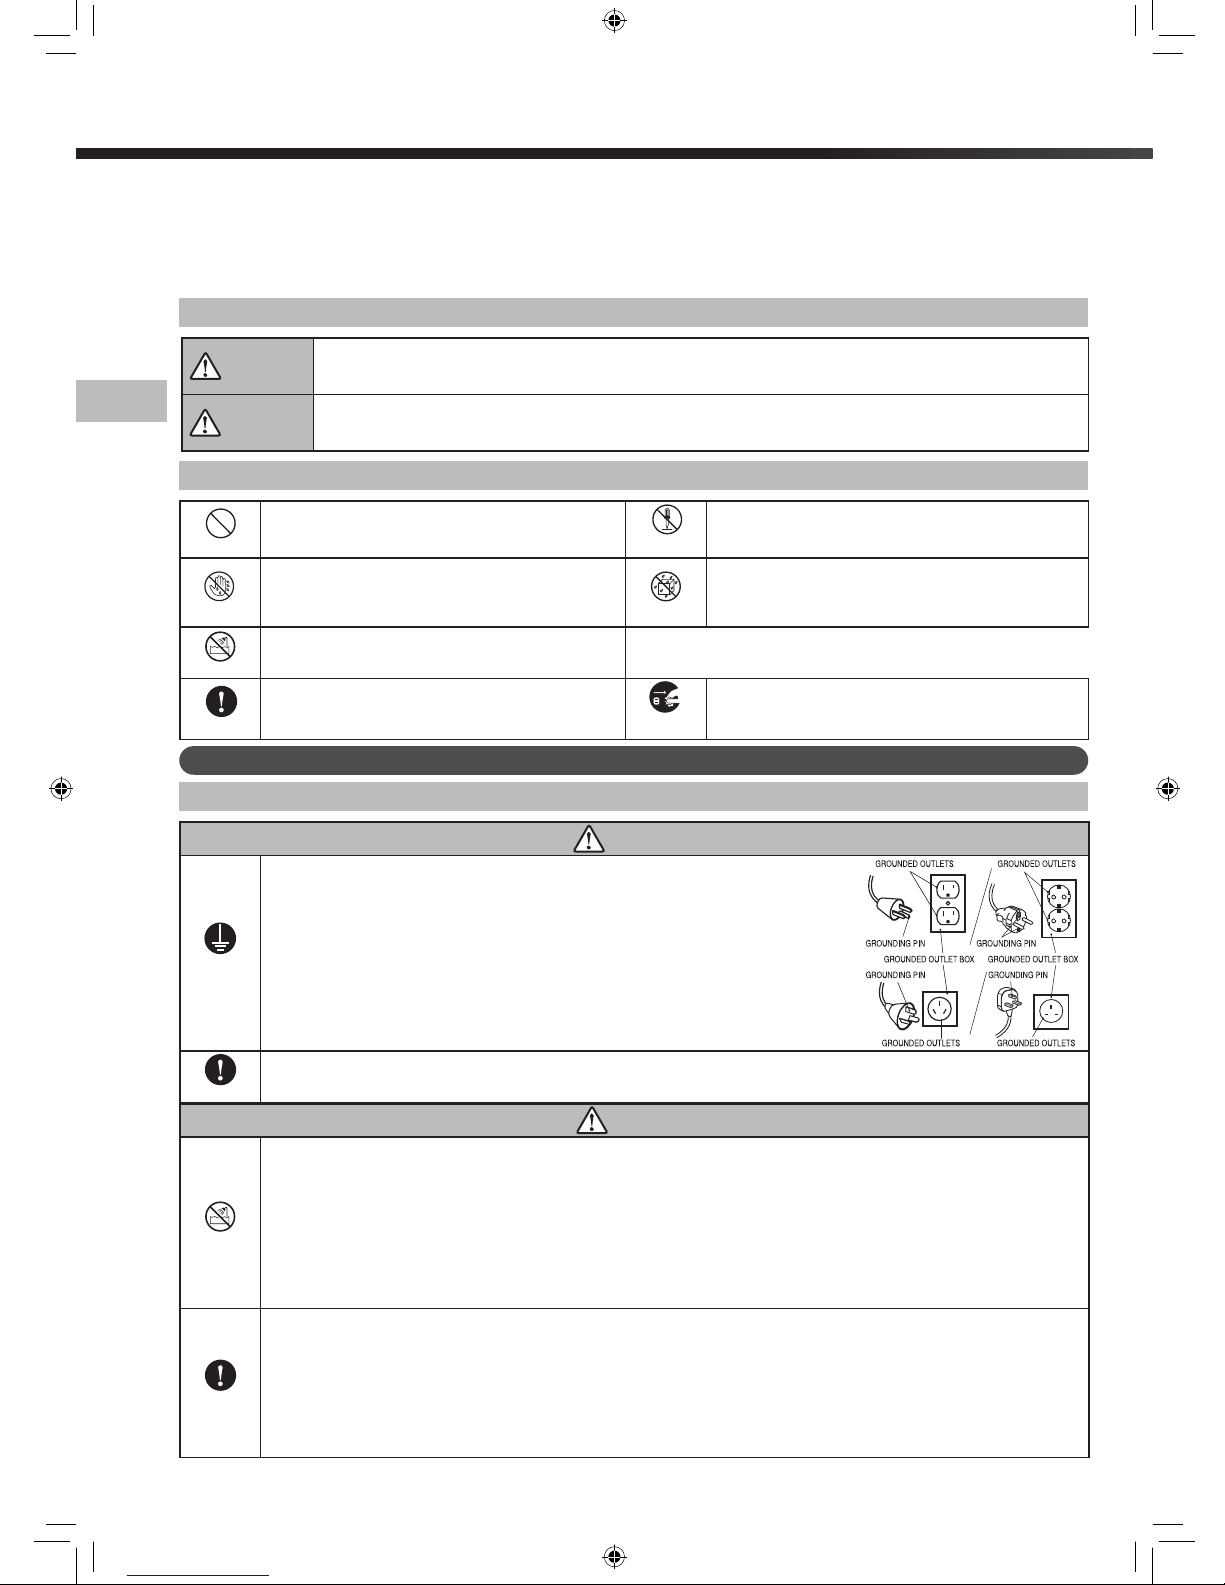
Types of Symbols and Description
Prohibited
Prohibited.
Do not
disassemble
Do not disassemble.
No wet hands
Do not handle with wet hands.
Do not wet
Do not allow the product to get wet,
or use in a location where it could be
splashed with water.
Prohibited
Do not use in a bathroom or shower
room.
Required Action
Required Action.
Unplug
the chair
Remove the plug from the outlet.
Remember to keep this Operating Manual in an easily accessible place.
Safety Precautions: Installation Location
Warning
Electrical
grounding
●
Space Requirements
This product must be grounded. If it should malfunction or breakdown, grounding provides a path of
least resistance for electric current in order to reduce the risk of electric shock. This product is equipped
with a cord having an equipment-grounding conductor and a grounding plug.
The plug must be plugged into an appropriate outlet that is properly installed and grounded in
accordance with all local codes and ordinances.
• Improper connection of the equipment-grounding conductor can result in the risk of electric
shock. Check with a quali ed electrician or serviceman if you are in doubt as to whether the
product is properly grounded. Do not modify the plug provided with the product if it will not t
the outlet; have a proper outlet installed by a quali ed electrician. This product uses on a normal
Alternating Current(AC) circuit and has a grounding plug that looks like the plug illustrated in the
gure to the right. Make sure that the product is connected to an outlet having the same
con guration as the plug. No adapter should be used with this product.
Required Action
●
Always unplug this appliance from the electrical outlet immediately after using and before cleaning.
Caution
Prohibited
●
Do not operate under blanket or pillow. Excessive heating can occur and cause re, electric shock, or injury to persons.
●
Use this appliance only for its intended use as described in this Operating Manual. Do not use attachments not recommended
by the manufacturer.
●
Never operate this appliance if it has a damaged cord or plug, if it is not working properly, if it has been dropped or damaged, or
dropped into water. Return the appliance to a service center for examination and repair.
●
Do not carry this appliance by supply cord or use cord as a handle.
●
Never operate the appliance with the air openings blocked. Keep the air openings free of lint, hair, and the like.
●
Never drop or insert any object into any opening.
●
Do not use outdoors.
●
Do not operate where aerosol (spray) products are being used or where oxygen is being administered.
●
Children should be supervised to ensure that they do not play with the appliance.
Required Action
●
An appliance should never be left unattended when plugged in. Unplug from outlet when not in use, and before putting on or
taking o parts.
●
Close supervision is necessary when this appliance is used by, on, or near children, invalids, or disabled persons.
●
Keep the cord away from heated surfaces.
●
To disconnect, turn all controls to the o position, then remove plug from outlet.
●
Keep children away from extended foot support (or other similar parts).
●
Connect this appliance to a properly grounded outlet only. See Grounding Instructions.
●
This appliance is not intended for use by persons (including children) with reduced physical, sensory or mental capabilities, or
lack of experience and knowledge, unless they have been given supervision or instruction concerning use of the appliance by a
person responsible for their safety.
2
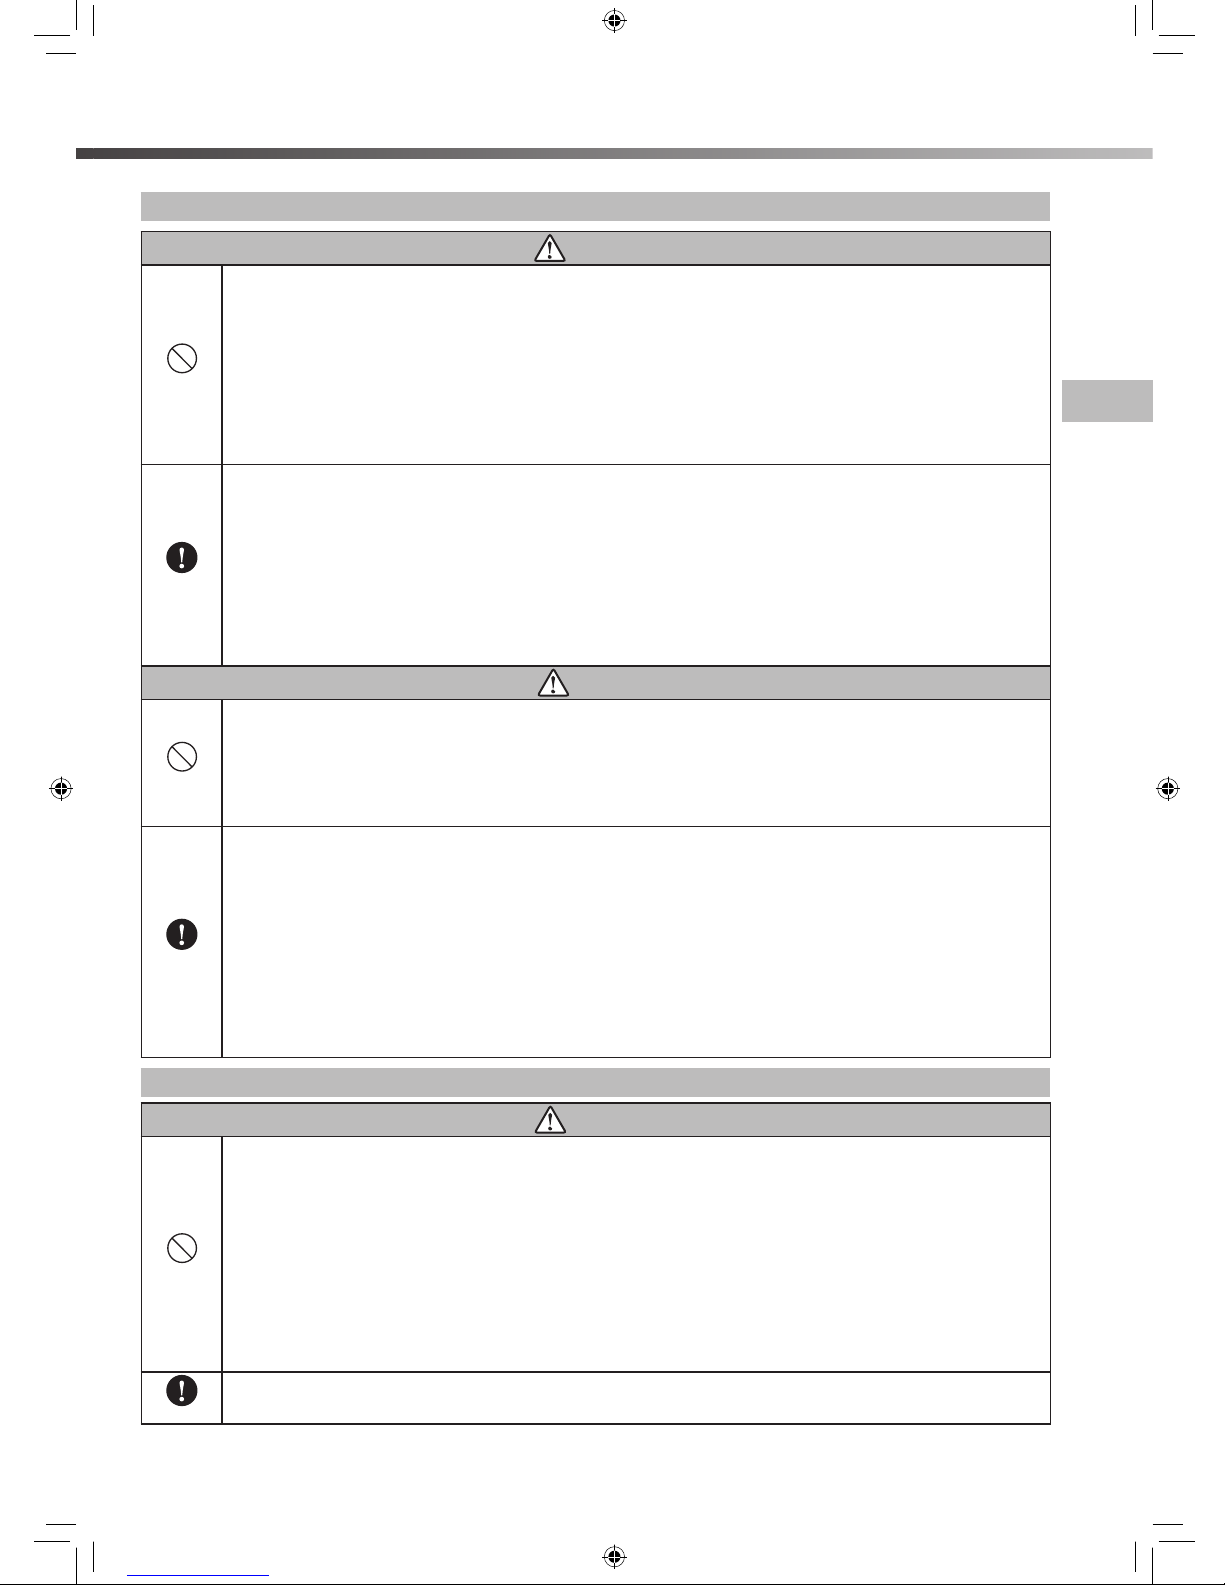
[SAFETY PRECAUTIONS]
Safety Precautions: Before Use
Warning
Prohibited
●
The following persons must not use this massage chair:
◎
Persons who have been instructed by a doctor to avoid massage therapy. Ex. Thrombosis, severe aneurism, acute varicosity, or dermatitis and/or
skin infection including in ammation of the hypodermis.
◎
Persons with suspected acute neck sprain (whiplash injury)
●
Do not use the chair with any power source other than AC 100-240 V.
→
May result in re or electric shock .
●
Do not use with any type of transformer device.
→
May result in damage to the chair or electric shock.
●
Do not use the chair, if the power cord or plug is damaged, or if the wall outlet connection is loose.
→
May result in electric shock, short circuit, or combustion.
●
Before each use, check for holes or tears in the active area covering. Also, check the other parts for tearing. Stop using the chair
immediately if you nd even the smallest tear. Unplug the chair and contact the vendor for assistance. Never use the product
with the active area covering removed or with holes or tears in the covering, because doing so is extremely dangerous.
→
Using the chair with holes or tears in the covering could result in injury or electric shock.
Required Action
●
Persons with any of the following conditions should seek medical advice before using the chair:
◎
Serious heart conditions ◎Sensory impairment caused by serious peripheral circulatory disorders due to diabetes and other diseases
◎
Osteoporosis, spinal fractures, acute pain and/or symptoms thereof ◎Persons being treated for personal injuries
◎
High fever (38°C (100°F ) or higher) Ex. Strong acute in ammation illness caused by fatigue, chills, blood pressure uctuation, or asthenia
◎
Persons in the early stages of pregnancy, or immediately after giving birth ◎Persons who have electronic medical device(s) easily susceptible
to electromagnetic interference Ex. pacemaker
◎
Abnormal or curved spine ◎ Persons planning to use the chair for treatment or for rehabilitation purposes ◎ Persons with malignant tumor(s)
◎
Persons under bed rest orders ◎Persons with acute gastro-intestinal complaints or ailments such as gastritis, enteritis, or hepatitis
◎
Persons under a doctor's care, or those experiencing unusual physical discomfort ◎Joint dysfunction due to rheumatism, gout, or other diseases
◎
Persons with symptoms such as qualm, dizziness, or tinnitus ◎In ammation due to sprains, muscle strain, or other injuries ◎Persons with thecitis
or suspected thecitis
●
Elderly people and persons with weak bones should seek medical advice before using the chair, even if they do not have a
speci c disease.
●
If your condition does not improve after use, consult a doctor or specialist.
Caution
Prohibited
●
Do not use the chair in any way not prescribed by the Operating Manual. Do not use the chair together with any other
therapeutic device or with an electric blanket.
→
May result in injury or have a negative e ect on health.
●
Do not move the chair while someone is in it.
→
Accident or injury may result if the chair tips over.
●
Do not sit down on the chair when it is in the reclined position.
→
Any sudden impact on the footrest could cause damage to the mechanism. Also, an accident or injury may result if the chair tips over.
●
Do not use with anything other than the accessories supplied with this product.
Required Action
●
Before plugging the power cord into the wall outlet, make sure that the main power switch is set to OFF.
→
May result in damage to the chair or electric shock.
●
Make sure that the plugs on the power cord are inserted fully into the cord connector and the wall outlet.
→
May result in electric shock, short circuit, or combustion.
●
Before using the chair for the rst time, turn on all the switches in order as indicated in this Operating Manual to check that the
chair is operating properly.
●
Remember to start o with a lighter massage.
→
Starting with a deep massage may hurt the user. Elderly people and persons with weak bones should be especially careful when selecting
massage intensity.
●
For safety, check the position of the mechanism, and if the mechanism is not in the storage position, switch the POWER on, and
check that the mechanism is stored before slowly sitting down.
●
Do not sit, stand, or lean on the leg rest unless you are sitting in or getting up from the chair.
→
Personal injury or damage to the chair may result if the chair tips over.
●
If you use the chair after it has not been used for a long time, read this Operating Manual again thoroughly and check if the
chair operates properly.
Safety Precautions: During Use
Warning
Prohibited
●
Do not wrap the power cord or the remote controller cord around the chair, or place the chair on top of either cord. Do not
scratch, tear, treat, unduly bend, stretch or twist the power cord or the remote controller cord.
→
The cords may be damaged, resulting in re or electric shock.
●
Do not spill water and/or other liquids on the chair or remote controller.
→
May result in electric shock, short circuit, or combustion.
●
Children and those who are unable to express their intentions should not use the chair. It is advisable to keep children and
pets o the chair and away from the surrounding area (especially behind the reclining seat back or under the seat or leg rest).
Children aged 14 years or over may use only the Youth Program. In such a case, an adult must attend the child.
→
Could result in accident or injury.
●
Do not use the chair while more than one person is sitting in it. In particular, do not use the chair while holding a small child (or baby).
→
Could result in accident or injury.
●
Do not use the chair while your body is wet, or with wet hands.
→
Could result in electric shock or damage to the chair.
●
Do not use the chair if the covering is torn. If it is, unplug the power cord from the wall outlet.
→
Could result in an accident, injury or electric shock. For repairs, contact the vendor for assistance (details on back cover).
●
Do not release hands suddenly while lifting the leg rest by hand.
Required Action
●
Make sure no one, especially children or pets, is in the way when lowering the reclining or raising the seat back or leg rest. Be
careful that people or objects are not caught behind the seat back or under the leg rest.
3
[SAFETY PRECAUTIONS]
SAFETY PRECAUTIONS
Note
●
Before disposing of the product or its accessories, consult your local authorities about the proper procedure.
Safety Precautions: During Use
Caution
Prohibited
●
Do not use the chair unclothed.
●
Do not use the chair for purposes other than massage, or other than the ordinary uses of a chair.
→
Could result in accident or injury.
●
Do not use the chair to massage the head, chest, stomach, and/or joints (knees, elbows).
→
May result in nausea or injury. Place a soft towel behind your neck if you want to avoid intense stimulation of the area.
●
Do not place your hands or feet into the mechanism tracks, or moving parts when reclining the seat. Do not sit wearing hard
objects, such as hair accessories, or a necklace, watch, bracelet or ring.
→
May result in personal injury.
●
Do not place anything other than legs and feet on the leg rest.
→
May result in personal injury.
●
Do not operate the massage chair or leave it operating when there is no one in it.
→
Could result in accident or injury.
Required Action
●
In an emergency, or if you nd any abnormal condition, push the Emergency stop button on the remote controller to stop
operation immediately.
●
If you get acute pain or other unusual physical discomfort while using the chair, immediately discontinue the use of the chair
and seek medical advice.
●
If you feel the massage is too strong, reduce the stimulation according to this Operating Manual. If you still feel the massage is
too strong, stop using the chair and contact the vendor for assistance (details on back cover).
→
May result in injury if you continue use with high stimulation under such circumstances.
●
When the pads are removed, if you feel the massage is too strong, stop use immediately and restore the pads.
→
May result in personal injury.
●
Do not fall asleep in the chair during a massage session.
→
May result in personal injury.
●
Keep massage sessions to no longer than 30 minutes.
→
Continuous use for extended periods of time can result in over-stimulation, which could cause the opposite of the desired e ect, or even injury. The
total amount of time for a daily massage should be limited to about 30 minutes keeping appropriate intervals between each massage session.
●
If your leg or foot comes out of the leg rest during the massage, do not try to force it back in.
→
Undue force may result in damage to the mechanism.
Unplug
the chair
●
If there is a power outage or the possibility of a power outage, stop operation immediately and turn the main power switch to
OFF. Unplug the power plug from the wall outlet.
→
Accident or injury may result if the chair is still in operating mode when the power resumes.
●
If there is a threat of lightning, stop operation immediately and turn the main power switch to OFF. Unplug the power plug from
the wall outlet.
●
If an operation does not start, or if you nd any abnormality, stop the chair immediately and turn the main power switch to OFF
to prevent an accident. Unplug the power plug from the wall outlet. Contact the vendor for assistance (details on back cover) for
inspection or repairs.
→
Electric shock or re caused by a short circuit may result if the chair is left plugged in under such circumstances.
Safety Precautions: After Use or When Not in Use
Caution
Prohibited
●
Be sure to turn the main power switch to OFF after every use and to unplug the power plug from the wall outlet.
→
An accident or injury may result if children or pets play with the chair.
●
Do not use the power cord on any other product than this.
●
After using the chair, be sure to return the reclining seat back to the upright position.
●
Wipe the chair o after every use, and store the chair in a place with low humidity.
●
Do not place any objects on the chair.
Unplug
the chair
●
Hold the power plug when unplugging from the wall outlet. Do not pull on the power cord.
→
May result in electric shock or re caused by short-circuiting.
●
When cleaning the chair, make sure to unplug the power plug from the wall outlet rst. Do not plug or unplug the power plug
with wet hands.
●
If the chair is left unused for a while, be sure to unplug it from the wall outlet.
→
Insulation degradation by dirt or moisture may cause electric shock, or re due to short-circuit.
Other Precautions
Warning
Prohibited
●
Do not stand on the chair. Do not make a major impact or sit on any part of the chair other than the seat.
→
Personal injury or damage to the chair may result if the chair tips over.
Do not
disassemble
●
Do not try to repair any malfunction of the chair. Contact the vendor for assistance (details on back cover) for assistance.
●
It is dangerous to continue using the chair if the power cord is damaged. Contact the vendor for assistance (details on back
cover) for a replacement.
●
Do not modify or remodel the chair.
→
May result in re, electric shock, or injur y.
Caution
Required Action
●
If you lend, sell, or otherwise transfer the chair to another party, make sure to include this Operating Manual.

4
[MAIN FEATURES]
Main Features
Bene ts
As a therapeutic massage device in the general households, the INADA ZERO-G provides the following bene ts:
●
Relaxes muscles ●Relieves minor muscle aches and pains
MAIN FEATURES
New Full Body System
Full body Running Roller Mechanism
Rollers that ow in one movement from the neck to the feet provide a new full body massage to relieve your
entire body.
Stimulates 77 shiatsu points, from the "Tenchu" point in the neck to the "Yusen" point on the soles of feet, and
massages major muscle groups such as those alongside the spine and the trapezius muscle.
Firm hold and massage
Equipped with 8 rollers
Our unique technology uses 8 rollers to massage and relieve muscles.
The upper body is massaged over an even broader range, and both legs can be individually massaged.
Whole Body Shiatsu Point Locator
Optical Sensor Automatic Shiatsu Point Locator System
Our unique optical sensor technology nds Shiatsu points in the entire body.
Automatically locates shiatsu points which vary from person to person.
Joint Industrial Academic Development
Healthcare Program
Massage programs developed through joint university research.
By using programs developed to accurately nd the correct shiatsu point, and to stimulate at the correct intensity,
order, and for the correct length of time, more e ective full body massages are achieved.
Image of Weightlessness
Zero Gravity Angle Achieved
The reclining angle for massaging is automatically set to the angle that puts the least amount of strain on muscles.
Enjoy a massage while lying in a relaxing position that feels like there is no gravity.
Easier to use
Audio Guidance Function
Audio guidance accompanies remote controller operations.
The audio guidance explains details about the aims and operations of each program, making it easier to understand
and use.
Relieve any kind of fatigue
Multiple course programs
Select the desired program according to your particular needs from a total of 13 programs, including 4 general
healthcare programs, 4 specialized healthcare programs, and 5 area speci c healthcare programs.
Independently Developed
Youth Program for younger people
Developed through joint university research, we have developed unique programs for children aged 14 years or
over.
As children aged 14 years or over have a higher metabolism, we recommend a low-stimulation, short course massage.
5
[COMPONENTS & DESCRIPTION]
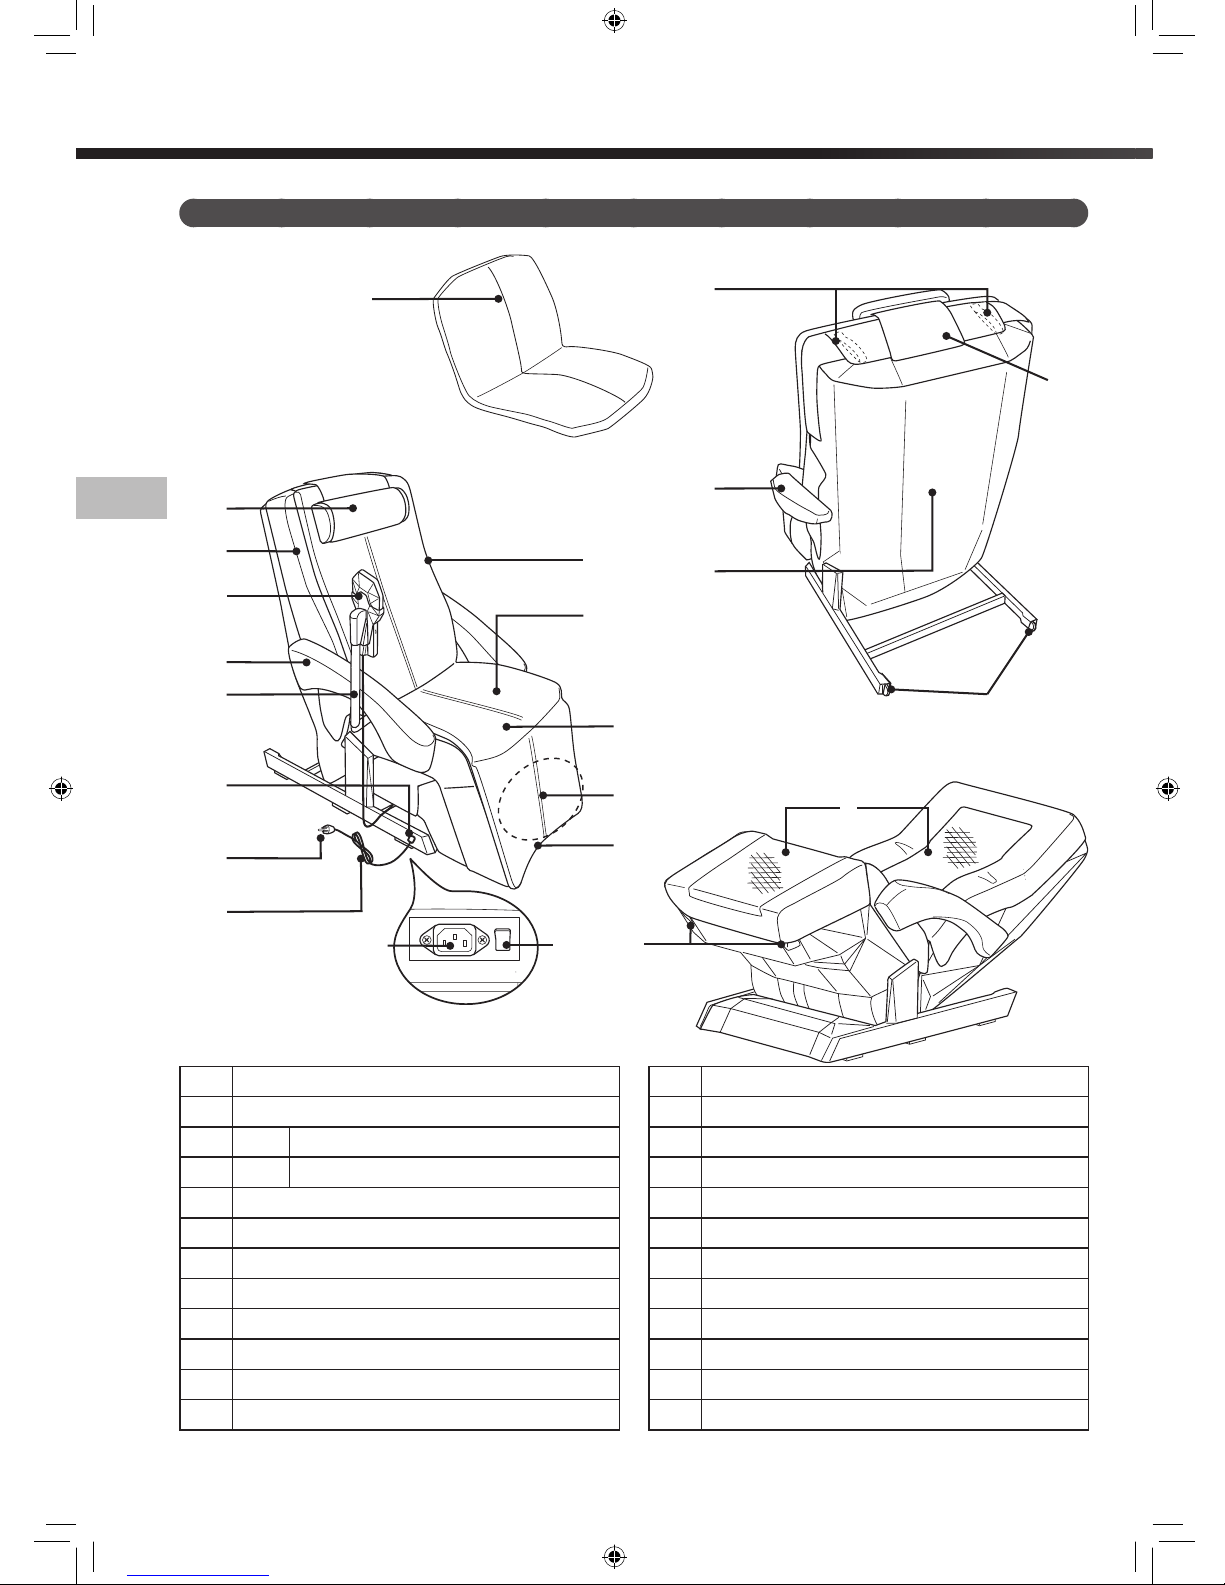
1
Headrest
2
Pad
2
-1 Back Pad
2
-2 Seat leg Pad
3
Reclining Seat Back
4
Armrest (right)
5
Armrest (left)
6
Seat
7
Leg Rest
8
Remote Controller
9
Remote Controller Stand
0
Back Cover
a
Wheels
b
Main Power Switch
c
Power Connector
d
Cord Connector
e
Power Cord
f
Plug
g
Carrying belt
h
Headrest sheet
i
Active Area
j
Carrying handle
k
Mechanical Storage Section
l
Cushion
COMPONENTS & DESCRIPTION
Chair
2
-1
2
-2
1
3
8
4
9
d
f
e
c
b
j
l
7
k
6
i
a
0
5
g
h
6
Mechanism Position
Healthcare Programs
Full Body Quick
Full Body Active
Calm
Intensity
Cancel
Vibe
Sound
Auto Upright
ShiatsuPoint
Detecting
Complete
ReclineRoller
Hi
Med
Lo
Special Programs
Full Stretch
Each Region Programs
Seat
FootLeg
Low Body Revive
Calm Vibes
Yout h
Shoulder
Low Back
[COMPONENTS & DESCRIPTION]
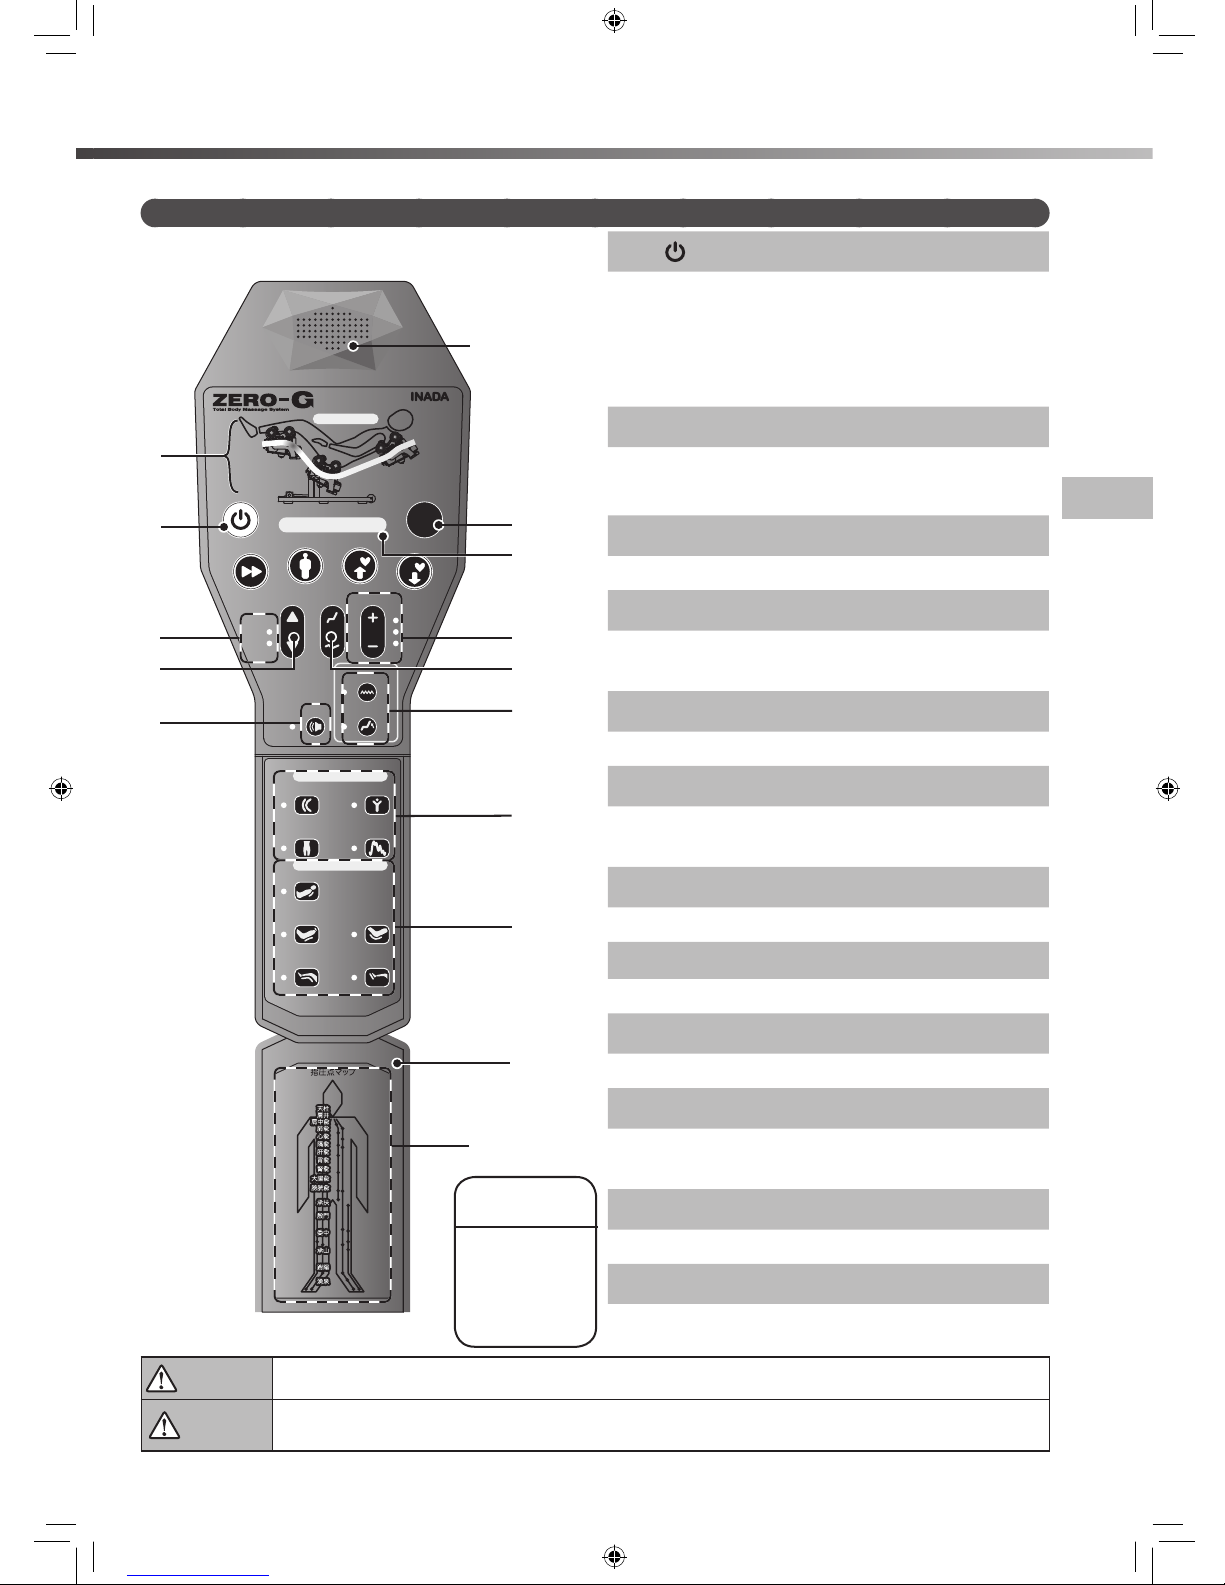
①
Power Button
Turns the remote controller power ON and OFF.
If the button is pressed again, the operation will stop after the rollers
return to their storage position.
The button ashes green while the power to the remote controller
is ON, lights orange while the power is OFF, and ashes red while
the chair is stopped in an emergency.
②
Emergency Stop Button
Use this button to shut the chair o immediately in an emergency
or if there is a malfunction during operation of the chair. The rollers
will stop immediately.
③
Mechanism Position Display Section
The position of the mechanism during the massage is displayed.
④
Shiatsu Point Locator Indicator
A light indicates when the shiatsu point locator is operating and
when the operation has nished.
⑤
Healthcare Program Buttons
You can select full body massage courses.
⑥
Special Program Buttons
You can select specialized courses that di er from conventional
massages.
⑦
Each Region Program Buttons
You can select massages programs that focus on speci c areas.
⑧
Shoulder Position Adjustment Button
Used to adjust the shoulder position when locating shiatsu points.
⑨
Reclining Button
Use to adjust the angle of the reclining seat back.
⑩
Intensity Button
The intensity level can be adjusted between three levels, "Low",
"Medium" and "High".
⑪
Cancel Buttons
"Vibe" and "Auto Upright" can be switched ON or OFF.
⑫
Sound Button
"Sound" can be switched ON or OFF.
Warning
●
Do not spill water and/or other liquids on the remote controller.
●
Do not handle the remote controller with wet hands.
Caution
●
Do not sit on the remote controller. Do not drop or step on the remote controller. Do not pull the remote controller cord forcibly.
●
Do not use pointed or hard objects to push the buttons.
→
May result in damage to the remote controller.
Remote Controller
Panel
Shiatsu Point
Map
Speaker
What is the Shiatsu
Point Map?
It shows the names
of the shiatsu points
along the lines across
which the mechanism
passes.
3
1
4
8
2
5
0
9
a
6
7
b

7
40 cm
(16 inch)
Operating Manual Operating Guide AC Cord
Remote Controller
Stand
Chair
Armrest
One each on left and
right sides
L-shaped Wrench
Installation Screw
(short) x 2
Installation Screw
(long) x 2
[BEFORE USE]
BEFORE USE
●
This product is shipped with the reclining seat back in its fully reclined position. Be sure to raise the seat back to its
fully upright position.
●
Do not expose the chair to sudden bursts of heat. If the room where the chair is to be used is cold, turn the heat up
slowly. If the chair is moved from a cold place into a heated room, wait one hour before using the chair.
→
Condensation could occur in the moving parts of the chair, which may compromise performance.
Installation
Allow for at least 40 cm (16 inch) clearance behind the chair so as to be able to recline the seat back fully without
obstruction, and allow enough space in front of the chair for people to pass.
Caution
●
Do not install the chair in an area of high humidity, such as a bathroom or sauna.
●
Install on a at, level surface only.
●
Do not use in areas of high debris or dust content. Do not use where the ambient temperature is 40°C (104°F) or over.
●
Do not install the chair where it can come into contact with direct heat, such as direct sunlight or a radiator.
●
Keep re sources such as cigarettes and ashtrays away from the chair.
●
To avoid damaging oor surfaces and to minimize the chair noise, it may be better to install the chair on a carpeted surface or to lay a piece
of carpet under the chair.
(Do not use electric blanket.)
●
The chair is very heavy, so please be careful when unloading it so as not to damage oor surfaces.
●
Install the chair at least 1 m (39 inch) away from TVs, radios, and other audio or video equipment. Otherwise they may make noises a ected
by the operation of the chair.
●
The load to the oor per 1 cm
2
(0.15 inch2) is approximately 3.0 kg (6.6 lb), with a person weighing 100 kg (220 lb) sitting on the chair.
Checking the Supplied Items
Check that the chair and the other items are all in the package.
8
[BEFORE USE]
How to Transport or Move the Chair
Turn the main power switch to OFF and disconnect the plug from the wall outlet before moving the chair.
Install the remote controller stand to the armrest before installing the armrest to the chair.
How to Install the Armrests
Install the armrests according to the following procedure.
①
Recline the seat back.
②
Insert the arm rest clasps into the
installation position on the chair,
and slide them forwards.
③
Insert the installation screws
(long) into the screw holes, and
tighten using the T-shaped wrench
provided.
Insert
Slide
Tighten
Caution
●
Always x the arm rest in place with the screws, and check that the screws are not loose.
→
If the screws are not installed or not tightened correctly, they may come out during use, which is dangerous. Always check the screws.
Installation
screw (long)
L-shaped
Wrench
Screw hole
Insert
Clasp
Installation
location
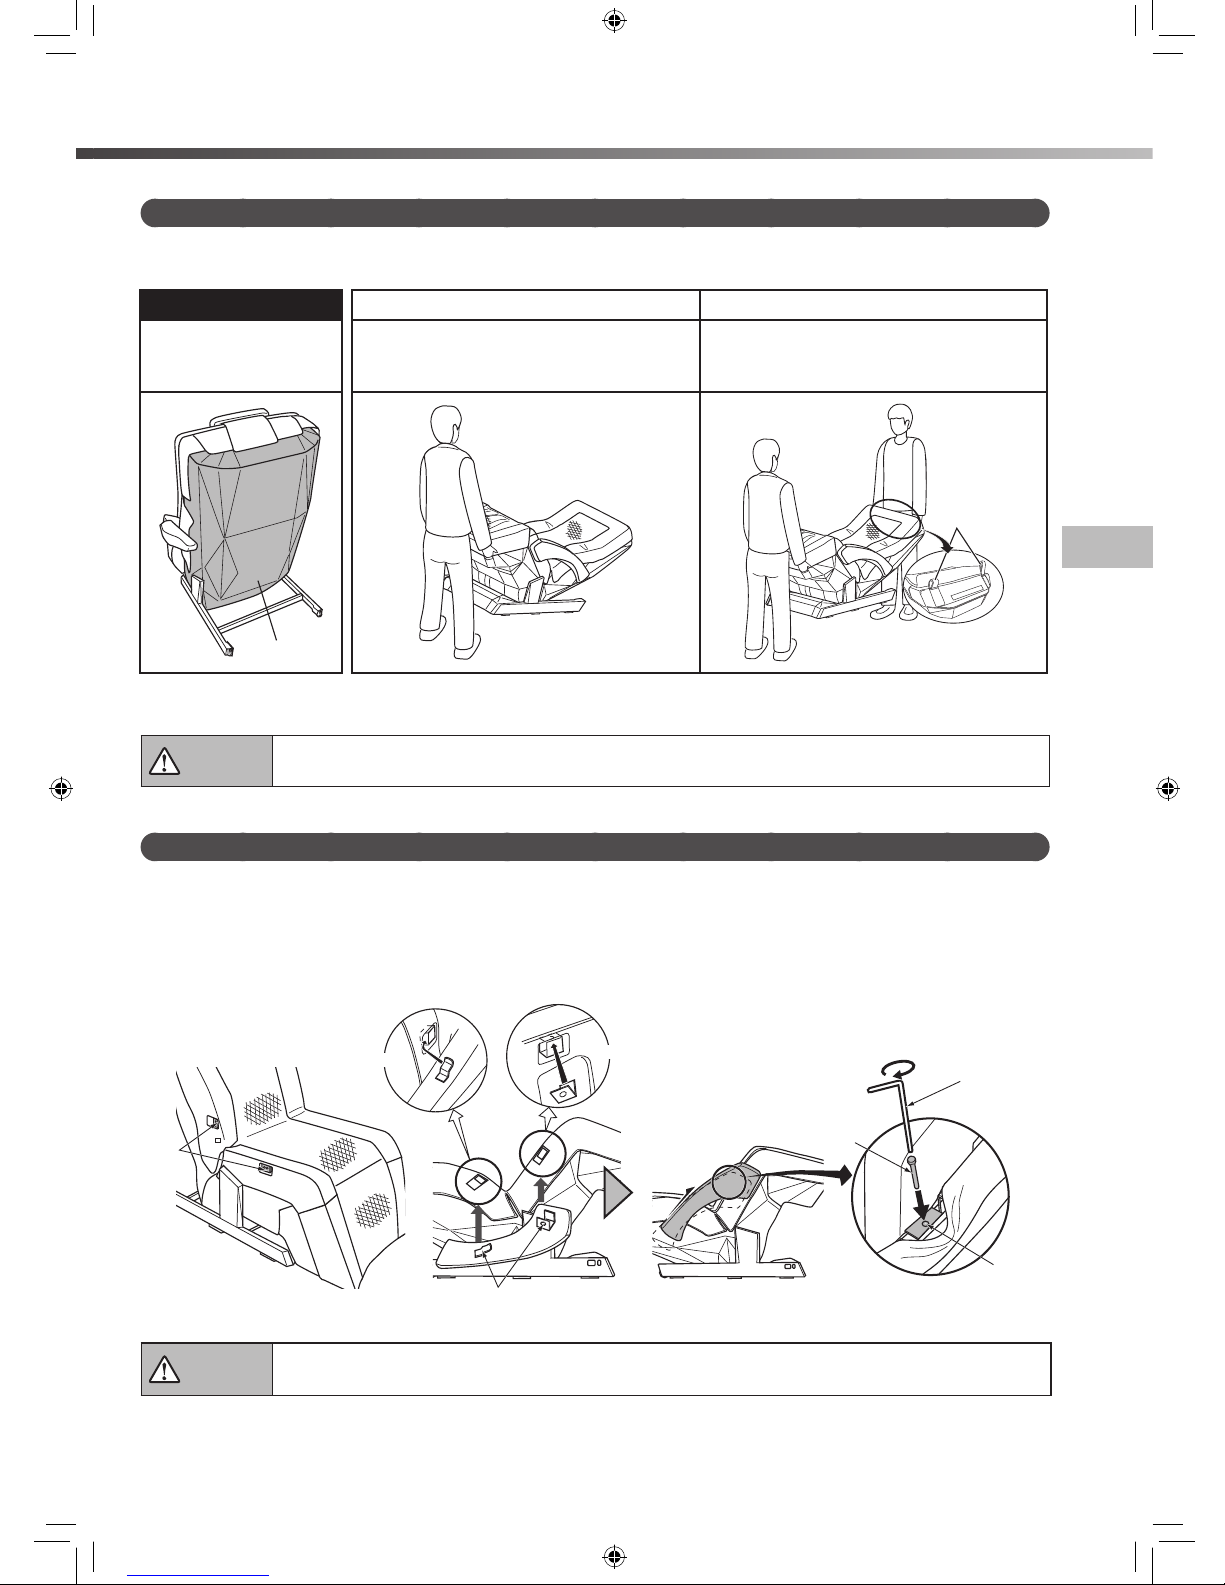
■
The chair is very heavy, so be careful not to hurt your lower back when transporting or moving it.
■
The remote controller is attached to the chair, so make sure that it does not fall when moving the chair.
Caution
●
Do not move the chair while someone is in it.
●
Be sure to disconnect the power cord from the wall outlet before moving the chair.
→
The power cord may be damaged, resulting in re or electric shock.
Caution To Move with the Wheels To Carry
Do not pick up or push
the back cover.
Recline the seat, hold the carrying handles
(leg), and then lift the front part of the chair
to move using the wheels.
Fully recline the seat back and carry the chair
by holding the carrying belt on the back
cover and foot rest carrying handles (legs).
Back Cover
Carrying belt
9
[BEFORE USE]
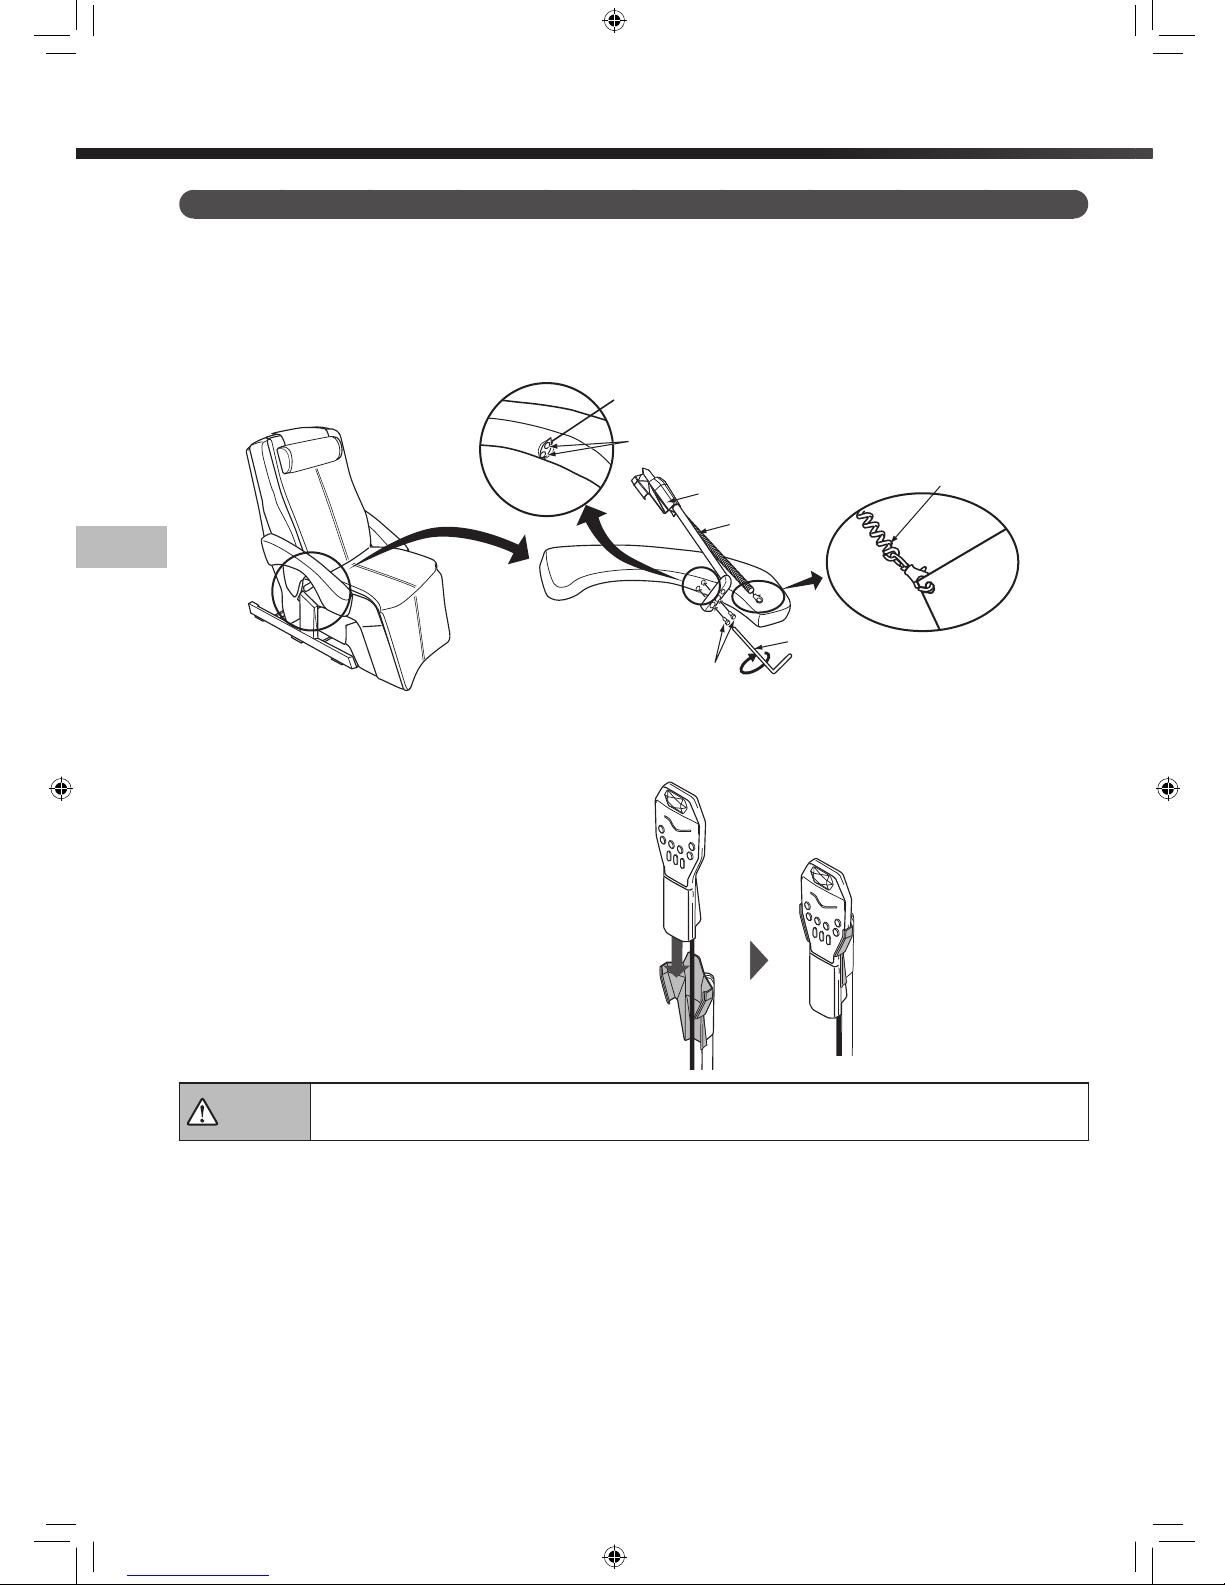
Caution
●
When the remote controller is inserted in the remote controller holder, be careful of the remote controller cable.
Insert the remote controller into the holder for
use, as shown in the gure on the right.
BEFORE USE
How to Install the Remote Controller Stand
The remote controller stand can be installed to the arm rest (left or right).
Install the remote controller stand to the armrest which removed from the chair.
Curled cord
Operating
Guide
Tighten
Remote Controller
Stand
Installation screw
(short)
L-shaped
Wrench
Installation
screw hole
Securely fasten the remote controller stand with the included installation screws (short) from the rear of the arm rests.
Perform these steps in reverse order to remove.
After installing the remote controller stand, connect the curled cord protruding from the remote controller stand to the
operating guide.
Armrest (Right)
rear side
Curled cord
* For installation, use the L-shaped wrench provided.
Spread out the
material
10
[BEFORE USE]
Caution
●
Before each use, check for holes or tears in the active area covering. Also, check the other parts for tearing. Stop using
the chair immediately if you nd even the smallest tear. Unplug the chair and contact the vendor (details on back cover)
for assistance. Never use the product with the active area covering removed or with holes or tears in the covering,
because doing so is extremely dangerous.
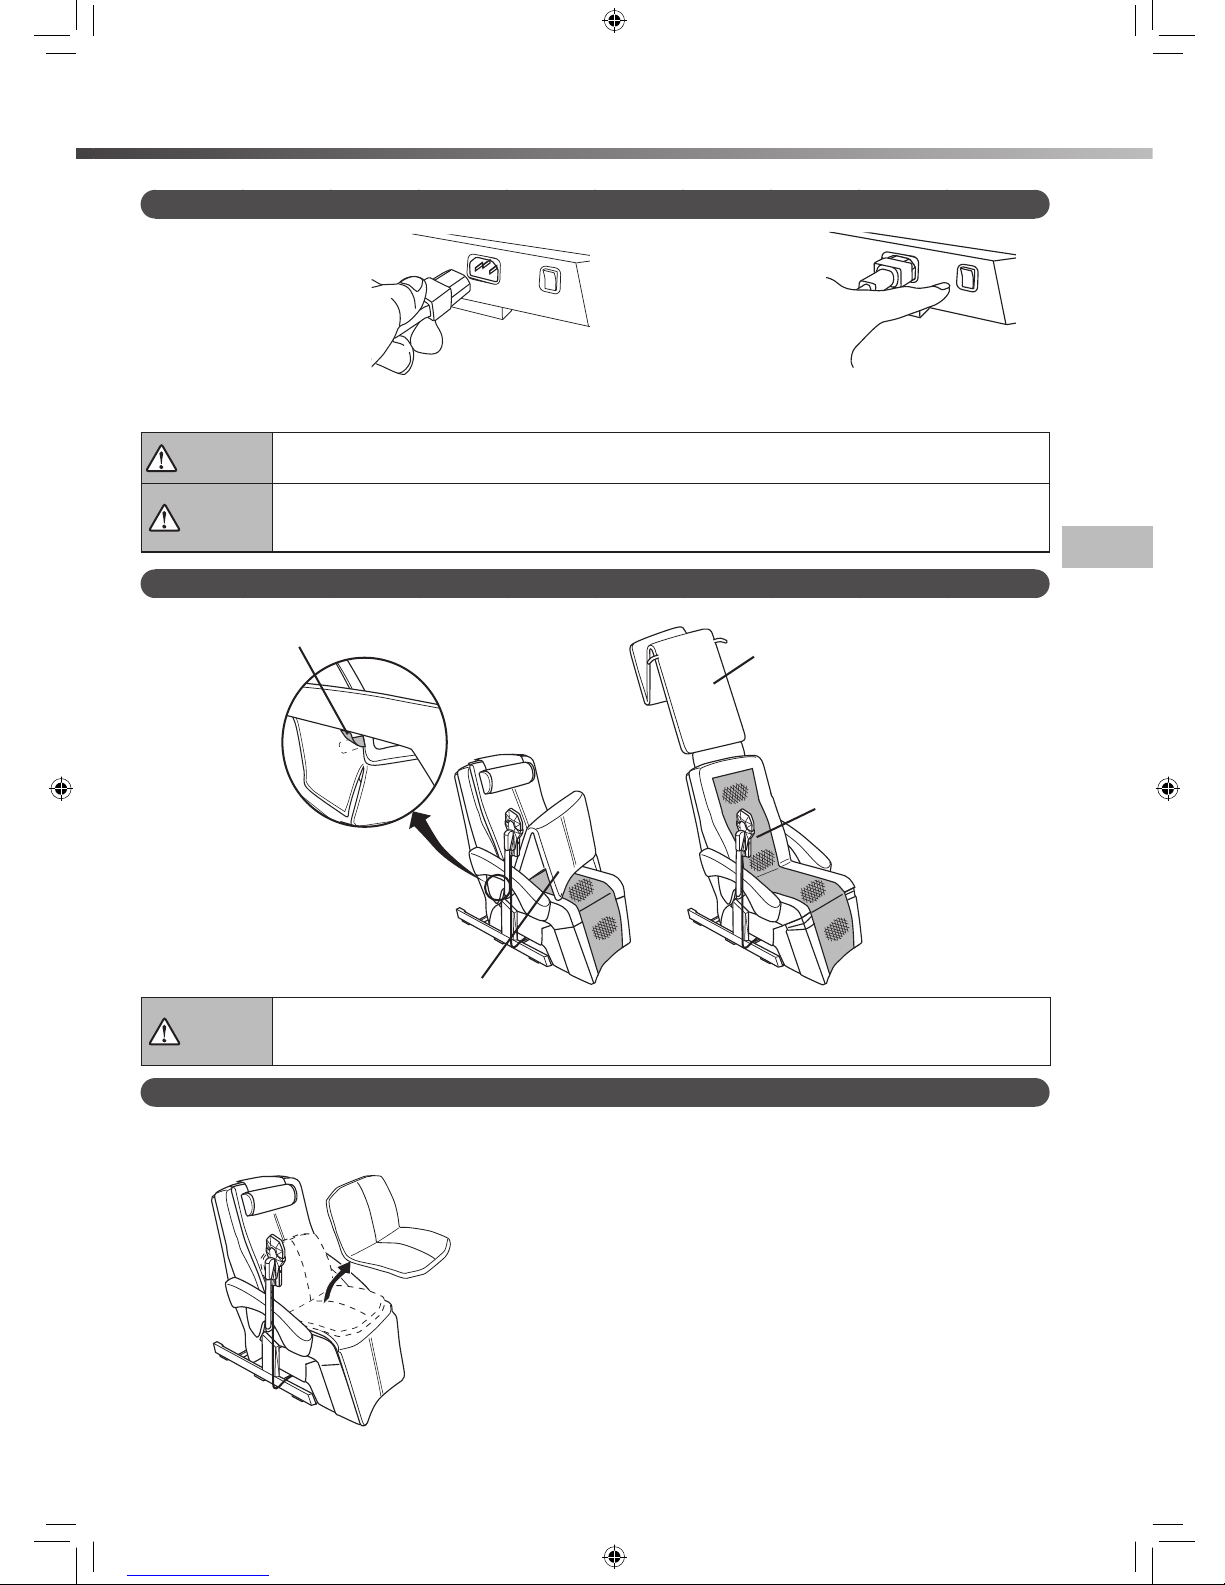
Checking the Seat Cover
Check there are no tears in the covers of all parts.
Main Power Connection
①
First, plug the power
cord connector into the
cord connector located at
the front right of the chair.
Then, plug the other end
into the wall outlet.
②
Set the main power
switch located at the front
right of the chair to ON.
*If the main power switch is turned ON while the rollers are stopped partway, they will automatically return to the starting position (leg section) and then stop.
Warning
●
Do not use with any type of transformer device.
→
May result in damage to the chair or electric shock.
Caution
●
Before plugging the power cord into the wall outlet, make sure that the main power switch is set to OFF.
●
Make sure that the plug on the power cord is inserted fully into the wall outlet.
●
Before using the chair for the rst time, turn on all the switches in order as indicated in this Operating Manual to check
that the chair is operating properly.
①
Remove the Velcro from the side of the pads.
(Left and right)
②
Turn over the pads from under the feet.
③
Lift the pads.
④
Check there is no
damage to the active
area cover.
How to Use Cushions
When using the massage function, remove the provided cushions. If you think the stimulation is too intense, attach the
cushions.
11
[POSITION ADJUSTMENT]
①②
POSITION ADJUSTMENT
How to Sit
The mechanism is normally drawn back into the leg section (storage position).
For safety, rst check the position of the mechanism. If it is in any position other than the storage position, turn the
main power switch ON before sitting down to allow the mechanism to return to its storage position. When you nish
checking, sit down slowly in the center of the seat.
Caution
●
Do not sit down on the chair when it is in the reclined position.
→
Any sudden impact on the footrest or reclining seat back could cause damage to the mechanism. Also, an accident or injury may
result if the chair tips over.
●
Remember to start o with a lighter massage.
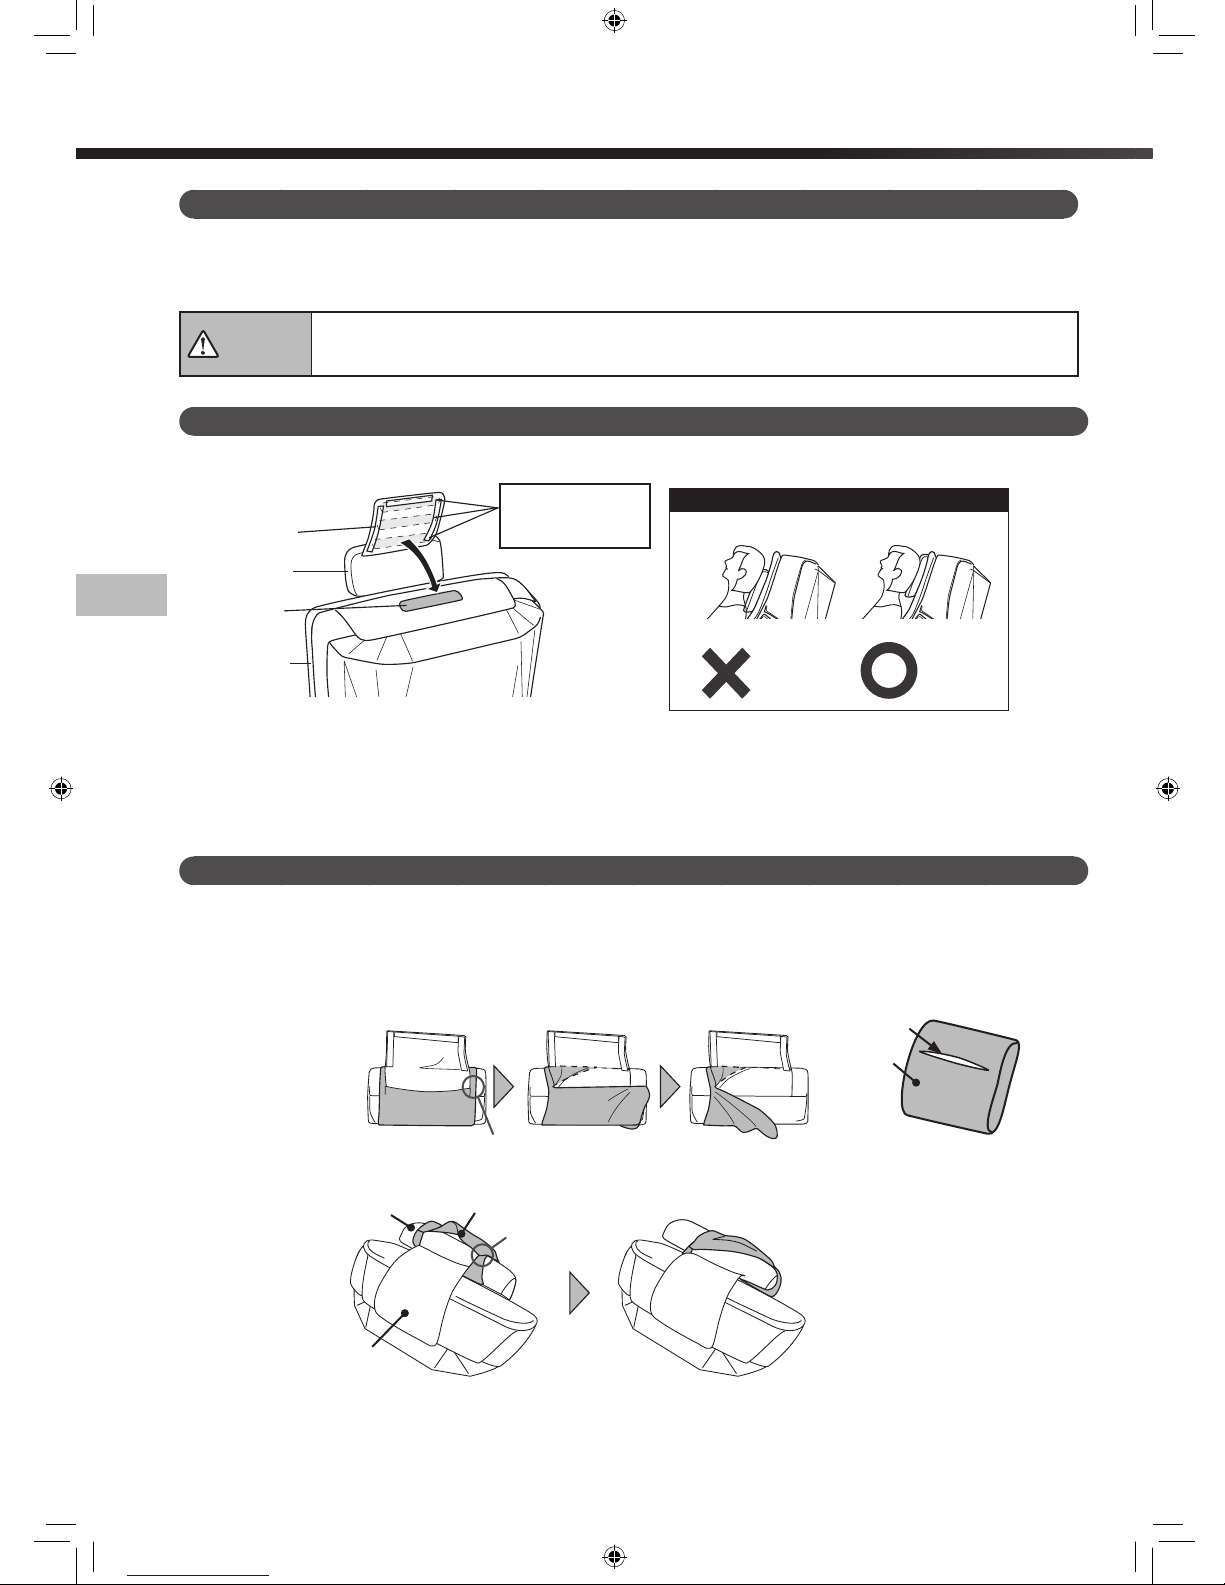
Headrest Adjustment
The position of the headrest can be adjusted using the Velcro on the back of the headrest. Adjust the small headrest to
match the position of your head before starting the massage.
Correct headrest position
Behind the head
(back of th e head).
Behind t he neck.
●
Place the headrest in the proper position. If it is not placed properly, the automatic shiatsu point locator may not function properly.
The headrest cover can be removed following the procedure below.
* Be careful at this time, because the headrest cover may tear if you turn it over with undue force.
* Attach the cover by following this procedure in reverse.
Cover slit
①
Pull the cover slit upwards to move it
out of place.
②
Pull the sides of the cover slit, and
remove the headrest from the slit.
Pull here
Headrest
Headrest sheet
Headrest Cover
Headrest
Cover
How to Remove the Headrest Cover
Velcro
Velcro
Align the headrest
position with the Velcro
attachment position.
Headrest
Pad
* Image from above the reclining seat back.
* Headrest back
Pull here

12
Back Pad
Back Pad
Seat leg Pad
②
Remove the
zipper.
Back Pad
Seat leg Pad
①
Remove the
zipper.
②
Remove the
seat leg pad.
[POSITION ADJUSTMENT]
How to Install/Remove the Pads
The pads can be removed when massage is used.
③
Remove
the pads.
Velcro
Pad
①
Remove the Velcro from the side of the pads (left and right).
②
Turn over the pads from under the feet.
④
Install the
headrest.
Remove the entire pad
Remove just the back pad
Remove just the seat leg pad
③
Remove the
back pads.
①
Remove the Velcro from the side of the pads (left and right).
④
Install the
headrest.
Velcro
Install the pads
Install the pads by following these procedures in reverse.

13
Recline
[POSITION ADJUSTMENT] [AFTER USE]
POSITION ADJUSTMENT
How to Use the Reclining Seat Back
Vertical Adjustment
■
To raise the reclining seat back
Press the top Recline button to raise the reclining seat back.
■
To lower the reclining seat back
Press the bottom Recline button to lower the reclining seat back.
■
The reclining seat back can be adjusted up or down when the button
on the remote controller
is set to ON. Note that it cannot be operated while the
chair is stopped in an emergency.
Warning
●
Make sure no one, especially children or pets, is in the way when lowering the reclining seat back. Be careful that people
and/or objects are not caught behind the reclining seat back.
AFTER USE
While making sure there is nothing in the surrounding area, return the reclining seat back to its upright position.
Set the main power switch at the front right of the chair to OFF.
Unplug the power plug from the wall outlet. This will save energy because no standby power will be consumed.
Caution
●
Be sure to turn the main power switch to OFF after every use and to unplug the power plug from the wall outlet.
→
An accident or injury may result if children or pets play with the chair.
●
After using the chair, be sure to return the reclining seat back to the upright position.
●
Wipe the chair o after every use, and store the chair in a place with low humidity.
●
Hold the power plug when unplugging from the wall outlet. Do not pull on the power cord.
●
If the chair is left unused for a while, be sure to unplug it from the wall outlet.
●
Be careful not to become tangled in the cords and trip over.
Press the Recline button for 2 seconds or longer, and
the chair continues reclining automatically to the
maximum position.
Hold Function
How to use the leg rest when using the Foot program
When using the Foot program, insert your heels into the bag shaped section shown in the diagram below, so that your
legs are between the mechanical rollers.
Place heels here.
You may feel slight vibration when
the reclining seat back is moving.
This may occur when your center of
balance moves while the reclining seat
back is moving.
 Loading...